
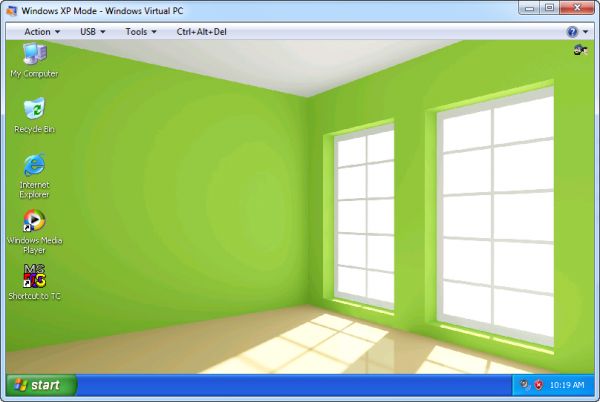
Если вам необходимо использовать Windows XP, а на компьютере установлена Windows 10 home, нет необходимости устанавливать устаревшую систему рядом с новой. Достаточно использовать XP mode в Windows 10 — и все получится.
Для того, чтобы вы могли установить Windows XP mode на Windows 10, нужно немного подготовиться, поскольку Microsoft предлагает такой режим по умолчанию только для Windows 7.
Для начала загрузите бесплатное приложение Windows XP-Mode на сайте Microsoft. То, на каком языке будет работать это приложение, не играет решающей роли.
Если на вашем компьютере не установлена программа-архиватор, загрузите и установите бесплатную версию WinRAR, поскольку вам понадобится инструмент для распаковки модуля XP.
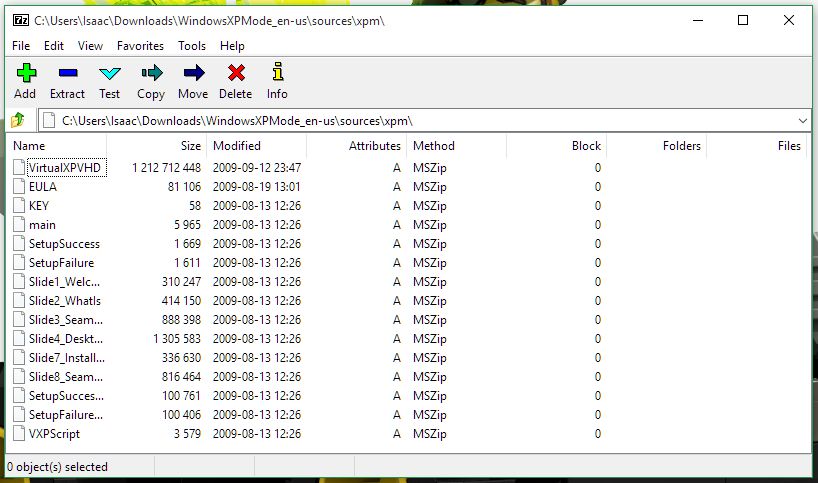
После загрузки откройте загруженный Windows XP-Mode с помощью WinRAR. В архиваторе перейдите в каталог, куда вы загрузили модуль XP. Дважды щелкните соответствующий EXE-файл (например: «WindowsXPMode_en-us.exe»), чтобы отобразить его содержимое.
Кроме WinRAR можно использовать любой другой архиватор, например, 7Zip
- Откройте папку «sources» и извлеките файл «xpm». Вы можете просто перетащить его в любую папку.
- Через архиватор WinRAR зайдите в каталог, куда вы перенесли файл «xpm» и дважды кликните по нему. Теперь вы увидите целый ряд файлов, среди которых важен только VirtualXPVHD. Извлеките его так же, как описано выше, с помощью перетаскивания.
- Переименуйте файл в VirtualXPVHD.vhd.
- Наконец, загрузите и установите бесплатную программу VirtualBox.
Создание виртуальной машины
После подготовки нужно создать виртуальную машину и запустить Windows XP mode со своего рабочего стола.
- Переместите вновь созданный файл «VirtualXPVHD.vhd» в папку на рабочем столе, которую вы больше не будете изменять. В будущем VirtualBox всегда будет искать и использовать именно этот файл по этому адресу.
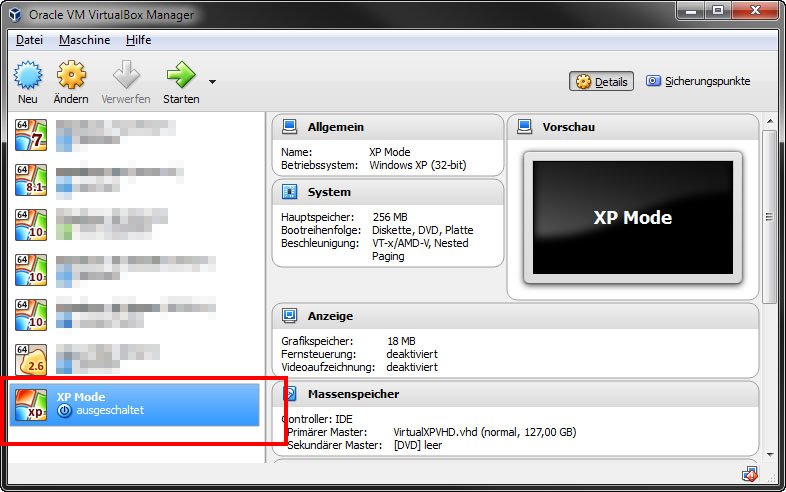
- Запустите VirtualBox и создайте новую виртуальную машину в поле «Новое». В следующем поле введите имя виртуальной машины по вашему выбору, выберите «Microsoft Windows» в качестве типа, а «Windows XP (32-разрядная версия)» — в качестве версии.
- В разделе «Диск» выберите «Использовать существующий диск», щелкните значок папки и выберите файл «VirtualbXPVHD.vhd» в директории, которую вы используете.
- Теперь нажмите на кнопку «Создать».
Windows 10: установка XP mode — запуск Windows XP
Теперь вы можете запустить Windows XP из VirtualBox:
- Выберите только что созданную виртуальную машину из списка в VirtualBox;
- Нажмите на зеленую стрелку «Старт» в верхней панели.
Возможно, VirtualBox не будет корректно распознавать мышь, поэтому вам придется выполнить начальную настройку с помощью клавиатуры.
Как только вы переключились на рабочий стол Windows XP, для начала лучше установить гостевые дополнения (VirtualBox Guest Additions) на старую ОС. Это позволит лучше эмулировать видеокарту, использовать общие папки и т.д.
Дополнения VirtualBox — это один файл образа CD-ROM, который называется VBoxGuestAdditions.iso. Этот файл образа находится в каталоге установки VirtualBox. Чтобы установить гостевые дополнения для конкретной виртуальной машины, нужно смонтировать этот файл ISO в старой ОС в виде виртуального компакт-диска и установить оттуда.
Если вы хотите использовать старое программное обеспечение в режиме XP, вы должны установить и запустить эти программы в VirtualBox.
Читайте также:
- Как отменить синхронизацию данных с OneDrive в Windows 10
- Лучшие сборки Windows 10: сравниваем, тестируем
Фото: CHIP, компания-производитель, pixabay.com
Содержание статьи:
- Создание виртуальной «Windows»
- ШАГ 1: включаем компонент Hyper-V, и запускаем диспетчер
- ШАГ 2: создание виртуальной машины (ВМ)
- ШАГ 3: установка Windows на ВМ
- ШАГ 4: использование ВМ
- Вопросы и ответы: 50
Доброго времени суток!
Оказывается в некоторых учебных заведениях еще используют Windows XP и делают на них лабораторные работы 👀. Собственно, именно по этой причине — одни знакомые попросили меня как-нибудь запустить старый софт в новой Windows 10 (11).
Как вариант решения: решил установить им виртуальную машину с Windows XP, на которой лабораторные будут «работать» (благо, что в Windows 10/11 есть встроенное средство гипервизор Hyper-V, а значит качать дополнительно ничего не нужно!). Да и пользоваться им достаточно просто… 👌
В общем, ниже покажу на пошаговом примере как можно создать себе виртуальную «Windows», и пользоваться ей, как обычной программой (запуская в окне).
Возможно, это кого-то убережет от покупки старого ноутбука/ПК для учебы (или для запуска старых игр 😉).
*
Примечание: всё, что описано ниже — можно сделать на 📌ОС Windows 10/11! Для норм. работы Hyper-V необходимо не менее 6 ГБ ОЗУ и 64-разрядный процессор (с аппаратной 📌виртуализацией // проверьте, чтобы она была у вас включена!). Вообще, ее сейчас поддерживают все современные ЦП…
*
📌Важно!
Если вам нужна виртуальная Windows XP (например), чтобы подключать к ней старые принтеры, сканеры и пр. — то рекомендую остановить свой выбор на VirtualBOX. Более подробно по этой теме тут.
*
Что у нас получится в итоге — виртуальная Windows XP запущена в Windows 10 (аппаратная виртуализация в Windows 10)
*
Создание виртуальной «Windows»
ШАГ 1: включаем компонент Hyper-V, и запускаем диспетчер
Итак, сначала необходимо установить компонент Hyper-V (по умолчанию в Windows он выключен). 📌Сразу предупрежу, что в домашних версиях Windows — этот компонент установить нельзя! В этом случае вам нужно сначала перейти на Pro версию ОС // для этого, как правило, необходимо поменять ключ активации и обновить ОС).
*
Наиболее простой способ «задействовать» Hyper-V — воспользоваться вкладкой «Включение или отключение компонентов» в панели управления Windows.
*
Чтобы открыть ее — можно нажать Win+R, и воспользоваться командой optionalfeatures (либо зайти в 👉 панель управления Windows и открыть раздел «Программы», см. скрин ниже 👇).
В ней нам требуется поставить галочку напротив пункта «Hyper-V» и нажать OK.
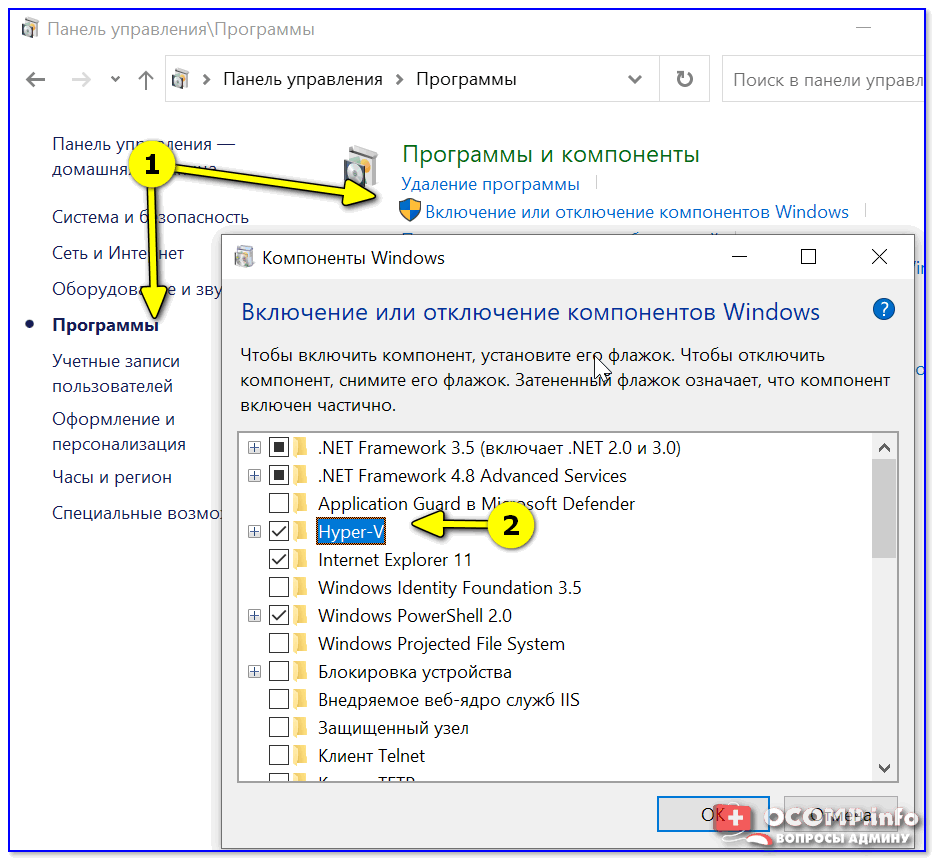
Как установить Hyper-V
Кстати, установить диспетчер Hyper-V в Windows 10/11 можно и другим способом — запустить командную строку от имени динистора и использовать команду:
DISM /Online /Enable-Feature /All /FeatureName:Microsoft-Hyper-V
Важно: обязательно согласиться на перезагрузку, выбрав вариант «Y». 👇
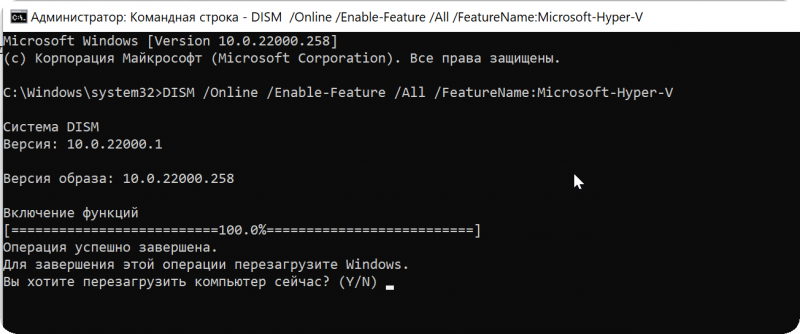
Включение Hyper-V в командной строке
Во время перезагрузки компьютера произойдет до-установка нужного нам компонента. 👌
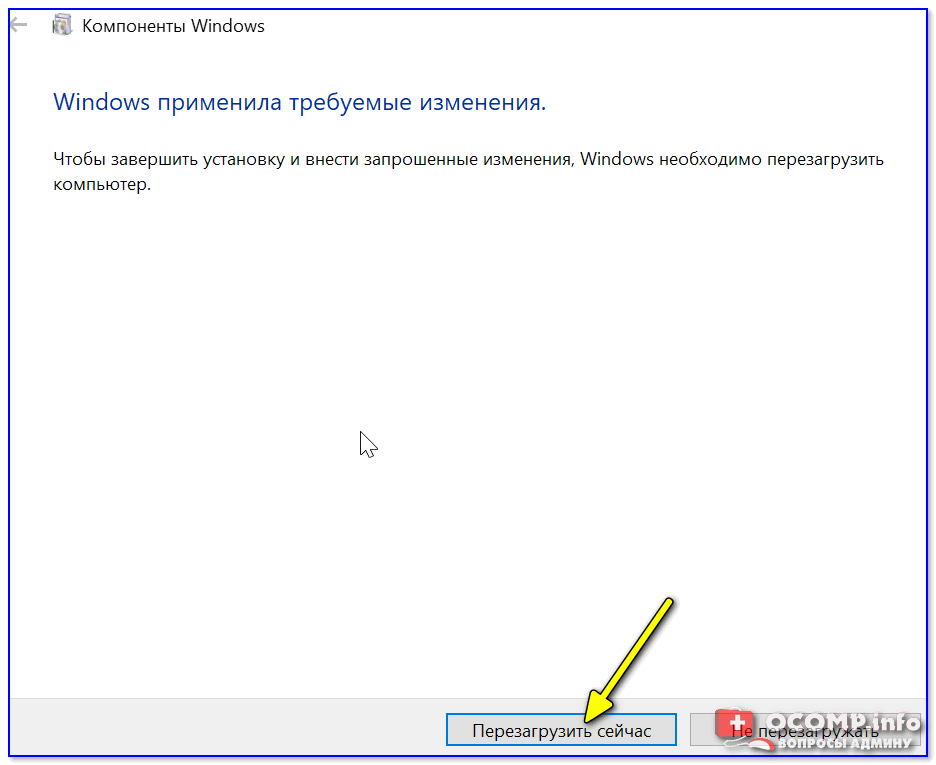
Перезагрузить сейчас
*
📌Запустить диспетчер Hyper-V (если у вас уже установлен этот компонент) достаточно просто:
- можно нажать Win+R, и использовать команду virtmgmt.msc;
- либо можно набрать в поиске «Hyper-V» и запустить «диспетчер Hyper-V». И тот, и другой вариант — должны работать! 👌
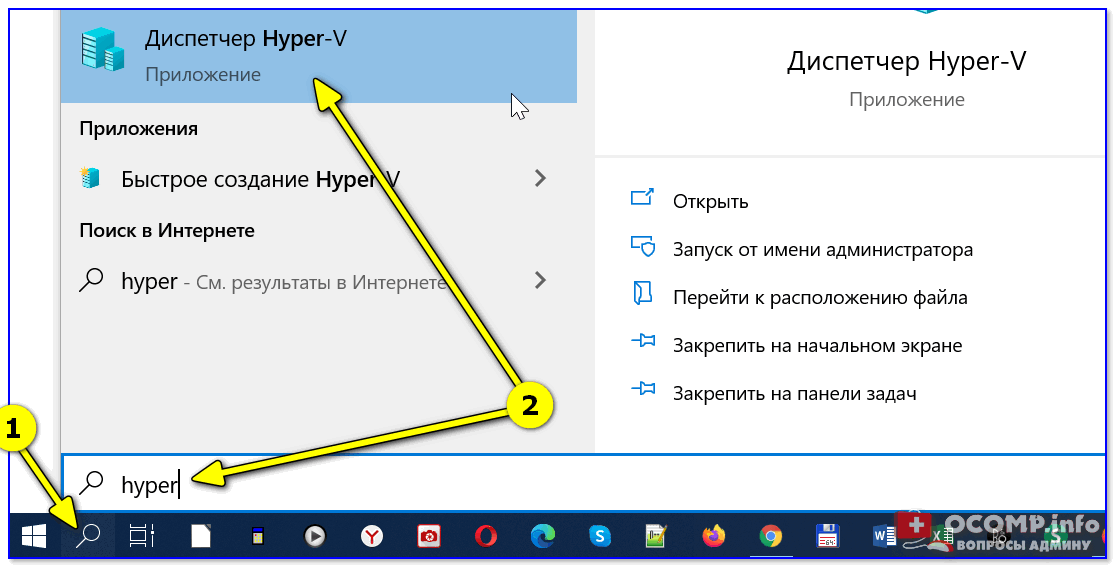
Запуск Hyper-V
*
ШАГ 2: создание виртуальной машины (ВМ)
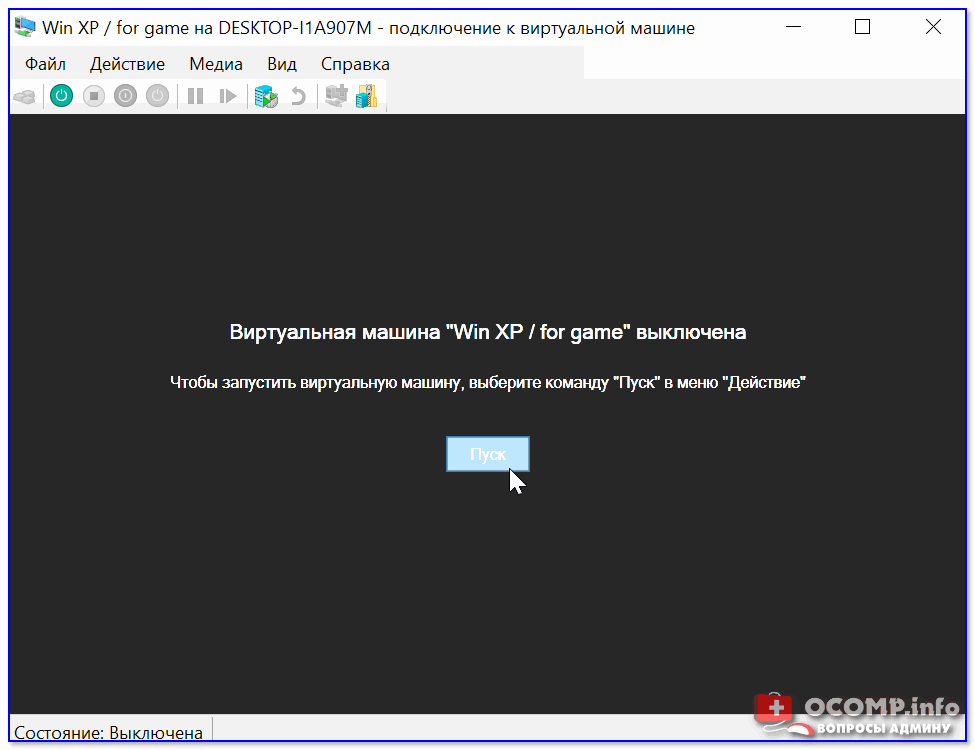
После первого запуска диспетчера Hyper-V — у вас никаких виртуальных машин (далее просто «ВМ») быть не должно.
Чтобы создать ВМ — обратите внимание на вкладку «Действия» (в колонке справа 👇). Кликните по кнопке «Создать» как у меня на скриншоте.
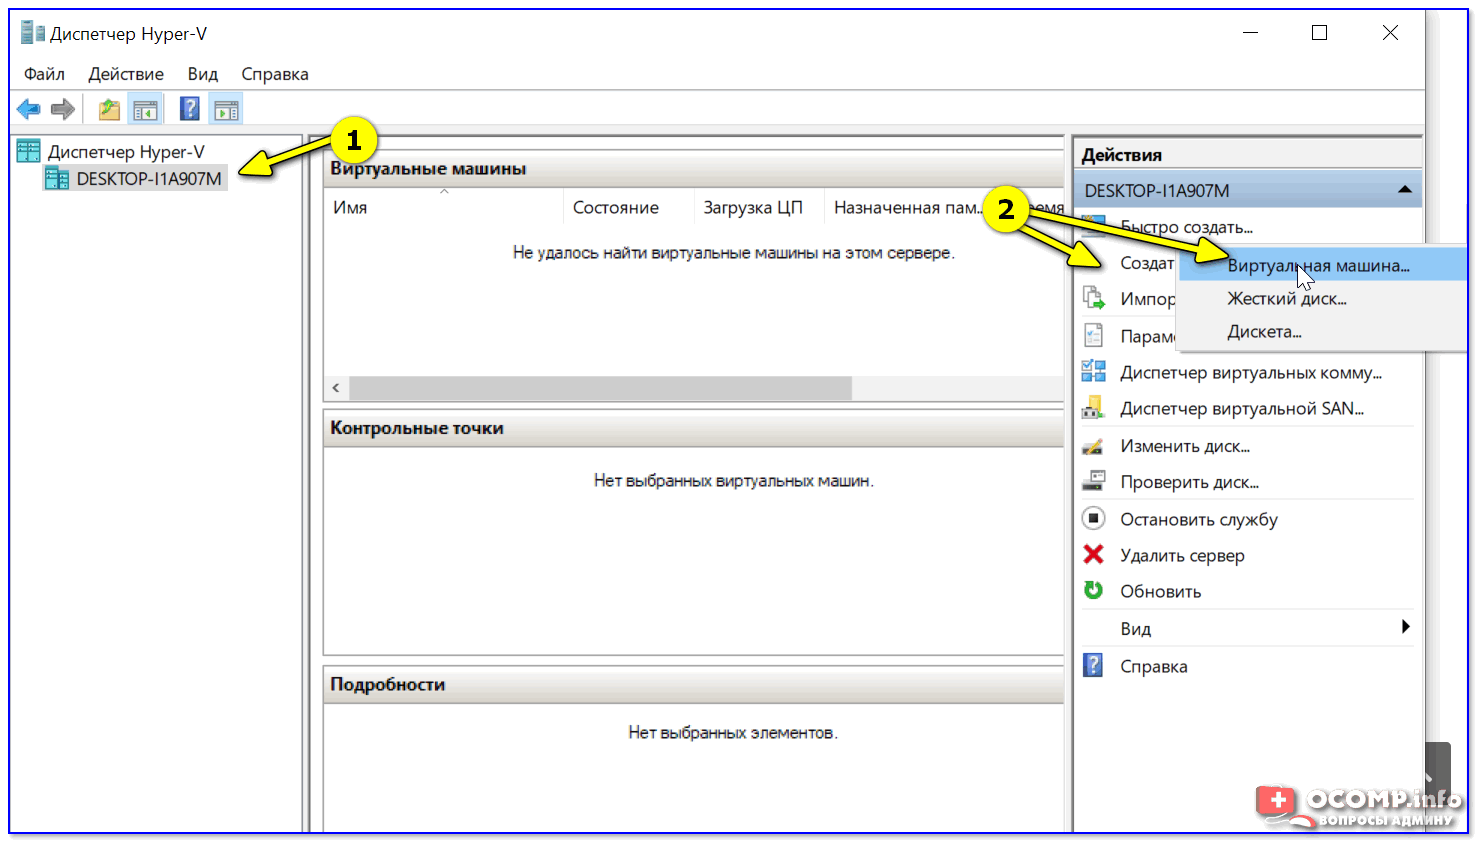
Диспетчер Hyper-V — создать
Далее необходимо придумать имя для ВМ. Можно использовать любое.
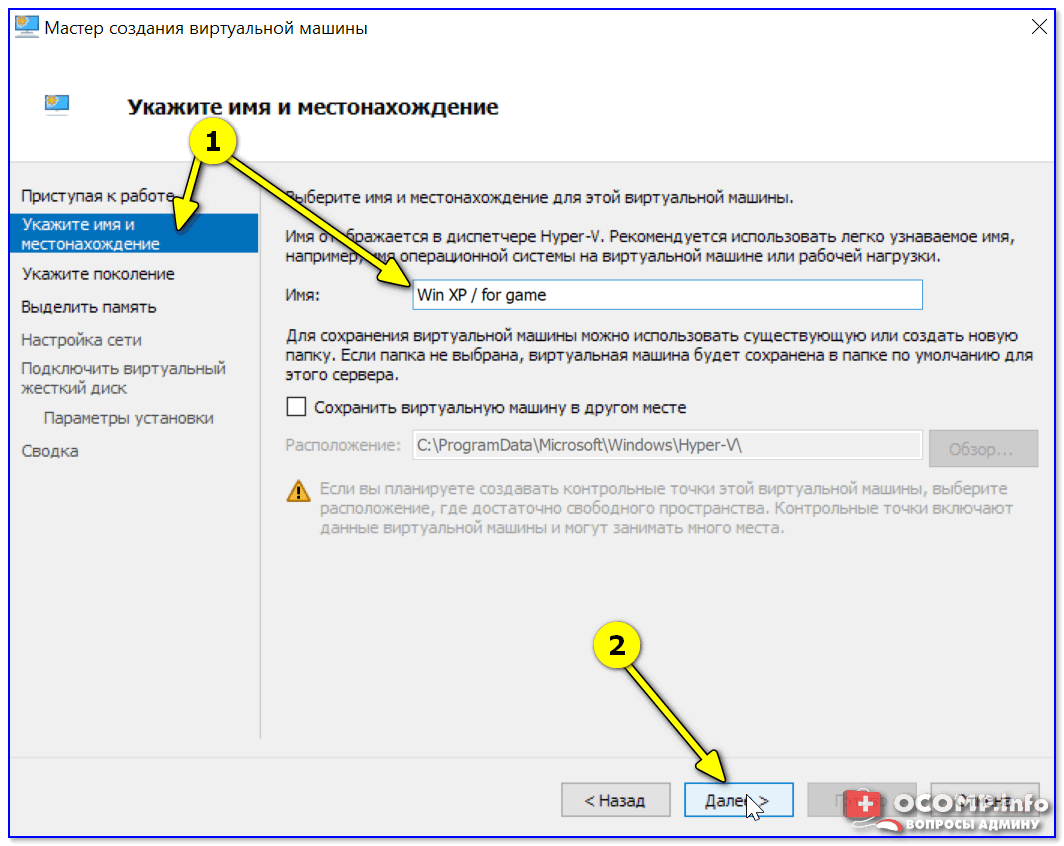
Укажите имя и местонахождение
Если вы хотите создать «виртуальную Windows XP» (т.е. старую ОС) — выбирайте первое поколение. 👇
Для «виртуальной Windows 10/11» — выбирайте второе поколение.
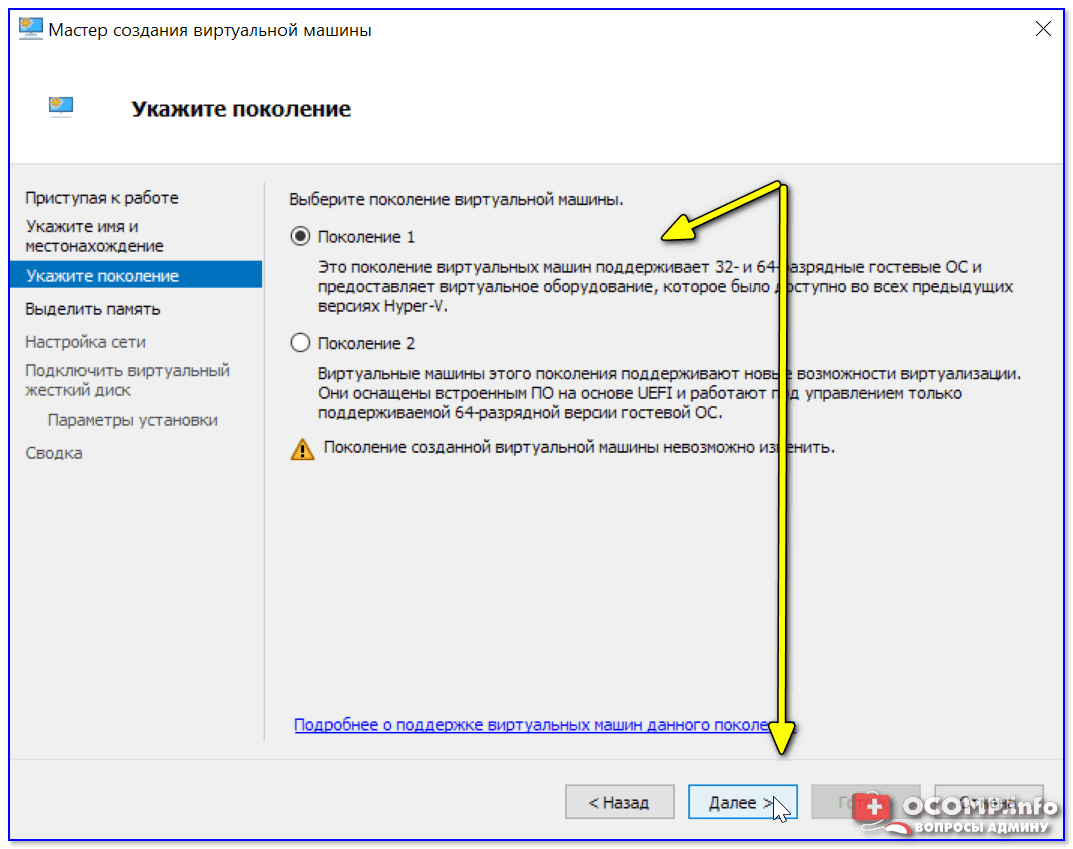
Укажите поколение
Затем необходимо указать количество выделяемой ОЗУ. Рекомендую как минимум 2000 МБ (для «виртуальной Windows 10/11» — 4000 МБ).

Выделить память
Что касается настройки сети — то ее пока что на этом этапе можно пропустить.
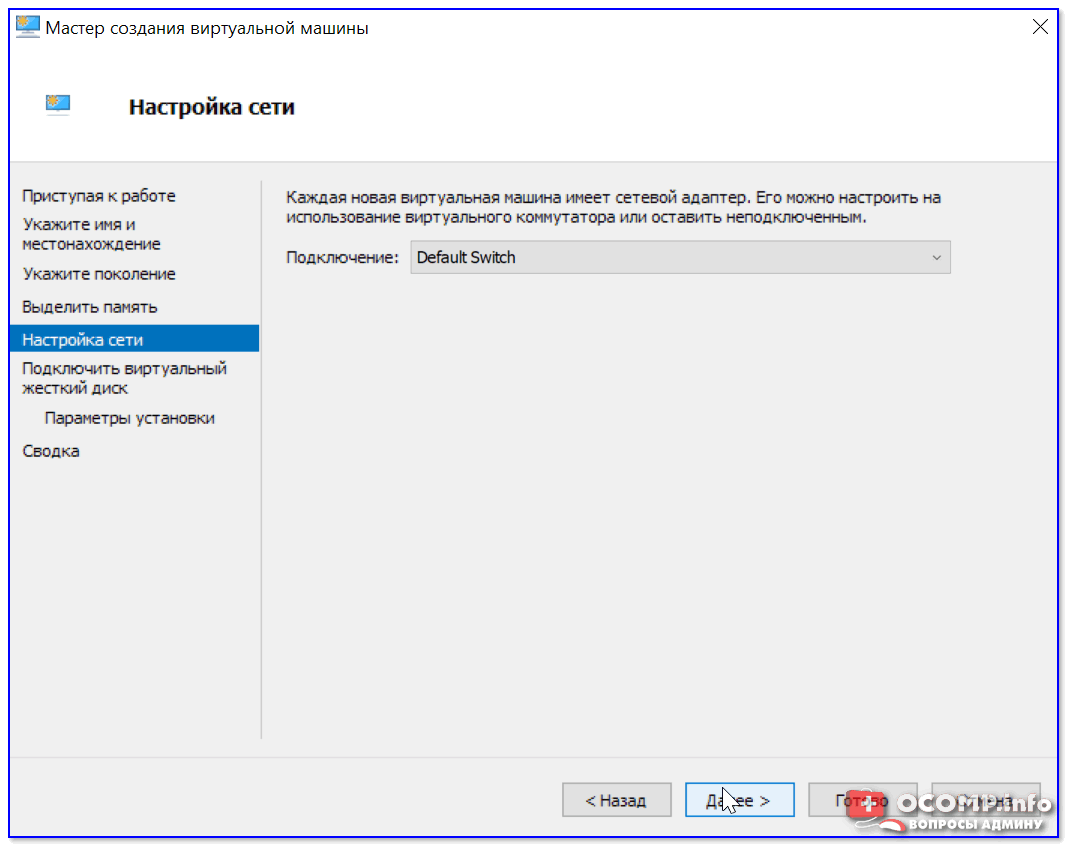
Настройка сети
Советую сразу же создать виртуальный жесткий диск (на нем будет храниться ваша виртуальная ОС, все ее файлы и т.д.). В моем примере я взял 15 ГБ (обычно требуется больше, и лучше указывать как минимум 30-45 ГБ).
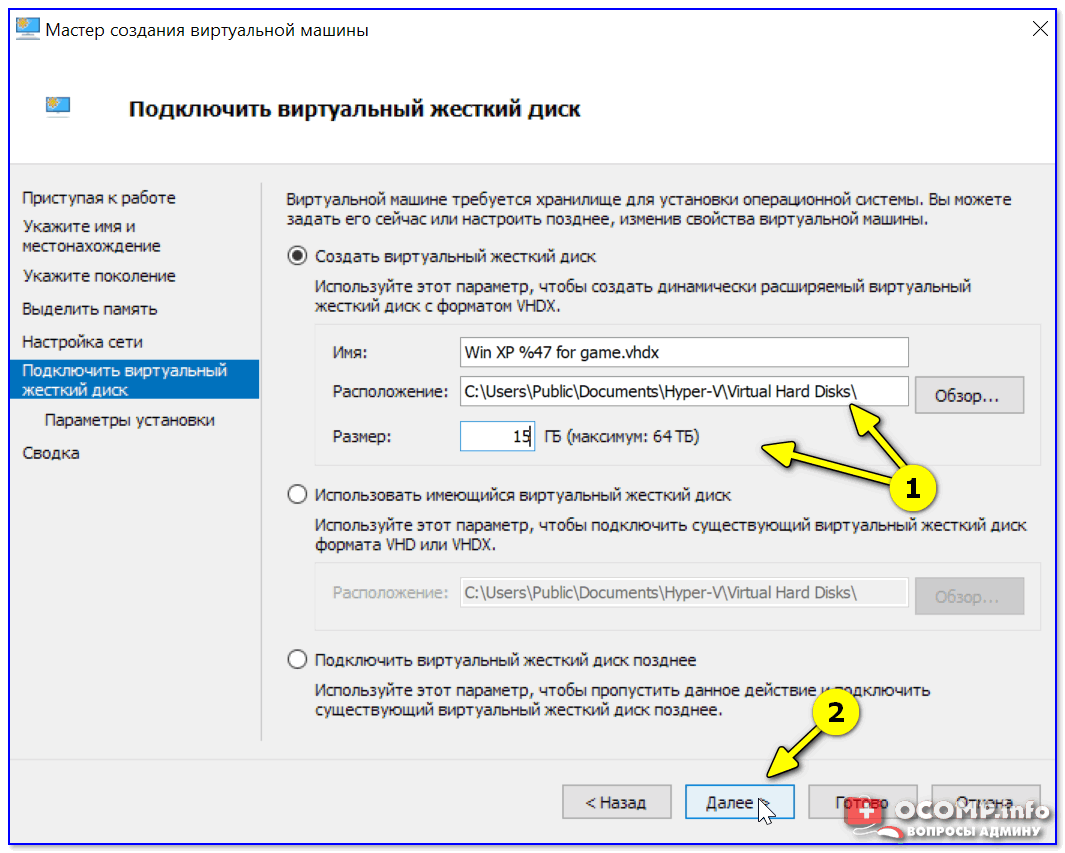
Подключить виртуальный жесткий диск
Следующий шаг важен: здесь нужно указать расположение ISO-образа с ОС Windows, которую вы хотите установить на ВМ (т.е. эта версия ОС у вас станет «виртуальной»).
В своем примере я использовал образ ISO с Windows XP.
👉 В помощь!
1) Как и где искать «редкие» файлы: программы, игры, фильмы и пр. (кроме как в Google / Яндекс)
2) Как скачать Windows 10/11 на русском языке (официальные ISO-образы)
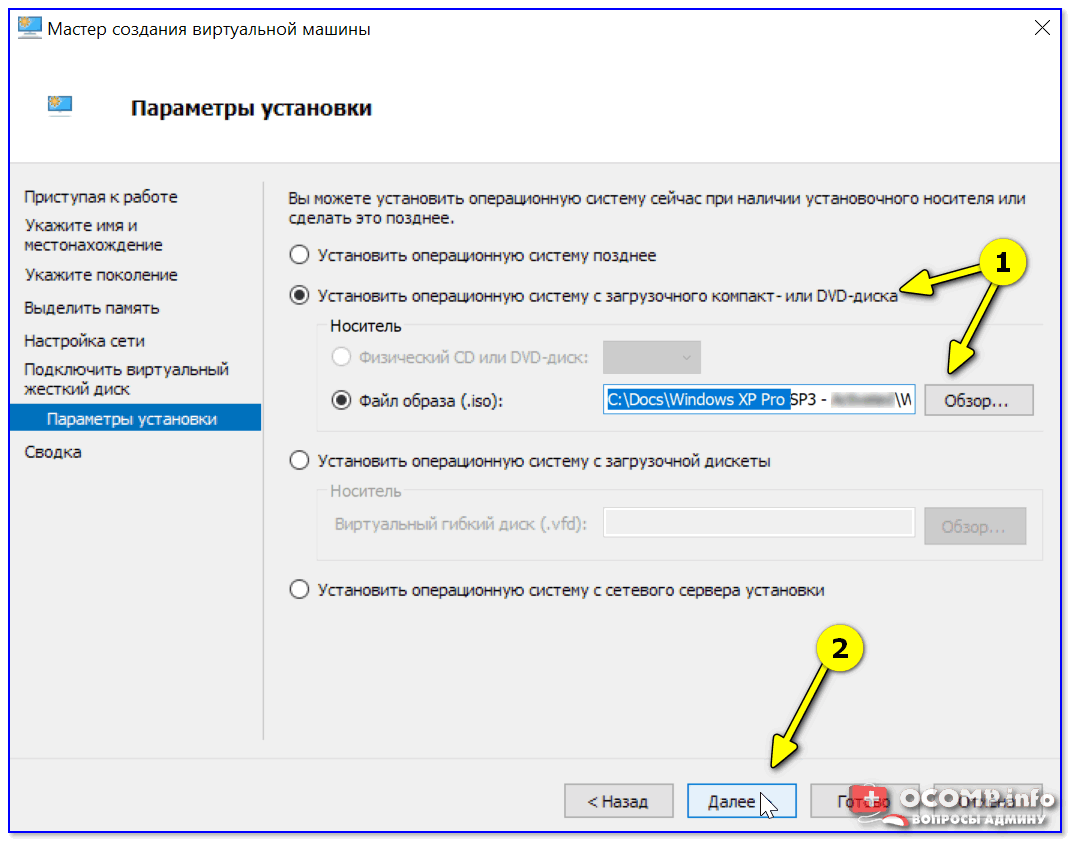
Параметры установки (выбор установочного ISO)
Ну и последний шаг — это обычная сводка, можно сразу же нажать на «Готово».
ВМ была создана! 👌
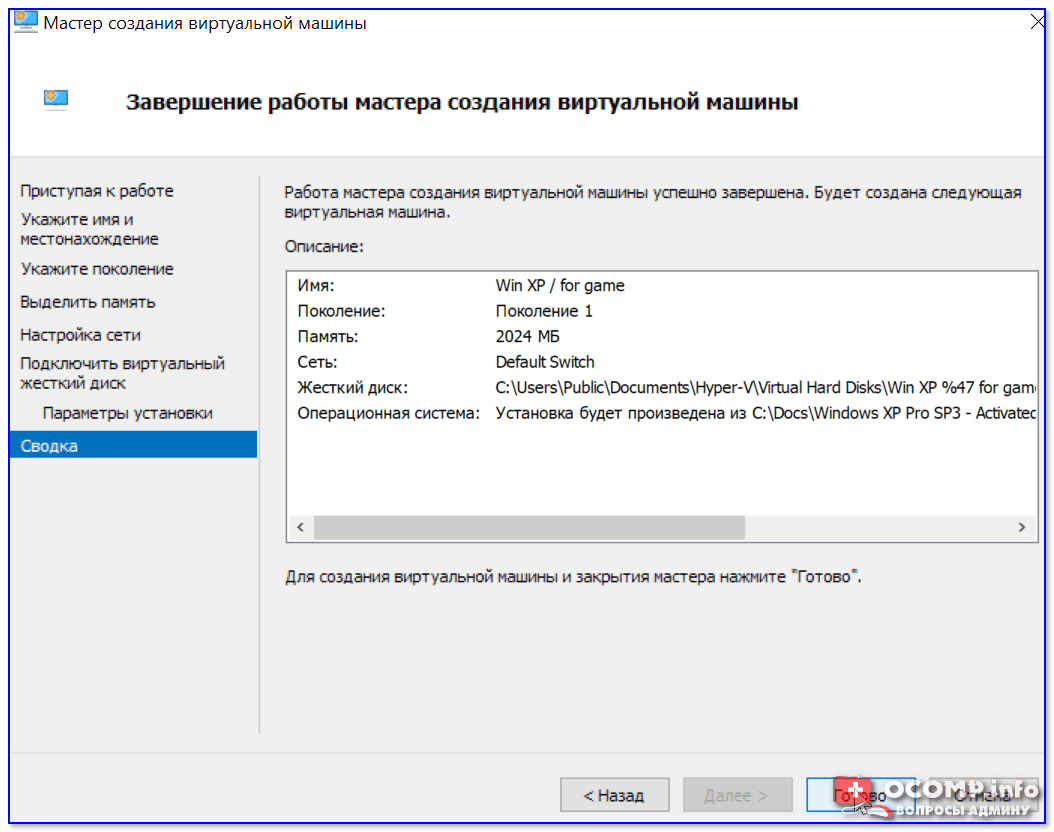
Сводка
*
ШАГ 3: установка Windows на ВМ
Теперь созданную ВМ можно запустить — для этого по ней достаточно кликнуть правой кнопкой мыши и выбрать в меню «Подключить…». 👇
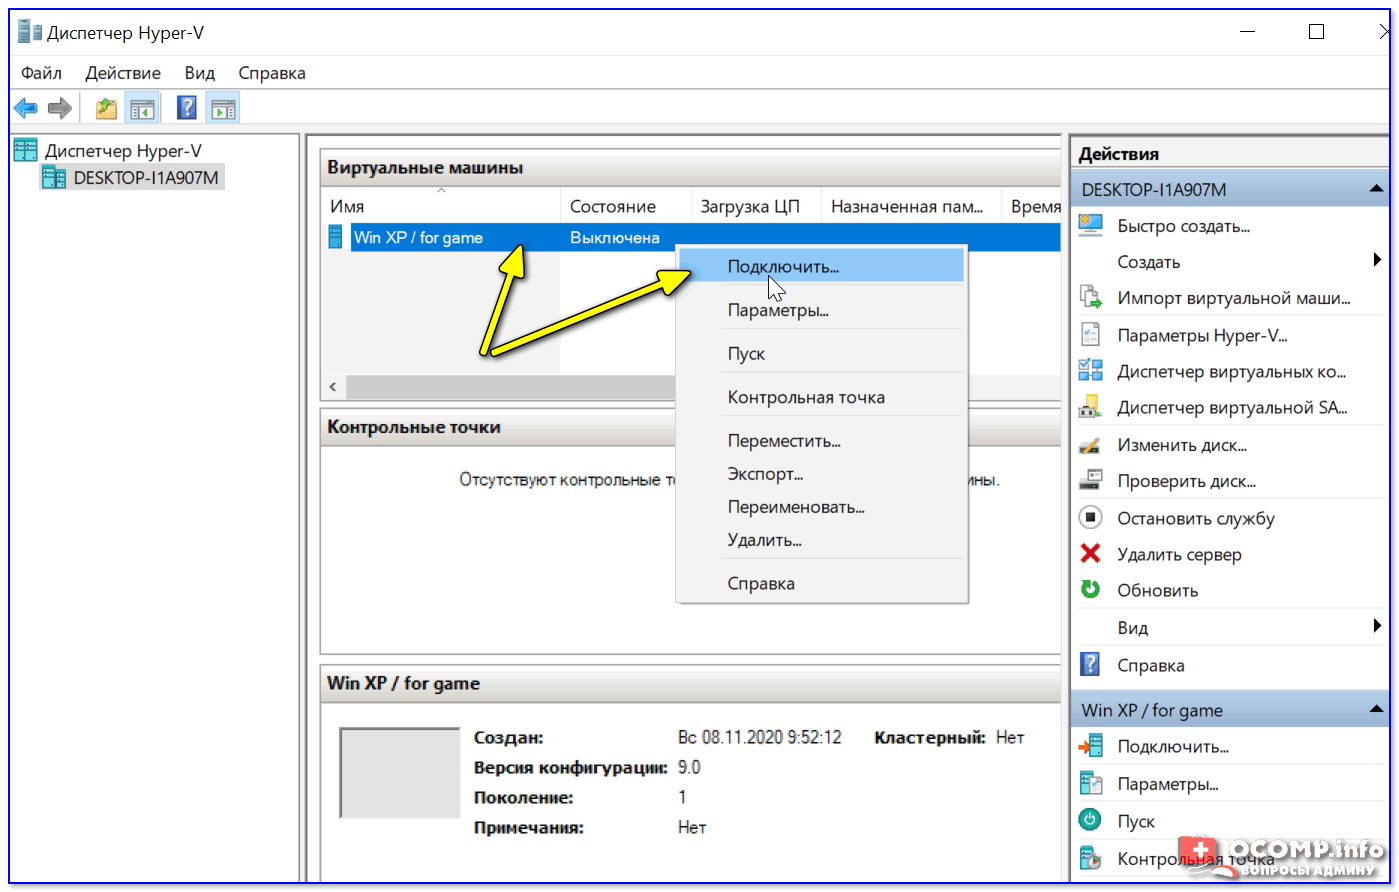
Подключить ВМ
Далее нажать по кнопке «ПУСК».
Пуск, запускаем ВМ
Т.к. в предыдущем шаге мы указали установочный образ ISO с Windows XP — ее установка на виртуальную машину начнется автоматически!

Т.к. при создании ВМ мы указали файл ISO — то установка началась автоматически
Как правило, достаточно несколько раз нажать на кнопку Enter, и дождаться окончания форматирования виртуального диска и копирования файлов.
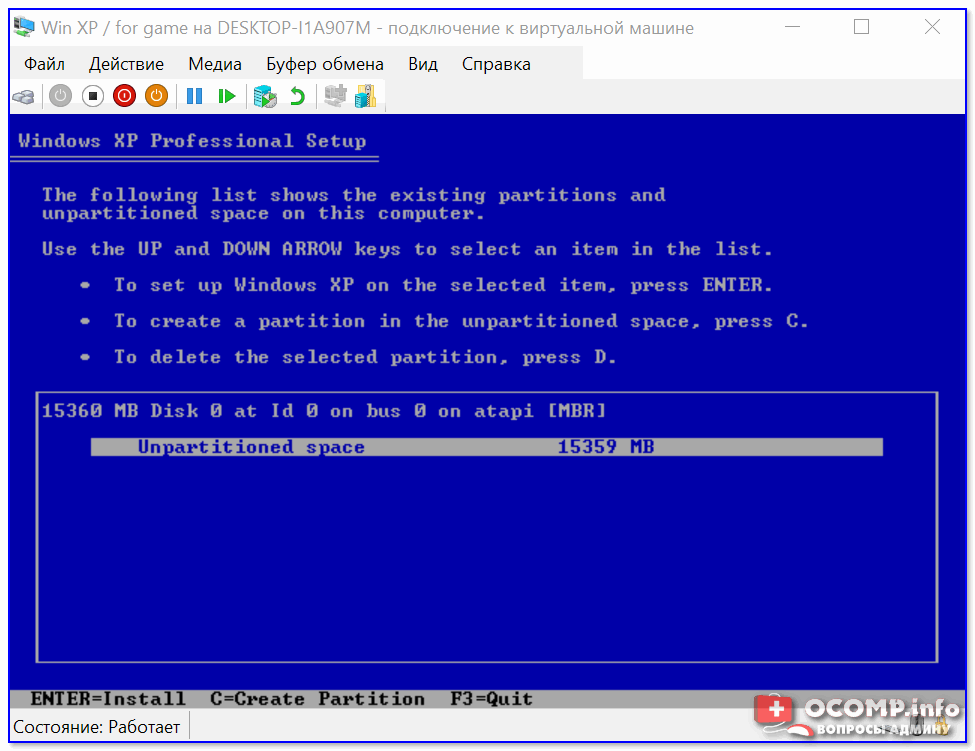
Выбор диска, форматирование, и копирование загрузочных файлов
Далее начнется весьма обыденный процесс установки ОС. Несколько раз придётся отвлечься и указать имя, часовой пояс и пр.
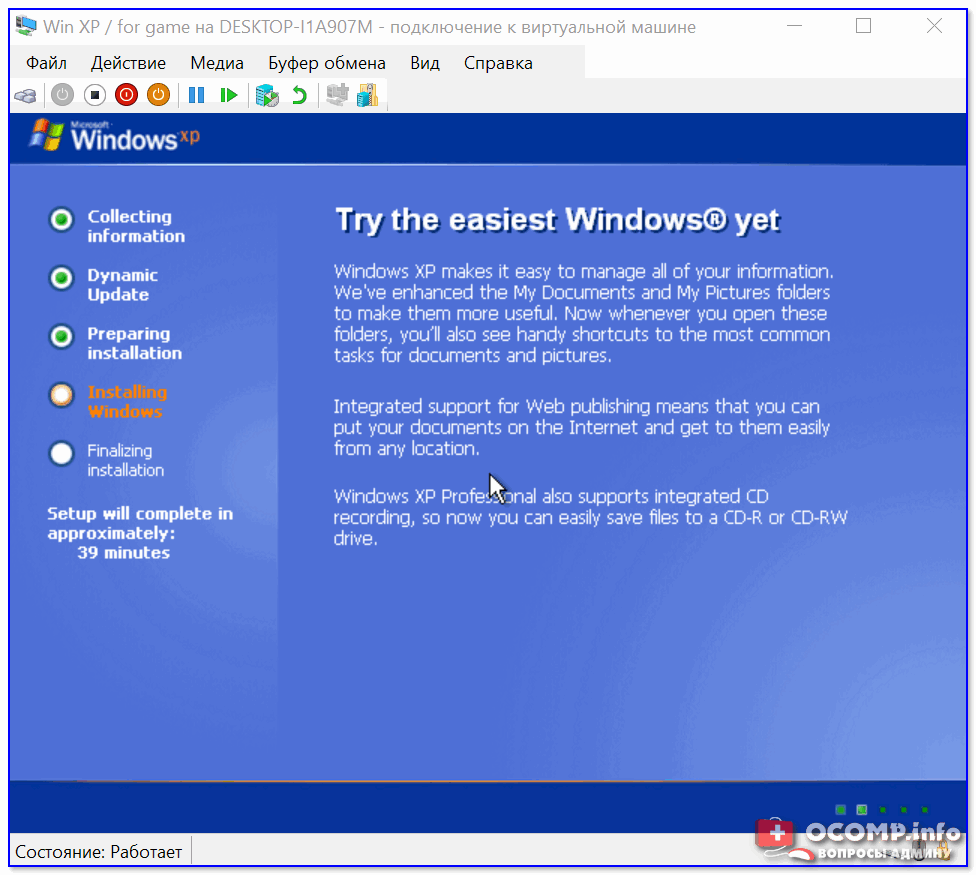
Процесс установки и копирования файлов
Через некоторое время Windows установится и произойдет первая загрузка… 👇
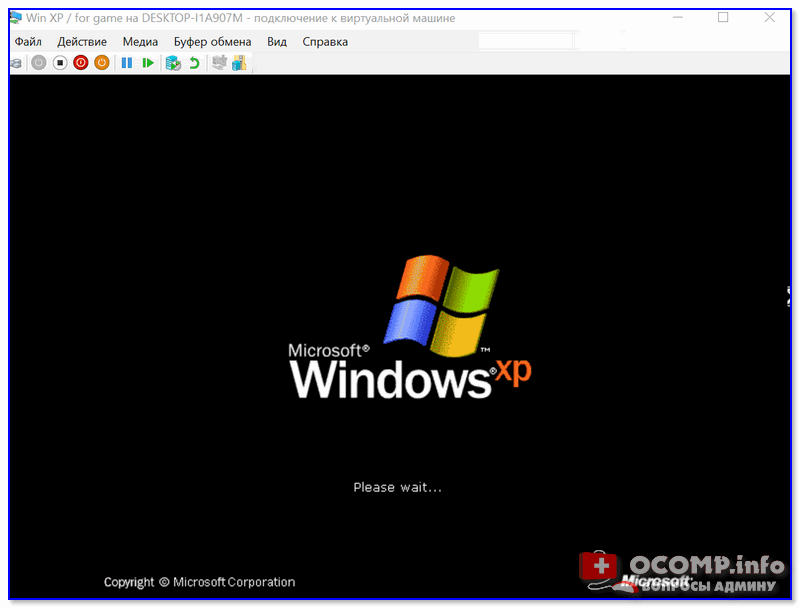
Запуск ОС
Теперь у нас есть «виртуальная Windows XP» и с ней можно полноценно работать. 👌

Виртуальная Windows XP готова к работе
*
ШАГ 4: использование ВМ
Использование ВМ крайне простое. После запуска диспетчера достаточно кликнуть по нужной ВМ правой кнопкой мыши и выбрать «Подключить» (так, как мы это делали при установки ОС в предыдущем шаге).
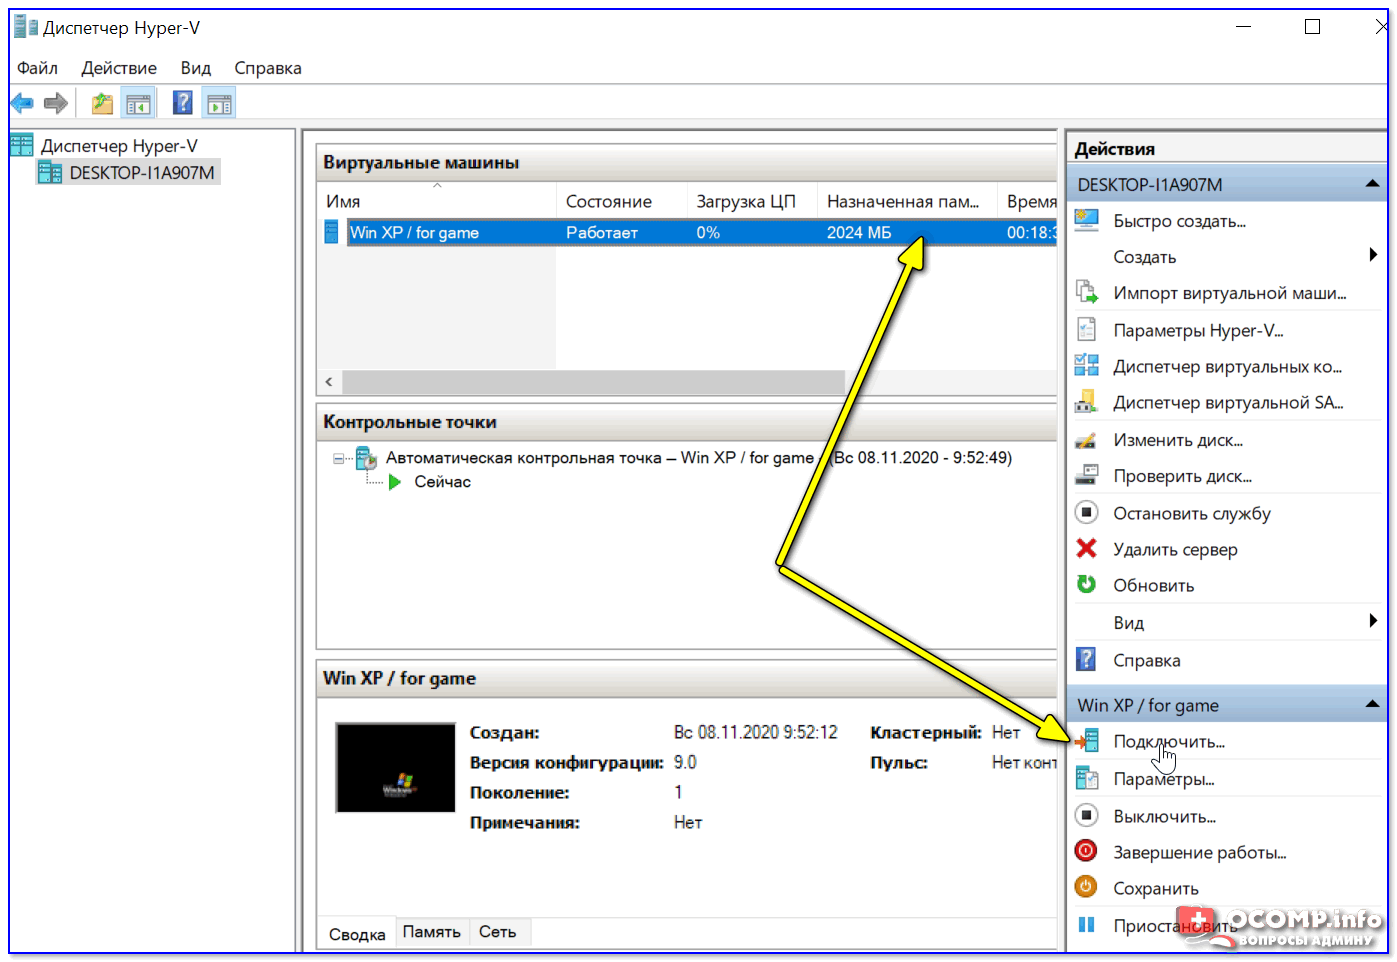
Подключаем ВМ и работаем
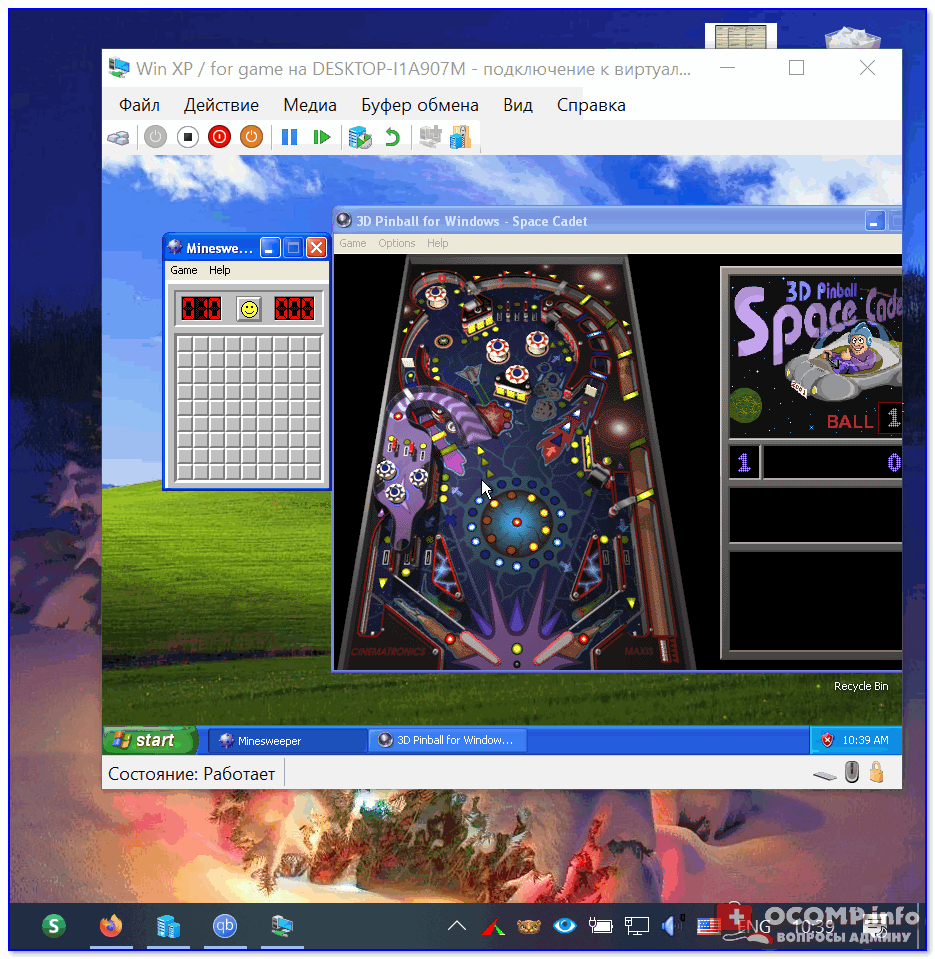
После, виртуальная Windows будет запущена в отдельном окне (как и др. программы), и в ней можно будет работать как в обычной системе — также доступна кнопка ПУСК, файлы на диске, игры и т.д. 👇
Можно играть
Важно: для выхода из окна приложения виртуальной машины — нажмите сочетание Ctrl+Alt+←.
*
Как скопировать файлы на диск ВМ
📌 В помощь!
Общая папка между реальной и виртуальной Windows: способы быстрой передачи файлов
*
Довольно популярный вопрос по поводу обмена файлами с виртуальной ОС (ведь через правка/копировать это делать не получается…).
Приведу наиболее простой способ: сначала нужно отключить ВМ.
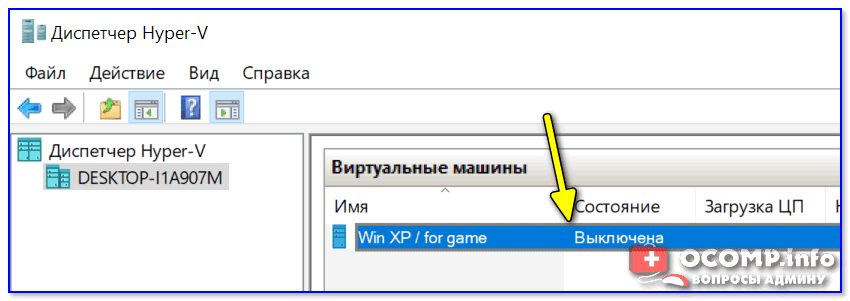
Состояние — выключена
Далее открыть 👉 управление дисками, нажать по меню «Действие / Присоединить виртуальный жесткий диск» и указать его расположение (по умолчанию: C:\Users\Public\Documents\Hyper-V\Virtual hard disks).
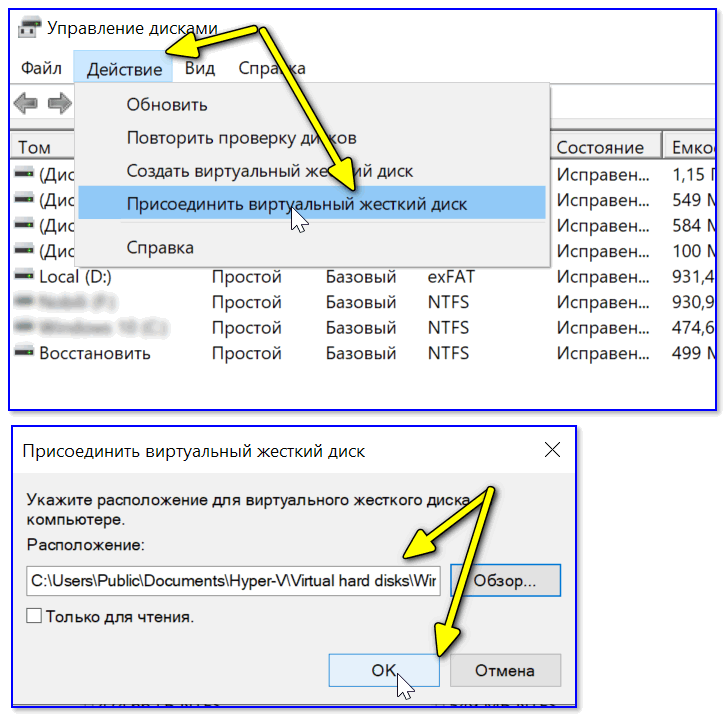
Присоединить виртуальный диск
В результате виртуальный диск (на котором установлена «виртуальная Windows») отобразиться в «Моем компьютере» и с ним можно будет работать как с обычным HDD. Т.е. скопировать и перенести на него (с него) любые файлы.
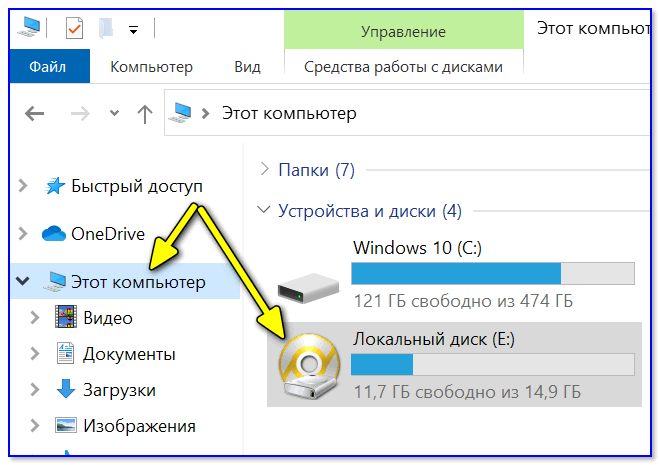
Можно работать с дисками
После обмена файлами с виртуальным диском — не забудьте его отключить: для этого в управлении дисками кликните по нему правой кнопкой мыши и выберите в меню «Отсоединить виртуальный жесткий диск».
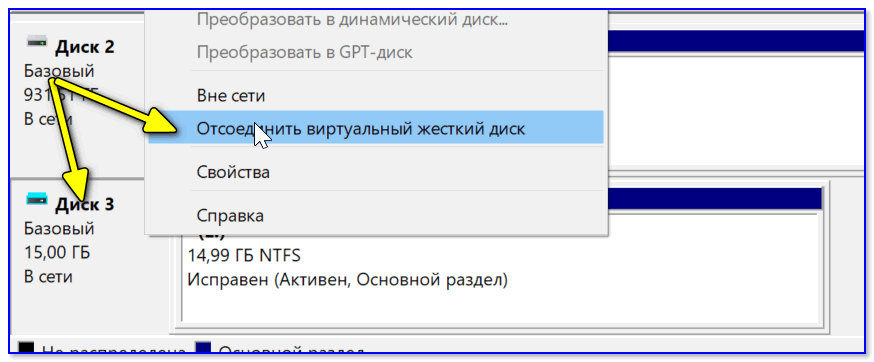
Отсоединить виртуальный диск
*
В общем-то, на этом и всё…
Компонент Hyper-V является весьма неплохой заменой отдельным программам вроде VirtualBox (о которой я рассказывал в этой заметке).
Впрочем, иногда виртуальные машины не позволяют всё же запускать определенный старый софт, и для его работы приходится ставить «реальную ОС» на реальный старый ноутбук (например).
*
Дополнения — всегда приветствуются!
Всем успехов!
👋
Первая публикация: 10.11.2020
Корректировка: 11.02.2022
Windows XP Virtual Machine Under Windows 10
The digital landscape is constantly evolving, and with that evolution comes the need to maintain compatibility with older software and operating systems. One example of this is Windows XP, an operating system released by Microsoft in 2001 and officially retired in 2014. Despite its age, many users still rely on Windows XP for legacy applications or nostalgia. This is where virtualization comes into play. Running a Windows XP virtual machine on a Windows 10 host allows users to access XP’s features and applications without needing to maintain a separate physical machine.
This article will delve into the details of setting up a Windows XP virtual machine under Windows 10, exploring the advantages, necessary tools, and a step-by-step guide for successful installation.
Understanding Virtualization
Virtualization is a technology that allows a single piece of hardware to run multiple operating systems. Virtual machines (VMs) simulate computer systems in software, allowing users to run different platforms and programs. This technology has gained traction for various reasons, including sandboxing applications, testing software, and running legacy systems.
There are several benefits to using virtualization, particularly for an operating system like Windows XP:
- Isolation: A virtual machine provides a secure environment where users can run potentially unsafe programs without affecting the host system.
- Legacy Support: Organizations can keep old software running without setting up and maintaining old hardware.
- Resource Efficiency: VMs share the resources of the host machine, leading to better resource utilization compared to using multiple physical machines.
- Snapshot and Restore: Virtual machines can be backed up as snapshots. If something goes wrong, users can easily revert to a previous state.
Tools Needed for Virtualization
Before we can set up a Windows XP virtual machine, we need a few tools:
-
Virtual Machine Software: There are several options available, including:
- Oracle VM VirtualBox: A free and open-source option that is user-friendly and popular among individuals and organizations alike.
- VMware Workstation Player: A free version of VMware’s virtualization software, known for its robustness and commercial support.
- Microsoft Hyper-V: Included with Windows 10 Pro, Education, and Enterprise editions, Hyper-V enables the creation and management of virtual machines.
-
Windows XP Installation Media: This can be either a physical CD/DVD or an ISO image file. Retaining a legitimate license is vital for legal compliance.
-
Sufficient Hardware: Check that your modern PC has enough RAM, CPU power, and disk space to support both Windows 10 and the virtual machine.
Setting Up a Windows XP Virtual Machine Using Oracle VM VirtualBox
For this guide, we will focus on Oracle VM VirtualBox due to its popularity and ease of use. Here is how to set up a Windows XP virtual machine on Windows 10 using VirtualBox.
Step 1: Download and Install VirtualBox
- Visit the official Oracle VM VirtualBox website to download the latest version of the software.
- Choose the appropriate version for Windows and follow the installation prompts. During installation, you might be asked to install drivers; ensure you allow this for proper functionality.
Step 2: Setting up the Virtual Machine
-
Create a New VM:
- Open VirtualBox.
- Click on the «New» button in the toolbar.
- Enter a name for the VM (e.g., «Windows XP») and select «Microsoft Windows» as the Type and «Windows XP (32-bit)» as the Version. (If you’re using a 64-bit version of Windows XP, choose that instead.)
- Click «Next.»
-
Assign Memory:
- Allocate RAM to your VM. A minimum of 512 MB is recommended for Windows XP, but if your system can support it, consider allocating 1 GB.
- Click «Next.»
-
Create a Virtual Hard Disk:
- Choose «Create a virtual hard disk now» and click «Create.»
- Choose «VDI (VirtualBox Disk Image)» and click «Next.»
- Select «Dynamically allocated» which will allow the virtual hard disk to grow as needed (up to the set limit).
- Set the hard disk size—10 GB or more is generally sufficient for a standard Windows XP installation. Click «Create.»
Step 3: Configuring the Virtual Machine Settings
-
Access Settings:
- With the VM selected in the main VirtualBox interface, click on the «Settings» icon.
-
System Settings:
- Under the «System» tab, consider enabling the appropriate amount of CPU cores under the «Processor» tab. Ensure «Enable EFI» is unchecked, as Windows XP does not support UEFI.
- Modify the Boot Order to make sure «Optical» (for CD/DVD) is prioritized if using an ISO.
-
Storage Setup:
- Go to the «Storage» tab. Click on the empty disk under «Controller: IDE.»
- On the right side, click the disk icon to choose a virtual optical disk file. Select your Windows XP ISO or physical disc.
-
Network Settings:
- Under the «Network» settings, choose «Bridged Adapter» to give the VM network access.
Step 4: Installing Windows XP
-
Start the Virtual Machine:
- Click the «Start» button with the VM selected.
- The VM will boot from the selected installation media.
-
Follow Installation Prompts:
- You will see the Windows XP installation screen. Follow the on-screen instructions to format the virtual hard drive, choose installation options, and enter your product key when prompted.
- Once installation is complete, the system will reboot, and you can remove the installation media from the VM settings.
-
Complete Windows XP Setup:
- After rebooting, complete the setup by setting up user accounts and preferences as prompted.
Step 5: Install VirtualBox Guest Additions
To enhance performance and usability, it’s a good idea to install VirtualBox Guest Additions:
- With the Windows XP VM running, click on the “Devices” menu in the VirtualBox window.
- Select “Insert Guest Additions CD image” from the dropdown.
- Follow the prompts to install the Guest Additions. This will enhance video performance, provide better mouse integration, and allow shared clipboard functionality.
Troubleshooting Common Issues
- Performance Issues: Allocate more RAM or CPU cores if the VM is sluggish. Ensure that hardware virtualization is enabled in your BIOS/UEFI settings.
- Network Connection Problems: If the Windows XP VM doesn’t connect to the internet, check the network settings in VirtualBox to ensure it’s correctly set to «Bridged» or «NAT.»
- Screen Resolution Problems: If the display isn’t scaling properly, ensure you’ve installed Guest Additions.
Conclusion
Running a Windows XP virtual machine under Windows 10 provides an effective solution for those who require access to legacy applications or simply wish to revisit a cherished operating system. Virtualization encapsulates the flavor of the old while leveraging the power and security of modern computing. By following the outlined steps and considerations, users can create a functional XP environment that integrates seamlessly with their Windows 10 systems, allowing them to experience a piece of computing history with the confidence that their primary system remains unaffected.
With the rich history and unique software offerings that Windows XP provides, setting up a virtual machine is not just a useful exercise, but also a nostalgic journey into the past. Whether for software development, migration testing, or simply for the love of old-school gaming, this process can help make dreams of legacy use a reality.
Microsoft
Windows XP Mode
for Windows 7, 8.x, and 10
100% WORKING /
FULL VERSION
!!!
VM settings
— Name: Windows XP Mode
— Processors / Cores: 1 CPU / 1 Core
— VT-x/AMD-V: Disabled
— Memory: 256 MB (minimum) ~ 4096 MB (maximum)
— Hard Disk(s): VirtualXPVHD.vhd/vmdk (127 GB)
— Optical(s): Auto detect x1
— Floppy(ies): Auto detect x1
— Network Adapter(s): NAT x1
— USB Controller: USB 2.0 present
— Sound Card: Auto detect
— Display: Auto detect with 3D
— Graphics Memory: 32 MB (minimum) ~ 8 GB (maximum)
— Shared Folders:
1: Name= Host OS C, Path= C:\, Mode: R / W
— Other Devices: No present
OS objectives
— Supported Host Operating Systems:
Windows 7 and higher (any editions)
— Supported Virtual Machines:
Windows Virtual PC
VMware Workstation Player 6.x and later
VMware Workstation Pro 10.x and later
Oracle VM VirtualBox 5.2 and later
Microsoft Hyper-V (experimental)
— User name: Administrator
— Password: XPMUsers
— Account type: Administrator
— 32-bit (IA-32 / x86)
— Professional edition
— English language
— All updates are installed
— Disk cleanup already
— Includes extra features
— Includes extra languages support
— Includes extra updates
— Cracked version (use AntiWPA v3.4.6)
— Modified version the Windows XP Mode
See details: Please read to «
Readme.txt
«
Are you trying to use an old program that just won’t work on your Windows 10 computer? You’re not alone. Many people still need to run software designed for Windows XP, but they’re not sure how to do it on a modern system.
Maybe you’ve got a favorite game from years ago that you’re itching to play again. Or perhaps there’s a specialized work application that your company still relies on. Whatever the reason, it can be frustrating when these programs refuse to run on your up-to-date machine.
But here’s the good news: you can set up something called an emulator on your Windows 10 computer. Think of it as creating a virtual Windows XP machine inside your current system. It’s like having two computers in one, allowing you to run old XP programs without giving up your modern Windows 10 setup.
In this guide, we’ll walk you through the process step by step. Don’t worry if you’re not tech-savvy – we’ll explain everything in plain language.
By the time you’re done reading, you’ll know exactly how to get those old programs running again. Ready to bring a bit of the past into the present?
What you’ll need to get started:
Before we begin, make sure you have:
- A Windows 10 computer.
- A Windows XP installation disc or digital copy (ISO file).
- Enough free space on your hard drive (at least 15GB).
Step 1: Get VirtualBox
First, you need to download a free program called VirtualBox. Here’s how:
- Open your web browser and go to the VirtualBox website.
- Click the “Download” button.

- Choose the version for Windows hosts.

- Once it’s downloaded, open the file and follow the installation instructions.
VirtualBox is the tool that will let you create and run your virtual Windows XP.
Step 2: Set up your virtual machine
Now that you have VirtualBox installed, let’s create your virtual Windows XP:
- Open VirtualBox.
- Click “New” at the top of the window.

- Give your virtual machine a name, like “My Windows XP“.

- For “Type,” choose “Microsoft Windows“.

- For “Version,” select “Windows XP“.
- Click “Next“.

Step 3: Allocate memory and create a virtual hard drive
Now you’ll decide how much of your computer’s resources to give to your virtual XP:
- Choose how much memory (RAM) to allocate. 512MB is the minimum, but 1024MB (1GB) is better if you can spare it.
- Click “Next“.

- Select “Create a virtual hard disk now“.
- Set the size to about 10GB and click “Next“.

Step 4: Install Windows XP
You’re now ready to install Windows XP on your virtual machine:
- In VirtualBox, select your new virtual machine and click “Start“.

- When prompted, select your Windows XP installation disc or ISO file.

- Follow the on-screen instructions to install Windows XP, just like you would on a real computer.
- Once installation is complete, your virtual Windows XP will restart.
Step 5: Using your virtual Windows XP
Congratulations! You now have a virtual Windows XP on your Windows 10 computer. Here’s how to use it:
- Open VirtualBox.
- Select your Windows XP virtual machine.
- Click “Start“.
Your virtual Windows XP will boot up in a window on your desktop. You can use it just like a regular computer. When you’re done:
- Click the Start menu in your virtual XP.
- Choose “Shut Down“.
Remember, any programs you install on your virtual XP won’t affect your main Windows 10 system. This keeps things safe and separate.
Why might you need to use old Windows XP programs?
Even though Microsoft no longer supports Windows XP, there are good reasons why you might want to use programs designed for it. Let’s explore why and how you can do this safely:
1. Old programs that don’t work on new systems
Some older software just doesn’t run on modern Windows versions. Maybe you have:
- A favorite game from years ago.
- A work program your company still uses.
- Specialized software for a hobby or interest.
These programs might be important to you, but they’re not compatible with Windows 10.
2. Security concerns with old systems
Running Windows XP directly on your computer isn’t safe because:
- It doesn’t get security updates anymore.
- It can’t handle new software or hardware well.
- It’s more likely to get viruses or other malware.
3. A safer way to use old programs
This is where a virtual Windows XP comes in. It’s like having a separate XP computer inside your Windows 10 system. Here’s why it’s better:
- It keeps your old programs separate from your main system.
- If something goes wrong, it won’t affect your Windows 10.
- You can easily start over if you need to.
By using a virtual Windows XP, you get to enjoy your old programs without putting your computer at risk. It’s the best of both worlds – you keep the security of Windows 10 while still being able to use software from the XP era.
The takeaway
Setting up a virtual Windows XP on your Windows 10 computer isn’t just a trip down memory lane – it’s a practical solution for many of you. Whether you need to run an old work program or revisit a favorite game, this method keeps things safe and separate.
You don’t need to be a tech whiz to make this happen. With some patience and the steps we’ve shared, you can create your own virtual XP environment. It’s like having an old computer inside your new one, without the security risks.
Remember, keep your virtual XP offline when possible, and don’t store important files there. This way, you get the best of both worlds – access to old programs and the safety of your modern system.
So, why not give it a try? You might be surprised at how useful this little blast from the past can be in your digital present. Have you ever needed to use an old program on a new computer? We’d love to hear about your experiences!
Frequently Asked Questions
What is a Windows XP emulator?
A Windows XP emulator allows you to run Windows XP within a virtual machine on your Windows 10 system. This setup creates a separate, virtualized environment where you can operate XP without affecting your main operating system.
Why should I use a Windows XP emulator instead of directly installing Windows XP?
Using an emulator provides a safer alternative to installing Windows XP directly on your hardware. Since XP is no longer supported with security updates, running it in a virtual environment isolates potential security threats, such as malware, from your main system.
What software do I need to set up a Windows XP emulator on Windows 10?
Oracle VM’s VirtualBox is recommended for emulating Windows XP on Windows 10. It’s a free and robust virtual machine software that allows for the easy setup and management of virtual operating systems.
How do I get a Windows XP installation media for the emulator?
You will need a Windows XP CD/DVD or an ISO disk image to use with the emulator. These can often be found in old software collections, purchased from legal sources, or downloaded from a trusted online repository if available.
Can I use Windows XP emulator to run old games or software?
Yes, one of the main reasons to use a Windows XP emulator is to run old games and software that are incompatible with newer versions of Windows. The emulator provides the necessary old OS environment for these programs to function correctly.
What should I do if my emulated Windows XP gets infected with malware?
If your virtual Windows XP environment becomes infected, you can easily reset or reinstall it without affecting your Windows 10 system. This involves wiping the virtual hard drive or rolling back to a previous state using VirtualBox’s snapshot feature.