
In this post, you’re going to learn how to install Kali Linux in a VirtualBox virtual machine on a Windows 10 host.
🎥 Want to watch a video to supplement your reading? Check this out:
Prerequisites 🛠️
VirtualBox
If you don’t have VirtualBox installed, head over to VirtualBox.org and download the latest version.

You can skip this step if you already have it installed. ✅
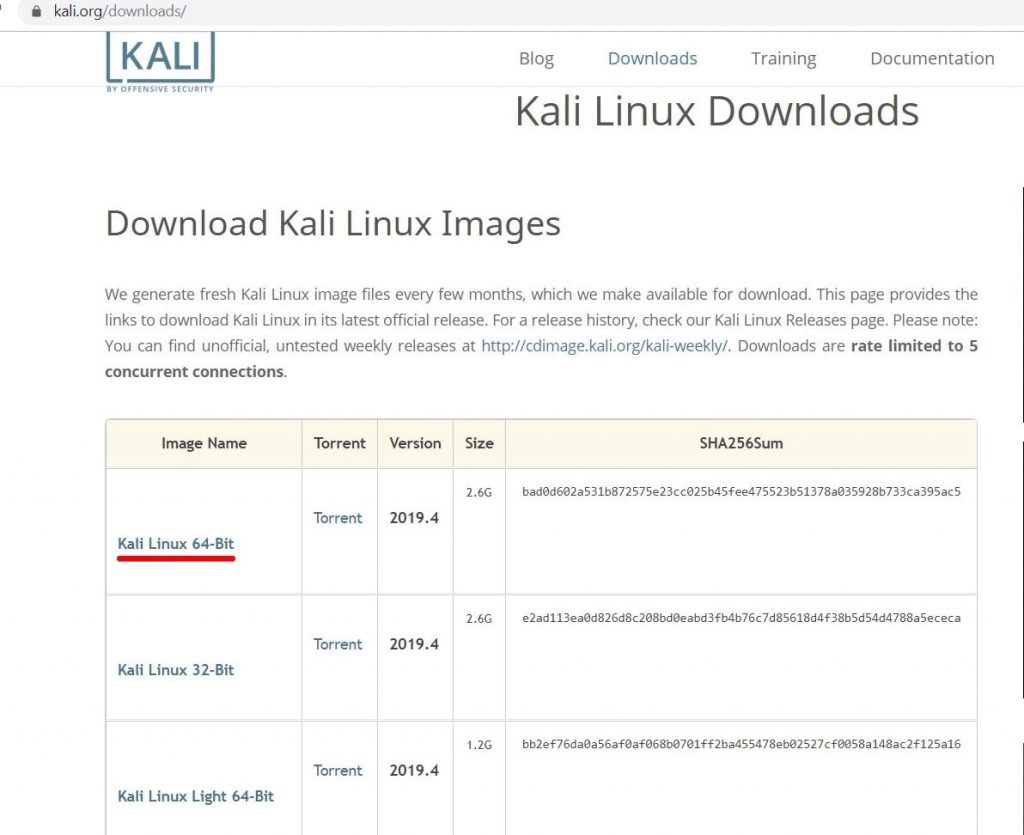
Download Kali Linux
Head over to Kali.org and download the desired ISO image.

Download the 64-bit only if you’re running a 64-bit CPU. Otherwise, download the 32-bit version.
If you want to install all the tools that Kali comes with, select the Everything version.
For this tutorial, we’re going to install the recommended version.
Enable Virtualization
One final check you must do before initiating the installation is to enable virtualization in your BIOS/UEFI system.
To check if virtualization is enabled, press CTRL + SHIFT + ESC to open Task Manager -> Performance then see the Virtualization label.

If your virtualization is disabled you must go to your UEFI/BIOS and enable it.
Here is how it looks on my system.
Yours may be different.

Intel users may find the setting labeled as VT-d or VT-x.
AMD users as AMD-V.
Make sure to consult your motherboard’s manual if you cannot find the virtualization setting.
Let’s finally configure the virtual machine and then install Kali Linux!
Virtual Machine configuration
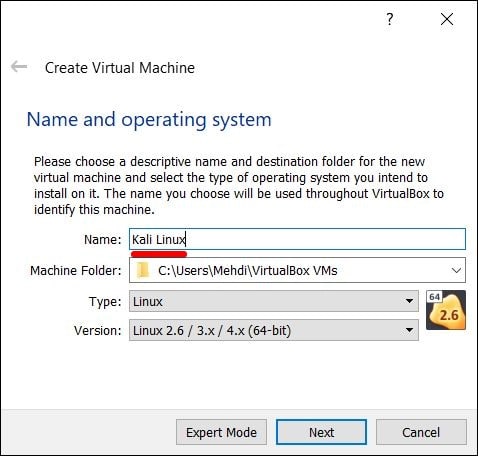
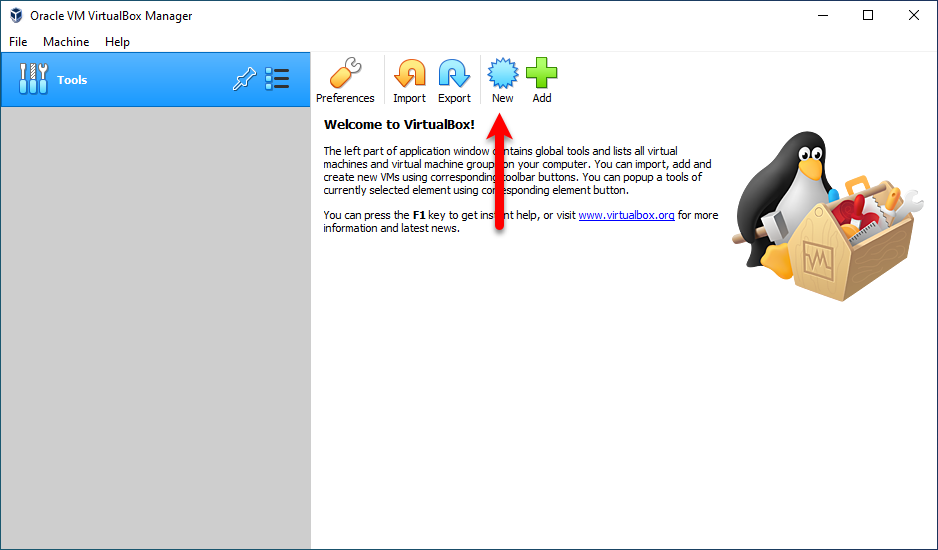
Start up VirtualBox and click the New button.

Choose a name for your operating system.
It will be used in any filenames such as configuration, hard disk, and snapshot.
Then select the Kali Linux ISO file you just downloaded and then click Next.
The Type and Version fields will be automatically completed when you select the ISO Image.

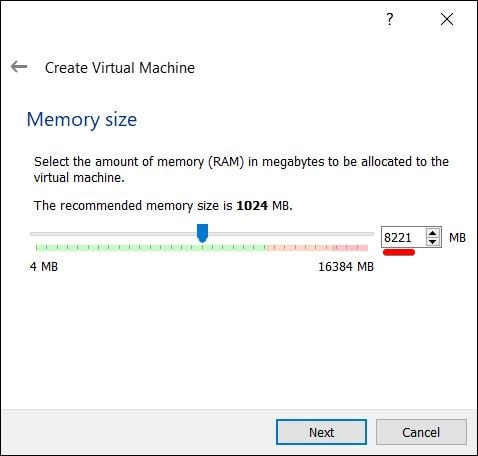
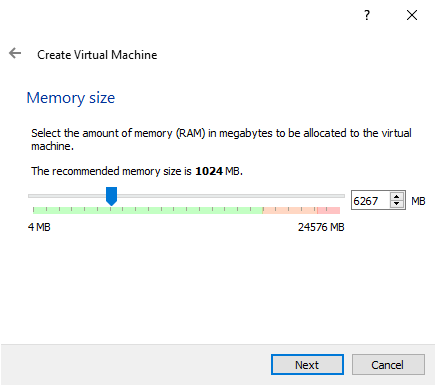
Hardware is the next section where we can define how much RAM to use.

The higher amount of RAM, the better the performance.
Various tools inside Kali can use a lot of resources.
In this example, I’m going with 6GB of RAM (6144MB in binary).
I’d say you should go with something between 25-50% of your maximum RAM. The same goes for CPUs.
Kali tends to be more efficient than Windows, and allocating more resources will cause Windows to get sluggish.
Click Next once you’re ready to move to the next step.
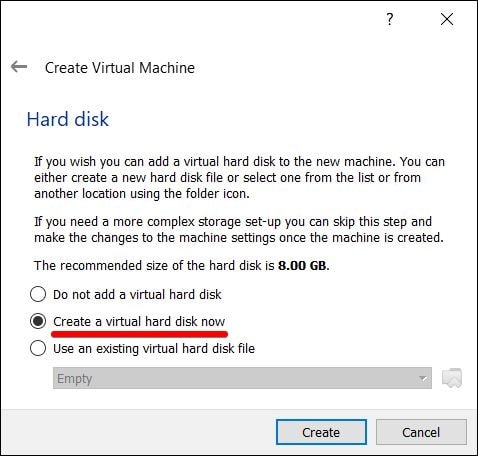
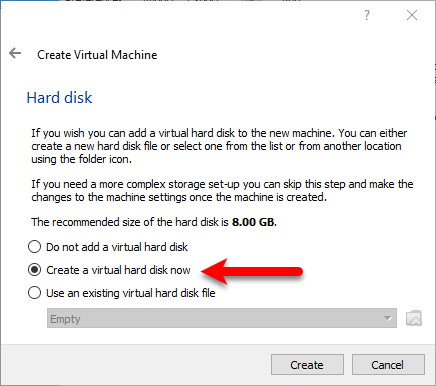
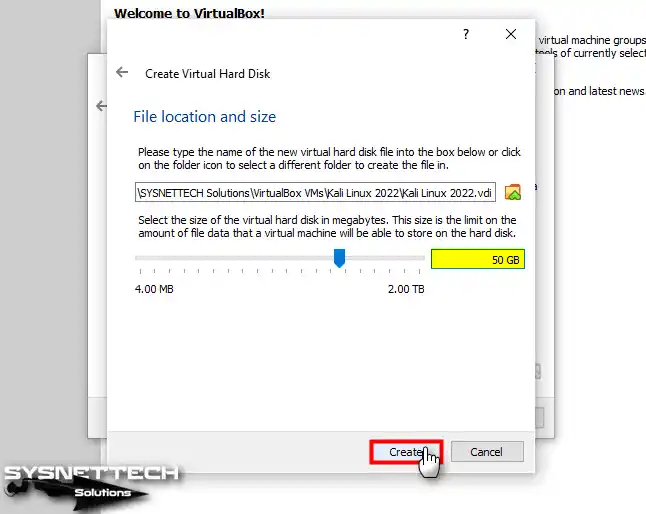
Virtual Hard disk is the next screen.

As the name suggests, we can create a Virtual Hard Disk.
My SSD has a total of 2TB and I’m ok with allocating it 100GB.
You can also opt not to add a Virtual Hard Disk.
In this example, let’s go with 100GB.
The final screen is the Summary.

If you made a mistake and you’d like to change something, you can go back and do it.
If you’re ok with the setup, then press Finish.
The wizard is complete! Awesome 😎
Advanced Virtual Machine configurations
We still have some small tweaks to ensure we have a healthy virtual machine.
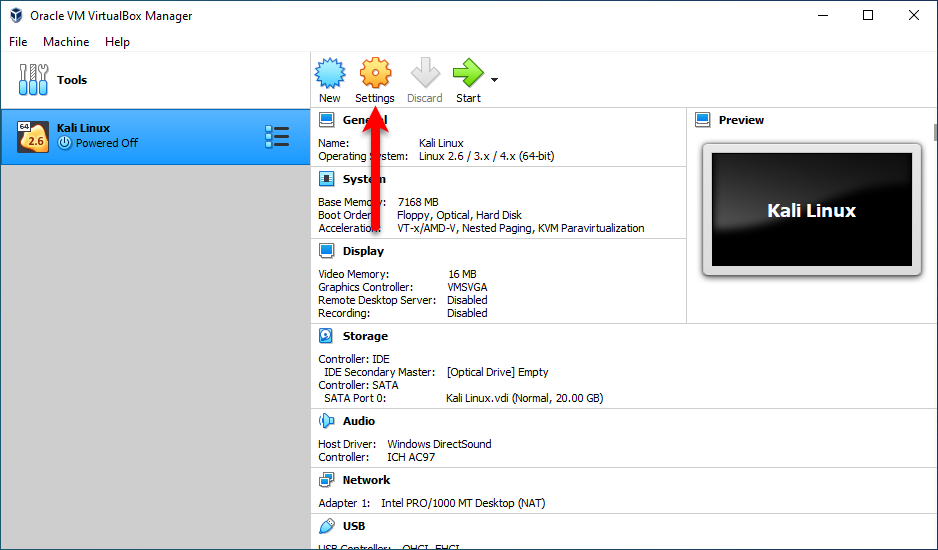
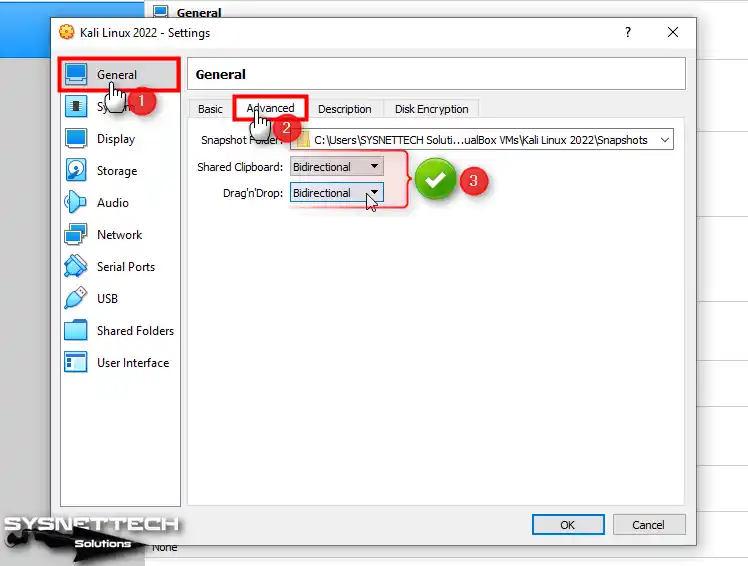
Select the Kali virtual machine and click on Settings to customize it further.

Go to General -> Advanced and make sure to set Shared Clipboard and Drag n’ Drop to bidirectional.

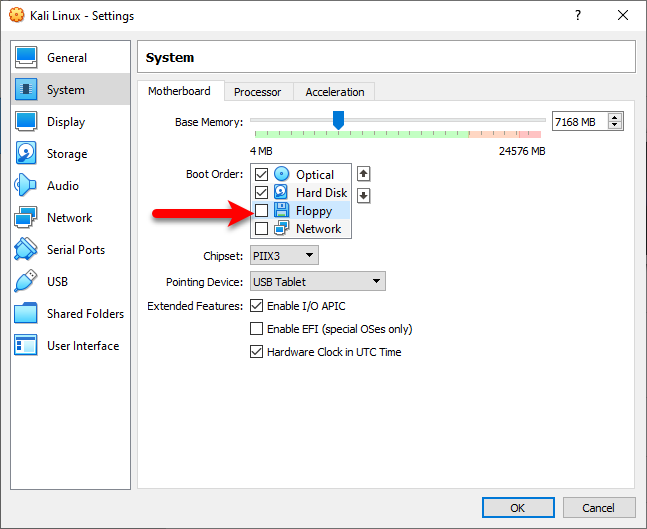
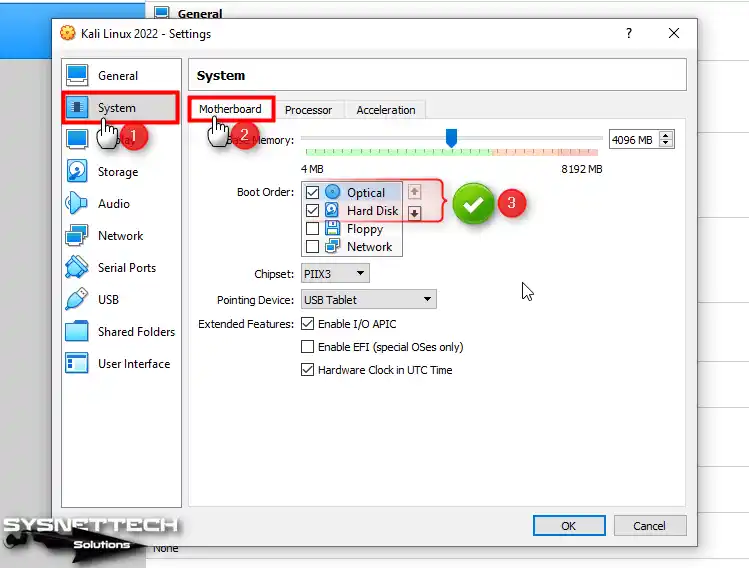
In System -> Motherboard change the Boot Order so that Hard disk is on top and Optical is the second.
Everything else should be disabled.

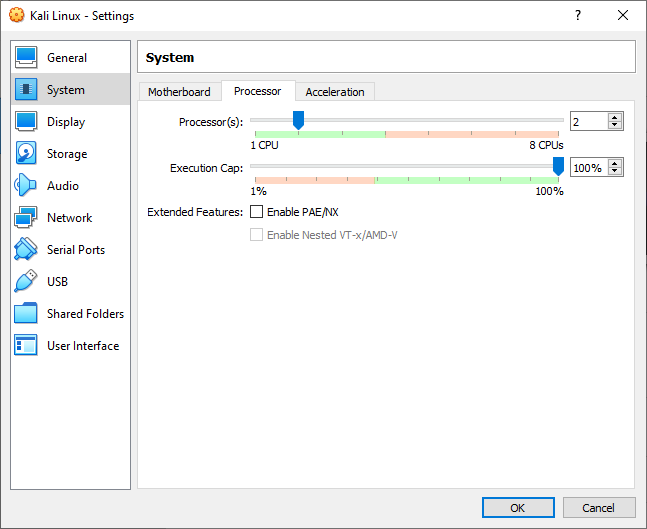
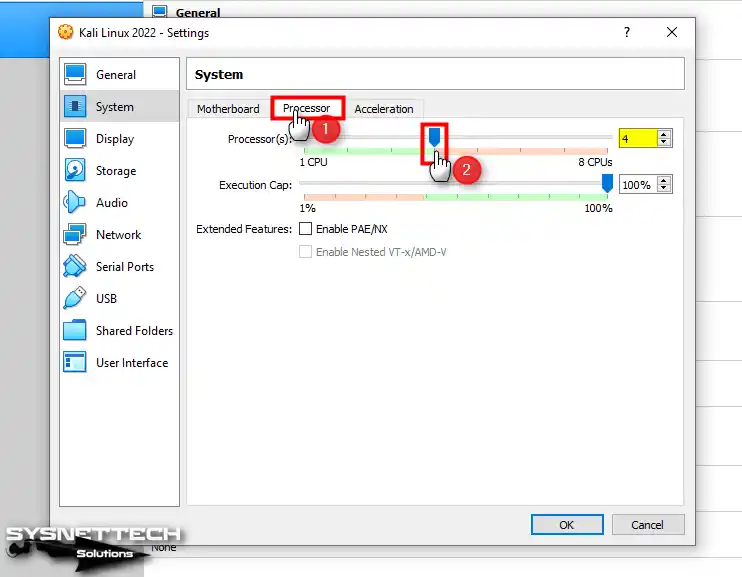
In System -> Processor enable the extended feature named Enable PAE/NX ONLY if you’re using a 32-bit system.
Leave it disabled if you’re using a 64-bit system.

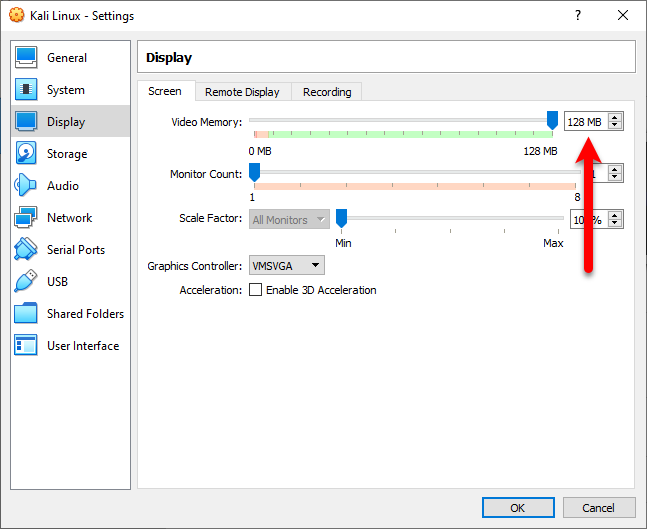
In Display -> Screen, make sure to have Video Memory set to 128MB.
Also, make sure to have 3D Acceleration disabled as people have reported it causes issues.

Press OK and your settings should look like this:

The configuration is complete and you are now ready to install Kali Linux on your virtual machine! 🎉
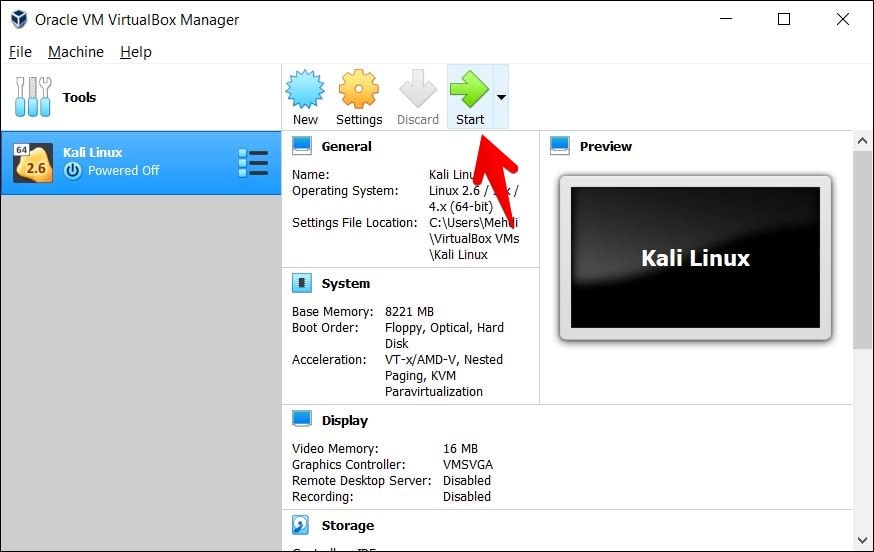
Power up the virtual machine by double-clicking it.
Alternatively, you can power it up by right-clicking it, then Start -> Normal Start.
You should be greeted with the Kali Linux Boot screen.

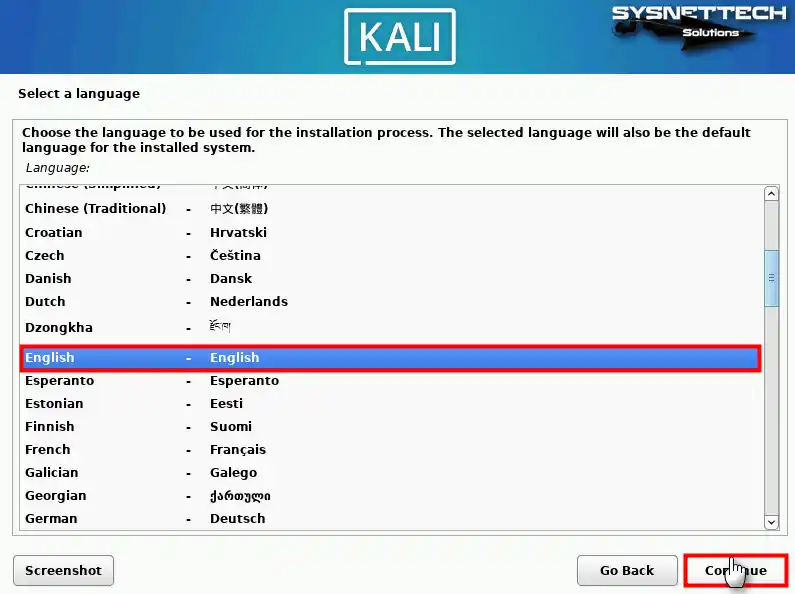
Select your preferred language.
This will be used for both the setup process and once you are using Kali Linux.

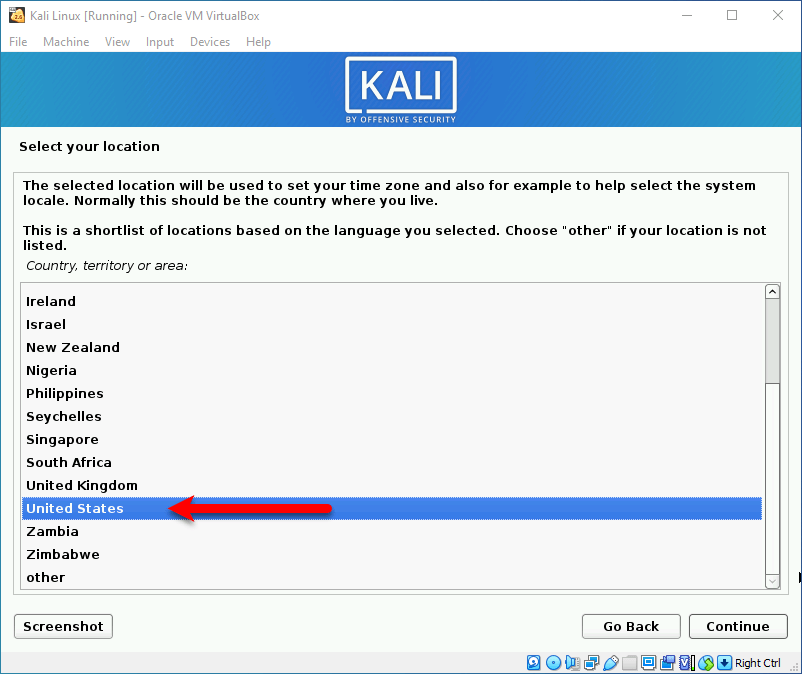
Select your location.

Select the localization.

Select the keyboard layout.

Click Continue and then Kali Linux will start installing media files.
Grab a cup of your favorite beverage, sit back, relax, and wait for the next step. 🍹

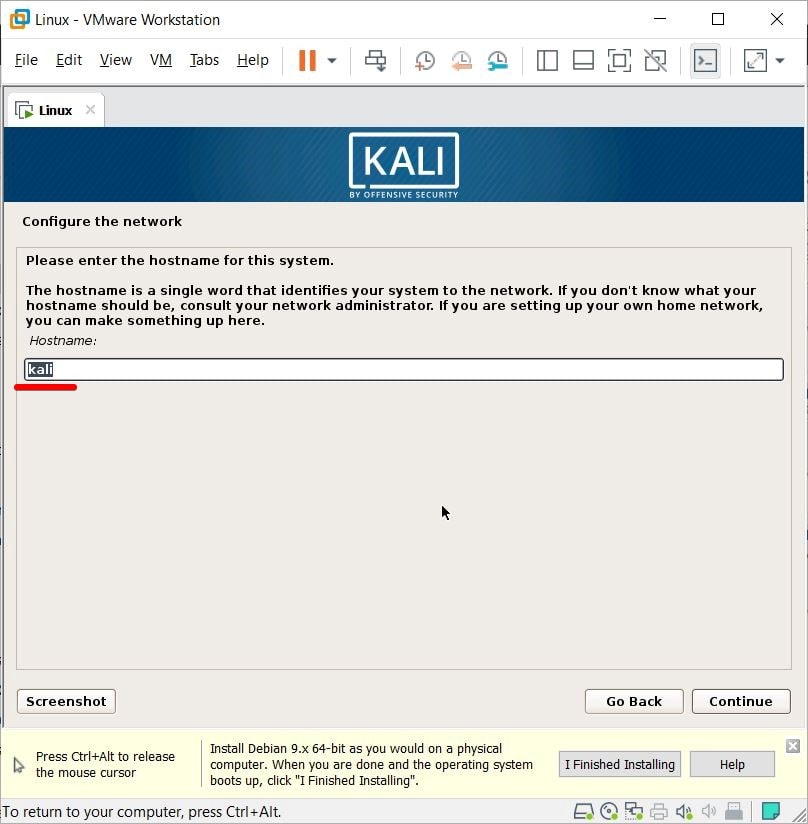
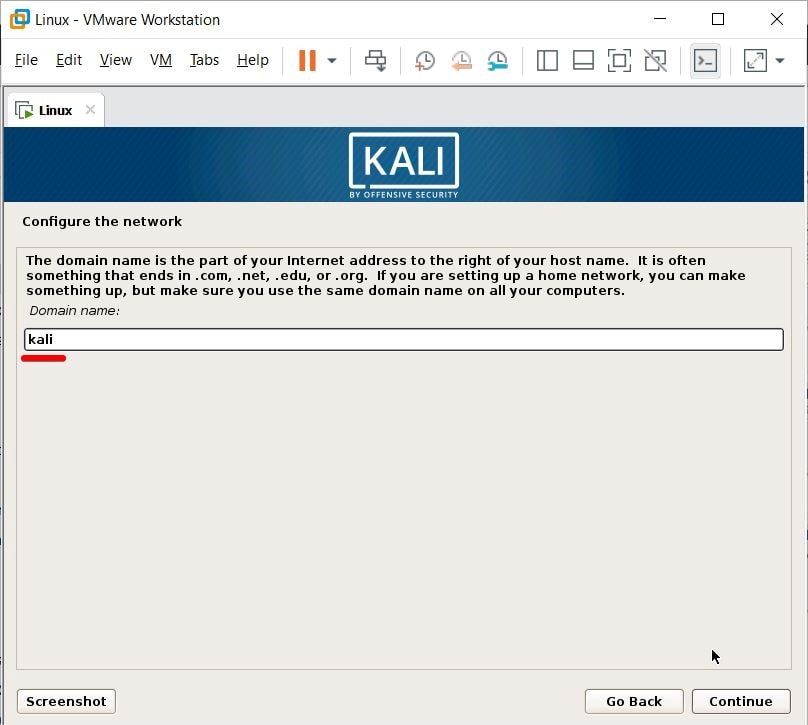
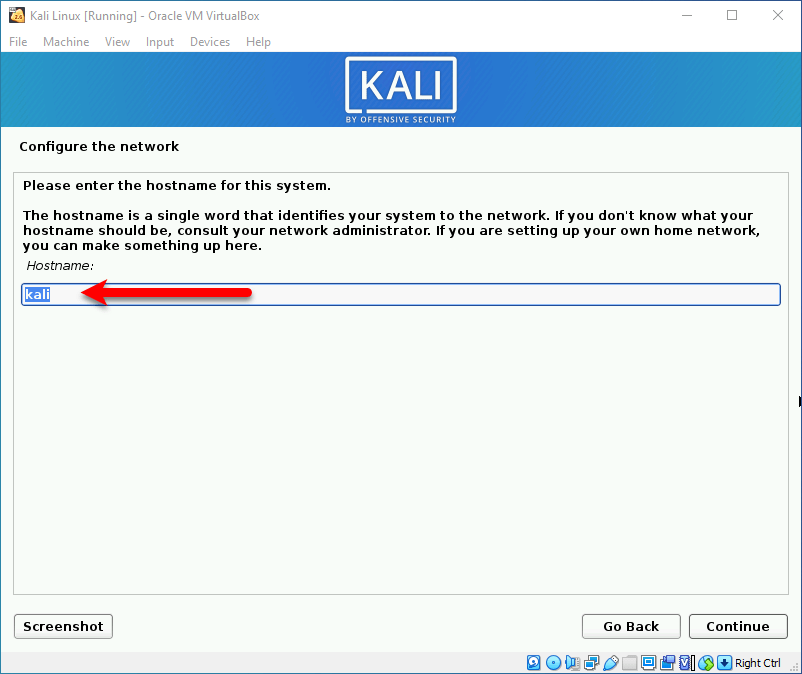
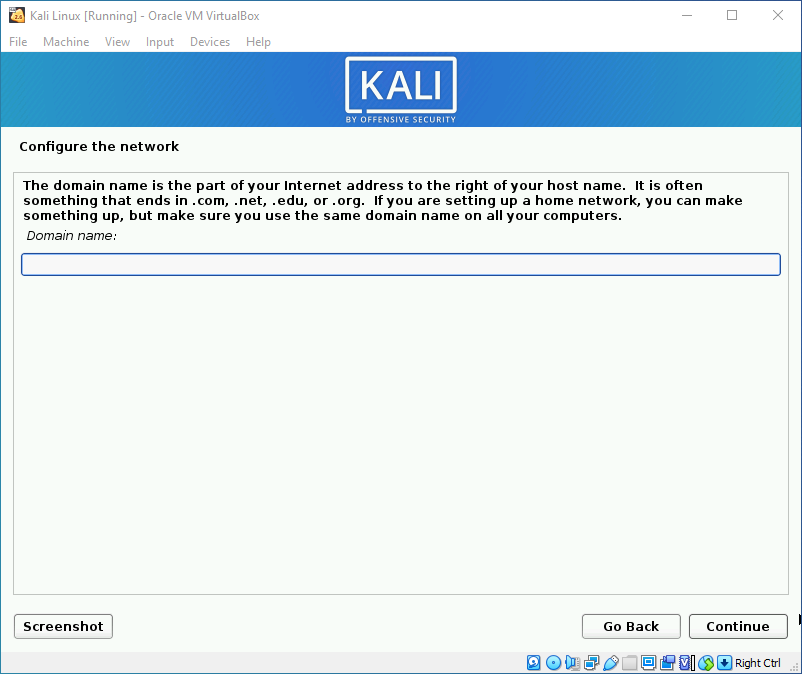
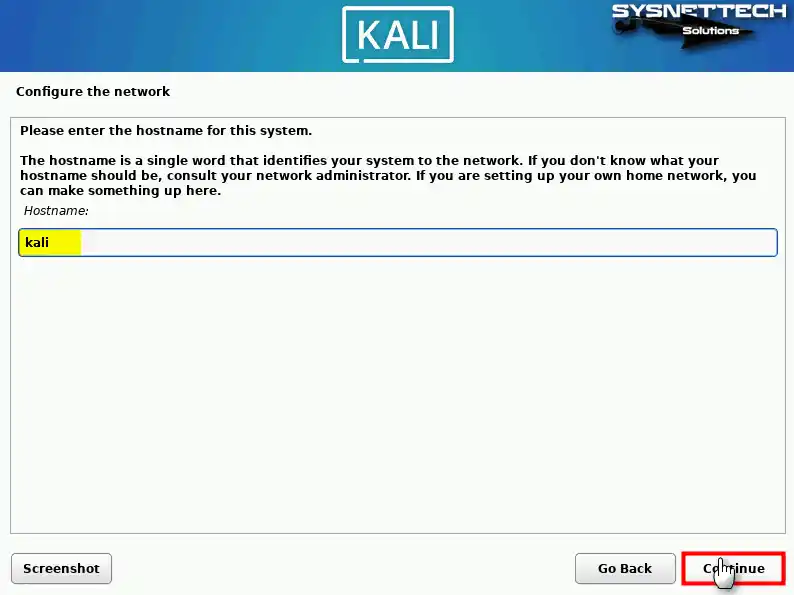
Configure the network
I’d go with the default kali hostname.

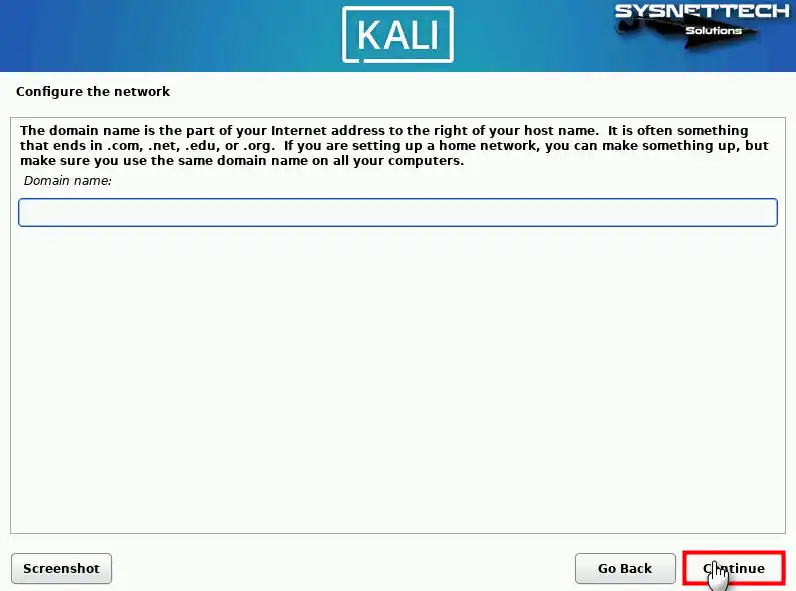
I choose neutron as the domain name.

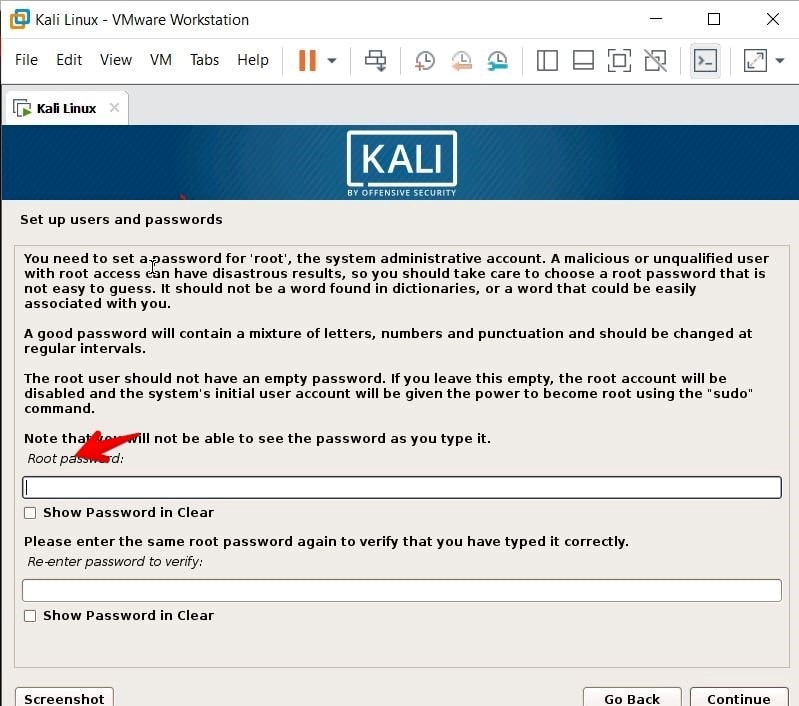
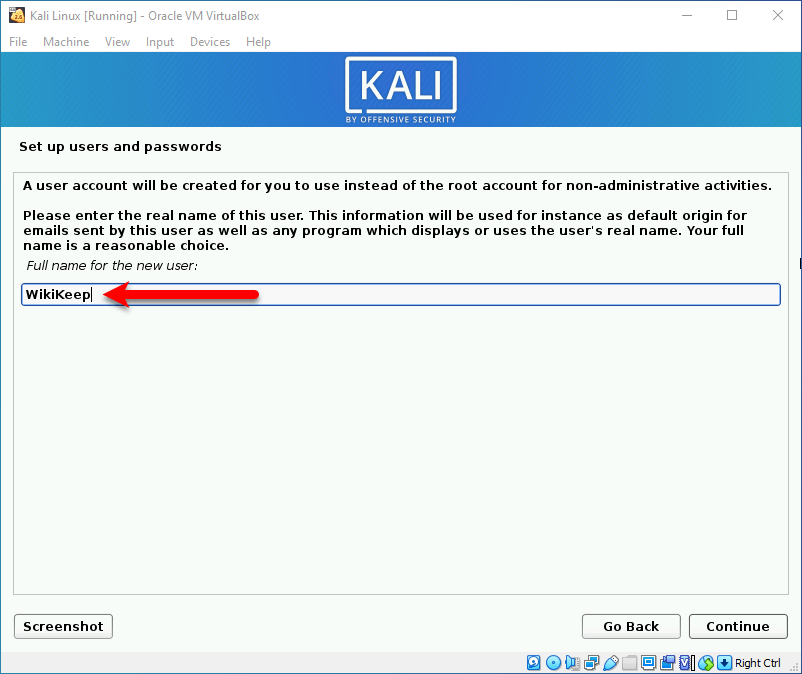
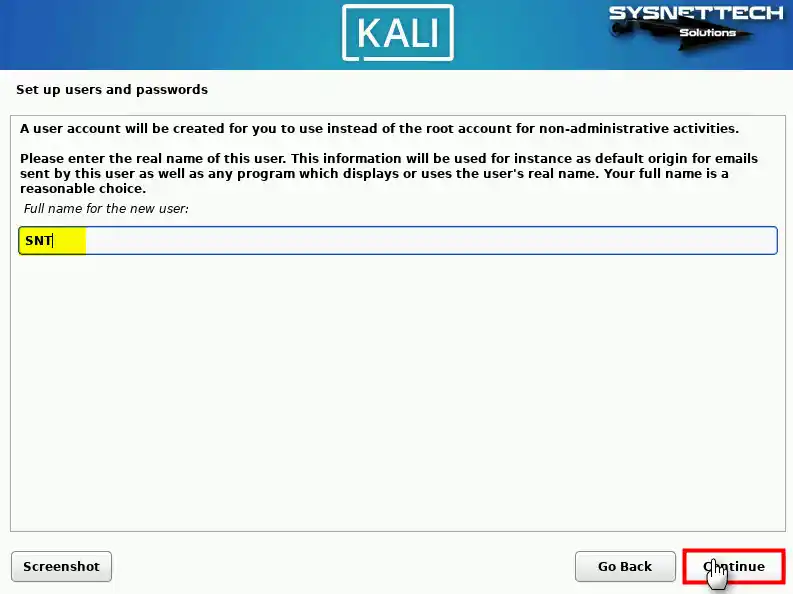
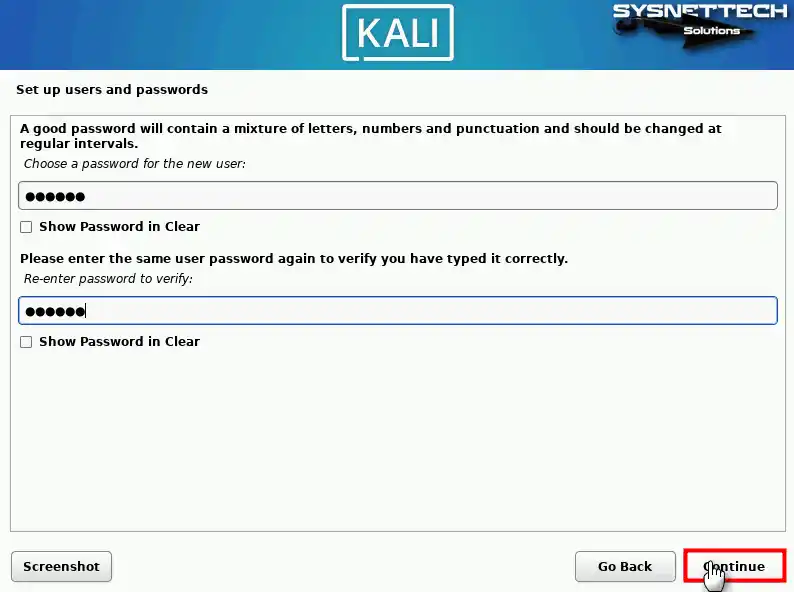
Next up you’ll have to create the user account for the operating system.
Choose a name for the new user.

Choose a username.

Choose a good password.
Kali will ask for the password every time you boot it up.

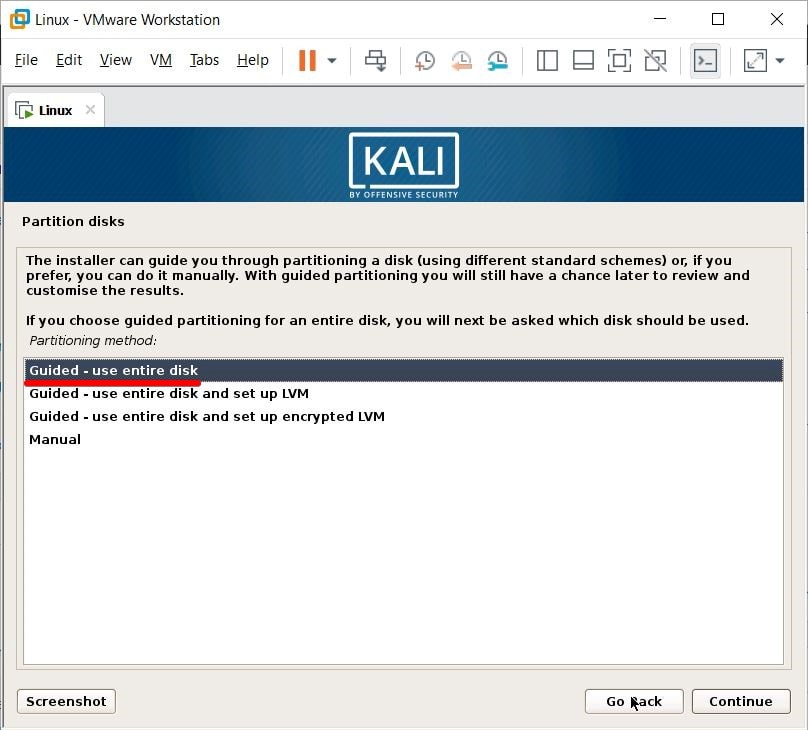
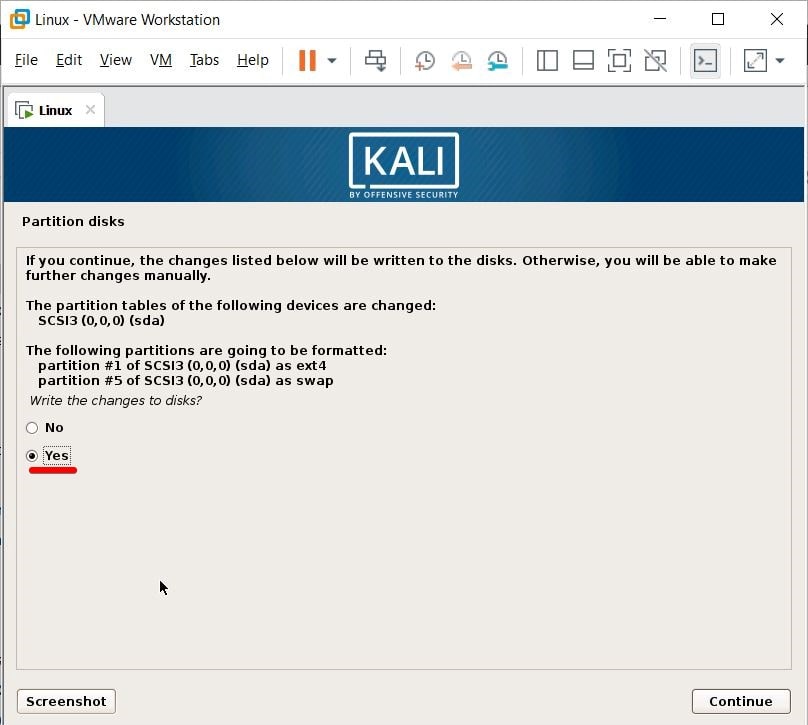
Partition disks
Select the Guided – use entire disk option.

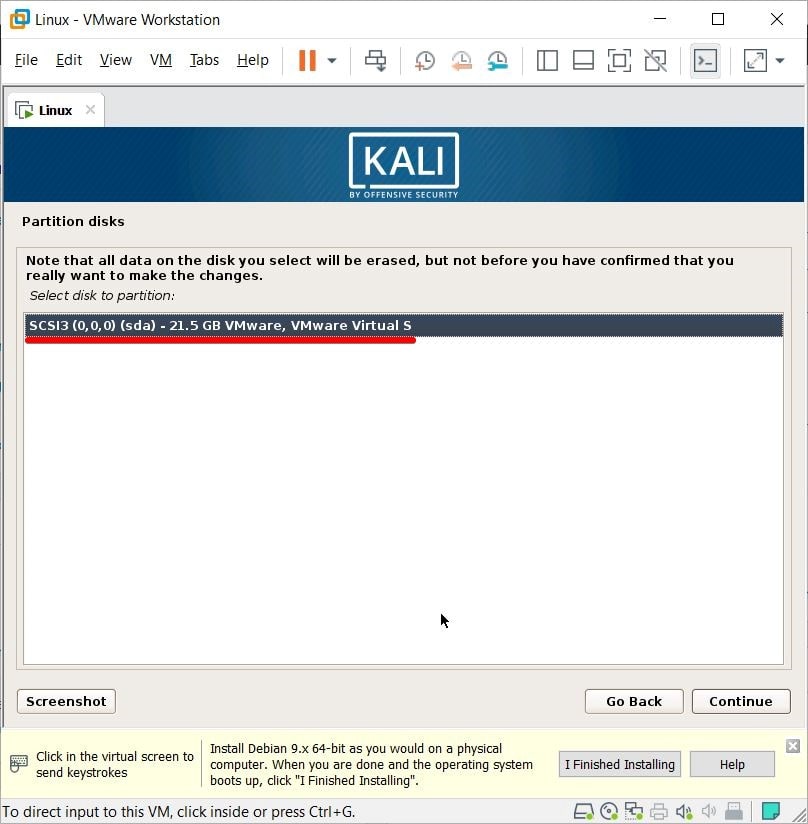
Select the disk we created earlier.

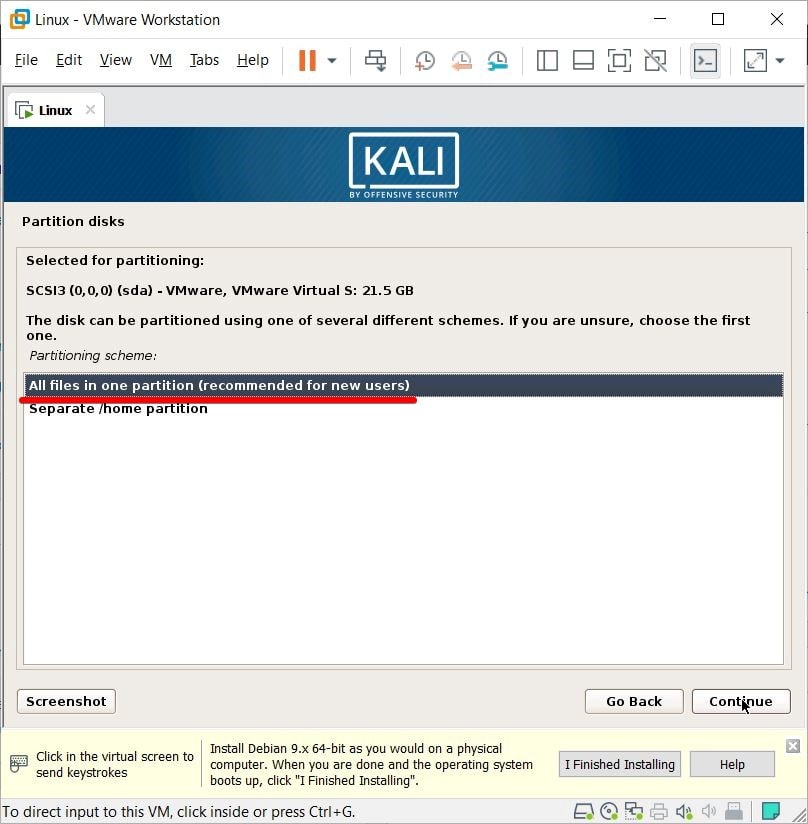
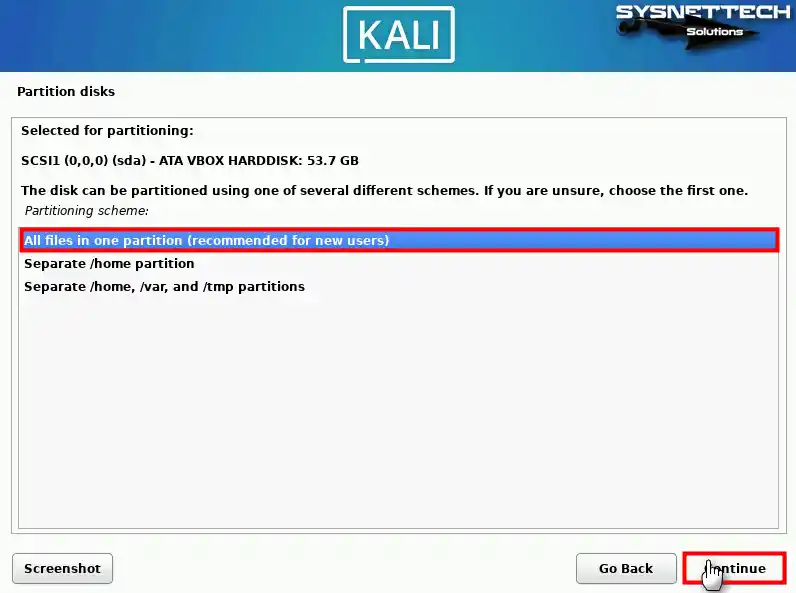
Choose disk partitioning
Depending on your needs, you can choose to keep all your files in a single partition or to have separate partitions.
If you’re not sure which you want, go with All files in one partition.

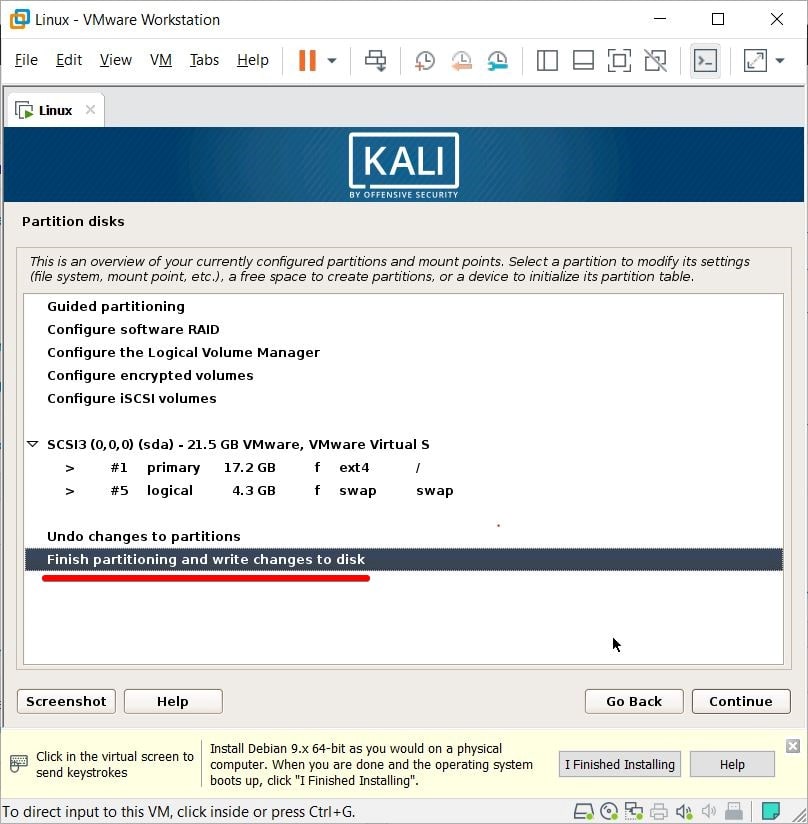
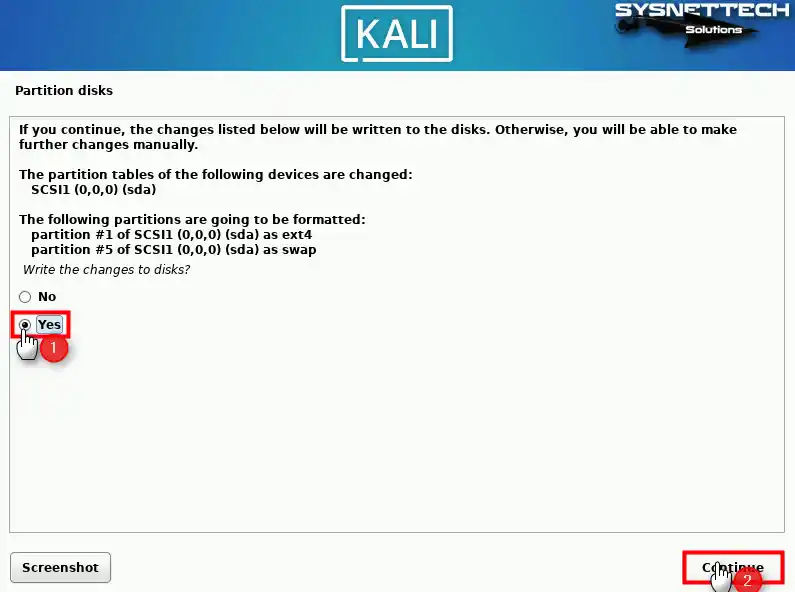
Next, you have one last chance to review your disk configuration before the installer makes irreversible changes.

Write the changes to disks?
Select Yes and click Continue.

After that, the installation will take several minutes.
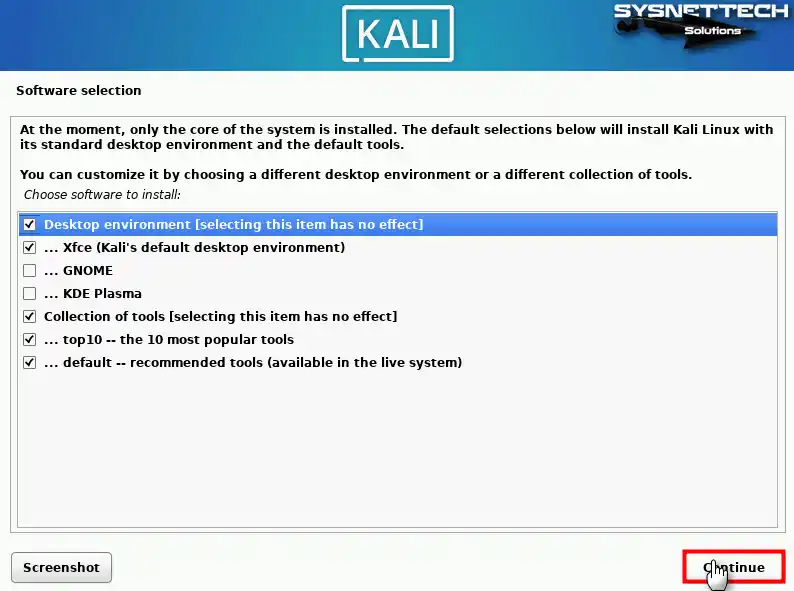
Once the core of the system is installed, a new window will pop up asking you to select a collection of tools.
I’d go with the ones selected by default but feel free to install everything you need.
The more thing you select to install at this point will make the installation last a bit more.

Configuring gub-pc
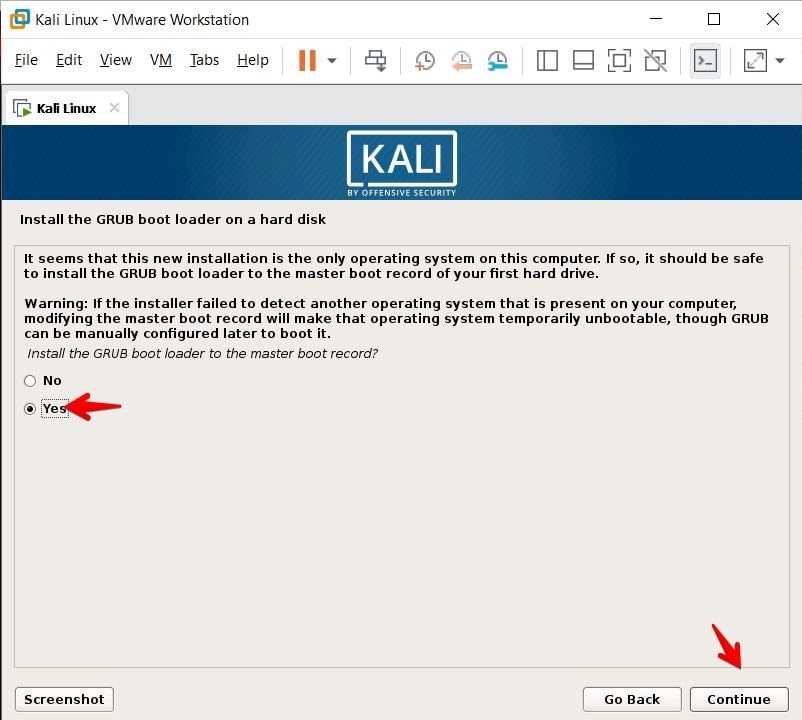
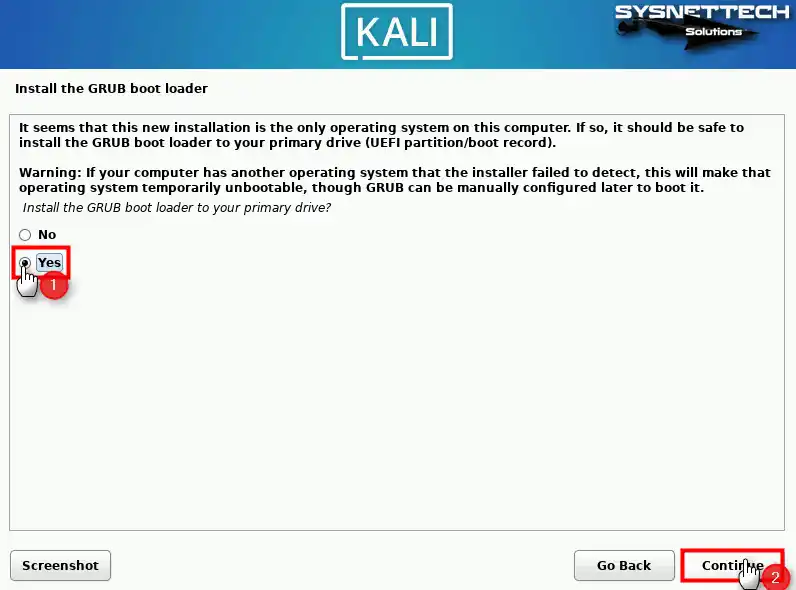
It is important to install the GRUB boot loader.
Select Yes and then press Continue.

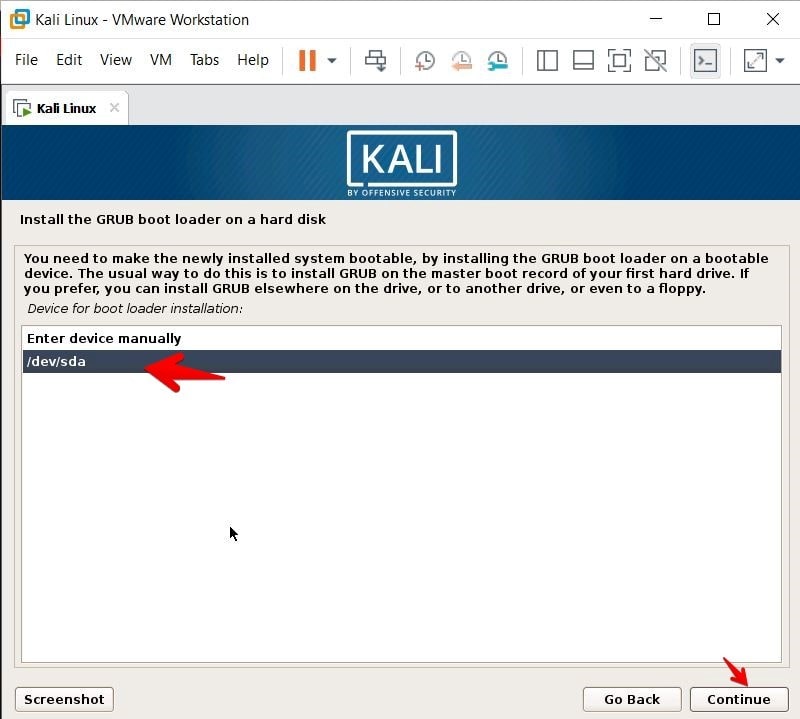
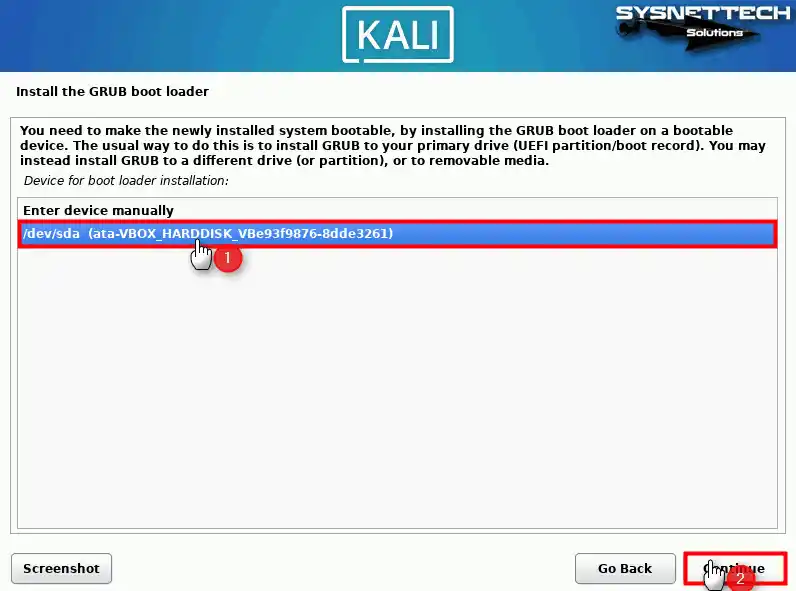
Then select the primary drive to install the GRUB boot loader.

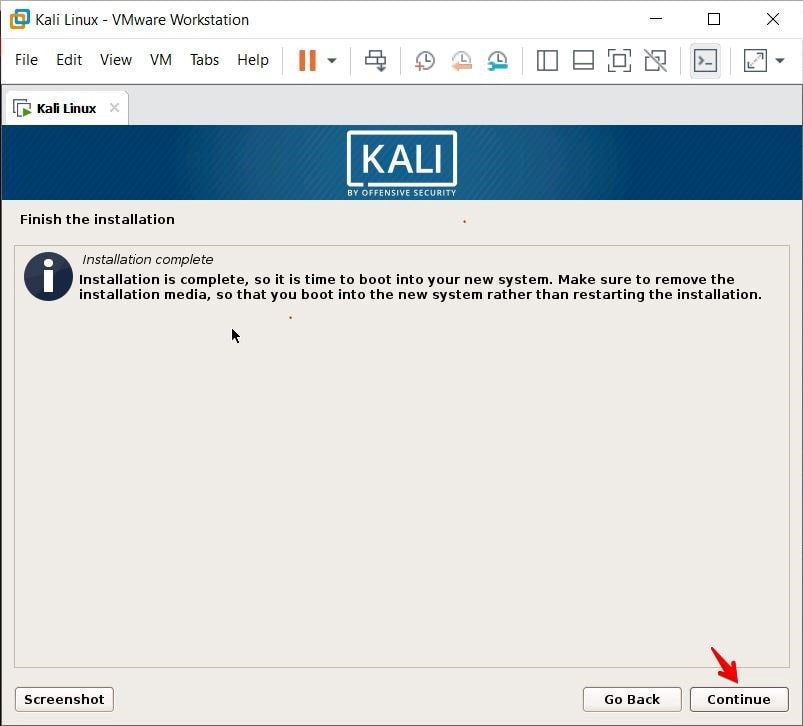
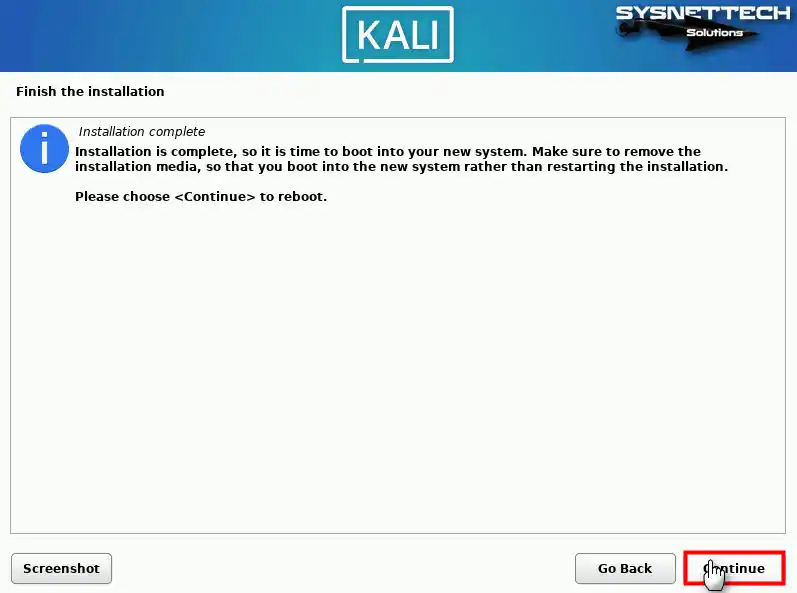
Finally, finish the installation
At this point, the installation is complete and you have to reboot your virtual machine.
Just press Continue and wait for the system to reboot.


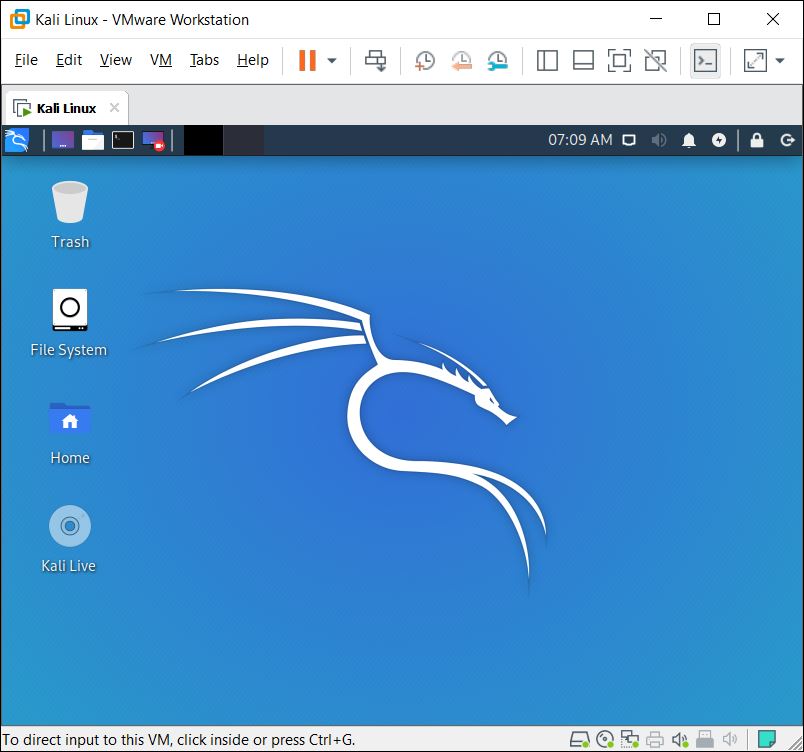
Enter your username and password and you’re in!

Welcome to your new Kali Linux desktop!

Let’s now resize the window resolution to look much better.
Press (right) CTRL + C twice.
Your window should look like this.

You’re all set!
Enjoy your new Kali Linux! 🐉
Let me know what you think about this article in the comments section below.
If you find this article helpful, please share it with others and subscribe to the blog to support me, and receive a bi-monthly-ish e-mail notification on my latest articles.
how to install Kali Linux on VMware workstation 15, how to install kali Linux on VMware 2019, how to install kali linux on vmware fusion, how to install kali linux in VMWare workstation 14, how to install kali linux in vmware workstation 15 pro, can’t install kali linux on VMware, how to install vmware tools in kali linux 2018, how to install kali linux in vmware workstation 15 player. Kali Linux mostly used by Hackers is developed by Offensive Security. With Kali Linux, you can do Penetration Testing, Vulnerability Scanning, and Security Audit. Kali is a Debian based Linux operating system. The main reason for the creation of kali is for digital forensics and penetration testing. It has lots of penetration testing programs like Armitage, NAMP, Wireshark, etcetera. Maximum packages that Kali is having are imported from some Debian Repos. If you are a beginner to Linux OS, I recommend starting with Ubuntu which is for development purposes or with RedHat Linux. In this post, I’ll show how to install Kali Linux on VMware or VirtualBox on Windows 10 PC.
- Related: How to Reset Forgotten Password of Kali Linux
No, it’s not like that. Kali just helps you in creating a path to enter some other host. To install Kali Linux for practice instead of dual booting your PC, we’re here. In this tutorial, you will learn how to install Kali Linux on VMware or VirtualBox on Windows 10 PC.
- More than 600 penetration testing tools included
- Free (as in beer) and always will be
- Open source Git tree
- FHS compliant
- Wide-ranging wireless device support
- Custom kernel, patched for injection
- Developed in a secure environment
- GPG signed packages and repositories
- Multi-language support
- Completely customizable
- ARMEL and ARMHF support
Related: Install macOS Catalina on VMware on Windows PC
Table of Contents
Install Kali Linux on VMware or VirtualBox on Windows 10 PC
Download Kali Linux ISO Image
First, off Download the Kali Linux ISO image file from the official site of Kali Linux. You may have many different versions of Kali Linux so go for the first one as mentioned below in the screenshot. You can directly download it from here: Download Kali Linux for Virtualbox & VMWare
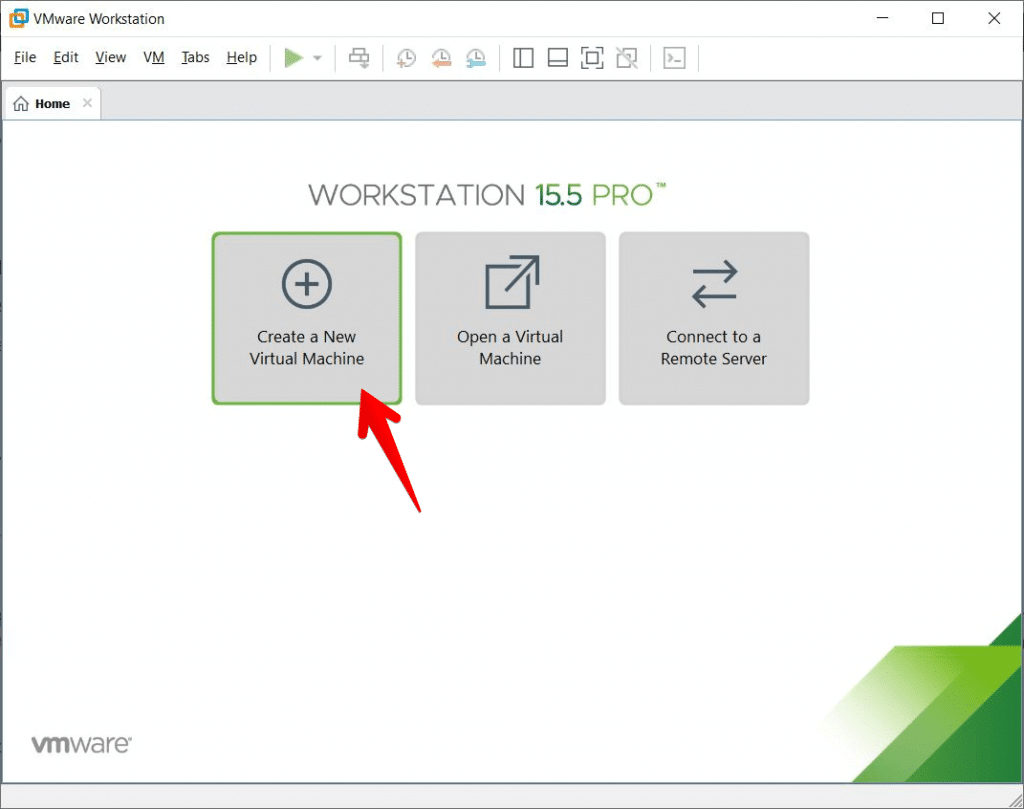
Create a New Virtual Machine on VMware
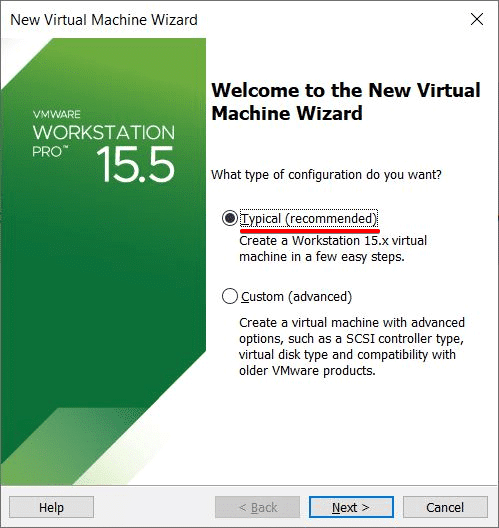
Go ahead and start how to install Kali Linux on VMware or VirtualBox on Windows 10 PC. First, open VMware Workstation player, then click on Create a New Virtual Machine as shown below.
When the wizard opened, click on Typical (recommended) then click Next.
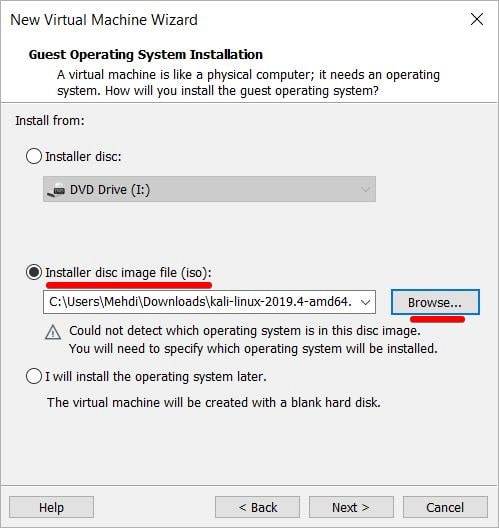
On the Guest Operating System Installation, select Installer Disc Image File (ISO). After that, click Browse and choose the Kali Linux ISO file then click Next .
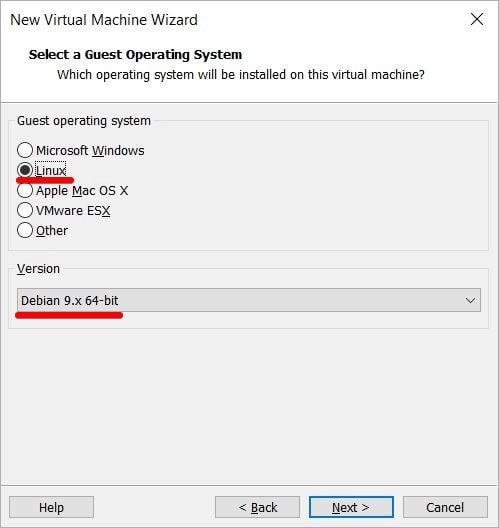
On the next window, select Linux for the operating system and Debian 9.x 64-bit for the version. Then hit Next.
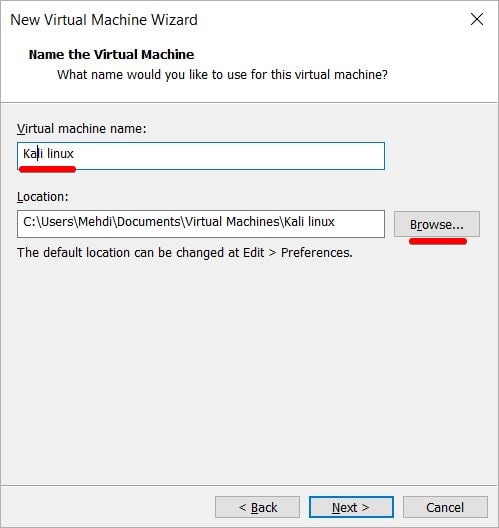
Name the virtual machine, choose a location for it then click Next.
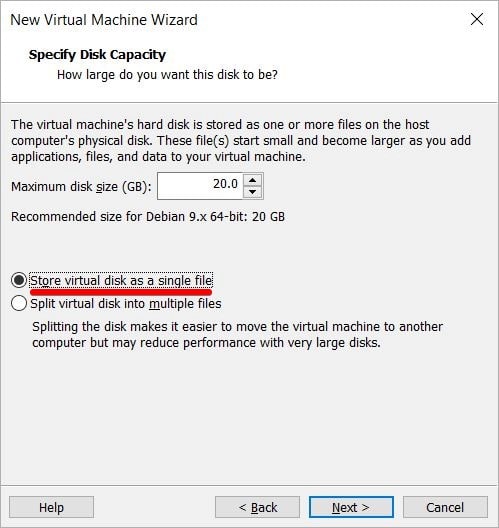
For the disk capacity, assign 20 or 25 GB. Then select Store virtual disk as a single file. Then click Next.
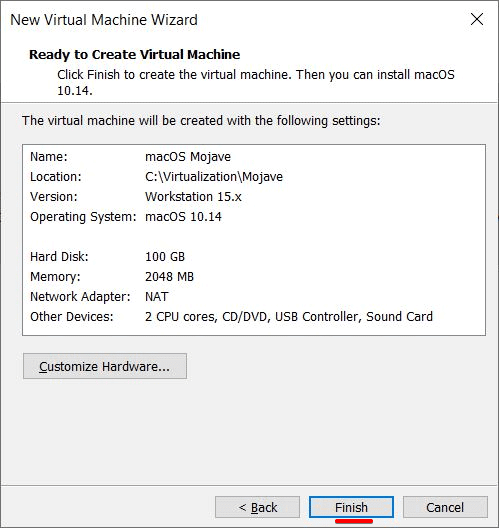
When done, click Finish.
Edit Virtual Machine Settings on VMware
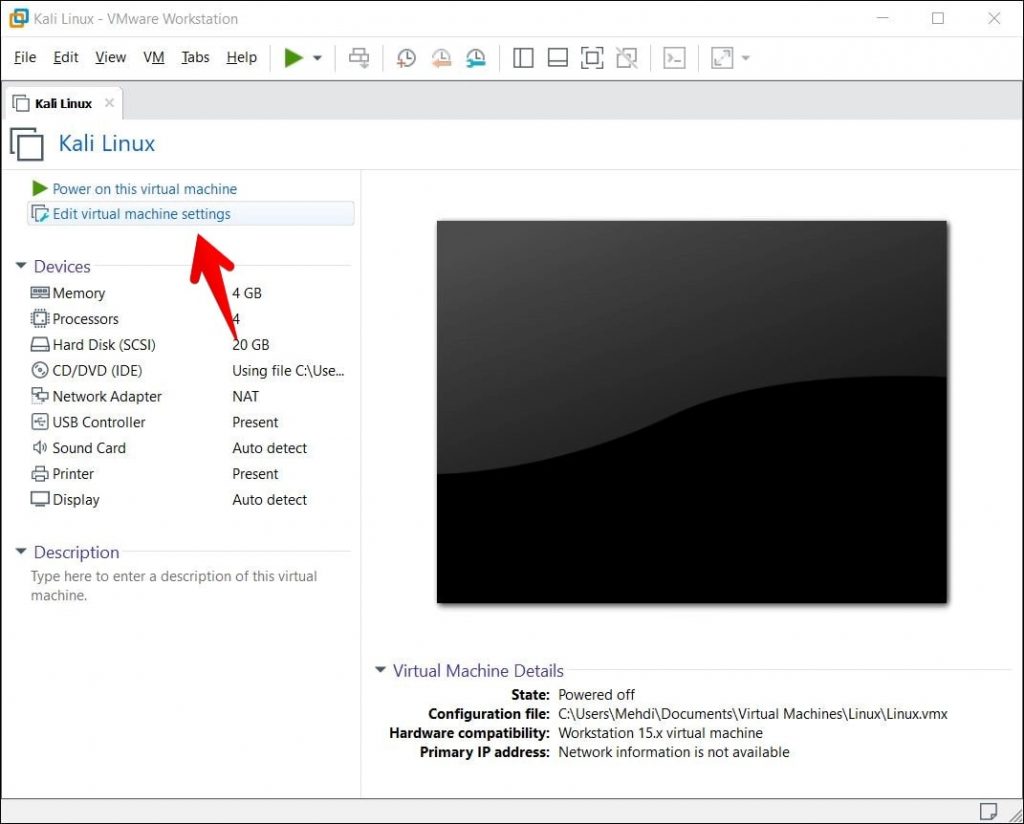
Now proceed with how to install Kali Linux on VMware or VirtualBox on Windows 10 PC. Goto VMware and click Edit Virtual Machine Settings on Kali Linux.
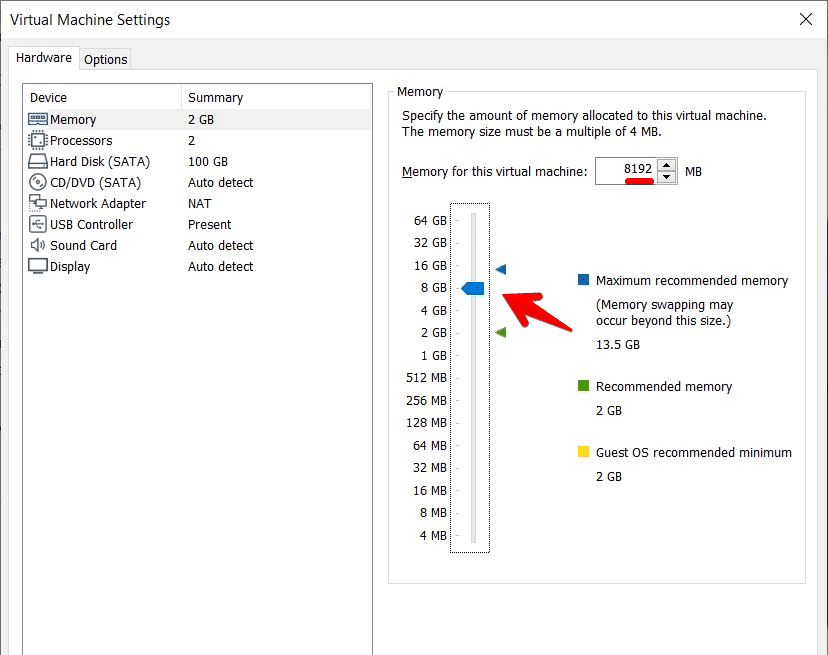
Allocate RAM for your Kali Linux OS. If you have installed 4 GB RAM than set 2 GB, 4 GB if you have 8 GB Ram and 8 GB if you have 16 GB.
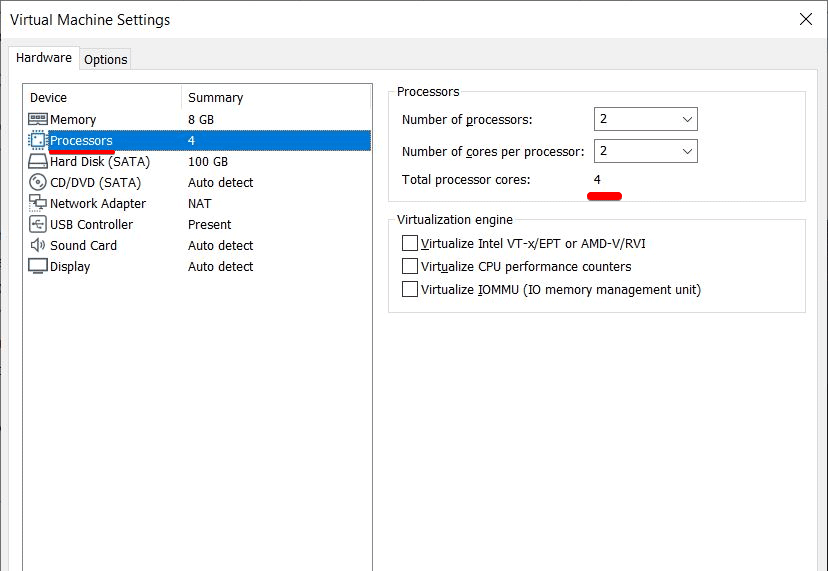
Click the Processors tab, from the left side menu, increase the number of processors to 4 and click OK.
Here you go .The Virtual machine is now set.
Create Virtual Machine on VirtualBox
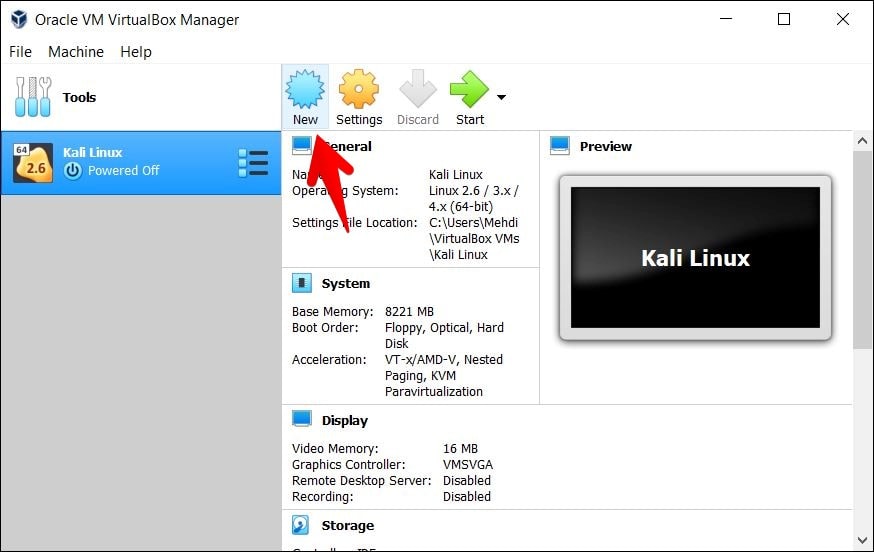
Open your Virtual Box Manager. Click on the new button to create new Virtual Machine.
Set the name of Virtual Machine as you desire.The type and version option is set automatically and choose the machine folder in which you want to store Kali Linux.
Set the amount of memory RAM in megabytes to be allocated the virtual machine. Allocate more than 2GB ..
Create a virtual hard disk now.
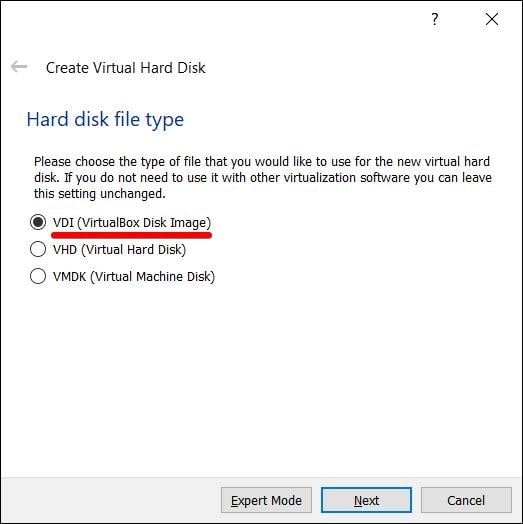
Leave selected VDI (VirtualBox Disk Image ) and click Next.
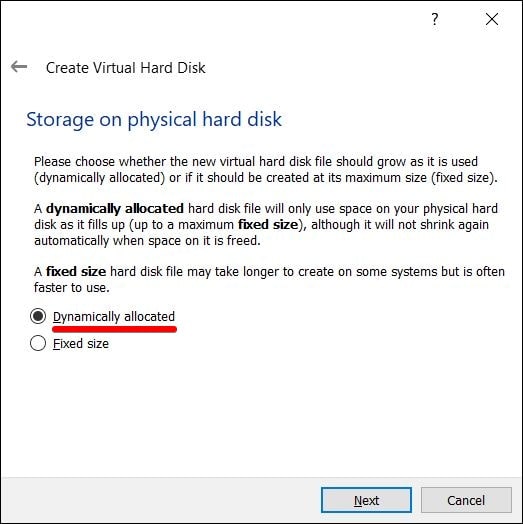
Select the option Dynamically allocated and click Next.
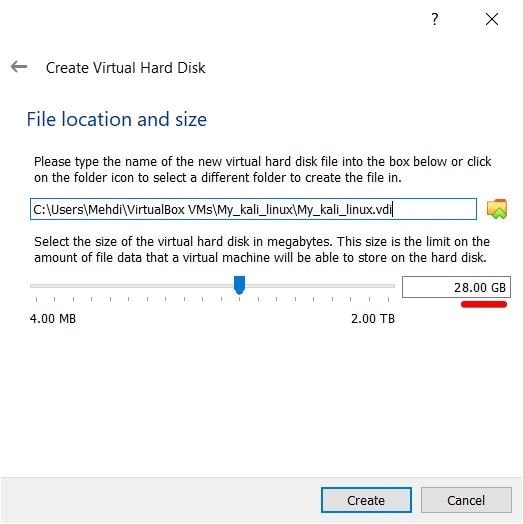
Choose the disk location, set the amount disk to 20 GB which will automatically reduce 20 GB from your selected disk and click Create .
The virtual machine is now created . Click Settings as shown below.

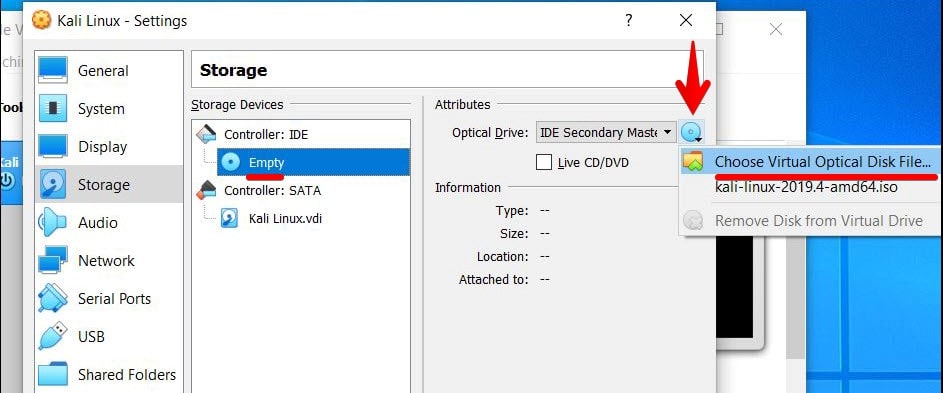
In the left side of settings window , click on the Storage tab .The list of storage devices appears in the middle of window then click on the empty. Choose the icon (looks like CD) at the right side of window the list of options appears then select option, choose virtual optical disk as shown below.
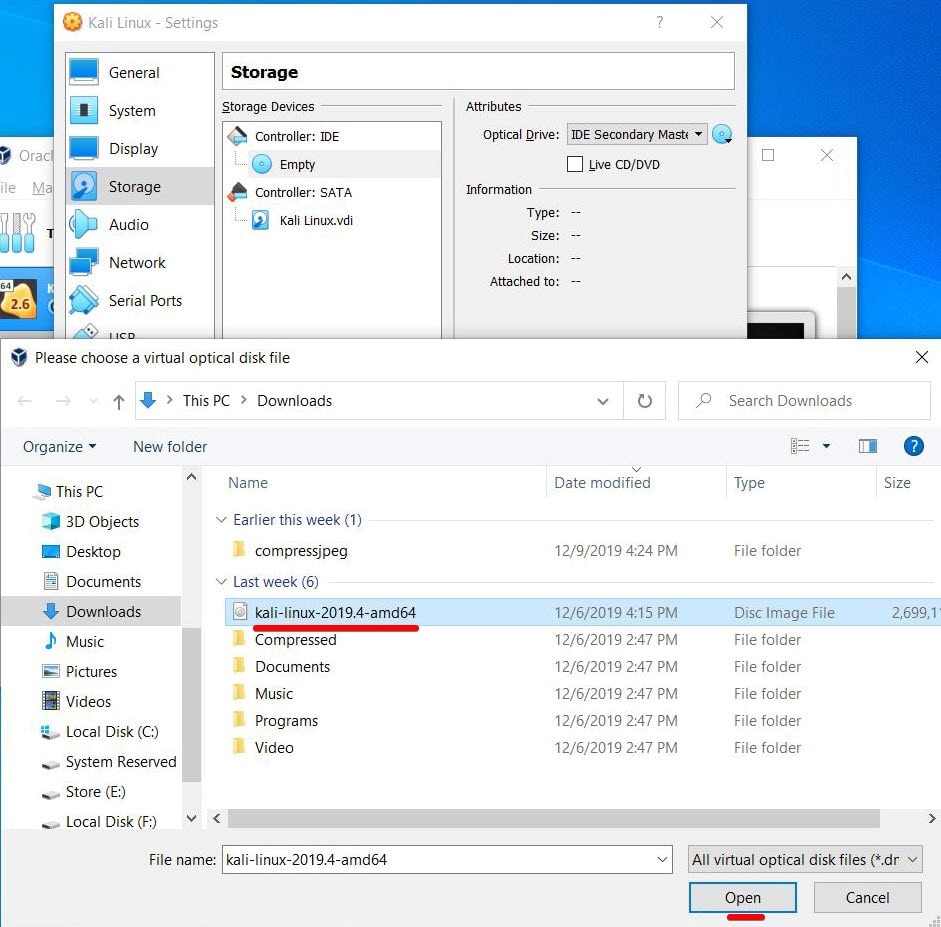
Select the Kali Linux ISO image file that you had downloaded, and click open.
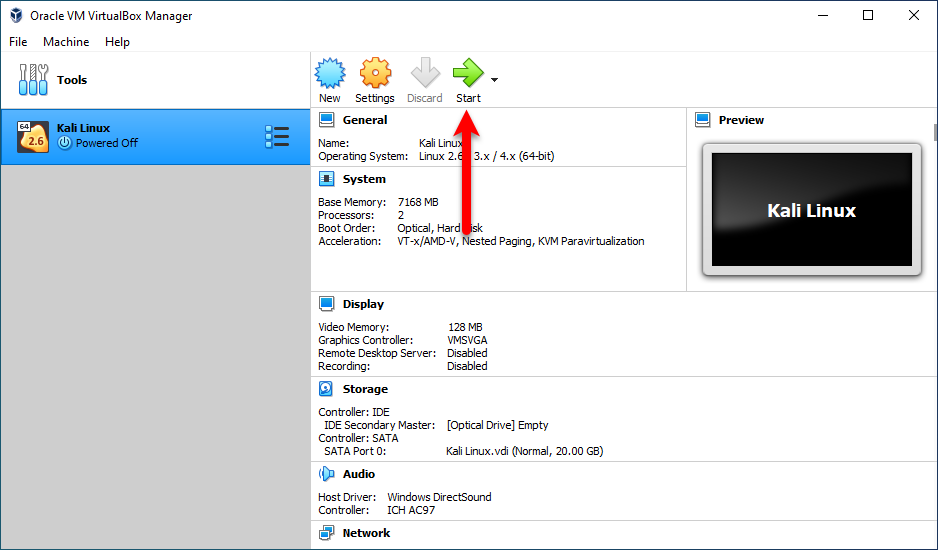
Click Start.
Next up, head over to another step of how to install Kali Linux on VMware or VirtualBox on Windows 10 PC. The installation process of Kali Linux on VMware and VirtualBox are the same.
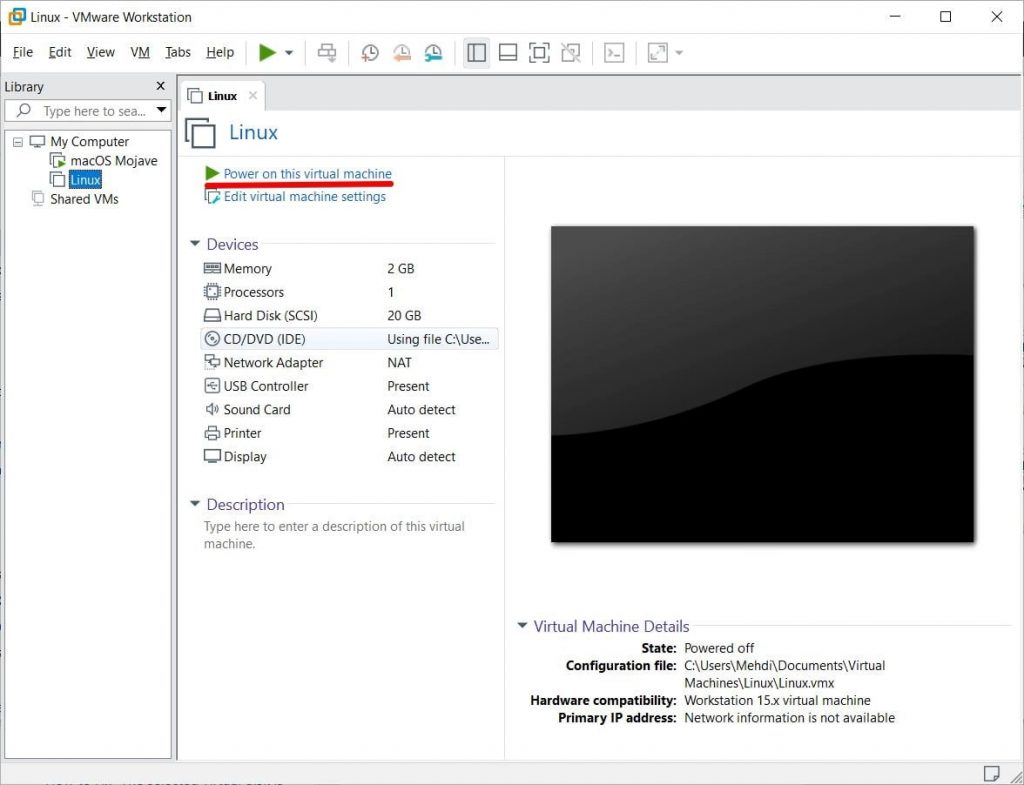
Now it’s time to install Kali Linux so click the button Power on this Virtual Machine.
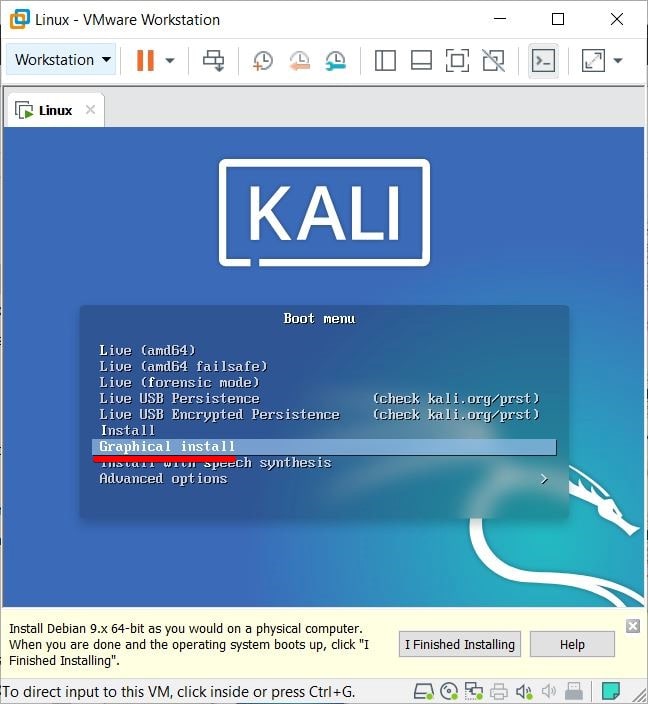
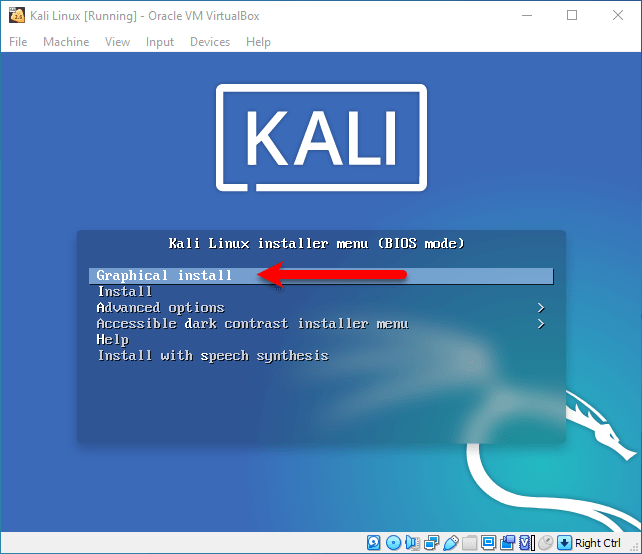
The installation option Interface appears as below so click on Graphical Install.
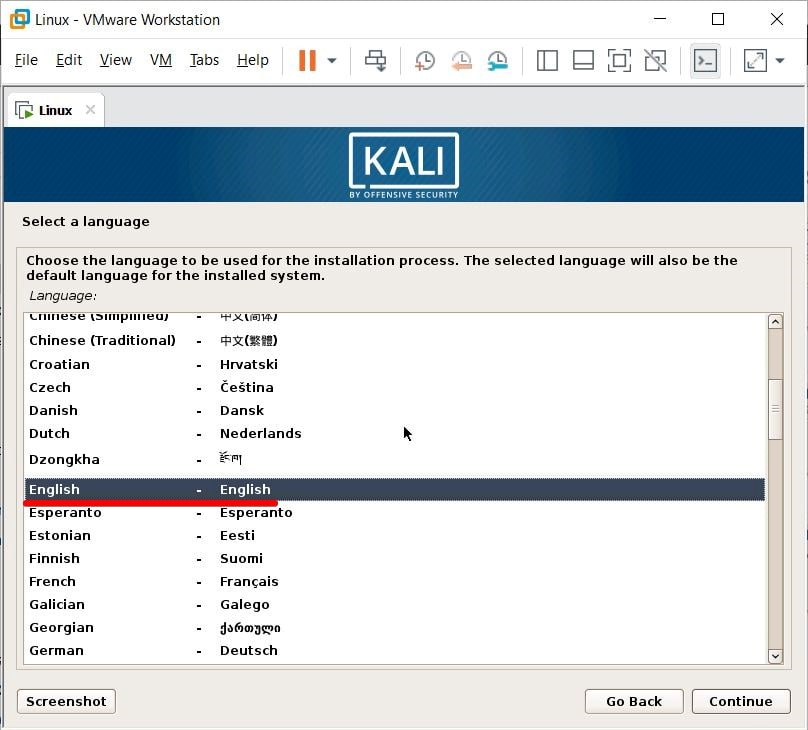
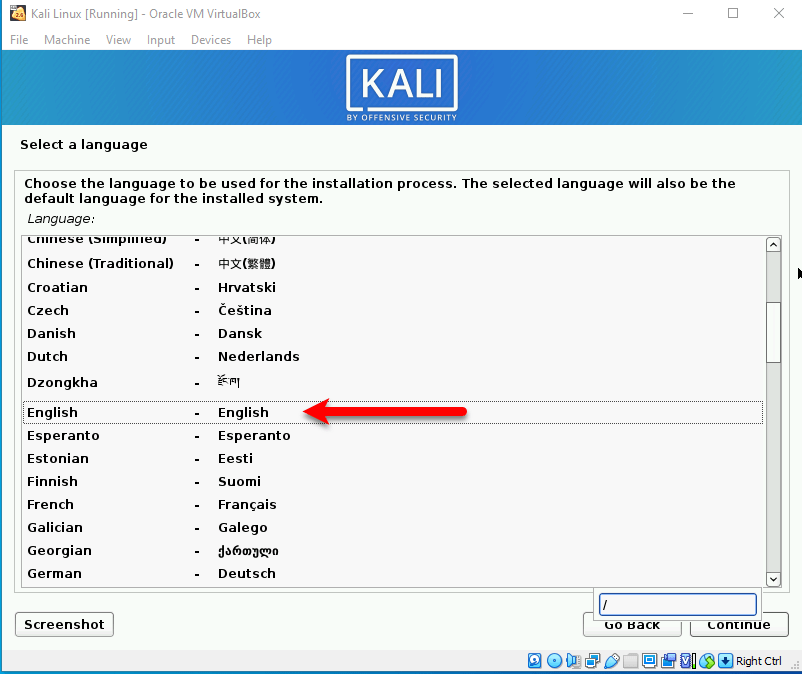
Choose you language and click Continue.
Name your desired Host Name and click Continue.
Leave the Domain Name empty and click Continue.
Enter your own password that will be required for signing in to the Linux and click Continue.
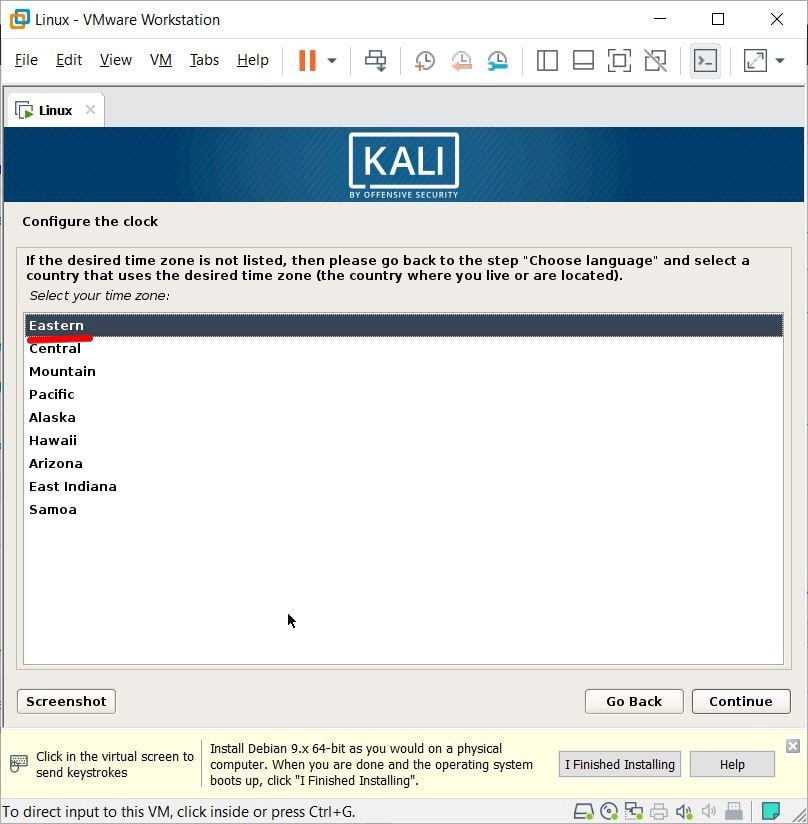
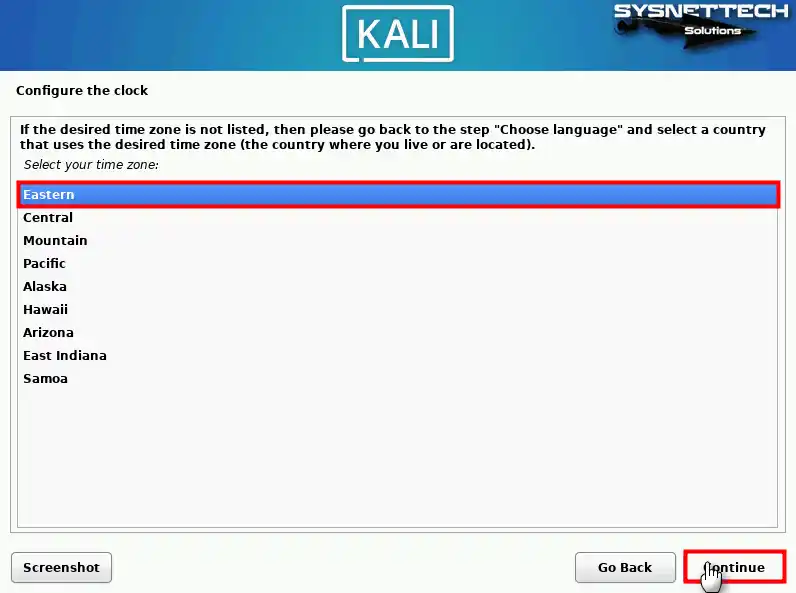
In this step, set the time zone according to your geography and Continue.
Now select Guided – use entire disk and Continue.
Next up, select SCSI3 (0,0,0) (sda) – 21.5GB VMware, VMware Virtual and Continue.
On this screen, select All files in one partition (recommended for new users) and Continue.
At this window, select Finish partitioning and write changes to disk and click Continue.
For partition disks, select the Yes option and click Continue.
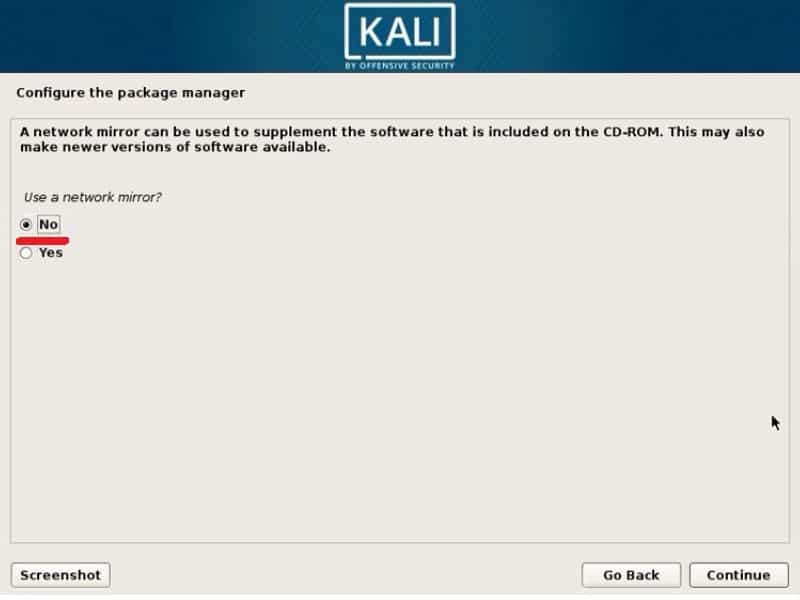
Hit No and Continue.
Accept it by clicking on Yes and Continue.
Select “/dev/sda” and Continue.
That’s all and click Continue to finish the installation.
All done, here you go. Enter the default user name “root”. The password is the password that you set during the installation so simply enter it.
That was how to install Kali Linux on VMware or VirtualBox on Windows 10 PC.
Enjoy hacking!.
Kali Linux knows as BackTrack operating system in the past based on Debian for network security. Also, Kali Linux mostly nowadays the users are using for penetrating tests. The professional hackers currently in touch with Kali Linux operating system. Indeed Kali Linux is one of the best and safe operating systems in the world. In fact, Kali Linux is using for the country sever security, to keep there file documents safe out of the hackers. However, Kali Linux over 600 million Pre-installed penetration-testing programs, as it is used currently one of the best-operating systems for security.
So, it is the world of virtualization lets test it out on Virtual machine platform that known VirtualBox. Do you have information about VirtualBox? VirtualBox is an open-source platform in which you can test any kind of operating system on it. The procedure is pretty easy everyone can do it. For this procedure, you need a better computer environment where you have to test it. Take it out which kind of hardware accessories you need to install Kali Linux on VirtualBox on Windows 10 PC.
Before getting started on how to install Kali Linux on Windows 10 using VirtualBox. You need some important things to know about that. The first one is your computer requirements. The second one is the Kali Linux Image. The third one is VirtualBox platform software where you have to perform a clean installation of it on your Windows 10 PC.
- How to Dual Boot Kali Linux with Windows 10 on a single SSD Drive
- Install Kali Linux 2020 on Windows 10 using VMware Workstation
System Requirements:
- 4GB of RAM for Better performance
- 20GB of Hard Disk capacity
- 2GHz core processors
- Nvidia or AMD graphics card (Must)
- Kali Linux ISO file
- VirtualBox or VMware Workstation
Step 1. Install VirtualBox
You can download VirtualBox from its official website VirtualBox.org. Once the software downloaded go ahead and perform a clean installation.
- Double-click to launch the setup file
- When the installation wizard opened simply click Next.
- Specify the location where you want to install VirtualBox.
- If you want to create a shortcut on the Windows start menu, or desktop check the box.
- On the next screen again click next
- Now VirtualBox is ready to install, so click Install option.
- Wait until the installation should be completed, when the installation is done click Finish.
Step 2. Create Virtual Machine for Kali Linux
Once the installation of VirtualBox is successfully done on Windows 10 PC. Then go ahead create a Virtual Machine.
Open up the VirtualBox, on the VirtualBox screen click on the “New” option.
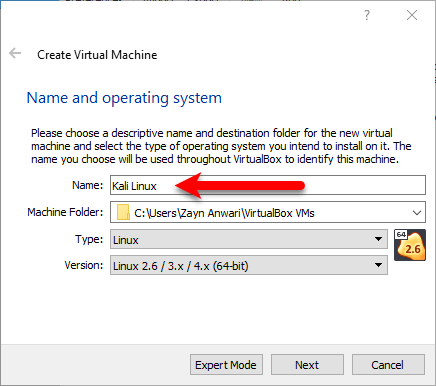
Type “Kali Linux”, here it will automatically detect the “Type” and “Version” of Linux then click next.
Increase the Memory Size and click next.
Select the option “Create a virtual hard disk now” and click next.
Choose a Hard disk file type so the recommend type is “VDI (VirtualBox disk image”.
Select the option “Dynamically allocated” option for Storage on the physical hard disk.
Select the hard disk capacity for Kali Linux, and manage the location where you want to install it.

Step 3. Configure the settings for Kali Linux
For better performance of Kali Linux on VirtualBox, you need to bring some changes to the settings. So, to do that simply click “Settings”.
On the setting window, select the “System” from left-handed. On the motherboard option uncheck the “Floppy disk”.
Navigate to the “Processor” tab and increase the size of the processor.
Now select the “Display” tab, then select “Screen” and increase the size of Video Memory.
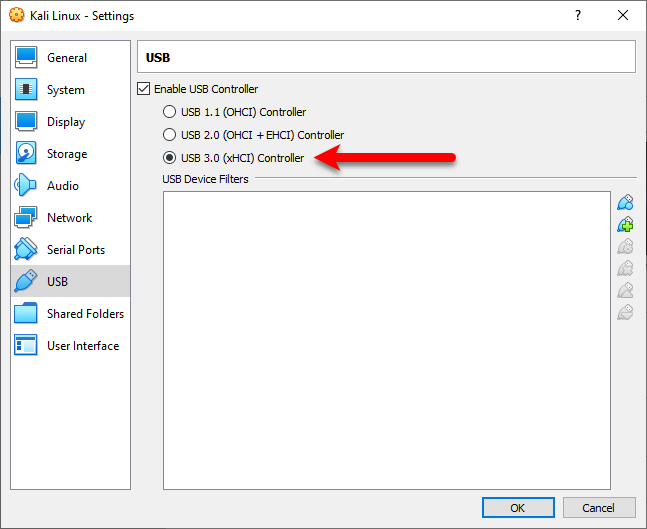
Select below down the “USB” option, and select “USB 3.0 (xHCI) Controller. Once the settings cleared click OK to save changes.
Step 4. Install Kali Linux on Windows 10 using VirtualBox
When the VirtualBox installation completed, and you have created a new virtual machine for Kali Linux. After that, the configuration successfully is done, then its time to install Kali Linux on VirtualBox on Windows 10 PC. Remember that follow each of the following the guidance of installation. Otherwise, you will face any issue during the installation process.
So, once everything is up on VirtualBox click the “Start” button to start up.
On the welcome screen of Kali Linux select “Graphical Install”.
Select your input language and click continue.
Choose your country where you live and click continue.
Please enter the hostname for this system. The hostname is a single word that identifies your system to the network. If you don’t know what your hostname should be, consult your network administrator. If you are setting up your own home network, you can make something up here. However, it will detect the hostname automatically but you can enter your favorite hostname too. Once the hostname entered click continue.
Configure the network, the domain name is the part of your internet address to the right of your hostname. I recommend you to leave it empty and click continue.
Set up your user and password, a user account will be created for you to use instead of the root account for non-administrative activities. The user name is optional you can enter anything you want and click continue.
- If you are installing Kali Linux on your actual computer, then you have to enter a heavy password. On the other hand, for testing on the Virtualization platform, it doesn’t matter whether you should enter a heavy password or not.
- When you approached the next screen select there “Guided – use entire Disk” then click continue.
- In this window, select “All files in one partition (Recommended for new users), then click continue.
- Select “Finish partitioning and write changes to disks” and click continue.
- If you continue, the changes listed below will be written to the disks. Otherwise, you will be able to make further changes manually. So, if you want to make changes to disk select (YES) and click continue.
- Wait until the base system installation should be completed.
- On the next screen, the recommended software will be installed automatically.
- Once the installation completed the Virtual machine will restart automatically. When you back to Kali Linux enter your password and hit enter.
Step 5. Fix Kali Linux Screen Resolution on VirtualBox
Once the installation completed, then the only thing is remaining. That is entering the full-screen resolution of Kali Linux on VirtualBox. There is a small tool that you download from VirtualBox.org. That called “Guest Tool”, insert the guest and complete the installation to enter the full-screen resolution.
That’s it if you faced any kind of problems then feel free to share with me below in the comment section.
This article will set up and configure Kali Linux 2024 on a new virtual machine using the Oracle VM VirtualBox virtualization program. This will enable you to create virtual machines and run and use Windows, Linux, or macOS systems virtually on your Windows 10 64 Bit or Windows 11 operating system computer. Following the stages abstracted in this article, you can start with Kali Linux and begin exploring its many features and capabilities.

How to Set Up Kali Linux 2024 on a New Virtual Machine using Oracle VM VirtualBox on Windows 11 & 10
Kali Linux is a distribution widely preferred by people who want to improve themselves in cybersecurity. This is because it includes various software, mainly related to the system and network security, for free.
Using this software, users can analyze system security vulnerabilities in their home or corporate network and take measures to ensure information security.
Kali distribution is not only used in the field of cybersecurity. It can also be preferred over Microsoft’s Windows system on personal computers, so users can have multiple powerful tools.
Suppose you find the need for an alternative operating system, like Windows 10, on your Kali PC. In this instance, you can build a dual-boot structure. This will allow you to have both systems on your physical computer. However, switching between them will always require a computer restart.
You can utilize virtualization programs like VMware or VirtualBox on your host machine. This lets you run the preferred active system on a virtual machine without restarting your computer.
How to Create a New VM for Kali Linux
After installing Oracle VM VirtualBox on your Windows 10 computer, you can create a new virtual pc for Kali or other Linux distributions with simple steps.
Step 1
After running the VirtualBox program, click the New icon in the tool menu and open the virtual machine creation wizard. When you type the name of the Linux distribution you will install in the VM wizard, the values in the Type and Version sections are automatically selected.
However, Oracle software may not detect some systems correctly, so you need to adjust some settings yourself. Since the Kali Linux system is Debian-based, change the virtual computer version to Debian (64-bit) and click Next.

Step 2
Determine a suitable RAM size for your Kali virtual computer depending on the hardware performance of your host computer. If you have a memory size of 8 GB on your host computer, configure the virtual memory size of your VM as 4 GB and click Next.

Step 3
Since you will install Kali from scratch on the virtual computer you created, check to Create a Virtual Hard Disk Now in the HDD configuration and click the Create button.

Step 4
If you do not plan to use your Kali guest machine in any software other than Oracle virtualization software, select the virtual hard disk file type as VDI (VirtualBox Disk Image) and click Next.

Step 5
If you configure the virtual disk of your Kali virtual computer to a Fixed Size, the space equal to the disk size will be allocated from your host disk. This setting improves VM performance but takes up more space on your host disk.
Therefore, select the Dynamically Allocated feature and click Next to configure the space allocation on your host disk as much as the guest operating system will need.

Step 6
If you plan to create a virtual disk backup with a VDI file extension, you can store it on one of your external storage devices. In that case, you can change the disk location in the File Location and Size window.
Suppose you prefer to have the virtual disk backed up to the destination where the VM will be installed. In that case, bypassing the alteration of the file location is recommended. Instead, adjust the disk size to accommodate your system’s requirements for the tasks you perform, and then proceed by clicking the Create button.
Step 7
After preparing your Kali VM, click Settings to add an ISO file or change the boot order.

Step 8
In the advanced tab of your virtual computer’s general settings, change the relevant settings to Bidirectional to enable the shared clipboard and drag-and-drop features between your host and VM.
- Shared Clipboard: Bidirectional
- Drag’n’Drop: Bidirectional
Step 9
Disable Floppy from Boot Order devices in your virtual machine’s System / Motherboard settings and configure the Optical device as primary.
Step 10
Configure the Processor hardware settings of the Kali VM according to the virtual core of your host CPU. The green area indicates that you can select a maximum of 4 cores. Still, you can set a higher value for higher performance.
Step 11
If you will use applications that require high graphics power in your guest operating system, enable the 3D Acceleration feature in the Display settings and configure the Video Memory size to the maximum value.

Step 12
View the Storage hardware settings and delete the old technology IDE Controller.

Step 13
Click the Leave Empty button to add an empty optical drive in the Optical Disk Selector window that opens after clicking the icon next to the SATA Controller.

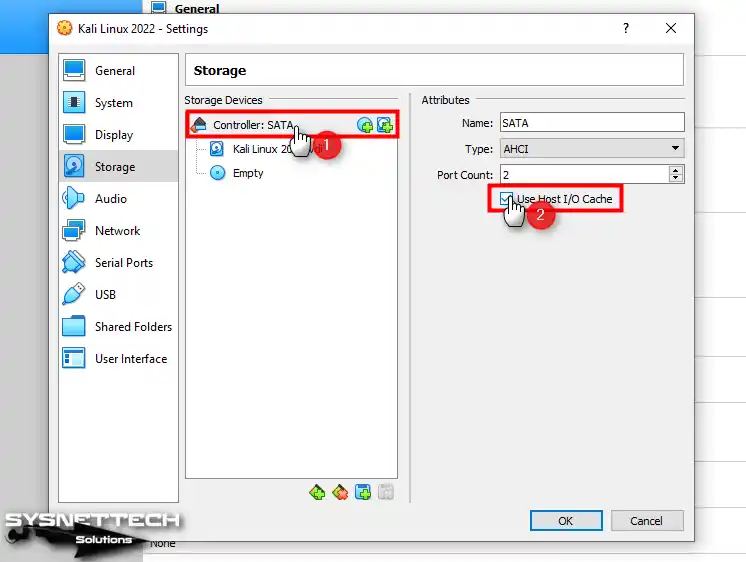
Step 14
Enable the Host I/O Cache feature to enhance the write and read speeds of the SATA controller in your virtual machine.
Step 15
To increase the performance of Kali Linux 2024.vdi virtual disk, configure the SATA Port setting as Solid-State Drive (SSD) in the Attributes tab.

Step 16
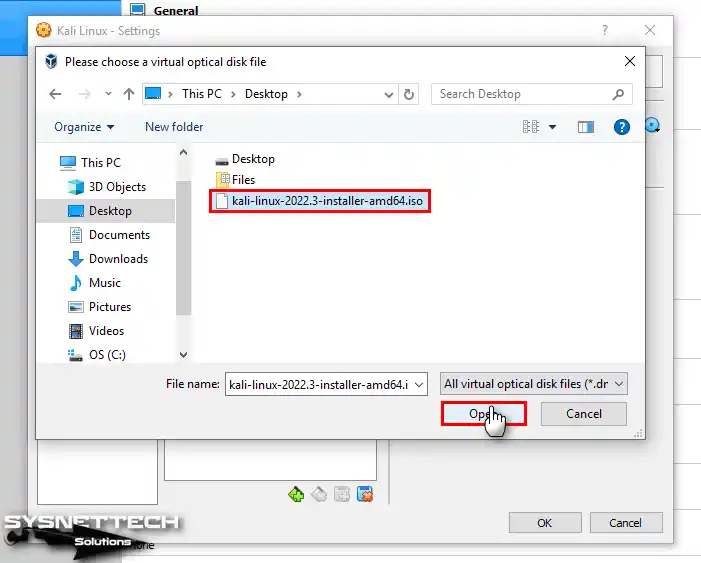
To add the Kali Linux ISO file to the virtual pc, select the Empty optical disk, then click the CD/DVD icon, and click Choose a disk file from the drop-down options.

Step 17
Select the Kali Linux image file you downloaded to your computer from the link here and click Open.
Step 18
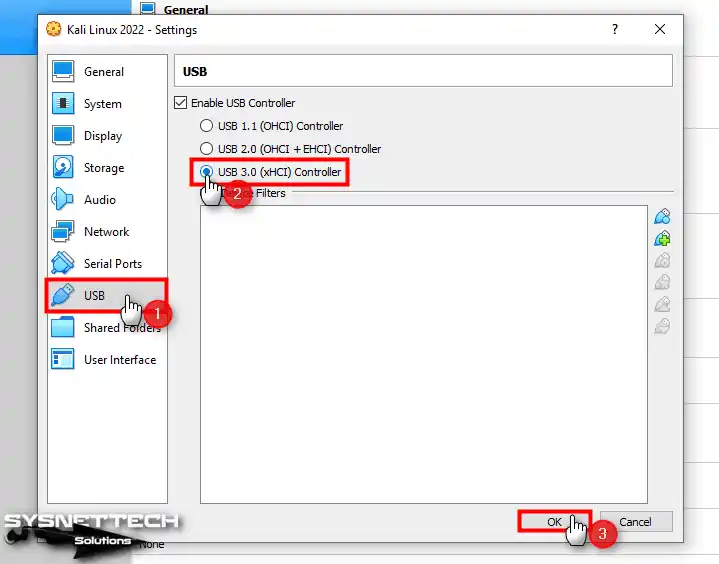
If you want to connect and use your USB 3.x devices in your Kali virtual system, change the Compatibility setting from the USB hardware settings to the USB 3.0 (xHCI) Controller and close the VM wizard.
Step 19
Click Start to run the Kali Linux virtual computer you prepared with Oracle and start the setup wizard.

How to Install Kali Linux in VirtualBox
Once you have successfully created a Linux VM using VirtualBox, running the VM allows you to set up your system like a physical PC effortlessly. Therefore, installing an operating system on a virtual system follows the same stages as setting it up on a PC.
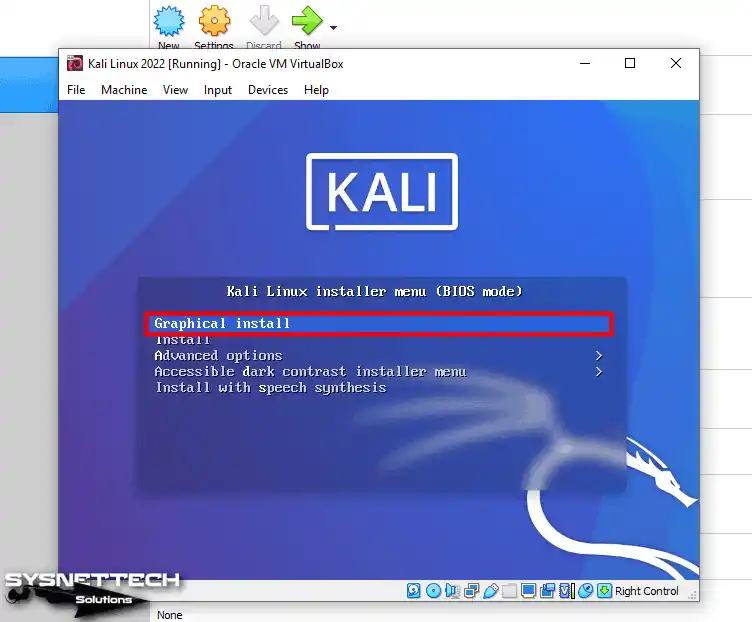
Step 1
Press Enter in the Graphical Install option in the Kali Linux installation wizard.
Step 2
When you continue with the graphical installation, select the language in which you will perform the installation process on the Select a Language screen that opens. The language you choose here will also be your system display language.
Step 3
The Location setting, which is generally configured as your country of residence, sets the time zone for your system. Thus, you can display your system time accurately.

Step 4
Configure your virtual computer’s keyboard layout according to your host computer’s hardware.

Step 5
Type a hostname to identify your Kali virtual machine on your network and continue.
Step 6
If your network environment has an Active Directory server, type your domain name to add your VM to the domain network.
Step 7
Type your full username for the account that will be used instead of the root account on your Kali system.
Step 8
Please enter your account name, which will be utilized for logging into your system, using lowercase letters.

Step 9
Create a solid and hard-to-guess password to prevent anyone else from accessing your virtual system.
Step 10
If the checklist does not reflect your time zone, you can change your location by revisiting the setup wizard.
Step 11
In the Partition Disks window, you can see the virtual HDDs that you have added to the virtual machine. Choose the virtual disk where you wish to install the Linux system within this window.

Step 12
You can use different schemes to partition the virtual disk of your choice. If you are an entry-level user of Linux, we recommend continuing with the All Files In One Partition option.
Step 13
After configuring the disk, click Continue to finish the partition process and write the changes to the disk.

Step 14
After checking the changes to be made on the disk, select Yes to confirm writing the changes to the disk and click Continue.
Step 15
After partitioning, select the Kali desktop environment during system setup and continue.
Step 16
Select the Yes button to install the GRUB Boot Loader on the drive configured as the primary.
Step 17
Select your virtual disk for Boot Loader installation and click Continue.
Step 18
After installing Kali Linux, remove the installation media and click Continue to boot your system.
Step 19
Press Enter in the Kali GNU/Linux option on the Kali boot screen.

Step 20
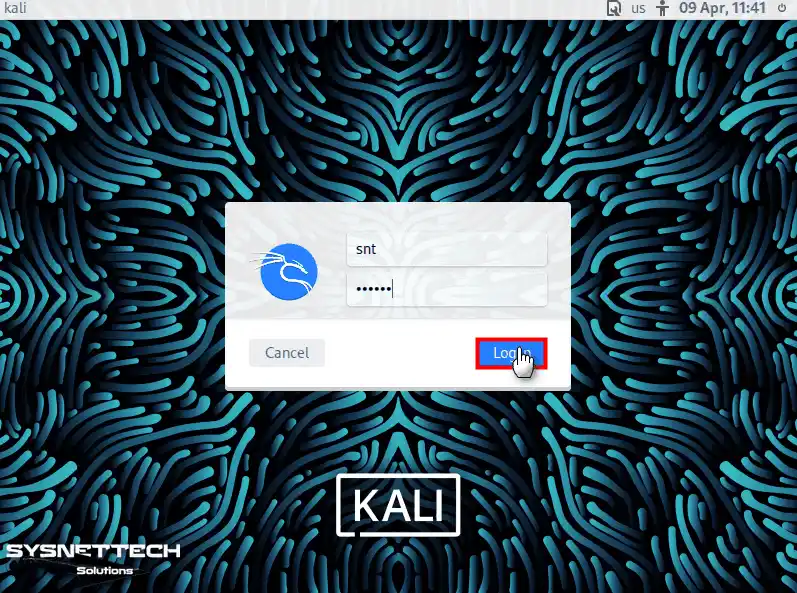
Type the username and password you set during installation and click Log In.
How to Install Guest Additions in Kali Linux VM
After installing Kali Linux with VirtualBox, you must install Guest Additions to install the drivers for your guest operating system and use your host PC’s devices, such as USB and webcam.
Usually, the Guest Additions are installed automatically when your host PC is linked to the Internet while building a guest operating system on the virtual machine. However, if the automatic installation does not occur, you must manually perform this task.
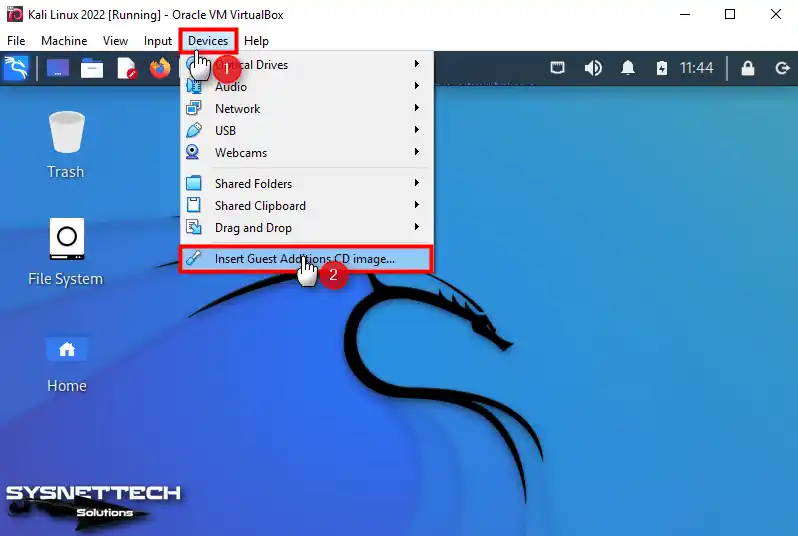
Step 1
While your Kali Linux guest operating system is running, click Devices / Insert Guest Additions CD Image from the tool menu and mount the installation media to the system.
Step 2
To start installing, use CTRL + Alt + T to open the command console. Then, execute the following commands to list the contents of the CD image mounted on your system.
cd /media/cdrom
ls
sudo sh ./VBoxLinuxAdditions.run
Step 3
When you see the Kernel Header 5.18.0-kali5-amd64 error in the terminal while installing Guest Additions, you must install this package and its dependent packages on your system.
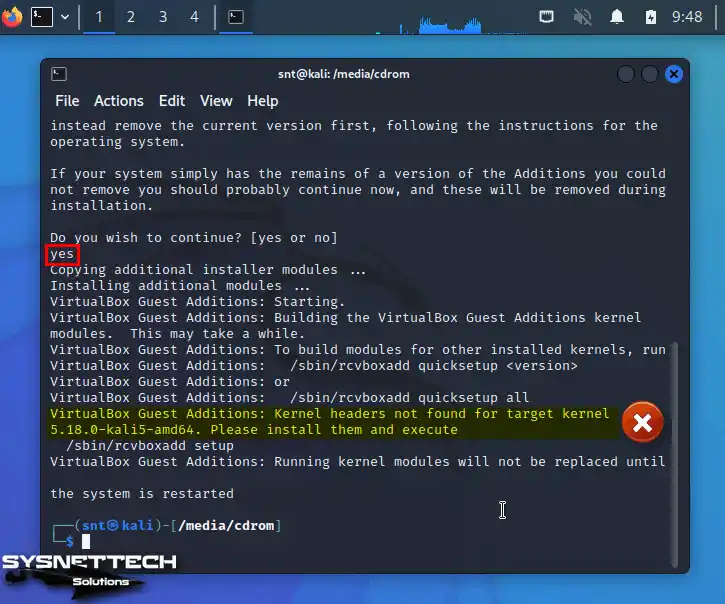
Step 4
To get VirtualBox working on Linux, type “sudo apt install build-essential dkms” into the terminal to install the correct kernels.
sudo apt install build-essential dkmsNOTE: If the packages required for Guest Additions cannot be installed automatically using the above command, download and install the relevant packages manually in the terminal.
wget http://http.kali.org/pool/main/l/linux/linux-headers-5.18.0-kali5-amd64_5.18.5-1kali6_amd64.deb | wget http://http.kali.org/pool/main/l/linux/linux-headers-5.18.0-kali5-common_5.18.5-1kali6_all.deb | wget http://http.kali.org/pool/main/l/linux/linux-kbuild-5.18_5.18.5-1kali6_amd64.deb | wget http://http.kali.org/pool/main/l/linux/linux-compiler-gcc-11-x86_5.18.5-1kali6_amd64.deb
sudo dpkg -i *.deb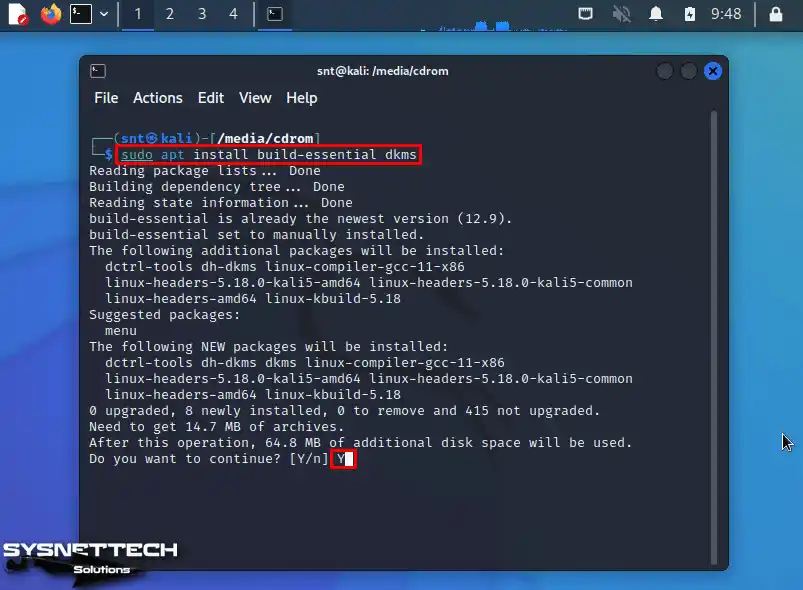
Step 5
The installation process will be successful once you try to install Guest Additions again on your Kali VM.

Step 6
To check the Guest Additions version, execute the “sudo /usr/sbin/modinfo vboxguest” command in the terminal.
sudo /usr/sbin/modinfo vboxguest
Step 7
Restart your Kali virtual system, and when you try to transfer a file by dragging and dropping a file from your host PC to the desktop environment of your VM, you can see that the file is copyable.
Step 8
You can select whether to use your virtual computer in full-screen or windowed mode.
How to Configure a Shared Folder
You can enable and use Oracle software’s Shared Folder feature to quickly copy larger files between your Kali VM and your host.
Step 1
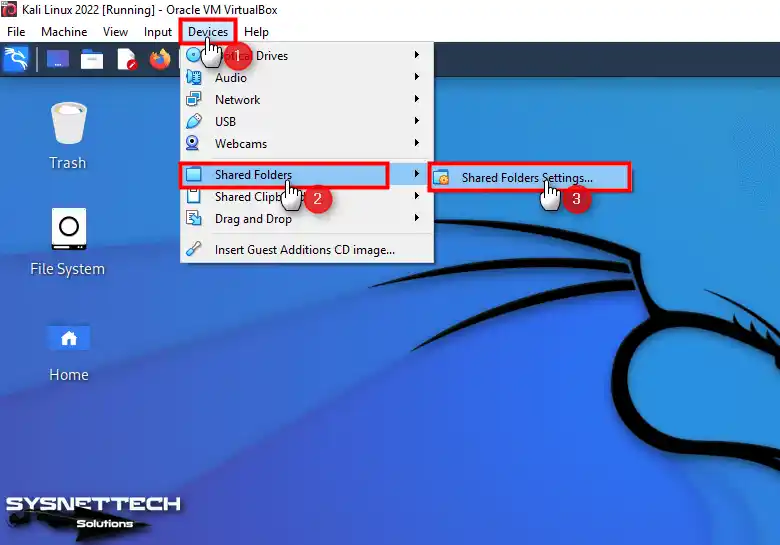
Click Devices / Shared Folders / Shared Folders Settings in the tool menu of your Kali VM.
Step 2
In the Shared Folders configuration window, click the add icon as in the image below, and then click Other from the drop-down list in the Add Share window that opens.

Step 3
Create a shared folder in a location of your host operating system and change its name as you wish.

Step 4
After specifying the folder on your host, if you want this folder on your VM to be automatically mounted and permanent every time you restart your system, tick the Auto-Mount and Make Permanent options and click OK.

Step 5
Create a new folder in KaliSharedFolder on your host computer’s desktop and check the folder’s contents from Home or media/sf_KaliSharedFolder from your virtual system.
NOTE: If you get a user permission denied error when you try to access sf_KaliSharedFolder, you must make your user account a member of the vboxsf group. To add your user account to the vboxsf group, execute the “sudo adduser $USER vboxsf” command in the terminal and reboot your system.
sudo adduser $USER vboxsf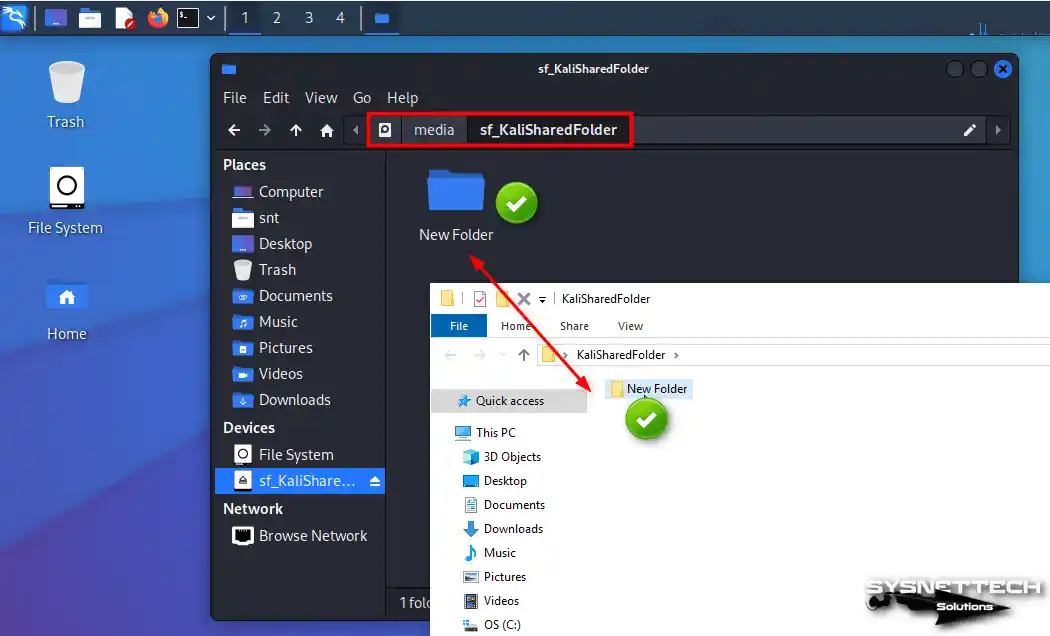
Step 6
You can construct a shortcut on the desktop location to access the shared folder faster.
sudo ln -s /media/sh_KaliSharedFolder ~/Desktop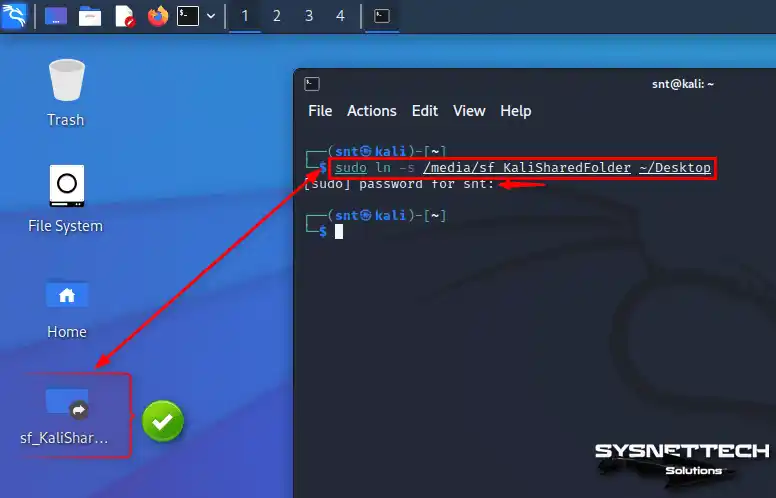
How to Use USB Flash Memory
Connecting your USB storage devices or flash drives to your Kali guest system lets you do your work, quickly back up your files, or install any software.
Step 1
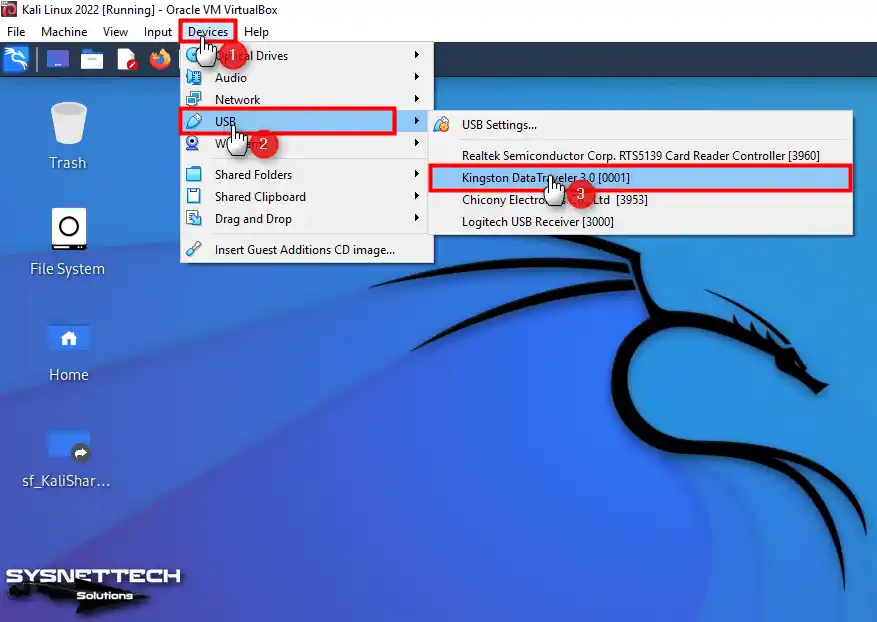
First, plug your flash disk into one of your physical computer’s free USB 3.x ports and then create a folder named ‘Backup’ to test your disk in the VM.

Step 2
Click Devices / USB / Name of Your USB in the tool menu of your Kali VM to connect your USB to the virtual machine.
Step 3
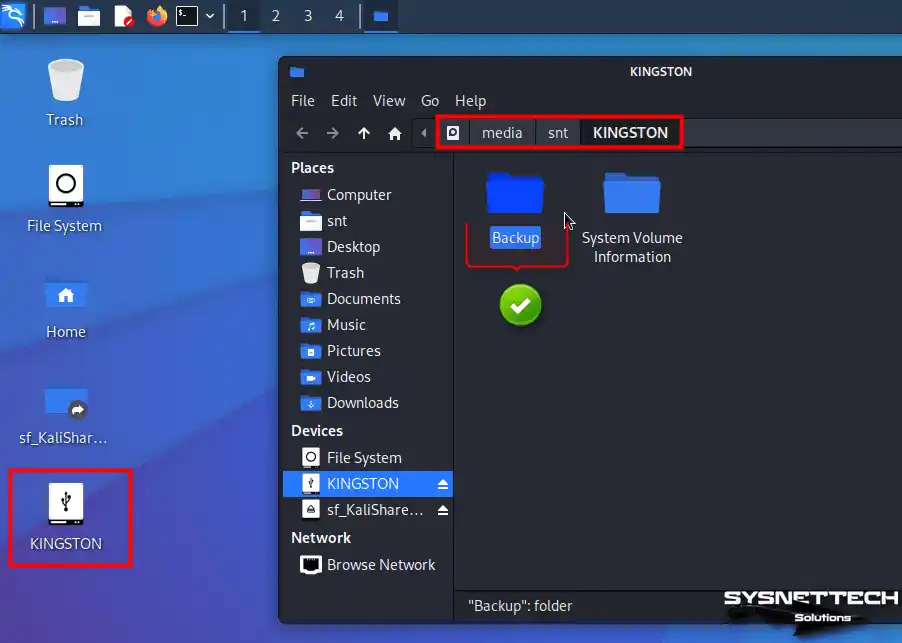
When you check the contents of your USB memory that is automatically mounted to your Linux system, you can access the folder named Backup.
How to Delete the Virtual Machine from Kali Linux
Once you have removed all files of the guest system from your PC, it is vital to verify that there is nothing remaining associated with it. You can do this by scanning both the virtual machine library of the Oracle software and the installation location on your host PC.
Step 1
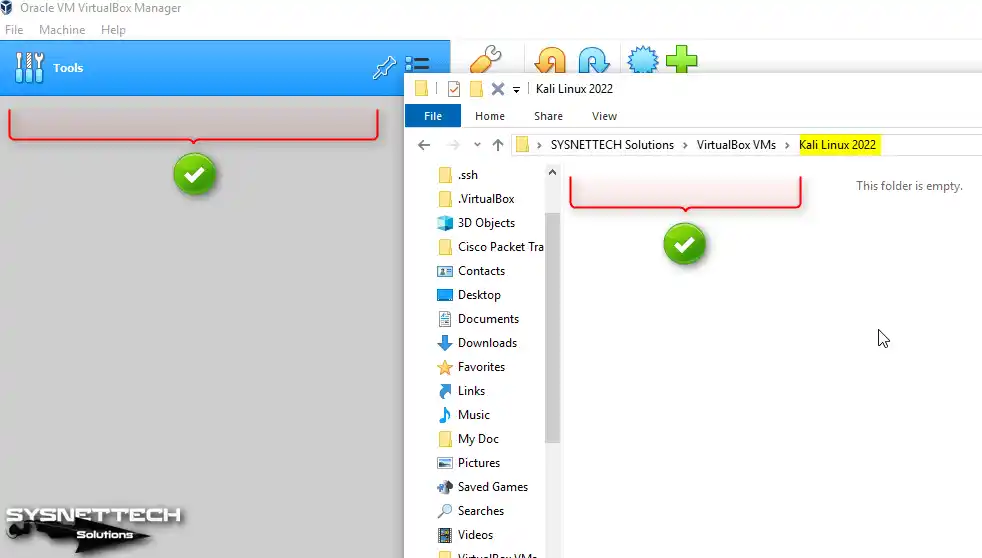
Right-click / Remove the virtual machines listed on the left panel of your Oracle software and click the Delete All Files button in the open window.

Step 2
After deleting all the files of the guest system from your PC, you can check that there are no files or folders related to the guest operating system, both in the virtual machine library of the Oracle software and in the installation location of your host PC.
Video
Installing Old Versions
| Kali / VBox Version | YouTube Video | Slide |
|---|---|---|
| 2022.1 / 6.1.32 | Watch | View |
| 2022.3 / 6.1.36 | Watch | – |
Conclusion
As a result, you can install the Kali Linux 2024 distribution in a virtual machine with Oracle VM VirtualBox on your Windows 10 & 11 PC. So you can dive into the world of cybersecurity and discover the many features and capabilities of Kali Linux.
In short, you can run Kali as a VM thanks to the steps I have explained in this article. Afterward, you can experience this excellent system in terms of testing, learning, and network security.
Moreover, Kali is a good choice for personal use, cybersecurity training, or professional purposes. So you can improve your skills by using it in a controlled and safe environment.
Introduction: How to Run Kali Linux in Your Windows 10 Operating System?
Virtual Machine:
A Virtual Machine is an emulator that can run multiple operating systems in a single hardware device i.e. virtual computers within a computer.
Anything happening inside the Virtual Machine doesn’t affect the hardware device, thus keeping it safe and secure. The Virtual Machine replicate a real-life operating system and thus gives all the functionality of the real operating system and more. Web Developers, Hackers, etc. uses Virtual Machine(VM).
Kali Linux:
Kali Linux is a Debian-derived Linux distribution designed for digital forensics and penetration testing. It is maintained and funded by Offensive Security. Kali Linux has around 600 penetration-testing programs.
Below are the key features that you will get with Kali Linux.
- Kali Linux is packed with several pre-installed penetration testing tools like Wireshark, Nmap, Aircrack-ng and many more.
- It comes with support for several languages enabling the users to operate in their native language accordingly.
- Kali Linux has been developed in a secured environment, ensuring that only trusted users can interact with Kali code repositories.
- Kali Linux follows the standard filesystem hierarchy for locating libraries, support files and many others.
- Kali Linux is available for free for use for all users, especially experienced.
- It may be possible that every user will agree with the design of Kali Linux, so they made it open for customizable according to their requirement.
Supplies
Step 1: Enabling Virtualization Technology
Most devices don’t have Virtualization Technology enabled in them and it is necessary to run Virtual Machine in your device. A hardware Virtualization Technology enable a processor feature for running multiple simultaneous Virtual Machines allowing specialized software applications to run in full isolation of each other.
For enabling Virtualization Technology:
- Turn on your Desktop or Laptop and press esc key repeatedly until Startup Menu opens.
- The Hot Key to open Startup menu in HP is esc key
- The Hot Key to open Startup menu in Dell is F12 key.
- The Hot Key to open Startup menu in Acer is F12 key.
- Press the key to enter to «BIOS Setup».(Key may vary from device to device and thus press the key that is showing in front of «BIOS Setup»)
- After that using keyboard go to «System Configuration» tab in navigation bar.
- Now look for a «Virtualization Technology» and enable it.
- Then Save the changes and exit.
Step 2: Downloading Kali Linux
Go to https://www.kali.org/ and click on «Download». A new window opens and then click Virtual Machines. Then select 64-bit or 32-bit according to your device.
Now two images are given: VMware 64 and VirtualBox 64.
Download VirtualBox 64 of size 3.7GB.
Now using WinRAR or 7zip, extract the file download and you will presented with a .ova file named — Kali-Linux-2021.4-virtualbox-amd64.ova.
Step 3: Downloading Oracle VM VirtualBox
Go to https://www.virtualbox.org/wiki/Downloads and download Oracle VM VirtualBox for Windows.
Now scroll down a little and you will notice Oracle VM Extension Pack, click on All supported platforms and download the extension pack.
Once both Oracle VM VirtualBox and Extension pack is downloaded. Install the Oracle VM VirtualBox and when the installation is over, open it. Now click on the extension package that you downloaded and it will open a pop-up window, click on Install or Reinstall option. Once the extension package is installed you are ready to move on to the next step.
Step 4: Installing and Setting-up Kali Linux on Virtual Machine
Installing Kali Linux to Virtual Machine:
- First, you have to click «File» in Oracle VM VirtualBox’s navigation bar. Click on it and then select «Import Appliance» and it will open «Import Virtual Appliance». You can also use ctrl + I to open «Import Virtual Appliance» Window.
- Click on File icon and select and open the Kali-Linux-2021.4-virtualbox-amd64.ova file which we downloaded earlier and then select «Next» button.
- A window named «Appliance settings» is opened now. You can change the name of the OS according to your own desire by double clicking on the name section. After renaming the OS, click «Import» button and this will start installing process of Kali Linux. This might take some 14-20 minutes (may vary).
- After installation, you will see your OS on the left side, click on it and then a window will open on the right side giving description about your OS.
Setting-up Kali Linux for Virtual Machine:
- Click on «Settings» icon on navigation bar in right side, then go to «System» section and then to «Motherboard» section and reset the «Base Memory» to 1024 MB and press «OK» to save.
- And then again open «Settings» and go to «Network» section and select «Adapter 1» and set «Attached to:» to «Bridged Adapter» from the dropdown options and then press «OK» to save.
- Now click on «Start» icon on navigation bar in right side, then wait for the system to open. You can maximize the screen size by clicking on «View» in VM VirtualBox’s navigation bar and selecting «Full-screen Mode».
- Select «Kali GNU/Linux» option and press Enter.
- The Username and Password is kali initially which you can change later on.
Step 5: Kali Linux Is Ready to Use
Finally, the Kali Linux Virtual Operating System is ready to be used.