
Are you considering installing Debian 12 on a virtual machine using Oracle VM VirtualBox 7? Don’t look elsewhere because I have prepared a comprehensive guide with all the details for you!
With this comprehensive guide, you will be able to create a virtual machine that can run Debian 12 efficiently. At the same time, you will gain not only performance but also full VM functionality by adjusting the settings correctly. If you are new to exploring the Debian operating system in a virtual environment, let’s start using the accessible method VirtualBox!
How to Set Up Debian 11 on a Virtual Machine using Oracle VM VirtualBox 6.1.34
Debian is a unique operating system that uses either the Linux or FreeBSD kernel. It is a leading open-source project granting users access to 59,000 applications.
After the base version of the Debian 11 distribution was released on August 14, 2021, the updated version 11.3 was released on March 26, 2022.
There are two ways to utilize this Linux operating system. You can either directly install it onto your computer or opt for virtualization programs to install and use it virtually. This means you can start utilizing the Linux distribution without getting rid of or restarting any other systems already installed on your PC.
Using Debian in a virtual machine is recommended for entry-level Linux users. After installing a clean system on their computers, users can create snapshot backups and quickly get back their systems that crashed due to a faulty code or software later on.
How to Create a New Virtual Machine for Debian
When you choose to use the Debian Linux operating system via a VM on your host, you must configure its settings correctly. If you do not configure some settings of virtual hardware correctly, you may affect the performance and system stability of the VM.
Step 1
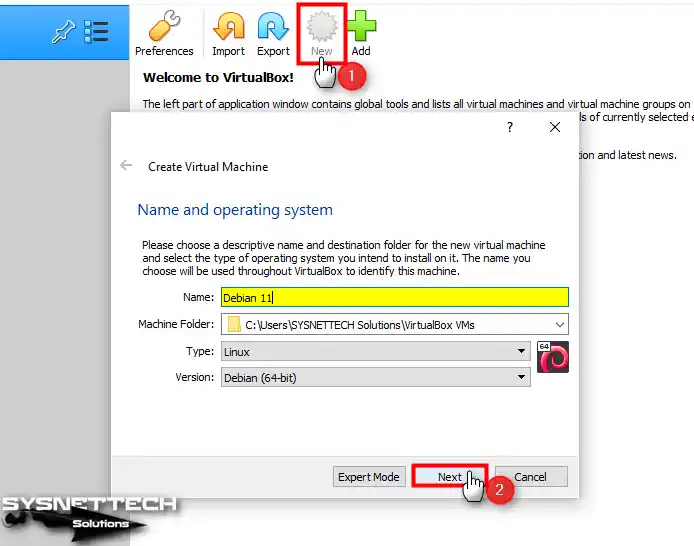
After installing the Oracle VirtualBox software on your host computer, run it, and when the program opens, click the New button from the options on the main screen and start the virtual machine creation wizard.
When you type the system’s name, you will install it in the Name and Operating System window, and the Type and Version fields will be automatically configured by VirtualBox. If the system settings you will install cannot be determined at this stage, you must select it manually.
Suppose you opt to install the Debian system’s 32-bit or 64-bit versions. In that case, check that this architecture type is set correctly in the version section.
After selecting the architecture type of the Debian system and configuring the location to be installed, click Next.
Step 2
In the Memory Size window, configure an appropriate virtual memory size for the virtual machine according to the RAM capacity of your host PC.
For Debian, a minimum memory size of 4 GB or 8 GB may be sufficient. Still, you can increase this value according to your work on your guest system and the programs you will use.

Step 3
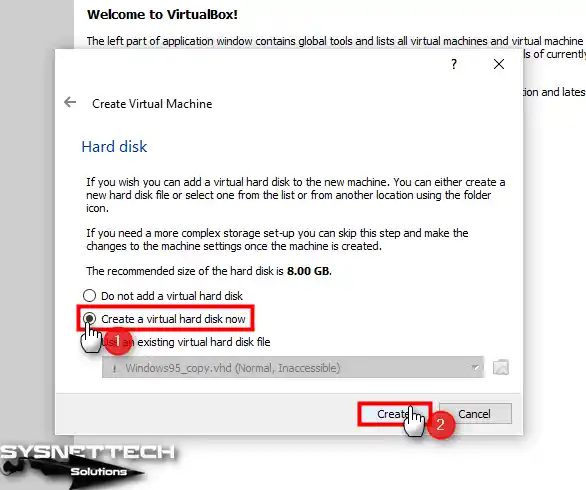
You must create a new virtual disk since you will install a Debian from scratch in the Hard Disk configuration window. If you have a VM installed before, you can add the VDI virtual disk file from this window.
Step 4
If you will not use the virtual machine you prepared later with other virtualization programs, select the VDI (VirtualBox Disk Image) disk type recommended by Oracle and click Next.

Step 5
You can dynamically or permanently store the VM on your host’s physical storage device. When you choose Fixed Size, space will be allocated from your host disk as much as the size of the virtual disk.
Suppose you are using an SSD or NVMe disk. In that case, choosing the Dynamically Allocated storage method is helpful, as there will be no performance loss.

Step 6
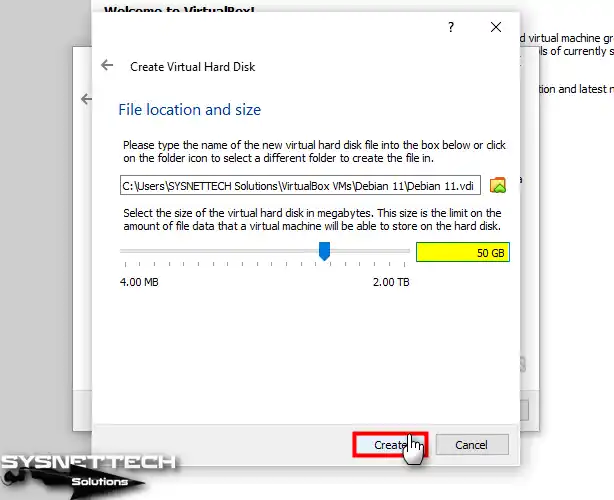
Leave the location of the virtual machine disk file at the default and choose a suitable disk size according to the work you will do on the guest machine.
Step 7
After preparing the Debian VM, click Settings from the tool menu to make more advanced settings.
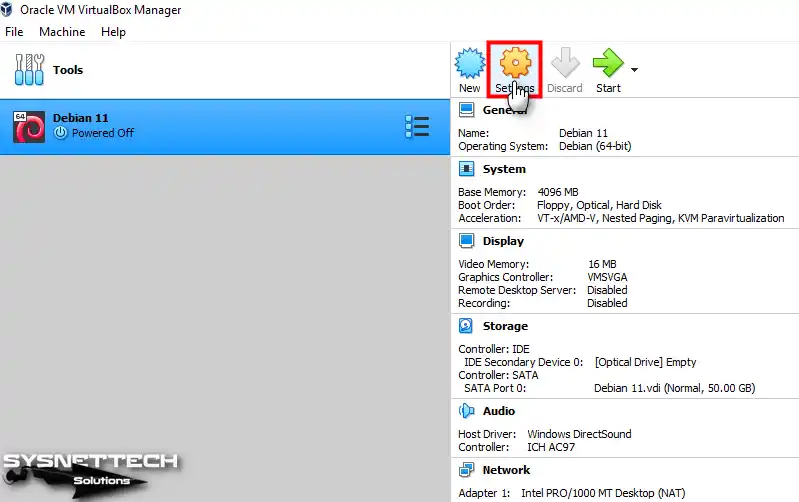
Step 8
In General / Advanced virtual hardware settings, change Shared Clipboard and Drag and Drop properties to Bidirectional to transfer files or copy text from the host machine to the VM.

Step 9
Disable Floppy from the devices in the Boot Order section of the System / Motherboard settings and set Optical to the preliminary order.

Step 10
Open the settings of the Processor’s virtual hardware and increase the number of virtual processors according to the capacity of your host CPU. For optimal system stability, allocating a minimum of 2 or 4 virtual processor cores is recommended.

Step 11
Open Display / Screen device settings and enable 3D Acceleration for a better graphics experience in the virtual machine. Next, set your virtual system’s graphics memory to 128 MB or higher.

Step 12
Select IDE Controller from Storage settings and delete it.

Step 13
To add a SATA optical drive, click the icon next to the SATA Controller and click the Leave Empty button in the Optical Disk Selector window.

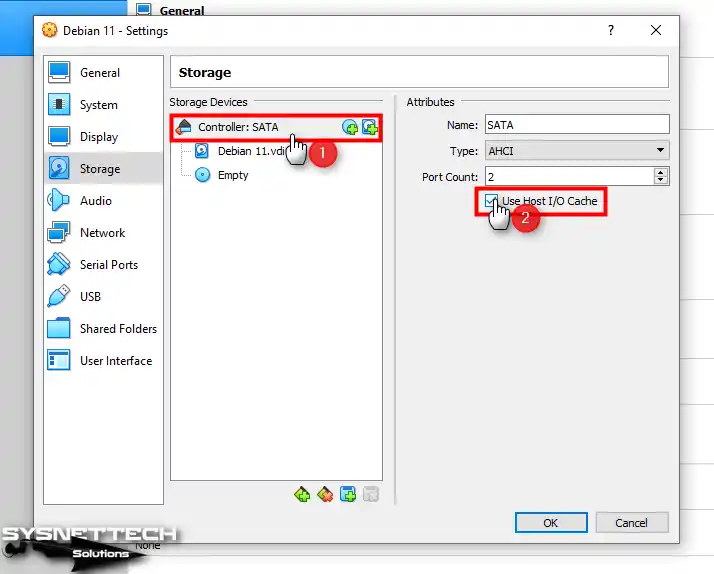
Step 14
Select SATA Controller and enable Host I/O Cache from Attributes for virtual PC performance.
Step 15
Select the Debian 11.vdi virtual disk file and enable the Solid-State Drive (SSD) feature to improve disk performance.

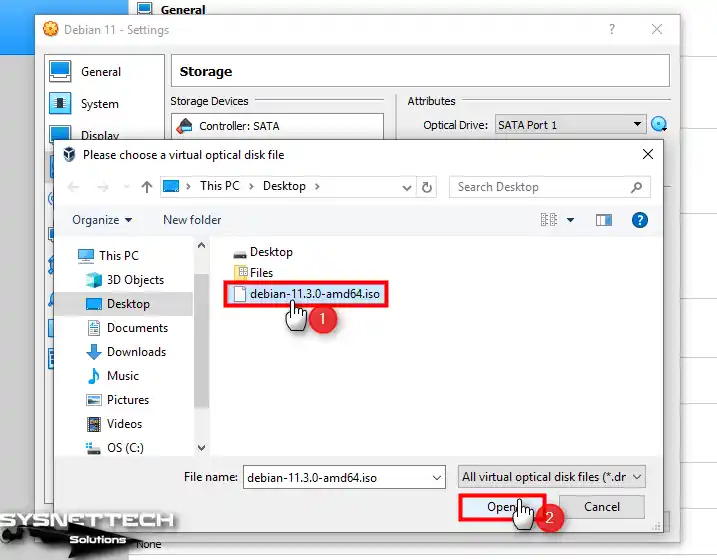
Step 16
To add a Debian 11 ISO file to the virtual PC, select the Empty disk drive, then click the CD/DVD icon and click Choose a disk file from the options that appear.

Step 17
Visit the link here, select the Debian 11 ISO file you downloaded to your host computer, and open it.
Step 18
Finally, select the USB 3.0 (xHCI) Controller type and close the settings of the virtual computer to transfer files faster using your USB 3.x devices in your virtual system or quickly back up your documents with big file sizes.

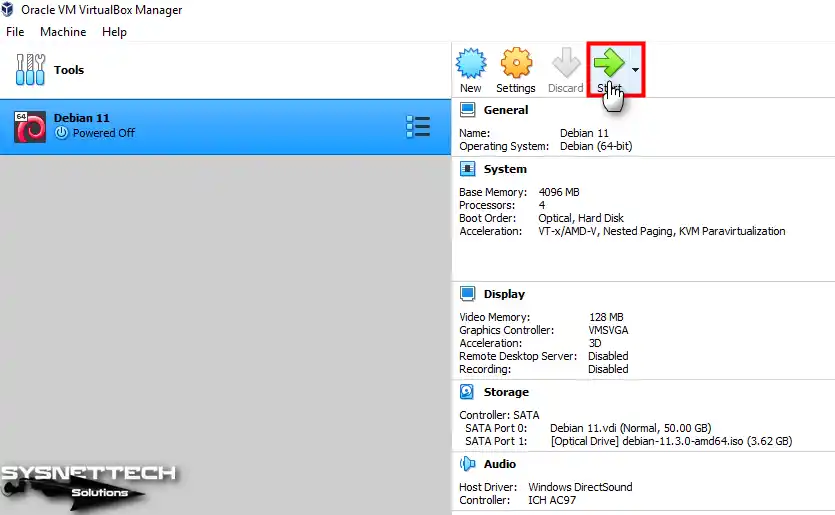
Step 19
After correctly setting the Debian 12 virtual computer’s settings, click Start from the tool menu.
How to Install Debian 12 in VirtualBox
After preparing and running the Debian guest system, you can start the system setup and install it virtually on your host PC.
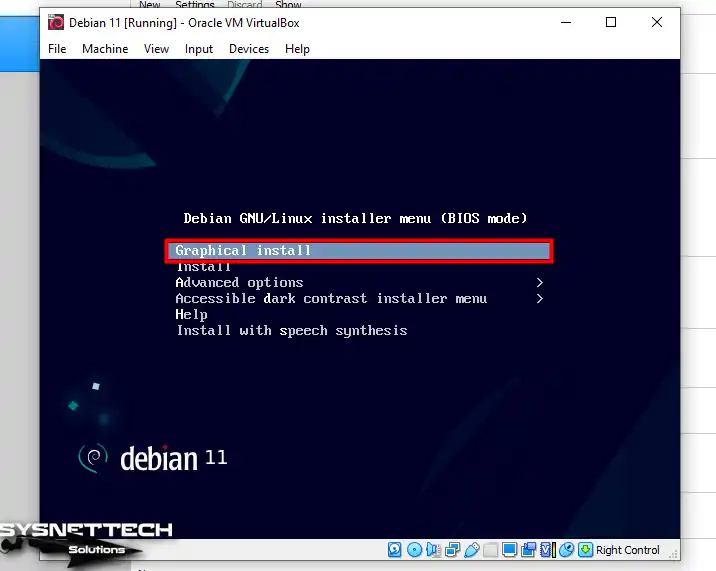
Step 1
After running your Debian virtual PC, you will see the Installer Menu as in the image below. On this screen, press Enter in the Graphical Install option and continue.
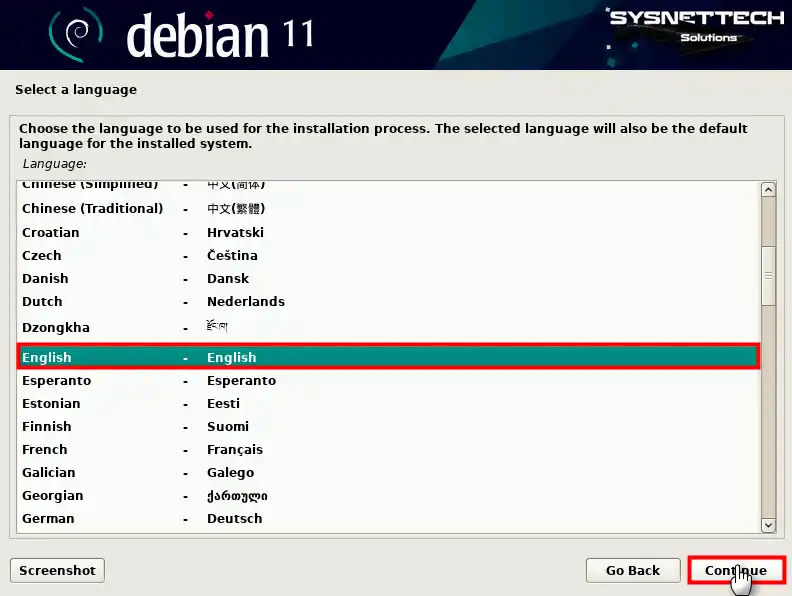
Step 2
Select the language of your Linux virtual system and click the Continue button.
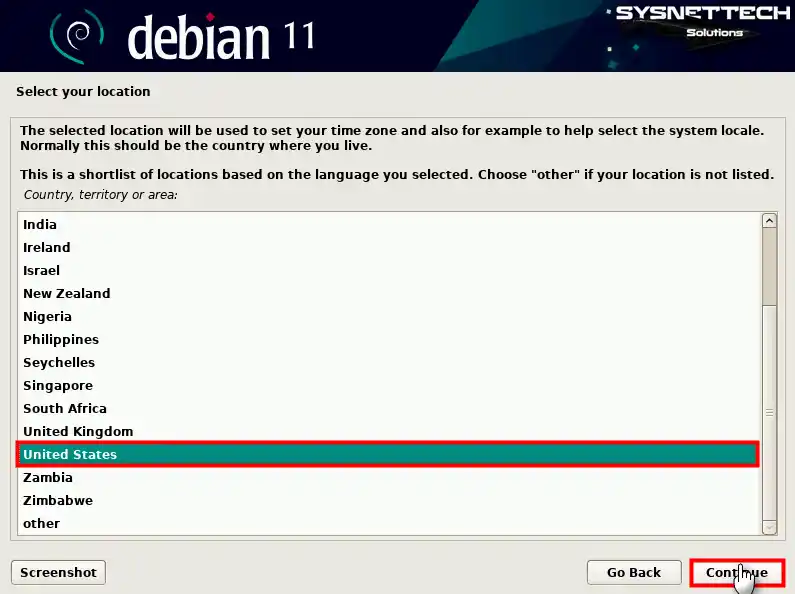
Step 3
Kindly choose your region and proceed by clicking the “Continue” button.
Step 4
Select your keyboard layout for the Debian guest operating system and click Continue.

Step 5
Type a unique hostname that identifies your virtual PC in your network environment and continue.

Step 6
If there is no Active Directory server in the environment where you use your VM, leave the domain name blank.

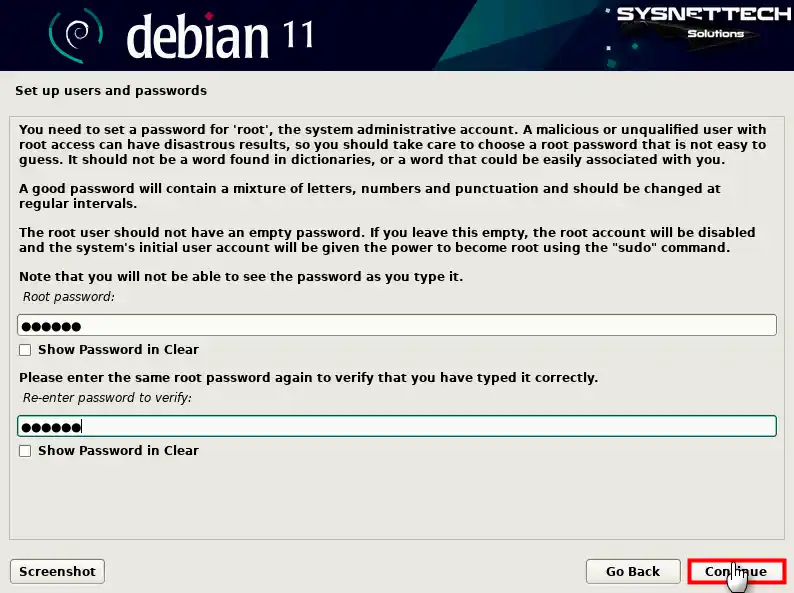
Step 7
Create a strong root password to prevent unauthorized users from damaging your Linux system.
Step 8
A typical user account is used instead of the root account for non-administrative activities. Type your full name for the local user account and click Continue.

Step 9
Your user account name is set because it contains your first name, but you can change it. After ensuring your username is typed in lowercase letters, click Continue.

Step 10
For optimal security, generating a strong password that incorporates a mix of lowercase and uppercase letters and numerical characters is crucial.

Step 11
Select your time zone and click Continue to display your system time correctly.

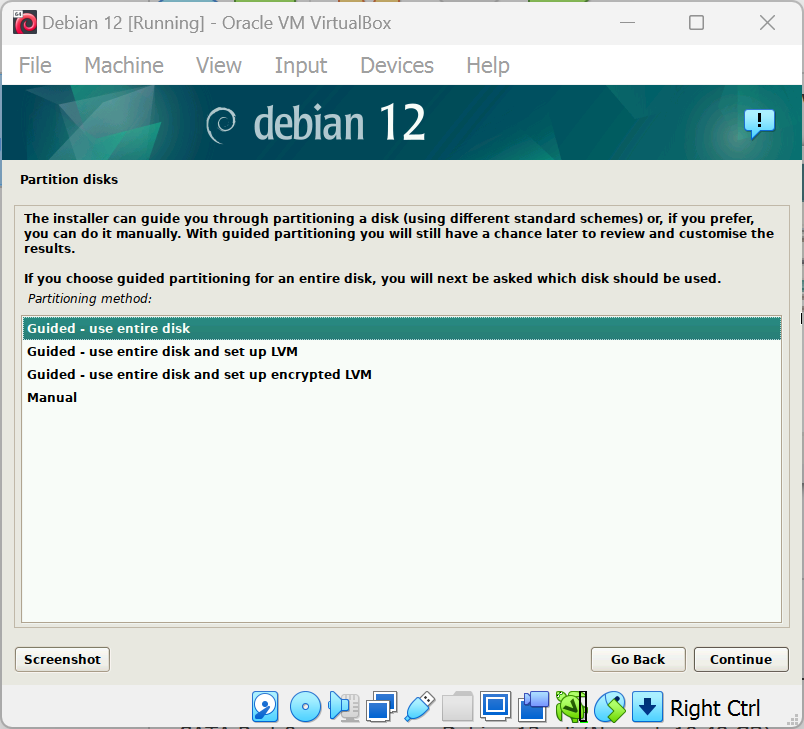
Step 12
Select the Guided – use the entire disk option from the disk configuration options and continue.

Step 13
Select the VBOX HARDDISK virtual disk for partition configuration.
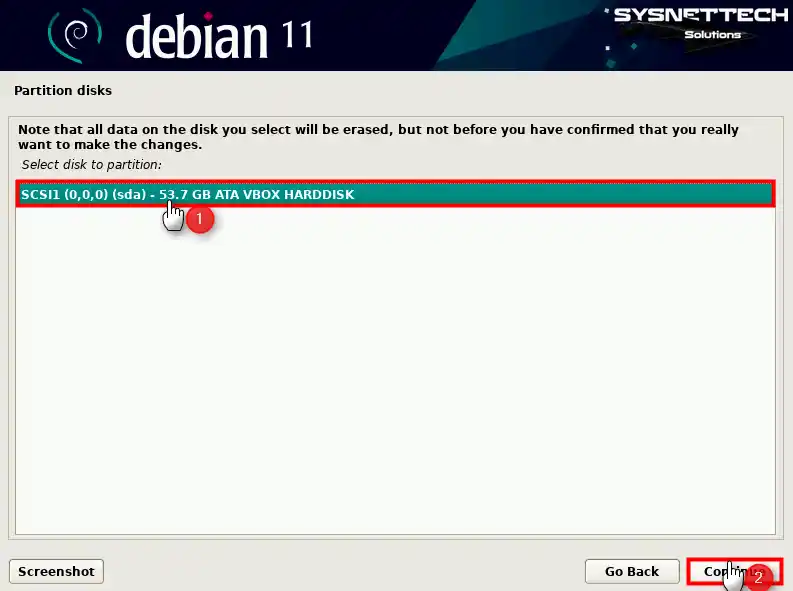
Step 14
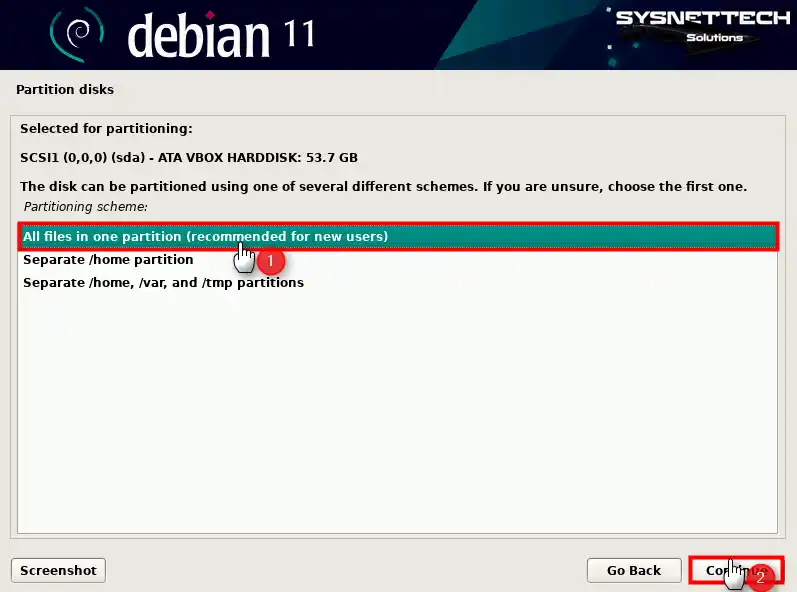
You can install the system using different disk schemes, or if you need more clarification, you can choose the first option, All files in one partition.
Step 15
To complete the disk configuration, select Finish partitioning, write changes to the disk, and click Continue.

Step 16
After checking the operations on the disk, select Yes to approve the changes to the disk.

Step 17
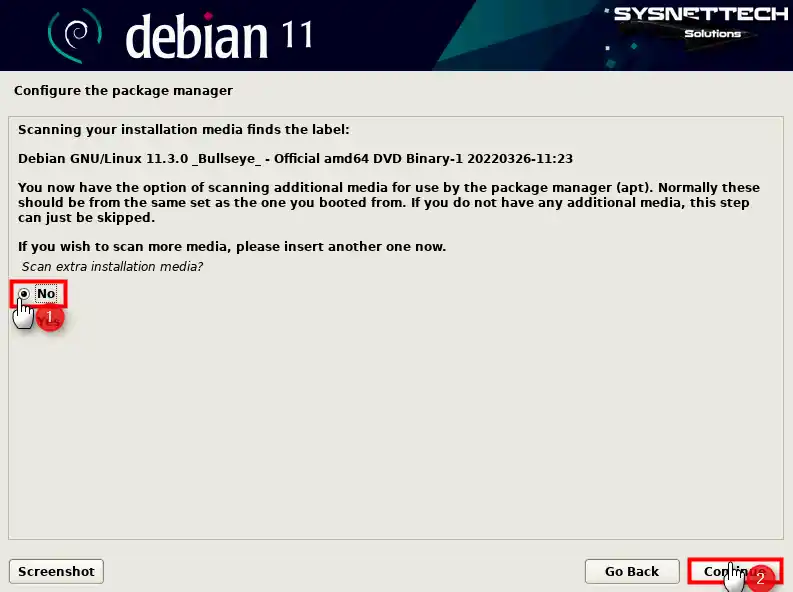
If you do not have any other installation media and want to continue without scanning a different media, continue with the No option.
Step 18
When you want to download a program from the Internet after installing the system from a DVD image, the current addresses must be defined in the repository list. Therefore, select Yes to add a network mirror and click Continue.

Step 19
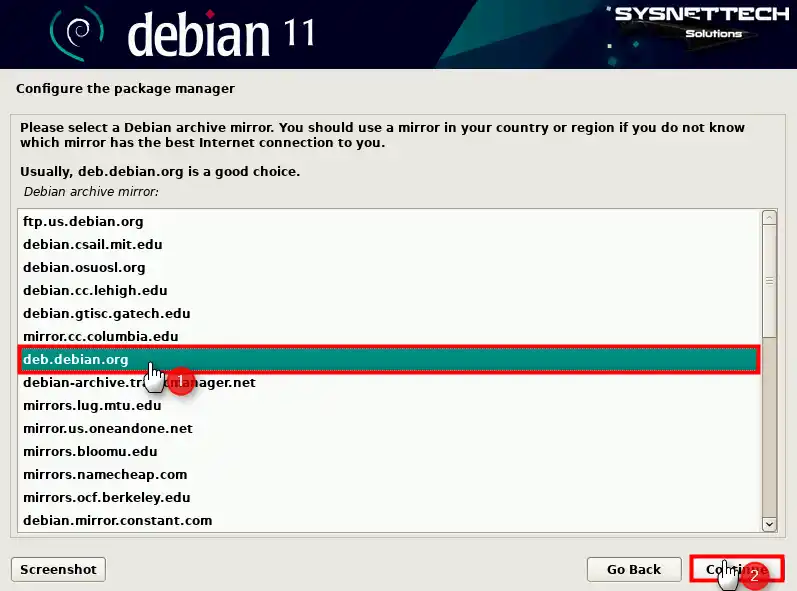
Select your location or the country closest to you for the Debian archive mirror.

Step 20
For the Debian archive mirror, continue with the suggestions from deb.debian.org.
Step 21
Leave the suitable option blank if you do not want to configure a proxy address.

Step 22
If you’re pleased to share your statistics with Debian developers, you can confidently select “Yes.” However, if you prefer to keep them private, choose “No” and proceed by clicking “Continue.”

Step 23
On the software selection screen, select your preferred Debian desktop environment.

Step 24
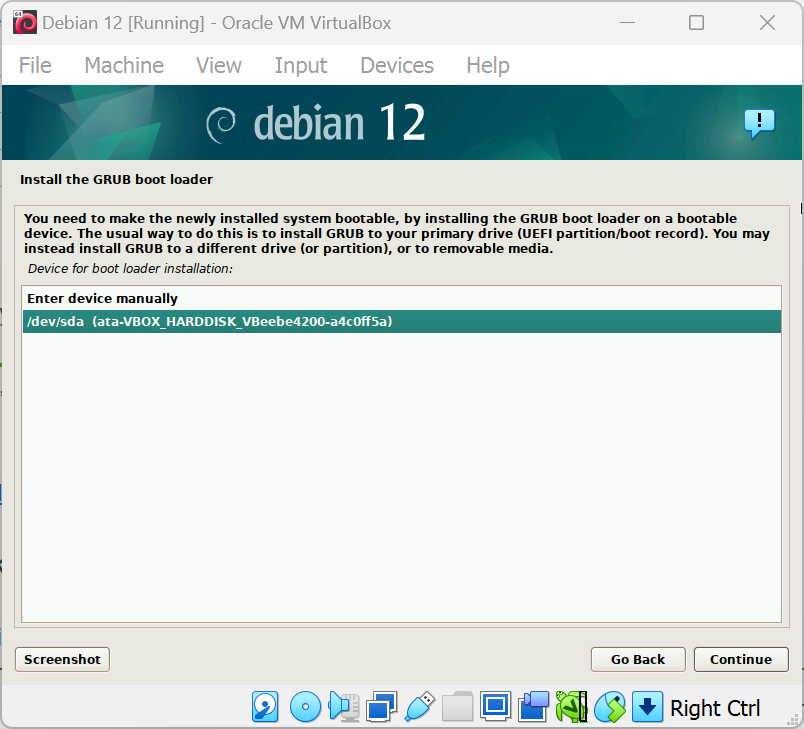
Select Yes to confirm installing the GRUB Boot Loader on the primary partition and click Continue.
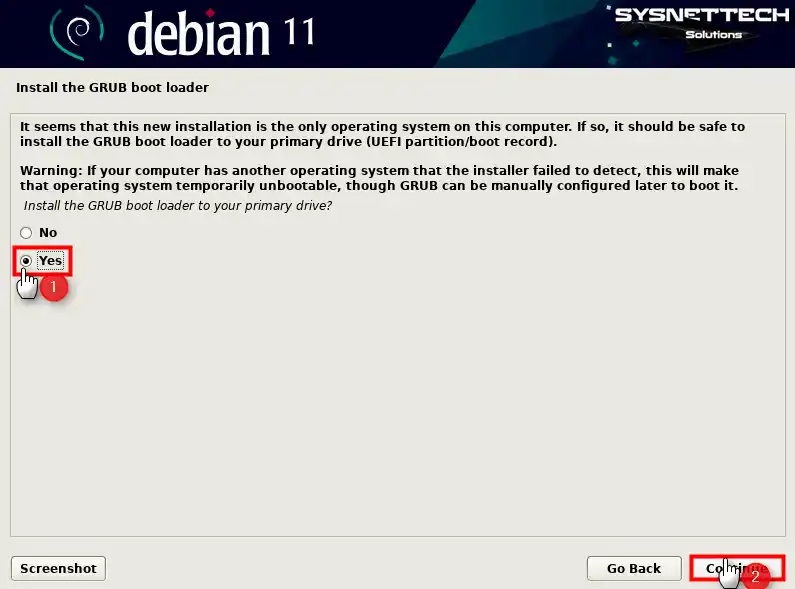
Step 25
Kindly select the /dev/sda device as the ideal option to install the GRUB Boot Loader.
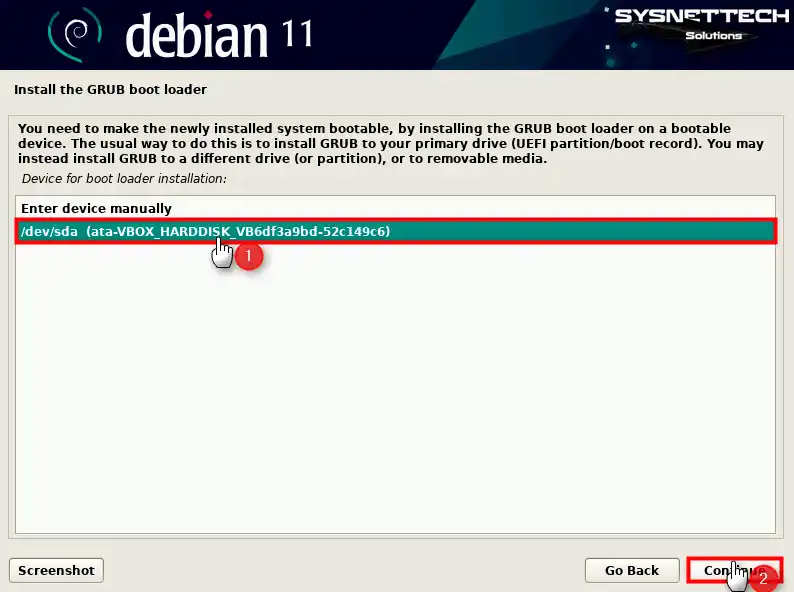
Step 26
Once the installation process is finished, kindly remove the installation media and reboot your system to utilize your brand-new design.

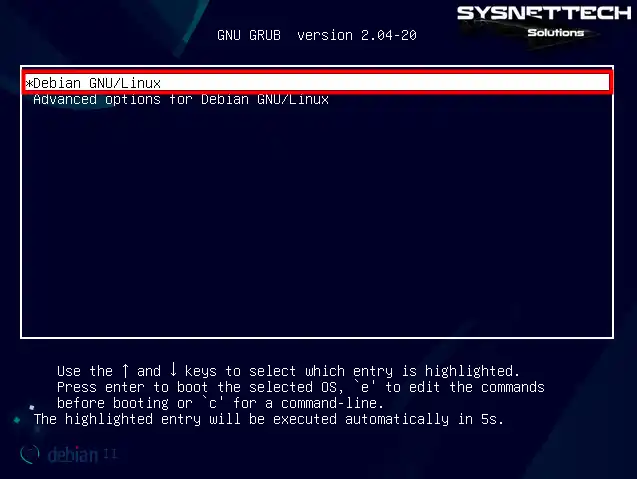
Step 27
When your Debian guest machine is turned on, press Enter on Debian GNU/Linux from the GRUB menu or wait for the specified time for the selected entry to occur automatically.
Step 28
Type your Debian user account and password and log in.

Step 29
When the Debian 11 desktop opens, find the terminal from the start menu and open it. To check your system version, execute the “lsb_release -a” command in the command console.
lsb_release -a
How to Install Guest Additions to Debian VM
Once you’ve successfully installed Debian with VirtualBox, the next crucial step is to install Guest Additions. For a smoother experience, you can effortlessly modify the screen resolution of your virtual machine while concurrently transferring files between the host and your VM. Additionally, you can enable the Shared Folder feature and start using your USB devices.
Step 1
The display adjustment does not work when expanding the Debian guest system to full-screen mode, as evidenced by the image provided.

Step 2
Click Devices / Insert Guest Additions CD Image from the VirtualBox tool menu.

Step 3
Before installing Guest Additions, you must install Linux kernels; otherwise, you will get an error during compilation. To get started, access the terminal on your Debian system and confidently enter the command “sudo apt install build-essential dkms” to execute it quickly.
sudo apt install build-essential dkms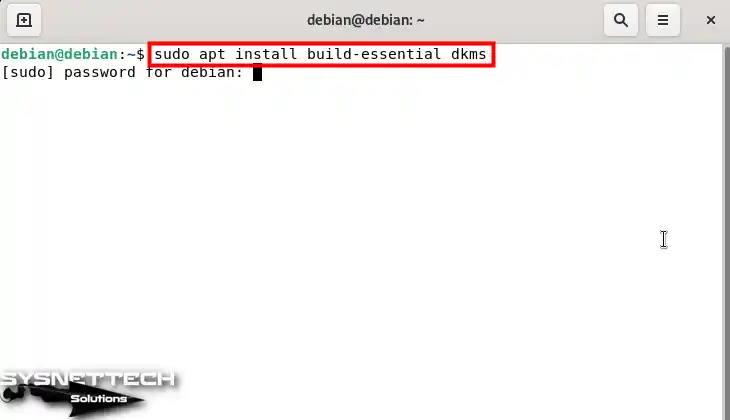
Step 4
After checking the packages to be installed, press Y and Enter to confirm the additional disk space usage of 258 MB.

Step 5
To install Guest Additions using the terminal, you must first go to the cdrom location and run the .run file. To do this, navigate to the image location with the “cd /media/cdrom” command and execute the “sudo sh ./VBoxLinuxAdditions.run” command.
cd /media/cdrom
ls
sudo sh ./VBoxLinuxAdditions.run
Step 6
When the VirtualBox Guest Additions Installer starts, you can see that the Linux kernels are compiled from the outputs in the terminal. After finishing the installation process, you must carry out the command “sudo reboot” to reboot your computer and ensure the successful implementation of the modifications.
sudo reboot
Step 7
After restarting your virtual PC, execute the “sudo /usr/sbin/modinfo vboxguest” command in the terminal to check the Guest Additions version.
sudo /usr/sbin/modinfo vboxguest
Step 8
The virtual machine’s screen resolution has been tailored to fill the entire screen perfectly.

How to Configure Shared Folder
Enabling the Shared Folder feature is the easiest way to share files from your host PC to your virtual computer. This way, you can quickly transfer documents from your host to your VM.
Step 1
Click Devices / Shared Folders / Shared Folders Settings from the VirtualBox tool menu.
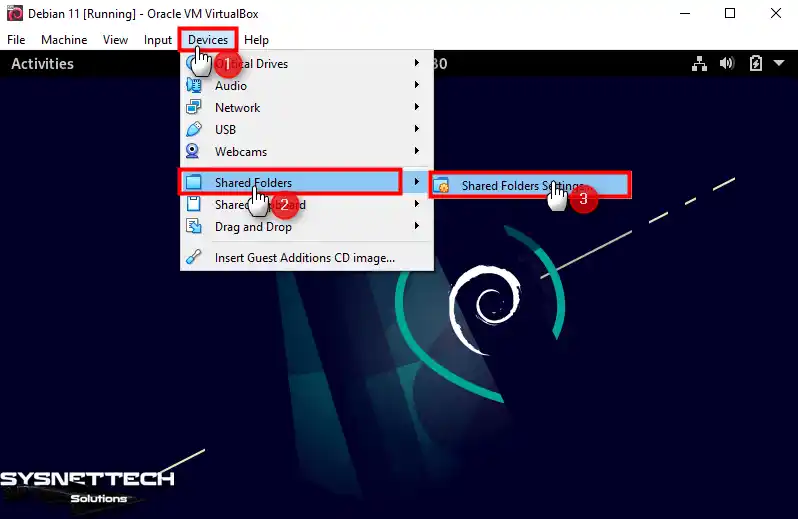
Step 2
After clicking the Add icon in the Shared Folders window, expand the drop-down menu in the Folder Path section and click Other in the Add Share window that opens.

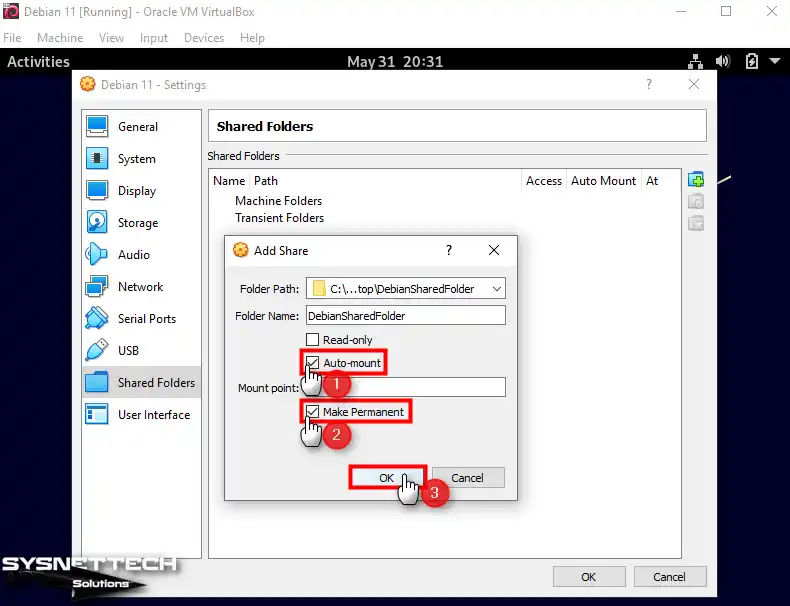
Step 3
In the Select Folder window, please select a new folder in any location of your host.

Step 4
After selecting the shared folder, check the Auto-Mount and Make Permanent options and click OK.
Step 5
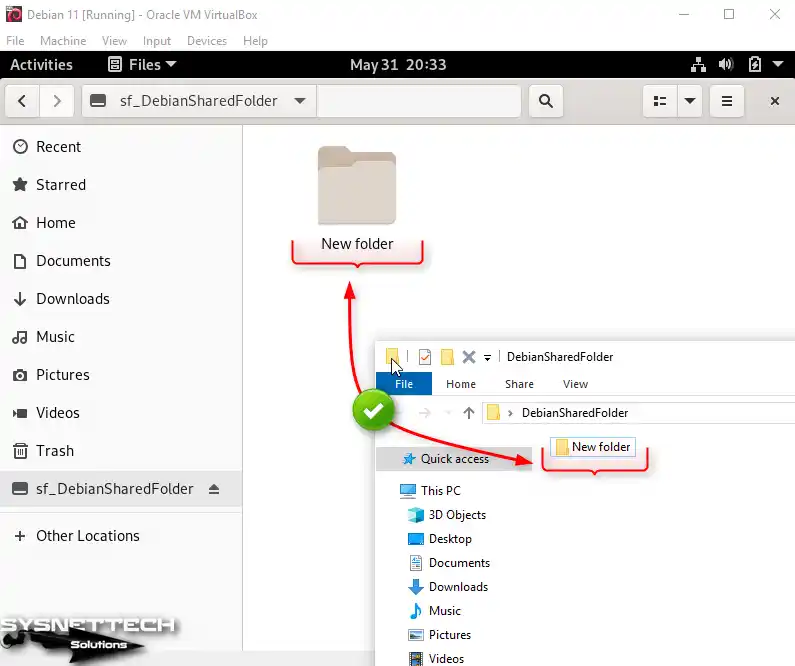
Open Files from your Debian VM and click sf_DebianSharedFolder in the Bookmark section to view the contents of the sharing folder. You must edit the user permissions if you get an error like the image below.

Step 6
Open the terminal and execute the “sudo adduser $USER vboxsf” command to allow your local user account access to Shared Folders.
sudo adduser $USER vboxsf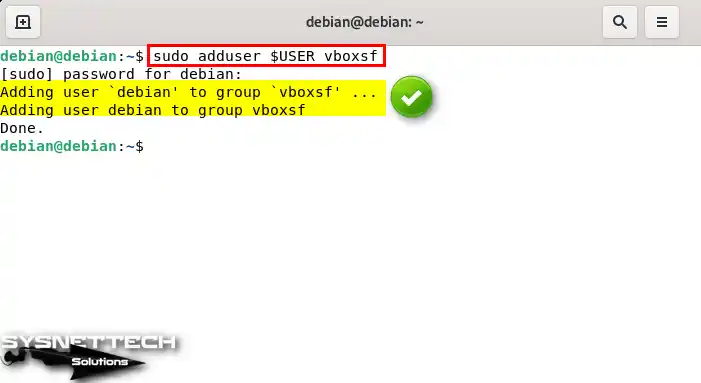
Step 7
Restart your virtual system and check whether you can reaccess Shared Folder, and this time you can see that the process is smooth.
How to Use a USB Flash Memory in Debian Guest Machine
You can use your USB storage devices to quickly copy or back up your documents with large file sizes between your host and your VM. An effortless method to ensure your files are backed up is simply linking an external SSD that supports USB 3.0/3.1 to your virtual computer.
Step 1
Insert a flash memory into your host’s empty USB 3.x port and create a Backup folder.

Step 2
Click Devices / USB / Name of your USB from the tool menu to mount your USB flash drive in your Debian VM.
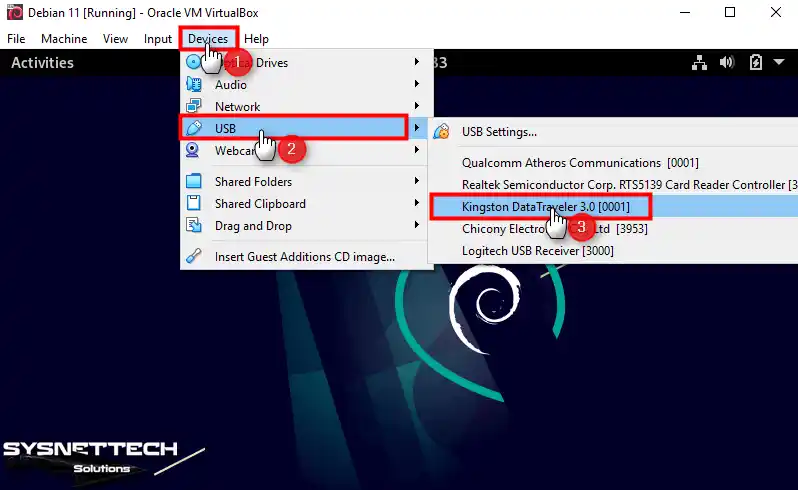
Step 3
After your USB disk is automatically mounted to your virtual machine, you can see the folder named Backup you created when you view its contents.

Video
Installing Old Versions
| Debian Version | YouTube Video | Slide |
|---|---|---|
| 9 | Watch | View |
| 11 (NEW) | Watch | – |
Conclusion
As a result, you can install the Debian system as a secondary on the virtual machine with Oracle VM VirtualBox. In this case, you can continue your work without affecting your primary operating system.
Thanks to the versatile features of VirtualBox, you can use both Windows and Linux distributions. You can create a Debian machine that suits your needs using the steps I explained.
3 min read
Linux
In this post, I will explain how to easily install Debian 12 in VirtualBox running on Windows 11.
Remember that Windows 11 has the ability to run WSL2 (Windows Subsystem for Linux), which is much easier to setup and work with, but sometimes setting up a virtual machine on our own can be useful.
Download and install VirtualBox
First step is to download and install VirtualBox, go HERE and download and install the latest version of VirtualBox
Download Debian ISO
Go HERE and download the amd64 version of the iso
Installing Debian in VirtualBox
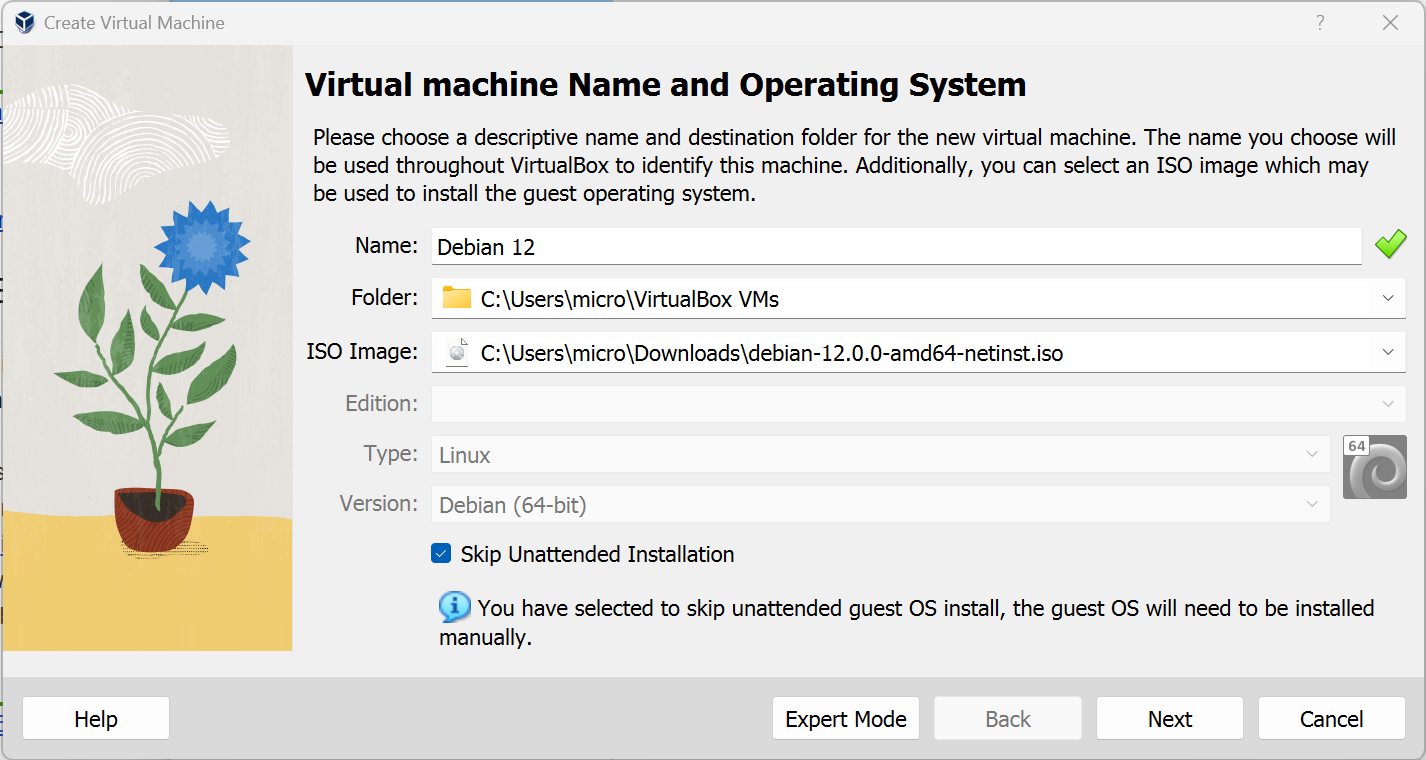
Step 1 : Configuring the new VM in VB
Open virtualbox, click New, it will open up a window to configure your new vm information.
- Name : Choose a name, I chose
Debian 12 - Folder : You can leave it at the default
- ISO Image : Browse to the debian ISO we just downloaded
- Skip unattended installation : Uncheck this, so as to control things like installing a desktop environment
Step 2 : Choose system resources, Virtual hard disk
Here we choose how much CPU and ram to give to the new VM. This entirely depends on what you are planning to do with the VM. In my case, I chose :
- 2048MB of ram
- 2 cpu cores
Next, under Virtual Hard Disk, choose Create a virtual hard disk now.
Give enough disk space as you would see fit. I chose to give 10GB, click next and Finish
Step 3 : Installing Debian 12
Back in VirtualBox, click on the VM we just created and click Start. This should boot up the iso and you will be presented with a boot menu. Choose Graphical installer
- Choose your language, location and keyboard
- Hostname : choose a preferred hostname,
debianshould be good if you are unsure - Domain name : Leave it empty
- Root password : Set a root user password that you will remember
- Full name for the new user : Choose a new name for a new user that will be created
- User password : Choose a password for the new user
- Choose your timezone
- Under «Partition disks», choose
use entire disk. Don’t worry about this, this is only using the virtual disk we created for this virtual machine
- Click continue
- In the next screen, choose
All files in one partition - And choose
Finish partitioning and write changes to disk - Choose
yesand click next Scan extra installation media: ChooseNoConfigure the package manager: Choose your country or a country close to you.- Choose the default address
- Skip the
HTTP Proxy information(leave it blank)
Step 3.2 Choosing a desktop environment
This part is completely up to you. If you want your new debian virtual machine to have a graphical UI like Gnome, or KDE, you can choose that one here.

If you want a desktop environment, make sure you check two boxes:
Debian desktop environment- An environment of your choice. Xfce, Mate, LXDE are very lightweight and I would recommend any of them if you want a desktop environment
I choose not to install any desktop environment because I will be using ssh to connect to this VM. You can see that I have chosen SSH server for that reason.
Step 3.3 Installing Grub Bootloader
Choose Yes in the Install GRUB bootloader screen and choose the device as shown below.
Reboot and enjoy your new Debian 12 installation
Guide on: Installing Debian on VirtualBox

Welcome to the guide on installing Debian on VirtualBox! Whether you’re a curious tech enthusiast or a budding developer, this step-by-step tutorial will help you set up Debian, a versatile and reliable Linux distribution, within the VirtualBox virtualization platform.
By creating a virtual environment, you can explore Debian’s powerful features, test software configurations, or simply learn more about this popular operating system.
Install Debian on VirtualBox
Throughout this guide, I will break down the installation process into simple, easy-to-follow steps. You don’t need to be a seasoned Linux user or a virtualization expert to follow along. I’ll provide clear instructions and explanations, ensuring that you understand each stage of the installation. So, let’s get started on this exciting journey of exploring Debian on VirtualBox!
Here’s a brief overview of what we’ll cover:
- Download Debian and VirtualBox
- Creating a New Virtual Machine
- Installing Debian
- Post-Installation Steps
- Tips and Troubleshooting
By the end of this guide, you’ll have a fully functional Debian installation running smoothly within VirtualBox. So, without further ado, let’s embark on this exciting journey of installing Debian on VirtualBox!
Step 1: Download Debian and VirtualBox
To begin the installation process of Debian on VirtualBox, you’ll need to download both the Debian ISO image and the VirtualBox. For downloading Debian ISO Image, you can visit their Official site. There you can download the ISO file for free.
Whereas for VirtualBox, you can use this link or visit the official site. Both links will provide the latest version of VirtualBox for you. Once downloaded then you will install the VirtualBox on your system.
Users who have already installed VirtualBox on their system can skip to the next step; other users will need to stop here and do the installation. All you will need to do is to double click on the installer, follow on-screen prompts and VirtualBox is installed.
Related: Download VirtualBox for Mac M1 & M2
Step 2: Creating a New Virtual Machine
Now let’s begin the second step to install Debian on VirtualBox. Now that you have downloaded the Debian ISO image and installed VirtualBox, it’s time to create a new virtual machine where you will install Debian. Follow the steps below to create a new virtual machine within VirtualBox:
1. Open the VirtualBox. You should see the VirtualBox Manager window.

2. In the VirtualBox Manager, click on New at the top-left corner. This will start the virtual machine creation wizard.
3. In the Name and operating system of the wizard, provide a meaningful name for your virtual machine (e.g., “Debian”). VirtualBox will automatically detect the type and version based on the name you provide.
4. In Type, choose Linux. In the second drop-down menu labeled Version, select the specific Debian version that matches the ISO image you downloaded.
5. In the Memory size, select the amount of memory (RAM) you want to allocate to the virtual machine. It is recommended to allocate at least 1 GB or more for smooth operation.
6. In the Hard disk, select the Create a virtual hard disk Now option and click Create.

7. In the Hard disk file type, select the default option, VDI (VirtualBox Disk Image), and click Next.
8. In the Storage on physical hard disk, select the default option, Dynamically allocated, and click Next. This allows the virtual hard disk to grow dynamically as you use it.
9. In the File location and size, choose a location to save the virtual hard disk file.
The default location is usually fine. Then, set the size for the virtual hard disk. It is recommended to allocate at least 10 GB or more to accommodate the Debian installation and any additional software you may install later.
Review the settings in the summary window, and if everything looks correct, click Create to create the new virtual machine.
Now you have successfully created a new virtual machine within VirtualBox. In the next step, I will guide you through the installation of Debian using the ISO image you downloaded.
Step 3: Installing Debian on the VM
Now that you have created a new virtual machine in VirtualBox, it’s time to install Debian using the ISO Image you downloaded. Ok let’s start the process of installing Debian on VirtualBox with ISO Image;
1. In the VirtualBox Manager window, ensure that your newly created virtual machine is selected. Then, click on the Settings button located at the top of the window.
2. Now navigate from Settings > Storage > Controller: IDE or Controller: SATA.
Click on the small disc icon, and in the pop-up menu, select Choose/Create a Disk Image. Browse and select the Debian ISO Image you downloaded, and click Open to attach it to the virtual machine.
3. With the Debian ISO Image attached, click on the Start button.
4. The virtual machine will start, and you will see the Debian installer menu.
– Use the arrow keys to navigate the menu and select the Install option. Follow the on-screen instructions to proceed with the installation.
– Select your preferred language, location, and keyboard layout when prompted.
During the installation, you will reach a step where you need to configure network settings. Choose the appropriate options based on your network setup. If you are unsure, the default settings should work in most cases.
– When prompted to partition the disk, select the guided partitioning option (usually referred to as “Guided – use entire disk“). Choose the virtual disk you created for the virtual machine.
– Debian will automatically partition and format the disk for installation.
– Set up a user account and password now. Provide a username and password for the Debian system. Follow the instructions to set up the user account and administrator (root) password.
Allow the installation process to continue until it reaches completion. This may take some time depending on your system’s resources and the selected software packages.
After the installation is finished, the virtual machine will prompt you to reboot. Press Enter to restart the virtual machine.
Congratulations! You have successfully installed Debian on VirtualBox virtual machine. From now on, the steps are optional and are recommended only for a better experience. As there are some essential post-installation steps, including updating the system and configuring any necessary settings that you need to perform.
Step 4: Post-Installation Steps
After you have successfully installed Debian on VirtualBox virtual machine, there are a few important post-installation steps you should follow to ensure optimal performance and functionality. Let’s go through these steps:
1. Update the system first. Open a terminal or command prompt in Debian and run the following command:
sudo apt update && sudo apt upgradeEnter your password when prompted, and allow the process to complete. This will ensure that your Debian system is up to date with the latest security patches and software updates.
2. Install additional software (optional) as Debian provides a vast repository of software packages that you can install to expand the functionality of your system. For this, you can use the `apt` package manager to search for and install the software. For example, to install a web browser like Firefox, you can run the following command:
sudo apt install firefox3. Debian allows you to customize various system settings according to your preferences. Use the system settings or configuration tools provided by Debian to adjust parameters such as display resolution, input devices, network settings, and more. You can typically find these settings in the desktop environment or system menus.
4. VirtualBox provides Guest Additions, which are additional drivers and utilities that enhance the performance and integration between the host system and the virtual machine.
To install Guest Additions in Debian, start the virtual machine and click on the Devices menu in the VirtualBox window.
Choose to Insert Guest Additions CD image, and Debian will mount the Guest Additions ISO file. Open a terminal or command prompt in Debian, navigate to the mounted CD image location, and follow the instructions provided in the documentation to install Guest Additions.
If you encounter any issues or have further questions, don’t hesitate to ask for assistance. Enjoy your Debian experience!
Tips and Troubleshooting
While installing Debian on VirtualBox, you may encounter some common challenges or have specific requirements. Here are some helpful tips and troubleshooting suggestions to assist you:
Enable hardware virtualization:
Ensure that hardware virtualization is enabled in your computer’s BIOS settings. This option is often found under the Virtualization or CPU Configuration section. Enabling hardware virtualization can enhance the performance of your virtual machine.
Allocate sufficient resources:
If you experience sluggishness or poor performance, consider increasing the allocated memory (RAM) and CPU cores for your virtual machine. Adjust these settings in the VirtualBox Manager by selecting the virtual machine and clicking on Settings, then navigating to the System tab.
Enable 3D acceleration (optional):
If you require better graphics performance in your virtual machine, you can enable 3D acceleration in the virtual machine settings. This option allows Debian to utilize your computer’s GPU for enhanced graphics rendering.
Take snapshots:
Before making significant changes to your virtual machine or experimenting with software installations, it’s advisable to take a snapshot of your virtual machine. Snapshots allow you to revert back to a previous state if something goes wrong during the process.
Network configuration issues:
If you’re experiencing network connectivity problems within your virtual machine, ensure that the network adapter in the virtual machine settings is properly configured. You can choose between different networking modes, such as NAT, Bridged, or Host-only, depending on your requirements.
Mounting additional ISO images:
In addition to the Debian ISO Image, you may need to mount other ISO Images for software installations or updates. Follow the same process as Step 4, but choose the desired ISO Image when prompted to select a disk image.
Remember, troubleshooting can be a unique process depending on the specific issue you’re facing. Don’t hesitate to seek help from us, just comment and I will get to you. If you have any questions related to Install Debian on VirtualBox then also comment down. Enjoy your Debian experience and happy virtualization!
Related: How to Install Ubuntu on Windows 10 using VirtualBox?
Would you like to learn how to install Debian 11 or 12 on a virtual machine using Oracle VM VirtualBox on your Windows computer? Debian is a popular type of Linux, which is a free operating system.
This helpful article will show you how to do it step by step. It doesn’t matter if you’re new to Linux or already know a lot about it; this guide will help you try it out on a virtual machine before putting it on your actual PC.

Credit: Debian
Discovering What Debian Can Do
Debian is a free operating system that’s made by lots of people working together. It’s famous for using tools from GNU, the Linux kernel, and other free software. People like to use this OS because it’s really steady and safe for both servers and regular computers.
One unique thing about it is how it handles software. It has an intelligent system for installing, updating, and removing programs. This keeps your system safe and up-to-date with the latest fixes.
In this OS, you’ll find a bunch of different programs, files, and instructions. It’s designed so you can decide what you want to install. Plus, there’s a massive collection of software available, both free and not free, that you can quickly get through Debian’s software system.
Another cool thing about it is that you can decide which programs get updated and which ones don’t. This is helpful if you need to keep specific programs the same for compatibility reasons.
All in all, it is a really flexible and trustworthy operating system. It’s got great tools for managing software, lots of programs to choose from, and a helpful community of people who use and develop it.
Installing Debian on a Virtual Machine using VirtualBox
If you want to try Debian Linux with VirtualBox, you can do it in two ways: either put it on your actual PC or use a virtual machine. It’s easier and safer to try it out on a VM because it won’t mess with your computer.
To do this, you can use a program called VirtualBox, which Oracle makes. Our video guide or written instructions are below to help you set it up.
- To begin using Oracle VM VirtualBox, click on the “New” button. You’ll find this button inside the VirtualBox program. When you click it, a wizard will pop up. This wizard will ask you for some information to create a new virtual machine. It’ll walk you through each step, so it’s simple to set up and customize your VM the way you want.
- When you’re making a new virtual machine using VirtualBox, choose “Debian” in the Name field. Make sure the Type is set to Linux and the Version is 64-bit. Checking these settings will help your virtual machine run smoothly without any problems.
- For the best performance of your Debian system, set your virtual memory to at least 4GB. This helps your system handle memory better, so it doesn’t crash or lose data. Make sure to put it to 4GB or more, depending on what your system needs and how much memory you have.
- When you’re putting Debian on your computer for the first time, make sure to create a new virtual hard disk in the settings. This ensures that Debian is installed correctly and works well on your system. Pay close attention to this step during installation to avoid problems or mistakes later on.
- When you’re making a new virtual machine in VirtualBox, remember to pick VDI (VirtualBox Disk Image) as the file type for the hard disk. This helps the virtual machine run well and smoothly.
- When you’re making a backup of your virtual disk, it’s a good idea to choose the Dynamically Allocated option. This stores the data on your physical disk in a way that lets it grow when necessary. This makes sure you have enough space for your backups without using up too much storage on your physical disk.
- It’s best to keep the virtual disk where or how big it is to suit your needs. If you do, it could cause unexpected problems or mistakes. Before you make any changes to the virtual disk, it’s a good idea to talk to an expert or check the proper documents.
- After making the Debian virtual machine in VirtualBox, you’ll have to go into its settings and adjust the Shared Clipboard and Drag’n’Drop settings. You can find these in the General / Advanced section of the settings. Change them to Bidirectional so those features work smoothly.
- Turn off the Floppy disk in the Boot Order list under System / Motherboard settings. Then, move the Optical device to the top of the list.
- Decide how many virtual processors to use based on how powerful your PC is. You can do this in the motherboard settings for the virtual machine.
- To make the graphics better on your device, turn on 3D Acceleration. Go to Display/Screen settings and find where to enable it. Also, it boosts video memory to 128 MB for even better visuals. This helps the device handle high-quality graphics without any problems.
- To make the changes needed, please take out the IDE drive from the Storage settings. Then, put in an empty SATA optical drive instead.
- To make your system’s virtual disks work better, turn on the Host I/O Cache in the SATA controls settings. This lets the virtual machine use the host system’s memory to speed up reading and writing to the disk. Also, you can set up the virtual disk to be seen as an SSD. This makes it even faster to access data, boosting performance.
- To get started, find and pick the optical drive on your computer. Then, click on the icon in the right area. A new window will show up. Choose “Choose a disk file.” You’ll see your computer’s files. Pick the Debian ISO image file you downloaded earlier. After you select the file, you can start the installation.
- To turn on USB 3.0 (xHCI), go to the USB settings and choose to enable it. After you’ve done this, close the VM wizard to save your settings.
- It’s best to run the VirtualBox Debian virtual machine to finish installing the system. This ensures that everything is set up correctly and that all the essential parts are installed for the system to work smoothly.
Installing Debian 12 in a New Virtual Machine
- When you start the virtual PC, you’ll see the Debian GNU/Linux Installer Menu. To begin the graphical setup, click on the “Graphical Install” option on the menu.
- Please pick the language you want for Debian and then change its location to match what you prefer.
- Please select the Type of keyboard layout that matches what’s set up on your actual computer. This helps make sure that all software and apps work correctly for you.
- To set your hostname, type the name of your device or computer. You don’t have to include the domain name.
- To keep your system safe, make a strong password for your root account. This stops people from getting into your system and messing with important stuff.
- Please type in the username you want, and then go to the next step to check if it’s available.
- To start using your new user account, make a strong and unique password that follows the system’s rules. This password keeps your account safe and makes sure only you can use it. Take a moment to think of a good password with numbers, letters, and symbols mixed. Once you’ve got it, type it into the box to finish setting up your account.
- Please tell us where you are so we can set the time on your system clock right for your time zone.
- When you see the Partition Disks screen, pick the Guided option. Then, choose the whole disk you want to split into parts. This lets you set up the partitions how you wish. Just do what the screen says to finish.
- To organize your files on the disk you picked, you can decide to use one partition as the structure for all your files. This makes it simpler to divide and take care of your files.
- After you finish setting up the virtual disk, go ahead and choose the option to complete the partitioning and save all the changes you made to the disk.
- Please check the changes you made on the Partition Tables screen. If you’re happy with them, please confirm so we can apply them to the disk.
- To make the installation faster, you can choose to skip an extra media scan. Instead, you can confirm using a network mirror. This lets you install software straight from the internet, so you don’t have to put in installation disks manually.
- For better internet speed on your Debian system, pick the archive country nearest to you and use deb.debian.org. This makes it faster and more reliable to access its archive so that you can download and install packages easily.
- Please don’t type in any information about HTTP proxy setup or settings. We don’t need them for this task, and adding them could cause unexpected problems.
- You can choose to send package statistics to developers. If you want to help them improve the package management system and offer better service to users, select Yes.
- When you’re picking software, you’ll be asked to choose a desktop environment. This decides how your computer’s graphical interface looks and works, including the tools and apps you’ll use. Think about what you like and pick the desktop environment that fits you best.
- To put the GRUB Boot Menu on your virtual disk, pick the right option. After it’s done installing, please take out the image from your virtual machine and restart it. This makes sure the changes work right and your virtual machine runs well.
- Once your Debian operating system starts up in VirtualBox, please log in using your user account details. This lets you access your settings and files.
- If you want to know what Version of Debian you’re using, open the terminal and type “lsb_release -a”. This will show you all the details about your OS, like the version number and codename.
lsb_release -a
Conclusion
If you want to test out Debian without messing with your actual computer, you can use something called a virtual machine. Oracle VM VirtualBox is a good tool for this job. In this guide, we’ve laid out simple steps for getting your virtual machine set up just right.
We’ve also highlighted essential things to remember while doing it. With Debian’s safe and steady system, plus its easy-to-use software and helpful community, you’ll have a blast trying out this popular Linux.
If you want to learn about another kind of Linux, check out our easy guide on How to Install Kali Linux using VirtualBox. It is a strong and flexible operating system. People usually use it to test PC security and solve digital mysteries. This guide will help you set it up on a pretend device inside your real one using Oracle software. That way, you can try it out without any risk on your regular Windows PC.
Ready to discover the features of the Debian operating system and want to try it out without changing your computer’s primary setup? Say hello to VirtualBox, the answer to exploring Debian safely.
Whether you are a macOS, Windows, or Linux user, you can easily install and use Debian within a virtual environment. It’s like having a mini-computer inside your computer, where you can experiment with Debian’s cool features. Let’s see the method for installing Debian on a VirtualBox.
Prerequisites to Install Debian on VirtualBox
For the purpose of installing Debian on VirtualBox, check out the given hardware and software specifications:
- VirtualBox
- Debian ISO file
- Minimum 20GB disk space
- Minimum 4GB RAM
After fulfilling the mentioned prerequisites, move on to the Debian installation on VirtualBox.
How to Install Debian on VirtualBox
For beginners, it is quite easy to create a Debian machine on VirtualBox. To do so, follow these steps:
- Install the VirtualBox virtual machine software on your PC
- Download the Debian ISO file
- Create a new Debian virtual machine
- Configure the virtual machine
- Install Debian
- Carry out post-installation steps and customizations
The following sections expand on these steps.
1. Install VirtualBox
VirtualBox is available for Linux, Windows, and macOS users. So, if you do not have VirtualBox, open up its official website and download the version compatible with your host system.
The VirtualBox installation process can be different based on your operating system. Carefully check the detailed instructions, follow them, and start using VirtualBox without any hassle.
Our guide to installing VirtualBox on Linux will help you here.
Download: VirtualBox (Free)
2. Download the Debian ISO File
Next, download the ISO file of the latest Debian release. For this, open the Debian official website, navigate to the Downloads section, and select the appropriate ISO file with respect to your system architecture.
Make sure to verify the integrity of the downloaded ISO file to prevent any issues during installation.
Download: Debian 12.1 ISO file (Free)
3. Create a New Debian Virtual Machine
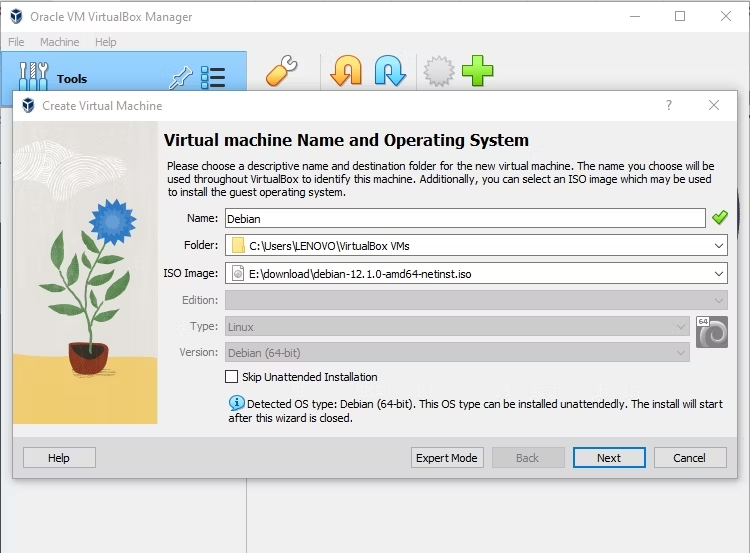
Now, launch VirtualBox and click on New for creating a new Debian Virtual Machine. Specify the desired Name of your machine. However, we recommend you name it Debian. Consequently, VirtualBox will automatically detect the OS Type and Version of your system.
You can also change the default location for storing the virtual machine file using the drop-down Folder menu.
With this selected, browse for the downloaded Debian ISO Image from the local storage and click Next.
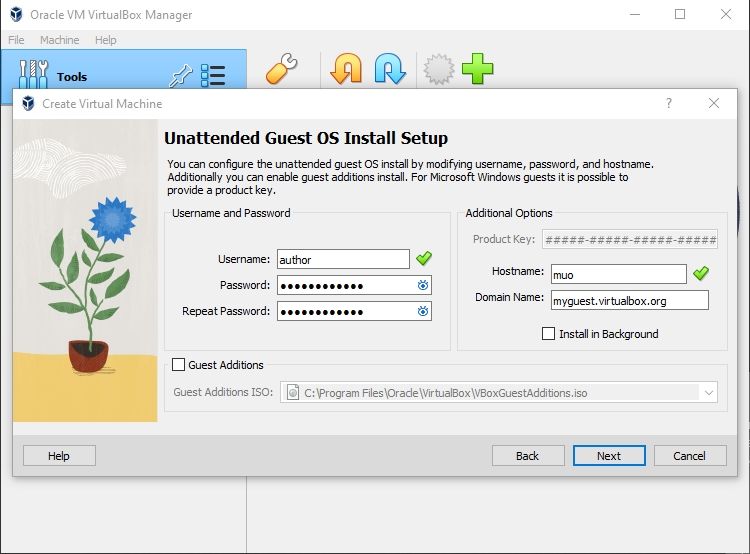
When prompted, configure the Username, Password, and Hostname. You can also mark other options as per your preferences.
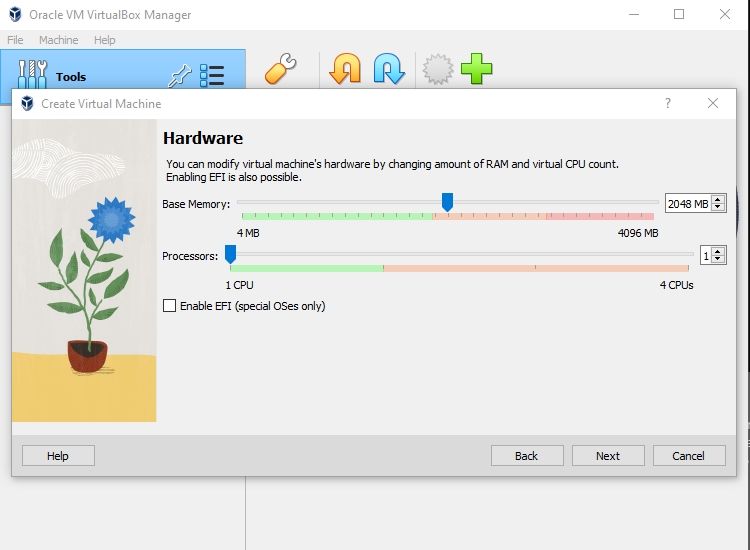
Go with the default settings of Base Memory size and the number of Processors and click Next.
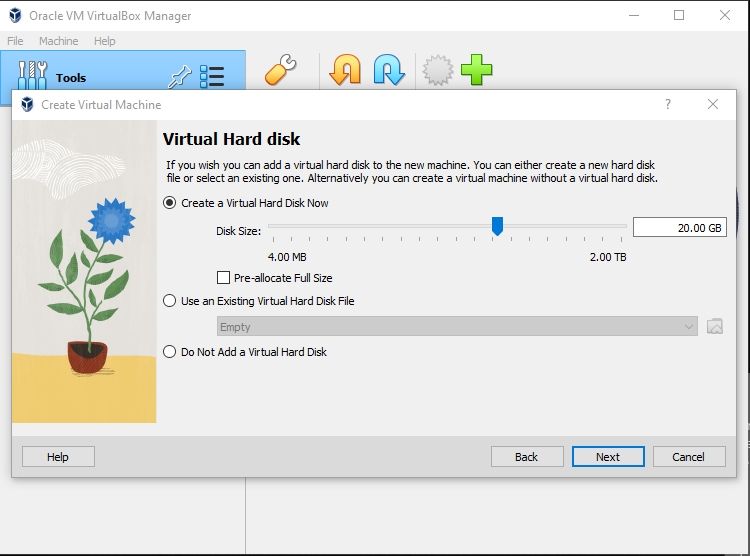
Mark the Create a Virtual Hard Disk Now checkbox, adjust the Disk Size slider, and click Next.
Now, you will see a table that summarizes the selected configuration for the new Debian virtual machine. Click Finish to create the virtual machine.
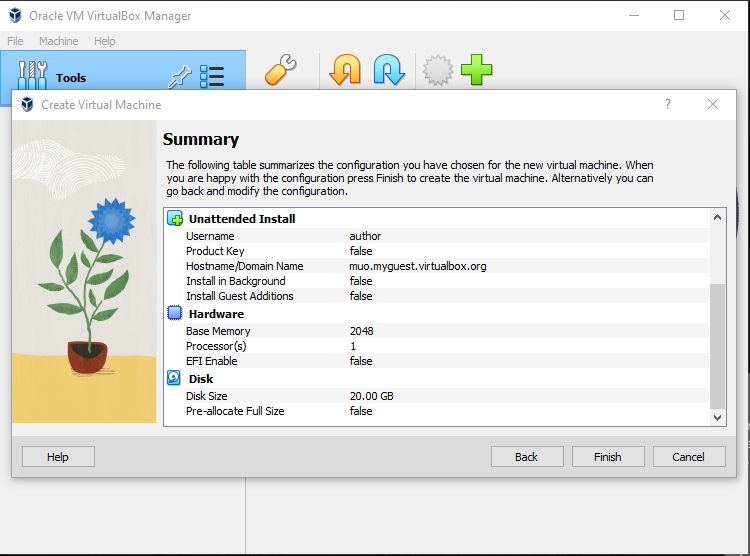
After creating the Debian virtual machine, you will be ready to set the virtual machine’s settings.
4. Configure the Debian Virtual Machine
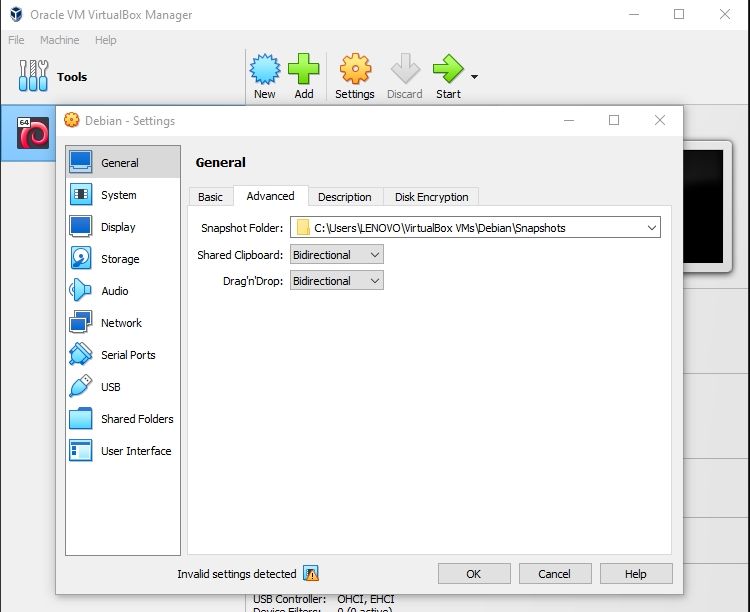
To configure more advanced settings of your virtual machine, select it (you should have named it «Debian») from the left pane and click on the Settings button.
Next, open General settings, navigate to the Advanced tab and select Bidirectional functionality for Shared Clipboard and Drag’n’Drop options.
Move to the System settings, rearrange the Boot Order, and choose Optical as the first and Hard Disk as the second boot device. Other than mentioned options, uncheck everything.
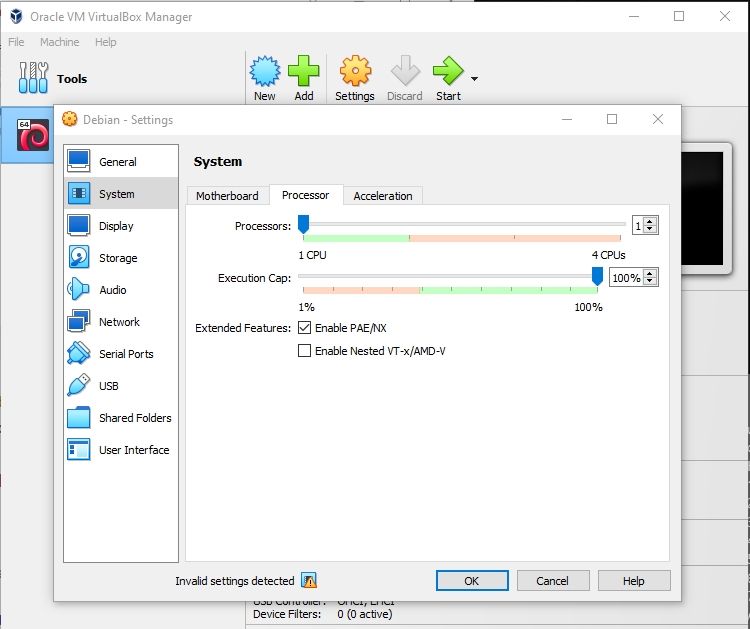
Then, switch to the Processor tab and mark the Enable PAE/NX checkbox.
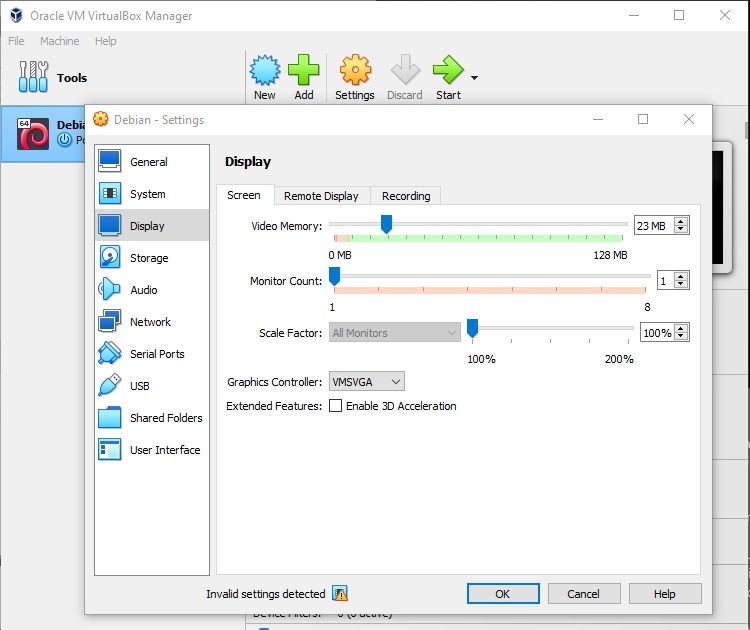
Navigate to the Display settings, choose the desired Video Memory for the Debian virtual machine, and unmark the Enable 3D Acceleration checkbox.
5. Install Debian
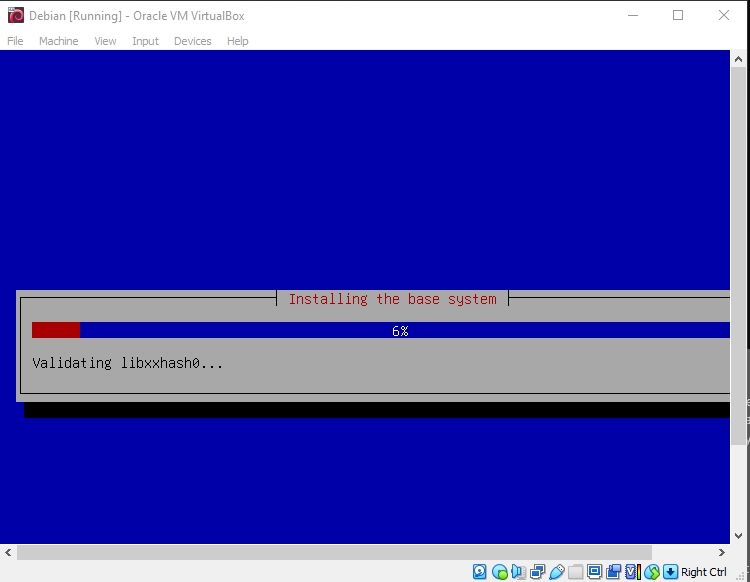
Press the Start button to install Debian on the VirtualBox. Your virtual machine will start up. Wait for a few minutes for the required packages and files to be installed.
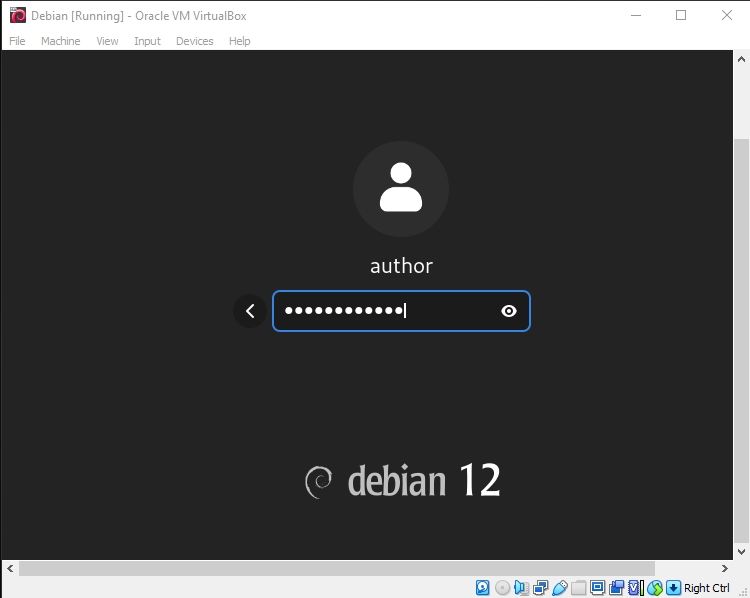
After completing the Debian installation, type the password which you configured earlier, and hit Enter.
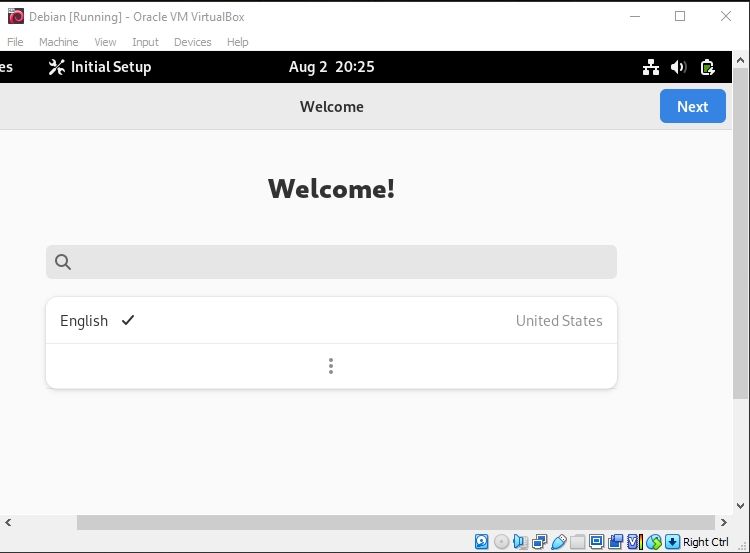
Welcome to the initial setup of your Debian system! Select English as the language of the setup wizard and click Next.
Choose the preferred keyboard layout or input method and click Next.

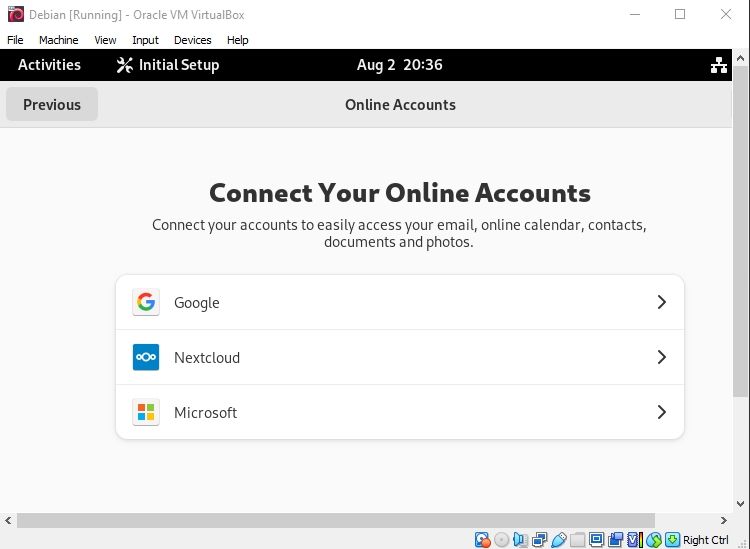
Connect any online accounts you require to access email, contacts, photos, documents, and online calendar.
That’s it! Your Debian system is now ready to use.
6. Post-Installation Setup
Once Debian is installed on VirtualBox, you have to perform some post-installation steps for enhancing your experience.
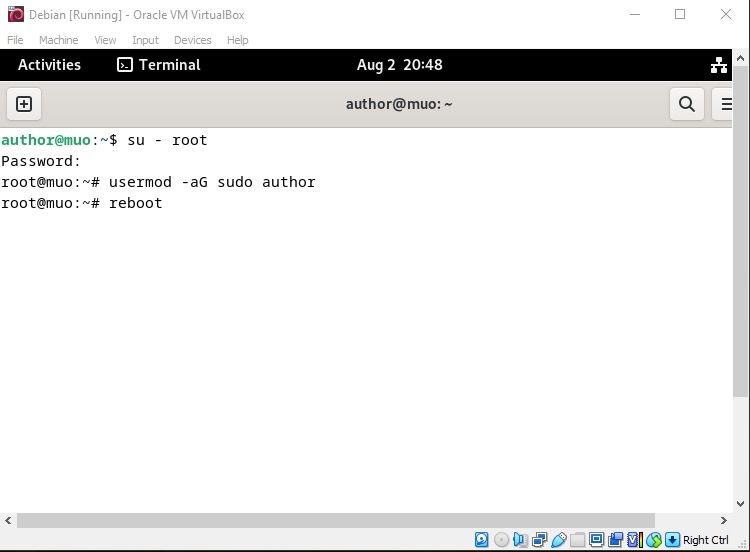
First, add the local user of your Debian system to the sudo group. This step is essential to grant the sudo or admin rights to the selected user. To do so, open Terminal using the Applications menu. Then, execute the following:
su - root
Now, specify the username in the given command to add it to the sudo group:
usermod -aG sudo <username>
After doing so, reboot your Debian system with:
reboot
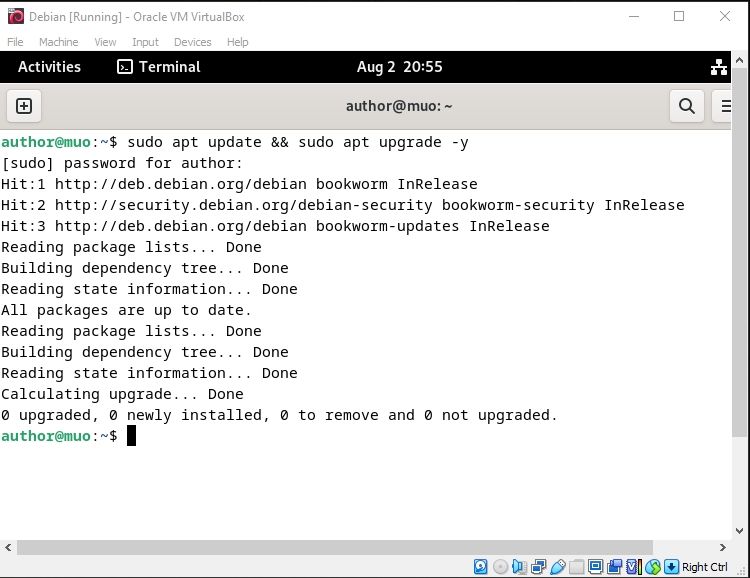
Upon restart, run the below command for updating and upgrading packages at once:
sudo apt update && sudo apt upgrade -y
This step ensures that your Debian system is up-to-date.
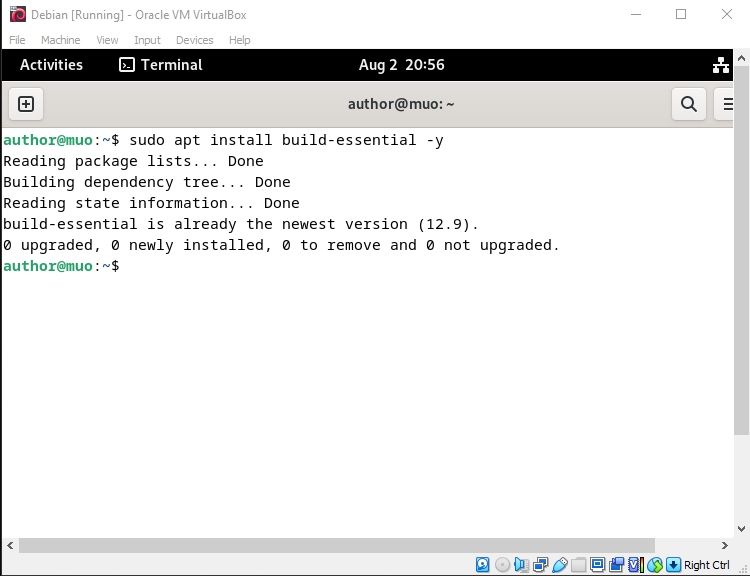
Consider installing the build-essential package. This package contains all the necessary packages and tools for enabling the developers to build and compile software from the source.
To install the build-essential package, enter:
sudo apt install build-essential -y
You have completed all post-installation steps. Now, you can customize the virtual machine by installing any preferred software, or making further tweaks to Debian.
Installing Debian on VirtualBox is Key
VirtualBox provides an invaluable platform for installing different operating systems, trying out new software, and exploring them without affecting your primary system. More specifically, you can install and run Debian in such a virtual environment.
So, dive into the world of the Debian operating system and discover its features at your pace.