
Applies ToWindows 11 Windows 10
Поддержка Windows 10 прекратится в октябре 2025 г.
После 14 октября 2025 г. корпорация Майкрософт больше не будет предоставлять бесплатные обновления программного обеспечения из Центра обновления Windows, техническую помощь и исправления безопасности для Windows 10. Ваш компьютер по-прежнему будет работать, но мы рекомендуем перейти на Windows 11.
Подробнее
Виртуализация позволяет устройству Windows эмулировать другую операционную систему, например Android или Linux. Включение виртуализации дает доступ к более крупной библиотеке приложений для использования и установки на устройстве. Если вы обновили устройство с Windows 10 до Windows 11, эти действия помогут включить виртуализацию.
Примечание: На многих устройствах Windows уже включена виртуализация, поэтому вам может не потребоваться выполнять эти действия.
Прежде чем приступить к работе, определите модель устройства и производителя. Эти сведения потребуются позже в процессе.
Перед началом работы рекомендуется открыть эту страницу на другом устройстве. Вот как получить UEFI из Windows:
-
В приложении «Настройки» на устройстве с Windows, выберите Восстановление системных > или используйте следующий ярлык:
Выздоровление
Примечание: В Windows 10 вы можете получить доступ к обновлению & Безопасность > Восстановление
-
В разделе Параметры восстановления рядом с пунктом Расширенный запуск выберите Перезапустить сейчас.
-
Компьютер перезагрузится в среде восстановления Windows. Выберите Устранение неполадок > Дополнительные параметры > параметры UEFI > перезапуск

-
Компьютер перезагрузится снова, и вы будете использовать служебную программу UEFI. На этом шаге на компьютере может появиться UEFI, который называется BIOS.

Примечание: Эти инструкции могут применяться, если вы обновили компьютер с Windows 10 до Windows 11.
-
Нажмите кнопку Пуск , введите компоненты Windows и выберите Включить или отключить компоненты Windows в списке результатов.
-
В открывшемся окне Компоненты Windows найдите платформу виртуальных машин и выберите ее.
-
Нажмите кнопку ОК. Возможно, потребуется перезагрузить компьютер
Нужна дополнительная помощь?
Нужны дополнительные параметры?
Изучите преимущества подписки, просмотрите учебные курсы, узнайте, как защитить свое устройство и т. д.
-
Home
-
News
- 2 Ways – How to Enable Virtualization in Windows 10
By Tina |
Last Updated
If the virtualization in Windows 10 is disabled, you may need to enable it. Do you know how to enable virtualization in Windows 10 or how to enable virtualization in BIOS? This post from MiniTool shows 2 ways to enable virtualization Windows 10.
CPU virtualization is a hardware feature found in all current AMD & Intel CPUs that allows a single processor to act as it was multiple individual CPUs. CPU virtualization allows the operating system to use CPU more effectively and efficiently on the computer so that it makes the computer fast.
CPU virtualization is also the requirement for many virtual machine software since it is able to make them run normally. So, many users would like to enable virtualization Windows 10.
However, some of them do not know how to enable virtualization in Windows 10 and ask for help. So, in this post, we will show how to enable virtualization in Windows 10.
2 Ways – How to Enable Virtualization in Windows 10
In this section, we will elaborate on 2 ways to enable virtualization in Windows 10.
Enable Virtualization Windows 10 in BIOS
As we have mentioned in the above part, virtualization can be enabled in BIOS. So, we will show you how to enable virtualization in BIOS.
Now, here is the tutorial.
- Power off your computer.
- Then press the specific hotkey to enter BIOS. The hotkeys may vary due to different brands. It usually is Esc, F2 or Del, etc.
- Then navigate to the Advanced tab, press Enter to continue.
- Select Virtualization and enable it.
- After that, save the changes and reboot your computer.
Once all steps are finished, you have successfully enabled virtualization in Windows 10.
Enable Virtualization Windows 10 in Settings
Besides enabling virtualization Windows 10 in BIOS, you can also choose to enable virtualization Windows 10 in Settings.
Now, here is the tutorial.
1. Before proceeding on, you need to check whether your computer has enabled virtualization Windows 10.
2. Open Task Manager, and go to the Performance
3. On the bottom right, you can see Virtualization and check whether it is enabled or disabled.
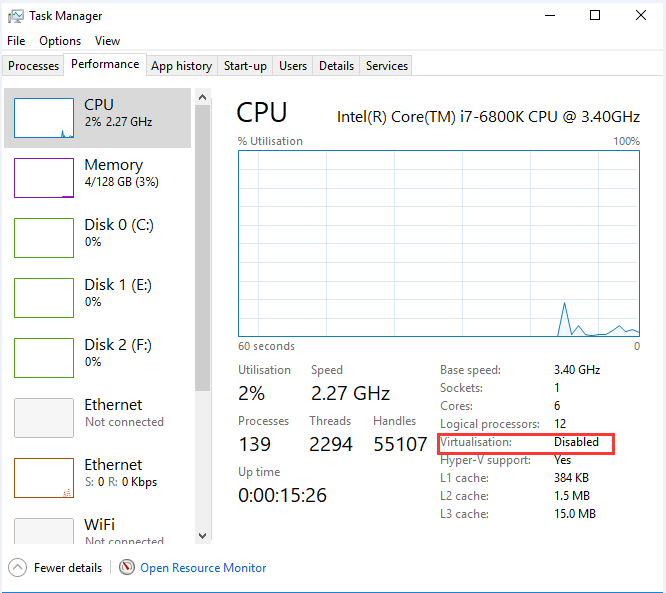
4. If you find that the Virtualization is disabled, you can go on your reading to find how to enable Virtualization in Windows 10.
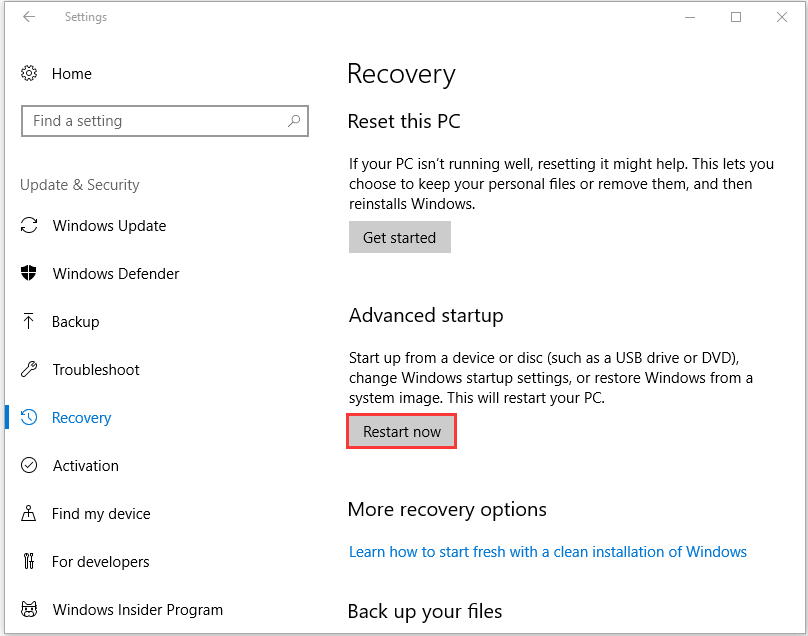
5. Press Windows key and I key together to open Settings.
6. Choose Update & Security.
7. In the pop-up window, navigate to the Recovery tab on the left panel.
8. In the Advanced section, click Restart now.
9. You will enter the Windows Recovery Environment. Click Troubleshoot > Advanced options > UEFI Firmware Settings.
10. Then click Restart now to continue.
11. Next, you will enter the BIOS settings.
12. Select the Virtualization and choose to enable it.
Once all steps are finished, you have successfully enabled virtualization in Windows 10.
Related article: How to Fix UEFI Firmware Settings Missing Windows 10
Final Words
As for how to enable virtualization in Windows 10, this post has shown 2 ways. If you want to enable virtualization Windows 10, you can try those ways. If you have any different idea of enabling virtualization Windows 10, you can leave a message in the comment zone.
About The Author
Position: Columnist
Tina is a technology enthusiast and joined MiniTool in 2018. As an editor of MiniTool, she is keeping on sharing computer tips and providing reliable solutions, especially specializing in Windows and files backup and restore. Besides, she is expanding her knowledge and skills in data recovery, disk space optimizations, etc. On her spare time, Tina likes to watch movies, go shopping or chat with friends and enjoy her life.
Начинающие программисты часто сталкиваются с необходимостью использования виртуальной машины, но при этом не до конца понимают, как включить аппаратную виртуализацию. При этом виртуализация — один из самых полезных инструментов для разработчика, особенно если код пишется под смартфоны. В статье расскажем о преимуществах виртуализации и о том, как включить технологию в Windows 10 и 11.

Что такое аппаратная виртуализация и зачем она нужна
Виртуализация — это разделение ресурсов одного компьютера на две ОС одновременно. В этом случае ПК продолжает работать под управлением Windows, а параллельно в нем независимо запущена оболочка Android.
В результате вы получаете две операционные системы на компьютере или ноутбуке, которые обладают выделенными ресурсами и собственной файловой системой. Windows является домашней, а гостевая запускается внутри нее, как обычная программа.
Виртуализация на Windows может понадобиться для эмуляции Linux, Android или другой версии Windows. Технология нужна для тестирования кода или получения доступа к приложениям, которых нет в домашней системе.
Такое решение обладает рядом преимуществ для разработчика:
- экономия — нет необходимости покупать дополнительный компьютер;
- безопасность — при виртуализации машина получает независимый от основной ОС участок памяти, поэтому даже в случае проникновения вирусов основная информация защищена от удаления;
- удобство — можно сразу работать в обеих ОС на одном компьютере.
Если вы работаете с Android, то также можете использовать программную виртуализацию: для ее настройки не нужно заходить в настройки БИОС, но придется столкнуться с существенными ограничениями — низкой скоростью работы и одноядерным режимом. Примером ПО для программной виртуализации является Bluestacks или виртуализация по-русски — отечественные аналоги в эпоху импортозамещения.
Как проверить, поддерживает ли компьютер аппаратную виртуализацию
Не все компьютеры под управлением Windows 10 или 11 поддерживают виртуализацию. Поэтому, если вы только планируете приобрести ПК или ноутбук, рекомендуем узнать о наличии функции заранее.
Чтобы понять, доступна ли виртуализация на устройстве, зайдите в «Диспетчер задач» с помощью клавиш Ctrl + Shift + Esc и далее в раздел «Производительность». Если в списке параметров под графиком есть упоминание виртуализации или Hyper-V, то вы можете настроить виртуализацию в будущем.
В качестве альтернативы можно загрузить сторонние утилиты для проверки доступа к виртуализации, в зависимости от процессора:
- Intel — загрузите Intel Processor Identification Utility с сайта производителя и откройте раздел CPU. Если рядом с параметром Virtualization есть галочка, то технология доступна;
- AMD — если у вас процессор AMD, то установите программу AMD-V Detection Utility и запустите ее от имени администратора. ПО сразу сообщит вам, доступно ли включение виртуализации.
Пошаговая инструкция по включению аппаратной виртуализации через BIOS/UEFI
Настройка виртуализации в Windows 10 и 11 проходит через BIOS или UEFI. Не стоит пугаться этих программ: далее мы подробно объясним, как включить виртуализацию без каких-либо рисков.
Для начала нужно зайти в BIOS/UEFI. Для этого при перезагрузке нажмите на F1, F2 или Del — на разных моделях компьютеров и ноутбуков срабатывают разные клавиши.
Как включить виртуализацию на процессорах Intel и AMD:
- Находясь в BIOS/UEFI, нажмите на F7 или перейдите в раздел Advanced Mode.
- Найдите вкладку CPU Configuration.
- Нажмите на Intel Virtualization Technology для процессоров Intel или CVM Mode для AMD — параметр Disabled должен смениться на Enabled.
- Выйдите из оболочки, предварительно сохранив изменения.
После этого можно перейти к финальному этапу запуска виртуализации на вашем ПК.
Настройка виртуализации в Windows после включения в BIOS/UEFI
Осталось выполнить несколько действий внутри оболочки Windows, после чего вы сможете запустить виртуальную машину:
- Включите технологию Hyper-V — для этого в панели управления выберите “Программы”, затем “Программы и компоненты”, после чего зайдите во “Включить или отключить компоненты Windows”, нажмите на Hyper-V и сохраните изменения.
- Установите гипервизор — для начала оптимальным вариантом будет VirtualBox от Oracle.
- Создайте виртуальную машину в консоли Microsoft Hyper-V Manager — найдите ее в поиске по программам, выберите нужный гипервизор и следуйте контекстным инструкциям.
- Создайте виртуальную машину в гипервизоре — выберите нужную ОС, выделите ресурсы и добавьте образ операционной системы.
- Запустите аппаратную виртуализацию — теперь вы можете использовать вторую ОС через окно гипервизора.
Если вы работаете в нескольких ОС, то виртуализация еще больше все упростит. Вы можете создать более одной виртуальной машины в VirtualBox — они могут быть под управлением как одной, так и разных операционных систем.
Главное, не забывайте держать под контролем объем выделенных ресурсов под решение конкретных задач. В противном случае вы рискуете замедлением работы. Особенно это касается устройств, на которых менее 16 Гб оперативной памяти.
Часто возникающие проблемы и их решение
Что делать, если виртуализация не включается в BIOS/UEFI?
Проверьте, доступна ли виртуализация на устройстве, после чего повторно перезагрузите компьютер или ноутбук.
Где загрузить ОС для гипервизора?
Дистрибутивы операционных систем можно скачать на официальных сайтах разработчиков.
Как улучшить производительность виртуальных машин?
Выделяйте ресурсы, достаточные для эффективной работы. Соблюдайте баланс между домашней и гостевой ОС, особенно если на устройстве не так много оперативной памяти.
There are several things that make Windows 10 the best Windows version there has ever been. One such feature is the support for hardware virtualization and therefore, the ability to create virtual machines. To those unaware and in layman’s terms, virtualization is the creation of a virtual instance of something (the list includes an operating system, storage device, network server, etc.) on the same set of hardware. Creating a virtual machine allows users to test beta applications in an isolated environment, use and easily switch between two different operating systems, etc.
Although virtualization is a feature that most users have no use for, it is disabled by default on Windows. One needs to manually enable it from the BIOS menu and then install Windows’ virtualization software (Hyper-V). In this article, we will be covering all the little details of enabling virtualization on Windows 10 and also show you how to create a virtual machine.

Table of Contents
Requisites for Virtualization
Hardware virtualization was first introduced in Windows 8 and has since evolved to include a greater number of features such as enhanced session mode, high fidelity graphics, USB redirection, Linux secure boot, etc. in Windows 10. Although, better and more virtualization features also demand a more powerful system. Below is a list of prerequisites your computer needs to possess in order for you to create and run a virtual machine.
1. Hyper-V is only available on Windows 10 Pro, Enterprise, and Education versions. If you have Windows 10 Home and wish to create a virtual machine, you will need to upgrade to the Pro version. (If you are unsure about your Windows version, type winver in the start search bar or run command box and press enter.)

2. Your computer should be running on a 64-bit processor that supports SLAT (Secondary Level Address Translation). To check for the same, open the System Information application and review the System Type & Hyper-V Second Level Address Translation Extensions entries.

3. A minimum of 4gb of system RAM should be installed, although, having more than that would make for a much smoother experience.
4. There should also be enough free storage space to install the desired OS on the virtual machine.
Check if Virtualization is enabled in BIOS/UEFI
Virtualization technology may be already enabled on your computer. To check if that is indeed the case, follow the below steps.
1. Search for Command Prompt or Powershell (either of them works) in the search bar and click on Open.

2. Type systeminfo.exe and press enter to execute the command. It may take a few seconds for the window to gather all the system information and display it for you.
3. Scroll through the displayed information and try to locate the Hyper-V Requirements section. Check the status for Virtualization Enabled in Firmware. It should, as obvious, read Yes if Virtualization is enabled.

Another way to check if virtualization is enabled is to open Windows Task Manager (Ctrl + Shift + Esc) and in the Performance tab, check its status (Ensure the computer’s CPU is selected on the left). If virtualization isn’t enabled, first enable it from the BIOS menu and then install Hyper-V to create virtual machines.

Enable Virtualization in BIOS/UEFI
BIOS, the software that is responsible for making sure your computer boots on properly, also handles a number of other advanced features. As you might have guessed, BIOS also contains the settings to enable virtualization technology on your Windows 10 computer. To enable Hyper-V and manage your virtual machines, you will need first to enable virtualization in the BIOS menu.
Now, BIOS software differs from manufacturer to manufacturer, and also the mode of entry (BIOS key) to the BIOS menu is different for each. The easiest way to enter BIOS is to press one of the following keys repeatedly (F1, F2, F3, F10, F12, Esc, or Delete key) when the computer boots. If you do not know the BIOS key specific to your computer, follow the below guide instead and enable virtualization on Windows 10 PC:
1. Open Windows Settings by pressing the hotkey combination of Windows key + I and click on Update and Security.

2. Using the left navigation menu, move to the Recovery settings page.
3. Here, click on the Restart now button under the Advanced startup section.

4. On the Advanced startup screen, click on Troubleshoot and enter Advanced Options.
5. Now, click on UEFI Firmware Settings and reboot.
6. The precise location of Virtualization or Virtual Technology settings will be different for each manufacturer. In the BIOS/UEFI menu, look for the Advanced or Configuration tab, and under it, enable virtualization.
3 Ways to Enable Hyper-V in Windows 10
Microsoft’s native hypervisor software is called Hyper-V, and it lets you create and manage virtual computer environments, also known as virtual machines on a single physical server. Hyper-V can run operating systems virtually, along with hard drives and network switches. Advanced users can even use Hyper-V to virtualize servers.
While Hyper-V is built-in on all supported PCs, it needs to be enabled manually. There are exactly 3 ways to install Hyper-V on Windows 10, all of which are explained in detail below.
Method 1: Enable Hyper-V From the Control Panel
This is the easiest & most straightforward method as you have a graphical user interface at your disposal. You merely need to navigate your way to the required destination and tick a box.
1. Press Windows key + R to launch the Run command box, type control or control panel in it, and click on OK to open the same.

2. Look for Programs and Features in the list of All Control Panel items and click on it. You can change the icon size to small or large to make looking for the item easier.

3. In the Programs and Features window, click on the Turn Windows features on or off hyperlink present on the left.

4. Finally, enable Virtualization by ticking the box next to Hyper-V and click on OK.

5. Windows will automatically start downloading and configuring all the files required to create a virtual machine on your computer. Once the download process completes, you will be requested to Restart.
Click on Restart now to reboot your PC immediately or click on Don’t restart and restart manually at a later time as per your convenience. Virtualization will only be enabled after the reboot, so do not forget to perform one.
Method 2: Enable Hyper-V using Command Prompt
A single command is all you need to enable and configure Hyper-V from the Command Prompt.
1. Type Command Prompt in the Start search bar (Windows key + S), right-click on the search result, and select Run as Administrator.

Note: Click on Yes in the User Account Control pop-up that appears requesting permission to allow the program to make changes to the system.
2. In the now elevated Command Prompt window, type the below command and press enter to execute it.
Dism /online /Get-Features | find “Microsoft-Hyper-V”

3. You will now receive a list of all available Hyper-V related commands. To install all Hyper-V features, execute the command
Dism /online /Enable-Feature /FeatureName:Microsoft-Hyper-V-All

4. All Hyper-V features will now be installed, enabled, and configured for your use. To complete the process, a computer restart is required. Press Y and hit enter to restart from the command prompt itself.
Method 3: Enable Hyper-V using Powershell
Similar to the previous method, you only need to execute a single command in an elevated Powershell window to install all Hyper-V features.
1. Similar to Command Prompt, Powershell also needs to be launched with administrative privileges to enable Hyper-V. Press Windows key + X (or right-click on the Start button) and select Windows Powershell (Admin) from the power user menu.

2. To obtain a list of all available Hyper-V commands and features, execute
Get-WindowsOptionalFeature -Online | Where-Object {$_.FeatureName -like “Hyper-V“}
3. Execute the first command in the list to install and enable all Hyper-V features. The entire command line for the same is
Enable-WindowsOptionalFeature -Online -FeatureName Microsoft-Hyper-V -All
4. Press Y & hit enter to restart your PC and enable Hyper-V.
How to create a Virtual Machine using Hyper-V?
Now that you have enabled virtualization and set up Hyper-V on Windows 10, it is time to put the technology to use and create a virtual machine. There are multiple ways to create a virtual machine (Hyper-V Manager, PowerShell, and Hyper-V Quick Create), but the easiest one is by using the Hyper-V Manager application.
1. Open Control Panel using your preferred method and click on Administrative Tools. You can also open the same (Windows Administrative Tools) directly through the search bar.

2. In the following explorer window, double-click on Hyper-V Manager.
3. A Hyper-V manager window will open soon. On the left, you will find the name of your computer, select it to proceed.
4. Now, click on Action present at the top and select New, followed by Virtual Machine.
5. If you want to create a Virtual Machine with the most basic configuration, directly click on the Finish button in the New Virtual Machine Wizard window. On the other hand, to customize the Virtual Machine, click on Next and go through the individual steps one by one.
6. You will find the new virtual machine on the right panel of the Hyper-V Manager window. Options to turn it on or off, shut down, settings, etc. will also be present there.
Recommended:
- 8 Ways to Open Windows Services Manager in Windows 10
- How to Fix Windows 10 running slow after update
- 3 Ways to Share Wi-Fi Access without revealing Password
So that is how you can enable virtualization and create a virtual machine on Windows 10 PC. If you are having a hard time understanding any of the steps, comment down below, and we will get back to you ASAP.