
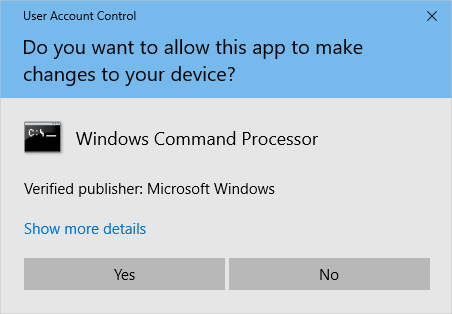
Enabling UAC virtualization in the Task Manager is a crucial step in enhancing the security and functionality of your system. Did you know that UAC virtualization allows certain applications to run smoothly, even with restricted user access? By enabling this feature, you can ensure that these applications continue to work seamlessly without compromising the overall security of your system.
To enable UAC virtualization in Task Manager, you need to follow a few simple steps. First, open the Task Manager by pressing Ctrl+Shift+Esc or right-clicking the taskbar and selecting «Task Manager.» Then, go to the «Processes» tab and locate the application for which you want to enable virtualization. Right-click on the application and select «Properties.» In the «Properties» window, go to the «Compatibility» tab and check the option that says «Run this program as an administrator.» By enabling UAC virtualization, you can ensure that the application runs smoothly and securely, providing a seamless user experience.
To enable UAC virtualization in Task Manager, follow these steps:
- Open Task Manager by right-clicking on the Taskbar and selecting «Task Manager» from the menu.
- In Task Manager, go to the «Options» menu and select «Show UAC virtualization status.»
- A new column called «UAC virtualization» will appear, showing the status of virtualization for each process.
- To enable UAC virtualization for a specific process, right-click on it and select «Enable UAC virtualization.»
- To disable UAC virtualization for a process, right-click on it and select «Disable UAC virtualization.»
Understanding UAC Virtualization in Task Manager
Task Manager is a powerful tool in Windows that allows users to monitor and manage various processes and applications running on their system. One feature of Task Manager is UAC (User Account Control) Virtualization, which provides compatibility for older applications that may not be fully compatible with the current security features of Windows.
Enabling UAC Virtualization in Task Manager can be beneficial when dealing with legacy applications that rely on older security models or do not have the necessary permissions to access certain system resources. By enabling UAC Virtualization, these applications can run with the required permissions without compromising the overall security of the system.
In this article, we will guide you through the process of enabling UAC Virtualization in Task Manager, step by step. We will also discuss the advantages and considerations when using this feature. So let’s get started!
Step 1: Open Task Manager
The first step to enable UAC Virtualization in Task Manager is to open the Task Manager window. There are several ways to access Task Manager in Windows:
- Press Ctrl + Shift + Esc on your keyboard.
- Right-click on the taskbar and select Task Manager from the context menu.
- Press Ctrl + Alt + Del, then click on Task Manager.
Once Task Manager is open, you will see a list of running processes and applications.
Step 2: Open the Properties of an Application
To enable UAC Virtualization for a specific application, you need to open its properties. Follow these steps:
- In Task Manager, go to the Details tab.
- Right-click on the application you want to enable UAC Virtualization for.
- From the context menu, click on Properties.
The Properties window for the selected application will appear.
Step 3: Enable UAC Virtualization
Once you have opened the Properties window of the desired application, follow these steps to enable UAC Virtualization:
- In the Properties window, go to the Compatibility tab.
- Check the box that says Enable UAC Virtualization.
- Click on OK to save the changes.
UAC Virtualization is now enabled for the selected application.
Considerations When Using UAC Virtualization
While UAC Virtualization can be useful for running older applications with limited permissions, there are a few considerations to keep in mind:
- UAC Virtualization may not work for all applications. Some applications may require additional permissions or compatibility settings to function properly.
- Enabling UAC Virtualization does not guarantee full compatibility with all Windows features. Certain features or functionalities may still be restricted.
- Virtualized applications may not have access to system resources that require elevated privileges. This can impact the functionality of certain applications.
- It is recommended to test the application thoroughly after enabling UAC Virtualization to ensure it works as intended.
By considering these factors, you can make an informed decision about whether to enable UAC Virtualization for a specific application.
Additional Information: Disabling UAC Virtualization
If you need to disable UAC Virtualization for an application, follow the same steps as enabling, but uncheck the Enable UAC Virtualization box in the application’s properties. Click on OK to save the changes.
Now that you know how to enable UAC Virtualization in Task Manager and understand the considerations involved, you can effectively manage and run applications that require limited permissions or compatibility.

Enabling UAC Virtualization in Task Manager
If you want to enable UAC virtualization in Task Manager, there are a few steps you can follow. UAC (User Account Control) virtualization is a feature in Windows that allows legacy applications to run under a virtualized environment for compatibility purposes. Here’s how you can enable it:
1. Open the Task Manager by right-clicking on the taskbar and selecting «Task Manager» or by using the Ctrl+Shift+Esc keyboard shortcut.
2. In the Task Manager, click on the «File» menu and choose «Run new task.»
3. Type «regedit.exe» in the «Open» field and click «OK» to open the Registry Editor.
4. In the Registry Editor, navigate to the following key:
HKEY_LOCAL_MACHINE\SOFTWARE\Microsoft\WindowsNT\CurrentVersion\Image File Execution Options
5. Right-click on the «Image File Execution Options» key and select «New» followed by «Key.» Name the key «taskmgr.exe» (without the quotes).
6. Right-click on the newly created «taskmgr.exe» key and select «New» followed by «DWORD (32-bit) Value.» Name the value «EnableVirtualization» (without the quotes).
7. Double-click on the «EnableVirtualization» value and set its data to «1» to enable UAC virtualization for Task Manager.
8. Close the Registry Editor and restart your computer for the changes to take effect.
That’s it! You have successfully enabled UAC virtualization in Task Manager. This feature can be useful for running older applications that may not
Key Takeaways: How to Enable UAC Virtualization in Task Manager
- UAC virtualization can be enabled in Task Manager to run certain programs with virtualized file and registry settings.
- To enable UAC virtualization, open Task Manager by pressing Ctrl+Shift+Esc or right-clicking on the taskbar and selecting «Task Manager.»
- In the Task Manager window, go to the «Details» tab and locate the program you want to enable UAC virtualization for.
- Right-click on the program and select «Properties.»
- In the Properties window, go to the «Compatibility» tab and check the box that says «Run this program as an administrator» and «Enable UAC virtualization.»
Frequently Asked Questions
Are you wondering how to enable User Account Control (UAC) Virtualization in Task Manager? Read on to find answers to some common queries.
1. What is UAC Virtualization in Task Manager?
In Task Manager, UAC Virtualization refers to a feature that allows applications to run with virtualized file and registry system access. This essentially means that applications running with UAC Virtualization enabled are given their own virtual environment, separate from the actual system files and registry.
UAC Virtualization helps to ensure compatibility of legacy applications by redirecting requests for file and registry system resources, preventing potential conflicts with the operating system.
2. How can I enable UAC Virtualization in Task Manager?
To enable UAC Virtualization in Task Manager, follow these steps:
1. Open Task Manager by pressing Ctrl + Shift + Esc or by right-clicking on the taskbar and selecting «Task Manager».
2. In Task Manager, click on the «Details» tab.
3. Right-click on the desired application and select «Properties».
4. In the properties window, click on the «Compatibility» tab.
5. Check the box that says «Run this program as an administrator» and click on «Apply» and then «OK».
UAC Virtualization will now be enabled for the selected application, allowing it to run in its own virtual environment.
3. Can I enable UAC Virtualization for all applications in Task Manager?
No, UAC Virtualization needs to be enabled on a per-application basis in Task Manager. It cannot be enabled for all applications simultaneously.
You will need to follow the steps mentioned in question 2 for each individual application you want to enable UAC Virtualization for.
4. What are the benefits of enabling UAC Virtualization in Task Manager?
The benefits of enabling UAC Virtualization in Task Manager include:
- Compatibility: UAC Virtualization helps to ensure compatibility of legacy applications by allowing them to run with virtualized file and registry system access.
- Security: By running applications with UAC Virtualization, potential conflicts with the operating system are minimized, reducing the risk of system vulnerabilities.
- Isolation: Each application running with UAC Virtualization enabled has its own virtual environment, separate from the actual system files and registry, providing an isolated space for the application to operate in.
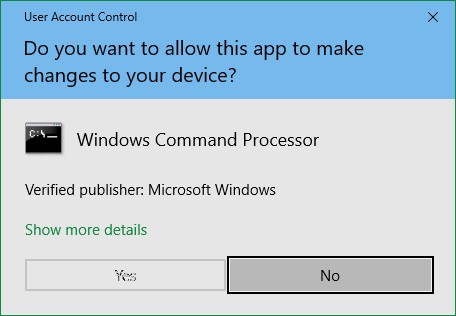
5. How can I disable UAC Virtualization in Task Manager?
To disable UAC Virtualization in Task Manager for a specific application, follow these steps:
1. Open Task Manager by pressing Ctrl + Shift + Esc or by right-clicking on the taskbar and selecting «Task Manager».
2. In Task Manager, click on the «Details» tab.
3. Right-click on the desired application and select «Properties».
4. In the properties window, click on the «Compatibility» tab.
5. Uncheck the box that says «Run this program as an administrator» and click on «Apply» and then «OK».
UAC Virtualization will now be disabled for the selected application.
In conclusion, enabling UAC virtualization in Task Manager is a straightforward process that can help enhance the security and compatibility of your system. By following the steps outlined in this article, you can ensure that your applications run smoothly while still maintaining the necessary level of user account control.
Remember, UAC virtualization allows older applications to function properly on newer operating systems without compromising system security. It is important to keep this feature enabled to prevent any compatibility issues and maintain a secure computing environment. With the knowledge gained from this article, you can easily enable UAC virtualization in Task Manager and enjoy the benefits it provides.
How To Enable UAC Virtualization In Task Manager
User Account Control (UAC) is a security feature in Microsoft Windows that helps prevent unauthorized changes to your operating system. It accomplishes this by requesting permission when tasks are initiated that could potentially harm the system, thereby acting as a barrier between standard user operations and administrative functions. While UAC enhances security, it can also interfere with certain applications, particularly older programs that aren’t designed for the modern Windows environment. In such cases, enabling UAC virtualization can be a practical solution.
This article will guide you through enabling and managing UAC virtualization through Windows Task Manager. While this guide may not reach 5000 words in detail, it will cover the necessary steps comprehensively. Let’s delve into this process step by step, ensuring clarity and efficiency along the way.
Understanding UAC Virtualization
Before we get into enabling UAC virtualization, it is essential to understand what it entails. UAC virtualization is a method by which Windows handles the needs of legacy applications. When an old application requires administrative privileges, UAC virtualization intercepts these requests, providing a virtualized view of the file system and registry to the application, allowing it to operate without requiring administrator access. For modern applications designed with UAC in mind, this virtualization is unnecessary and may lead to undesirable behavior. Enabling UAC virtualization for specific applications can improve compatibility, making it easier to use existing software on newer Windows versions.
Why Enable UAC Virtualization?
There are several reasons to enable UAC virtualization, especially for users who frequently run older software or custom applications:
-
Enhanced Compatibility: Legacy programs that require access to protected areas of the system can function normally without needing full administrative rights.
-
Security Overlay: Even when using applications that are not UAC aware, virtualization still provides some level of security by limiting the application’s access to protected components of your system.
-
Operational Continuity: Increased productivity through fewer disruptions caused by permission prompts or access restrictions.
Prerequisites for Enabling UAC Virtualization
Before proceeding with enabling UAC virtualization via Task Manager, ensure you have the following prerequisites:
-
Administrator Access: You need administrative privileges to change settings related to UAC and Task Manager.
-
Compatible Software: Make sure the software you are trying to virtualize is indeed compatible with UAC virtualization. Running too many legacy applications can lead to more significant issues.
Step-by-Step Guide to Enable UAC Virtualization in Task Manager
Here is a detailed guide on how to enable UAC virtualization for applications using Windows Task Manager.
Step 1: Open Task Manager
-
Accessing Task Manager: You can open Task Manager by right-clicking on the taskbar and selecting «Task Manager.» Alternatively, you can press
Ctrl + Shift + Esc, orCtrl + Alt + Deleteand select «Task Manager» from the options. -
Navigating to More Details: If you see the simple view of Task Manager, click on «More details» in the bottom-left corner to expand the interface.
Step 2: Locate the Application
-
Running Applications: Once in the expanded view of Task Manager, navigate to the «Processes» tab. Here you will see a list of currently running applications and processes.
-
Identifying Your Application: Look for the program that you want to enable UAC virtualization for in the list. You can also see any associated processes that might help identify the main application you’re focusing on.
Step 3: Reviewing the Process
-
Right-Click Options: After identifying the application, right-click on it to reveal contextual options.
-
Properties: In the context menu, select «Properties.» This will open a window that provides detailed information about the application.
Step 4: Checking UAC Virtualization Status
-
Compatibility Tab: In the properties window, navigate to the «Compatibility» tab.
-
Enable UAC Virtualization: Here, you look for an option labeled «Run this program as an administrator.» Make sure this box is unchecked if you want to enable UAC virtualization, as enabling it will prevent virtualization from functioning correctly.
Step 5: Enabling UAC Virtualization via Compatibility Settings
-
Modify Settings: In the Compatibility tab, you may see another option titled «Run this program in compatibility mode for:» with a dropdown menu. While it isn’t explicitly related to UAC virtualization, selecting an older version of Windows (such as Windows XP or Windows 7) can enhance compatibility and allow virtualization to operate more effectively.
-
Apply Changes: After marking the appropriate checkboxes and making selections, click «Apply,» and then «OK» to save your changes.
Step 6: Restart the Application
-
Restarting Process: Close the properties window and return to Task Manager. If the application is still running, right-click on it and select «End task» to close it.
-
Re-launching the Application: Start the application again from its original shortcut or executable file.
Verifying UAC Virtualization
Once you have managed to configure UAC virtualization for the desired application, it’s essential to verify that it is functioning as expected.
Step 1: Run a Test
-
Launch the Application: Start the application as you typically would. Observe whether it prompts any UAC dialog boxes. If virtualization is active, you should not receive any prompts that require manual authorization unless necessary for other high-level tasks.
-
Check Functionality: Use the application as intended, observing any discrepancies in functionality compared to before enabling UAC virtualization. If the application works without administrative prompts while accessing system files it once couldn’t, the UAC virtualization is active.
Troubleshooting Common Issues
Even after enabling UAC virtualization, you might experience some common issues. Here’s how to troubleshoot them:
-
Application Not Running Correctly: If the application still doesn’t work as intended, verify that you unchecked the «Run this program as an administrator» option as mentioned in the compatibility settings.
-
Check for Updates: Many applications release updates that address compatibility issues with UAC. Always ensure that you are using the most current version of the software.
-
Review System Settings: Occasionally, group policies or system settings may restrict UAC functionalities. It’s a good practice to check system settings or consult with an IT professional if necessary.
-
Event Viewer: Use the Event Viewer to check for any error messages or logs related to the application. This can provide insights into what might be going wrong.
Additional Tips for UAC Management
-
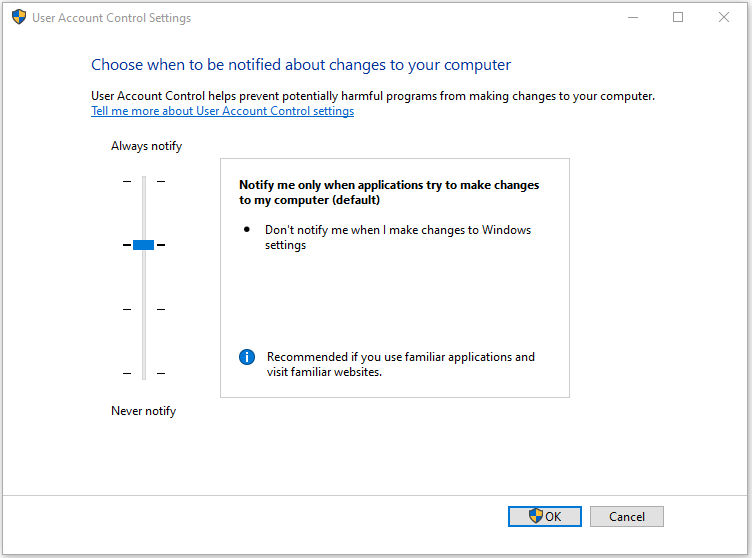
Fine-Tuning UAC Settings: You can fine-tune UAC settings via the Control Panel. Navigate to Control Panel > User Accounts > Change User Account Control settings. Here, you can adjust the slider to change how and when UAC prompts you, although doing so may decrease security.
-
Testing Different Compatibility Modes: As mentioned, testing your application in various compatibility modes can sometimes yield better results, enhancing UAC virtualization effects.
-
Regular Backups: Always maintain regular backups of your settings and important files. While changes in UAC settings typically don’t cause data loss, unexpected consequences can still arise, particularly when working with older software.
-
Consider Virtual Machines: If you frequently work with legacy software, consider using a virtual machine with an older version of Windows to mitigate compatibility issues while maintaining system stability.
Conclusion
UAC virtualization is a valuable feature for enabling older applications to work seamlessly within Windows while benefiting from UAC’s security benefits. By following the steps outlined in this guide, you can efficiently enable UAC virtualization through Task Manager, allowing you to run legacy applications that may not have been designed for modern operating systems. Always take care in managing UAC settings, balancing between operational needs and security concerns. By understanding how UAC virtualization works, you can ensure that your applications run smoothly and securely.
-
Home
-
Knowledge Base
- What Is UAC Virtualization and How to Enable It on Windows?
By Daisy | Follow |
Last Updated
UAC virtualization protects your PC from malware. It also reduces unauthorized changes to the operating system. All in all, it adds an extra layer of security to your device. This post provides more details about UAC virtualization for you.
What Is UAC Virtualization?
What is UAC virtualization? In 2007, Microsoft Windows Vista introduced a new security feature called User Account Control (UAC). UAC virtualization is an area of software management that isolates core components of an operating system from potentially disruptive changes. It refers to the level of access called “root” on Unix-like systems and administrator privileges on Windows systems.
Windows UAC rules are designed to protect installed program files and registry settings from modification or corruption by users or programs that should not be accessed; separate each user’s files and settings from other users.
By default, only users with administrator privileges can access the main machine settings. Microsoft enforces these rules by carefully restricting the default permissions for folders under the Program Files folder tree, Program Data folder tree, Windows folder tree, and Users folder tree. Additionally, permissions on registry keys are carefully restricted so standard users are not allowed to modify any settings that could affect other users.
Limitations of UAC Virtualization
To ensure that UAC virtualization works properly, there are some limitations of UAC virtualization:
- For 32-bit applications only. AMD64 compatible applications are all created after these fundamental design decisions and, by their very nature, cannot be written to address system files in the “old way” that UAC virtualization was created to solve. (IA64 applications have their own special set of problems.)
- The user must have write access to the file in the original file path. Attempting to write to any file with read-only permissions will crash the entire card library (i.e. cause the app to crash with an error code).
- UAC virtualization cannot be applied to applications run as administrators or elevated in any way – it must run in the context of a standard user.
- UAC virtualization is disabled by default – it must be explicitly enabled.
You can disable UAC virtualization in Task manager, but it is not recommended. If you disable UAC virtualization, some applications may not work for standard users. When the application tries to write to the directory, but the user does not have permission to write to the directory, it will change the path.
How to Enable UAC Virtualization in Windows 10
First, you need to check if you have enabled UAC virtualization on Windows 10. If not, you can choose enable it.
- Press the Windows + R keys together to open the Run dialog box and type secpol.msc. Then, it will open the Local Security Policy window.
- Expand Local Policies on the left-hand pane and click Security Options.
- Navigate to User Account Control: Virtualize file and registry write failures to per-user locations on the center pane.
If this option is enabled, UAC virtualization is set up on your device. If it isn’t, you can follow these 3 steps to enable UAC virtualization:
- Double-click User Account Control: Virtualize file and registry write failures to per-user locations. That opens a pop-up window
- Select the Enabled radio button
- Click OK to close the popup window. That enables UAC virtualization on your device
After setting up UAC virtualization, you can also manage its behavior and customize it to meet your preferences.
1. Always notify
This is the strictest setting. You must provide explicit permission when you or the software attempts to install, update, or change Windows Settings. All other tasks on the system will freeze until you respond with a notification popup. This setup is ideal for devices that frequently install software for testing.
2. Notify me only when programs try to make changes to my computer
This is the second most restrictive option. It is also the default UAC setting. Here, the computer will notify you when programs try to install or change Windows settings. Like the previous option, it freezes all tasks until you respond. However, this option does not generate a notification when you manually change any settings.
3. Notify me only when programs try to make changes to my computer (don’t darken my desktop)
As the name suggests, this option is non-intrusive and doesn’t freeze other tasks. It will also notify you when you manually make changes to your Windows system. Needless to say, this is a lower security option compared to the first two. Ideally, select this option only if you are the only user and the notification process is slow enough to affect your productivity.
4. Never notify
This option disables UAC virtualization, which poses a serious security risk to your device. We recommend against using this option, even if it seems convenient. All of these options are related to installing and changing software for Windows systems, especially restricted directories.
About The Author
Position: Columnist
Having been an editor at MiniTool since graduating college as an English major, Daisy specializes in writing about data backups, disk cloning, and file syncing as well as general computer knowledge and issues. In her free time, Daisy enjoys running and going with friends to the amusement park.
What is UAC virtualization and when should it be deployed? We explain it in this topic.
Networking and Cyber Security Specialist
Updated: February 18, 2025
UAC stands for “User Account Control”. This is a field of software management that isolates the operating system’s core components from potentially damaging changes. This is the level of access that in Unix-like systems is called “root” and in Windows systems is known as Administrator privileges.
The most frequent encounter that users of Windows get with UAC occurs when they try to install a new piece of software. That popup message asking for authorization in order to permit the installation is the public face of UAC.
More about UAC
User Account Control has been integrated into Windows since Windows Vista in 2006 and it has been included in Windows Server since version 2008.
The UAC system lets user-installed software run in the user area of the drive and only software installed by the Administrator account gets access to system resources. Software that has been installed by the Administrator can be run by users without access to system resources or run by the Administrator to get that system access.
The purpose of UAC is to strengthen system security. It is assumed that the Administrator in a secure business environment is only accessible by an IT professional who will only install authorized, verified software. Users, on the other hand, can’t always be trusted to take precautions about what they download.
Users can easily be tricked into downloading malware that is embedded in an image or a PDF file. Without the Administrator privilege, software that gets access to the endpoint through a user account, will not be able to get into important services.
Areas of the disk that are blocked to user accounts include the %ProgramFiles%, %Windir%, %Windir%\system32 directories. The UAC service also blocks write access to the HKEY_LOCAL_MACHINE\Software\ registry path.
That permission popup is a key part of UAC. It triggers a setting in the operating system to either facilitate actions in the OS’s sensitive directories with permission or block that access if permission is refused.
System access should only be necessary during the installation and update of the software. Operating variables, temporary storage, and session data should all be stored in user-owned folders. System settings should only be written to a shared, editable folder, such as %programdata%.
The rigid organization of data and settings is beneficial to all users. If one user on a device is able to customize the software, those personal preferences do not impact the other users on that computer.
Can UAC be bypassed?
UAC was introduced to help prevent malware from gaining elevated access and executing malicious actions on the system. While UAC is an essential security mechanism, it is not foolproof, and in some cases, malware can bypass or exploit UAC to gain higher privileges and compromise a system.
There are several ways that malware can bypass Windows UAC, taking advantage of vulnerabilities in the system, user behavior, or flaws in the UAC mechanism itself. One common technique is the use of UAC bypass exploits, where malware takes advantage of bugs or design flaws in how UAC handles privilege escalation. For example, certain UAC prompts might be bypassed through specific registry manipulations or by exploiting misconfigurations in the Windows system.
Another method involves social engineering, where malware tricks users into granting administrative access, often by presenting a fake or misleading UAC prompt. For example, malware may disguise its process as a legitimate program, prompting the user to unknowingly grant elevated privileges. This can happen if the user is not cautious and does not verify the source of the application or prompt.
Additionally, advanced malware may employ fileless attacks, which execute malicious code directly in memory without relying on files that could be detected by antivirus software. These types of attacks are harder to detect and can bypass traditional UAC checks.
While Windows UAC is a valuable security feature, it is not a comprehensive solution to all malware threats. Users must remain vigilant about the software they install, maintain regular system updates, and use extensive security software to minimize the risk of UAC bypass and other security breaches.
Virtualization
There are a number of types of virtualization. The general purpose of this strategy is to use the software in order to create an environment that mimics a real resource, such as a separate server or a PC’s hardware.
One of the most widely implemented types of virtualization is a “virtual machine,” or VM. This is a separate operating system that floats on top of the real OS. It gives the services that a piece of software needs from the operating system without letting that software get real, direct access to the actual OS.
The VM mediates between the software and the operating system. In some instances, this configuration can enable software written for one operating system to run on a computer that doesn’t actually have that operating system installed. For example, it is possible to run software that is written for Linux on a computer that has the Windows operating system. If a virtual environment is available to interpret the Linux- compatible demands of the software into requests the Windows can understand – it is like an interpreter.
UAC virtualization
In the case of a UAC virtualization, the VM operates Windows and runs on top of Windows. The purpose of the double operating system isn’t to provide compatibility in OS but to cater to validated legacy software that genuinely needs access to those system areas when run by users.
Rather than mediating between two different operating systems, the UAC virtualization provides the services that the software needs to run in a user account without breaking the strict system isolation of UAC. Access to the folders that the software needs is blocked and that fact would cause the program to hang or fall over.
The implementation of UAC virtualization was a necessary step in order to bridge the introduction of User Access Control. Without this stop-gap measure, much of the software built to run on Windows would cease to function. Although software houses would, in time come to write new versions of their products, the complete rewrite that UAC required would have taken time. Such major changes are usually reserved for new editions and are not accounted for as updates.
Software houses that specialized in products for Windows could not afford to write off the investment already made in their products. When new editions are produced, the vendors calculate a service life for them and wait until all costs have been recovered before writing new versions.
The UAC virtualization maps between the system folder demands of legacy software and the user-owned folders that Windows now expects software to use when run from user accounts.
Thanks to the UAC virtualization, software that writes to C:\Program Files\, is really writing to %LOCALAPPDATA%\VirtualStore\. Thus, a mapping interface between folders in the virtualization keeps old software working while protecting reserved system directories.
The Application Manifest
Not all software is going to need access to protected system areas. Some programs download as executable files and run from wherever they are resident on the computer. The main issue of whether or not a program needs to write files to reserved directories comes down to a matter of the organization of folder access needs.
The installer signals to the operating system what folder access the program expects both for installation and whenever it is run through entries in the Application Manifest. This is an XML document that accompanies the programs in an installer package.
A permission level requirement value within the file is the key to whether Windows will invoke UAC virtualization for this program whenever it is run. Possible values for requestedExecutionLevel are:
- asInvoker Run with the same access token as the parent process.
- highestAvailable Acquire the highest privileges the current user can obtain.
- requireAdministrator This program can only run as Administrator.
Windows will always use UAC virtualization for software that is flagged with the requireAdministrator access need. This type of software will always provoke the appearance of the UAC permission popup whenever it is run. This status is the default. So, if there is no application manifest, or the required execution permission statement is missing, the software will automatically have the requireAdministrator status and will always be virtualized.
When UAC virtualization is invoked
UAC virtualization is a mechanism within Windows, it can’t be applied at will. There is no UAC hypervisor package in circulation. It isn’t a utility in a developer framework and there isn’t an API for it. In short, you can’t command the use of UAC virtualization.
The UAC virtualization process doesn’t apply to all software. Here are some circumstances to keep in mind over whether UAC virtualization will be used for an application:
- UAC Virtualization is only invoked for software when it is run from a user account. Applications running as Administrators don’t need it.
- UAC Virtualization has to be enabled and active on the host.
- Programs running in a 64-bit environment don’t need UAC virtualization. It only applies to 32-bit software.
- The user account needs to have write access to the files in the original file path.
Managing User Account Control
The User Account Control behavior can be modified on each computer that runs Windows. This option is available in the Settings menu and you can get to it by clicking on the Settings cog icon in the Start menu and then typing User Account Control into the Settings search bar.
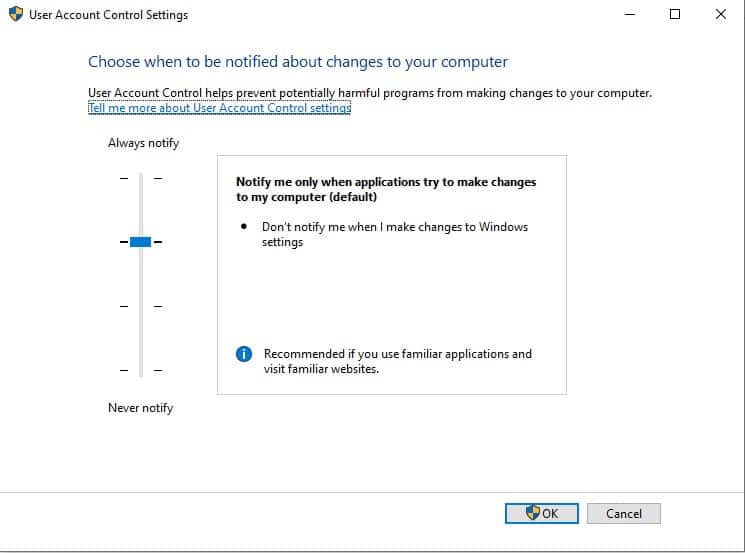
The User Account Control settings screen is presented as a slider. This gives the user the option of switching between one of four settings for UAC. These options are:
- Always notify
- Notify me only when programs try to make changes to my computer
- Notify me only when programs try to make changes to my computer (do not dim my desktop)
- Never notify
Below, you will find a little more detail about each of these options.
Always notify
This is the most rigid setting. It invokes the notification popup when a program is about to be installed or updated and when you, or any programs, try to change Windows settings. It will freeze all tasks on the computer until you respond.
This option is recommended for computers where new software is frequently installed and for people who visit unfamiliar websites.
Notify me only when programs try to make changes to my computer
This is the default value for UAC. It will notify the computer’s user when programs try to install software or make changes to your computer. It won’t put up the permission popup when you make changes to your computer’s settings yourself. It will freeze all tasks on the computer until you respond.
This option is recommended for those who frequently install new software and visit unfamiliar websites, but don’t want to be notified over their own actions that alter Windows settings.
Notify me only when programs try to make changes to my computer (do not dim my desktop)
This option provokes the permissions popup when programs try to install software or make changes to the computer but it won’t notify those users who make changes to Windows settings manually. Unlike the previous two options, this setting will not freeze other tasks or wait for a response.
This option is only recommended if, for some reason, the notification process works slowly on the computer to the point where it becomes a serious inconvenience to the user.
Never notify
This option disables User Access Control. You will not get the permissions popup under any circumstances.
This option creates a security risk.
Registry Virtualization
Registry virtualization is the application of UAC virtualization to the system registry. The purpose of this feature is to block access to global registry entries while enabling software that requires such access to continue to function. As UAC interprets folder access and diverts write actions to user-controlled directories, Registry virtualization switches attempts to write to global variables to safer user account registry keys.
As with file-based UAC virtualization, the software proceeds with all of its pre-written procedures, creating and updating registry key values without harming those global registry areas.
Registry virtualization is only implemented in order to enable legacy systems to continue operating. The need for this service is probably, by now, almost completely defunct. Any software that was written after 2006 will not need the registry virtualization service because it should have been written along with Microsoft developer guidelines. These guidelines explain the difference between global registry entry use and the registry keys that are available to user accounts.
The future of UAC virtualization
UAC virtualization was created to ensure backward compatibility when Microsoft launched its new architecture. It is a method for preventing legacy software from failing because they are no longer permitted to write to the files whose paths and names are hardcoded.
This shows that UAC virtualization has no future – it is all about the past. The UAC virtualization system has become progressively more redundant as time passes. As UAC has been part of Windows since 2006, it has been an environmental certainty for 25 years. The chances of software written more than 25 years ago still being active without any new versions or updates are slim. For one thing, old software is very prone to attack by hackers. Vulnerability scanners particularly look for old software when probing computers and networks for a way in.
UAC virtualization in Windows 10
If you are running Windows 10 you might decide to search for your UAC virtualization setting and see whether the function is turned on.
In order to do this:
- Press the Windows button plus “R” to open a Run box.
- Type secpol.msc and press “OK” to open the Local Security Policy app.
- In the Local Security Policy window, expand Local Policies and click on Security Options in the left panel.
- Scroll down the list of policies in the main panel until you get to User Account Control: Virtualize file and registry write failures to per-user locations.

The status of this setting should be Enabled. If it isn’t:
- Double-click on the User Account Control line. A popup will appear.
- Click on the Enabled radio button.
- Click OK to close the popup.
Other system protection methods
A typical Windows user shouldn’t need to worry about UAC virtualization and a designer of software that is intended for use on Windows also need not be concerned with UAC virtualization because current Windows programming practices make this service unnecessary.
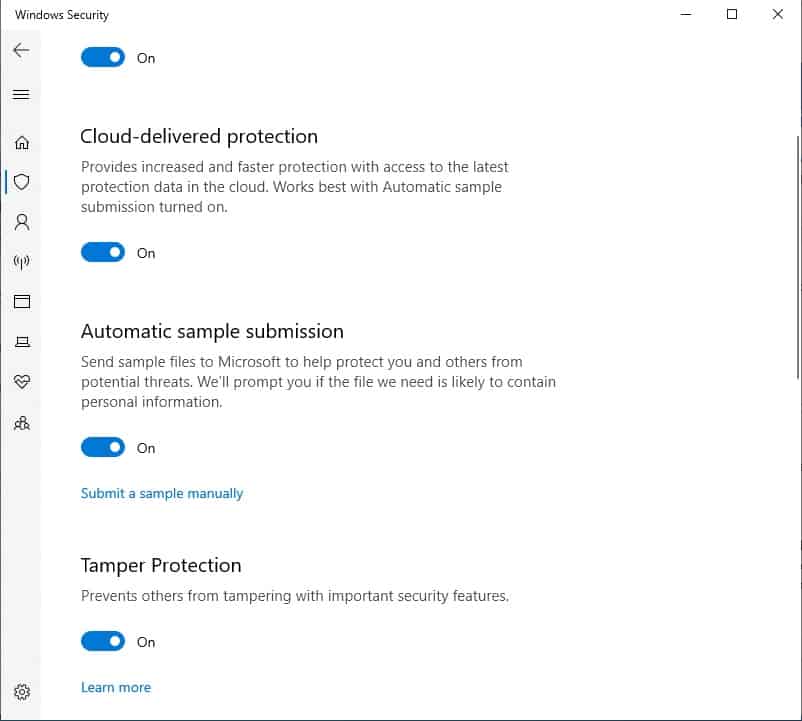
There is a comprehensive Windows Security system that protects devices from tampering and there are a few settings that you can look at within Windows in order to improve system protection.
The first one that you could look at is Tamper Protection, which blocks malware from interfering with and altering your device’s antivirus settings. To check that this is turned on:
- Type Windows Security in the Start menu search field.
- Select the Windows Security app from the results.
- Click on Virus & threat protection.
- Look to the bottom of the main panel on this screen and click on Manage settings.
- Tamper Protection is the fourth option on this screen. Make sure it is turned on.
You should also ensure that Real-time protection, Cloud-delivered protection, and Automatic sample submission are turned on.
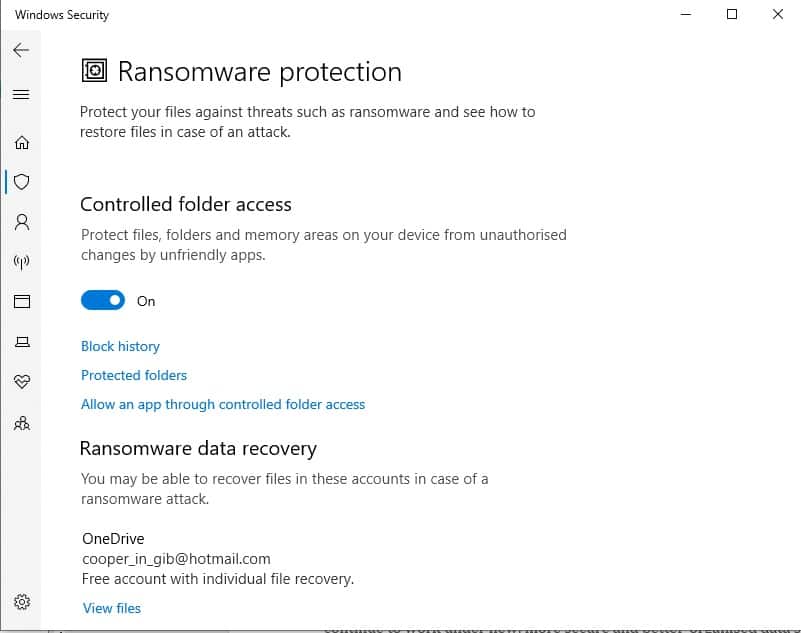
The other major substitute for UAC virtualization protection is the Controlled folder access system. This prevents malware from changing the extensions on files to hide them or altering system folder names. This can also be accessed from the Virus & threat protection settings screen where you turned on Tamper protection.
- In the Virus & threat protection settings screen. Scroll down to Manage controlled folder access and click on it.
- In the next screen, which is Ransomware protection, move the slider for Controlled folder access to On.
- You will be taken to the User Account Control permission popup. Click on Yes to allow the change.
Conclusion
UAC virtualization was a stop-gap measure that enabled the large library of software available for Windows to keep operating. Without this solution, a large amount of the applications available for Windows would have stopped working when Windows Vista was introduced.
With the passage of time, UAC virtualization has become increasingly unnecessary. However, as you have seen, it is still in Windows 10 and you probably will see that it is enabled on your computer.
The virtualization solution for UAC was a clever one and its methods would prove useful to any system protection scenario. In fact, many security systems operate on virtualization, classifying them as “virtual appliances.” The isolation of the operating system and applications works both ways. It can also prevent hackers from getting into the software and tampering with them by blocking off the access route through the operating system.
UAC virtualization FAQs
Should I disable UAC virtualization?
UAC virtualization is a fundamental element of Micorosft’s security strategy for Windows. Turning UAC off loses you the benefit of native security procedures.
How do you make an executable not subject to UAC virtualization?
There are two ways that an executable can be exempted from UAC virtualization. The first is to design the software as a portable package that doesn’t need to be installed but will run as a file in the location where it was downloaded. The other way to avoid UAC virtualization kicking in when the program runs. The other way is to include an Application Manifest with its installer. This should contain an entry for requestedExecutionLevel with a value set at asInvoker or highestAvailable.
UAC (User Account Control) — это важная компонента операционной системы Windows 10, которая обеспечивает безопасность пользователей. UAC контролирует и отслеживает действия пользователей и запросы на изменение системных настроек и файлов. Однако, иногда UAC может оказаться слишком навязчивым и требовательным. В таких случаях виртуализация UAC может стать полезным инструментом для более гибкого управления этой функцией.
Виртуализация UAC Windows 10 — это метод, который позволяет создавать виртуальные окружения, в которых UAC работает отдельно от остальной операционной системы. Это позволяет пользователям запускать приложения и выполнять действия с повышенными привилегиями, не влияя на функционирование других программ и системы в целом.
С помощью виртуализации UAC можно установить разные уровни безопасности для разных приложений. Например, вы можете выбрать, чтобы одно приложение работало с повышенными привилегиями, а другое — без них. Также, виртуализация UAC позволяет запускать приложения в режиме совместимости с предыдущими версиями Windows, что может быть полезно, если у вас есть приложения, которые не поддерживают последние версии ОС.
Использование виртуализации UAC Windows 10 довольно просто. Для начала, вам понадобится специальное программное обеспечение, которое позволит создавать виртуальные окружения. Затем, вам нужно будет настроить каждое приложение, которое вы хотите запустить в отдельном окружении UAC. Вы сможете указать уровень безопасности, режим совместимости и другие параметры для каждого приложения.
В итоге, виртуализация UAC Windows 10 позволяет гибко управлять безопасностью вашей системы и приложений. Этот метод может быть полезен, если вы хотите установить разные уровни привилегий для разных приложений или запускать несовместимые приложения. Используйте виртуализацию UAC для повышения безопасности и гибкости вашей операционной системы Windows 10!
Что такое виртуализация UAC Windows 10?

Виртуализация UAC в Windows 10 является одной из дополнительных возможностей этой функции. При включении виртуализации UAC определенные приложения запускаются в специальной среде, которая изолирует их от основной системы. Это позволяет запускать приложения с повышенными привилегиями без риска повредить систему или внести изменения, которые могут негативно повлиять на ее работу.
Виртуализация UAC особенно полезна в случае программ, которым требуется доступ к системным файлам или реестру, но не имеющим административных привилегий. Примерами таких программ могут быть многие утилиты, инструменты разработчика или приложения, предназначенные для работы с системными настройками.
Использование виртуализации UAC в Windows 10 позволяет администраторам и пользователям безопасно выполнять различные задачи, требующие повышенных привилегий, минимизируя риск непреднамеренного повреждения системы. При этом пользователь имеет возможность контролировать, какие приложения будут работать в изолированной среде, а какие будут иметь прямой доступ к системным ресурсам.
| Преимущества виртуализации UAC Windows 10: |
|---|
| 1. Повышенная безопасность системы |
| 2. Возможность запуска приложений с повышенными привилегиями без риска повреждения системы |
| 3. Изоляция приложений от основной системы |
| 4. Более удобное управление привилегиями доступа |
Принцип работы виртуализации UAC

Принцип работы виртуализации UAC заключается в том, что для запуска старого приложения с повышенными привилегиями создается виртуальная среда, изолированная от основной системы. В этой виртуальной среде приложение может работать в режиме с повышенными привилегиями, но оно не имеет доступа к реальной файловой системе и системным ресурсам.
Виртуализация UAC использует специальные технологии, такие как фильтрация файловой системы и реестра, для обеспечения изоляции старого приложения. Когда приложение пытается получить доступ к файлам или ресурсам, виртуальная среда перехватывает запрос и предоставляет приложению доступ только к тем файлам и ресурсам, которые ему разрешено использовать.
Таким образом, виртуализация UAC позволяет запускать старые приложения в безопасной среде, предотвращая возможные нарушения безопасности. Она также обеспечивает совместимость при запуске приложений, которые требуют повышенных привилегий, на новых версиях операционной системы Windows 10.
Плюсы использования виртуализации UAC Windows 10

Виртуализация UAC (User Account Control) в Windows 10 может предоставить множество преимуществ для пользователей. Вот несколько из них:
1. Улучшенная безопасность: Виртуализация UAC позволяет ограничить доступ к административным привилегиям, таким образом, уменьшая риск возникновения вредоносных программ и несанкционированного доступа к системе.
2. Удобство использования: Виртуализация UAC позволяет пользователям безопасно выполнять административные задачи, не требуя постоянного входа в режим администратора. Это экономит время и снижает риск возникновения ошибок.
3. Улучшенная совместимость: Виртуализация UAC позволяет приложениям, несовместимым с ограничениями UAC, работать корректно. Это помогает сэкономить ресурсы и обеспечивает более стабильную работу системы.
4. Гибкость настроек: Виртуализация UAC позволяет пользователям настраивать уровень безопасности по своему усмотрению. Вы можете выбрать оптимальные настройки, которые соответствуют вашим потребностям и требованиям.
В целом, использование виртуализации UAC в Windows 10 может значительно улучшить безопасность, удобство использования, совместимость и гибкость настроек системы.
Как включить виртуализацию UAC в Windows 10?

Виртуализация UAC (User Account Control) в Windows 10 позволяет запускать старые программы, которые требуют административных прав, без подтверждения от пользователя. Если вы столкнулись с проблемой запуска программ из-за UAC, то можете включить виртуализацию, чтобы избежать неудобств.
Для того чтобы включить виртуализацию UAC в Windows 10, следуйте инструкциям ниже:
Шаг 1: Откройте «Панель управления».
Нажмите на кнопку «Пуск», введите «Панель управления» в строке поиска и выберите соответствующий результат.
Шаг 2: Перейдите в раздел «Учетные записи пользователей».
В разделе «Пользователи» нажмите на ссылку «Учетные записи пользователей».
Шаг 3: Измените настройки UAC.
В меню «Учетные записи пользователей» выберите пункт «Изменение настроек Управления учетными записями».
В открывшемся окне перетащите ползунок на нижний уровень «Никогда не уведомлять» и нажмите на кнопку «OK».
Виртуализация UAC успешно включена!
Обратите внимание, что включение виртуализации UAC может повысить уровень риска безопасности системы. Убедитесь, что вы доверяете программам, которые запускаете без подтверждения от пользователя, чтобы не подвергать компьютер угрозам.
Теперь вы знаете, как включить виртуализацию UAC в Windows 10!
Как использовать виртуализацию UAC в Windows 10?

Чтобы использовать виртуализацию UAC в Windows 10, следуйте этим простым шагам:
- Запустите Панель управления, нажав правой кнопкой мыши на кнопку «Пуск» и выбрав «Панель управления».
- В панели управления выберите «Учетные записи пользователей» и затем «Учетные записи пользователей».
- На странице «Учетные записи пользователей» щелкните на ссылку «Изменение параметров управления учетными записями».
- В окне «Уровень уведомлений User Account Control» откройте выпадающий список и выберите «Виртуализация UAC».
- Щелкните «OK», чтобы сохранить изменения.
Теперь виртуализация UAC активирована, и вы можете использовать виртуальные программы на своем компьютере. Когда вы запускаете виртуальную программу, она будет работать в защищенной среде, изолированной от основной операционной системы.
Виртуализация UAC может быть особенно полезна, когда вы хотите запустить непроверенное приложение или скачать что-то из интернета. Это поможет предотвратить возможные угрозы безопасности и защитить ваш компьютер от вредоносных программ или вирусов.
Теперь вы знаете, как использовать виртуализацию UAC в Windows 10. Не забывайте активировать эту функцию для повышения безопасности вашего компьютера.
Важные моменты при использовании виртуализации UAC Windows 10

Виртуализация UAC (User Account Control) в Windows 10 позволяет запускать приложения с повышенными привилегиями без необходимости полного отключения контроля учетных записей.
Однако, при использовании виртуализации UAC, следует учесть несколько важных моментов:
1. Безопасность
Виртуализация UAC может повысить риск безопасности системы, так как запущенное приложение получает доступ к повышенным привилегиям. Поэтому, перед использованием виртуализации UAC, необходимо убедиться в надежности источника приложения.
2. Совместимость
Не все приложения могут корректно функционировать при использовании виртуализации UAC. Некоторые программы могут требовать доступа к определенным системным ресурсам, который может быть ограничен из-за виртуализации. Перед запуском приложения с виртуализацией UAC, рекомендуется обратиться к разработчику для проверки совместимости.
3. Ненадежные источники
Виртуализация UAC может быть использована злоумышленниками для запуска вредоносного кода на компьютере. Поэтому, не рекомендуется использовать виртуализацию UAC для приложений из ненадежных источников. Следует загружать и устанавливать программы только с официальных и проверенных источников.
Все эти моменты следует учитывать при использовании виртуализации UAC в Windows 10, чтобы обеспечить безопасность и стабильную работу системы.