
VirtualHere USB Server has come to Windows, (And the Microsoft Store!)
Due to popular demand, this is a Windows build of VirtualHere USB Server (version 4.7.8 Changes)
Its very easy to use, simply download the file below and run
- VirtualHere Server for Windows 64-bit (Win10/Server2016 or later)
OR
you can install directly from the Microsoft Store (The Microsoft Store version also supports Windows 10/11 on ARM64)
Installation is automatic and immediate. Then download the USB Client software to remotely use USB devices!
The trial edition is restricted to sharing one device at a time. Purchase a license to remove this limitation
If you have any issues post a question in the forums or email mail [at] virtualhere.com (mail[at]virtualhere[dot]com)
Windows FAQ
В эпоху гипервизоров редко когда под какой-то сервер приложений или баз данных выделяют отдельный физический сервер. Очень часто такие сервера работают в качестве гостевой операционной системы виртуальной машины на одном из гипервизоров. Обычно в 80-90% случаев это так (данные взять на основе сугубо моего личного опыта). Проброс USB устройств в таком случае не всегда является тривиальной задачей.
Если у вас, скажем, гипервизор ESXi, то задача может быть решена без помощи стороннего ПО. Проброс USB в Hyper-V все еще не завезли.
Совсем по-другому обстоят дела, когда вам необходимо подключить удаленное USB устройство, например, на ноутбук сотрудника. Особенно, если этим устройством пользуются попеременно. Это может быть токен с ЭЦП, аппаратный ключ с лицензией на ПО.
Я хочу поделиться с одним из возможных решений данной проблемы.
Как поделились коллеги в комментариях ЭЦП с Рутокен2 для ЕГАИС не выгружается таким образом, как приведено в методе ниже. Рутокен Lite – без проблем выгружается как на флэшку, так и в реестр.
Краткое описание задачи
Задача, собственно, проста. Есть порядка 5-10 USB устройств, которые будут периодически подключаться к разным клиентам. Соответственно, все эти USB устройства физически должны быть подключены к какому-то одному устройству, которое будет доступно всем клиентам. Клиенты же уже в порядке живой очереди будут “разбирать” пул доступных устройств.
В силу особенностей работы 1 USB устройство в один момент времени будет подключено только к одному клиенту.
Если у вас исключительно Linux окружение, то вы можете использовать встроенное решение USB/IP.
Выбор решения
Программного обеспечения, которое может обеспечить проброс USB устройств по сети, очень много. После долгих сравнений набора возможностей, стоимости и предлагаемого набора клиентов решение было выбрано – VirtualHere.
Скажу сразу – решение платное (49$). Однако, лицензируется сервер целиком, т.е. нет ограничений на количество подключенных устройств. Без лицензии в один и тот же момент времени можно использовать только одно USB устройство. Для настройки PoC (Proof of Concept) решения этого достаточно. Вы сможете проверить – подойдет ли вам этот продукт или нет.
Почему VirtualHere?
Аргументы в сторону выбора этого решения:
- Большой выбор серверной части – Window, Linux, Android, OSX.
- До безобразия простая настройка сервера.
- Достаточно большой набор клиентов. Есть клиент под Windows, Linux, Mac OS и Android.
- Клиент может быть запущен как сервис.
- У клиента есть как графический вариант, так и консольный аналог.
- У клиента есть свой API.
- Относительно гуманная стоимость – 49$.
ВАЖНО: В Linux CentOS 8 и 9 из коробки нет модуля vhci_hcd. Поэтому нужно либо добавлять этот модуль вручную. Либо использовать контейнеры. Признаюсь честно, я потратил около 2-х часов на то, чтобы попробовать реализовать какой-то из этих вариантов, но из этого толком ничего не получилось. Пробовал даже сторонний модуль vhci_hcd от elrepo. Насколько я понял, модуль от elrepo не работает на ядре 4.18.0-394, а рассчитан на работу с более старой версией ядра. Но это только мои догадки - не так много у меня опыта работы с Linux. Если у кого-то получилось запустить клиент на CentOS 8 или 9 - поделитесь в комментариях опытом.
В качестве физической коробки, к которой будут подключены устройства будет выступать небольшой неттоп. Можно использовать любое практически любое физическое устройство, т.к. ресурсов серверу много не нужно. Можно даже использовать Raspberry Pi.
Могу ошибаться, но все или некоторые аппаратные решения DistKontrolUSB, например, используют клиент как две капли воды похожий на клиент VirtualHere. Возможно, что серверная часть тоже. Но это лишь мои наблюдения и догадки.
Теперь я покажу вам, как выполняется как выполняется настройка сервера, а также подключение к серверу с клиентских рабочих мест.
Настройка сервера
Мы будем использовать вариант с Linux сервером. Наш дистрибутив – Ununtu 20.04. Вы можете использовать любой дистрибутив. Но у меня под рукой для написания статьи был только этот 🙂
Если у вас абсолютно новая установка Ubuntu, то предварительно необходимо установить curl:
apt update
apt install curl
При наличии на сервере прямого выхода в Интернет установка производится в одну команду:
curl https://raw.githubusercontent.com/virtualhere/script/main/install_server | sudo sh
Теперь проверим статус нашего сервера:
systemctl status virtualhere.service
Серсив запущен и готов принимать клиентские подключения. Клиентский трафик прослушивается на порту TCP/7575:
netstat -tulpn
Клиент для Windows
Сначала я покажу, как выглядит клиент для Windows. Скачиваем его с сайта проекта.

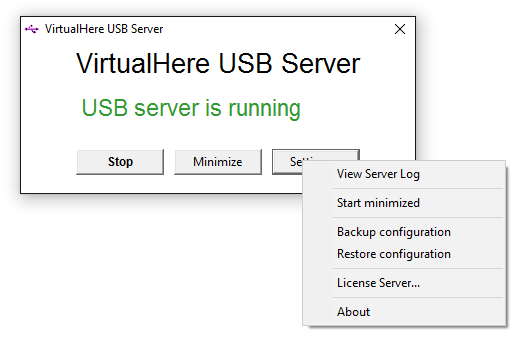
Запускаем клиент:
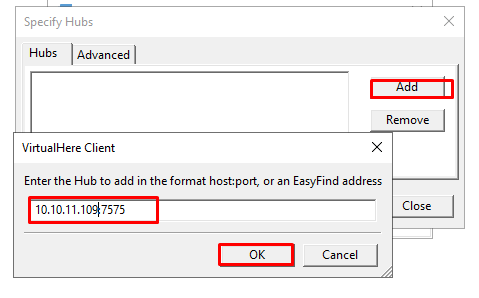
Если вы находитесь в одной подсети с сервером, то клиент скорее всего найдет его автоматически. Если сервер автоматически не найдет, то нужно подсказать клиенту, по какому IP-адресу находится сервер:
Теперь мы видим все подключенные к серверу USB устройства и можем примонтировать одно из них:

Также можем зарегистрировать клиент в качестве службы Windows:
Работу клиента я проверил на следующих серверных ОС: Windows Server 2008 R2, 2012 R2, 2016 и 2019 и соответствующим им клиентским ОС – Windows 7, 8.1, 10 + Windows 11.
Также можно использовать API для работы с клиентом. Например, запросим перечень всех устройств на сервере:
vhui64.exe -t list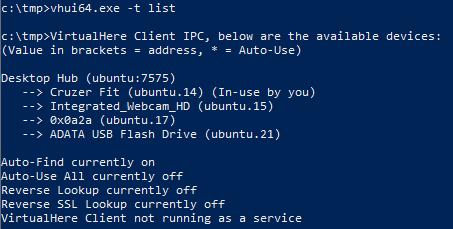
Клиент для Linux
Теперь я покажу, как выглядит клиент для Linux. Скачиваем его с сайта проекта.

Разрешаем выполнение:
chmod +x vhuit64И запускаем клиент.
sudo ./vhuit64
В остальном работа Linux клиента аналогична работе Windows клиента. Также нужно указать расположение сервера:

Теперь мы можем увидеть перечень устройств и подключить одно из них:

Стоит отметить, что для Linux есть отдельный консольный клиент для тех случае, если вы будите использовать клиент, например, на Linux сервере.
Server application for VirtualHere, allowing USB devices to be used remotely over a network just as if they were locally connected.
Command Line
Download Links For Version 4.5.8
Download Links For Version 4.6.3
Download Links For Version 4.6.5
Download Links For Version 4.6.6
Download Links For Version 4.6.7
Download Links For Version 4.6.8
Download Links For Version 4.6.9
Download Links For Version 4.7.0
Download Links For Version 4.7.1
Download Links For Version 4.7.2
Download Links For Version 4.7.5
Download Links For Version 4.7.6
Download Links For Version 4.7.7

Join our monthly Unpacking Software livestream to hear about the latest news, chat and opinion on packaging, software deployment and lifecycle management!
Learn More

Join the Chocolatey Team on our regular monthly stream where we put a spotlight on the most recent Chocolatey product releases. You’ll have a chance to have your questions answered in a live Ask Me Anything format.
Learn More

Join us for the Chocolatey Coding Livestream, where members of our team dive into the heart of open source development by coding live on various Chocolatey projects. Tune in to witness real-time coding, ask questions, and gain insights into the world of package management. Don’t miss this opportunity to engage with our team and contribute to the future of Chocolatey!
Learn More

Webinar from
Wednesday, 17 January 2024
We are delighted to announce the release of Chocolatey Central Management v0.12.0, featuring seamless Deployment Plan creation, time-saving duplications, insightful Group Details, an upgraded Dashboard, bug fixes, user interface polishing, and refined documentation. As an added bonus we’ll have members of our Solutions Engineering team on-hand to dive into some interesting ways you can leverage the new features available!
Watch On-Demand

Join the Chocolatey Team as we discuss all things Community, what we do, how you can get involved and answer your Chocolatey questions.
Watch The Replays

Webinar Replay from
Wednesday, 30 March 2022
At Chocolatey Software we strive for simple, and teaching others. Let us teach you just how simple it could be to keep your 3rd party applications updated across your devices, all with Intune!
Watch On-Demand

Livestream from
Thursday, 9 June 2022
Join James and Josh to show you how you can get the Chocolatey For Business recommended infrastructure and workflow, created, in Azure, in around 20 minutes.
Watch On-Demand

Livestream from
Thursday, 04 August 2022
Join Paul and Gary to hear more about the plans for the Chocolatey CLI in the not so distant future. We’ll talk about some cool new features, long term asks from Customers and Community and how you can get involved!
Watch On-Demand

Livestreams from
October 2022
For Hacktoberfest, Chocolatey ran a livestream every Tuesday! Re-watch Cory, James, Gary, and Rain as they share knowledge on how to contribute to open-source projects such as Chocolatey CLI.
Watch On-Demand
Table of Contents
- 1 VirtualHere
- 2 Installing the VirtualHere Server
- 2.1 Getting the Server Software
- 2.2 Installing and Running the Server
- 2.3 Run Automatically on Boot
- 3 Installing the VirtualHere Client
- 4 Running VirtualHere
- 5 Conclusion
- 5.1 Parts List
Have you ever wanted to connect to a USB device, such as a webcam or a printer, but you were in a different room? With VirtualHere you can connect to remote USB devices over your wired or wireless network, and your computer will think they are directly attached.

VirtualHere is the perfect solution to connecting USB devices over your network, be it Ethernet or WiFi. It works seamlessly with Windows, Linux, or macOS, and it’s very easy to set up.
All you need to do is to run a VirtualHere server on a Raspberry Pi, any Raspberry Pi will work as long as it can connect to your network. You plug your USB device into the Raspberry Pi and then use a VirtualHere client on your workstation to connect to the server over your existing network.

If you’d like to run a remote camera, this is an ideal solution. So let’s get it installed!
Installing the VirtualHere Server
You will need to have a network-attached Raspberry Pi that is running the current version of the Raspberry Pi OS for this to work. Any type of network connection will suffice, including WiFi, so you can even use a Raspberry Pi Zero W or Zero 2 W.
Getting the Server Software
Once you have your Raspberry Pi connected to the network, use it to go to the VirtualHere website. You might want to read some of the home page text to learn more about the capabilities of VirtualHere.

After that, head over to the Linux Server download page. Scroll down until you get to the Generic VirtualHere USB Server Builds. Download the “VirtualHere USB Server for Linux (ARM)” file to your Raspberry Pi.
Once the file has been downloaded you can close the web browser on the Pi, you’ll need to revisit it on your client computer later.
Installing and Running the Server
Open your terminal and navigate to the Downloads folder.
The next step is to make the file you downloaded, which is named vhusbdam, executable:
And finally, you can run the server file:
When you run the VirtualHere server, you’ll get a message on your terminal saying that it is active. You can press Ctrl-C to stop it if you need to.
Run Automatically on Boot
If you plan on dedicating a Raspberry Pi to being a VirtualHere server, then you’ll likely want to have it run automatically every time the Pi is powered up. This way, you can run it in “headless mode”, without a keyboard or monitor.
You can do this by editing your rc.local file to contain an entry for VirtualHere. Open your terminal and type the following command:
This will open the Nano text editor, and you can now modify the file. Scroll down to the line before the “exit 0” statement and type the following:
|
/home/pi/Downloads/vhusbdarm —b |
Now save the file using Ctrl-X and then respond “Y” to overwrite the existing file.
You’ll need to reboot your Raspberry Pi for the change to come into effect.
Installing the VirtualHere Client
Now that you have a VirtualHere server working on your Raspberry Pi you’ll need to install a VirtualHere client on your target workstation.
On the workstation that you want to use with VirtualHere visit the VirtualHere client page. You will find clients for Windows, macOS, and Linux.
Download the client that suits your machine. The installation procedure will depend upon the operating system:
- Windows – The client is an EXE file, just click on it to run the installation.
- macOS – The client is a DMG file, click on it and run the installation.
- Linux – The client file needs to be made executable with a chmod command before you can run it.
Once the client is running, it will open up a dialog box when it detects a VirtualHere server on its network.
Running VirtualHere
Running VirtualHere is easy, in fact, it just about runs itself!
Make sure that your Raspberry Pi is running VirtualHere, either from the terminal or by having it start on boot. Then plug a USB device into one of the Raspberry Pi USB ports.

Now go to the workstation running a VirtualHere client. You can only connect to one client at a time, just as you can only plug a USB device with a cable into one computer at a time. VirtualHere is not a replacement for a print server!
If all is working correctly, the client machine will pop up a window that displays the connection to the VirtualHere server, and it will show the server’s IP address (i.e., the address of the Raspberry Pi).
The pop-up window will also list the devices it sees connected to the server’s USB port. You may see it by name, or it may just show a hexadecimal number on the port.

You can select the device by right-clicking on it and choosing “Use”. Once you do, the device will be connected to your computer, just as if it were connected with a USB cable. If there are drivers to install, your computer will do that in its usual fashion.
You should now be able to use the remote USB device as if it were connected directly to your computer!
Conclusion
VirtualHere does have a licensing requirement, and I have to confess that it isn’t very clear as to what that is. To fully license the product, there is a one-time fee, which was 49 dollars when I last looked. However, it does seem that you can run a single device without a license, but again, I’m not entirely clear on this, so please don’t quote me!
Licensing aside, this is a very neat product that does seem to work as advertised. I used it with a webcam, and it performed as well as it would have had I directly connected the camera.
So for remote access to your USB devices, I suggest you give VirtualHere a try, it may just be the solution you’re looking for.
Summary
Article Name
Extend your USB with VirtualHere
Description
If you have ever needed to connect to a USB device that was in another room, then VirtualHere is the project for you! Using a Raspberry Pi and your existing wireless or wired network, you can remotely connect USB devices to any Windows, macOS, or Linux workstation.
Author
Publisher Name
DroneBot Workshop
Publisher Logo