
Item Preview
01_2000.png
02_2000.png
03_2000.png
04_2000.png
05_2000.png
06_2000.png
07_2000.png
08_2000.png
09_2000.png
10_2000.png
11_2000.png
12_2000.png
13_2000.png
14_2000.png
15_2000.png
16_2000.png
17_2000.png
18_2000.png
19_20200.png
20_2000.png
21_2000.png
22_2000.png
23_2000.png
24_2000.png
29,226
Views
4
Favorites
7
Reviews
DOWNLOAD OPTIONS
Uploaded by
Unknown
on
SIMILAR ITEMS (based on metadata)
If you use a virtual machine and want to download Windows 2000 ISO for VirtualBox, then this is the place for you. At this time Microsoft Windows 2000 is outdated. But, people need the ISO file for testing purposes.
One of the most popular uses of a VM is to run a legacy version of Windows such as Windows 2000. However, the process of downloading and installing the Windows 2000 ISO can be a bit tricky. That’s why in this blog post, we’ll be discussing Windows 2000 ISO download for Oracle VM VirtualBox with Product Key.
What is Windows 2000?
Windows 2000 ISO file is a Microsoft operating system released in 2000. It was the successor to Windows NT 4.0 and was the first version of Windows to use the Windows NT kernel. Windows 2000 provided users with a more stable and secure operating system compared to Windows 95, Windows 98, and ME.
It also included support for newer hardware, greater performance, and better reliability. As a result, it remained the most popular version of Windows until the release of Windows XP in 2001.
If you need an older version of Windows, then you should download Windows 2000 ISO. It is a reliable, stable operating system that can provide you with all the necessary tools.
| Developer | Microsoft |
| Source Model | Closed source |
| Released to manufacturing | December 15, 1999 |
| License | Proprietary commercial software |
| Succeeded by | Windows XP |
Windows 2000 ISO Download (All Editions)
There are four editions of Windows 2000: Professional, Server, Advanced Server, and Datacenter Server.
- The professional edition of Windows 2000 was designed for desktop and laptop computers.
- With Windows 2000 Server, you can share files and prints, host domains, and access remote services.
- In Windows 2000 Advanced Server, you can use up to 8 processors, increase security features, and add up to 8GB of RAM.
- The Windows Datacenter Server was designed for large, high-availability environments. It supported up to 32 processors, and 64GB of RAM, and included Cluster Services.
Windows 2000 had a number of features that made it popular with businesses, including improved security, easier management, and better reliability.
It also had support for a wide range of hardware, including modern hardware such as USB, IEEE 1394, and AGP. Microsoft also included a number of new technologies in Windows 2000, such as Active Directory and Internet Information Services 5.0, which enabled better network and web server management.
Overall, Windows 2000 ISO was a major improvement over its predecessors, and it was the last version of Windows to be based on the Windows NT kernel. It was replaced by Windows XP in October 2001, but it still remains popular among businesses due to its stability and reliability.
Install Windows 2000 ISO on a Modern Computer
Microsoft no longer supports Windows 2000, and the operating system was designed for obsolete hardware. Before going to the main content, Download Windows 2000 ISO for VirtualBox, here is a step-by-step guide for installing Windows 2000 on a modern computer using a VM:
- Installing Windows 2000 requires an original installation disc or Windows 2000 ISO file.
- In order to install Windows 2000 on a modern computer, you will need to disable or work around some hardware features that are incompatible with the operating system. In addition to disabling or limiting the amount of RAM, processors, and storage, you will need to ensure that your computer can boot from a CD/DVD or USB drive.
- You can burn the ISO image file to a CD or DVD or create a bootable USB drive using software like Rufus.
- Insert the USB or CD/DVD and restart your computer. Press the appropriate key (usually F2, F12, or Delete) to enter the BIOS setup. Make sure that your USB or CD/DVD is the first boot option.
- You may need to use a custom or advanced installation process to work around hardware incompatibilities when installing Windows 2000.
- When the installation is complete, you will have to install drivers for any hardware that is not recognized by Windows 2000. You can download the drivers from the manufacturer’s website, if they are available. This could include networking cards, storage controllers, and other devices.
- For protection against known security vulnerabilities, Windows 2000 should be updated and patched as soon as possible.
The Windows 2000 operating system may not function properly on modern hardware, and it may not be able to support all the newer features and capabilities. Furthermore, Microsoft no longer supports it, so it is not recommended for production use.
How to Install Windows 2000 on VirtualBox?
Here’s a step-by-step guide for installing Windows 2000 on VirtualBox, a free and open-source virtualization software.
- The latest version of VirtualBox can be downloaded from the official website and installed on your computer.
- A new virtual machine can be created by opening VirtualBox and clicking on the “New” button. Select “Windows” as the type and “Windows 2000” as the version.
- In the next screen, you will configure the virtual machine’s settings. Set the amount of RAM and hard disk space to match Windows 2000’s requirements.
- To install Windows 2000, click the “Empty” CD icon in the “Storage” section of the virtual machine’s settings, then click on the CD icon with a plus sign to add the ISO file.
- Once the virtual machine has been configured and the installation media has been added, you can start it by clicking the “Start” button.
- The Windows 2000 installation process should begin automatically. Follow the on-screen instructions to install the operating system. To work around hardware incompatibilities, you may need to use a custom or advanced installation process.
- Upon completion of the installation, you will need to install drivers for any hardware that Windows 2000 does not recognize. This includes network cards, storage controllers, and other devices. Drivers can be downloaded from the manufacturer’s website if they are available.
- For protection against known security vulnerabilities, Windows 2000 should be updated and patched as soon as possible.
VirtualBox may not function properly with Windows 2000 ISO download, and it may not be able to support all the features and capabilities of newer operating systems. A production environment should not use it, because it is no longer supported by Microsoft.
Are you looking for a reliable way to download Windows 2000 ISO? As you know it’s discontinued by the official, you need a direct link for Windows 2000 ISO download.
We have covered all of the versions with direct links. Just click on the above links to get your desired files. You don’t need to worry about security. They are image files that will be installed on the VM.
Windows 2000 Product Key
Check out below the product keys to activate Windows 2000 after installing the ISO on VMware or a virtual machine.
Windows 2000 Professional Edition Product Key
RBDC9-VTRC8-D7972-J97JY-PRVMG
F4PFP-HGXFB-QRVYK-C9J2Y-23PW6
Windows 2000 Server Edition Product Key
WY6PG-M2YPT-KGT4H-CPY6T-GRDCY
What are the System Requirements for Windows 2000?
Windows 2000 requires a minimum of 32 MB of RAM, at least 650 MB of free hard drive space, and a 486 DX/33 MHz or higher processor.
Can I still use Windows 2000 today?
Windows 2000 is no longer supported by Microsoft and is not recommended for use on modern computers due to security vulnerabilities. It is not recommended to use it on any connection to the Internet.
Final Verdict
Hope you liked the guide to Download Windows 2000 ISO file. If you need a reliable, stable system, it is still a great choice. It is relatively easy to install and can be used on a wide range of machines. It’s also a great choice if you run older hardware because, Windows 2000 ISO download supports it. Even though it doesn’t have all the latest features of modern operating systems, it’s still a good choice.
In this article, I will tell you how to install Windows 2000 with Oracle VM VirtualBox 7.0 on Windows 11 & 10 operating systems. I will examine the configuration process, especially by considering the Professional version.
Microsoft released Windows 2000, which we initially knew as Windows NT 5.0, on February 17, 2000. This old system brought significant improvements in file encryption, NTFS file system, and file compression features. Therefore, it was mainly successful in corporate environments. However, they eventually ended its direct support.
How to Set Up Windows 2000 on Windows 11 / 10 using Oracle VM VirtualBox 7.0
Windows 2000 was unveiled by Microsoft on February 17, 2000, initially named Windows NT 5.0, but it is now more commonly recognized as Win2K.
The Windows 200 system, where file encryption, NTFS file system, and file compression features were improved, was primarily successful in corporate companies. Although it provides many new improvements compared to previous Windows versions regarding system security, it could have been a better system for home users due to system crashes.
The direct support of the Windows 2000 operating system, which works very well on the server computers of the companies, was terminated on June 30, 2005, and its extended support was closed on July 13, 2010.
Windows 2000 is a version that was not released as an update to Windows 98 or Windows 98 SE and included four different versions.
- Windows 2000 Professional
- Windows 2000 Server
- Windows 2000 Advanced Server
- Windows 2000 Datacenter
Windows 2000 Professional Edition was developed for personal use on desktop and laptop computers. However, nowadays, there is no point in installing this operating system on your physical computer because a platform without support can always get you in trouble.
If you desire to utilize Windows 2000, you can install a virtual device using virtualization programs like VirtualBox or VMware.
How to Create a New Virtual Machine for Windows 2000 OS
After successfully installing VirtualBox on your host computer, launch the virtual machine wizard to prepare the Windows 2000 operating system on your new VM.
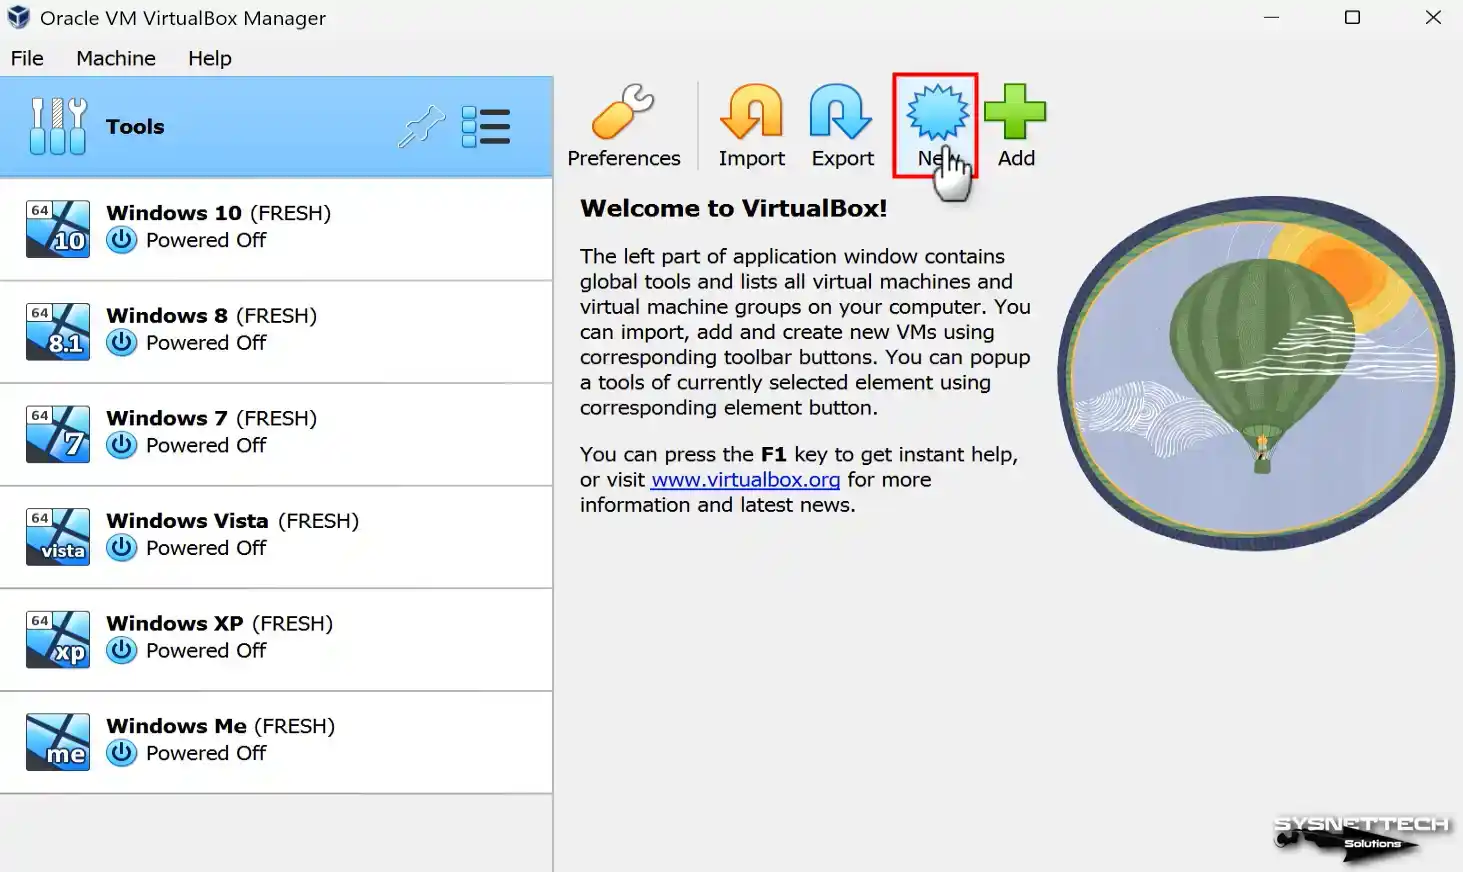
Step 1
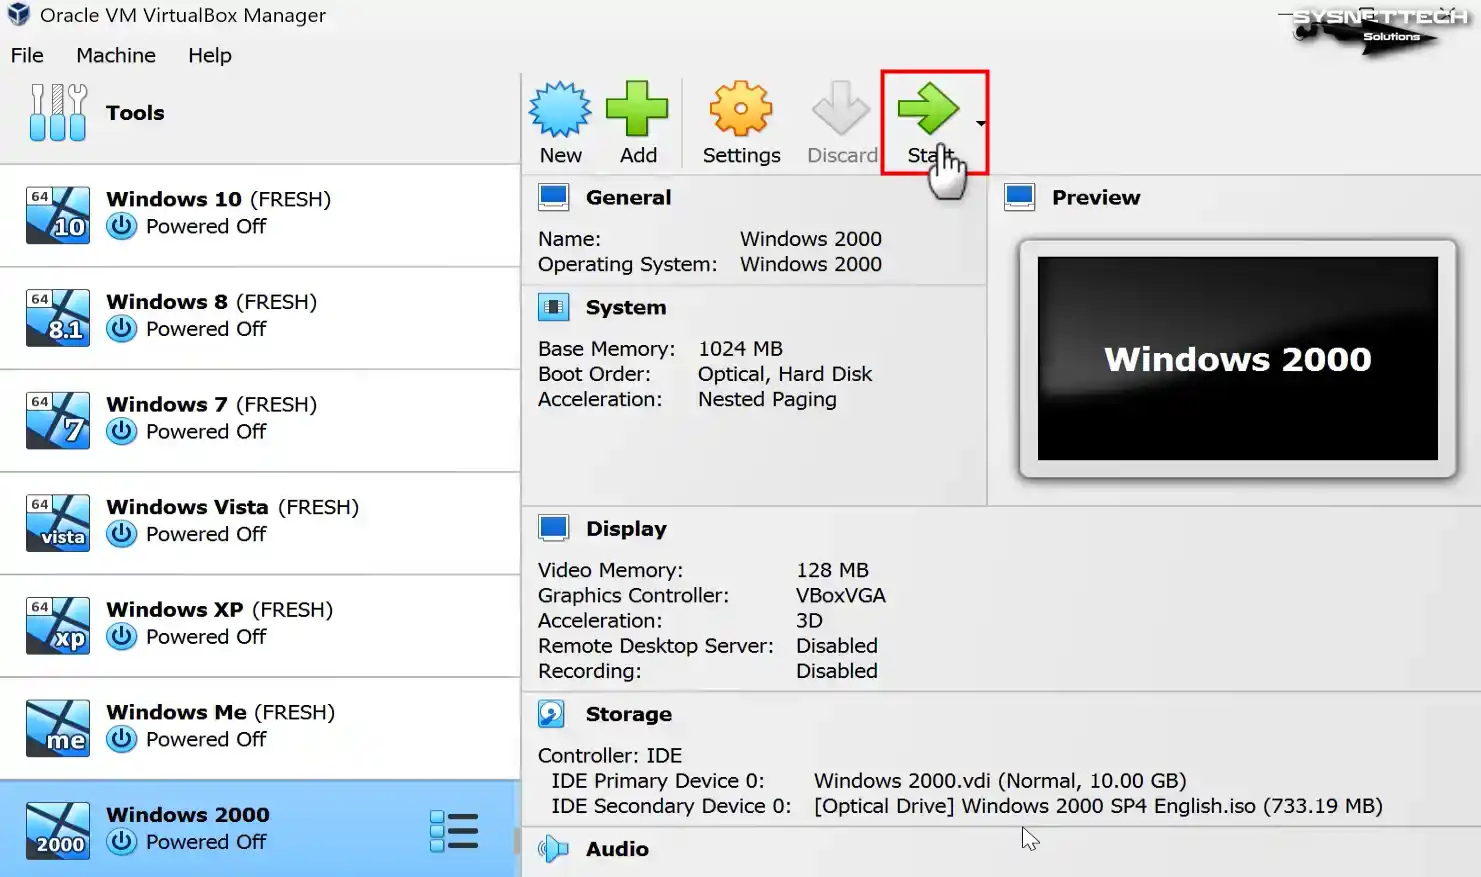
After running Oracle VM VirtualBox, open the virtual machine creation wizard by clicking the Machine / New option from the tool menu or the blue New icon.
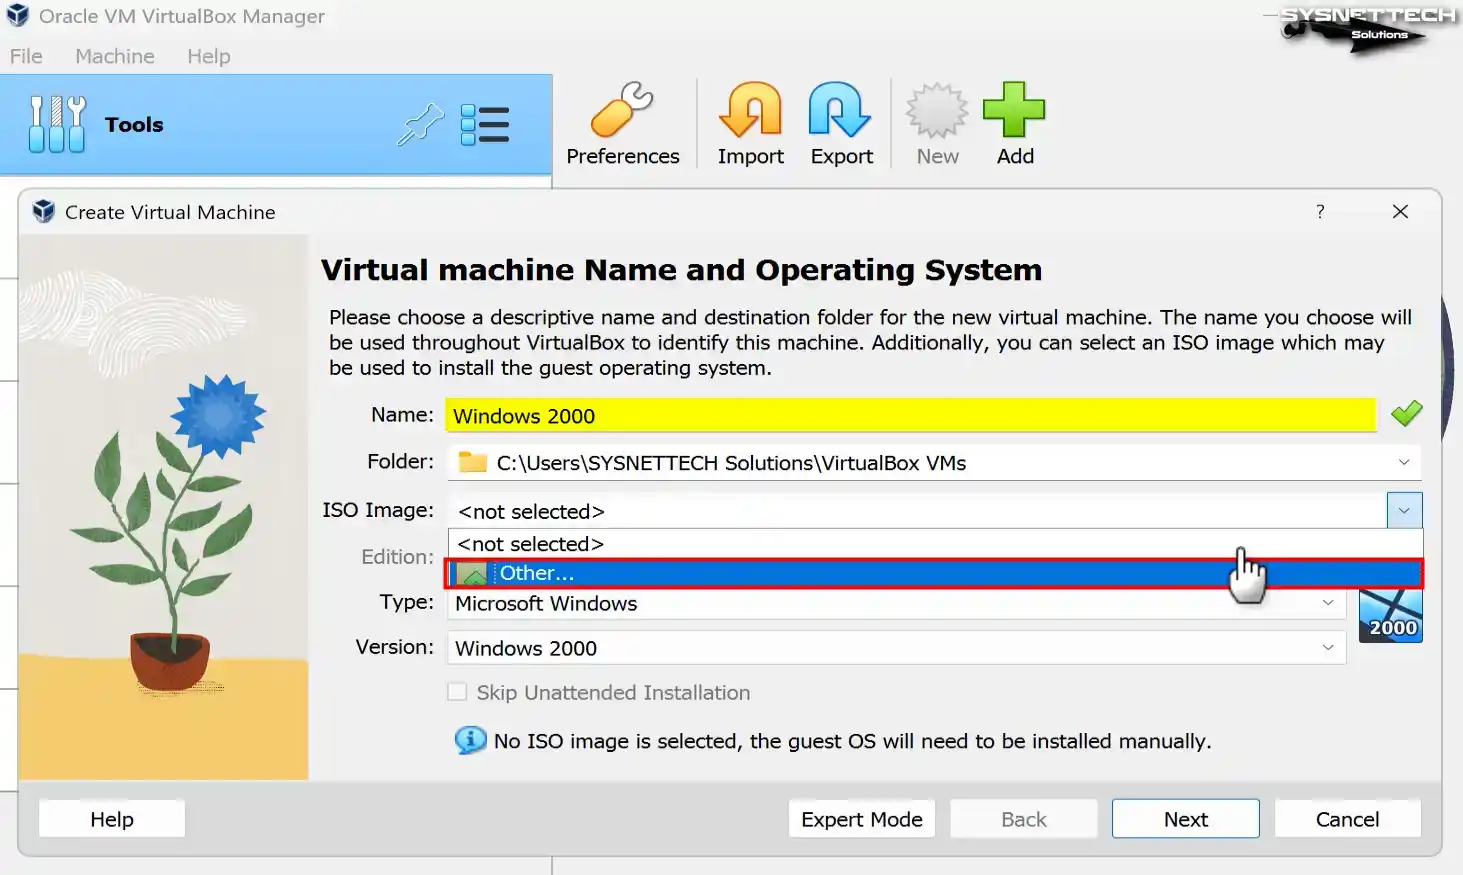
Step 2
Kindly provide a title for the operating system you intend to install. After that, select the required edition from the “Version” area and proceed by clicking the “Next” button. Also, configure the location of the virtual system you will install from the Folder section to the host disk or an external HDD or SSD.
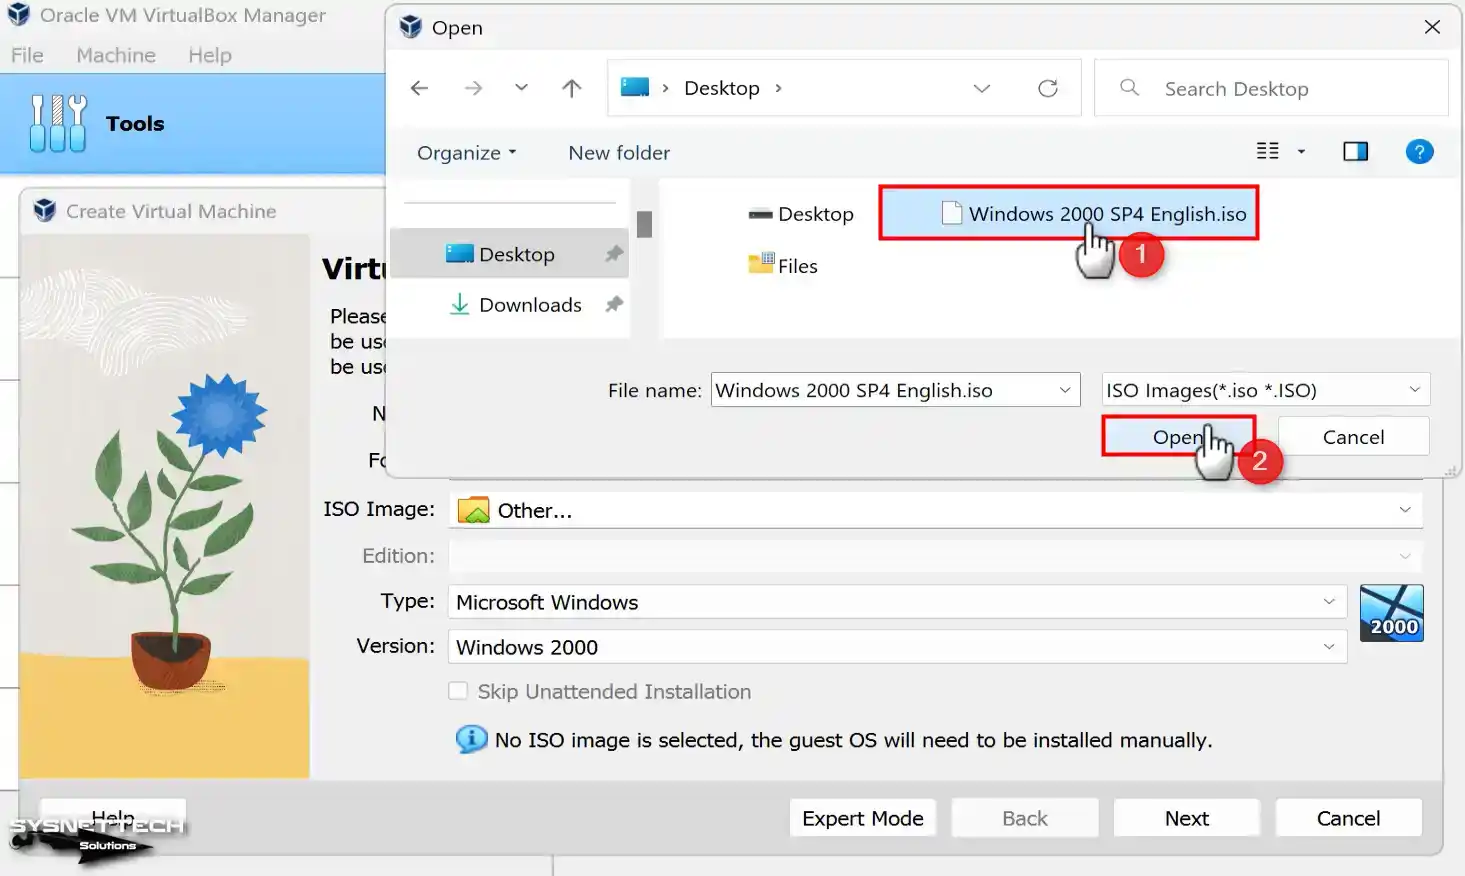
Select Other from the ISO Image section to add the Windows 2000 ISO file to the guest operating system you have prepared.
Step 3
From the table below the article, select the Windows 2000 image file you downloaded to your computer and open it.
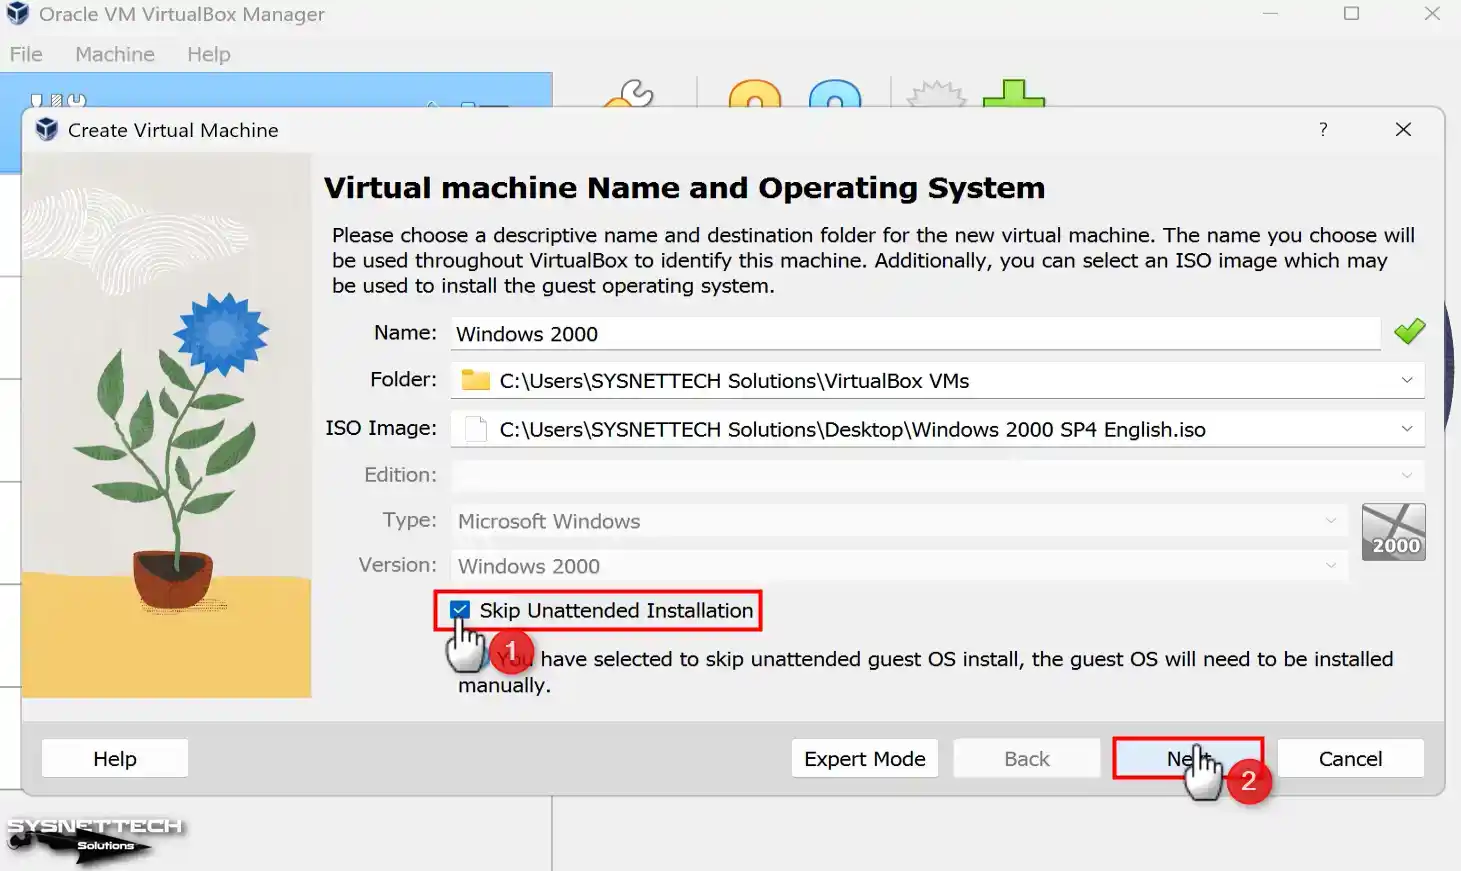
Step 4
The Windows 2000 system will be determined when you add the image file. However, check Skip Unattended Installation to continue with manual system installation and click Next.
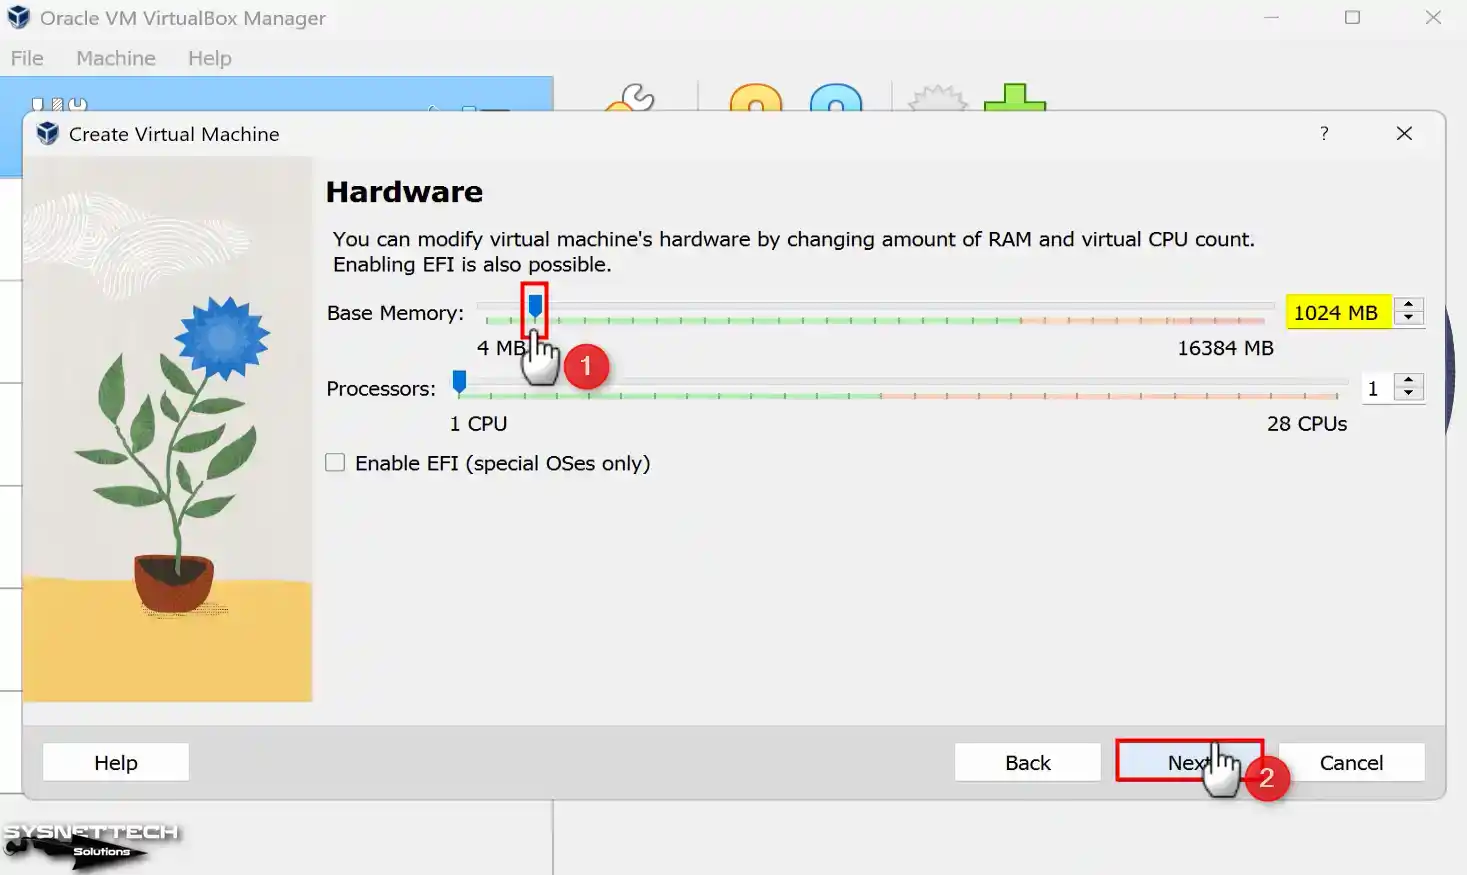
Step 5
In the Memory Size window, configure the RAM size of 1 GB (1024 MB) for the Windows 2000 VM and click Next. You can enhance the performance of your guest system by increasing the number of virtual processors in this window.
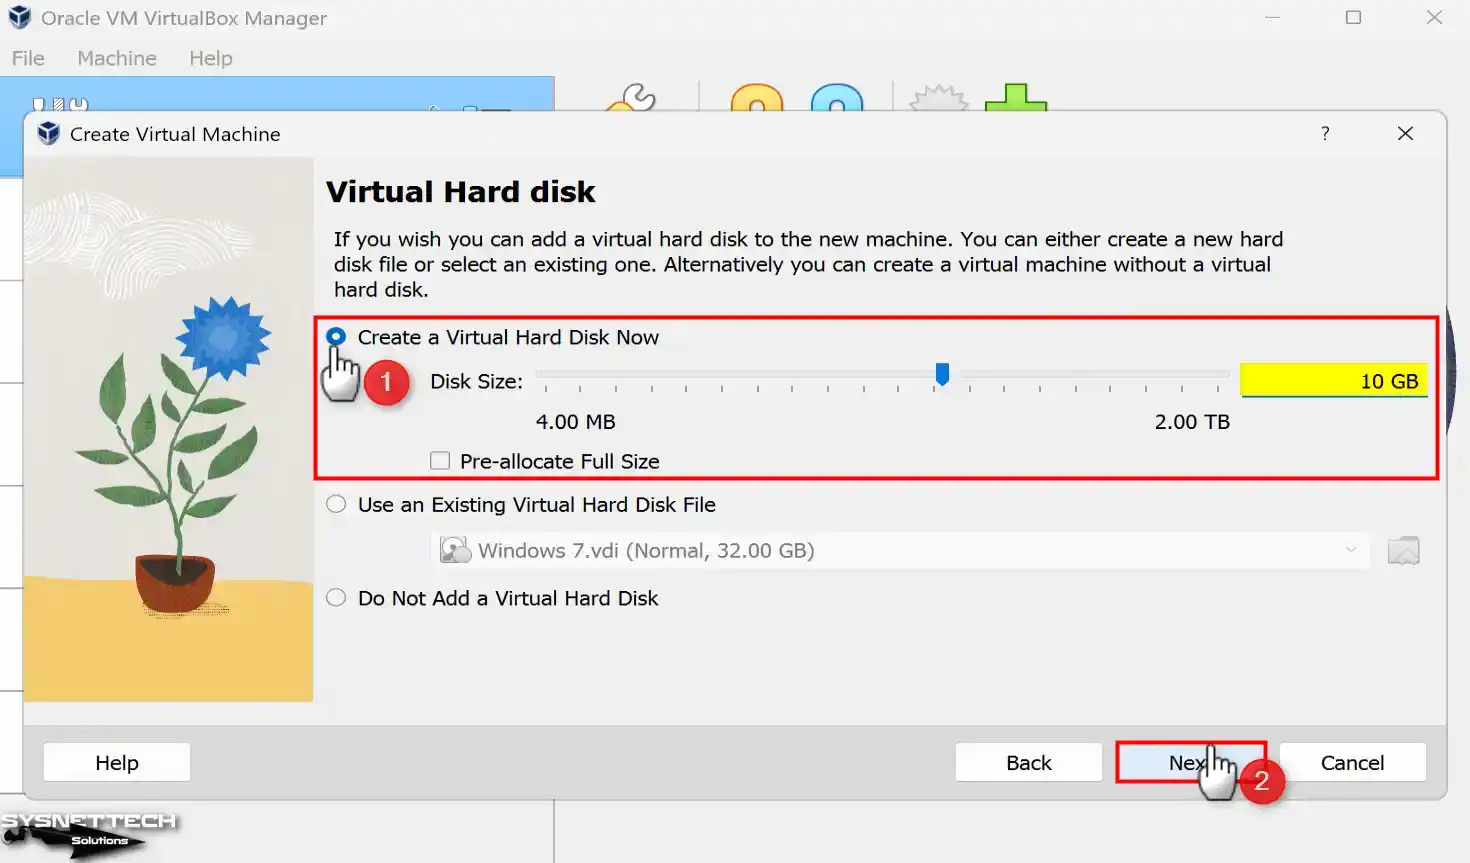
Step 6
To create a new virtual disk for a clean Win2K installation, select Create a virtual hard disk now and click the Create button after configuring the disk size. If you have previously installed a Win2000 VM, you can add the virtual disk from this window.
In the 6.x versions of VirtualBox, select VDI (VirtualBox Disk Image) as the virtual hard disk file type during disk configuration. Configuring the virtual disk to Fixed Size improves virtual machine performance on computers with old hardware. However, since Fixed Size will reduce the capacity of the host disk, you can select the Dynamically Allocated option to allocate disk space from your host’s disk only as much as necessary.
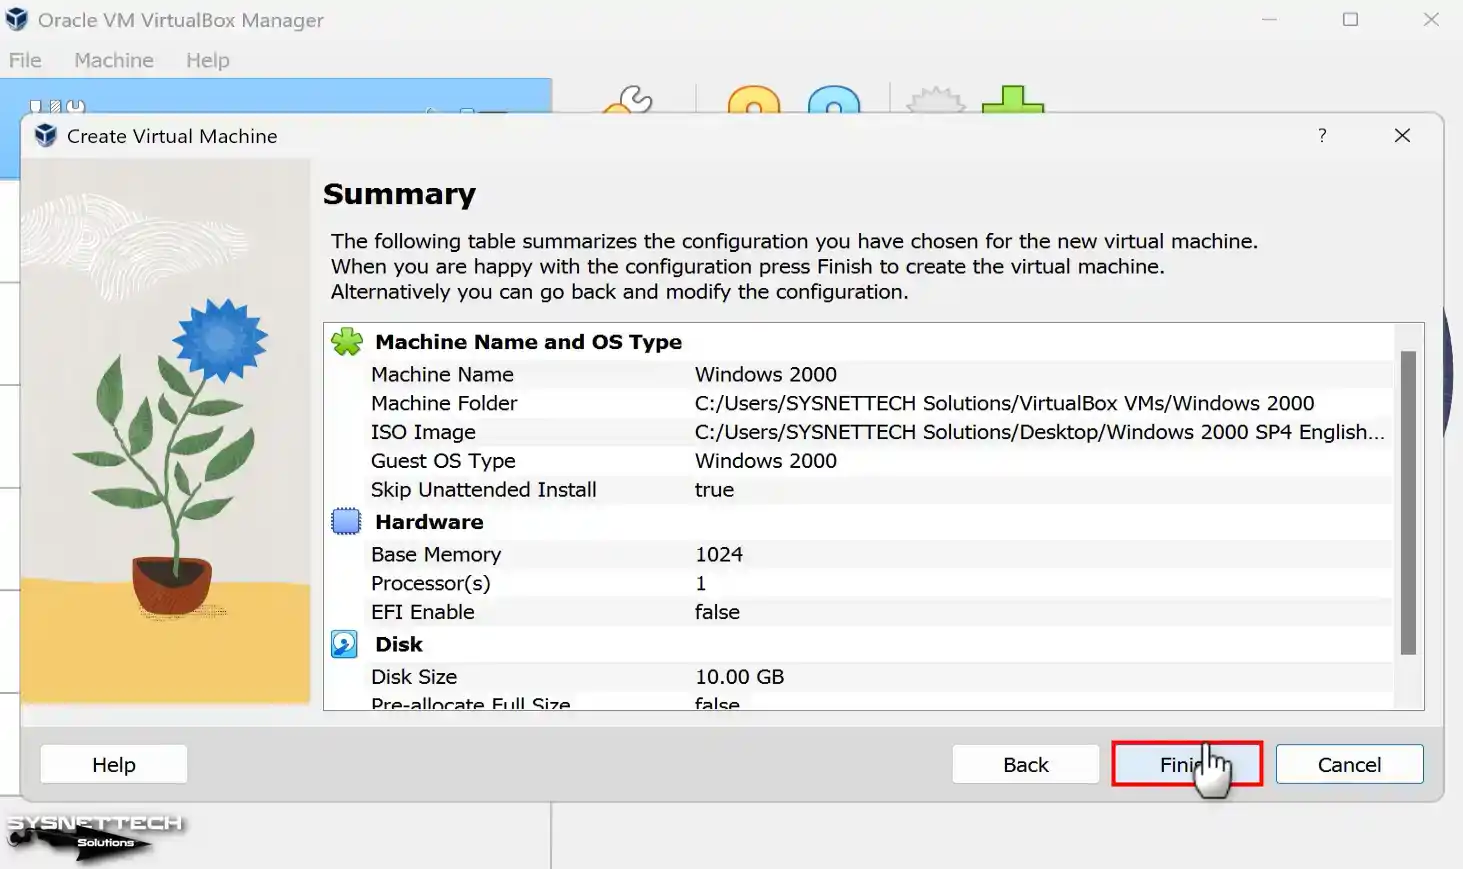
Step 7
After checking the hardware summary of the Windows 2000 virtual system, click Finish to close the window.
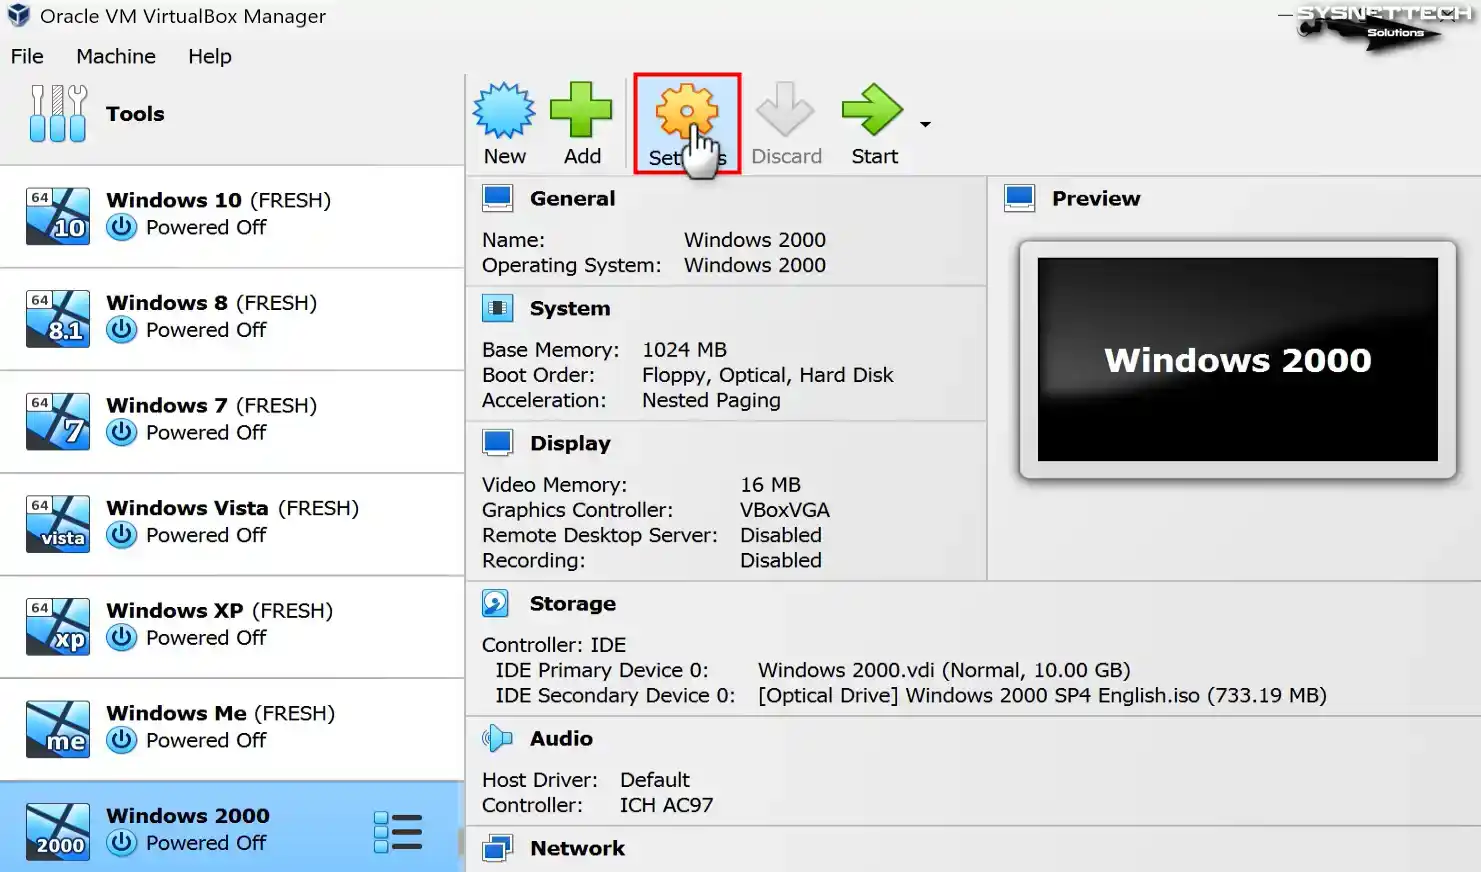
Step 8
Click Settings to adjust the virtual machine settings better.
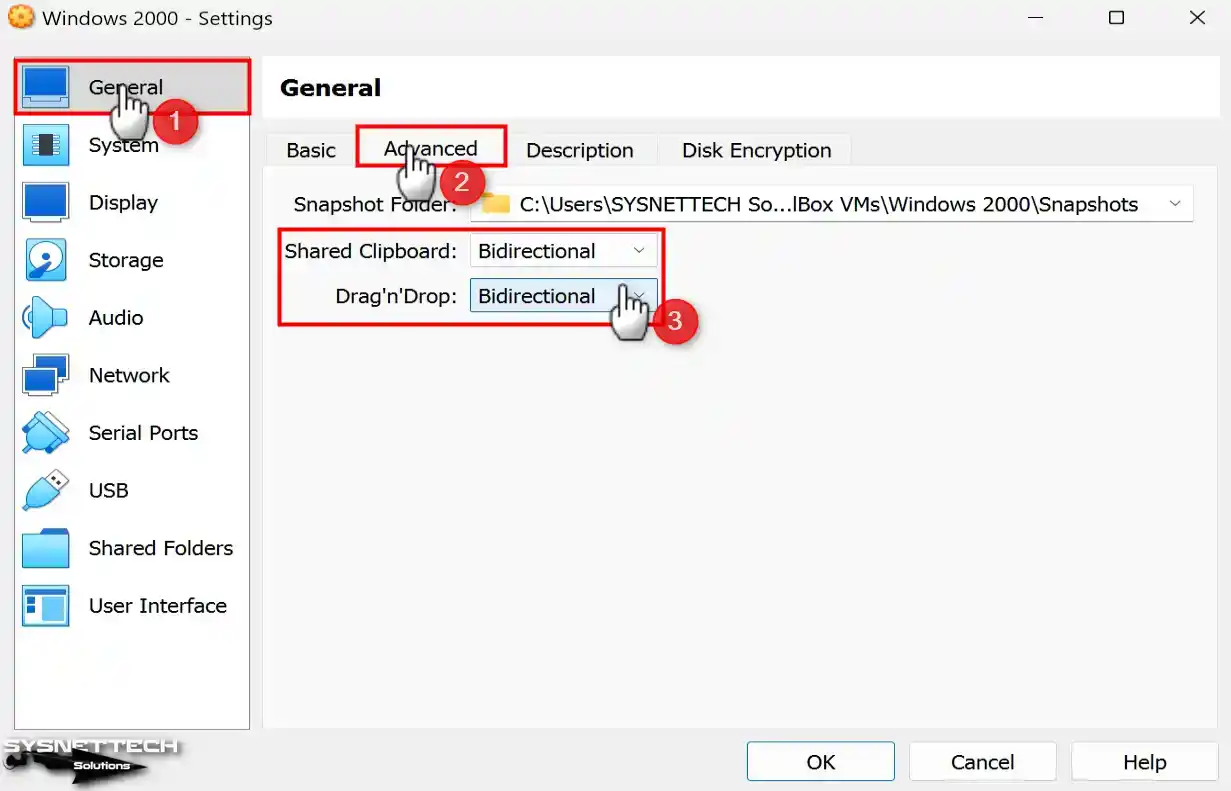
Step 9
In the General / Advanced tab, configure the file transfer and text copying features as Bidirectional between the virtual machine and the host PC by drag-drop or copy-paste method.
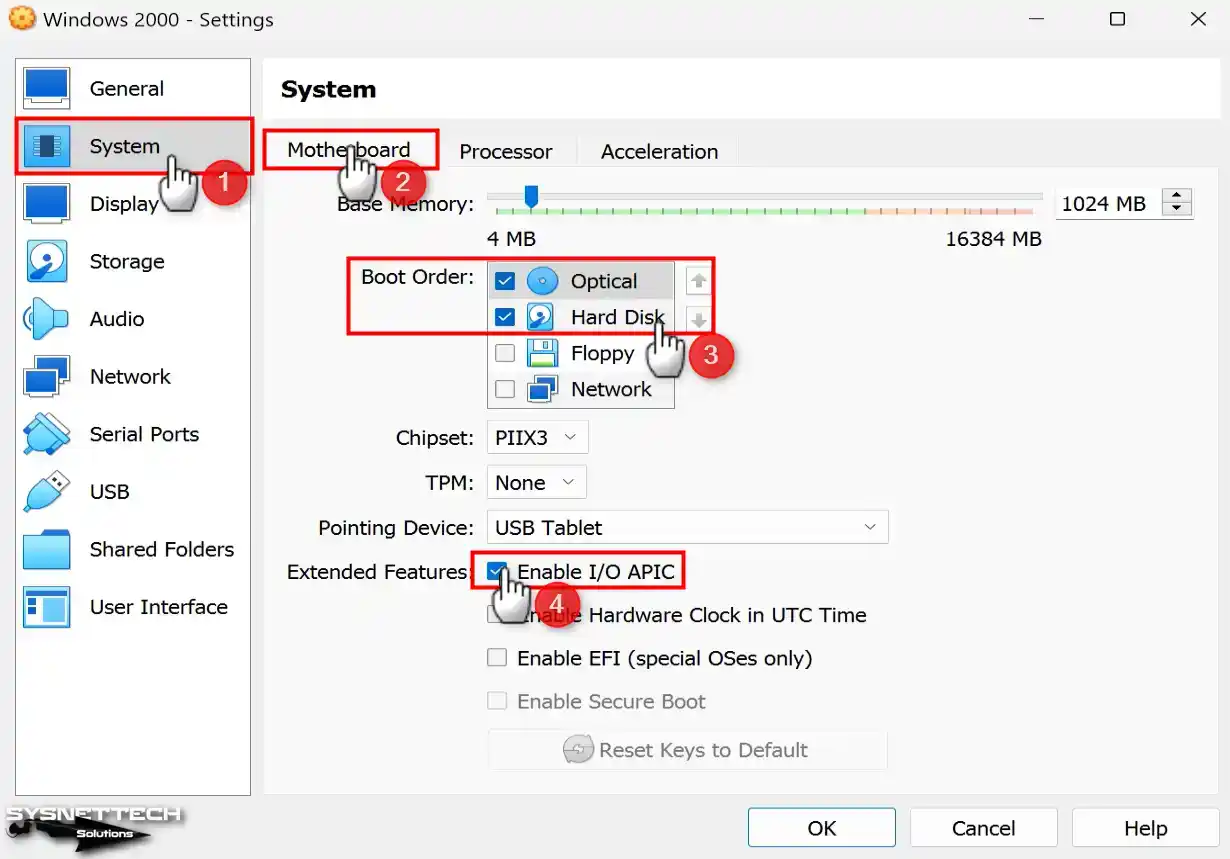
Step 10
On the System / Motherboard tab, configure the Optical device as the first row in the Boot Order section and disable Floppy.
Also, if you will use more than one virtual processor on a Windows 2000 VM, check the Enable I/O APIC option in the Extended Features section.
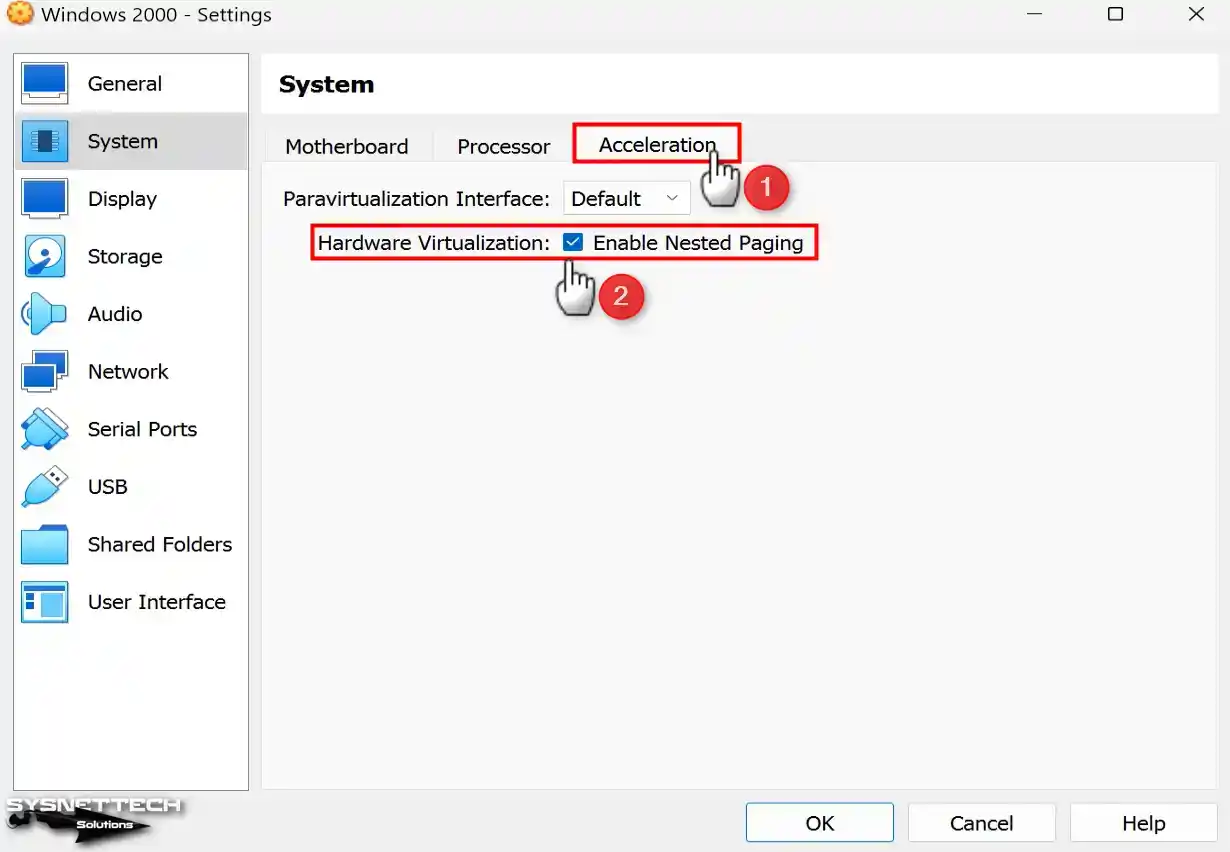
Step 11
Enable Nested Paging in the Acceleration tab for better memory management between the host and VM.
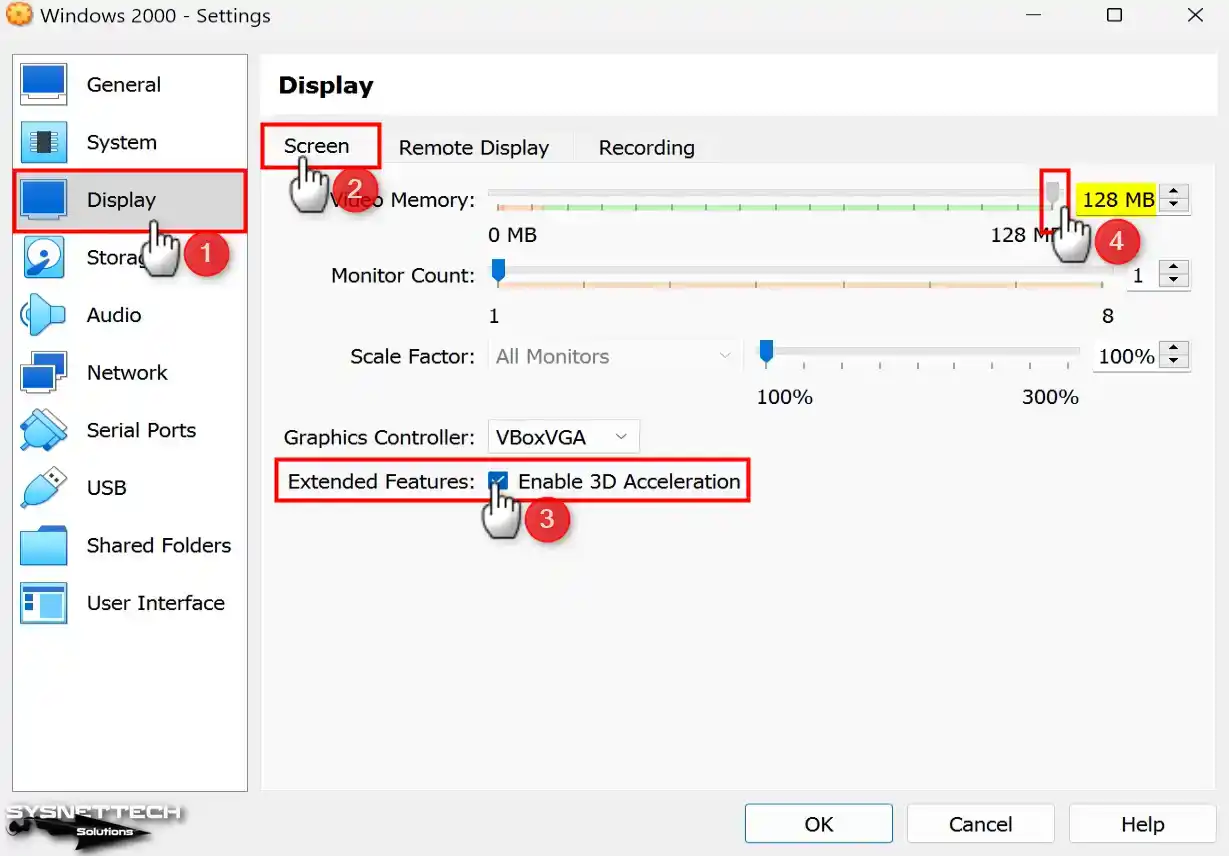
Step 12
For better graphics rendering in the virtual machine, enable the 3D Acceleration option and configure the Video Memory value to 128 MB.
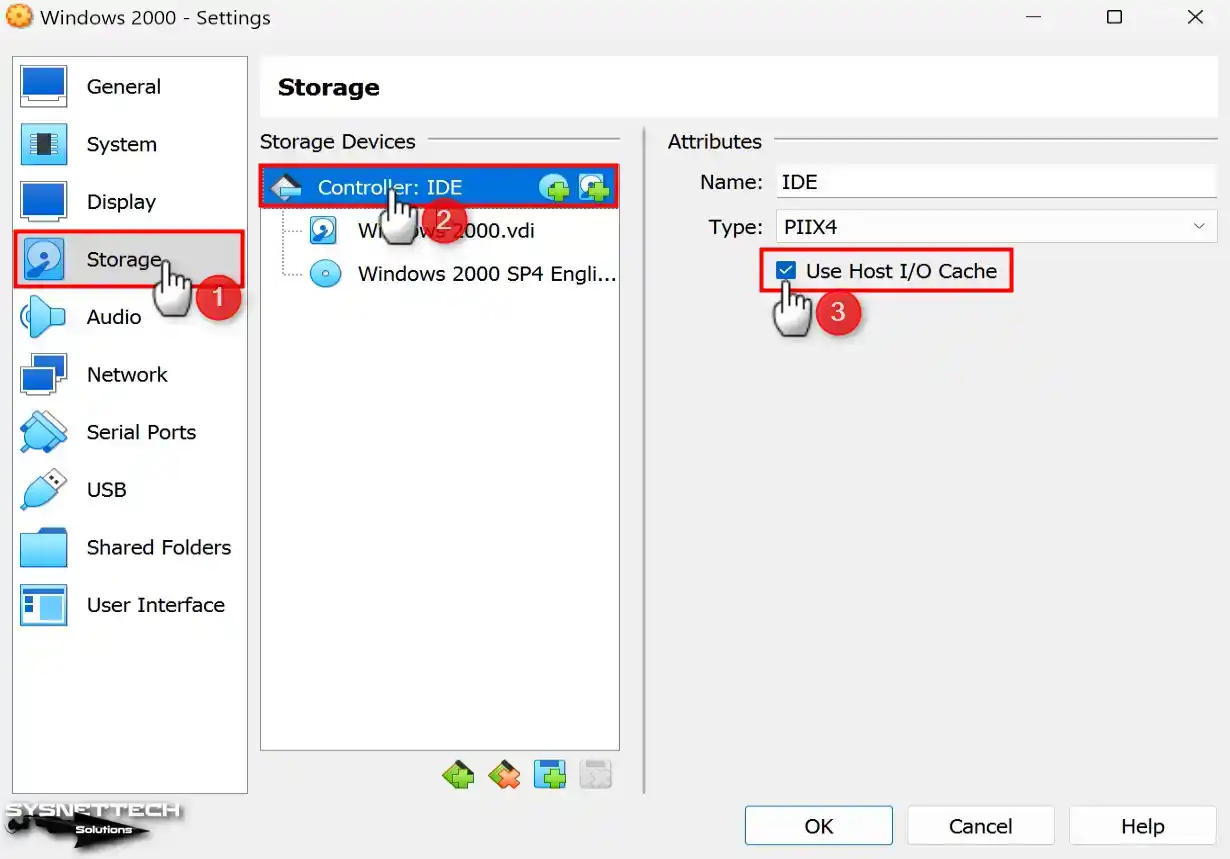
Step 13
Check that the Host I/O Cache feature is enabled for the IDE controller in the Storage settings.
Step 14
Configure the Windows2000.vdi virtual disk file type as SSD (Solid-State Drive).

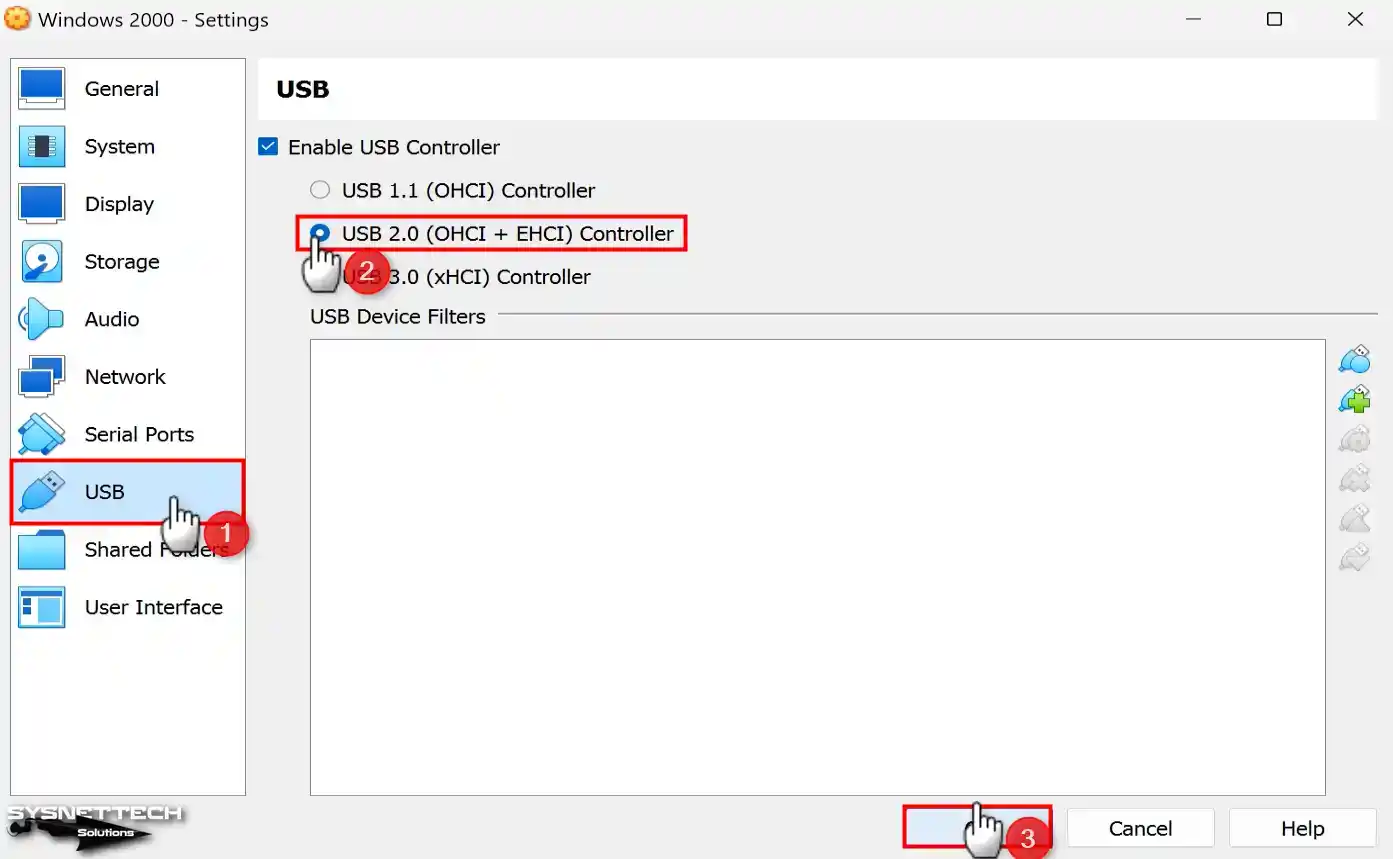
Step 15
Select the USB 2.0 (OHCI + EHCI) Controller to connect your USB devices to your virtual system.
Step 16
To install Windows 2000 with VirtualBox, run the virtual machine you created by clicking the Start button.
How to Install Windows 2000 using VirtualBox
After configuring the virtual machine correctly, you can install the Win2000 system as if you were installing Windows on a physical computer.
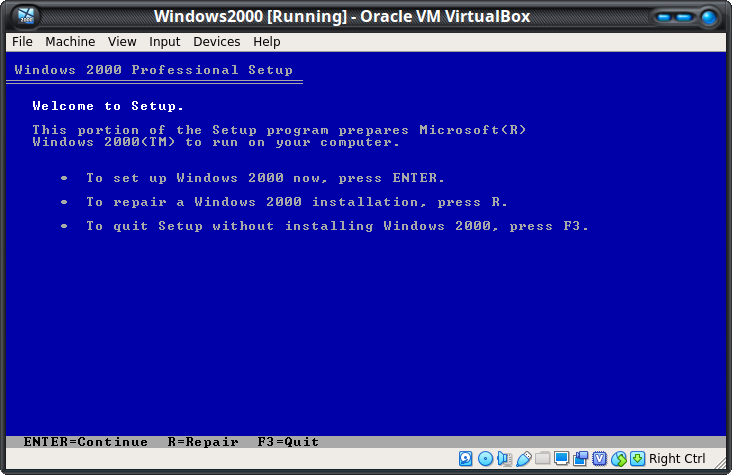
Step 1
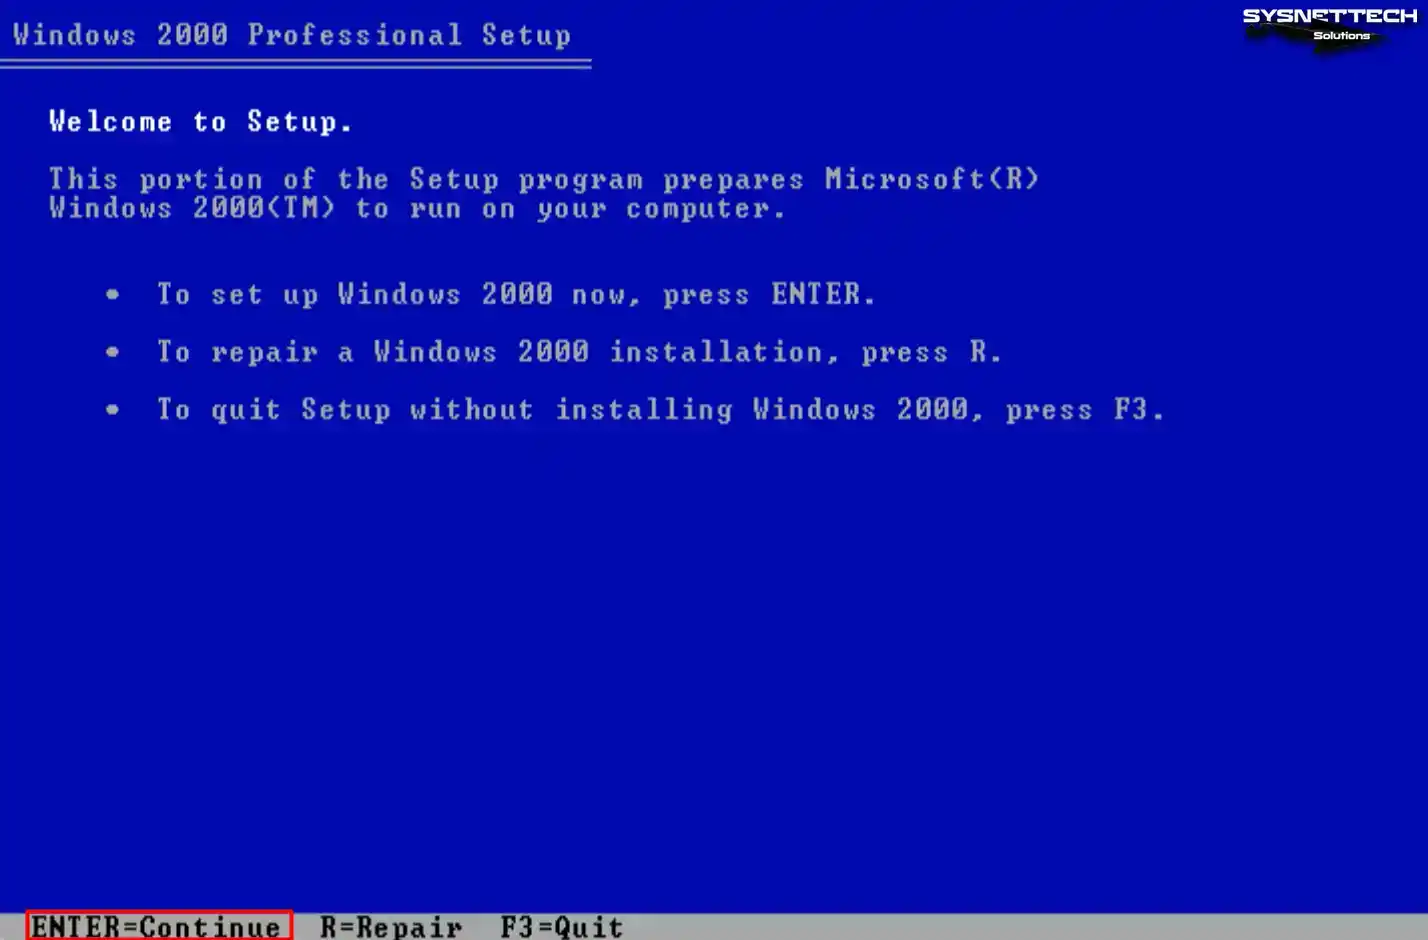
In the Windows 2000 Professional Setup screen, press Enter to start the installation or press R to repair your system. You can press F3 to close the wizard screen and exit it.
Step 2
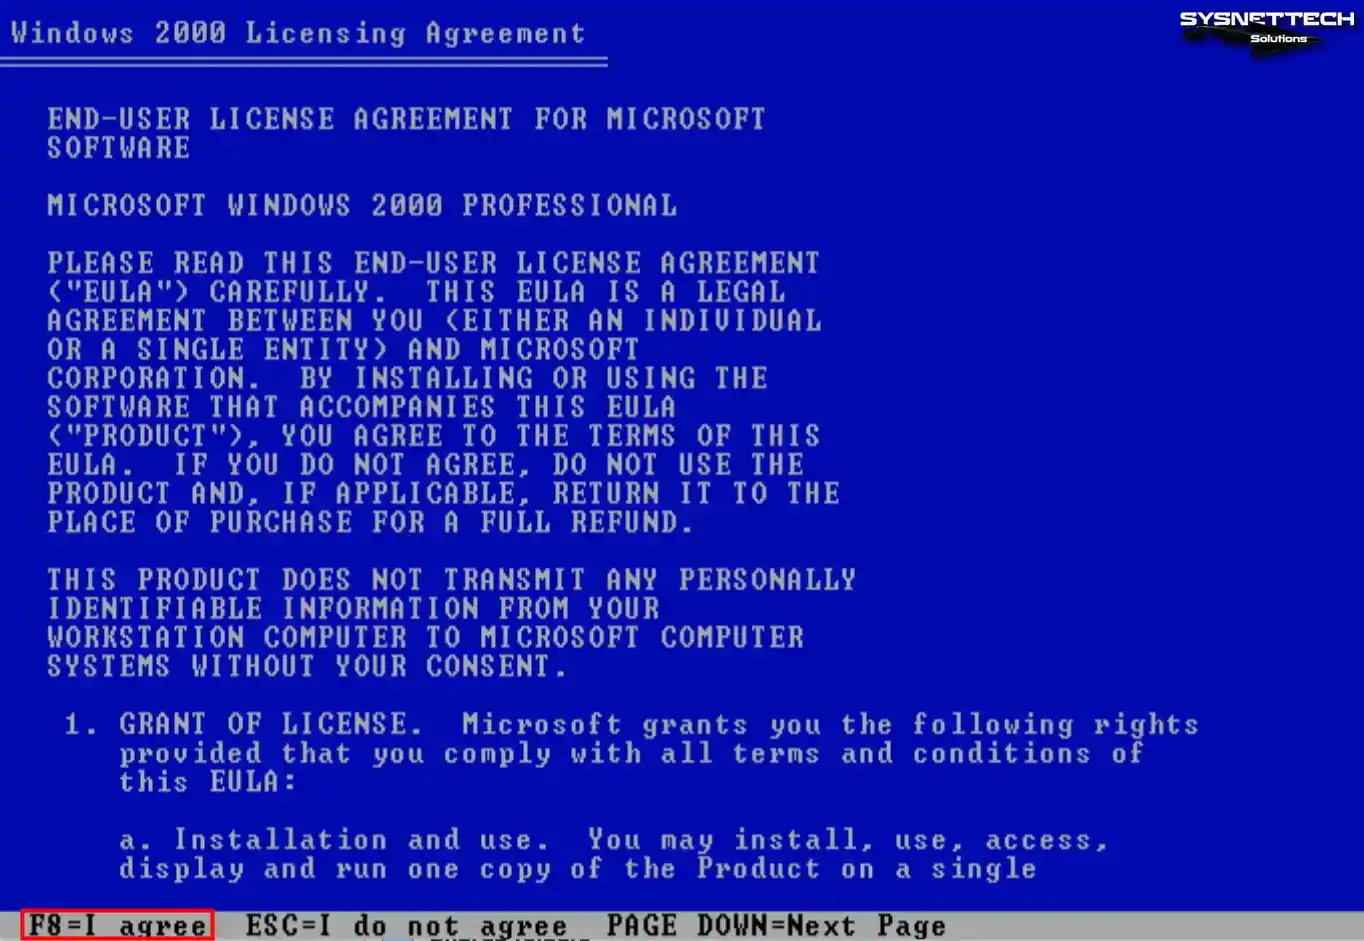
Press the Page Down key to explore the full text of the Windows 2000 operating system license agreement. If you want to approve the license agreement directly, press F8 and continue.
Step 3
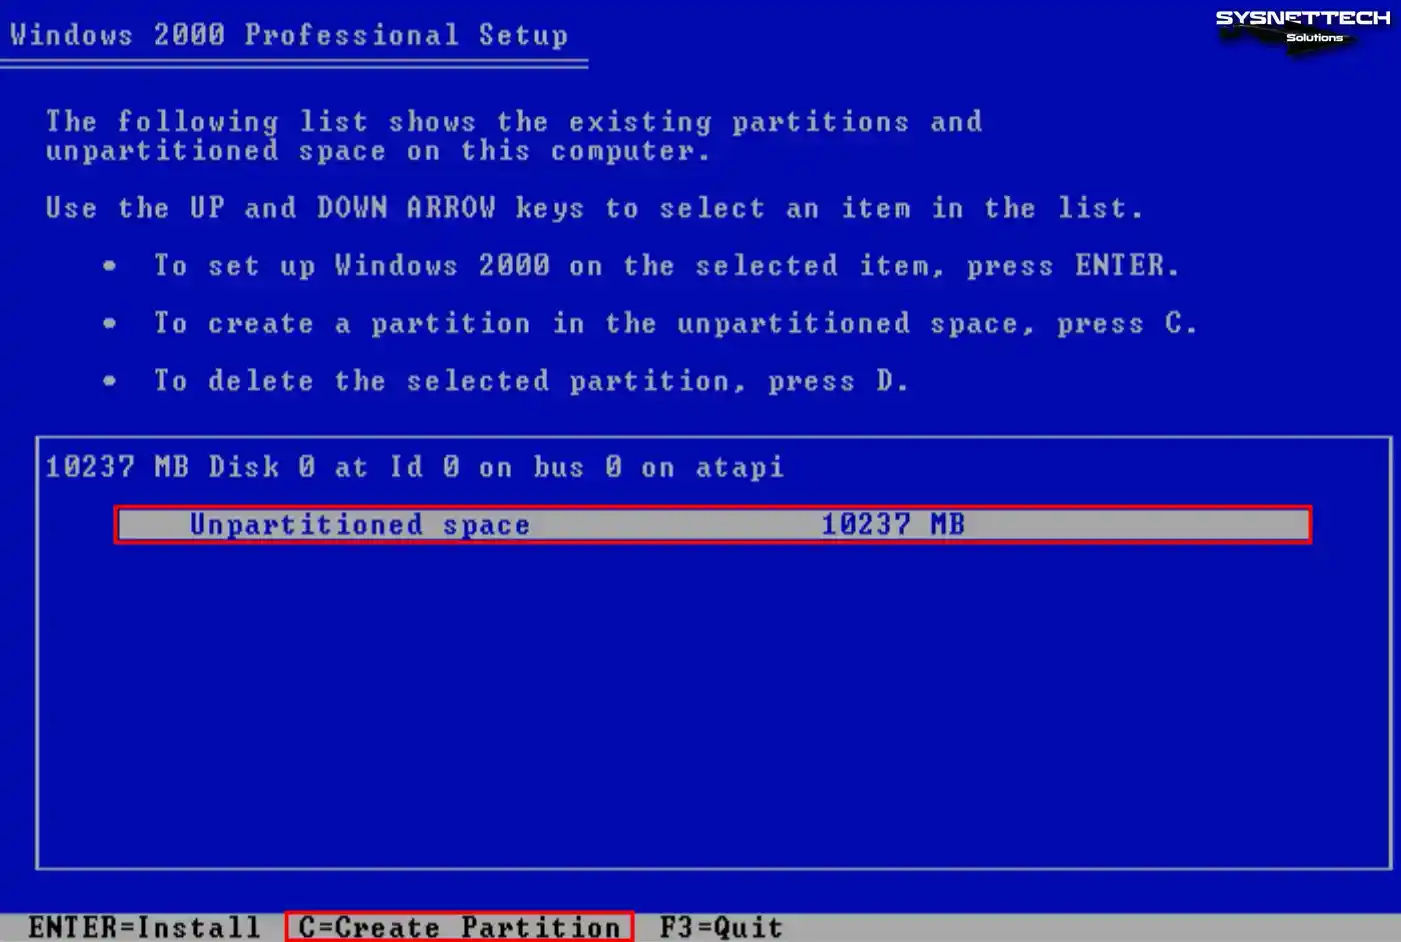
Press the C key to edit the unallocated disk space in the disk configuration window.
Step 4
Press Enter to confirm the disk space usage, which is determined automatically by the installation wizard.
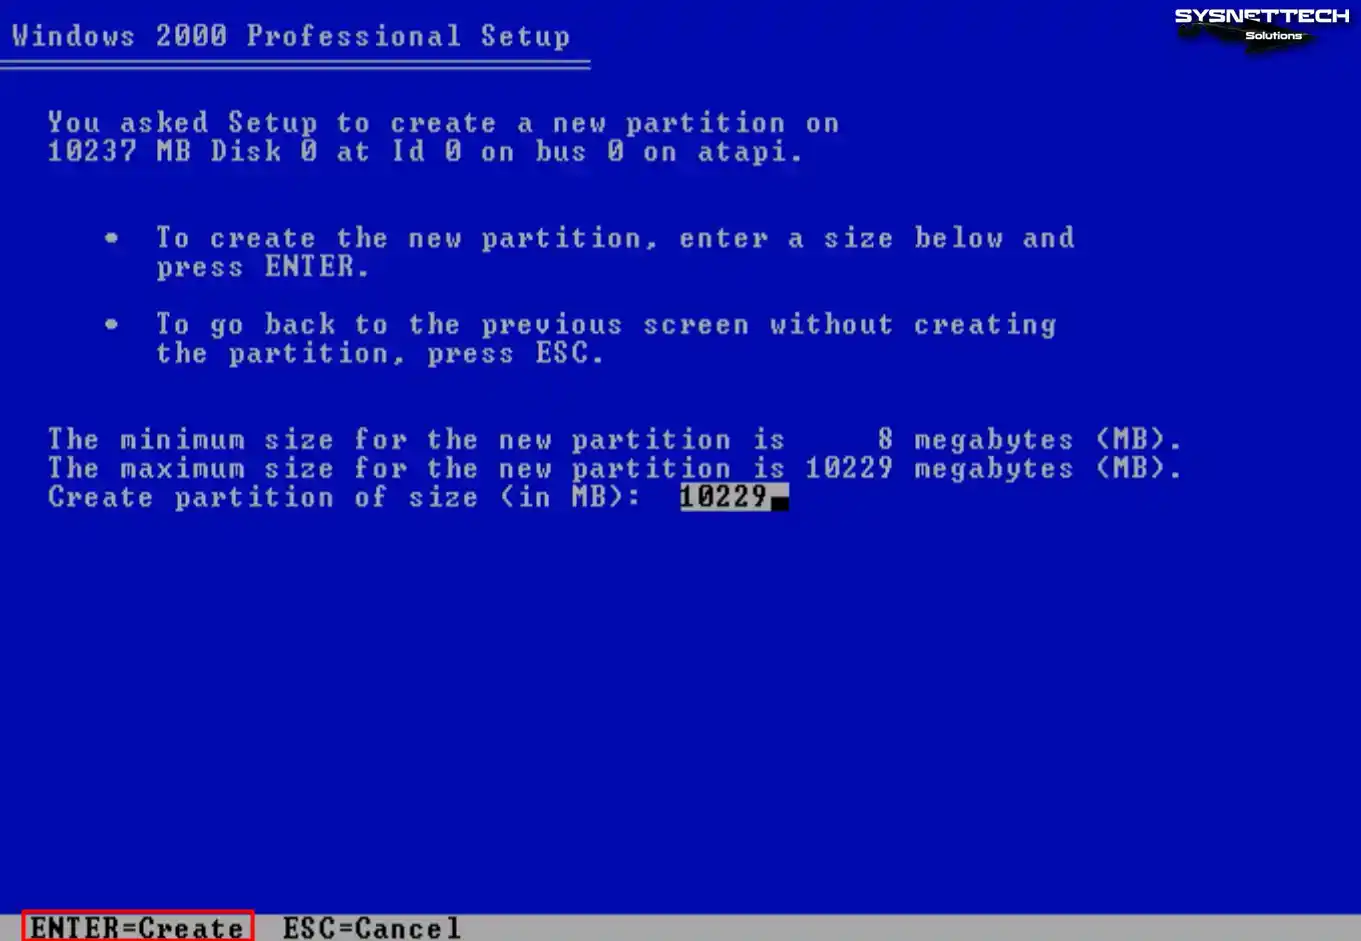
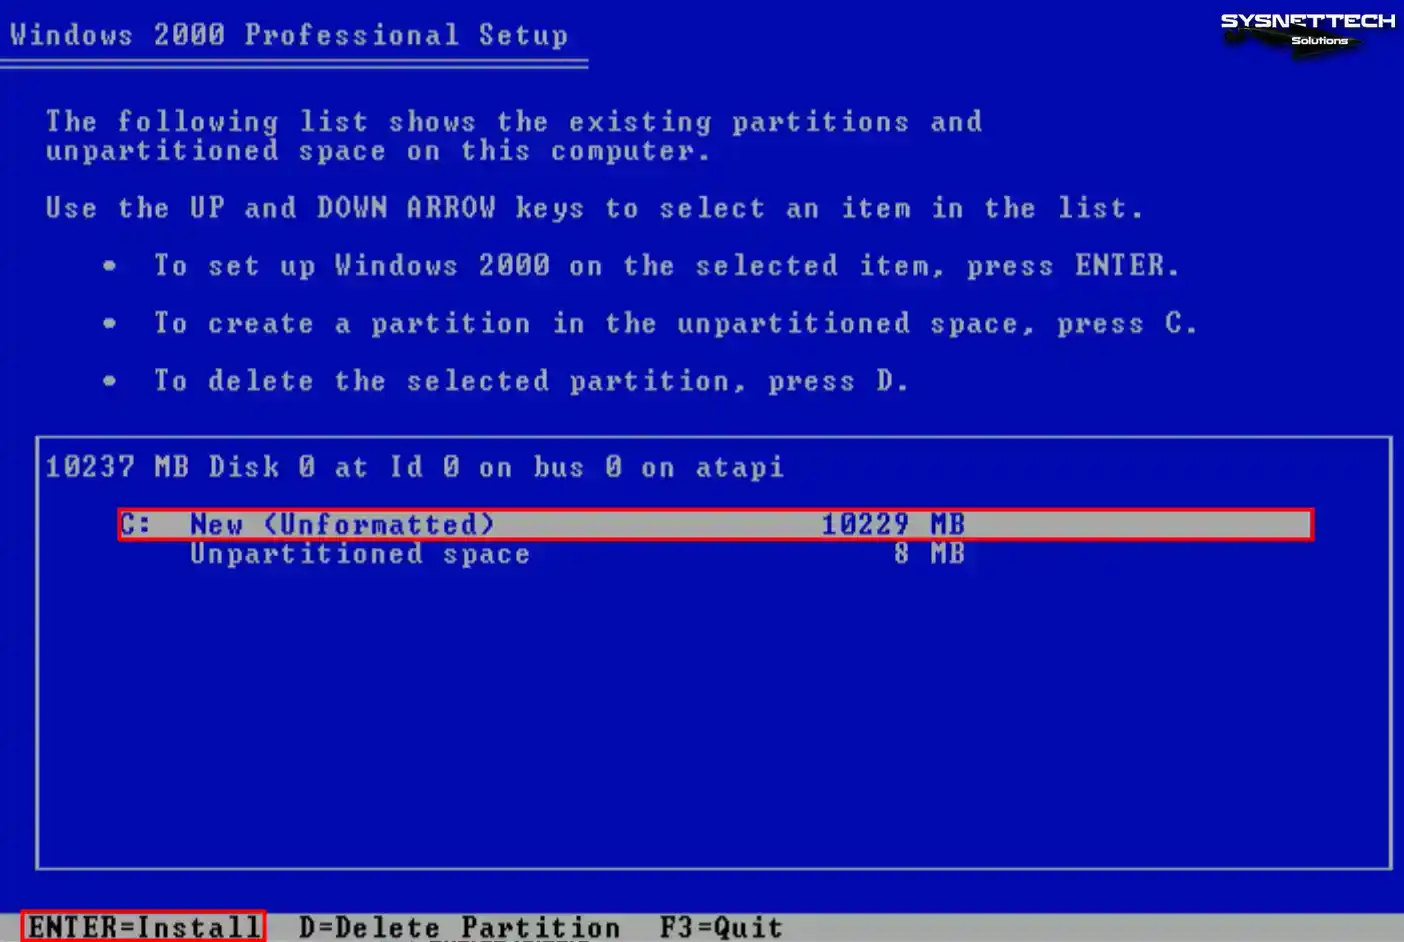
Step 5
After creating a new Partition on your virtual disk, press Enter to start the installation.
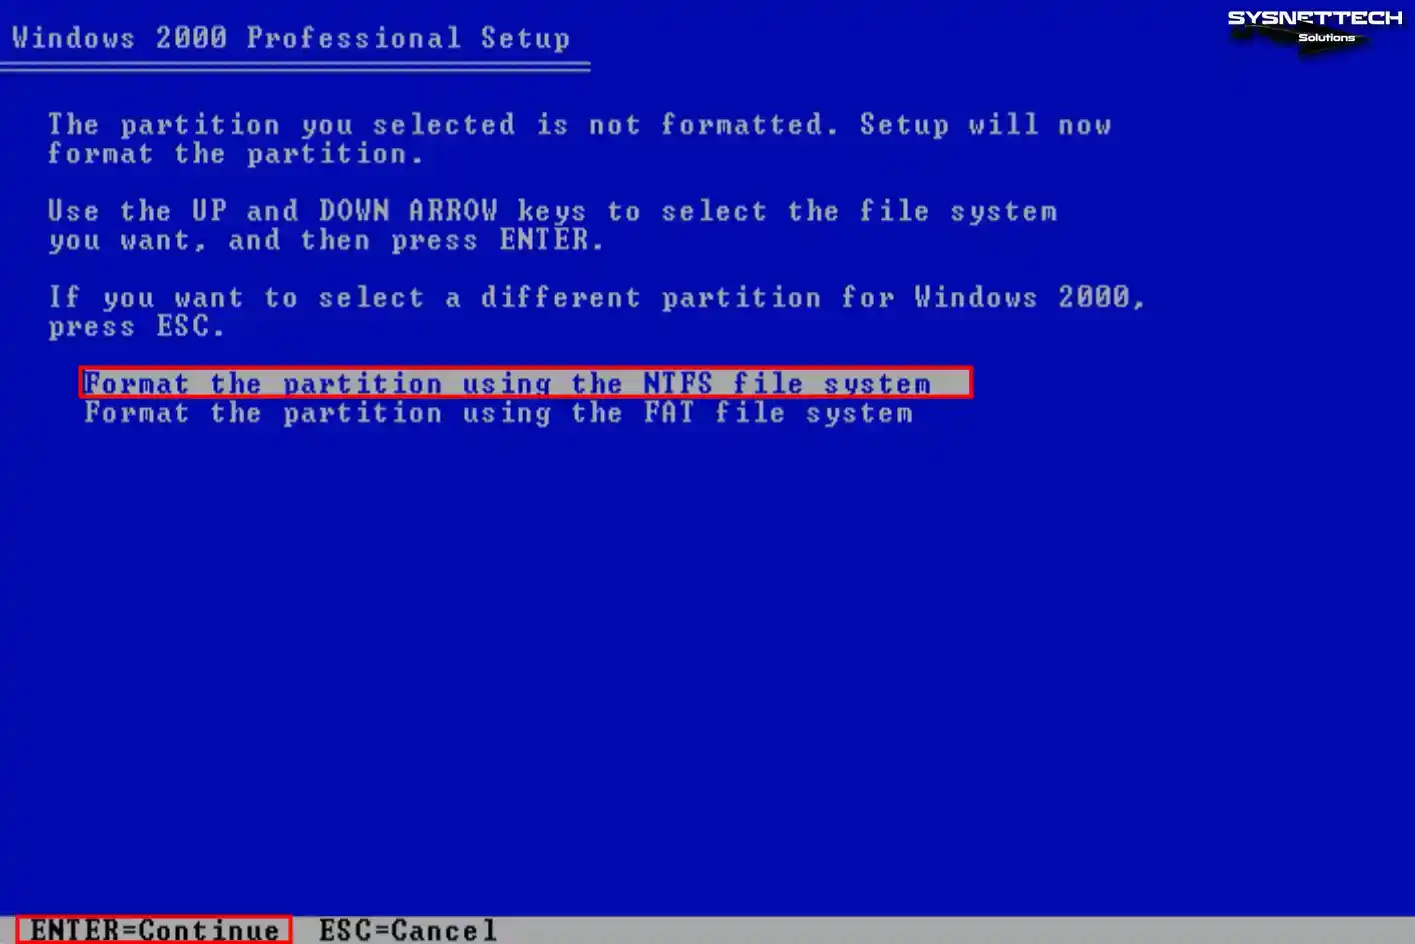
Step 6
Press Enter again using the appropriate option to format the disk of the virtual system using the NTFS file format.
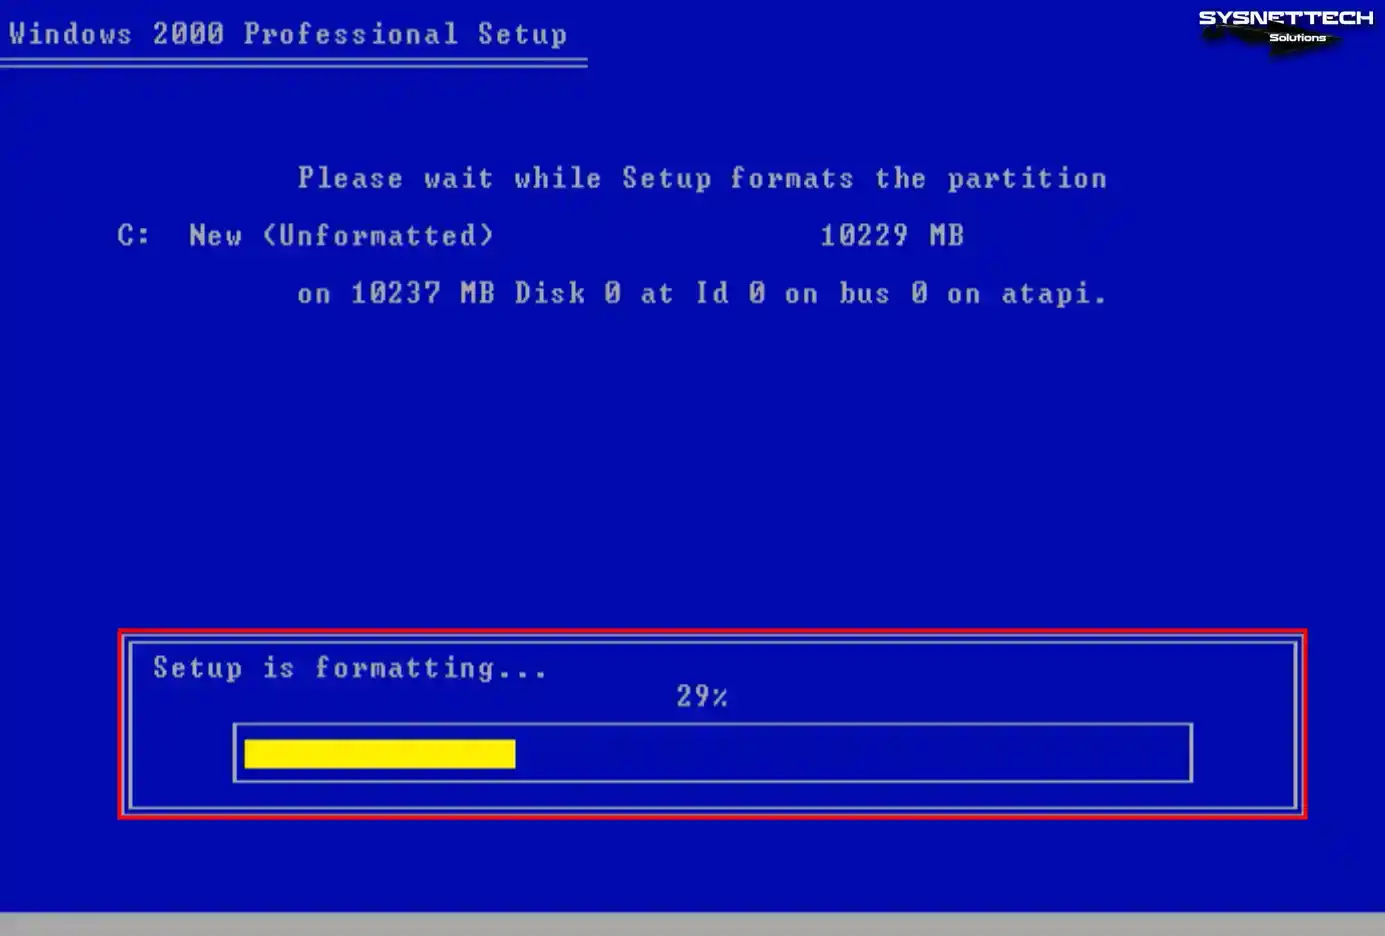
Step 7
Wait while the setup wizard formats the virtual disk.
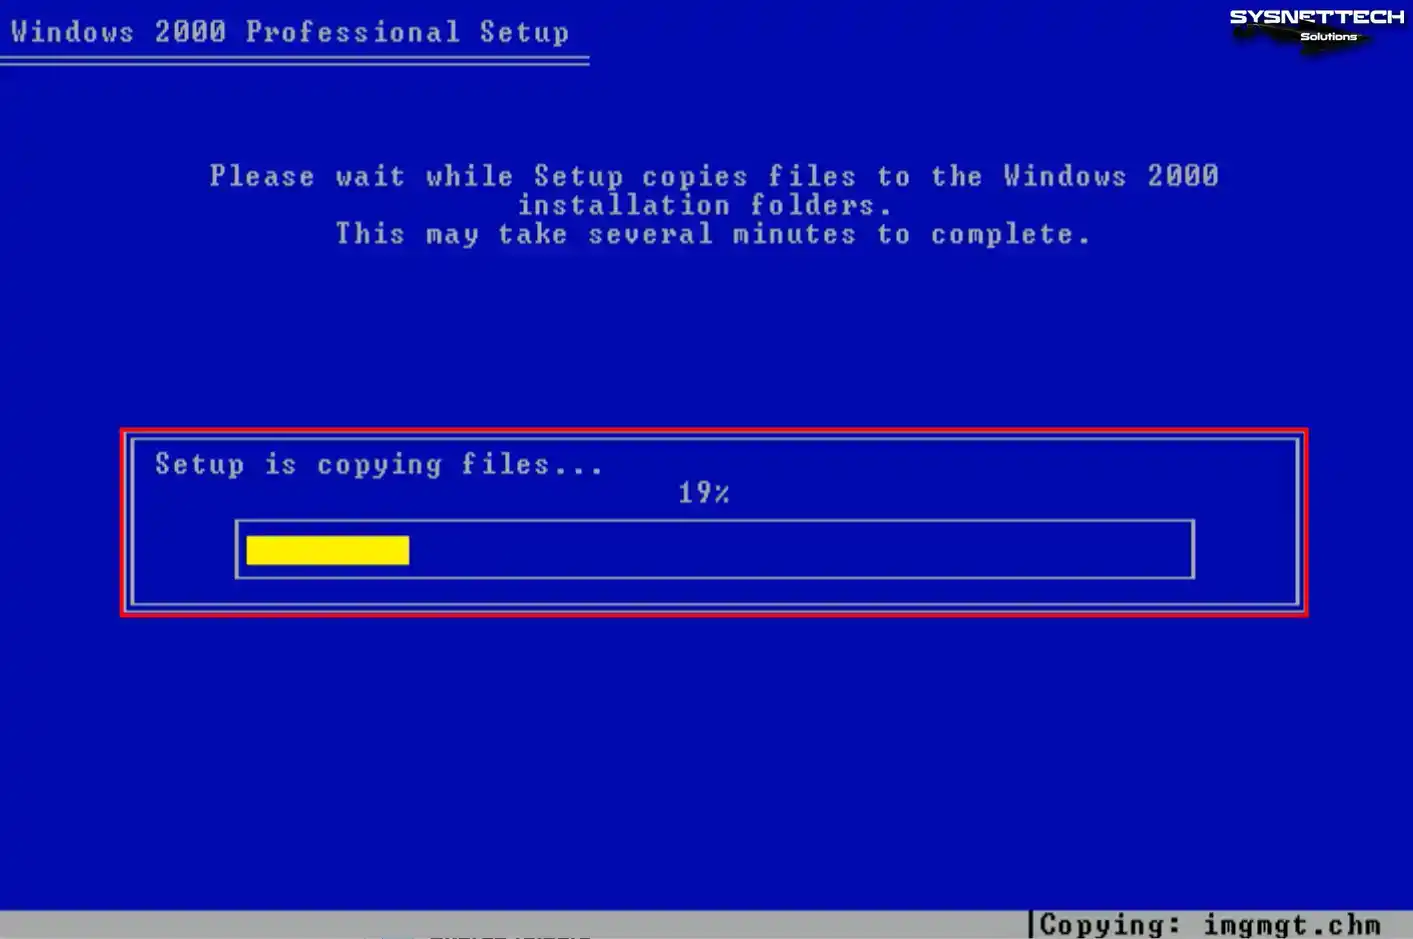
Step 8
Copying Windows 2000 system files may take time, depending on the performance of your host computer. Do not turn off your virtual computer while the system files are copied.
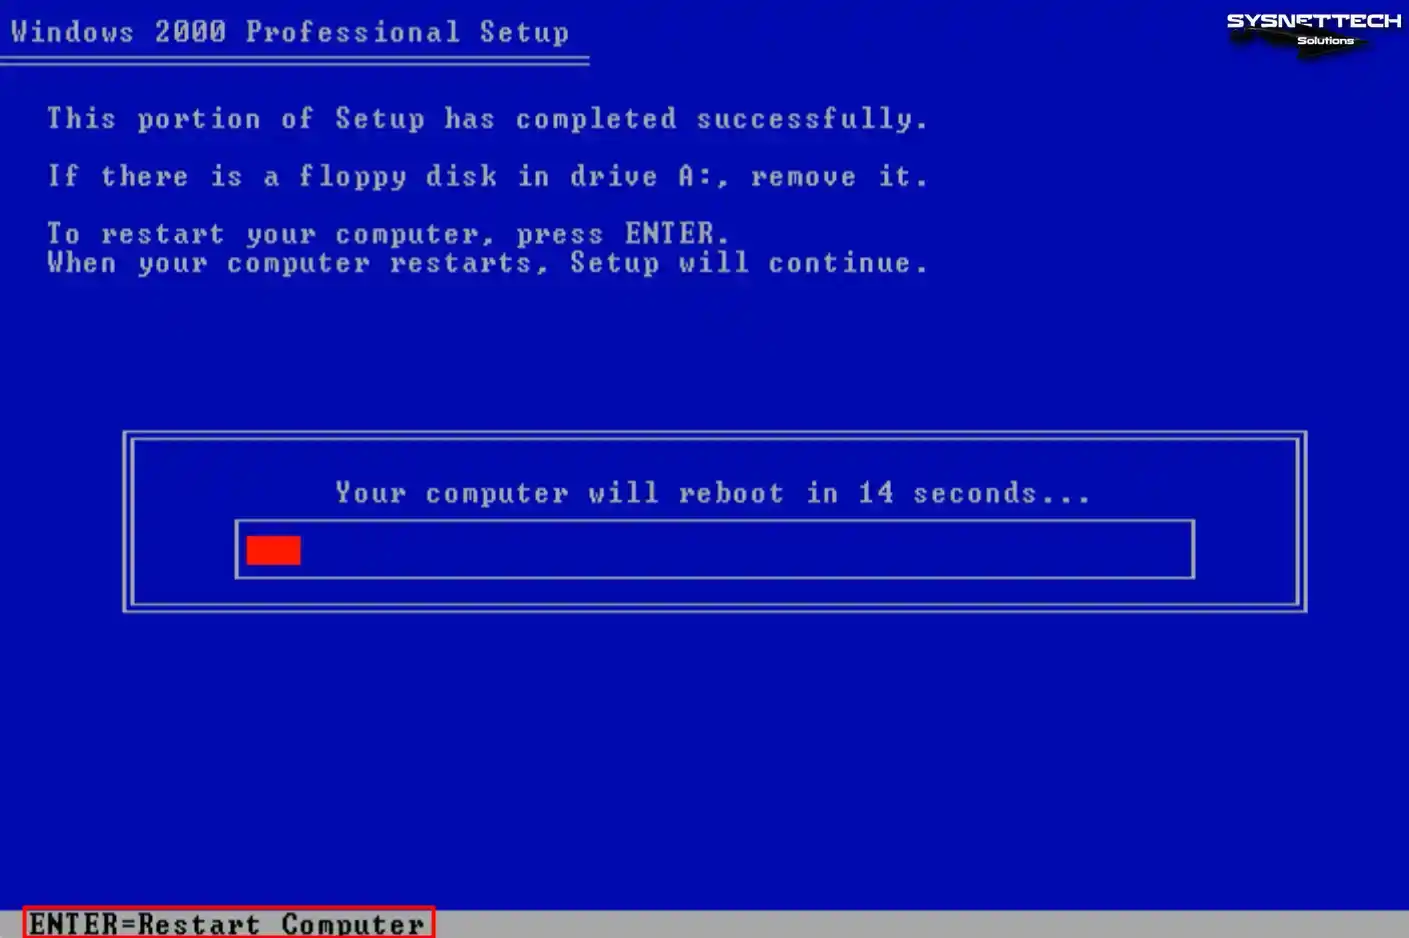
Step 9
After copying the system files, your virtual system will automatically reboot in 15 seconds.
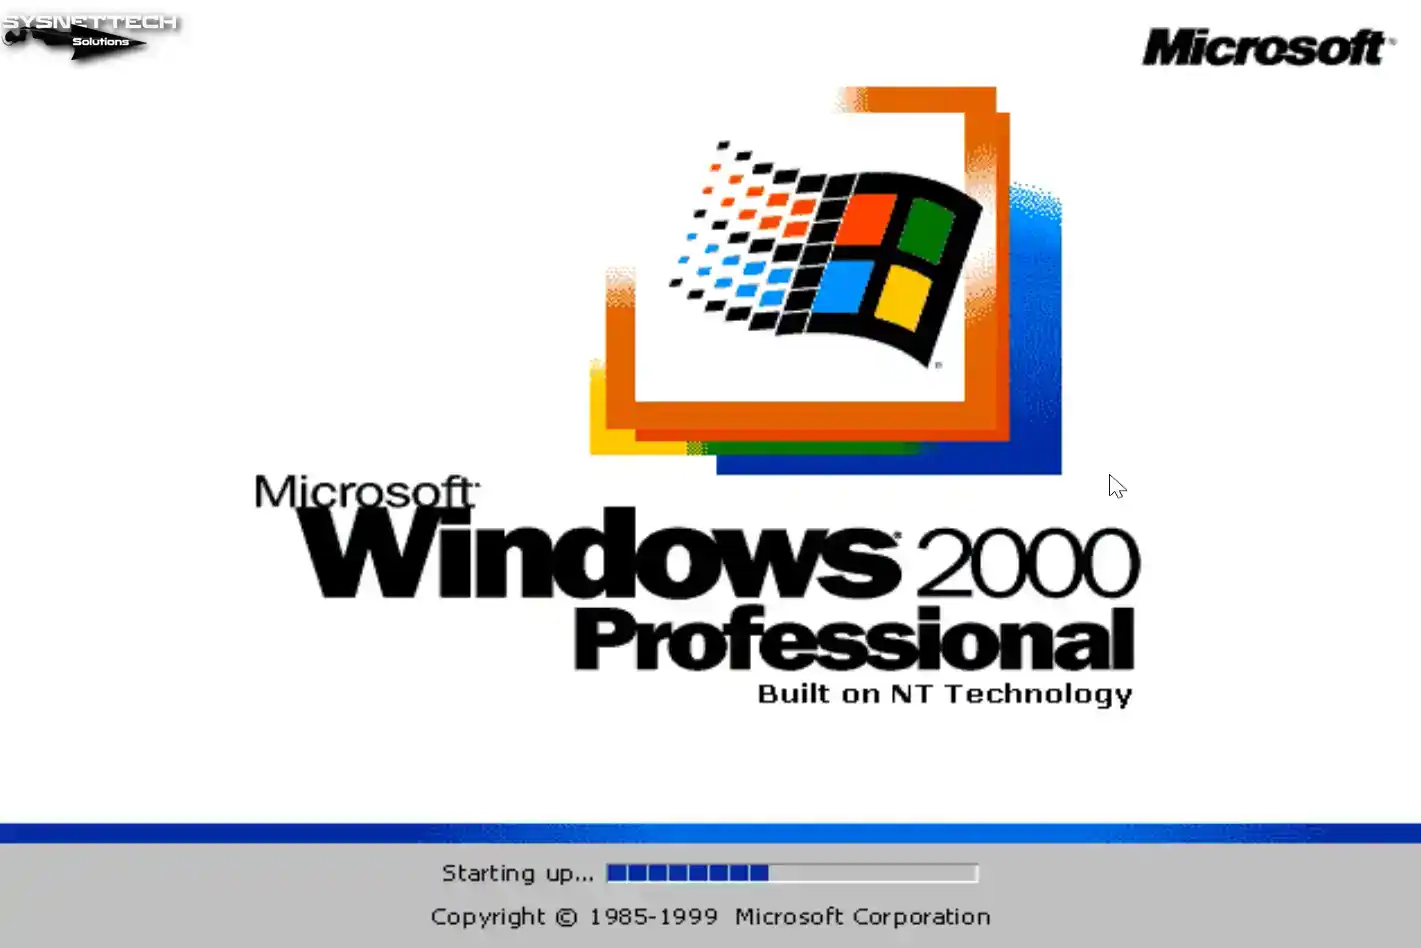
Step 10
After your virtual PC restarts, wait while Microsoft Windows 2000 Professional opens.
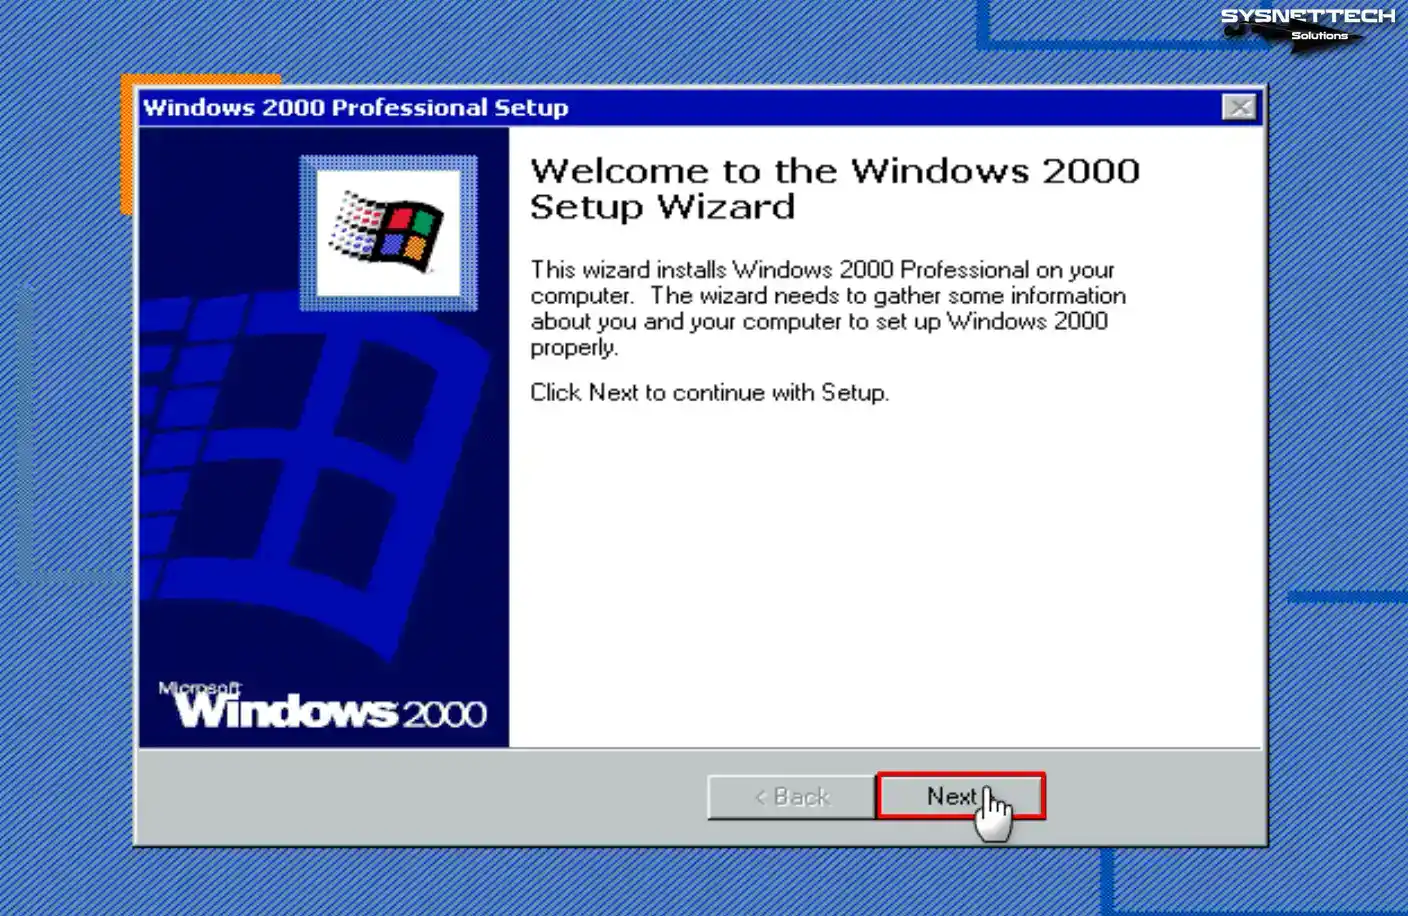
Step 11
Click Next in the window stating that some information will be collected so the Windows 2000 system can function correctly.
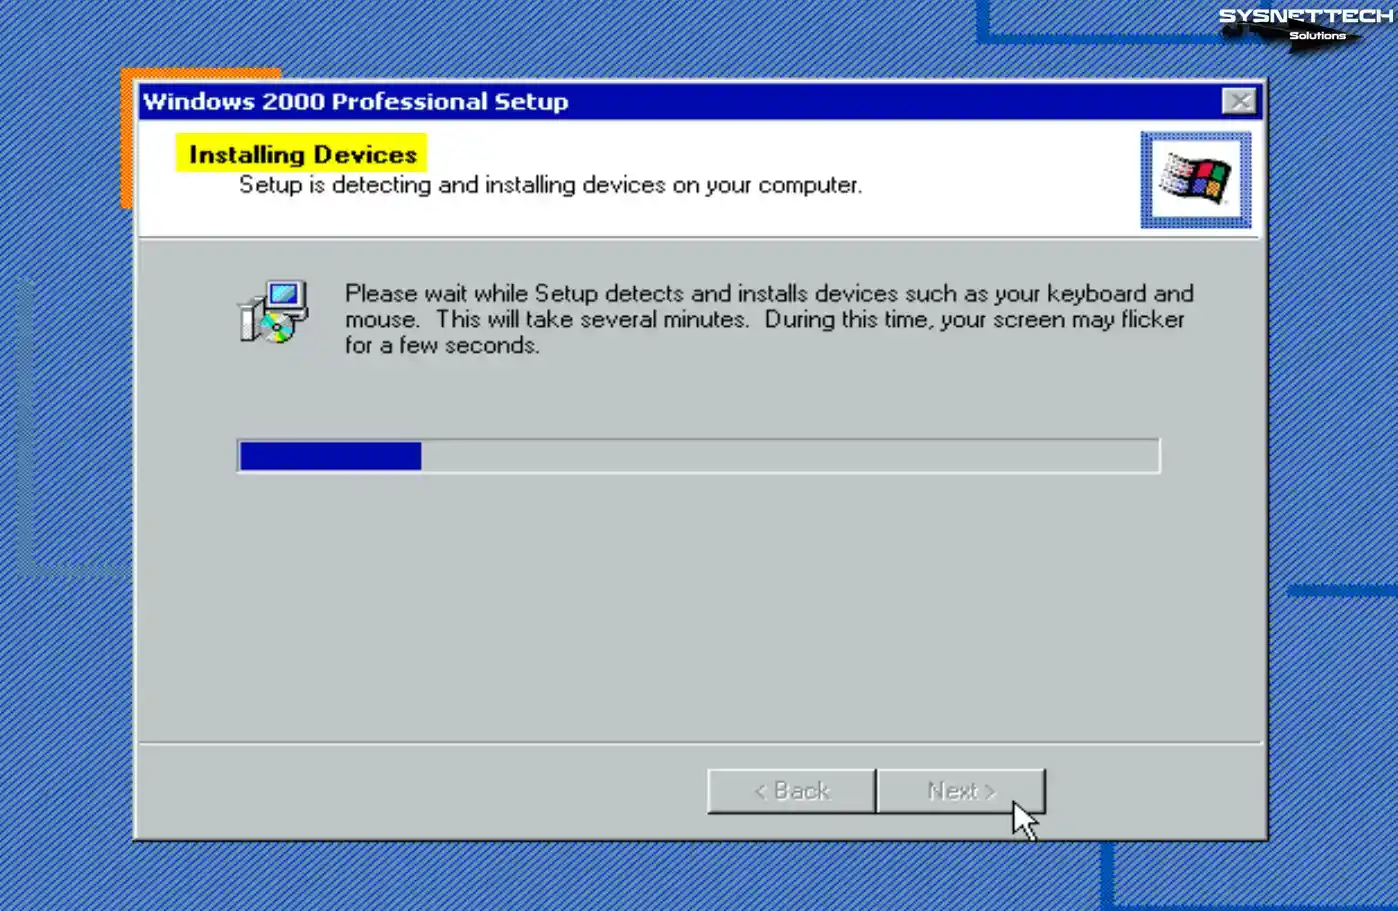
Step 12
At this stage, the installation wizard will scan your system’s hardware and install the drivers.
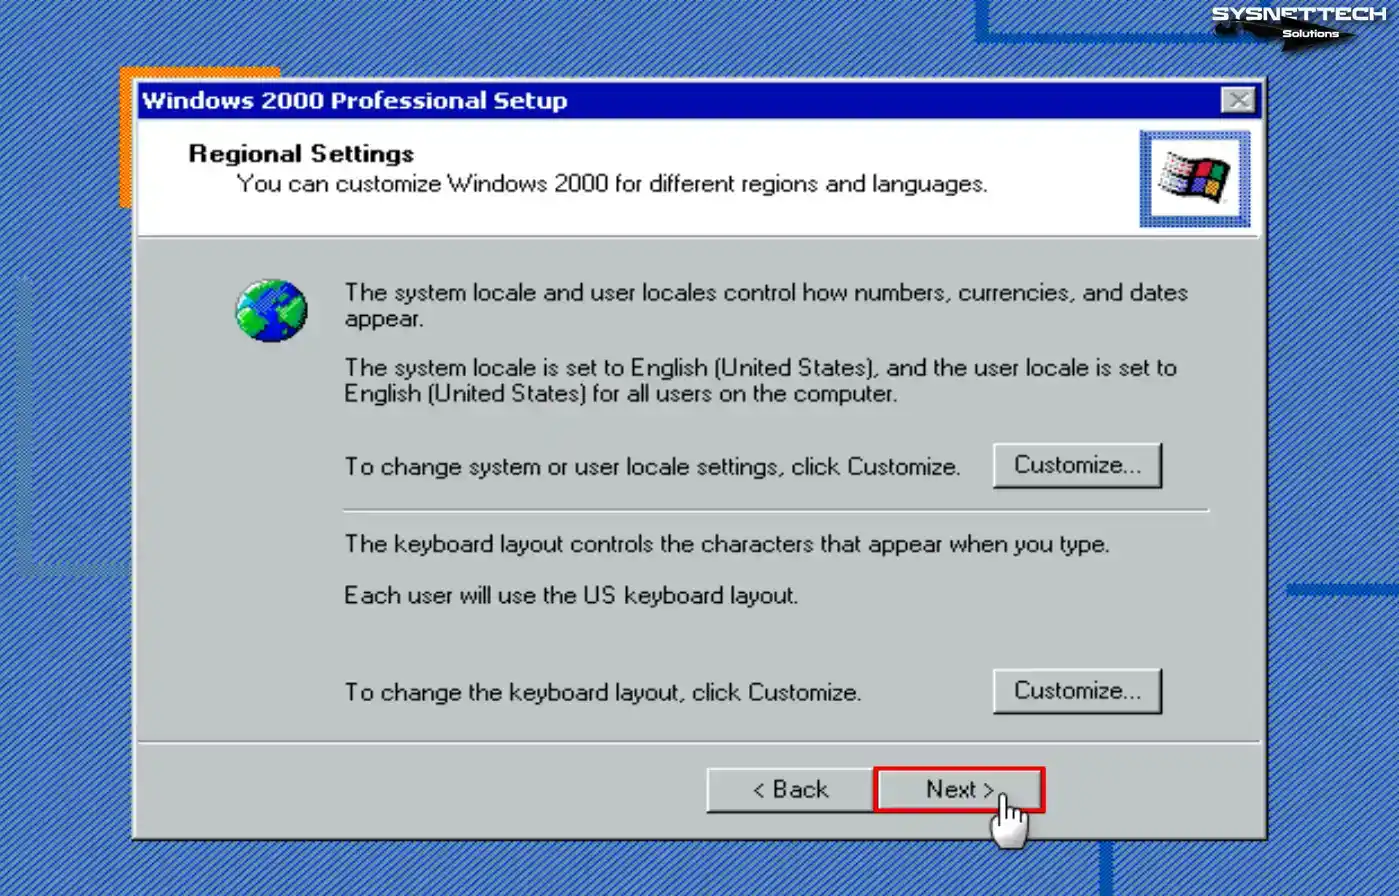
Step 13
Configure your country in the region settings window via the Customize button. Also, change the keyboard layout of your host computer and click Next.
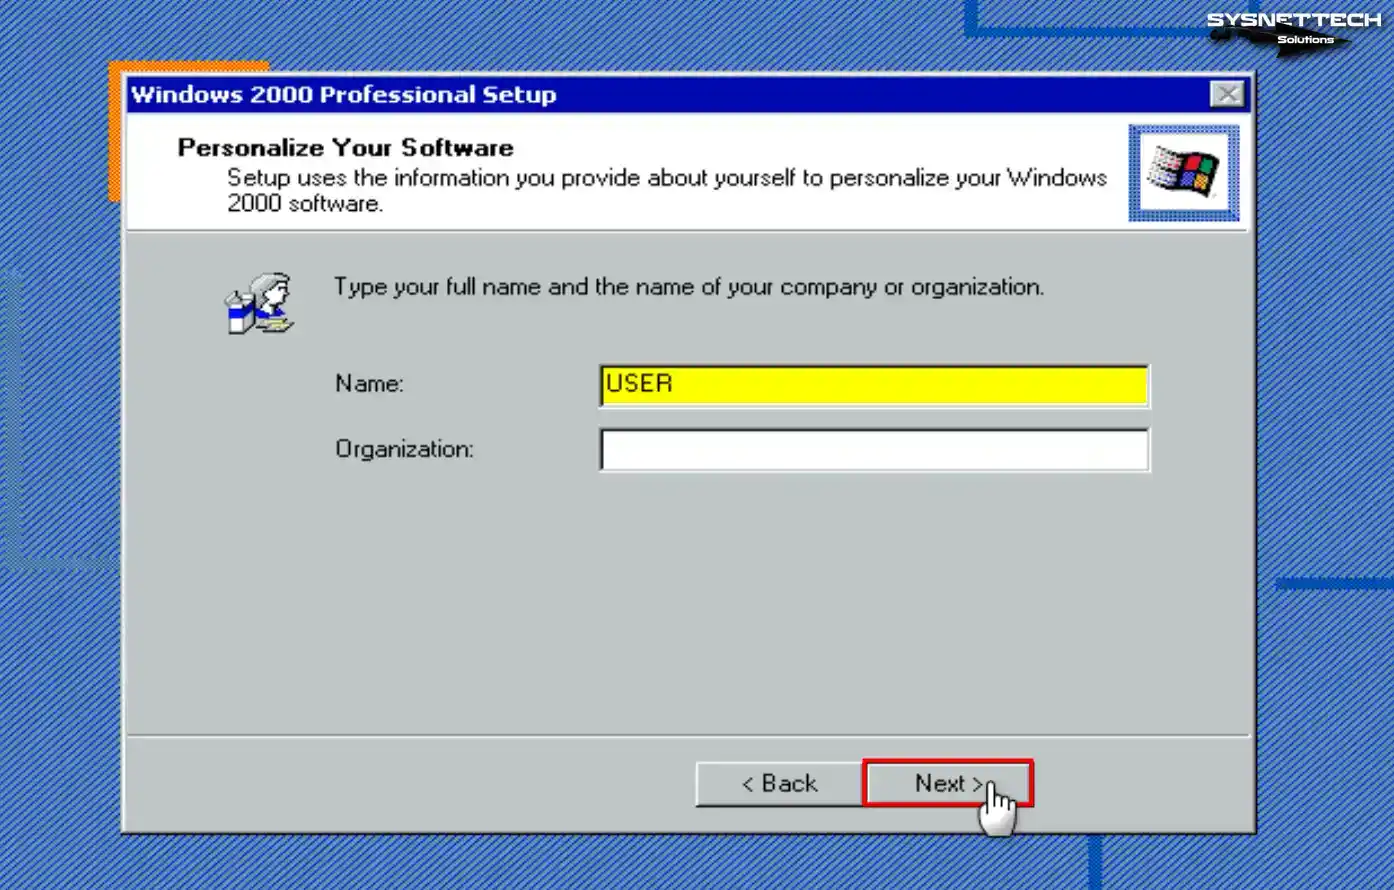
Step 14
If you will only use the virtual PC, type your username in this step and continue.
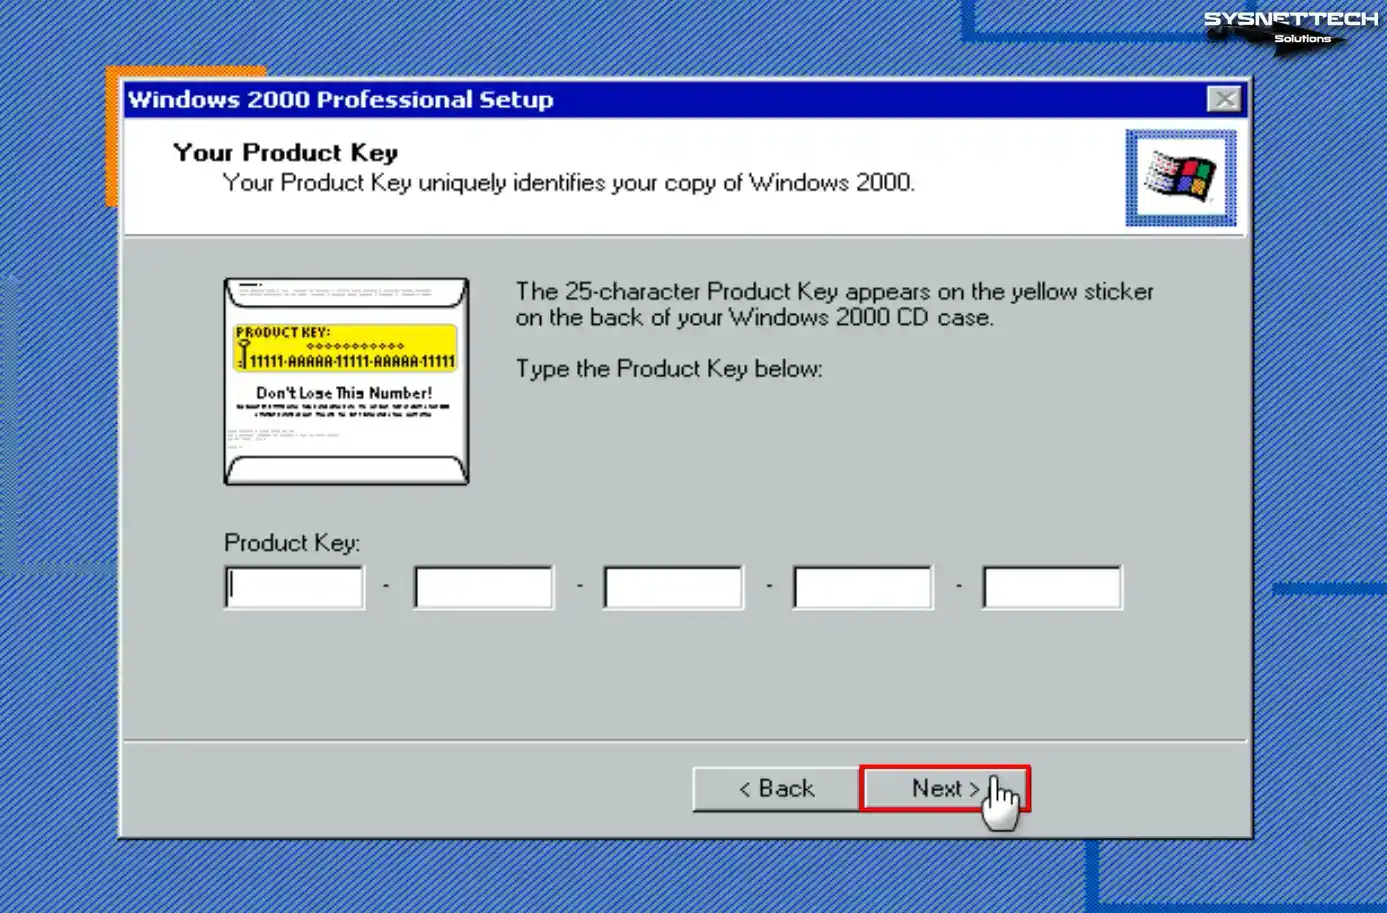
Step 15
Type your Windows 2000 Pro SP4 product key and click Next.
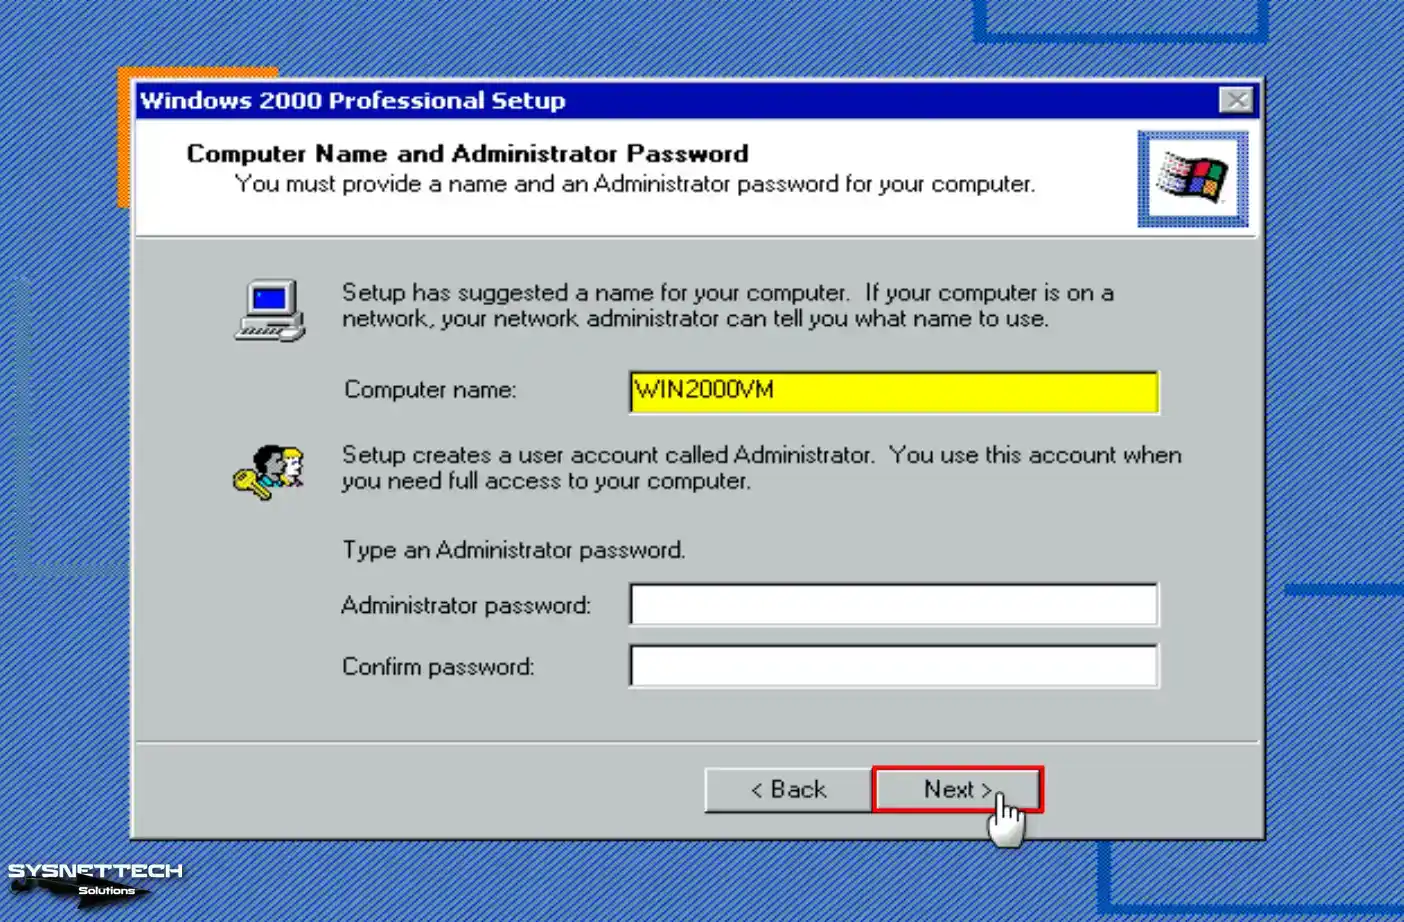
Step 16
Note that the computer’s name differs if multiple computers are on the network. If you wish to put a password for the administrator account of the system software, create a strong passcode and click Next.
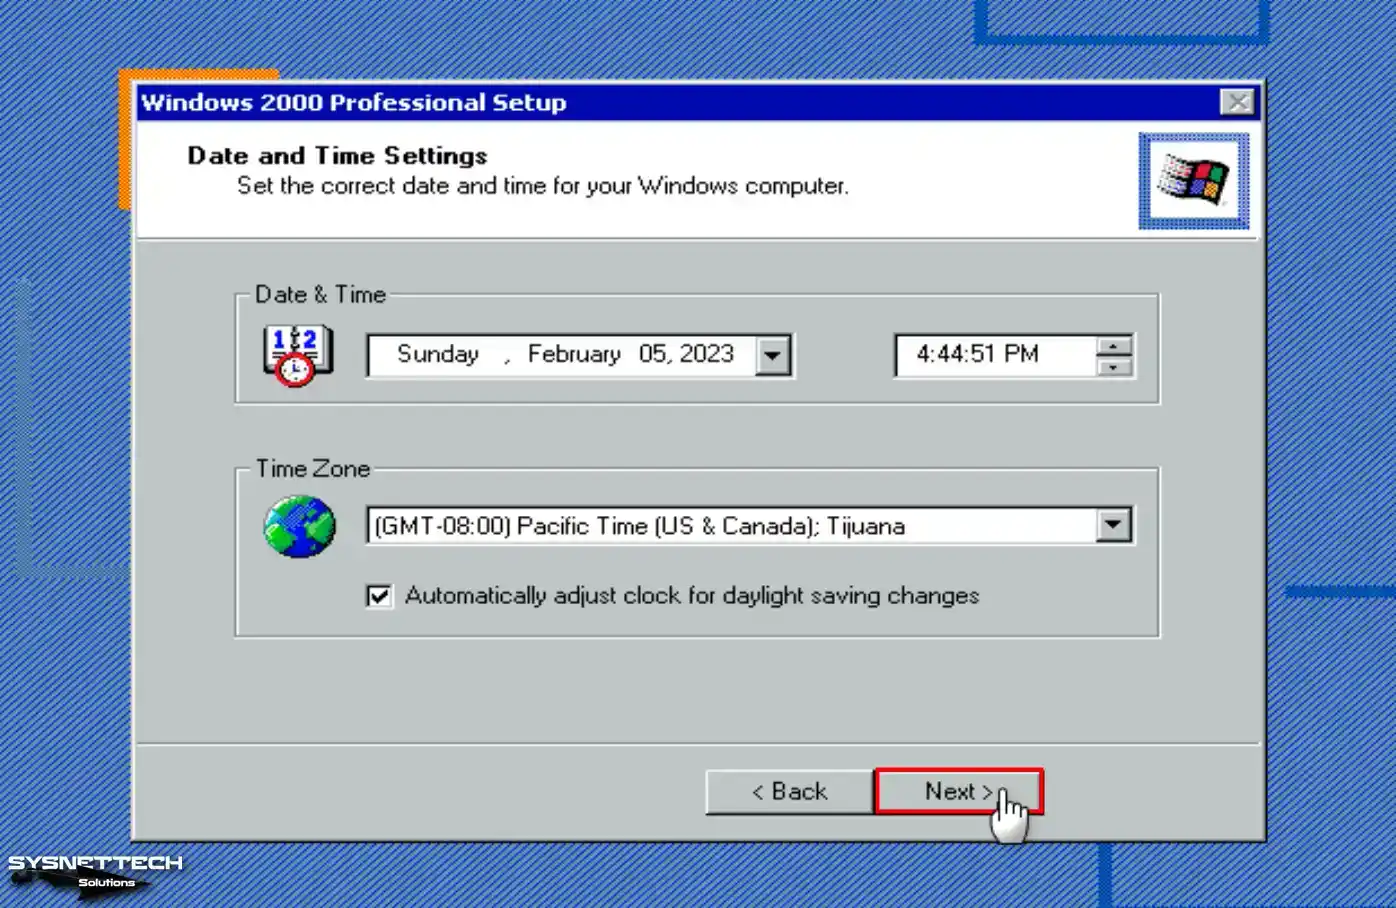
Step 17
Configure your time settings according to the location of the country you live in and click Next after checking that the system date is correct.
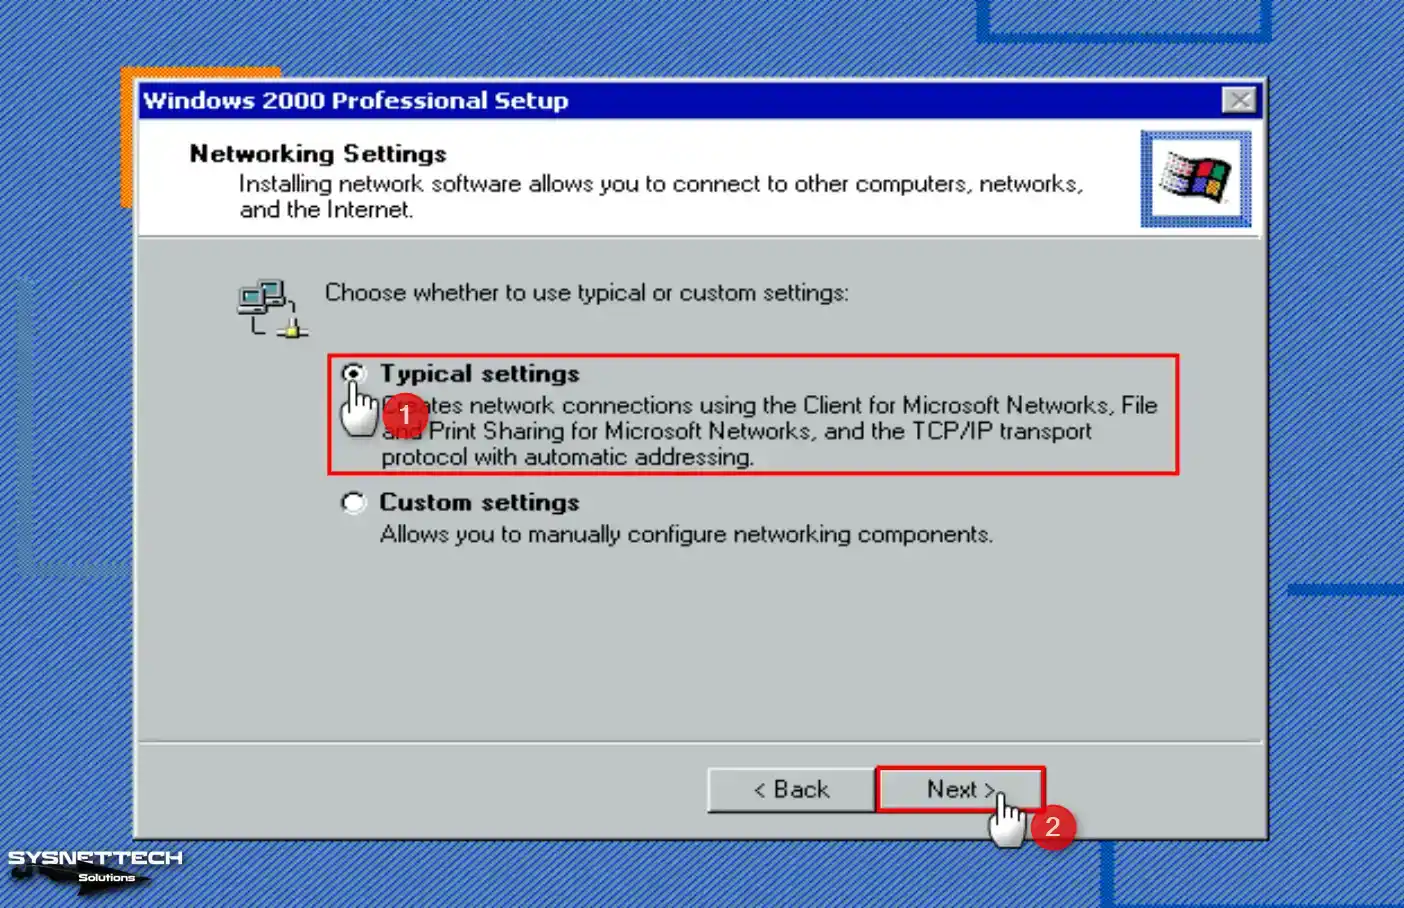
Step 18
Select Typical Settings for your network settings and continue.
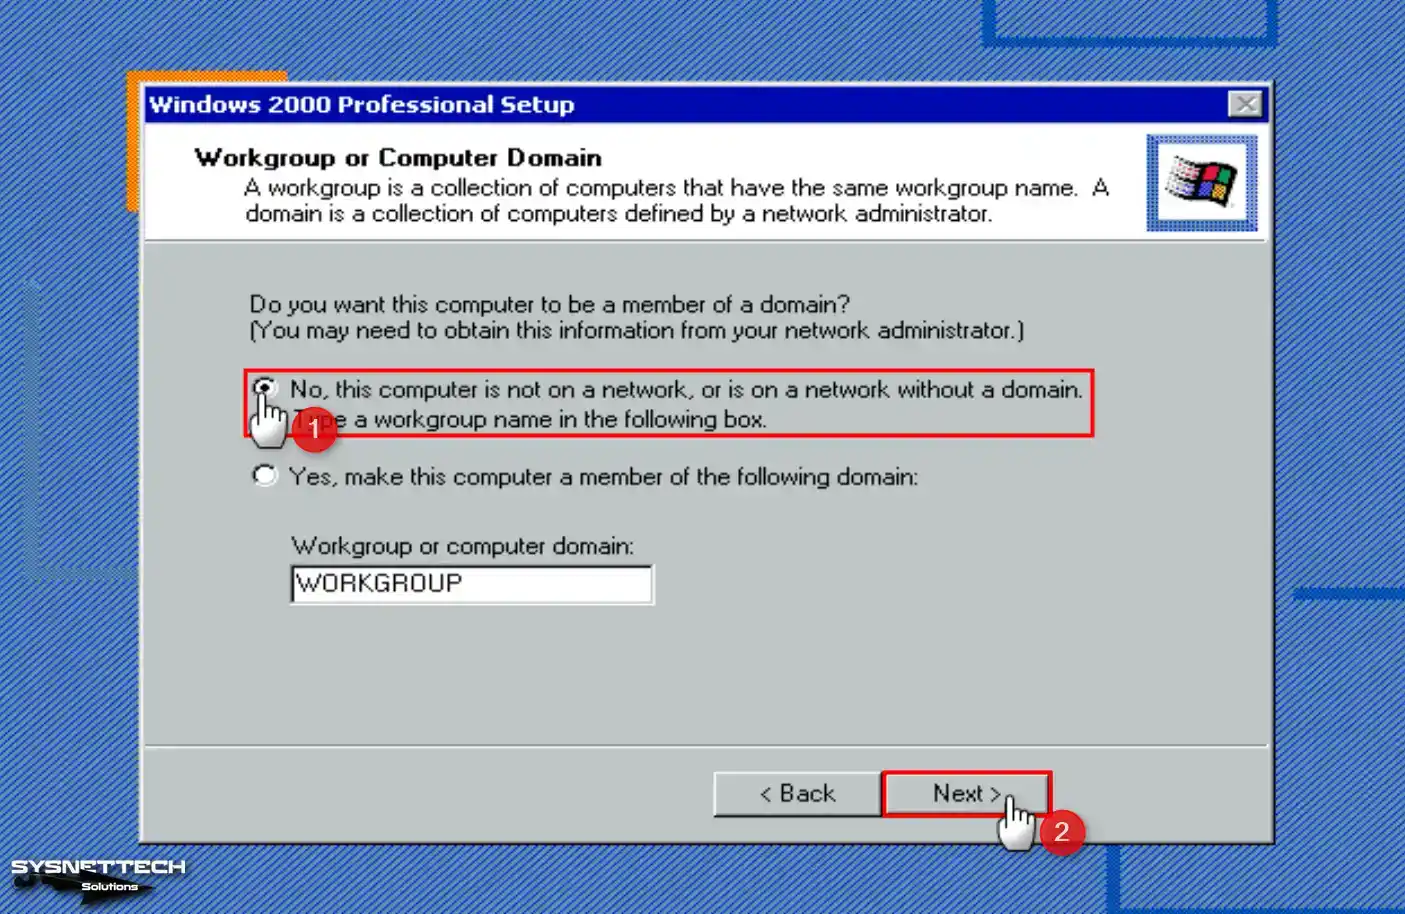
Step 19
If there is no server running an Active Directory service in your network environment, configure Workgroup with the No option.
Step 20
Wait while the setup wizard configures your virtual system’s start menu items, shortcuts, registry components, and settings.

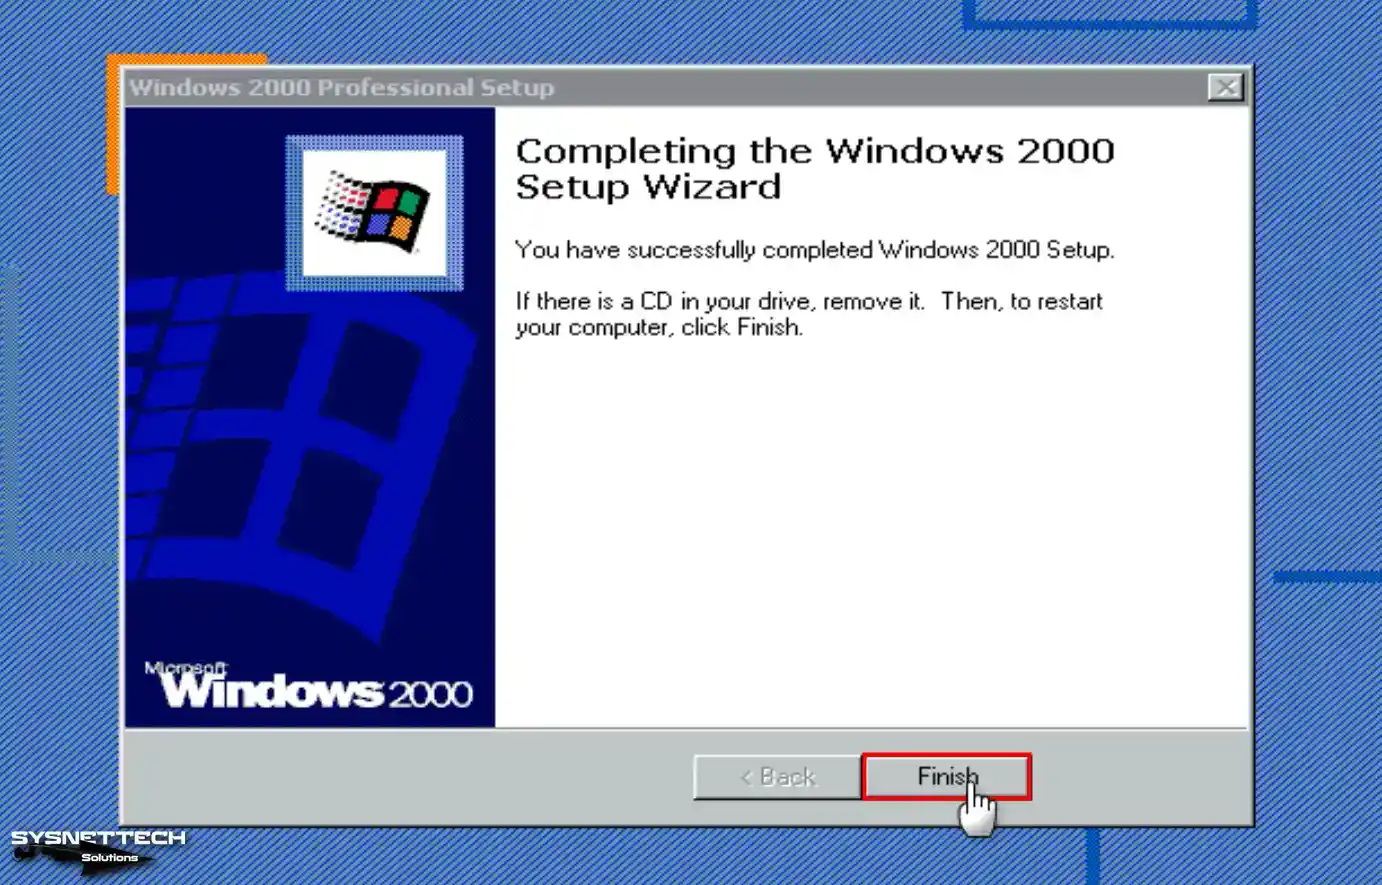
Step 21
Click Finish when the Win2K installation wizard is complete, and restart your virtual PC.
Step 22
After your system boots up, your network connections will be configured and prepared.

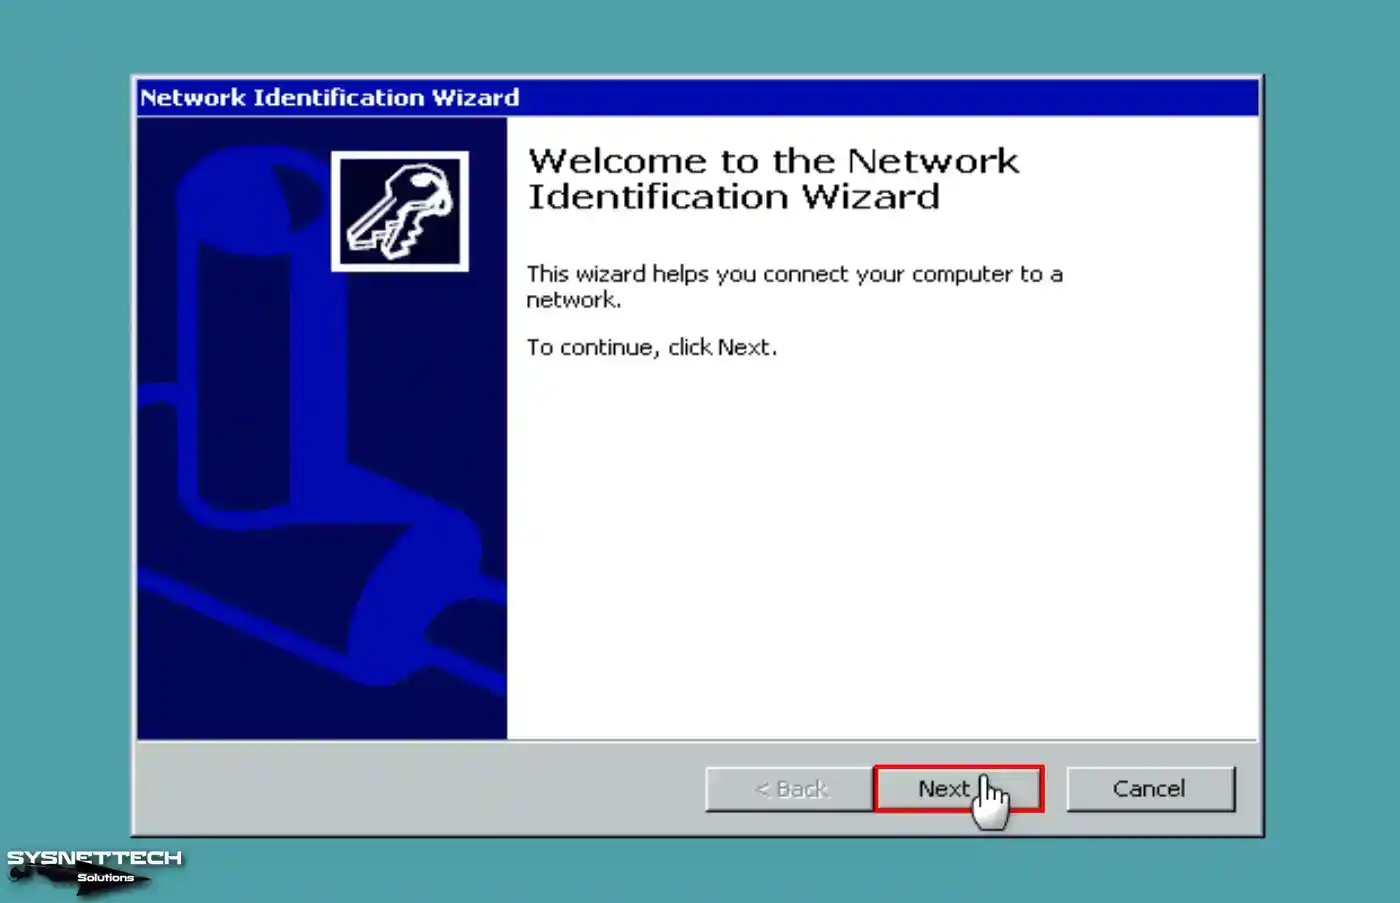
Step 23
Click Next when the Network Identification wizard opens to connect your virtual computer to a network.
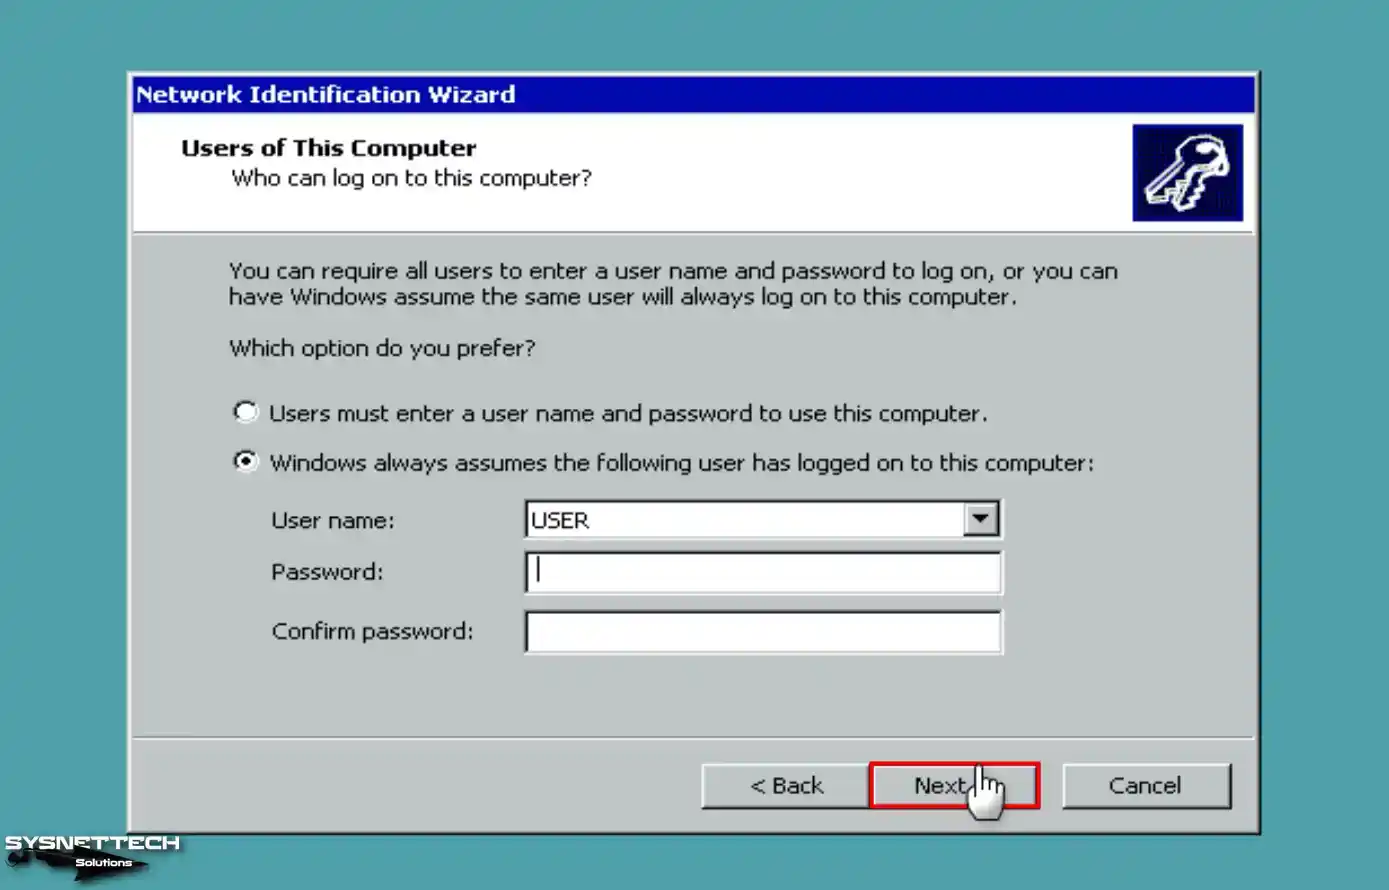
Step 24
You can check the option above to have users using the virtual machine enter a username and password. Otherwise, if no one else will use a VM, you can use your default user account for login information.
Step 25
After completing the network diagnostic wizard, click Finish again and continue.

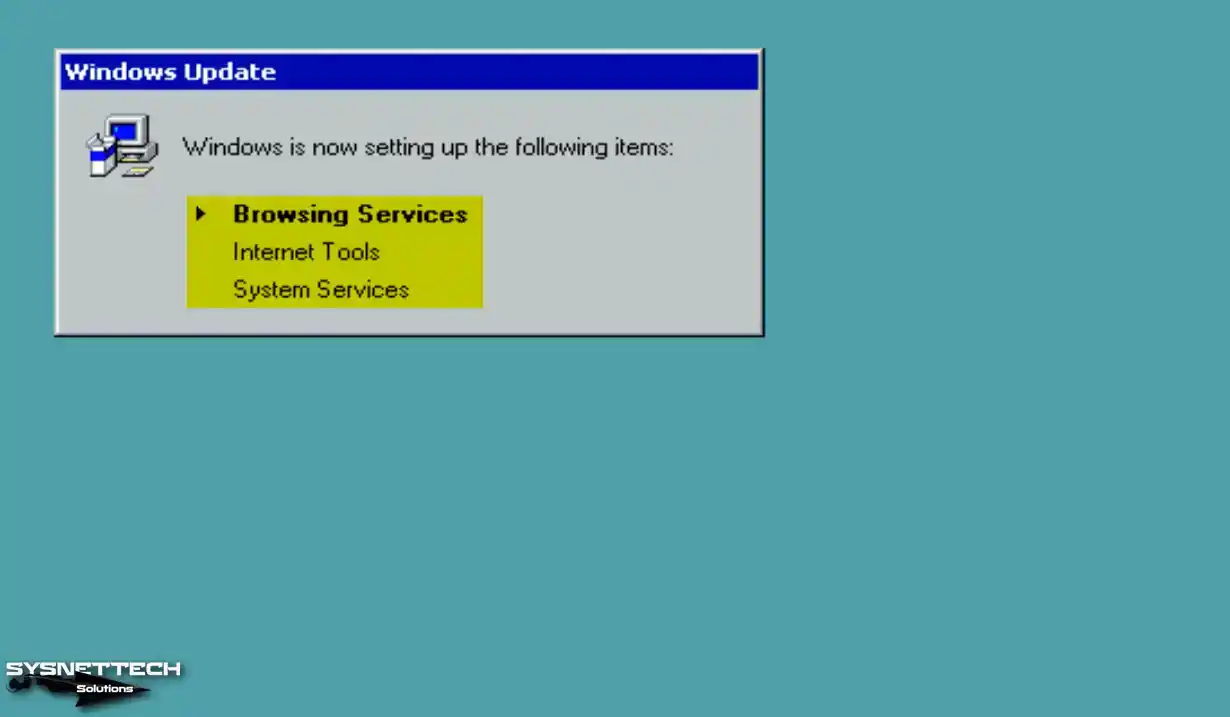
Step 26
While your virtual system boots up, wait while Windows configures Internet tools and system services.
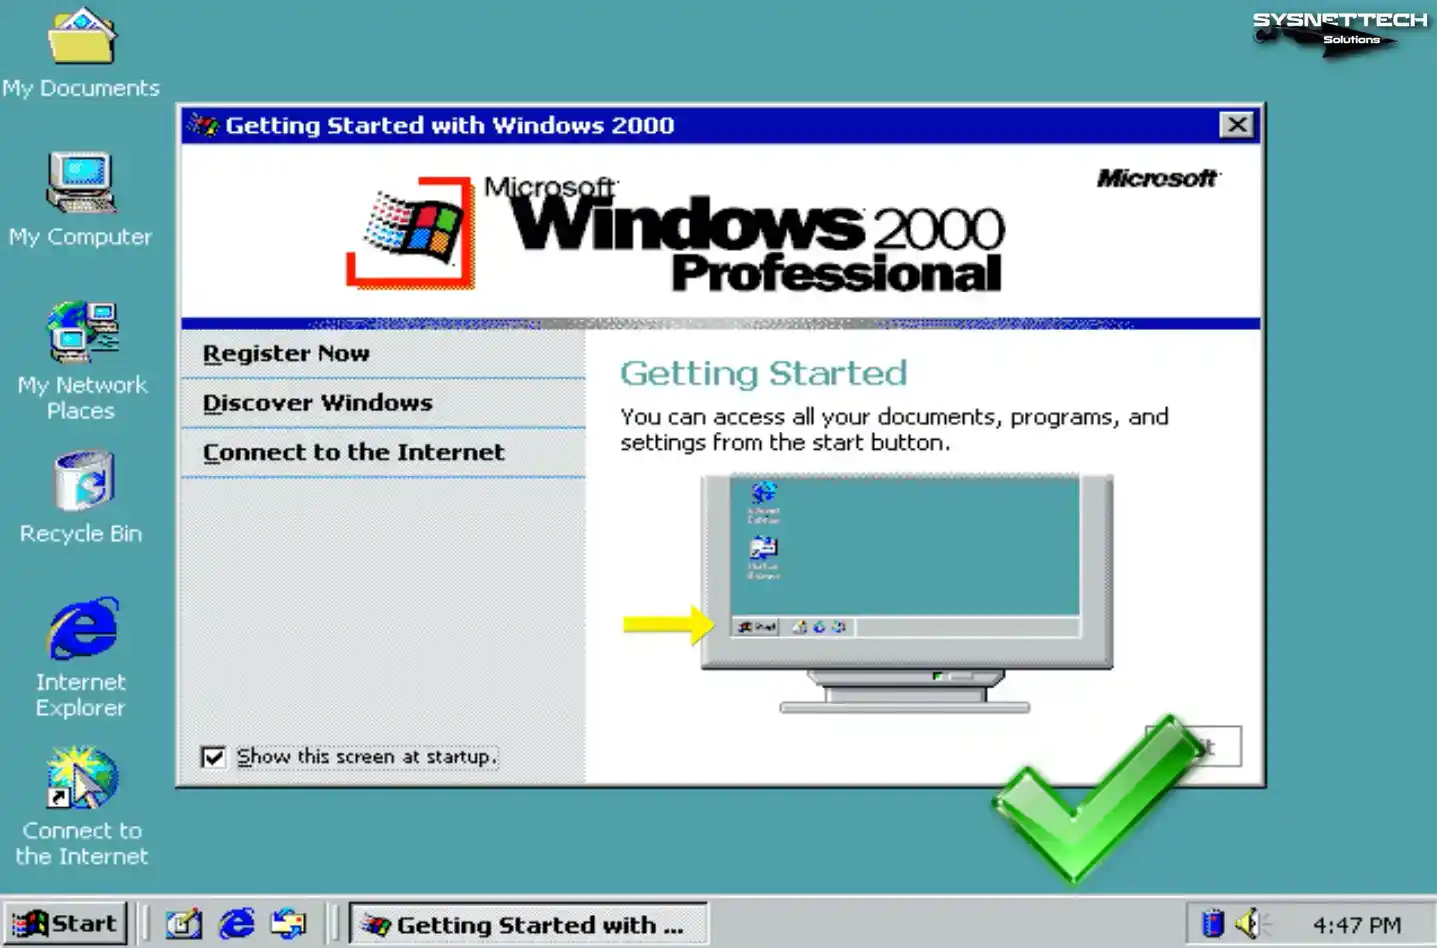
Step 27
After Windows has configured the necessary settings, your desktop environment will be ready, as in the image below.
Step 28
To examine the OS version and build number, right-click the My Computer symbol and choose Properties.

How to Install Guest Additions in Windows 2000 VM
After installing Windows 2000 on the virtual machine, you must deploy the Guest Additions software to use your host computer’s hardware on the virtual PC. This software is only required for Guest machines installed on the VM.
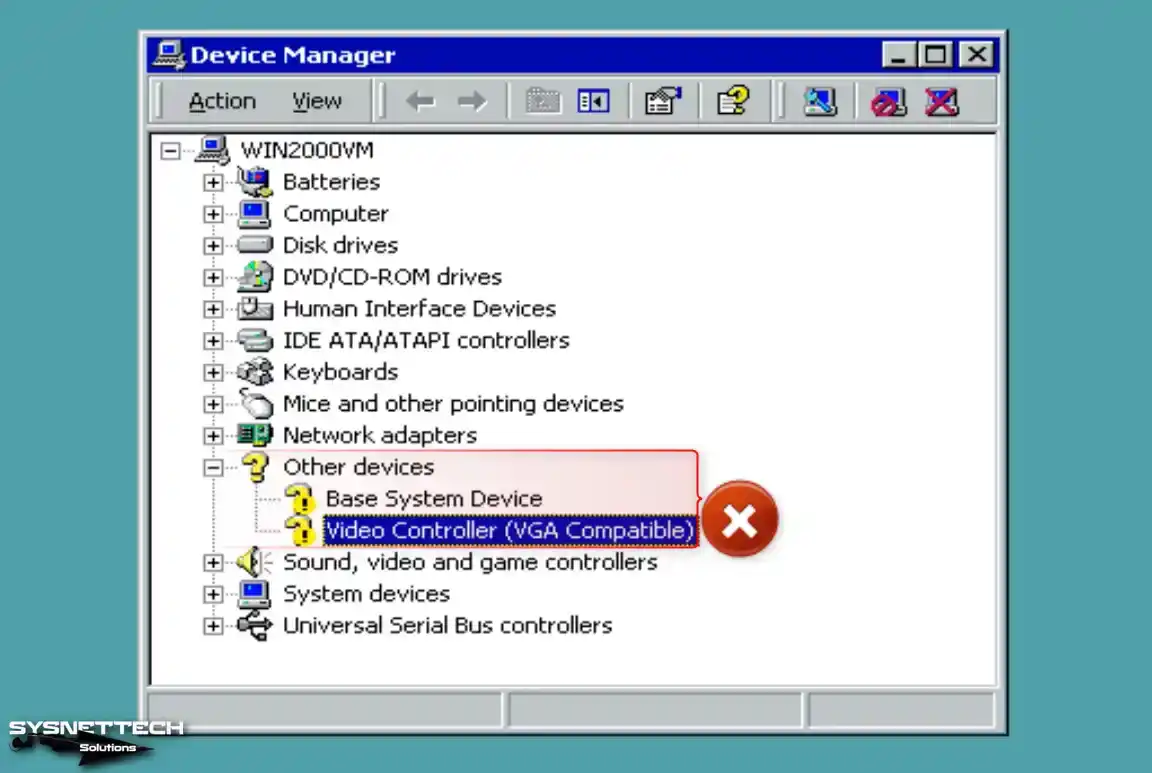
Step 1
Before installing, you must check the drivers are not automatically installed on your guest machine. On my computer, click the right button, then Manage, then open the Computer Management tool and click Device Manager, then check the drivers with the exclamation mark.
Step 2
Click Devices / Insert Guest Additions CD image from the tool menu of the Win2K guest machine.

Step 3
If the Guest Additions installation wizard does not open automatically, double-click the VBox_GAs image on my computer to start the wizard.

Step 4
When the Oracle VM VirtualBox Guest Additions wizard opens, click Next to continue the installation.

Step 5
Constantly installing guest additions in the default location can avoid any problems, so click Next directly in the install location window.

Step 6
In this window, select the components you want to install and continue. If you enable Direct3D support, you need to install Guest Additions in safe mode.
Note: Always click the Yes button if you encounter the Digital Signature Not Found window during installation.

Step 7
After installing the Guest Additions software on Windows 2000, restart your virtual system.

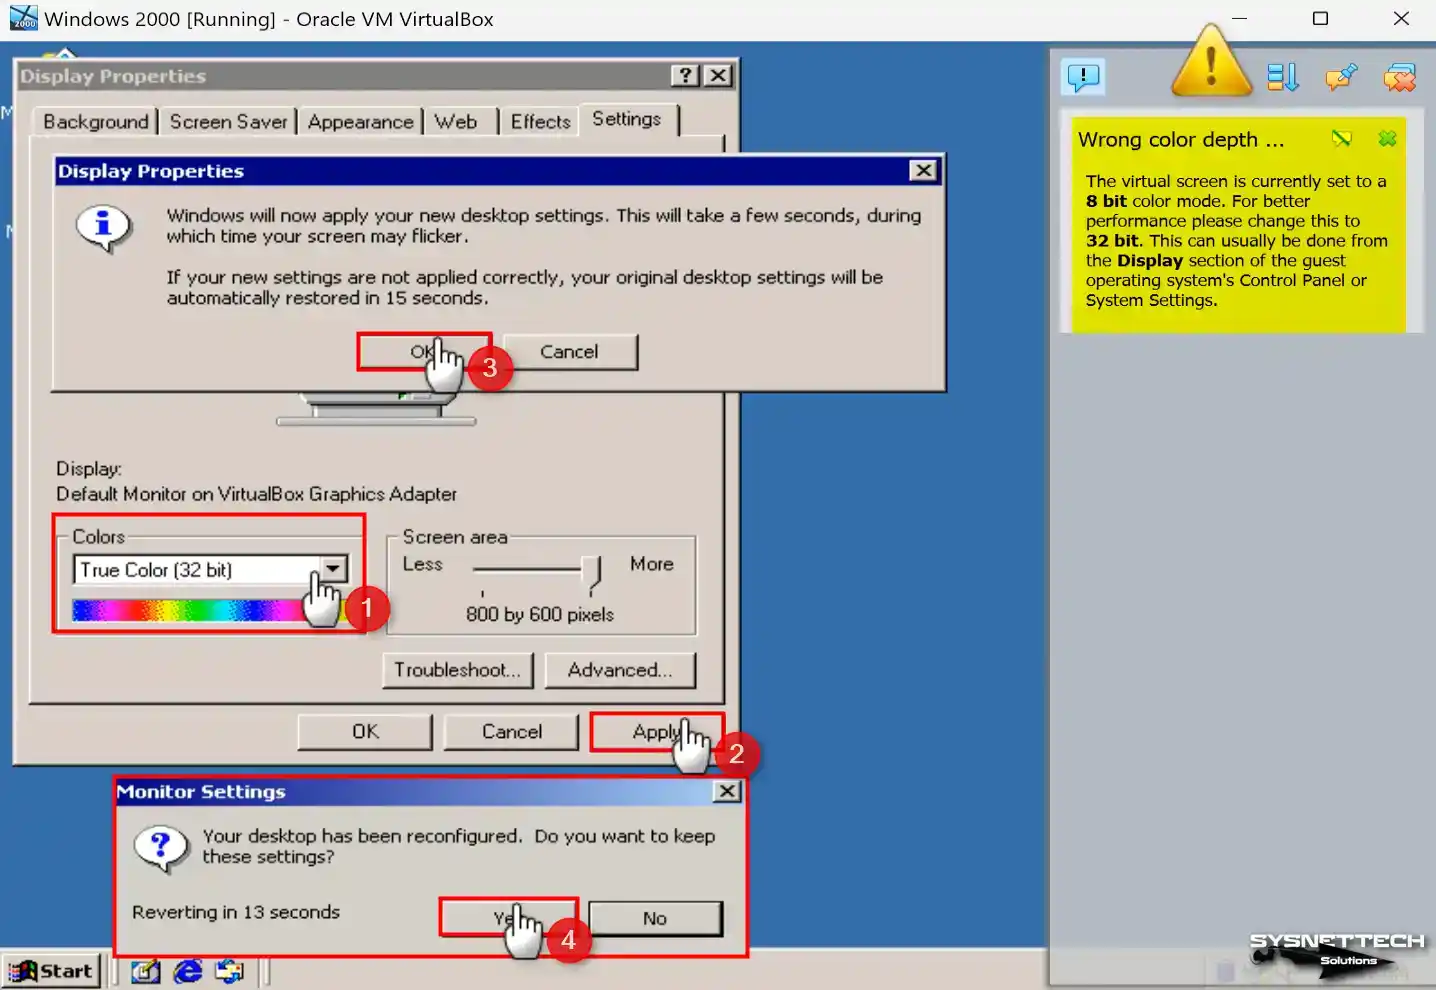
Step 8
Suppose the image quality of the virtual machine is lower than the default. In that case, VirtualBox will notify you as in the window below. To change the color mode of the virtual machine from 8 Bit to 32 Bit, open Display Properties and change the value in Colors to True Color (32-bit).
Step 9
When you view Device Manager again, you can see that all drivers have been successfully installed.

Step 10
After installing the required driver package for the virtual machine, you can seamlessly transfer files between the host and your simulated computer using the convenient drag-and-drop method. Alternatively, you can easily copy text from any file and effortlessly paste it into the VM’s file.

Step 11
If you want to make the screen resolution of your Windows 2000 virtual computer full-screen according to your host’s monitor, click View / Full-Screen Mode from the tool menu and check.

How to Configure and Check Internet Connection in Win2K
Internet connection may be required for virtual systems you set up with Oracle VM VirtualBox. Usually, the network settings are configured automatically after installation, but checking your link is still a good idea.
Step 1
After clicking the start menu, find CMD via the search box and run it. After opening the CMD command prompt, execute the ping 8.8.8.8 command and check your Internet connection by pinging the Google servers.

Step 2
Double-click the Internet Explorer shortcut after verifying your Internet connection, and the Internet Connection Wizard will open. In this window, select I want to connect to the Internet via a LAN connection option and click Next.

Step 3
In the next window, check the I connect via LAN option again and click Next.

Step 4
Configure the proxy server settings of your virtual computer as Automatic Discovery and continue.

Step 5
Select the No choice to avoid setting up an Internet mail account.

Step 6
After completing the Internet connection wizard, click Finish and close it.

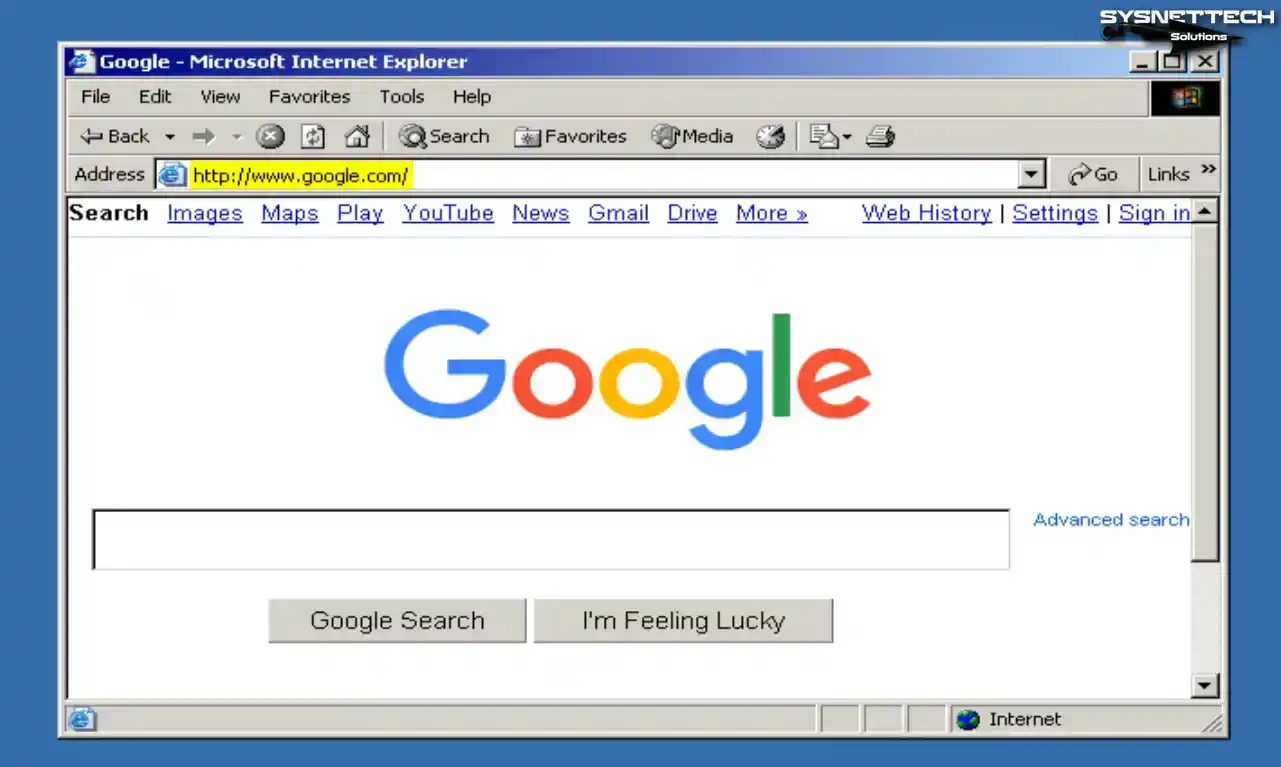
Step 7
When you close the wizard and the Internet Explorer browser opens, you can test your connection by visiting the Google search engine website.
How to Configure Shared Folder
Creating a Shared Folder in the virtual machine lets you transfer files quickly through your host computer.
Step 1
Click Devices / Shared Folders / Shared Folder Settings on your Windows 2000 guest machine.

Step 2
In the Shared Folder window, click the green + button to open the Add Share window. Select a shared folder you created in the Folder Path location setting on your host’s desktop or another site.
Configure the shared folder as a network drive by checking the Auto-Mount and Make Permanent options.

Step 3
When you check the public folder on my computer, you can see the SharedFolder on the “VBoxSvr” location.
When you create a file or folder within the shared folder you established on your host, you can confirm the success of the sharing process by checking its presence in the corresponding location on your VM.

Step 4
This time, click on My Network Places, go to the Shared Folder as indicated in the image below, and check the access.

How to Use USB Flash Memory
You can use your USB flash drives or external storage devices inserted in your host on your virtual PC.
Step 1
First, insert a flash drive into your host’s USB 2.0 port and click Devices / USB / Kingston DataTraveler on your guest’s machine.

Step 2
To connect your flash drive to the guest operating system, click Devices / USB / Name of your USB from the Oracle tool menu.

Step 3
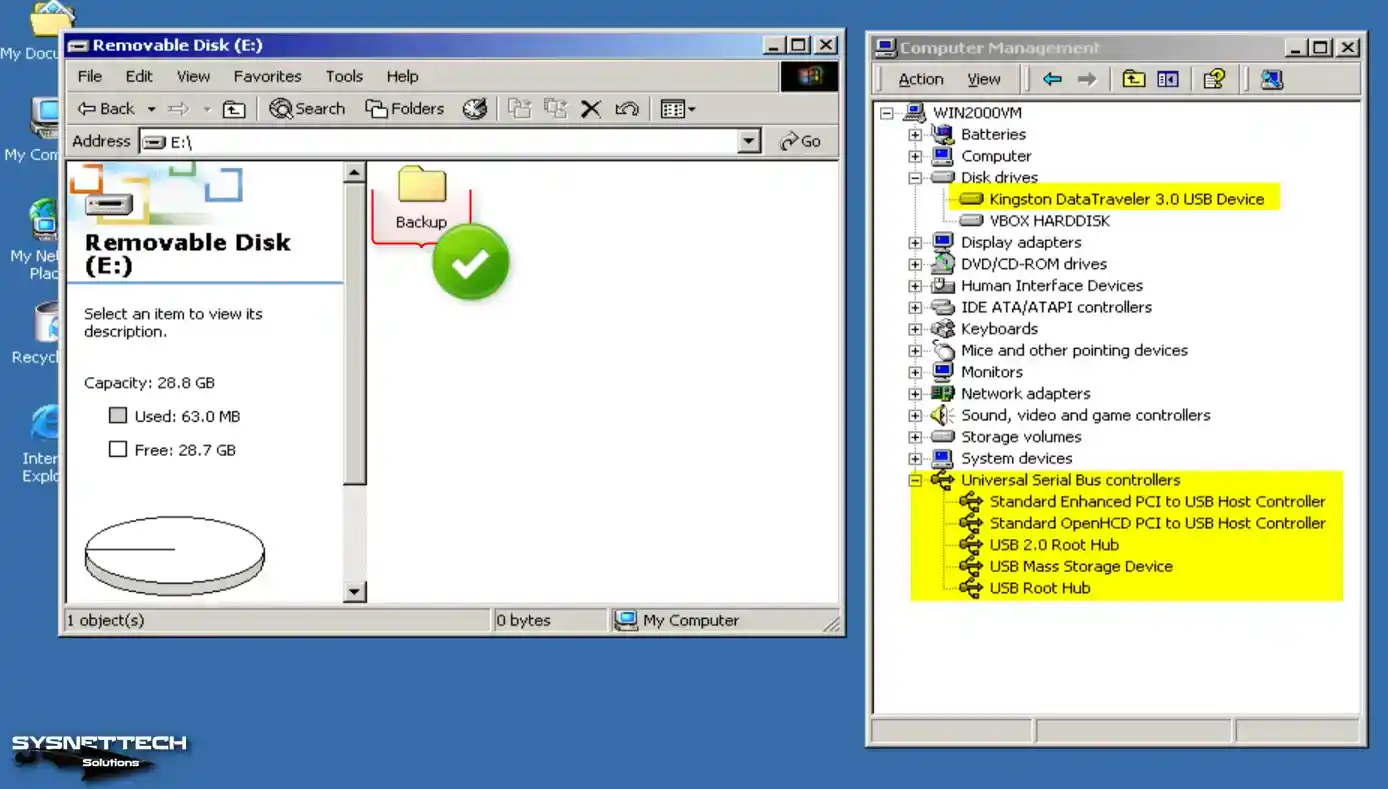
The flash memory you plug into your host’s USB 2.0 port will be automatically recognized on your Windows 2000 virtual computer. When you check My Computer, you can see your Removable Disk device. In the device manager underneath Disk Drives, you can see that the USB memory is working fine.
How to Increase Graphics Memory to 256 MB
When you install old operating systems such as Windows 2000 with Oracle software, the graphics memory can be 128 MB by default. You can increase this value by 256 MB by using the PowerShell tool from the location where your virtualization program is installed.
Step 1
Press Windows + R and then Run the DirectX Diagnostic Tool by executing the dxdiag command after opening it.
First, check that the Total Memory value in the Display tab in the DirectX tool is 128 MB.

Step 2
Open the location where Oracle VM VirtualBox is installed and click the right button while holding down the Shift key. Click the “Open PowerShell windows here” option in the open window.
Execute the following command in the PowerShell tool and change the Windows 2000 graphics memory to 256 MB.
./VBoxManage modifyvm 'Windows 2000' --vram 256
Step 3
After restarting your guest machine, execute the dxdiag command and check your virtual PC’s total GPU/Graphics memory value.

Video
Installing Old Versions
| VirtualBox Version | YouTube Video | Slide |
|---|---|---|
| 5 | Watch | View |
| 6 | Watch | View |
| 7 (NEW) | Watch | – |
Conclusion
As a result, thanks to Oracle VM VirtualBox 7.0, you can install Windows 2000 Professional in a virtual machine. Thus, you can discover the features of this historical operating system in a safe and comfortable environment.
In fact, Windows 2000 is no longer suitable for physical installations due to a lack of support. However, virtualization enthusiasts and professionals still have a method with experience. This is where the VirtualBox software comes into play and makes our work easier.
With this guide that I have explained in full detail, you can quickly run the Windows 2000 operating system. When you proceed step by step, you can use this system in a virtual environment without any problems.
- Download Microsoft Windows 2000 Download
- Extract the Windows 2000 files
- Launch Virtualbox
- Create a New VM by selecting Machine > New
Name: Windows 2000
Machine Folder: C:\VMs
Type: Microsoft Windows
Version: Windows 2000
Memory Size: 1024 MB
Hard disk: Create a virtual hard disk now - Click Create
- On the Create Virtual Hard Disk dialog
Name the virtual disk image Windows 2000.vdi
File size: 4.00 GB
Hard disk file type: VDI
Storage on physical hard disk: Dynamically Allocated - Click Create
- Select the VM and Click Settings
- Select Storage
- Click on the CD-ROM drive
- Select the disc dropdown to the right > Choose a virtual optical disc file…
- Browse to the extracted Windows 2000 files and select Win2000 .iso
- Click OK
- Make sure the Windows 2000 VM is selected and click Start > Normal
- The Windows 2000 setup should load on boot
- Press Enter to Continue with Setup
- Press C to Continue with Setup
- Press F8 to agree to the Licensing Agreement
- Press Enter to Install to the unpartitioned space
- Select the top option to format using the NTFS file system
- Press Enter to continue
- Setup will copy files and then reboot the VM
- When the VM boots back up, Click Next
- Wait for Windows to install devices and drivers
- Click Next
- Enter a name and organization > Click Next
- Enter a valid Windows 2000 product key (XGH9J-KBPBD-FXDKQ-K36XB-X9J6Y), click Next
- Give the computer a name
- Enter an administrator password > Re-type to confirm > Click Next
- Set the date/time and select a timezone > Click Apply > Click OK
- Select Typical settings on the Network settings dialog > Click Next
- Select No, this computer is not on a network > Click Next
- Wait for Windows to install components
- Click Finish, the VM will reboot
- On the Network Identification dialog select This computer is for home use… > Click Next > Click Next > Click Finish, the VM will reboot
- Welcome back to Windows 2000…Y2k
- Revel in the nostalgia
Optional Steps
- Select Devices > Insert Guest Additions CD image…
- If VirtualBox Guest Additions doesn’t autorun, open My Computer > CD Drive > Double click VBoxWindowsAdditions-x86.exe
- Install Guest Additions accepting the defaults
- Accept any driver popups from the Guest Additions installer by clicking the Yes button
- After the installation completes select Reboot now > Click Finish
- Upon rebooting, you can now full screen the VM and the interal resolution will automatically change to match the window size
- Download i12bretro Windows SP.iso Download
- Select Devices > Optical Drives > Select disk image…
- Navigate to and select i12bretro_Windows_SP.iso
- If the VM doesn’t autorun, open My Computer > CD Drive
- Open the Windows 2000 folder > Double click Windows 2000 SP4.exe
- Follow the dialogs to install Service Pack 4
- Click Finish to reboot and complete the SP4 install
Intro:
This is a tutorial on how to install Windows 2000 to Virtual Box. I have seen tutorials posted on VM Ware but not one on Virtual Box yet. In this tutorial I will be using Virtual Box 5.1.26. If you want I will post more tutorials with different operating systems, please leave your feedback in the comments below.
If you Don’t Have Virtual Box:
If you do not currently have Virtual Box it can be downloaded from: https://www.virtualbox.org/wiki/Downloads and installation is quite simple, just follow the onscreen instructions.
Making the Virtual Machine:
To start out we will create our new virtual machine by clicking the «New» button in the top left of the Virtual Box window. In the «Name» section type whatever you want but I recommend something like «Windows 2000», «Windows 2k». In the first drop down select «Microsoft Windows» and in the second «Windows 2000». Once completed click next. Chose the amount of RAM you want to dedicate to the virtual machine, I am using the default «168 MB». Now click «Create a virtual hard disk now» and then «Create». Now click the «VDI» option. Click «Dynamically allocated» then next. I will be saving my virtual hard disk to a USB flash drive with 16gb and using the default size of «4gb». Do note: If make the size to high and save it on your computer it will take up a fair amount of memory.
Virtual CD:
Now you may think we are done and you can just start the machine and have Windows 2000 but Windows 2000 is not installed yet. We need to make a virtual CD the virtual machine will boot off of. To do this click the «Settings» button at the top left of the screen. Then click on «Storage», and then the CD. We now need to download the Windows 2000 iso. I will be using the Windows 2000 Professional iso available on Win World here: https://winworldpc.com/download/4136388D-18DA-11E4-99E5-7054D21A8599. The product key for this iso is: RBDC9-VTRC8-D7972-J97JY-PRVMG. If you want to use your own iso that is fine installation is still the same but the product key above may not work.
Once the iso is downloaded. Click the small CD next to the drop down box under «Attributes». Click «Chose Virtual Optical Disk File» Select the Windows 2000 iso and click «Open». Once you have selected your Windows 2000 iso we can now start the virtual machine.
Installing Windows 2000:
We are now ready to start the new virtual machine. Click the «Ok» option in the settings menu if you haven’t already and click «Start» in the top left. A new window will appear. After it loads it will ask if you want to boot from the hard drive of CD ROM. Chose the CD ROM. If you do not see any boot options and if it does not automatically boot to Windows 2000 setup check your iso or re download it.
Press enter. Press «C» to move on». Do Note: Windows 2000 is talking about the virtual hard drive file you made at the begging of this tutorial, please do not think it will erase your hard drive. Press F8 to agree to the license, you may need to do FN > F8. Press enter again. Select whatever you want here but I recommend using the NTFS file system.
Now wait until setup finishes formatting and copying files to the virtual hard drive. Press enter to reboot. Let the computer boot from the hard drive. Now you have started the graphical part of setup!
To use the mouse you may need to click the virtual machine’s display or just move your mouse into it, it depends on your settings. The first screen you will see is a welcome one, just click next. The next one is what is shown above wait until it has finished. This screen may take some time, while everything else is probably going twice as fast as it would on normal hardware. When it is done click next (you may change the settings if you want). Type in your name and company (this is required).
Now its time for our best friend! The product key! If you used the iso I provided the key is again: RBDC9-VTRC8-D7972-J97JY-PRVMG. If not I can’t help you there. Enter your product key and click next.
Enter a name for the computer and a admin password if you want. I leave mine at the default. Change your time settings if you want and click next. Setup will then install network components. On the next screen please chose typical if you want to be able to connect to the internet. Chose no on the next screen and click «Next». Setup will then install components. Then it will start to install items such as the start menu items and the control panel. Once this is done the computer will restart. It will ask you for a password but just press enter if you did not set on up (this is referring to the admin password we had the option to make before). And thats it! Windows 2000 is now installed to Virtual Box! Before you go you do want to remove the virtual CD, by clicking «Devices» in the top left and then «Optical Drives» and lastly «Remove disk from virtual drive».
Thank you for reading this, and again to those of you who viewed this before I was finished I am sorry I accidentally pressed «Submit» instead of preview. Hope this helped!