
На сегодняшний день существует уже куча приложений для виртуализации. И VirtualBox один из них, и как правило почти каждая вторая виртуальная машина имеет доступ по сети. У каждой виртуальной машины своё предназначение, например, кому-то нужно просто протестировать ОС или просто запустить приложение, требующее определенную ОС.
Зачастую использование виртуализации без сети для виртуальных машин затрудняет работу с ними, а иногда они и вовсе не нужны без доступа по сети к ним.
И сегодня рассмотрим, как настроить эту чертову локальную сеть и ваше приложение наконец-то будет доступно из вне по локальной сети.
Требования
Для начала убедитесь, что у вас уже установлен сам VirtualBox и создана виртуальная машина.
Типы сетей
В таблице ниже рассмотрим какие типы сетей вы можете использовать в VirtualBox и какие доступы вы будете иметь.
| Тип сети | VM > Host | Host > VM | VM1 > VM2 | VM > LAN | LAN > VM |
|---|---|---|---|---|---|
| NAT | + | Port forwarding | — | + | Port forwarding |
| Bridged | + | + | + | + | + |
| Internal | — | — | + | — | — |
| Host-Only | + | + | + | — | — |
| NATservice | + | Port forwarding | + | + | Port forwarding |
Когда вы создаёте новую виртуальную машину (сервер) ему автоматом добавляется виртуальный сетевой адаптер (1 активный и 3 неактивных). Как правило хватает только одного сетевого активного адаптера. По умолчанию тип адаптера выставлен в NAT.
NAT
Не буду сильно расписывать о том, что это такое просто скажу, что при использовании такого типа происходит сопоставление IP-адреса с другим путем изменения заголовка IP-пакетов. И в этом случае IP-адрес вашей виртуальной машины будет из подсети 10.0.2.0. Отмечу что это самый простой способ дать доступ виртуальной машине к внешней сети.
В таком режиме ваша виртуальная машина при выходе во вне через локальную сеть, например, выход в интернет будет прикидываться вами. Т.е. весь трафик будет идти с вашего локального IP-адреса. И понятное дело, что вы не сможете в таком режиме получить доступ к вашему виртуальному серверу по IP-адресу из подсети 10.0.2.0. Т.е. по сути у вашего виртуального сервера будет только исходящие соединения, но не входящие. Зато не надо ничего настраивать ни на хосте, ни на виртуальной машине.
Т.е. если вам просто нужен доступ в интернет и вас совсем не беспокоит что в итоге весь траффик по сети идёт от вашего локального компьютера то используем NAT.
Также если вам вдруг всё же очень сильно нужен NAT и доступ к виртуальной машине из вне или локальной сети вы можете настроить Port Forwarding. Но в таком случае для доступа к виртуальной машине нужно будет обращаться к IP-адресу хоста.
Если вдруг вам не нравится какие IP-адреса назначаются вашим виртуальным машинам можете изменить это в настройках VirtualBox (Менеджер сетей > NAT).
NATservice
По сути тоже самое что и NAT но плюс ещё вам станет доступна сеть виртуальных машин. Т.е вы сможете обратиться по сети с одной виртуальной машины на другую. Правда, чтобы был такой доступ эти виртуальные машины должны быть в одной сети.
Сама сеть настраивается в (Менеджер сетей > NAT).
Также как и в NAT доступен Port Forwarding.
Bridged networking (Сетевой мост)
Тут уже немного посложнее, суть в том, что виртуальная машина VirtualBox подключается к одной из ваших сетевых карт на локальном хосте и обменивается сетевыми пакетами напрямую, минуя сетевой стек операционной системы хоста.
Тут если у вас в сети нет DHCP сервера, то придётся прописывать IP-адрес на виртуальной машине вручную. IP-адрес как правило из той же подсети что и IP-адрес на локальном хосте, с тем же шлюзом.
При использовании такого типа подключения помимо доступа к интернету с виртуального хоста вы еще получаете и входящие подключения по IP-адресу виртуального хоста.
Для примера представим ситуацию что у меня нет DHCP сервера в следствии чего мои настройки будут следующими:
- Локальный хост
DNS-суффикс подключения . . . . . : IPv4-адрес. . . . . . . . . . . . : 192.168.8.11 Маска подсети . . . . . . . . . . : 255.255.255.0 Основной шлюз. . . . . . . . . : 192.168.8.1 - Виртуальная машина
DNS-суффикс подключения . . . . . :
IPv4-адрес. . . . . . . . . . . . : 192.168.8.12
Маска подсети . . . . . . . . . . : 255.255.255.0
Основной шлюз. . . . . . . . . : 192.168.8.1
С такими настройками я легко смогу попасть в интернет через виртуальную машину, но также буду иметь доступ по локальной сети к локальному хосту (192.168.8.11) и наоборот, если только не включен файрволл.
Internal networking (Внутренняя сеть)
При использовании такого типа соединения доступ по сети будет доступен только внутри сети образованной из ваших виртуальных машин. Т.е. это локальная сеть, которая будет доступна только для виртуальных машин.
Естественно ни, а какой речи доступа к интернету тут не может идти и речи так как доступа у вириальных машин к вашей сети нету и соответственно наоборот тоже.
Для примера представим мои настройки сети будут следующими:
- Локальный хост
DNS-суффикс подключения . . . . . : IPv4-адрес. . . . . . . . . . . . : 192.168.8.11 Маска подсети . . . . . . . . . . : 255.255.255.0 Основной шлюз. . . . . . . . . : 192.168.8.1 - Виртуальная машина
DNS-суффикс подключения . . . . . : IPv4-адрес. . . . . . . . . . . . : 192.168.8.12 Маска подсети . . . . . . . . . . : 255.255.255.0 - Виртуальная машина 2
DNS-суффикс подключения . . . . . :
IPv4-адрес. . . . . . . . . . . . : 192.168.8.13
Маска подсети . . . . . . . . . . : 255.255.255.0
При таких настройках я с легкостью смогу получить доступ с одной виртуальной машины на другую через локальную сеть, например, запущу ping с 192.168.8.12 на 192.168.8.13 или наоборот. Но я никак не смогу получить доступ с локального хоста (192.168.8.11) до виртуальных машин и наоборот (даже если пропишу шлюз 192.168.8.1).
Host-Only Networking (Виртуальный адаптер хоста)
Виртуальный адаптер хоста можно рассматривать как что-то среднее между Internal networking (Внутренняя сеть) и Bridged networking (Сетевой мост).
Когда используется Host-Only Networking (Виртуальный адаптер хоста) VirtualBox создаёт новый виртуальный адаптер, благодаря которому ваши виртуальные машины соединяются с вашим локальным хостом и наоборот. Только тут отличие в том, что вы должны подключаться не к IP-адресу вашего хоста, а к IP-адресу, который вы должны задать в настройках VirtualBox (Менеджер сетей).
IP-адреса для виртуальных машин будут назначаться DHCP сервером, настройки которого вы можете задать также в настройках VirtualBox (Менеджер сетей).
In this modern business world, networking is a crucial component of interactive computer operations. It is difficult to imagine how to exchange data between computers without networks in a world where everything is changing at ever-growing speed. One of the central focal ideas behind hardware virtualization is the possibility to use virtual machines in nearly all cases where physical computers can also be used.
Thus, virtual machines must be able to connect to physical and virtual networks with their virtual network adapters. Virtual machines running on VirtualBox can be connected to different networks. VirtualBox provides multiple network modes for virtual machines. This blog post covers VirtualBox network settings to help you configure VirtualBox in the best way possible to suit your needs.
Virtual Network Adapters
Each VirtualBox VM can use up to eight virtual network adapters, each of which in turn is referred to as a network interface controller (NIC). Four virtual network adapters can be configured in the VirtualBox GUI (graphical user interface). All virtual network adapters (up to  can be configured with the
 VBoxManage modifyvm command. VBoxManage is a command line management tool of VirtualBox that can be used for configuring all VirtualBox settings including VirtualBox network settings. VirtualBox network adapter settings can be accessed in the virtual machine settings (select your VM, hit Settings and go to the Network section in the VM settings window).

There you should see four adapter tabs. One virtual network adapter is enabled by default after virtual machine creation. You can tick the “Enable Network Adapter” checkbox to enable the adapter and untick the checkbox to disable (this checkbox defines whether a virtual network adapter device is connected to a VM or not).
Hit Advanced to expand advanced VirtualBox network adapter settings.
Types of Virtual Network Adapters in VirtualBox
A virtual network adapter is a software-emulated physical device. There are six virtual adapter types that can be virtualized by VirtualBox.
- AMD PCnet-PCI II (Am79C970A). This network adapter is based on AMD chip and can be used in many situations. As for Windows guests, this network adapter can be used for older Windows versions (such as Windows 2000) because newer Windows versions such as Windows 7, 8 and 10 do not contain a built-in driver for this adapter. Originally, the Am79C970A PCI device contained a single chip 10-Mbit controller and the DMA engine was integrated. This network adapter also supports AMD’s Magic Packet technology for remote wake-up.
- AMD PCnet-FAST III (Am79C973). This virtualized network adapter is supported by almost all guest operating systems that can run on VirtualBox. GRUB (the boot loader) can use this adapter for network boot. Similarly to the previous network adapter, this one is based AMD chip.
- Intel PRO/1000 MT Desktop (82540EM). This adapter works perfectly with Windows Vista and newer Windows versions. The most of Linux distributions support this adapter as well.
- Intel PRO/1000 T Server (82543GC). Windows XP recognizes this adapter without installing additional drivers.
- Intel PRO/1000 MT Server (82545EM). This adapter model is useful to import OVF templates from other platforms and can facilitate import process.
- Paravirtualized Network Adapter (virtio-net) is a special case. Instead of virtualizing networking hardware that is supported by most operating systems, a guest operating system must provide a special software interface for virtualized environments. This approach allows you to avoid the complexity of networking hardware emulating and, as a result, can improve network performance.
The industry standard virtIO networking drivers are supported by VirtualBox. VirtIO networking drivers are a part of the KVM project and are open-source. These drivers are available for Linux with kernel 2.6.25 or later, and Windows including older versions such as Windows 2000, XP and Vista.
Jumbo frames support
VirtualBox provides limited support for jumbo frames (Ethernet frames that can carry packets which size is more than 1,500 bytes). If you need to use jumbo frames, select an Intel virtualized network adapter, and configure that adapter to work in bridged mode. AMD-based virtual networks adapters don’t support jumbo frames. If you try to enable jumbo frames for AMD-based virtual network adapters, jumbo frames will be dropped silently for input and output traffic. Jumbo frames are disabled by default.
VirtualBox provides a long list of network modes, which is one of the most interesting features of VirtualBox network settings. Each virtual network adapter can be separately configured to operate in a different network mode. For example, you can set the NAT mode for the adapter 1 and the Host-only mode for the adapter 2. You can select the network mode in the Attached to drop-down menu.

Let’s consider each VirtualBox network mode in detail.
Not attached
A virtual network adapter is installed in a VM, but the network connection is missing, much like when you unplug the Ethernet network cable when using a physical network adapter. This mode can be useful for testing. For example, you can enable this network mode for a short time to emulate unplugging the cable. When you disable the Not Attached mode by switching to another network mode, the network connection becomes available again. You can also check whether a DHCP client obtains the IP address correctly, whether the appropriate application can resume downloading after link interruption or packet loss, and so on.
Instead of using the Not Attached network mode, you can use any other network mode without ticking the Cable Connected checkbox. You can tick/untick the checkbox when a VM is in the running state (see the screenshot above). Don’t forget to hit OK to apply changes in the VM network configuration.
NAT
This network mode is enabled for a virtual network adapter by default. A guest operating system on a VM can access hosts in a physical local area network (LAN) by using a virtual NAT (Network Address Translation) device. External networks, including the internet, are accessible from a guest OS. A guest machine is not accessible from a host machine, or from other machines in the network when the NAT mode is used for VirtualBox networking. This default network mode is sufficient for users who wish to use a VM just for internet access, for example.
The IP address of the VM network adapter is obtained via DHCP and the IP addresses of the network used in this network mode cannot be changed in the GUI. VirtualBox has a built-in DHCP server and NAT engine. A virtual NAT device uses the physical network adapter of the VirtualBox host as an external network interface. The default address of the virtual DHCP server used in the NAT mode is 10.0.2.2 (this is also the IP address of the default gateway for a VM). The network mask is 255.255.255.0.
If you configure the network adapters of two or more VMs to use the NAT mode, each VM will obtain the 10.0.2.15 IP address in its own isolated network behind a private virtual NAT device. The default gateway for each VM is 10.0.2.2. In VirtualBox IP addresses are not changed when the NAT mode is used, as you can see below:

In order to enable the NAT mode for a VM with VBoxManage, execute the following command:
VBoxManage modifyvm VM_name –nic1 nat
Where:
- VM_name is the name of your virtual machine;
- nic1 is the number of the virtual network adapter;
- nat is the name of the VirtualBox network mode that you need to set.
Port forwarding can be configured right from the VirtualBox VM network settings window by clicking the Port forwarding button (seen in the screenshot above). Detailed information about configuring port forwarding in VirtualBox network settings, which you can find below after the Network Modes section.
NAT Network
This mode is similar to the NAT mode that you use for configuring a router. If you use the NAT Network mode for multiple virtual machines, they can communicate with each other via the network. The VMs can access other hosts in the physical network and can access external networks including the internet. Any machine from external networks as well as those from a physical network to which the host machine is connected cannot access the VMs configured to use the NAT Network mode (similarly to when you configure a router for internet access from your home network). You cannot access the guest machine from the host machine when using the NAT Network mode (unless you are configuring port forwarding in global VirtualBox network settings). A built-in VirtualBox NAT router uses a physical network interface controller of the VirtualBox host as an external network interface (as is the case for the NAT mode).

The network address and name can be changed in the global VirtualBox preferences (File > Preferences). In the left pane of the Preferences window, select Network to access global VirtualBox network settings, then double click your existing NAT network to edit the settings (you can also add a new network or delete an existing network by clicking the + or x icons).

In the small pop-up window that will appear, it is also possible to enable/disable DHCP, IPv6 and configure port forwarding.
The default address of the NatNetwork is 10.0.2.0/24.
The default gateway IP is 10.0.2.1 (the x.x.x.1 template is used to assign the default gateway IP). For example, if you create a new virtual network for the NAT Network mode in VirtualBox and set the 192.168.22.0/24 network address, the IP address of the gateway in this network will be 192.168.22.1. You cannot change the IP address of the gateway for the network used in the NAT Network mode and change the range of IP addresses issued by the DHCP server. Similarly, the IP address of the DHCP server is 10.0.2.3 by default (the x.x.x.3 template is used).
The IP configuration of the Windows 7 VM running on VirtualBox with a virtual network adapter configured in the NAT Network mode is displayed on the screenshot.

If you don’t want to edit VirtualBox network settings in the GUI, you can add a new NAT network with VBoxManage by using the command:
VBoxManage natnetwork add –netname natnet1 –network “192.168.22.0/24” –enable
Where:
- natnet1 is the name of the NAT network;
- 192.168.22.0/24 is the address of that NAT network.
If you want to configure a VM network adapter in order to use the NAT Network mode with VBoxManage, run the following command:
VBoxManage modifyvm VM_name –nic1 natnetwork
Where:
- nic1 is the first virtual network adapter (network interface controller);
- natnetwork is the name of the VirtualBox network mode.
You may need to shut down the VM before applying these settings.
In order to avoid repeating the same command with VBoxManage when selecting a network mode for the virtual network adapter of a VM in each section of the article, consider the names of all possible VirtualBox network modes: none, null, nat, natnetwork, bridged, intnet, hostonly, generic.
Port forwarding is one more option that can be accessed and configured from this window. Port forwarding can be used to configure access from the host machine and other hosts of the same physical network to the services running on the guest OS inside the VM (see details below). As you can see, the location of the port forwarding settings for the NAT mode and NAT Network modes are different in the VirtualBox GUI. Port forwarding settings for the NAT mode are available in VM > Settings > Network while port forwarding settings for the NAT Network mode can be configured in File > Preferences > Network. This is because port forwarding rules for the NAT mode are individual for each VM while port forwarding rules for the NAT Network mode are common for multiple VMs whose adapters are connected to the appropriate NAT network. See details about configuring port forwarding below in the Port Forwarding section.
Bridged Adapter
This mode is used for connecting the virtual network adapter of a VM to a physical network to which a physical network adapter of the VirtualBox host machine is connected. A VM virtual network adapter uses the host network interface for a network connection. Put simply, network packets are sent and received directly from/to the virtual network adapter without additional routing. A special net filter driver is used by VirtualBox for a bridged network mode in order to filter data from the physical network adapter of the host.
This network mode can be used to run servers on VMs that must be fully accessible from a physical local area network. When using the bridged network mode in VirtualBox, you can access a host machine, hosts of the physical network and external networks, including internet from a VM. The VM can be accessed from the host machine and from other hosts (and VMs) connected to the physical network.
If you have multiple physical network adapters on the host machine, you should select the correct adapter in VirtualBox network settings. On the screenshot below you can see two physical network adapters – Ethernet adapter and Wi-Fi adapter . If you use the bridged mode for a wireless network adapter, you cannot use low-level features of that Wi-Fi adapter in a guest operating system. For example, you cannot select Wi-Fi networks to connect to, enable the monitoring mode, etc. Instead, you need to connect to the Wi-Fi network on the host machine. If you have to use all features of the Wi-Fi adapter in the guest OS of the VM, use a USB Wi-Fi adapter and the USB Pass-through feature as explained in the blog post about installing Kali Linux on VirtualBox.

In VirtualBox, the IP address of a VM virtual network adapter can belong to the same network as the IP address of the physical network adapter of the host machine when the bridged mode is used. If there is a DHCP server in your physical network, the virtual network adapter of the VM will obtain the IP address automatically in the bridged mode (if obtaining an IP address automatically is set in the network interface settings in a guest OS). Thus, the default gateway for a virtual network adapter operating in the bridged mode is the same as for your host machine. Let’s look at a simple example with IP addresses.
The address of the physical network: 10.10.10.0/24
The IP address of the default gateway in the physical network: 10.10.10.1
The IP address of the DHCP server in the physical network: 10.10.10.1
IP configuration of the host machine: The IP address – 10.10.10.72; netmask – 255.255.255.0; default gateway – 10.10.10.1.
IP configuration of the guest machine: The IP address – 10.10.10.91; netmask – 255.255.255.0; default gateway – 10.10.10.1.

Sometimes, you may find that you have multiple gateways in your physical network. You can use a host machine for connecting to necessary networks via one gateway and use a guest machine for connecting to other networks via the second gateway. You can also edit a routing table on your VM and add routes for using both gateways to connect to the appropriate networks. As you can see, the bridged network mode is a powerful option in VirtualBox network settings with a lot of use cases.
Promiscuous mode. This mode allows a network adapter to pass all received traffic, no matter to which adapter the traffic is addressed. In normal mode, a network adapter receives only frames that include the MAC address of this particular network adapter as the destination address in the header. The frames that are addressed to a MAC address which differs from the MAC address of the selected adapter (when traffic is not broadcast) are dropped when in normal mode. The promiscuous mode makes it possible for a physical network adapter to have multiple MAC addresses, allowing all incoming traffic to pass the physical network adapter of the host machine and reach the virtual network adapter of the VM which has its own MAC address that is represented on the host adapter, even if that traffic is not addressed to the virtual network adapter of that particular VM.
Most wireless network adapters don’t support the promiscuous mode. Bridging to Wi-Fi adapters is done in following way – VirtualBox replaces the appropriate MAC addresses in the headers of Ethernet frames that must be delivered to the virtual network adapter of the VM (the MAC address of the host Wi-Fi adapter must be used for that traffic). The promiscuous mode is useful for network testing and security audits. You can enable the promiscuous mode in VirtualBox network settings and monitor network traffic with a sniffer.
There are three options of using the promiscuous mode.
- Deny. Any traffic that is not intended to the virtual network adapter of the VM is hidden from the VM. This option is set by default.
- Allow VMs. All traffic is hidden from the VM network adapter except the traffic transmitted to and from other VMs.
- Allow All. There are no restrictions in this mode. A VM network adapter can see all incoming and outgoing traffic.
The Promiscuous mode can be used not only for the Bridged network mode, but also for NAT Network, Internal Network and Host-Only Adapter modes.
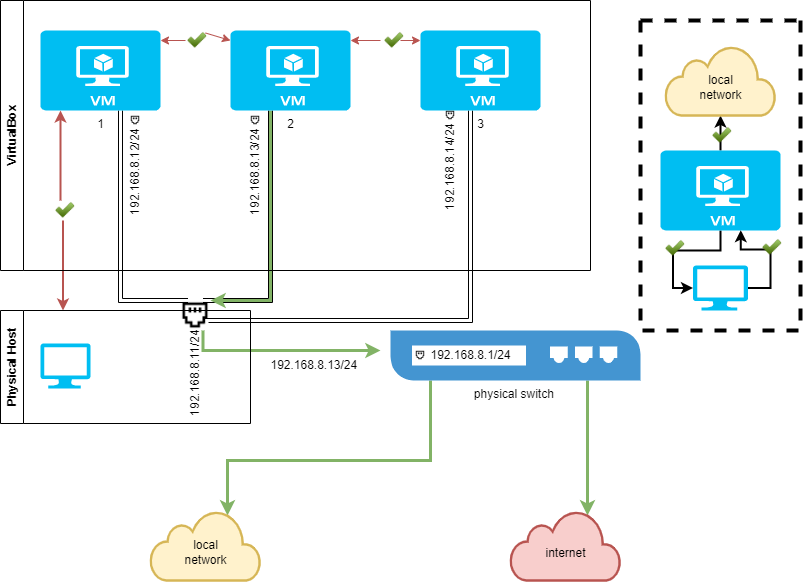
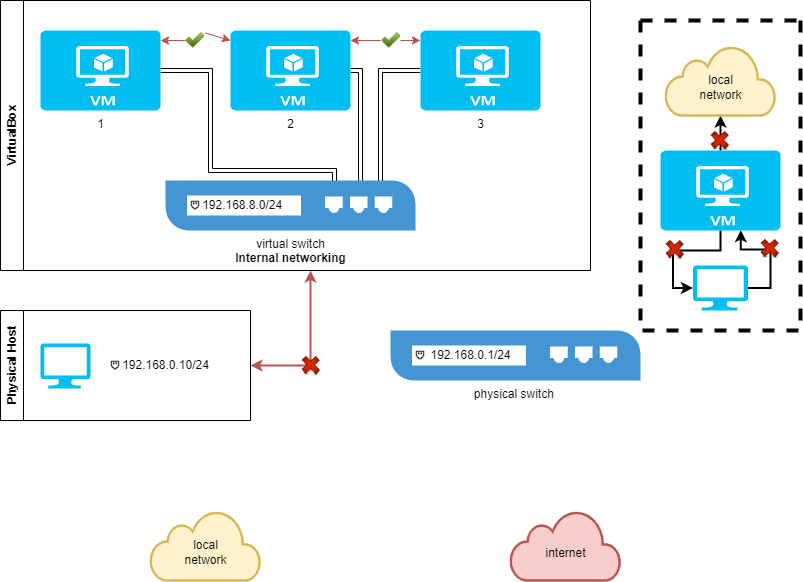
Internal Network
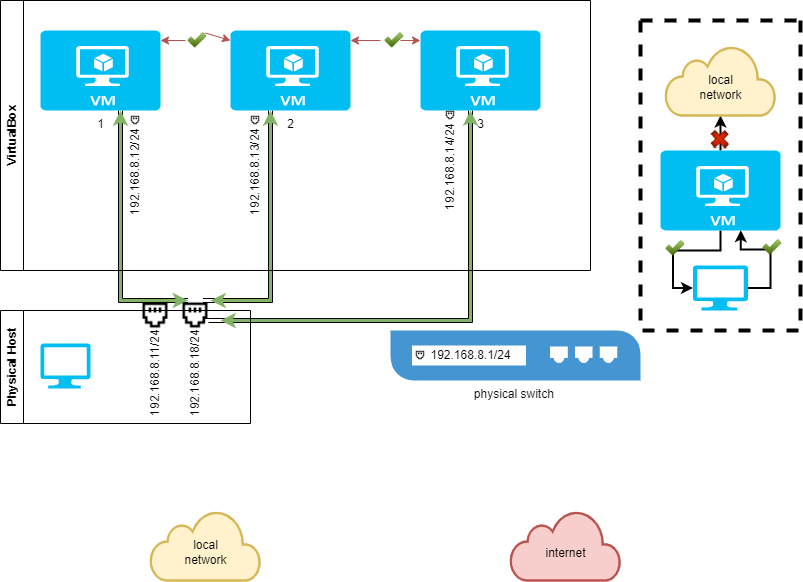
Virtual machines whose adapters are configured to work in the VirtualBox Internal Network mode are connected to an isolated virtual network. VMs connected to this network can communicate with each other, but they cannot communicate with a VirtualBox host machine, or with any other hosts in a physical network or in external networks. VMs connected to the internal network cannot be accessed from a host or any other devices. The VirtualBox internal network can be used for modelling real networks.
For example, you can create three VMs, each of which has a virtual network adapter (Adapter 1) connected to the internal network. The IP addresses of these network adapters are defined from the subnet used for the VirtualBox internal network (you should define the subnet manually). One of these VMs (VM1) also has a second virtual network adapter that is configured to operate in the NAT mode. The VM1 is configured as a router (one of the best solutions for creating a router is to install Linux and configure IPTABLES, but for the first time you can use simpler routing solutions in a case of VirtualBox network testing).
A VM2 and VM3 whose network adapters are connected only to the VirtualBox internal network can have access to external networks if the IP address of the internal network adapter of the VM1 are set as a gateway in the network settings of VM2 and VM3.
Network configuration used in this example:
VM1. IP address – 192.168.23.1 (internal network mode); 10.0.2.15 (NAT mode), gateway 10.0.2.2 (the IP address of the built-in VirtualBox NAT device).
VM2. IP address – 192.168.23.2 (internal network), gateway – 192.168.23.1
VM3. IP address – 192.168.23.3 (internal network), gateway – 192.168.23.1
VirtualBox internal network subnet: 192.168.23.0/24
See the diagram below for more clarity.

Note: You can also deploy such virtual infrastructure for testing firewall rules in IPTABLES before implementing them in your real network infrastructure, but it is preferable to use the bridged mode and not the NAT mode for the second virtual network adapter of the VM1 when connecting to/from external networks.
Host-only Adapter
This network mode is used for communicating between a host and guests. A VM can communicate with other VMs connected to the host-only network, and with the host machine. The VirtualBox host machine can access all VMs connected to the host-only network.

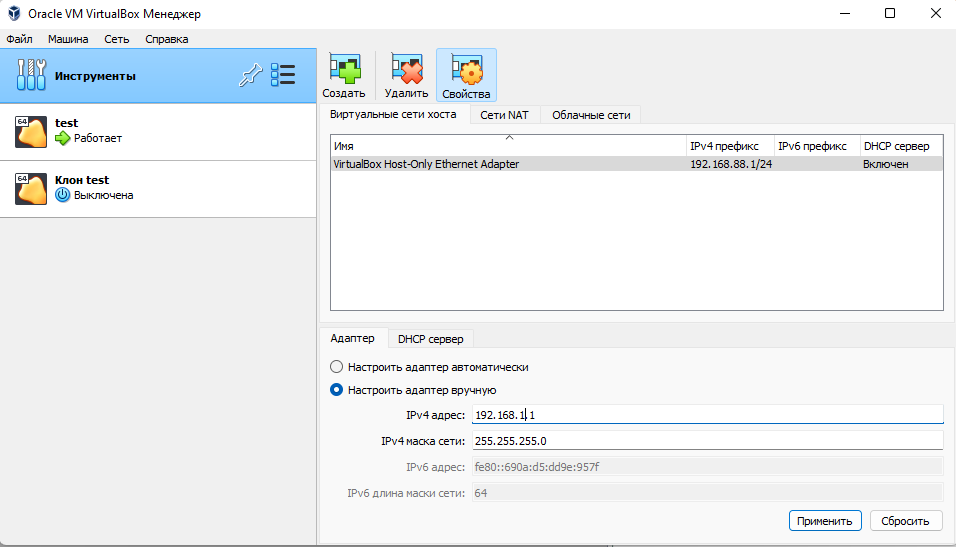
The VirtualBox Host-Only virtual network adapter is created in a host operating system for use in the host-only network. You can edit settings of this VirtualBox network by going to File > Host Network Manager.
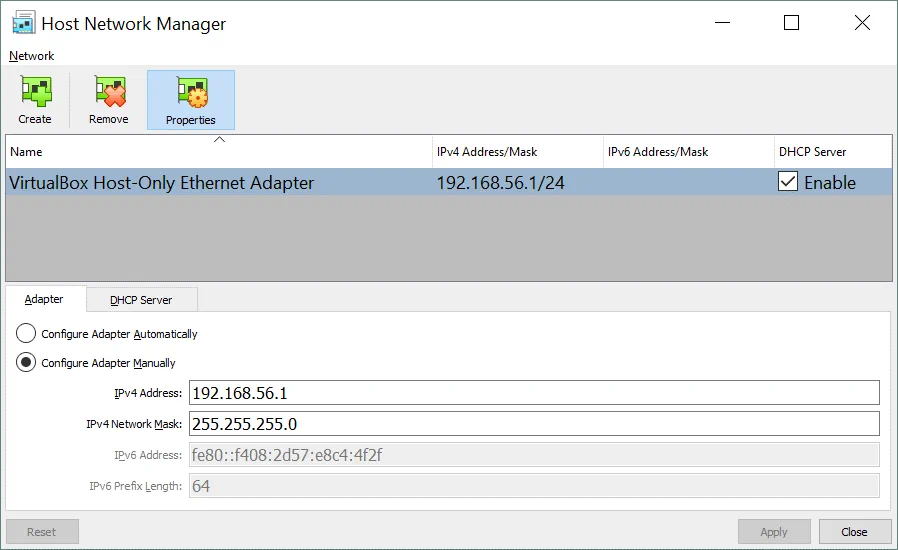
In our case, the default network address of the host-only network is 192.168.56.0/24 and the IP address of the virtual network adapter on the host machine is 192.168.56.1. You can edit these IP addresses manually in the Adapter tab. A DHCP server can be enabled or disabled by ticking the appropriate checkbox. In the DHCP Server tab, you can set the IP address of the DHCP server, netmask and the range of IP addresses to be issued for DHCP clients.

The virtual network adapters of the VMs don’t have a gateway in their IP configuration because the Host-Only mode doesn’t allow you to connect to any devices outside the host-only network. It is also possible to create more than one VirtualBox host-only network adapter in order to use different host-only networks—just press the Create button. If the host-only network is no longer needed, simply select the adapter and hit Remove.
Generic Driver
This network mode allows you to share the generic network interface. A user can select the appropriate driver to be distributed in an extension pack or be included with VirtualBox.
Two sub-modes are available for VirtualBox Generic Driver mode – UDP Tunnel and VDE (Virtual Distributed Ethernet) Networking.
UDP Tunnel. Virtual machines that run on different hosts can communicate transparently by using an existing network infrastructure.
VDE Networking. Virtual machines can connect to a virtual distributed switch on Linux or FreeBSD hosts. You need to compile VirtualBox from sources to use VDE networking since standard VirtualBox packages don’t include this feature.
Comparison of VirtualBox Network Modes
For more convenience, let’s summarize all information about network modes supported by VirtualBox in this table:

Port Forwarding
Port forwarding is a process of intercepting traffic addressed to the appropriate IP address and port in addition to redirecting that traffic to a different IP address and/or port. Special applications can be used on computers and other router devices to configure port forwarding. One of the most popular use cases for port forwarding is by providing access to particular network services that are hidden behind the NAT from external networks. After configuring port forwarding rules, clients can access the appropriate services from outside by connecting to the router’s (host’s) external IP address and specified port.
The packets are first intercepted by an application on the router, then the application reads the destination IP address and port number of the appropriate headers (IP packet headers, headers of TCP or UDP segments). If a combination of the destination IP address and/or port number in headers matches a condition set in a port forwarding rule, the routing application rewrites the header information (IP address and/or port number) and sends a packet/segment to another network interface according to the port forwarding rule.
By default, connecting to VirtualBox VMs whose network adapters are set to operate in the NAT or NAT Network mode is impossible from a VirtualBox host and other hosts in LAN, but VirtualBox provides a built-in port forwarding feature to enable such access.
Example 1 – SSH access
Let’s now consider configuring port forwarding for connecting to VirtualBox VMs using the example of connecting to an SSH server running on an Ubuntu Linux VM that is connected to the network by the NAT mode. You can read how to install Ubuntu on VirtualBox in this blog post.
The input data:
Host IP: 10.10.10.72 (a physical NIC).
Ubuntu VM IP: 10.0.2.15 (NAT mode)
User name: user1
1. Install the SSH server on the Ubuntu VM.
apt-get install openssh-server
2. Edit the SSH server configuration file.
vim /etc/ssh/sshd_config
3. Uncomment the string for enabling authentication with passwords.
PasswordAuthentication yes
4. Restart the SSH daemon (service).
/etc/init.d/ssh restart
5. Verify that the SSH server is working and try to connect to the SSH server from localhost (Ubuntu VM).
ssh user1@127.0.0.1
6. If everything is OK, you can start configuring port forwarding in VirtualBox.
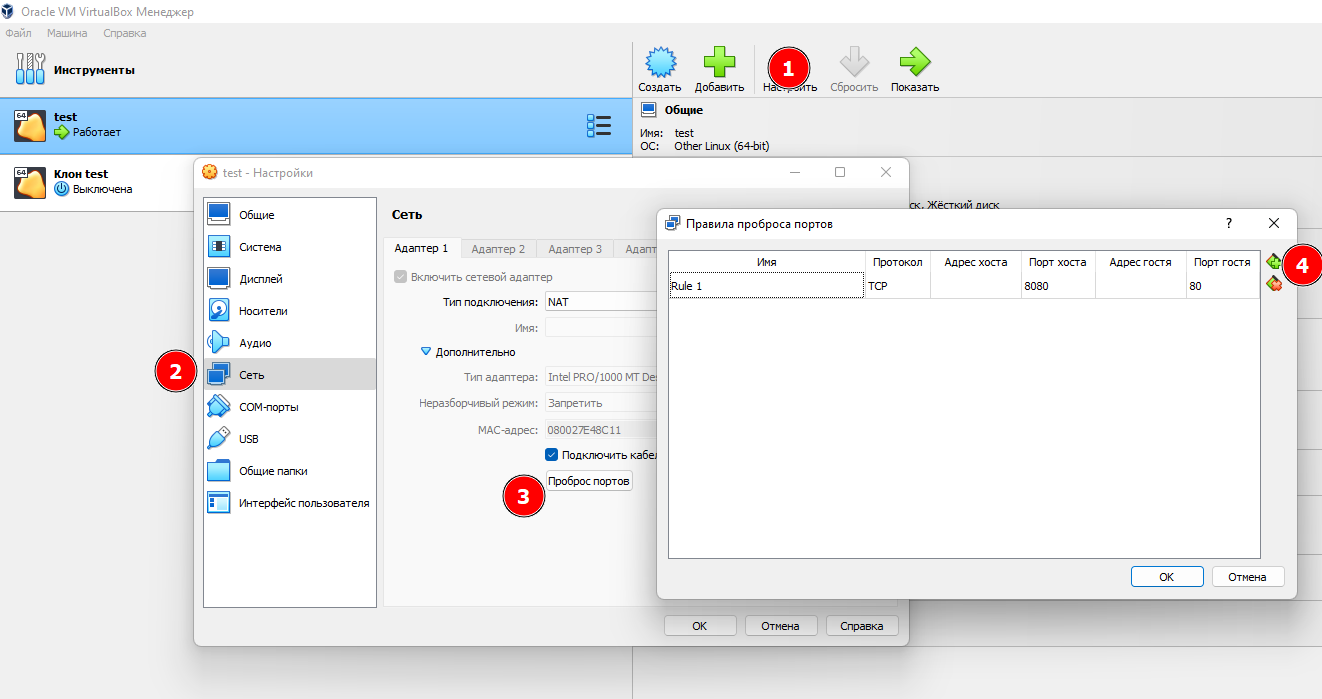
As you recall, you should open VM settings and select the Network section. Select your virtual network adapter that is configured to work in the NAT mode, expand Advanced settings and hit the Port Forwarding button. Click the + icon to add a new port forwarding rule in VirtualBox network settings of the VM.

An SSH server listens the 22-nd TCP port by default. Let’s create a rule that allows you to forward all connections to the VirtualBox host machine on port 8022 to the Ubuntu VM on port 22 that is listened by SSH server. First, you can create a rule that allows for connections only from the VirtualBox host.
| Name | Protocol | Host IP | Host Port | Guest IP | Guest Port |
| Ubuntu-SSH | TCP | 127.0.0.1 | 8022 | 10.0.2.15 | 22 |
The view of the port forwarding rules window in the VirtualBox GUI is shown on the screenshot below.

Open an SSH client (for example, PuTTY if you use Windows) on your VirtualBox host and connect to 127.0.0.1 on port 8022.
Other hosts in your physical network will be able to access the Ubuntu VM via SSH by connecting to the VirtualBox host machine on port 8022 if you create a similar port forwarding rule where the real IP address of your physical network adapter of the VirtualBox host will be defined instead of the localhost IP address (127.0.0.1). In this example, the IP address of the physical NIC on the VirtualBox host is 10.10.10.72.
| Name | Protocol | Host IP | Host Port | Guest IP | Guest Port |
| Ubuntu-SSH | TCP | 10.10.10.72 | 8022 | 10.0.2.15 | 22 |
Open an SSH client on your VirtualBox host or on another host attached to your LAN and connect to your VirtualBox host IP on port 8022.
Example 2 – HTTP access
If you want to deploy a web server on your VM and provide access to your web sites from outside, you can add another port forwarding rule. Let’s consider how to configure that port forwarding rule for accessing a web site deployed on an Ubuntu VM from a VirtualBox host machine and other machines connected to the physical local area network (LAN). Apache is used as a web server in this example.
First, install Apache on the Ubuntu VM running on VirtualBox.
apt-get install apache2
The ufw firewall is disabled in Ubuntu by default. If a firewall is enabled on your Ubuntu VM, make sure that access to the TCP 80 port is enabled.
After installing Apache, open a web browser on your Ubuntu VM and access the default Apache page by entering http://127.0.0.1 in the address bar. If everything is OK, you will see the Apache2 Ubuntu default page in your web browser.
This means that now you can configure a port forwarding rule in VirtualBox network settings for accessing your web site hosted on the Ubuntu VM. Open the Port Forwarding settings window by going to VM settings > Network > [select your adapter] > Port Forwarding (similarly as explained above). You can add a new rule by doing the following:
| Name | Protocol | Host IP | Host Port | Guest IP | Guest Port |
| Ubuntu-HTTP80 | TCP | 10.10.10.72 | 8080 | 10.0.2.15 | 80 |
Open a web browser on your host machine or on any other machine connected to your physical network and enter the IP address of your VirtualBox host machine and port defined in the port forwarding rule created above:
http://10.10.10.72:8080
In the current example, 10.10.10.72 is the IP address of the VirtualBox host machine and 8080 is a TCP port listened on the VirtualBox host machine. A positive result of configuring port forwarding is shown on the screenshot below.

You can also create similar rules for accessing a VM via RDP, FTP and other protocols.
Configuring port forwarding for VMs whose virtual network adapters work in the NAT Network mode functions similarly (see the section above where the NAT Network mode is explained for locating port forwarding settings for the NAT Network mode).
Conclusion
VirtualBox is a powerful virtualization solution that is flexible and provides a wide range of network settings. Each VM can use up to eight virtual network adapters, and each network adapter can be emulated as the appropriate model of real Intel and AMD network interface controllers (NICs). VirtualBox network adapter settings allow you to change the MAC address of each virtual NIC, plug or unplug the virtual network cable, and select the network mode. Setting the network mode for a virtual network adapter is one of the most interesting and important parts of VirtualBox network settings. There are six network modes, each of which can be utilized for different use cases. Port forwarding can be configured for external access to VMs whose network adapters operate in NAT or NAT Network modes.
- Какие типы подключения доступны в VirtualBox
- Как включить и отключить адаптер
- Как подключить виртуальную машину к интернету
- Как настроить сеть между хостом и виртуальной машиной VirtualBox
- Настройка сети между виртуальными машинами в VirtualBox
VirtualBox позволяет на одном устройстве запустить несколько виртуальных машин с разными операционными системами. Виртуальные машины используют для тестирования нового ПО, для знакомства с особенностями разных ОС, а также для запуска программ, которые созданы для определённой операционной системы.
Какие типы подключения доступны в VirtualBox
В VirtualBox можно разными способами настроить интернет:
- на отдельной виртуальной машине,
- в локальной сети между несколькими виртуальными устройствами.
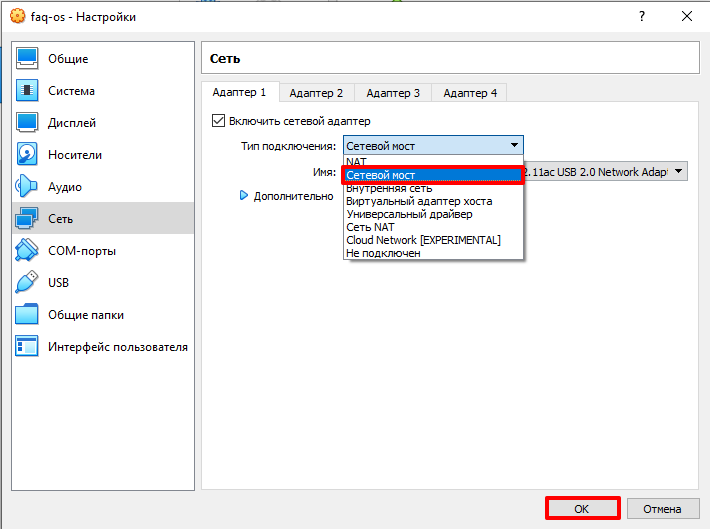
Для VirtualBox 6.1 доступны инструменты:
- NAT,
- сетевой мост,
- внутренняя сеть,
- виртуальный адаптер хоста,
- универсальный драйвер,
- сеть NAT,
- Cloud Network.
На одной виртуальной машине можно использовать до 4 сетевых адаптеров. Для каждого адаптера есть возможность выбрать любой тип подключения. Благодаря этому можно комбинировать настройки, выбирать разные варианты работы сети. Например, комбинировать NAT и сетевой мост. Ниже мы рассмотрим, как включить/отключить адаптер.
Как включить и отключить адаптер
1. Выберите гостевую ОС, кликните на неё правой кнопкой мыши. Нажмите Настроить:
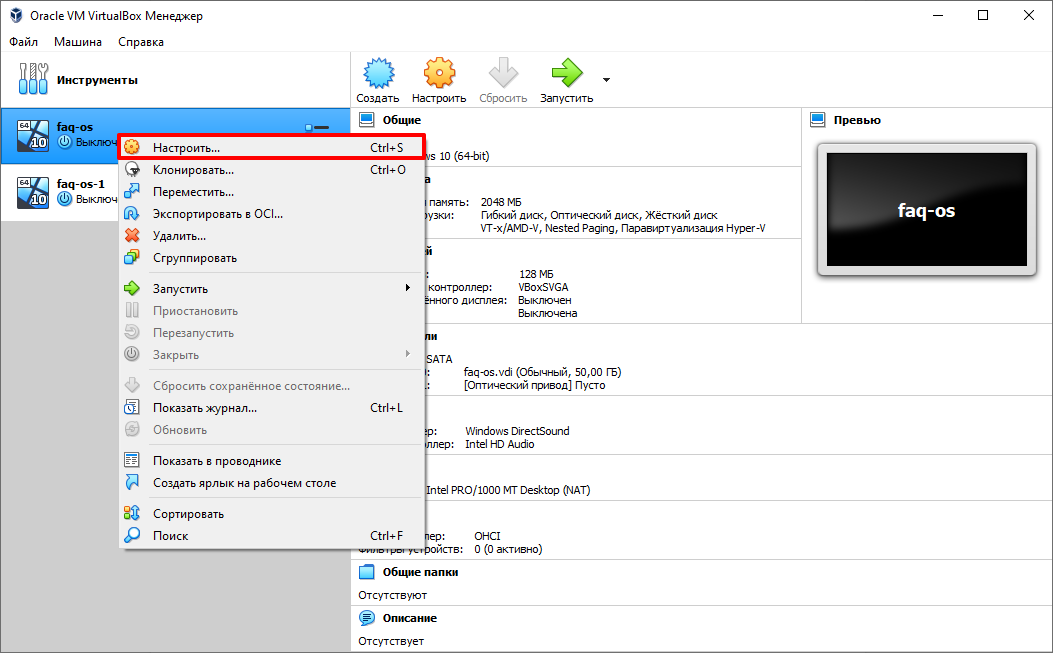
2. В появившемся меню выберите Сеть:
3. Выберите адаптер, который хотите добавить или удалить. Затем переключите чек-бокс Включить сетевой адаптер в нужное положение. Если вы включаете новый адаптер, в выпадающем списке выберите тип подключения и нажмите OK:
Готово, гостевая ОС будет работать с выбранными адаптерами.
Как подключить виртуальную машину к интернету
Если вам нужен доступ только в интернет, можно использовать NAT-подключение. NAT изолирует виртуальную машину от соединений извне, поэтому доступа к другим гостевым ОС при таком подключении не будет. Проводником в интернет выступает хост-система, через которую и проходят все входящие и исходящие запросы.
В VirtualBox при создании каждой виртуальной машины подключение к интернету с помощью NAT происходит автоматически. Поэтому это самый простой способ подключения гостевой ОС к интернету.
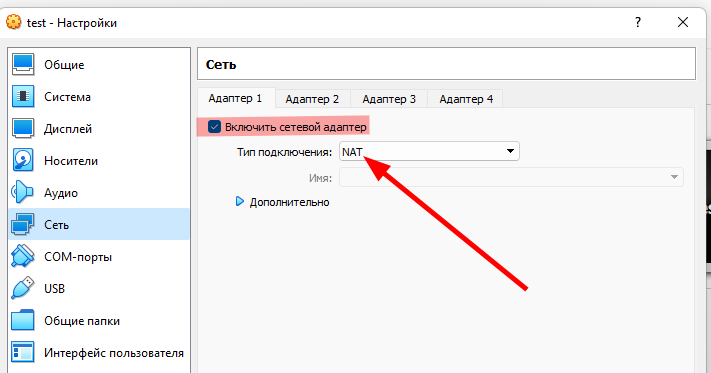
Чтобы включить или отключить интернет с помощью NAT в VirtualBox:
1. Выберите нужную виртуальную машину и кликните по ней правой кнопкой мыши. Нажмите Настроить:
2. В появившемся меню выберите Сеть. Поставьте галочку напротив «Включить сетевой адаптер». Выберите тип подключения NAT и нажмите OK:
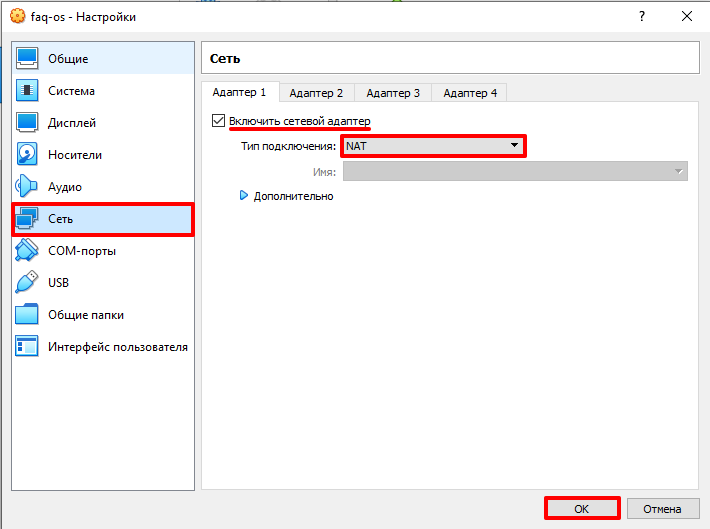
Настройка сети на виртуальной машине VirtualBox
Готово, теперь вы знаете, как включить интернет на виртуальной машине VirtualBox.
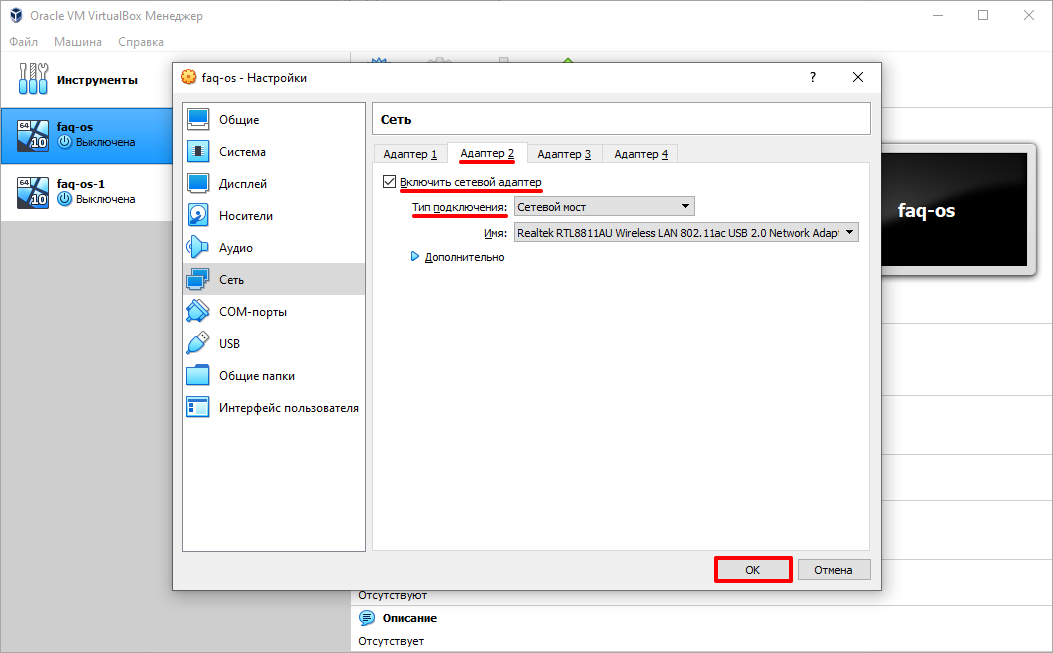
Как настроить сеть между хостом и виртуальной машиной VirtualBox
Для подключения между основной и гостевой ОС нужно использовать тип подключения «Сетевой мост». В этом случае виртуальная машина подключается напрямую к основной сети как полноценное устройство. Для подключения используется сетевая карта хост-системы.
Чтобы включить сетевой мост:
1. Выберите виртуальную машину, которую хотите подключить к сети. Кликните по ней правой кнопкой мыши и нажмите Настроить:
2. В появившемся меню выберите вкладку «Сеть».
3. В настройках адаптера в строке «Тип подключения» выберите Сетевой мост и нажмите OK:
Готово, гостевая ОС теперь доступна для основной.
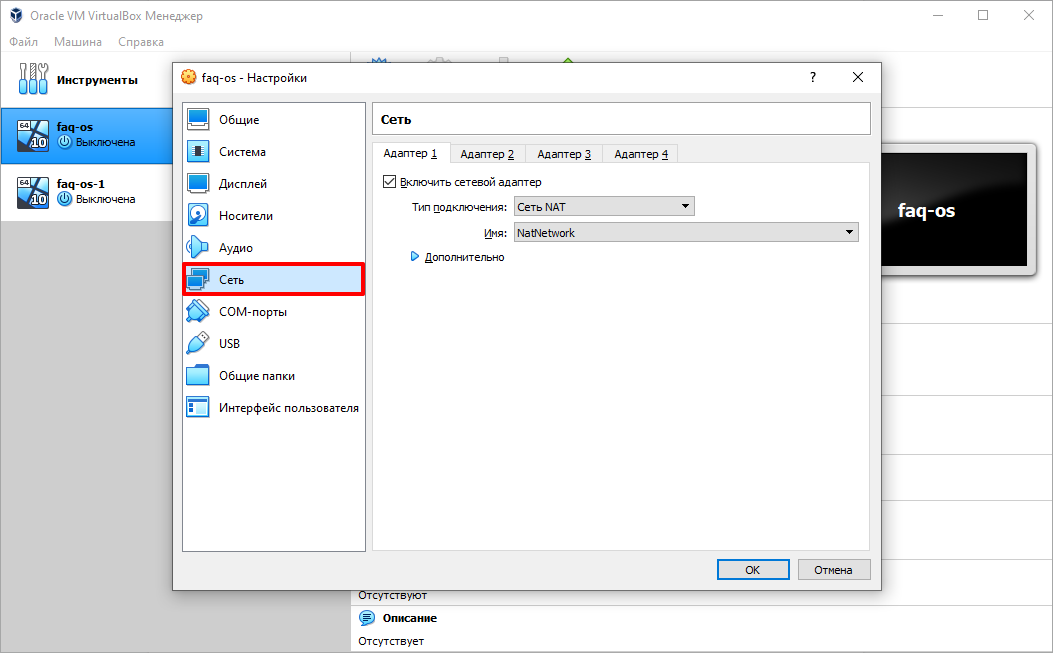
Настройка сети между виртуальными машинами в VirtualBox
Иногда нужно объединить в одну сеть несколько виртуальных машин. Для этого используется подключение «Сеть NAT». Она объединяет необходимые виртуальные машины в локальную сеть. Как и в случае с обычным NAT, у каждой есть доступ в интернет, но от доступа извне они изолированы.
Чтобы создать сеть из виртуальных машин VirtualBox:
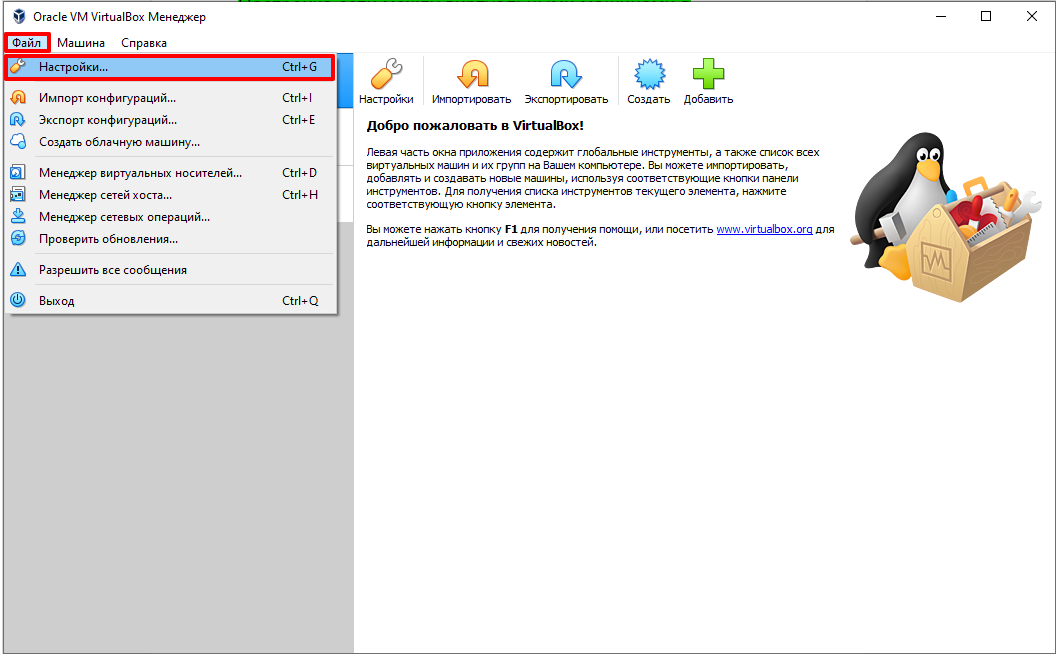
1. На главной странице VirtualBox нажмите Файл ― Настройки:
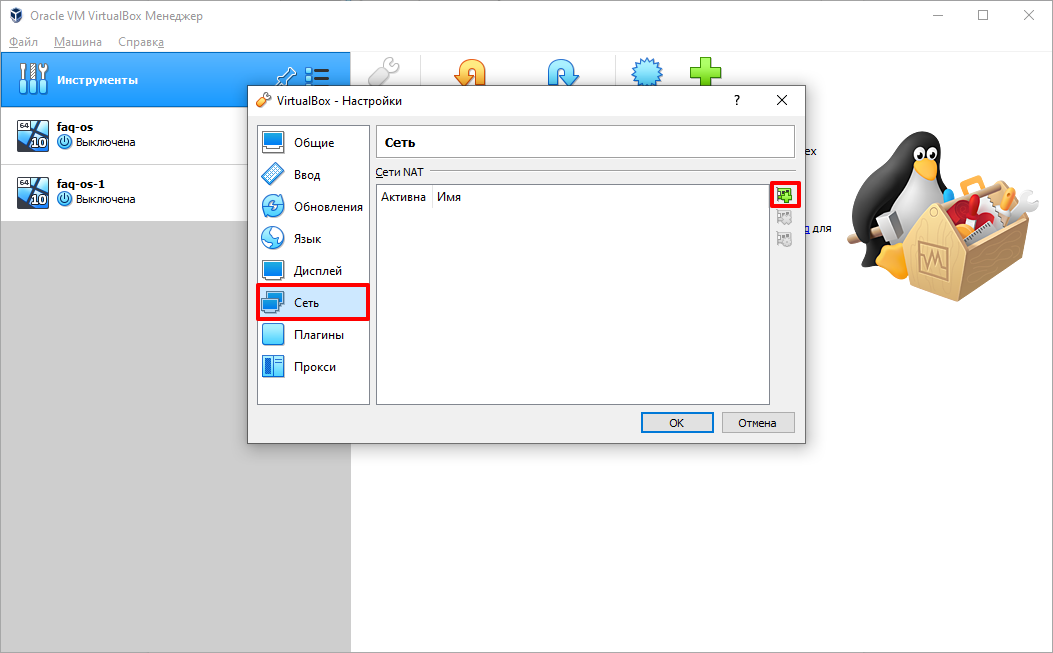
2. Перейдите во вкладку Сеть и нажмите на кнопку с зеленым плюсом:
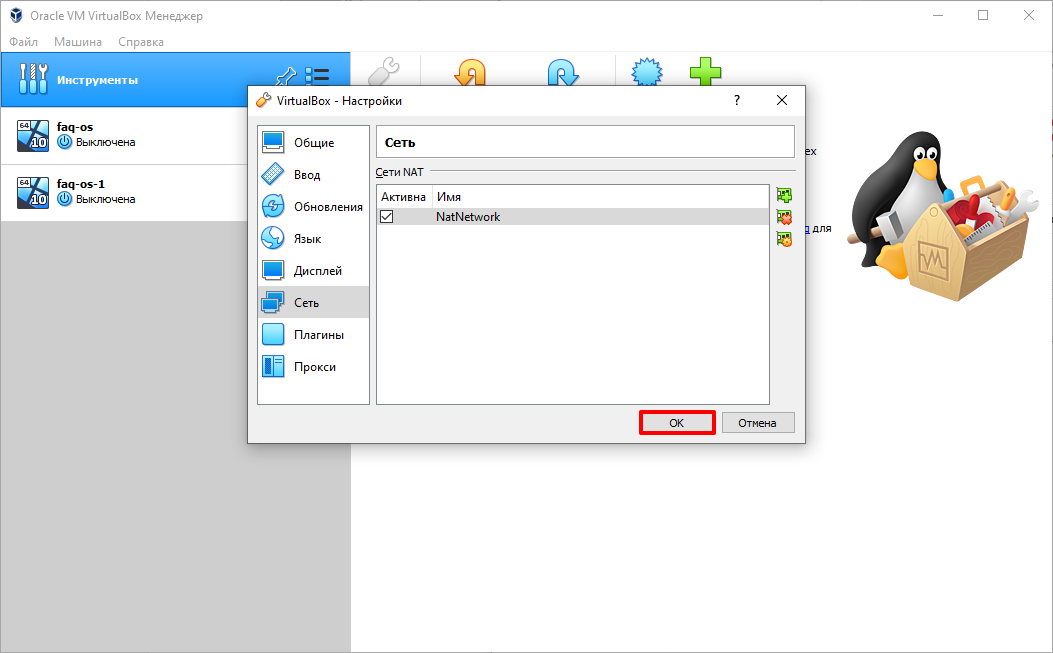
3. Нажмите OK:
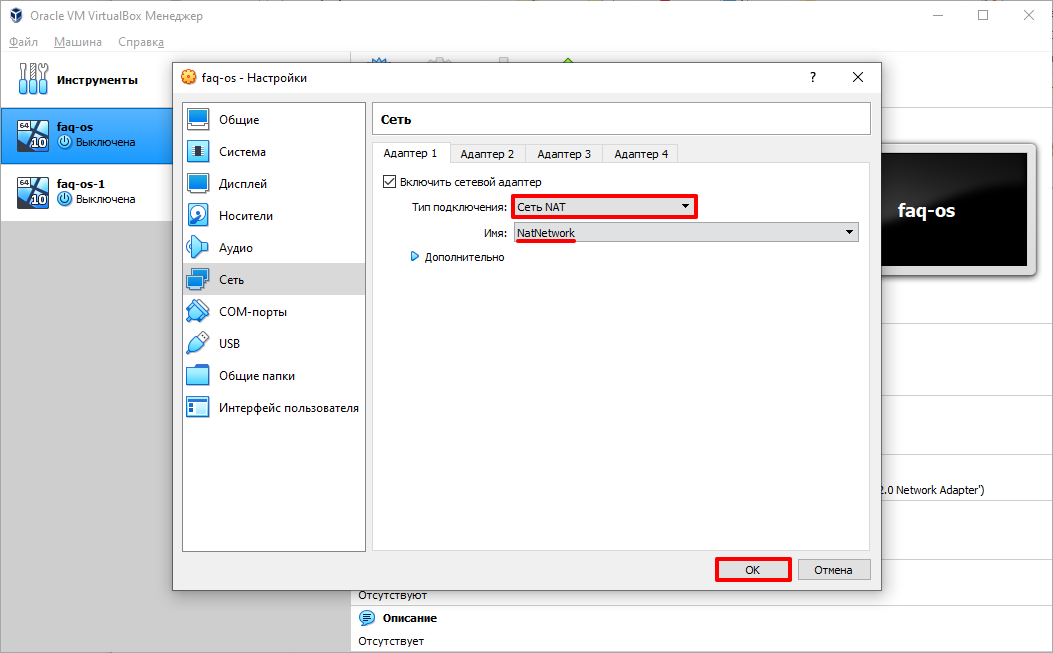
4. Выберите виртуальную машину, которую хотите добавить в сеть, и кликните по ней правой кнопкой мыши. Нажмите Настроить:
5. Выберите тип подключения Сеть NAT. В строке «Имя» выберите имя созданной сети. Нажмите OK:
Как создать сеть из виртуальных машин VirtualBox
6. Если вы хотите подключить другие виртуальные машины к сети, повторите действия с 4 шага.
Готово, локальная сеть из виртуальных машин создана.
When you think about running a Virtual Machine for a lab or testing something out, the first option that will come to your mind would be the VirtualBox. The Oracle VirtualBox is a free open source virtualization platform developed and maintained by the oracle corporation. It is still my free go-to solution when I wanted to spin up some VMs for my labs.
Whenever you work with VirtualBox, you must have seen different types of network interfaces. And Each interface has other functions and features. Depending on your requirements, those interfaces can be connected to the Virtual machines that you have in your VirtualBox environment.
I have covered numerous blogs on how you can deploy virtual machines in VirtualBox hypervisor. In this blog, let’s look at important virtual network interfaces in VirtualBox Network settings and the scenarios in which you could use them.
Virtual network vs physical network
Before we dive in, you first need to understand the primary difference between the physical and virtual networks. If you don’t understand them, it would be difficult to grasp what’s happening on VirtualBox networking.
A physical network is connected using physical gears such as routers, switches, and other network hardware. The best example would be your home wifi network.
As shown below, you have a physical internet connection provided by the ISP and connected to your home router, and all the hosts are connected using either wired or wireless. That is the best example of a physical network.
The Virtual Network is getting widely popular now because of the adoption of virtualization in the data center and software-defined networking.
It is mainly used for the connection between virtual machines and extends its network to other locations. You can think of virtual networking as a virtualized version of physical networking. While the physical network is managed using hardware, the virtual network is controlled using the software.
Though virtual networking is a vast topic and every vendor has their way of managing it, let’s look at virtual networking in a VirtualBox networking environment.
The VirtualBox network can be used to build a different variety of labs for testing.
The below example shows how the physical network on the right is connected to the virtual networks in VirtualBox.
Note: In our following example configuration, we would call the physical network a local network.
What is the difference between NAT and NAT Network in VirtualBox?
The NAT and the NAT networks are two of the network settings in the VirtualBox. They both let the VM talk to the internet or outside the network using the host machine’s IP address. While in NAT, the VMs cannot speak to each other, however in NAT network, you create a network for the VMs with a subnet mask. Attach those VMs to the NAT network, and those VMs which are part of the NAT network can talk to each other, and that’s the main difference, and those VMs can talk to the outside world as well.
Let’s see how the VirtualBox VM behaves when the NAT and the NAT networks are connected. By the end of it, you will understand how each of them works.
VirtualBox NAT interface.
We just discussed the difference between the NAT and the NAT network; let’s look at the NAT interface first.
The NAT interface is a very common interface that you can use on a VirtualBox, and it is also the default interface on the VirtualBox hypervisor.
If you have ever installed an operating system on the VirtualBox, you would most likely have used the NAT interface. As most of the users wanted the VM to browse the internet, and it does that perfectly.
If you are from networking and heard about the term NAT (Network address translation), that’s the same concept.
For those who are not familiar with the network NAT concept, the home network is a great example.
You will have a wifi router connected to the internet, and that router would act as a DHCP server for your internal LAN network. And you have clients who are in private IP range 192.168.1.0/24 and if any of our local clients want to go out to the internet. The request goes to the wifi router, and the internet-facing interface on the router will have a public IP, and all the clients use that IP to go out to the internet.
So basically, here, it translates the private IP (192.168.1.0/24) with a public one. The public IP is a unique IP address on the internet. You can find out your public IP information here.
That’s the common NAT we know of at our home.
How does the NAT work on the VirtualBox?
The NAT interface on the VirtualBox works the same way as the above explanation. However, there is a slight difference. Instead of using the wifi public IP explained above, it uses a host IP address. NAT is performed on the host level where the VirtualBox is installed.
So, if the guest VM wanted to go to the internet or outside the network, it follows the below.
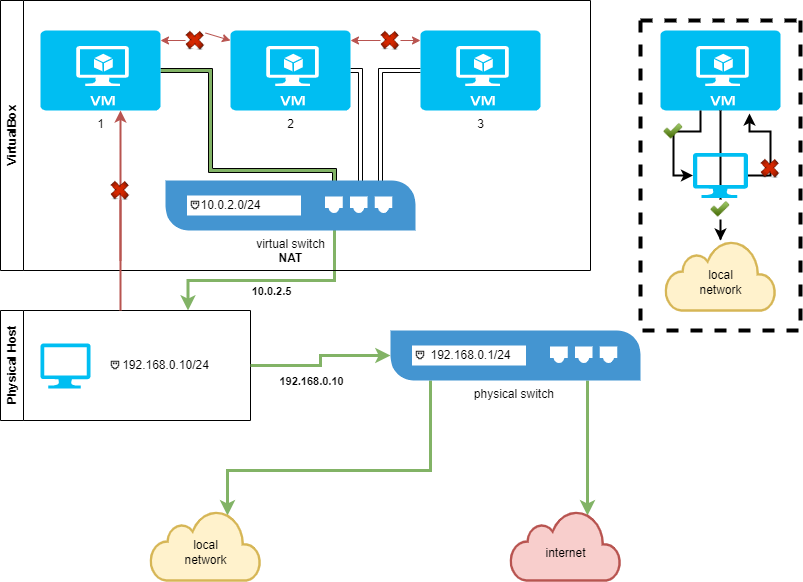
Guest VM (10.0.2.15) ((((NAT)))) Host machine (192.168.1.14) → internet or outside network.
As you can see, I have a guest VM, which I have connected to a NAT interface.
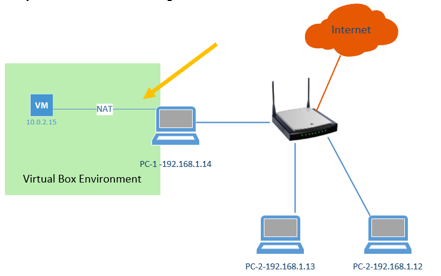
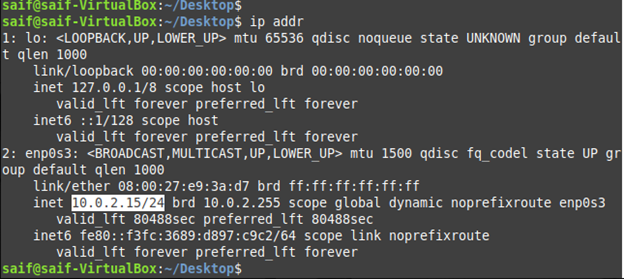
When the VM starts, it should get an IP address 10.0.2.15 from the VirtualBox NAT engine.
What does happen when the guest VM wanted to go to the internet?
The packet will initiate from the guest VM IP address 10.0.2.15, and when the VirtualBox receives the packet, it translates it to the host machine IP address which is 192.168.1.14. And from the host machine, it treats the packet just like any other packets.
If you were to look from the outside of the host machine, you should see the packet came from the same host machine itself than the VM. You will not be able to see the packet ever came from the IP address 10.0.2.15.
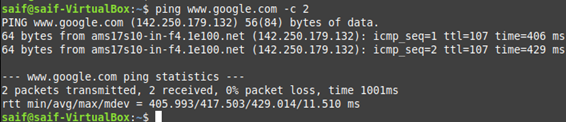
Let’s try to ping google public DNS IP 8.8.8.8 from the VM and do a packet capture on the host to see how the packet looks like.
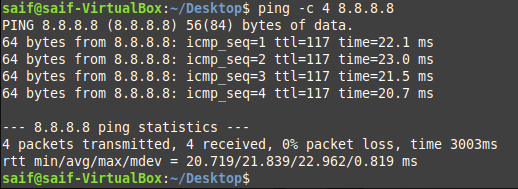
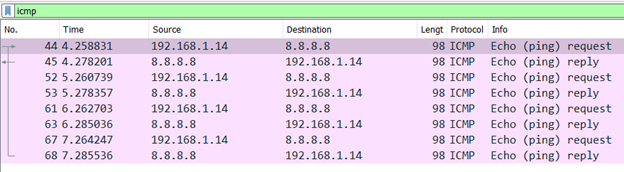
When we performed the ping test, you know that the packet was sourced from IP 10.0.2.15 and reached destination 8.8.8.8 as per above. Let’s see what the packet capture has to say.
I ran the packet capture on my host machine, and as you can see, the packet was sourced from my host IP 192.168.1.14 (not from the guest VM IP 10.0.2.15, because NAT took place here.) And it is going to destination 8.8.8.8.
Even the return packet from 8.8.8.8 has been sent back to the same host IP 192.168.1.14, and as soon as VirtualBox receives this packet, it forwards this packet to the guest VM (10.0.2.15)
Let’s also try to ping other hosts on the local network from the VM, and you should be able to reach the other hosts to respond successfully.
As you can see below, I can reach the IP address from the host network.
However, you will not be able to initiate communication from other hosts on the local network (192.168.1.0/24) back to the VM. As shown below, it says destination unreachable. Moreover, I do not have a route for 10.0.2.15 in my host route table.
C:\Users\saifudhe>ping 10.0.2.15
Pinging 10.0.2.15 with 32 bytes of data:
Reply from 192.168.1.1: Destination net unreachable.
Request timed out.
Reply from 192.168.1.1: Destination net unreachable.
Reply from 192.168.1.1: Destination net unreachable.
Ping statistics for 10.0.2.15:
    Packets: Sent = 4, Received = 3, Lost = 1 (25% loss),
C:\Users\saifudhe>
How about VirtualBox VM to VM communication over the NAT?
You should not be able to communicate between VMs either while it is connected to the NAT. Because each VM will have a separate isolated NAT network, it gets the same IP address from the VirtualBox NAT engine.
You may spin up another VM with the NAT interface, and you should be able to see the same IP address 10.0.2.15 gets assigned by the VirtualBox to the guest VM.
So, if you are using the NAT interface, you can expect the below results.
- The VM’s can talk to the internet.
- And they cannot talk to each other.
- It can initiate the conversation with the HOST and other nodes on the local network.
- However, other hosts on the local network cannot talk to the VM directly.
There are times. You might want to use the same NAT functions mentioned above and still wanted the VMs to talk to each other. Is it possible?
Yes, it is possible. You can use the NAT network for this purpose.
With the NAT Network, the VMs that are connected to it should be able to talk to each other and go out to the internet. Though the VMs under the NAT network can talk to the local hosts, the local hosts cannot initiate the communication with the VM just like the NAT.
Let’s try to connect our three VMs to the NAT networks and see how it behaves.
How do I enable NAT network in VirtualBox?
To connect the VMs to the NAT networks, you need to first create the NAT networks in the VirtualBox. To create the NAT networks, follow the steps below.
- On the VirtualBox, click on File>Preferences.
- Click on network and click on the plus icon to add the NAT networks. The NAT networks will be added automatically.
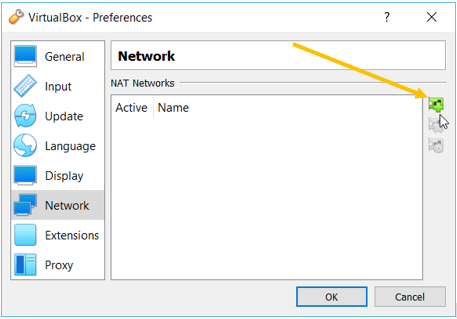
- Once you have the NAT networks added, you can double click or select and click on the gear icon the right on the added network to modify the default subnet. I have added the subnet mask as 10.1.1.0/24
Note: You can see an option called port forwarding, it will be useful to forward any port to the virtual machine. Which I covered here in detail with an example.
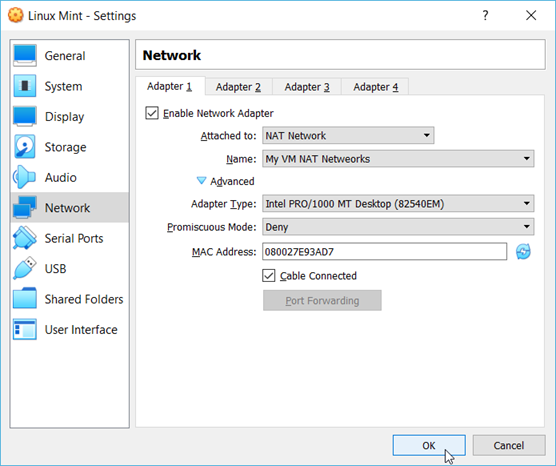
You may now right-click on the VM and attach the newly created NAT network.
Right click-> Settings-> Network
Choose the NAT networks, add the NAT network that we have just created and click on OK.
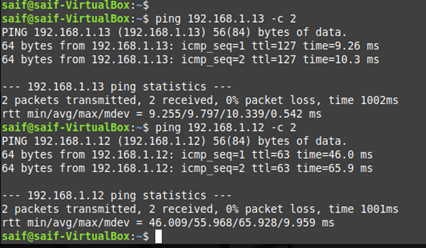
I performed the above steps on all three VMs that I have. And let’s take a look at the IP address that I received from my nat networks.
All my VM’s got an IP address as below from the exact subnet that we defined.
Ubuntu-VM-01 – 10.1.1.6/24
Ubuntu-VM-02 – 10.1.1.5/24
Linux Min-VM-01- 10.1.1.4
All my VMs can talk to each other.
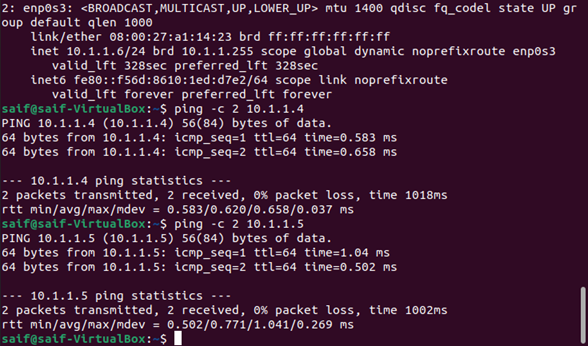
And it can also reach the internet as well.
In NAT Networks.
- The VM’s can talk to each other.
- And it can go out to the internet and also talk to other hosts in the local network.
- Local network devices cannot talk to the VM’s.
VirtualBox Bridged adapter.
The next important Network in Virtualbox is called the Virtualbox Bridged adapter.
In VirtualBox bridged adapter, it works like a switch connecting your VM to the local network. After the VMs are connected to the bridged network, the VMs will work just like other local host machines.
When you choose the bridged network, the VirtualBox will pick up your host’s interface connected to the local network. In my case, it is my wifi adapter.
If you choose the bridged adapter, make sure you choose the host interface that connects to the local network.
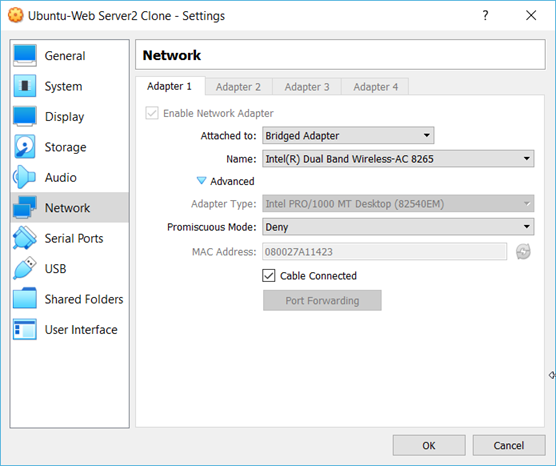
I have connected all three VMs to the bridged network, and I got IP addresses (192.168.1.25, 26, and 27) from my local router.
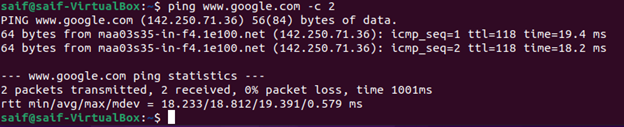
These three VM now act as another host on the local network, and let’s try to ping each other.
And we were able to ping each other successfully.
How about the internet?
The internet will work just fine, as long as your local network can reach the internet.
And you can see below that I can reach the internet.
Can the VM talk to the host machine now?
The answer is YES because both the host machine and the VM are in the same network. Everyone can talk to each other. And even the devices which are in the local network can talk to the Guest VMs.
In bridged network;
- The VM’s will get the IP address from your local network router just like other local hosts.
- All the VM’s should be able to talk to each other.
- The VM can talk to the local network hosts, the devices on the local network can also initiate the communication with the VM’s.
- It can also go out to the internet using the local internet connection from the router.
VirtualBox internal network.
In the Virtualbox Internal network, you can create a separate private network isolated from all the other networks. It will be useful when you want to build some labs without worrying about leaking the network to your production or local network.
In this network, the VM’s Network will be completely isolated from the other network, including the host network.
When you configure the internal network, there will be no DHCP configured. You have to configure the IP address manually. There is an option in VirtualBox CLI to configure the DHCP. And another option is that If you build a VM that can act as a DHCP server in the VirtualBox, then that VM can act as a DCHP server for your internal network.
To configure the internal Network, Right-click on the VM and click on Settings.
Click on the network, choose the internal network from the dropdown, and click OK.
After you configured the IP address on the VMs, it can talk to all the VMs in the internal network. But it cannot communicate with the host and the outside the internal network.
For example, if you try to communicate to the host machine from the VM, it will fail. The only way you can allow the VM to talk to the outside of the local network is by using a transit VM. It can be a router or a firewall. And its outside interface is connected to the Bridged interface, and the inside interface is connected to the VirtualBox internal network.
I have a lab where I have installed and demonstrated a pfSense firewall in VirtualBox using the same internal network.
In the pfsense Lab setup, when the VM’s that are connected to the internal network wanted to go to the internet, it has to talk to its gateway, which is in the internal network from the pfSense LAN and goes out to the bridged interface on the outside. You may check out the article here to understand that more.
In VirtualBox internal network
- The VM’s can talk to each other.
- It cannot talk to the host machine nor the local network.
- And the VM’s cannot reach the outside world/Internet.
Virtualbox Host-only adapter – VirtualBox network connection between host and guest
When you wanted the VMs to talk to the host but not to the outside network, you can use a VirtualBox host-only adapter. In this setup. The host machine would create a host-only virtual adapter on the host. You can think of it as a loopback interface that can be attached to the virtual machine.
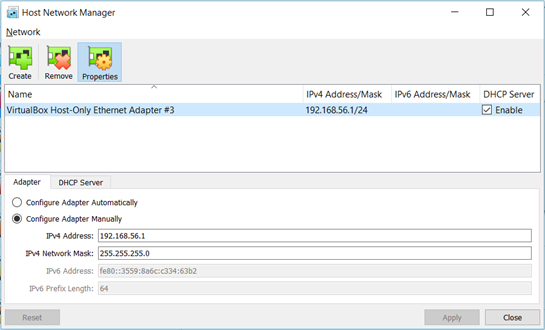
You can configure the host network adapter under the host network manager (File-> Host Network manager) in the VirtualBox. Where you can create or remove the adapter, configure the DHCP service, and so on.
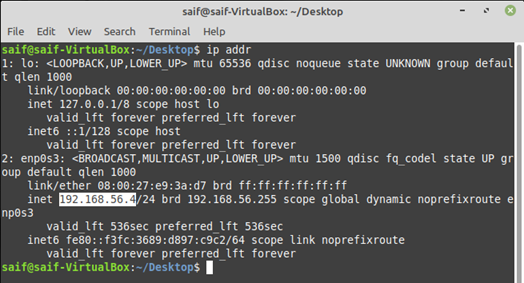
I already have one virtual host adapter in my VirtualBox with the IP 192.168.56.1
Using VirtualBox GUI, you can create up to 4 virtual adapters, if you wanted to create more, you can do so by using the VirtualBox CLI, however, you are limited to only eight adapters maximum.
The adapter that I have on the VirtualBox can be seen on the host machine as well, and it can be verified by going to the command prompt on the host machine.
Open the command prompt and run the command ipconfig and you will be able to see the virtual adapter settings.
Also, you can notice the host-only adapters in windows network adapter settings.
Let’s see how it behaves in VirtualBox host-only network setup.
I have attached one of my VM to be part of the VirtualBox host-only network. As soon as the VM is powered on, it has an IP address from the same Host Network Manager DHCP service.
Can I reach the internet with the host-only adapter?
No, you cannot. As you can see below, I cannot reach the internet.
How about the host machine access?
You can reach the host machine using the host-only adapter IP address, which is 192.168.56.1 in my case.
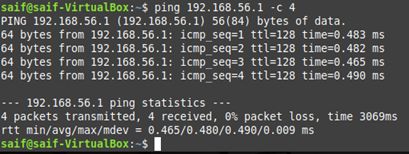
However, I cannot reach the physical adapter IP address 192.168.1.14, which is again part of our host local network.
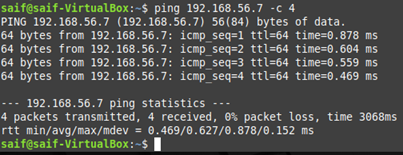
And I should be able to reach another VM that is part of the same virtual host adapter network.
I have another VM connected to the host-only adapter that has an IP address 192.168.56.7. As you can see, I can reach that VM just fine.
In a host-only network,
- You can talk to the host machine using the host-only adapter IP.
- You cannot talk to the host physical network from the VM’s. Hence no access to the host local network.
- The VM’s cannot go out to the internet either.
VirtualBox is a free, open source virtualization platform that you can run on Linux, Windows, or macOS (among others). Because it is extremely accessible and pretty easy to learn, I usually recommend it to first time creators of virtual machines. In this post I show how to install VirtualBox, and configure VirtualBox to use a NAT Network and allow SSH from the host computer.
See the following video for a step-by-step procedure about installing VirtualBox in Windows and in Linux.
Duration: 8:54
Links
- VirtualBox download: link
- VirtualBox manual: link
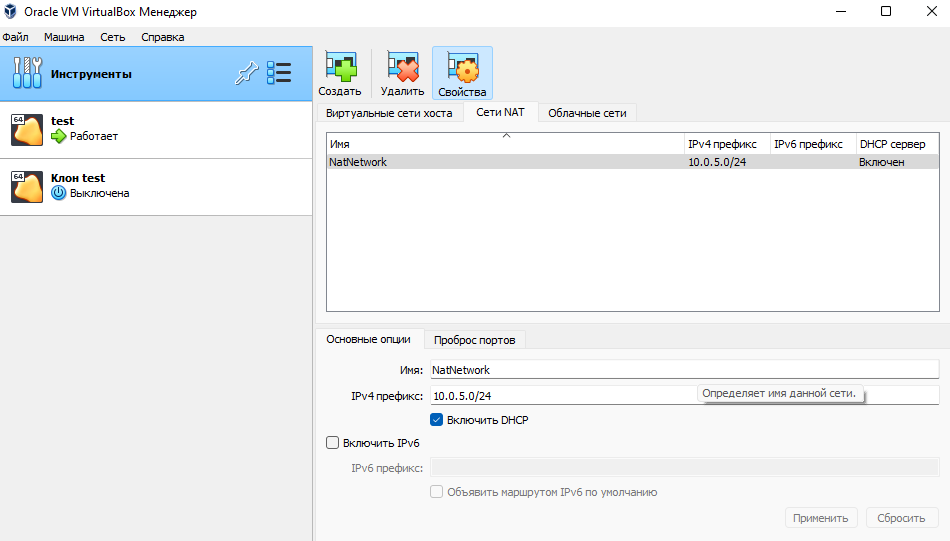
Creating a NAT Network in VirtualBox
By default, VirtualBox VMs are set to «NAT» mode. However, if you want to have multiple VMs that can communicate with each other, you will need «NAT Network» mode.
You can create a NAT network in VirtualBox from the graphical user interface (GUI), as shown in the following video, or from the command line interface (CLI). Both are described as written step-by-step procedures after the video.
Duration: 8:15
Option 1: (GUI)
Version 7 Process
-
Go to File > Tools > Network Manager
-
Click the Nat Networks tab.
-
If there is no NAT network, then right-click to create a new NAT Network here. You can use the default 10.0.2.0/24 IP network if you wish, and the task is complete. (You will need to configure the client VM’s network setting to use this new NAT network.)
Old Way prior to Version 7.
-
Go to File > Preferences > Network.
-
Click the + sign to the right. A new NAT Network will be created. You can use the default 10.0.2.0/24 IP network if you wish, and the task is complete. If you wish to use a different IP network, then continue to the following optional steps.
-
Double-click the new NAT Network.
-
In the Network CIDR field, change the IP scheme to whatever you wish. For example, to use something different than 10.0.2.0, enter in 192.168.15.0/24.
-
Press OK for all open windows.
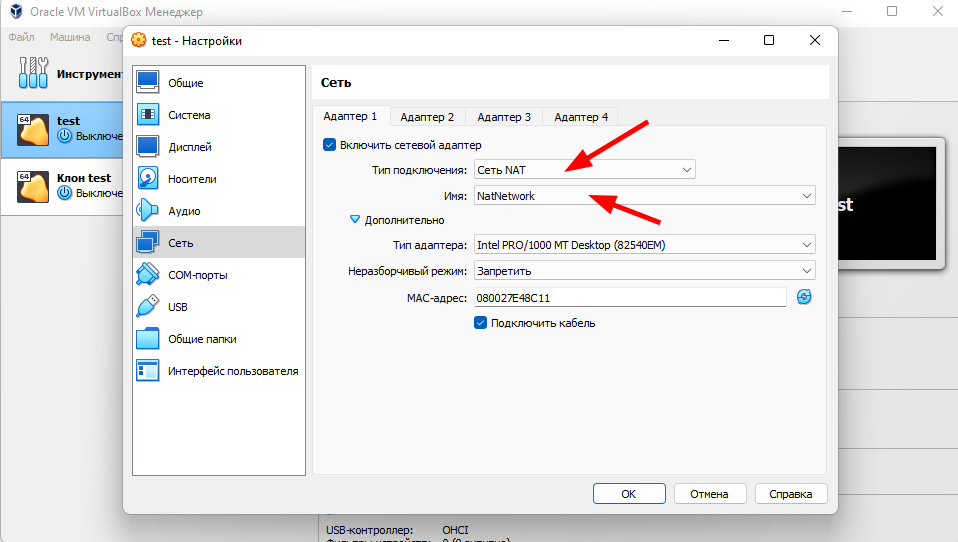
Afterward, in the VirtualBox VM settings, go to Network, then in the «Attached to:» drop down menu select the NAT network that you just created.
Option 2: (CLI)
In Windows you need to navigate to the following path and run the command below.
C:\Program Files\Oracle\Virtualbox
Note: If you have issues using Powershell, use the Command Prompt instead.
In Mac and Linux you can run the command from any directory:
VBoxManage natnetwork add --netname natnet1 --network "192.168.15.0/24" --enable --dhcp on
Adjust the name of the NAT Network and the IP scheme as you see fit. The name of the NAT Network in the example is “natnet1” and the IP scheme is 192.168.15.0/24
Afterward, in the VirtualBox VM settings, go to Network, then in the «Attached to:» drop down menu select the NAT network that you just created.
How to setup SSH capability into a VirtualBox guest on a NAT Network.
Guests on a VirtualBox NAT network can access external systems and the Internet. However, by default, the host computer cannot access the guests. At times, you might want to connect from your host computer to a VirtualBox guest with SSH in the command line. To allow this, add a port forwarding rule in VirtualBox by following the steps below.
-
Go to File > Preferences > Network, and then double-click the appropriate NAT Network.
-
In the NAT Network window click Port Forwarding.
-
Click the + sign to add a new rule, and add the appropriate information, similar to the figure below. The Guest IP address will vary depending on your VM’s IP and your particular NAT Network setup. For example, it could be a different IP address on the 10.0.2.0 network, or on a different NAT network altogether if you created a separate one.
-
Connect to the guest with SSH using a command similar to the following:
ssh -p 2222 user@127.0.0.1
Note: The port number portion (-p 2222) can go before or after ‘user@127.0.01’. Be ready to supply the password of the user account on the guest computer.
The connection on the IP address 127.0.0.1 and port 2222 will redirect to the IP address of the guest (in this case, 10.0.2.4) and port 22. That should begin an SSH session.
For every other VM that you want to connect to, simply create a new rule and increase the port number by one. For example, 2223, 2224, and so on.

🙏
Thanks for reading this post. Now… go forth and use VirtualBox as your testing ground for whatever virtual machine goodness you require. Any questions? Feel free to ping me!