
How to use a shared folder in VirtualBox
- 100
- 1
- 2
- 3
- 4
- 5
1

In virtual machine the shared folders feature allows to exchange the files between the host and the guest OS and vice versa. This is very convenient if you don’t have access to the Internet in guest operational system, for instance, and you need to download some file. In this case you may use the host system connection and transfer the file object right to the emulated system. In this article I’m going to tell how to open a shared folder in VirtualBox in Windows and in Linux OS.
How to use a shared folder feature in Windows in Oracle VM VirtualBox?
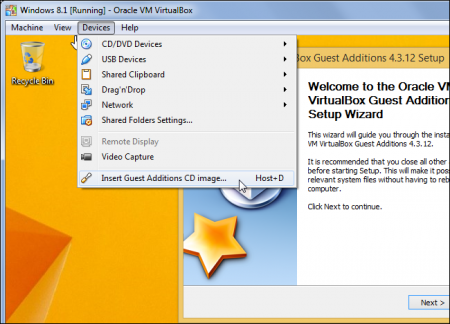
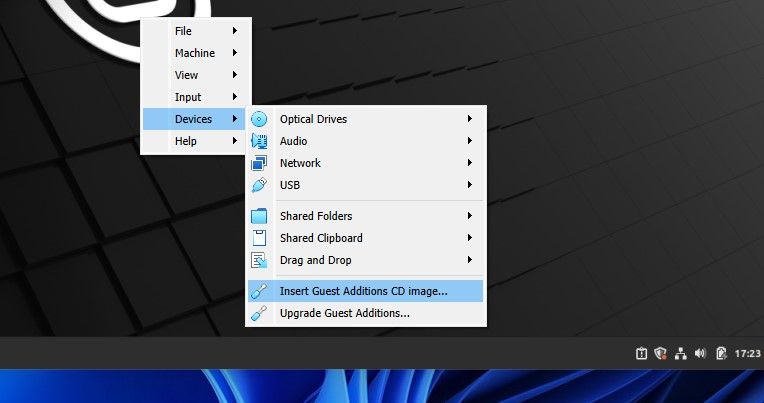
The way you can use shared folders either in Linux or Windows environment is quite similar. In order to apply it, you would need to install VirtualBox Guest Additions in the guest VM. Address to the upper menu of the app and click Devices -> Insert Guest Additions CD image menu item in the virtual machine running. In such a way the proper installer will be called.
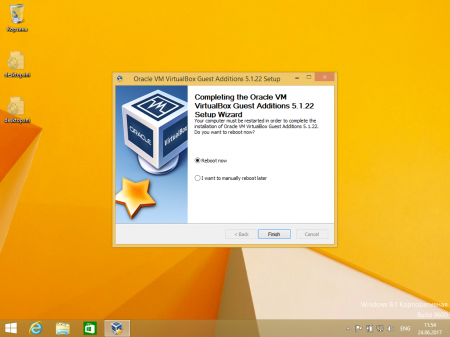
Follow the wizard instructions and install the mentioned module in the guest VM. The setting up procedure takes a little more than a minute, but you will be notified about the workflow of the routine. After setup is completed, the virtual system would need to be rebooted, so you will get a proper notification regarding this.
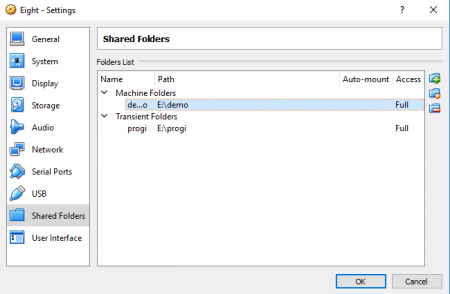
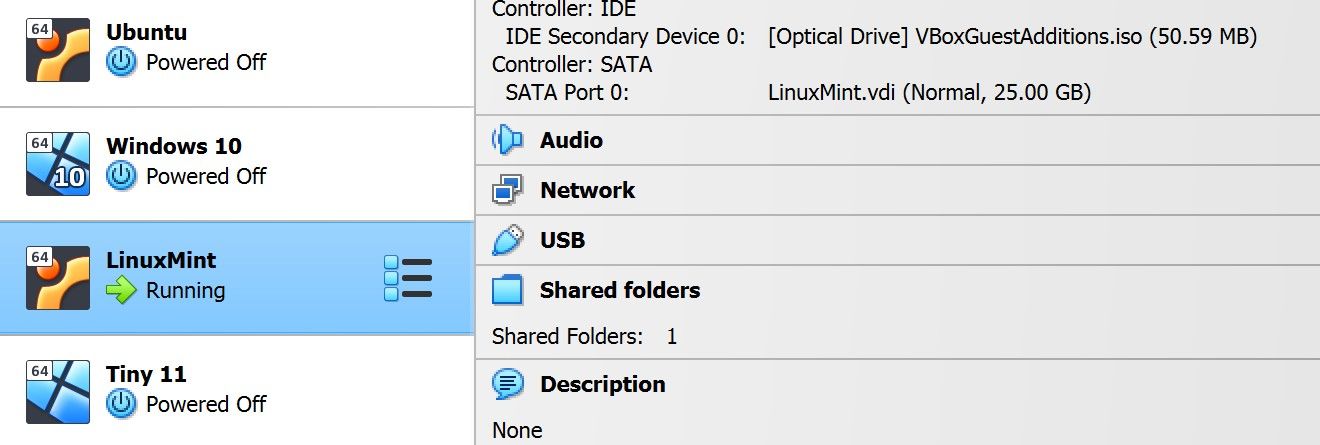
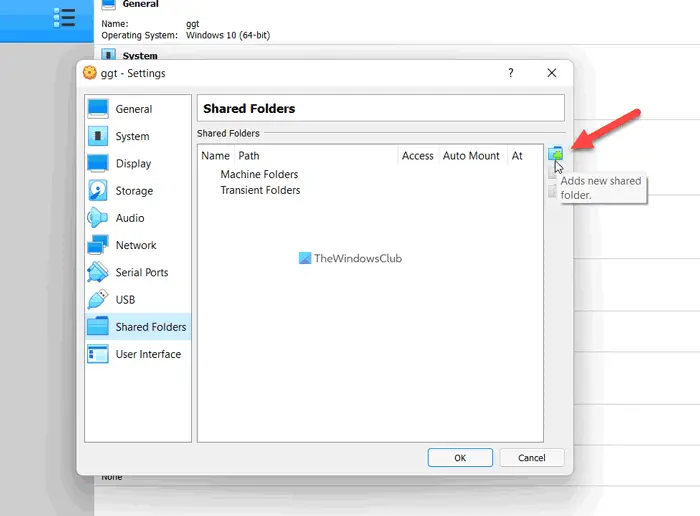
After the VM is rebooted, click the Machine -> Settings item in the guest OS upper menu and choose Shared Folders category. In here you may see all the common folders that are available for the customization. Here are two types of common directories – Transient Folders, which are temporary objects and are expected to be removed when the VM restarts or shuts down, and Machine Folders, which are permanent objects, and they will be shared constantly, until you remove them in a manual way.
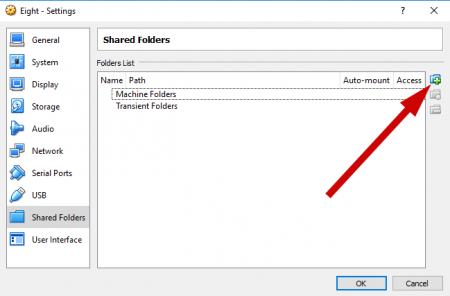
If you want to add a new common folder to the list, click Add icon in the right part of the form.
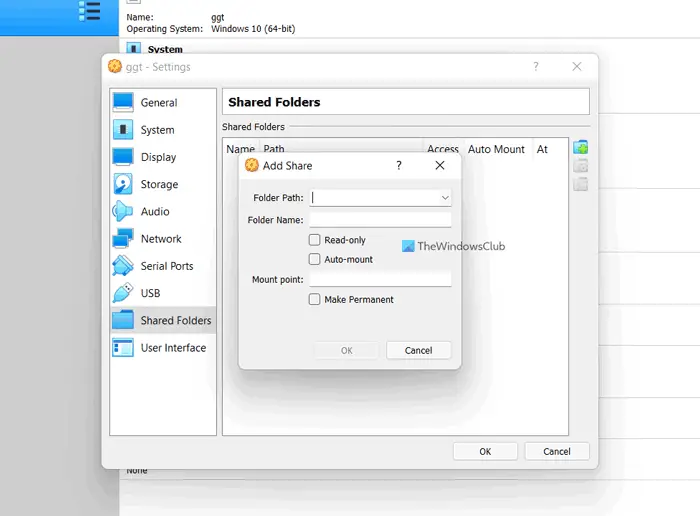
Now it’s time to configure the newly added common folder. In the Folder Path field specify the path on the host OS, where the defined common folder is stored. At the same time, the Folder Name field represents the name of the directory, under which it will be accessible in the guest OS. By default, the user gets the full rights to the directory. If you want the virtual machine to have read-only rights, mark the Read-only checkbox. If you set the Make Permanent checkbox, the folder will be put to the Machine folders section.

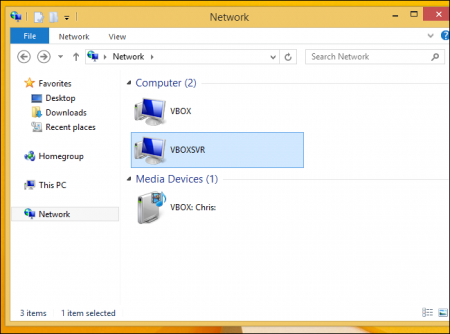
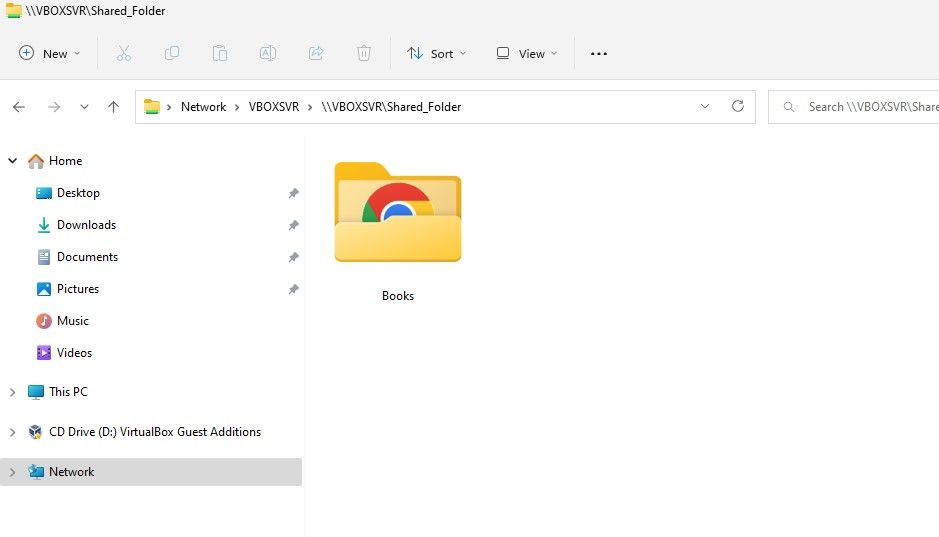
Now a few words about how to access the defined shared folder. Open the Explorer, then unroll the Network category, and in there you will see the “VBOXSVR” common computer. That is the shared folder station, which is designed by the virtual machine. Open it and you will see all the shared folders right in there.
How to use a shared folder in VirtualBox in Ubuntu?
In Linux Ubuntu the way to access the common folders is nearly identical. In the same way you need to install VirtualBox Guest Additions, and after that address to the Devices -> Shared Folders menu item. Then add the common folders, using the method similar you applied in Windows OS. The only difference is the path representation. If in Windows it had the absolute way exceptionally, in Ubuntu the path will have either a relative (~/share) or absolute (/home/share) representation.
On Windows (11 or 10), after creating a virtual machine on VirtualBox, you may sometimes need to share files between the host and guest operating systems to install apps or work with documents.
Although you can configure the virtualization solution to drag and drop files, you can also set up a folder on the host device to share files with the virtual machine. In addition, you can also use this approach when, for example, the feature to mount an ISO file or storage peripherals doesn’t work with the virtual machine.
Whatever the reason, VirtualBox on Windows 10 offers two ways to share files, including using a shared folder or mapping a folder as a network drive in the guest operating system.
In this guide, you will learn how to share a folder with a virtual machine using VirtualBox on Windows 10 (or Windows 11).
- Create a shared folder on VirtualBox
- Create a mapped drive on VirtualBox
- Access VirtualBox shared folder or mapped drive
- Delete shared folder or mapped drive on VirtualBox
To set up VirtualBox to share a folder with a virtual machine, use these steps:
-
Open VirtualBox.
-
Right-click the virtual machine and select the Settings option.

-
Click on Shared Folders.
-
Click the “Add new shared folder” button from the top-right corner.
-
In the “Folder path” field, confirm the path for the local folder to share with the device. Alternatively, you can click the down-arrow button and select the Other option to browse and select the folder.

-
In the “Folder Name” field, confirm a name to identify the shared folder.
-
(Optional) Check the Read-only option to prevent saving files into the folder from the virtual machine.
-
Click the OK button.


Once you complete the steps, the folder will appear in the network section of the guest machine.
Create a mapped drive on VirtualBox
To map a shared folder to a virtual machine, use these steps:
-
Open VirtualBox.
-
Right-click the virtual machine and select the Settings option.
-
Click on Shared Folders.
-
Click the Add new shared folder button from the top-right corner.
-
In the “Folder path” field, confirm the path for the local folder to share with the device. Alternatively, you can click the down-arrow button and select the Other option to browse and select the folder.
-
In the “Folder Name” field, confirm a name to identify the shared folder.
-
(Optional) Check the Read-only option to prevent saving files into the folder from the virtual machine.
-
In the “Mount point” field, specify the drive letter to map the folder as a drive on the virtual machine – for example, “G:”
-
Check the Auto-mount option to mount the shared folder with the drive letter from the previous step.
-
Check the Make Permanent option to keep the shared folder mounted even after restarting the virtual machine.
-
Click the OK button.

After you complete the steps, the folder will mount as a drive on the virtual machine. In the case of Windows 10, you can access it under the “Network locations” section on File Explorer’s “This PC” page.
You can access the folder from the “Network” or “This PC” pages, depending on how you configure the feature.
Network page
If you created a shared point to access the files, use these steps:
-
Open File Explorer.
-
Click on Network.
-
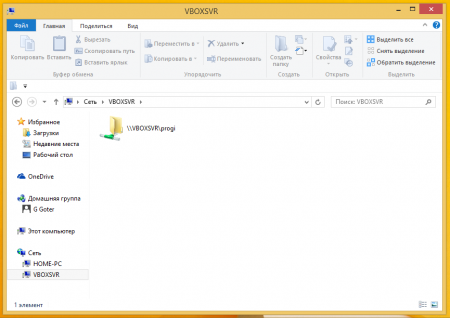
Double-click the VBOXSVR device.

-
Double-click the shared folder to access the files.

Once you complete the steps, you can interact with the files and folders.
This PC page
If you mounted the folder as a drive to access the files, use these steps:
-
Open File Explorer.
-
Click on This PC.
-
Under the “Network locations” section, double-click the drive letter assigned to the mount point to access the files.

After you complete the steps, the files and folders will be accessible.
To delete a shared folder or mapped drive from VirtualBox, use these steps:
-
Open VirtualBox.
-
Right-click the virtual machine and select the Settings option.
-
Click on Shared Folders.
-
Select the shared folder or mapped drive and click the “Remove selected shared folder” button from the top-right.

Once you complete the steps, the folder will no longer be accessible from the virtual machine.
Creating a shared folder between VirtualBox and Windows host makes sharing and transferring files quick and easy. Once created, the guest and host machines can access all the files in the VirtualBox shared folder. Whether you are sharing documents, code, or other files, a shared folder between the VM and host makes things easy.
In this quick and simple tutorial, I will show you the simplest way to create a shared folder in VirtualBox to make file sharing between your VM and Windows easy. Let’s get started.
Before You Being
- Before creating a shared folder for a particular virtual machine (VM), ensure that it is fully powered off (not running or in a saved state).
Steps to Create a Shared Folder in VirtualBox
- Press the Windows button to open the Start menu.
- Search and open “VirtualBox“.
- Right-click on a VM on the left sidebar.
- Select the “Settings” option.
- Click the “Expert” option at the top.
- Select the “Shared Folder” tab on the sidebar.
- Click the “Add” button on the right panel.
- Click the dropdown icon next to the “Folder Path” field.
- Select the “Other” option.
- Choose the folder and click the “Select Folder” button.
- Click “OK“.
- With that, you’ve added a shared folder in VirtualBox VM.
Good to know: How to share a folder in Windows 11 & 10
Detailed Steps (With Screenshots)
Open the VirtualBox application to get started. To do that, open the Start menu by pressing the Windows button on the taskbar. Next, type “VirtualBox” in the Start menu’s search bar at the top, and click the “Open” option.

Once the VirtualBox application opens, right-click on the VM for which you want to add the shared folder, and select the “Settings” option.

Click the “Expert” tab at the top, go to the “Shared Folders” tab on the sidebar, and click the “Add” button on the right panel.

Now, click the down arrow icon next to the “Folder Path” field and then click the “Other” option.

Select the folder you want to share in the selection window and click the “Select Folder” button.

Optionally, you can enter a custom name for the shared folder in the “Folder Name” field. You can also optionally select the “Read-only” checkbox to improve security. By selecting it, you can still access the files in the shared folder but cannot create or modify them. This keeps your host machine safe.
Click the “OK” button to continue.

That is it. With that, you’ve created and added a shared folder in VirtualBox VM.

To access the shared folder, start the virtual machine. To do that, select the VM on the sidebar and click the “Start” button at the top.

Note: The steps below are for Windows installed VirtualBox. If you are using some other OS, the steps to access the shared folder will be different.
Once the guest system boots, open the File Explorer, go to the “Network” tab on the sidebar, and open the “VBOXSVR” folder to see and access your shared folder.
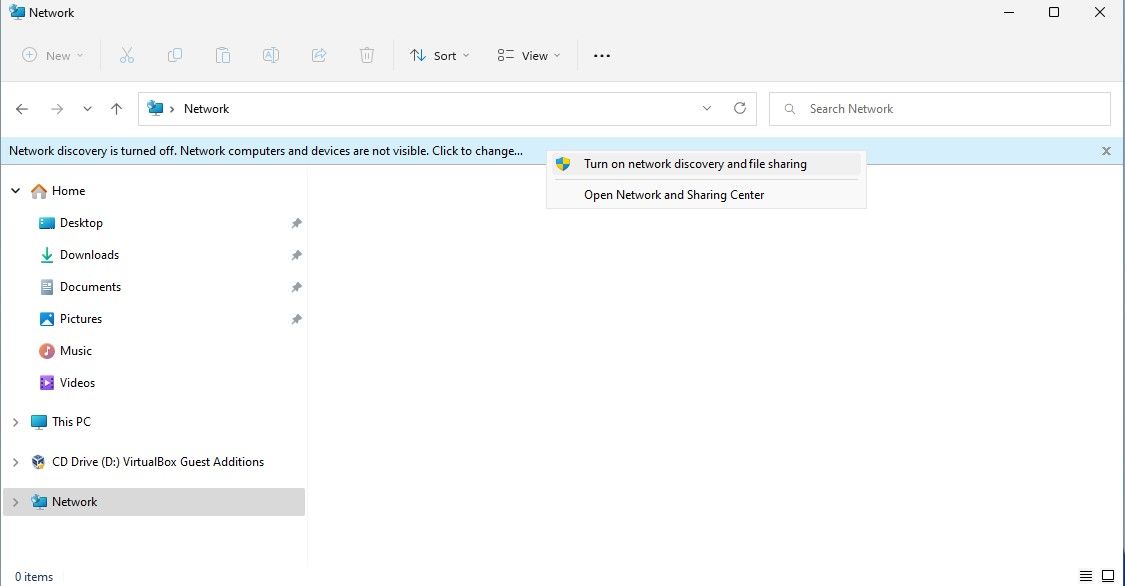
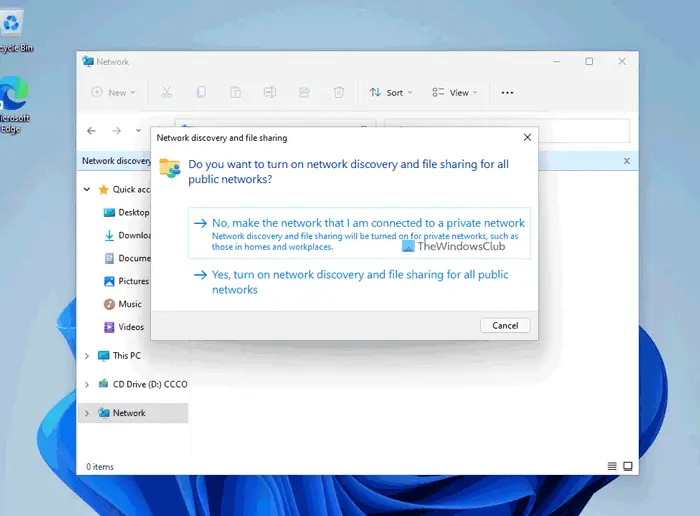
Note: Network Discovery and File Sharing should be turned on to access network shares in Windows.

In the future, if you want to modify the shared folder settings such as read-only status, name, etc., go to VM “Settings” > “Shared Folder“, select the shared folder entry, and click the “Edit” button. You can also delete it by clicking the “Delete” button under the “Edit” button.

If you have any questions or need help, comment below. I’ll be happy to assist. Also, if you are using VMware, follow these steps: How to create a shared folder in VMware.
If you’ve ever used VirtualBox, you’ll know the hassle of transferring files between the host and guest machine.
For a VM to access host files and vice versa, you’ll have to configure VirtualBox and appoint a shared folder. This folder will allow the host and guest machine access to all the files stored within this appointed shared folder.
Configuring a VirtualBox shared folder isn’t too difficult, and we’ve created a step-by-step guide to ease you through the process.
To create a shared folder in VirtualBox, you must create a folder on both the host and guest machines. Then you’ll need to install the VirtualBox Guest Additions software on your guest machine and configure the folders you just made to act as your shared folder on that specific machine.
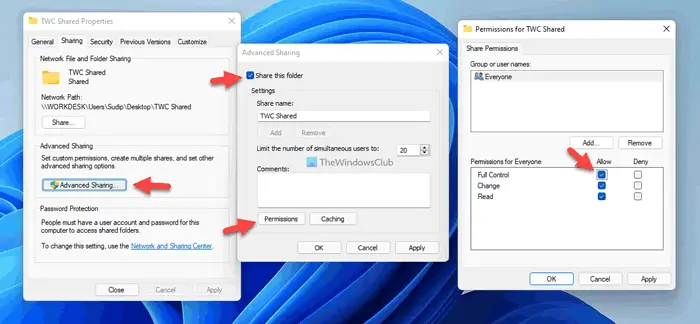
- Start by creating a folder. Once created, right-click on the folder and go to Properties > Sharing.
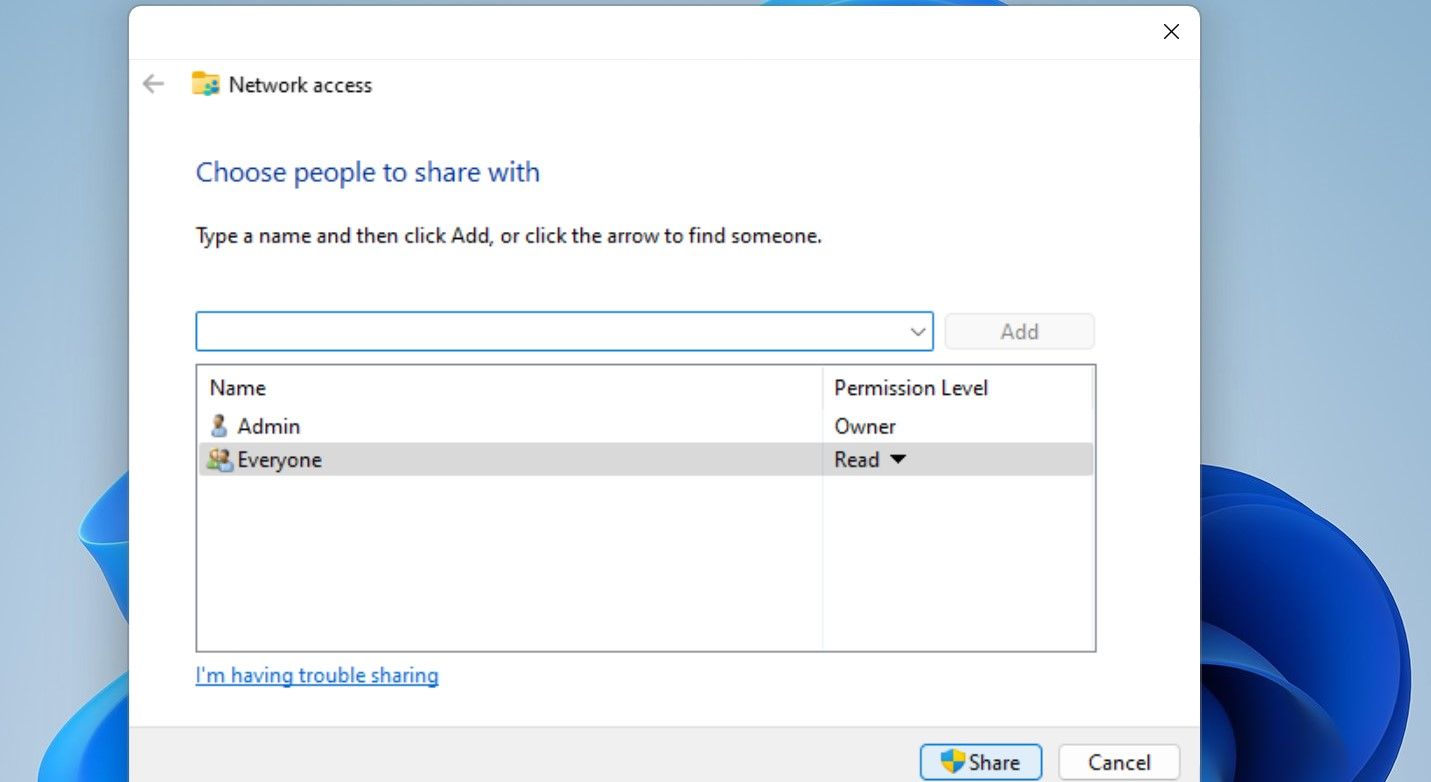
- Now click on the Share button, select Everyone, and then click on Add.
-
Once you’ve added Everyone within the network, change the permission level to Read/Write, then click Share.

- Now it’s time to configure the Windows guest machine. Go to your Windows VM, hover over Devices, and select Insert Guest Additions CD image. You may also hold CTRL + Home to reveal the menu. A prompt should pop up. Select the first option to run the VirtualBox Windows Additions software. The installation will take a bit of time. Wait for it to complete, and then reboot by hitting Finish.
-
Once the Windows VM has restarted, hover over Devices > Shared Folders, then select Shared Folders Settings. You will be shown the Shared Folders menu. This is where you will add the folder you want to assign as your shared folder with the host machine.

- To add the folder, click the add folder icon on the window’s right side. Now specify which folder you want to assign as Shared Folder through the Folder Path. Then, add a folder name and tick Auto-mount and Make Permanent.
-
Now, let’s configure the VM’s network. Open File Explorer and go to Networks. Within Networks, you will see a prompt stating that your «Network discovery is turned off.» Click the prompt and select Turn on network discovery and file sharing.

- Select Yes to turn on network discovery and file sharing.
-
After tuning on network discovery and file sharing, go to Networks and refresh. You should now see that the shared folder is available!


To create a shared folder in VirtualBox on a Linux guest machine, you’ll need to create one folder on your host machine and configure it to be viewable within your network.
-
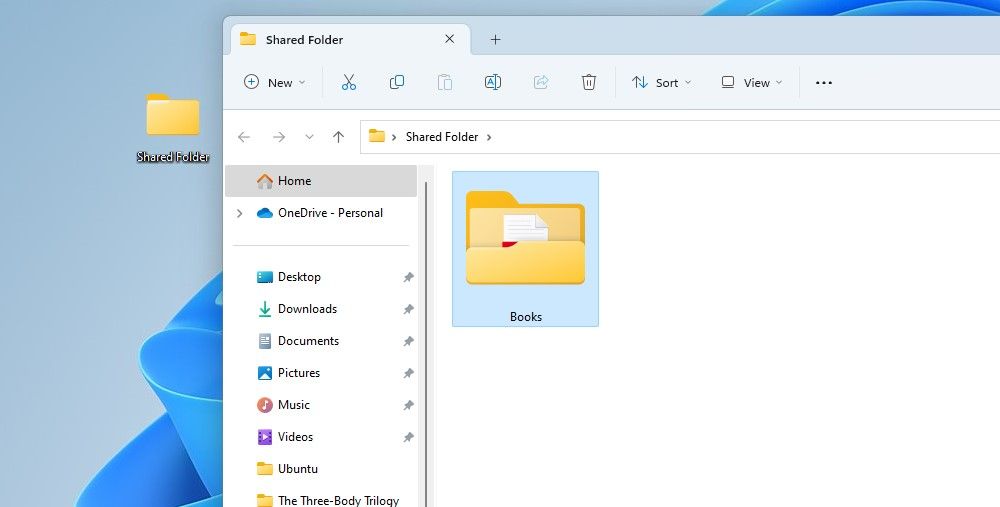
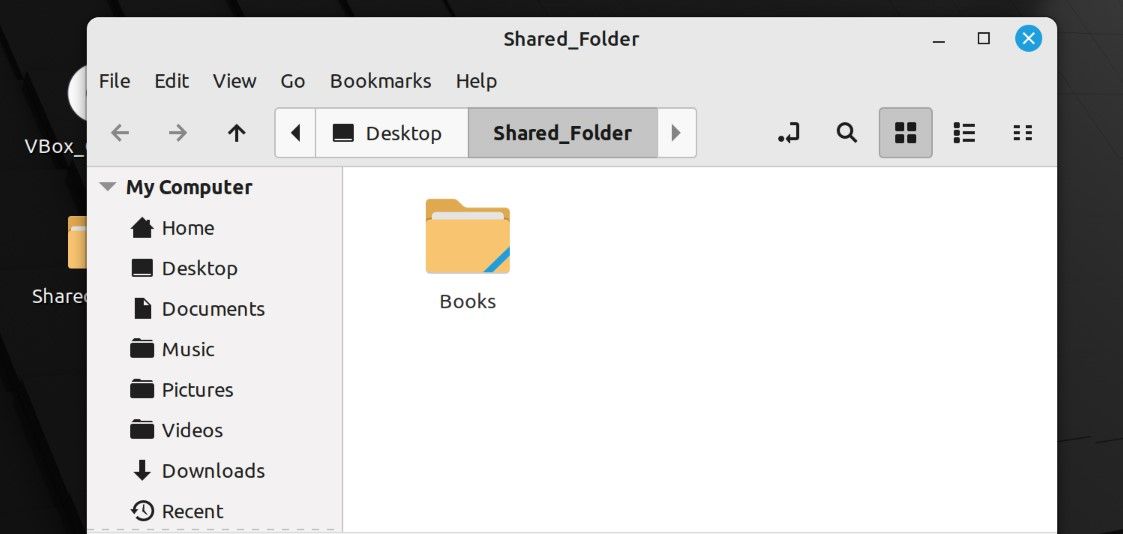
Let’s start with the host machine and create a folder named Shared Folder. To see if the files are accessible on both guest and host machines, we’ve added another folder named Books inside the folder we created.

-
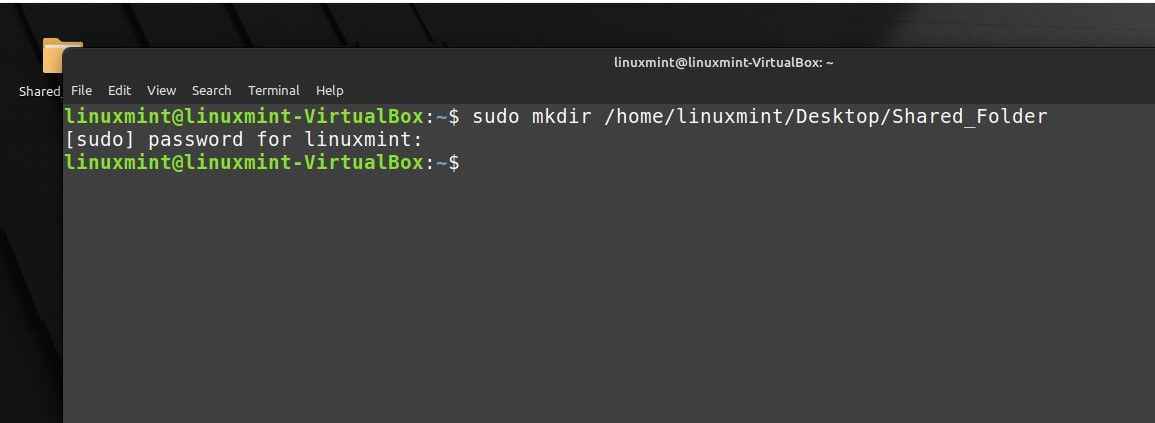
Open your Linux VM and create a folder to act as your mount point. You can either use the GUI to make one or use the following command:
sudo mkdir (Current/Directory/Folder_Name)
-
In this example, we’ve named our folder Shared_Folder and placed it on Desktop for convenient access.

- Once the folder has been created on both machines, open a terminal on your Linux machine and ensure your system has the latest Linux packages and dependencies installed to avoid any hiccups when installing the VirtualBox Guest Additions software.
-
Once the update completes, go to your guest machine and hover over Device > Insert Guest Additions CD image. If the toolbar isn’t visible, you can hold CTRL + Home to show toolbar options. Next, you should be prompted to run the Virtual Box Guest Additions software. Click Run and input your password.

-
After installing the software, go to VirtualBox and configure the guest machine by going to Settings > Shared Folders. There you click on the add folder icon located on the right side of the window and input the Folder Path, Folder Name, and Mount Point, then click OK.
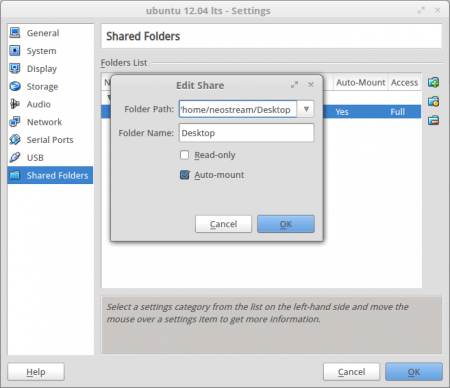
- The Folder Path should be the folder you want to appoint as the shared folder. In our case, we have selected the folder we made earlier, named Shared Folder.
- The Folder Name will be the name of the folder you will see on the guest machine.
- The Mount Point should lead to the folder you want to use as your shared folder in the guest machine. Since we made our folder in the Desktop directory, the mount point should be /home/linuxmint/Desktop/Shared_Folder.
- If you’re not sure of the specific directory where you created your folder, open the folder you made in Linux, open a terminal, and input the pwd command to print the working directory.
-
To make the shared folder a permanent feature on your guest machine, you’ll want to tick the Auto-mount and Make Permanent options. After completing the configuration, if you go back to the system configuration menu, you should see that there is one shared folder configured.

-
Now, If you go to your VM, you’ll see that there is a shared folder mounted in your home directory. If you try to open the mounted shared folder, you’ll notice that it is locked. This is because you haven’t added the user in the vboxsf group, which is the owner of the shared folders. To add the user to the group, open a terminal and use:
sudo adduser (username) vboxsf
-
After adding the user to the group, reboot your system by running:
sudo reboot
-
After the reboot, you should now be able to open and access all files within the shared files folder. If you wish, you can also eject the mounted shared folder icon and still have access to the shared folder you created earlier.

Thanks to the VirtualBox Guest Additions, creating a shared folder where your guest and host machine can share files has become incredibly convenient. It only takes a few steps to create a VirtualBox shared folder.
Download Windows Speedup Tool to fix errors and make PC run faster
If you want to create a VirtualBox shared folder in Windows 11/10, you can follow this step-by-step guide. You can access the shared folder from your Windows virtual machine and host computer to transfer files from one to another.

At times, you might need to transfer files from a virtual PC to a host computer or vice versa. In such situations, instead of using a USB drive, you can create a shared folder to get the job done.
Note: You must enable the Network discovery and file sharing on the host computer before following these steps.
To create a VirtualBox shared folder in Windows 11/10, follow these steps:
- Create a folder on the host computer.
- Right-click on it and select Properties.
- Go to the Sharing > Advanced Sharing.
- Tick the Share this folder checkbox.
- Allow Full Control for Everyone.
- Open VirtualBox > right-click on virtual machine > select Settings.
- Go to the Shared Folder section.
- Click the Adds new shared folder
- Enter the shared folder path.
- Tick the Auto-mount checkbox.
- Click the OK button.
- Open File Explorer on the virtual machine.
- Go to the Network section.
- Turn on Network discovery.
To learn more about these steps, continue reading.
First, you need to create a shared folder on the host computer. For that, you can create a folder anywhere on your host computer. Then, right-click on it, select Properties and switch to the Sharing tab. Click on the Advanced sharing button and tick the Share this folder button.
Then, click on the Permissions button and tick the Full Control checkbox.
After that, save the changes and open VirtualBox. Right-click on the virtual machine, select Settings and switch to the Shared Folders tab. Click the Adds new shared folder button and choose the shared folder path you created earlier.
Then, tick the Auto-mount checkbox and click the OK button.
Next, run the virtual machine and open File Explorer on your computer. Go to the Network section in the sidebar panel of the File Explorer and turn on Network discovery and file sharing by clicking the confirmation button.
Once done, you can find the shared folder in the File Explorer of your virtual machine. Following that, you can use it to transfer files from the virtual machine to the host computer and vice versa.
For your information, you can add multiple shared folders using the same guide. If you want to create a different shared folder for transferring different files, you can follow the same steps mentioned above to get it done.
However, if you do not want to continue using the shared folder, you have two options to disable it. First, you can remove the original shared folder you created on your host computer. Second, you can open the virtual machine setting > go to the Shared Folders, where it contains all the shared folders. Following that, choose the shared folder you want to remove and click on the remove button.
How do I create a shared folder in virtual machine?
To create a shared folder in virtual machine using VMware, you need to follow this guide. However, if you want to create a shared folder on VirtualBox virtual machine, you can follow the aforementioned steps. Here we have shown the exact guide you need to follow to get things done.
Where is the shared folder in VirtualBox?
Like any other virtual machine software, you need to create a shared folder manually in VirtualBox. However, if you are looking for the corresponding option, you need to right-click on the virtual machine and select Settings. Then, switch to the Shared folders tab to find the setting you are trying to use.
That’s all! Hope this guide helped you.
Read: How to share Files and Folders over a Network in Windows.
When he is not writing about Microsoft Windows or Office, Sudip likes to work with Photoshop. He has managed the front end and back end of many websites over the years. He is currently pursuing his Bachelor’s degree.