
Virtual smart cards offer businesses the same benefits as physical smart cards at a lower cost. You can create your virtual smart card in many ways. They provide an additional layer of security for online transactions and can be used in place of physical smart cards in certain situations. This article will explore how to use Virtual Smart Cards in Windows 10.
What is Virtual Smart Card?
Virtual Smart Card is Microsoft‘s Trusted Platform Module (TPM)-based solution. It is designed to protect hardware by generating encryption keys and storing part of the key information in the TPM. It provides certificates against Active Directory to authenticate devices and users.
Virtual smart cards work similarly to most traditional smart cards but are more efficient. Traditional smart cards use encryption or chips. A virtual smart card stores the key information directly in the device. It enables two-factor authentication (2FA) on the user’s device without additional hardware. Virtual smart cards can protect a company’s IT systems from external threats. These external threats include hacker attacks or unauthorized access from other external devices.
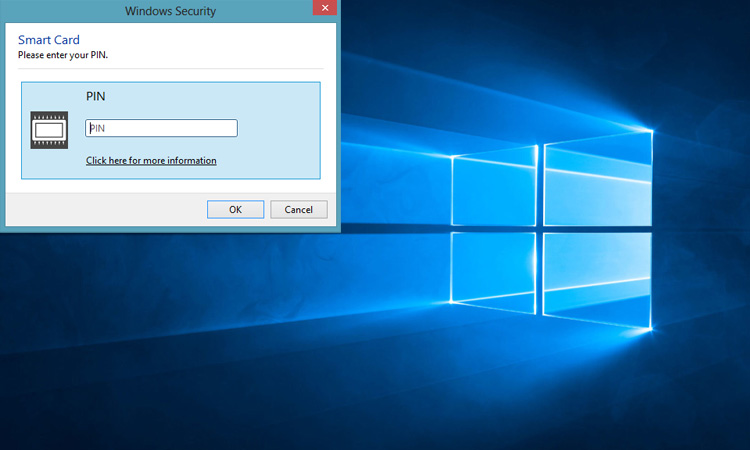
After configuring the virtual smart card, you can enter the correct PIN on the device to log in properly. It will always appear as an inserted smart card in Windows. The operating system provides the virtual smart reader and virtual smart card to the application when you need to use it. The application has the same interface as a physical smart card. So you can log in to a given system more quickly.
The virtual smart card is virtual, so it costs less to use it. You can save on the cost of purchasing additional smart card hardware.
The following types of smart cards are available for virtual smart card functionality.
- Universal ISO – 7816 smart cards
- German electronic ID cards (NPA) with EAC support (PACE, TA, CA)
- BAC-enabled ePassport (ePass/MRTD)
- Cryptoflex smart cards
How Do I Use Virtual Smart Cards in Windows 10?
The virtual smart card is available for devices equipped with TPM (version 1.2 or 2.0) that have been added to Windows 10. Also, having an accessible KPI infrastructure working environment is crucial. For example, the more common Microsoft Certificate Services.
Next, we divided the whole process into three steps:
- Create a certificate template (that meets the requirements for virtual smart card registration)
- Creating a virtual smart card (supported by TPM)
- Registering a TPM virtual smart card certificate
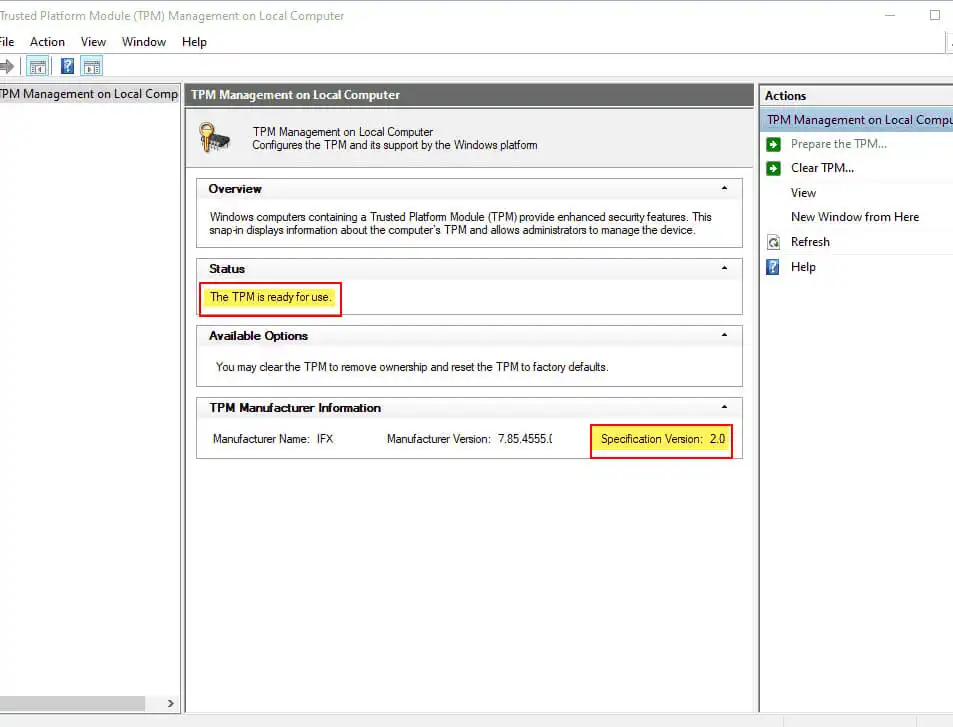
In addition, you will need to verify that your device has TPM installed. You can run tpm. msc to try this.
Creating a Certificate Template
The first step we need to take is to create a certificate template that matches the requirements of the virtual smart card. Let’s do the following using Microsoft Certificate Services as an example of a PKI infrastructure in a Windows domain.
- Open the Microsoft Management Console (MMC).
- Click on File and click on Add/Remove Management Units.
- Click on Certificate Templates in the list of available management units
- Click Add File.
- Double-click to view all certificate templates located in the root directory of the MMC console.
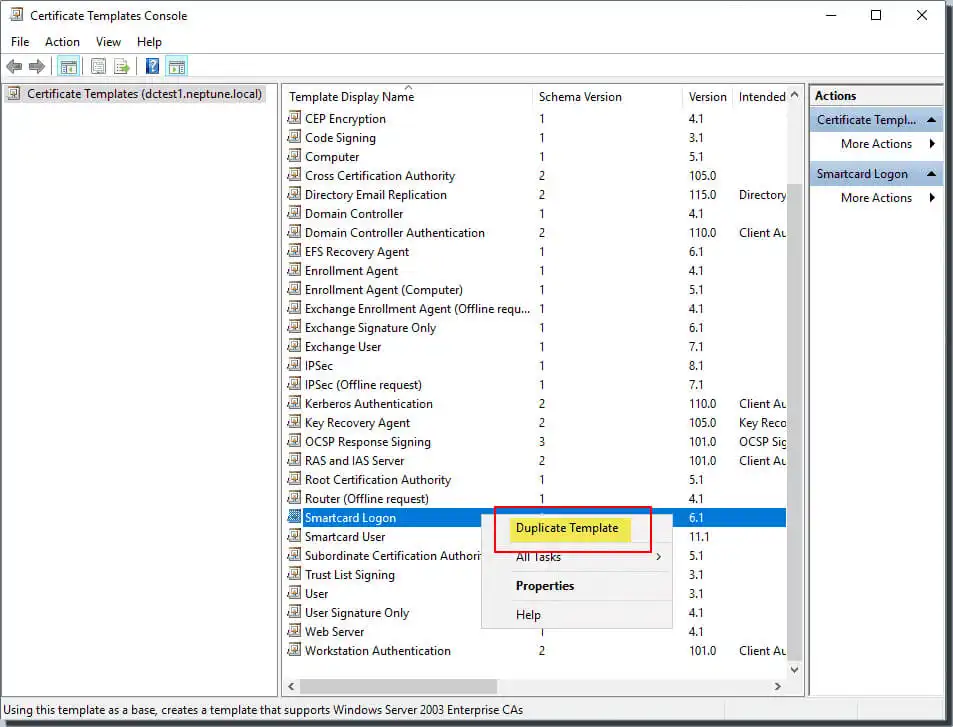
- Right-click on the smart card login template.
- Click Copy Template.
View the Certification Authority on the Compatibility tab and change it as required.
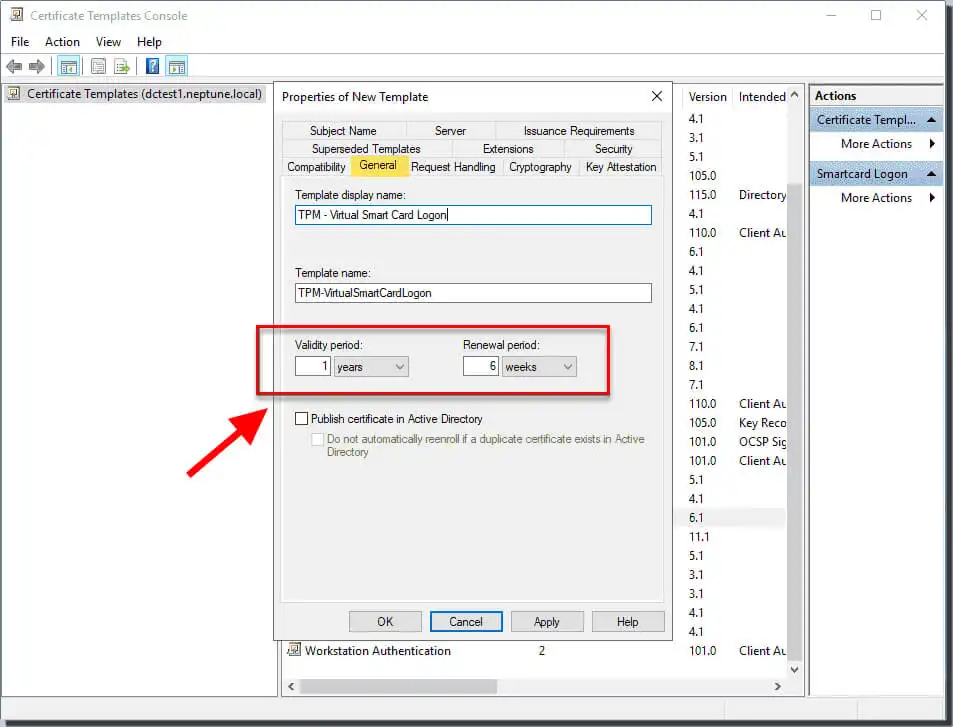
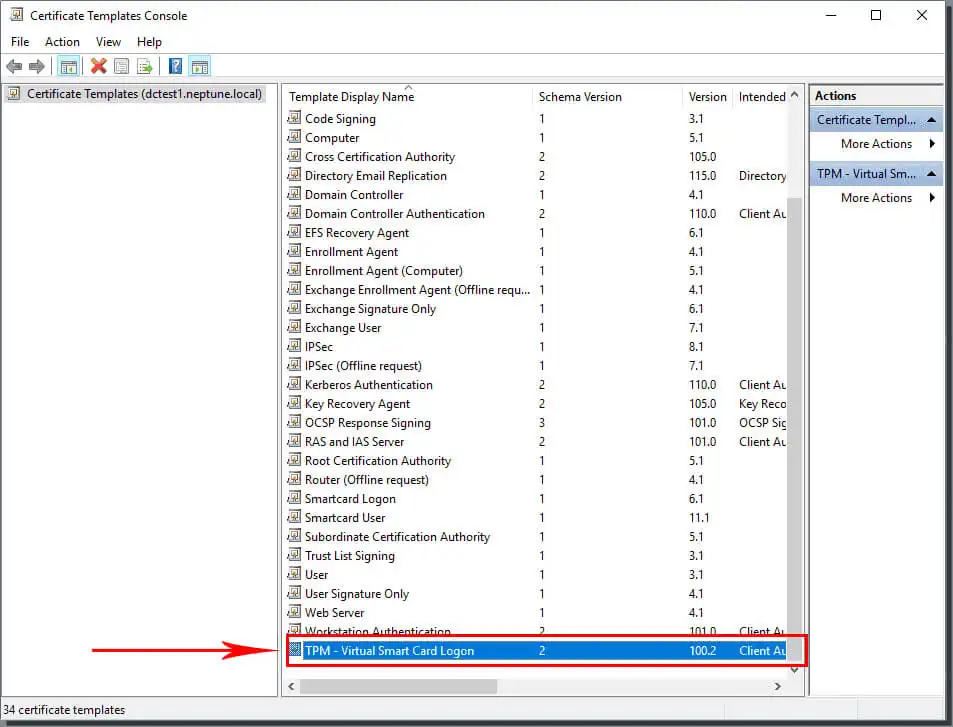
Specify the name on the General tab and set the valid value to the desired value. Specify a name for the TPM Virtual Smart Card Logon.
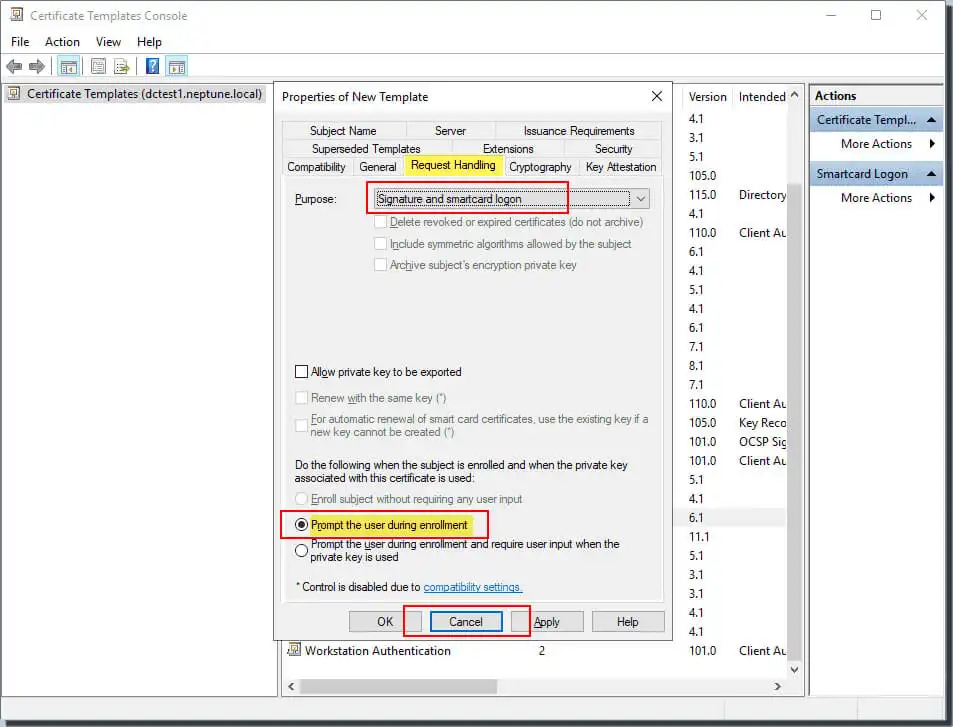
On the Request tab, set Usage to Signature and smartcard logon. Then click Prompt user on registration.
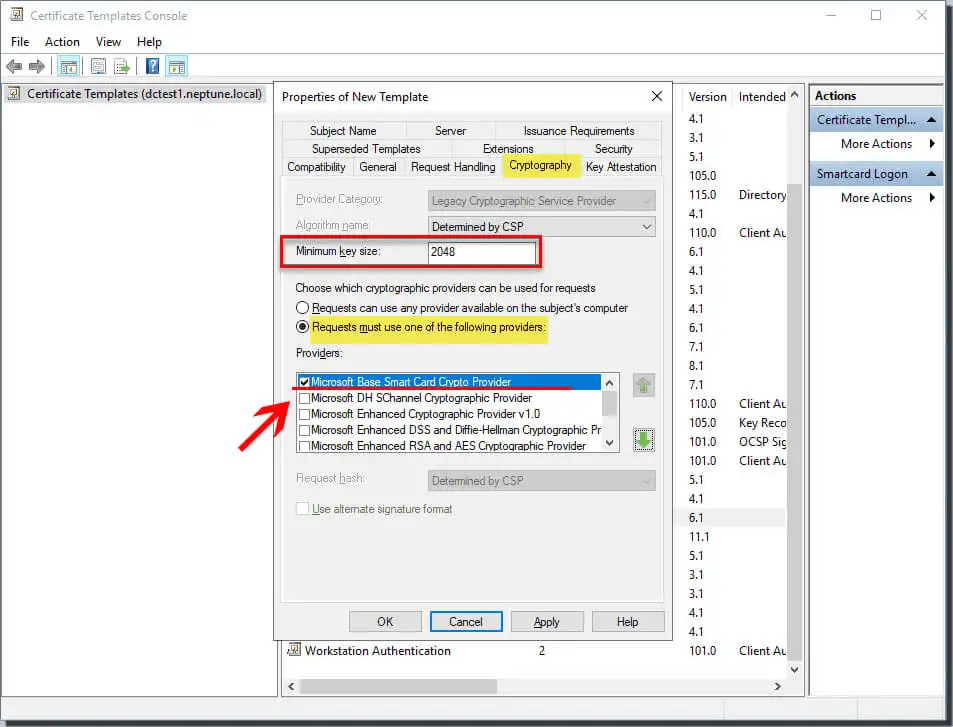
On the Cryptography tab, set the Minimum key size to 2048. select Requests must use one of the following providers. Select Microsoft Base Smart Card Crypto Provider.
Add the security group to which you want to grant registration access. This selection is visible on the Security tab.

Click Confirm to complete the changes to create a new template. At this time, your new template will appear in the list of certificate templates.
Select File and click Add/Remove Snap-in. to add the Certification Authority management unit to your MMC console. Then select the computer the system asks to manage as the computer where the CA is located.
Next, expand Certification Authority (Local) in the left pane of the MMC. You can then expand your CA in the Certification Authority list.
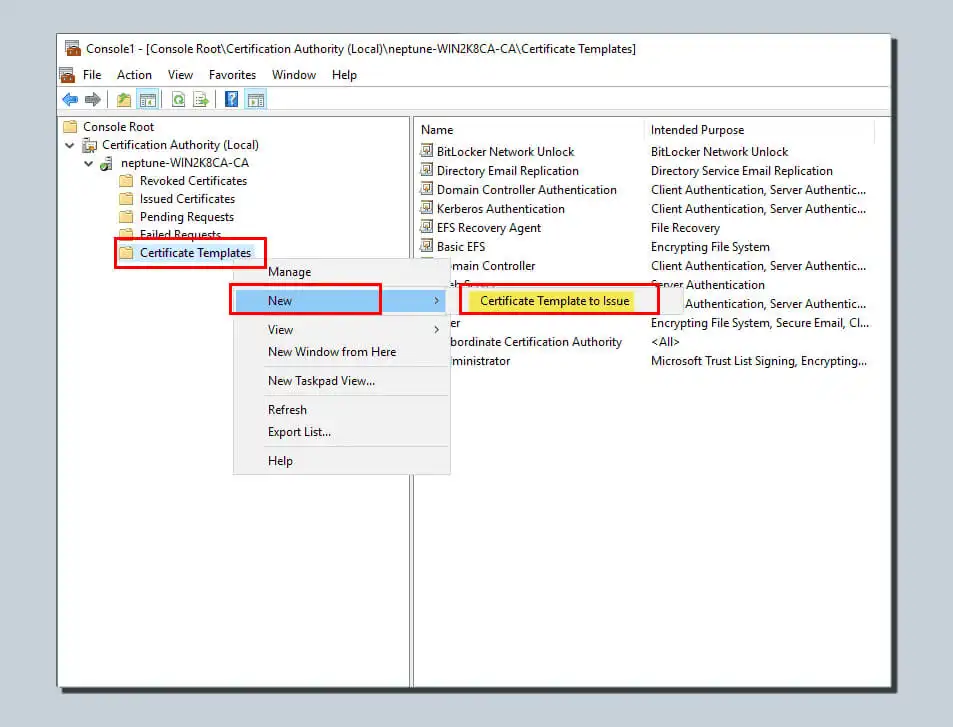
Right-click on the certificate template. Then click on New and click on the certificate template you want to issue.
Then, you will need to select the new template you just created from the list and click Confirm.
Stop and start the certificate service on the CA before proceeding. It is done by going back to the MMC after the template has been copied successfully. Right-click on the list of Certificate Scheme Authorities. Select All Tasks and click Stop Services. Right-click on the CA’s name again. Click All Tasks and then click Start Service.

You can grant access to all users when you add a security group. You need to click to select the authenticated user groups. Then just register permissions for them. You must know that your newly created template may take some time to replicate on all your servers. You can use it in this list only after successfully replicated.
Creating a TPM Virtual Smart Card
In this step, you will use the command-line tool Tpmvscmgr.exe. It ensures that you can successfully create virtual smart cards on client computers. It is done as follows:
- Open the command prompt and switch on the joined computer using the administrative credentials.
- Type and run this command at the command prompt:
tpmvscmgr.exe create /name TestVSC /pin default /admin key random /generateIt will then create a virtual smart card. This virtual smart card will allow you to omit the unlock key and generate the file system on the card.
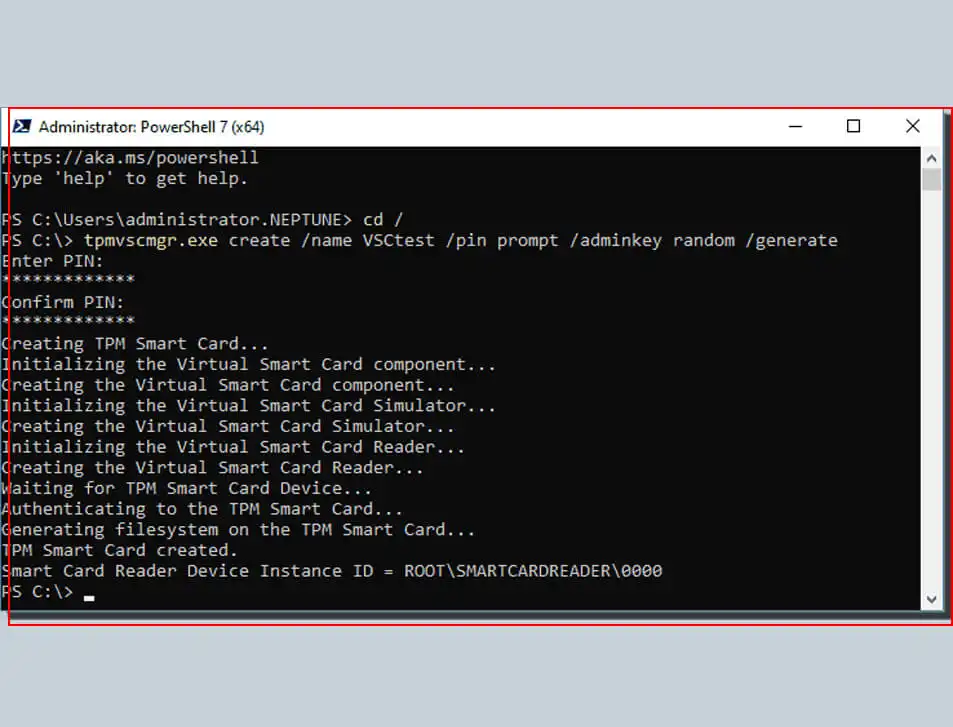
Wait a few seconds for the process to complete. tpmvscmgr.exe will provide you with the device instance ID of the TPM virtual smart card when it is done. This ID will help you manage or delete all your virtual smart cards.
Note that you must set the PIN default when running the above command. You need to type /pin default instead of /pin default when prompted to enter the PIN.
Registering the TPM Virtual Smart Card Certificate
After doing this, you will also need to equip it with the login credentials needed to complete the process. It will only be fully functional if you have the appropriate login credentials.
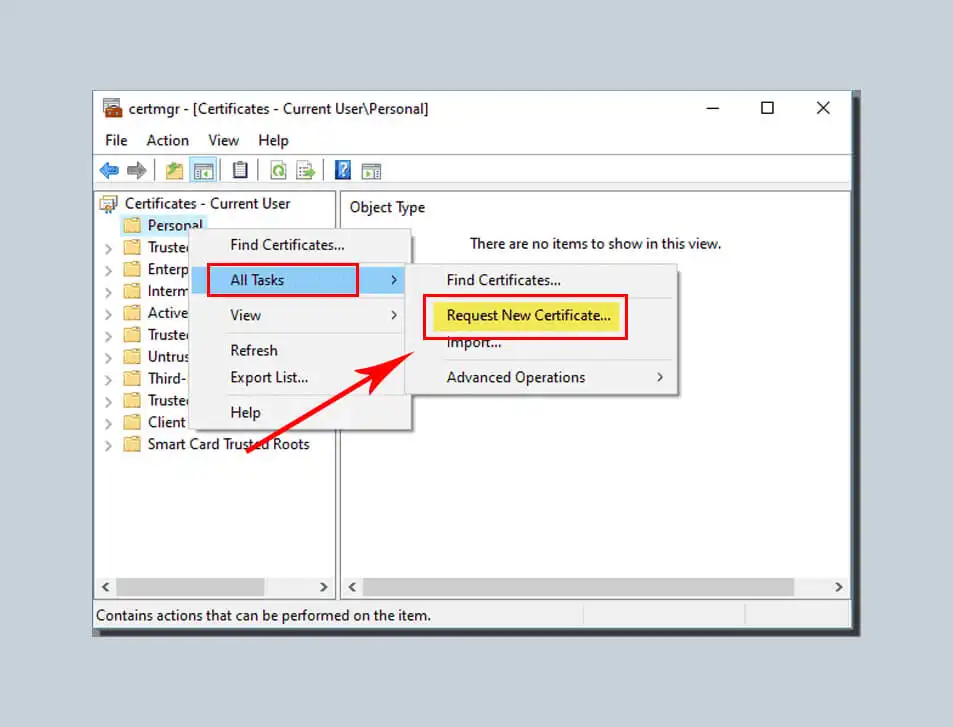
- Type certmgr.MSC in the Start menu on the Windows 10 client. This command will help you to open the Certificate Console quickly.
- Then right-click on the certificate manager for your storage. Right-click on the individual, select All Tasks and choose to Apply for New Certificate.
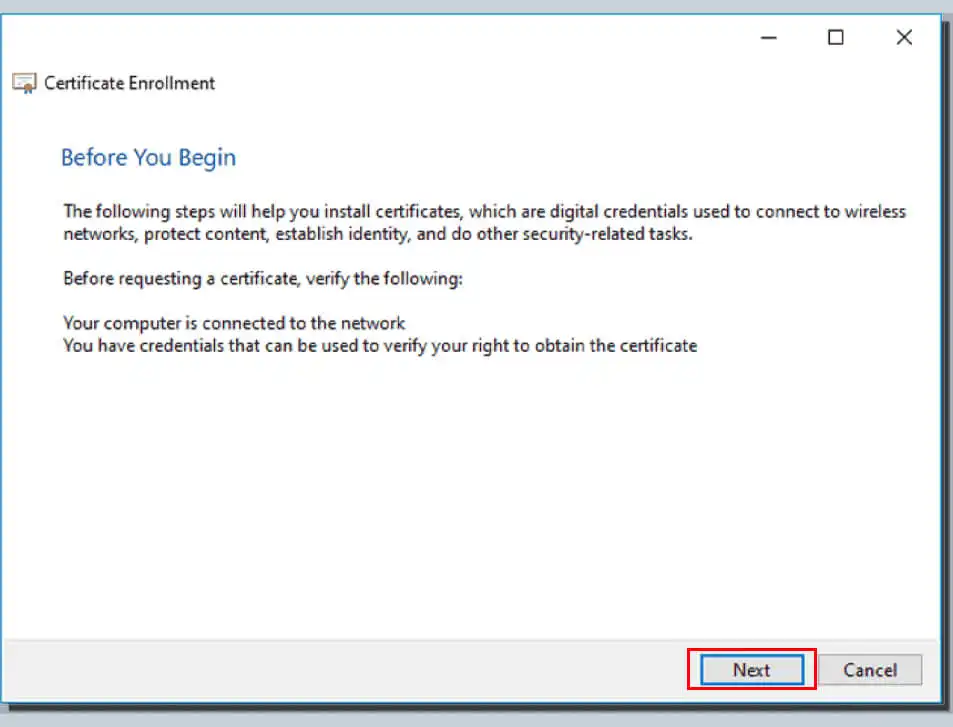
This step will help you start the Certificate Enrollment Wizard. Then, we click “Next“
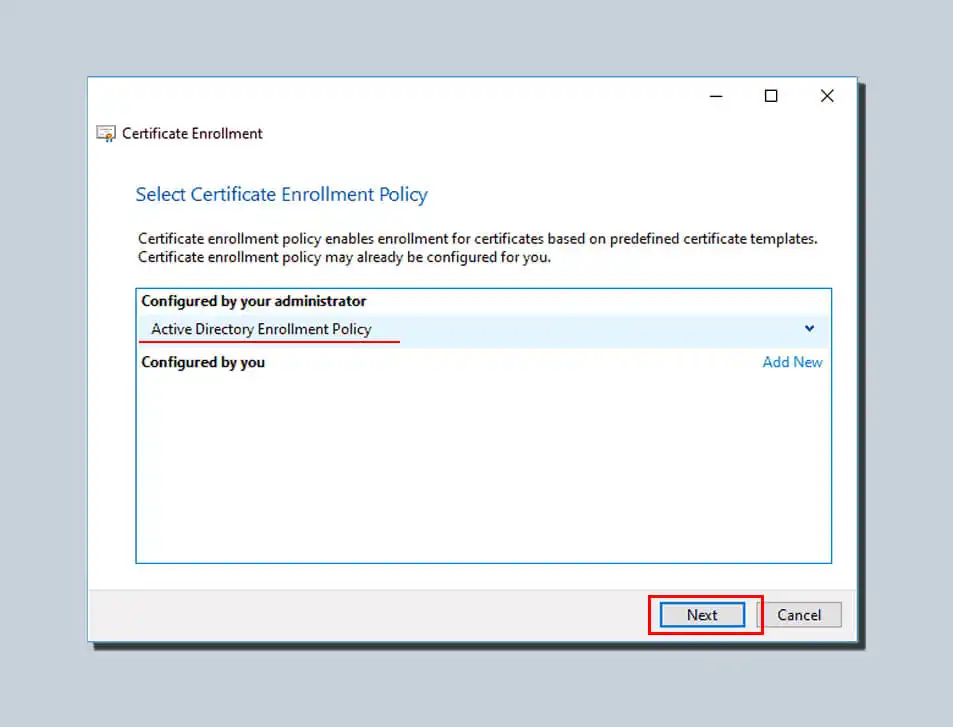
Then click Next. Continue to click Next on the Select Certificate Enrollment Policy display screen.
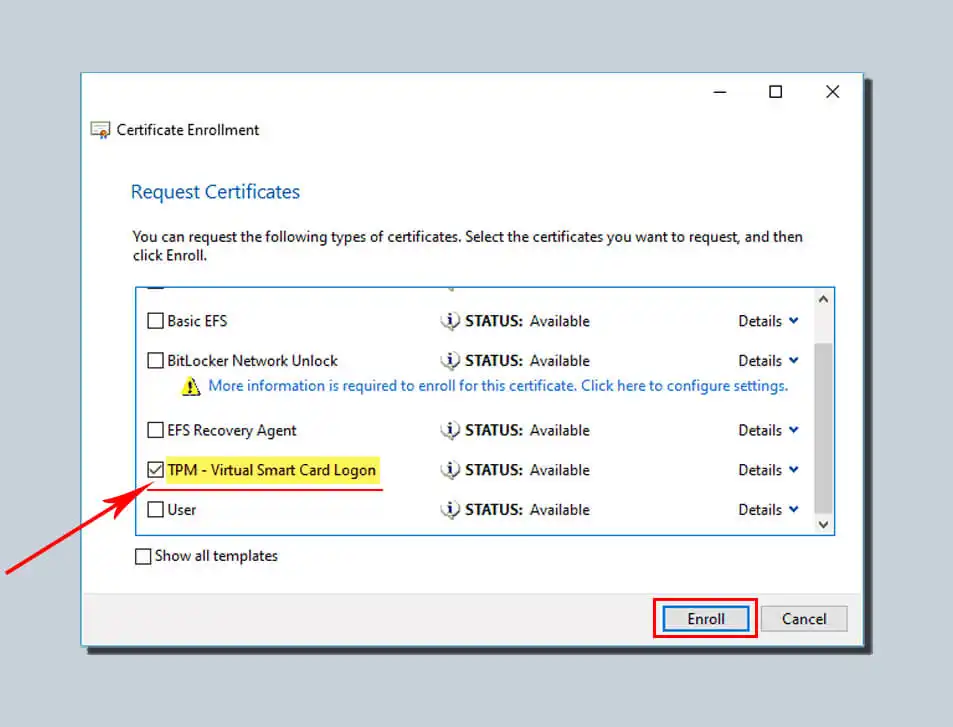
Select the name of the certificate template you created in the previous step. Then click Enroll.
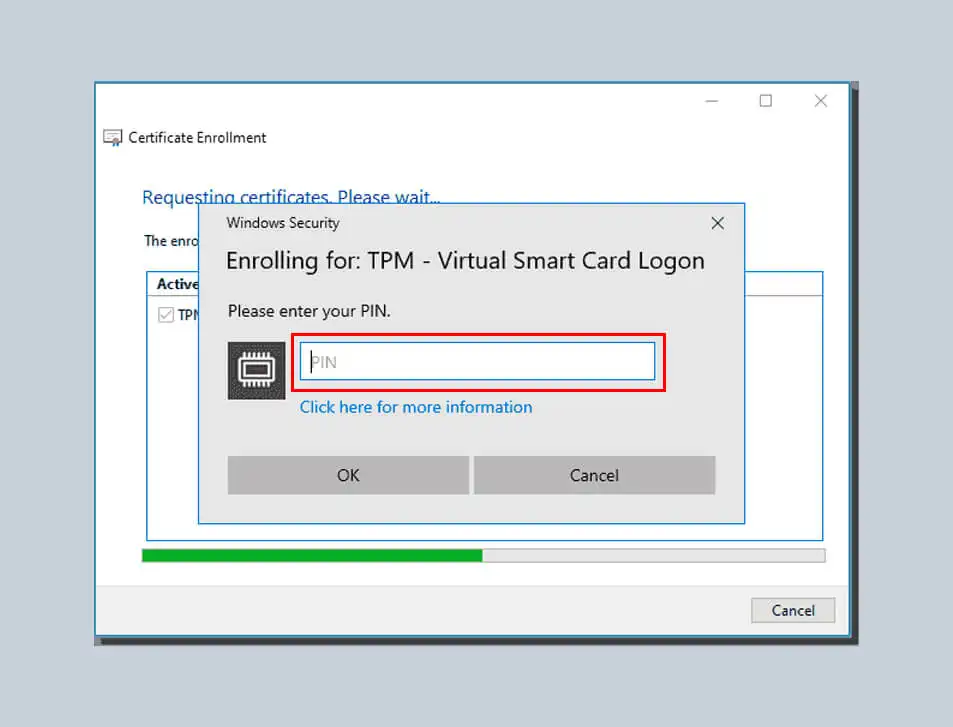
Next, enter the PIN password you created when creating the TPM virtual smart card and click OK.
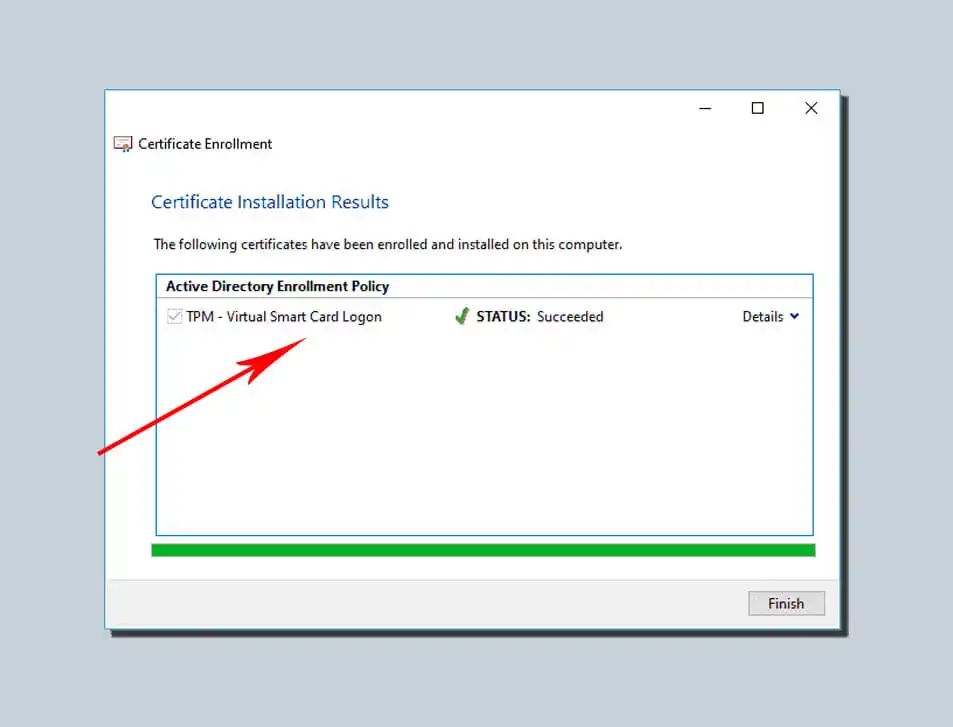
Wait for the previous registration to complete, and then click Finish.
The prompt to enter the device appears in the Register TPM Virtual Smart Card certificate session above. Then, you must select the corresponding Microsoft Virtual Smart Card you used in the previous steps. It is usually shown as the identity device, i.e., the Microsoft profile.
Once all the above processes are finished, the installation of the virtual smart card windows 10 is complete. Your computer has a new option to log in as a secure device.
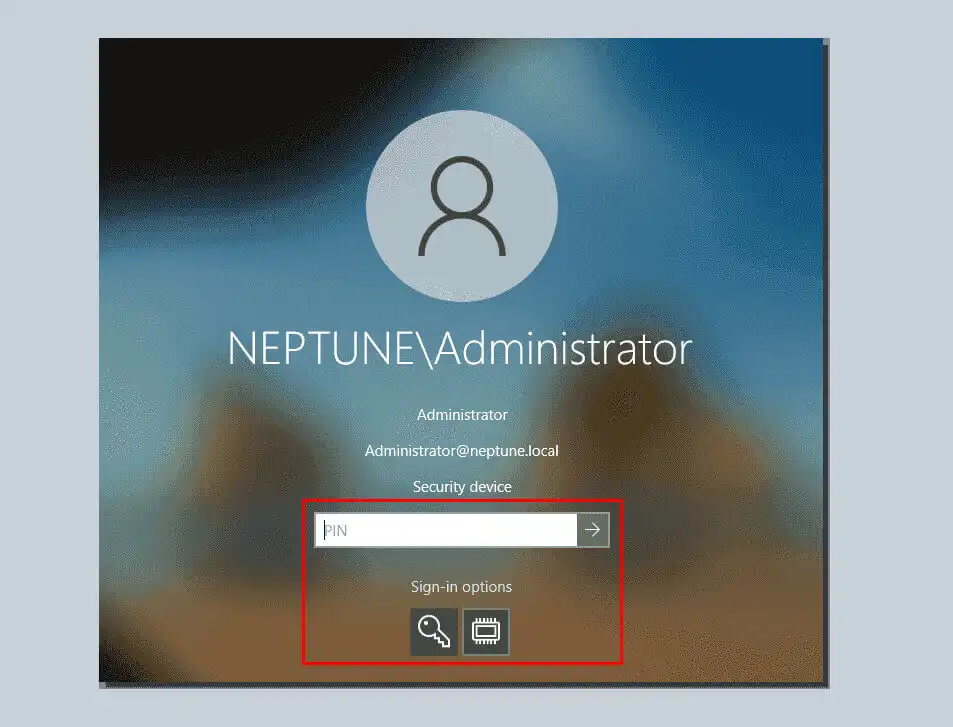
Suppose you want to verify that your virtual smart card is equipped and that the certificate registration was successful. You can log out of the current session and log in again. You can see a new TPM Virtual Smart Card icon on the desktop login screen. You will be redirected to the TPM Smart Card login dialog if the previous action fails.
Click on this new smart card icon displayed on the login screen. Then enter your PIN password. Click OK again, and you will quickly log into your domain account.
Using Virtual Smart Cards with Remote Desktop
You can use virtual smart cards with Remote Desktop to provide an additional layer of security when accessing remote computers. To use a virtual smart card with Remote Desktop, you will need a smart card reader and a virtual smart card with a digital certificate installed. Follow these steps to use a virtual smart card with Remote Desktop:
- Open the Remote Desktop Connection on your computer.
- Click the “Options” button.
- Click the “Local Resources” tab.
- Click the “More” button.
- Click the “Smart Card” checkbox.
- Click the “OK” button.
- Enter the remote computer’s information and click the “Connect” button.
- Insert your smart card reader and use the Virtual Smart Card to authenticate yourself when prompted.
Using Virtual Smart Cards with Microsoft Passport
Microsoft Passport is a feature in Windows 10 that allows you to use a Virtual Smart Card or a biometric authentication method (such as fingerprint or facial recognition) to log in to your computer or access certain resources. To use a Virtual Smart Card with Microsoft Passport, you will need a smart card reader and a Virtual Smart Card with a digital certificate installed. Follow these steps to use a Virtual Smart Card with Microsoft Passport:
- Open the Settings app on your computer.
- Click the “Accounts” tab.
- Click the “Sign-in options” tab.
- Click the “Windows Hello PIN” tab.
- Click the “Set up” button.
- Follow the prompts to set up Microsoft Passport. This may include creating a PIN and setting up a recovery key.
- Insert your smart card reader and use the Virtual Smart Card to authenticate yourself when prompted.
Using Virtual Smart Cards with Other Applications
In addition to the above uses, you can use Virtual Smart Cards with other applications supporting smart card authentication. Check the documentation for the application in question to see if it supports smart card authentication and follow the instructions to use a Virtual Smart Card with the application.
Where can I Use My Virtual Smart Card?
The virtual smart card is used in some places where it is important. You can use it to authenticate users to external resources. You can also use it to protect data through secure encryption. Many businesses also use it to provide reliable signatures for their integrity. You can easily deploy virtual smart card authentication in-house or by purchasing a solution. It is an extremely strong authentication method and is suitable for any size of business. The following are three common virtual smart card applications in life.
Authentication-based Use Cases
- Remote Access Via Two-factor Authentication
- Client-side Authentication
- Virtual Smart Card Redirection for Remote Desktop Connection
- Virtual Smart Cards with Windows To Go
Confidentiality Use Cases
- S/MIME email encryption
- BitLocker for Data Volumes
Data Integrity Use Case
- Signed Data
A virtual smart card is arguably a stronger version of a physical smart card. It makes authentication much easier. It is also well-suited to our various authentication needs. Examples include wireless networks, desktop logins, and VPN services.
More About Virtual Smart Card FAQs
-
What is a virtual smart card, and how does it differ from a physical smart card?
A virtual smart card is a software-based implementation of a smart card. This can be used for secure authentication and access control. Unlike a physical smart card, which is a physical device with a chip embedded in it, a virtual smart card uses the cryptographic capabilities of the host device (such as a computer or a mobile phone) to provide the same level of security.
-
What are the benefits of using virtual smart cards instead of physical smart cards?
Virtual smart cards have several advantages over physical smart cards, such as being easier to manage, deploy, and update. This is because they do not require physical distribution. Virtual smart cards are also more cost-effective, as they do not require purchasing and maintaining physical devices.
-
What security measures are in place to protect virtual smart cards from unauthorized access or theft?
Virtual smart cards use various security measures to protect against unauthorized access or theft, such as a PIN or password protection, encryption of sensitive data, and access control policies. Additionally, virtual smart cards are designed to be tamper-resistant, so any attempts to modify or access them without proper authorization will trigger alerts or disable the card.
-
How do virtual smart cards work with different operating systems and applications?
Virtual smart cards are compatible with various operating systems and applications. This is because they use standardized interfaces and protocols for communication. These interfaces and protocols allow virtual smart cards to work seamlessly with different applications that support smart card authentication.
-
Can virtual smart cards be used for secure remote authentication, and if so, how?
Yes, virtual smart cards can be used for secure remote authentication. Virtual smart cards can authenticate users remotely using cryptographic protocols such as TLS, VPN, or Remote Desktop Protocol (RDP).
-
What are some common use cases for virtual smart cards, and how are they deployed in different industries?
Virtual smart cards are used in various industries and applications, such as government agencies, financial institutions, healthcare, and e-commerce. They are used for secure access control, data protection, and identity verification.
-
How do virtual smart cards fit into the broader digital identity and authentication technologies landscape?
Virtual smart cards are a part of the broader landscape of digital identity and authentication technologies. This includes biometric authentication, multi-factor authentication, and digital certificates. Virtual smart cards provide an additional layer of security and flexibility to these technologies, as they can be used across different devices and applications.
-
What is the process for provisioning and managing virtual smart cards, and who is responsible?
The process for provisioning and managing virtual smart cards can vary depending on the specific implementation and the industry in which they are used. Typically, the IT department or a designated security team is responsible for provisioning and managing virtual smart cards.
Provide feedback
Saved searches
Use saved searches to filter your results more quickly
Sign up
Appearance settings
Для генерации code signing сертификата (генерации пары ключей, public и private) мне нужна smart card, работающая через Microsoft Base Smart card Crypto provider (которой нет, и хочется избежать покупки).
Хочется использовать виртуальную карту, но у компьютера нет TPM (trusted platform module), в BIOS (материнка от BIOSTAR) тоже нет таких настроек.
Вопрос: порекомендуйте программное решение (желательно бесплатное), работающее с Windows 10 Enterprise.
-
Вопрос задан
-
649 просмотров
This post has been republished via RSS; it originally appeared at: Ask the Directory Services Team articles.
First published on TechNet on May 11, 2016
Hello Everyone, my name is
Raghav
and I’m a Technical Advisor for one of the Microsoft Active Directory support teams. This is my first blog and today I’ll share with you how to configure a Hyper-V environment in order to enable virtual smart card logon to VM guests by leveraging a new Windows 10 feature:
virtual Trusted Platform Module (TPM).
Here’s a quick overview of the terminology discussed in this post:
- Smart cards are physical authentication devices, which improve on the concept of a password by requiring that users actually have their smart card device with them to access the system, in addition to knowing the PIN, which provides access to the smart card.
-
Virtual smart cards (VSCs) emulate the functionality of traditional smart cards, but instead of requiring the purchase of additional hardware, they utilize technology that users already own and are more likely to have with them at all times. Theoretically, any device that can provide the three key properties of smart cards (non-exportability, isolated cryptography, and anti-hammering) can be commissioned as a VSC, though the Microsoft virtual smart card platform is currently limited to the use of the Trusted Platform Module (TPM) chip onboard most modern computers. This blog will mostly concern TPM virtual smart cards.
For more information, readUnderstanding and Evaluating Virtual Smart Cards
.
-
Trusted Platform Module — (As Christopher Delay explains in his
blog
) TPM is a cryptographic device that is attached at the chip level to a PC, Laptop, Tablet, or Mobile Phone. The TPM securely stores measurements of various states of the computer, OS, and applications. These measurements are used to ensure the integrity of the system and software running on that system. The TPM can also be used to generate and store cryptographic keys. Additionally, cryptographic operations using these keys take place on the TPM preventing the private keys of certificates from being accessed outside the TPM.
-
Virtualization-based security – The following Information is taken directly from
https://technet.microsoft.com/en-us/itpro/windows/keep-secure/windows-10-security-guide
- One of the most powerful changes to Windows 10 is virtual-based security. Virtual-based security (VBS) takes advantage of advances in PC virtualization to change the game when it comes to protecting system components from compromise. VBS is able to isolate some of the most sensitive security components of Windows 10. These security components aren’t just isolated through application programming interface (API) restrictions or a middle-layer: They actually run in a different virtual environment and are isolated from the Windows 10 operating system itself.
- VBS and the isolation it provides is accomplished through the novel use of the Hyper V hypervisor. In this case, instead of running other operating systems on top of the hypervisor as virtual guests, the hypervisor supports running the VBS environment in parallel with Windows and enforces a tightly limited set of interactions and access between the environments. Think of the VBS environment as a miniature operating system: It has its own kernel and processes. Unlike Windows, however, the VBS environment runs a micro-kernel and only two processes called trustlets
-
Local Security Authority (LSA)
enforces Windows authentication and authorization policies. LSA is a well-known security component that has been part of Windows since 1993. Sensitive portions of LSA are isolated within the VBS environment and are protected by a new feature called Credential Guard. -
Hypervisor-enforced code integrity verifies the integrity of kernel-mode code prior to execution. This is a part of the
Device Guard
feature.
VBS provides two major improvements in Windows 10 security: a new trust boundary between key Windows system components and a secure execution environment within which they run. A trust boundary between key Windows system components is enabled though the VBS environment’s use of platform virtualization to isolate the VBS environment from the Windows operating system. Running the VBS environment and Windows operating system as guests on top of Hyper-V and the processor’s virtualization extensions inherently prevents the guests from interacting with each other outside the limited and highly structured communication channels between the trustlets within the VBS environment and Windows operating system.VBS acts as a secure execution environment because the architecture inherently prevents processes that run within the Windows environment – even those that have full system privileges – from accessing the kernel, trustlets, or any allocated memory within the VBS environment. In addition, the VBS environment uses TPM 2.0 to protect any data that is persisted to disk. Similarly, a user who has access to the physical disk is unable to access the data in an unencrypted form.
VBS requires a system that includes:
- Windows 10 Enterprise Edition
- A-64-bit processor
- UEFI with Secure Boot
- Second-Level Address Translation (SLAT) technologies (for example, Intel Extended Page Tables [EPT], AMD Rapid Virtualization Indexing [RVI])
- Virtualization extensions (for example, Intel VT-x, AMD RVI)
- I/O memory management unit (IOMMU) chipset virtualization (Intel VT-d or AMD-Vi)
- TPM 2.0
Note
:
TPM 1.2 and 2.0 provides protection for encryption keys that are stored in the firmware. TPM 1.2 is not supported on Windows 10 RTM (Build 10240); however, it is supported in Windows 10, Version 1511 (Build 10586) and later.
Among other functions, Windows 10 uses the TPM to protect the encryption keys for BitLocker volumes, virtual smart cards, certificates, and the many other keys that the TPM is used to generate. Windows 10 also uses the TPM to securely record and protect integrity-related measurements of select hardware.
Now that we have the terminology clarified, let’s talk about how to set this up.
Setting up Virtual TPMFirst we will ensure we meet the basic requirements on the Hyper-V host. On the Hyper-V host, launch
msinfo32
and confirm the following values:
The
BIOS Mode
should state “UEFI”.
Secure Boot State
should be On.
Next, we will enable VBS on the Hyper-V host.
-
Open up the Local Group Policy Editor by running
gpedit.msc
. -
Navigate to the following settings:
Computer Configuration, Administrative Templates, System, Device Guard
. Double-click
Turn On Virtualization Based Security
. Set the policy to
Enabled
, click
OK
,
Now we will enable
Isolated User Mode
on the Hyper-V host.1. To do that, go to run type
appwiz.cpl
on the left pane find Turn Windows Features on or off.
Check Isolated User Mode, click OK, and then reboot when prompted.
This completes the initial steps needed for the Hyper-V host.
Now we will enable support for virtual TPM on your Hyper-V VM guest.
Note: Support for Virtual TPM is only included in Generation 2 VMs running Windows 10.
To enable this on your Windows 10 generation 2 VM. Open up the VM settings and review the configuration under the Hardware, Security section.
Enable Secure Boot
and Enable Trusted Platform Module should both be selected.
That completes the Virtual TPM part of the configuration. We will now work on working on virtual Smart Card configuration.
Setting up Virtual Smart Card
In the next section, we create a certificate template so that we can request a certificate that has the required parameters needed for Virtual Smart Card logon.These steps are adapted from the following TechNet article:
https://technet.microsoft.com/en-us/library/dn579260.aspx
Prerequisites and Configuration for Certificate Authority (CA) and domain controllers
- Active Directory Domain Services
-
Domain controllers must be configured with a domain controller certificate to authenticate smartcard users. The following article covers Guidelines for enabling smart card logon:
http://support.microsoft.com/kb/281245
-
An Enterprise Certification Authority running on Windows Server 2012 or Windows Server 2012 R2. Again, Chris’s
blog
covers neatly on how to setup a PKI environment.
- Active Directory must have the issuing CA in the NTAuth store to authenticate users to active directory.
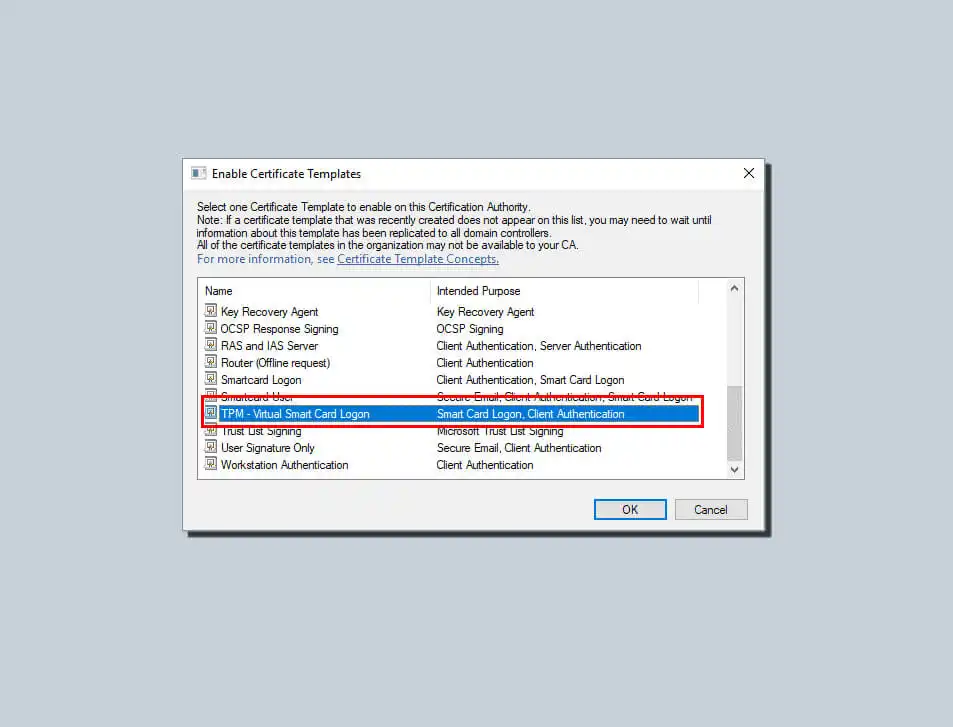
Create the certificate template
1. On the CA console (certsrv.msc) right click on Certificate Template and select Manage
2. Right-click the Smartcard Logon template and then click Duplicate Template
3. On the Compatibility tab, set the compatibility settings as below
4. On the
Request Handling tab, in the
Purpose section, select Signature and smartcard logon from the drop down
menu
5. On the Cryptography Tab, select the
Requests must use on of the following providers
radio button and then select the
Microsoft Base Smart Card Crypto Provider option
.
Optionally, you can use a Key Storage Provider (KSP). Choose the KSP, under Provider Category select Key Storage Provider. Then select the Requests must use one of the following providers radio button and select the
Microsoft Smart Card Key Storage Provider option
.
6. On the General tab: Specify a name, such as TPM Virtual Smart Card Logon. Set the validity period to the desired value and choose OK
7. Navigate to
Certificate Templates
. Right click on Certificate Templates and select New, then Certificate Template to Issue. Select the new template you created in the prior steps.
Note that it usually takes some time for this certificate to become available for issuance.
Create the TPM virtual smart card
Next we’ll create a virtual Smart Card on the
Virtual Machine by using the Tpmvscmgr.exe command-line tool.
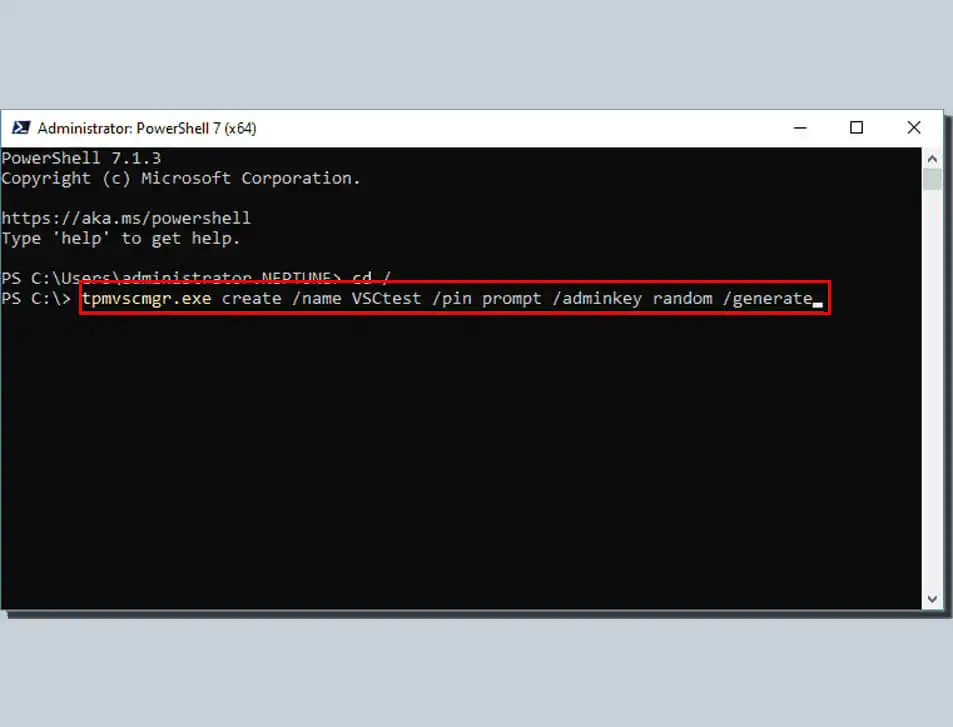
1. On the Windows 10 Gen 2 Hyper-V VM guest, open an Administrative
Command Prompt
and run the following command:
tpmvsmgr.exe create /name myVSC /pin default /adminkey random /generate
You will be prompted for a pin. Enter at least eight characters and confirm the entry. (You will need this pin in later steps)
Enroll for the certificate on the Virtual Smart Card Certificate on Virtual Machine. 1. In
certmgr.msc
, right click Certificates, click All Tasks then Request New Certificate.
2. On the certificate enrollment select the new template you created earlier.
3. It will prompt for the PIN associated with the Virtual Smart Card. Enter the PIN and click
OK
.
4. If the request completes successfully, it will display Certificate Installation results page
5. On the virtual machine select sign-in options and select security device and enter the pin
That completes the steps on how to deploy Virtual Smart Cards using a virtual TPM on virtual machines. Thanks for reading!
Raghav Mahajan
| Fun with Virtual Smart Cards! |
Outline:
Steps on how to enable a virtual smart card.
Assumptions:
Virtual smart cards require a computer with an initialized TPM. N.B., Windows 10 initializes the TPM by default.
Virtual Smart Card Configuration:
tpmvscmgr.exe create /name VSC /pin prompt /puk prompt /adminkey random /generateReset the Virtual Smart Card:
tpmvscmgr.exe destroy /instance root\smartcardreader\0000PINs, PUKs, and Keys:
- Smart Card Personal Identity Number (PIN). The PIN is essentially a password. The PIN can be changed by the end user from any domain computer:
CRTL-ALT-Delete → Change Password → Change PIN.
- Smart Card Personal Unlock Key (PUK). Windows locks the PIN after three unsuccessful attempts. End users can use their PUK to unblock their PIN:
CRTL-ALT-Delete → Change Password → Unblock Smart Card.
The PUK is optional but I recommend it. It’s simply too easy to lock the PIN!
The PUK changes the PIN. Keep the PUK safe and only use it when its absolutely necessary.
In addition, Windows does not include native tools to change the PUK. In order to choose a new PUK, the virtual smart card must first be deleted (i.e., destroyed) and then recreated. Of course, this process deletes all certificates on the smart card.
- Admin Key. The key benefit to the admin key is that it allows Administrators to generate certificate keys for enrolling-on-the-behalf of others. Organizations that do not use enrollment stations should simply generate a random admin key.
References:
https://docs.microsoft.com/en-us/windows/security/identity-protection/virtual-smart-cards/virtual-smart-card-get-started
Network Administration
PKI
Virtual Smart Cards