
In Windows computers, Virtual memory is used in place of the physical RAM when it runs out of usable space. Virtual memory combines your computer’s RAM with temporary space on your hard disk called the Swap file, Paging file or Pagefile. Whenever RAM is not enough to complete the task windows moves data to the paging file and frees up RAM so that your computer can complete its task. And prevent issues like slow down of the machine, Blue Screen of Death (BSOD), Low Memory problems, App Crashes Etc.
Virtual memory can be considered as being an extension of the computer’s physical memory.
Your computer has two types of memory: The hard drive or solid-state drive, used for your operating system, photos, music and documents, and RAM (Random Access Memory) used for storing program-specific data. The hard drive is perfect for long-term storage, while RAM is much faster and more volatile, acting as a working area for the programs and files you have open.
Every time you open more applications than the RAM on your PC can accommodate, the programs already present in the RAM are automatically transferred to the Pagefile. This process is technically called Paging. Because the Pagefile works as a secondary RAM, many times it is also referred to as virtual memory in windows 10.
Increasing Virtual Memory in Windows 10
Windows 10 and windows 11 manage Virtual memory itself only, But at times you might be required to alter the memory allocated. It is always said to customize the virtual memory into a size that is within the permissible limit. Here is Fallow To manually Adjust Virtual memory for windows computers.
- First press the combination of Win + R keys together to open the Run dialog box.
- Here type sysdm.cpl on it and then click on the OK button.
- This will open “System Properties” of your computer.
- Go to the Advanced tab and click on the Settings option. Which is available under the “Performance” section.
- Now On the “Performance Options” window, go to the Advanced tab and click on the Change button located under the “Virtual Memory” section.
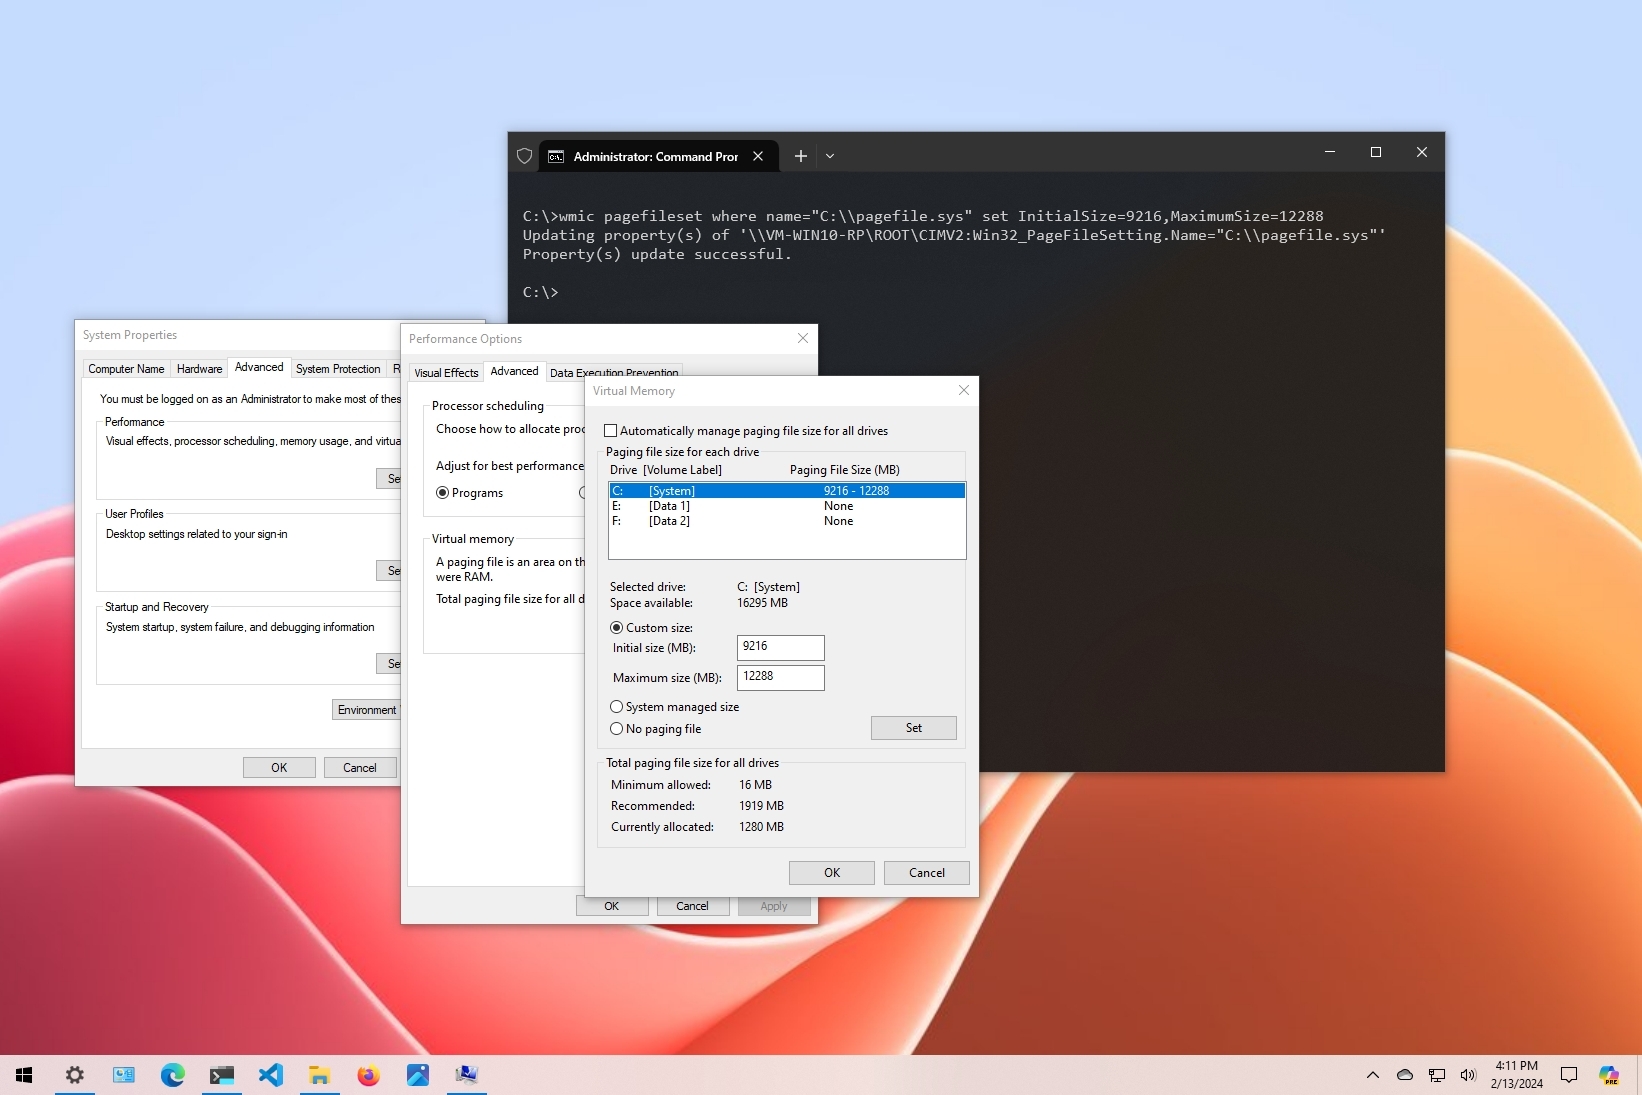
- You will see the Virtual Memory window on your computer screen.
- Here you have to uncheck the “Automatically manage paging file size for all drive” option at the top of the same window.
- Select any of the Drive letters where you allow to create the paging file and then click on Custom size.
- Then enter custom fields in the “Initial size (MB)” and “Maximum size (MB)” fields.
How To Calculate pagefile size
To Calculate the pagefile size always recommended amount (Refer above image) of total system memory. The maximum size is three (1.5) x the initial size. So let’s say you have 4 GB (1 GB = 1,024 MB x 4 = 4,096 MB) of memory. The and maximum size would be 1.5 x 4,096 = 6144 MB.
After Set the Initial size (MB)” and “Maximum size (MB)” Value and click on set, Now Click on the OK button and then on the Apply button to save changes. This will prompt to Restart the window ” you must restart your computer to apply these changes. ”
This is the Best and simple way to Increase Virtual Memory in Windows 10.
Also Read
- Google Chrome not working/responding after the Windows 10 update
- How to Fix Your Computer Is Low On Memory Warning In Windows 10
- 5 Tweaks to fix Slow Boot Times in Windows 10 (Updated)
- Solved: Windows 10 Critical Structure Corruption BSOD Error (5 Working solutions)
- Fix System Restore did not complete successfully error 0x80070005 on Windows 10
(Image credit: Mauro Huculak)
On Windows 10, virtual memory (or paging file) is an essential component (hidden file) designed to remove and temporarily store less frequently used modified pages allocated in RAM (Random-Access Memory) to the hard drive. Using this approach lets the system prioritize faster physical memory for more frequent processes and apps, improving the overall performance and preventing the computer from locking up in the event it runs out of system memory.
In addition, the paging file is important to support crash dumps during a system crash (Blue Screen of Death), as without a large enough page file, a dump with all the contents of the system memory won’t be created.
Although the system can manage the paging file size automatically according to various factors, sometimes, you may still need to increase the default virtual memory values manually. For example, when you see the «Your system is low on virtual memory» message. You’re noticing slow performance over time, or a particular application requires specific parameters to work correctly.
If the computer has issues with virtual memory, the device doesn’t have enough memory, or you’re trying to improve the system performance, Windows 10 includes the settings to increase the size of the virtual memory in at least two ways using the Settings app and Command Prompt.
In this how-to guide, I will walk you through the steps to increase the size of the virtual memory to improve Windows 10 responsiveness.
Warning: Although anyone can change the paging file size, using these instructions is only recommended if you have a valid reason and know what you’re doing.
How to increase virtual memory form Settings
To adjust the virtual memory size on Windows 10, use these steps:
All the latest news, reviews, and guides for Windows and Xbox diehards.
- Open Settings.
- Click on System.
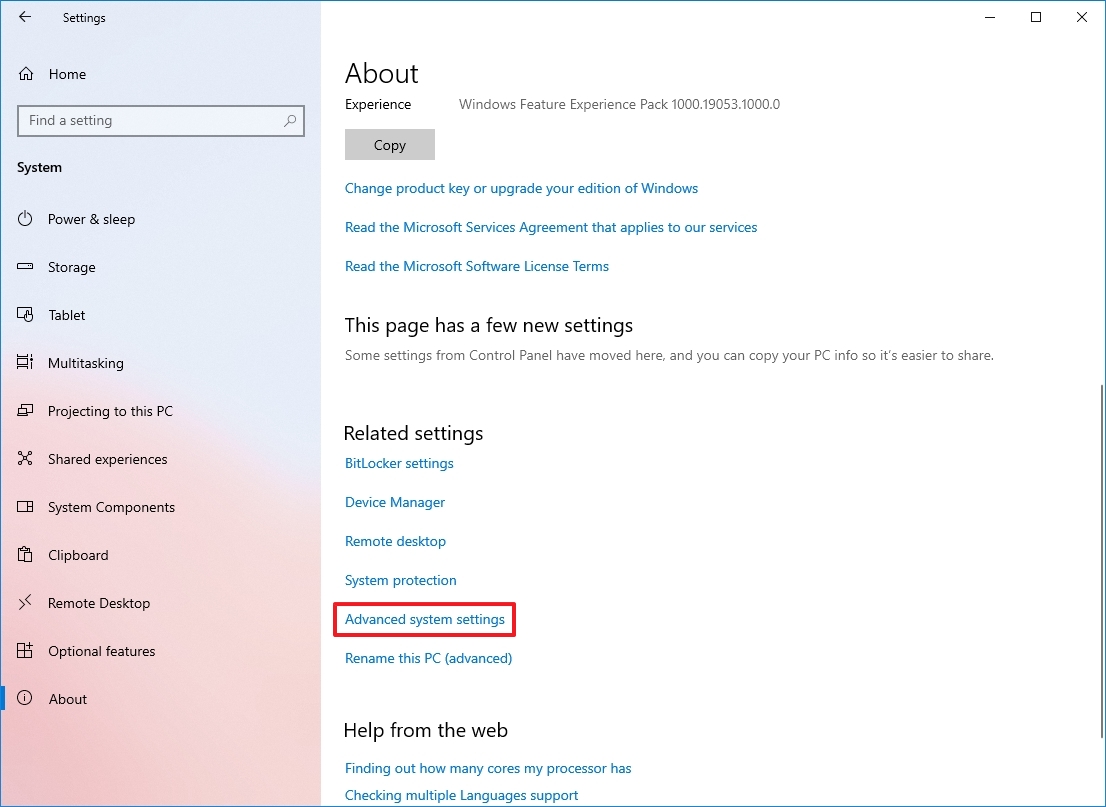
- Click on About.
- Click the «Advanced system settings» option under the «Related settings» section.
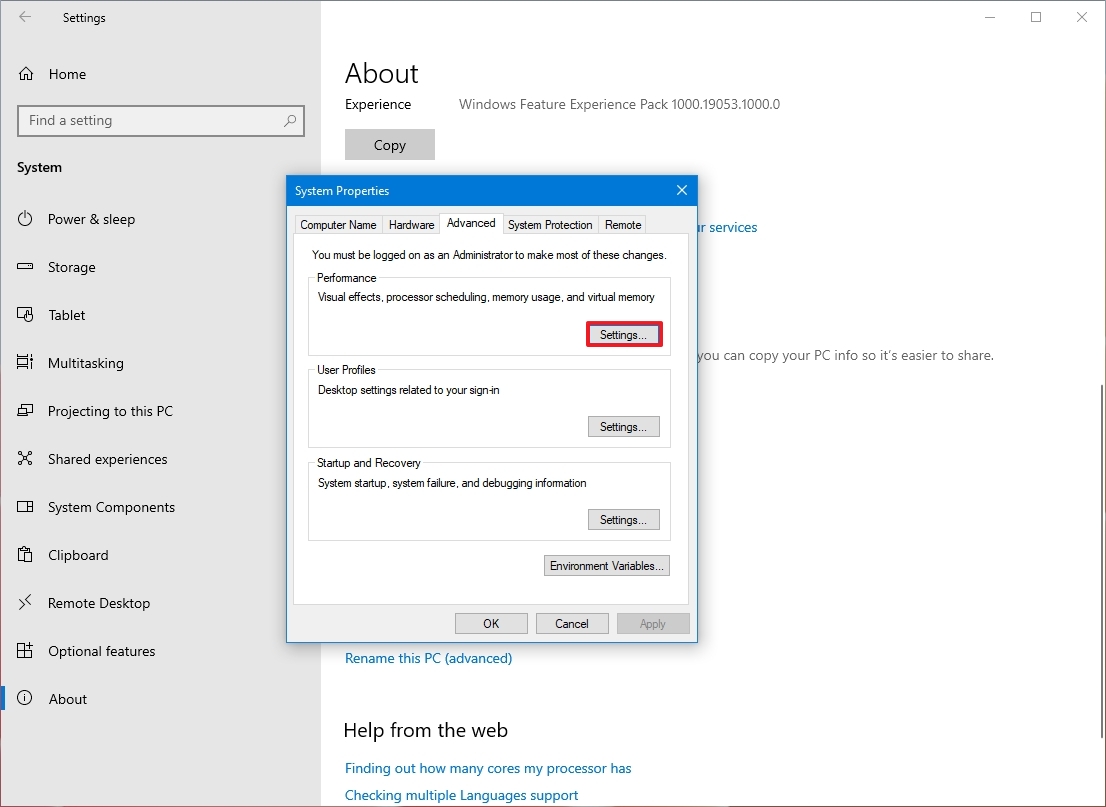
- Click the Advanced tab.
- Click the Settings button under the «Performance» section.
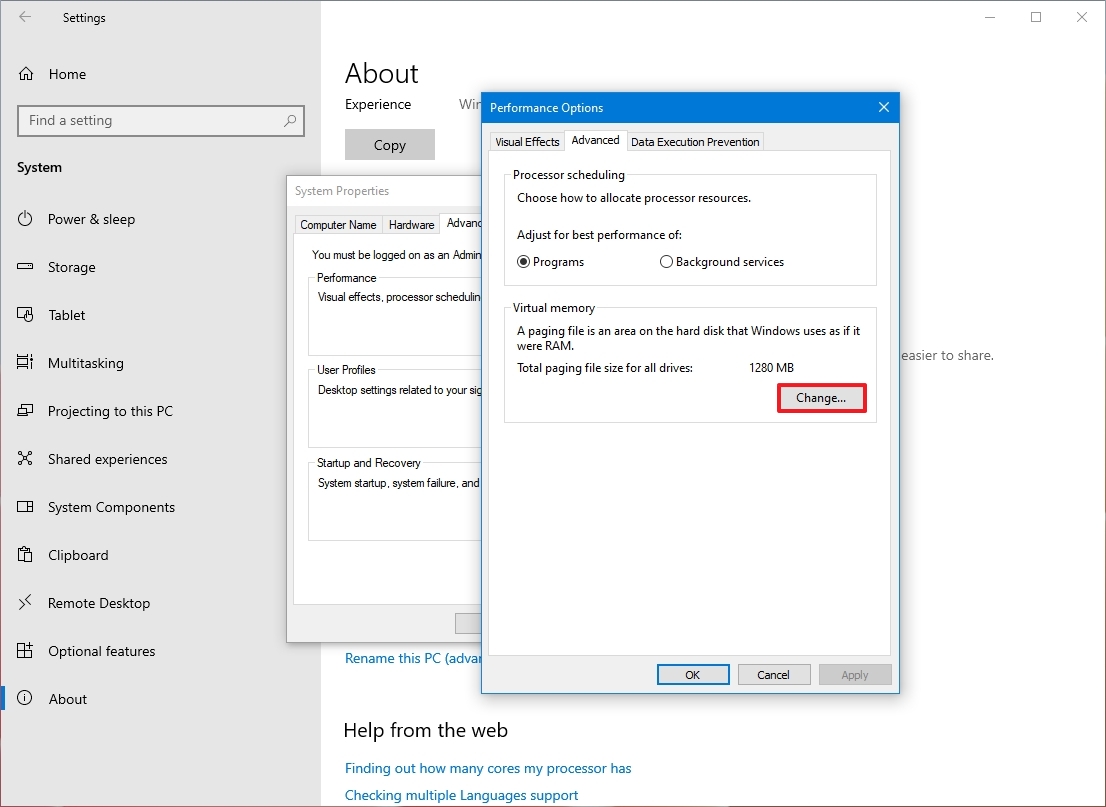
- Click the Advanced tab.
- Click the Change button under the «Virtual memory» section.
- Clear the «Automatically manage paging files size for all drives» option.
- Select the Custom size option.
- Specify the initial and maximum size for the paging file in megabytes.
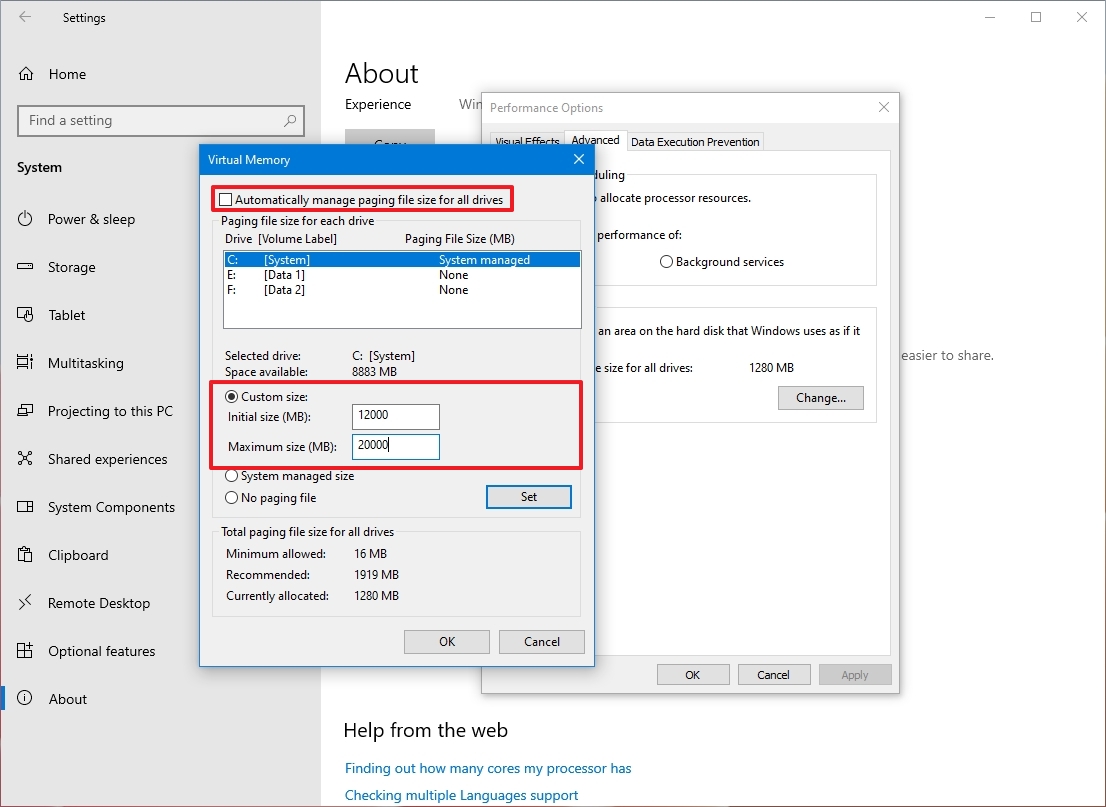
- Quick tip: The virtual memory size is unique to each device and can’t be generalized. However, usually, it’s recommended to use a number that’s one and a half times the total available memory for the «Initial size» and three times the available memory for the «Maximum size» when possible. You also have to make sure that the device has enough free space to store the new page file.
- Click the Set button.
- Click the OK button.
- Click the OK button again.
- Restart your device.
Once you complete the steps, you should notice an increase in performance when navigating Windows 10 as well as when running multiple apps at the same time.
If you need to revert the changes, you can use the same instructions, but on step 10, check the «Automatically manage paging size for all drives» option and restart your device.
How to increase virtual memory from Command Prompt
To modify the paging file size with Command Prompt, use these steps:
- Open Start.
- Search for Command Prompt, right-click the top result, and select the Run as administrator option.
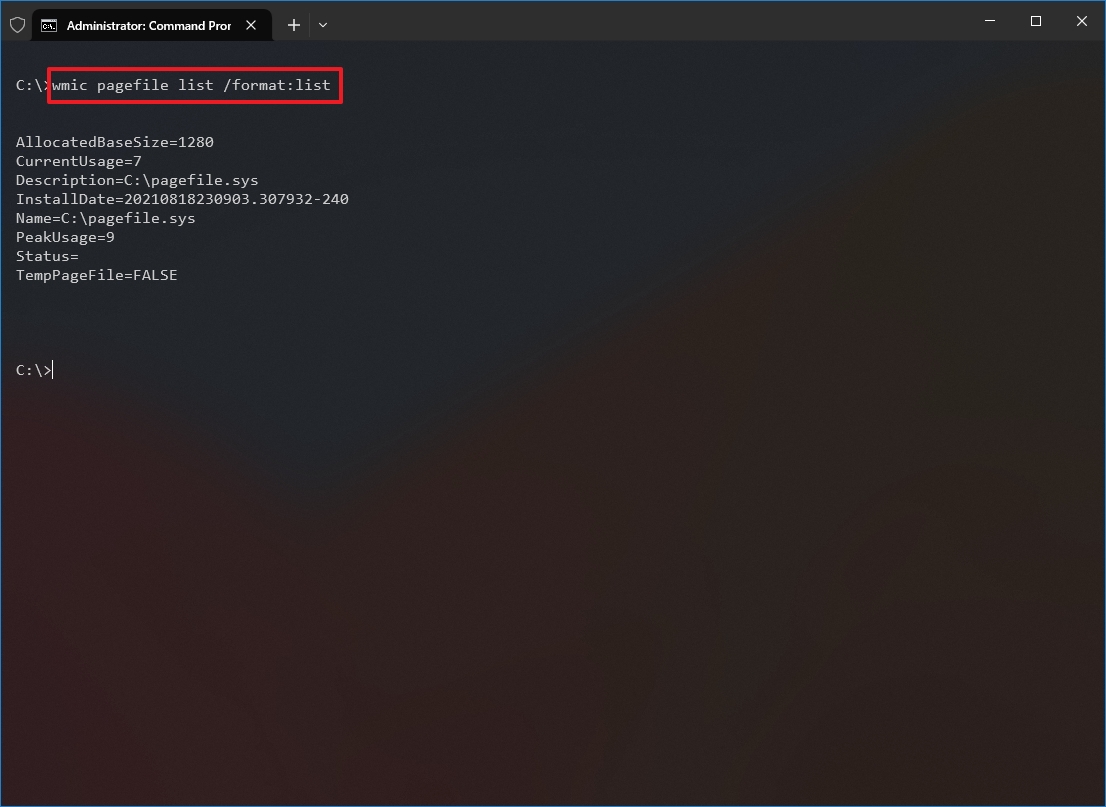
- Type the following command to understand the current status of the paging file and press Enter: wmic pagefile list /format:list
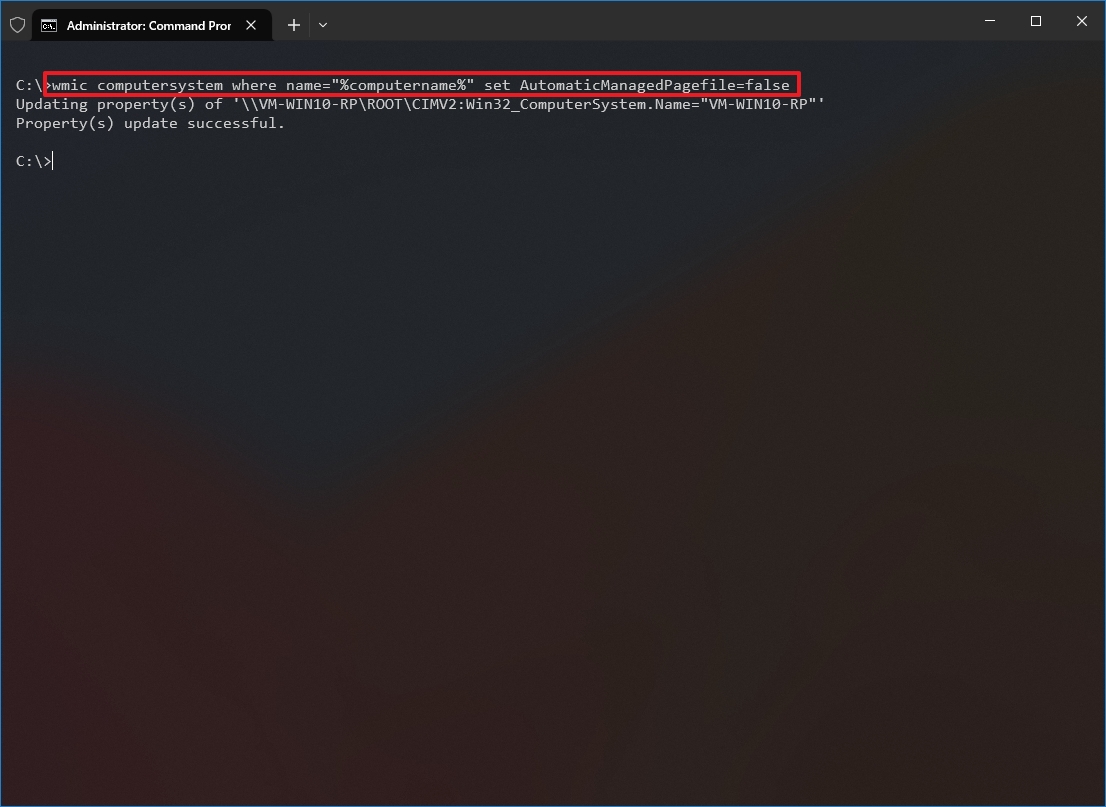
- Type the following command to switch from manage to custom virtual memory and press Enter: wmic computersystem where name=»%computername%» set AutomaticManagedPagefile=false
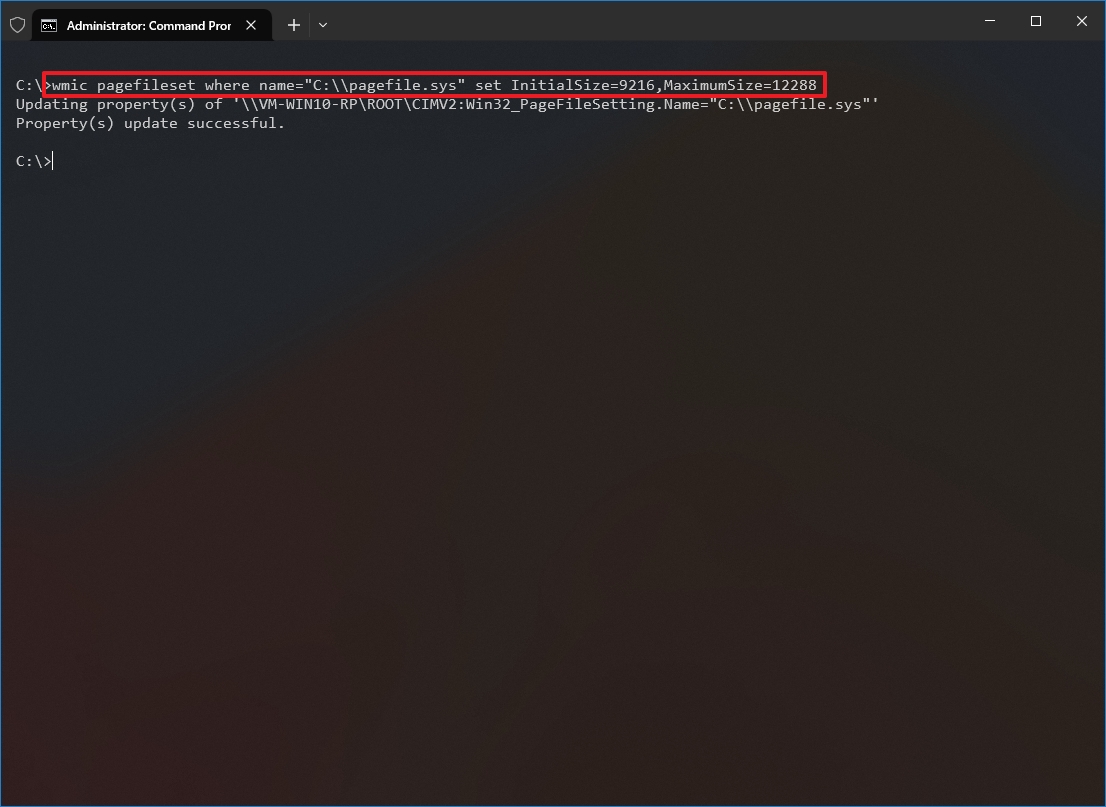
- Type the following command to set the initial and maximum size of the virtual memory and press Enter: wmic pagefileset where name=»C:\\pagefile.sys» set InitialSize=YOUR-INIT-SIZE,MaximumSize=YOUR-MAX-SIZE
This example sets the paging file to «9216» and «12288» megabytes for the initial and maxium size: wmic pagefileset where name=»C:\\pagefile.sys» set InitialSize=9216,MaximumSize=12288
- Type the following command to restart your computer and press Enter: shutdown -r -t 00
After you complete the steps, the device will start using the new values for virtual memory, which, if done correctly, should help to improve system performance.
If you no longer need to use the custom size for virtual memory, you can always revert the changes and allow Windows 10 to manage this feature using this command: wmic computersystem where name=»%computername%» set AutomaticManagedPagefile=true and restart the computer.
While it’s recommended to use one and a half times the available memory for the initial and three times the memory for the maximum size, make sure to test the changes and adjust the values if you’re experiencing freezes, crashes, and other problems.
Although it’s possible to disable virtual memory on Windows 10, even when you have a large amount of system memory, it’s not recommended to disable this feature. Usually, if you disable paging file, some applications may stop working, some system features may not work efficiently, and you may end up with some weird behaviors.
More resources
For more helpful articles, coverage, and answers to common questions about Windows 10 and Windows 11, visit the following resources:
- Windows 11 on Windows Central — All you need to know
- Windows 10 on Windows Central — All you need to know
Mauro Huculak has been a Windows How-To Expert contributor for WindowsCentral.com for nearly a decade and has over 15 years of experience writing comprehensive guides. He also has an IT background and has achieved different professional certifications from Microsoft, Cisco, VMware, and CompTIA. He has been recognized as a Microsoft MVP for many years.
Updated February 13, 2025
Optimizing Virtual Memory in Windows has always been an easy way to fine-tune the performance of a computer. When I started working with Windows computers in the 90s, the memory measurement was Megabytes (MB); now, it’s Gigabytes (GB). The calculation contained in this article is for Windows computers that have 8 GB or less of memory. If your system has 16 GB or more of memory, you can give this Virtual Memory calculation a try, but you might find that letting Windows automatically manage the paging file will work. Give it a try, and let us know how you make out in the comments below.
Your computer has two types of memory: Random Access Memory (RAM) and Virtual Memory. All programs use RAM, but when there isn’t enough RAM for the application you’re trying to run, Windows temporarily moves information that would usually be stored in RAM to a file on your hard disk called a Paging File. The data temporarily stored in the paging file is also referred to as virtual memory. Using virtual memory, in other words, moving information to and from the paging file, frees up enough RAM for running programs correctly.
The more RAM your computer has, the faster your programs will generally run. If a lack of RAM is slowing your computer, you might be tempted to increase virtual memory to compensate. However, your computer can read data from RAM much faster than from a drive, so adding RAM is a better solution.
If you receive error messages that warn of low virtual memory, you need to add more RAM or increase your paging file size to run the program on your computer. Windows usually manages this automatically, but you can manually change the virtual memory size if the default size isn’t large enough for your needs.
If you have more than one drive in your computer, you can have more than one pagefile. If you have a Solid State Drive (SSD) and a Hard Disk Drive (HDD), I recommend placing the paging file on the HDD, as Windows is continuously reads and writes to the virtual memory. This wear and tear can shorten the life span of an SSD.
How to calculate Windows 10 Virtual Memory / Paging File
There is a formula for calculating the correct pagefile size. The Initial size is one and a half (1.5) x the amount of total system memory. The Maximum size is three (3) x the initial size. So let’s say you have 4 GB (1 GB = 1,024 MB x 4 = 4,096 MB) of memory. The initial size would be 1.5 x 4,096 = 6,144 MB, and the maximum size would be 3 x 6,144 = 18,432 MB.
How to change Windows 10 Virtual Memory / Paging File
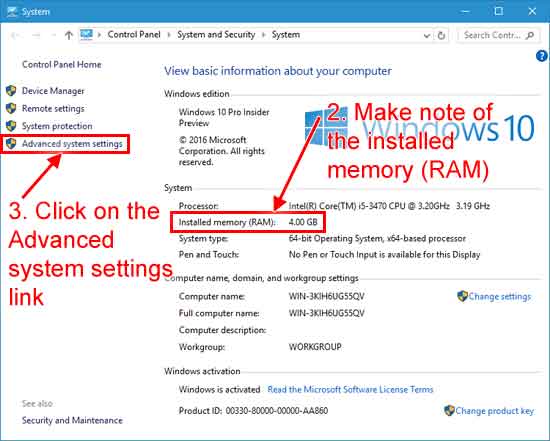
All the information and links you will need are going to be on the System page.
- Bring up the System page by either:
- Make a note of the installed memory (RAM)

- Click on the Advanced system settings link
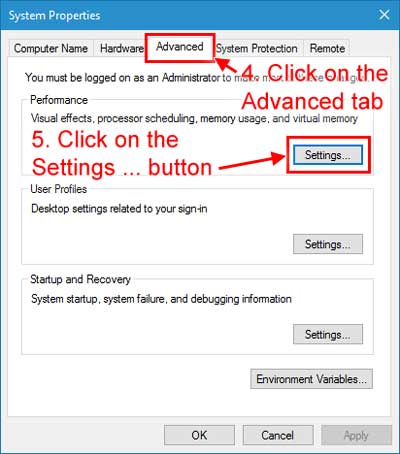
- Click on the Advanced tab of the System Properties dialog box

- Click on the Settings … button in the Performance section
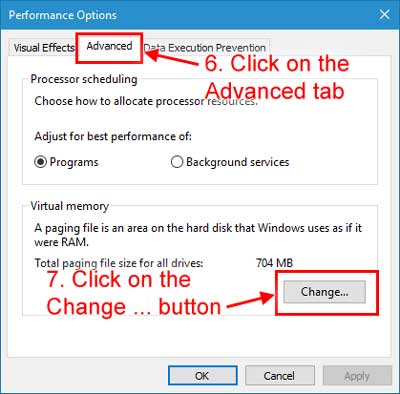
- Click on the Advanced tab of the Performance Options dialog box

- Click on the Change … button inside of the Virtual memory section
- Deselect the Automatically manage paging file size for all drives checkbox
- Select Custom size and enter the initial size and maximum size using the calculation shown above
- Click on the Set button
67bbfed5-8b50-4171-b87f-318eb1bbde9d|2|5.0|96d5b379-7e1d-4dac-a6ba-1e50db561b04
Setting virtual memory in Windows 10 can help improve your computer’s performance, especially if you frequently run out of RAM. In simple terms, virtual memory is a portion of your hard drive that Windows uses as if it were RAM. To set virtual memory, you’ll need to access your computer’s system settings and adjust the virtual memory settings.
Adjusting virtual memory settings in Windows 10 involves several straightforward steps. These steps will guide you through accessing the necessary settings and configuring virtual memory to optimize your system’s performance.
Step 1: Open System Properties
First, right-click on “This PC” and select “Properties.”
When you right-click on “This PC” (or “My Computer” on older versions), you’ll see a menu. Selecting “Properties” will open a window that gives you an overview of your computer’s system information.
Step 2: Access Advanced System Settings
In the System Properties window, click on “Advanced system settings.”
This option is usually located on the left-hand side of the window. Clicking it will open a new window with more detailed system settings.
Step 3: Open Performance Settings
Under the “Advanced” tab, click on the “Settings” button in the Performance section.
The Performance section is where you can tweak how Windows handles visual effects and virtual memory. Clicking “Settings” will open another window focused on performance options.
Step 4: Adjust Virtual Memory Settings
In the Performance Options window, click on the “Advanced” tab and then click “Change” under Virtual memory.
Here, you’ll find the settings to adjust virtual memory. Clicking “Change” will open the Virtual Memory settings window.
Step 5: Set Custom Size
Uncheck “Automatically manage paging file size for all drives,” select your drive, and choose “Custom size.” Enter initial and maximum sizes, then click “Set” and “OK.”
Disabling the automatic management allows you to manually set the virtual memory size. Make sure to enter values that suit your needs, generally 1.5 to 3 times your actual RAM.
After completing these steps, your computer will use the new virtual memory settings. You may need to restart your computer to apply these changes.
Tips for Setting Virtual Memory in Windows 10
- Know Your RAM Size: Always know the amount of physical RAM in your computer. This will help you set an appropriate size for virtual memory.
- Use SSD if Available: If you have an SSD, set your virtual memory on that drive for better performance.
- Don’t Overdo It: Setting virtual memory too high can actually hurt performance as much as a low setting can.
- Monitor Performance: Keep an eye on your computer’s performance after making changes. Adjust as needed.
- Keep it Updated: Regularly check and update your virtual memory settings as you upgrade your hardware.
Frequently Asked Questions
What is virtual memory?
Virtual memory is a portion of your hard drive that Windows uses as if it were RAM to help manage workloads when your physical RAM is full.
How much virtual memory should I set?
A good rule of thumb is to set it to 1.5 to 3 times your actual RAM.
Will virtual memory improve my computer’s performance?
Yes, setting virtual memory correctly can improve performance, especially if you run out of RAM frequently.
Can I disable virtual memory?
Yes, but it’s not recommended as it can lead to system instability and crashes.
Do I need to restart after changing virtual memory settings?
Yes, a restart is usually required to apply the new virtual memory settings.
Summary
- Right-click on “This PC” and select “Properties.”
- Click on “Advanced system settings.”
- Click “Settings” under Performance.
- Click the “Advanced” tab and then “Change” under Virtual memory.
- Uncheck “Automatically manage,” set custom size, and click “Set” and “OK.”
Conclusion
Setting virtual memory in Windows 10 is a simple yet effective way to optimize your computer’s performance. Whether you’re a gamer, a professional, or just someone who wants their computer to run smoothly, adjusting virtual memory can make a noticeable difference.
Remember, virtual memory is like a pressure valve for your RAM, helping to manage overflow when things get busy. By following our easy steps and tips, you can ensure your system runs like a well-oiled machine. Want more tips on optimizing your Windows 10 experience? Stay tuned for more articles!
Matt Jacobs has been working as an IT consultant for small businesses since receiving his Master’s degree in 2003. While he still does some consulting work, his primary focus now is on creating technology support content for SupportYourTech.com.
His work can be found on many websites and focuses on topics such as Microsoft Office, Apple devices, Android devices, Photoshop, and more.
Are you running out of RAM and your computer feels sluggish? You might not need to buy new hardware just yet. You can add virtual RAM in Windows 10 to boost your computer’s performance. This involves tweaking your computer’s settings to use part of your hard drive as if it were RAM. Let’s walk through the process step-by-step.
Adding virtual RAM in Windows 10 will improve system performance by allowing your computer to use part of your hard drive as additional memory. Follow these simple steps to get started.
Step 1: Open System Properties
First, open the System Properties window.
You can do this by pressing the «Windows + Pause/Break» keys simultaneously. If you don’t have a Pause/Break key, simply type «System» into the Windows search bar and click on «System.»
Step 2: Navigate to Advanced System Settings
Next, find and click on the «Advanced system settings» link on the left-hand side of the System window.
This will open a new window called «System Properties.»
Step 3: Open Performance Settings
From the System Properties window, click on the «Settings» button under the Performance section.
This button is located under the Advanced tab, and it will open the Performance Options window.
Step 4: Adjust Virtual Memory
Under the Performance Options window, select the «Advanced» tab and click on the «Change» button in the Virtual Memory section.
This action will open a new window where you can change the paging file size, which is your virtual RAM.
Step 5: Uncheck Automatic Management
Uncheck the box that says «Automatically manage paging file size for all drives.»
This allows you to manually set the virtual RAM size.
Step 6: Set Custom Size
Select the «Custom size» option and enter the initial and maximum size of virtual RAM you want to allocate.
It’s usually recommended to set the initial size to 1.5 times your actual RAM and the maximum size to 3 times your actual RAM.
Step 7: Apply and Restart
Click «Set,» then «OK,» and restart your computer to apply the changes.
Your computer will now use the allocated hard drive space as virtual RAM, enhancing performance.
After completing these steps, you should notice a boost in your computer’s performance, especially when running multiple applications or resource-heavy programs.
Tips for Adding Virtual RAM in Windows 10
- Always keep the initial and maximum sizes within recommended limits to avoid system instability.
- Make sure you have enough free space on your hard drive before increasing virtual RAM.
- Regularly check your system performance to ensure the changes are beneficial.
- Avoid setting virtual RAM sizes too high, as it can cause reduced performance.
- Consider upgrading your physical RAM if you frequently run out of memory.
Frequently Asked Questions
What is Virtual RAM?
Virtual RAM, also known as a paging file, is a part of your hard drive that your computer uses as if it were extra RAM.
Does Virtual RAM Replace Physical RAM?
No, virtual RAM doesn’t replace physical RAM. It supplements it, allowing your computer to handle more tasks.
Can I Add Virtual RAM on Any Drive?
Yes, but it’s best to allocate it on a fast drive to improve performance.
How Much Virtual RAM Should I Allocate?
A good rule of thumb is to set the initial size to 1.5 times your actual RAM and the maximum size to 3 times your actual RAM.
Will Adding Virtual RAM Fix All Performance Issues?
Not necessarily. Virtual RAM can help, but physical RAM upgrades and other optimizations might also be necessary.
Summary
- Open System Properties.
- Navigate to Advanced System Settings.
- Open Performance Settings.
- Adjust Virtual Memory.
- Uncheck Automatic Management.
- Set Custom Size.
- Apply and Restart.
Conclusion
Boosting your computer’s performance doesn’t always mean you have to spend money on new hardware. Adding virtual RAM in Windows 10 can be a quick and effective way to enhance your system’s capabilities. By following these simple steps, you can allocate part of your hard drive as virtual RAM, allowing your computer to manage applications more efficiently.
Remember, while virtual RAM can be a helpful short-term solution, it doesn’t replace the need for physical RAM. If you frequently find your computer running out of memory, consider exploring other options like upgrading your physical RAM or optimizing your system settings.
In the meantime, enjoy the smoother performance and explore what your newly-optimized computer can do. Happy computing!
Kermit Matthews is a freelance writer based in Philadelphia, Pennsylvania with more than a decade of experience writing technology guides. He has a Bachelor’s and Master’s degree in Computer Science and has spent much of his professional career in IT management.
He specializes in writing content about iPhones, Android devices, Microsoft Office, and many other popular applications and devices.
Read his full bio here.