
Окно диспетчера устройств можно открыть любым из следующих способов:
- С использованием интерфейса Windows
- С помощью командной строки
- В окне «Управление компьютером»
- С удаленного компьютера


What is a virtual network adapter?
A virtual network adapter is software that operates like a physical network adapter within the host operating system (OS) or through an application installed on the endpoint or server. Applications and services on the device or server can access the virtual network adapter when a second network interface is needed but no physical adapter is available.
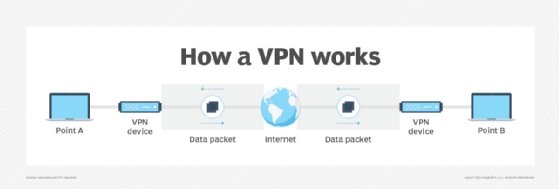
A virtual network adapter can be used with a virtual private network (VPN). A VPN is a service that creates a secure network that extends a private network across a public network, such as the internet. It provides remote offices or users with secure access to the company network. A virtual network adapter separates the data flows that should be sent across the VPN tunnel from the data flows that should be sent from the local, physical network adapter.
Virtual network adapters are a foundational component within hypervisor environments, such as the following:
- VMware’s vSphere and ESXi
- Microsoft’s Hyper-V
- Citrix Xen or Xen Server
- kernel-based virtual machine
Each virtual server or desktop is a software copy of a physical server or desktop. These virtual machines must contain one or more virtual network adapters to talk to other devices on either logical or physical networks that reside outside the VM.
How does a virtual network adapter work?
Virtual network adapters are created in one of three ways. The first method uses tools within the device OS to create a virtual adapter. For example, Windows 10 has built-in functionality to create VPN virtual network adapters. A virtual network adapter for VPN purposes requires only a few bits of information regarding the connection name, the VPN head-end name or IP address, the VPN type the head-end VPN server uses to communicate, and a pre-shared key or similar authentication mechanism depending on how the VPN tunnels are configured.
Windows Device Manager can also be used to manually configure virtual network adapters for a variety of reasons, including the loopback adapter — now called Microsoft KM-TEST Loopback Adapter in Windows 10 — for testing purposes or to manually configure hypervisor-specific adapters.
Another way to create virtual adapters is with a third-party application. This type of application automatically builds a virtual network adapter within the device OS on the user’s behalf. It is useful when the adapter serves a single purpose and does not require any special network configuration settings.
Finally, in a virtualized desktop or server environment, the administrator can configure virtual networks and virtual network adapters to enable the VMs to communicate outside their virtual instance. The configuration of the adaptors is performed through the hypervisor management interface during the VM setup processes. Additionally, additions, deletions or changes can be performed using hypervisor management tools as needed.
What are the benefits of a virtual network?
Virtual network adapters provide an additional network interface on a device without the need for a physical network interface card (NIC).
By enabling an OS system to create new virtual interfaces, complex network designs and routing can occur within the OS, which was previously impossible without physical NICs. Segmenting traffic for security and link sharing are the most common use cases for virtual network adapters in desktop or ad hoc scenarios. Virtual network adapters are a requirement in virtualized architectures.
Installing a virtual network adapter in Windows 10
There are several ways to install virtual network adapters, depending on need and purpose. For example, loopback virtual network adapters are commonly used for troubleshooting and testing. In Windows 10, a loopback adapter can be installed using the following steps:
- From the Windows 10 search interface, type in Device Manager, and click on the result. Network adapters appears on the list.
- Click on the Action drop-down menu, and select Add legacy hardware.
- Click on Next on the Add Hardware Wizard, choose the manual install process radio button and click on Next. Select Network adapters from the list, and click on Next.
- Select Microsoft on the Manufacturer list and then Microsoft KM-TEST Loopback Adapter.
- Click on Next to confirm the installation and then Finish.
Once completed, a new adapter will be visible in the Windows 10 Network Connections portion of the Control Panel, and the adapter can be modified as needed. For example, the loopback adapter is set to use Dynamic Host Configuration Protocol by default. This can be easily modified to configure an IP address manually, the same way a physical interface is modified.
This was last updated in October 2021
Continue Reading About virtual network adapter
- SDP vs. VPN vs. zero-trust networks: What’s the difference?
- What is secure remote access in today’s enterprise?
- Why network configuration templates are useful in automation
- VM networking best practices to boost network performance
- Why VPNs Are Neither Secure Nor Private
Dig Deeper on Network infrastructure
-

What is remote desktop protocol (RDP)?
By: Kinza Yasar
-
ingress filtering
By: Jessica Scarpati
-
KY Health System Strikes Analytics Collab to Enhance Specialty Pharmacy Services
By: Shania Kennedy
-
A quick guide to BGP best practices
By: Terry Slattery


Virtual network adapters are a crucial component of virtualization technology. They allow virtual machines to communicate with other devices on a network, enabling seamless integration and connectivity. Whether you’re a seasoned IT professional or a curious tech enthusiast, understanding how to create a virtual network adapter on Windows 7 can greatly enhance your virtualization skills.
In this blog post, we will explore the reasons why you need to create a virtual network adapter on Windows 7 and provide step-by-step instructions for four different methods to accomplish this task. Additionally, we will discuss what to do if you encounter any issues during the process, share three bonus tips to optimize your virtual network adapter experience, answer some frequently asked questions, and conclude with our final thoughts.
Video Tutorial:
There are several compelling reasons why you might need to create a virtual network adapter on Windows 7. Firstly, virtual network adapters enable seamless integration between virtual machines and the physical network, allowing for efficient communication and data transfer. This is especially important in scenarios where multiple virtual machines need to interact with each other or access resources on the host machine or other devices on the network.
Secondly, virtual network adapters provide enhanced security by isolating virtual machines from the host machine and the rest of the network. This ensures that any potential vulnerabilities or compromises in a virtual machine cannot directly affect the host or other machines on the network. By creating a virtual network adapter, you can define and control the network connections of each virtual machine, thus reducing the risk of unauthorized access or data breaches.
Lastly, virtual network adapters offer flexibility and convenience by allowing virtual machines to connect to different types of networks, including local area networks (LANs), wide area networks (WANs), and virtual LANs (VLANs). This versatility enables IT professionals to build complex network infrastructures within virtual environments, test various network configurations, and simulate real-world scenarios without impacting the production network.
Method 1: Creating a Virtual Network Adapter via Hyper-V Manager
Creating a virtual network adapter via Hyper-V Manager is a straightforward process that requires a few simple steps. Before we delve into the steps, let’s first understand the method in detail.
Hyper-V Manager is a built-in administrative tool for managing virtual machines and network connections on Windows 7. By utilizing this tool, you can create and configure virtual network adapters with ease. Follow the steps below to create a virtual network adapter via Hyper-V Manager:
1. Open Hyper-V Manager by clicking on the «Start» button, searching for «Hyper-V Manager,» and clicking on the matching result.
2. In Hyper-V Manager, select the host machine from the list of available servers.
3. Right-click on the host machine and choose «Virtual Switch Manager» from the context menu.
4. In the Virtual Switch Manager window, click on «New virtual network switch» on the left side.
5. Select the appropriate virtual switch type for your network requirements and click on «Create Virtual Switch.«
6. Give the virtual switch a name, specify the connection type, and click on «Apply» or «OK.«
Pros:
1. Easy and intuitive user interface in Hyper-V Manager.
2. Provides various virtual switch types to accommodate different network configurations.
3. Allows granular control over network connections and settings for virtual machines.
Cons:
1. Limited to Windows 7 Professional, Enterprise, or Ultimate editions.
2. Requires compatible hardware and BIOS settings to enable Hyper-V functionality.
Method 2: Creating a Virtual Network Adapter via VirtualBox
VirtualBox is a popular virtualization platform that allows you to create and manage virtual machines on Windows 7. It also provides the capability to create virtual network adapters for seamless network integration. Here’s how you can create a virtual network adapter via VirtualBox:
1. Open VirtualBox and select the desired virtual machine from the list.
2. Click on the «Settings» button in the toolbar to open the virtual machine settings.
3. In the settings window, select the «Network» tab.
4. Click on the «Adapter 2» tab to configure the additional network adapter.
5. Check the «Enable Network Adapter» checkbox.
6. Choose the desired network attachment type, such as NAT, Bridged Adapter, or Host-Only Adapter.
7. Configure any additional settings, such as MAC address, promiscuous mode, or advanced features.
Pros:
1. VirtualBox is a free and open-source virtualization platform.
2. Provides a wide range of networking options and configurations.
3. Suitable for both personal and professional use.
Cons:
1. May require additional configuration and troubleshooting due to the complexity of network settings.
2. Limited to virtual machines managed by VirtualBox.
Method 3: Creating a Virtual Network Adapter via VMware Workstation
VMware Workstation is a robust virtualization solution that offers advanced features and capabilities for creating and managing virtual machines. It also enables the creation of virtual network adapters to establish network connectivity within virtualized environments. Follow the steps below to create a virtual network adapter via VMware Workstation:
1. Open VMware Workstation and select the desired virtual machine from the library.
2. Click on the «Edit virtual machine settings» button in the toolbar.
3. In the Virtual Machine Settings window, select the «Network Adapter» option from the list.
4. Click on the «Add» button to add a new virtual network adapter.
5. Choose the appropriate network type, such as bridged, NAT, or host-only.
6. Configure any additional settings, such as network connection, MAC address, or advanced options.
7. Click on «OK» to save the settings.
Pros:
1. VMware Workstation provides robust virtualization features and performance.
2. Offers a comprehensive range of networking options for virtual machines.
3. Suitable for both individual users and enterprise environments.
Cons:
1. Requires a license for VMware Workstation, which may be an additional cost.
2. May require advanced knowledge and understanding of virtualization concepts.
Method 4: Creating a Virtual Network Adapter via PowerShell
PowerShell, the command-line shell and scripting language developed by Microsoft, offers a powerful approach to creating a virtual network adapter on Windows 7. Although this method requires some familiarity with PowerShell commands, it provides flexibility and automation capabilities. Follow the steps below to create a virtual network adapter via PowerShell:
1. Open PowerShell with administrative privileges.
2. Run the following command to list the available virtual switches: `Get-VMSwitch`
3. Identify the desired virtual switch from the list.
4. Run the following command to create a virtual network adapter: `New-NetAdapter -Name «VirtualAdapterName» -SwitchName «VirtualSwitchName«`
5. Replace «VirtualAdapterName» with the desired name for the virtual network adapter.
6. Replace «VirtualSwitchName» with the name of the virtual switch identified in step 3.
Pros:
1. PowerShell provides a command-line approach for automation and scripting.
2. Enables advanced customization and configuration options.
3. Can be integrated into larger scripts and workflows for efficient management.
Cons:
1. The PowerShell method may not be suitable for users unfamiliar with command-line interfaces.
2. Requires administrative privileges to execute PowerShell commands.
What to Do If You Can’t Create a Virtual Network Adapter
If you encounter any issues while creating a virtual network adapter on Windows 7, here are some potential fixes:
1. Check system requirements: Ensure that your system meets the hardware and software requirements for virtualization, including virtual network adapters. Verify that your processor supports virtualization technology and that virtualization features are enabled in the BIOS settings.
2. Update virtualization software: If you’re using virtualization platforms like Hyper-V, VirtualBox, or VMware Workstation, ensure that you’re running the latest version of the software. Check for updates and apply any available patches or bug fixes that might resolve compatibility issues.
3. Troubleshoot network connections: If the virtual network adapter is not functioning correctly, perform basic troubleshooting steps. Check network cables, router configurations, and ensure that the host machine has an active network connection. Restarting the host machine, virtual machine, or virtualization software may also help resolve networking issues.
4. Seek technical support: If you have exhausted all troubleshooting options and are still unable to create a virtual network adapter, consider reaching out to the virtualization software vendor’s technical support team for assistance. They can provide personalized guidance and help troubleshoot any specific issues you may be facing.
Now, let’s move on to some bonus tips to optimize your virtual network adapter experience.
Bonus Tips
1. Assign meaningful names to virtual network adapters: When creating virtual network adapters, it’s good practice to assign descriptive names that reflect their purpose or the virtual machine they are associated with. This makes it easier to manage and identify adapters in complex virtualized environments.
2. Regularly update virtualization software: Stay up to date with the latest versions of your chosen virtualization software, as updates often bring bug fixes, security enhancements, and new features. Regular updates ensure that you have access to the latest networking capabilities and improvements.
3. Optimize network settings for performance: Depending on your network requirements, there are various settings you can adjust to optimize the performance of virtual network adapters. Experiment with features like jumbo frames, VLAN tagging, or bandwidth management to enhance network throughput and reduce latency.
5 FAQs
Q1: Can I create multiple virtual network adapters for a single virtual machine?
A: Yes, you can create multiple virtual network adapters for a single virtual machine. This allows for more complex network configurations, such as connecting to different networks simultaneously or implementing advanced networking features like network bonding or load balancing.
Q2: Can I share my physical network adapter with a virtual machine?
A: Yes, it is possible to share a physical network adapter with a virtual machine. This is achieved by assigning the physical network adapter to the virtual machine as a bridged or passthrough network adapter. However, keep in mind that the physical network adapter can only be used by either the host machine or the virtual machine at a given time.
Q3: Can I create virtual network adapters on Windows 7 Home edition?
A: No, the ability to create virtual network adapters is limited to Windows 7 Professional, Enterprise, and Ultimate editions. The home editions of Windows 7 do not include the necessary virtualization features and tools required for managing virtual machines and network connections.
Q4: Is it possible to change the network type of a virtual network adapter after creation?
A: Yes, it is typically possible to change the network type of a virtual network adapter after creation. However, the specific steps and options available depend on the virtualization software being used. In most cases, you can modify the network adapter settings within the virtualization software’s management interface or settings.
Q5: Can I create a virtual network adapter without using virtualization software?
A: No, creating a virtual network adapter requires the use of virtualization software. Virtualization software allows you to create and manage virtual machines, including configuring virtual network adapters. Without virtualization software, you cannot create and utilize virtual network adapters.
Final Thoughts
Creating a virtual network adapter on Windows 7 is an essential skill for anyone working with virtual machines or interested in exploring the world of virtualization. Whether you choose to use Hyper-V Manager, VirtualBox, VMware Workstation, or PowerShell, each method offers its advantages and allows you to establish seamless network connectivity within virtualized environments.
By following the step-by-step instructions outlined in this blog post, you can confidently set up virtual network adapters on Windows 7. Remember to consider the pros and cons of each method, and troubleshoot any issues you encounter along the way. With a well-configured virtual network adapter, you can enhance your virtualization experience and explore a wide range of possibilities within virtualized environments.
The previous blog post covered how to create a Hyper-V virtual machine (VM). However, creating a Hyper-V VM is merely the first step of building a large-scale virtual environment; thereafter, you have to ensure that VMs that are running on a Hyper-V host are able to communicate with one another. For this purpose, you need to have knowledge on Hyper-V network adapters, the technology behind Hyper-V networking, as well as how Hyper-V networking can be configured.
About Hyper-V Networking
A virtual network adapter (also known as virtual NIC) can be regarded as a virtualized version of a physical network adapter. It is used in Hyper-V environments to connect a physical server with other servers, VMs, or any other networking devices over a LAN connection. In short, vNIC enables and manages all network communications.
Each VM has one or more vNICs, which provide connection to a single subnet. However, you can assign additional IP addresses to that NIC in order to gain access to multiple subnets.
When you install the Hyper-V role on your computer and start creating new VMs, you need to be aware of the networking configurations that are present by default.
- Earlier Windows versions (before Windows 10) had no virtual switches. However, when you enable Hyper-V on Windows 10, you can use a Default Switch for seamless networking, as it provides access to the host’s network.
- Hyper-V virtual network adapters enable communications between VMs through a virtual switch. However, newly created VMs do not have any virtual switches assigned to them. Each new VM has a network adapter, which can be configured by assigning a single virtual switch, or you can leave it disconnected. Thus, to enable network connectivity, you need to create a virtual switch and configure a virtual network adapter.
There are three virtual switches that provide different levels of network connectivity:
- An external virtual switch can connect to the physical network adapter, which allows VMs to access a physical network. An external virtual switch enables communications between VMs on the same physical computer, VMs and the physical computer, as well as enables VMs to access physical network.
- An internal virtual switch enables communications between the VMs running on the same Hyper-V server, as well as between those VMs and the management OS. However, this type of switch does not provide access to a physical network.
- A private virtual switch only ensures connectivity between the VMs that run on the same Hyper-V host. This type of network provides an isolated mode of network connectivity.
Another point worth mentioning is VLAN tagging, which is a method of assigning a specific tag (VLAN ID) to each packet running on the network. VLAN tagging simplifies the process of identifying which information packet belongs to a particular VLAN. As a result, this method allows you to isolate network traffic, and ensures that network communications are performed without disruption.
Virtual network adapters in Hyper-V can be of two types:
- Legacy network adapters emulate a physical network adapter and only work with Generation 1 VMs. This type of network adapter is used for unenlightened guest VMs that do not support Hyper-V Integration Services or Linux Integration Services. Up to 4 legacy vNiCs can be deployed on a single VM. Moreover, a legacy network adapter is applied for enabling communication between guest OSes that are not supported by Hyper-V. Legacy vNiCs can perform a network-based installation of the guest OSes.
- Synthetic network adapters are used for enlightened guest VMs that provide support for Hyper-V Integration Services or Linux Integration Services. Up to 8 synthetic vNICs can be deployed on a single VM. They generally provide better performance than legacy vNICs. In this case, network connectivity is enabled by VMBus, which provides and controls communication between separate partitions. Furthermore, with this type of a network adapter, you are able to use VLAN tagging.
How to Set Up Virtual Network Adapter in Hyper-V Manager
There are two ways through which you can enable and configure a Hyper-V network adapter: in Hyper-V Manager by using graphical user interface (GUI), or in PowerShell by running PowerShell scripts. We will discuss them both in detail. Now, let’s start with the former method:
- Open Hyper-V Manager.
- Find the VM for which you want to add a Hyper-V network adapter and right-click the VM name. Select Settings.
- The new menu will open, providing information about the VM settings. In the Hardware Section, select Add Hardware to see the list of devices that you can add to your VM.In our case, we are only interested in two options: Network Adapter and Legacy Network Adapter (which is only available for Generation 1 VMs). Select the network adapter that you need and click Add.

- You will be redirected to the Network Adapter section where you can configure a new Hyper-V network adapter by choosing a virtual switch to connect to, by enabling VLAN identification and specifying VLAN ID, and by specifying the maximum and minimum amount of bandwidth usage.You are also able to remove the Hyper-V network adapter by clicking Remove.

- Click Apply to save changes.


Moreover, in Hyper-V Manager, you can modify hardware acceleration settings and enable more advanced features.
- Double-click Network Adapter under the Hardware section. Select Hardware Acceleration. Here, you can enable Virtual Machine Queue (VMQ) and IPsec task offloading, as well as specify the maximum number of Offloaded SA (security associations).Hyper-V Virtual Machine Queue is a hardware virtualization technology that ensures direct network data transfer to the VM shared memory. IPsec is the security protocol used for encrypting network data exchange.With IPsec task offloading enabled, you can offload IPsec-related tasks to a network adapter so as not to overuse hardware resources.

- Click Apply to save changes.
- Then, select Advanced Features to set up the advanced features on the virtual network adapter. They include MAC address, DHCP guard, Router guard, Protected network, Port mirroring, and NIC teaming. Each feature is accompanied by a short description of how it can be used. Read them and decide which features should be enabled.
- Check the required boxes and click Apply to save changes.

Managing Hyper-V Network Adapters with PowerShell
As can be seen, configuration options in Hyper-V Manager are quite limited. Moreover, by using the GUI you are only able to set up Hyper-V network adapters for guest VMs, and not for the management OS. For this reason, PowerShell can be used to provide more advanced functionality and multiple configuration options. Let’s look at how Hyper-V network adapters can be managed in PowerShell.
Create Hyper-V network adapters
Note that in order for the PowerShell cmdlets to work, you need to run PowerShell in administrator mode. To do this, type PowerShell in a search bar, right-click the PowerShell icon, and select Run as Administrator.
Insert the Add-VMNetworkAdapter cmdlet to add a new virtual network adapter to a Hyper-V VM. Below is an example of how you can use this cmdlet:
Add-VMNetworkAdapter -VMName DemoVM -SwitchName DemoVSwitch –Name ‘Demo Network Adapter’
The following example demonstrates how you can add a second virtual network adapter in the management OS:
Add-VMNetworkAdapter -ManagementOS -Name ‘Second Network Adapter’
Connect or disconnect Hyper-V network adapters
The Connect-VMNetworkAdapter cmdlet allows you to connect a virtual network adapter to a virtual switch of your choice. The example below demonstrates how you can add one virtual switch (Default switch) to two VMs (DemoVM and New Virtual Machine) at the same time. Ensure that neither of the VMs is in a running state.
Connect-VMNetworkAdapter -VMName DemoVM, ‘New Virtual Machine’ -SwitchName ‘Default Switch’
To disconnect Hyper-V network adapter from a virtual switch or Ethernet resource pool, the Disconnect-VMNetworkAdapter cmdlet can be used. The following script allows you to disconnect all network adapters from a single VM named DemoVM:
Disconnect-VMNetworkAdapter -VMName DemoVM
This PowerShell script can be used to disconnect all virtual network adapters that are connected to a virtual switch Default Switch in all VMs in Hyper-V environment.
Get-VMNetworkAdapter -VMName *| Where-Object {$_.SwitchName -eq 'Default Switch'} | Disconnect-VMNetworkAdapter
With PowerShell, you can be even more precise in your configurations. If you want to disconnect all network adapters that are connected to a particular virtual switch (Default Switch) that are running on a certain VM (DemoVM), use the cmdlet below:
Get-VMNetworkAdapter -VMName DemoVM | Where-Object {$_.SwitchName -eq 'Default Switch'} | Disconnect-VMNetworkAdapter
Get Hyper-V network adapters
These PowerShell scripts can be used to access information about the virtual network adapters that are present on a particular VM, on the management OS, or on all VMs as well as the management OS running in the virtual environment. All of the cmdlets are presented below:
- For a single VM:
Get-VMNetworkAdapter –VMName DemoVM
- For the management OS:
Get-VMNetworkAdapter -ManagementOS
- For all VMs in Hyper-V environment, including the management OS:
Get-VMNetworkAdapter -All
If the final script is properly implemented, you will see the following screen containing information about your Hyper-V network adapters:

Remove Hyper-V network adapters
This cmdlet is used to remove one or more virtual network adapters from a VM, as well as from the management OS.
In the next example, the network adapter NewNetworkAdapter is removed from a VM named DemoVM:
Remove-VMNetworkAdapter -VMName DemoVM -VMNetworkAdapterName NewNetworkAdapter
The example below shows how you can remove the network adapter Secondary from the management OS:
Remove-VMNetworkAdapter -ManagementOs -Name Secondary
Rename Hyper-V network adapters
You can also rename a Hyper-V network adapter of a particular VM or on the management OS:
Rename-VMNetworkAdapter -VMName DemoVM -NewName ‘Network Adapter 2019’
In Hyper-V Manager you can verify that all network adapters of a VM named DemoVM have been successfully renamed.
To give a new name to a network adapter (Network Adapter 2019) of a particular VM (DemoVM), run the following script:
Rename-VMNetworkAdapter -VMName DemoVM -Name ‘Network Adapter 2019’ -NewName ‘Hyper-V network adapter’
The next cmdlet can help you to rename a network adapter of the management OS.
Rename-VMNetworkAdapter -ManagementOs -Name Adapter -NewName ‘Communications Channel’
Set Hyper-V network adapters
This section lists various cmdlets, which can be used for configuring the features of the Hyper-V network adapter in a Hyper-V VM or the management OS. Exploring all configuration options to their full extent can take a lot of time. Therefore, we will only discuss a few features that can be enabled through PowerShell.
For example, you can enable DHCP Guard by running the script below. DHCP Guard is used for protecting the system against unauthorized access from the side of the guest OS.
Set-VMNetworkAdapter -VMName DemoVM -DhcpGuard On
Additionally, you can enable Port Mirroring, which allows you to copy the network packets of one virtual network adapter and send them to another one. There are two mirroring modes: Source and Destination. By selecting Source mode, we agree that the network traffic of this particular network adapter will be copied and sent to the monitoring VM. The network adapter of that VM will be assigned a Destination mirroring mode. Note that each Source network adapter should be assigned a Destination network adapter in order for this feature to work.
To enable Port Mirroring in a Source mode, run the following script:
Set-VMNetworkAdapter -VMName DemoVM –Name ‘Hyper-V network adapter’-PortMirroring Source
This cmdlet will enable the Port Mirroring feature on the VM named DemoVM, and will assign its virtual network adapter the role of a source.
In the following example, the virtual network adapter named Monitoring is configured as the destination point for port mirroring. As a result, a VM named DemoVM (‘Source’) will monitor all network traffic of the VM named ‘New Virtual Machine’ (Destination).
Set-VMNetworkAdapter -VMName ‘New Virtual Machine’-Name Monitoring -PortMirroring Destination
The following cmdlet can be used to enable VLAN identification as well as to assign a specific VLAN ID:
Set-VMNetworkAdapterVlan -VMName DemoVM -VMNetworkAdapterName ‘Hyper-V network adapter’ -Access -VlanId 20
In this case, VLAN tagging will be enabled on a particular Hyper-V network adapter (Hyper-V network adapter) that is connected to a certain VM (DemoVM).
Or, if you want to disable VLAN tagging, type this cmdlet:
Set-VMNetworkAdapterVlan -VMName DemoVM -VMNetworkAdapterName ‘Hyper-V network adapter’ -Untagged
The main advantage of the PowerShell cmdlets is that you can arrange them in any way you want, and create comprehensive scripts. With their help, you can considerably optimize the process of managing and configuring your Hyper-V environment.
How to Protect Hyper-V Environment with NAKIVO Backup & Replication
NAKIVO Backup & Replication is a reliable and cost-effective solution which can provide 24/7 protection of your virtual environment, while ensuring that your most sensitive data and mission-critical applications can be rapidly recovered, even in a case of disaster. NAKIVO Backup & Replication includes a comprehensive set of tools, which enable fast and efficient backup, replication, and system recovery.
With this solution, you can significantly improve the performance of your backup and replication jobs, particularly by optimizing network operations within your infrastructure. For this purpose, NAKIVO Backup & Replication provides the following features:
- Network acceleration applies traffic reduction and data compression tools, which allow you to significantly decrease the amount of data transferred over the WAN. Such results are achieved by the use of two Transporters, which are installed at both sites (source and target). The Transporter in the source site compresses VM data before it is sent over the network, whereas the Transporter in the target site decompresses the received data. As a result, the speed of VM backup and replication jobs can be considerably increased and the network load can be reduced.
- Advanced bandwidth throttling allows you to set data transfer speed limits so as to define how much bandwidth can be used by particular data protection jobs. For this purpose, you need to create global or per-job rules that would control how much bandwidth is consumed during backup operations. These rules can be applied to different data protection jobs and on different schedules. With this feature, you can ensure that your networks are not be overloaded, even during business hours.
- Network Mapping and Re-IP are used in replication, failover, and site recovery jobs when the source site and the target site are connected to different networks and have different IP addresses. To avoid any issues during disaster recovery, you need to create network mapping and Re-IP rules. These rules ensure that source virtual networks can be mapped to appropriate target virtual networks, while source IP addresses can be mapped to target IP addresses during a DR event. These features allow you to efficiently optimize and automate the process of network configuration.
Having a hard time connecting to the internet? Then you might have encountered the error “network adapter is missing.” Luckily, there are several ways to fix this issue. You can either do it manually or use the built-in Windows 10 feature to solve the issue automatically. If you are not sure how to proceed, read this article. It will guide you through the process step by step.
In order to manually configure a virtual network adapter, you can either use the Windows Device Manager or use a third-party application. The loopback adapter is a good example of this, as it is used for testing and for manually configuring hypervisor-specific adapters. If you want to create a virtual network adapter for a specific use, however, you can also use a third-party application that is built into the device OS. These applications can be useful if you have a single-purpose network adapter or if you need to install an older virtual network adapter.
Once you’ve found the right virtual network adapter, you can change its settings. To do so, open the Network and Sharing Center and click on the newly created connection. Next, you need to change the settings of the physical network adapter. Once you’ve made these changes, the virtual network adapter will be detected and displayed in the Network and Sharing Center. If you are using a virtual machine, you can share your Internet connection with other virtual machines by using the same network adapter.
To create a virtual network adapter, go to the Network adapters tab on the control panel. You can create more than one virtual adapter and define the properties of each one. Then, click Create Adapter to assign it to a specific partition. You can also assign it to other devices as well. To create a virtual network adapter, follow these steps:
The Windows installer will detect the radio hardware. Once the adapter is installed, you can configure its settings using the Windows Network Connections App. Alternatively, you can open Windows Control Panel by selecting the Windows icon on the lower-left corner of the screen. Click on Change adapter settings in the left pane and sort the list by clicking on’more options’. If you can’t see the network adapter you’re looking for, check your driver installation.
If you’re using Windows 10, select the “Add legacy hardware” option. In the Add Hardware Assistant window, click Network adapters. Select the “Bridged networking” option. The Add Hardware Assistant will ask for the adapter’s MAC address and then proceed to add the new network adapter to your PC. You’re done! Once you’ve installed the virtual network adapter, you’re all set!
How Do I Create a Network Adapter?
If you’ve never configured a network adapter before, the first step is to open your Control Panel. You’ll find the Network Connections page here. From here, you can configure your network adapter. To do this, you’ll need to select “Change adapter settings” in the left pane and click the More options button. On the next page, click “Manage adapters” to find the one you want.
To open Device Manager, press the Windows key and search “device manager”. The device manager will show up in an elevated search result. Click “Network adapters” and you’ll see a list of network adapters. You can expand the list by clicking on the name of the network adapter. In the network adapter drop-down, click “Update driver” or “Search for hardware changes.”
To manually configure a network adapter, you can use Windows Device Manager. The loopback adapter, now called Microsoft KM-TEST in Windows 10, can be configured manually. Another way to manually configure network adapters is through third-party applications. If you have a network adapter that does not need special network configuration, you can create a virtual adapter using a third-party application.
How Do I Find My Virtual Network Adapter?
When the network adapter on your computer is missing, you may be wondering how to find it. To find the network adapter, start by restarting your computer. If this does not work, try typing in the IP or domain to run a ping test. If you are unable to ping a website, you can open the Control Panel and type in the name of the website. Once you’ve found the address, you can look for the network adapter’s driver by running the ping test.
Alternatively, you can use the registry editor. Click on the Network and Internet control panel in Windows 10. This will show you the list of network connections. Choose one and click ‘Details’ to open the details window. Click OK when you’re done. Your network adapter should now be disabled. If you want to revert to a previous state, you can do this by right-clicking on it.
How Do I Create a Virtual Network Interface?
To create virtual network interfaces on your PC, you can use the Windows(tm) operating system. Virtual IP addresses are also known as virtual clients and virtual servers and can be used for testing and stubs. The steps to accomplish this task may differ from version to version, and you can use more than one method to complete your virtual IP creation. The simplest method involves following the on-screen instructions. You can also refer to the documentation provided by the operating system provider.
To configure a virtual network interface, first you need to configure the interface. The name of the interface where you are going to create the interface is data-link. Next, you need to specify the name of the virtual network interface. You must also configure the interface on an IP level. The IP zone can be configured automatically or manually. The ifconfig command will help you configure the interface. Once it is configured, you can then use it for whatever purpose you need.
What is Virtual Network Adapter?
A virtual network adapter (VNA) is a type of hardware device that lets you create a virtual network without a physical network interface card. These devices are useful for creating complicated network designs that would be impossible otherwise. To configure a virtual network adapter in Windows 10, use the Hyper-V Manager application on your system. Click on the “Network adapters” menu and choose “New virtual network switch.”
The virtual network adapter’s name is Network Adapter, but it can also be called Legacy Network Adapter if you have an older version of Windows. The main settings for virtual network adapters are displayed on the first page of this window. To delete the adapter, click on Remove and then click OK to apply the changes. To edit the remaining settings, expand the adapter and click “Manage network settings.”
Once you’ve created the virtual network adapter, configure it to enable or disable network access. To enable or disable the adapter, type a command to manage the virtual network adapter. If you’ve never used it, you’ll want to know what it does and how to use it. You’ll need to know the Operating System, ManagementOS, and Name for your new VNA. After that, specify the DHCP Guard switch to prevent the guest operating system from issuing an IP address. This is useful in hosting environments and other situations where the Hyper-V administrator is not confident with the guest administrator.
What is VM Network Adapter?
The first step to create a VM Network Adapter is to select the VM’s hardware and select the appropriate settings. Selecting the VM’s hardware will bring up the Network Adapter window. It will show you its basic settings, such as the name and type. Next, you will need to enable teaming. Teaming can only be done if the host and virtual machine are clustered.
The network adapter is used for connecting to networks. Each network adapter is associated with a MAC address, IP address, and hostname. A network adapter connects each VM to the network and is a virtual interface card. It is important to note that each VM can have one network adapter, but it can have up to a total of ten. Each NIC has a primary IP address and up to 254 secondary ones.
Once you’ve added a virtual network adapter, you can manage it through the VirtualCenter. From here, you can select a network from a list and click OK to add the network adapter to your VM. Alternatively, you can edit the network adapter settings of an existing virtual network adapter. The Network Adapter page in the VM’s hardware provides details on its network adapter. You can also change the type of virtual NIC from the VM’s hardware.
How Do I Fix No Network Adapter Windows 10?
If you’re having a hard time connecting to the internet, you’ll want to learn how to fix no network adapter in Windows 10. If you don’t have one, there are a couple of steps you can take. First, open up the Command Prompt and start typing the command netcfg -d. Next, you’ll need to reboot your device. After that, close the lid of your laptop.
Secondly, try to unplug the Ethernet cable from your PC. This will help to reboot your computer, which may fix the problem. Lastly, try reinstalling your network adapter. You can also try to uninstall the network adapter and then reinstall the updated driver. However, this method is only applicable to PCs and is not recommended for laptops. If you’ve tried these methods and still have no luck, you might need to contact your PC manufacturer for more help.
If you’re still experiencing the no network adapter error, you can try to uninstall or rollback the operating system. The problem may be affecting other network adapters in your computer or at the router level. You can also try to repair the problem by restoring your computer to an earlier date. If this does not work, you can also try restoring your computer to an earlier time by pressing the Windows Key + R.
Learn More Here:
1.) Windows Help Center
2.) Windows – Wikipedia
3.) Windows Blog
4.) Windows Central