
Download
Current releases
virt-manager
virt-manager 5.0.0 (gpg) Tuesday November 26, 2024
Releases are curently GPG signed by Pavel Hrdina using
a key having the fingerprint:
4252 D86A 5204 1137 C291 CADF C85C 5E95 7062 A701 (4096R)
Releases 4.1.0 and older are GPG signed by Cole Robinson using
a key having the fingerprint:
D8F5 BE72 9291 CC5E FE4B 4D09 6455 9E28 C21C C7A8 (4096R)
- virt-clone: colne serial files (Oleg Vasilev)
- virt-clone: Copy disk permissions as well (Martin Kletzander)
- virt-install: Add properties for AMD SEV-SNP (Daniel P. Berrangé)
- virt-install: Add passt backend for user network interface
- virt-install: Add support for —sound multichannel,stream (Lin Ma)
- virt-install: Add support for —tpm backend.debug,backend.source (Lin Ma)
- virt-xml: add —edit —convert-to-q35
- virt-xml: add —edit —convert-to-vnc
- virt-xml: Add —edit —boot uefi
- virt-manager: Fix opening graphical console with egl-headless (Feng Jiang)
- virt-manager: Add support to create external snapshots
- virt-manager: Default to scaling=Always for consoles
- virt-manager: switch to not forking by default
- cli: Add more —disk options (Lin Ma)
- cli: Add —memdev target.address_base for virtio-mem and virtio-pmem (Lin Ma)
- cli: Add —features kvm.pv-ipi.state=on|off (Lin Ma)
- cli: Add —video model.blob=on|off (Lin Ma)
- Add missing Hyper-V features and enable most of them by default
- Add loongarch support (Xianglai Li)
- Add support for hvf domain type (Mohamed Akram)
- Support creating sparse volumes on ZFS pools (Iain Buclaw)
- UEFI improvements for riscv64 and loongarch64 VMs (Andrea Bolognani)
- Add graphcis to riscv64 and aarch64
- build: swtich from setuptools to meson
- diskbackend: Drop support for sheepdog (Lin Ma)
- cli: Deprecate —cpu host in favor of —cpu host-model (Andrea Bolognani)
virt-viewer
virt-viewer 11.0
(gpg)
Friday November 18th, 2021
Win x86 MSI
(gpg)
Win x64 MSI
(gpg)
Virt-viewer releases are curently GPG signed by Daniel P. Berrange using
a key having the fingerprint:
DAF3 A6FD B26B 6291 2D0E 8E3F BE86 EBB4 1510 4FDF (4096R)
This same fingerprint is listed at time of the release announcements mails
on the mailing list
- Minimum libgovirt is now 0.3.7
- CentOS 7 is no longer a supported build platform
- Use header bar for oVirt ISO dialog
- Add change CD button to toolbar for oVirt
- Support using ISOs in oVirt DATA storage domains
- Remove clashing -r command line shortcut for ‘resize’ that clashed with
existing ‘reconnect’ shortcut - Support modifier-only hotkeys for cursor release
- Fix smartcard and USB hotkey configuration regression
- Add USB device reset hotkey support
- Fix various mixed up GTK actions for hotkeys
- Release keyboard grab at same time as mouse grab with SPICE
- Fix misc compiler warnings with glib > 2.68
- Fix creation of window when guest uses multiple heads with a single QXL
video card - Updated translations from weblate
- Avoid warnings from GTK from overly strict minimum desktop width/height rules
- Update window action sensitivity to fix regression causing disabled send key
menu items - Fix mixed up action / menu state when user cancels a quit request
- Ensure auth dialog credential fields are cleared
- Fix setting os-id when building RPMs
- Avoid extra hyphen in build ID strings
- Explicitly disable spice/ovirt features when invoking meson for RPM builds
- Fix uninitialized variable for keymaps
virt-bootstrap
virt-bootstrap 1.1.1 (gpg) Tuesday Jul 9th, 2019
- Don’t expose the root password via command line
- Set SElinux file context of destination folder
- Use absolute destination path
- safe-untar: Inherit SElinux context
- don’t allow overwriting of the root partition
Previous releases
- virt-manager: Sources and Changelogs
- virt-viewer: Sources and Changelogs
- virt-bootstrap: Sources and Changelogs
Verifying gpg signatures
As a quick guide, to import a key from the key servers and verify downloads use.
$ gpg --recv-key 0xBE86EBB415104FDF
$ gpg --fingerprint 0xBE86EBB415104FDF
...check it matches fingerprint above...
$ gpg --verify SIGNATURE-FILE  SOURCE-FILE
Virt viewer для Windows
Дано
-
Хост виртуализации с гипервизором KVM.
-
На хосте виртуализации работает виртуальная машина.
-
ПК с установленной ОС Windows.
Надо
-
Управлять виртуальной машиной с ПК, на котором установлена ОС Windows.
Решение
Шаг 1.
На ПК с Windows дём на сайт https://virt-manager.org/download.
Скачиваем программу virt-viewer соответствующей разрядности.

Устанавливаем virt-viewer на ПК с Windows.
Шаг 2
Идём на ПК с гипервизором, запускаем Virt-manager.
-
Открываем свойства виртуальной машины, к которой нужно подключаться из-под Windows.
-
Переходим на «Дисплей Spice».
-
Настраиваем параметры.
-
Нажимаем кнопку «Применить».

Важно!
Запомните порт, на котором работает дисплей Spice.
В моём примере — это tcp/ip 5900
Шаг 3
На ПК с гипервизором разрешаем подключения на порт 5900 (мы его узнали на предыдущем шаге). Для этого запускаем терминал, становимся суперпользователем root и подаём 2 команды.
USER
firewall-cmd –add-port=5900/tcp –permanent
firewall-cmd –reload
Надеюсь, что вы знаете IP-адрес своего ПК с гипервизором, он нам пригодится на следующем шаге.
Ели не знаете, то его можно уточнить при помощи команды
ifconfig
Шаг 4
Возвращаемся на ПК с Windows.
-
Запускаем программу Remote viewer
-
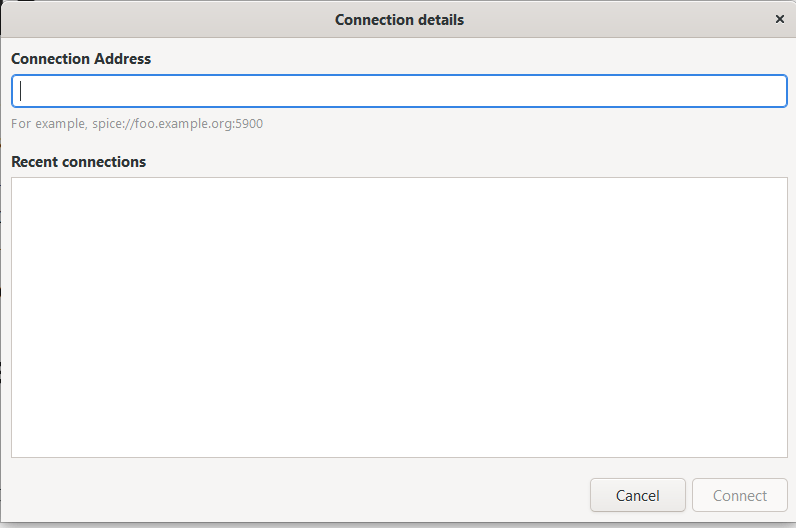
Указываем адрес подключения.
-
Нажимаем кнопку подключиться.
В моём случае адрес подключения получился таким: spice://192.168.100.10:5900
Здесь:
-
spice — протокол подключения
-
192.168.100.10 — IP-адрес хоста виртуализации
-
5900 — порт подключения.

Шаг 5
Начинаем управлять виртуальной машиной.

Источники
⇑ Наверх ⇑
В моей WIKI постоянно ведётся какая-то работа со статьями.
Если у вас возникли вопросы или замечания,
можете их отправлять на почту support@mihanik.net
Virt-Viewer or Remote Viewer is an open-source program by Redhat to allows users to control and view the virtual machines that are running on local or remote servers. It is light in weight and offers a simple graphical user interface to access VMs managed by Libvirt or even without it. For viewing the remote Virtual Machine, it use different protocols such as VNC and SPICE. However, unlike Virt-Manager which is not available for Windows, we can’t use Virt-Viewer to create, delete, or edit the virtual machines.
Step-by-Step Remote Viewer Windows 11 installationStep 1: Run CMD as AdminStep 2: Update Winget SourceStep 4: Install Virt-Viewer on Windows 11 or 10Step 5: Launch Remote ViewerConclusion:
Step-by-Step Remote Viewer Windows 11 installation
The command given to install Virt-viewer on Windows 11 will be the same for Win 10 as well.
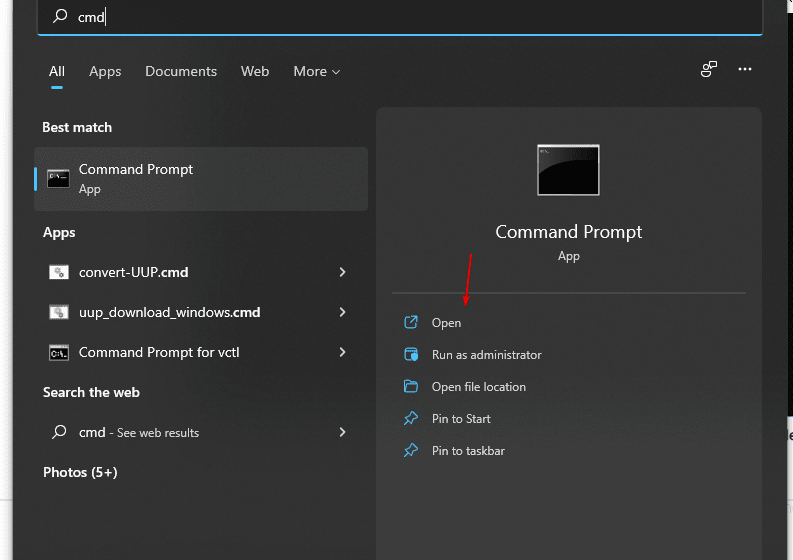
Step 1: Run CMD as Admin
Here we are going to learn the command line method to install Virt-Viewer on Windows, therefore run the Command Prompt as Admin. For that you can click on the Windows Start button and search for it, as it appears click on the “Run as Administrator” option.
Step 2: Update Winget Source
The Winget is the default package manager on Windows 11 and 10 for installing applications using the command line. So, let’s first update its source using the given command on CMD or PowerShell.
winget source updateStep 4: Install Virt-Viewer on Windows 11 or 10
Now, we use the package installation command of Winget to download and install Virt-Viewer automatically on Windows. We just need to execute a single command that’s it, no need to visit any third-party website manually to download the application.
winget install virt-viewerNote: Those who don’t want to use the command line can manually download it and install it like any other application from this link: Download Virt-Viewer for Windows
Step 5: Launch Remote Viewer
By following the previous step of this tutorial you will have the “Virt-Viewer” on your Windows 11 or 10 system; now to launch it go to the Start menu search for “remote viewer” as it appears in the result, and click to launch it.
The Remote Viewer and Virt-Viewer are same and both use the SPICE and VNC protocols however unlike Virt-Viewer it doesn’t need libvirt to connect remote VMs. To understand more about it refer to the Redhat help page.
Conclusion:
When we install the Virt-Viewer, the Remote viewer will be installed along with the Virt-Viewer package. Using the Winget, we can configure various applications with a few commands only. Those who want to use Virt-Manager on Windows 10 can see our article using this link.
Download Virt Viewer
Windows clients requires the
virt-viewer
tool to connect to their Virtual Machine.
Fix Windows registry
If virt-viewer won’t start automatically after when viewing the
virtual machine, add this to the Registry, or download spice.reg. (Thanks to @gmiranda).
Windows Registry Editor Version 5.00

[HKEY_CLASSES_ROOT\spice]
@="URL:spice"
"URL Protocol"=""

[HKEY_CLASSES_ROOT\spice\DefaultIcon]
@="C:\\Program Files\\VirtViewer v5.0-256\\bin\\remote-viewer.exe,1"

[HKEY_CLASSES_ROOT\spice\Extensions]

[HKEY_CLASSES_ROOT\spice\shell]
@="open"

[HKEY_CLASSES_ROOT\spice\shell\open]


[HKEY_CLASSES_ROOT\spice\shell\open\command]
@="\"C:\\Program Files\\VirtViewer v5.0-256\\bin\\remote-viewer.exe\" \"%1\""