Платформа виртуализации Hyper-V доступна не только в Windows Server, но и в десктопных редакциях Windows 10 и 11. С помощью встроенного гипервизора Hyper-V пользователи могут создавать и запускать виртуальные машины. В этой статье мы рассмотрим, как включить компоненты Hyper-V в Windows 10 и 11.
Компоненты роли виртуализации Hyper-V можно установить в Pro и Enterprise редакциях Windows 10 и 11. Сначала, нужно проверить, поддерживает ли ваш компьютер виртуализацию Hyper-V. Откройте командную строку с правами администратор и выполните:
systeminfo
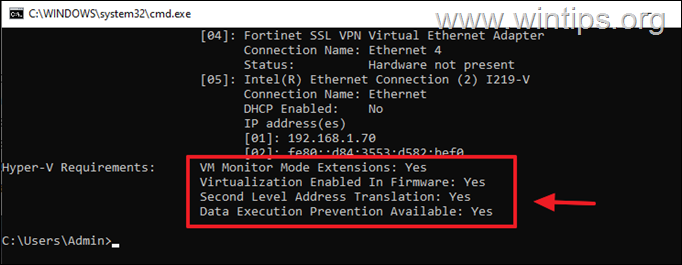
Промотайте в конец вывода и проверьте, что включены следующие компоненты в разделе Hyper-V Requirements:
VM Monitor Mode Extensions: Yes
Virtualization Enabled In Firmware: Yes
Second Level Address Translation: Yes
Data Execution Prevention Available: Yes
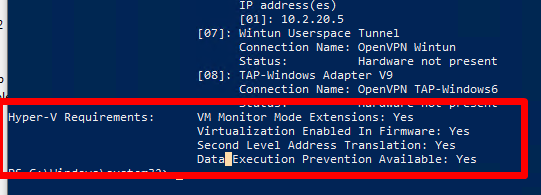
Если здесь указано Virtualization Enabled in Firmware: No, попробуйте включить аппаратную поддержку виртуализации в настройках BIOS/UEFI компьютера (может называться Intel VT-X или AMD-V).
Также проверить совместимость вашего процессора можно на вкладке CPU в диспетчере задач Windows. Здесь должно быть указано
Virtualization: Enabled
.
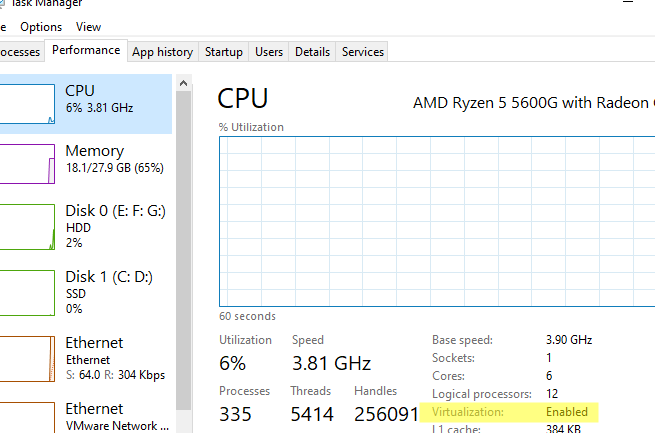
Если тут указано
A hypervisor has been detected. Features required for Hyper-V will not be displayed
, значит компоненты Hyper-V уже установлены.
Включить роль Hyper-V в Windows 10 и 11 можно через панель управления компонентами Windows Features. Выполните команду
optionalfeatures
и выберите для установки компоненты Hyper-V Platform и Management Tools.
Также вы можете включить компоненты Hyper-V в Windows из командной строки. С помощью PowerShell команды:
Enable-WindowsOptionalFeature -Online -FeatureName Microsoft-Hyper-V -All
Или с помощью DISM:
dism.exe /Online /Enable-Feature:Microsoft-Hyper-V-All

После завершения установки компонентов перезагрузите компьютер. Проверьте, что компоненты гипервизора установлены:
Get-WindowsOptionalFeature -Online -FeatureName *hyper*|ft

Включите автоматический запуск Hyper-V при загрузке:
bcdedit /set HypervisorLaunchType auto
Для управления Hyper-V и виртуальными машинами используется графическая консоль Hyper-V Manager (
virtmgmt.msc
). Запустите ее и можете начать создавать виртуальные машины.
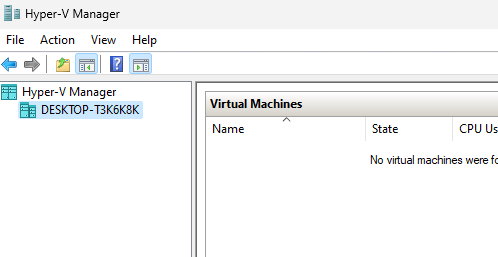
Также для управления гипервизором и ВМ можно использовать командлеты PowerShell из встроенного модуля Hyper-V.
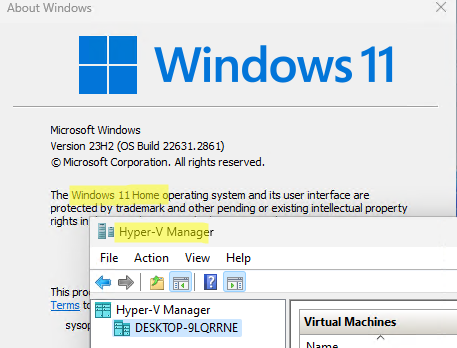
Компонент виртуализации Hyper-V отсутствует в домашних (Home) редакциях Windows 10 и 11. Однако есть небольшой трюк, который позволяет установить роль Hyper-V из зранилища компонентов WinSxS даже в Home редакции Windows.
Создайте на рабочем столе файл enable-hyperv.bat с кодом
pushd "%~dp0"
dir /b %SystemRoot%\servicing\Packages\*Hyper-V*.mum >hyper-v.txt
for /f %%i in ('findstr /i . hyper-v.txt 2^>nul') do dism /online /norestart /add-package:"%SystemRoot%\servicing\Packages\%%i"
del hyper-v.txt
 Dism /online /enable-feature /featurename:Microsoft-Hyper-V -All /LimitAccess /ALL
pause
Запустите BAT файл с правами администратора.
После завершения установки компонентов, перезагрузите компьютер. Проверьте, что виртуализация Hyper-V теперь доступна в вашей Home редакции Windows.
How to Enable Virtual Machine Platform in Windows 10
Enabling the Virtual Machine Platform in Windows 10 is a straightforward process that involves accessing the Windows Features menu and activating the required option. You can complete this task in just a few steps, which will allow you to run virtual machines and use hypervisors on your system. This guide will walk you through the entire process so you can get started with virtualization right away.
In this section, we’ll cover the steps needed to enable the Virtual Machine Platform on your Windows 10 computer. This platform is essential for running virtual machines efficiently.
Step 1: Open Control Panel
First, open the Control Panel by searching for it in the Start Menu.
When you open the Start Menu and type «Control Panel,» you should see it pop up as one of the first options. Click on it to proceed.
Step 2: Navigate to Programs
Next, navigate to the «Programs» section within the Control Panel.
In the Control Panel window, you’ll see a category labeled «Programs.» Click on this to access the next set of options.
Step 3: Access Windows Features
Access the Windows Features menu by clicking on «Turn Windows features on or off.»
Within the Programs section, you’ll find an option that says «Turn Windows features on or off.» Clicking this will open a new window with a list of features.
Step 4: Enable Virtual Machine Platform
In the Windows Features window, scroll down and check the box next to «Virtual Machine Platform.»
Find «Virtual Machine Platform» in the list and click the checkbox next to it. This enables the feature.
Step 5: Restart Your Computer
Finally, click «OK» and restart your computer to apply the changes.
After enabling the Virtual Machine Platform, you’ll need to restart your system for the changes to take effect. Save any work before doing this.
After completing these steps, your Windows 10 PC will support virtual machines. You’ll be able to run virtualization software and create virtual environments with ease.
Tips for How to Enable Virtual Machine Platform in Windows 10
- Make sure your system meets the hardware requirements for virtualization.
- Keep your Windows 10 updated to ensure compatibility with the Virtual Machine Platform.
- You may also need to enable virtualization in your BIOS settings.
- Check for additional virtualization tools that might be beneficial for your specific needs.
- Ensure your antivirus software is compatible with virtualization features.
Frequently Asked Questions
What is the Virtual Machine Platform?
The Virtual Machine Platform is a feature that allows you to run virtual machines and use hypervisors on your Windows 10 system.
Do I need to enable virtualization in BIOS?
Yes, you may need to enable virtualization technology in your BIOS settings for the Virtual Machine Platform to work.
Can I use this feature on any version of Windows 10?
No, the Virtual Machine Platform is available in specific editions of Windows 10, such as Pro and Enterprise.
What if I can’t find the Virtual Machine Platform option?
Ensure your Windows is up to date and that your hardware supports virtualization.
Will enabling this feature affect my computer’s performance?
Enabling the Virtual Machine Platform should not significantly impact your computer’s performance. However, running multiple virtual machines may require more resources.
Summary
- Open Control Panel.
- Navigate to Programs.
- Access Windows Features.
- Enable Virtual Machine Platform.
- Restart Your Computer.
Conclusion
Enabling the Virtual Machine Platform on Windows 10 is a simple yet powerful step to dive into the world of virtualization. Whether you’re a developer testing different environments or a tech enthusiast experimenting with new systems, this feature provides the foundation you need. Remember to check your system’s requirements and update your software to avoid any hiccups along the way.
If you found this guide helpful, feel free to explore more about virtualization and how it can benefit your computing needs. Whether you’re managing complex workflows or just curious about new technology, enabling the Virtual Machine Platform is a gateway to numerous possibilities. Happy virtualizing!
Matthew Burleigh is the head writer at solveyourtech.com, where he covers topics like the iPhone, Microsoft Office, and Google apps. He has a Bachelor’s and Master’s degree in Computer Science and has over 15 years of IT experience.
He has been writing online since 2008 and has published thousands of articles that have been read millions of times.
You can read his full bio here.
Applies ToWindows 11 Windows 10
Support for Windows 10 will end in October 2025
After October 14, 2025, Microsoft will no longer provide free software updates from Windows Update, technical assistance, or security fixes for Windows 10. Your PC will still work, but we recommend moving to Windows 11.
Learn more
Virtualization lets your Windows device emulate a different operating system, like Android or Linux. Enabling virtualization gives you access to a larger library of apps to use and install on your device. If you upgraded your device from Windows 10 to Windows 11, these steps help you enable virtualization.
Note: Many Windows devices already have virtualization enabled, so you might not need to follow these steps.
Before you begin, determine your device model and manufacturer. You’ll need this information later in the process.
Before you begin, we recommend opening this page on a different device. Here’s how to get to the UEFI from Windows:
-
In the Settings app on your Windows device, select System > Recovery or use the following shortcut:
Recovery
Note: In Windows 10, you can access from Update & Security > Recovery
-
Under Recovery options, next to Advanced startup, select Restart now
-
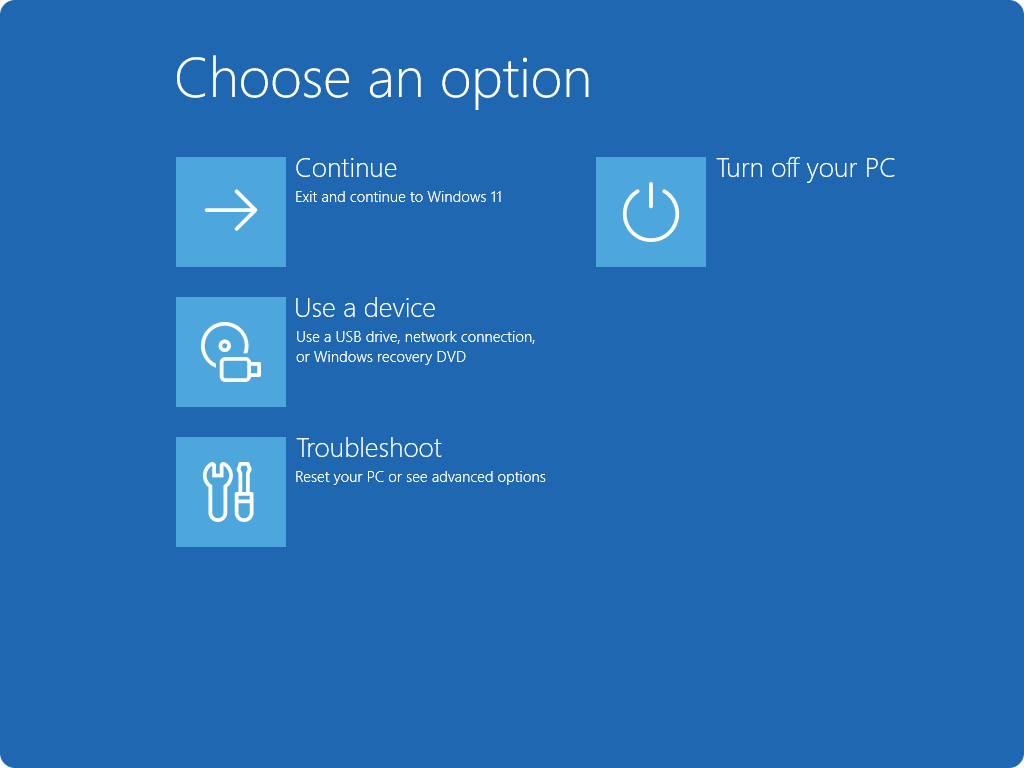
Your PC will restart in the Windows Recovery Environment. Select Troubleshoot > Advanced options > UEFI Settings > Restart
-
Your PC will restart again and you’ll be in the UEFI utility. At this step, you might see the UEFI referred to as the BIOS on your PC
Note: These instructions might apply if you upgraded your PC from Windows 10 to Windows 11.
-
Select Start , enter Windows features, and select Turn Windows features on or off from the list of results
-
In the Windows Features window that just opened, find Virtual Machine Platform and select it
-
Select OK. You might need to restart your PC
Need more help?
Want more options?
Explore subscription benefits, browse training courses, learn how to secure your device, and more.
Hyper-V is Microsoft’s virtualization platform. It is available on Windows Server operating systems and Microsoft has also added the Hyper-V functionality to Windows 8.1, Windows 10, and Windows 11.
Unfortunately, the Hyper-V feature is only available in Windows 10 Professional, Enterprise, and Education editions. You can’t install it on Windows 10 Home edition by default.
However, using the steps in this article, we’ll show you how to enable Hyper-V in the Windows 10 Home edition.
Table of Contents
Does Your System Support Virtualization?
Before moving forward, we need to check if our system supports virtualization. Hardware virtualization is required for Hyper-V to function correctly. Otherwise, you can use other virtualization platforms like Virtualbox and VMWare.
There are four basic requirements for Hyper-V to be installed on a Windows 10 computer:
- VM Monitor Mode Extensions
- Virtualization enabled in firmware
- Second Level Address Translation (SLAT)
- Data Execution Prevention
All four of these requirements can be easily checked through a Command Prompt cmdlet. Run the following cmdlet in an elevated Command Prompt and obtain the results on the four requirements:
systeminfoThis will generate a list, and you will find the section “Hyper-V Requirements” at the end of the list containing the details of the 4 requirements, as in the image below:

If these requirements are met, the results will display “Yes.” However, if you find that “Virtualization Enabled In Firmware” states “No,” you need to enable it using the guide below.
Enable Virtualization in Firmware/BIOS
Most modern computers support all the requirements of Hyper-V. But some systems have virtualization disabled from BIOS. You can go to the BIOS setup computer at the startup and enable Virtualization using the following steps:
-
Restart your computer and enter the BIOS setup using the hotkey.
-
Here, look for the “Virtualization” tab and click on it, or use the arrow keys on the keyboard to highlight it and press Enter.
-
Now enable Virtualization.
Enable virtualization from BIOS -
Now save the new settings and exit BIOS. The system will now reboot normally.
When it reboots, continue with the following steps to install and enable Hyper-V.
Install Hyper-V in Windows 10 Home
Note: Since Windows Home edition comes without Hyper-V, you must first install it. If you have the Pro, Education, or Enterprise editions, then you may skip this step and proceed to the next section of this article. To check which edition you have, type in winver in the Run Command box and obtain your operating system’s details.
Follow the steps below to install and enable Hyper-V in Windows 10 Home:
-
Download Hyper-V Installer by clicking on the following link:
Hyper-V installer and enabler for Windows 10 Home (317 bytes, 40,984 hits)
-
Once downloaded, right-click on the file and select Run as Administrator from the context menu. This will trigger the installation script.
Run as admin -
If prompted with a UAC, click Yes.
Click Yes on User Access Control It may take some time to complete the installation. Please let it complete without interruption.
-
Once complete, press Y to continue.
Press Y to continue The computer will now reboot and update.
Once rebooted, Hyper-V will have installed and automatically enabled on your Windows Home.
How to Enable Hyper-V on Windows 10 (Pro, Enterprise, Education)
The method given above automatically enables Hyper-V as well as installing it on a Windows Home. However, if you are running Windows Pro, Education, or Enterprise edition, then you can enable Hyper-V using any one of the following methods.
Enable Hyper-V from Optional Features
Since Hyper-V is an optional feature that one can enable when needed, you can enable it from the Optional Features applet. Here is how:
-
Open the Optional Features applet by typing in optionalfeatures in the Run Command box.
Open the Optional Features applet -
Now look for the “Hyper-V” option from the list and check the box next to it. Then click Ok.
Enable Hyper V from Optional Features -
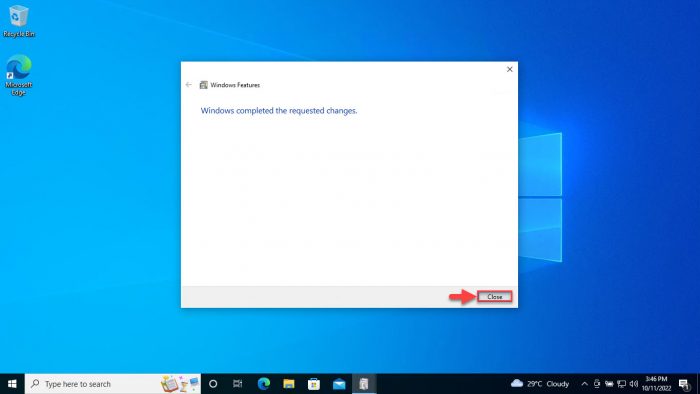
You will now see a window applying the changes. Click Close when it is done.
Close installation window
Hyper-V will now be installed and enabled. You can now access the Hyper-V manager by searching for it in the search box in the taskbar or through the Start menu.

Alternatively, you can also use the other 2 command-line methods to enable Hyper-V on Windows 10.
Enable Hyper-V from Command Prompt
Follow these steps to enable Hyper-V using the DISM command tool in the Command Prompt:
-
Run the following cmdlet in an elevated Command Prompt:
DISM /Online /Enable-Feature /All /FeatureName:Microsoft-Hyper-VEnable Hyper V from Command Prompt -
When asked, enter Y to restart the computer:
Enter Y
The computer will now restart, When it does, Hyper-V should be enabled successfully.
Enable Hyper-V from Windows PowerShell
If you’d rather prefer to use Windows PowerShell, here is how to enable Hyper-V:
-
Run the following cmdlet in an elevated PowerShell:
Enable-WindowsOptionalFeature -Online -FeatureName Microsoft-Hyper-V-AllEnable Hyper V using PowerShell -
When asked, enter Y and hit Enter to restart the computer:
Enter Y When the computer reboots, Hyper-V will have installed successfully.
These are the 3 methods to enable Hyper-V in Windows 10, provided that the hardware is supported and Hyper-V is installed.
How to Disable Hyper-V in Windows 10 (Home, Pro, Enterprise, Education)
If you don’t want this functionality on your computer, you can always disable it. There are three ways to disable it:
-
From Optional Features
-
Open the Optional Features applet by typing in optionalfeatures in the Run Command box.
Open Optional Features applet -
Uncheck the box next to Hyper-V and click Ok.
Disable Hyper-V from Optional Features -
When done, click Restart now to finalize the changes.
Restart PC
-
-
From Command Prompt
Run the following cmdlet in an elevated Command Prompt to disable Hyper-V:
DISM /Online /Disable-Feature /FeatureName:Microsoft-Hyper-V-allIf asked for a reboot, enter Y for Yes.
Disable Hyper V from Command Prompt -
From PowerShell
Run the following cmdlet in an elevated PowerShell to disable Hyper-V:
Disable-WindowsOptionalFeature -Online -FeatureName Microsoft-Hyper-V-AllIf asked for a reboot, enter Y for Yes.
Disable Hyper V from Windows PowerShell
Closing Thoughts
Sometimes Hyper-V is very useful even for home users. It can be used to test and evaluate new software without hurting the host system. But there are times when enabling virtualization support or installing Hyper-V is not recommended.
Hyper-V requires some system resources to run its virtual machines. For example, if you have 4 GB RAM, you won’t be able to give any resources to the virtual machine. So it would not be wise to enable Hyper-V functionality.
For what purpose do you want to enable Hyper-V functionality on your Windows 10 Home computer? Please share your thoughts in the comments below.
,
If you want to enable Hyper-V on Windows 10/11 Home edition, continue reading below.
Hyper-V is Microsoft’s hypervisor platform and, like the VΜware or VirtualBox hypervisors, allows you to run multiple operating systems on a singe Windows PC.
With the Hyper-V virtualization platform, you can create virtual machines that run on their own hardware without affecting the host. Compared to other hypervisors, Hyper-V offers comparable features and functionality which is why it is currently used by many system administrators to do their testing.
Hyper-V was originally built into Windows Server 2008 and later versions, but now it’s also available in Windows 10/11 Pro, Enterprise, and Education editions. But, don’t worry… if you’re a Windows 10/11 Home owner, in this article I’ll show you how you can install the Hyper-V platform even on your own system.
Hyper-V Requirements
A Virtual Machine (usually called «VM»), is a virtual computer with its own hardware (CPU, RAM, DISK, etc.), that is «borrowed» from the physical computer (usually called «HOST»). Thus, to install Hyper-V, the host machine must meet the following hardware requirements.
A. RAM: 8GB at least. (If you want to get better performance, RAM should be increased to at least 16GB or better to 32GB).
B. CPU: You must have a 64-bit Processor that supports Second Level Translation Address (SLAT). (Most Intel and AMD processors support the SLAT hardware mechanism, especially on computers pre-installed with Windows 8 or a later versions).
* Info: The «Second Level Address Translation» (SLAT), is a hardware mechanism which is supported when the Virtualization Technology is supported. If you own an Intel processor, go to your processor’s specification page and look if the «Intel® Virtualization Technology (Intel® VT-x)» located under «Advanced Technology». Alternatively see if the «Virtualization Technology» feature is enabled in BIOS.
C. in order to run Hyper-V, the following items must be enabled in BIOS : *
- Virtualization Technology
- Hardware Enforced Data Execution Prevention (DEP)
* Notes:
1. To find out if the above items are already enabled on your system:
1. Open Command Prompt and type systeminfo.exe
2. Scroll at the end of the report to find out if the Hyper-V requirements are met. If not, proceed to enable them in Bios by using the instructions below.

2. To Enable Virtualization Technology & Data Execution Prevention (DEP) in BIOS:
1. Restart the computer and repeatedly press one of these keys: F2, F10, F8, F12 or Del* when the computer manufacturer’s logo appears on the screen to enter the BIOS/UEFI settings (* The key may vary from manufacturer to manufacturer).
2. To Enable Virtualization in BIOS:
a. If you own an Intel CPU:
- Click the Advanced* tab and set the Virtualization (aka «Intel® Virtualization Technology (VT-x)» to Enable.
* Note: In some BIOS the «Virtualization» setting is located in Performance, or in System Configuration sections.
b. If you own an AMD CPU:
- Click the M.I.T. tab –> Advanced Frequency Settings –> Advanced Core settings and the set the SVM Mode (aka «Secure Virtual Machine») to Enable.
3. To Enable Data Execution Prevention (DEP) in BIOS:
Depending on your computer manufacturer, the option to enable the hardware DEP varies and can be located at Advanced or in Performance section and may be labeled as «Data Execution Prevention,» «XD,» «Execute Disable,» or «NX».
How to Enable Hyper-V on Windows 11/10 Home.
Once all the requirements above are met, follow these instructions to activate the Hyper-V feature on your Windows 10/11 home PC.
1. Open Notepad and paste the code below: *
pushd «%~dp0»
dir /b %SystemRoot%\servicing\Packages\*Hyper-V*.mum >hyper-v.txt
for /f %%i in (‘findstr /i . hyper-v.txt 2^>nul’) do dism /online /norestart /add-package:»%SystemRoot%\servicing\Packages\%%i»
del hyper-v.txt
Dism /online /enable-feature /featurename:Microsoft-Hyper-V -All /LimitAccess /ALL
pause
* Note: The above script adds the Hyper-V feature on Windows 10/11 home. The code has been created by the Microsoft Virtualization team on Github.
2. Save the file as Hyper-V Enabler.bat and close notepad.
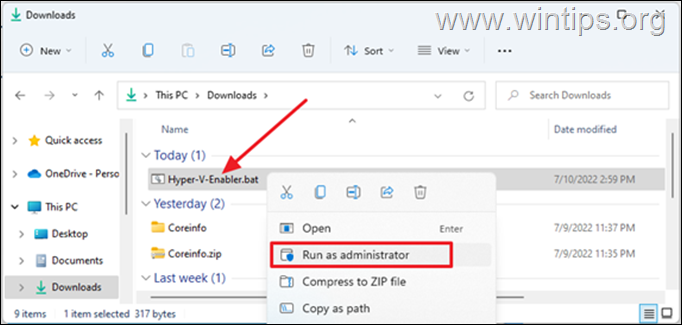
3. Right-click on Hyper-V Enabler.bat and select Run as administrator. This will open the command prompt, and trigger the installation process to begin.
4. Once the installation completed, you will get a prompt asking if you want to restart the computer now, press Y to proceed.

5. During rebooting Windows will install updates and will take a few minutes to complete.
6. After signing to Windows, press the Windows key + R keys to open the Run dialog box.
7. Type optionalfeatures and hit Enter.
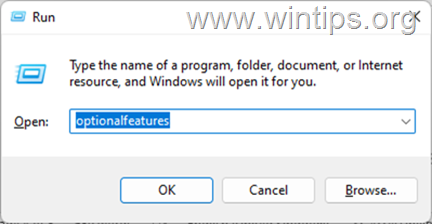
8. Check the Hyper-V option and press OK to enable the feature.
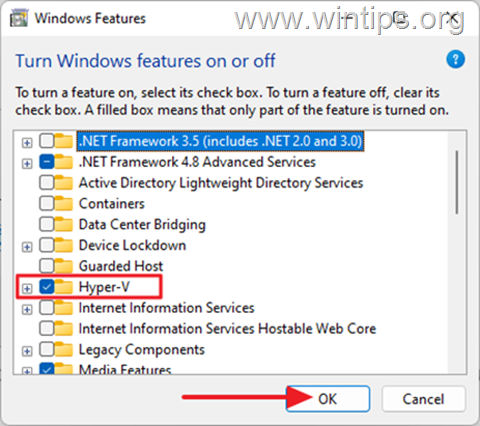
9. Wait for Windows to install Hyper-V, and when prompted, restart your computer.
10. Search for ‘hyper-v» to Open it and start creating virtual machines.
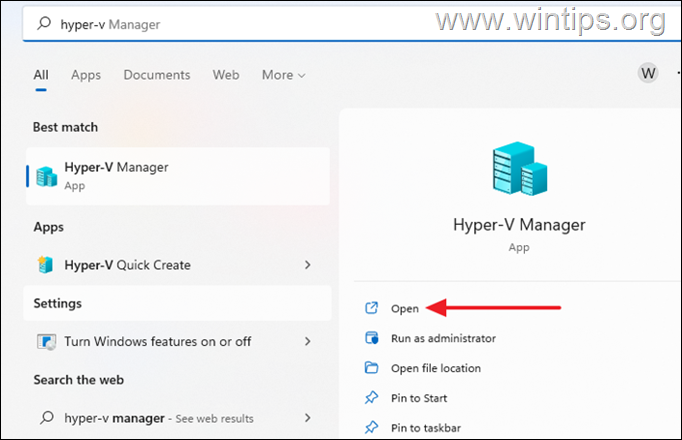
Final words: These are all the steps required to enable Hyper V on Windows 10 Home & Windows 11 Home Editions. If something doesn’t work as instructed, make sure your computer meets the requirements to run Hyper-V.
You can always disable Hyper-V if you no longer need it, either by unchecking the Hyper-V check box on Windows Features, or by executing the below command in PowerShell (Admin):
- DISM /Online /Disable-Feature /FeatureName:Microsoft-Hyper-V
That’s it! Which method worked for you?
Let me know if this guide has helped you by leaving your comment about your experience. Please like and share this guide to help others.
If this article was useful for you, please consider supporting us by making a donation. Even $1 can a make a huge difference for us in our effort to continue to help others while keeping this site free:
- Author
- Recent Posts
Konstantinos is the founder and administrator of Wintips.org. Since 1995 he works and provides IT support as a computer and network expert to individuals and large companies. He is specialized in solving problems related to Windows or other Microsoft products (Windows Server, Office, Microsoft 365, etc.).

