
Introduction
This is a set of best practices to follow when installing a Windows Server 2012(R2) guest on a Proxmox VE server 6.x.
Install
Prepare
To obtain a good level of performance, we will install the Windows VirtIO Drivers during the Windows installation.
- Create a new VM, select «Microsoft Windows 8.x/2012/2012r2» as Guest OS and enable the «Qemu Agent» in the System tab. Continue and mount your Windows Server 2012 ISO in the CDROM drive
- For your virtual hard disk select «SCSI» as bus with «VirtIO SCSI» as controller. Set «Write back» as cache option for best performance (the «No cache» default is safer, but slower) and tick «Discard» to optimally use disk space (TRIM).
- Configure your memory settings as needed, continue and set «VirtIO (paravirtualized)» as network device, finish your VM creation.
- For the VirtIO drivers, upload the driver ISO (use the stable VirtIO ISO, download it from here) to your storage, create a new CDROM drive (use «Add -> CD/DVD drive» in the hardware tab) with Bus «IDE» and number 0. Load the Virtio Drivers ISO in the new virtual CDROM drive.
- Now your ready to start the VM, just follow the Windows installer.
- Note for Older Version of Windows like Windows-2012 (use the stable older version of VirtIO ISO — virtio-win-0.1.189.iso, download it from here)
Launch Windows install
- After starting your VM launch the noVNC console
- Follow the installer steps until you reach the installation type selection where you need to select «Custom (advanced)»
- Now click «Load driver» to install the VirtIO drivers for hard disk and the network.
- Hard disk: Browse to the CD drive where you mounted the VirtIO driver and select folder «vioscsi\2k12\amd64» and confirm. Select the «Red Hat VirtIO SCSI pass-through controller» and click next to install it. Now you should see your drive.
- Network: Repeat the steps from above (click again «Load driver», etc.) and select the folder «NetKVM\2k12\amd64», confirm it and select «Redhat VirtIO Ethernet Adapter» and click next.
- Memory Ballooning: Again, repeat the steps but this time select the «Balloon\2k12\amd64» folder, then the «VirtIO Balloon Driver» and install it by clicking next. With these three drivers you should be good covered to run a fast virtualized Windows Server 2012 system.
- Choose the drive and continue the Windows installer steps.
HINT: There is a video showing the process for a Windows Server 2016 installation which is the same as for Windows Server 2012.
Install Guest Agent and Services
Guest Agent
If you enabled the Qemu Agent option for the VM the mouse pointer will probably be off after the first boot.
To remedy this install the «Qemu Guest Agent». The installer is located on the driver CD under guest-agent\qemu-ga-x86_64.msi.
Drivers and Services
VirtIO guest tools installer
The easiest way to install missing drivers and services is to use the provided MSI installer. It is available on the driver CD since version «virtio-win-0.1.173-2».
Run the «virtio-win-gt-x64.msi» file located directly on the CD. If you do not plan to use SPICE you can deselect the «Qxl» and «Spice» features. Restart the VM after the installer is done.
After all this the RAM usage and IP configuration should be shown correctly in the summary page of the VM.
For more information and configuration about ballooning, see Dynamic Memory Management
Check for missing drivers
- See also: Paravirtualized Block Drivers for Windows
Unknown device in device manager
Make sure to include subfolders
Go to the Device Manager to see if there are any drivers missing.
For any unknown device:
- Right click an select «Update driver».
- Select «Browse my computer for driver software».
- Select the Driver CD. Make sure that «Include subfolders» is checked.
- Once a driver has been found you might be prompted with a security warning asking if you «Would like to install this device software». Click «Install».
Installing WSL(g)
To run WSL (Windows Subsystem for Linux) you need to enable Nested Virtualization. Make sure to set your processor to ‘host’; if you already set up your VM and did not select ‘host’ as processor, you can change it in the ‘Hardware’ section of your VM in the web interface.
Follow the official instructions.
If you are using a GPU via PCI(e) passthrough, you might need to add
args: -cpu host,kvm=off
to your config file at /etc/pve/qemu-server/<vm_id>.conf, see the vfio blog
Further Information
RAW vs QCOW2
The RAW file format provides slightly better performance WHILE qcow2 offers advanced features such as copy on write and Live_Snapshots independent of the backing storage.
Since Proxmox VE version 2.3, qcow2 is the default format.
VirtIO Drivers
Make it really easy:Build your ISO with drivers already included:
Windows guests — build ISOs including VirtIO drivers
Latest ISO file with VirtIO drivers:
https://fedorapeople.org/groups/virt/virtio-win/direct-downloads/latest-virtio/
See also
Windows 2003 guest best practices
Windows 2008 guest best practices
Item Preview
There Is No Preview Available For This Item
This item does not appear to have any files that can be experienced on Archive.org.
Please download files in this item to interact with them on your computer.
Show all files
775
Views
2
Favorites
DOWNLOAD OPTIONS
Uploaded by
Unknown
on
SIMILAR ITEMS (based on metadata)
Estimated reading time: 1 min
Install VirtIO drivers for Windows Server 2012
In this article, we’re explaining how to install the VirtIO drivers on Windows Server 2012.
Prerequisites
- VPS with Windows Server 2012 installed.
- You have to be logged in as an administrator.
Step 1: Log in with RDP into Windows Server 2012
Connect to your server with the login credentials which you can find in your client area.
Step 2: Downloading the Virtio Installer
Go to https://fedorapeople.org/groups/virt/virtio-win/direct-downloads/archive-virtio/ and click on the most recent map. Find the .exe file and click on it. In our case it’s Virtio-Win-0.1.189. This will start the download.
When it’s done downloading, run the application. You can do that by clicking on the File Explorer and go to Downloads.
Then click on the download.
Step 3: The installation
Agree to the license terms and conditions and click Install.
Click Next.
Accept the terms in the License Agreement and click Next.
The features list contains: Balloon, Network, Pypanic, Qemufwfcg, Qemupciserial, Viorng, Vioscsi, Vioserial, Viostor.
In this menu, you can choose if and where features will be installed. In this case, we’re keeping it how it is. Click Next to continue.
Now click Install to start the installation.
When the installation is done, click on Finish to finish the installation.
Conclusion
Congratulations, you have successfully installed the VirtIO Drivers on Windows Server 2012.
Was this article helpful?
Like
3
Dislike
1
When dealing with hypervisors it is not uncommon to be required to supply specific drivers in order to recognize the virtual hardware, such as NICs and SCSI controllers. A while back I wrote blog articles on how to inject VMware drivers (PVSCSI and VMXNET3) into a Windows Server 2008 R2, Windows 7 image and Windows Server 2012. You can check out those articles here and here. But if you use the Nutanix Acropolis hypervisor (based on KVM), you will need a different set of drivers.
This article will show you how to inject the VirtIO drivers into your Windows Server 2012 R2 ISO, so that it will recognize the virtual KVM hardware. Do keep in mind that in the future Nutanix will be redistributing the Fedora VirtIO drivers, after we get them WHQL signed by Microsoft. So while this article uses unsigned Fedora drivers, in the future you can use fully signed and supported drivers. Stay tuned for that release!
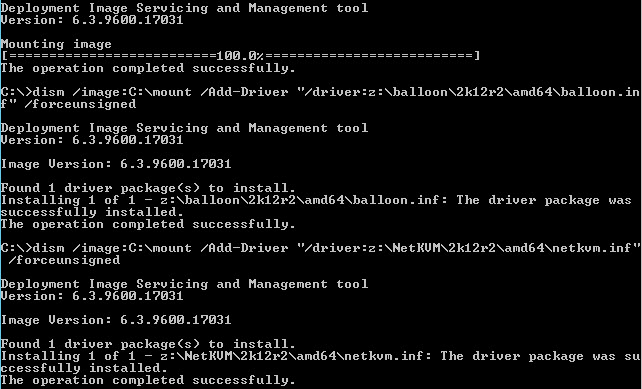
The process below injects the required drivers into the Windows Server 2012 R2 installation boot files, and the actual Window Server operating system, for a fully KVM aware image. The drivers include Balloon, NetKVM, serial, rng, SCSI, and stor.
1. Download the Windows 8 ADK (Assessment and Deployment Kit) from here. Never mind that it says Windows 8, as it will work with Windows Server 2012 R2.
2. Start the installation process and after a long download select the two options below (Deployment Tools and Windows Preinstallation Environment (Windows PE)). WinPE is optional, but in case you need it in the future, I’d install it anyway. If you are in a hurry and won’t ever use WinPE, just select Deployment tools.

3. Mount the Windows Server 2012 R2 ISO. Navigate to the Sources directory and copy boot.wim and install.wim to your computer, say on the C: drive under C:\WIM.
4. Download the Fedora VirtIO Drivers from here, or when they are released, the Microsoft-signed Nutanix Acropolis driver bundle. Fedora packages the drivers as an ISO, so mount that ISO to your VM. I’m using the Z drive for my CD-ROM.
5. Create a folder on the C: drive called Mount. This will be the WIM mounting target.
6. Depending on your Windows Server 2012 R2 ISO image, it may have varying amounts of images included in the WIM. The VL ISO I have contains four indexes, or images. You can list the indexes with the following command:
dism /get-wiminfo /wimfile:C:\WIM\install.wim
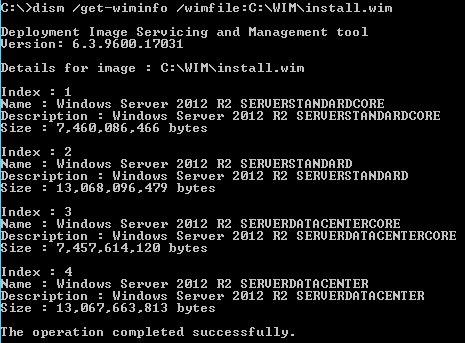
Decide which index you want to inject the drivers in. Open the provided batch file found here and modify the IDX variable as needed. You could run the script multiple times and do all indexed images, if you wish.
7. Run the batch file and wait for it to complete. It should take a few minutes, depending on the speed of your disks. Make sure you monitor the output for any errors, in case you messed up the paths to the files.
8. Now you can re-build the Windows ISO with the updated WIM files, and you are set. Just create a VM shell on Nutanix Acropolis, then mount the updated ISO, and it will be all set for a smooth installation. If you don’t have an ISO building tool, I recommend UltraISO. It’s not free, but I’ve exceptionally good luck with it for many years.
Download the batch file here.
It’s been a while since I’ve created a Windows Server image (namely because I hate Windows so much), so the last time I created an image with qemu/kvm I loaded the virtio drivers as a floppy drive with KVM.
Ex:
sudo qemu-x86_64 -enable-kvm -m 1024 -cdrom /media/usb/isos/windows_2008.ISO -drive file=win2008-base.raw,if=virtio,index=0, -boot d -net nic,model=virtio -net user,hostfwd=tcp::3389-:3389 -nographic -vnc :0 -fda /media/usb/isos/virtio-win-0.1-30.iso
What I noticed this time around, is that the floppy option doesn’t work too well with the latest drivers. qemu-system-x86_64 would start the vm, and everything would go fine until I hit the “find your disk” part of the installation where you load the virtio drivers. Most likely because the latest drivers are around 71M, which is a lot larger than a floppy.
Instead, you need to specify the virtio driver image as a CDROM.
sudo qemu-x86_64 -enable-kvm -m 1024 -drive file=/media/usb/isos/windows_2012_r2.ISO,index=1,media=cdrom -drive file=win2012-base.raw,if=virtio,index=0, -boot d -net nic,model=virtio -net user,hostfwd=tcp::3389-:3389 -nographic -vnc :0 -drive file=/media/usb/isos/virtio-win-0.1-81.iso,index=2,media=cdrom
In qemu, the index option is to specify whether it’s disk 1,2,3, etc, so don’t blindly use index=0 and think it will work. In Windows, the command above will map the drives as such.
0: C: -> File for hard drive image
1: D: -> ISO image for Windows install DVD
2: E: -> ISO for the virtio drivers.
More information is in the manpage for qemu:
index=index
This option defines where is connected the drive by using an index in the list of available connectors of a given interface type.