
Download
Current releases
virt-manager
virt-manager 5.0.0 (gpg) Tuesday November 26, 2024
Releases are curently GPG signed by Pavel Hrdina using
a key having the fingerprint:
4252 D86A 5204 1137 C291 CADF C85C 5E95 7062 A701 (4096R)
Releases 4.1.0 and older are GPG signed by Cole Robinson using
a key having the fingerprint:
D8F5 BE72 9291 CC5E FE4B 4D09 6455 9E28 C21C C7A8 (4096R)
- virt-clone: colne serial files (Oleg Vasilev)
- virt-clone: Copy disk permissions as well (Martin Kletzander)
- virt-install: Add properties for AMD SEV-SNP (Daniel P. Berrangé)
- virt-install: Add passt backend for user network interface
- virt-install: Add support for —sound multichannel,stream (Lin Ma)
- virt-install: Add support for —tpm backend.debug,backend.source (Lin Ma)
- virt-xml: add —edit —convert-to-q35
- virt-xml: add —edit —convert-to-vnc
- virt-xml: Add —edit —boot uefi
- virt-manager: Fix opening graphical console with egl-headless (Feng Jiang)
- virt-manager: Add support to create external snapshots
- virt-manager: Default to scaling=Always for consoles
- virt-manager: switch to not forking by default
- cli: Add more —disk options (Lin Ma)
- cli: Add —memdev target.address_base for virtio-mem and virtio-pmem (Lin Ma)
- cli: Add —features kvm.pv-ipi.state=on|off (Lin Ma)
- cli: Add —video model.blob=on|off (Lin Ma)
- Add missing Hyper-V features and enable most of them by default
- Add loongarch support (Xianglai Li)
- Add support for hvf domain type (Mohamed Akram)
- Support creating sparse volumes on ZFS pools (Iain Buclaw)
- UEFI improvements for riscv64 and loongarch64 VMs (Andrea Bolognani)
- Add graphcis to riscv64 and aarch64
- build: swtich from setuptools to meson
- diskbackend: Drop support for sheepdog (Lin Ma)
- cli: Deprecate —cpu host in favor of —cpu host-model (Andrea Bolognani)
virt-viewer
virt-viewer 11.0
(gpg)
Friday November 18th, 2021
Win x86 MSI
(gpg)
Win x64 MSI
(gpg)
Virt-viewer releases are curently GPG signed by Daniel P. Berrange using
a key having the fingerprint:
DAF3 A6FD B26B 6291 2D0E 8E3F BE86 EBB4 1510 4FDF (4096R)
This same fingerprint is listed at time of the release announcements mails
on the mailing list
- Minimum libgovirt is now 0.3.7
- CentOS 7 is no longer a supported build platform
- Use header bar for oVirt ISO dialog
- Add change CD button to toolbar for oVirt
- Support using ISOs in oVirt DATA storage domains
- Remove clashing -r command line shortcut for ‘resize’ that clashed with
existing ‘reconnect’ shortcut - Support modifier-only hotkeys for cursor release
- Fix smartcard and USB hotkey configuration regression
- Add USB device reset hotkey support
- Fix various mixed up GTK actions for hotkeys
- Release keyboard grab at same time as mouse grab with SPICE
- Fix misc compiler warnings with glib > 2.68
- Fix creation of window when guest uses multiple heads with a single QXL
video card - Updated translations from weblate
- Avoid warnings from GTK from overly strict minimum desktop width/height rules
- Update window action sensitivity to fix regression causing disabled send key
menu items - Fix mixed up action / menu state when user cancels a quit request
- Ensure auth dialog credential fields are cleared
- Fix setting os-id when building RPMs
- Avoid extra hyphen in build ID strings
- Explicitly disable spice/ovirt features when invoking meson for RPM builds
- Fix uninitialized variable for keymaps
virt-bootstrap
virt-bootstrap 1.1.1 (gpg) Tuesday Jul 9th, 2019
- Don’t expose the root password via command line
- Set SElinux file context of destination folder
- Use absolute destination path
- safe-untar: Inherit SElinux context
- don’t allow overwriting of the root partition
Previous releases
- virt-manager: Sources and Changelogs
- virt-viewer: Sources and Changelogs
- virt-bootstrap: Sources and Changelogs
Verifying gpg signatures
As a quick guide, to import a key from the key servers and verify downloads use.
$ gpg --recv-key 0xBE86EBB415104FDF
$ gpg --fingerprint 0xBE86EBB415104FDF
...check it matches fingerprint above...
$ gpg --verify SIGNATURE-FILE  SOURCE-FILE
v5.0.0
v5.0.0
- virt-clone: colne serial files (Oleg Vasilev)
- virt-clone: Copy disk permissions as well (Martin Kletzander)
- virt-install: Add properties for AMD SEV-SNP (Daniel P. Berrangé)
- virt-install: Add passt backend for user network interface
- virt-install: Add support for —sound multichannel,stream (Lin Ma)
- virt-install: Add support for —tpm backend.debug,backend.source (Lin Ma)
- virt-xml: add —edit —convert-to-q35
- virt-xml: add —edit —convert-to-vnc
- virt-xml: Add —edit —boot uefi
- virt-manager: Fix opening graphical console with egl-headless (Feng Jiang)
- virt-manager: Add support to create external snapshots
- virt-manager: Default to scaling=Always for consoles
- virt-manager: switch to not forking by default
- cli: Add more —disk options (Lin Ma)
- cli: Add —memdev target.address_base for virtio-mem and virtio-pmem (Lin Ma)
- cli: Add —features kvm.pv-ipi.state=on|off (Lin Ma)
- cli: Add —video model.blob=on|off (Lin Ma)
- Add missing Hyper-V features and enable most of them by default
- Add loongarch support (Xianglai Li)
- Add support for hvf domain type (Mohamed Akram)
- Support creating sparse volumes on ZFS pools (Iain Buclaw)
- UEFI improvements for riscv64 and loongarch64 VMs (Andrea Bolognani)
- Add graphcis to riscv64 and aarch64
- build: swtich from setuptools to meson
- diskbackend: Drop support for sheepdog (Lin Ma)
- cli: Deprecate —cpu host in favor of —cpu host-model (Andrea Bolognani)
v4.1.0
v4.1.0
- Fix build with setuptools-61 (Peter Alfredsen, Miro Hrončok)
- add UI and cli support for qemu-vdagent channel (Jonathon Jongsma)
- cli: More —iothreads suboptions (Lin Ma)
- launch_security: Use SEV-ES policy=0x07 if host supports it (Charles
Arnold) - cli: Add support for URL query with disks (Martin Kletzander)
v4.0.0
v4.0.0
- virt-install —os-variant/—osinfo is now a hard requirement for most
cases - Add ‘Enable shared memory’ UI checkbox (Lin Ma)
- add UI preference to default to UEFI for new VMs (Charles Arnold)
- Add virtiofs filesystem driver UI option
- Fill in all —cputune, —cpu, —shmem, —input, and —boot suboptions
(Hugues Fafard) - virt-* mdev improvements (Shalini Chellathurai Saroja)
- bhyve improvments (Roman Bogorodskiy)
- Revive network portgroup UI
- enable a TPM by default when UEFI is used (Daniel P. Berrangé)
- Use cpu host-passthrough by default on qemu x86
- use virtio-gpu video for most modern distros
- Default to extra pcie root ports for q35
- set discard=unmap by default for sparse disks and block devices
- We now require xorissofs for —location ISO
- We now use setuptools rather than just plain distutils
v3.2.0
v3.2.0
- Slim down filesystem device editor UI
- Fix TOCTTOU virt-install bugs (Martin Pitt)
- Several other bug fixes
v3.1.0
v3.1.0
- Return to using qcow2 sparse by default with libvirt 5.0.0+
- Make VM window shortcuts less likely to conflict with guest usage
- Fix 3.0.0 regression with spice audio
- createvol: Add explicit option for qcow2 non-sparse
- Unconditionally add USB redirdev to new VMs when using SPICE
- Unconditionally add sound devices to new VMs
- Translation string improvements (Pino Toscano)
v3.0.0
- virt-install —cloud-init support (Athina Plaskasoviti, Cole Robinson)
- The virt-convert tool has been removed. Please use virt-v2v instead
- A handful of UI XML configuration options have been removed. The XML
editor can be used instead. For a larger discussion see this thread:
https://www.redhat.com/archives/virt-tools-list/2019-June/msg00117.html - The ‘New VM’ UI now has a ‘Manual Install’ option which creates a VM
without any required install media - In the ‘New VM’ UI, the network/pxe install option has been removed. If
you need network boot, choose ‘Manual Install’ and set the boot device after
initial VM creation - ‘Clone VM’ UI has been reworked and simplified
- ‘Migrate VM’ UI now has an XML editor for the destination VM
- Global and per-vm option to disable graphical console autoconnect. This
makes it easier to use virt-manager alongside another client like virt-
viewer - virt-manager: set guest time after VM restore (Michael Weiser)
- virt-manager: option to delete storage when removing disk device (Lily
Nie) - virt-manager: show warnings if snapshot operation is unsafe (Michael
Weiser) - Unattended install improvements (Fabiano Fidêncio)
- cli: new —xml XPATH=VAL option for making direct XML changes
- virt-install: new —reinstall=DOMAIN option
- virt-install: new —autoconsole text|graphical|none option
- virt-install: new —os-variant detect=on,require=on suboptions
- cli: —clock, —keywrap, —blkiotune, —cputune additions (Athina
Plaskasoviti) - cli: add —features kvm.hint-dedicated.state= (Menno Lageman)
- cli:—iommu option (Menno Lageman)
- cli: Add —graphics websocket= support (Petr Benes)
- cli: Add —disk type=nvme source.* suboptions
- cli: Fill in all —filesystem suboptions
- Translation string improvements (Pino Toscano)
- Convert from .pod to .rst for man pages
- Switch to pytest as our test runner
- Massively improved unittest and uitest code coverage
- Now using github issues as our bug tracker
Installing Virt-Manager on Windows 10 is not like any other application method because it is a Linux program and is meant to manage Linux-running virtual machines. However, don’t forget we have a Windows Subsystem for Linux on Windows 10, thus it is quite possible to run the GUI interface of Virt-Manager on Windows like any other application. Here are the steps to follow…
Install Virt-Manager on Windows 10 using WSL1. Enable WSL – Windows 10 subsystem for Linux2. Download and install MobaXterm3. Open MobaXterm and run WSL Linux2. Install Virt-Manager3. Run Virt-Manager GUI on Windows 104. Connect Remote KVM on Virt- Manager5. Start managing KVM Virtual Machines
Virt-Manager is an open-source app that provides a graphical user interface to command line Type 1 hypervisor platforms such as Qemu, KVM, and Xen.
1. Enable WSL – Windows 10 subsystem for Linux
The steps given here are straightforward, however, before following them make sure on your Windows 10, you have WSL enabled and have at least Ubuntu 20.04 or 18.04 LTS version running over it. If you don’t know how to do that then see our tutorial on how to enable WSL and install Ubuntu over it.
2. Download and install MobaXterm
MobaXterm is a free application that provides a wide range of tools and server services to make the job of developers and administrators a lot easier. In short, it is an enhanced terminal for Windows with an X11 server, tabbed SSH client, network tools, and much more. Here is the link to download the MobaXterm home edition. After downloading, install it like any other normal Windows software.
3. Open MobaXterm and run WSL Linux
As you open this advanced terminal for Windows 10, the WSL-installed Ubuntu app will show on the left side panel of it. Double-click on that to start the WSL session.

2. Install Virt-Manager
Once you have started the WSL on your Windows 10 installed MobaXterm, the next thing is to run the Ubuntu system update command.
sudo apt update
After that in the command line terminal of Linux, simply run the Virt-Manager installation command as we do on any regular Linux distro of Debian.
sudo apt install virt-manager
3. Run Virt-Manager GUI on Windows 10
Everything is ready, we already have our Linux Virtual Machine Manager installed on Windows 10 WSL, so it’s time to open its GUI interface. For that run:
sudo virt-manager
Note: Remember the Graphical user interface of applications installed on Linux can only be accessed on MobaXterm, directly on WSL 1, it is not possible because of no X server availability.

4. Connect Remote KVM on Virt- Manager
As we cannot install KVM on the Windows platform, thus obviously the reason for using this Linux Virtual Machine manager is to connect some remote Linux server running with KVM. Therefore, click on the File menu of Virt-Manager and select “New Connection“.
Then check “Connect to a remote host over SSH” and enter the user and hostname of the remote KVM server you want to connect.

5. Start managing KVM Virtual Machines
Once connected, you will have the list of Virtual machines running on remote KVM on Windows 10 running Virt-Manager. Now, you can directly control or view them.

Other Tutorials:
- How to use Virt-Manager GUI to manage Multipass Ubuntu VMs
- How to install GUI File Manager Nautilus on WSL -Windows 10 Subsystem for Linux
- How to enable WSL 2 Windows 10 Subsystem for Linux
Virt-Manager – графическая консоль для управления виртуальными машинами KVM от компании Red Hat. С помощью Virt-Manager можно, создавать, редактировать, запускать и останавливать виртуальные машины на гипервизоре KVM. Можно выполнять настройку параметров виртуальных машин, что значительно упрощает работу по сравнению с управлением KVM из интерфейса командной строки.
В статье мы рассмотрим установку Virt-Manager на сервер с KVM, типовые задачи управления виртуальными машинами в графической консоли и покажем, как использовать virt-manager из Windows-клиента.
Содержание:
- Установка Virt-Manager в Linux
- Управление KVM через virt-manager из Windows
- Использование Virt-Manager для управления виртуальными машинами KVM
- Типовые проблемы с Virt-Manager
Установка Virt-Manager в Linux
Прежде всего нужно установить необходимые пакеты из базового репозитория на сервере с KVM (в нашем примере сервер KVM установлен на Linux CentOS). Выполните следующую команду yum (или dnf):
# yum install -y virt-manager xorg-x11-xauth liberation-sans-fonts
Чтобы удаленно подключаться к virt-manager с Windows-компьютера, нужно дополнительно настроить SSH. Откройте файл sshd_config:
# nano /etc/ssh/sshd_config
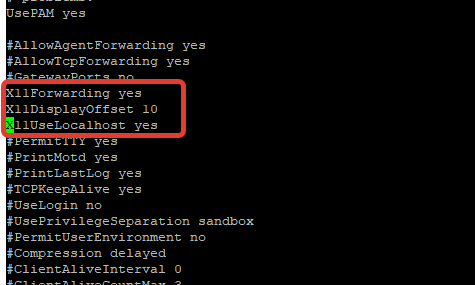
Включите следующие параметры:
X11Forwarding yes
X11DisplayOffset 10
X11UseLocalhost yes
Перезапустите сервис sshd:
# service sshd restart
Управление KVM через virt-manager из Windows
Для удалённого подключения к virt-manager с Windows компьютера, вам понадобится следующее ПО:
- Putty – ssh клиент
- Xming – порт сервера для ОС Windows.
Скачать putty можно с официального сайта https://www.putty.org/, а Xming по ссылке https://sourceforge.net/projects/xming/
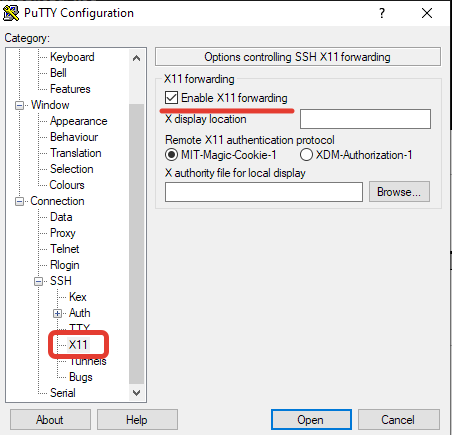
Откройте Putty, перейдите в Connection—>SSH—X11. Включите опцию “Enable X11 Forwarding“.
Теперь на вкладке Session, укажите адрес KVM сервера, имя сессии, укажите порт и сохраните подключение.
Чтобы из Windows удаленно подключаться к KVM серверу через virt-manager, используется следующий порядок:
- Сначала запускаете Xming;
- Запускаете сохраненную сессию Putty с опцией X11 Forwarding;
- Подключаетесь к virt-manager.
После включения Xming у вас в трее должен светиться значок X:
Далее запустите Putty, и после авторизации на сервере, выполните:
# virt-manager
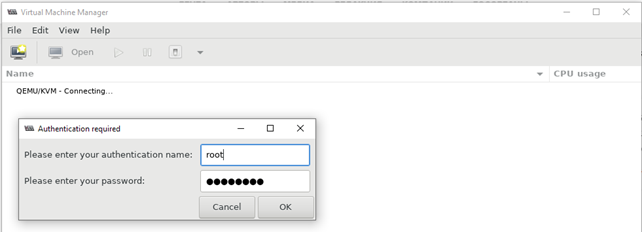
Через несколько секунд у вас должно открыться окно управления virt-manager и окно дополнительной авторизации, где нужно ввести данные для подключения к серверу:
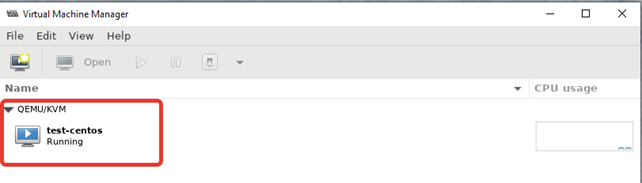
После авторизации вы должны увидеть список виртуальных машин.
Использование Virt-Manager для управления виртуальными машинами KVM
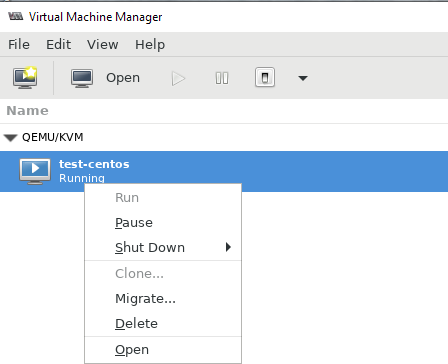
Щелкнув ПКМ по виртуальной машине, вы можете выключить, перезагрузить, включить ВМ.
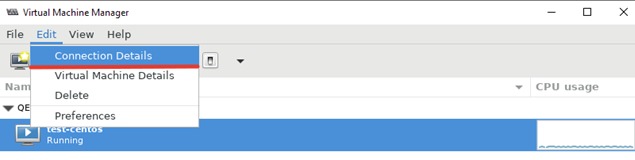
Далее я хочу изменить директорию для хранения файлов виртуальных машин, так как основное место на диске при установке операционной системы на сервере с KVM, я отдал под директорию VZ. Чтобы поменять стандартную директорию, перейдите в меню “Edit -> Connection Details”.
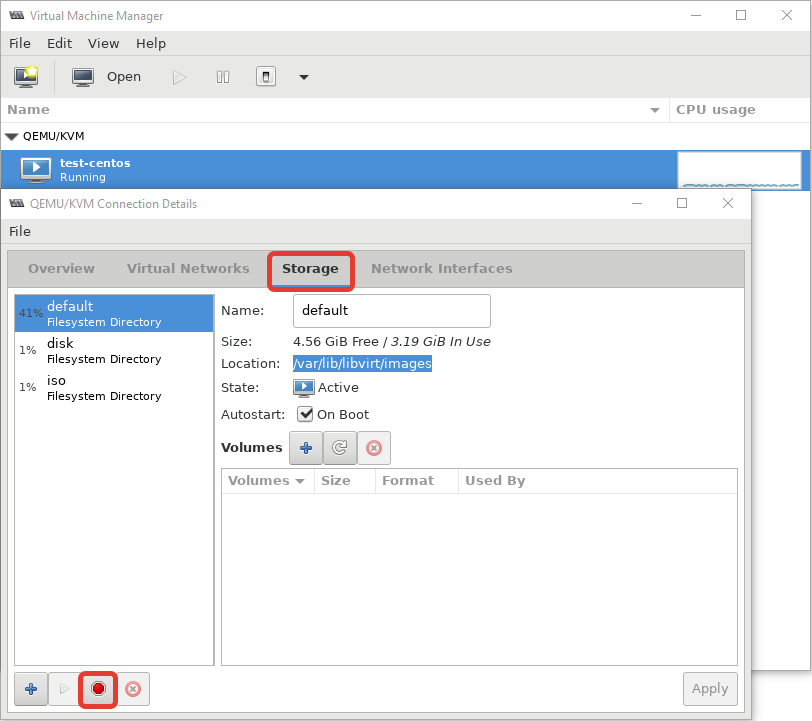
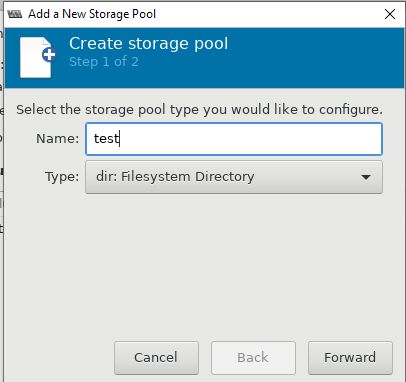
В открывшемся окне, нужно перейти во вкладку “Storage”. Для создания нового пула, нужно остановить работу текущего и после чего удалить его:
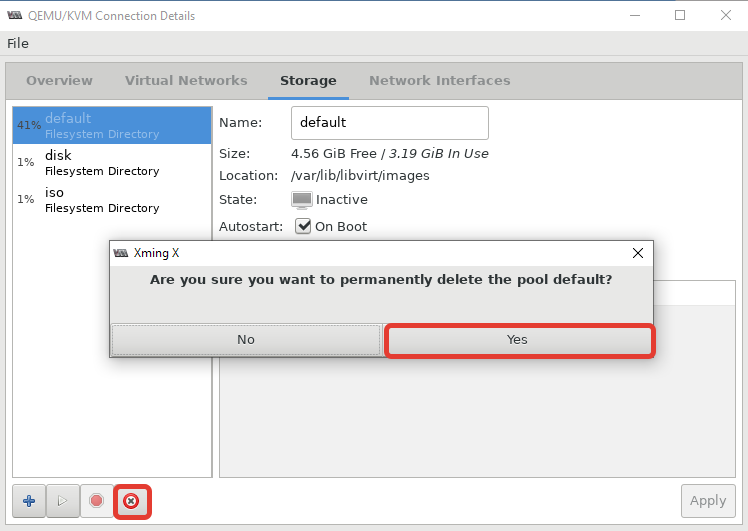
После установки пула, кнопка удаления станет активна:
Теперь можно создать пул в нужной вам директории или разделе:
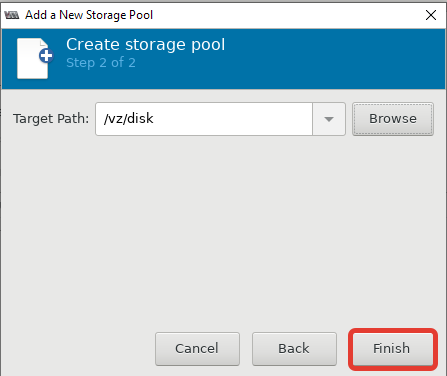
После этого, у меня стал активным мой основной раздел для файлов ВМ:

Либо просто удалить первоначальную директорию и создал симлинк на нужный раздел:
# rm -rf /var/lib/libvirt/images/
# ln -s /vz/disk/ /var/lib/libvirt/images
Теперь можно попробовать создать новую виртуальную машину KVM. Ниже я прикреплю ряд скриншотов, на которых по шагам будет все более-менее понятно. В конце опишу весь процесс создания машины.
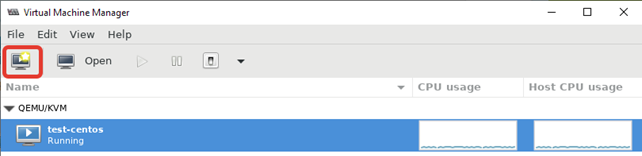
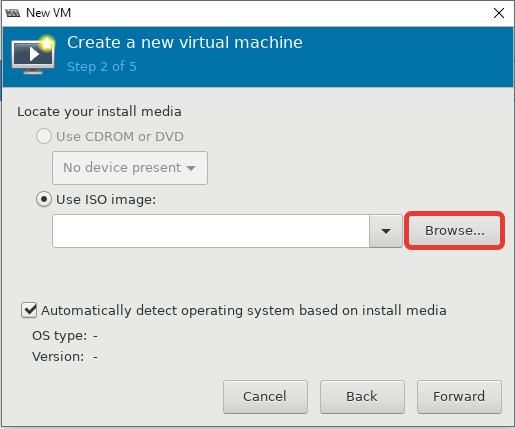
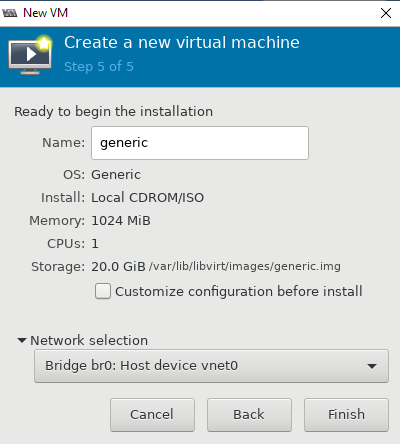
- При нажатии кнопки на первом скриншоте, запускается процесс создания новой виртуальной машины KVM;
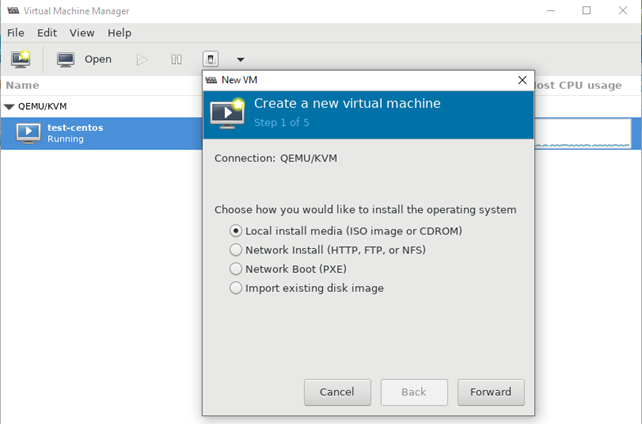
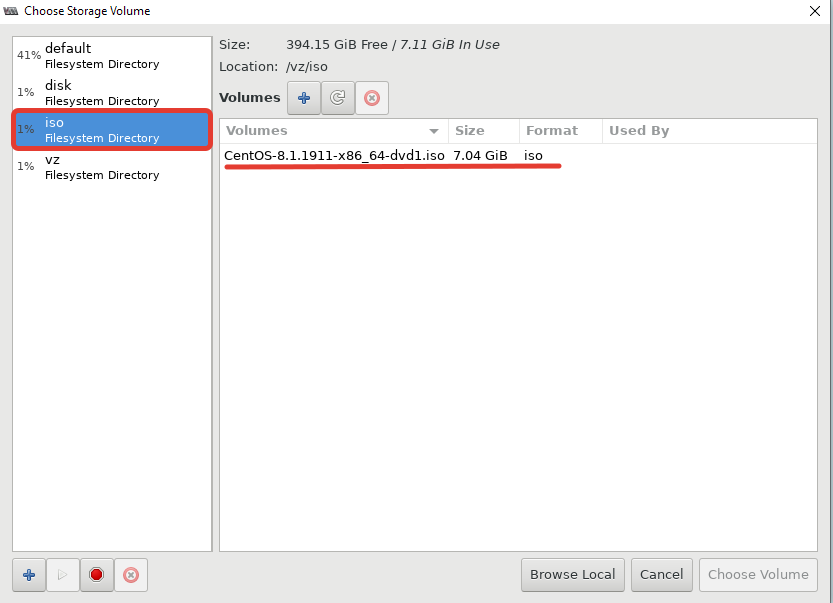
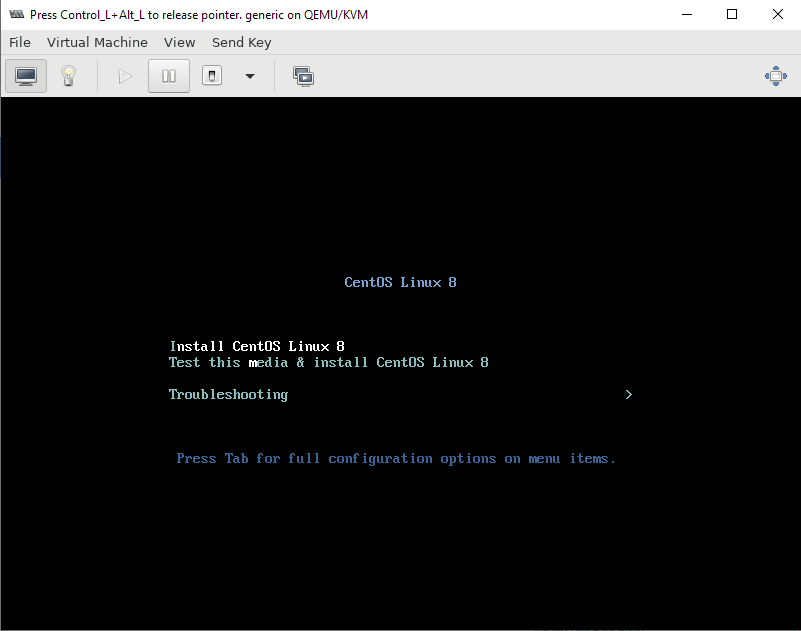
- Затем указываем, откуда запускать установку ОС на виртуальной машине. Я использовал локальный ISO образ с дистрибутивом CentOS 8;
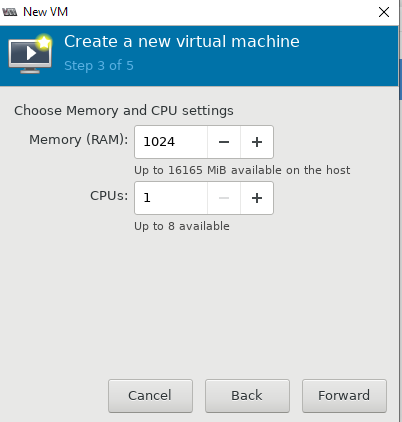
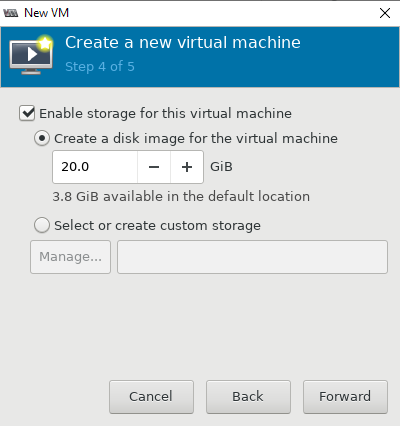
- Далее настраиваются ресурсы виртуальной машины: количество памяти и vCPU, размер виртуального диска (при необходимости его можно будет расширить или уменьшить), имя, и указываем сеть;
- После создания ВМ к ней сразу будет примонтирован установочный образ ОС, который указали при создании.
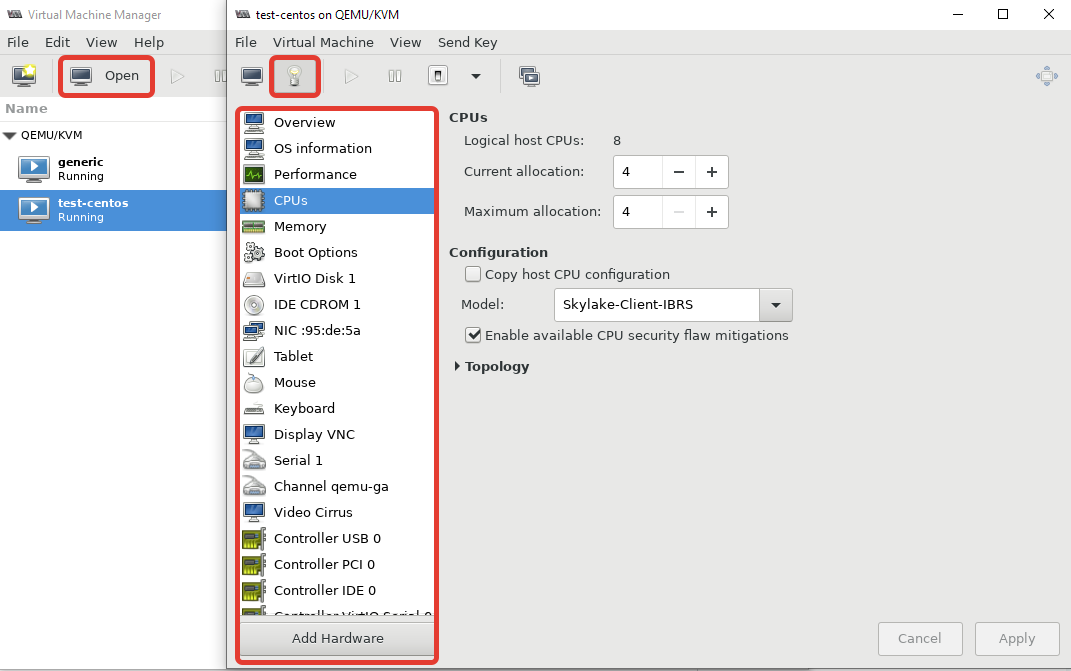
Чтобы изменить ресурсы или какие-то параметры уже созданной машины, вам нужно выделить ее и нажать кнопку “Open”. В открывшемся меню нажмите на лампочку и у вас откроется список параметров виртуальной машины KVM.
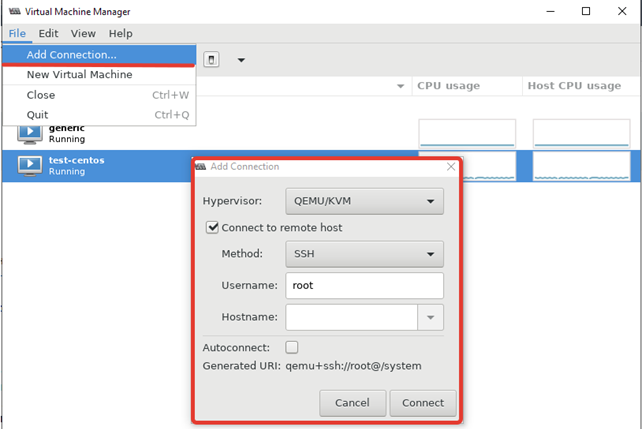
Чтобы добавить новый сервер KVM, выполните следующее “File -> Add Connection” и заполните данные в открывшемся окне:
Red Hat Linux изменила статус virt-manager в RHEL 8 на deprecated, и возможно в следующих релизах OC этот пакет будет недоступен. Вместо него предлагается использовать веб интерфейс Cockpit. Однако на данный момент в модуле управления KVM в Cockpit пока нет хватает всех необходимых функций, доступных в virt-manager.
Типовые проблемы с Virt-Manager
Во время изучения интерфейса virt-manager, я столкнулся с несколькими ошибками и решил описать их в статье. Первая ошибка, с которой я столкнулся, вышла на стадии создания новой виртуальной машины:
libvirt error: cannot execute binary /etc/libvirt/hooks.qemu: No such file or directory.
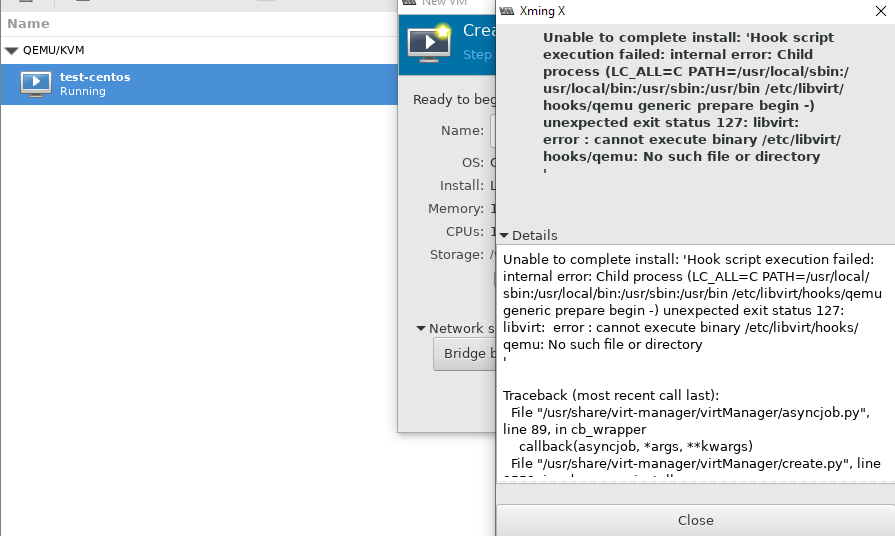
Система ругается на отсутствие файла, который скорее всего должен быть создан при установке KVM на сервер, но в моем случае он отсутствовал. Решился вопрос, созданием файла:
# touch /etc/libvirt/hooks/qemu
После этого нужно перезапустить сервис libvirtd:
# service libvirtd restart
Следующая ошибка ожидала меня сразу же на следующем шаге установки:
Unable to complete install: “NoneType object has no attribute storageVolLookupByPath“
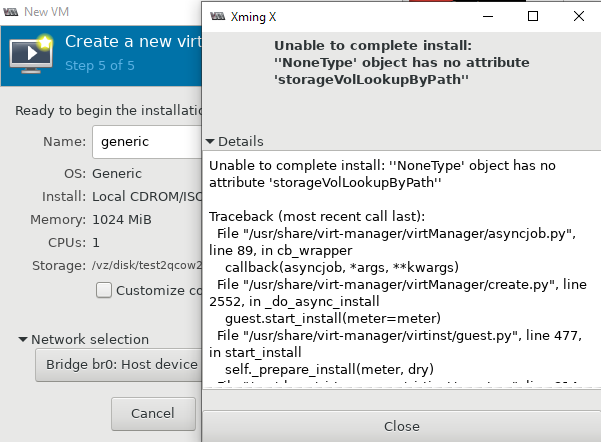
Чтобы решить эту проблему и возможно последующие другие, нужно установить пакет qemu-kvm-tools:
# yum install qemu-kvm-tools -y
После выполненных действий, виртуальная машина создалась без ошибок, и я смог выполнить установку гостевой операционной системы на ней.
Управлять KVM через virt-manager очень удобно. Вы значительно сократите время на выполнение рядовых операций с виртуальными машинами, а также сможете подключиться к ним из Windows.
Virt viewer для Windows
Дано
-
Хост виртуализации с гипервизором KVM.
-
На хосте виртуализации работает виртуальная машина.
-
ПК с установленной ОС Windows.
Надо
-
Управлять виртуальной машиной с ПК, на котором установлена ОС Windows.
Решение
Шаг 1.
На ПК с Windows дём на сайт https://virt-manager.org/download.
Скачиваем программу virt-viewer соответствующей разрядности.

Устанавливаем virt-viewer на ПК с Windows.
Шаг 2
Идём на ПК с гипервизором, запускаем Virt-manager.
-
Открываем свойства виртуальной машины, к которой нужно подключаться из-под Windows.
-
Переходим на «Дисплей Spice».
-
Настраиваем параметры.
-
Нажимаем кнопку «Применить».

Важно!
Запомните порт, на котором работает дисплей Spice.
В моём примере — это tcp/ip 5900
Шаг 3
На ПК с гипервизором разрешаем подключения на порт 5900 (мы его узнали на предыдущем шаге). Для этого запускаем терминал, становимся суперпользователем root и подаём 2 команды.
USER
firewall-cmd –add-port=5900/tcp –permanent
firewall-cmd –reload
Надеюсь, что вы знаете IP-адрес своего ПК с гипервизором, он нам пригодится на следующем шаге.
Ели не знаете, то его можно уточнить при помощи команды
ifconfig
Шаг 4
Возвращаемся на ПК с Windows.
-
Запускаем программу Remote viewer
-
Указываем адрес подключения.
-
Нажимаем кнопку подключиться.
В моём случае адрес подключения получился таким: spice://192.168.100.10:5900
Здесь:
-
spice — протокол подключения
-
192.168.100.10 — IP-адрес хоста виртуализации
-
5900 — порт подключения.

Шаг 5
Начинаем управлять виртуальной машиной.

Источники
⇑ Наверх ⇑
В моей WIKI постоянно ведётся какая-то работа со статьями.
Если у вас возникли вопросы или замечания,
можете их отправлять на почту support@mihanik.net