
Download Article
Get a full list of your computer’s network connections
Download Article
- Checking Internet Connectivity Fast
- Using Windows 11
- Using Windows 10
- Using the Command Prompt
- Video
- Q&A
- Tips
|
|
|
|
|
|
On Windows 10 and 11, you can see your network connections in the Settings app, or by clicking the Wi-Fi or network icon on the taskbar. We’ll cover this in-depth and also show you how to use the netstat command to view information about active network connections so you can figure out if you have an internet connection or server problem.
Viewing Network Connections
- In Windows 11, type “settings” into the search bar, click «Settings,» and then click «Network & Internet.»
- In Windows 10 and earlier, open Settings from the Start menu, then open the «Network & Sharing Center» to view your connections.
- You can also check your network connections and traffic by typing “netstat -a” in the command prompt.
-

On every version of Windows, the network connectivity is displayed on the taskbar. Click the little radio signal logo (WiFi) or globe (ethernet).
- This will not show you all of the network connections on your computer, but it will show you if you have an active internet network connection.
-
Windows will display the name of the network, the strength of the connection, whether the internet is active, and whether you’re on a secured network or not.
- Below your network, there may be a list of more networks if you’re looking for a specific connection.


Advertisement
-
Press the Start menu and click on the little gear icon in the bottom left to open the settings.[1]
- If you don’t see a gear icon, you can also just type “settings” into the search bar and click it when it pops up in the results.
-
You can now see the status of your network connection and the name of any internet networks you’re connected to.


Advertisement
-
If the Settings are pinned to your start menu, click it. Otherwise, type “settings” into the menu’s search bar and click Settings.
-
-
The Network and Sharing Center is a feature of Windows 10 where you can find the status of your network, the type of connection you have, if you can connect to other computers other than your own, and if you are connected to your network or the internet.[2]
-
This should correspond to your connection type. For example, «Ethernet» will be paired with an ethernet cable «plug» and a wireless network connection will be paired with five bars.[3]
-
This will prompt a window to display the details of your network connection.


Advertisement
-
You can use the netstat command on any version of Windows (including older versions like Windows 7 and 8.1) to view your network connections, network status, connected hosts, and other helpful details. You’ll need to use an administrator-level command prompt to use the command effectively. To open the command prompt as an administrator:
- Press the Windows key (or click the Start menu) and type cmd.
- Right-click «Command Prompt» and select Run as administrator.
- Click Yes when prompted.
-
This command will show you a list of your current TCP (Transmission Control Protocol) connections and ports, physical computer names listed for local addresses, and hostnames for remote addresses. It will also tell you the state of the port (waiting, established, etc.)[4]
-
This command will show you the same list as netstat -a, but it will also show you which programs are using the connections/ports.[5]
-
This command will show you the same list of connections and ports but with numerical IP addresses instead of hostnames.[6]
-
to see the different netstat command. This command will provide you with additional options for using netstat.[7]


Advertisement
Add New Question
-
Question
Why isn’t my computer shown in the network group?
Your computer is probably not set to work with the networking group then. You need to re-configure that correctly.
-
Question
How do I get access on other websites using my active network connections?
If you have the proper credentials, use an ssh-connection, if this port is open on the website you would like to access.
Ask a Question
200 characters left
Include your email address to get a message when this question is answered.
Submit
Advertisement
Video
-
Experiment — many UNIX commands are available (i.e., «netstat» mentioned above) in Windows. Use your favorite search engine to look them up.
-
On Linux, use «ip –s,» «ss,» or «ip route» instead of the netstat command.
Thanks for submitting a tip for review!
Advertisement
References
About This Article
Article SummaryX
To see your active network connections in Windows, start by selecting Settings in your Start menu and going to Ethernet. Then, click on the Network and Sharing Center before choosing the icon that’s next to Connections. On the next page, click on Details to display information about your network connection. Alternatively, if you’re using Windows 7, open the Start menu and type NCPA.CPL into the search box. After the Network Connections folder opens, right click on the connection you want and choose Status from the dropdown menu. After the Network Status page loads, go to Details to find out more about the connection. For tips on how to get network connection details on Windows Vista or XP, keep reading!
Did this summary help you?
Thanks to all authors for creating a page that has been read 1,034,924 times.
Reader Success Stories
-
«Needed to find how to connect a DVR to my computer. Could not find network connections and was afraid of pressing…» more
Is this article up to date?
Время от времени пользователям приходится заходить в раздел «Сетевые подключения» для того, чтобы отключить подключения, подключить, изменить их свойства, настройки и т.д., в данном материале рассмотрим какими способами можно попасть в это системное окно в Windows 11 и более ранних версиях.
{banner_google1}
Это самый простой и быстрый способ попасть в окно с названием «Сетевые подключения».
1. Нажимаем Пуск и переходим в пункт «Выполнить». Можно воспользоваться сочетанием «Win+R».
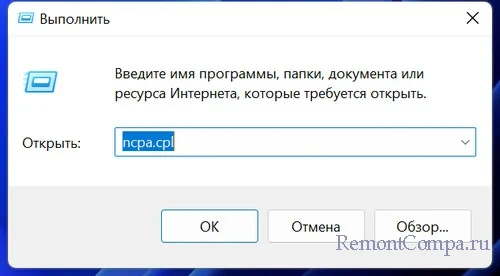
2. Прописываем команду «ncpa.cpl» и нажимаем Enter.
3. Готово.
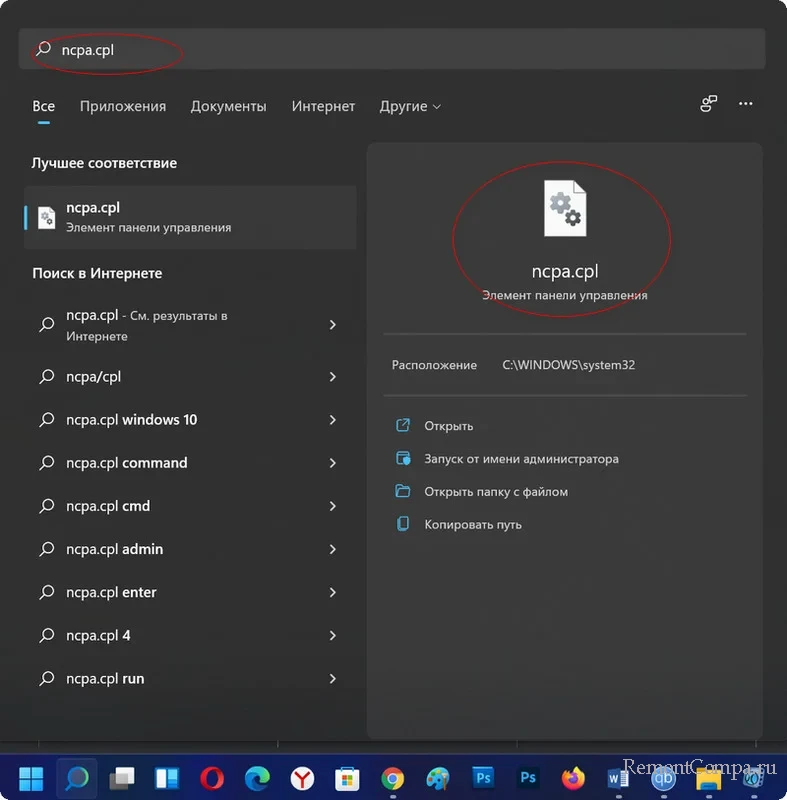
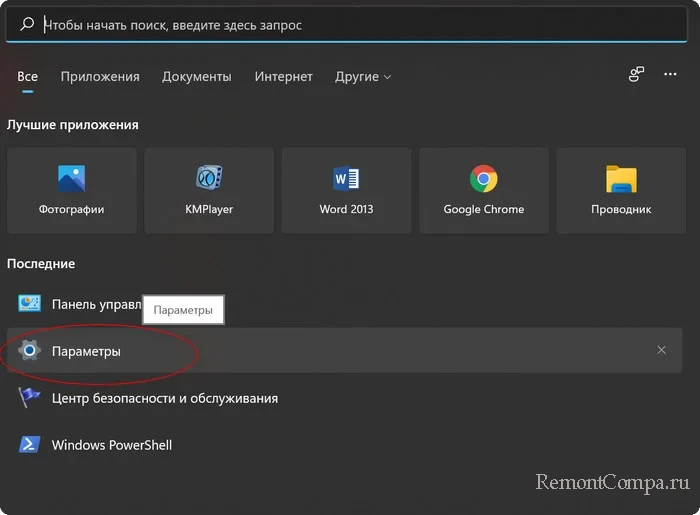
То же самое можно воспроизвести и с помощью поиска Windows.
1. Кликаем мышкой на значок поиска в панели задач.
2. Пишем ту же команду «ncpa.cpl» и щелкаем по результату.
{banner_google1}
Можно также войти с помощью старой доброй панели управления.
1. Щелкаем на поиск, вводим «
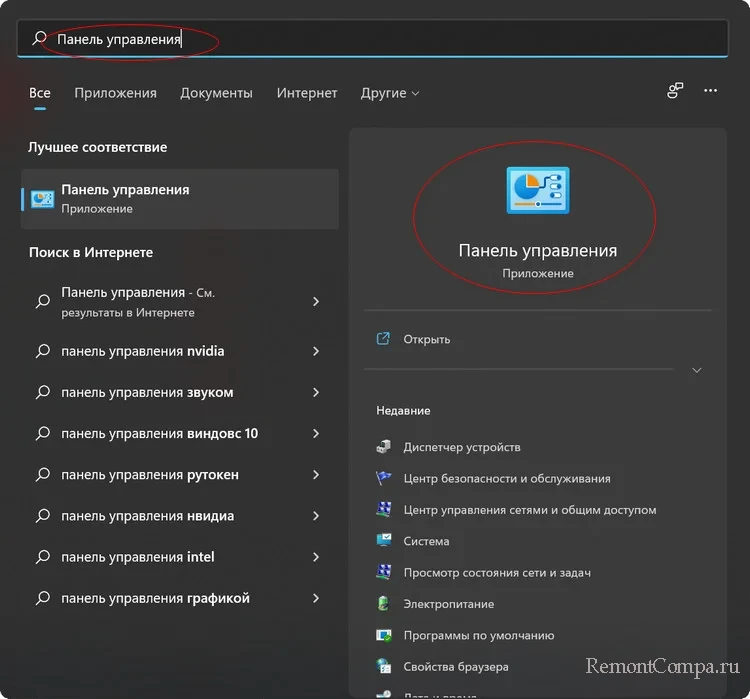
Панель управления» и кликаем ЛКМ на результат.
2. Далее нас интересует раздел «Сеть и интернет». В нем нажимаем «Просмотр состояния сети и задач».
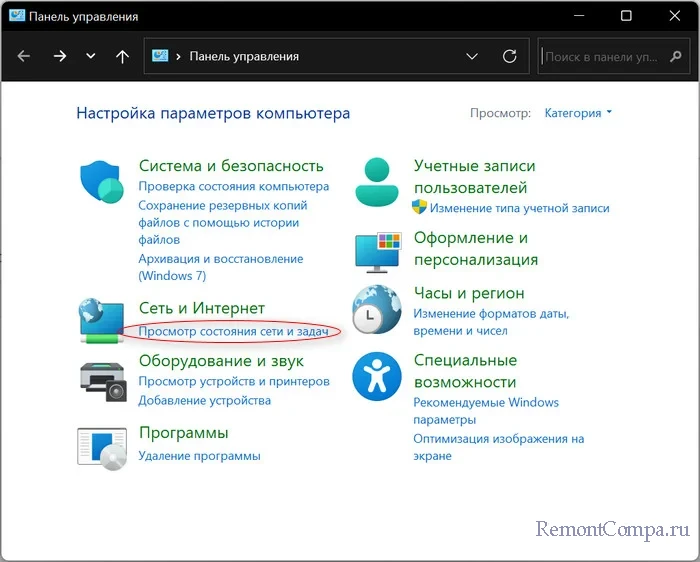
3. Слева жмём «Изменение параметров адаптера».

4. Готово.
{banner_google1}
Если предыдущие способы работают и на более старых редакциях системы, то этот способ будет актуален только на Windows 11.
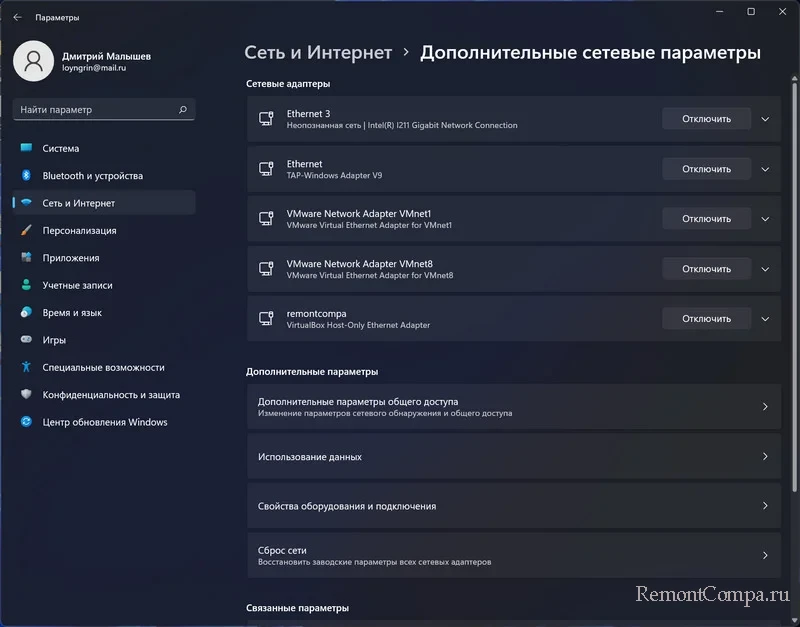
1. Нажимаем Пуск и выбираем «Параметры».
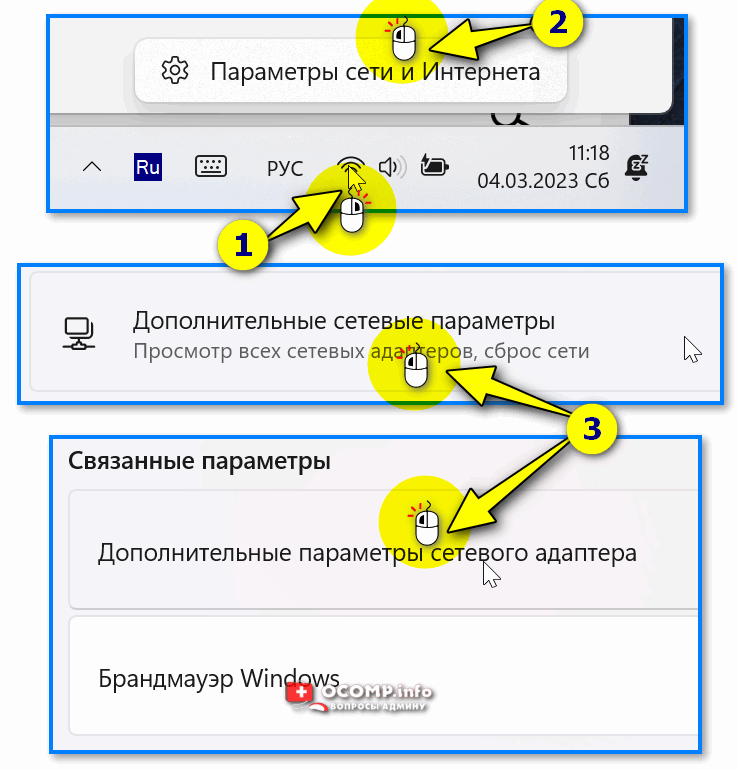
2. Слева жмём на «Сеть и интернет», а справа «Дополнительные сетевые параметры». Сюда можно также попасть кликнув ПКМ на значок Wi-Fi в правом углу панели задач и выбрав «Параметры сети и интернета».
3. Затем нажимаем «Дополнительные параметры сетевого адаптера» в разделе «Связанные параметры».

Для этого метода придётся воспользоваться командной строкой.
1. Нажимаем Пуск и выбираем «Командная строка». Либо в поиске Windows вводим «cmd» и кликаем на результат.
2. Прописываем команду
rundll32.exe shell32.dll, Control_RunDLL ncpa.cpl
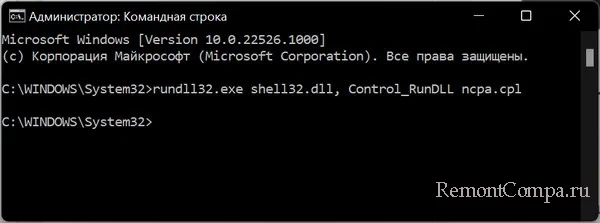
И нажимаем Enter.
3. Готово.
Вот основные способы входа в системное меню «Сетевые подключения».
Discover connected devices on your Windows 11 network.
Published
5 min read
How to View All Devices Connected to the Network on Windows 11
In the age of smart homes and interconnected devices, knowing how to view all the devices connected to your network is essential. Whether you’re troubleshooting an issue, securing your network, or simply curious about what’s connected, Windows 11 offers various methods to check for devices. This comprehensive guide will lead you through multiple techniques to monitor and view all devices connected to your network on Windows 11.
Understanding Network Connections
Before diving into the steps, it’s crucial to understand what a network is and how devices connect to it. A network allows multiple devices to communicate and share resources. This can be through Ethernet cables in a wired network or Wi-Fi in a wireless network. Each device connected to your network is assigned a unique IP address, which helps in identifying and managing devices.
Using the Command Prompt
One of the quickest and most effective ways to view the devices connected to your network is through the Command Prompt. Here’s how you can do it:
-
Open Command Prompt:
- Right-click on the Start button or press
Windows + Xon your keyboard. - Select Windows Terminal (Admin) or simply Command Prompt if it’s listed.
- Right-click on the Start button or press
-
Run the ARP Command:
- In the Command Prompt window, type the following command and hit
Enter:arp -a - This command will display the ARP table, showing Address Resolution Protocol settings. It lists the IP addresses of devices that your computer has communicated with since the ARP cache was last cleared.
- In the Command Prompt window, type the following command and hit
-
Interpreting the Results:
- The output will include the IP address, physical (MAC) address, and type of allocation (dynamic/static). Make a note of the IPs that do not belong to your usual devices.
Using Windows Settings
Windows 11 offers a user-friendly interface that can help you manage connected devices through its Settings. Follow these steps:
-
Open Settings:
- Click on the Start button and select the Settings gear icon, or press
Windows + Ion your keyboard.
- Click on the Start button and select the Settings gear icon, or press
-
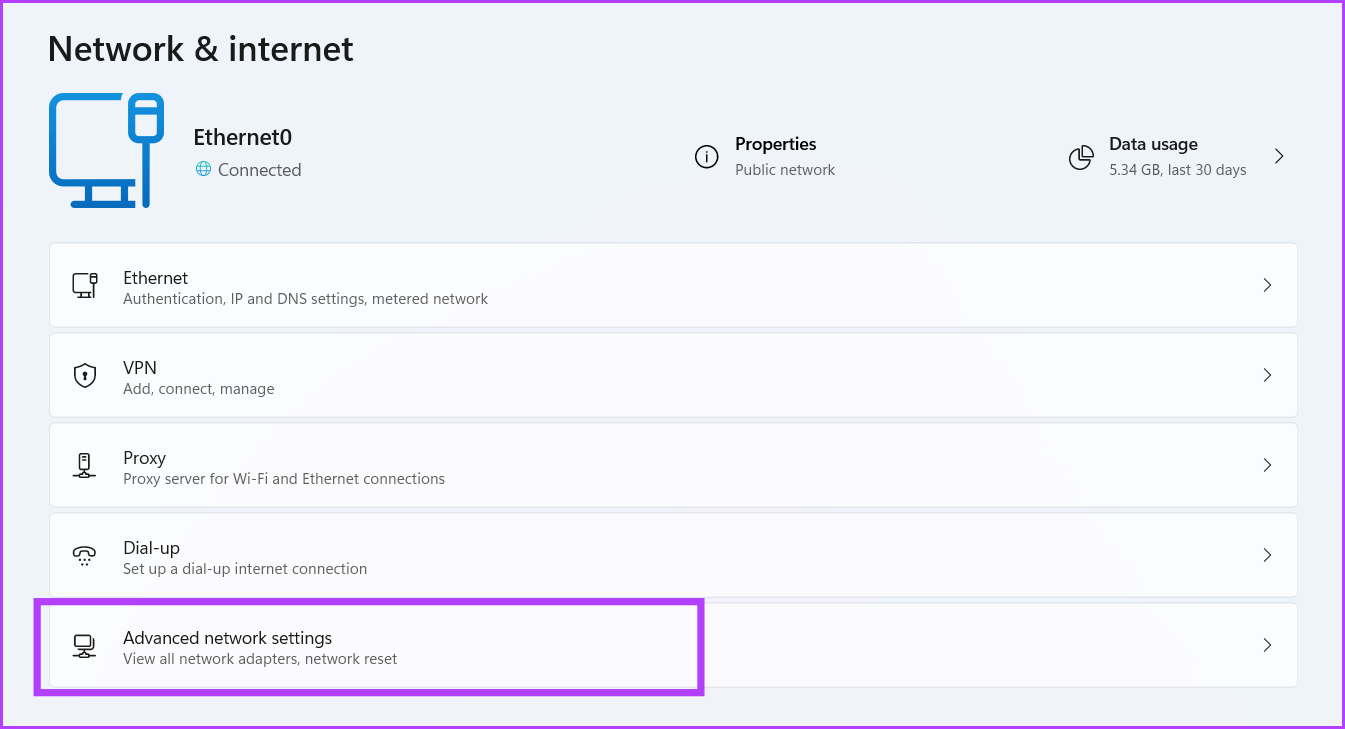
Navigate to Network & Internet:
- Once in Settings, click on Network & internet in the left pane.
-
View Network Details:
- Choose either Wi-Fi or Ethernet, depending on how you’re connected to the internet.
- Click on the network you are currently connected to, and scroll down to find the Properties section.
- Here, under Advanced network settings, you can see information about your network connection, including the IP address and other relevant details.
-
Check for Network-Connected Devices:
- While this section will not directly show you all connected devices, knowing the IP info assists in using additional methods like a network scanner.
Using Network Scanner Apps
Third-party network scanning applications can provide a more straightforward approach to viewing all devices connected to your network. Some popular tools include:
-
Advanced IP Scanner:
This is a free tool that scans your network for devices, providing a list complete with details like IP addresses and device types. -
Nmap (Network Mapper):
This is a more advanced tool primarily used for network discovery and security auditing, suitable for those who are tech-savvy.
Here’s how to use Advanced IP Scanner:
-
Download and Install Advanced IP Scanner:
- Visit the Advanced IP Scanner website to download the application.
- Follow the installation instructions.
-
Run the Application:
- Open Advanced IP Scanner after installation.
- Click the ‘Scan’ button. The default range should be correct for most home networks.
-
View Results:
- Once the scan is complete, the app will display a list of all connected devices, including their IP addresses and MAC addresses. You’ll also see options to remotely manage devices if applicable.
Utilizing the Network Map Feature
Windows 11 provides a network map feature that visually illustrates the devices connected to your network.
-
Open Control Panel:
- Search for Control Panel in the Start menu search box and open it.
-
Navigate to Network and Sharing Center:
- Select Network and Internet, then go to Network and Sharing Center.
-
Access Network Map:
- Click on See full map on the left side under View your active networks.
-
Examine the Map:
- This map shows the devices connected to your network, such as computers, printers, and any wireless devices. It’s worth noting that the map may not display all devices (especially if they are not sharing resources) but provides a good graphical representation.
Checking Your Router’s Admin Interface
Most routers have a built-in admin interface that offers insights into connected devices. Here’s how to access it:
-
Find Your Router’s IP Address:
- Open a Command Prompt window and type:
ipconfig - Look for the Default Gateway IP address. This usually starts with
192.168.x.x,10.x.x.x, or172.16.x.x.
- Open a Command Prompt window and type:
-
Access Router Interface:
- Open a web browser and input the router’s IP address into the address bar.
- You will be prompted to enter a username and password. If you haven’t changed them, the default credentials can often be found on the router or in its manual.
-
Locate Connected Devices:
- Once logged into the router interface, look for sections labeled Connected Devices, Device List, or DHCP Client List. This may differ based on your router model.
- You will see a list of devices connected to your network, often including their IP addresses, MAC addresses, and device names.
Security Considerations
Knowing how to view devices connected to your network is just the first step; securing your network is equally important. Here are some tips:
-
Change Default Passwords:
- Ensure you change the default password for your router to something strong and unique. This reduces the chances of external unauthorized access.
-
Regularly Check Connected Devices:
- Make it a habit to check the list of connected devices regularly, especially if you suspect unauthorized access.
-
Enable Network Encryption:
- Use WPA3 (or at least WPA2) for wireless security to encrypt data and protect your wireless network.
-
Guest Networks:
- If your router supports it, consider setting up a guest network for visitors. This keeps your main network secure, reducing access to your personal devices.
-
Update Router Firmware:
- Regularly check for firmware updates from your router manufacturer to ensure you are protected with the latest security protocols.
-
Disable UPnP:
- Universal Plug and Play (UPnP) can pose risks, as it might allow devices to open ports without your knowledge. Disable it if it’s not needed.
-
Use a Firewall:
- Ensure your firewall is enabled and properly configured. This adds another layer of protection to your network.
Conclusion
Monitoring devices connected to your network can help ensure security, resolve connectivity issues, and manage bandwidth usage. Windows 11 offers several methods — from built-in command-line tools and settings to third-party applications and router interfaces — to achieve this. Remember that while viewing connected devices is straightforward, maintaining the security of your network requires vigilance and proactive management.
By employing these methods and following best security practices, you can protect your network and enjoy the benefits of a connected environment without compromising safety. Whether for home or office, understanding your network will empower you to take control in an increasingly digital world. Keep exploring and learning as technology evolves, and always be one step ahead in network management.
Содержание статьи:
- Сетевые подключения
- Как открыть данную вкладку
- Как посмотреть свойства адаптера, изменить ряд параметров
- Пару слов о сетевых параметрах Windows 10/11
- Вопросы и ответы: 0
Всех приветствую!
В современных Windows 10/11 почему-то «скрыли от глаз» классическую панель управления, а вместе с ней и вкладку «Сетевые подключения» (которая бывает ой как нужна при различных настройках ОС). Забавная коллизия… 🙂
Между тем, эта вкладка помогает просмотреть все ранее созданные подключения (те же PPPoE), работающие сетевые адаптеры Wi-Fi, Bluetooth, Ethernet, их свойства, установленные параметры, и прочее.
В рамках этой заметки приведу неск. способов, как открыть «Сетевые подключения», а также посмотреть свойства того или иного адаптера (в общем-то, базовые моменты, которые часто требуются при настройке сети).
Итак, ближе к теме…
*
Сетевые подключения
Как открыть данную вкладку
📌 Способ 1 (универсальный)
- нажать сочетание клавиш Win+R (должно появиться окно «Выполнить»);
- в строку «Открыть» ввести команду ncpa.cpl и нажать Enter.
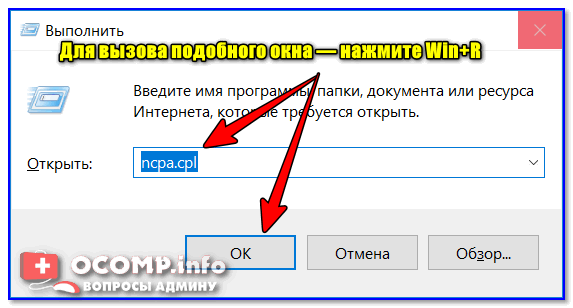
ncpa.cpl — просмотр всех сетевых подключений
*
📌 Способ 2 (проверен в Windows 10 и 11)
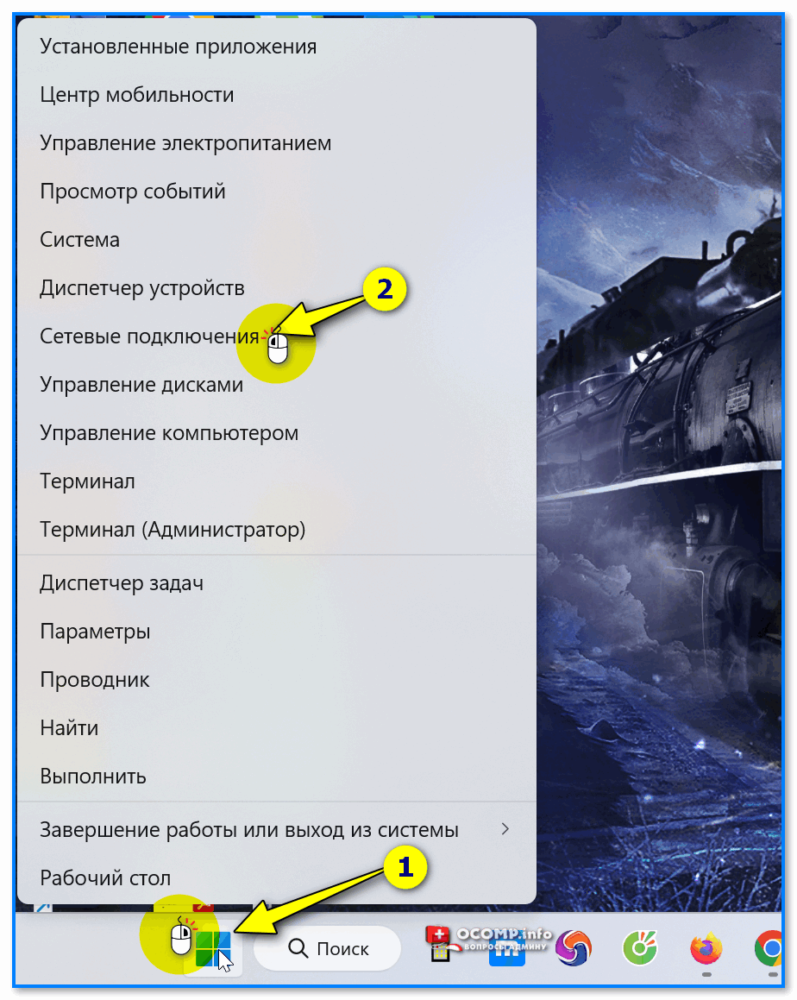
Если у вас в трее (рядом с часами) есть сетевой значок — нажмите по нему правой кнопкой мыши и в меню выберите «Параметры сети и Интернета».
Далее нужно перейти во вкладку «Дополнительные сетевые параметры / Доп. параметры сетевого адаптера». Скрин см. ниже. 👇
Доп. параметры сетевого адаптера — значок сети в трее Windows
*
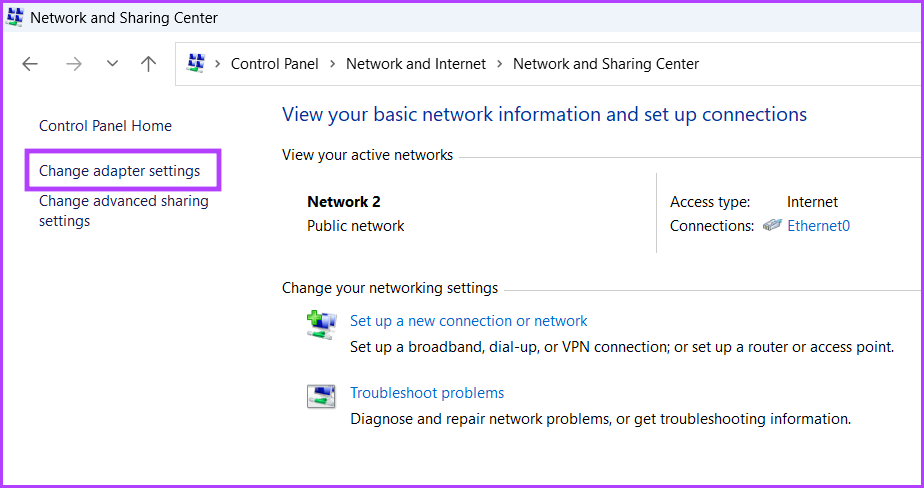
📌 Способ 3
- открыть контрольную панель управления;
- далее перейти во вкладку «Сеть и интернет / центр управления сетями…»;
- затем в боковом меню перейти по ссылке «Изменение параметров адаптера».
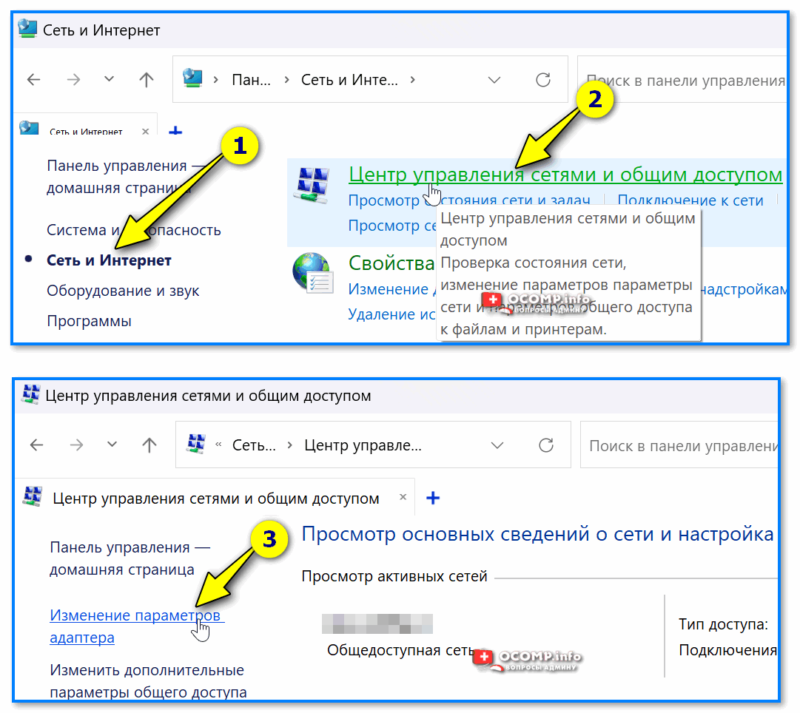
Центр управления сетями — контрольная панель
*
📌 Способ 4
Если вкладка сетевых подкл. не открывается — информацию можно посмотреть и другим образом — с помощью командной строки. Как это делается:
- запускаем командную строку;
- вводим команду netsh interface show interface и нажимаем Enter;
- получаем список адаптеров, и видим, какие из них подключены, а какие нет.
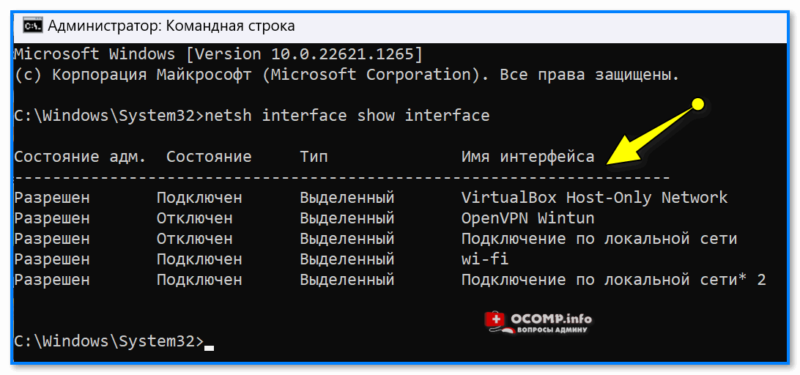
netsh interface show interface
*
Как посмотреть свойства адаптера, изменить ряд параметров
Для неискушенных пользователей: обратите внимание на цвет значков в этой вкладке («Сетевых подкл.»):
- если значок серый (бесцветный) — значит этот адаптер выключен (т.е. не работает). В моем примере ниже таких 2; 👇
- если значок цветной, но рядом с ним горит красный крестик — значит, что сам адаптер работает, но ничего к нему не подключено (в моем примере Bluetooth адаптер именно такой 👇);
- если значок цветной и рядом с ним нет никаких крестиков — адаптер работает, подключение активно.
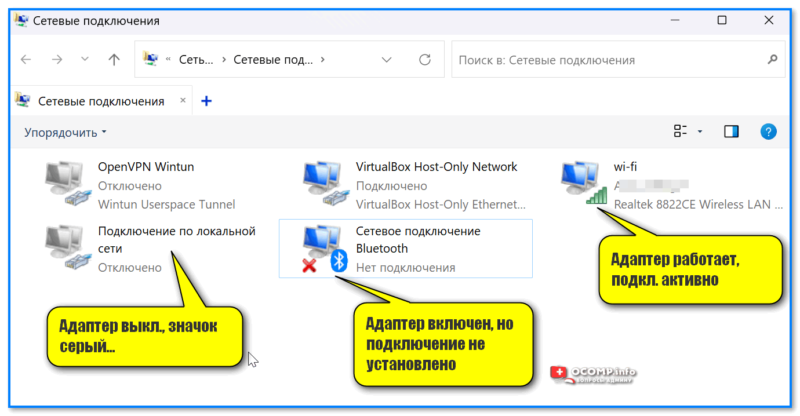
Какой адаптер вкл., какой выключен
Кстати, чтобы включить адаптер — кликните по нему правой кнопкой мыши и в меню выберите «Подключить». (Прим.: по умолчанию все адаптеры должны быть вкл., однако, в некоторых случаях их откл. вручную…)
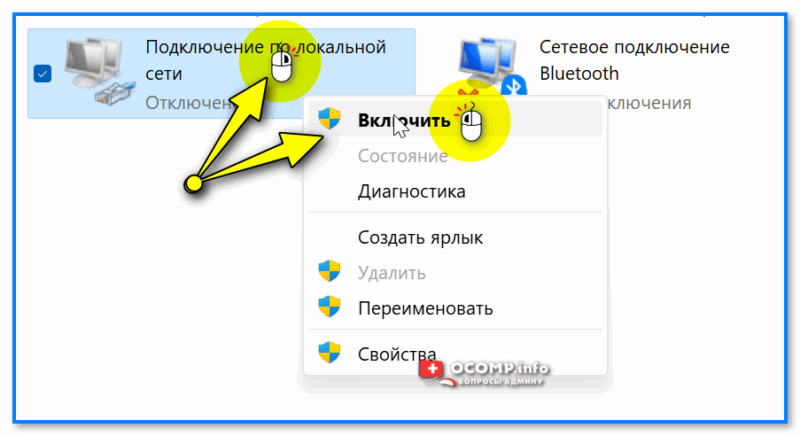
Вкл. адаптера — ПКМ по значку адаптера
Чтобы открыть свойства конкретного адаптера — сделайте по нему ПКМ и в контекстном меню выберите соотв. пункт. Как в примере ниже. 👇
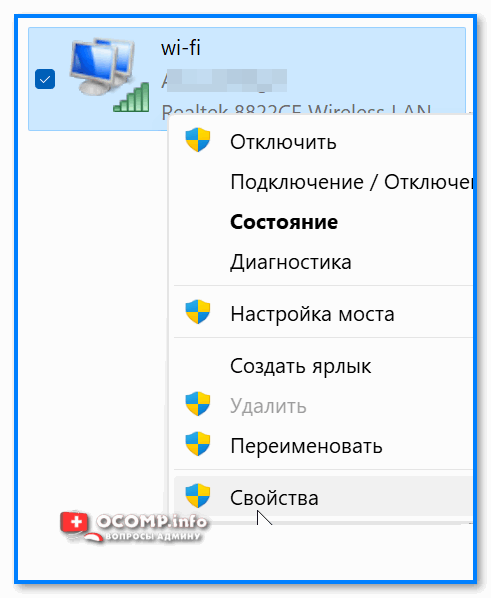
Свойства адаптера
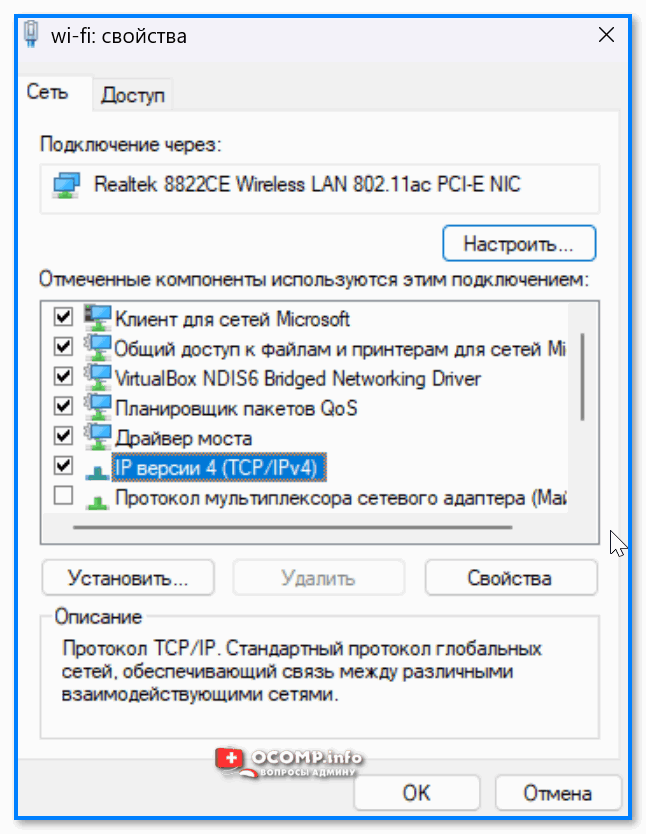
Далее появится окно свойств: в нем можно будет настроить некоторые параметры более точечно. Например, довольно часто требуется поменять IP или DNS — для этого выберите строку «IP версии 4» и откройте ее свойства. 👇
IP версии 4 — свойства
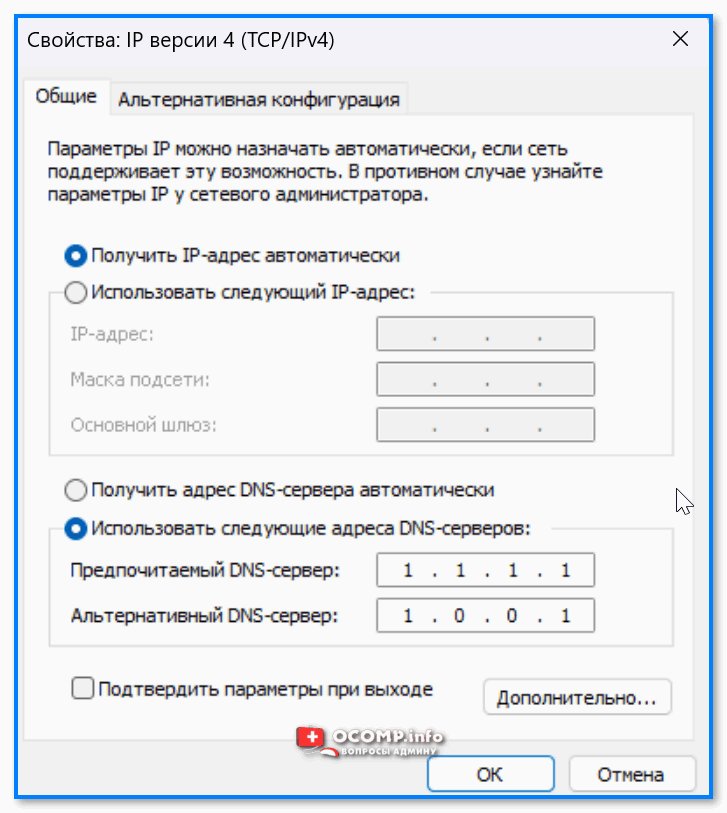
Далее можно задать требуемые 📌DNS (IP, маску…). 👇
📌 В помощь!
Как сменить DNS в Windows, и как выбрать наиболее быстрый публичный DNS-сервер — https://ocomp.info/kak-vyibrat-public-dns.html
Использовать следующие DNS и IP
*
Пару слов о сетевых параметрах Windows 10/11
Кстати, в современных Windows 10/11, если нажать ПКМ по меню ПУСК, — то в меню можно заметить возможность открыть вкладку с сетевыми подкл. Однако, на деле откроется раздел «Сеть и Интернет» в 📌параметрах ОС (см. пару скриншотов ниже 👇).
Сетевые подключения — параметры в Windows 10-11
Раздел этот достаточно «большой» и относительно удобный — есть все основные разделы: VPN, Wi-Fi, исп. данных, прокси и др. Однако, решить он помогает не все вопросы… и иногда вкладка сетевых подкл. просто необходима…
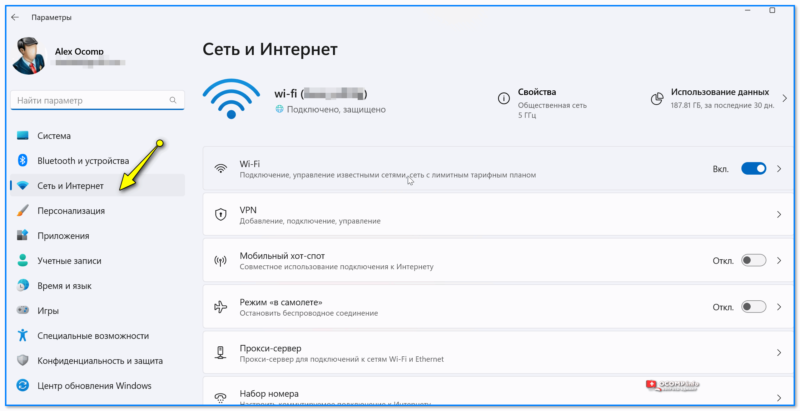
Сеть и Интернет — параметры Windows 11
📌 Кстати, если у вас не работает какой-нибудь адаптер, или вы никак не можете открыть «Сетевые подкл.» — можно попробовать сбросить все сетевые настройки Windows. В этом случае будут использоваться настройки по умолчанию, и скорее всего вопрос разрешится…
О том, как это сделать, расскажет моя предыдущая заметка, ссылочка на нее ниже. 👇
https://ocomp.info/kak-sbrosit-nastroyki-seti.html
*
За сим откланяюсь, успехов!
🙂
Quick Tips
- Open Control Panel and click on Network and Internet > Network and Sharing Center > Change adapter settings.
- Launch Settings > Network & internet > Advanced network settings > list of current Network adapters.
- Use the ncpa.cpl command with Command Prompt or the start-process control netconnections command with Windows PowerShell to open Network Connections utility.
Basic Ways:
- Using the Search bar: Click on the Search bar, type Network Connections, and open the app from the search results.
- Using Start: Go to the taskbar, right-click on Start, and click on Network Connections to launch the app.
- Via Run command/Files Explorer: Open the Run window or the File Explorer, type Network Connections in the relevant search bar, and press enter to open the Network Connections window.
Method 1: Using the Control Panel
Network Connections is a Control Panel applet nested deep inside the Network and Internet section. So, you can launch the utility from the Control Panel too. Here’s how to do it:
Step 1: Open the Control Panel and click on the Network and Internet option.

Step 2: Click on Network and Sharing Center.

Step 3: Here, click on Change adapter settings. Network Connections will launch in a separate window.
Also Read: How to fix Windows 10 network connection issues
Method 2: Using the Settings App
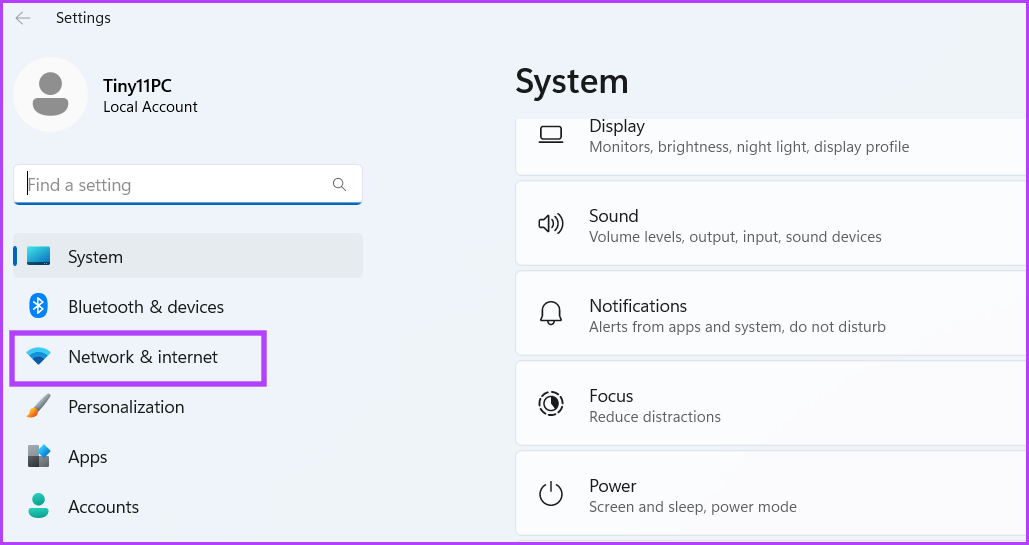
Microsoft is slowly moving many Control Panel utilities to the Settings app. There is an elaborate Network setting in the app, which also has a Network Connections section. Here’s how to open it on Windows 11.
Step 1: Use the Windows + I key to launch Settings. Click on Network & internet.
Step 2: Here, click on Advanced network settings. This will open a list of Network adapters.
Method 3: Using Command Prompt or PowerShell
If you love Terminal in Windows 11 and prefer running applications that way, you can launch the Network Connections utility directly using it. Here’s how to open it using Command Prompt and PowerShell.
Via Command Prompt
Step 1: Open Command Prompt, type the following command, and press enter to open the Network Connections window.
ncpa.cpl

Via Windows PowerShell
Step 1: Open Windows PowerShell, type the following command, and press enter.
start-process control netconnections

Method 4: Creating a Desktop Shortcut
Unfortunately, you cannot pin the Network Connections utility to the Start menu or the Taskbar. However, you can create a shortcut for the utility and launch it directly from the desktop. Here’s how.
Step 1: Right-click on the desktop and click on New. Select the Shortcut option.

Step 2: Type the following path and click on Next.
C:\Windows\SysWOW64\ncpa.cpl

Step 3: Name the shortcut and click on Finish to create the shortcut.

Now, double-click on the newly created shortcut whenever you want to open the Network Connections window on your Windows 11 laptop.
Was this helpful?
Thanks for your feedback!
The article above may contain affiliate links which help support Guiding Tech. The content remains unbiased and authentic and will never affect our editorial integrity.