
Накануне Microsoft выпустила новую инсайдерскую сборку Widows 11 версии 24H2 под номером 26120.2992 для канала Dev, которая принесла с собой несколько нововведений для устройств с маркировкой ПК Copilot+. Подробности об этом вы можете узнать из нашей статьи по этой ссылке.
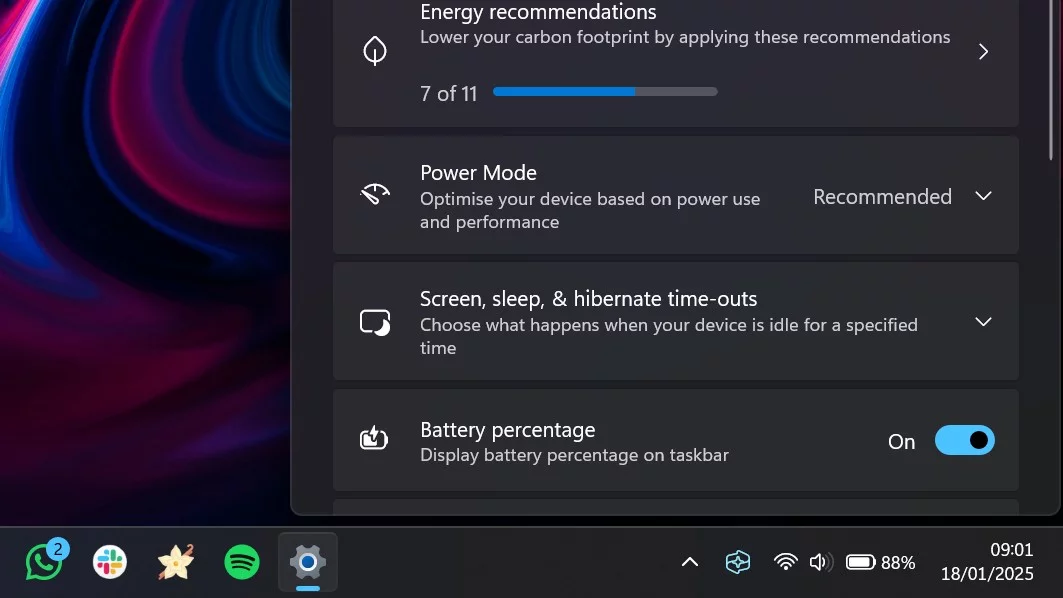
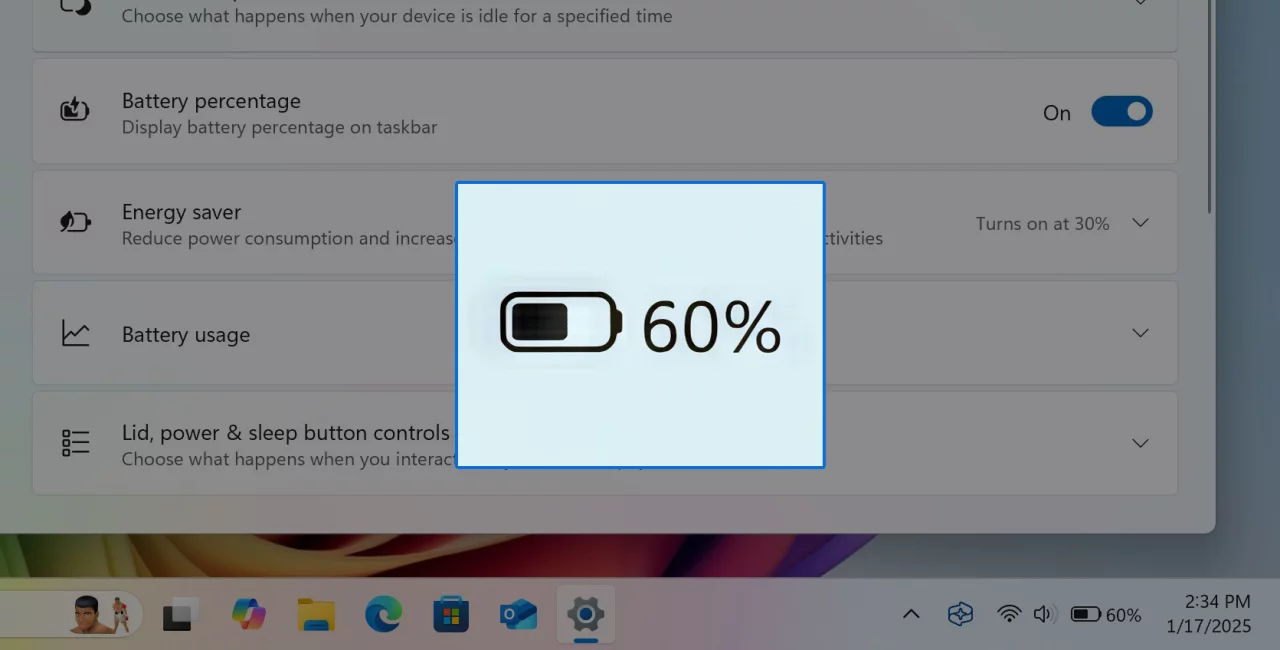
Также в этой сборке появилась возможность вывести процент заряда аккумулятора устройства рядом со значком батареи на панели задач. Такая функция уже давно присутствует почти во всех существующих операционных системах, но в Windows она появляется только сейчас. До этого процент заряда можно было узнать из всплывающей подсказки, появляющейся при наведении курсора на иконку аккумулятора на панели задач.
На текущий момент изменение отключено по умолчанию, но вы можете вручную включить его с помощью утилиты ViveTool. Вероятно, функция станет доступна всем инсайдерам в ближайшие недели.
Благодарим за информацию пользователя phantomofearth.
Инструкция
- Скачайте утилиту ViVeTool по этой ссылке.
- Распакуйте скачанный архив в любое место на вашем компьютере (например, можно создать папку ViVeTool в корне диска C: и поместить файлы туда).
- Откройте командную строку от имени администратора (например, набрав CMD в поиске и выбрав соответствующий пункт).
- В командной строке перейдите в папку с ViVeTool с помощью команды
cd /d <путь к папке>, после чего нажмите Enter. Например:cd /d "C:\ViVeTool". - Введите команду
vivetool /enable /id:48822452,48433719и нажмите Enter. - Убедитесь, что в командной строке появилось сообщение «Successfully set feature configuration»
- Перезагрузите компьютер для применения изменений.
Для отключения функции воспользуйтесь командой:
vivetool /disable /id:48822452
Время на прочтение1 мин
Количество просмотров16K
Издание Neowin сообщило, что в Windows 11 появились виджеты для мониторинга показателей CPU, GPU, потребления оперативной памяти и других параметров. Виджеты стали частью недавно представленного приложения Dev Home.

На прошлой неделе Microsoft анонсировала приложение Dev Home, которое должно объединить в себе повседневные инструменты разработчиков. С помощью виджетов, к примеру, можно отслеживать статистику GitHub. Теперь же стали доступны виджеты для отслеживания параметров ПК.
Приложение Dev Home можно установить из официального магазина Microsoft Store, репозитория GitHub или с помощью пакетного менеджера winget, используя команду winget install --id Microsoft.DevHome -e. У проекта открытый код, и Microsoft призывает сторонних разработчиков присоединиться к развитию Dev Home.
После установки необходимо вызвать панель виджетов с помощью сочетания клавиш Win + W и выбрать необходимые виджеты из коллекции Dev Home. Сейчас с помощью Dev Home можно отслеживать параметры процессора, видеокарты, сети, оперативной памяти, выводить связку SSH-ключей и использовать инструменты GitHub. В будущем Microsoft планирует расширить библиотеку.

Также журналисты издания отметили, что виджеты пока могут работать нестабильно. К примеру, они часто пропадают с доски, перестают отвечать или обновляться. Сам инструмент DevHome находится в бета-тесте. Ожидается, что к моменту полноценного релиза разработчики исправят ошибки.
Если эта публикация вас вдохновила и вы хотите поддержать автора — не стесняйтесь нажать на кнопку
If you are looking for Battery Meeer Widget Windows 11, then this is the correct help page to get started with widgets. It is part of Stefan vd Windows 11 widgets project.
Table of Contents
Introduction
Windows 11 is the latest operating system from Microsoft, offering a range of new features and enhancements. One useful addition is the Battery Meter widget Windows 11, which allows users to monitor their device’s power status easily. In this article, we will explore what a battery meter Windows 11 widget is, its benefits, installation process, customization options, and tips for optimizing battery life. We will also provide a list of top battery meter widgets for Windows 11 and address common troubleshooting issues. So, let us dive in and discover how these widgets can enhance your Windows 11 experience.
A battery meter Windows 11 widget is a small graphical element that displays the current battery level of your device on the desktop or taskbar. It provides real-time information about the remaining battery percentage, estimated time left, and charging status. This convenient widget eliminates the need to navigate through multiple menus to check your device’s power level, ensuring you stay informed at a glance.
Using a battery meter Windows 11 widget offers several advantages. Firstly, it provides you with quick and easy access to essential battery information without interrupting your workflow. You can always keep an eye on your battery status, allowing you to plan your work accordingly and avoid unexpected shutdowns. Additionally, it helps you monitor the effectiveness of power-saving strategies and identify applications or processes that consume excessive battery power.
Installing a battery meter Windows 11 widget is a simple process. Follow these steps to get started:
- Go to the Microsoft Store and download the Battery Meter widget
- When the installation is completed, it will open the application. And click on the widget icon (that is mostly the weather on the bottom left of your screen)
- Click on the + button to add the Battery Meter widget
- Next, search for the Battery Meter widget in Windows 11 and click on the + button.
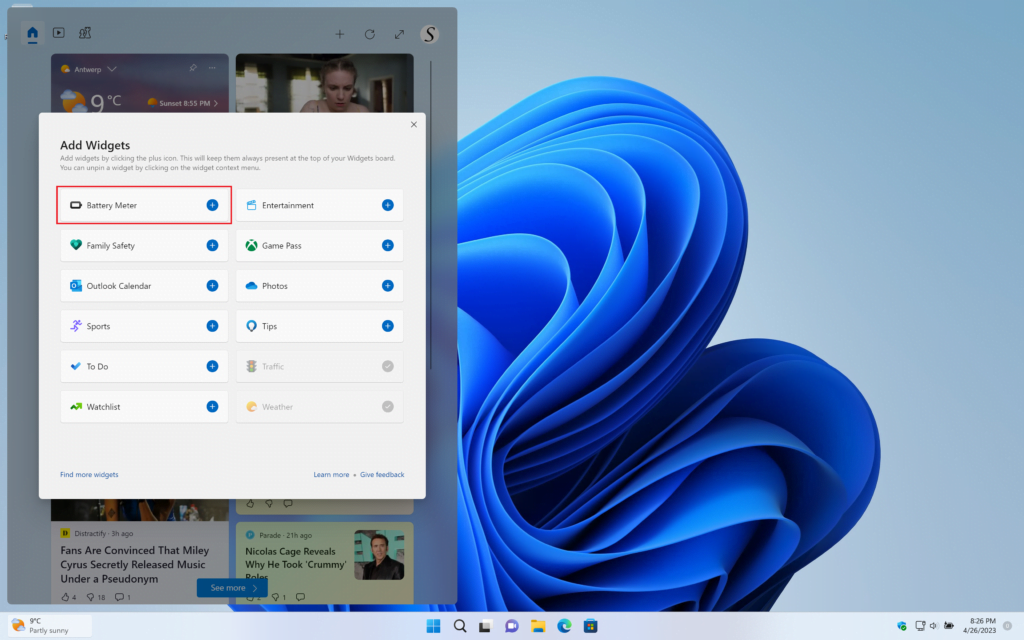
- Now the Battery Meter widget Windows 11 is visible in the Windows 11 widget panel.
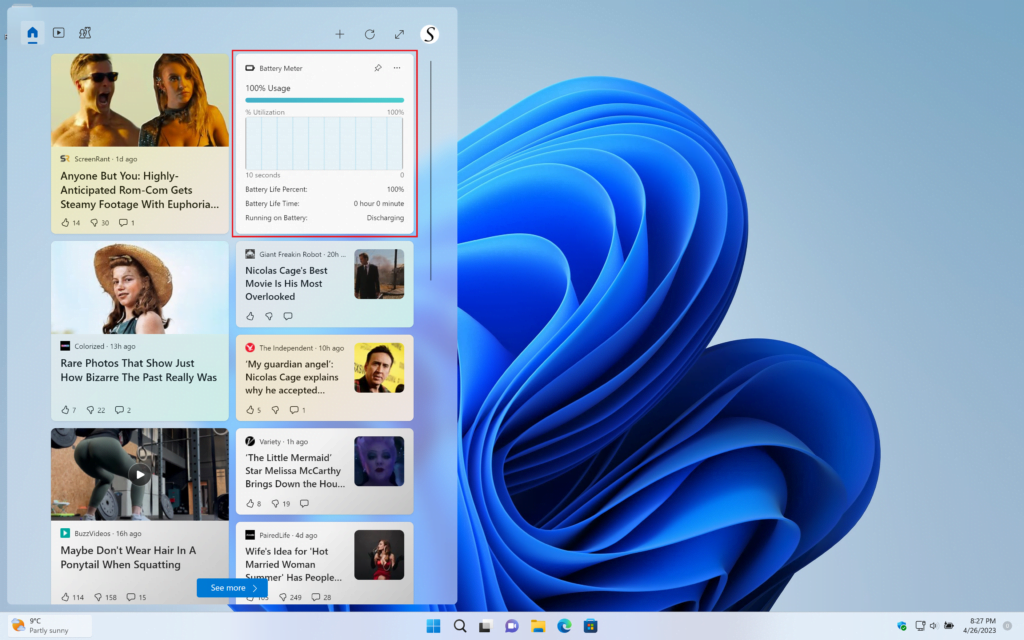
Customization options vary depending on the widget you choose, but most battery meter Windows 11 widgets offer options to personalize the appearance and behavior. You can often customize the size, position, color, and transparency of the widget. Some widgets may also provide additional features like power-saving modes, battery health monitoring, and different display styles. Explore the settings of your chosen widget to make it align with your preferences and needs.
Tips for Optimizing Battery Life on Windows 11
Apart from using a battery meter Windows 11 widget, here are some practical tips to optimize your device’s battery life:
- Adjust screen brightness: Lowering the screen brightness can significantly reduce battery consumption.
- Manage background apps: Close unnecessary apps running in the background to minimize battery drain.
- Enable battery saver mode: Activate Windows 11’s built-in battery saver mode to extend battery life.
- Disconnect peripherals: Unplug external devices like USB drives and printers when not in use.
- Update drivers and software: Keep your device’s drivers and software up to date to ensure optimal performance and energy efficiency.
While battery meter widgets can be highly beneficial, users may encounter some common issues. Here are a few troubleshooting tips:
- Widget not displaying: Check if the widget is properly installed and enabled. If not, reinstall the widget or restart your device.
- Inaccurate battery readings: Calibrate your device’s battery by fully charging and then fully discharging it. This can help recalibrate the battery meter widget’s readings.
- Widget causing performance issues: If the widget is consuming excessive system resources or causing slowdowns, consider using a different widget or updating to the latest version.
Conclusion
The Battery Meter Windows 11 widget is a valuable tool for staying informed about your device’s power status. It offers convenience, customization, and the ability to optimize your battery usage. By installing a battery meter widget and following the tips mentioned in this article, you can effectively manage your device’s power and enhance your Windows 11 experience.
Can I use multiple battery meter widgets on Windows 11?
Yes, you can use multiple battery meter widgets simultaneously as long as they are compatible with your device.
Do battery meter widgets affect battery life?
Battery meter widgets themselves have a minimal impact on battery life. However, keeping your device’s screen on for prolonged periods to view the widget may contribute to battery drain.
Can I uninstall a battery meter widget?
Yes, you can uninstall a battery meter widget like any other app on Windows 11. Go to the Microsoft Store, locate the widget, and choose the uninstall option.
Are battery meter widgets customizable?
Yes, the battery meter widget offer customization options. Users can typically adjust the size, color, position, and transparency of the widget to suit their preferences and desktop setup. Also, allow customization of the font style and display format.
stefan
Stefan is a tremendous developer that changed the internet web experience. As an industry engineer, created enhanced Browser extensions and build high-quality apps for Web, Windows, Mac, Android, and iOS. He created the amazing Turn Off the Lights browser extension that has been featured on Google, YouTube, Mozilla, and Microsoft Windows Blog. He is an expert in building browser extensions for over 12 years and has been making them since 2009.
Stefan is a web browser product expert for all the major web browsers. And he is an official Google Chrome Diamond Product Expert, Google Developer Expert, and Chromium developer community member. And a W3C member of the WebExtensions Community.
Laptop batteries degrade when kept charged at 100 percent. The more you leave a laptop plugged in, the more its battery will deteriorate over time. So, some users no doubt try to preserve their laptops’ battery lifespans by leaving them unplugged as much as possible.
Windows doesn’t incorporate a high-battery notifier (alert) for informing you when a plugged-in laptop is fully charged or close to it. Such a feature would be useful for users who prefer to leave their laptops unplugged when they can. This is how you can add a full battery charge alert to Windows 11/10 with three apps.
How to Add a Full Battery Charge Alert With Battery Notification
Battery Notification is a Microsoft Store app you can utilize in Windows 11/10. That app enables you to set both high and low-battery alert notifications. The basic app is freely available, but you can upgrade it to one with battery analytics for $4.99. You can set up a fully charged notifier with Battery Notification as follows:
- Bring up the Battery Notification app page in a browser.
- Click Battery Notification’s Get in Store App option.
- Select Open in Microsoft Store to access a download option for the app outside the browser.
- Click Get to install Battery Notification.
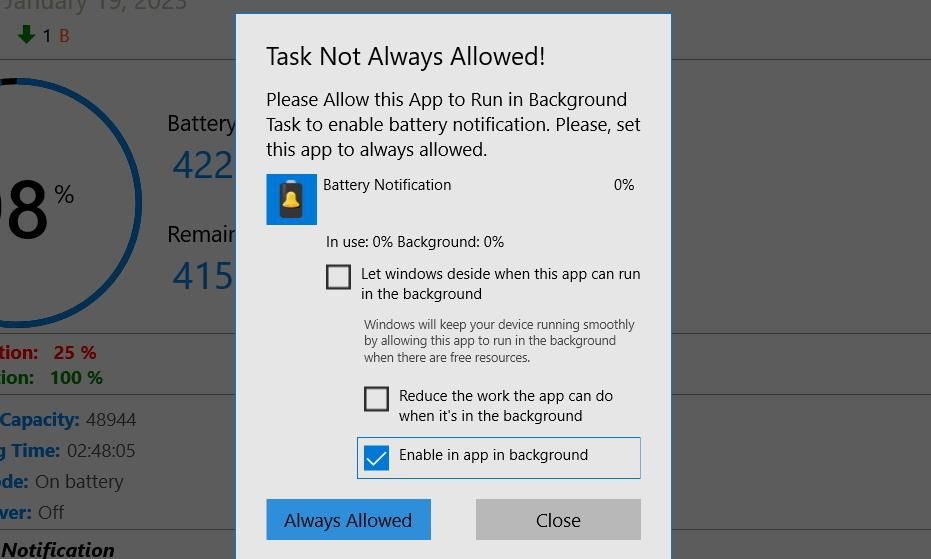
- Select Battery Notification on the Start menu to open its window.
-
Next, select the Always Allowed option if prompted to enable the app to run in the background.

- Click the app’s Home tab if it’s not selected.
-
Then turn on the Full Battery Notification option if it’s disabled. A high battery alert will now pop up when the battery reaches the level set on the Notification bar.

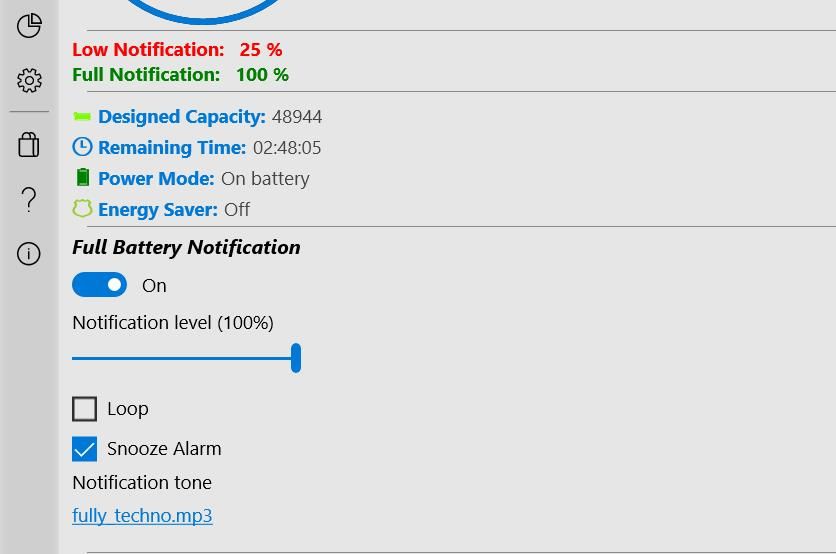
You can apply some optional tweaking of the full battery notifier after enabling it. Drag the slider on the Notification level bar to set a battery charge percentage level. If you only want the alarm to ring for a fully charged battery, set that bar to 100 percent. Drag the slider left to set the notifier to appear at lower charge levels.
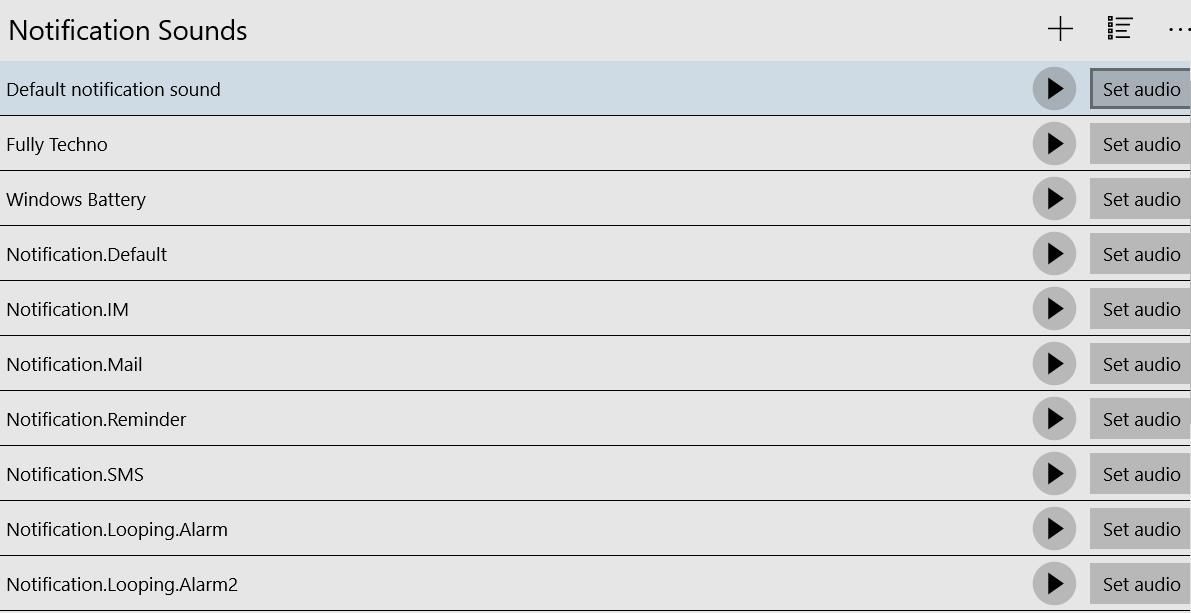
You can also change the notification’s sound. Click Default notification sound to view a list of alarm sounds. To preview a sound, click its play button. Press the Set audio option to select an alternative.
This app also has a handy taskbar indicator for your battery. The app’s taskbar icon shows the percentage level of your batter. Thus, you can keep an eye on the battery level on the taskbar when Battery Notification is open.
How to Add a Full Battery Charge Alert With Battery Notifier
Battery Notifier is a small app you can utilize from the Windows 11/10 system tray. This app provides low and high-battery charge notifiers and enables you to view the current battery status by clicking its system tray icon. This is how you can add Battery Notifier’s full battery charge alert to Windows 11/10:
- Bring up the Battery Notifier Softpedia page.
- Click Download to view a couple of location options.
- Select the Secure Download (US) location option.
- Click File Explorer (a taskbar button) to open up the folder containing the downloaded BatteryNotifier.exe file.
- Right-click BatteryNotifier.exe to select Run as administrator.
-
Next, click the Battery Notifier icon in the system to view the app’s panel.

-
Make sure the Full Battery notification checkbox is set to On.

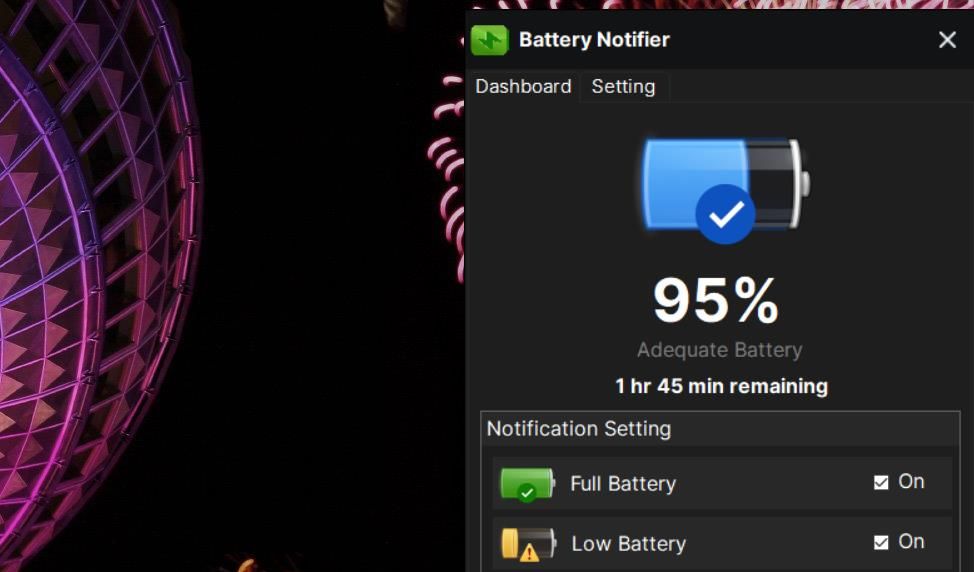
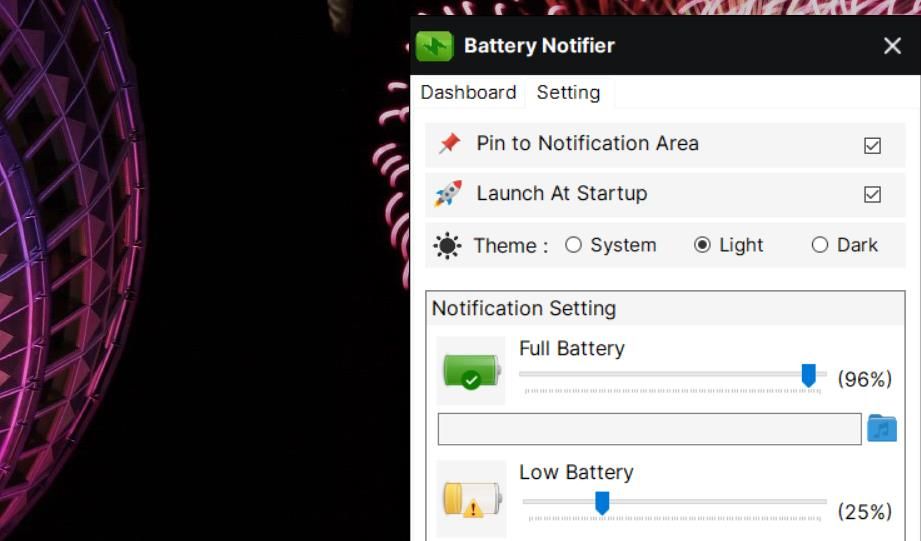
To configure the Battery Notifier app, click the Settings tab. There you can set the battery percentage level for the full and low battery notifiers to alert you. Drag the Full Battery bar’s slider to set it how you wish.
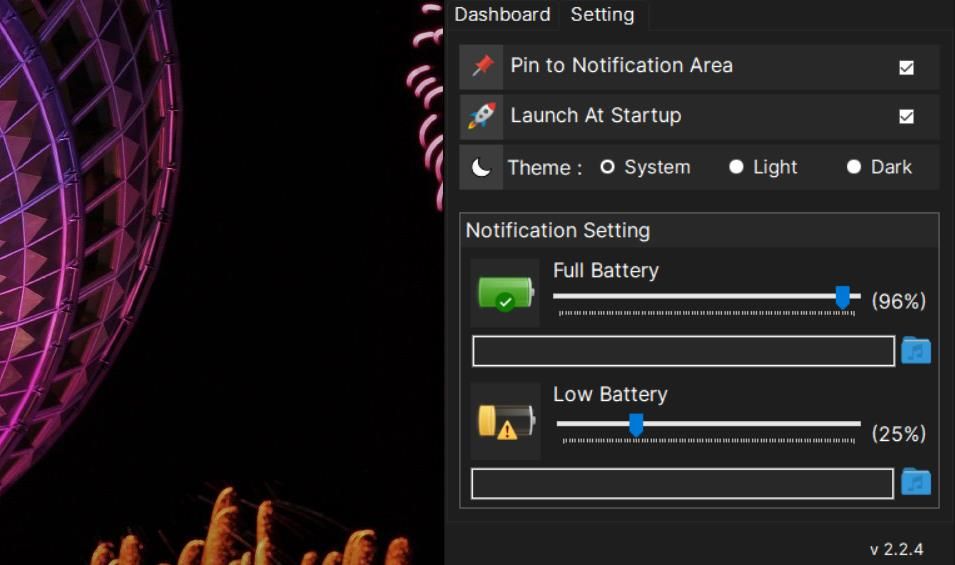
You can also set custom sounds for the full battery charge notifier. Click the music folder icon below the Full Battery bar to view a file selection window. Then choose a music or sound file for the alarm and click OK.
The Launch at Startup option there is a self-explanatory setting. That setting adds the app to the Windows startup when selected. Then you won’t need to manually start the app.
There are also alternative theme options available. Selecting Dark makes the app black. If you prefer a white app, click the Light radio button.
How to Add a Full Battery Charge Alert Full Battery & Theft Alarm
Alert Full Battery & Theft Alarm is an app with which you add a full battery charge notifier to Windows laptops and Android mobile devices, as it’s available on Google Play. It also provides an additional theft alarm for security. The upgraded version of the app ($1.49) shows your battery history. These are the steps for adding a full battery charge notifier with Full Battery & Theft Alarm.
- Open the Full Battery & Theft Alarm MS Store page in a web browser.
- Select Full Battery & Theft Alarm’s Get in Store app option.
- Click Open Microsoft Store > Install to download the app.
- Select the Open option for Full Battery & Theft Alarm in MS Store.
-
Turn on the Charge Alarm option if it’s off.

- Click the Settings (cog) button at the bottom left of the app.
-
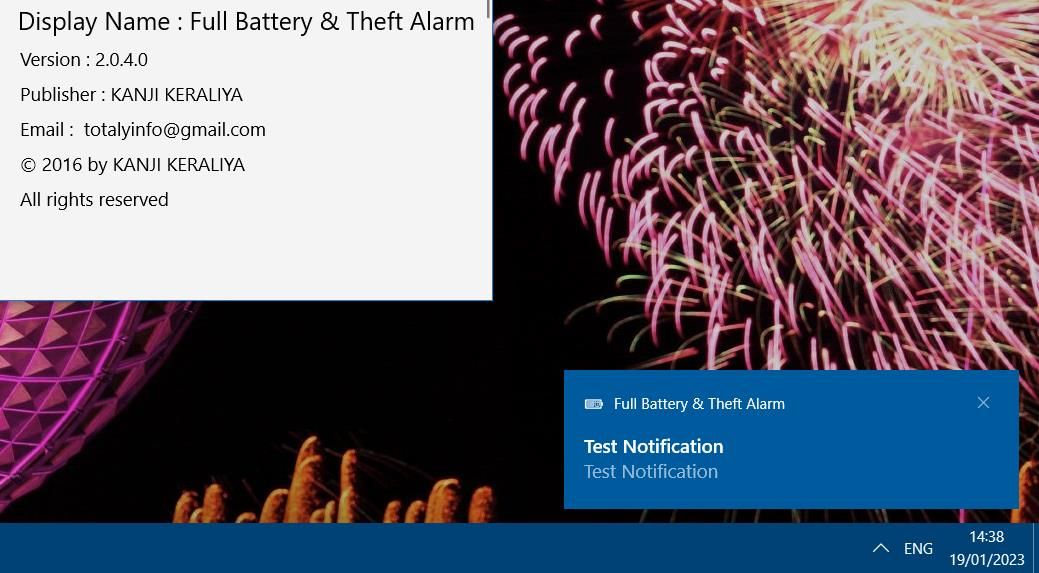
Set the Notification Type option to Reminder. Then you can wait for the notification to appear at the bottom right of the desktop when your laptop is charged to the set battery level.

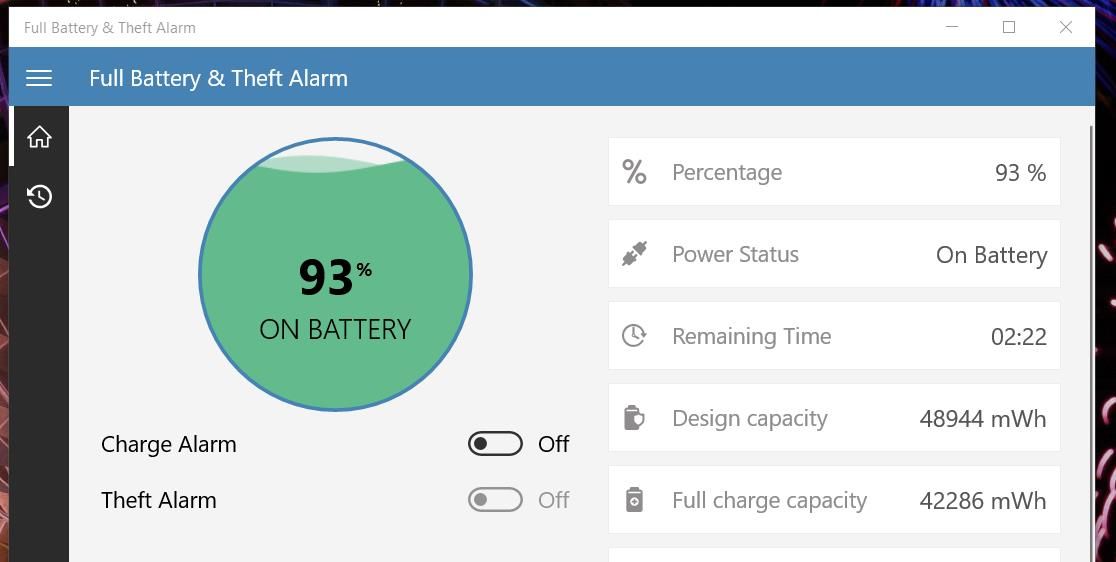
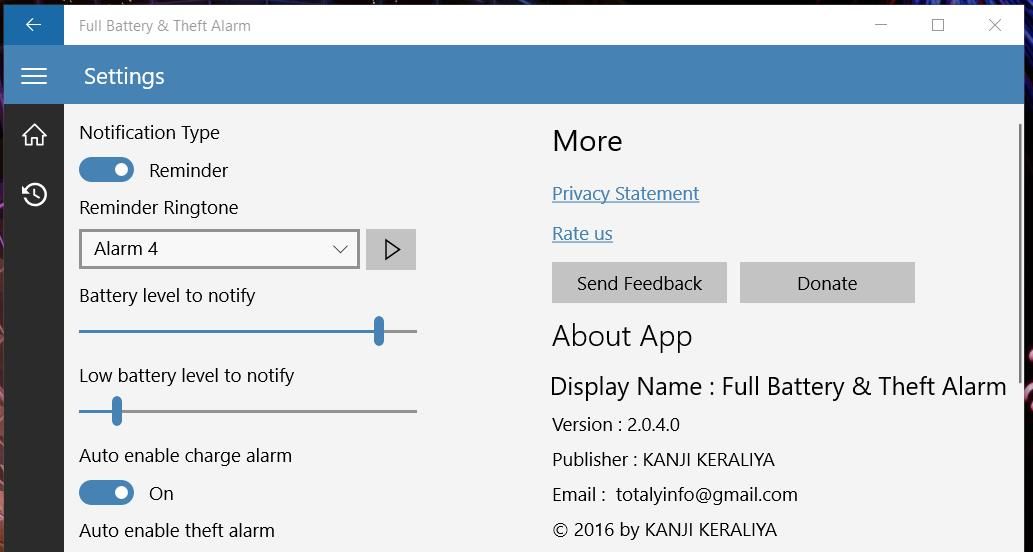
You can change the charge percentage for the high alert by dragging the bar on the Battery level to notify bar. Below that there’s also a Low battery level to notify bar you can configure.
To change the sound for the notifier, click the Reminder Ringtone drop-down menu; select an alternative alarm or call sound there. Click Play to see and hear a test notification with the chosen sound.
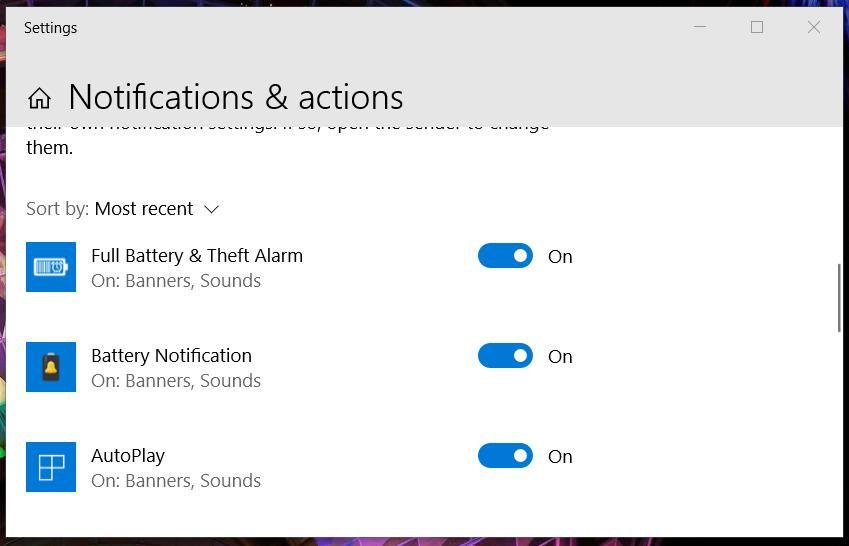
How to Enable Notifications for the Battery Apps
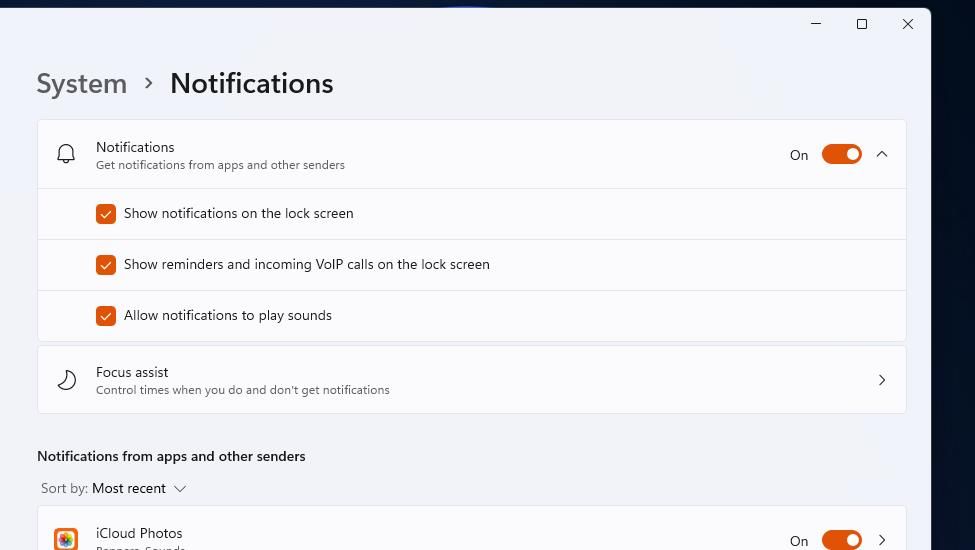
Note that Windows notifications need to be turned on for the above apps’ full battery charge notifiers to work right. Make sure notifications for the battery apps are enabled in Windows 11/10 like this:
- Open Run by pressing Win + R (see all the ways to open Run on Windows for more).
- Type ms-settings:notifications inside Run, and click that accessory’s OK option.
-
Turn on the Notifications or Get notifications setting.

- Select the Allow notifications to play sounds option.
-
Click the notification toggle switches on for the battery apps in this guide.

Listen Out for Your Full Battery Charge Notifiers in Windows
Battery Notification, Full Battery & Theft Alarm, and Battery Notifier include some good options and features for monitoring battery levels in Windows. You’ll never forget to unplug a fully charged laptop when you’ve added a full battery charge notifier to Windows 11/10 with one of those apps. They’ll help minimize laptop battery degradation by always reminding you when to pull the plug on a fully charged laptop.
Want to keep an eye on your battery life without clicking through menus? Displaying the battery percentage on the taskbar in Windows 11 is a breeze. Just follow these simple steps, and you’ll have that crucial info right at your fingertips.
Step by Step Tutorial: Displaying Battery Percentage on the Taskbar in Windows 11
Before we dive into the steps, let’s clarify what we’re aiming to achieve here. By the end of this tutorial, you’ll have the exact battery percentage visible on your taskbar, so you can monitor your battery life at a glance. No more guessing if you’ve got enough juice to finish your work or stream that final episode!
Step 1: Right-click on the Taskbar
Start by right-clicking on an empty space on your taskbar.
This will open up a small menu. You won’t find the battery percentage option here, but this step is essential to get to the Taskbar settings where you can make the change.
Step 2: Select “Taskbar settings”
From the menu that appears, click on “Taskbar settings.”
This will open the Settings app, specifically on the Taskbar page. Here, you can customize various aspects of your taskbar, including the battery icon.
Step 3: Choose “Turn system icons on or off”
Scroll down until you see the “Turn system icons on or off” option and click it.
You’ll now see a list of system icons that you can choose to show or hide from your taskbar. We’re interested in the battery icon, of course.
Step 4: Toggle the switch next to “Power” to on
Find the “Power” option and toggle the switch to the “On” position.
Doing this will ensure the battery icon is visible on your taskbar. However, the percentage may not show just yet – there’s one more step to ensure that happens.
Step 5: Hover over the battery icon to see the percentage
Now, hover your mouse cursor over the battery icon on the taskbar.
As you hover over the icon, a small pop-up will appear, showing your exact battery percentage. While it won’t be displayed constantly on the taskbar, this quick action gives you the information you need without any clicks.
After completing these steps, you’ll have the power to see your battery percentage simply by hovering over the battery icon on your taskbar. It’s a small tweak, but it can make managing your device’s power on Windows 11 that much easier.
- Keep your cursor over the battery icon for a second or two to give the percentage pop-up time to appear.
- Remember that the battery percentage will only show when you hover over the icon, so don’t worry if you don’t see it right away.
- If the battery icon is not visible, make sure it’s not hidden in the overflow menu of the taskbar.
- Keeping the battery icon visible can help you develop better charging habits, as you’re constantly aware of your battery life.
- If you’re not seeing the battery percentage, ensure that your device’s drivers are up to date as this can affect system icon functionality.
Frequently Asked Questions
Can I keep the battery percentage visible at all times on the taskbar?
No, Windows 11 does not have a built-in feature to keep the battery percentage visible at all times on the taskbar. However, you can quickly view it by hovering over the battery icon.
Why can’t I see the battery icon on my taskbar?
If the battery icon is missing from your taskbar, it might be disabled in the Taskbar settings, or it could be hidden in the overflow area where less frequently used icons are stored.
How can I check my battery health in Windows 11?
You can check your battery health by accessing the Windows PowerShell and entering a specific command to generate a battery report. This report provides detailed information about your battery’s capacity and performance history.
What should I do if the battery percentage is not appearing when I hover over the icon?
Ensure that your drivers are up to date, as outdated drivers can cause issues with system icons. You can also try restarting your computer to see if that resolves the problem.
Is there a way to display the battery percentage on the taskbar using third-party software?
Yes, there are third-party applications that can display the battery percentage constantly on the taskbar. However, always ensure you download software from reputable sources to avoid potential security risks.
Summary
- Right-click on the Taskbar
- Select “Taskbar settings”
- Choose “Turn system icons on or off”
- Toggle the switch next to “Power” to on
- Hover over the battery icon to see the percentage
Conclusion
Mastering the task of displaying battery percentage on the taskbar in Windows 11 is a simple yet effective way to keep track of your device’s power. While it’s not a permanent fixture on the taskbar, the hover-over method is a quick and convenient way to stay informed about your battery life. It helps you avoid any unpleasant surprises like your laptop dying in the middle of an important task. Moreover, being aware of your battery level can encourage better charging habits, contributing to the longevity of your device’s battery. Remember, keeping your system up to date and exploring third-party options are also ways to enhance your user experience on Windows 11. So, go ahead, give it a try and never get caught off guard by a low battery again!
Matt Jacobs has been working as an IT consultant for small businesses since receiving his Master’s degree in 2003. While he still does some consulting work, his primary focus now is on creating technology support content for SupportYourTech.com.
His work can be found on many websites and focuses on topics such as Microsoft Office, Apple devices, Android devices, Photoshop, and more.