
Погода, календари, мониторинг ресурсов и другие полезные вещи будут всегда под рукой.
Виджеты, или мини‑приложения, — одна из интересных функций современной Windows. В отличие от старых версий ОС виджеты располагаются не на рабочем столе, а в специальной панели, которая открывается при наведении или клику курсора по иконке погоды в панели задач. Панель также можно открыть сочетанием клавиш Win + W, причём это работает, даже если вы убрали оттуда значок температуры.

Погода, акции, трафик и несколько других виджетов уже включены по умолчанию. Пользователи могут активировать новые, а также настроить их внешний вид и расположение. Для добавления необходимо открыть панель, кликнуть «+», выбрать виджет из бокового меню и нажать «Закрепить».

Мини‑приложения можно перетаскивать и фиксировать в определённом месте с помощью кнопки булавки. Также через меню «…» легко менять их размер и настраивать некоторые параметры (например, город в погоде). Для удаления виджета нужно нажать «Открепить мини‑приложение».
Нативные мини‑приложения для панели виджетов в Windows 10 и 11
К этой категории относятся плагины, которые добавляются в панель. К сожалению, подобных виджетов не очень много и большая часть из них — фирменные мини‑приложения от Microsoft. Несмотря на то, что компания разрешила сторонним разработчикам создавать свои собственные виджеты, те почему‑то не очень спешат с этим.
1. Календарь Outlook

Один из самых полезных виджетов, с помощью которого можно в одно касание свериться с собственным расписанием и быстро добавить новое событие. Имеет два размера плитки, настройки позволяют установить часовой пояс и выбрать аккаунты календарей для отображения.
Виджет доступен бесплатно во встроенной галерее.
2. Связь с телефоном

Данное мини‑приложение поможет экономить время на проверку смартфона. Благодаря синхронизации вы будете видеть все уведомления и сообщения, а также сервисную информацию вроде состояния сети и уровня заряда аккумулятора. И всё это — не доставая гаджет из кармана или не трогая его на столе. На выбор доступно три размера: от компактного до большого, где помещаются сразу несколько уведомлений.
Добавить виджет можно из стандартного комплекта бесплатно.
3. Фокусирование

А это мини‑приложение с таймерами пригодится для организации рабочих сессий и поддержания продуктивности, помогая вам чередовать интервалы концентрации и отдыха в течение дня. Размер плитки средний или мелкий, длительность промежутков можно менять прямо из виджета.
«Фокусирование» тоже доступно бесплатно среди встроенных мини‑приложений.
4. Список дел

Виджет фирменного менеджера задач Microsoft To Do, благодаря которому у вас перед глазами всегда будет список запланированных дел. Отсюда можно полноценно взаимодействовать с задачами, отмечать выполнение, выделять срочные, создавать новые и переключаться между списками. На выбор два размера, которые различаются количеством отображаемых пунктов.
Добавить виджет можно из стандартной галереи бесплатно.
5. S Media Controls

Простое, но полезное мини‑приложение для управления воспроизведением музыки. После добавления в панели появится плитка с обложкой и кнопками плеера, а также названием трека и исполнителя. Есть два размера виджета. Поддерживаются встроенный Media Player, Spotify, Apple Music и YouTube.
Виджет бесплатный и доступен в официальном магазине.
Скачать →
6. Network Usage Monitor

Ещё один виджет для просмотра статистики использования Сети. Network Usage Monitor показывает текущую скорость скачивания и выгрузки данных, рисует наглядный график потребления трафика, а также отображает информацию о сетевом интерфейсе: тип, локальный и публичный IP, MAC‑адрес. Можно выбрать один из двух размеров плитки.
Виджет полностью бесплатен и доступен в официальном магазине.
Скачать →
7. Battery Meter

С Battery Meter вы будете иметь более расширенную информацию об аккумуляторе ноутбука и его автономности, нежели представлена в значке батареи в панели задач. В малом размере виджет покажет шкалу и процент оставшегося заряда, примерное время автономной работы и текущий статус. В среднем ко всему этому добавится график уровня заряда, по которому можно определить потребление.
Battery Meter представлен бесплатно в Microsoft Store.
Скачать →
8. Виджеты Dev Home

Набор виджетов для разработчиков Microsoft, среди которых есть полезные и для обычных пользователей. Например, статистика заполнения оперативной памяти, использования Сети, загрузки процессора или видеокарты.
Все они доступны бесплатно в составе пакета Dev Home.
Скачать →
Виджеты для рабочего стола
Если вас не устраивают плитки в панели, то есть сторонние приложения, предлагающие виджеты в более классическом их понимании. Календари, часы и другие подобные вещи работают по принципу гаджетов Windows 7 — их можно закрепить прямо на рабочем столе, расположив в нужных местах.
1. BeWidgets

Приложение с современными минималистичными виджетами и поддержкой тёмного оформления. Всего их внутри шесть: часы, дата, погода, слайдшоу, ярлыки приложений и акции.
Добавляются плагины через основное окно приложения, там же и настраиваются, причём довольно гибко. Можно задать размеры, прозрачность, шрифты, указать необходимые параметры вроде города для погоды. При желании легко сохранить разные наборы виджетов и переключаться между ними.
BeWidgets полностью бесплатен и доступен в Microsoft Store.
Скачать →
2. Widget Launcher

Ещё один набор из 12 виджетов на базе стороннего приложения. Вы найдёте здесь разнообразные часы, календари, заметки, калькулятор, а также погоду, конвертеры валют и величин, RSS, монитор ресурсов. Поддерживаются скины, настройка некоторых свойств виджетов и сортировка по категориям.
Данная версия приложения бесплатна, но имеет ограничение на пять виджетов. Существует Pro‑вариант за 3,79 доллара без ограничений с большим количеством плагинов.
Скачать →
Download Article
Tricks to get a calendar widget on your laptop or desktop computer
Download Article
- Using Widget Launcher (Windows 10 & 11)
- Using Calendar Flyout (Windows 11)
- Using Outlook (Windows & Mac)
- Using a Google Calendar Shortcut (Windows & Mac)
- Using a Calendar Widget (Mac)
- Adding a New Calendar (Mac)
- Q&A
|
|
|
|
|
|
If you want to show a calendar on your Windows or Mac desktop, there are some easy ways to do so. On Windows, you can use a free app called Widget Launcher, or a paid option like Calendar Flyout. You can also create shortcuts on your desktop to open the calendars that you prefer. Read on to learn how to get a calendar on your desktop.
There is no built-in way to add a calendar to your desktop on Windows, but you can use an app like Widget Launcher (Free) or Calendar Flyout (Paid). Programs like Outlook, Google Calendar, and Apple Calendar will show you a calendar if you keep them open. You can also create a desktop shortcut for Google Calendar.
-

You can do this by clicking the Win key and then clicking the shopping bag icon in the Start menu.
- Unfortunately, none of the calendar widgets for Windows 10 or 11 have the ability to add events or sync with your Windows calendar or other calendars. However, you can quickly access the built-in Windows calendar by clicking the date and time in the taskbar. Click the plus (+) to add a new event or sync another calendar service with your Windows calendar.
-
2
Type Widget Launcher in the search bar and press ↵ Enter. You’ll see all the apps that match your search.
Advertisement
-
3
Hover your mouse over the app and click Get. At first, the app says «Free» next to it, but when you hover over it, the tile will enlarge. «Free» changes to «Get.»
-
4
Open Widget Launcher. After downloading, you can either click Open in the Microsoft Store or click the Widget Launcher icon in the Start menu.
- In the MS Store, if you are looking at tiles of search results, hover your mouse over the app to see «Installed» and change to «Open.»
- You will immediately see the «Open» option if you are looking at the Widget Launcher page.
-
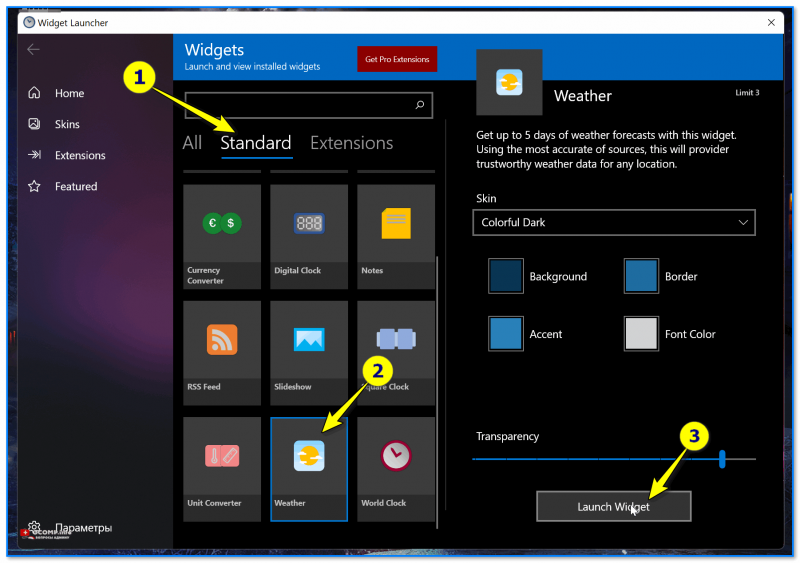
5
Click Calendar. This will add a widget with a calendar to your desktop, but you need to choose some options first.
- There are other widgets you can also add, like a CPU Meter. However, you can only add up to 2 objects.
-
6
Customize your calendar and click Launch Widget. You can pick the colors that appear, like the background, border, and so on, as well as the transparency.
- If you see an ad, wait for it to finish, then click Launch Widget again.
-
You can place the Calendar widget anywhere you want on your desktop by clicking and dragging it.
- To change the size of the calendar, click and drag the dots next to the lower right corner.
-
The small x appears when you hover your mouse over the calendar and will open a window centered on your screen. Click Yes to continue to close the calendar widget.


Advertisement
-
1
There’s no built-in calendar widget on Windows 11. Even though the Windows 10 calendar widget isn’t available in Windows 11, you can install an alternative called Calendar Flyout to bring the old Windows 10 calendar back to your taskbar. Calendar Flyout syncs with your Microsoft and Google accounts, so you can easily keep an eye on your agenda from your desktop.
- To check it out, open the Widgets panel by pressing ⊞ Win+W.
- Click the gear at the top-right, then click + Discover New Widgets to add more widgets.
- From there, you can search calendar flyout and click its price ($3.99) to install it, or just search for calendar to explore alternatives to having a calendar on your desktop.
-
1
Open the Calendar app in Outlook. Even though your calendar will open in Outlook, this is a free alternative to installing additional software.[1]
To open the calendar, click the calendar icon on the left side of the screen.- You can also use the Outlook app on either a Mac or a PC to view a calendar.
-
2
Click

. This gear icon is near the top right corner of the app window.
-
3
Click Add Account. You’ll see this in the Accounts tab.
-
4
Enter your account and press ↵ Enter. Once you enter the account that you want to add, click Continue and sign into that account in your web browser when prompted.
- Click Continue again, then select all or just Calendar to add that account to your Outlook.
- After you’ve signed in, return to the Calendar view.
-
5
Make your added calendar appear. In the panel on the left, you’ll see the name of the account you just added. Click it to expand it, then click «Calendar» to select the circle next to it. You’ll see events from that calendar appear in your main calendar.
- You can change how your calendar events appear between accounts by clicking the ••• next to the calendar’s name on the left.
- Leave the app open to quickly refer to your calendar whenever you need to!
- You can change how your calendar events appear between accounts by clicking the ••• next to the calendar’s name on the left.

Advertisement
-
1
Go to your Google Calendar in Chrome. Use this method on a Mac or PC desktop or mobile laptop if you don’t want to open Outlook or a third-party app.
- Go to https://calendar.google.com/calendar/u/0/r to find your Google Calendar.
- Sign in if prompted.
- You can make desktop shortcuts using any web browser, but using Google Chrome is the easiest.
-
2
Click ⋮. This three-dot menu icon is in the top right corner of your browser window.
-
3
Hover your mouse over Cast, save, and share and click Create shortcut. You can rename the shortcut to anything you will recognize, then click Create.
- Look at your Desktop, and the shortcut will be there. Double-click it to open your Google Calendar in a Chrome page.[2]
- Alternatively, highlight the URL while you’re looking at your Google Calendar, then drag it to your Desktop. You can also use this technique to create shortcuts in other browsers like Safari.
- Look at your Desktop, and the shortcut will be there. Double-click it to open your Google Calendar in a Chrome page.[2]
Advertisement
-
1
Click the time and date in the menu bar on your Mac. Doing this will open the Notification Center.
- You can use this method to get a calendar on your Mac desktop computer or MacBook.
-
2
Click Edit Widgets. You’ll see this at the bottom of Notification Center.
-
3
Search for a calendar widget or browse categories. Once you find the calendar widget, continue to the next step.
-
4
Add the widget to the Notification Center. You can do either of these:
- Drag the widget to the upper-right corner of your Desktop
- Click the widget and the Add button + icon.[3]
-
5
View your calendar by clicking the time and date in the menu bar. You’ll see a quick calendar, but if you need more details about an event, click on it.[4]
Advertisement
-
You’ll find it in your Dock. This opens the Apple Calendar app.[5]
-
You’ll see the Calendar option on the menu bar, and Add Account will appear in the drop-down menu. This displays a window with a list of services you can add.[6]
-
There are several calendar services you can add to Apple Calendar. You can add an iCloud account, Exchange, Google, Facebook, Yahoo, AOL, or Other CalDAV account. Click Continue in the lower-right corner of the window when you are ready.
-
The sign-in screen is going to be a little different depending on which service you want to add. You will most likely need to enter the email address and password associated with the account you want to sign in to. For example, if you want to add a calendar associated with your Google account, you would sign in with the email address and password associated with your Google account.
-
You can also add email, contacts, and notes to your Apple services. Check Calendar to add your calendar and click Done in the lower-right corner. This adds the calendar to your Apple Calendar app. You can click the different calendars you have added in the sidebar to the left.
- To add an event to the Apple Calendar, click a time slot below a date and fill out the form in the pop-out window.


Advertisement
Add New Question
-
Question
I have Windows 7. The calendar used to be displayed all the time on the right side of my computer when I had my email page open, but it’s disappeared from there. How do I get it back to that location, and why aren’t I sent reminder notices for the events that I’ve asked to have reminders sent for?
The Widgets feature of Windows 7 was removed because of malicious use — hackers could create widgets which seemed benign, but would access system data and files once installed from the Widget public sharing space. Microsoft could not counter these security flaws and decided to disable the software entirely. So, you may need to move on to a different calendar.
-
Question
I have Windows 10, and these instructions for Windows 7 or later didn’t work. What do I do?
Widgets do not work on Windows 8 or later; in fact, they were removed from Windows 7 due to malicious use. You will have to move to a different calendar.
Ask a Question
200 characters left
Include your email address to get a message when this question is answered.
Submit
Advertisement
Thanks for submitting a tip for review!
References
About This Article
Article SummaryX
1. Open the App Store on Mac or Microsoft Store on Windows.
2. Search «miniCalendar & Widget» on Mac, or «Widgets HD» on Windows.
3. Click GET followed by Install.
4. Launch Widgets HD or MiniCalendar & Widget.
5. Click Allow (Mac only).
6. Click and drag the calendar Widget to where you want to it on your desktop.
Did this summary help you?
Thanks to all authors for creating a page that has been read 525,058 times.
Is this article up to date?
Содержание статьи:
- Подборки гаджетов
- Из Microsoft Store
- Не из Store (сгодятся для установки в «любую» версию Windows)
- Вопросы и ответы: 0
Доброго времени!
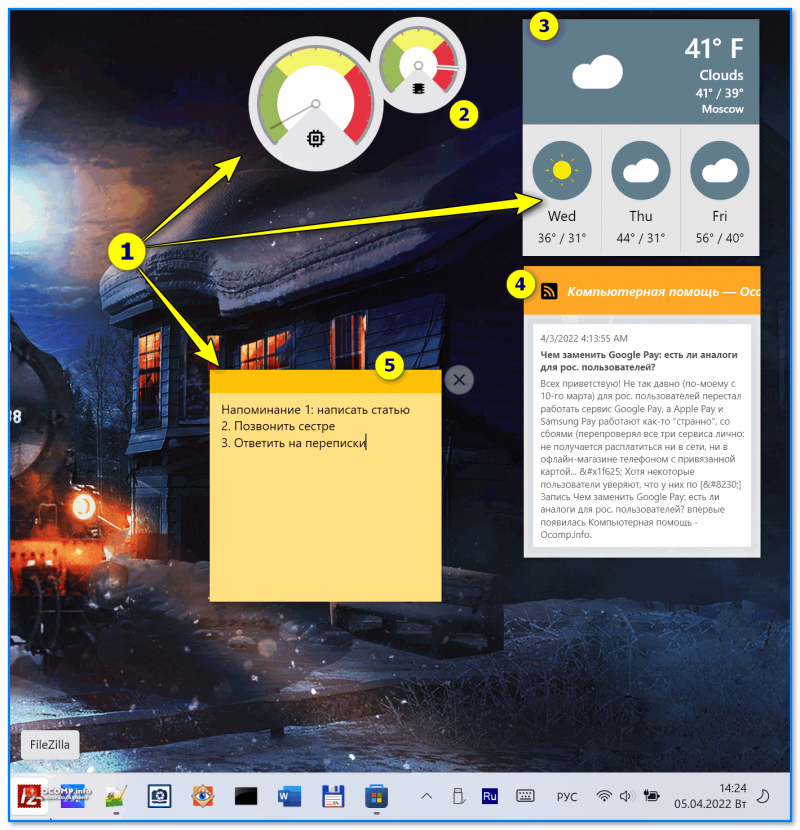
Когда-то давно в Windows 7 появилась одна архи-удобная штука на рабочем столе — виджеты (гаджеты): это небольшие окна-информеры, которые сообщают вам текущее время, погоду, посл. заметки, курс валют и многое другое! Т.е. вам нет нужды собирать эту информацию с десятка сайтов вручную (они это сделают за вас) — достаточно взглянуть на рабочий стол!
В современных Windows 10/11 — по умолчанию на рабочем столе нет никаких виджетов. Однако, при желании, можно относительно легко их туда добавить! См. скрин ниже с примером. 👇
Собственно, ниже в заметке приведу неск. приложений, которые помогут вам решить сей вопрос…
*
Xwidget.com. Пример использования гаджетов
*
Подборки гаджетов
Из Microsoft Store
Если не получается установить нижеприведенные подборки — проверьте, что у вас в системе установлен Microsoft Store (в некоторых версиях Windows его может не быть).
*
Widget Launcher
Ссылка на Microsoft Store: https://www.microsoft.com/
Как добавить виджеты // Widget Launcher
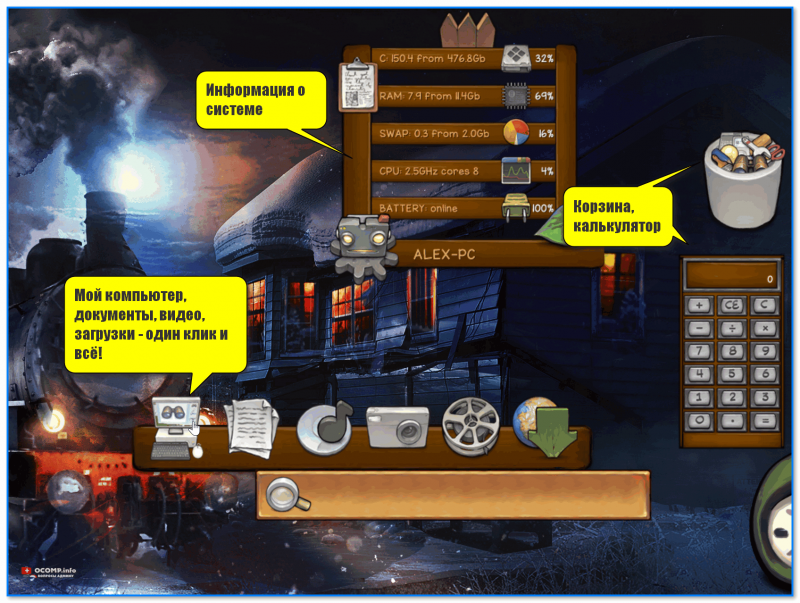
Widget Launcher — спец. ПО («оболочка»), позволяющее в 2 клика мышкой добавить на рабочий стол десятки самых разных виджетов:
- валютный конвертер и информер;
- цифровые часы;
- липкие заметки;
- RSS граббер;
- календари;
- мониторинг нагрузки ЦП и пр.
Кстати, все вышеперечисленное — бесплатно! И, разумеется, цветовую гамму оформления можно настроить вручную, под-себя. Каждый из добавленных виджетов — можно разместить в нужном месте (достаточно «потянуть» его мышкой…).
В общем, подборка заслуживает знакомства. 😉
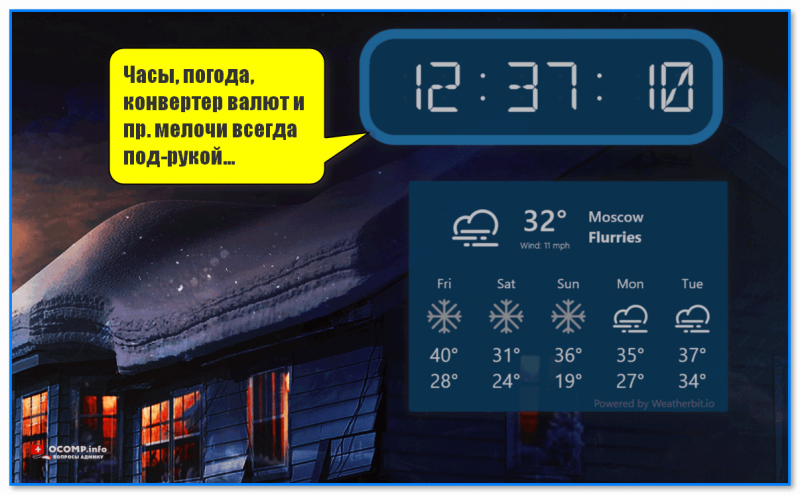
Часы, погода, конвертер валют и пр. мелочи всегда под-рукой… (пример с виджетами)
*
Desktop Gadgets
Ссылка на Store: https://www.microsoft.com/
Стиль минимализма — скриншот \\ Desktop Gadgets
Desktop Gadgets — этот набор попроще (в плане графики), зато ассортимент гаджетов шире (причем, если бесплатных вам мало — можно и докупить! Правда, для рос. пользователей тут может быть проблема, т.к. карточки Visa/Mastercard пока не работают…).
Что стоит отметить:
- «не требовательны: к ресурсам ПК по сравнению с классическими гаджетами, которые были на Windows 7;
- хороший набор бесплатных гаджетов: часы-будильники, RSS-грабберы, календари, калькуляторы, конвертеры валют, мониторинг загрузки ЦПУ, липкие заметки и многое другое;
- за доп. вознаграждение можно докупить: новые скины и шаблоны, переводчики, тесты для измерения скорости сети, и др.
Несколько гаджетов из набора вы можете увидеть на моем скриншоте ниже. 👇 Я, конечно, бы не назвал их самыми красивыми, но они вполне годятся для решения своих задач (по крайней мере это куда удобнее, чем вручную «что-то» ежедневно проверять).
Добавлено неск. виджетов на раб. стол Windows 11
*
Не из Store (сгодятся для установки в «любую» версию Windows)
8gadgetpack.net
Сайт: https://8gadgetpack.net/
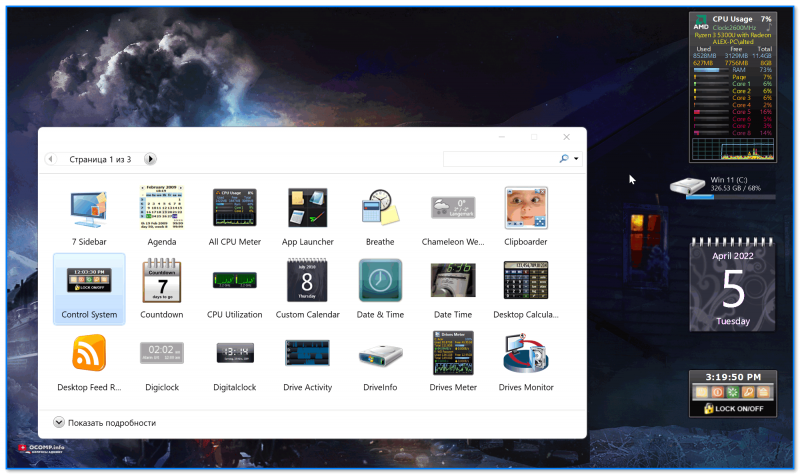
8gadgetpack.net — основное окно управления
Очень удобный и красивый набор для повседневного использования. Мне, например, весьма понравились гаджеты, показывающие нагрузку на ЦП, ОЗУ, занятое место на диске, календарик.
Обратите внимание, что в базовой комплектации идет 21 настраиваемый виджет (однако, при желании можно загрузить их куда больше 😉).
Набор совместим с ОС Windows 8, 10, 11 (32/64 bits).
*
Xwidget.com
Сайт: https://www.xwidget.com/xwidget.html
Xwidget.com. Пример использования гаджетов
Виджеты от «Xwidget.com» одни из самых красивых и разносторонних! Причем, это приложение позволяет найти десятки дополнительных виджетов и скинов, чтобы разнообразить базовый набор: загрузка выполняется прямо из окна ПО (вам ничего не нужно искать самостоятельно/дополнительно…).
Общее кол-во виджетов в коллекции: уже более 1900!
Системные требования: Windows 7, 8, 8.1, 10, 11; минимум 1 ГБ ОЗУ; место на диске от 1 ГБ (в процессе установки требуется больше, чем при работе).
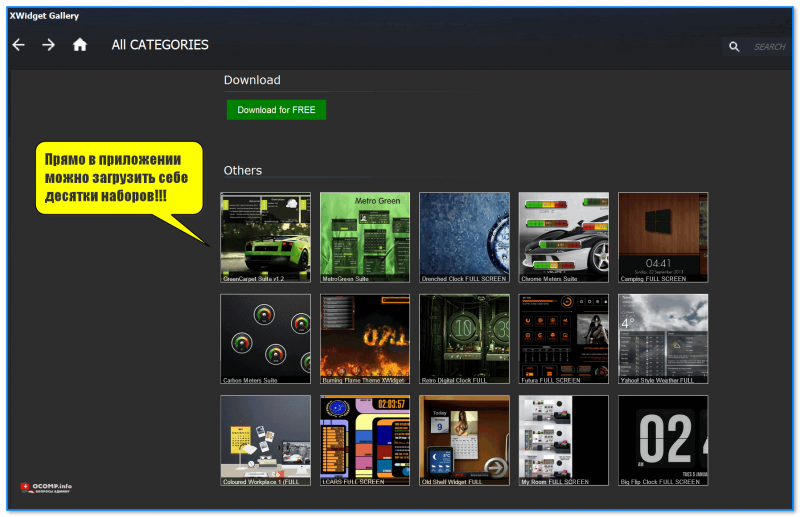
Xwidget.com. Прямо в приложении можно загрузить себе десятки наборов!!!
*
Gadgets Revived
Сайт разработчика: https://gadgetsrevived.com/
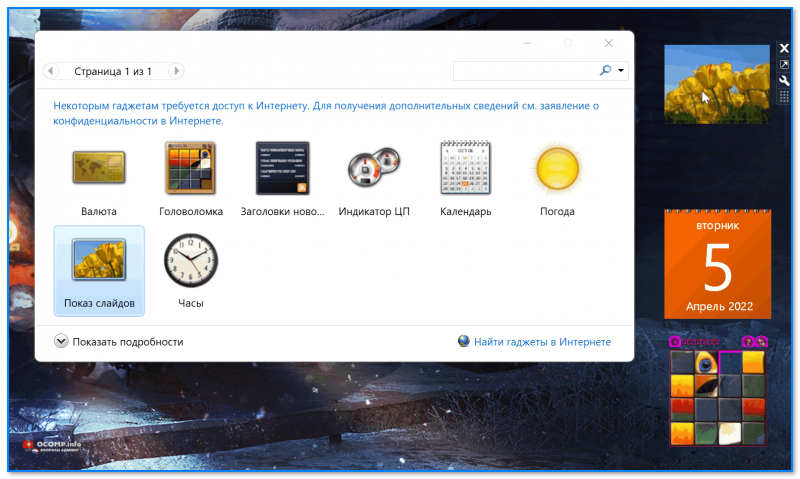
Gadgets Revived — классические гаджеты
Набор именно тех «старых» гаджетов, которые были в семерки. Они максимально похожи на них как в плане графики, так и по функциональности.
В базовом наборе есть всего неск. виджетов: валюта, головоломка, заголовки новостей с сайтов, индикатор ЦП, календари, погода, показ слайдов и часы. На офиц. сайте можно до-загрузить что-нибудь нужное: одних информеров погоды там не меньше десятка…
Главный их недостаток: безопасность у этого пакета ниже, чем у вышеприведенных (речь в первую очередь идет о загрузке и установке сторонних виджетов, не входящих в набор…).
*
На сим пока всё, успехов!
👋
Первая публикация: 12.04.2022
Корректировка заметки: 15.04.2024
How to Put a Calendar Widget on Desktop Windows 11
Windows 11, released by Microsoft, brought a fresh, modern interface and a plethora of features aimed at enhancing productivity and personal customization. One of the most intriguing features of Windows 11 is the incorporation of widgets, including the calendar widget, which can significantly improve your workflow by providing easy access to your schedule at a glance. This detailed guide will walk you through everything you need to know about adding a calendar widget to your desktop environment in Windows 11.
Understanding Widgets in Windows 11
Before diving into the technical steps, let’s clarify what widgets are in the context of Windows 11. Widgets are mini-applications that reside on your desktop and provide real-time information and updates without the need to open full applications. They can range from weather updates, news headlines, to calendar views, and more.
The Windows 11 widgets experience has been redefined to offer a streamlined, easy-to-use interface. Accessed via the Taskbar, these widgets can be customized to show information that is most relevant to you.
Why Use a Calendar Widget?
Integrating a calendar widget into your desktop setup has several benefits:
- Quick Access to Schedule: With a calendar widget on your desktop, you can quickly check your appointments, events, and reminders without opening your calendar application.
- Enhanced Productivity: Staying organized boosts productivity; a calendar widget helps you prioritize tasks and efficiently manage your time.
- Customizability: Windows 11 allows you to customize your widget settings, ensuring that you see the most pertinent information at a glance.
Prerequisites for Adding Calendar Widget
Before we proceed, here are a couple of prerequisites you should be aware of:
- Windows 11 Operating System: Ensure your PC is running Windows 11, as widgets are not available in earlier versions.
- Microsoft Account: To use the calendar feature effectively, linking your Microsoft account (if you use Outlook) allows you to sync your calendar data seamlessly.
Steps to Add a Calendar Widget to Windows 11 Desktop
Now that you understand what widgets are and why you need them, let’s explore how to add a calendar widget to your Windows 11 desktop:
Step 1: Ensure Widgets Are Enabled
- Access Widgets: Look at your taskbar for the widgets icon (it resembles a white square with a small grid on the left side). Click on it to open the widgets panel.
- Check for Widgets Feature: If the panel opens, this indicates that your widgets feature is enabled. If not, ensure that your Windows is updated to the latest version and that the feature is activated through Settings.
Step 2: Customize Your Widgets
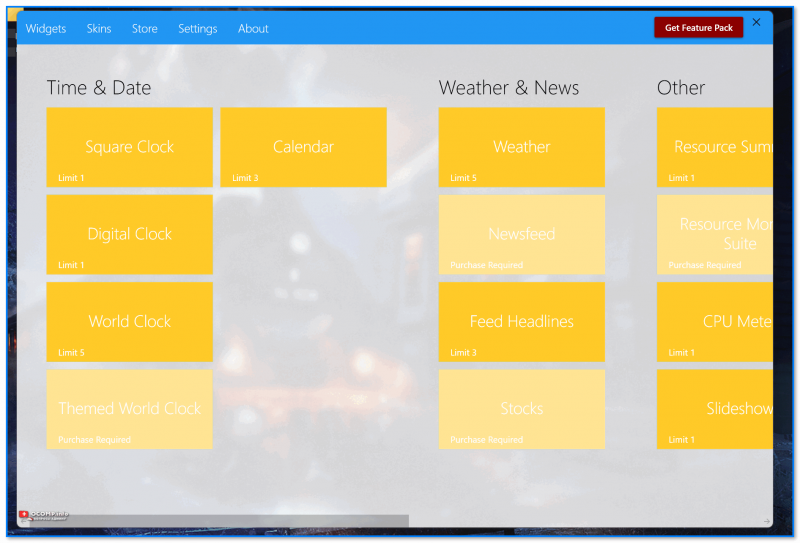
- Once in the widgets panel, you’ll see various widgets that are available by default. Here, you’ll find options to add a calendar widget.
- Click on the “Add Widgets” option or the “+” icon typically displayed at the top right of the widgets panel.
- A new window will pop up showing different widgets you can add. Scroll until you find the calendar widget and click on the “Add” button to include it in your panel.
Step 3: Pin the Calendar Widget to Your Desktop
Windows 11 does not allow direct pinning of widgets onto the desktop like previous operating systems. However, there are workarounds that simulate this desire.
-
Use Third-Party Applications: Applications like Desktop Gadgets or others found on reliable sources can allow you to pin a calendar widget directly to your desktop. Follow the application’s instructions for integration.
-
Using Microsoft To-Do or Outlook: If you’re using Microsoft To-Do or Outlook, ensure that your tasks and calendar items are synchronized. You may get a glance at tasks or calendar events from within these applications, which can serve as your desktop calendar.
-
Creating a Shortcut to Calendar:
- Right-click on an empty area on your desktop.
- Select
New>Shortcut. - In the location field, type
outlook.exe /c ipm.calendar(for Outlook) or%windir%system32control.exe /name Microsoft.Calendar(for the Windows calendar). - Click
Next, name your shortcut and clickFinish. - This will not create a widget but provides quick access to your calendar.
Step 4: Configuring Your Calendar Widget
After adding the calendar widget, you may want to customize it:
- Resize the Widget: Drag the edges of the widget to resize it according to your desktop layout.
- Changing Calendar View: If your widget offers options, you may be able to change views from day, week, or month depending on your preferences.
- Syncing with Other Calendars: Ensure it is synchronized with other calendars you may have (Google, Outlook, etc.).
Troubleshooting Common Issues
Should you run into any issues while adding or managing your calendar widget, consider the following troubleshooting steps:
- Windows Updates: Check for any pending updates by going to
Settings>Windows Updateand ensuring your system is fully updated. - Check Widget Settings: If the calendar widget does not show your events, double-check the settings within the widget to ensure it is linked to the correct Microsoft account.
- Restart Widgets: Sometimes widgets may glitch; restarting the widgets can often fix this. You can do so by signing out and signing back in, or simply restarting your PC.
Conclusion
Having a calendar widget on your Windows 11 desktop can significantly enhance your productivity and keep you organized. While Windows 11 does not allow you to pin widgets directly onto the desktop, it still offers several alternatives to have quick access to your calendar. Remember to regularly customize and synchronize your widgets to make the most of this feature. Utilizing boatloads of features available to you can make daily management of your tasks much more manageable, thus leading to greater efficiency in both your personal and professional life.
By following the steps outlined in this guide, you can optimize your Windows 11 experience, keeping your calendar events and tasks at hand, enabling you to plan and execute your responsibilities more efficiently.
The calendar is really important not only to know which day/date it is today but also, to mark important dates, to plan schedules, & to remember the birthdays of your loved ones. As technology developed, the calendar evolved too from a paper calendar to a digital one residing in all electronic devices. Listed below are a few recommendations for the best Calendar apps for Windows 11 that could enhance your date-keeping experience. Windows 11 provides a Calendar widget in the Taskbar. You can click it to view the Calendar card. But, it does take a lot of space in the Notification Center. So, we have also provided a perfect guide to hide Calendar in Windows 11 notification center.

Table of Contents
First, read our list of best free calendar apps for Windows 11 and then, the steps to minimize or maximize calendar in Notification center.
1. Google Calendar
Google Calendar is a featured-packed calendar app that is available on all major platforms. It syncs your data across all devices signed in using the same Google account. Google Calendar is free to use. It comes with its little perks like:
- Sharing your calendar with others,
- Creating events
- Inviting guests,
- Access to World clock, and
- Syncing with CRM software.
All these features help increase the efficiency of the user. Due to the integration of Google accounts, the app is a good pick over your usual calendar app.

2. Mail And Calendar
Mail and Calendar app comes from the house of Microsoft. It has got everything you may expect from a basic calendar app. Mail and Calendar app is also free to use and you can get it from the Microsoft Store.
- It has integrated Microsoft apps like To Do, People, and mail making switching into one, one-click easy.
- It provides customization options like a light and dark theme, background color, and images of your choice.
- It also supports cloud integration along with major email platforms.

Also Read: How to Turn Outlook Email Read Receipt On Off
3. Outlook Calendar
Outlook Calendar is the calendar component made specifically keeping Microsoft Outlook in mind. Visit Outlook in your browser to try this Calendar app with these amazing features:
- It integrates contacts, email, and other outlook-related features.
- You can create events and appointments, organize the meeting and invite your contacts to the meeting.
- Additionally, you can check groups and other people’s schedules, and much more.
- It also supports multiple calendars and you can view them side by side.
- You can also send your calendar using email and share it using Microsoft SharePoint websites.

4. Calendar
Calendar fits the need for a functional calendar app for workspace scenarios and is free to use.
- It lets you add multiple workspaces for multiple calendars.
- It allows you to analyze your personal and work life to see how much time is spent doing what.
- The calendar also allows you to schedule meetings and create events.

Also Read: How to Fix Windows 11 Taskbar Not Working
5. Timetree
Timetree is a great idea for people who need a purpose-driven calendar. You can visit the official Timetree website to download it.
- You can customize how your calendar looks.
- You can fill it according to your needs.
- It can be used to manage work schedules, time and assignments, etc.
- It is easy to use.
- Moreover, it gives you notes support to jot down important points.

6. Daybridge
Daybridge is quite new for this list as it is still in its beta testing phase. However, this does not mean it lacks any feature that you could find in its other rivals. You can join the waiting list by trying this amazing Daybridge calendar app.
- One of the most highlighted features of Daybridge is its Travel help that keeps track of your itinerary and sleep routine.
- It comes with IFTTT integration which lets the app connect to other services and products making automation a breeze.

Also Read: Fix Outlook Password Prompt Reappearing
7. Kin Calendar
This open-source calendar project is made to be used with Mailbird. If you are an existing Mailbird user, you would certainly love it. You can sign up for Kin Calendar here.
- It is a paid application that costs about $2.33 a month.
- This is the closest alternative for Sunrise calendar by Microsoft.
- It supports many social media calendar integrations to make sure you keep track of your social life along with your professional life.

8. One Calendar
One calendar brings all your calendars from Google Calendar, Outlook Exchange, iCloud, Office 365, and many other services to one place. Thereby, justifying its name. You can get One Calendar for free from the Microsoft Store.
- It supports multiple viewing modes and manages appointments across all different calendars.
- It also offers calendar theming, and multiple languages options.
- It comes with widget support for Windows Live tiles which is customizable.
- Interestingly, it can also work without any internet connection. However, the functionality cuts down to viewing and managing appointments only.

Also Read: How To Add Widgets To Windows 10 Desktop
9. Lightning Calendar
Lightning Calendar is the calendar extension from the Mozilla Thunderbird mailing service. Try Lightning Calendar in the Thunderbird Mail.
- It is open-source and completely free for all.
- You can do all basic calendar tasks.
- Also due to its open-source nature, Lightening Calendar has got huge community support.
- It offers features like progress tracking and advanced postponing which helps a lot in proper meeting management.
- Moreover, it provides options and settings to the user to customize it according to their needs; be it an individual or an organization.

Also Read: How to Disable Notification Badges in Windows 11
How to Minimize or Hide Calendar in Windows 11 Notification Center
An expanded calendar in the Notification center can disrupt the layout of your desktop, workspace, and the flow of your work. It takes up too much room on the Notification Centre and effectively clutters it. The only method to get the calendar out of your way when monitoring your alerts is to minimize it. This contributes to the creation of a clean and tidy Notification Centre, one that focuses on pertinent notifications only.
Note: When you minimize the calendar, it remains minimized even if you restart or shut down your computer — for that day. After that, it resumes being displayed fully the next day.
Follow the steps listed below to minimize Calendar in Windows 11 Notification Center:
1. Click on the Clock/Date icon in the bottom right corner of the Taskbar.
2. Then, click on the downward-pointing arrow icon in the top right corner of the Calendar card in the Notification Center.
3. Finally, Calendar card will be minimized, as shown.
Pro Tip: How to Maximize Calendar in Windows 11 Notification Center
A minimized Calendar frees up a lot of room in the notifications center for other alerts. Although, if we want to view it normally simply, click the upward arrowhead in the top-right corner of the Calendar tile to restore the minimized calendar.
Recommended:
- How to Change Microsoft Teams Profile Avatar
- How to Download Hextech Repair Tool
- How to Type N with Tilde Alt Code
- How to Enable Hibernate Mode in Windows 11
We hope you found this list of the Best Calendar Apps for Windows 11 PC helpful. Let us know if you have any suggestions of your own calendar apps. We hope you learned how to minimize or maximize calendar in Notification center too. Drop your queries in the comment box down below.