
Способ 1: Системные средства
В предыдущей версии Windows расположение панели задач (ПЗ) на экране можно было менять в параметрах персонализации, но в 11 такая возможность отсутствует. На сегодняшний день переместить ПЗ в любое место, отличное от заданного по умолчанию, системными средствами можно только путем редактирования реестра. Алгоритм действий следующий:
- Вызовите окно «Выполнить» и вставьте в его строку указанный ниже запрос. Нажмите «ОК» или «Enter» для его выполнения.
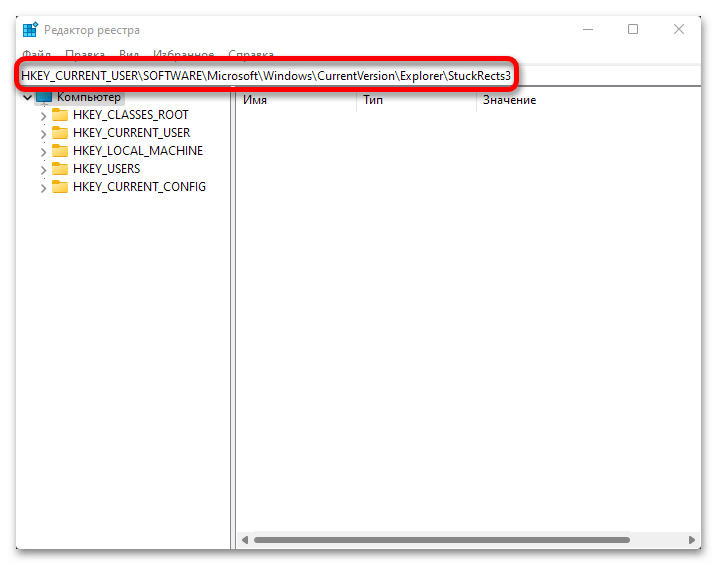
regedit - Скопируйте указанный ниже путь, вставьте его в адресную строку открывшейся системной оснастки и нажмите «Enter» для быстрого перехода. Вместо этого вы можете самостоятельно перейти к нужной директории, последовательно открывая каждый из каталогов.
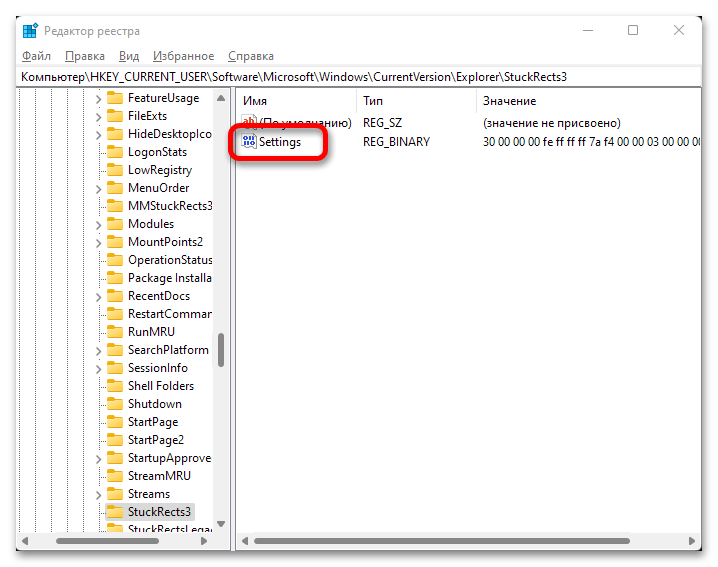
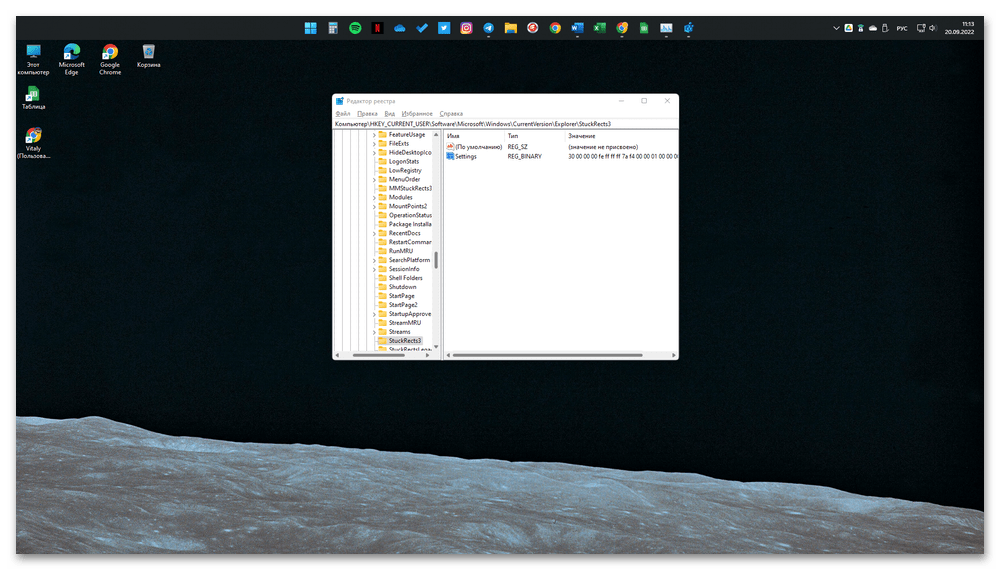
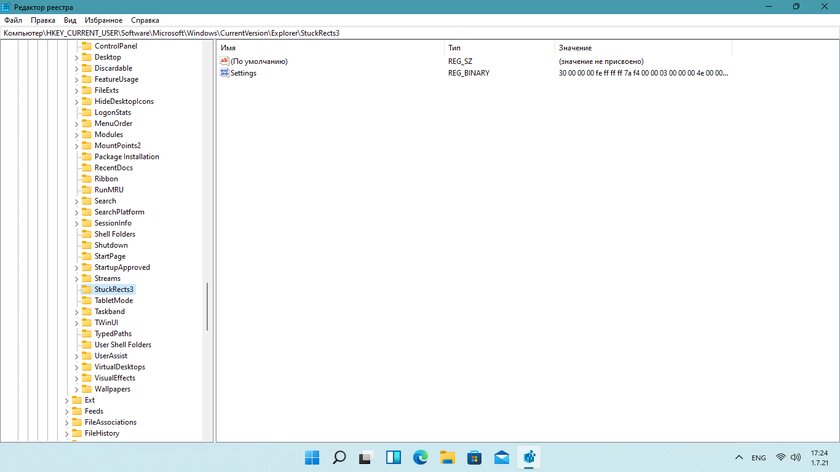
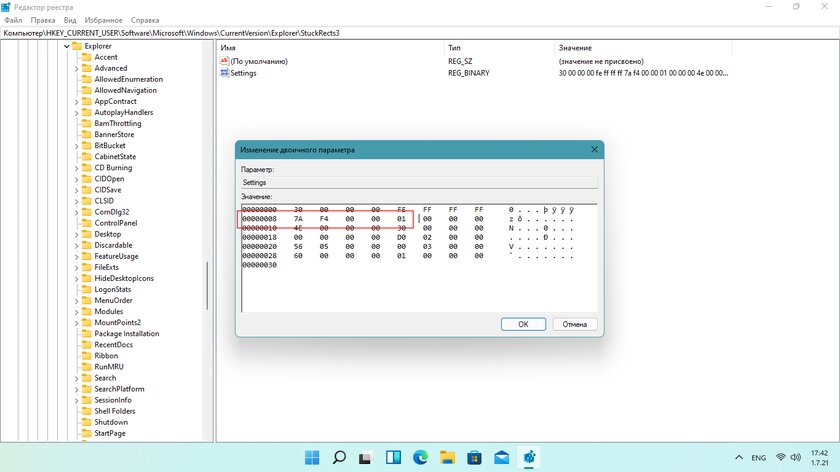
HKEY_CURRENT_USER\SOFTWARE\Microsoft\Windows\CurrentVersion\Explorer\StuckRects3 - Двойным нажатием левой кнопки мышки (ЛКМ) откройте параметр «Settings».
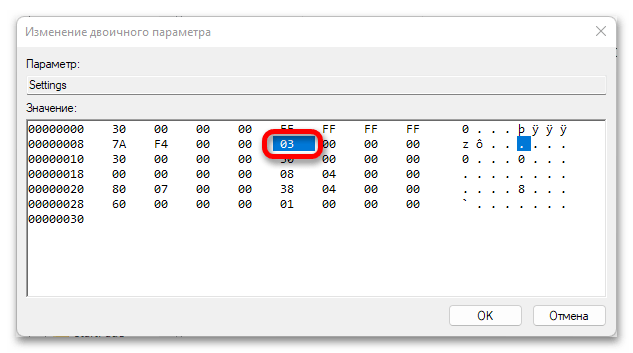
- Кликните по значению, указанному в строке 00000008 и столбце FE, – по умолчанию это 03.

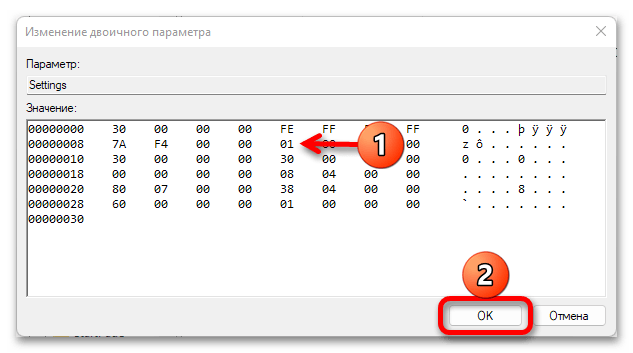
Замените его на 01 и нажмите «ОК» для подтверждения.
- Перезапустите «Проводник». Для этого сочетанием клавиш «Ctrl+Shift+Esc» вызовите «Диспетчер задач» (вместо этого можно воспользоваться соответствующим пунктом в меню кнопки «Пуск», вызываемым нажатием правой кнопки мышки (ПКМ).

Найдите в списке активных процессов «Проводник», кликните по нему для выделения и воспользуйтесь расположенной в правом нижнем углу кнопкой «Перезапустить».

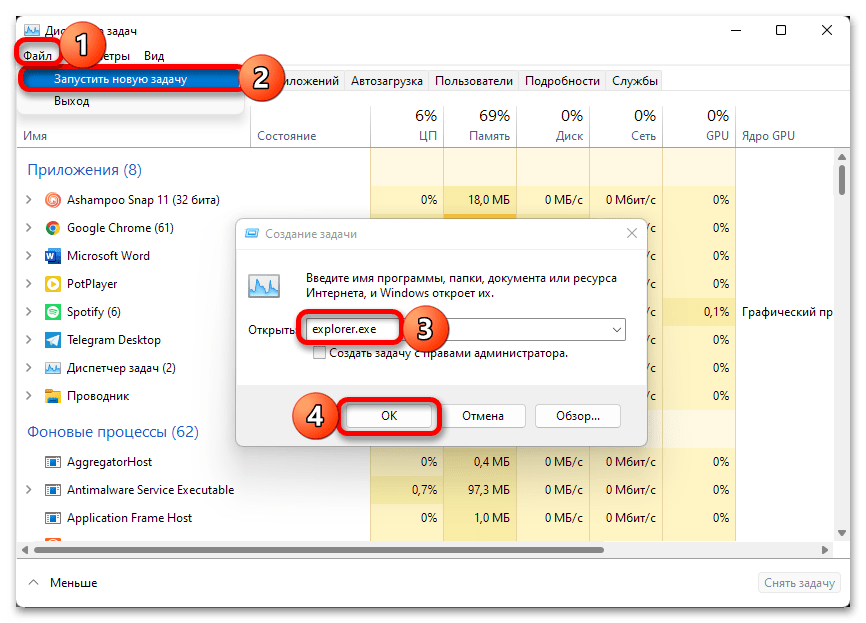
Примечание: Если «Проводник» в настоящий момент не запущен, то есть отсутствует в продемонстрированном выше перечне, откройте его самостоятельно клавишами «Win+E» либо через «Диспетчер задач»: вызовите меню «Файл», выберите в нем пункт «Запустить новую задачу», затем в открывшемся окне введите
explorer.exeи кликните «ОК» для подтверждения. Повторно выполните действия, описанные в предыдущем абзаце.


Изображение на экране ПК обновится, а панель задач будет перемещена вверх. Если потребуется вернуть ей прежнее расположение, выполните действия, противоположные тому, что описано в пунктах №3-4 настоящей инструкции – откройте параметр «Settings» системного реестра, в строке 00000008 и столбце FE замените значение 01 на 03.
Читайте также: Как изменить размер панели задач в Виндовс 11
Способ 2: Сторонние утилиты
Для каждой версии Windows, и 11 не стала исключением, сторонними разработчиками выпускается множество программ, позволяющих в той или иной степени персонализировать интерфейс и делать то, что изначально недоступно в системных параметрах. С помощью одного из таких решений можно буквально в несколько кликов переместить панель задач в верхнюю часть экрана.
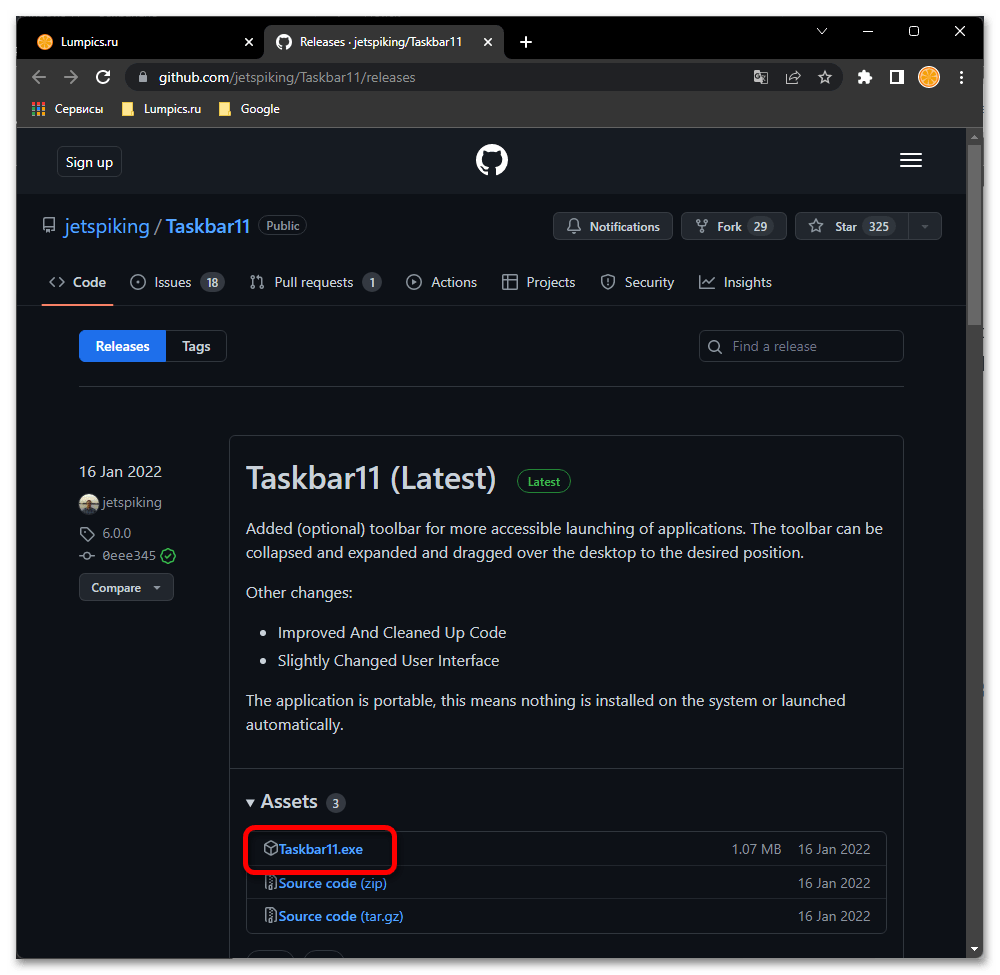
Скачать Taskbar11 на GitHub
- Откройте сайт по указанной выше ссылке и кликните по строке «Taskbar11.exe» в блоке «Assets».

Подтвердите сохранение установочного файла на ПК, если это потребуется.
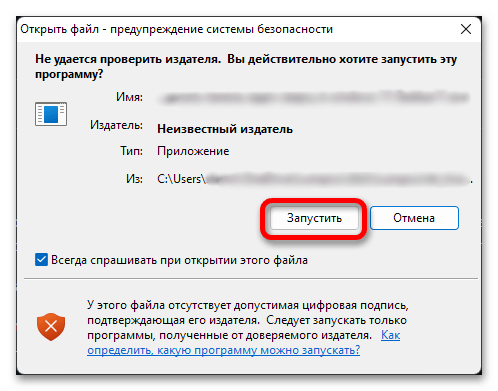
- Запустите скачанное приложение. Если появится предупреждение от системы безопасности, подтвердите выполнение данной процедуры.
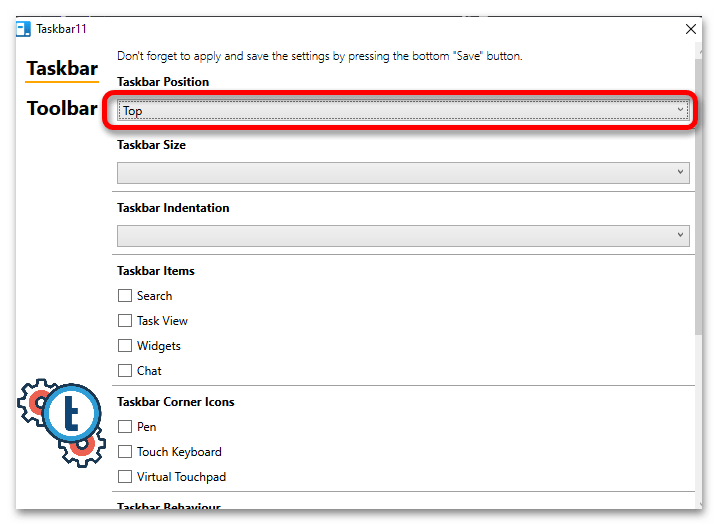
- Taskbar11 не требует установки, а потому сразу будет открыт его интерфейс. Разверните выпадающий список под строкой «Taskbar Position»

и выберите в нем значение «Top».
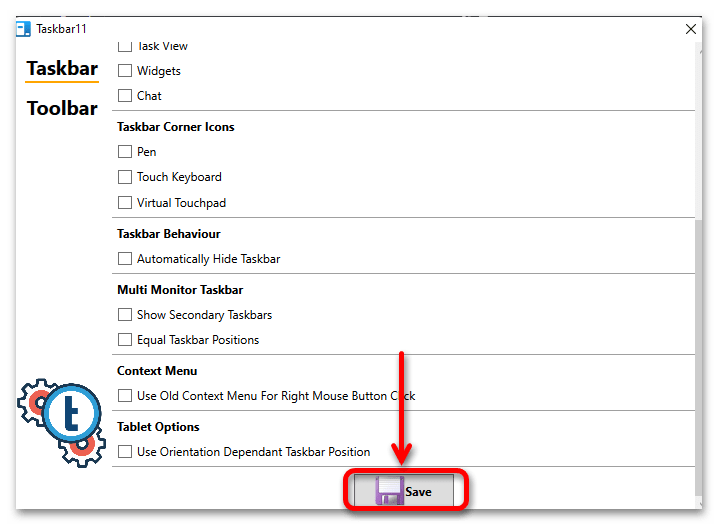
Пролистайте окно приложения вниз и воспользуйтесь кнопкой «Save» для того, чтобы внесенные изменения вступили в силу.
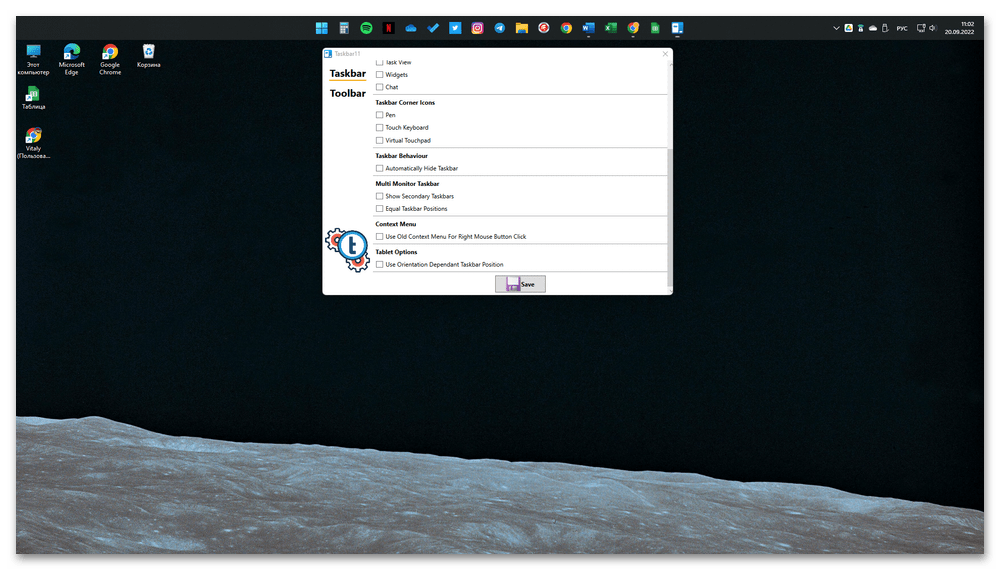
Как и в предыдущем случае, панель задач переместится из нижней части экрана вверх.

Для того чтобы восстановить ее прежнее расположение, измените значение опции «Taskbar Position» на «Bottom».

Читайте также: Как восстановить работоспособность панели задач в Виндовс 11
Наша группа в TelegramПолезные советы и помощь
Если вы задумываетесь над тем, чтоб переместить Панель задач вверх в Windows 11 и в итоге решаете действовать, то может сложиться такое ощущение, что вас в чем-то ограничили, ведь в одиннадцатой версии операционной системы перемещение Панели задач в верхнюю часть запрещено. Это обстоятельство является очень обидным, так как аналогичные действия без проблем можно было выполнить в Win 10, а вот в Win 11, как уже было написано ранее, такая возможность отсутствует. Но не стоит расстраиваться, так как мы знаем один очень эффективный способ настройки ОС, который реально работает.
Как переместить Панель задач вверх в Windows 11?
Для начала нажмите на сочетание клавиш «Win+R» → в открывшееся окно «Выполнить», в его пустое поле, прописываем команду – regedit → как только откроется новое окно, вам нужно будет выполнить переход по следующему пути: HKEY_CURRENT_USER\SOFTWARE\Microsoft\Windows\CurrentVersion\Explorer\StuckRects3 → дважды кликните по «Settings» → теперь, нужно отыскать строку «00000008» и столбец «FE», где по умолчанию указано цифровое значение «03», которое необходимо заменить на «01» → нажмите на «Ок» → перезагрузите устройство.

После того, как устройство загрузится, вы сможете увидеть, что вам удалось не сложными действиями переместить Панель задач вверх в Windows 11 и все будет после данного перемещения полноценно работать.
Если же в будущем, вам захочется, чтоб Панель задач располагалась в нижней части экрана монитора, просто измените цифровое значение с «01» на «03» и все вернется к прежнему состоянию.
Панель задач вместе с меню «Пуск» подверглась значительным изменениям в Windows 11. Привычные элементы кардинально переделали, поэтому, например, от живых плиток почти спустя 10 лет окончательно отказались, календарь и быстрые настройки полностью преобразились, а в панели задач поменялись значки и всё переместилось в центр. Кроме того, расположение панели задач на экране больше нельзя изменять — это смутило огромное количество пользователей Windows 10. Но, как оказалось, изменения не означают, что подобное теперь стало невозможным.
- В тему: Всё о Windows 11 — секреты, инструкции, лайфхаки и полезные статьи
Установить панель задач Windows 11 в верхнюю часть экрана получится с помощью редактора реестра (по крайней мере в текущей тестовой сборке 22000.51). Делается всё довольно легко.
Как переместить панель задач Windows 11 в верхнюю часть экрана
- Используйте сочетание клавиш Windows + R для открытия утилиты «Выполнить» и введите в поле запуска «regedit.exe», после чего нажмите «OK». Или найдите через поиск «Редактор реестра».
- Перейдите по следующему пути:
HKEY_CURRENT_USER\Software\Microsoft\Windows\CurrentVersion\Explorer\StuckRects3.
- Найдите параметр типа REG_BINARY под названием «Settings».
- Дважды нажмите на него — откроется окно изменения двоичного параметра.
- В столбце FE для параметра 00000008 (второй по списку) установите значение 01 — поместите на него курсор, удалите текущее значение и пропишите нужные цифры. По умолчанию он должен быть установлен на 03.
- Нажмите «OK» и перезапустите «Проводник» через «Диспетчер задач».
Чтобы отменить изменение, необходимо открыть тот же параметр в редакторе реестра и вернуть стандартное значение 01. Учтите, что другие значения (02 или 04) не работают, поэтому переместить панель задач на левую или правую сторону не выйдет.
⚠️ Важно: следует знать, что при перемещении панели задач в верхнюю часть экрана меню «Пуск» станет автоматически открываться только с левой стороны.
- On Windows 11, to move the Taskbar, edit the “Settings” binary key in the “StuckRects3” Registry key.
- The 01 value moves Taskbar to the top.
- The 02 value moves Taskbar to the right.
- The 00 value moves Taskbar to the left.
- The 03 value moves Taskbar to the bottom.
UPDATED 2/22/2023: Windows 11 has a redesigned Taskbar with a center alignment for the Start menu and app buttons, a new notification area, new effects and animations, and more. Although it introduces many welcome improvements, it also removes some legacy capabilities, such as the ability to move the Taskbar around.
You can’t move the Taskbar on Windows 11 because this is an entirely new design, and moving it around the screen is challenging. Microsoft has explained that only moving the Taskbar to the right side suddenly changes the entire design (including the Start menu and apps), and the current interface and animations are designed for the bottom placement. As a result, the work implicating it was not worth the effort since there was insufficient demand.
If you are among those who like the Taskbar on another location (such as at the top, left, or right side), it’s still possible to move it. The only caveat is that you can only complete this task by editing the Registry.
In this guide, you will learn the steps to change the Taskbar position to the different sides of the screen on Windows 11.
- Move Taskbar position on Windows 11 (Deprecated)
- Move Taskbar to top with ExplorerPatcher tool
- Move Taskbar to top with Start11 tool
Warning: Modifying the Windows Registry can cause serious problems if misused. It’s assumed you know what you’re doing and have created a full backup of your system before proceeding. As always, use these instructions at your own risk.
After the release of version 22H2, the Registry method seems to stop working. You can try it, but it may or may not work. If you’re using version 21H2 or an older release of the operating system, this method may still work. Using the ExplorerPatcher or Start11 apps is the best option available to move the Taskbar to the top.
Move Taskbar position on Windows 11 (Deprecated)
To move the Taskbar to the top, left, right, or bottom of the screen on Windows 11, use these steps:
-
Open Start on Windows 11.
-
Search for regedit and click the top result to open the Registry Editor.
-
Browse the following path:
HKEY_CURRENT_USER\Software\Microsoft\Windows\CurrentVersion\Explorer\StuckRects3
-
Double-click the Settings binary key.
-
Under the “Value data” section, in the second row and the sixth column, click the 03 value, press the Delete key, and replace the value with 01 to move the Windows 11 Taskbar at the top of the screen.

-
Change the 03 value to 02 to move the Taskbar on the right side of the screen.
-
Change the 03 value to 00 to move the Taskbar on the left side of the screen.
-
Change the value to 03 to move the Taskbar at the bottom of the screen.
-
Click the OK button.
-
Right-click the Start button and select the Task Manager option.
-
Click the Processes tab.
-
Select the Windows Explorer process.

-
Click the Restart button.


Once you complete the steps, the Windows 11 Taskbar will move to the top or either side of the screen as specified in the binary key.
While you can still change the Taskbar position, this is not a supported feature on Windows 11, which means this behavior may not work as expected.
Alternatively, if you can’t use the Registry settings, you may be able to use third-party tools to move the Taskbar to the top of the screen. For example, ExplorerPatcher is a free solution that brings back the classic design of the Taskbar with legacy functionalities, such as the ability to change the bar position. It’s not a perfect solution, but this might be the best free option if you want to reposition settings.
To move the Taskbar to the top of the screen with ExplorerPatcher, use these steps:
-
Open ExplorerPatcher GitHub page.
-
Under the “Assets” section, click the ep_setup.exe link to download the app.

Quick note: The browser may complain the software is untrusted, but this is only because the app makes system changes. Although the app works as advertised, use it at your own risk.
-
Confirm you want to keep the file in the web browser (if applicable).
-
Double-click the file to install the app.
-
Right-click the Taskbar and select the Properties option.
-
Click on Taskbar.
-
Use the “Taskbar style” setting and select the “Windows 10” option.
-
Use the “Primary taskbar location on screen” setting and select the Top option to move the Taskbar to the top of the screen. (You also have the option to move it to the left or right side.)

-
(Optional) Use the “Start button style” setting and select the “Windows 11” option.
-
(Optional) Use the “Combine taskbar icons on the primary taskbar” setting and select the Always combine option.
-
Click on Start menu.
-
Use the “Start menu style” setting and select the “Windows 11” option.
-
Click the Restart File Explorer option in the bottom-left corner (if you don’t see the changes).


After you complete the steps, you can start using the Taskbar from the top of the screen.
It’s important to note that the ExplorerPatcher app is known to break sometimes due to changes that Microsoft makes to the operating system. However, the developer usually fixes the problems in a timely manner.
Move Taskbar to top with Start11 tool
Another way to change the Taskbar location on the screen is by using the Start11 app from Startdock, which is similar to the ExplorerPatcher app, but with the difference that this is a more reliable solution since it’s a paid product. At the time of this update, the app costs $9.99, but you can use the 30-day trial before purchasing using your email.
To move the Taskbar to the top with Start11, use these steps:
-
Open Start11 page.
-
Click the Try Free button to download the app on your computer.

Quick note: The browser may complain the software is untrusted, but this is only because the app makes system changes. Although the app works as advertised, use it at your own risk.
-
Double-click the setup file to launch the installer.
-
Check the option to agree to terms.
-
Click the Next button.
-
Click the Next button again.
-
Open Start11 from the Start menu.
-
Click the “Start 30 Day Trial” button.

-
Confirm your email address.
-
Click the Continue button.
-
Confirm the email to start the trial.
-
Click the Finish button.
-
Click on Start Menu.
-
Choose the “Windows 11 style” option.
-
Click on Taskbar.
-
Click the Taskbar position setting.
-
Choose the Align top option for the “Primary monitor” setting.
-
Click the Yes button.
-
(Optional) Choose the Align top option for the “Secondary monitor” setting.
-
Click the Yes button.


Once you complete the steps, the Taskbar will align at the top of the screen with the same Windows 11 Start menu.
The Start11 app has many settings to customize the Taskbar and Start menu, and it’s up to you to play around and find the best setup for you.
Also, I wanted to add more context on why Windows 11 doesn’t include an option to move the Taskbar. The biggest issue is that Microsoft has plans to update the elements of the desktop experience in future releases. Although it’s unclear, it’s expected that the company will try to do something similar to macOS, including adding a floating Taskbar docked at the bottom and a top bar at the top of the screen showing the System Tray, weather, and other information.
Update March 1, 2023: Microsoft warns that apps like ExplorerPatcher and StartAllBack can cause booting issues on Windows 11 after installing the update KB5022913 or higher releases.
Update March 2, 2023: The developer of ExplorerPatcher has released an updated version of the tool that fixes the problem and works with the new update of Windows 11.
Update August 24, 2023: The developer of ExplorerPatcher has released yet another updated version of the tool that fixes a bug with the Start menu after installing the latest update of Windows 11.
Update February 22, 2024: This guide has been updated to ensure accuracy and reflect additional information.