

Пытаться разрабатывать большие и средние PHP проекты на Windows, по моему, не совсем правильно. Поэтому если PHP разработка это ваше основное занятие, то скорее всего вас давно на рабочей машине стоит Linux и горя вы не знаете. Но если по каким-то причинам вы также, как и я, прилипли к Windows, но при этом вам необходимо работать с веб проектами, эта статья поможет вам настроить и запустить 100% полноценную среду для веб разработки с любым набором линукс софта, докером, и при всем этом красиво интегрированную в Windows.
Спойлер — для тех, кому лень много читать
После долгих лет работы под всякими Denwer/OpenServer, мучениями с нативным докером для Windows, VirtualBox-ом, попыткой использовать подсистему Ubuntu в Windows и прочее, прочее… я наконец-то нашел связку ПО, которая позволяет поднять безупречную Linux систему поверх Windows и сделать работу внутри Linux такой же органичной, как и работу с любым приложением Windows.
И так, это
- VMware Player 7 для создания виртуальной машины
- Xubuntu 14.02 64-bit как подсистема линукс
- VMware Tools
- VMware Unity mode
- Несколько простых настроек, чтобы все было удобно (см. ниже)
Ниже все тоже самое, но развернуто…
Немного истории TL DR
Когда-то очень давно был Денвер, Far manager и FTP. Этого хватало. Потом подключались ssh, git, phing, composer — но все это так или иначе, с небольшими танцами с бубном, можно было настроить в Windows и продолжать жить в своем счастливом мире. Это было предельно просто, понятно и легко.
Такая счастливая пора длилась довольно долго. Но в какой-то момент стартовала неистовая гонка за новыми технологиями, которая с каждым годом лишь набирала обороты. Денвер не успевал и не хотел успевать за выходом новых версий PHP, проекты росли и становились сложнее, зоопарк технологий плодился на глазах.
Спасением на некоторое время стал OpenServer. Очень адекватное решение для Windows с большим количеством инструментов и достаточно актуальными версиями ПО. На нем удалось продержаться несколько лет. Если вы начинающий разработчик, прилипший к Windows, если у вас относительно простые проекты, или веб разработка это ваше не основное занятие, то выбор в пользу OpenServer для вас может быть очень хорошим решением. Просто, удобно и понятно.
Но зоопарк технологий в нашей компании тем временем продолжал расти — nodeJS, elastic, разные версии PHP для разных проектов — от 5.6 до 7.1. Стартанули проект на PHP 7.1, а OpenServer оказывается не поспевает… На момент написания этой статьи поддержка 7.1 уже есть, но тогда не было. Да и обновлять OpenServer занятие не очень приятное, т.к. с переносимостью настроек между версиями у них тяжело.
Немного потыкался, погуглил более продвинутые аналоги OpenServer. Не нашел ничего вразумительного. Ну и бросил это дело, т.к. для средних и больших проектов с кучей зависимостей этот путь развития кажется тупиковым.
Подсистема Ubuntu в Windows 10?
Была предпринята попытка настроить подсистему Ubuntu на Windows. Потыкался, что-то попытался поставить и настроить. Это не работает, то глючит, документации внятной не найдешь.
Docker на Windows?
Пришлось проапргрейдить домашнюю версию до professional, чтобы все заработало нативно. Несколько дней возьни с настройками, перенастройками, установками. Ну и плюсом погружение в докер. Работает!
Серьезно, докер на Windows работает вполне вполне успешно, и наверняка пойдет для мелких и средних проектов. У меня же все уперлось в производительность файловой системы в shared volumes. Этот баг давно известен и хорошо описан, например здесь, проявляется он на Windows и Mac.
На практике на моей машине с SSD диском это выглядело так — открытие стартовой страницы сразу после дефолтной установки Symfony 3 занимало в среднем 1.5 секунды. Проект над, которым мне надо было работать, самую простую страницу открывал около 10-15 секунд, некоторые тяжелые страницы вообще не открывались. Работать в таких условиях я посчитал нереальным.
Существует проект docker-sync, который как раз призван решить проблему со скоростью работы файловой подсистемы. Вместо использования shared volumes, docker-sync организует двунаправленную синхронизацию файлов между вашей локальной системой и докер контейнерами. К сожалению, попробовать docker-sync в реальной работе мне так и не довелось. К тому моменту я устал от обилия костылей, которыми обрастала моя конфигурация среды разработки на Windows и решил снова дать шанс виртуальным машинам.
Виртуальная машина
«Это то, с чего надо было начать!» — скажет продвинутый читатель, и окажется почти прав.
Конечно, за всю историю своей веб разработки на Windows, я не раз пытался переключиться на использование виртуальных машин. Но ни одна из тех попыток не была успешной из-за значительного ухудшения User Experience, который я получал при использовании виртуалок. Не знаю, с чем это связано, может с недостатками VirtualBox, который я использовал, может с кривыми руками и ленью, но факт, остается фактом — я пробовал Linux в VirtualBox, натыкался на какие-то проблемы одна за одной, плевался, все бросал и возвращался в свой уютный Windows.
В очередной раз, обернувшись в сторону виртуализации, я нашел очень многообещающую инструкцию по установке Linux на бесплатную версию WMVare Player.
Минимальный набор требований к виртуальной машине для комфортной работы выглядел с моей стороны примерно так:
- адекватная скорость
- работа с приложениями Linux также как с обычными приложениями Windows (unity mode в WMvare или Seamless mode в VirtualBox).
- нормальная работа буфера обмена между хост машиной и виртуальной машиной в обе стороны
- общие файлы без тормозов с синхронизацией в обе стороны
- полноценная Linux среда со всеми возможностями, в т.ч. вложенной docker виртуализацией
- крайне желательна простая настройка без плясок с бубном и поиском костыльных решений
И вот, наконец-то, звезды сошлись вот в таком варианте использования ПО:
- VMware Player 7.x. Обязательно нужна именно 7-я версия. Более поздние версии не поддерживают режим Unity для Linux. Т.е. пользоваться то тоже можно, но будет не так удобно, как с 7кой. VMware Player бесплатен для некоммерческого использования. Скачать нужную версию можно по ссылке
- В качестве гостевой Linux системы берем xubuntu 14.02 64-bit. Скачать можно тут
- После создания виртуальной машины и установки ОС требуется установить VMware Tools. VMware сама вам напомнит об этом при установке и после, но если вы этот момент пропустили, то для установки нажмите на меню Player, потом Manage и выберите Install VMware Tools.
- С VMware Tools мы можем переводить нашу виртуальную машину в Unity mode, а на любое Linux приложение создавать ярлыки на рабочем столе или закреплять его на панели задач, как обычное Windows приложение.
Для еще большего удовольствия от работы следует выполнить несколько дополнительных настроек виртуальной машины. Для этого в меню Player, Manage, выберите Virtual Machine Settings. Там внутри
- Hardware, Network Adapter. Выберите режим соединения Bridged и отметьте опцию Replicate physical network connection state. В таком режиме виртуальная машина будет выглядеть, как компьютер подключенный к вашей локальной сети, а при перезапуске машины она будет пытаться сохранить свой прежний IP адрес.
- Во вкладке Options вы можете настроить общие папки между вашей и виртуальной машинами. По умолчанию Shared Folders отключены.
- Ну и в Options, Unity можно поснимать галочки с пунктов Show borders и Show badges, чтобы Linux окна никак не выделялись на фоне остальных. Хотя это совсем не обязательно.
Вот так в несколько довольно простых шагов мы получили практически идеальную среду Linux для разработки, работающую внутри виртуальной машины. При этом для нас любое приложение из виртуальной машины выглядит так, как будто оно запущено в среде Windows.
Я очень надеюсь, что с установкой xubuntu в виртуальную машину вы справились самостоятельно, также как и справитесь с настройкой необходимого ПО для запуска своих веб проектов на Linux. Для этого достаточно следовать любой инструкции по установке Nginx, Apache, MySQL, PHP и других приложений на Ubuntu. Либо использовать Docker, как это делаю теперь и я.
Кстати, приложение которое у меня выполнялось по 15 секунд и больше в докер контейнерах на Windows, в виртуальной машине отрабатывает секунды за 3, т.е. в 5 раз быстрее. Конечно, хотелось бы еще большей скорости, но пока это лучший вариант из найденных мной, и он очень удобный.
Данная статья во многом основана на материале из данного видео. Если вы хотите увидеть полную пошаговую инструкцию по установке и настройки виртуальной машины, то рекомендую к просмотру. Язык — английский, автор видео — Nick Janetakis.
🔭 Overview
After a lot of trial and error, I’ve been able to piece together a pretty respectable Windows dev environment. There are plenty of guides already out there, but none of them seem to cover the entire scope. I tried to do that here, without getting too deep into any individual topic. I believe this will leave the majority of users with a smooth Windows developer experience.
The repo for this guide contains some additional info and will be continually updated.
Prerequisites
- Windows 10 version 2004 and higher (Build 19041 and higher) or Windows 11 (Which version do I have?)
- A GitHub account
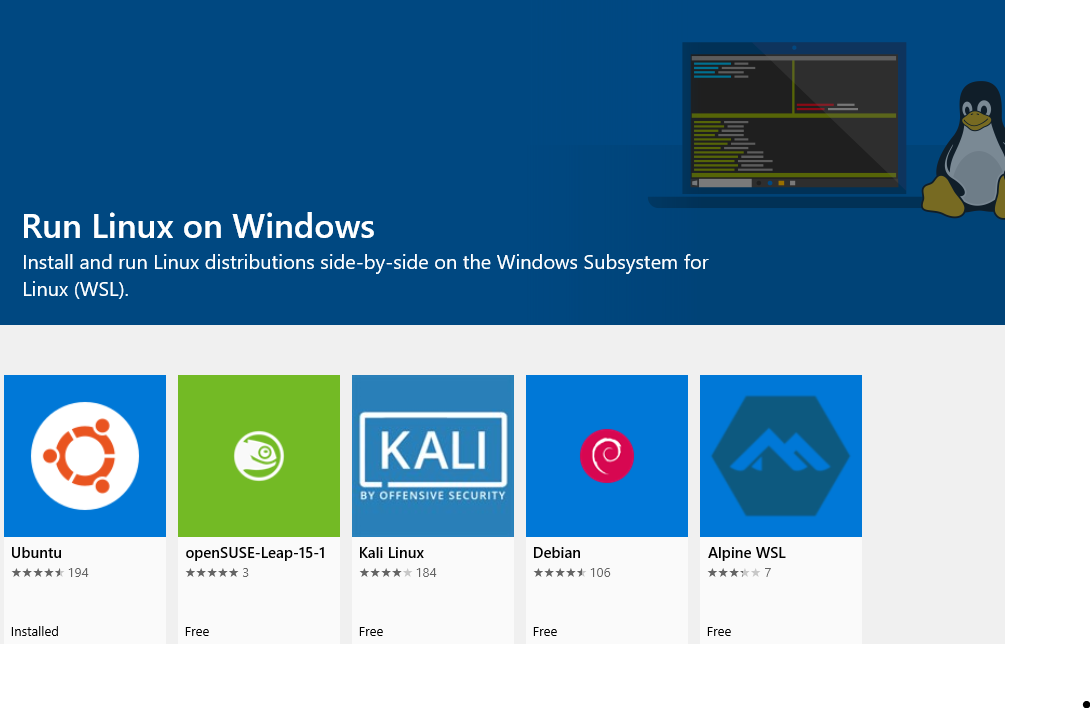
🐧 WSL
The first and most important part of setting up your Windows dev environment is installing the Windows Subsystem for Linux (WSL). I recommend sticking with Ubuntu, but feel free to try out as many distributions as you like. There are no issues with having multiple distributions installed at once.
Installing WSL 2
WSL 2 is the latest version of WSL, adding new features like a full Linux kernel and full system call compatibility. There used to be a handful of steps needed to install it, but we now only need to enter the following command into PowerShell or Command Prompt:
wsl --install
Enter fullscreen mode
Exit fullscreen mode
This command does the following:
- Enables the optional WSL and Virtual Machine Platform components
- Downloads and installs the latest Linux kernel
- Sets WSL 2 as the default
- Downloads and installs the Ubuntu Linux distribution (a reboot may be required)
Using the --install command defaults to Ubuntu and only works if WSL is not installed yet. If you would like to change your default Linux distribution, follow these docs.
User Config
Once the process of installing your Linux distribution with WSL is complete, open the distribution (Ubuntu by default) using the Start menu. You will be asked to create a User Name and Password for your Linux distribution. When you enter your new password, nothing will display in the terminal. Your keyboard is still working! It is just a security feature.
-
This User Name and Password is specific to each separate Linux distribution that you install and has no bearing on your Windows user name.
-
Once you create a User Name and Password, the account will be your default user for the distribution and automatically sign-in on launch.
-
This account will be considered the Linux administrator, with the ability to run sudo (Super User Do) administrative commands.
-
Each Linux distribution running on WSL has its own Linux user accounts and passwords. You will have to configure a Linux user account every time you add a distribution, reinstall, or reset.
Updating Linux
It is recommended that you regularly update and upgrade your packages. In Ubuntu or Debian, we use the apt package manager:
sudo apt update && sudo apt upgrade
Enter fullscreen mode
Exit fullscreen mode
Windows does not automatically update or upgrade your Linux distribution(s). This is a task that most Linux users prefer to control themselves.
Mapping Your Linux Drive
When you open the Windows file explorer, it displays your devices and drives. We are going to add our Ubuntu virtual drive as a network location for easy access.
-
Open the
\\wsl$\location from file explorer:
-
Right-click on the Ubuntu folder, and select
Map network drive:
-
Select the drive letter you would like to use, leave
Reconnect at sign-inchecked andConnect using different credentialsunchecked, and then click finish (mine will look slightly different because it’s already been done):
-
The end result should look something like this:


If you wanted to access your Windows files from the Linux terminal, they are found in the /mnt/ directory, so your Windows user directory would be located at /mnt/c/Users/username.
With your Ubuntu drive mapped, you can easily drag/drop or copy/paste Windows files to the Linux file system by using the file explorer.
However, it is recommended to store your project files on the Linux file system. It will be much faster than accessing files from Windows and it can also be a little buggy.
Pin Your Code Directory
Another quick tip I have is to create a code directory inside of Ubuntu, and then pin it to the quick access menu found on the left side of the file explorer. This comes in handy when transferring files quickly between Windows and Linux.
- Open file explorer and click on the Ubuntu network drive we created
- Select the home dir, and then your user directory
- Right-click and create a new folder, name it code, or anything else you’d like
-
Drag that new folder to the left, underneath the star icon that says
Quick access

Restarting WSL
If for some reason WSL stops working, you can restart it with these two commands from PowerShell/Command Prompt:
wsl.exe --shutdown
wsl.exe
Enter fullscreen mode
Exit fullscreen mode
If you go back to your Linux shell everything should be back to normal.
👨💻 Windows Terminal
To launch a Linux terminal we currently need to use the Ubuntu icon from the Start menu or enter the wsl or bash commands into PowerShell/Command Prompt. Another option that will give us more features like tabs, split views, themes, transparency, and key bindings, is to use the Windows Terminal. There are also a few other terminals like Cmder, ConEmu, or Hyper, but in my experience, Windows Terminal works extremely well.
Installing Windows Terminal
Windows 11 comes with Windows Terminal by default, but If you are using Windows 10, Download and install Windows Terminal through the Microsoft Store.
Terminal Settings
A couple of quick things I recommend setting up are the default profile and your starting home directory. These settings make it so launching Windows Terminal will open directly into WSL inside our user’s home directory.
Default Profile
Windows Terminal will open a PowerShell or Command Prompt shell when launched by default, here is how to switch it to WSL:
-
Select the
˅icon from Windows Terminal and go to the Settings menu:
-
In the Startup section you will find the Default profile dropdown, select Ubuntu. Below it, select Windows Terminal as the Default terminal application:


Starting Directory
A default Ubuntu terminal will open to the root directory. To make finding your files a little quicker we can have it open into your home directory instead.
-
Under the Profiles section in the settings menu click on Ubuntu
-
At the General tab, you will find a Starting directory input
-
Enter the following replacing «username» with your Ubuntu user name:
\\wsl$\Ubuntu\home\username -
You can leave the
Use parent process directorybox unchecked -
If it is still opening into your
/directory, change theCommand linesetting located right above theStarting directoryinput box to the following:wsl.exe -d Ubuntu

There are many more settings to explore, and there is also a JSON file you can edit for more advanced customizations.
Check out this guide for some popular Windows Terminal themes and how to install them.
📝 Git Config
Git should come pre-installed on most, if not all of the WSL Linux distributions. To ensure you have the latest version, use the following command in an Ubuntu or Debian based distro:
sudo apt install git
Enter fullscreen mode
Exit fullscreen mode
Name
To set up your Git config file, open a WSL command line and set your name with this command (replacing «Your Name» with your preferred username):
git config --global user.name "Your Name"
Enter fullscreen mode
Exit fullscreen mode
Email
Set your email with this command (replacing «youremail@domain.com» with the email you prefer):
git config --global user.email "youremail@domain.com"
Enter fullscreen mode
Exit fullscreen mode
Username
And finally, add your GitHub username to link it to git (case sensitive!):
git config --global user.username "GitHub username"
Enter fullscreen mode
Exit fullscreen mode
Make sure you are inputting user.username and not user.name otherwise you will overwrite your name and you will not be correctly synced to your GitHub account.
You can double-check any of your settings by typing git config --global user.name and so on. To make any changes just type the necessary command again as in the examples above.
😺 GitHub Credentials
Creating your Personal Access Token
GitHub has removed the ability to use a conventional password when working in a remote repository. You are now required to create a personal access token instead.
Personal access tokens (PATs) are an alternative to using passwords for authentication to GitHub when using the GitHub API or the command line.
Follow these docs for step-by-step instructions on creating your personal token.
Git Credential Manager
Once you enter in your token the first time, it can be stored via Git Credential Manager (GCM) so you won’t have to authenticate yourself each time.
You can have Git installed in WSL and also in Windows at the same time. Git for Windows includes GCM and is the preferred way to install it.

You can also download the latest installer for Windows to install the GCM standalone version.
Storing Your Token
Once Git Credential Manager is installed you can set it up for use with WSL. Open your WSL terminal and enter this command:
git config --global credential.helper "/mnt/c/Program\ Files/Git/mingw64/bin/git-credential-manager-core.exe"
Enter fullscreen mode
Exit fullscreen mode
Note:
If you ever receive the following error message:
/mnt/c/Program\ Files/Git/mingw64/libexec/git-core/git-credential-manager-core.exe store: 1:
/mnt/c/Program Files/Git/mingw64/libexec/git-core/git-credential-manager-core.exe: not found
Enter fullscreen mode
Exit fullscreen mode
Try using the this command:
git config --global credential.helper store
Enter fullscreen mode
Exit fullscreen mode
💤 Zsh
Z shell works almost identically to the standard BASH shell found on default Linux installs. What makes it different is its support for plugins and themes, along with some extra features like spelling correction and recursive path expansion. It’s time to throw BASH in the trash!
Installing Zsh
Zsh can be installed with one command:
sudo apt install zsh
Enter fullscreen mode
Exit fullscreen mode
After installing, type the zsh command. Zsh will ask you to choose some configurations. We will do this later on while installing oh-my-zsh, so choose option 0 to create the config file and prevent this message from showing again.
OhMyZsh
The most popular plugin framework by far is OhMyZsh. It comes preloaded with loads of plugins, themes, helpers, and more. It can help with productivity for sure, but more importantly, it just looks cool 😎.
cURL
First off, we need to make sure we have cURL installed. Short for «Client URL», it’s a way to transfer data from the command line, and that’s how we will download OhMyZsh.
Install curl with:
sudo apt install curl
Enter fullscreen mode
Exit fullscreen mode
Installing OhMyZsh
Enter the following command into your terminal to install OhMyZsh:
sh -c "$(curl -fsSL https://raw.github.com/ohmyzsh/ohmyzsh/master/tools/install.sh)"
Enter fullscreen mode
Exit fullscreen mode
That’s it! You should now see a .oh-my-zsh directory inside of your home directory. To change your plugins and themes you will need to edit your .zshrc file, also found in your home dir.
Here is a list of all the themes and plugins that come bundled with OhMyZsh.
More Plugins
There are countless plugins available, but these are the two I recommend most.
zsh-autosuggestions
Autosuggestions for zsh, It suggests commands as you type based on history and completions.
- 1. Clone this repository into
$ZSH_CUSTOM/plugins(by default~/.oh-my-zsh/custom/plugins)
git clone https://github.com/zsh-users/zsh-autosuggestions ${ZSH_CUSTOM:-~/.oh-my-zsh/custom}/plugins/zsh-autosuggestions
Enter fullscreen mode
Exit fullscreen mode
- 2. Add the plugin to the list of plugins for Oh My Zsh to load (inside
~/.zshrc):
plugins=(git zsh-autosuggestions)
Enter fullscreen mode
Exit fullscreen mode
- 3. Start a new terminal session.
zsh-syntax-highlighting
This package provides syntax highlighting for the shell zsh. It enables highlighting of commands whilst they are typed at a zsh prompt into an interactive terminal. This helps in reviewing commands before running them, particularly in catching syntax errors.
- 1. Clone this repository in oh-my-zsh’s plugins directory:
git clone https://github.com/zsh-users/zsh-syntax-highlighting.git ${ZSH_CUSTOM:-~/.oh-my-zsh/custom}/plugins/zsh-syntax-highlighting
Enter fullscreen mode
Exit fullscreen mode
- 2. Activate the plugin in
~/.zshrc:
plugins=(git zsh-autosuggestions zsh-syntax-highlighting)
Enter fullscreen mode
Exit fullscreen mode
- 3. Start a new terminal session.
More
A huge list of plugins can be found at the awesome zsh plugins repo.
📦 Node.js
Node.js is a JavaScript runtime environment that executes JavaScript code outside a web browser. It allows us to install packages, run local web servers, create APIs, and more.
NVM
You will likely need to switch between multiple versions of Node.js based on the needs of different projects you’re working on. Node Version Manager allows you to quickly install and use different versions of node via the command line.
Installing NVM
- 1. Open your Ubuntu command line and Install NVM with:
curl -o- https://raw.githubusercontent.com/nvm-sh/nvm/v0.39.1/install.sh | bash
Enter fullscreen mode
Exit fullscreen mode
To verify installation, enter: command -v nvm. This should return ‘nvm’, if you receive ‘command not found’ or no response at all, close your current terminal, reopen it, and try again.
- 2. List which versions of Node are currently installed (should be none at this point):
nvm ls
Enter fullscreen mode
Exit fullscreen mode

- 3. Install both the current and stable LTS versions of Node.js.
Install the current stable LTS release of Node.js (recommended for production applications):
nvm install --lts
Enter fullscreen mode
Exit fullscreen mode
Install the current release of Node.js (for testing latest Node.js features and improvements, but more likely to have issues):
nvm install node
Enter fullscreen mode
Exit fullscreen mode
- 4. List what versions of Node are installed:
nvm ls
Enter fullscreen mode
Exit fullscreen mode
Now you should see the two versions that you just installed listed.

- 5. Verify that Node.js is installed and the current version:
node --version
Enter fullscreen mode
Exit fullscreen mode
Then verify that you have NPM installed as well:
npm --version
Enter fullscreen mode
Exit fullscreen mode
Changing Node Versions
Use the following commands to change the version of Node you would like to use for any given project:
Switch to the Current version:
nvm use node
Enter fullscreen mode
Exit fullscreen mode
Switch to the LTS version:
nvm use --lts
Enter fullscreen mode
Exit fullscreen mode
You can also use the specific number for any additional versions you’ve installed:
nvm use v8.2.1.
Enter fullscreen mode
Exit fullscreen mode
To list all of the versions of Node.js available, use the command: nvm ls-remote.
NPM
Node Package Manager is the default package manager for Node.js. It is a command-line tool used to download or publish packages and manage the dependencies of a project. There is a searchable repository of all available NPM packages at https://www.npmjs.com/.
New Projects
When creating a new project that will utilize NPM, it must be initialized with the init command. First, make sure you are in the root directory of your project, and then use the following command:
npm init
Enter fullscreen mode
Exit fullscreen mode
package.json
npm init generates a package.json file and will prompt you for the metadata of your project. This includes things like the name, version, description, and license. You can think of it as the blueprint of your project as it will also contain the packages it depends on. The metadata can be changed at any time by editing the package.json file after the initialization.
If you would like to automatically populate the initialization with all the default values, you may add the --yes flag.
npm init --yes
Enter fullscreen mode
Exit fullscreen mode
Installing Modules
Modules are installed via the npm install or npm i command.
npm install react
Enter fullscreen mode
Exit fullscreen mode
The above command will install the React module as a dependency in package.json.
We can also install NPM packages globally on our system. This is useful for utilities like command line interfaces.
Yarn is another widely used node package manager, if we wanted to use it on all our node projects we would need the --global or -g flag.
npm install --global yarn
Enter fullscreen mode
Exit fullscreen mode
Dependencies
You can save a module as either a dependency or a developer dependency.
A dependency would be something that your project cannot function properly without.
The --save flag used to be needed to install modules as a dependency, but it is now done automatically with the install command.
npm install --save gray-matter
Enter fullscreen mode
Exit fullscreen mode
Is the same as:
npm install gray-matter
Enter fullscreen mode
Exit fullscreen mode

Developer Dependencies
A developer dependency would be the modules used to build the project, not run it. This would include things like linters and testing tools.
Developer dependencies are added with the --save-dev or -D flag. This adds the module to the devDependencies section of package.json
npm install --save-dev husky
Enter fullscreen mode
Exit fullscreen mode

Batch Installing
Apart from installing a single module, you can install all modules that are listed as dependencies and devDependencies:
npm install
Enter fullscreen mode
Exit fullscreen mode
This will install all modules listed in the package.json of your current directory.
If we only wanted to install the dependencies needed to run our project, the --production flag is used:
npm install --production
Enter fullscreen mode
Exit fullscreen mode
the --production flag will only install the modules from the dependencies section of package.json and ignore the devDependencies. The perk of this is notably reducing the size of the node_modules folder.
Uninstalling
Removing modules works in the same way as installing them. Flags will need to be used for any global or developer dependencies.
Dependencies:
npm uninstall react
Enter fullscreen mode
Exit fullscreen mode
Developer Dependencies:
npm uninstall --save-dev husky
Enter fullscreen mode
Exit fullscreen mode
Global Installs:
npm uninstall --global yarn
Enter fullscreen mode
Exit fullscreen mode
Versioning
Package versions are identified with major, minor, and patch releases. 8.1.1 would be major version 8, minor version 1, and patch version 1.
You can specify an exact version number by using the @ symbol.
npm install react@17.0.1
Enter fullscreen mode
Exit fullscreen mode
Two more symbols we can use are ^ and ~.
^ is the latest minor release.
For example, npm install ^8.1.1 specification might install version 8.3.1 if that’s the latest minor version.
~ is the latest patch release.
In the same way as minor releases, npm install ~8.1.1 could install version 8.1.6 if that’s the latest patch version available.
When using the npm install or npm i command, the latest minor version will be used.
package-lock.json
The exact package versions will be documented in a generated package-lock.json file.
The values found inside the dependencies and devDependencies objects of the package.json file include a range of acceptable versions of each package to install.
package-lock.json is generated by the npm install command and contains the exact versions of the dependencies used.
Scripts
package.json also contains a scripts property that can be defined to run command-line tools installed on the current project. This can include things like running tests, formatting your code, and launching a local server.

NPM scripts are run by using the run command. With the above configuration, you would use the following command to have prettier format your code:
npm run format
Enter fullscreen mode
Exit fullscreen mode
The keys in the scripts object are the command names and the values are the actual commands.
Check out the official npm and Node.js docs for more in-depth guides.
💻 Visual Studio Code
There are many amazing code editors available for free, but Visual Studio Code has become the defacto standard and my personal favorite.
Installing VS Code
VS Code is available on Windows, macOS, and Linux. You can download the latest Windows installer here. I recommend using the stable build.
Changing the Default Shell
The WSL2 shell can be chosen as the default VS Code terminal by pressing Ctrl + Shift + P and typing/choosing Terminal: Select Default Profile, then selecting zsh:

Remote Extension
Install the Remote — WSL extension on VS Code.
This allows you to use WSL as your integrated development environment and will handle compatibility and pathing for you. Learn more.
This extension will also allow you to launch VS Code right from your WSL terminal by using the code command.
If I was inside the root directory of my repository, I would use code . to launch the entire directory inside VS Code.
cd my-project
code .
Enter fullscreen mode
Exit fullscreen mode
More Extensions
The number of extensions available for VS Code can be overwhelming, here are some of the ones I use the most.
- Live Server — Launch a local development server with live reload feature for static & dynamic pages.
- Live Share — Includes everything you need to start collaboratively editing and debugging in real-time.
- GitLens — Quickly glimpse into whom, why, and when a line or code block was changed.
- Git History — View git log, file history, compare branches or commits
- Prettier — Prettier is an opinionated code formatter.
- ESLint — Find and fix problems in your JavaScript code
- Color Highlight — This extension styles CSS/web colors found in your document.
- Markdown All in One — Markdown keyboard shortcuts, table of contents, auto preview, and more
- markdownlint — Markdown linting and style checking for Visual Studio Code
- GitHub Markdown Preview — Adds styling, markdown checkboxes, footnotes, emoji, and YAML preamble.
- Wakatime — Metrics, insights, and time tracking automatically generated from your programming activity.
- Dash — Dash, Zeal, and Velocity integration in Visual Studio Code
- Draw.io Integration — This unofficial extension integrates Draw.io (also known as diagrams.net) into VS Code.
- Docker — Makes it easy to create, manage, and debug containerized applications.
- Python — IntelliSense, Linting, Debugging, Jupyter Notebooks, refactoring, unit tests, and more.
Note:
You will need to install any VS Code extensions for your Remote — WSL. Extensions already installed locally on VS Code will not automatically be available. Learn more.
🍫 Chocolatey
Chocolatey is a package manager like homebrew, but for Windows.
Admin Shell
Before we start the installation process, I want to cover launching an administrative shell from windows. There are a few ways to do this:
Option 1
Right-click on the Windows start menu and select Windows Terminal (Admin):
Once your terminal loads, click the ˅ icon and open a new PowerShell tab. It should say Administrator: Windows PowerShell in the new tab:

Option 2
If you have Windows Terminal on your taskbar, Shift + Right-Click on the icon and select run as administrator, and then open a new PowerShell tab:
Option 3
Use the search bar from the Start menu and type in powershell. A link to Run as Administrator will display:

Option 4
Windows Terminal added a new feature where you can launch a PowerShell/Command Prompt profile in an Admin terminal automatically. In the Windows Terminal settings, scroll down to your desired profile and then toggle the Run this profile as Administrator switch. Now you can skip all the steps above, and the terminal will always launch as admin.

Installing Chocolatey
- 1. Open an administrative PowerShell terminal and run:
Get-ExecutionPolicy
Enter fullscreen mode
Exit fullscreen mode
- 2. If it returns
Restricted, then run one of the following commands:
Set-ExecutionPolicy AllSigned
Enter fullscreen mode
Exit fullscreen mode
or
Set-ExecutionPolicy Bypass -Scope Process
Enter fullscreen mode
Exit fullscreen mode
With PowerShell, you must ensure
Get-ExecutionPolicyis not Restricted. We suggest usingBypassto bypass the policy to get things installed orAllSignedfor quite a bit more security.
- 3. Now run the following command:
Set-ExecutionPolicy Bypass -Scope Process -Force; [System.Net.ServicePointManager]::SecurityProtocol = [System.Net.ServicePointManager]::SecurityProtocol -bor 3072; iex ((New-Object System.Net.WebClient).DownloadString('https://community.chocolatey.org/install.ps1'))
Enter fullscreen mode
Exit fullscreen mode
If you don’t see any errors, you are ready to use Chocolatey! Type choco or choco -? now, or see Getting Started for usage instructions.
Basic Chocolatey Commands
We use the choco command to run chocolatey. (Remember, you must use an administrative shell for it to work.)
Install a new package:
choco install filename
Enter fullscreen mode
Exit fullscreen mode
Remove a package:
choco uninstall filename
Enter fullscreen mode
Exit fullscreen mode
List all of the installed packages:
choco list
Enter fullscreen mode
Exit fullscreen mode
Update:
choco upgrade filename
Enter fullscreen mode
Exit fullscreen mode
or to update everything at once:
choco upgrade all
Enter fullscreen mode
Exit fullscreen mode
Windows Apps
Search for available apps on the Community Package Repository.
Here are a few of my favorite (free) apps for productivity and development on Windows:
- Wox — A full-featured launcher
- RunJs — JavaScript and TypeScript playground
- Responsively — A modified web browser that helps in responsive web development.
- Zeal — the Windows version of Dash
- Figma — A collaborative UI design tool
- draw.io — Flowchart maker and diagram software
- GitHub Desktop — A GUI for Git
- Postman — API tools
- Notion — Project management and note-taking software
- Microsoft PowerToys — A set of utilities for power users
You can download all these at once with the following command using chocolatey in an admin shell:
choco install wox runjs responsively zeal figma drawio github-desktop postman notion powertoys -y
Enter fullscreen mode
Exit fullscreen mode
🪜 Chrome Extensions
These are all available as Firefox extensions as well.
- React Dev tools — Adds React debugging tools to the Chrome Developer Tools.
- ColorZilla — Advanced Eyedropper, Color Picker, Gradient Generator, and other colorful goodies
- Axe Accessibility — Accessibility Checker for Developers, Testers, and Designers in Chrome
- daily.dev — Get a feed of the hottest developer news personalized to you.
- Nimbus Capture — Screen Capture full Web page or any part.
- WhatFont — With this extension, you could inspect web fonts by just hovering on them.
- JSON Formatter — Makes JSON easy to read.
📚 References
- WSL2 Install Guide
- Install and get started setting up Windows Terminal
- Git a Grip
- Git Credential Manager
- OhMyZsh Wiki
- Using Zsh in Windows Terminal
- A User’s Guide to the Z-Shell
- Installing Node on WSL
- Chocolatey Install Docs
Historically, Windows has not been been the preferred OS for most web developers, but things have changed over the past couple years. Microsoft recently launched Windows Subsystem for Linux or WSL (WSL2), allowing us to install REAL linux distros (like Ubuntu) on Windows 10. This means you can use Linux toolchains (bash, zsh, tmux) and apps to manage the file system and run windows apps.
Unlike a dual boot system, where two operating systems are installed on the same hard drive, WSL runs Linux in a compatibility layer that can run unmodified ELF64 binaries. The following lesson will teach you how to enable WSL and setup other important tools for web development, like Node.js, git, Docker, browsers, and more.
Linux on Windows
The following steps will install Linux in your Windows 10 environment. Also reference the official WSL install guide.
Enable Windows-Subsystem-Linux (WSL)
From the start menu, search for PowerShell and run it as an administrator.

Open PowerShell in Windows 10 as an administrator
Run the command below. It will require a full reboot of your system.
command line
Enable-WindowsOptionalFeature -Online -FeatureName Microsoft-Windows-Subsystem-Linux
Install a Linux Distro
Open the Microsoft store and search for Linux. Choose your preferred distro — choose Ubuntu if you don’t have a preference.
Install your favorite Linux flavor
Install Windows Terminal
Windows has a new terminal app that makes it easier to work with the command line. Install it to quickly between Linux and PowerShell sessions.

Install windows terminal and start a Linux session
You should now be able to work with the file system using the linux commands you know and love, such as:
command line
ls # list directory contents
mkdir testing # make directory
cd testing # move into directory
touch somefile.txt # create a file
cat somefile.txt # read a file
vim somefile.txt # edit a file with vim
code somefile.txt # edit a file with vscode
Update the Linux
Keeping the kernel up to date would simplify your life. Just run those commands:
sudo apt update
sudo apt upgrade -y
Run the Linux Train
You can run a the famous Linux shell train with the following commands:
sudo apt-get install sl
sl
Customize the Command Line Prompt
Basic Customization
Currently the command line (bash) prompt for Ubuntu is very long jeffd23@DESKTOP-R6U97PD:/mnt/c/Users/jeffd23$. How do we shorten the command line prompt in WSL? You can change it permanently in the .bashrc file by modifying the PS1 environment variable, which is the default prompt appearance.
command line
code ~/.bashrc # vscode
vim ~/.bashrc # vim
Below you you will find a few bash prompt examples. Add ONE of the lines to end of the file for your preferred prompt format.
file_type_config .bashrc
export PS1="\w$ " # full working dir
export PS1="\W$ " # basename of working dir
export PS1="\u@\W $ " # username @ working dir
export PS1="[\t] \u@\h:\w\$ " # timestamp + username + host + working dir
Here are some variables commonly used in the prompt
\wfull working directory\Wbasename of the current working directory\hhostname\uusername\ttime 24-hour HH:MM:SS\Ttime 12-hour HH:MM:SS\@time 12-hour am/pm
Zsh Z-shell
As an alternative, you can gain even more control over the Linux command line with Oh My ZSH.
sudo apt install zsh
sh -c "$(curl -fsSL https://raw.githubusercontent.com/ohmyzsh/ohmyzsh/master/tools/install.sh)"

sudo apt-get install fonts-powerline
code ~/.zshrc # to customize it
Change the ZSH_THEME="random". Your terminal sessions should be looking very fancy. Now hit ctrl+shift+3 to cycle through different options.
VS Code with WSL
With WSL installed, we need to to connect it VS Code.
Install the Remote WSL Extension
The Remote WSL extension makes it possible to use Linux (WSL) as your dev environment in VS Code.
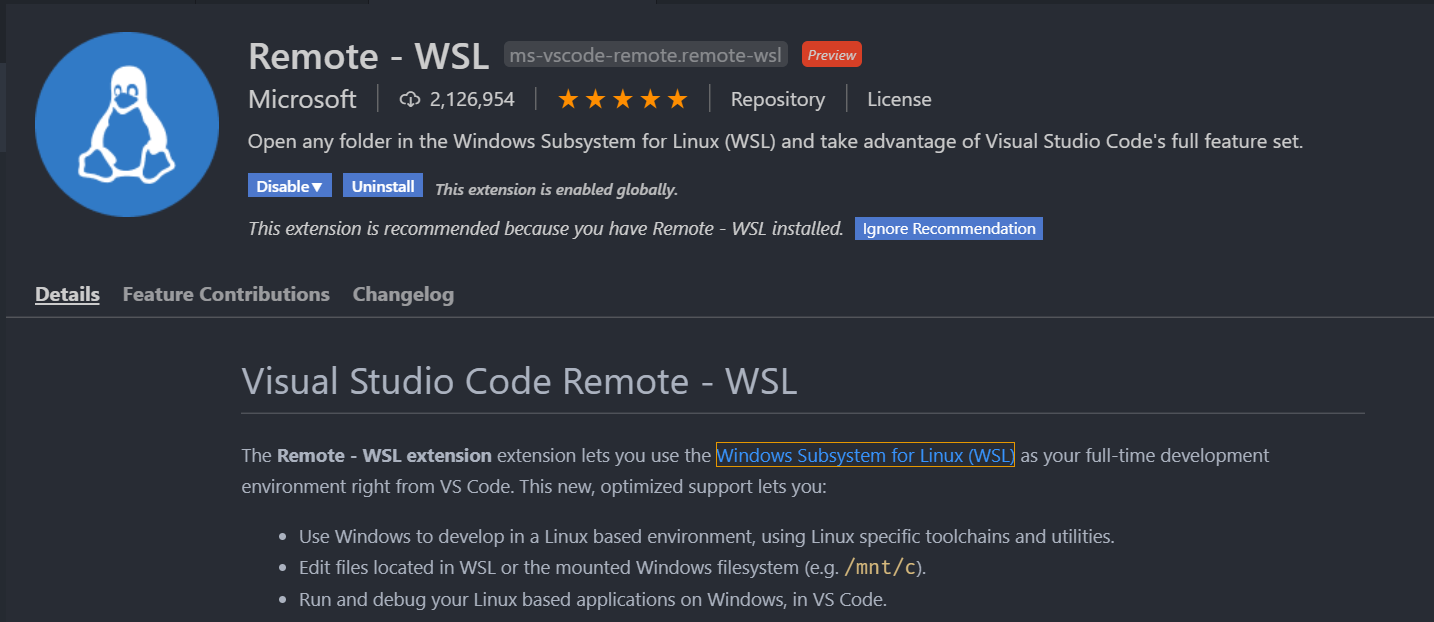
Remote WSL extension
Node.js & NPM
As a web developer you need Node.js. You can manage multiple versions with NVM.
Bash Install
If using bash, install NVM like so:
command line
curl -o- https://raw.githubusercontent.com/nvm-sh/nvm/v0.38.0/install.sh | bash
Zsh Install
If using Zsh, open the ~/.zshrc file and update the plugins:
Install Node
Install the recommended LTS version of Node. It will automatically install NPM and Node.
command line
nvm install --lts

node -v
npm -v
Git
Install the latest version of git.
command line
sudo apt install git
git --version
Cache Remote Login Credentials
If you work with Github it can be useful to cache your git credentials to avoid typing your username/password on every remote push.
command line
git config --global user.name "Jeff Delaney"
git config --global user.email "hello@fireship.io"
git config --global credential.helper cache --timeout=3600
GitHub CLI
The GitHub CLI allows you to manage remote repos, view issues, and other useful tasks on GitHub from the command line. Follow the install instructions for Ubuntu.
You now have access to the gh command For example, fetch a list of all the issues in a repo:
gh issue list --repo fireship-io/fireship.io
Docker
Docker containers can be managed from Windows, but connecting them to Linux requires some extra work. Improved interoperability is coming soon (May 2020) in WSL2.
Windows Docker Desktop
If you have Windows 10 PRO you can install Docker Desktop to run virtual machines natively on Windows. The desktop app makes it very easy to manage containers and search through their logs. When WSL2 becomes generally available, you can enable Linux support by ticking the box below.
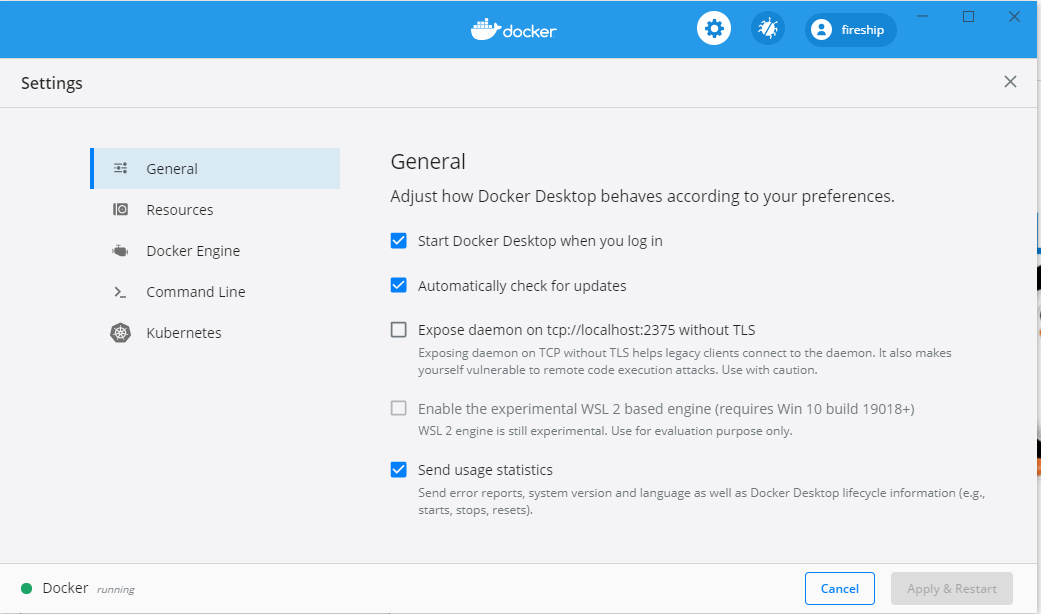
Docker Desktop. Notice the WSL2 option
Browsers
As a web developer, you should also have a variety of browsers installed on your system. At the very least, I recommend the following:
- Google Chrome — Best for JS Debugging
- Mozilla Firefox — Best for CSS Debugging
- Brave — See how your site behaves on a privacy-conscious environment
If you are looking for the best IDE for web development, this post is for you. Over the years, web development has evolved significantly. And so is the approach towards it.
However, what hasn’t changed over the years is the use of IDE in web development. In this post of best IDE 2024 for web development, we aim to highlight the top 13 best free IDE for web development. If that sounds exciting, let’s get going.
Table of Contents
- Introduction to IDE
- Benefits of IDE
- Top IDE for Web Development
- 13 Best IDE for Web Development
- Microsoft Visual Studio
- Atom by GitHub
- Eclipse
- Sublime Text 3
- PyCharm
- NetBeans
- PHPStorm
- WebStorm
- Komodo Edit
- NOTEPAD++
- Brackets
- AWS Cloud9
- CodePen
- FAQs
- What is the best IDE for beginners?
- Which IDE should I prefer for web development?
- Which IDE do most companies use?
- What are other IDEs for web development?
- Conclusion
What is an IDE?
An Integrated Development Environment is nothing but an application that provides web developers with the tools required for developing software. Ideally, it comes with a text editor, automation tools, code compilation, and a debugger.
However, there are a few web development IDEs that come with a necessary compiler, interpreter, or both. Let’s look at a few of the most common features of IDEs for web development.
Benefits of IDE
- With IDE, you can create robust and reliable software applications, drivers, and utilities.
- An IDE can increase your efficiency by minimizing language syntax errors.
- Foster collaboration by allowing your colleagues to work on the same project simultaneously.
- IDE makes resource management seamless while creating applications with it.
- It eases out the creation of database applications.
- IDEs can translate code from high-level programming languages to the object code of the targeted platform.
Want to Create Your Web Solution?
Want to validate your idea before you start a project? Book your free consultation call with our web expert.
13 Best IDE for Web Development
To help you pick the right IDE, we have created a list of the top 13 best IDE for website development. Here we go.
-
Microsoft Visual Studio
Undoubtedly, this is the most popular IDE for web development and one of the best-integrated development environments, it can be used to develop pretty much everything from complex computer programs to simple websites and lightweight web apps.
This IDE uses a few of the most popular Microsoft software development platforms, such as Windows API, forms, and presentation foundation. With its help, you can produce both native and managed code.
It comes with a code editor that supports IntelliSense — a smart code completion tool that provides intelligent code suggestions to allow developers to quickly complete the code. What’s more, its integrated debugger can debug both the source-level and machine-level code.
Apart from this, the Visual Studio includes a code profiler, designer for building GUI applications, web designer, and class designer. You can also expand its functionality by adding various plugins ranging from source control systems to toolsets like editors and visual designers.
In all, it supports 36 distinct programming languages. With its flexibility and ease of use, it is certainly one of the best-integrated development environments available out there on the internet.
Advantages of Using Microsoft Visual Studio Limitations of Using Microsoft Visual Studio - Amazing functions
- Seamless workflow
- Easy to use
- Quite expensive
- Requires a lot of resources to function optimally
-
Atom by GitHub
A free and open-source text editor, Atom is a desktop application developed using web technologies. It offers support for Node.js plugins and comes with Git Control, built by GitHub.
Atom, a code editor for web development is written in CoffeeScript and Less and is based on Electron — a framework enabling cross-platform desktop apps using Chromium and Node.js. It was first released in June 2015 and is fully customizable in HTML, CSS, and JS.
Atom comes with a built-in package manager to allow you to install new tools and themes for expanding its functionality. That’s not all, out-of-the-box Atom offers several pre-installed themes and works across various operating systems.
Advantages of Using Atom by GitHub Limitations of Using Atom by GitHub - Flexible & easy to use
- Scalable with plugins and various packages
- GitHub integration
- Slow performance
- Functions are limited
-
Eclipse
Eclipse is certainly one of the most popular Java Integrated Development Environment (IDE). While it was originally developed as a Java environment, today it supports various other languages, including C++, Python, and PHP.
Whether you are just starting out or a pro at web development, this framework has got you covered with its easy to use interface and exceptional features for web development.
Out-of-the-box, Eclipse offers debugging tools, a plugin development toolkit, and Git/CVS support. With the support of a strong and vibrant global community, the IDE today has numerous extensions – making it highly customizable and easy to use. Whether you want to add modeling or testing functionality, you will find a reliable solution via Eclipse Marketplace Client.
Advantages of Using Eclipse Limitations of Using Eclipse - Supports multiple language support
- Wide range of plugins available
- Fast compiler
- Steep learning curve
- Lacks advanced functionality
-
Sublime Text 3
Here’s a lightweight code editor supporting various popular languages, including HTML. Sublime Text comes with everything you’d expect from the best editor for web development. It offers numerous distinct features; a few of them include goto anything, multiple selections, command palette, and goto definition.
That’s not all. The IDE comes with 23 unique visual themes right out-of-the-box. You can download additional themes and set them up with the help of third-party plugins.
Sublime Text was first released in January 2008 by Jon Skinner and has been maintained ever since. Version 3.2.2 was the last stable release of the software in October 2019. While you can use the software for free, you should purchase its software for continued use. You can purchase a personal license at $80 USD (one time) which grants you regular updates until 3 years; post which you will need to upgrade if you wish to receive further updates.
Today, Sublime Text is certainly one of the most preferred IDE software among web developers – thanks to its powerful API and plugin support.
Advantages of Using Sublime Text Limitations of Using Sublime Text - Efficient development with its distinct features
- Lightweight & easy to work with
- Fully customizable
- Lacks advanced functionality
-
PyCharm
Built for Python, today PyCharm also supports many other popular programming languages. Developed by JetBrains, this cross-platform web development IDE provides code analysis, a graphical debugger, and an integrated unit tester to minimize the hassles of web developers.
While PyCharm is commercial software, it also has a community edition with a limited set of features. Today, it is mostly used for professional web development projects – thanks to its comprehensive coding assistance and highly customizable command-line interface.
However, according to some, the free IDE version of PyCharm possibly be buggy, especially the autocomplete feature.
With its intelligent features, PyCharm can automatically complete the code and prevent errors. You can also integrate it with Git and Mercurial – which is again an added advantage. Moreover, it comes with an integrated Python debugger and unit testing with line-by-line code coverage. Thus, if you are building cross-platform technology projects, PyCharm can be ideal for you.
Advantages of Using PyCharm Limitations of Using PyCharm - Easily customizable
- Can be used for cross-technology development
- Intelligent web development IDE
- A few performance bugs
- The community edition has limited features
-
NetBeans
Backed up by a vibrant community globally, NetBeans is undoubtedly one of the best open-source web development IDE software for developing programs based on C++, JavaScript, and Java.
Doesn’t matter if you are editing an existing project or creating something from scratch – NetBeans will make the process hassle-free with its drag-and-drop interface. You can develop high-performing applications from modules. The web development IDE can seamlessly run on various platforms, such as Windows, macOS, Linux, and Solaris.
NetBeans offers several integrated modules to assist your software development process. A few of the most useful modules include NetBeans profiler, GUI design tool, and JavaScript editor.
That’s not all. Out-of-the-box NetBeans comes with several project templates and an integrated debugger. Today, it supports all the major operating systems and compilers, including Cygwin and GNU.
Advantages of Using NetBeans Limitations of Using NetBeans - Highly functional debugging
- Cross-platform software
- Free to use
- Supports custom plugins
- Occasional performance lags
-
PHPStorm
PHPStorm is one of the best web development IDE for HTML, CSS, and JavaScript and best web IDE for commercial and cross-platform PHP apps. While PHPStorm is written in Java, it can be used for other languages by installing relevant plugins.
The intuitive user interface and amazing functions make PHPStorm an ideal coding environment for developing projects of any size and scale – without worrying about typos and manual errors.
A few of the major functions include a rich code editor (with syntax highlighting), code autocompletion, coding style support, and an easy-to-configure visual debugger. PHPStorm also supports some of the most popular frameworks like WordPress and Symfony. It also allows you to customize the IDE with different themes and extensions.
Advantages of Using PHPStorm Limitations of Using PHPStorm - Highly functional IDE
- Framework support
- Easily customizable
- Smart code navigator
- Refactoring and debugging tools
- Command line tools
- Commercially-sold software
-
WebStorm
The smartest JavaScript IDE, WebStorm stands tall amongst other Integrated Development Environments with its smart code editor. A few of its significant features include intelligent code completion, on-the-fly error detection, and powerful navigation. It is a closed-source software developed by JetBrains.
It boasts a modern yet minimal UI packed with amazing features in and out. Being a commercial software, it’s being billed on a monthly or yearly basis. You can either purchase its license for a year at the US $129 or pay a monthly fee of US $12.90.
It is super-easy to use and very lightweight web development IDE for developing web applications that stand out. WebStorm is certainly best code editor and one of the most used JavaScript IDE with exceptional features that will help you build applications like no other. Let’s now look at a few pros and cons of WebStrom.
Advantages of Using WebStorm Limitations of Using WebStorm - Support for code refactoring
- Smart autocomplete
- Easily customizable
- Comes with ample built-in tools
- Support for numerous plug-ins
- High memory usage
- Commercial software
-
Komodo Edit
Komodo Edit is one of the best open-source text editors for dynamic programming languages. Developed by ActiveState, it was first introduced in November 2007. While Komodo is mainly used for JavaScript projects, it supports the majority of the languages.
A few features that make Komodo stand out include auto-complete code, multi-language editor, multiple selections, projects & places manager, skin & icon sets, minimap, commando, unit testing, and debugging.
While the community edition of Komodo IDE is free to use, you have to pay if you wish to use more of its features. The pricing starts from $84 per year per user and goes up to $5,880/yr for 10 users. The paid versions have extra features that give you more flexibility and control over the code and the development process.
Advantages of Using Komodo Edit Limitations of Using Komodo Edit - Highly Customizable UI
- Multi-user editing
- Accessibility to several add-ons for expanding the functionality
- Comparatively expensive
- Limited functionality in free version
-
NOTEPAD++
Initially released in 2003 by Don Ho, Notepad++ has become one of the leading text and source code editor primarily used with Microsoft Windows. It was previously hosted on SourceForget.net – and was downloaded over 28 million times. Notepad++ has also been recognized with SourceForge Community Choice Award twice for Best Developer Tool.
Being a source code editor, it offers syntax highlighting, code folding, and autocompletion for programming, scripting, and markup languages. It can highlight the elements of 78 syntaxes. Notepad++ supports plugins and allows users to extend its functionality. So far, there are over 140 compatible plugins of which 10 are included in the Notepad++ by default.
Advantages of Using NOTEPAD++ Limitations of Using NOTEPAD++ - Easy coding in multiple languages
- Wide-range of plugins available
- Free and open-source
- More options can be overwhelming at times
- Cannot handle large volumes of data
-
Brackets
Developed by Adobe Systems, Brackets is undeniably one of the best web development IDE. It empowers the developers with visual tools like an inline editor and live preview to execute things efficiently. The editor comes with an elegant user interface and intuitive navigation.
That’s not all. With Brackets’ real-time connection with a browser, developers can instantly see all the code changes on the screen. Moreover, if you work with preprocessors, you will enjoy working with Brackets – as it makes editing your LESS and SCSS files seamless.
A few features that make this cross-platform IDE stand out to include inline editors and preprocessor support. What’s more, it’s open-source and free to use. Let’s look at some pros and cons of using Brackets.
Advantages of Using Brackets Limitations of Using Brackets - Lightweight
- Built for web development
- Real-time preview
- Lacks advanced IDE functionality
- Can get slower post plugin installation
-
AWS Cloud9
An open-source IDE, AWS Cloud9 supports multiple programming languages, including C, C++, PHP, Ruby, Perl, and Python. While a good part of it is written in JavaScript, it uses Node.js on the back-end.
Because Cloud9 was acquired by Amazon in 2016, now it can only be accessed through an AWS account. Some of the most useful features include code completion, syntax highlighting, a built-in terminal (with npm), and an in-built image editor.
Advantages of Using AWS Cloud Limitations of Using AWS Cloud - Scalable
- High performing
- Allows you to write, debug, and create code all from a web browser
- Intuitive & user-friendly
- May underperform at times.
- Lacks support for various plugins
- Code folding
-
CodePen
Here’s a thriving community of over 330,000 registered users and 14.16 million monthly visitors. The online community boasts user-generated HTML, CSS, and JavaScript. CodePen is just like an online code editor where developers can create code snippets and test them.
CodePen was initially established in 2012 by Alex and Tim — two full-stack developers and a front-end designer Chris Coyier. Today, CodePen has become one of the largest social development environment for front-end designers and developers. People come here to take inspiration, design test cases, develop new creative designs – and connect with like-minded individuals.
Advantages of Using CodePen Limitations of Using CodePen - A vibrant community
- Great platform to learn ideas and share insights
- A novice might get a little overwhelmed at the beginning
- IntelliJ IDEA
- RubyMine
- Bluefish
- CKEditor
- Visual Studio Code
- Light Table
Looking for a Reliable Web Development Partner?
We have experience in developing custom web solutions from scratch. Tell us about your idea and get your free quote.
Frequently Asked Questions
What is the best IDE for beginners?
NetBeans and Eclipse are the two of the most user-friendly web development IDEs anyone can get accustomed to easily.
Which IDE should I prefer for web development?
While the IDE you should go with really depends on your needs, NetBeans stands tall among the list of other IDEs as far as web development is concerned. That’s because it can help you create robust and reliable web applications in no time. The IDE works with almost all the languages, including JavaScript, HTML5, PHP, and C/C++.
Which IDE do most companies use?
Most companies use Eclipse IDE for developing websites – primarily because it’s easy to use and offers all the functions one would ever need while web development.
What are other IDEs for web development?
Conclusion
An Integrated Development Environment plays a major role when you are developing a custom software or web application. While no one IDE has all the features, all of them have a specific set of features – which one to select really depends on your requirements. Thus, while choosing your IDE, make sure you thoroughly evaluate your needs and its features.
Having provided software development services for literally a decade now – we know what it takes to breathe life into your idea. So, if you are seeking to build a robust and reliable web/mobile application or software, let us help you. Hire our dedicated resources today and transform your idea into a tangible reality.
Written by
Bhaval Patel is a Director (Operations) at Space-O Technologies. He has 20+ years of experience helping startups and enterprises with custom software solutions to drive maximum results. Under his leadership, Space-O has won the 8th GESIA annual award for being the best mobile app development company. So far, he has validated more than 300 app ideas and successfully delivered 100 custom solutions using the technologies, such as Swift, Kotlin, React Native, Flutter, PHP, RoR, IoT, AI, NFC, AR/VR, Blockchain, NFT, and more.
По тематике этого сайта вполне логично, в одной из первых статей, познакомится с главными инструментами для создания локальных сайтов и программных приложений, платформами локальных серверов. В этой статье кратко ознакомимся с WAMP сборками для разработки локального сайта на машине с установленной Windows. Это основные и наиболее популярные WAMP сборки.
Зачем нужны WAMP платформы?
Ответ на этот вопрос, до банальности прост. Для создания сайтов или разработки и тестирования расширений.
Довольно популярен метод создания сайта сначала на локальной платформе, с последующем переносом сайта на хостинг. Этот способ позволяет в спокойном режиме сделать сайт, протестировать его, не торопясь выбрать хостинг для сайта, например, основывать на рейтинг хостингов для wordpress. Такой спокойный режим работы позволяет не тратится на содержание хостинга, однако требует изучения и выбора локальных платформ «под себя».
Open Server
Данная сборка многовариантная. Установка стационарная (на домашний компьютер) и портативная (на переносной носитель).
Open Server — сборка относительно молодая, однако прочно завоевывает первые позиции в линейке локальных серверов. Причин в этом несколько, но главных три:
- Платформа портативна и доступна без установки на операционную систему;
- Open Server постоянно обновляется, и не «висит» по несколько лет без апгрейда, что говорит о постоянной работе автора над проектом;
- Платформа имеет пять языковых варианта (русский основной).
В сборке Open Server еще много приятных фишек, упрощающих работу разработчика. Радует простота установки, автономная подкачка недостающих программ, два сервиса HTTP (Apache и Nginx), несколько версий СУБД и PHP, наличие управляющей программы.
Оф.сайт: open-server.ru
Xampp
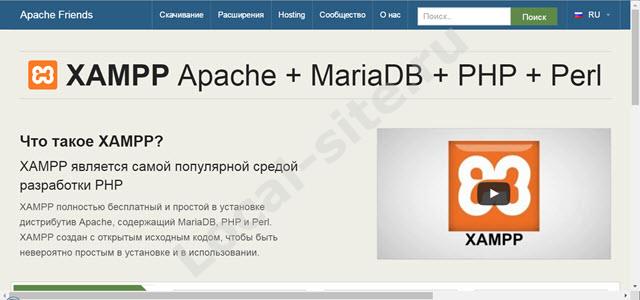
Данная сборка расшифровывается, как: любая ось+apache+mariabd+php+perl. Установка только стационарная.
Платформа Xampp лидирует в ранге аналогичных платформ, за рубежом. Платформа интересна, возможностью работы на разных операционных системах, об этом говорит первая буква акронима [X]. Это может быть Windows, Linux и OS X. Две буквы [p] в конце акронима, означают php и perl (доступные языки). Вместо MySQL стоит более мощная СУБД MariaDB.
Сообществу XAMPP более 10 лет, как следствие, много информации по использованию платформы. За XAMPP «ухаживают», постоянно обновляют, есть версия c PHP 7.0.4. даже появился русский вариант официального сайта.
Первоисточник: www.apachefriends.org/ru/index.html
Denver
Сборка WAMP (windows+apache+mysql+php). Установка только стационарная.
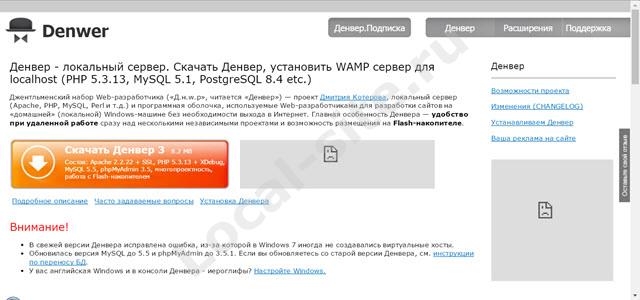
Самая легендарная и самая противоречивая платформа локального сервера. Denver, был хорош, когда был один на Российском рынке. Время течет, а Denver никак не хочет развиваться. Пожалуй, Денвер держит первенство в сети, по вопросам о решении проблем его установки и использованию, а еще больше о проблемах при переносе локальных сайтов с него на платные хостинги.
Оф. сайт: www.denwer.ru/
WampServer
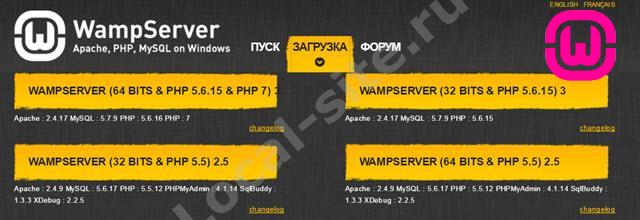
Оф. сайт: www.wampserver.com/ru/
Из названия платформы понимаем, что это классическая платформа WAMP: сборка последних версий Apache, MySQL и PHP под Windows. Формально по сборке похожа на Денвер, однако. Денвер и WampServer просто нельзя сравнивать, это два совершенно разных уровня программного продукта, а именно:
- WampServer ставим без танцев с бубнами в два приема (скачать/установить);
- Wamp Server элементарно управляется из трея Windows;
- Конфигурацию сервера можно через интерфейс, без редакции файла конфигурации;
- На правой кнопке мыши, есть смена версий компонентов платформы, управление параметрами конфигурации сервера, доступ к файлу ошибок, и т.д. и т.п.
USB Webserver
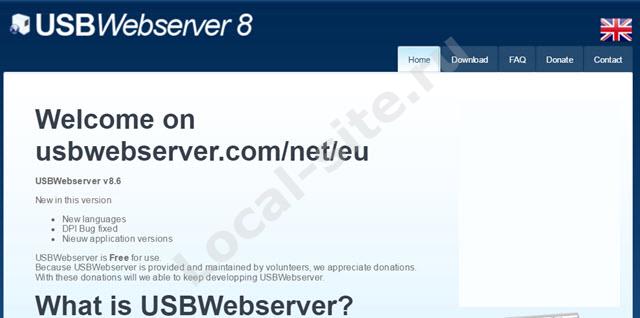
Оф.сайт: www.usbwebserver.net
Эта платформа не переведена на русский язык нет, зато есть возможность работать с переносного носителя. Сборка простая, без излишеств: Apache, MySQL, PHP, правда, с phpMyAdmin. Основное достоинство этого сервера, вы можете использовать его с переносного носителя (USB).
Winginx
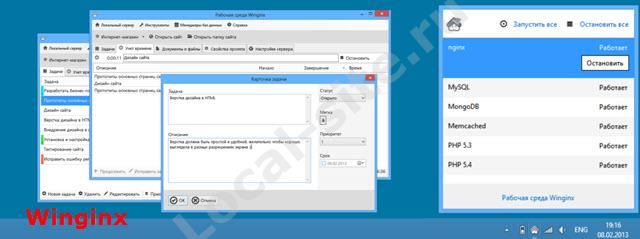
Оф. сайт: winginx.ru
Более интересная сборка: PHP 5, Node.js, MySQL, MongoDB, Redis, memcached, CMS, Фреймворки. Однако нет Apache, а отсюда специфичные модули для ЧПУ и замена файл htaccess, характерного для apache. Вся сборка сервера на веб-сервере Nginx под Windows. Дополнительное программное обеспечение загружаются из магазина Winginx, в том числе популярные CMS.
Vertrigo
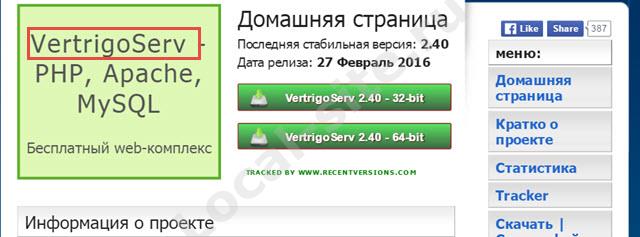
Оф. сайт: vertrigo.sourceforge.net
Достаточно профессиональный набор с простой установкой. Сборка достаточно объемная: сервер Apache, язык PHP, СУБД MySQL, правда с движком SQLite и утилитой для её управления, SQ Lite Manager. Не забыли авторы и про удобство PhpMyAdmin, всем известного администратора MySQL. Для ускорения работы впихнули, Zend Optimizer. На всякий случай напомню: Все собранно для работы на Windows.
Z-Wamp
zwamp.sourceforge.net
Z-WAMP представляет собой легкий пакет нулевой установки веб-сервер, который работает на Windows. Проект направлен на обеспечение последние производственные / стабильные версии Apache, MySQL, PHP, Adminer, MiniPerl, MongoDB, SQLite и альтернативной PHP Cache (APC) для повышения производительности сервера. Z-Wamp может работать с USB флешки.
UwAmp
www.uwamp.com/en
Free локальный сервер WAMP: Apache, MySQL, PHP, SQLite. С данной платформой можно работать на переносных носителях (USB флэшки). Стационарная установка не требуется, UwAmp доступна в виде ZIP архива. Распаковываете архив и запускаете сервер WAMP.
Bitnami WampStack
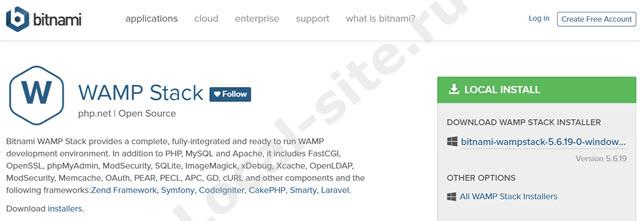
bitnami.com/stack/wamp
Платформа от облачного сервера. Название, Bitnami WAMP Stack. В сборку включены: Apache, PHP, MySQL, OpenSSL, FastCGI, phpMyAdmin, и еще 14 дополнительных программ и все под Windows.
AMPPS
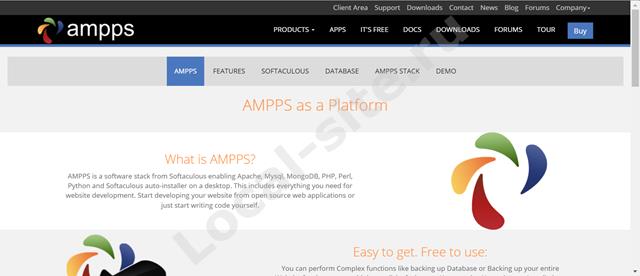
Еще одна платформа под любую операционную систему. Она прочно вошла в ТОП WAMP платформ для разработки. В сборку входят: Apache-MySQL-MongoDB-PHP-Perl- Python. AMPPS мощная платформа для создания сайтов, на готовых CMS входящих в библиотеку AMPPS. Полезна не только для сайтостроения, но как инструмент изучения CMS, форумов и других скриптов для создания веб-ресурсов.
AMPPS работает только с диска, недоступна с переносного носителя.
В сборку входят: веб-сервер Apache, базы данных MySQL и MongoDB, интерпретаторы PHP, Perl, Python. Для того чтобы приступить к созданию веб-сайтов, скачиваем и ставим AMPPS с Softaculous, автоматической установки. Через несколько минут, можно ставить и изучать или создавать локальный сайт на популярных платформах: Joomla, WordPress, Magento, Dolphin при помощи библиотеки Softaculous.
Работает в средах:
- Windows XP SP2, SP3, Vista, Windows 7,8,10 (Installer Package type: EXE);
- Linux: Centos, Red Hat, Ubuntu, Fedora, и др. (Installer Package type: RUN)
- MAC OC X (Installer Package type: DMG)
Официальный сайт: www.ampps.com
Выводы
Это все семь WAMP платформ этого обзора. Выводы по качеству делать еще рановато. в других статьях, будем разбираться с каждой платформой подробно.
©www.wordpress-abc.ru