If you are a VMware user and trying to switch to the Open-Source side of the Force by using VirtualBox, you may be stuck into difficulties if you try to import an existing VDI file into VirtualBox. So, here in this blog, I will be telling you how you can open VDI file in Virtualbox. Before moving to the solution directly you should first know about VDI file and Virtualbox. Let’s start.
What is Virtualbox?
VirtualBox is a well-built x86 and AMD64/Intel64 virtualization product which is widely used by enterprises. It is a greatly feature-rich, high-performance product for business customers. In addition, it is also the only professional solution that is freely available as Open Source Software.
What is a VDI file?
VirtualBox software creates Virtual Dik Image(.VDI) file and it stores all contents for a virtual disk. The core difference between VMware and VirtualBox is that VMware captures a whole virtual machine in an image. On the other hand, VirtualBox only supports images of a hard disk. So, in VirtualBox’s world, to first create a new virtual machine, before using an existing VirtualBox image.
Import a VDI in Virtualbox by just following the given below steps.
- First of all, copy your VDI file into VirtualBox’s virtual hard disks repository.
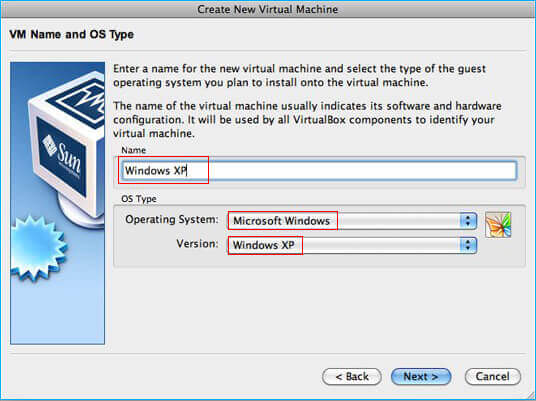
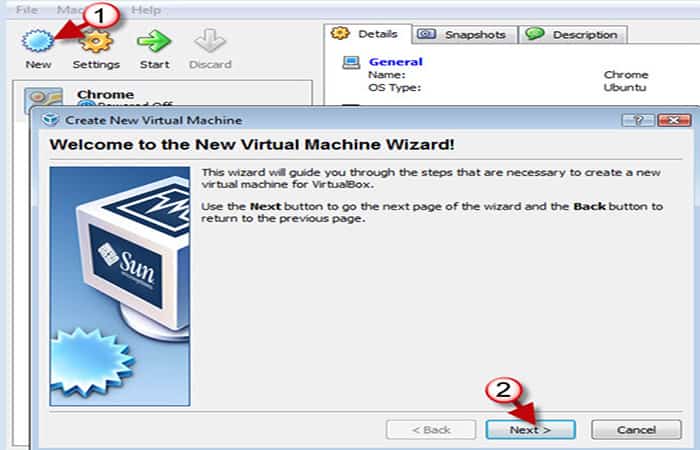
- After that, start VirtualBox and create a new virtual machine. Select the Operating System.
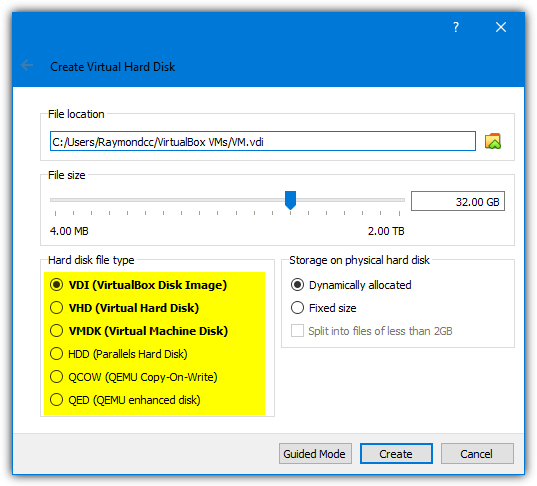
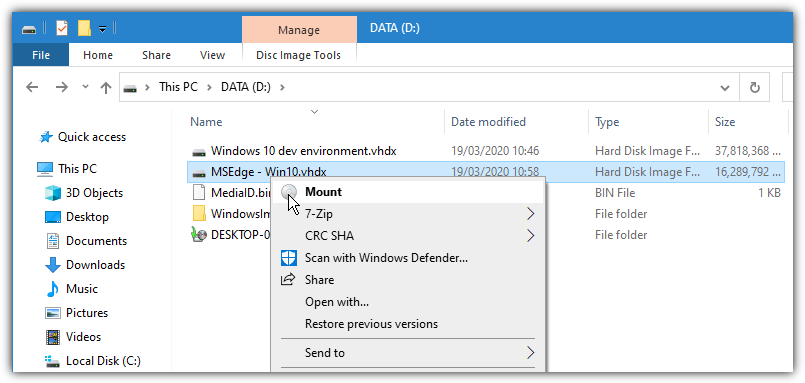
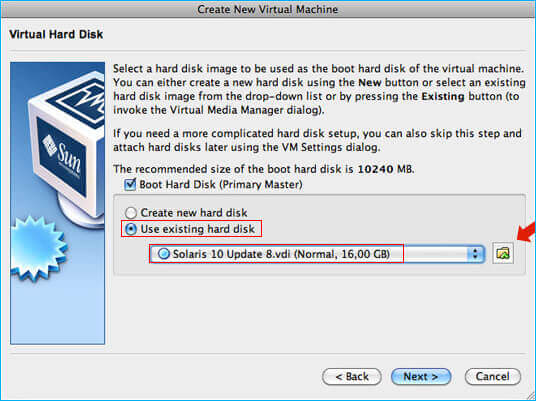
- Here, you will be asked for a hard disk image, select Use existing hard disk and click on the small icon on the right.
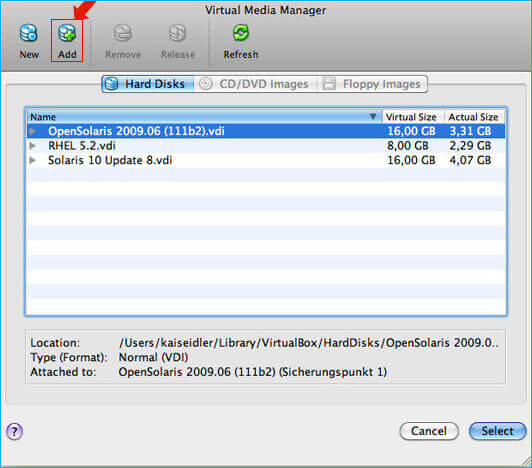
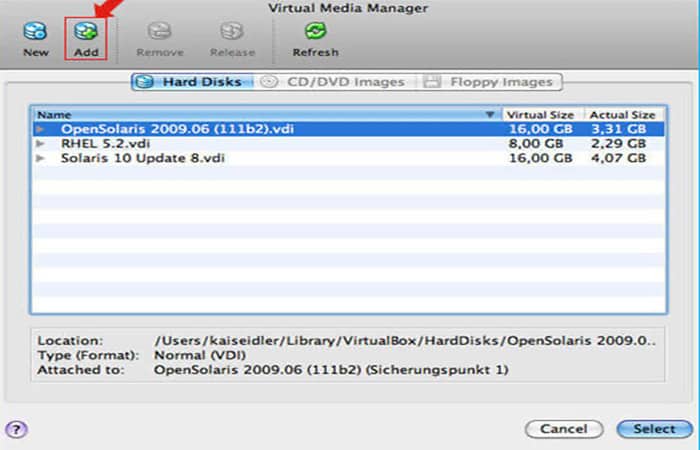
- This will bring you to the Virtual Media Manager. Click on the Add button and select the VDI file from step 1.
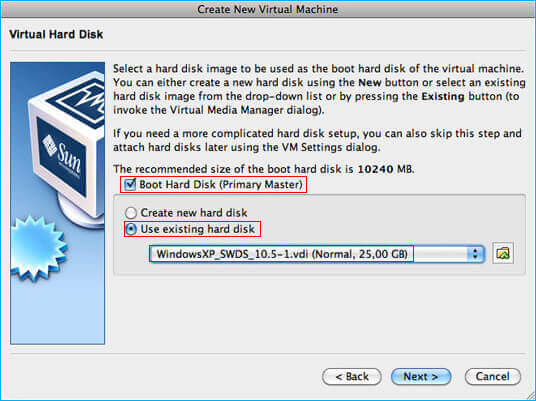
- Once you leave the Virtual Media Manager, you’ll be back in your virtual machine wizard. Next, you can select your new VDI as an existing hard disk and finalize the creation process.
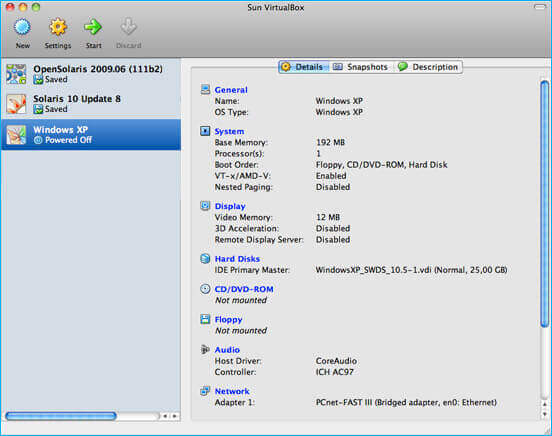
- Then, back in the main window, you will now be able to start your new virtual machine.
What if your virtual disk image(VDI) gets corrupted while importing?
Well, do not worry at all as I’ve got the solution to this situation as well. In such a case, the only option left is to try the professional tool. One such tool is VDI Recovery Software. This is one of the best tools available which provides an effective solution for Virtual disk image recovery. This software can swiftly recover the maximum possible data and it also helps in restoring the files in their original forms. The tool has multiple features that perform the hassle-free recovery. Thus, I would recommend you to try the demo version of this tool which is absolutely free of cost.
Download Now
Bottom Lines
The blog is describing the best possible solutions to open VDI File in Virtualbox. The method includes the manual approach as well as the automated tool. Now, it’s up to you to make your decision. I hope it helps to resolve your query.
You can also read: How to convert VDI to VMDK VMware
Просмотров 14,318
Виртуальные операционные системы и виртуальные жесткие диски зависят друг от друга, чтобы создать виртуальный мир, в котором вы можете управлять системой на сервере, очень похоже на то, что вы делаете на своем собственном ПК. Компании-разработчики программного обеспечения имеют собственные реализации на жестких дисках. Например, Oracle VirtualBox использует образ виртуального диска (VDI), VMWare использует диск виртуальной машины (VMDK), а продукты Microsoft, такие как Virtual PC или Hyper-V, используют виртуальные жесткие диски (VHD или VHDX). Честно говоря, некоторые люди могут не знать много об этих форматах виртуальных дисков. Вот почему мы получаем так много запросов о том, как открыть файлы .vdi или как транслировать файлы .vdi на рабочий стол. В этой статье мы ответим на этот запрос с подробностями. Запрыгивайте в поезд к файлу VDI!
Существует так много информации, которую нужно раскрыть для формата .vdi. Файлы с расширением .vdi чаще всего используются для приложения виртуализации рабочего стола Oracle VM VirtualBox.. Важно отметить, что файлы VDI, используемые этим программным обеспечением, являются файлами виртуальных дисков, которые можно монтировать как отдельный жесткий диск на операционных платформах Windows, Mac и Unix. Другими словами, файл VDI известен как инфраструктура виртуальных рабочих столов, которая предназначена для размещения окружения рабочего стола на сервере. По сути, это когда образы рабочего стола запускаются на виртуальной машине, а затем предоставляются клиентам по сети.
Файлы VDI редко встречаются в общих сценариях, тогда как они обычно используются теми, кто часто запускает Virtualbox. Кроме того, файлы образов дисков VDI становятся все более популярными из-за ряда преимуществ, одним из которых является экономия места на локальном диске.
Часть 2: Как открыть файл VDI с помощью Virtualbox
Многие люди знают, что Virtualbox это приложение, которое используется для виртуализации. Oracle теперь владеет этим продуктом, а VirtualBox — это мощный продукт виртуализации x86 и AMD64/Intel64 для корпоративного и домашнего использования. В целом, VirtualBox — это не только чрезвычайно многофункциональный, высокопроизводительный продукт для корпоративных клиентов, но и единственное профессиональное решение, которое свободно доступно как программное обеспечение с открытым исходным кодом в соответствии с условиями GNU General Public License (GPL) версии 2. Если это слишком техническое для вас (или вы не очень разбираетесь в технических вопросах), вы можете пропустить это и сразу вернуться к нашей теме о том, как открыть файлы .vdi.
Один из самых простых методов — открыть файлы .vdi с помощью Virtualbox, поскольку образ файла VDI совместим с VirtualBox. Чтобы это заработало, вы можете выполнить следующие шаги. Прежде чем продолжить, убедитесь, что вы правильно установили Virtualbox.
Шаг 1: Скопируйте файл VDI в репозиторий виртуального жесткого диска VirtualBox.

Шаг 2: Запустите VirtualBox и создайте новую виртуальную машину.
Выберите операционную систему из предложенных вариантов и нажмите кнопку «Далее», чтобы продолжить.

Шаг 3: В разделе «Виртуальный жесткий диск» выберите «Использовать существующий жесткий диск», а затем щелкните значок папки справа.
Теперь откроется окно Virtual Media Manager. В нем нажмите кнопку Add и выберите файл VDI, который вы хотите открыть.

Снова откроется окно виртуального жесткого диска, в котором будет показан ваш новый VDI. Затем нажмите кнопку «Далее».
Теперь ваша новая виртуальная машина запущена. В некоторых особых случаях, когда ваши файлы VDI повреждены, невозможно напрямую смонтировать файлы .vdi на виртуальную машину, но вам нужно восстановить поврежденные файлы .vdi, прежде чем вы сможете продолжить. Скорее всего, вам понадобится профессиональный инструмент для восстановления. Мы не будем углубляться в эту тему, но если вам это нужно, вы можете использовать программное обеспечение для восстановления VDI для получения помощи.
Часть 3: Как открыть файл VDI с помощью PowerISO
В дополнение к Virtualbox, у вас будет еще одно отличное решение для открытия файлов .vdi, а именно использование PowerISO. Некоторые из вас могут иметь представление об этой программе, но некоторые нет. В общем, PowerISO — это программное обеспечение для персонального компьютера, используемое для создания, открытия, монтирования и эмуляции, сжатия, шифрования и других манипуляций с файлами образов CD и DVD. Он поддерживает другие форматы, включая ISO, BIN, NRG и CDI. Давайте теперь откроем файлы .vdi в этой программе.
Шаг 1: Нажмите кнопку «Открыть» на панели инструментов или выберите меню «Файл > Открыть», чтобы открыть файлы .vdi.
Все ваши разделы будут немедленно показаны.

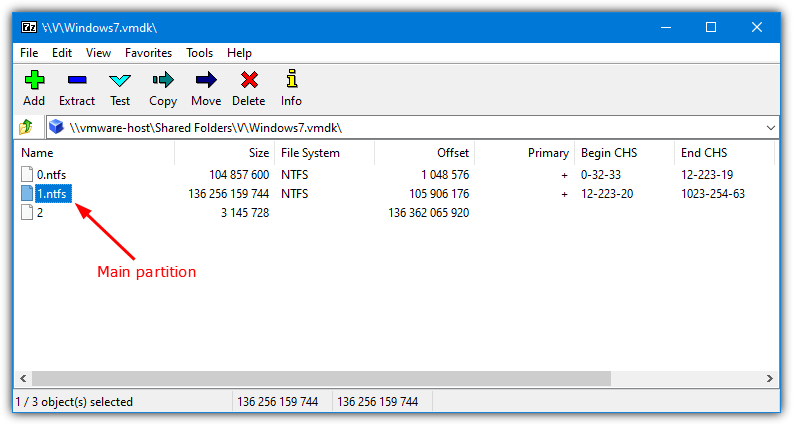
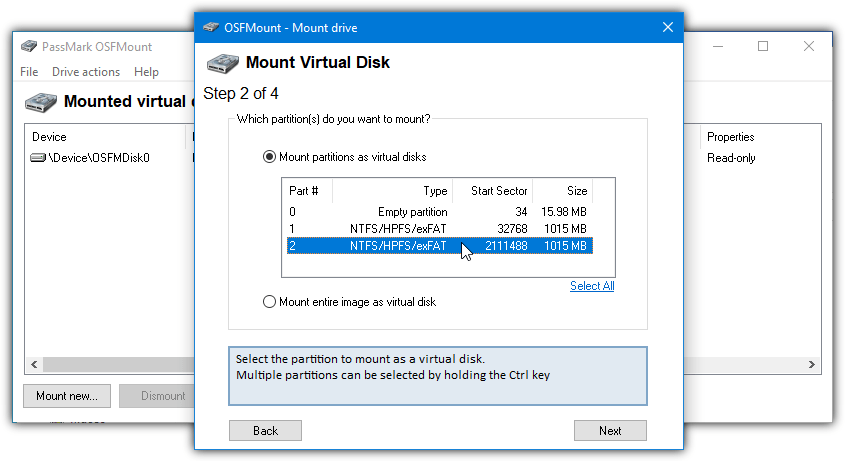
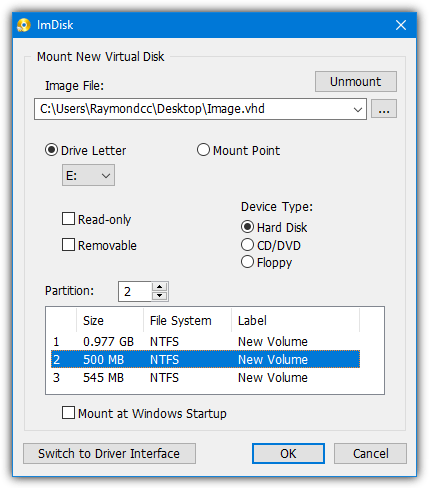
Шаг 2: Показать и выбрать раздел
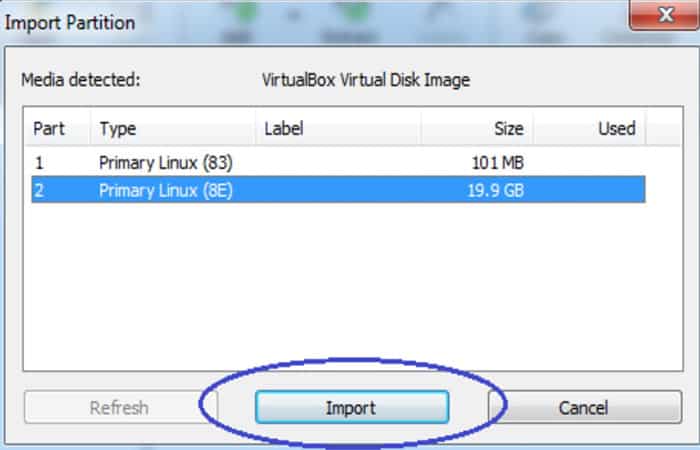
Если разделов больше одного, вам нужно будет выбирать по одному. Затем нажмите кнопку Импорт, чтобы продолжить.

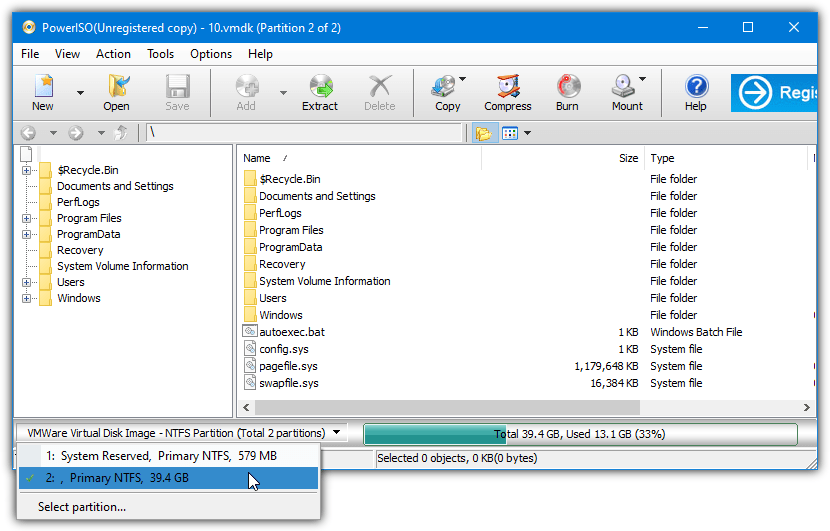
Шаг 3: Показать файлы .vdi в выбранном разделе
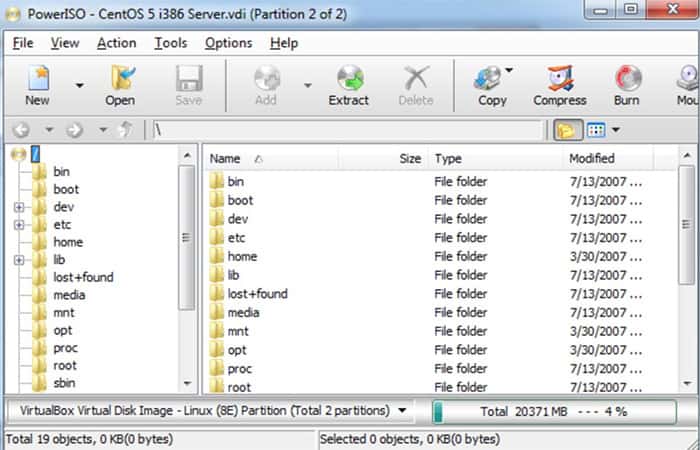
Все файлы будут отображены в разделе, и вы сможете просматривать их содержимое в файле .vdi.

Шаг 4: Извлечение выбранных файлов
Выберите нужные файлы в файле .vdi для извлечения и нажмите Извлечь для продолжения. Если файлы не выбраны, все перечисленные файлы будут извлечены по умолчанию.

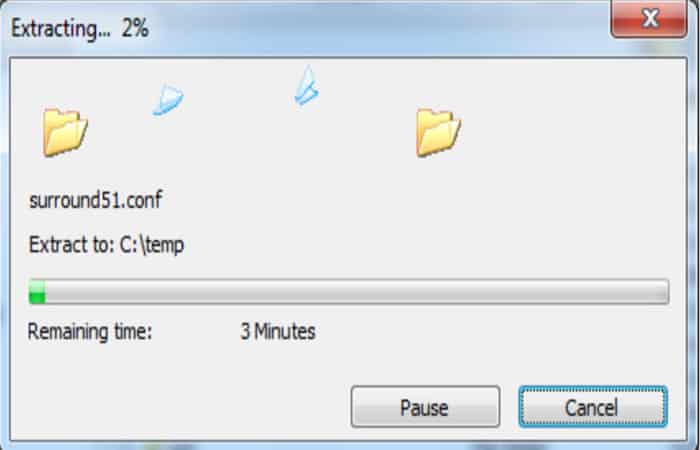
Шаг 5: Просмотр хода извлечения
Нажмите кнопку «ОК», чтобы начать извлечение. PowerISO покажет информацию о ходе извлечения. Если вы хотите извлечь другой раздел в файле vdi, вам нужно снова открыть файл vdi и выбрать нужный раздел. Это все, что нужно для открытия файлов .vdi в PowerISO. Будьте осторожны, если вам нужны полные функции для доступа, вам нужно получить платную версию PowerISO.

Заключение
Выше объясняется все, что вам нужно знать о формате .vdi и как открыть файлы .vdi с помощью Virtualbox или PowerISO. Это правда, что формат .vdi не так часто встречается в общих сценариях по сравнению с другими распространенными форматами носителей, такими как .wpl, .mp4, .avi, .mov, .iso и т. д.
Существуют полнофункциональные мультимедийные проигрыватели, позволяющие с легкостью открывать и воспроизводить распространенные медиафайлы. Leawo Бесплатный Blu-ray-плеер один из мощных медиаплееров. Он предлагает плеер на базе Windows, а также плеер на базе Mac, оба из которых полностью бесплатны.
-

-
Leawo Blu-ray Player
Программное обеспечение Blu-ray-плеера, не привязанное к региону, для бесплатного воспроизведения дисков Blu-ray и DVD, независимо от защиты диска и региональных ограничений.
Играть 4K FLV-видео, 4K MKV-видео, 4K Видео MP4 и т.п. без потери качества.
Поддержать конвертация с дисков Blu-ray/DVD в MKV в премиум-версии.

Любые названия продуктов третьих лиц, товарные знаки, логотипы и изображения, иногда упоминаемые на этом сайте, принадлежат их владельцам. Они могут включать, но не ограничиваться YouTube, Apple, Amazon, Adobe, Netflix и т. д. Leawo Программное обеспечение не зависит от всех этих владельцев собственности.
-
Written By
-
Updated on
September 18th, 2024
Are you searching for reliable ways to open VDI file in VirtualBox? Then you are landed at the right post. In this technical guide, you will be learning the best ways to open a VDI file in a VirtualBox. So keep reading this post, to know the entire process in detail using the manual and the professional approach.
VirtualBox is a free, open-source program that you can use to run another operating system (OS) inside your current operating system (OS). The best part of VirtualBox is that you can use it to run more than one operating system at a time. This is great if you need to do work on multiple desktop environments or different operating systems altogether.
Virtualization is the need of this modern time. The technology is designed to bring flexibility and reliability to all aspects of the IT industry. It is not just for personal use but for businesses, as well. The technology can be used in a number of ways that include data, servers, applications, and desktops or even servers.
Also Read: Open VHD in Virtualbox
What are the Different Formats for Virtual Disk Space?
Several different types of files create a clone of a physical hard disk for virtual machines. Also, these files have their own features. So let’s explore all of them.
Virtual Disk Image (VDI) – VDI file is the disk space file that is compatible with Oracle VirtualBox. These files are copies of the hard disk having the same disk partition as the physical drive. So, if you have a VDI file, you can add and open it in the virtual box.
Virtual Hard Drive (VHD) – This is kind of the default file type for Microsoft’s virtualization products. Thus, when using a virtual machine through Microsoft, you need to have a VHD file for creating the required disk space. Also, these files contain more storage space as compared to the VDI files.
Virtual Machine Disk (VMDK) – This is the virtual disk space file for VMware Virtual appliances. Also, it has a storage space from 2 TB to 62 TB. Also, these files are dynamic, which means that you can increase the storage space further.
In this section, we have listed all the prominent file types for the Virtual Machine Storage space. Now, in the upcoming section, we are going to open VDI in Oracle VirtualBox.
Way to Open VDI File using Oracle VirtualBox
Here firstly, you have to download the Virtual Disk Image file from the official website of the VirtualBox or some other source. After that, you can learn the detailed process to open VDI files in VirtualBox.
Step by Step Process to Open a VDI File
- Navigate to the downloaded VDI file and copy it to the root file location of the VirtualBox.
- Launch the VirtualBox and create the new virtual machine.
- Now, give the required name and fill in the desired Operating system details. Click Next.
- Here you can opt for the Use existing hard disk space and click on the folder icon to search the file explorer.
- Then, choose the copied VDI file and click on the Select button to assign the virtual disk space for the virtual machine.
- Further, after choosing the VDI file, you have to go back to the Virtual Machine Wizard and click on the Next button. Click the Finish button to end the process.
- After that, you will get back to the VirtualBox homepage. Here you can run the newly created Virtual Machine.
Using the above method, you can easily open the VirtualBox file to create the virtual desktop environment on your system. Also, while adding the VDI file to the VirtualBox, there are high chances that the VDI file may get corrupted. In this case, you cannot open the VDI file and add virtual hard disk space. Thus, in the next section, we are going to introduce the automated approach for the same.
Instant Solution to Open VDI File in Windows
To repair corrupt or damaged VDI files, you can opt for the Cigati VDI Recovery Software. The software is capable of supporting all the file systems of the VDI files, such as FAT, FAT16, FAT32, FAT64, NTFS, HFS+, EXTX, etc. Moreover, it also recovers and restores the deleted VDI files from the Virtual Machine using the software. Furthermore, its graphical user interface is very smooth and guides users through the recovery process.
Conclusion
In the above article, we have discussed the best two approaches to open VDI file in VirtualBox. To open their VDI files, users can opt for the best approach as per their requirements. Sometimes, the VDI files may get corrupted, due to which users have to opt for the professional approach only because the manual process does not remove the virus. Thank you for reading this post!
You May Also Read: VHDX Corrupted or Unreadable
Related Post
Do you want to know how to open the VDI file in Virtualbox? If you want to learn, here in this tutorial we will show you What is VDI file? The instant solutions, manual ways to open VDI files in VirtualBox, automatic way to open VDI file in Virtualbox, steps to open VHD files effortlessly, benefits of automated methods and more. We invite you to stay with us.
VirtualBox is an open source application used in virtualization. It is created by Innotek GmbH. It was then acquired by Sun Microsystems in 2008 and then by Oracle in 2010. Today it is called Oracle VM VirtualBox. VirtualBox can be installed on Windows, Linus, MacOS, Solaris, OpenSolaris, etc.
VDI or Virtual Drive format is used to save virtual drive image (vdi) file. It is one of the few disk image files supported by Oracle VM VirtualBox. VDI are virtual drive files which are used to mount as a standalone hard disk on Linux, Windows and others OS.
These files may allow the user to run programs written for different operating systems on a single hard drive. To open the VDI file, you need to follow the steps below given in the subtopic.
instant fix
Try the software Aryson VDI recovery and repairs and opens corrupted Virtual Disk Image (VDI) file and recovers data as a new VDI file. Recovers data from lost, deleted or missing partitions of VDI files.
Here you can learn about: How to Manage Files with Powershell
Manual way to open VDI files in VirtualBox
- Step 1:: Copy the VDI file to the VirtualBox virtual hard disk repository
- Step 2:: Start VirtualBoxand create a new virtual machine. Choose an operating system from the given options and click the button Next
- Step 3: En virtual hard drive, Select Use existing hard drive and then click on the folder icon on the right
- Step 4: Now, a window opens Virtual Media Manager. In that, click on the button Add and then select the VDI file you want to open
- Step 5: Again, the window opens virtual hard drive which displays your new VDI and then click Next
- Step 6: Now, your new virtual machine starts.
In this way, you can open the VDI file in VirtualBox very easily
Automatic way to open vdi file in Virtualbox
What if your VDI file gets corrupted? What will you do then? At such times, you need to repair your file, but that is not possible without professional help. A very simple approach to repair such files yourself is by using third-party software such as Aryson VDI Recovery. This software will repair any type of failure to open VDI file. It recovers and restores maximum content of VDI file.
Follow the steps to open VHD files effortlessly
- Step 1:: Install theVDI recovery software and run it.
- Step 2:: Select » dynamic disk»Or» Fixed disk » and click on the button Browse.
- Step 3:: Now, select the vdi fileand click on the button Open .
- Step 4:: Select recovery mode options » Standard»Or» Advanced «.
- Step 5:: Now click on the button » Next» and then the scanning process will begin.
- Step 6:: After scan,open the VDI file.
- Step 7:: Choose a location path to save the VDI file recovered.
- Step 8:: Click the » button Accept» to successfully save the VDI file.
- Step 9:: Now, import the VDI file to VirtualBox.
Benefits of automated methods
- Repairs corrupted VDI virtual disk image files also known as virtual disk image files and recovers data from them
- You don’t have to panic about deleted files either; Aryson VDI repair tool quickly recovers deleted files from deleted folders. Virtual machines to their original forms
- Supports recovery from both types of disk i.e. fixed and dynamic disks
- It has two scanning modes for different levels of corruption i.e. Standard and Advanced modes
- Supports both MBR (old) and GPT (new) partition tables
- Supports all file formats for various major operating systems i.e. FAT, FAT16, FAT32, FAT64, NTFS, HFS+ and EXTX
- Allows users to add a new custom volume and customize the settings.
- It has RAW recovery mode and also provides an option to add new file signatures
- It has three recovery modes to recover the maximum possible data: Standard, Advanced and Deep
- Preview smart tree structure for recovered files and folders before saving them
- Auto-search feature to search for specific file names in the tree structure
- Free online VDI recovery tool available to preview the repaired VDI files
VDI file in VirtualBox: what is it and how to open it? Other methods
Virtual operating systems and virtual hard drives depend on each other to fulfill a virtual world, where you can operate the system on the server, much like you do on your own PC.
Software companies have their own implementations on hard drives.
- E.g., Oracle VirtualBox uses Virtual Disk Image (VDI), VMWare uses Virtual Machine Disk (VMDK) and Microsoft products such as Virtual PC or Hyper-V use Virtual Hard Disks (VHD or VHDX).
To be honest, some people may not know much about these virtual disk formats. That is why we receive so many requests asking us how to open vdi files or how to stream vdi files on desktop. In this part of the article, we will answer the request with details.
Part 1: What is VDI file?
There is so much information to reveal for the vdi format. Files containing the vdi file extension are most often used for the Oracle VM VirtualBox desktop virtualization application.
It is important to note that the VDI files used by this software are virtual drive files that can be mounted as a separate hard drive on Windows operating platforms, Mac y Unix.
In other words, VDI file is known as virtual desktop infrastructure which is meant to host the desktop environment on a server. It is basically when the desktop images are run on the virtual machine and then delivered to the clients over the network.
VDI files are rarely used in general scenarios, while those who run Virtualbox frequently use them commonly. Moreover, VDI disk image files are gaining popularity due to a number of advantages, one of which is saving local disk space.
Part 2: How to open a file VDI in Virtualbox
Many people know that Virtualbox is the application used for virtualization. Oracle now owns this product and VirtualBox is a powerful x86 and AMD64/Intel64 virtualization product for business and home use.
Overall, VirtualBox is not only an extremely feature-rich and high-performance product for enterprise customers, but it is also the only professional solution that is freely available as open source software under the terms of the GNU General Public License (GPL) version 2.
If this is too technical for you (or you’re not really into technical stuff), you can skip this and go straight back to our topic on how to open vdi files.
One of the simplest methods is to open VDI files in Virtualbox because the VDI file image is supported by VirtualBox. To make it work, you can follow the steps here. Before proceeding, make sure you have installed Virtualbox properly.
- Step 1:: Copy the VDI file to the VirtualBox virtual hard disk repository

- Step 2:: Launch VirtualBox and create a new virtual machine. Choose an operating system from the given options and click the Next button to proceed.
- Step 3:: In Virtual Hard Disk, select Use existing hard drive and then click on the folder icon on the right. Now, a Virtual Media Manager window opens. In that, click on the button Add and then select the VDI file you want to open.
Again, the Virtual Hard Disk window opens showing your new VDI and then click Next.
Now, your new virtual machine is started. In some particular scenarios where your VDI files get corrupted, it is not feasible to directly mount the vdi files on the virtual machine, but you need to repair the corrupted vdi files before you can proceed.
Most likely, you will need a professional repair tool. We would not go into this topic in depth, but if you need to, you can use VDI recovery software for help.
Part 3: How to open a VDI file in Virtualbox with PowerISO
Apart from Virtualbox, you will have another great solution to open vdi files, which is to use PowerISO. Some may have an idea about this program, but some may not.
Generally speaking, PowerISO is a personal computer software application used to create, open, mount and emulate, compress, encrypt and manipulate CD and DVD image files. It supports other formats including ISO, BIN, NRG and CDI. Now let’s open vdi files in this program.
- Step 1:: Click on the button «Open» on the toolbar or select the « menuFile> Open» to open vdi files
All your partitions will be displayed immediately.

- Step 2:: Display and select the partition. If there is more than one partition, you will need to select one at a time. Then press the button Import to continue.
- Step 3:: Displays the vdi files in the selected partition. All files will be displayed in the partition and you can browse and view the vdi file contents.
- Step 4:: Extract the selected files. Select the files you want in the vdi file to extract and click Extract to continue. If no files are selected, all listed files will be extracted by default.

- Step 5:: View the extraction progress. Click the “Accept» to start extracting. PowerISO will display the progress information during the extraction. If you want to extract another partition in the vdi file, you need to open the vdi file again and select the partition you want. That’s all for opening vdi files in PowerISO.
NOTE: : Please note that if you need all the features to access, you must get a paid version of PowerISO.
You may also be interested in reading about: What is VirtualBox? Features and Functions
Conclusion
Above is explained everything you need to know about vdi format and how to open vdi files in Virtualbox or PowerISO. It is true that vdi format is not so often found in general scenarios as compared to other common media formats like .wpl , .mp4, .avi, .mov, .iso, etc.
There are full-featured media players to open and play common media files with ease. Leawo Free Blu-ray Player is one of the powerful media players. It offers a Windows player and a Mac player, both of which are completely free. We hope this information has helped you.
My name is Javier Chirinos and I am passionate about technology. Ever since I can remember, I have been interested in computers and video games, and that passion has turned into a job.
I have been publishing about technology and gadgets on the Internet for over 15 years, especially in mundobytes.com
I am also an expert in online marketing and communication and have knowledge in WordPress development.