
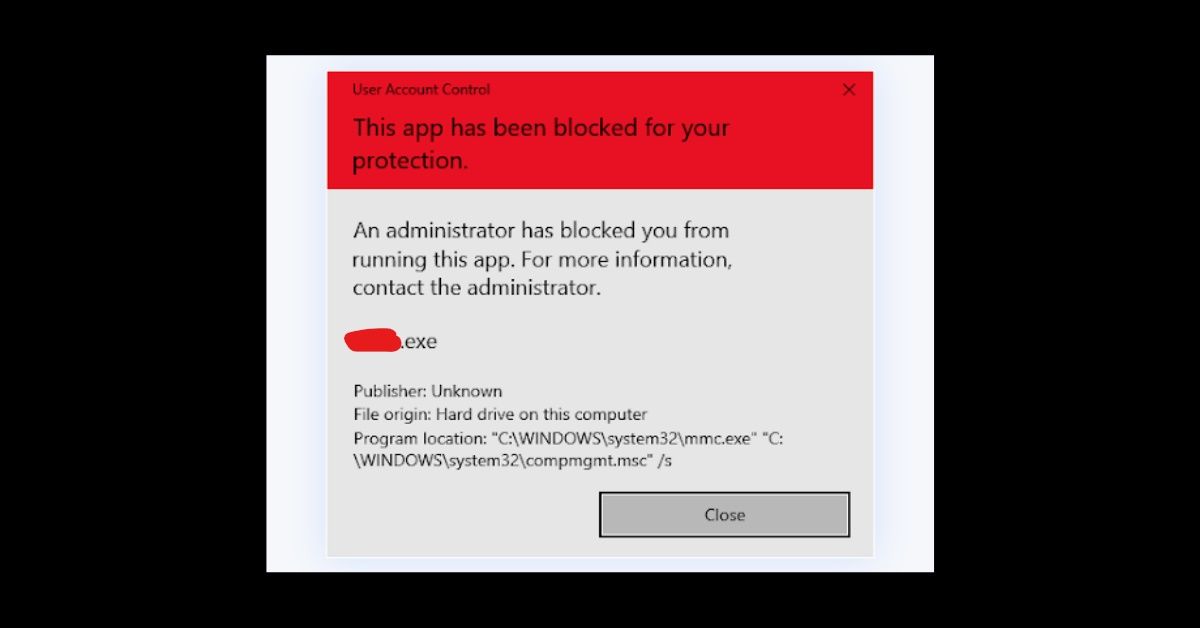
I have received several emails and comments from readers regarding this problem. This problem occurs in Windows 10 operating system. When a user tries to launch any program or app, the program doesn’t start and Windows shows following error message:
Your organization used Windows Defender Application Control to block this app
Contact your support person for more info.
Two buttons are given in the error message window: Copy to clipboard and Close button.

This error message not only appears for 3rd party installed software programs such as Google Chrome, Firefox, Microsoft Office but also appears for built-in default programs and tools such as Command Prompt, Registry Editor, etc. Even if the user tries to launch Windows Store or other UWP (modern/metro) apps, Windows shows similar error message such as “Something bad happened. Unknown layout specified in manifest“.
I did a lot of research on my various Windows 10 machines and finally I was able to reproduce this issue. There might be different reasons behind this problem like incorrect Windows 10 edition installed by mistake, a bug present in Windows 10 which appears on selected machines in selected conditions, etc.
In this article, I’ll try to cover all possible reasons and solutions to help you in fixing this annoying issue.
If you are also facing this irritating issue in Windows 10 computer, try following solutions to get rid of this error message:
Table of Contents
- SOLUTION 1: Disable Secure Boot Option in BIOS Settings
- SOLUTION 2: Disable Secure Boot Using Advanced Boot Options Screen
- SOLUTION 3: Disable Windows Defender App and Browser Control Feature
- SOLUTION 4: Disable Windows Defender Program
- SOLUTION 5: Disable Windows Defender Security Center App
- SOLUTION 6: Change Windows 10 Edition Installed in Your Computer
- SOLUTION 7: Reinstall Correct Edition of Windows 10
SOLUTION 1: Disable Secure Boot Option in BIOS Settings
Sometimes this issue might occur due to “Secure Boot” option enabled in your computer’s BIOS settings. Many readers have reported that disabling the secure boot option helped them in fixing this issue.
So first of all you should try to turn off secure boot option using following steps:
1. You’ll need to enter BIOS setup. Following tutorial will help you in entering BIOS setup screen in your computer system:
How to Enter BIOS Settings on Your Windows PC?
2. Once you enter into BIOS settings page, look for Secure Boot option. The option location will be different in different brand machines. The most common location of this option is “Security” menu. If you don’t see “Security” menu in your BIOS settings or if the Secure Boot option is not available on Security page, look into other sections like “Authentication“, “Boot“, etc.
In some new machines, you might get the secure boot option directly available on settings page.

3. Once you find “Secure Boot” option, set it to Disabled. You may need to use Enter or arrow keys to change its value.
PS: If you also see an option to clear existing or previous secure boot settings, use that option to reset the settings. Also if you see an option to enable/disable Trusted Platform Module (TPM) feature, disable that as well.
4. After making changes, you’ll need to save BIOS settings. Again a key press will be required to save BIOS settings which is generally mentioned at the bottom or in right-side pane. The most common key to save BIOS settings is F10. In newer machines, a new GUI is shown for BIOS settings which contains Apply button to save changes.
Once you make changes and save BIOS settings, your computer will restart and if everything goes right, your Windows will boot properly and now you should be able to launch all programs in Windows 10 without receiving any error message.
PS: If disabling secure boot option causes any problem to you, you can re-enable the option using the same steps in BIOS settings. Just set the secure boot option to Enabled again and save settings.
SOLUTION 2: Disable Secure Boot Using Advanced Boot Options Screen
If you can’t enter into BIOS settings, there is another way to disable Secure Boot option in your computer to fix this issue.
Windows 10 allows users to access an advanced boot options screen also known as recovery options screen which can be used to change UEFI/BIOS firmware settings to enable/disable secure boot option.
1. While your computer is running Windows 10, click on Start button and then click on Power button present at the bottom-left corner of Start Menu.
2. Press and hold SHIFT key while clicking on Restart option. It’ll launch Windows 10 boot options screen.
3. Now click on Troubleshoot option present on the screen. It’ll launch Advanced options screen.

4. Now you’ll see UEFI Firmware Settings option on the screen.

Click on the option and your computer will restart into UEFI firmware settings.
PS: You can also use shutdown /r /fw command in RUN dialog box to direct restart your computer into UEFI firmware settings screen.
5. Now you’ll get options to disable Secure Boot Control and Trusted Platform Module (TPM). Disable both these options and also select option to “Delete all secure boot keys“.
That’s it. Once you disable Secure Boot feature in Windows 10, it should solve your problem.
NOTE: If disabling secure boot option doesn’t work for you. You can try following other methods to troubleshoot the issue:
SOLUTION 3: Disable Windows Defender App and Browser Control Feature
Sometimes Windows Defender SmartScreen feature might also cause this issue. You can turn off this feature to fix the issue.
Following tutorial provides the required steps to disable SmartScreen feature in Windows 10:
[Tip] How to Disable Windows Defender SmartScreen Filter in Windows 10
SOLUTION 4: Disable Windows Defender Program
You may also try to permanently disable Windows Defender program which may also solve the issue.
To disable Windows Defender in Windows 10, you’ll need to follow a few steps given in following tutorial:
[Windows Tip] How to Disable Windows Defender Permanently
SOLUTION 5: Disable Windows Defender Security Center App
If you still receive the error message, you may also try to completely disable the new Windows Defender Security Center app.
Following tutorial will help you in disabling Windows Defender Security Center app in Windows 10:
[Tip] Disable or Remove “Windows Defender Security Center” App in Windows 10
SOLUTION 6: Change Windows 10 Edition Installed in Your Computer
It might also be possible that somehow the installed edition of Windows 10 in your computer got changed into Windows 10 S edition which comes with this limitation by default. Or may be you or someone else installed Windows 10 S edition by mistake in your computer.
If that’s the case, you’ll need to change the Windows 10 S edition installed in your computer to Windows 10 Home (also known as Core) or Windows 10 Pro to fix this problem.
If you got any recovery disc with your computer, you can use the disc to restore your computer to factory settings which will restore the installed Windows edition. Remember it’ll erase all custom installed software, personal data, etc from your computer. So take a backup of important data first before using recovery disc.
If you didn’t get any recovery disc, your computer might contain a recovery partition containing all required files to restore your computer to factory settings. Power on your computer and you should get an option or key mentioned on BIOS splash screen to restore your computer to factory settings.
If you can’t restore your computer to factory settings, you’ll need to manually change Windows 10 edition in your computer. First of all you’ll need to retrieve the original product key/license key of the genuine Windows 10 edition which came preinstalled in your PC. If you don’t know your machine product key, you can take help of various 3rd party software such as ProduKey to retrieve the product key from your computer.
Freeware to Recover Windows and Microsoft Office Product Keys
Once you get and note down the original product key, change the current product key in your Windows 10 machine to the retrieved product key using following steps:
1. Open Start Menu and click on Settings option. It’ll open Settings app. Alternatively, you can direct open Settings app using WIN+I hotkey.
2. Now click on “Update & Security” icon and in left-side pane, click on “Activation” section.
PS: Alternatively, You can directly launch the “Activation” page using “ms-settings:activation” command in RUN dialog box as mentioned here.
3. Now click on “Change product key” link, paste the original product key and follow the instructions.
It’ll take some minutes and should restore the default Windows 10 edition in your computer which should fix the problem.
PS: If you can’t access Settings app, you can use slmgr.vbs /ipk original_product_key command in RUN dialog box to change product key in your computer.
SOLUTION 7: Reinstall Correct Edition of Windows 10
If nothing works, then reinstalling the correct Windows 10 edition is the best solution for you. Write down the original product key which you retrieved in previous solution and download Windows 10 setup ISO file officially from Microsoft website.
Following articles will help you in downloading Windows 10 ISO files from Microsoft website:
[Tip] Get Direct Download Links of Windows 10 Offline ISO Files from Microsoft
Download Latest Windows 10 Setup ISO for Clean Install or Upgrade
After downloading the ISO file, create a bootable USB device to install Windows 10 in your computer.
How to Create Bootable USB Drive of Windows Setup without Using Any Software?
Boot using USB drive and install Windows 10 in your computer. When asked, enter the original product key and the setup will install a fresh copy of Windows 10 in your computer.
That’s all. Above mentioned methods should help you in fixing this irritating issue in Windows 10. If you know about any other method which helped you in fixing this issue, feel free to share it in your comment.
Also Check:
[Fix] Some Settings are Managed by Your Organization in Windows 10
[Fix] Your Browser is Managed by Your Organization in Google Chrome
[Fix] Your Organization has Disabled the Ability to Change Some Options in Mozilla Firefox
You are here: Home » Troubleshooting Guides » [Windows 10 Fix] “Your Organization Used Windows Defender Application Control to Block This App” Error Message
Quick Fixes
- Right-click the app/file and select Properties. Enable the Unblock checkmark under the General tab, and click OK.
- Disable Windows Defender SmartScreen on Windows 11 from Windows Security > App & browser control > Reputation-based protection settings.
Basic Fixes
- Run the app as an administrator: Right-click the app and select ‘Run as administrator’ from the context menu to launch the app with administrative permissions.
- Temporarily disable Windows Security: Press the Windows key, search Windows Security, and click to open it. Select ‘Virus & threat protection’ from the left sidebar, click Manage settings under ‘Virus & threat protection settings’, and toggle off Real-time protection.
- Update or reinstall the app: Update the app from the Microsoft Store or its installer file. Alternatively, uninstall the app from Windows Settings > Apps > Installed apps, and install it afresh.
- Perform a clean boot: Clean boot your Windows 11 system and retry opening the app.
Fix 1: Unblock the App Manually
Did you move files from another computer or external storage? Windows may block opening such files to protect your computer showing the ‘This app has been blocked for your protection ‘ message. Unblock it manually from the app/file properties to access it.
Step 1: Right-click your desired file/app and select Properties from its context menu.

Step 2: Enable the Unblock checkmark under the General tab and click OK.

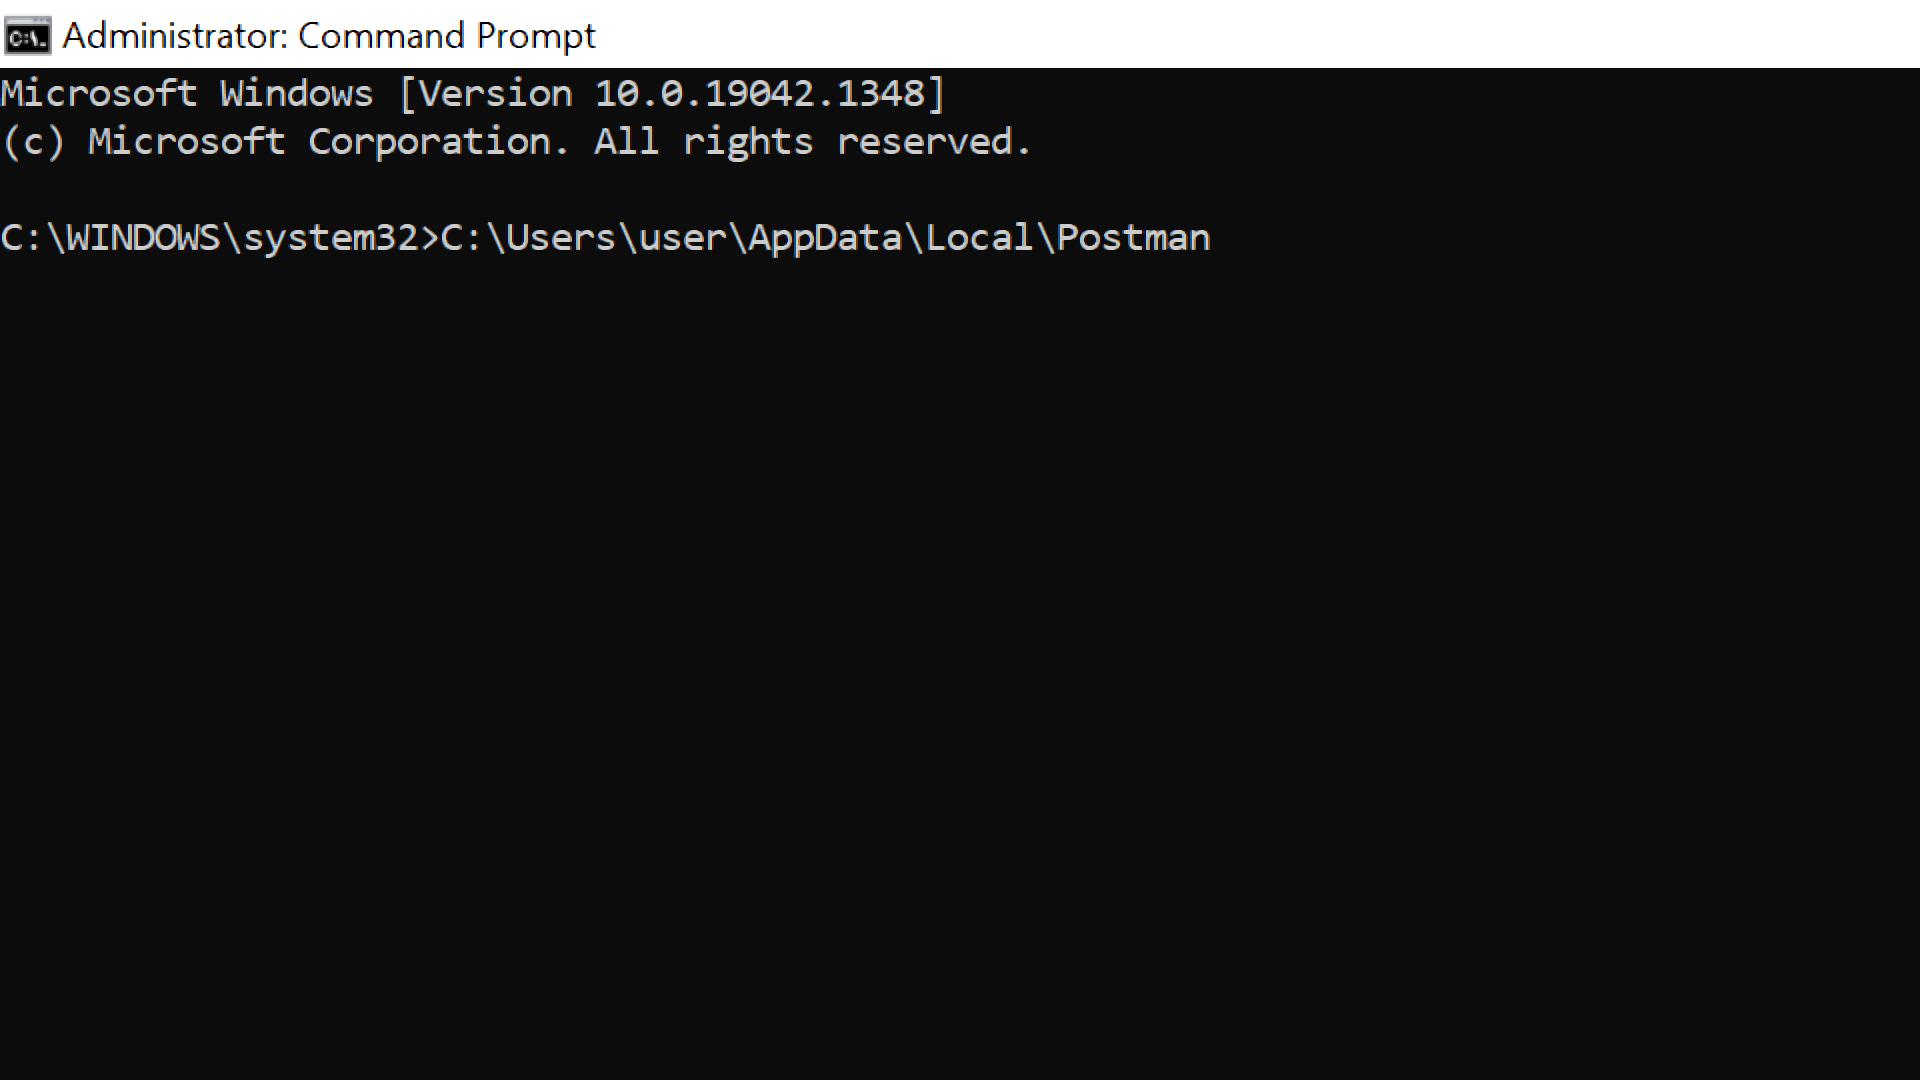
Fix 2: Launch the App From the Command Prompt
If you’re unable to open a specific app on Windows, use Command Prompt to launch it.
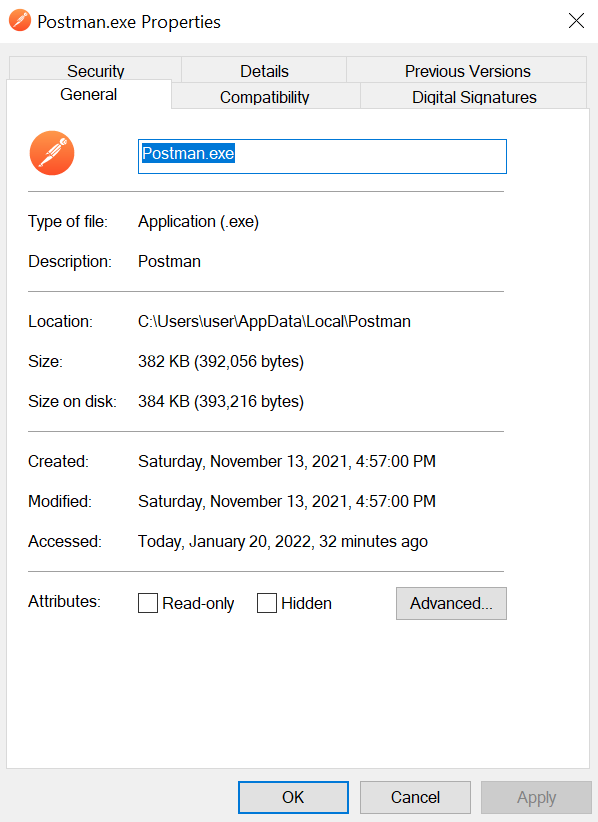
Step 1: Right-click the app shortcut you can’t launch and select Properties.

Step 2: Copy the target destination path.

Step 3: Press the Windows key, search Command Prompt, and click Run as administrator.

Step 4: Paste the copied destination path in the console and press Enter to launch the app.

Fix 3: Disable Windows Defender SmartScreen
SmartScreen is a Windows Security feature that protects your PC against malicious apps, files, and websites by checking them against a Microsoft database. If it incorrectly blocked the app you’re trying to access, disable the SmartScreen feature temporarily and retry opening it.
Step 1: Press the Windows key, search Windows Security, and click to open it.

Step 2: Select App & browser control from the left sidebar, and click Reputation-based protection settings.

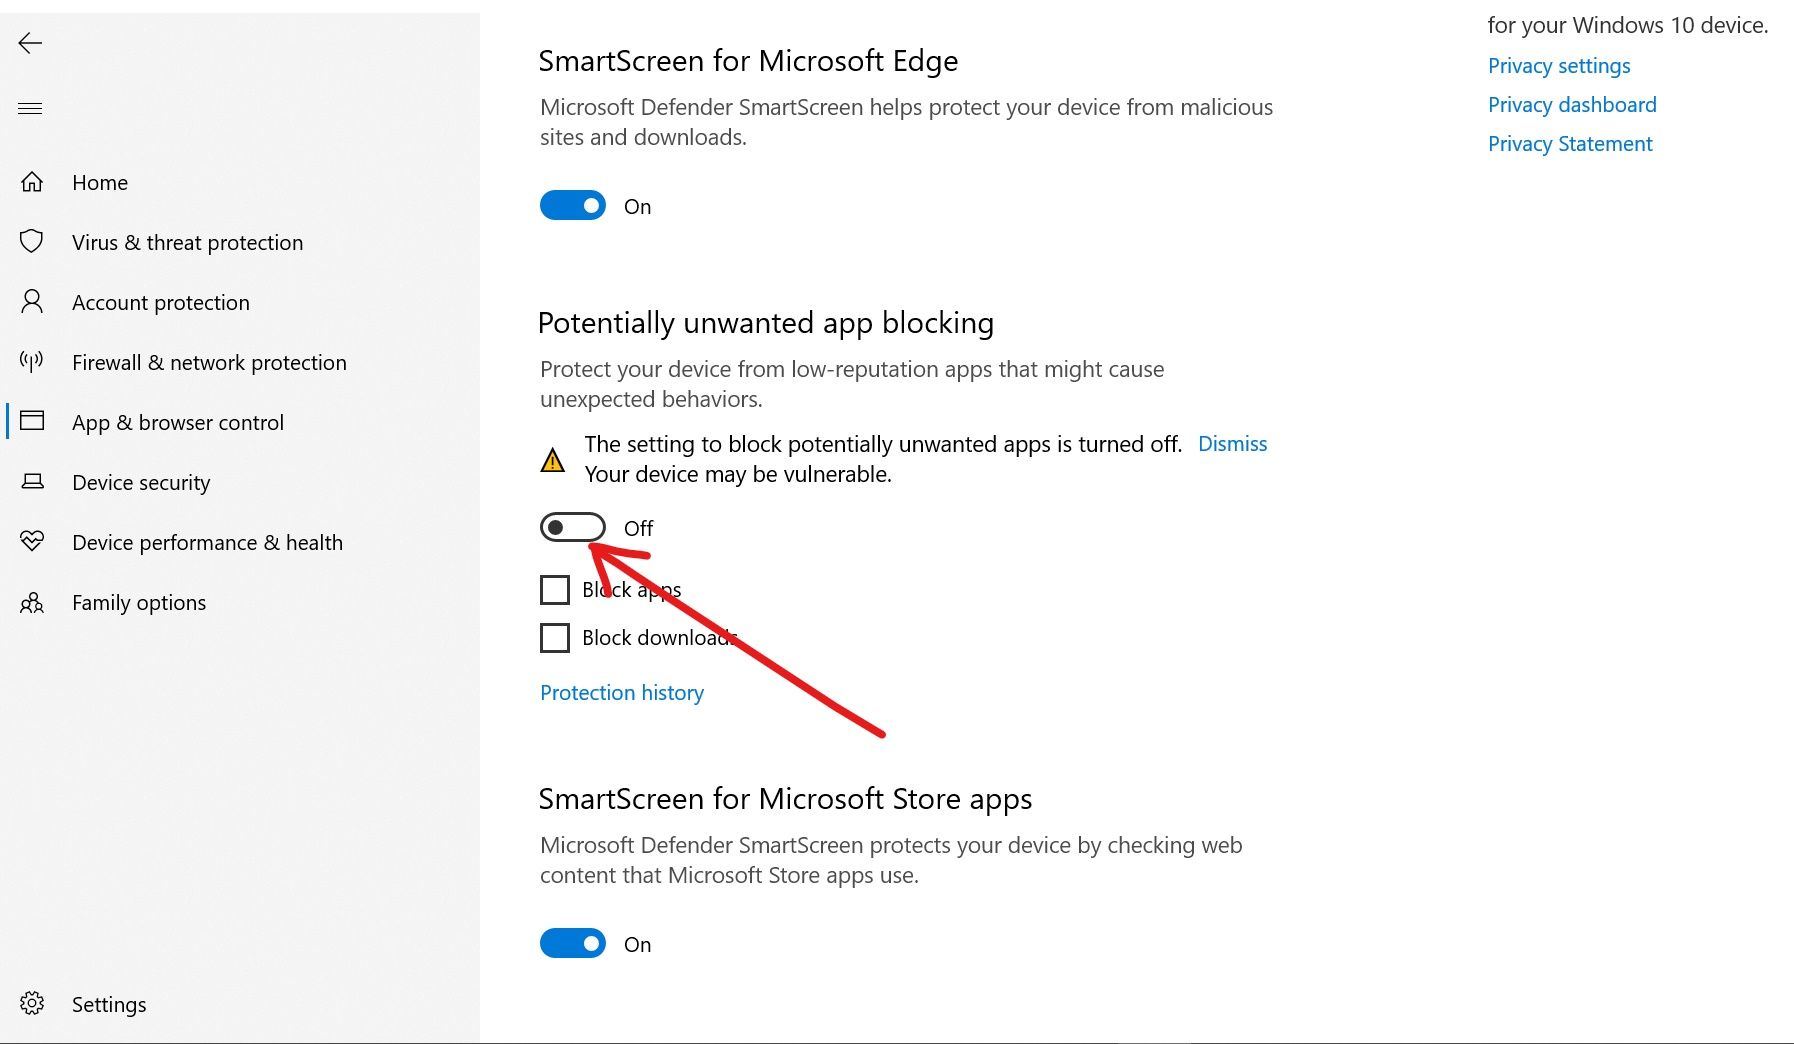
Step 3: Toggle off Potentially unwanted app blocking and SmartScreen for Microsoft Store apps.

Fix 4: Disable User Account Control Temporarily
Besides SmartScreen, the User Account Control on Windows 11 may block an app to protect your OS from unauthorized changes. Tweak the Windows registry to disable the User Account Control (UAC) temporarily and unblock the application.
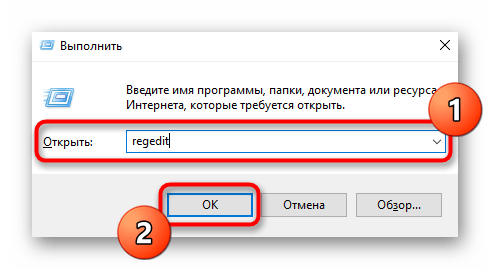
Step 1: Open the Run dialog using the Windows + R shortcut, type regedit, and press Enter.

Step 2: Approve the UAC prompt, paste the below path in the navigation bar and press Enter.
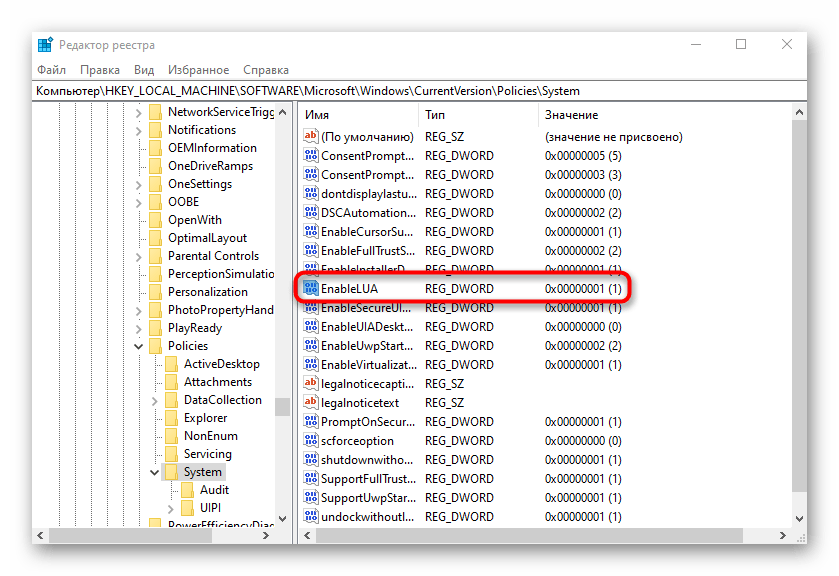
Computer\HKEY_LOCAL_MACHINE\SOFTWARE\Microsoft\Windows\CurrentVersion\Policies\System
Step 3: Double-click EnableLUA, set its Value data to 0, and click OK to save changes. Reopen your desired app to run it.

Fix 5: Perform a System Restore
Lastly, if the issue persists, restore the system to its previous settings to fix the ‘This app has been blocked for your protection’ error on Windows 11.
Step 1: Press the Windows + R shortcut to open the Run dialog, type rstrui, and press Enter.

Step 2: Pick a relevant restore point, click Next, and follow the on-screen instructions to revert your computer to its previous state.

Was this helpful?
Thanks for your feedback!
The article above may contain affiliate links which help support Guiding Tech. The content remains unbiased and authentic and will never affect our editorial integrity.
Все способы:
- Способ 1: Запуск через «Командную строку»
- Способ 2: Разблокировка через «Свойства»
- Способ 3: Отключение контроля учетных записей
- Способ 4: Отключение функции SmartScreen
- Способ 5: Редактирование параметра групповой политики
- Способ 6: Изменение параметра «Редактора реестра»
- Вопросы и ответы: 5
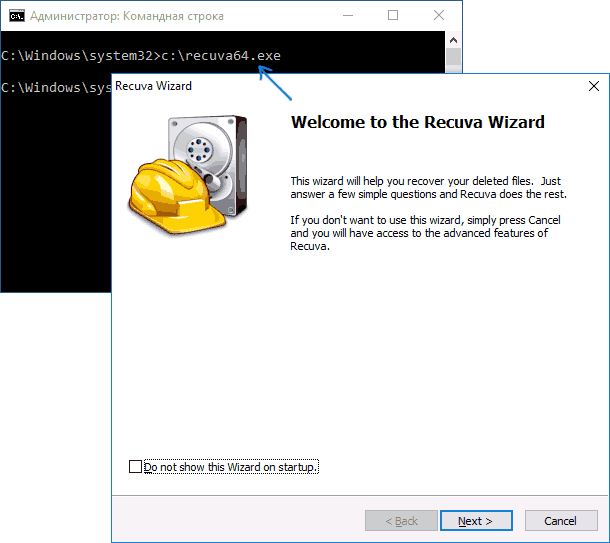
Способ 1: Запуск через «Командную строку»
Самый простой вариант решения ошибки «Это приложение заблокировано в целях защиты» в Windows 10, который часто оказывается эффективным, — запуск целевой программы через консоль, открытую от имени администратора. Для этого придется выполнить несколько действий, описанных ниже.
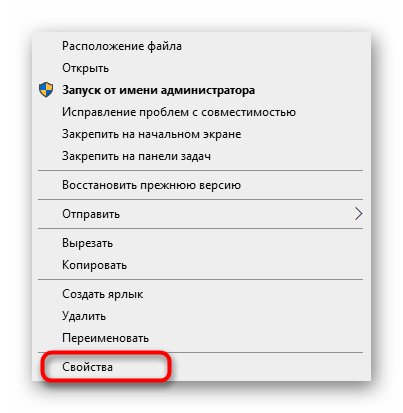
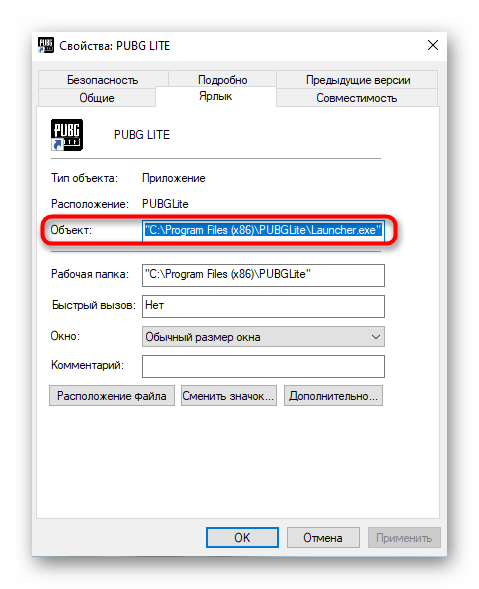
- Щелкните правой кнопкой мыши по исполняемому файлу, с запуском которого возникают проблемы, и в появившемся контекстном меню выберите пункт «Свойства».
- Там вас интересует поле «Объект»: скопируйте его содержимое учитывая кавычки.
- Запустите «Командную строку» от имени администратора. Проще всего сделать это, воспользовавшись поиском в «Пуск».
- Вставьте туда скопированный ранее путь, нажав Ctrl + V и подтвердив выполнение команды через Enter.
- Если программа была успешно запущена, не закрывайте консоль на протяжении всего времени ее использования.


Способ 2: Разблокировка через «Свойства»
После первого запуска целевого приложения, которое было заблокировано, в его свойствах появляется пометка «Осторожно». Если снять ее вручную, а затем применить настройки, возможно, следующий запуск ПО пройдет успешно. Проверяется действенность этого метода за несколько секунд.
- Снова кликните ПКМ по исполняемому файлу и перейдите в «Свойства».
- На вкладке «Общие» найдите внизу пометку «Осторожно» и поставьте галочку напротив соответствующего пункта.

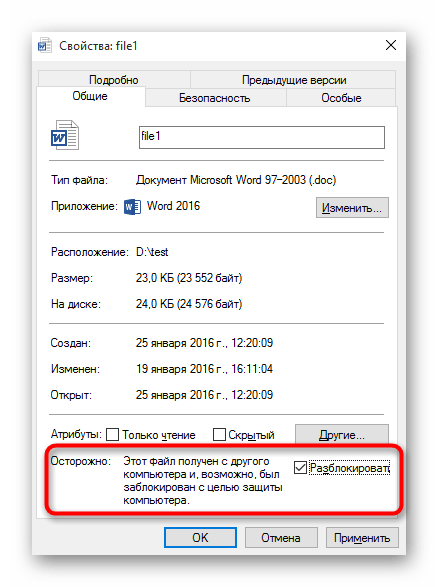
Не забудьте применить изменения, а затем закройте текущее окно и переходите к повторному запуску приложения.
Способ 3: Отключение контроля учетных записей
В Windows 10 по умолчанию функционирует компонент контроля учетных записей, действие которого может блокировать выполнение определенных программ. Рекомендуется отключить его, чтобы решить возможные проблемы, в том числе и рассматриваемую сегодня ошибку, что происходит так:
- Откройте утилиту «Выполнить», зажав комбинацию клавиш Win + R. Введите там команду
UserAccountControlSettingsи нажмите Enter. - При открытии нового окна переместите ползунок контроля в самое нижнее положение, чтобы он находился в состоянии «Никогда не уведомлять».
- После примените настройки и закройте текущее окно.


Способ 4: Отключение функции SmartScreen
SmartScreen — еще одна функция операционной системы, которая работает в активном режиме по умолчанию и может привести к проблеме «Это приложение заблокировано в целях защиты». Если предыдущие рекомендации не помогли, стоит попробовать отключить данный параметр через системные настройки.
- Откройте «Пуск» и перейдите в «Параметры».
- Там вас интересует раздел «Обновление и безопасность».
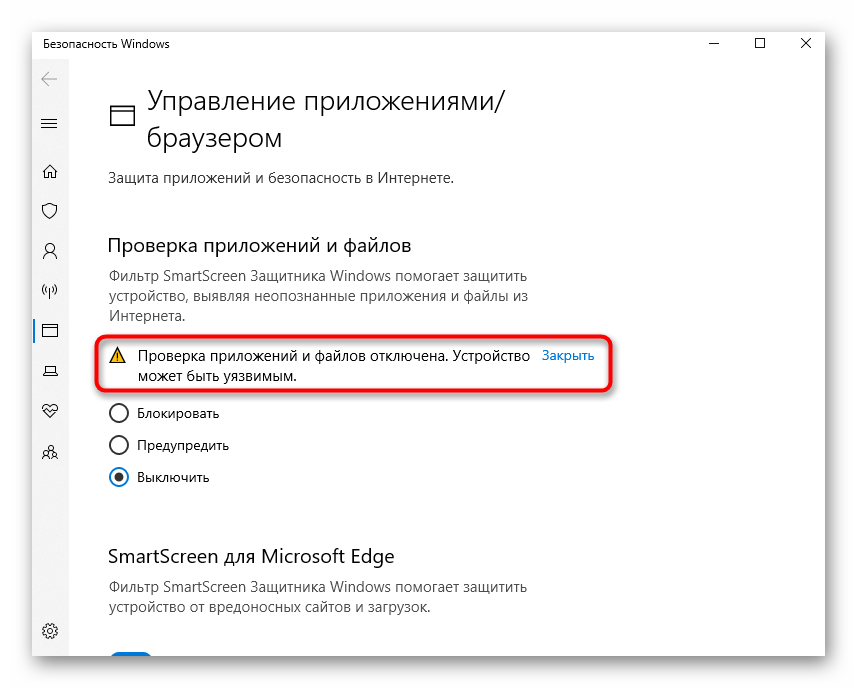
- Переместитесь к категории «Безопасность Windows» и выберите там пункт «Управление приложениями и браузером».
- Переместите маркер на пункт «Выключить».
- Вы будете уведомлены о том, что проверка приложений и файлов была успешно отключена, однако при этом компьютер стал более уязвимым к угрозам.


Советуем перезагрузить компьютер, чтобы все изменения точно вступили в силу. Только после этого переходите к запуску целевого приложения, проверяя, являются ли выполненные действия эффективными.
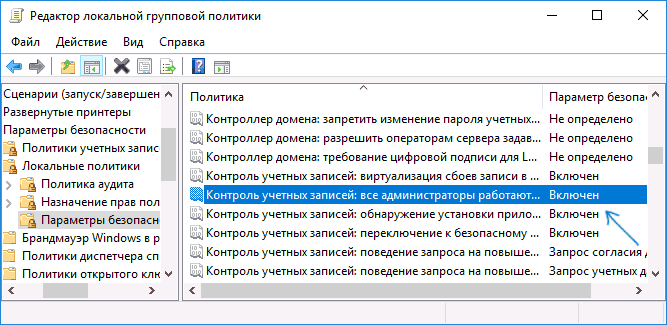
Способ 5: Редактирование параметра групповой политики
В редакторе локальной групповой политики есть параметр, отвечающий за контроль учетных записей, работающих в режиме одобрения администратором. Однако этот метод подходит только обладателям Windows 10 Pro и Enterprise, поскольку в других версиях редактор попросту отсутствует. Если он находится во включенном состоянии, это может стать причиной появления проблемы «Это приложение заблокировано в целях защиты», поэтому сам параметр понадобится отключить.
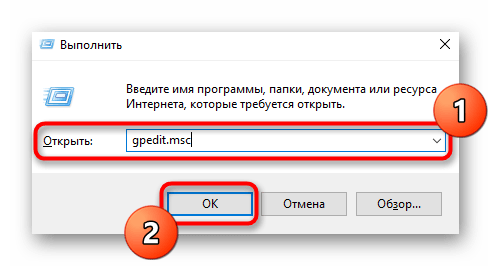
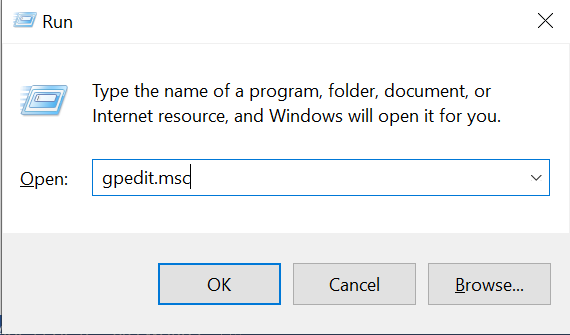
- Откройте утилиту «Выполнить» (Win + R), где впишите
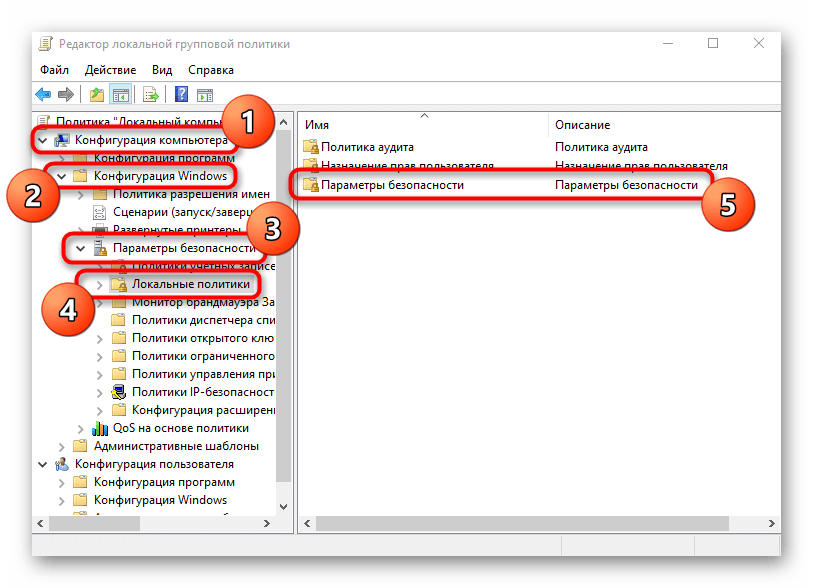
gpedit.mscи нажмите Enter. - Последовательно открывайте разделы «Конфигурация компьютера» — «Конфигурация Windows» — «Параметры безопасности» — «Локальные политики» — «Параметры безопасности».
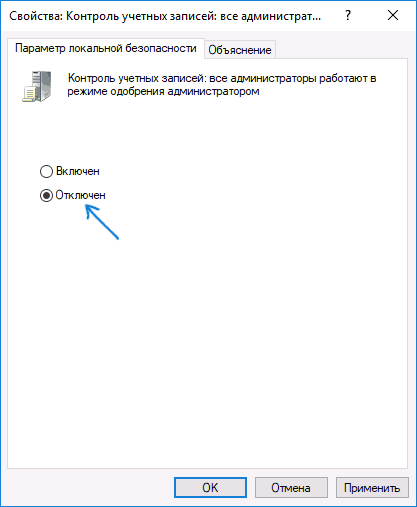
- Дважды кликните левой кнопкой мыши по находящемуся там параметру «Контроль учетных записей: все администраторы работают в режиме одобрения администратором».
- Отметьте маркером пункт «Отключен» и примените изменения.


В обязательном порядке перезагрузите компьютер для применения изменений а уже потом переходите к проверке метода.
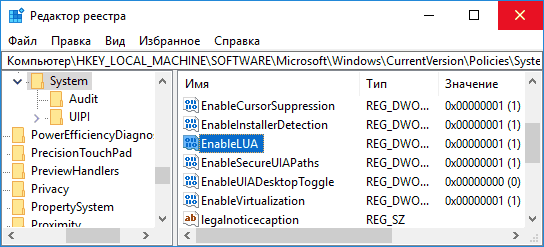
Способ 6: Изменение параметра «Редактора реестра»
Всем тем, у кого нет доступа к локальным групповым политикам, можно воспользоваться «Редактором реестра», чтобы внести те же самые изменения. При этом алгоритм действий немного поменяется.
- Откройте «Выполнить» (Win + R), где введите
regeditи нажмите на «ОК». - Перейдите по пути
HKEY_LOCAL_MACHINE\SOFTWARE\Microsoft\Windows\CurrentVersion\Policies\System. - Там найдите параметр «EnableLUA» и кликните по нему дважды ЛКМ.
- Измените значение на «0» и сохраните параметр.

Изменения, вносимые в реестр, заработают только после перезагрузки компьютера, после которой проверяйте результат, запуская проблемное приложение.
В завершение отметим, что иногда возникновение ошибки «Это приложение заблокировано в целях защиты» в Виндовс 10 может быть связано непосредственно с неполадками самого приложения. Если оно было скачано со сторонних источников или неизвестно как получено на компьютер, его рекомендуется удалить и скачать заново с проверенных сайтов.
Наша группа в TelegramПолезные советы и помощь
Это приложение заблокировано в целях защиты — как исправить
При запуске некоторых программ в Windows 10 вы можете столкнуться с сообщением контроля учетных записей: Это приложение заблокировано в целях защиты. Администратор заблокировал выполнение этого приложения. За дополнительными сведениями обратитесь к администратору. При этом, ошибка может появляться в случаях, когда вы являетесь единственным администратором на компьютере, а контроль учетных записей отключен (во всяком случае, при отключении UAC официальными способами). Также может пригодиться Отдельная инструкция для случая этой ошибки в приложении mmc.exe.
В этой инструкции — подробно о том, почему появляется ошибка «Это приложение заблокировано в целях защиты» в Windows 10 и о том, как убрать это сообщение и запустить программу. Обратите внимание: если вы видите сообщение о блокировке приложения или программы, но ничего о целях защиты, это может быть иная ситуация, для которой существуют отдельные решения, описанные в руководстве: Это приложение заблокировано вашим системным администратором — что делать. См. также: Как исправить ошибку «Невозможно запустить это приложение на вашем ПК».
Примечание: как правило, ошибка появляется не на пустом месте и связана с тем, что вы запускаете что-то действительно нежелательное, загруженное с сомнительного источника. Поэтому, если вы решили приступать к шагам, описанным далее, вы делаете это, беря всю ответственность на себя.
Причина блокировки приложения
Обычно, причиной сообщения о том, что приложение было заблокировано является поврежденная, истекшая, поддельная или запрещенная в настройках Windows 10 цифровая подпись (находящаяся в списке не доверенных сертификатов) исполняемого файла. Окно с сообщением об ошибке может выглядеть по-разному (слева позади на скриншоте — в версиях Windows 10 до 1703, справа ниже — в версии Creators Update).

При этом иногда случается, что запрет запуска происходит не для какой-то действительно потенциально опасной программы, а для, например, старых официальных драйверов оборудования, загруженных с официального сайта или взятых с входящего в комплект компакт-диска с драйверами.
Способы убрать «Это приложение заблокировано в целях защиты» и исправить запуск программы
Есть несколько способов запустить программу, для которой вы видите сообщение о том, что «Администратор заблокировал выполнение этого приложения».
Использование командной строки
Самый безопасный из способов (не открывающий «дыр» на будущее) — запуск проблемной программы из командной строки, запущенной от имени администратора. Порядок действий будет следующим:
- Запустите командную строку от имени администратора. Для этого вы можете начать вводить «Командная строка» в поиске на панели задач Windows 10, потом нажать правой кнопкой мыши по найденному результату и выбрать пункт «Запустить от имени администратора».
- В командной строке введите путь к файлу .exe для которого сообщается, что приложение было заблокировано в целях защиты.

- Как правило сразу после этого приложение будет запущено (не закрывайте командную строку до прекращения работы с программой или завершения ее установки, если не работал установщик).
Использование встроенной учетной записи администратора Windows 10
Этот способ исправить проблему подойдет только для установщика с запуском которого происходят проблемы (поскольку каждый раз включать и выключать встроенную учетную запись администратора — не удобно, а держать ее постоянно включенной и переключаться для запуска программы — не лучший вариант).
Суть действий: включаем встроенную учетную запись Администратора Windows 10, входим под этой учетной записью, устанавливаем программу («для всех пользователей»), отключаем встроенную учетную запись администратора и работаем с программой в своей обычной учетной записи (как правило, уже установленная программа будет запускаться без проблем).
Отключение блокировки приложений в редакторе локальной групповой политики
Этот способ потенциально опасен, поскольку позволяет не доверенным приложениям с «испорченными» цифровыми подписями запускаться без каких-либо сообщений от контроля учетных записей от имени администратора.
Выполнить описанные действия можно только в редакциях Windows 10 Профессиональная и Корпоративная (для Домашней редакции — см. способ с редактором реестра далее).
- Нажмите клавиши Win+R на клавиатуре и введите gpedit.msc
- Перейдите в раздел «Конфигурация компьютера» — «Конфигурация Windows» — «Параметры безопасности» — «Локальные политики» — «Параметры безопасности». Дважды нажмите по параметру справа: «Контроль учетных записей: все администраторы работают в режиме одобрения администратором».

- Установите значение «Отключен» и нажмите «Ок».

- Перезагрузите компьютер.
После этого программа должна будет запуститься. Если вам требовался однократный запуск данного приложения, настоятельно рекомендую вернуть параметры локальной политики безопасности в исходное состояние тем же самым образом.
С помощью редактора реестра
Это — вариант предыдущего способа, но для Windows 10 Домашняя, где не предусмотрен редактор локальной групповой политики.
- Нажмите клавиши Win+R на клавиатуре и введите regedit
- В редакторе реестра перейдите к разделу HKEY_LOCAL_MACHINE\ SOFTWARE\ Microsoft\ Windows\ CurrentVersion\ Policies\ System

- Дважды нажмите по параметру EnableLUA в правой части редактора реестра и задайте для него значение 0 (ноль).
- Нажмите Ок, закройте редактор реестра и перезагрузите компьютер.
Готово, после этого приложение, вероятнее всего запустится. Однако, ваш компьютер будет под угрозой, и я настоятельно рекомендую вернуть значение EnableLUA в 1, как было до изменений.
Удаление цифровой подписи приложения
Поскольку появление сообщения об ошибке Приложение заблокировано в целях защиты имеет своей причиной проблемы с цифровой подписи исполняемого файла программы, одно из возможных решений — удаление цифровой подписи (не выполняйте этого для системных файлов Windows 10, в случае, если проблема происходит с ними, выполните проверку целостности системных файлов).
Сделать это можно с помощью небольшого бесплатного приложения File Unsigner:
- Скачайте программу File Unsigner, официальный сайт — www.fluxbytes.com/software-releases/fileunsigner-v1-0/
- Перетащите проблемную программу на исполняемый файл FileUnsigner.exe (или используйте командную строку и команду: путь_к_файлу_fileunsigner.exe путь_к_файлу_программы.exe)

- Откроется окно командной строки, где, при успехе, будет указано, что файл был Successfully Unsigned, т.е. цифровая подпись была удалена. Нажмите любую клавишу и, если окно командной строки не закроется само, закройте его вручную.

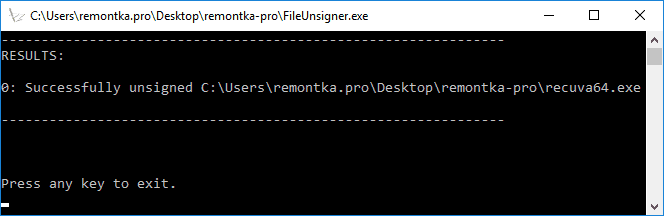
На этом цифровая подпись приложения будет удалена, и оно запустится без сообщений о блокировке администратором (но, иногда, с предупреждением от SmartScreen).
Кажется, это все способы, которые я могу предложить. Если что-то не получается, задавайте вопросы в комментариях, постараюсь помочь.
Sometimes when you decide to open an app or file or install or open a program on your Windows 10 PC, you might get the error «An administrator has blocked you from running this app».
You get this error because Windows 10 is optimized for protection against malware through Windows Defender and User Account Control (UAC).
But at times, this protection is overly sensitive. So, on some occasions, the error occurs even when you’re trying to run trusted apps or open trusted files.
Today is hopefully the last day you’ll see this error pop up on your Windows 10 PC. Because in this article, I will show you 5 ways to fix it, so you can start using your computer without the fear of the error.
PS: If you’re getting this error while running a trusted app or trying to open a trusted file, the solutions provided in this article are for you. If you don’t trust the app, use any of the solutions only if you’re ready to take a risk.
Table of Contents
- Temporarily Disable Your Antivirus Program
- Disable the Windows Smartscreen Feature
- Unblock the File
- Run the App with the Command Prompt
- Make Changes to the Group Policy
- Conclusion
Solution 1: Temporarily Disable Your Antivirus Program
If you get the «An administrator has blocked you from running this app» error, it could be because of your antivirus app.
So, disabling the antivirus app could provide a solution.
Whether you use the inbuilt Windows Defender or a third-party antivirus program, the steps below will help disable it.
Step 1: Press ALT + SHIFT + ESC on your keyboard to open the Task Manager.
Step 2: Switch to the Startup tab.
Step 3: Locate your Antivirus Program in the list, right-click on it and select «Disable».
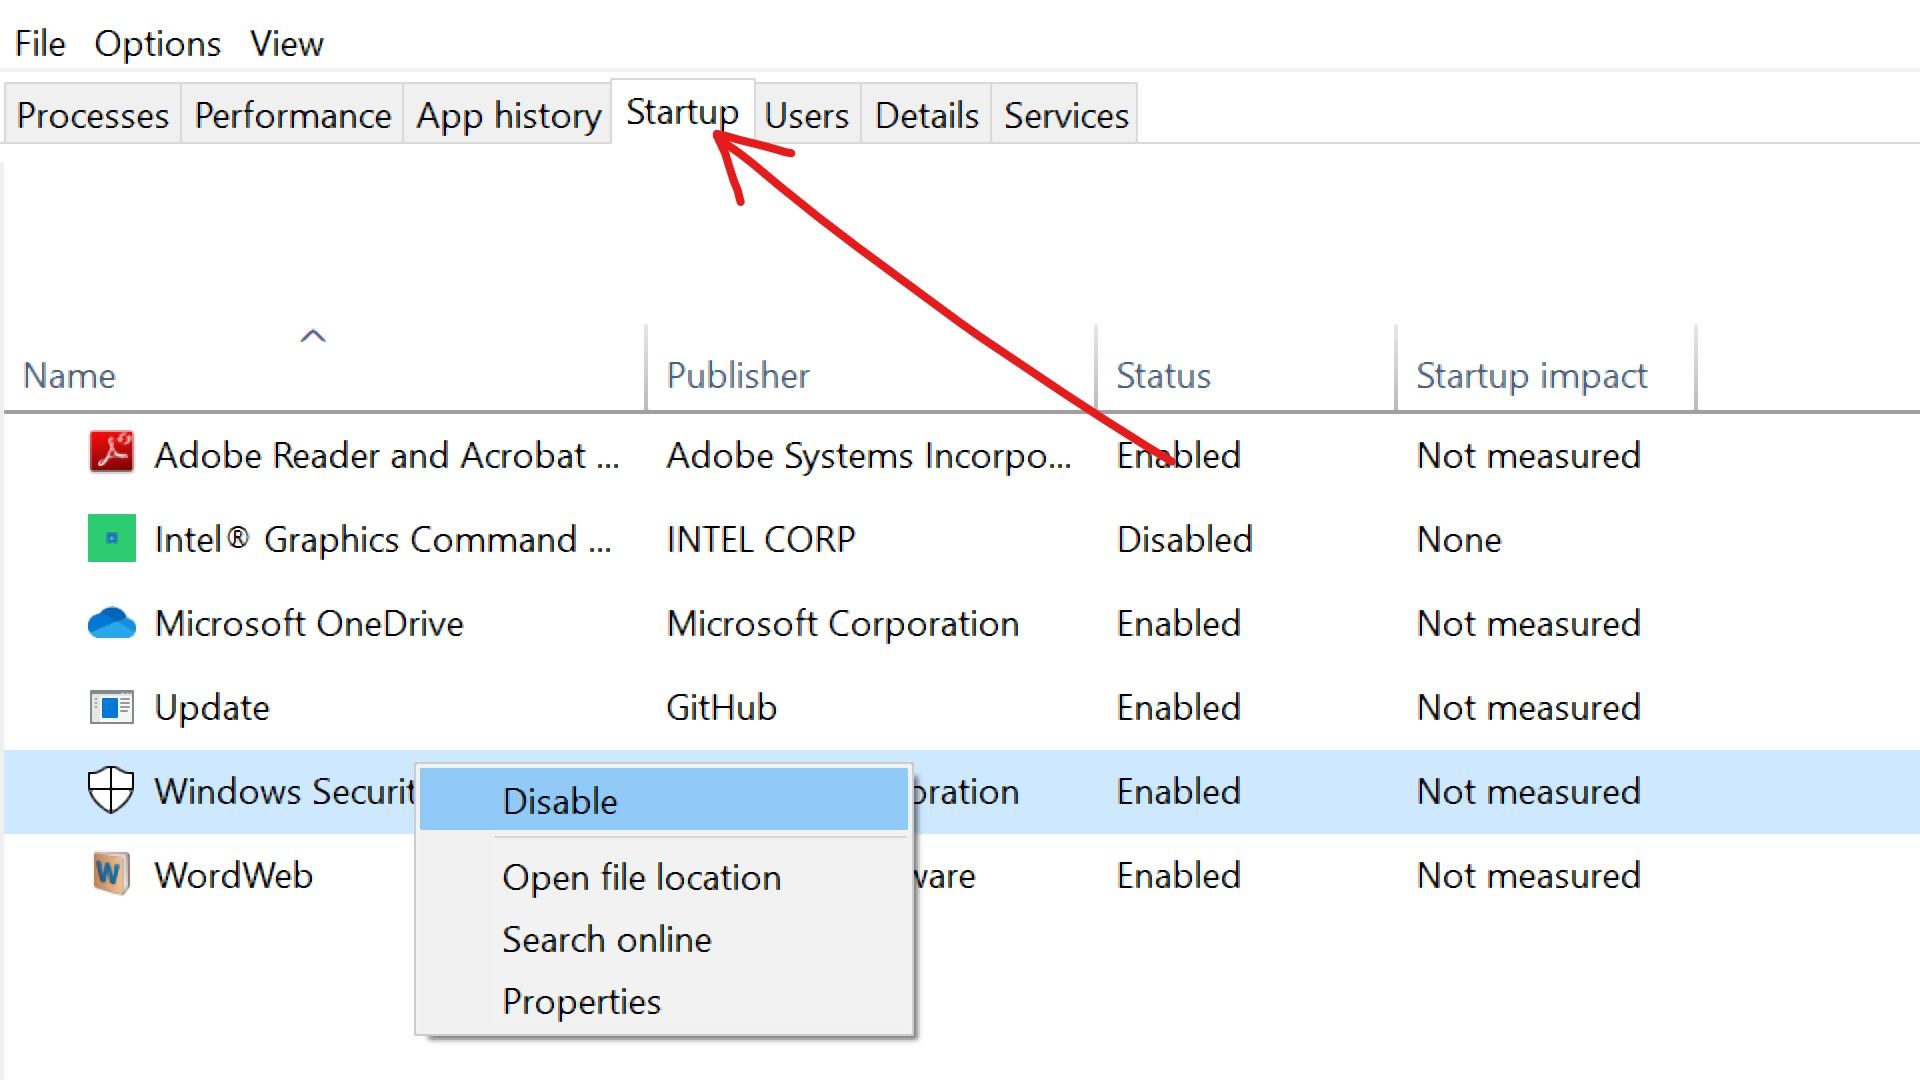
PS: If you don’t find your antivirus program in the startup tab, then check the Processes tab.
Solution 2: Disable the Windows Smartscreen Feature
The Windows Smartscreen is an anti-malware feature that works with Windows Defender to block malware.
Sometimes, it triggers this error even when you’re using a trusted app.
To disable Smartscreen, follow the steps below:
Step 1: Press WIN + S on your keyboard and search for «smartscreen», then click on the «App & Browser Control» search result.
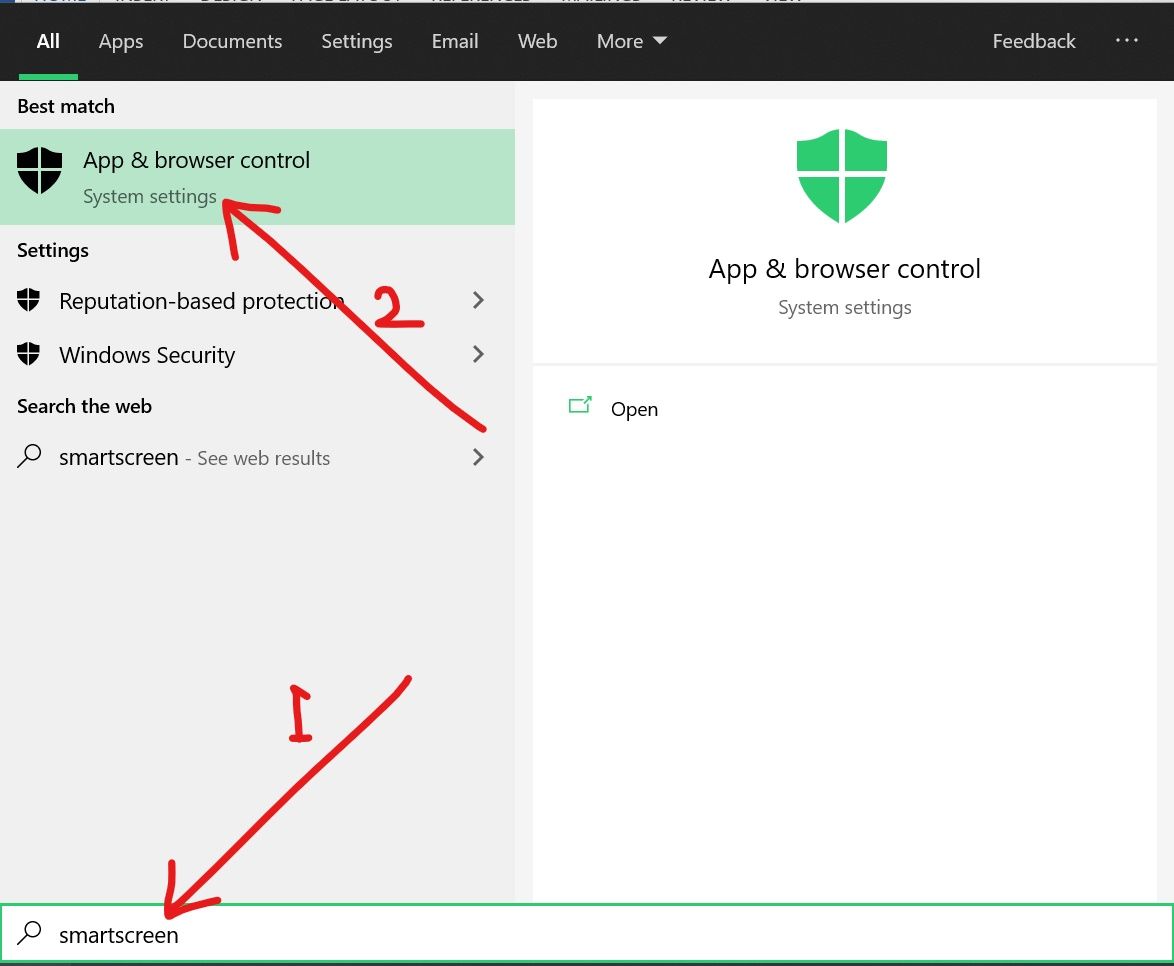
Step 2: Open the «Reputation-based protection settings» link.
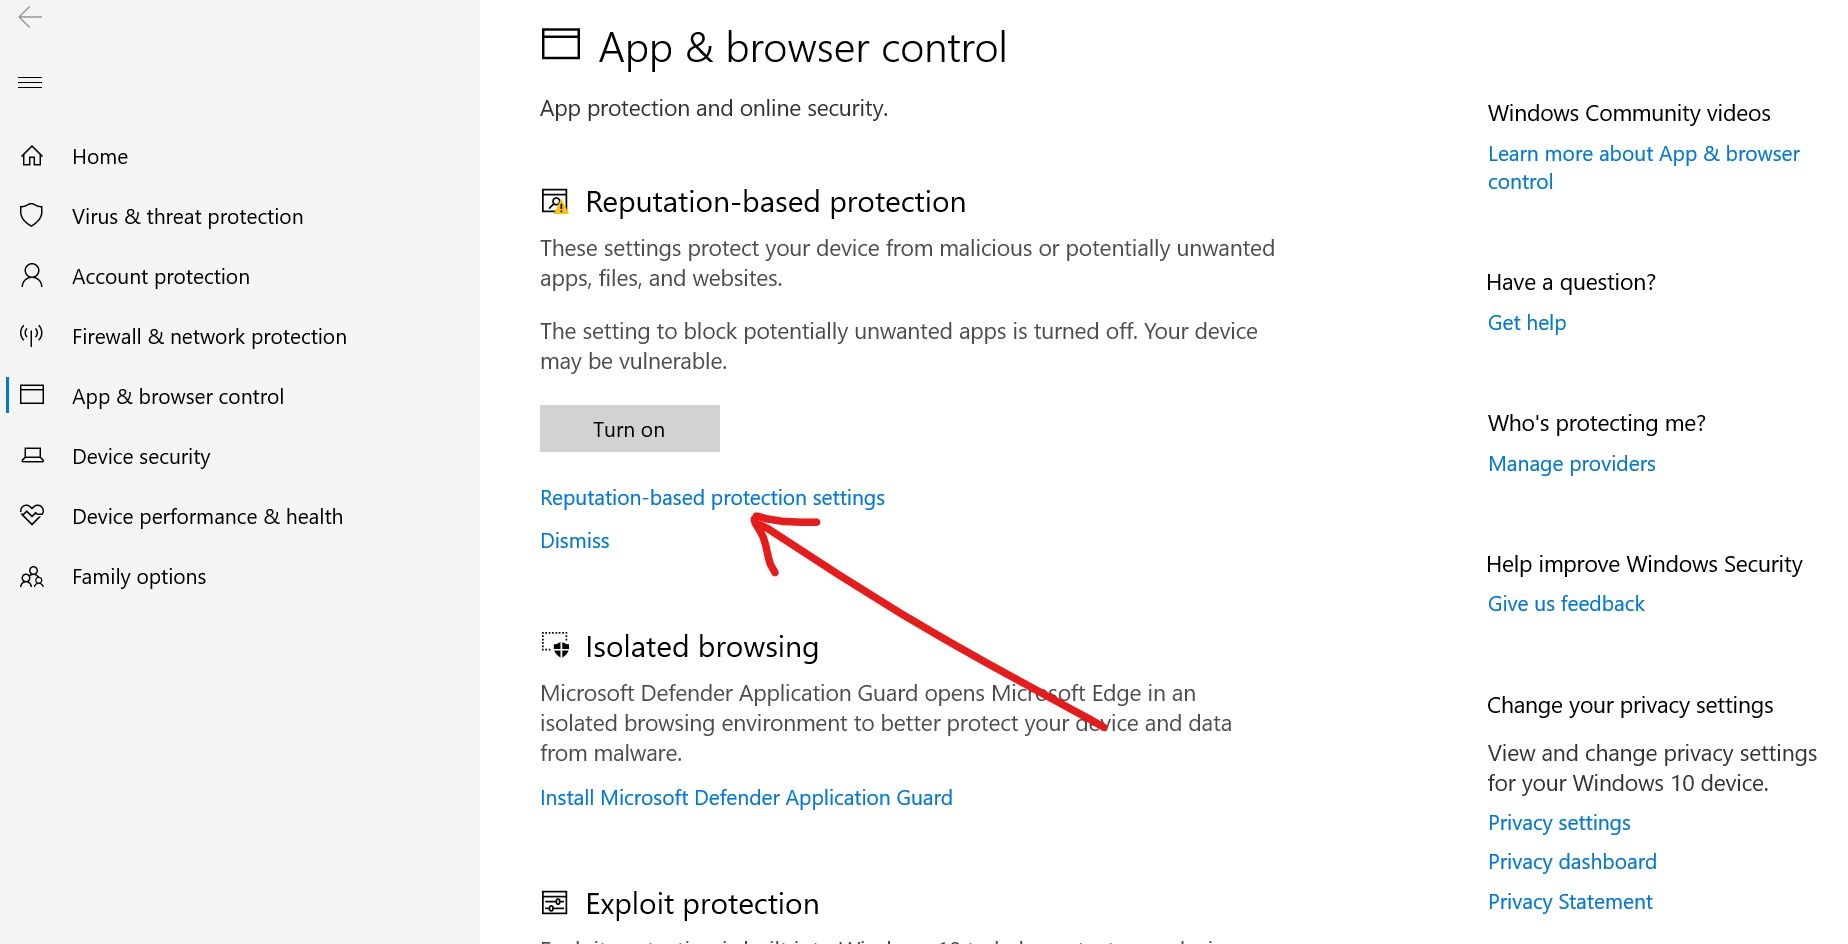
Step 3: Turn off the toggle under «Potentially unwanted app blocking».
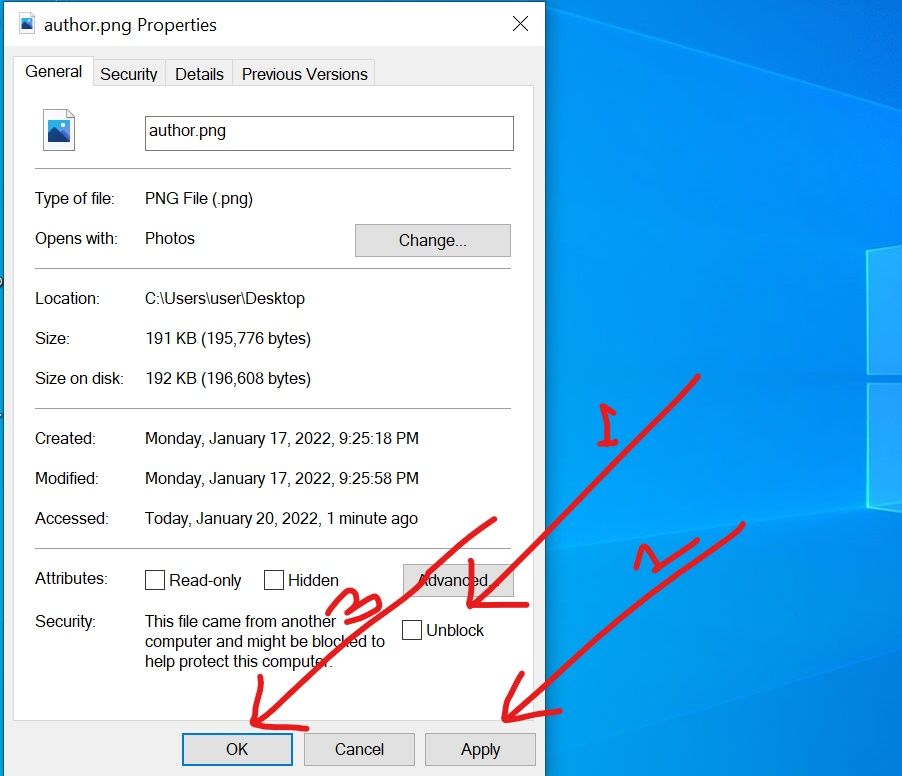
Solution 3: Unblock the File
If you’re getting the error while opening a file, this solution is for you.
Step 1: Right-click on the file and select Properties.
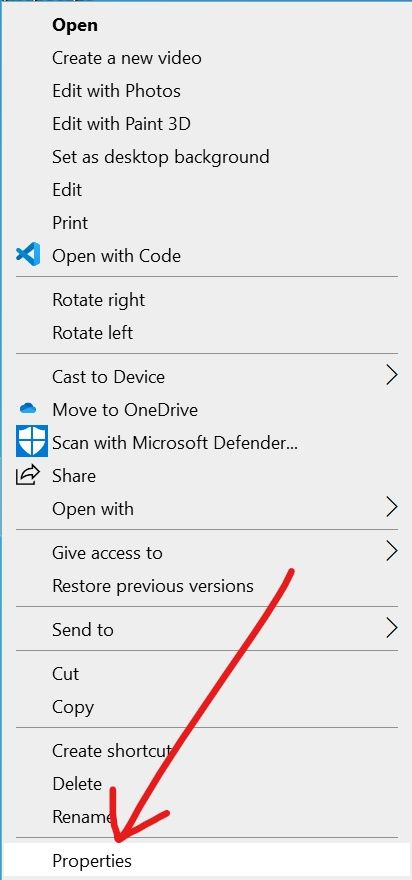
Step 2: In the General tab, check «Unblock» under «Security».
Step 3: Click Apply and then Ok.
Solution 4: Run the App with the Command Prompt
Command prompt allows you to run an app and bypass the administrator check.
So you can avoid getting this error if you run the app triggering the error using the command prompt.
The following steps show you how to run any app with the command prompt:
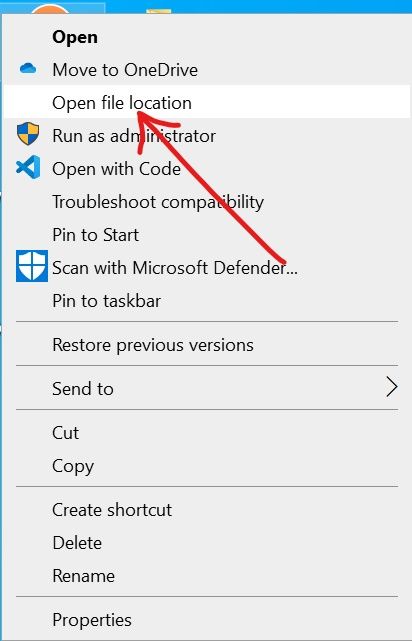
Step 1: Locate the app triggering the error, right-click on it and select Open file location.
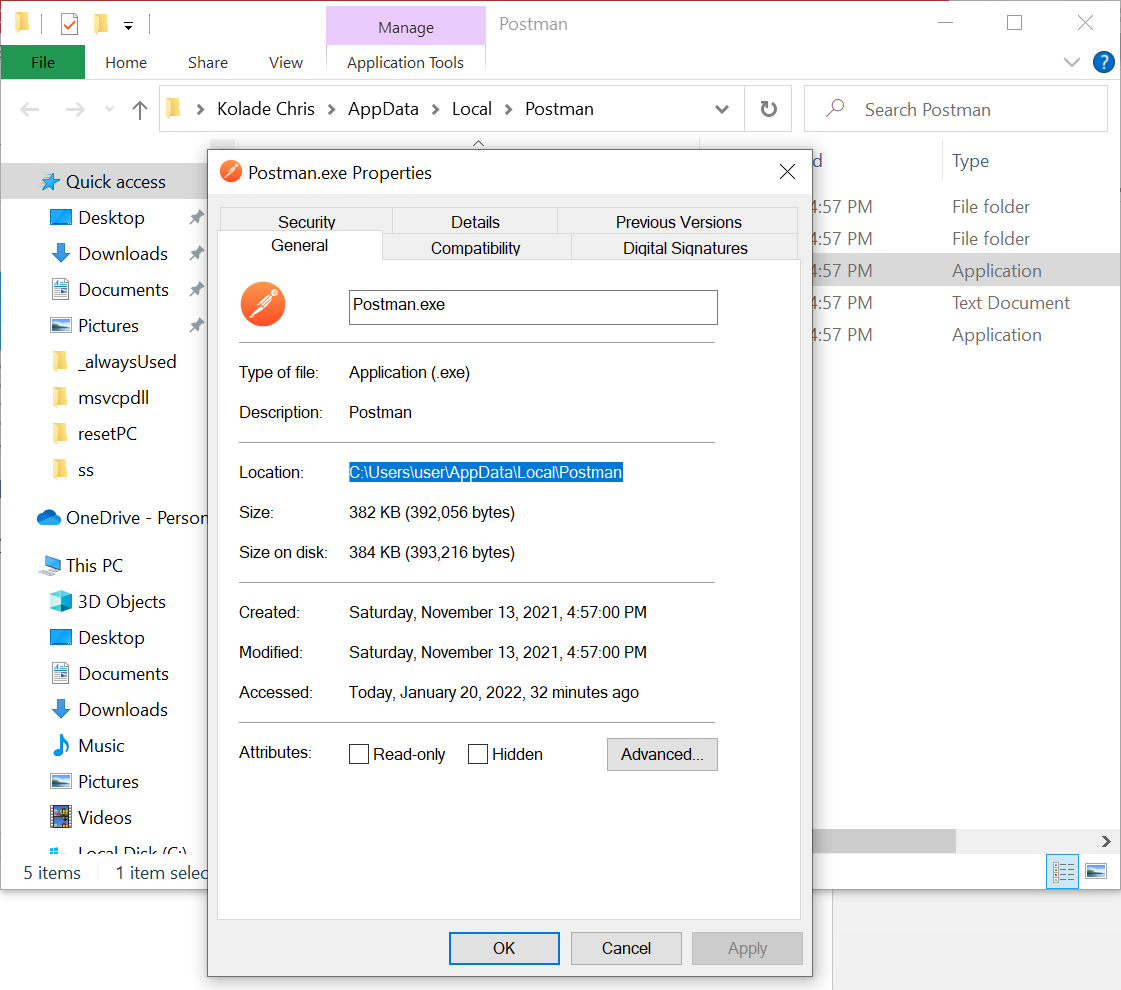
Step 2: Right-click on the file and select properties.

Step 3: In the General tab, copy the texts under location. Don’t close the Properties window yet.
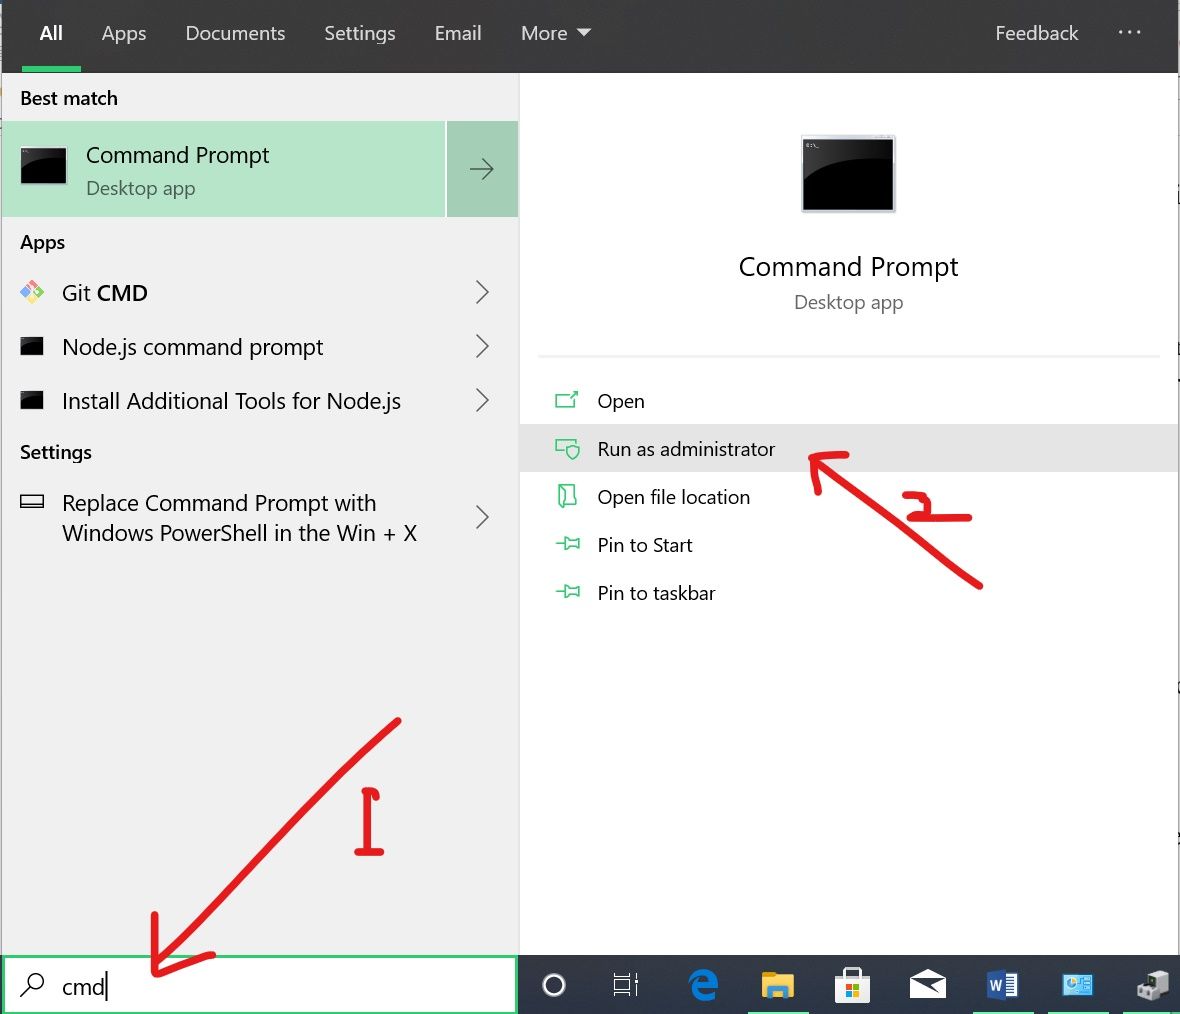
Step 4: Click on Start and search for «cmd», then select Run as Administrator on the right.
Step 5: In the command prompt, paste the text you copied in step 3, then minimize the command prompt.
Step 5: Head back to the Properties opened in Step 1 and copy the file name.
Step 6: Maximize the Command Prompt, type «\» (slash) in front of the text you pasted in Step 4, and paste in the file name, as you can see in the screenshot below.
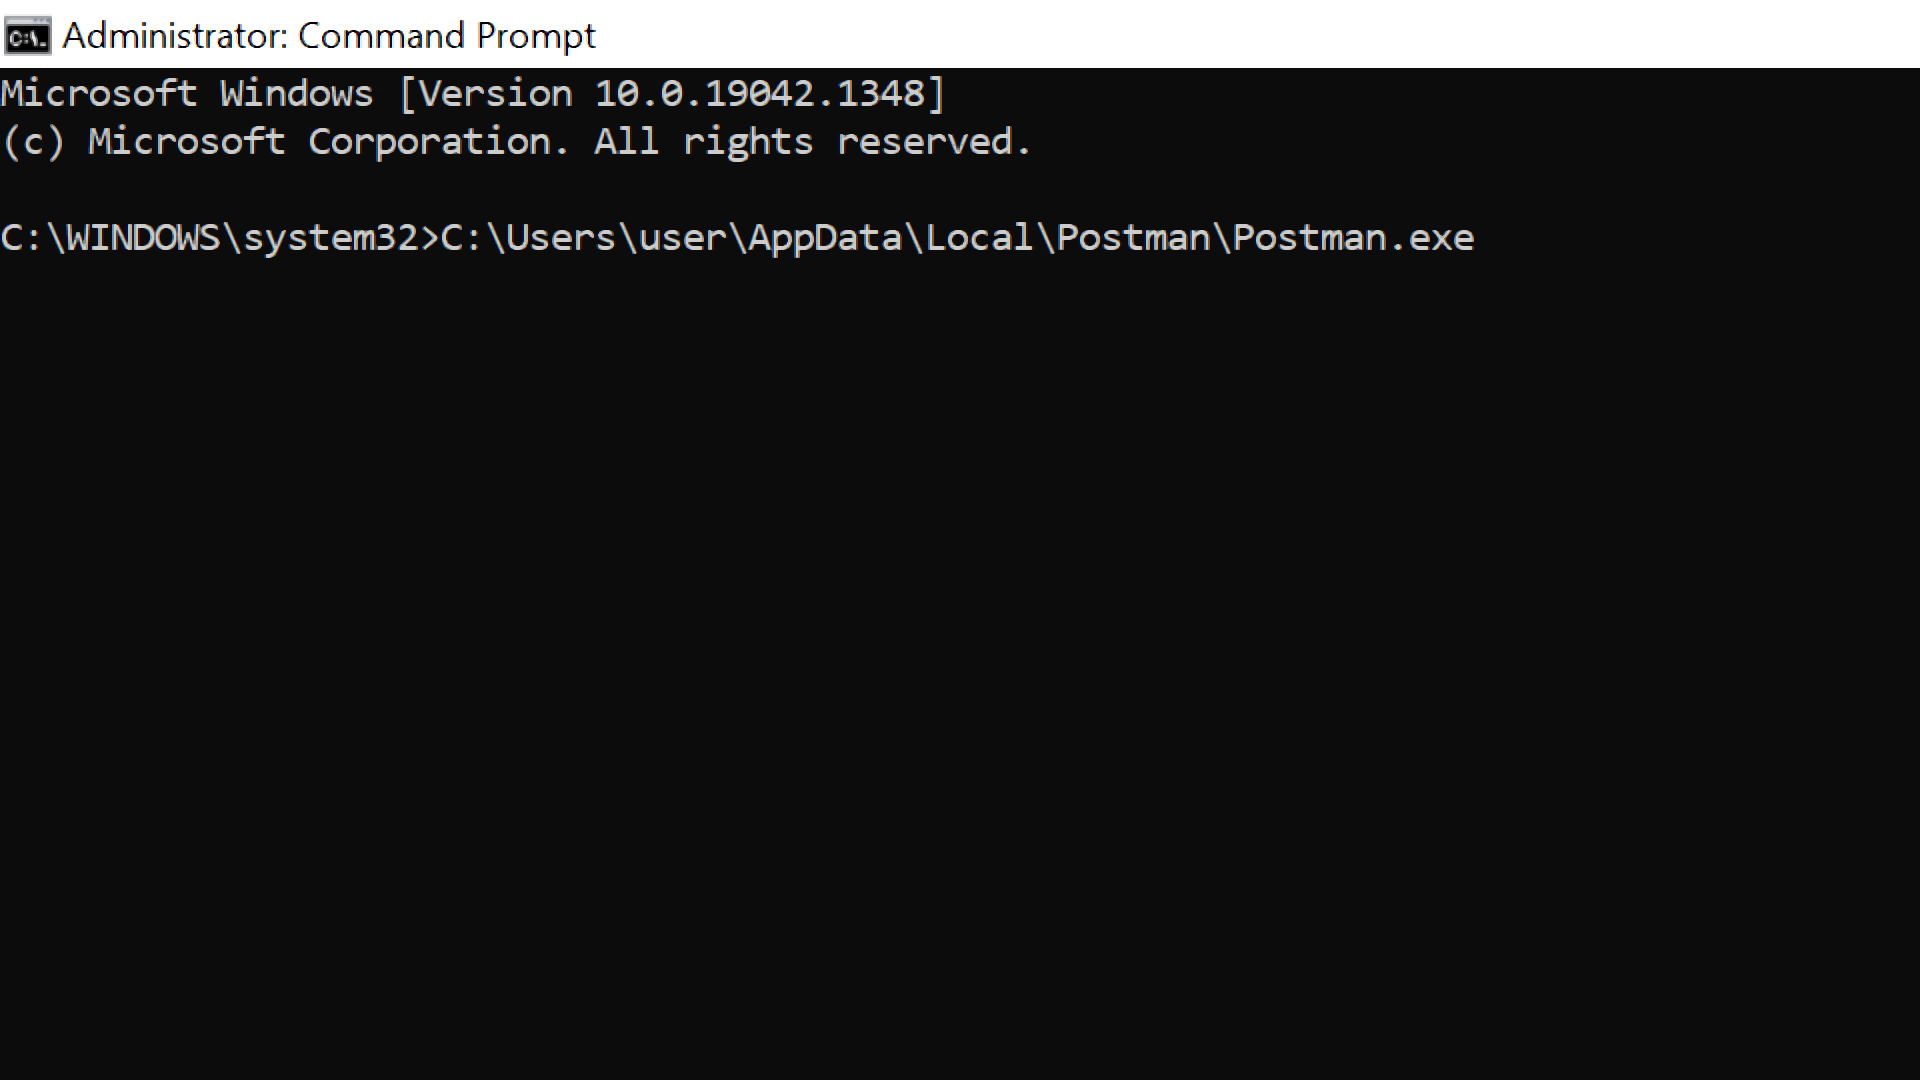
Step 7: Hit ENTER to finally launch the app.
Solution 5: Make Changes to the Group Policy
With the Group Policy, you can make changes you won’t easily find anywhere else on your computer.
One of these changes can be made on the User Accounts Control (UAC) to allow apps to escape the administrator check.
To make the changes that will get rid of the error, follow the steps below:
Step 1: Press WIN + R on your keyboard to open the Run dialogue.
Step 2: In the run dialogue, type in «gpedit.msc» and hit ENTER on your keyboard.
Step 3: Under Computer Configuration, expand Windows Settings, Security Settings, and Local Policies.
Step 4: Click on Security Options. Don’t attempt to expand it, just click on it.
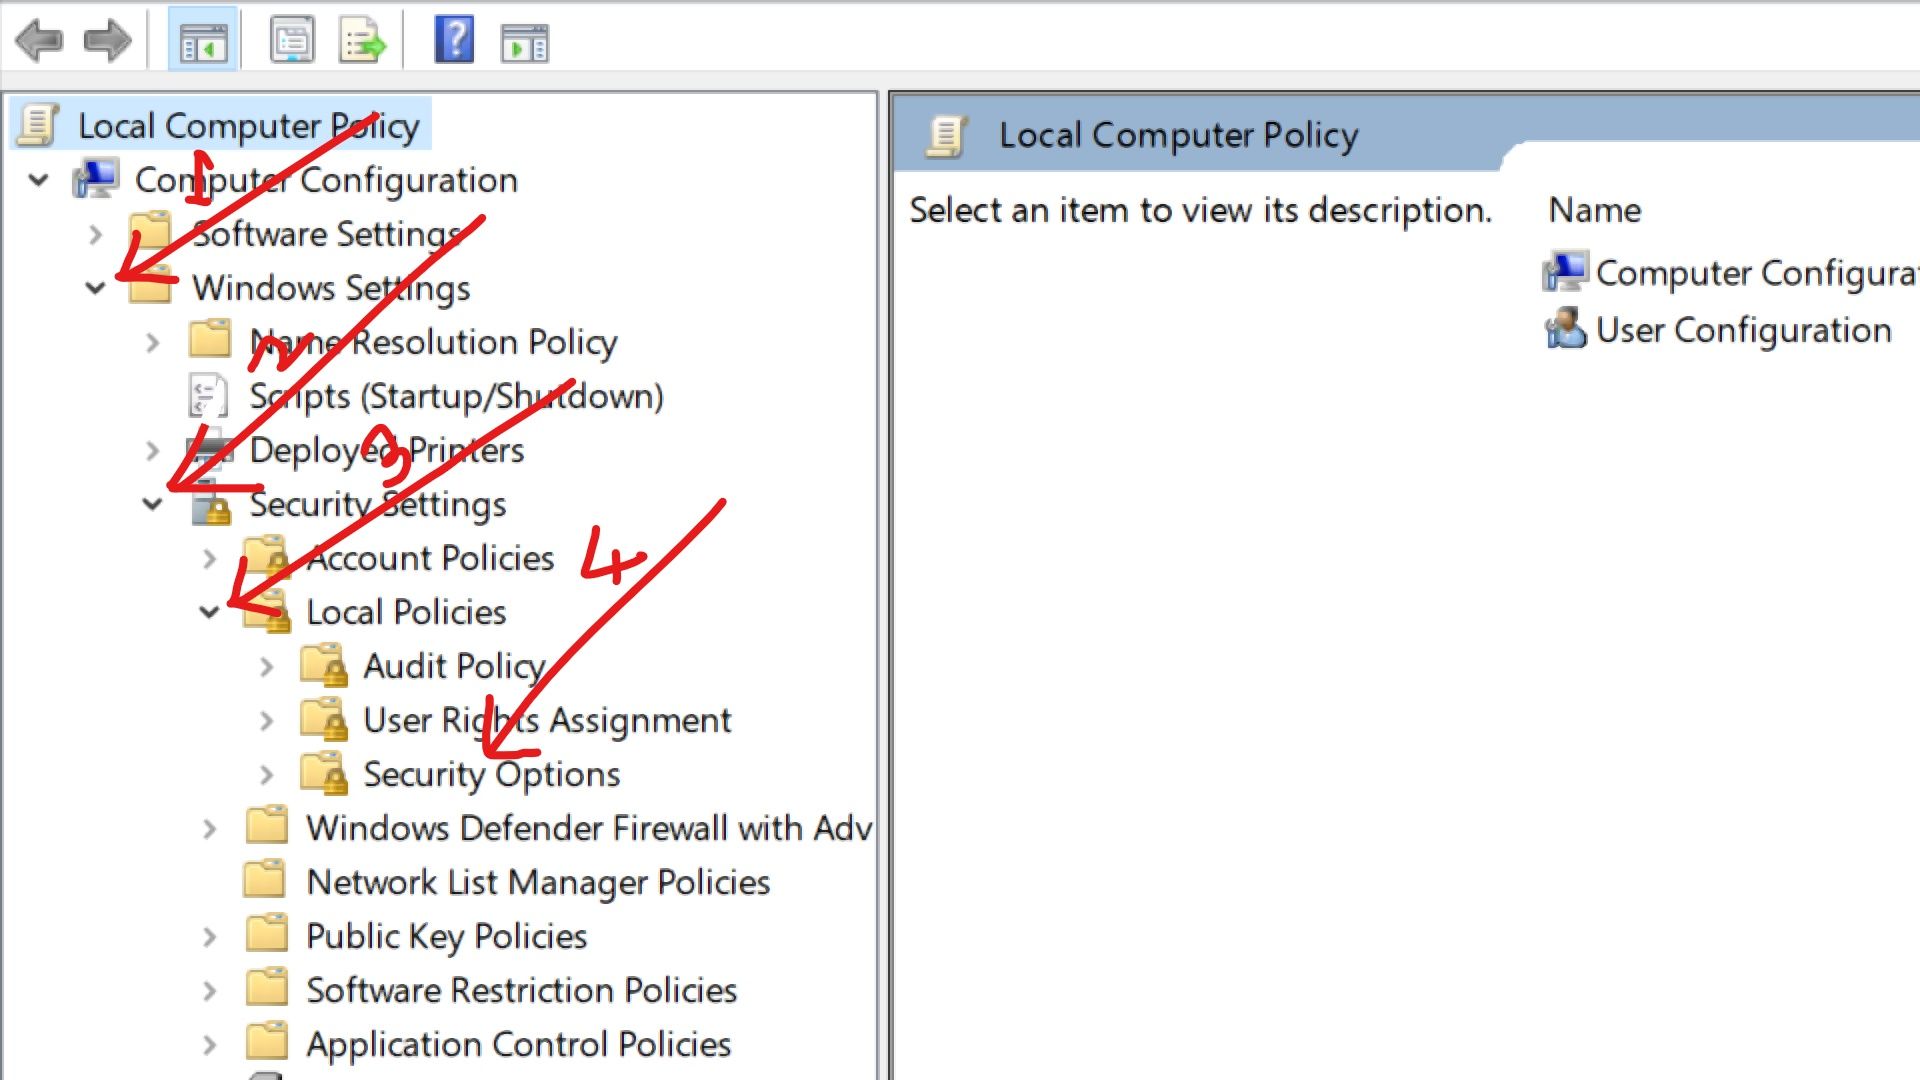
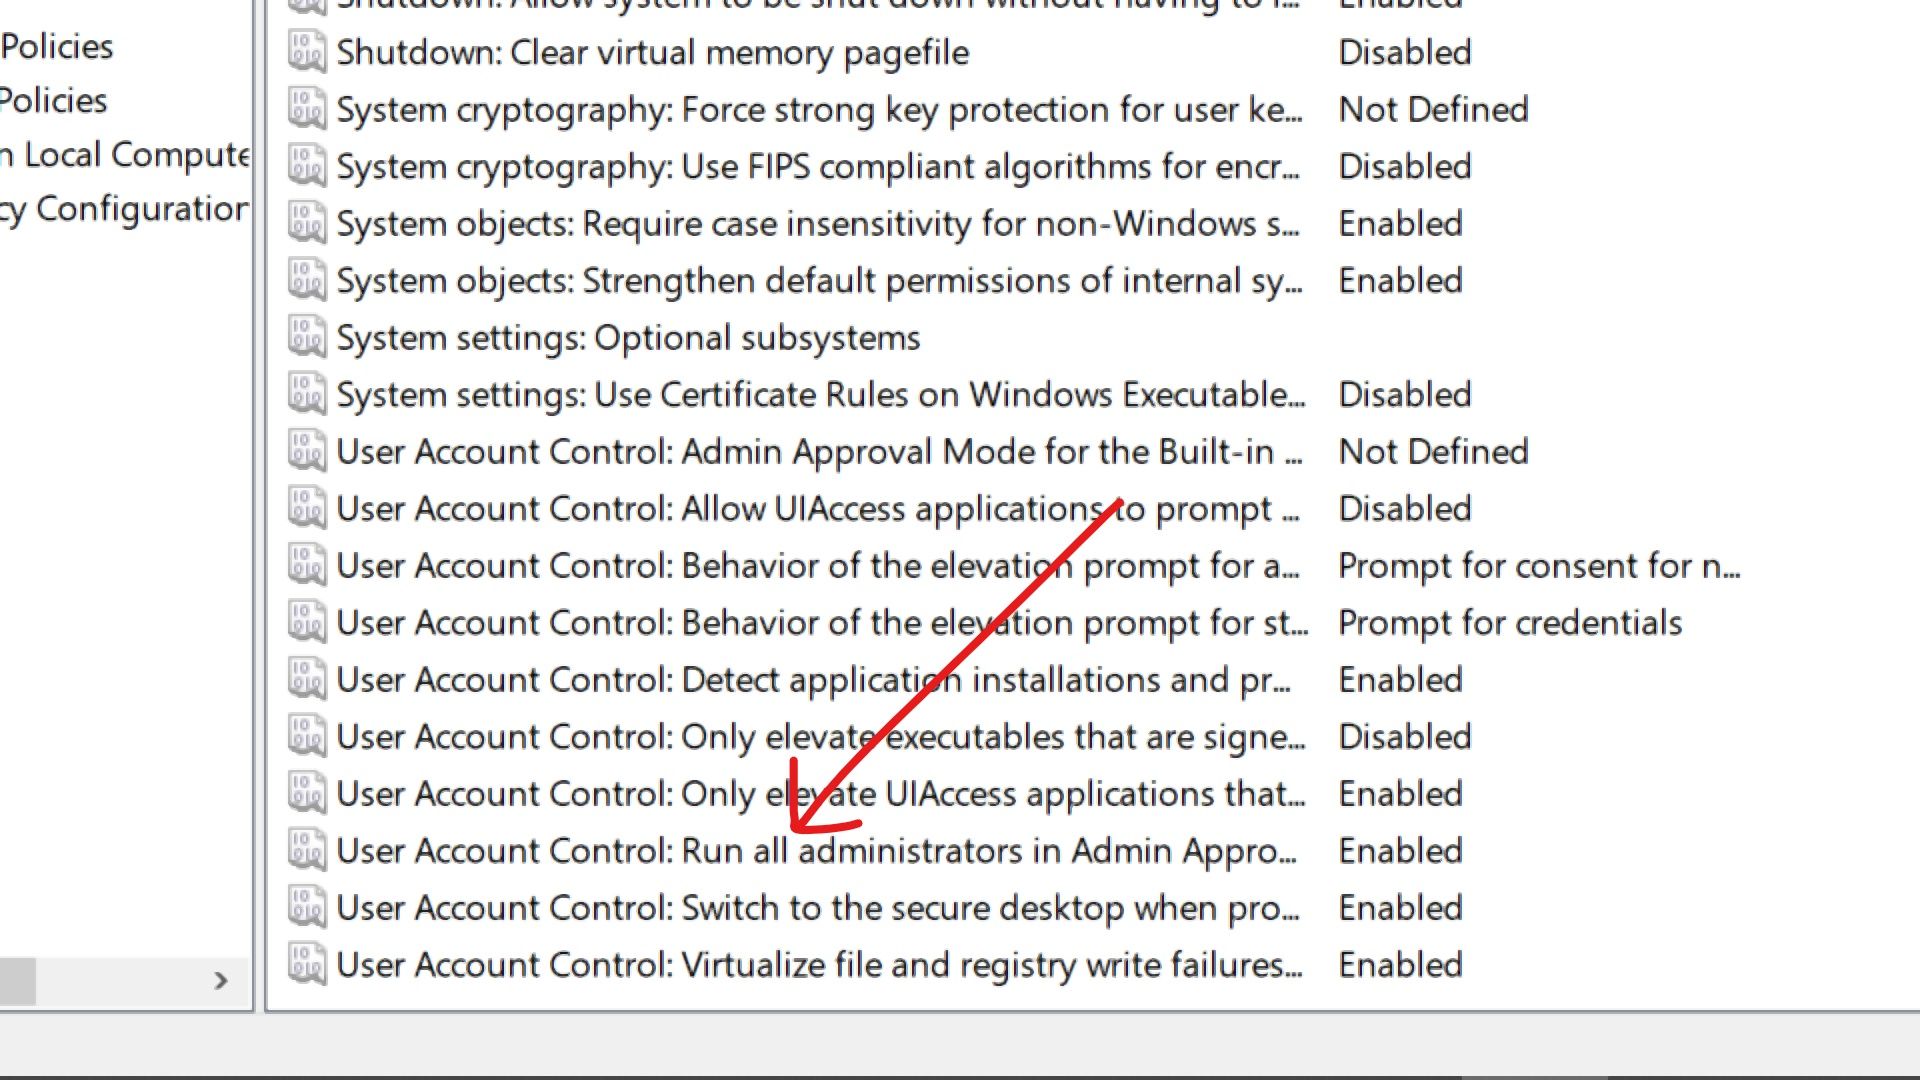
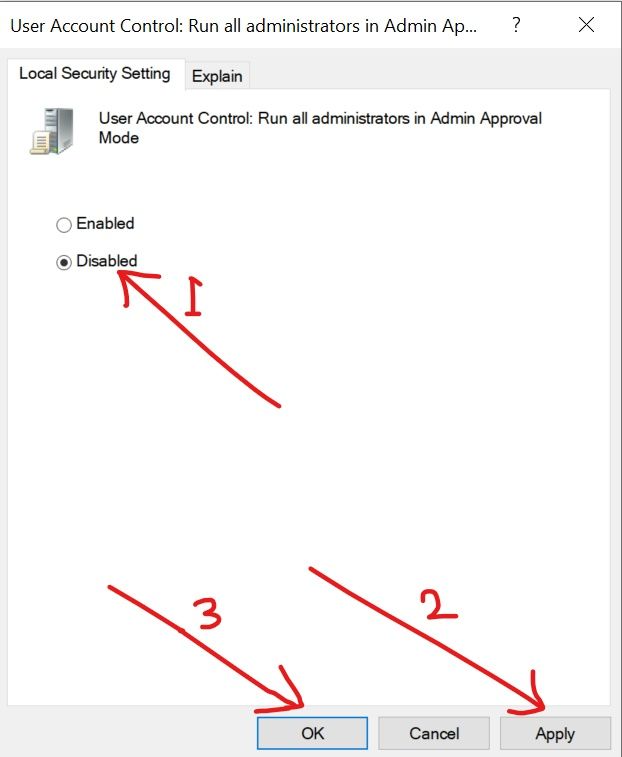
Step 5: Navigate to the bottom and double-click «User Account Control: Run all administrators in Admin Approval Mode».
Step 6: Select Disable, click Apply, and then Ok.
Conclusion
This article showed you 5 different ways you can fix the «An administrator has blocked you from running this app» error.
This error message is only one of the 3 ways the error could come up.
If you’re getting it in the form of «Your system administrator has blocked this program Group Policy, GPO, Regedit», then solution 5 is for you.
If you’re getting it in the form of «Your system administrator has blocked this program uTorrent, Avast, AVG», then solution 1 is for you.
In short, you’ll just need to figure out the source of the error and then choose the solution that’s right for your situation.
If you find this article helpful, consider sharing it with your friends and family.
Thank you for reading.
Learn to code for free. freeCodeCamp’s open source curriculum has helped more than 40,000 people get jobs as developers. Get started