
Краткая информация
Переменная частота обновления (VRR) – функция Windows 11 для полноэкранных игр и приложений, которые такую возможность не поддерживают. Она должна снижать риск возникновения разрывов изображения, когда на экране появляются дефекты в виде полос или отображается сразу несколько кадров. Такое может произойти даже когда ПК работает на мощном железе, например, если частота обновления монитора ниже, чем скорость с которой графическая карта создает и отправляет ему кадры.
Функция эта не новая, так как технология синхронизации кадров появилась давно и разные ее типы поддерживают многие видеокарты и мониторы. При этом, если вы уже какой-то из них пользуетесь, то, по утверждению Microsoft, включение «Variable Refresh Rate» никаких параметров не изменит, так как она не является альтернативой, а просто усиливает общий эффект.
Включение функции
«Variable Refresh Rate» – функция не обязательная, поэтому если вы собираетесь ею пользоваться, придется сначала ее включить.
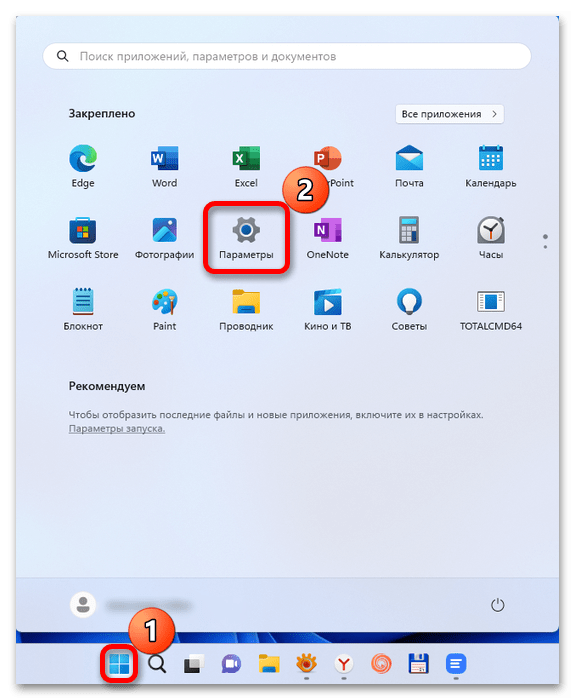
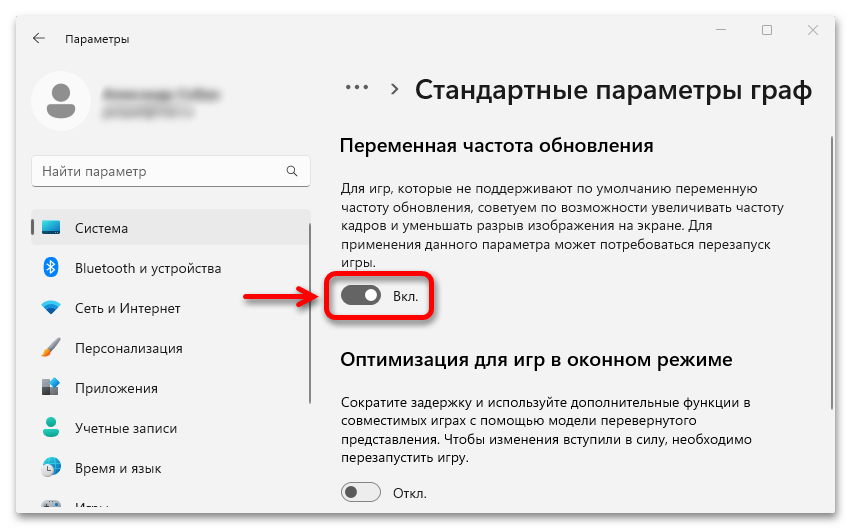
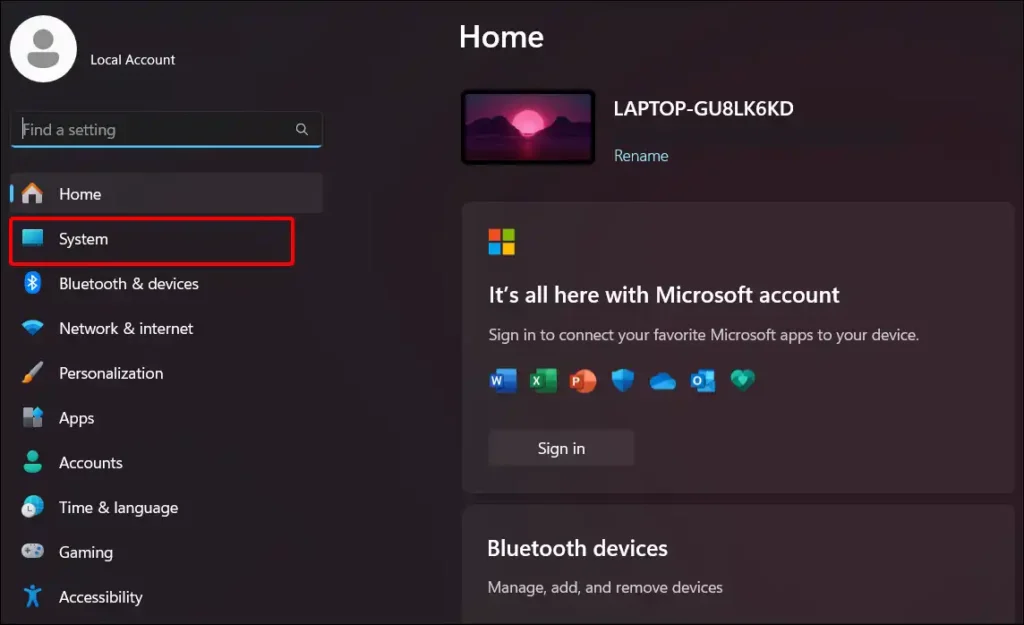
- Открываем меню «Пуск» и вызываем системные параметры.
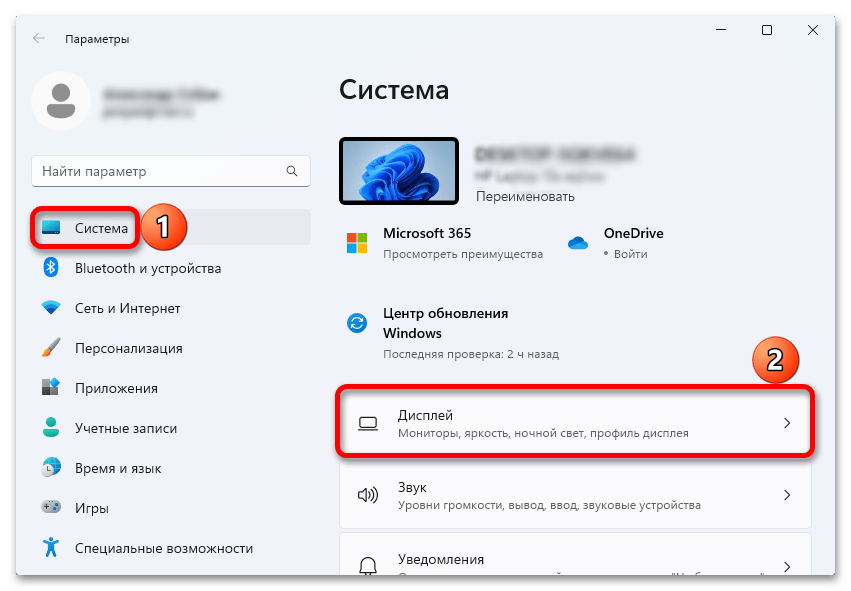
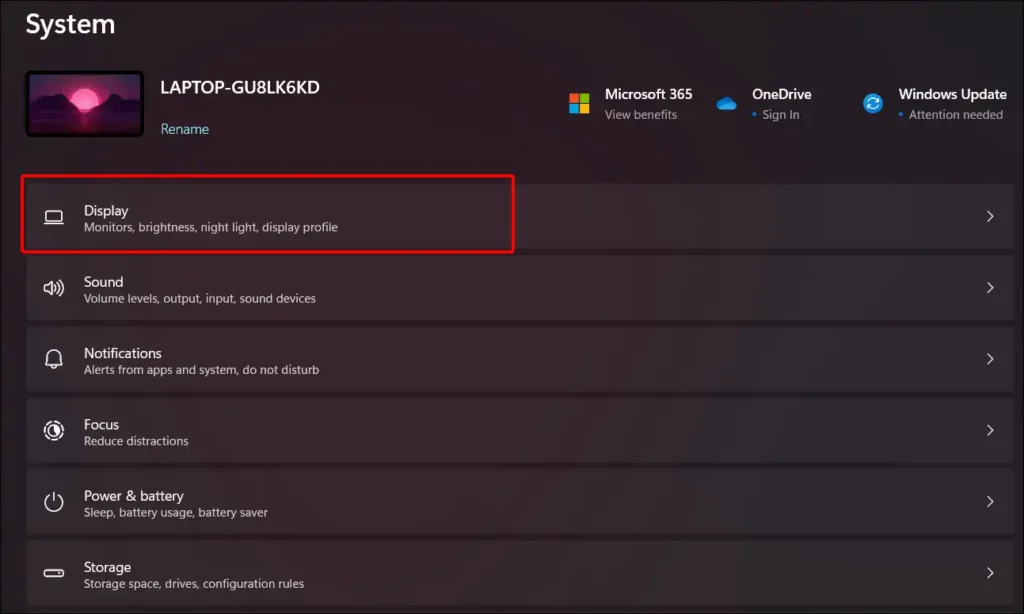
- Во вкладке «Система» открываем настройки дисплея,

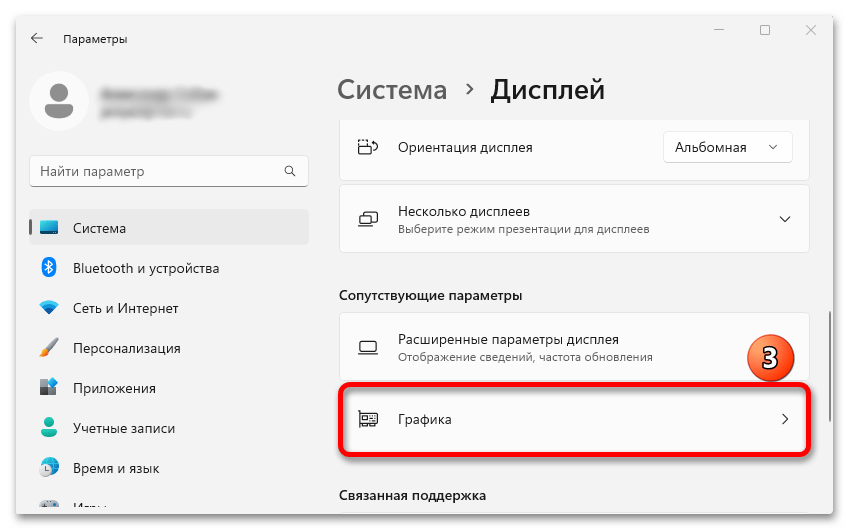
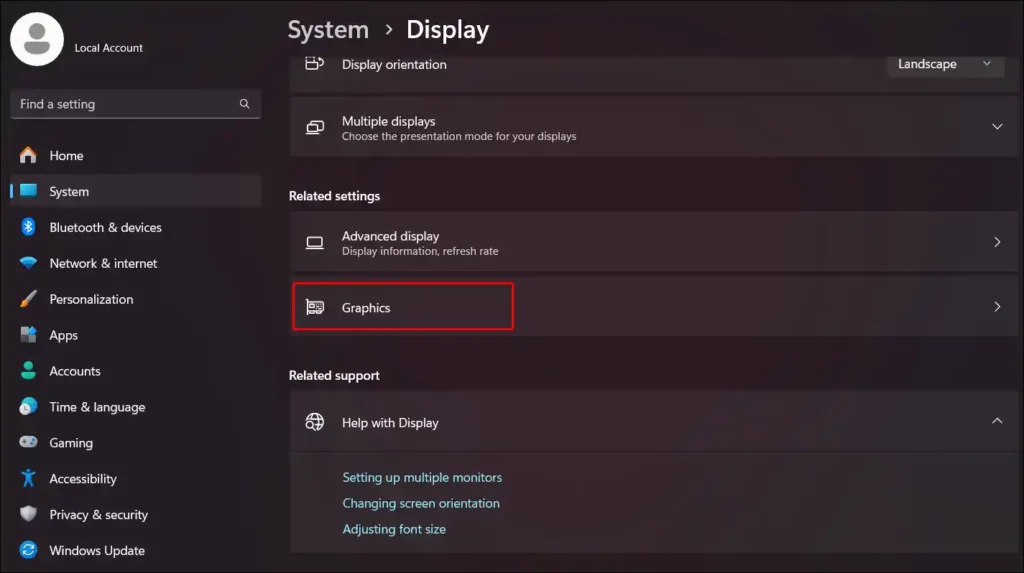
переходим в раздел с опциями графики,

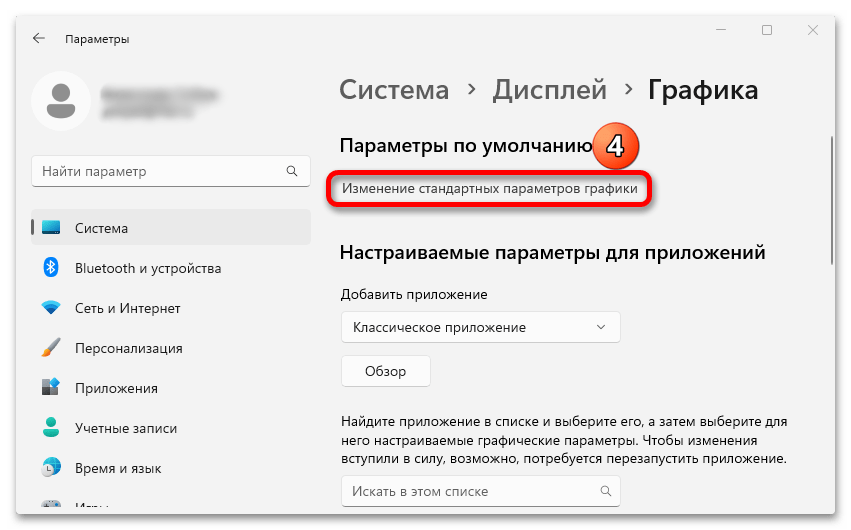
и кликаем «Изменение стандартных параметров графики».
- Перемещаем ползунок вправо, чтобы включить функцию VRR. Если игра в этот момент была запущена, ее рекомендуется перезапустить.
Возможные проблемы
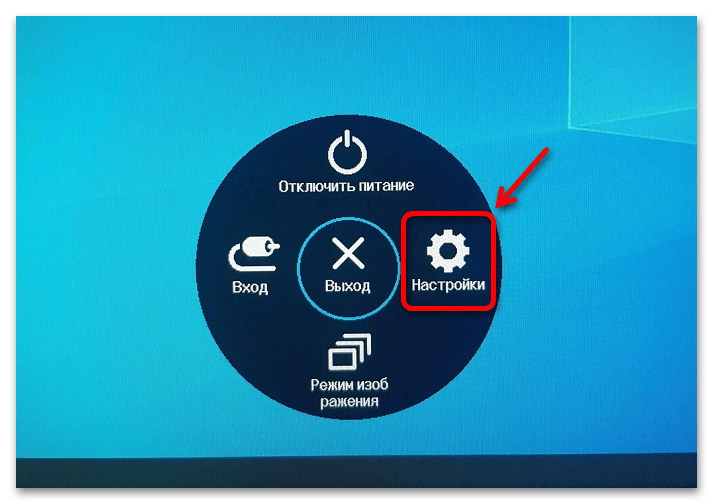
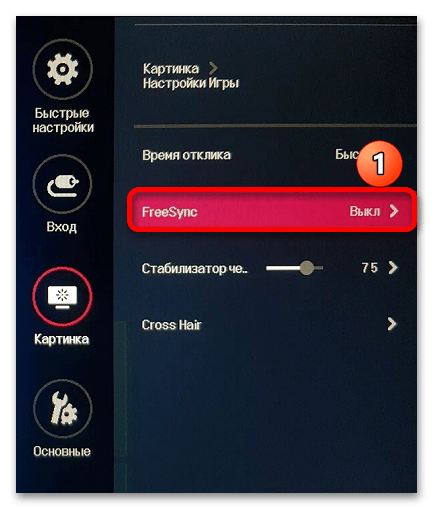
Впрочем, не всем пользователям доступна эта настройка, например она будет отсутствовать, если монитор не поддерживает «Freesync», «G-sync», «Adaptive Sync» или другой вариант технологии адаптивной синхронизации. Информация об этом должна быть в технических характеристиках устройства, но функцию можно поискать и в его настройках. Покажем, как это может выглядеть, на примере монитора LG.
- Вызываем меню (обычно это делается нажатием соответствующей кнопки на его корпусе) и переходим параметры.
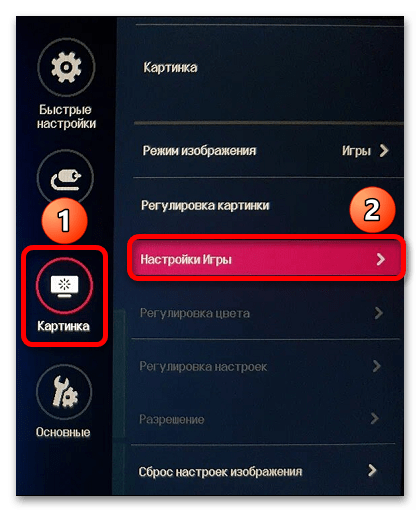
- В разделе «Картинка», открываем «Настройки игры»

и в данном случае видим функцию «Freesync».

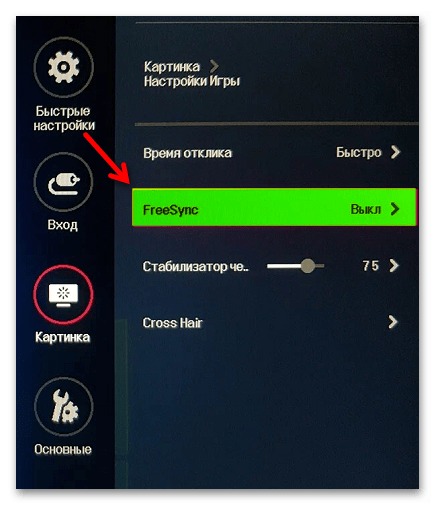
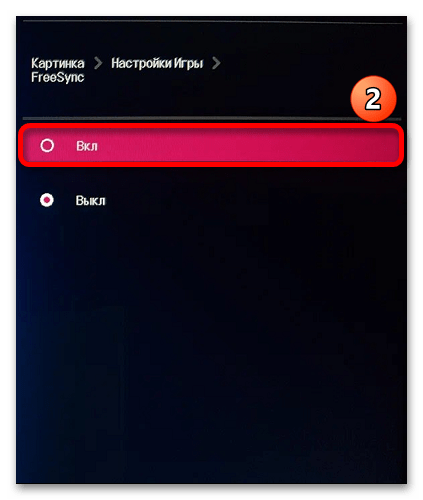
Если она нужна, выбираем ее

и включаем.
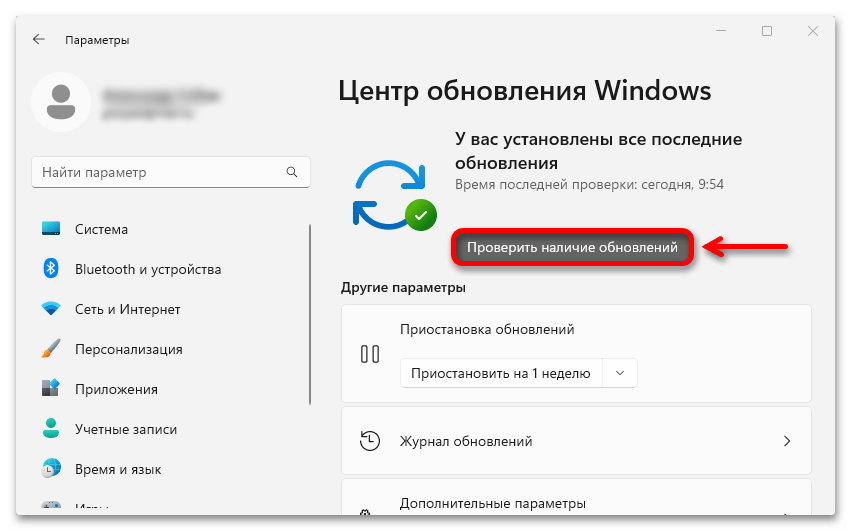
Несмотря на то что технология «Variable Refresh Rate» появилась еще в десятой версии операционной системы, Windows 11 получила ее не сразу, а только в обновлении 22H2. Кроме того, графический процессор, помимо поддержки функции адаптивной синхронизации, как у монитора, должен быть с драйверами WDDM 3.0, которые входят в финальную версию Windows RTM 21H2. Суть в том, что эти условия должны быть выполнены, поэтому если вы давно не обновляли ОС, обязательно сделайте это, используя подробную инструкцию, опубликованную на нашем сайте.
Подробнее: Обновление Windows 11 до последней версии
Наша группа в TelegramПолезные советы и помощь
Applies ToWindows 11 Windows 10
Частота обновления экрана — это количество обновлений изображения на экране в секунду. Например, экран с частотой 60 Гц будет обновляться 60 раз в секунду.
Каковы преимущества изменения частоты обновления дисплея?
Преимущества изменения частоты обновления дисплея зависят от типа просматриваемого содержимого и возможностей дисплея. Ниже приведены некоторые преимущества.
-
Игры: более высокая частота обновления может улучшить игровой процесс, уменьшив размытие движения и разрыв экрана. Это может дать вам конкурентное преимущество в быстро развивающихся играх, уменьшая задержку ввода и повышая скорость реагирования.
-
Просмотр и рукописный ввод. Более высокая частота обновления может сделать прокрутку и использование цифрового пера более плавной и естественной. Это также может уменьшить напряжение глаз и усталость путем минимизации мерцания и призрака.
-
Срок службы батареи. Снижение частоты обновления может сэкономить заряд батареи, уменьшив количество потребляемой дисплеем энергии. Это может быть полезно, если вы используете ноутбук или планшет и хотите продлить время работы батареи.
Изменение частоты обновления
Изменения частоты обновления дисплея можно изменить в параметрах дополнительного дисплея:
-
Выберите Параметры > Системный > Дисплей > Дополнительно .
На панели Сведений о отображении отображается текущее разрешение и частота обновления для выбранного дисплея, а также указано, поддерживает ли дисплей переменную частоту обновления (VRR).
Если ваша мотивация для изменения частоты обновления дисплея заключается в улучшении игрового процесса, это может оказаться ненужным, если ваш дисплей поддерживает VRR, так как многие популярные игры автоматически используют VRR для динамической адаптации частоты обновления, чтобы обеспечить лучший игровой интерфейс.
Чтобы изменить частоту обновления на странице Дополнительные параметры отображения, выполните следующие действия.
-
Выберите нужную частоту рядом с пунктом Выберите частоту обновления.
Частота обновления зависит от вашего дисплея и поддерживаемых им показателей. Выбор ноутбуков и внешних дисплеев будет поддерживать более высокую частоту обновления.
Важно: Раскрывающийся список частоты обновления отображает звездочку (*) рядом с частотой обновления, которая не поддерживает текущее разрешение. Если выбрать одну из этих частот, разрешение экрана изменится, чтобы достичь выбранной частоты обновления.
Что такое динамическая частота обновления (DRR)?
Windows 11 представляет новую функцию под названием Динамическая частота обновления (DRR), которая автоматически настраивает частоту обновления в зависимости от того, что вы делаете в данный момент. Это поможет вам получить все возможное из обоих миров: плавный опыт, когда он вам нужен для игр, просмотра или рукописного ввода, и более длительное время автономной работы, когда вы не делаете эти типы вещей.
Чтобы включить или отключить DRR, выполните приведенные далее действия.
-
Выберите Пуск > Параметры > Системный > Дисплей > Дополнительно .
-
Используйте переключатель Динамической частоты обновления , чтобы включить или выключить DRR. Примечание. Включить DRR можно только в том случае, если ваше оборудование поддерживает DRR.
Важно: DrR требует, чтобы дисплей поддерживал VRR и частоту обновления не менее 120 Гц. DRR не должен влиять на игры, предназначенные для VRR, но может ограничить максимальную частоту обновления других игр. Если вы включите DRR и обнаружите, что любимая игра работает с более низкой частотой обновления, лучше всего отключить DRR.
Нужна дополнительная помощь?
Нужны дополнительные параметры?
Изучите преимущества подписки, просмотрите учебные курсы, узнайте, как защитить свое устройство и т. д.
This article explains the steps to turn on or off Variable Refresh Rate (VRR) for games in Windows 11.
Variable refresh rate (VRR) allows a monitor with VRR capabilities, including AMD’s FreeSync, Nvidia’s G-SYNC, and VESA DisplayPort Adaptive-Sync, to adjust its refresh rate based on the frame rate of the image being displayed.
For DirectX 11 full-screen games that do not support VRR natively, this feature will enable the machine to output higher frame rates and help reduce screen tearing in games.
This setting will only appear if your machine has the necessary drivers and a VRR-capable monitor. Otherwise, you won’t see the settings.
Turn on or off Variable Refresh Rate (VRR) via Windows Settings
As described above, VRR enhances your VRR-capable monitors to adjust their refresh rate based on the image’s frame rate.
Here’s how to turn it on or off.
First, open the Windows Settings app.
You can do that by clicking on the Start menu and selecting the Settings app. Press the keyboard shortcuts (Windows key + I) to launch the Settings app.
When the Settings app opens, click the System button on the left.
On the right, click on the Display tile to expand.

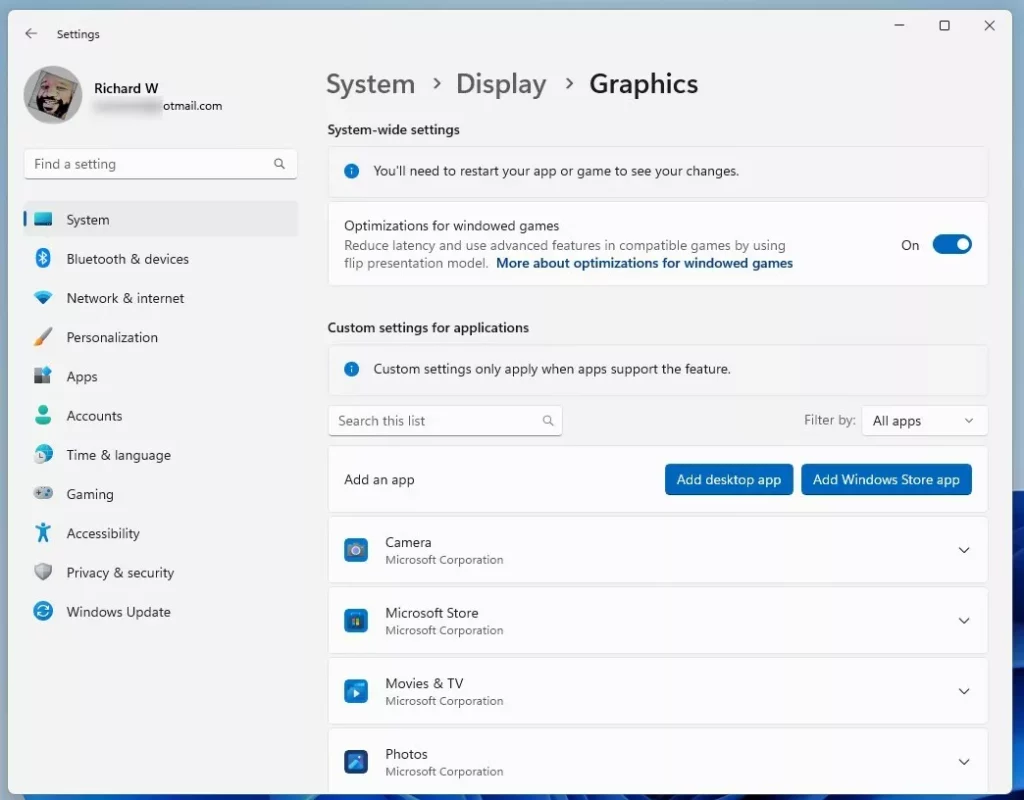
On the System -> Display settings pane, under Related settings, select the Graphics tile to expand.
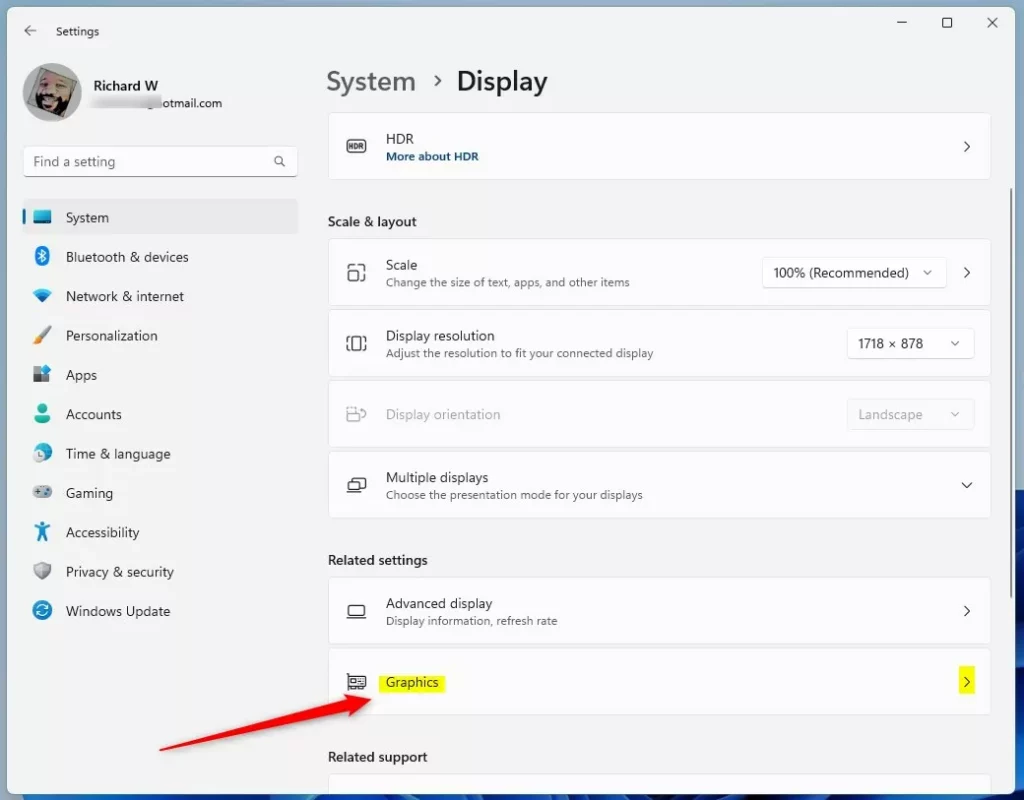
On the System -> Display -> Graphics settings pane, click the Advanced graphics settings at the bottom to expand.
Then, toggle the button for Variable refresh rate to the On position to enable.
To disable it, toggle the button back to the Off position.
Turn On or Off Variable Refresh Rate (VRR) via the Registry Editor
Alternatively, users can turn Variable Refresh Rate (VRR) on or off via the Windows Registry Editor.
To do that, first, open the Windows Registry, and navigate to the folder key path as listed below.
HKEY_CURRENT_USER\Software\Microsoft\DirectX\UserGpuPreferences
If you don’t see the UserGpuPreferences folder key, right-click on the DirectX key, then create the subkey (UserGpuPreferences) folders.
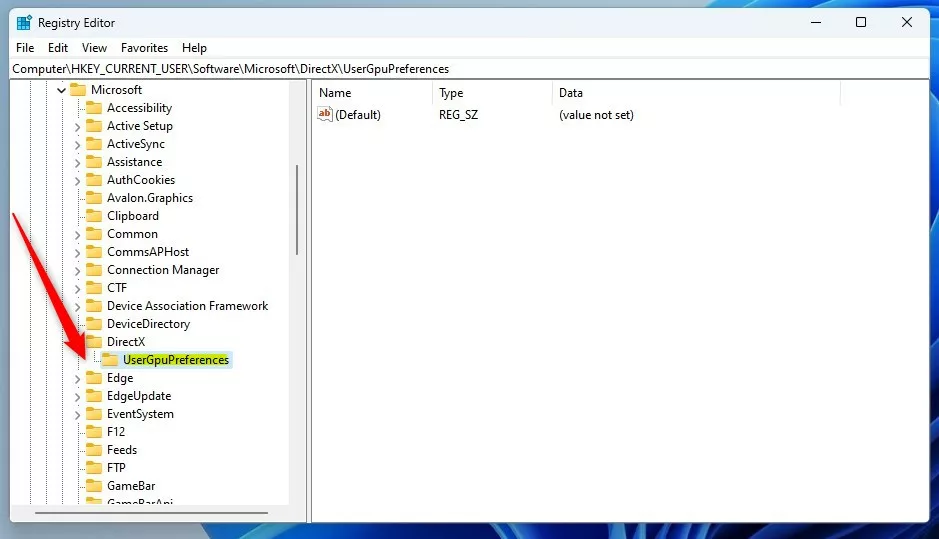
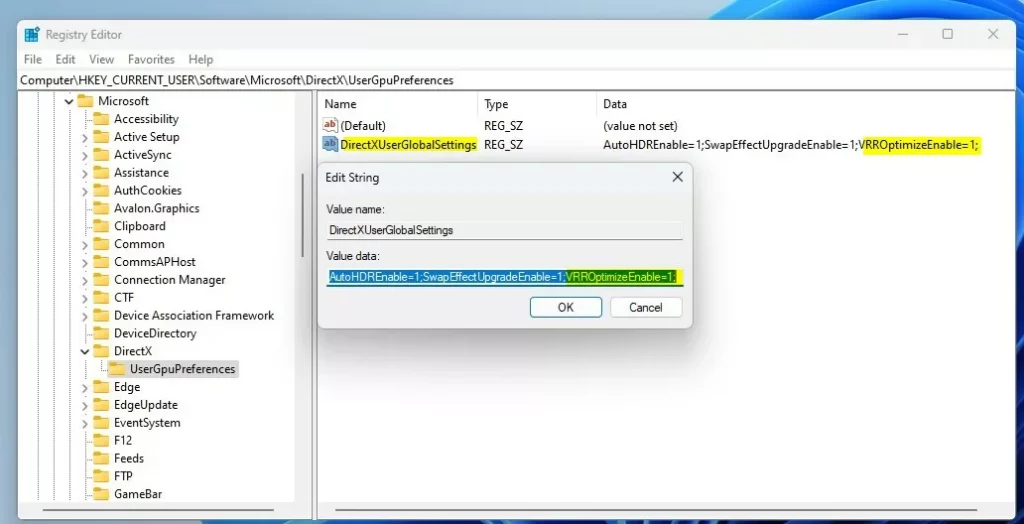
Right-click on the right pane of the UserGpuPreferences folder key and select New -> String. Next, type a new string value named DirectXUserGlobalSettings.
Double-click the new value name (DirectXUserGlobalSettings) and enter the Value data of 1 to the end of the string for VRROptimzeEnable to enable the VRR feature.
A Value data of 0 will turn off the VRR feature.
That should do it!
Reference:
Microsoft.com
Conclusion:
- Enabling Variable Refresh Rate (VRR) in Windows 11 can significantly enhance the gaming experience by allowing VRR-capable monitors to adjust their refresh rate based on the frame rate of the displayed image.
- This feature is particularly beneficial for DirectX 11 full-screen games that lack native VRR support, as it can help increase frame rates and reduce screen tearing.
- Users can easily toggle VRR on or off via Windows Settings by navigating through the System > Display > Graphics settings panel and accessing the Advanced graphics settings.
- Alternatively, advanced users can utilize the Windows Registry Editor to enable or disable VRR by modifying the Value data for the VRROptimzeEnable string value under the UserGpuPreferences key path.
- Users can refer to the official Microsoft DevBlog post linked in the reference section for more detailed information.
On Windows 11, Variable Refresh Rate (VRR) is a feature that allows your monitor to adjust its refresh rate in real-time to match the frame rate of the content you’re displaying. It also reduces screen tearing and stuttering and gives a smoother gaming and video-watching experience.
You can enable or disable the Variable Refresh Rate feature in Microsoft’s Windows 11. In this article, I have shared with you how to enable or disable Variable Refresh Rate on Windows 11 step-by-step. Let me tell you that this VRR mode is also available in the Windows 10 version, which is very similar to the VRR feature of Windows 11.
To use VVR mode in Windows 11, your PC or laptop must have a VVR-compatible graphics card. The graphics cards required for the VRR feature to work are NVIDIA G-Sync and AMD FreeSync.
To turn on Variable Refresh Rate (VRR) mode on a Windows 11-running PC or laptop:
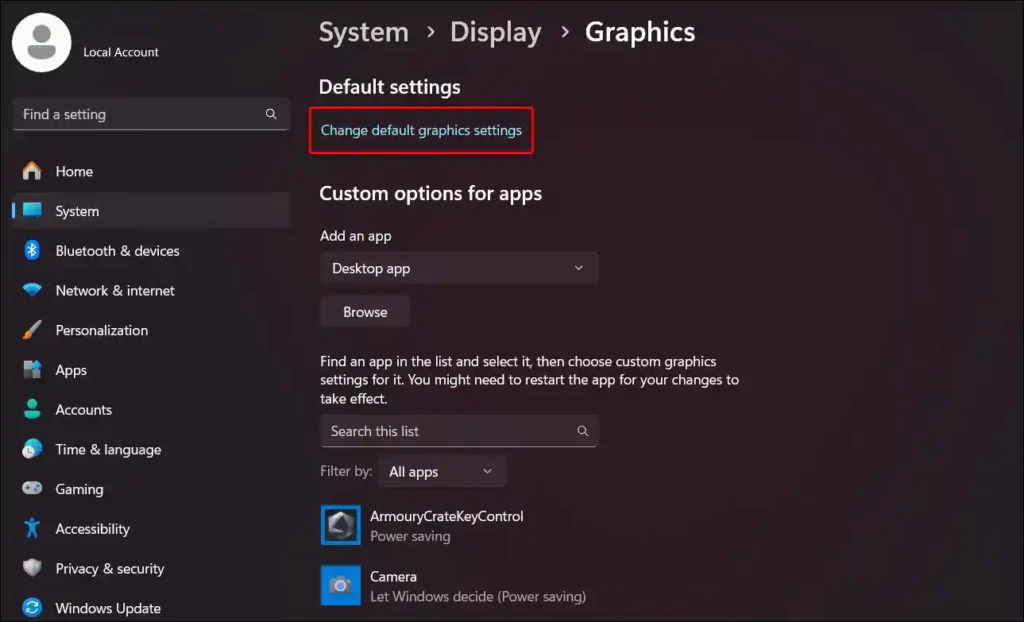
1. Go to Windows 11’s Settings by Pressing Windows + I Key on Keyboard.
2. Click on System.
3. Click on Display.
4. Scroll Down and Click on Graphics.
5. Click on Change Default Graphics Settings Under the Default Settings.
6. Turn On Toggle Switch Under Variable Refresh Rate Section.
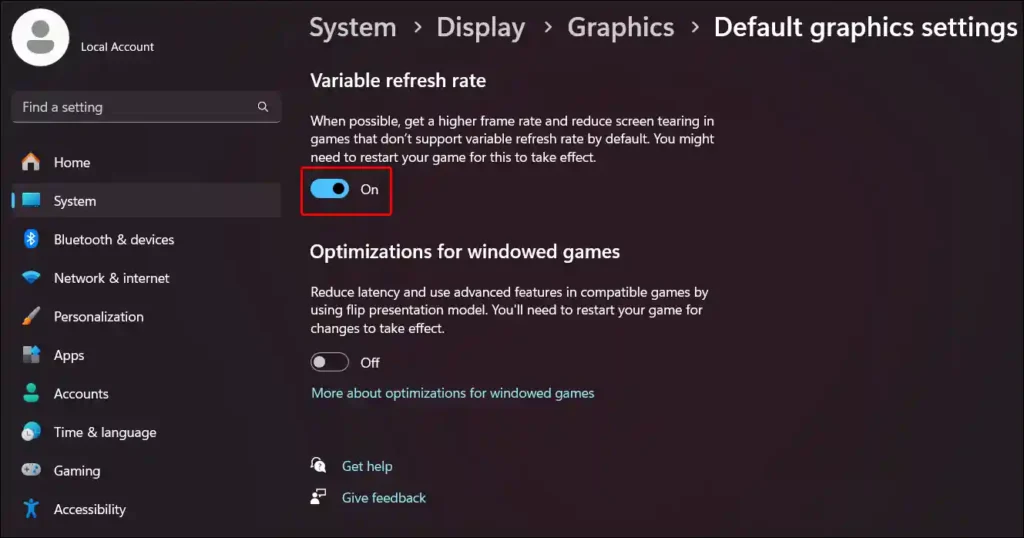
As soon as you turn on this toggle switch, VRR mode will be enabled on your Windows 11 PC or laptop.
Also read: How to Disable Snipping Tool on Windows 11
How to Disable Variable Refresh Rate on Windows 11
Many times, Windows 11 users want to turn off this Variable Refresh Rate on their PC or laptop for various reasons. If you also want to turn off this feature, then follow the steps given below carefully.
To turn off Variable Refresh Rate (VRR) mode on Windows 11:
- Open Settings on Windows 11.
- Click on System.
- Click on Display > Graphics.
- Click on Change Default Graphics Settings Under the Default Settings.
- Turn Off Toggle Switch Under Variable Refresh Rate.
Now VRR mode is disabled on your Windows 11 PC.
Also read: How to Disable News Feed from Widgets on Windows 11
I hope you have found this article helpful. And you have learned to enable and disable Variable Refresh Rate in Windows 11. Share this article as much as possible.
Hey! This is Mr. Rohit, Founder and Author of Techy Snoop. and I write How to guides about iOS, Android, Windows and Social internet and Technology news.
In this article, we’ll dive into the world of VRR in Windows 11, exploring its benefits, how it works, and what you need to do to get started. Additionally, we’ll cover how to enable or disable VRR.
First, here is a quick step-by-step guide on how to enable or disable VRR in Windows 11:
- Click on the Start menu and select “Settings” (gear icon)
- In the Settings app, click on “System”
- Then, select “Display
- Look for the “Variable Refresh Rate” option. If it’s available, click on the toggle switch to enable or disable VRR
However, please note that this is just an overview of the steps. As you continue reading the blog, you’ll find more detailed, step-by-step instructions on how to enable or disable VRR in Windows 11.
What is VRR and how it works ?
Variable Refresh Rate (VRR) is a technology that allows your monitor’s refresh rate to dynamically adjust to match your graphics card’s frame rate.
As a result, this eliminates the problem of screen tearing, which occurs when your monitor’s refresh rate and your graphics card’s frame rate are out of sync.
How VRR works ?
- Frame rate fluctuations: Firstly, in traditional monitors, the refresh rate remains constant. This can lead to inconsistent frame rates during gameplay, especially in demanding titles.
- VRR Synchronization: Secondly, VRR monitors, on the other hand, can adjust their refresh rate to match the frame rate your graphics card is outputting. This ensures that each frame is displayed at the exact moment it is rendered, eliminating screen tearing.
- Smoother gameplay: Lastly, VRR results in a smoother gaming experience as there are no sudden jumps or stutters in the image. This is particularly noticeable in fast-paced games or when playing at higher resolutions or frame rates.
Benefits of VRR
- Eliminates screen tearing: Primarily, VRR completely prevents screen tearing, providing a more eye-pleasing and immersive gaming experience.
- Reduces input lag: Additionally, VRR can also reduce input lag, making gameplay feel more responsive and improving overall performance.
- Improves visual quality: Furthermore, by matching the refresh rate to the frame rate, VRR can help improve the overall visual quality of your games.
Also Check: How do I disable Filmstrip in Microsoft Photo Viewer App ?
Compatibility and Optimization for VRR in Windows 11
To fully enjoy the benefits of VRR in Windows 11, you’ll need compatible hardware:
- VRR-compatible monitor: Firstly, look for monitors with G-SYNC (NVIDIA) or FreeSync (AMD) technology. These displays can dynamically adjust their refresh rate to match your GPU’s output.
- Compatible graphics card: Secondly, ensure your graphics card supports VRR. NVIDIA GeForce GTX 10 Series or newer and AMD Radeon RX 480 or newer typically offer VRR compatibility.
Once you have the right hardware, follow these tips to optimize your VRR experience:
- Enable VRR: to begin with, go to “Settings” > “System” > “Display” and turn on “Variable Refresh Rate.”
- Check Compatibility: Next, ensure your games support VRR by looking for “G-SYNC Compatible” or “FreeSync Premium” labels.
- Adjust In-Game Settings: Additionally, explore options like “Low Latency Mode” or “Frame Rate Cap” for better performance.
- Update Drivers: Furthermore, keep your graphics card drivers current for optimal compatibility.
- Use a Quality HDMI Cable: Lastly, connect your PC to your VRR monitor with a high-quality HDMI 2.1 cable for the best results.
How to Enable VRR in Windows 11 ?
Enabling Variable Refresh Rate (VRR) in Windows 11 can enhance your gaming experience by providing smoother visuals and reducing screen tearing. Here’s a detailed guide on how to enable VRR using various methods:
Enable VRR in Windows Settings
Open Settings:
- First, click on the Start menu (Windows icon) on the taskbar.
- Then, select Settings (gear icon) or press Windows + I on your keyboard.
Navigate to Display Settings:
- Next, in the Settings window, click on System.
- After that, select Display from the right sidebar.
Enable Variable Refresh Rate:
- Now, scroll down to the Advanced display section.
- Subsequently, click on Display adapter properties for your display.
- In the new window, go to the Monitor tab.
- Then, check the box for Variable Refresh Rate (if available).
- Finally, click OK to apply the changes.
Also Check: How to Rename Monitors in Windows 11 ?
Enable VRR in Graphics Control Panel
Depending on your graphics card, you may need to enable VRR through the graphics control panel (NVIDIA Control Panel or AMD Radeon Software).
For NVIDIA Users:
Open NVIDIA Control Panel:
- To begin, right-click on the desktop and select NVIDIA Control Panel.
Navigate to Set Up G-SYNC:
- Next, in the left sidebar, click on Display and then select Set up G-SYNC.
Enable G-SYNC:
- After that, check the box for Enable G-SYNC, G-SYNC Compatible.
- Then, choose whether to enable it for full-screen mode or both full-screen and windowed mode.
- Lastly, click Apply to save the changes.
For AMD Users:
Open AMD Radeon Software:
- Firstly, right-click on the desktop and select AMD Radeon Software.
Navigate to Display Settings:
- Secondly, click on the Settings gear icon in the top right corner.
- Then, select the Display tab.
Enable Radeon FreeSync:
- After that, toggle the Radeon FreeSync option to On.
- Finally, adjust any additional settings as needed.
Method Enable VRR in Game Settings
Some games have their own VRR settings that you can enable:
Launch the Game:
- To start, launch the game you want to configure.
Access Game Settings:
- Then, go to the Options or Settings menu within the game.
Find VRR Settings:
- Next, look for options related to G-SYNC, FreeSync, or Variable Refresh Rate.
- Subsequently, enable these settings if available.
Adjust Additional Settings:
- Lastly, you may also find options like Low Latency Mode or Frame Rate Cap that can further enhance your VRR experience.
Also Check: How to deploy CrowdStrike using Intune for endpoint security management ?
How to disable VRR in Windows 11 ?
Disabling Variable Refresh Rate (VRR) in Windows 11 can be useful if you encounter issues such as screen flickering or if you prefer a fixed refresh rate for certain applications.
Here’s a detailed guide on how to disable VRR using various methods:
Enable VRR through the Windows 11 Settings App
- Firstly, press the Windows key + I to open the Settings app.
- Secondly, click on System.
- Then, click on Display.
- After that, scroll down to the Advanced display section.
- Subsequently, click on Refresh rate.
- Now, toggle the switch next to Variable refresh rate to the On position.
- Finally, if you have multiple monitors connected, select the monitor you want to enable VRR for from the dropdown menu.
Enable VRR through the NVIDIA Control Panel (for NVIDIA GPU users)
- To begin, right-click on an empty area of the desktop and select NVIDIA Control Panel.
- In the NVIDIA Control Panel, first click on Display.
- Then, click on Change resolution.
- Next, click on Refresh rate.
- After that, select the monitor you want to enable VRR for from the dropdown menu.
- Subsequently, check the box next to Enable G-Sync (this will enable VRR).
- Lastly, click Apply.
Enable VRR through the AMD Radeon Settings (for AMD GPU users)
- First, right-click on an empty area of the desktop and select AMD Radeon Settings.
- In the AMD Radeon Settings, next click on Display.
- Then, click on Display settings.
- After that, click on Refresh rate.
- Subsequently, select the monitor you want to enable VRR for from the dropdown menu.
- Now, check the box next to AMD FreeSync (this will enable VRR).
- Finally, click Apply.
Enable VRR through the Graphics Card Driver Settings
- To start, press the Windows key + X and select Device Manager.
- In the Device Manager, first expand the Display Adapters section.
- Next, right-click on your graphics card and select Properties.
- In the Properties window, then click on the Driver tab.
- After that, click on Graphics Settings.
- Subsequently, select the monitor you want to enable VRR for from the dropdown menu.
- Now, check the box next to Variable refresh rate (this will enable VRR).
- Lastly, click Apply.
Also Check: What are some essential keyboard shortcut for efficiently opening Computer Management in Windows 11 computer ?
How to check if VRR is working pc ?
Here are a few methods to verify if VRR (Variable Refresh Rate) is enabled and working on your Windows 11 PC:
Check Windows Settings
- Open Settings: First, click on the Start menu and select “Settings.”
- Navigate to Display: Next, go to “System” > “Display.”
- Verify VRR Status: Then, look for the “Variable Refresh Rate” option. If it’s toggled on, VRR is enabled.
Monitor Display Settings
- Access Monitor Menu: To begin, press the menu button on your monitor and navigate to the display settings.
- Check for VRR Indicator: After that, look for a setting or indicator related to VRR or adaptive sync. If it’s enabled, VRR is active.
Check Game Settings
- Launch a Game: First, start a game that supports VRR.
- Look for VRR Indicator: Then, check the game’s settings or display options. Some games have a VRR indicator or setting that you can enable.
Visual Inspection
- Observe Gameplay: Finally, pay attention to the gameplay. If you notice a smoother, more fluid experience without any screen tearing or stuttering, it’s likely that VRR is working.
Conclusion
Firstly, VRR technology in Windows 11 offers gamers a smoother, more immersive experience by eliminating screen tearing and reducing input lag.
Secondly, with the right hardware and proper configuration, you can easily enable VRR to enhance your gaming sessions.
Moreover, remember to check your monitor and graphics card compatibility, and follow the step-by-step guides provided to enable VRR through Windows Settings, graphics control panels, or in-game options.
While VRR can significantly improve your gaming experience, it’s important to note that you can always disable it if you encounter any issues or prefer a fixed refresh rate for certain applications.
By understanding how to enable, disable, and verify VRR functionality, you’re now equipped to optimize your Windows 11 gaming setup for the best possible performance.
Source: [ elevenforum, techysnoop, overclockers, blurbusters ]
Frequently Asked Question’s (FAQ’s)
Does Windows 11 have VRR ?
Yes, Windows 11 supports Variable Refresh Rate (VRR). This feature helps eliminate screen tearing and stuttering, providing a smoother gaming experience. To enable VRR, you’ll need compatible hardware (monitor and graphics card) and can activate it through Windows Set.
How to turn on variable refresh rate in Windows 11 ?
To enable Variable Refresh Rate (VRR) in Windows 11, open the Settings app, navigate to “System” > “Display,” and find the “Variable Refresh Rate” option. If available, toggle it to “On.” Make sure your monitor and graphics card support VRR for the best results.
Is VRR good for PC ?
Yes, VRR (Variable Refresh Rate) is great for PCs, especially for gaming. It eliminates screen tearing and stuttering, providing smoother gameplay. VRR is especially beneficial for fast-paced games and when playing at higher resolutions and frame rates.