
Все способы:
- Способ 1: Настройка BIOS/UEFI
- Способ 2: Запуск в режиме совместимости
- Способ 3: Проверка модуля TPM
- Способ 4: Обновление ОС и программных компонентов
- Вопросы и ответы: 4
Способ 1: Настройка BIOS/UEFI
Чаще всего ошибка «Van 9003» в игре Valorant на Windows 11 возникает из-за настроек BIOS/UEFI. Преимущественно с этим сталкиваются владельцы ноутбуков. Во-первых, можно включить безопасную загрузку – стандарт безопасности для загрузки устройства только с использованием программного обеспечения, которому доверяет изготовитель аппаратных компонентов. Некоторым пользователям удалось исправить ошибку, активировав ее.
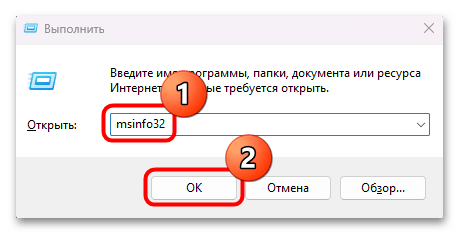
- Для начала можете проверить, включена ли безопасная загрузка на вашем ПК или ноуте. Для этого запустите встроенную утилиту «Сведения о системе»: одновременно нажмите на клавиши «Win + R», затем введите
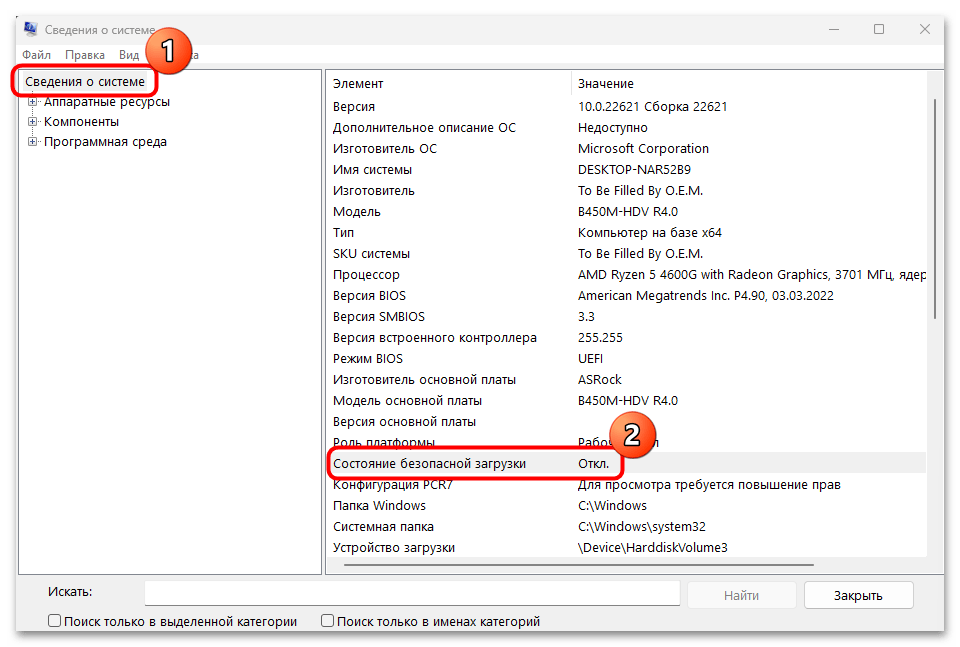
msinfo32и нажмите на кнопку «ОК». - На вкладке «Сведения о системе» располагается информация о состоянии безопасной загрузки. Найдите соответствующую строку и посмотрите сведения. Если она отключена, то попробуйте ее активировать.
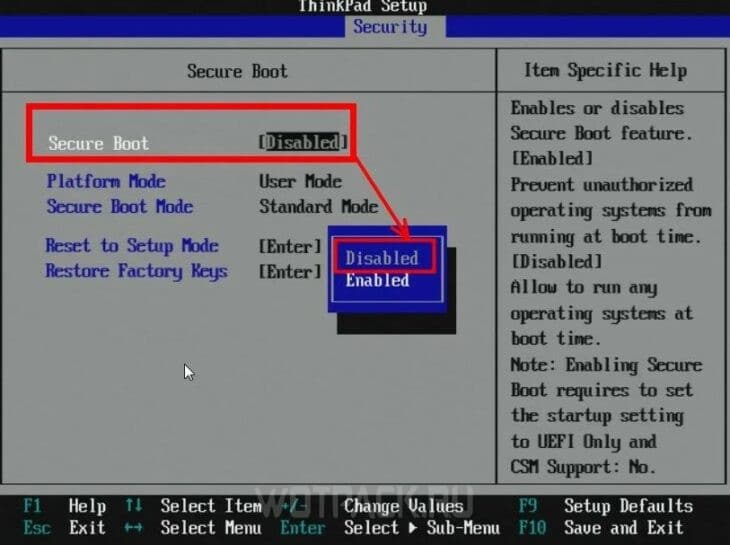
- Войдите в BIOS/UEFI. В зависимости от производителя и модели устройства алгоритм действий может отличаться. Мы разбирали способы входа в отдельных материалах.
Подробнее: Как попасть в BIOS на компьютере / ноутбуке
- Как правило, включение быстрой загрузки («Secure Boot») происходит через раздел «Security» — перейдите на одноименную вкладку и выберите для пункта значение «Available»/«Enable».
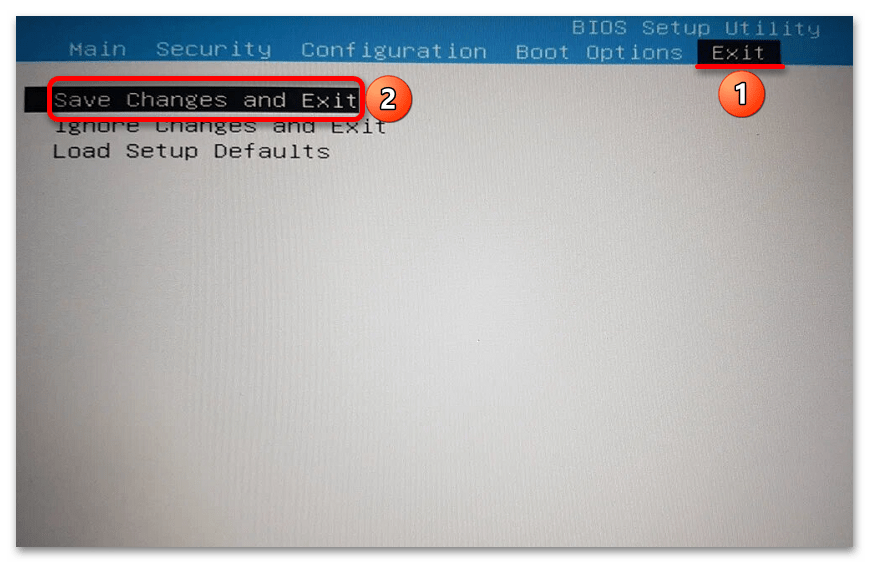
- Далее перейдите на вкладку «Exit» и выберите пункт «Save Changes and Exit», чтобы сохранить настройки и выйти.


После перезапуска системы проверьте, была ли исправлена ошибка при попытке запуска игры.
В некоторых версиях UEFI еще может помочь дополнительная настройка – выбор варианта «Windows UEFI Mode» у пункта «OS Type», который, как правило, располагается на вкладке «Boot».
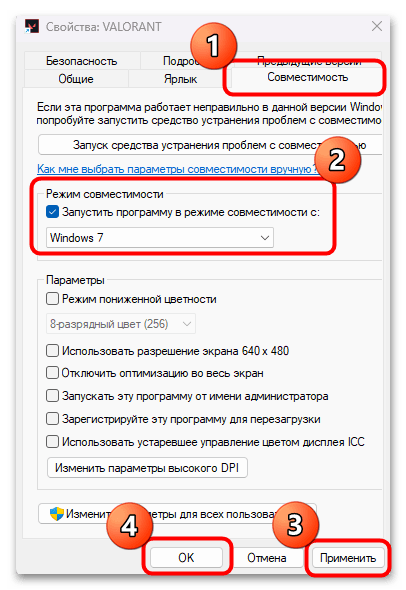
Способ 2: Запуск в режиме совместимости
Иногда рассматриваемую ошибку можно исправить, изменив параметры совместимости. Делается это в несколько простых нажатий:
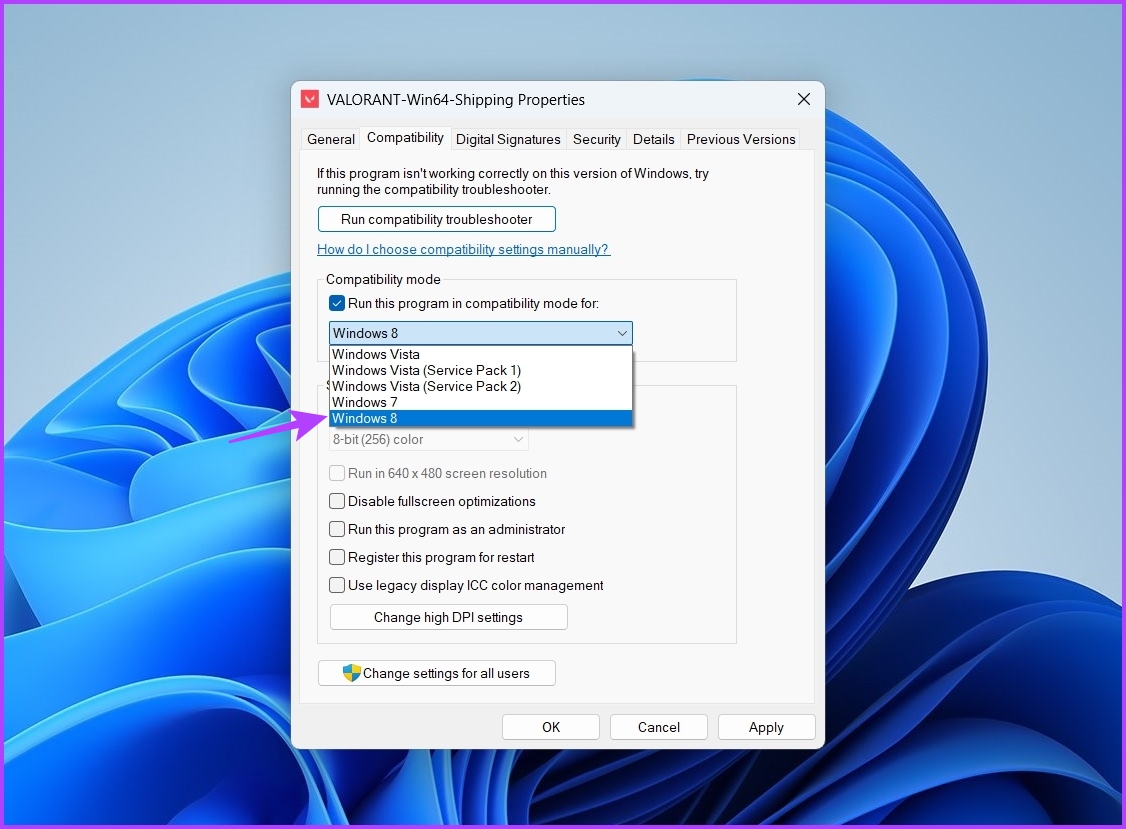
- Кликните правой кнопкой мыши по исполняемому файлу или ярлыку игры (не клиента), затем из контекстного меню выберите пункт «Свойства».
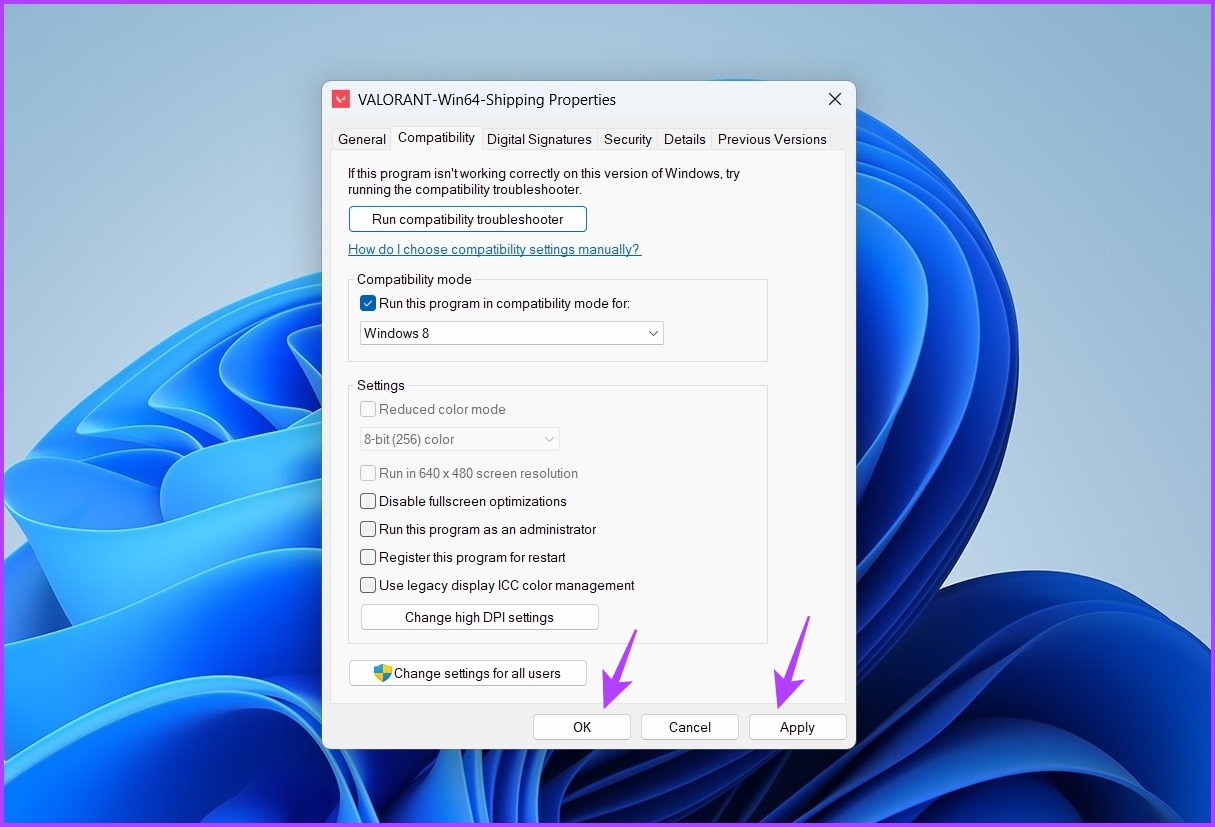
- Перейдите на вкладку «Совместимость» и отметьте опцию «Запустить программу в режиме совместимости с:» — откроется список вариантов. Из меню выберите другую операционную систему, например Windows 8 или 7, и нажмите на кнопку «Применить», потом на «ОК».
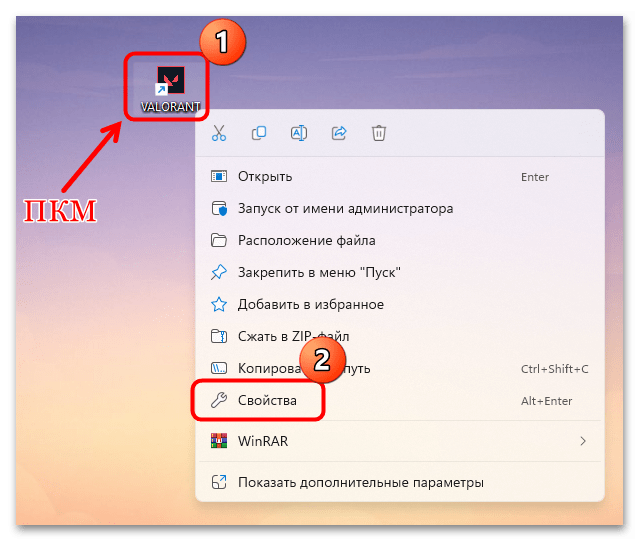
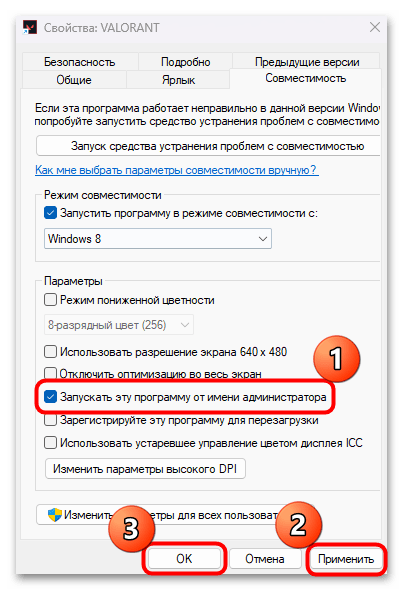
Также можете включить запуск игры с правами администратора по умолчанию, что иногда позволяет избежать различных проблем, связанных с ее открытием. Если бы проблема была в этом, то Valorant вовсе бы не запускалась, но иногда с помощью совокупности нескольких действий получается устранить проблему. Отметьте пункт «Запускать эту программу от имени администратора» и сохраните настройки файла.
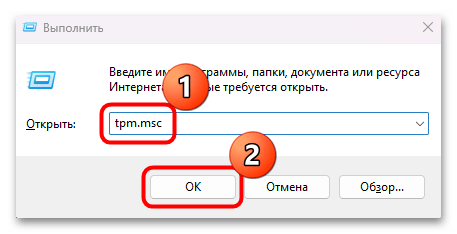
Способ 3: Проверка модуля TPM
Наличие доверенного платформенного модуля (TPM 2.0) – это одно из требований безопасности для операционной системы, наряду с функцией безопасной загрузки и виртуализации ЦП. Конечно, обновление до Windows 11 затруднительно без этого компонента, поэтому, скорее всего, он у вас предустановлен, но проверить это можно и с помощью встроенных средств:
- Через диалоговое окно «Выполнить» (одновременное нажатие на клавиши «Win + R») запустите утилиту «Управление доверенным платформенным модулем (TPM) на локальном компьютере», выполнив запрос
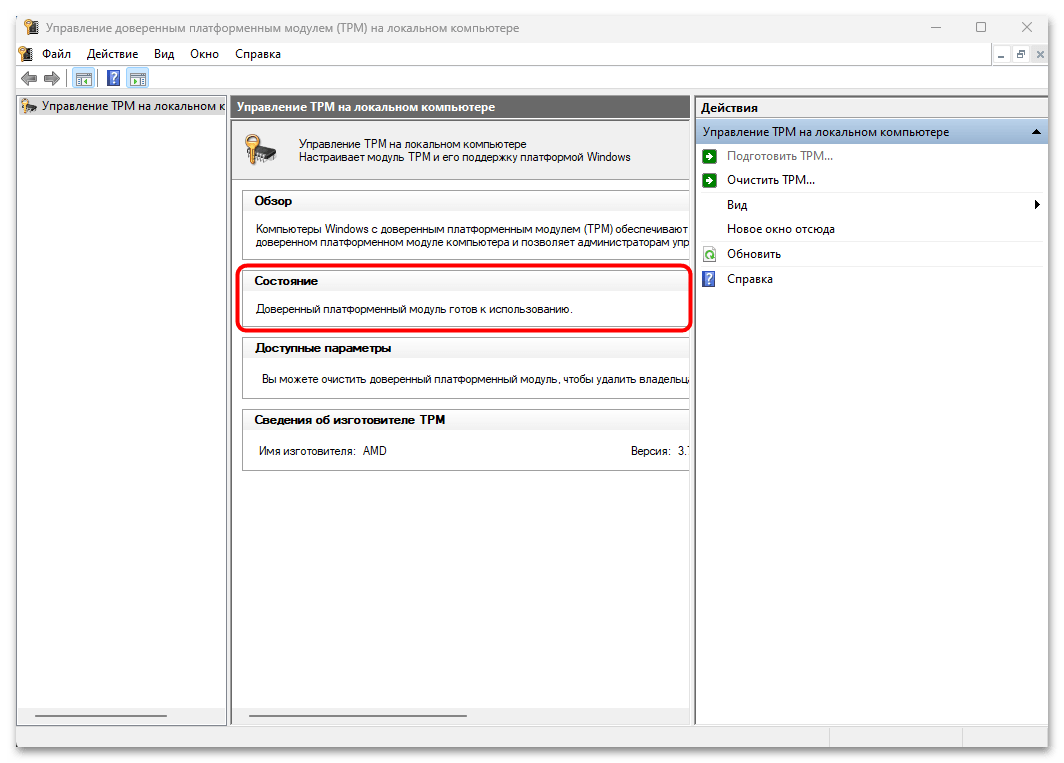
tpm.mscи нажав по кнопке «ОК». - Посмотреть, работает ли модуль TPM 2.0 на компьютере, можно в блоке «Состояние».
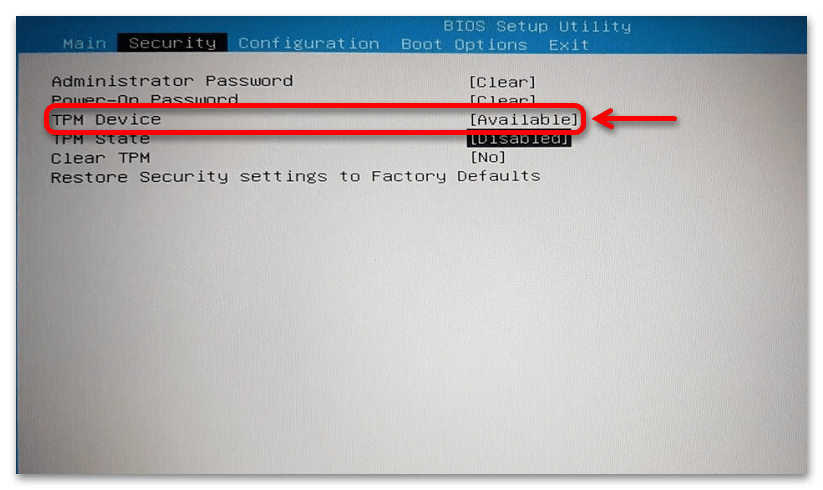
- Если информации нет и появляется ошибка о том, что найти совместимый TPM не удается, то, вероятно, его придется включить на аппаратном уровне – в BIOS/UEFI. Как зайти в него – смотрите в Способе 1 на Шаге 3. Перейдите на вкладку с параметрами безопасности – как мы уже писали выше, обычно она называется «Security», затем найдите параметр, в названии которого есть слово «TPM», к примеру это «TPM Device». Включите его, выбрав значение «Available».
- Если есть параметр «TPM State», «fTPM», «Trusted Platform Module» или даже «Security Chip» (это зависит от версии BIOS/UEFI), то для него также установите значение «Available».
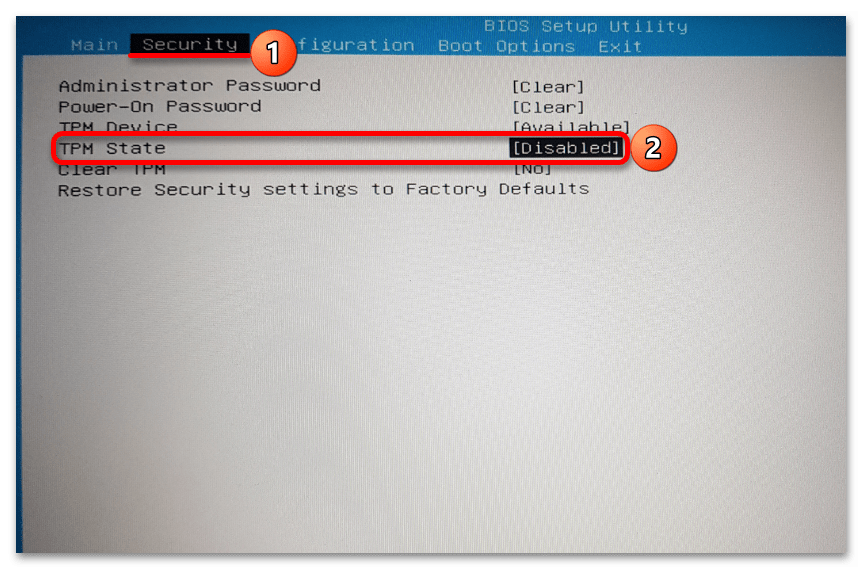
Останется выйти, сохранив настройки (вкладка «Exit», пункт «Save Changes and Exit»), после чего система будет перезапущена с новыми настройками.
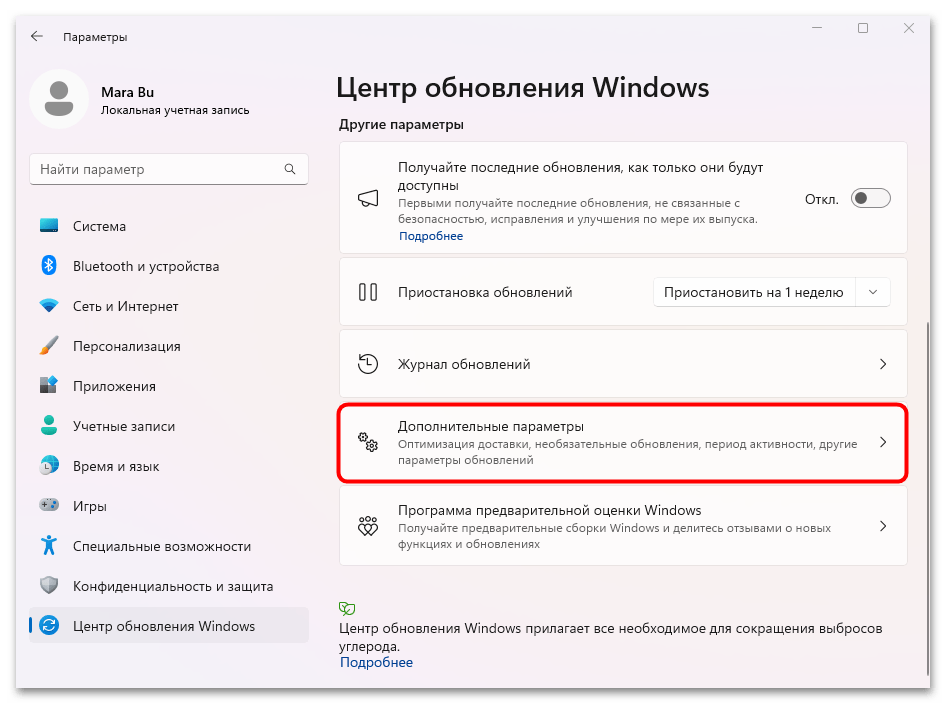
Способ 4: Обновление ОС и программных компонентов
Если драйверы для программных компонентов устарели, то это также может вызывать ошибки при попытке доступа к Valorant в Windows 11. В этом случае одним из лучших решений будет скачивание и установка актуального программного обеспечения и дополнительных компонентов. Как правило, основные апдейты можно инсталлировать с помощью встроенных средств системы:
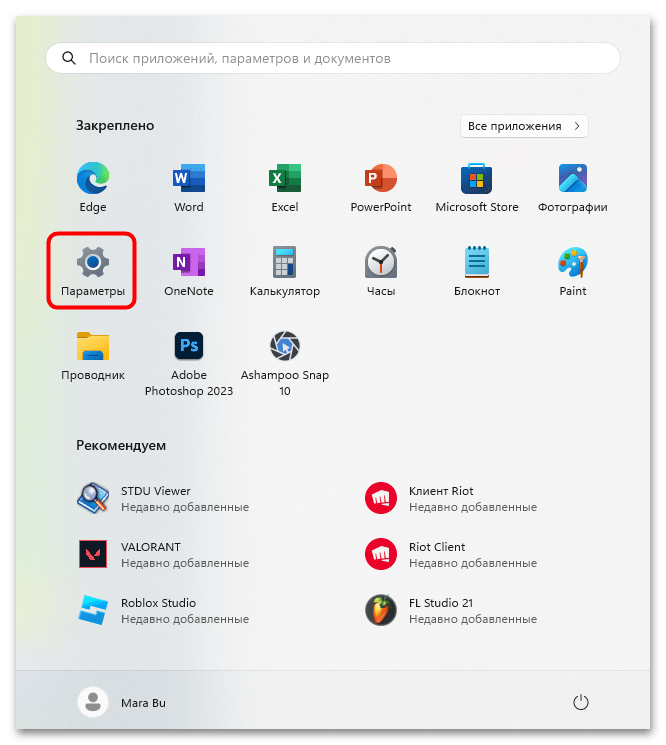
- Нажмите на кнопку «Пуск» и выберите приложение «Параметры».
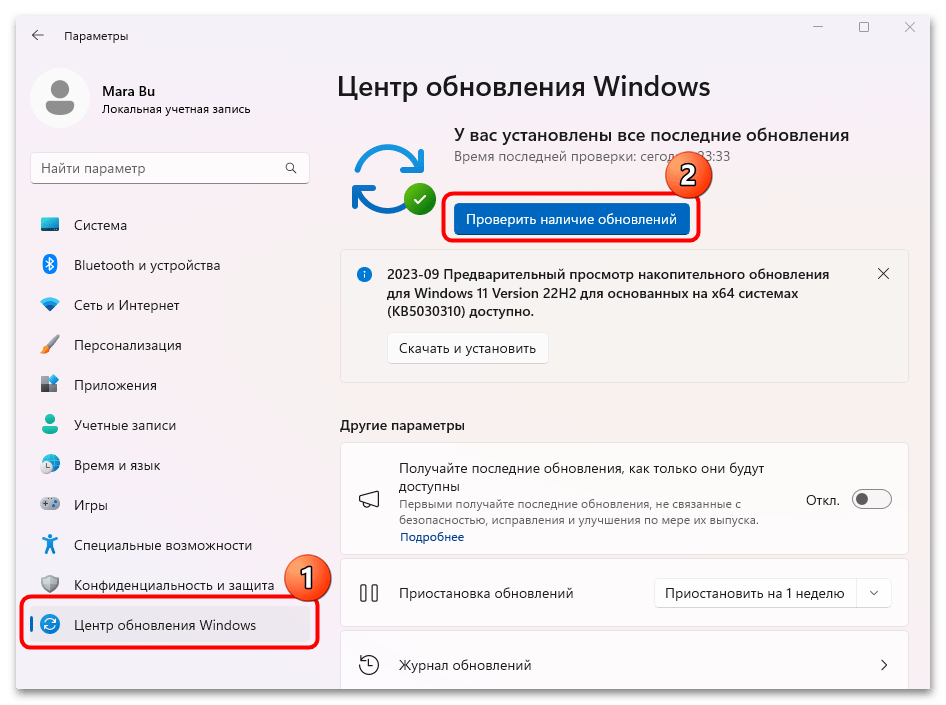
- На панели слева выберите вкладку «Центр обновления Windows», а в центральной части окна нажмите на кнопку «Проверить наличие обновлений». Если апдейты есть, то после проверки будет предложено их установить.
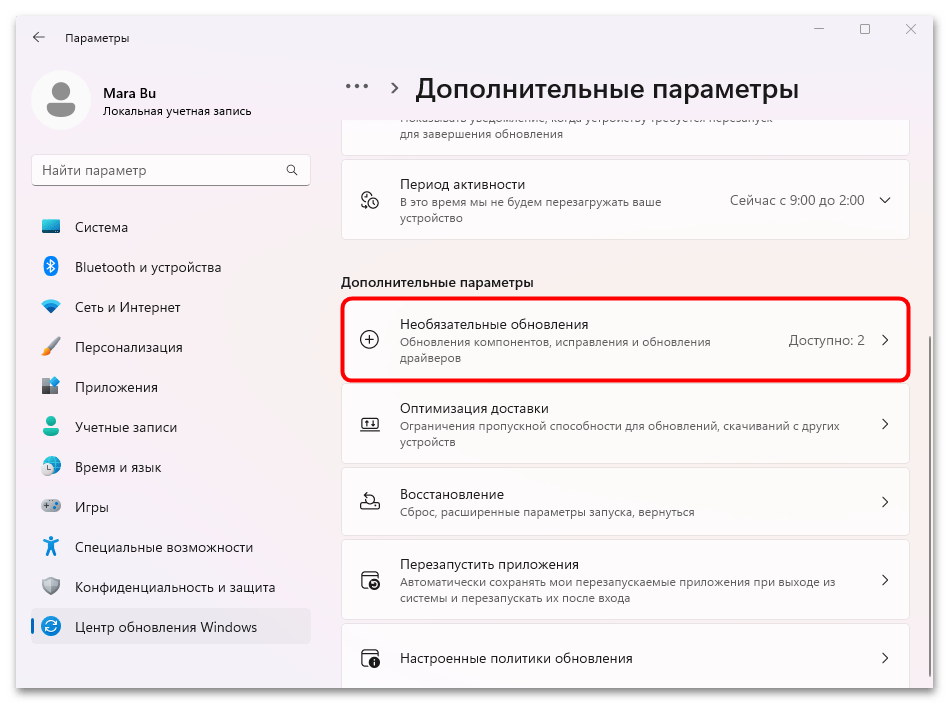
- Что касается второстепенных компонентов, то нажмите на строку «Дополнительные параметры».
- Потом в блоке «Дополнительные параметры» кликните по пункту «Необязательные обновления».
- Если в открывшемся списке есть обновления для различных компонентов, попробуйте их инсталлировать, несмотря на то что они являются необязательными.

Также не лишним будет отдельно проверить и установить обновления для видеокарты. Стандартные методы поиска апдейтов не всегда подходят – у производителей компонентов, как правило, есть фирменный софт, с помощью которого осуществляется не только настройка графики и отображения, но и происходит скачивание необходимых для стабильной работы файлов. О способах обновления ПО для графического адаптера мы писали ранее в отдельном руководстве.
Подробнее: Обновление драйвера видеокарты в Windows 11

Для поддержания состояния драйверов программных компонентов и устройств можно использовать специализированные приложения, которые мы также разбирали в нашей статье на сайте.
Подробнее: Лучшие программы для установки драйверов
Наша группа в TelegramПолезные советы и помощь
-
Home
-
News
- Valorant Keeps Crashing After Windows 11 Update [6 Solutions]
Valorant Keeps Crashing After Windows 11 Update [6 Solutions]
By Linda | Follow |
Last Updated
What to do if Valorant keeps crashing Windows 11? This post from MiniTool Partition Wizard offers 6 solutions to this issue. You can try them if you are facing the same issue.
I want to say that I was playing Valorant on Windows 10 for months and it was running smoothly until I got a notification about Windows 11. So I updated my windows but after installing Windows 11 my Valorant keep crashing no matter what I do it still keeps crashing…https://answers.microsoft.com/en-us/windows/forum/all/my-valorant-game-crashes-after-windows-11/08e987be-e80e-4091-9956-21d655ac6e75
Some people report that Valorant keeps crashing after Windows 11 update. Why does this issue occur? The most possible reason is that Windows 11 requires more resources than Windows 10. For example, Windows 10 requires 2GB RAM, 20GB storage, and DirectX 9 GPU, while Windows 11 requires 4GB RAM, 64GB storage, and DirectX 12 GPU.
Tips:
Valorant on Windows 11 also requires TPM 2.0 and UEFI Secure Boot. If you encounter related issues, you can refer to this post: This Build of Vanguard Requires TPM Version 2.0.
How to Fix the Valorant Crashing Windows 11 Issue
If Valorant keeps crashing Windows 11, you can try the following ways to solve it.
Fix 1. Update the GPU Driver
- Open the Windows Search bar and then search for the Device Manager app.
- Open this app and expand Display adapters.
- Right-click your graphics card and choose Update driver.
- Select “Search automatically for updated driver software”. If there is a driver update available, it will install it for you automatically.
Fix 2. Close Other Resource-Hungry Applications
Other programs will also eat PC resources. Therefore, when you run Valorant, please close other resource-hungry programs. Here is the guide:
- Open Task Manager using Ctrl+Shift+Esc.
- On the Process tab, right-click programs that eat too much memory and choose End task.
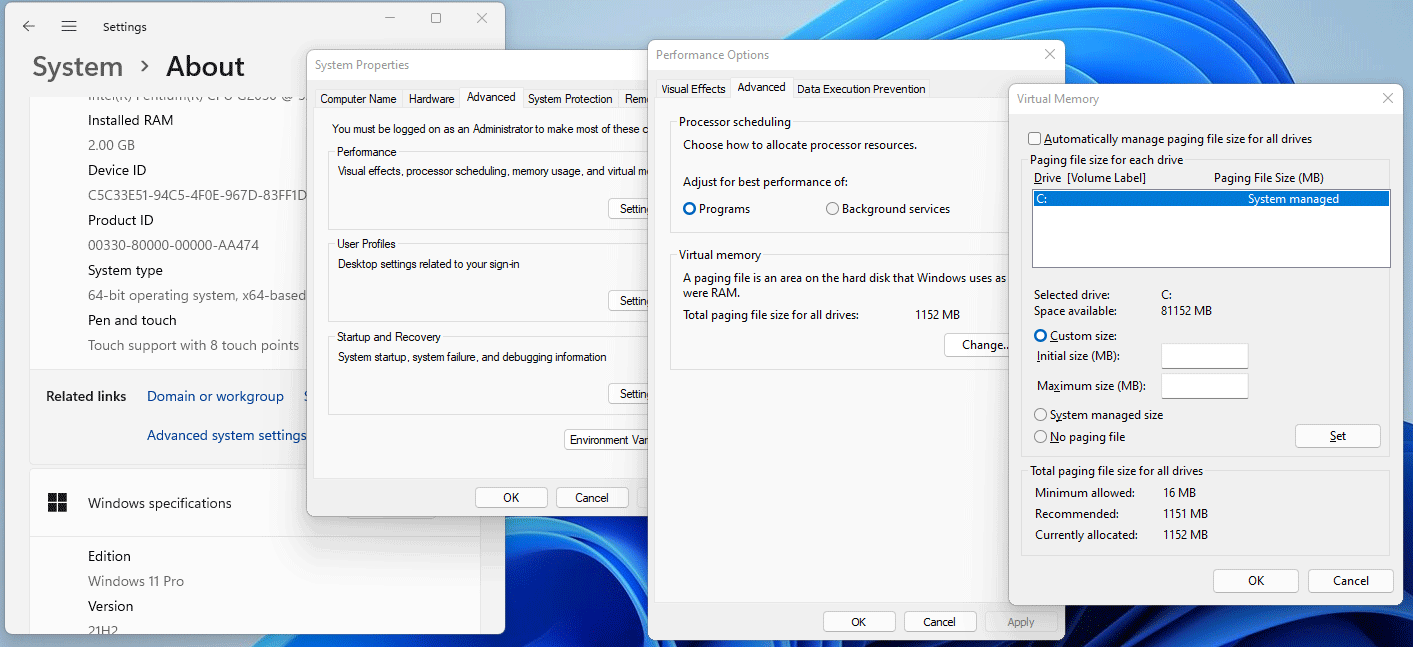
Fix 3. Increase Virtual Memory
Windows 11 eats more RAM resources. Therefore, you can increase the virtual memory to relieve this issue. Here is the guide:
- Press Windows + I keys to open Settings.
- Go to System > About.
- Click Advanced system settings.
- Click Settings in the Performance box.
- Skip to the Advanced tab and click Change in the Virtual memory box.
- Uncheck the box before Automatically manage paging file size for all drives.
- Select Custom size.
- Set the same value in Initial size and Maximum size. The value should be as 1.5 times or twice that of the physical memory.
- Click Set and OK to save.
Fix 4. Manage In-Game Graphic Settings
You can also manage Valorant in-game graphic settings to let it eat fewer resources. Here is the guide:
- Launch the game.
- Go to Game Menu > Settings > Video > Graphics Quality.
- Mark all quality settings to Low.
Fix 5. Uninstall Conflicting Programs
If Valorant keeps crashing Windows 11 after you install a program, uninstalling it may solve the issue. In addition, if necessary, you can perform a clean boot to find the conflicting program.
If Valorant keeps crashing after Windows 11 update, you can also uninstall the Windows 11 update. Besides, you can also try reinstalling Valorant.
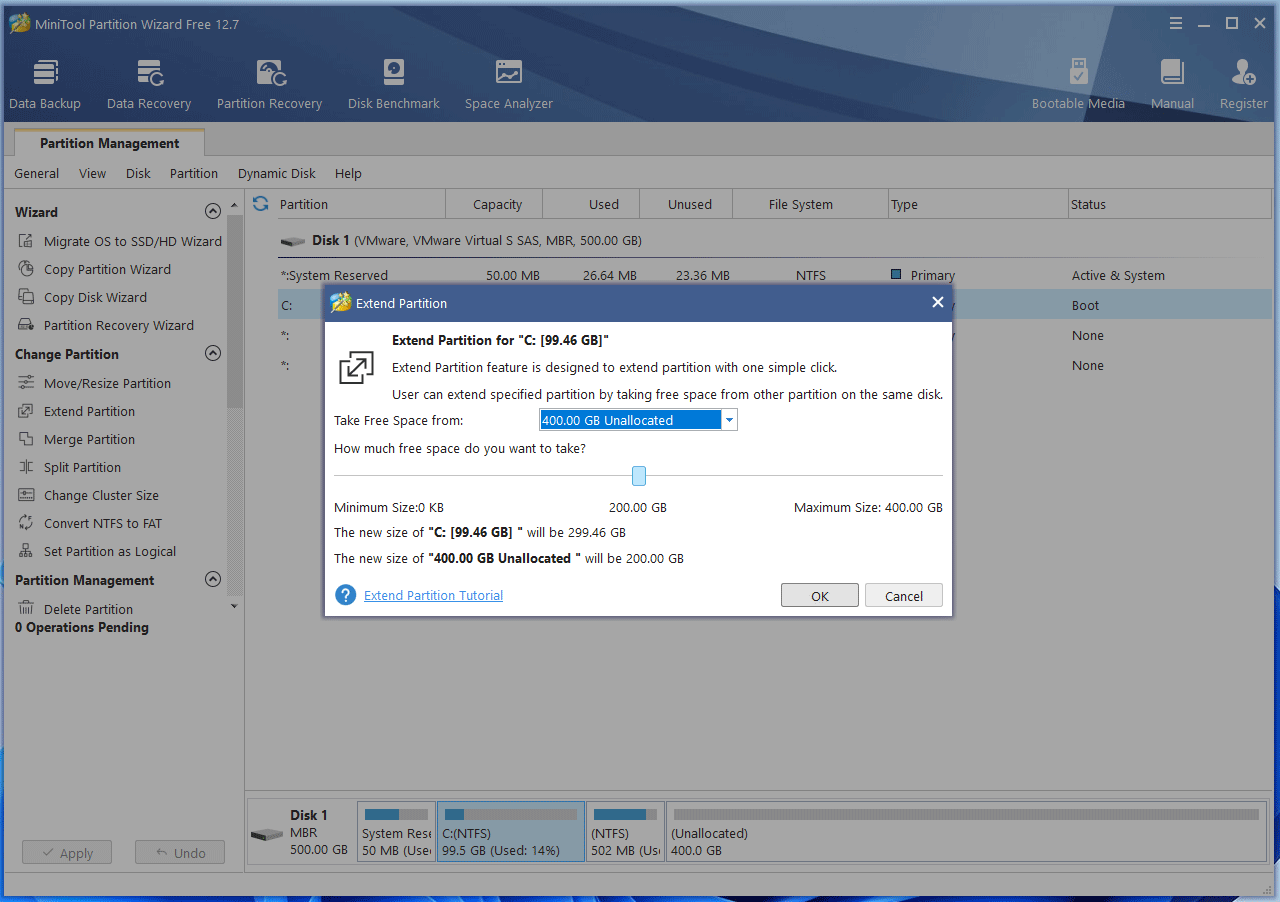
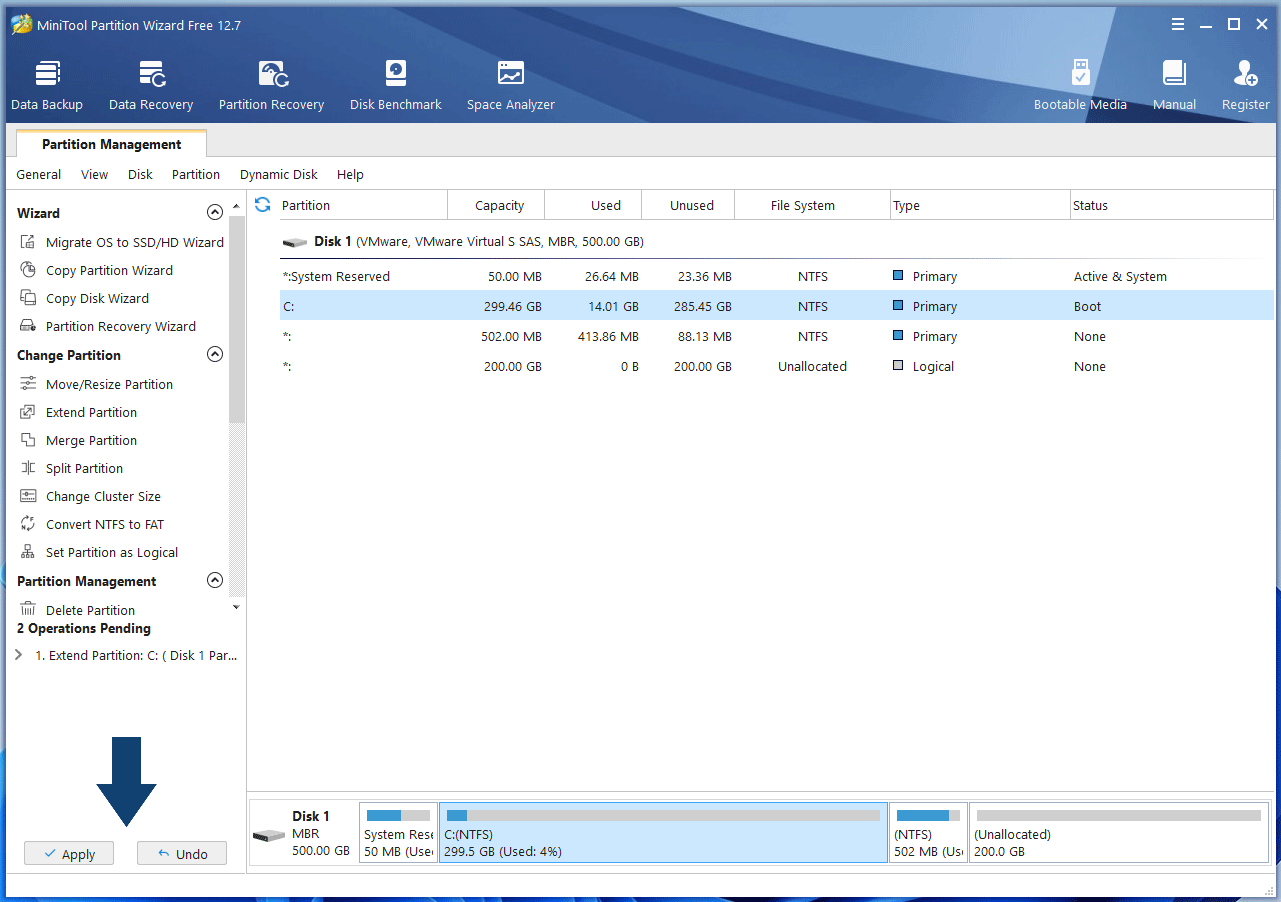
Fix 6. Extend Partition
If all of the above methods don’t work, you should check if there is enough free space on the C drive for the game to run. If not, you can extend the C drive using MiniTool Partition Wizard. Here is the guide:
MiniTool Partition Wizard FreeClick to Download100%Clean & Safe
Step 1: Launch this software. Right-click on the C drive and choose Extend.
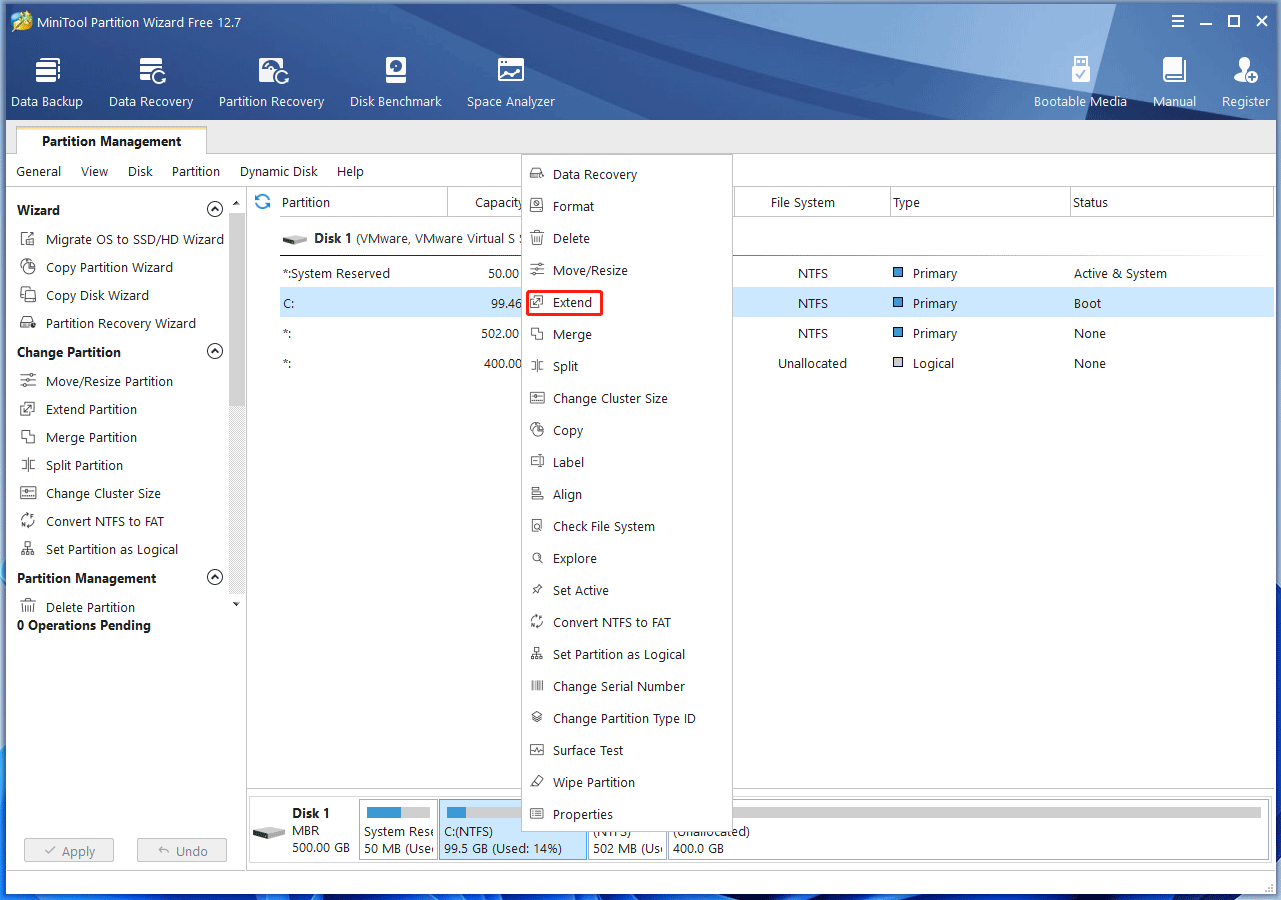
Step 2: Decide where to take free space and how much free space to take. Then, click OK.
Step 3: Click Apply to execute the pending operation.
Bottom Line
MiniTool Partition Wizard is a functional tool. It can recover data from hard drive, migrate OS, clone disk, recover partitions, etc. Download it to have a try.
MiniTool Partition Wizard DemoClick to Download100%Clean & Safe
About The Author
Position: Columnist
Linda has been working as an editor at MiniTool for 5 years. She is always curious about computer knowledge and learns it crazily. Her articles are simple and easy to understand. Even people who do not understand computer can gain something. By the way, her special focuses are disk management, data recovery and PDF editing.
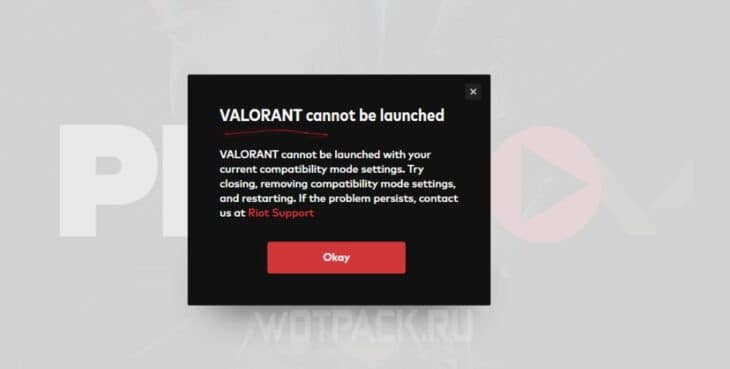
For countless PC gamers, VALORANT has become one of the most compelling tactical shooters on the market. Riot Games’ free-to-play title consistently draws millions of active players, largely thanks to its competitive depth, regular content updates, and a robust anti-cheat mechanism known as Vanguard. Yet, while the game is a technical marvel in many ways, those running it on Windows 11 have recently been beset by a confounding roadblock: the enigmatic VAN9003 error. As it turns out, this stubborn issue is more about system security than software bugs, catching even seasoned users by surprise after a routine upgrade to Microsoft’s latest operating system.

What Is the VAN9003 Error in VALORANT?
The VAN9003 error typically rears its head during attempts to launch VALORANT on a PC running Windows 11. While users on Windows 10 rarely—if ever—encountered this code, the Windows 11 landscape has made it a frequent topic of discussion within gaming forums and social media circles. The stark message provided by Vanguard, VALORANT’s anti-cheat tool, offers little guidance, simply announcing that the system is “not meeting security requirements.” For users, this is both confusing and frustrating, especially since the game often ran flawlessly prior to the OS upgrade.
After some investigation, experts and affected gamers have pinpointed VAN9003’s cause: one, or both, of the system’s core security features—Secure Boot and TPM 2.0—are disabled or unavailable. These settings, while familiar to enterprise users, have only recently entered mainstream gaming consciousness thanks to the widespread adoption of Windows 11, which requires both for full functionality.
What Are Secure Boot and TPM 2.0?
To grasp the root of the problem, it’s critical to understand what Secure Boot and TPM 2.0 actually do:
- Secure Boot: An essential UEFI feature, Secure Boot ensures only trusted operating systems can load during PC startup. It helps prevent bootkits and other malicious software from taking control before Windows itself even loads. Most motherboards shipped within the past five to six years support Secure Boot, although it’s not always activated by default.
- TPM 2.0 (Trusted Platform Module): This cryptographic security chip manages encryption keys and bolsters system integrity against low-level attacks. Because Windows 11 mandates TPM 2.0 for installation, most modern PCs include the chip. However, it often needs manual activation via UEFI firmware settings (formerly known as BIOS).
Vanguard, Riot’s anti-cheat system, leverages both Secure Boot and TPM 2.0 to prevent sophisticated cheat loaders from operating before or during game launch. If either is disabled, VAN9003 is triggered and gameplay is blocked.
Why Windows 11 and Not Windows 10?
Windows 10 did not require TPM 2.0 or Secure Boot on a hardware level, which is why most VALORANT players never encountered VAN9003 in the previous OS era. With Windows 11’s arrival, Microsoft prioritized a “zero-trust” approach, elevating hypervisor-protected code integrity and baseline security requirements. Vanguard embraced these changes to uphold the competitive integrity of VALORANT, making the game unplayable without these two features enabled.
As a result, upgrading to Windows 11 frequently “wakes up” dormant hardware requirements. Users often report that VALORANT worked seamlessly on their rig minutes before upgrading, only to be met with VAN9003 on reboot—even though the game itself hasn’t changed.
Diagnosing VAN9003: Are You Affected?
You’ll see the VAN9003 error if Secure Boot or TPM 2.0 are disabled, incorrectly configured, or unavailable on your motherboard. The symptoms typically present as follows:
- VALORANT launches Vanguard, then abruptly halts, displaying the recurring VAN9003 message.
- System information tools or Windows Security settings indicate Secure Boot and TPM 2.0 are “Off,” “Disabled,” or missing.
It’s important to note that console players (Xbox and PlayStation) and most Windows 10 users are exempt. VAN9003 is a Windows 11-specific issue, a point confirmed in official Riot support documentation and echoed by reputable technology outlets.
For those affected, hardware age is rarely the issue unless their motherboard predates 2016 or is otherwise incompatible. In that scenario, a hardware upgrade may be necessary—though this is considered a last resort.
How to Fix VAN9003: Step-by-Step Solution
The most effective remedy for VAN9003 is enabling Secure Boot and TPM 2.0. While this may seem daunting for those unfamiliar with firmware interfaces, the process is relatively straightforward with a bit of guidance.
1. Restart Your PC
Simple but essential. Begin by fully restarting your system, ensuring no residual system processes or updates interfere with BIOS access.
2. Enter BIOS/UEFI Firmware
During system reboot, immediately press the designated BIOS key (usually F2, F10, F11, F12, or Delete—your motherboard’s manual or splash screen will specify). Persistence is crucial: timing is everything in catching this narrow window before Windows boots.
3. Enable Secure Boot
Within the firmware menu:
- Navigate to the «Boot» or «Boot Options» tab.
- Locate the Secure Boot setting.
- Set it to Enabled.
- If the option is grayed out, check that your system is set to use UEFI (Unified Extensible Firmware Interface) rather than legacy BIOS. Switching to UEFI may require reinstalling Windows—a consideration to weigh carefully.
4. Enable TPM 2.0
- Move to the “Security,” “Advanced,” or “Trusted Computing” tab.
- Find TPM, Intel Platform Trust Technology (for Intel), or AMD fTPM (for AMD).
- Ensure it’s activated (“Enabled”).
- Some older boards label it as “Security Device Support.” Confirm that this is set to On.
5. Verify Boot Protocol is UEFI
Secure Boot only works in UEFI mode—not in Legacy or Compatibility Support Module (CSM) mode. Adjust this setting if prompted.
6. Save and Exit
After making changes, save your settings (usually via F10) and confirm the reboot. Your PC will restart with Secure Boot and TPM 2.0 now enabled.
7. Attempt to Launch VALORANT
Upon returning to Windows, start VALORANT. If the settings were correctly applied, the game should now launch—bypassing the VAN9003 error.
Troubleshooting Tips
- If these settings don’t appear, consult a guide or user video specific to your motherboard brand (ASUS, MSI, Gigabyte, ASRock, etc.).
- Some systems hide advanced options by default. You may need to activate “Advanced Mode” or supply an administrator password.
- For PCs built before 2015, motherboard limitation may necessitate hardware upgrades to meet requirements.
What If You Still See VAN9003?
- Double-check that both Secure Boot and TPM 2.0 are in fact enabled. Windows Device Security (findable from the Start Menu) can confirm this status.
- Ensure all Windows and motherboard firmware updates have been applied.
- If changes within BIOS/UEFI fail to save, your motherboard’s CMOS battery could be failing—or UEFI firmware might be corrupted.
- Uninstall and reinstall Vanguard, as remnants of misconfigured startup settings can linger even after a successful hardware change.
- Consider a clean install of Windows 11 set to UEFI mode.
Alternate Options for Affected Players
For users who simply cannot meet VAN9003’s demands—whether due to legacy hardware or technical barriers—other avenues for enjoying VALORANT remain:
- VALORANT Mobile (Pre-Registration): Riot is actively developing a mobile version, allowing gamers to keep playing on smartphones or tablets.
- Console Versions: The game is now available on Xbox and PlayStation, with full cross-progression and cosmetic carryover, minimizing disruption to your in-game experience.
While these options may not suit purists who prefer mouse-and-keyboard precision, they enable continued access to the VALORANT ecosystem while you plan a system upgrade.
A Critical Examination of Secure Boot and TPM 2.0 Requirements
Key Strengths
1. Enhanced Cheating Deterrence
Secure Boot and TPM 2.0 together provide a formidable barrier against advanced cheat loaders, which often attempt to compromise systems before or during the OS boot process. By leveraging Microsoft’s baseline security posture and integrating it with its own proprietary systems, Riot Games has set a new standard for anti-cheat rigor—mirrored by competitors like Easy Anti-Cheat and BattleEye in select titles.
2. System Integrity Beyond Gaming
The implementation of these technologies extends beyond gaming: Secure Boot and TPM 2.0 contribute to more resilient protection against bootkits, ransomware, and credential theft for all users, not just gamers. As cyberattacks grow ever more sophisticated, this is a net positive for the broader Windows 11 user base.
3. Future-Proofing the Competitive Ecosystem
By enforcing these requirements, Riot Games helps future-proof its competitive integrity, minimizing disruptions from known vectors of system-level attack. This alignment with Microsoft’s vision of “zero-trust security” amplifies VALORANT’s reputation as a fair, secure, and progressive esports platform.
Potential Risks and Drawbacks
1. Exclusion of Older Hardware
Not every gaming enthusiast has the latest motherboard or UEFI firmware. Players using slightly older but otherwise performant systems may discover that their hardware simply cannot meet the Secure Boot and TPM 2.0 benchmarks, forcing them into costly upgrades or out of the community altogether. While unavoidable as technology marches forward, this can be a bitter pill for cash-strapped or eco-conscious users.
2. Complex Configuration Barriers
Entering a system’s BIOS/UEFI firmware to toggle obscure settings can be terrifying for newcomers. A single misclick risks unbootable configurations or data loss, underscoring the importance of thorough research and, where possible, seeking the guidance of experienced hands or manufacturer support. Potential damage from misconfigured settings cannot be discounted.
3. Transitional Frustration
For many, the sudden appearance of VAN9003 after an otherwise smooth upgrade to Windows 11 feels both arbitrary and opaque. The sparse error messaging from Vanguard compounds frustration, and players may not know where to begin unless they find a reliable step-by-step guide or official Riot Games support resources.
4. Privacy and Trust Debates
Requiring system-level security features induces a necessary conversation around privacy, vendor trust, and platform neutrality. While Secure Boot and TPM 2.0 have proven their worth in enterprise and security contexts, some advanced users remain wary of technologies that limit system customization or cede control to third-party root-of-trust authorities.
Official Statements and Community Consensus
Both Riot Games and Microsoft have publicly articulated the necessity of Secure Boot and TPM 2.0 to protect against increasingly sophisticated threats—both to games and the operating system more broadly. Riot’s support channels and release notes make clear their commitment to enforcing VAN9003 as a baseline requirement, citing game fairness and user safety as primary motivators.
Independent testing by technology journalists and enthusiast forums confirms that enabling Secure Boot and TPM 2.0 reliably resolves the error, provided the underlying hardware is compliant. Community guides, expert blog posts, and YouTube videos echo this consensus, providing further comfort to wary upgraders and those troubleshooting for the first time.
It’s worth noting, however, that some anecdotal claims on fringe forums about “circumventing” the error by rolling back firmware or employing boot loaders have not been verified by reputable sources and often expose users to additional, substantial risks. Following the manufacturer’s and Riot’s prescribed solution remains the safest and most future-proof path.
Best Practices When Upgrading or Troubleshooting
- Always back up important data before entering BIOS/UEFI or toggling boot settings. Even minor misconfigurations can occasionally require a full OS reinstallation.
- Double-check motherboard documentation for specific language around Secure Boot and TPM 2.0—settings are sometimes relabeled or hidden by default.
- Leverage official support resources: Both Microsoft and Riot Games maintain up-to-date knowledgebases that can provide device-specific troubleshooting tips.
- Keep firmware and Windows updates current, as new releases may enhance compatibility or clarify ambiguous settings.
- Avoid untested third-party utilities that promise rapid fixes—these can corrupt firmware and sometimes introduce malware.
The Broader Impact: What Does VAN9003 Mean for PC Gaming?
VAN9003 is more than an isolated bug—it’s a bellwether for the future of gaming security on Windows. As games evolve into ever more complex, connected ecosystems, and as cheaters and malicious actors turn to deeper system manipulation, expect industry leaders to further embrace hardware-based safeguards. For most modern users, this transition is a simple, if momentarily inconvenient, procedural step. But for legacy hardware users or those unfamiliar with firmware menus, it’s a reminder that “just working” often requires a little more technical fluency in the Windows 11 era.
For its part, Riot Games has opted for uncompromising security standards, even at the risk of some user friction. The success of this approach will likely influence how both game developers and operating system vendors enforce baseline requirements in the years to come.
Final Thoughts
The VALORANT VAN9003 error exemplifies the growing intersection of gaming, security, and modern operating system requirements. While the initial appearance of this error post-Windows 11 upgrade can be frustrating and opaque, the underlying fix—enabling Secure Boot and TPM 2.0—is straightforward with a methodical approach. For those with compatible hardware, the process rewards players with a more secure system and a seamless gaming experience. For others, it may signal that a hardware refresh lies on the horizon—a challenging but inevitable facet of ever-advancing security paradigms.
The industry’s migration to hardware-backed protection is both a promise and a challenge: a promise of fairer, safer games, and a challenge for those whose systems are running on borrowed time. As always, knowledge, preparation, and a willingness to adapt remain the best armor in the PC gamer’s toolkit.
Source: Inven Global How to fix the VAN9003 error in VALORANT
Valorant is a popular free-to-play battle royale game for Windows. So, it’s a bummer when the game doesn’t start. Many players have posted on Reddit and other community forums about Valorant not launching on Windows 11.
Are you among those players who need to fix the Valorant launch issue on Windows? Here are seven troubleshooting methods to help you resolve the problem and carry on gaming.
1. Check the Minimum Requirements
Valorant is a graphics-intensive game. That means your system needs to pack components meet the minimum requirements of the Valorant game to run it without issues. However, if that doesn’t happen, you’re likely to face the launch issue.

Go through the Valorant hardware requirement page and see if your computer checks all the boxes. If not, you will have to upgrade your system to fix the Valorant launch issue.
2. Launch Valorant With Administrative Rights
It’s recommended to run AAA titles like Valorant with administrative rights. Lack of administrative permissions can cause a plethora of issues in these games, including the one at hand.
So, launch Valorant with administrative rights and check if it resolves the issue. Here’s how to do that:
Step 1: Press the Windows + E key to open File Explorer.
Step 2: Click the address bar at the top and paste the location in it:
C:\Riot Games\VALORANT\live\ShooterGame\Binaries\Win64

Step 3: Right-click on the VALORANT-Win64-Shipping file and choose Properties.
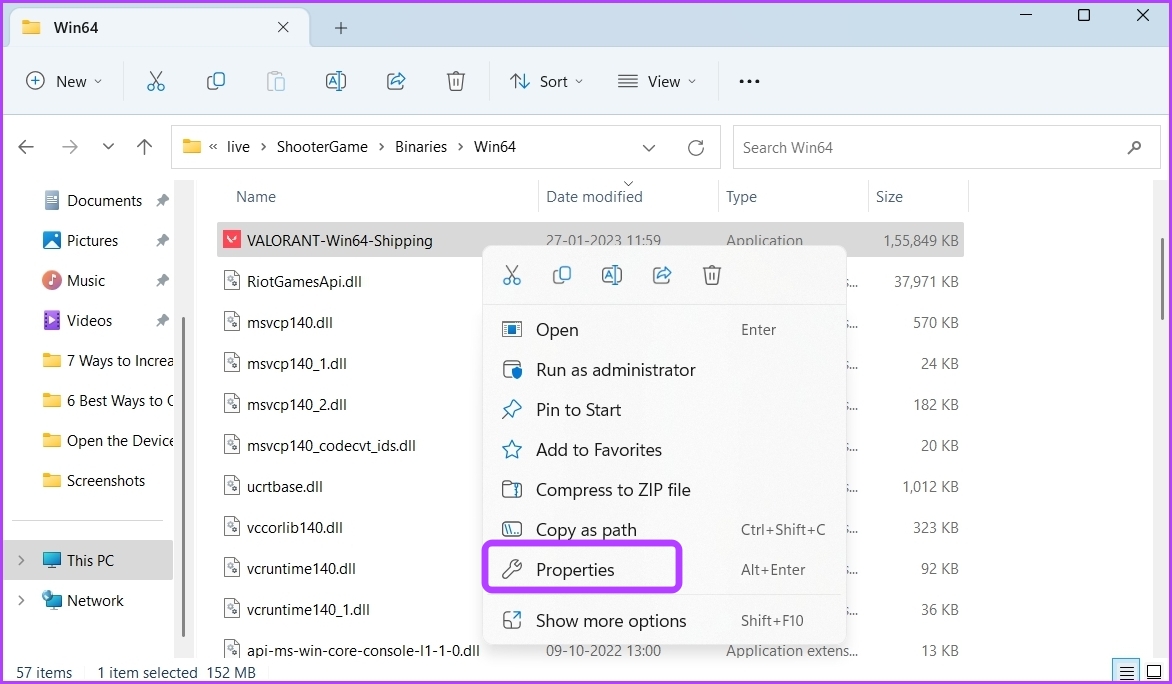
Step 4: Switch to the Compatibility tab and check the ‘Run this program as an administrator’ box.
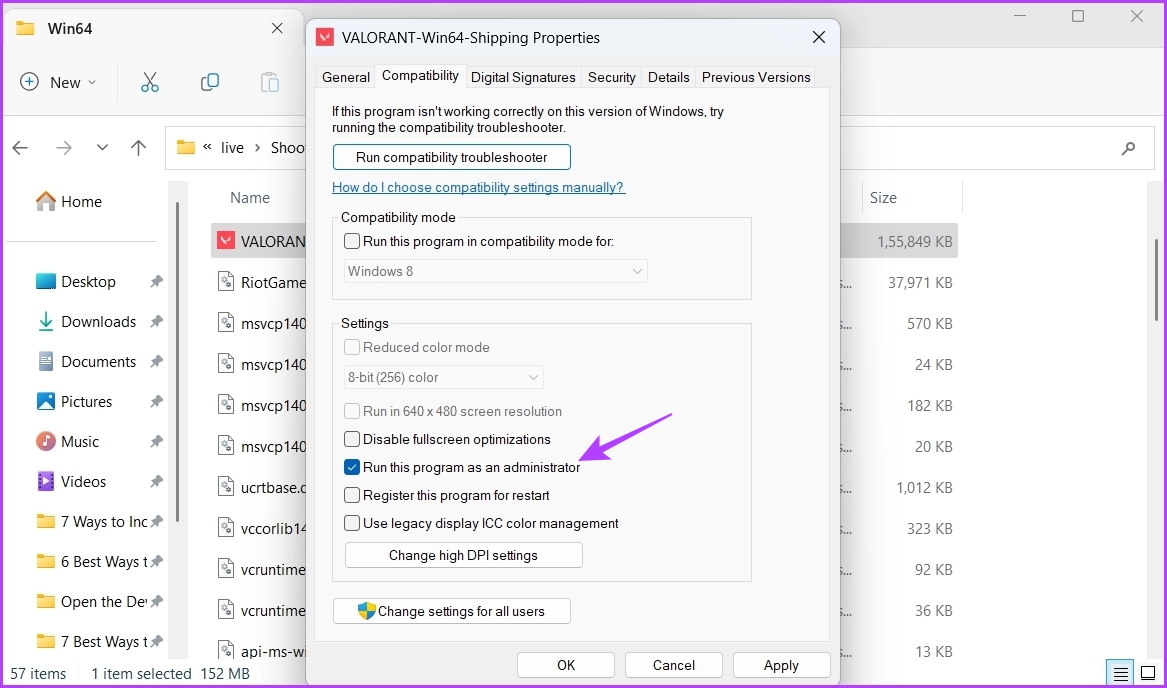
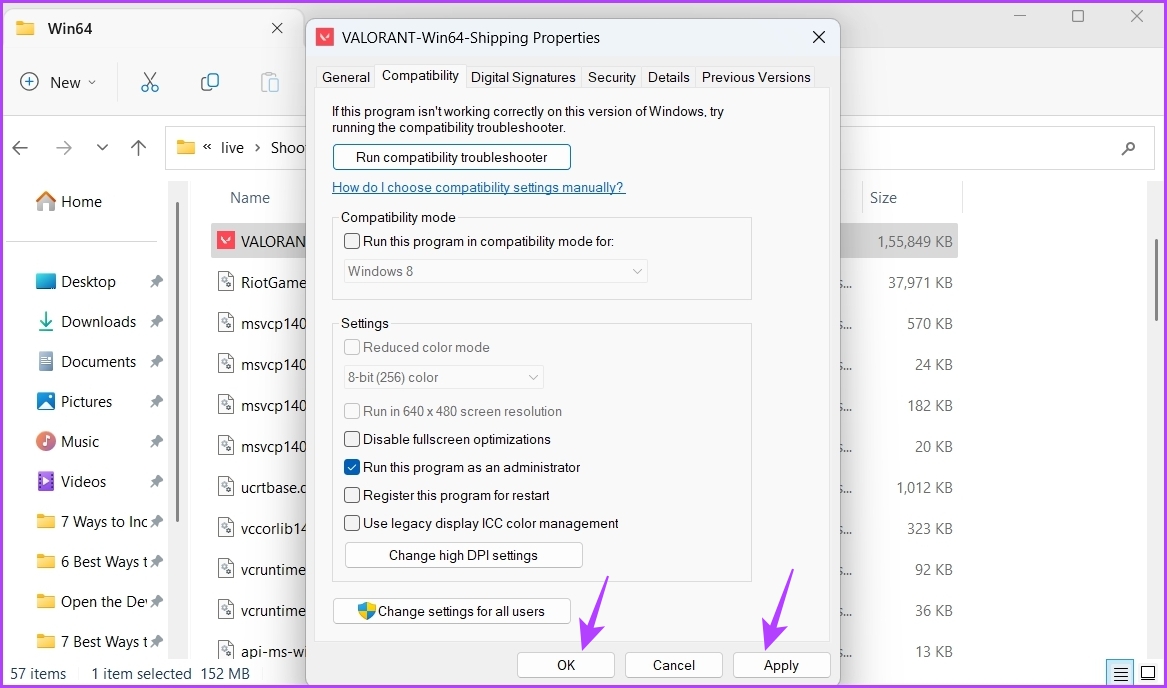
Step 5: Click Apply and OK to save the changes.
Next, launch Valorant and check if you’re still facing the issue.
3. Edit the Environment Variables
Environment variables contain data that Windows and other programs use to fetch crucial information. For many users, Valorant not launching issue was fixed by creating a new environment variable. This fix mainly works in computers featuring the Intel Processor.
So, if you have an Intel processor computer, you can try the below steps and check if it solves the problem.
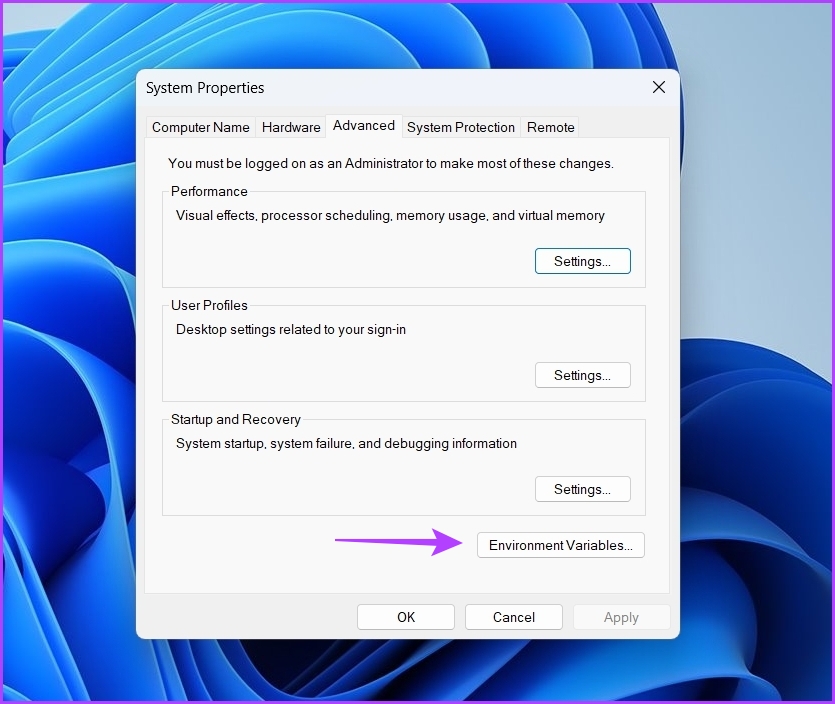
Step 1: Press the Windows + I key to open the Settings app.
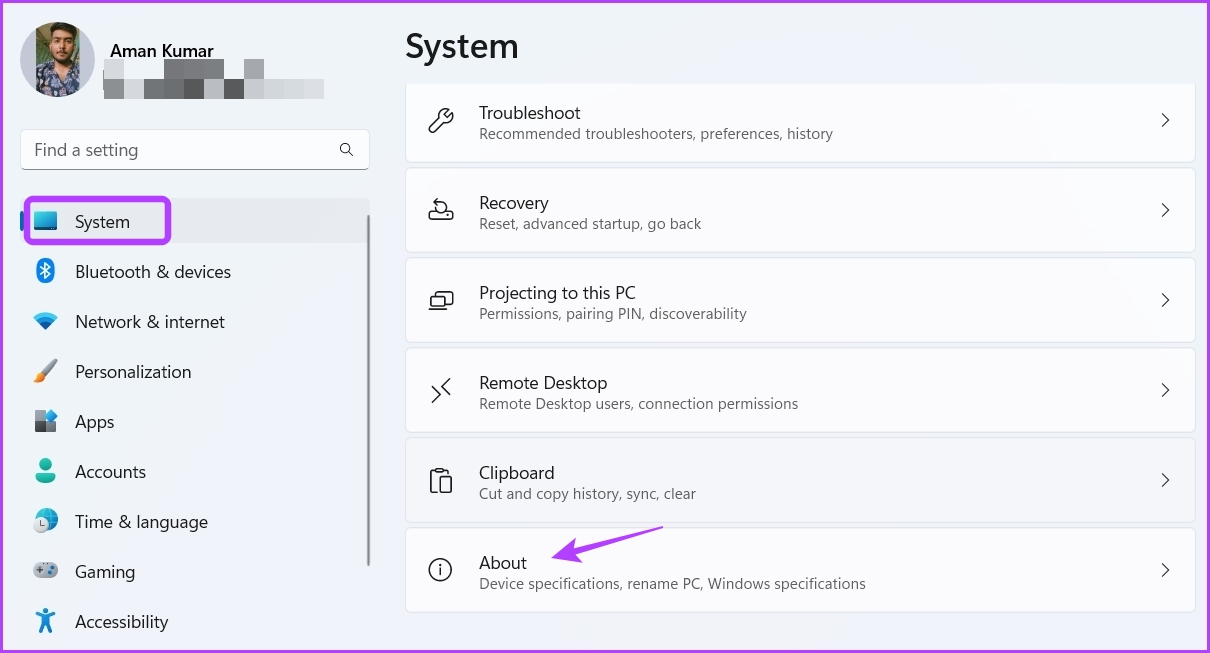
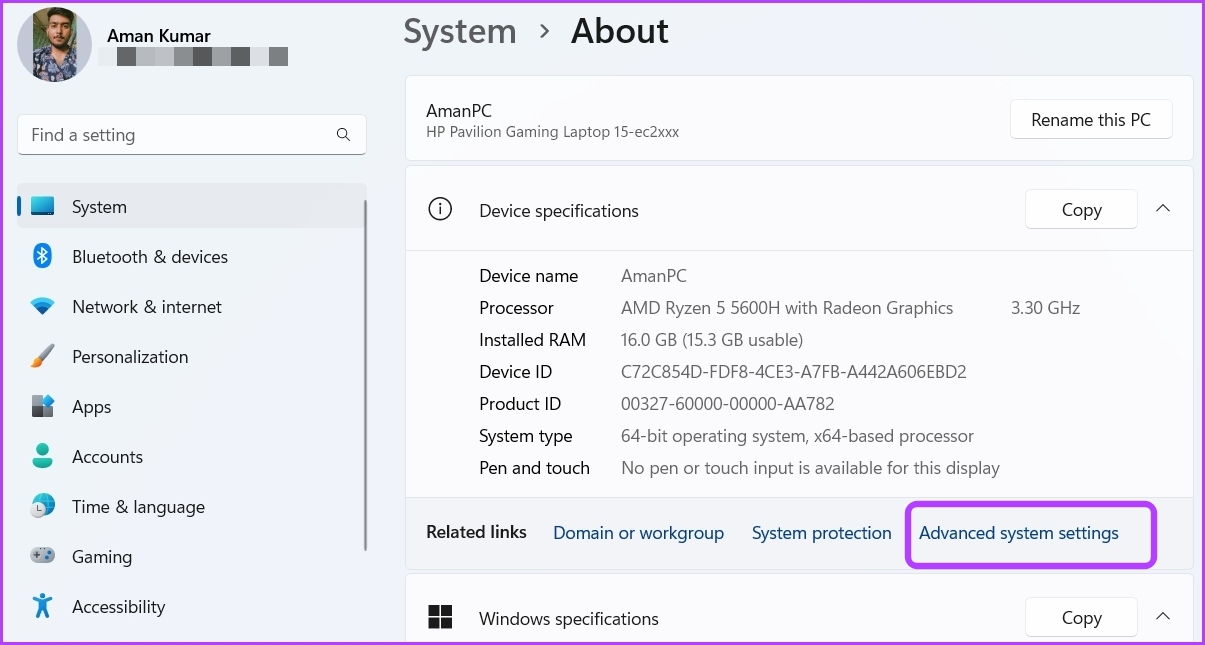
Step 2: Click System from the left sidebar and select the About option from the right pane.
Step 3: Click the Advanced system settings option.
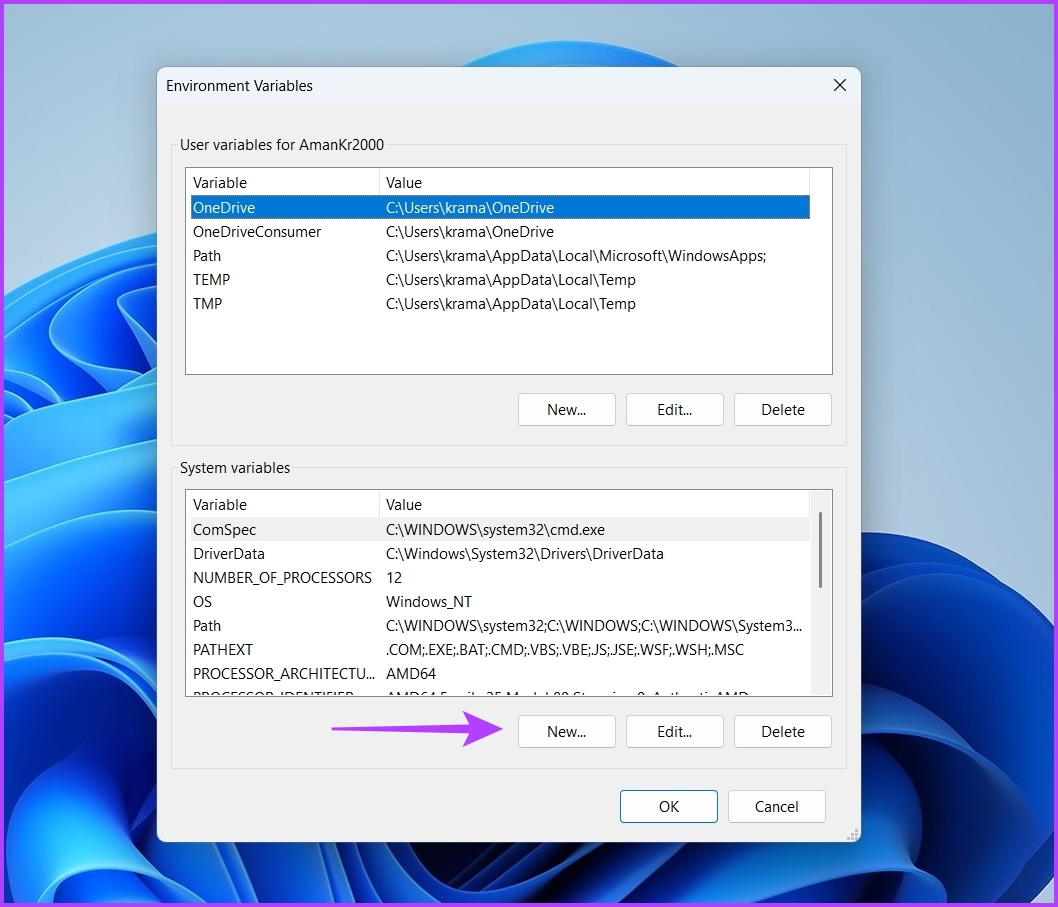
Step 4: Click the Environment Variables button.
Step 5: Under the System variables section, click the New option.
Step 6: Type OPENSSL_ia32cap in the Variable name field and ~0x200000200000000 in the Variable value field. Then, click OK to save.
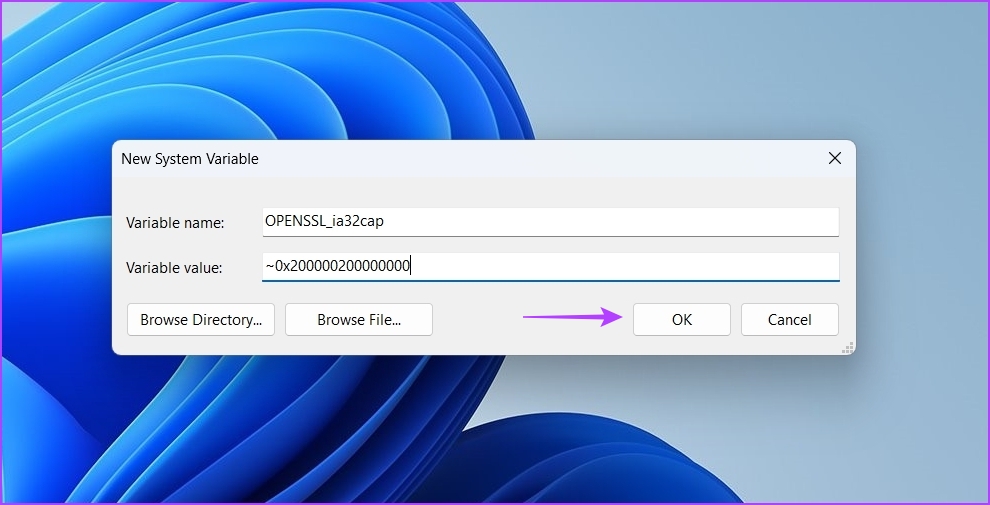
Launch Valorant and check if the problem continues.
4. Update the Graphics Driver
Updating the graphics driver is another effective way to fix Valorant not launching issue on Windows 11. Here’s how to download the latest graphics driver update on your computer:
Step 1: Press the Windows + X key to open the Power User Menu.
Step 2: Choose Device Manager from the list.
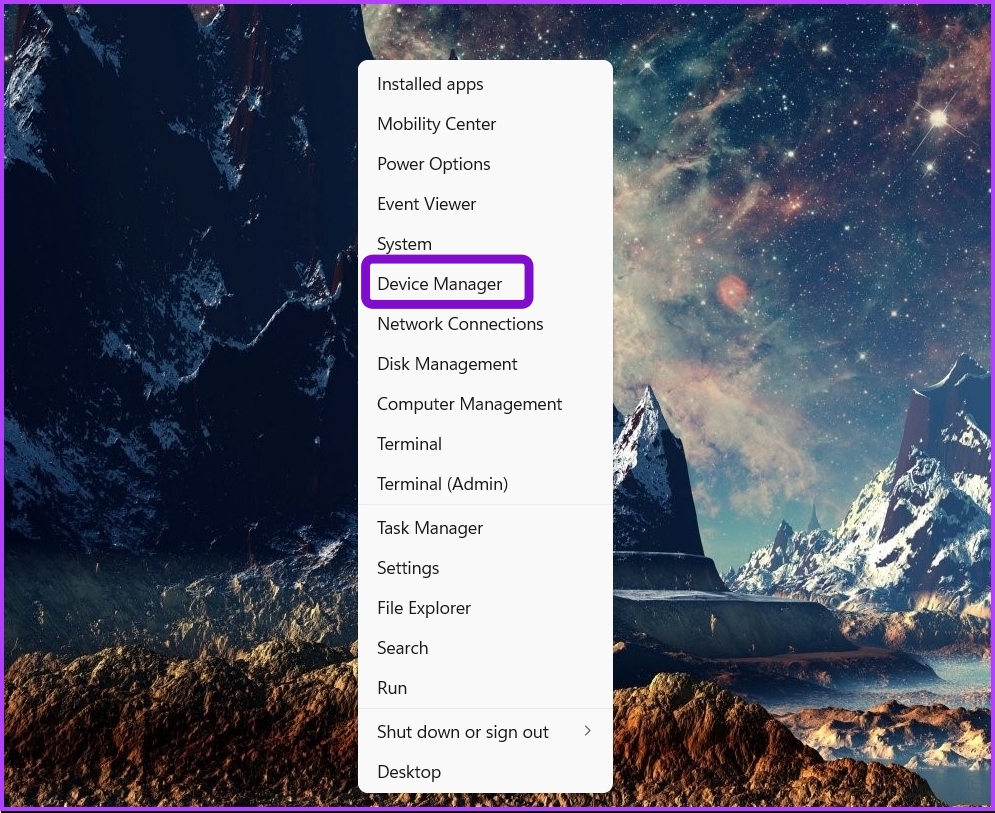
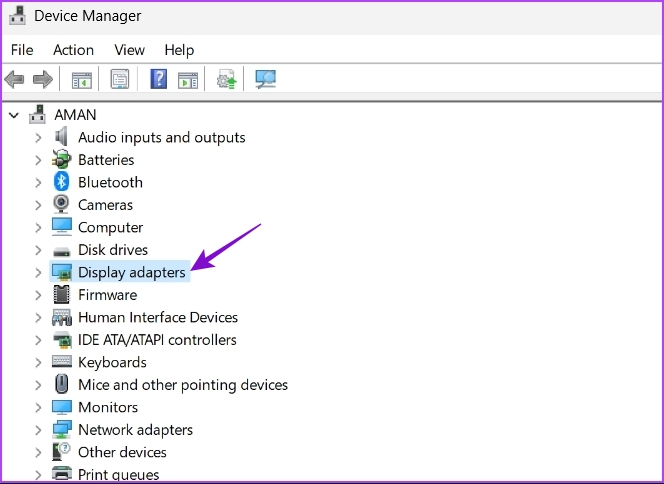
Step 3: Double-click on the Display adapters to expand it.
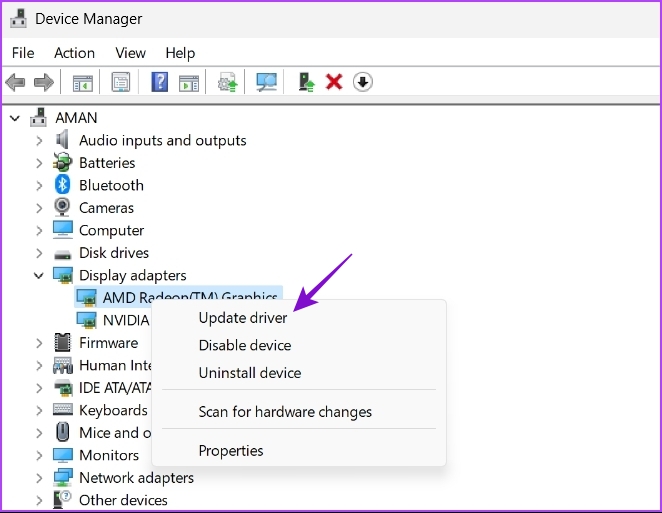
Step 4: Right-click on the installed graphics chip and choose Update driver.
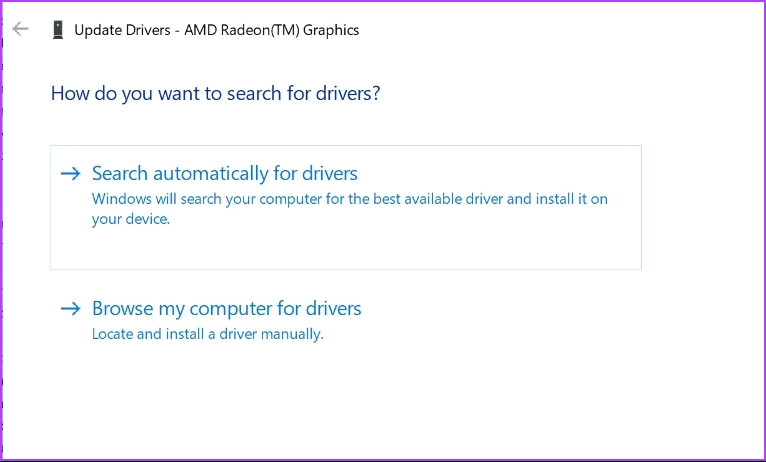
Step 5: Choose the Search automatically for drivers option.
Windows will now scan your computer for any available driver update and install it. After the installation is complete, restart your computer and check for the issue. If Windows fails to install the latest GPU drivers, check out our post on uninstalling existing graphics drivers completely before reinstalling the latest ones.
5. Close All Riot Processes From the Background
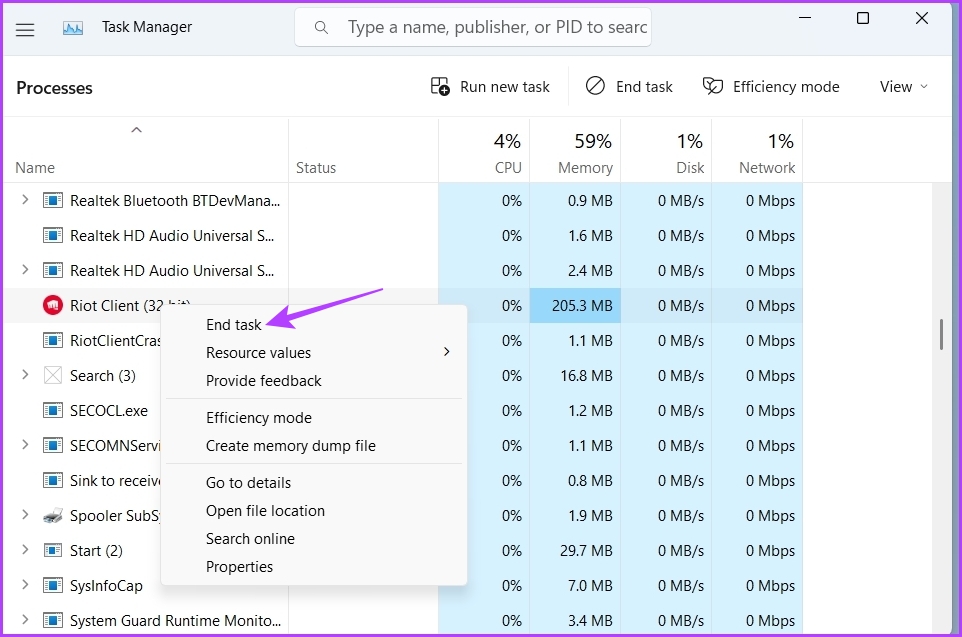
Another quick way to fix the problem is to open the Task Manager and close all the Riot-related processes running in the background. Here’s how to do that:
Step 1: Open the Power User Menu, and choose Task Manager from the list.

Step 2: In the Task Manager, right-click on all the processes associated with the Riot client and choose End task.
6. Run Valorant in Comparability Mode
Have you started facing the launch issue after upgrading to Windows 11? If yes, then Valorant is probably facing compatiblity issue with Windows 11.
The solution, in this case, is to use the compatibility mode, which will allow Valorant to run as if it was running in an older version of Windows. Here’s how to turn on compatibility mode for Valorant:
Step 1: Right-click on the Valorant executable file and choose Properties.
Step 2: Switch to the Compatibility tab.
Step 3: Check the Run this program in compatibility mode for box and choose Windows 8 from the drop-down menu.
Step 4: Click Apply and OK to save the changes.
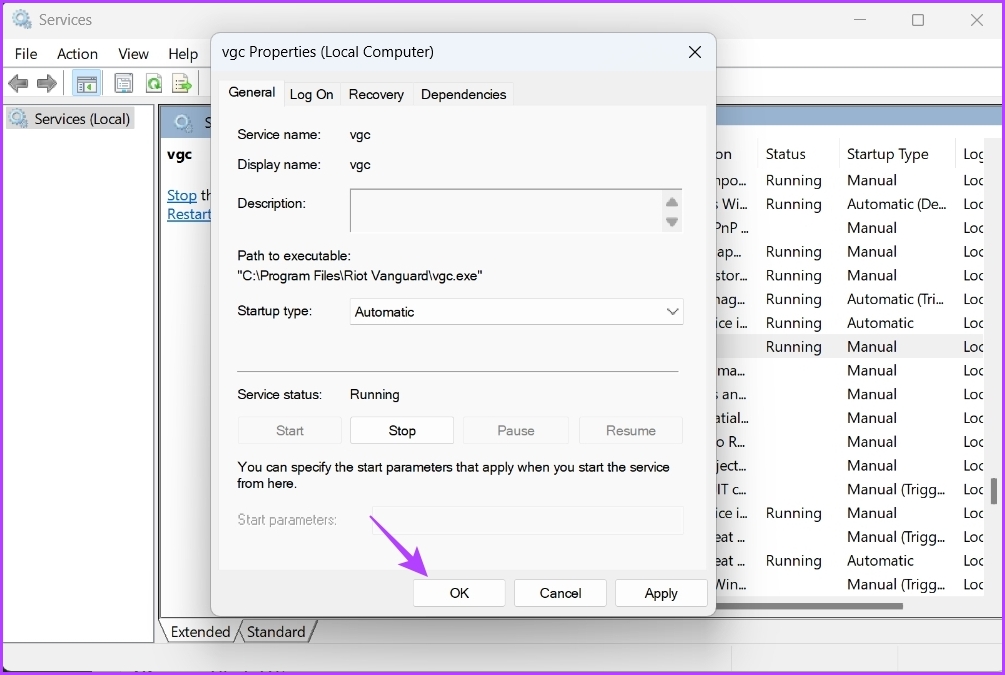
7. Check the VGC Service Status
Valorant Game Coordinator (VGC) is an important Valorant service that might be running in the background for the game to launch smoothly. You can check and change the status of this service by following the below instruction:
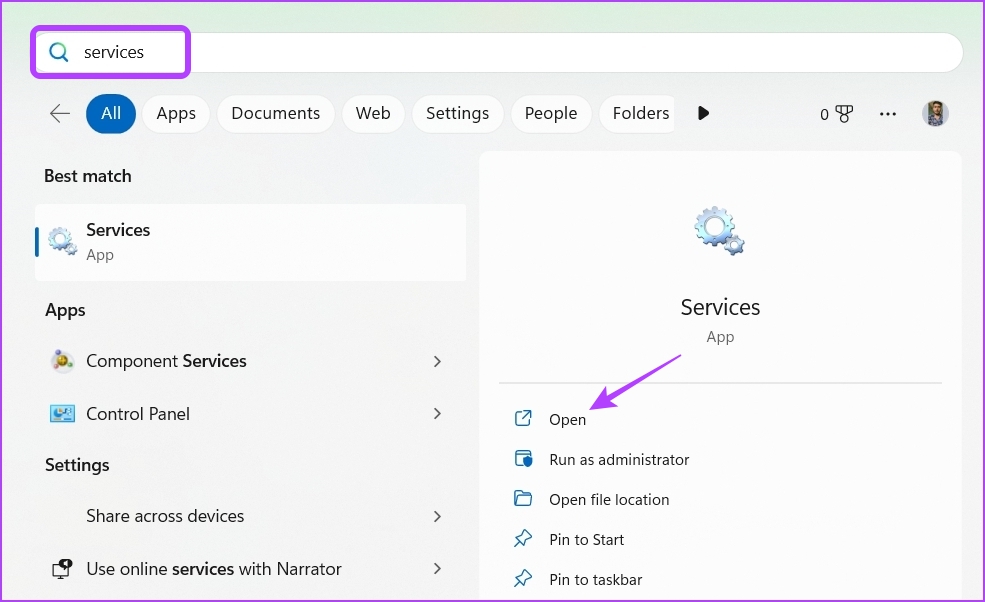
Step 1: Press the Windows + S key to open Windows Search, type Services and choose Open from the right pane to launch the Services window.
Step 2: In the Services window, double-click on the vgc service to open its properties window.
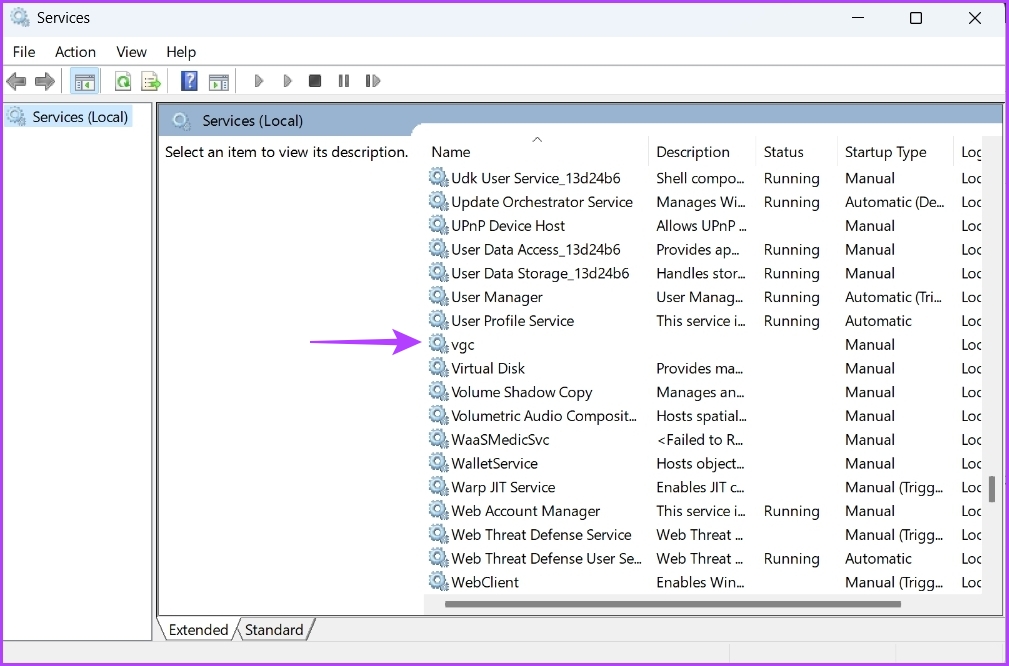
Step 3: Change the Startup type to Automatic, and click the Start button.
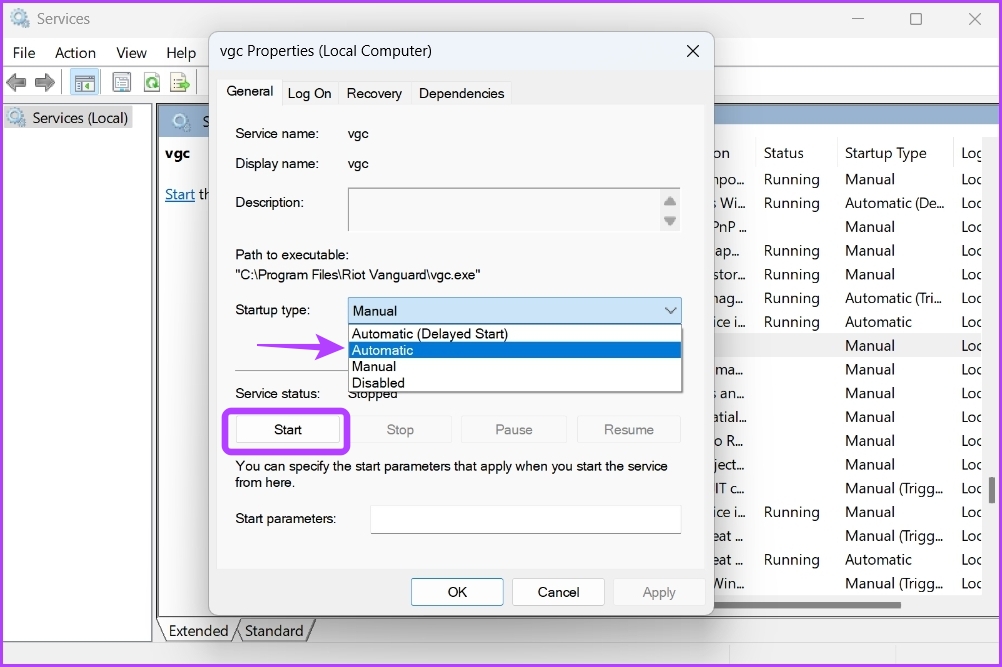
Step 4: Click OK.
If Services window fails to launch, read our post on what to do when services is not opening on Windows 11.
Play Valorant Without Any Issue
Getting Valortant to launch normally on Windows 11 is possible and you don’t have to re-install the entire game to play it. Fortunately, you can quickly troubleshoot this problem by applying the above fixes.
Was this helpful?
Thanks for your feedback!
The article above may contain affiliate links which help support Guiding Tech. The content remains unbiased and authentic and will never affect our editorial integrity.
Предоставляем решение основных ошибок в Valorant, возникающих из-за проблем в системе, работы анти-чита или других причин.
Ошибки в Valorant зачастую не просто мешают играть, а даже не позволяют запустить игру. Большая часть проблем вызвана некорректной работой собственного античита Riot Games — Vanguard, который работает с системой напрямую и очень чувствителен к любому софту. Чтобы разобраться со сложностями, стоит знать коды ошибок.
В руководстве предоставим решение ошибок в Valorant с объяснением причин их возникновения.
Решение всех ошибок в Валорант
Далее предоставим подробное решение ошибок в Валорант, которые чаще всего встречаются, а также объяснение каждого из наиболее популярных кодов.
Ошибка VAN

Ошибка VAN в Valorant — конкретный тип набора ошибок, которые могут возникать в игре по разным причинам: ошибки клиента или соединения, но зачастую связаны с античитом Vanguard. Чтобы решить ошибку, важно смотреть инструкцию для конкретного номера после кода «VAN», далее разберем наиболее популярные из них.
Ошибка VAN9003
Ошибка VAN9003 в Valorant зачастую появляется на ноутбуках с ОС Windows 11 и вызвана отключенной безопасной загрузкой. Сперва стоит проверить, действительно ли она выключена:
- Зажмите сочетание клавиш «Win+R». В открывшемся окне впишите «msinfo32» и нажмите «Enter».

- Кликните на «Сведения о системе», затем в правой части окна, примерно в середине», отыщите пункт «Состояние безопасной загрузки».
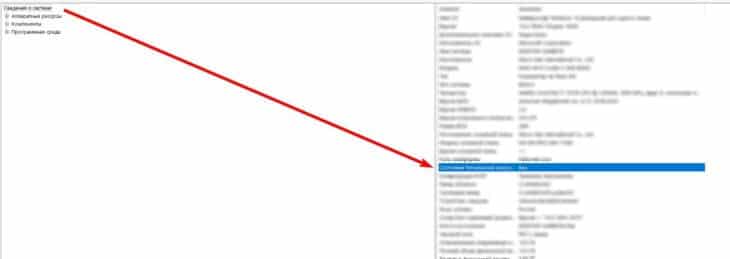
Если рядом написано «Выкл», следуйте инструкции:
- Включая компьютер, войдите в BIOS или UEFI. Комбинация и порядок действий для открытия биоса отличается от производителя к производителю.

- Перейдите в раздел «Security», после чего найдите пункт «Secure Boot», затем установите значение «Enable», либо же «Available».

- Нажмите клавишу рядом с «Save and Exit». Настройки сохранятся, после чего произойдет перезапуск системы. Проблема должна быть решена.
Ошибка при запуске
Ошибок при запуске Valorant может быть множество. Большинство из них чинится простым перезапуском клиента и всех процессов Riot. Если же это не помогло, стоит попробовать следующее:
- Запустите процесс от имени администратора.
- Проверьте целостность игровых файлов: перейдите в «Библиотеку», выберите Валорант, а затем кликните на три точки рядом с логотипом. Затем открывайте «Управление» и «Проверить файлы».
- Очистите логи игры: для этого перейдите в расположение запускаемого файла и удалите временные файлы.
- Убедитесь, что Vanguard не блокируется другими программами.
Ошибка Windows 11
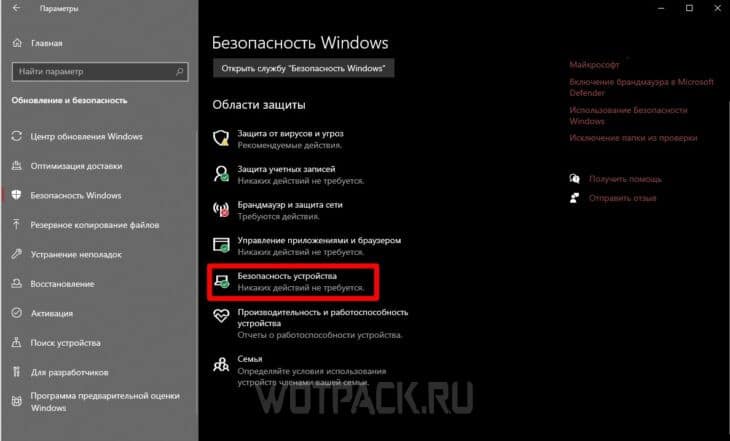
На Windows 11 чаще всего возникает две ошибки: VAN 9001 и VAN 9003. Вторая была разобрана в пункте выше. Ошибка VAN9001 в Valorant возникает как из-за выключенной функции безопасной загрузки, так и из-за выключенного TPM 2.0. Для решения проблемы требуется:
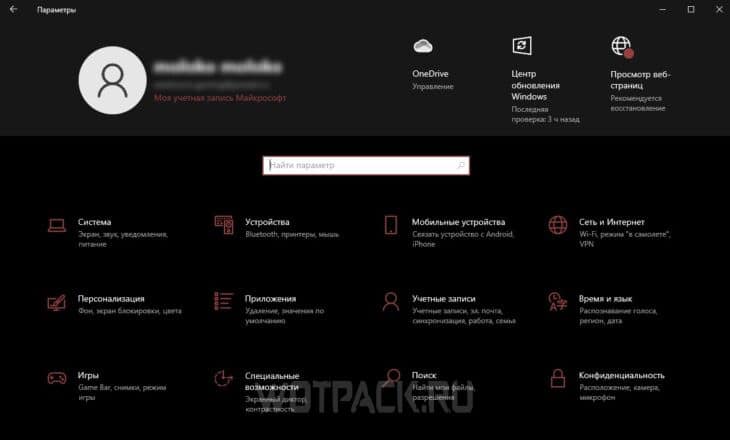
- Откройте параметры Windows.

- Перейдите в раздел «Безопасность Windows». Там необходимо найти раздел «Безопасность устройства».

- Если в этом пункте отсутствует раздел «Обработчик безопасности», значит, TPM недоступен. Если он есть, перейдите туда и убедитесь, что версия спецификации — 2.0. В противном случае устройство не соответствует требованиям Windows 11.
Чтобы включить TPM, необходимо зайти в BIOS/UEFI, делается это различными способами, в зависимости от производителя:
- Перейдите в «Настройки», затем «Обновление и безопасность», кликайте «Восстановление», после чего «Перезапустить сейчас».
- На следующем этапе выбирайте «Устранение неполадок», после этого выбирайте «Дополнительные параметры» и «Настройки прошивки UEFI». Перезапускайте устройство.
- Настройки могут содержаться в разделах «Расширенные», «Безопасность» или «Доверенные вычисления». Сама опция TPM может называться «Устройство безопасности», «Поддержка устройств безопасности» или в виде длинного текста с припиской «TPM» или «PTT» в конце.
Ошибка 128
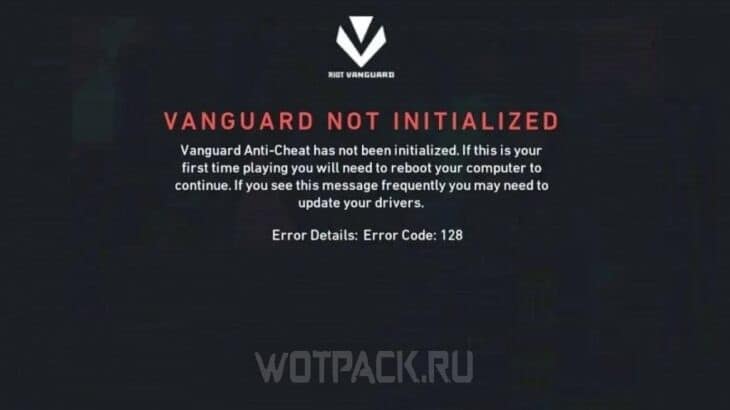
Ошибка VAN128 в Valorant напрямую связана с античитом Vanguard. Он работает с ядром, из-за чего ряд программ может вмешиваться в работу защитного ПО Riot. Сперва проверьте и обновите драйвера и перезагрузите античит, клиент и, если не помогло, компьютер. Альтернативное решение проблемы осуществляется следующим способом:
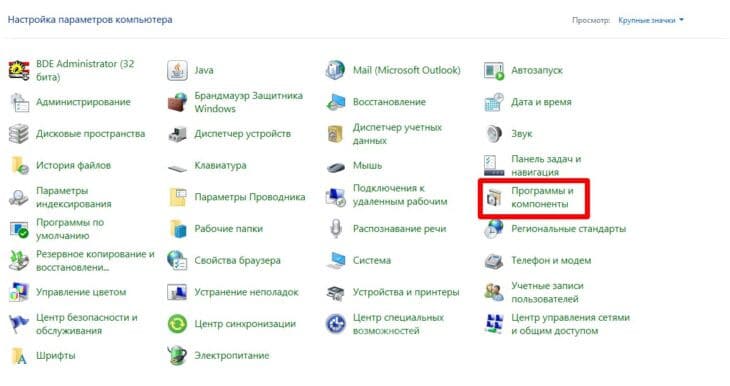
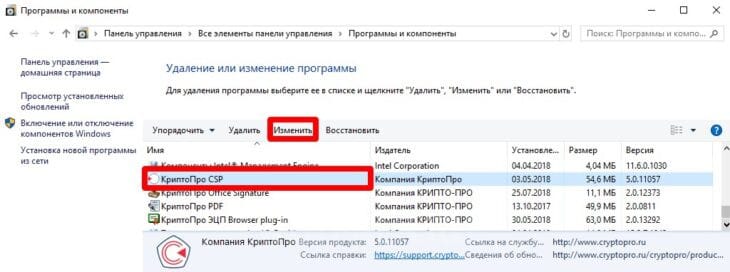
- Откройте панель управления. Затем перейдите в «Программы и компоненты».

- Найдите приложение «КриптоПро CSP», затем кликните на «Изменить» сверху.

- В мастере установок жмите «Далее», после чего выбирайте «Изменить». В пункте «Совместимость с продуктами Microsoft» установите параметр «Данный компонент будет недоступен».
Теперь остается перезагрузить ПК, если проблема сохранится, необходимо будет удалить ПО. Существуют и альтернативные способы решения ошибки:
- Откройте командную строку «Win+R».
- Введите два набора команд: «bcdedit -set TESTSIGNING OFF» и «bcdedit -set NOINTEGRITYCHECKS OFF».
- Откройте Valorant и перезапустите компьютер.
Кроме того, стоит проверить и восстановить файлы Valorant.
Ошибка Vanguard

Ошибка Vanguard в Valorant вызвана проблемами в работе античита. Исправить их можно рядом способов:
- Отключить антивирусы, а также добавить игру в исключения включенных антивирусов и брандмауэра.
- Установить последние обновления Windows. Если сидите на 7-й версии, обратите внимание на обновления KB4474419 и KB4490628. В случае сохранения ошибки установите пакет Visual C++.
- Переустановить Vanguard и проверьте его на наличие обновлений.
Ошибка VAN79


Ошибка 79 в Valorant зачастую связана с ошибкой в соединении. Исправить ее можно следующими действиями:
- Обновить Windows.
- Перезапустить клиент Riot и сам Valorant.
- Перезапустить Vanguard. Для этого нажмите «Win+R» и введите «services.msc». Найдите службу «vgc» и нажмите по ней правой кнопкой мыши. В пункте «Тип запуска» поставьте «Автоматический».
Ошибка 57
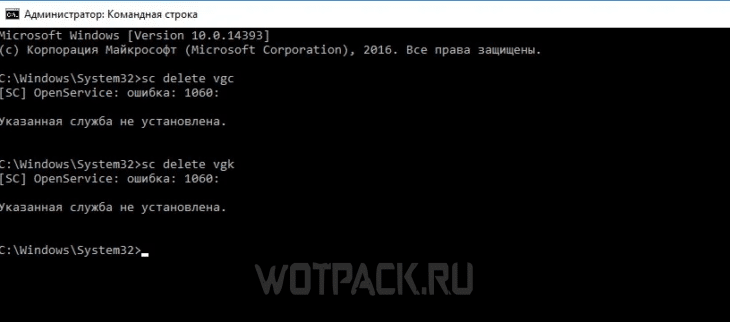
Ошибка 57 в Valorant также связана с проблемами в работе античита Vanguard. Легче всего исправить ее банальным удалением:
- Откройте диспетчер задач, зажав «Ctrl + Shift + Esc». Найдите Vanguard и завершите процесс, а также все связанные с ним.
- Запустите командную строку, нажав «Win+R» и вписав «cmd». Далее введите две команды: «sc delete vgc» и «sc delete vgk».

- Закройте консоль и через проводник найдите папку «Riot Vanguard» в «Program Files». Удаляйте каталог и перезагрузите устройство.
- Запустите установщик Валоранта от имени администратора. Согласитесь загрузить новую версию античита и вновь перезагрузите устройство.
Ошибка 43
Ошибка 43 в Valorant связана с истечением времени ожидания. Проблема может быть как на стороне Riot, так и на стороне пользователя. В первом случае нужно просто ждать, во втором можно попробовать несколько решений:
- Перезагрузить игру и компьютер.
- Проверить целостность файлов, а также открыть клиент и установить обновление.
- Удалить клиентские файлы игры. Для этого зажмите «Win+R» и введите «%AppData%». Вернитесь в папку «AppData», затем в «Local». Найдите «Riot Games», в этом каталоге перейдите в «Riot Client» и «Data». Там удалите файл «RiotGamesPrivateSettings».
Ошибка 185
Ошибка VAN185 в Valorant также связана с работой античита. Починить ее можно стандартными способами:
- Перезагрузить клиент и Vanguard.
- Обновить драйвера видеокарты.
- Проверить стороннее обеспечение и отключить оверлеи, антивирусы и оптимизаторы системы.
- Переустановить Riot Vanguard и саму игру.
- Отключить IPv6 и перезагрузить службу vgc в списке служб Windows.
Коды ошибок в Valorant
Если не смогли найти свою ошибку в пунктах выше, стоит посмотреть на официальном сайте поддержки Riot. Там разобраны почти все коды ошибок в Valorant с советами по решению.
Надеемся, что наша статья помогла разобраться с тем, как исправить ошибки в Валорант. Если остались какие-либо вопросы — задавайте их в комментариях, мы обязательно ответим.