
Илья Кондрашов
Работает в IT сфере, занимается программированием и тестированием банковских систем.
Задать вопрос
Wi-Fi насчитывает уже шесть поколений. Каждое отличается от предыдущего не только скоростью, стабильностью и уровнем сигнала, но и прикладными технологиями, о которых мало кто знает. Одной из таких дополнительных технологий является Wi-Fi директ. В этой статье расскажем о том, что это такое и как включить функцию Wi-Fi Direct в Windows 10 и 7.
Содержание
- Определение и применение
- Плюсы и минусы
- Включение в Windows 10
- Параметры системы
- Передача файлов
- Горячие клавиши
- Активирование через сеть
- Включаем в Windows 7
- Возможные проблемы и решения
Определение и применение
Это универсальный стандарт, который поддерживают многие производители техники, Wi-Fi Direct можно встретить на ноутбуках, телефонах, телевизорах.

Её смысл заключается в том, что устройства могут поднимать сеть и обмениваться между собой информацией, даже если к ним не подключен интернет. То есть роутер не потребуется. Связь устанавливается напрямую, где одно из устройств выступает в качестве точки доступа, а второе подключается к нему. Передача информации осуществляется на максимальной скорости без каких-либо ограничений. Это позволяет не только принимать и отправлять файлы, но и транслировать экран, заниматься созданием DLNA и прочим.
Плюсы и минусы
Как и у всех решений, у этой технологии есть достоинства и недостатки.
К явным плюсам можно отнести:
- Возможность сопряжения самых разных типов устройств. К примеру, к ноутбуку или ПК можно подключить телевизор через Wi-Fi для стриминга фильмов или любого аудио- и видеоконтента. Это очень удобно, так как непосредственно в ТВ не нужно будет ничего скачивать.
- Можно транслировать рабочий стол со смартфона на ПК. Для этого потребуется установить приложение, работающее с miracast, а на подключаемом устройстве установить ответную часть ПО.
- Устройства, подключенные по Direct, имеют максимально допустимую скорость передачи, так как между ними нет коммутатора, настройки и особенности которого могут сильно резать скорость передачи и загрузки контента.
- Стандарт поддерживает все современные операционные системы, в число которых входят MacOS, Windows 7 и старше, а также мобильные ОС Andoid и iOS.
- В идеальных условиях можно добиться стабильного сигнала в радиусе до 100 м.
Недостатков у технологии хватает, они не особо критичны, но сказать о них стоит.
- Быстрая разрядка аккумулятора у техники, в которой он есть. Так как идёт непрерывное подключение, работают беспроводные модули, мы получаем постоянный разряд.
- Если у одного из устройств плохой беспроводной модуль, качество сигнала будет падать, а значит снизится и радиус действия. То есть соединение нестабильно.
- Проблемы в связывании в одну сеть более двух устройств.
- Невысокая степень защиты передаваемого сигнала. Но это больше технический аспект, с которым в повседневной жизни вряд ли будут проблемы.
Включение в Windows 10
Перед началом работы с Директом нужно подготовить ПК или ноутбук. В случае если не получается подключиться, нужно провести некоторые манипуляции. Первое, что нужно сделать, – на время отключить антивирус, либо настроить его и внутренний файрволл так, чтобы они пропускали все входящие и исходящие подключения.
Если рядом с устройством работает беспроводной передатчик Bluetooth или ресивер от клавиатур или мышек, их лучше выключить, либо быть готовым к тому, что они могут мешать подключению из-за смешения сигналов.
Не лишним будет убедиться, что беспроводной адаптер или встроенная плата имеют актуальные драйверы, а сам Wi-Fi работает в принципе. Так как если будут проблемы с беспроводным подключением в целом, может показаться, что не работает именно протокол Direct.
Параметры системы
Для того, чтобы запустить Вайфай Директ для системы Виндовс 10, потребуется провести несколько подготовительных шагов.
- Необходимо включить Wi-Fi модуль на ноутбуке и убедиться, что устройство не подключено ни к одному роутеру.
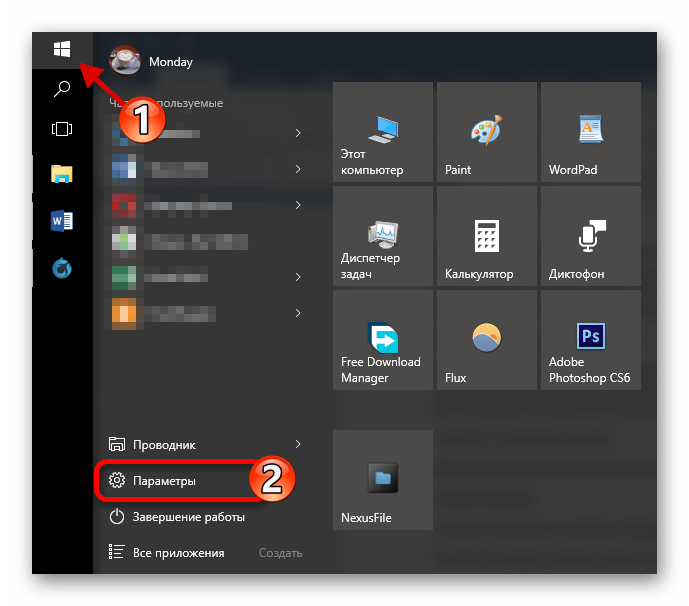
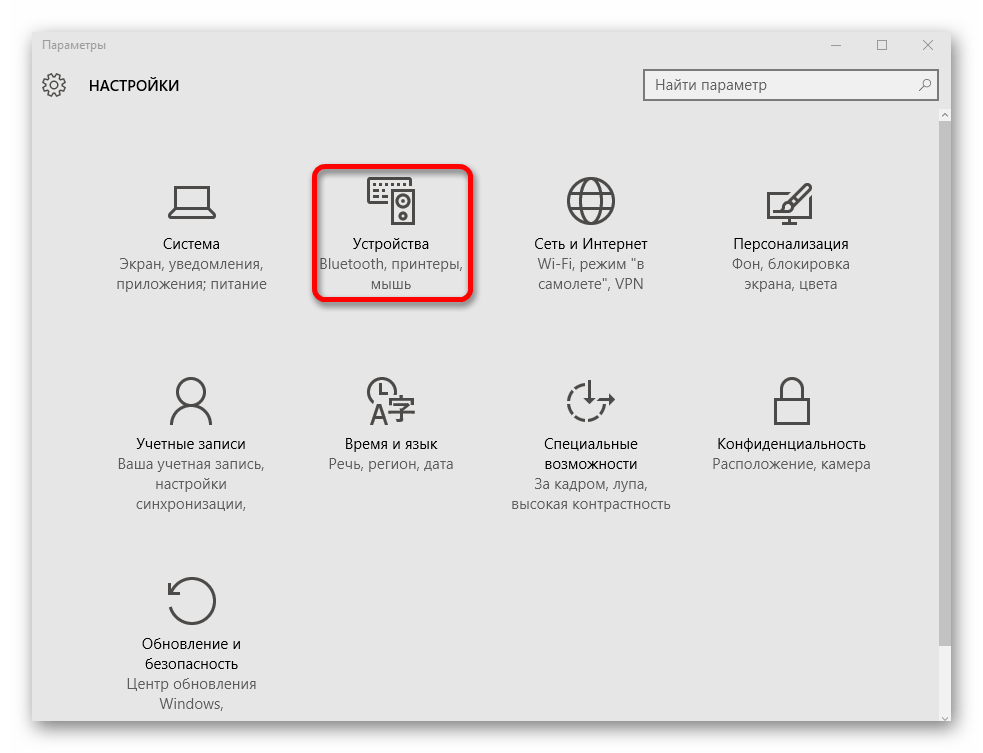
- Далее потребуется перейти в настройки системы. Сделать это проще всего через меню «Пуск», раздел «Параметры», в котором будет находиться пункт «Устройства».

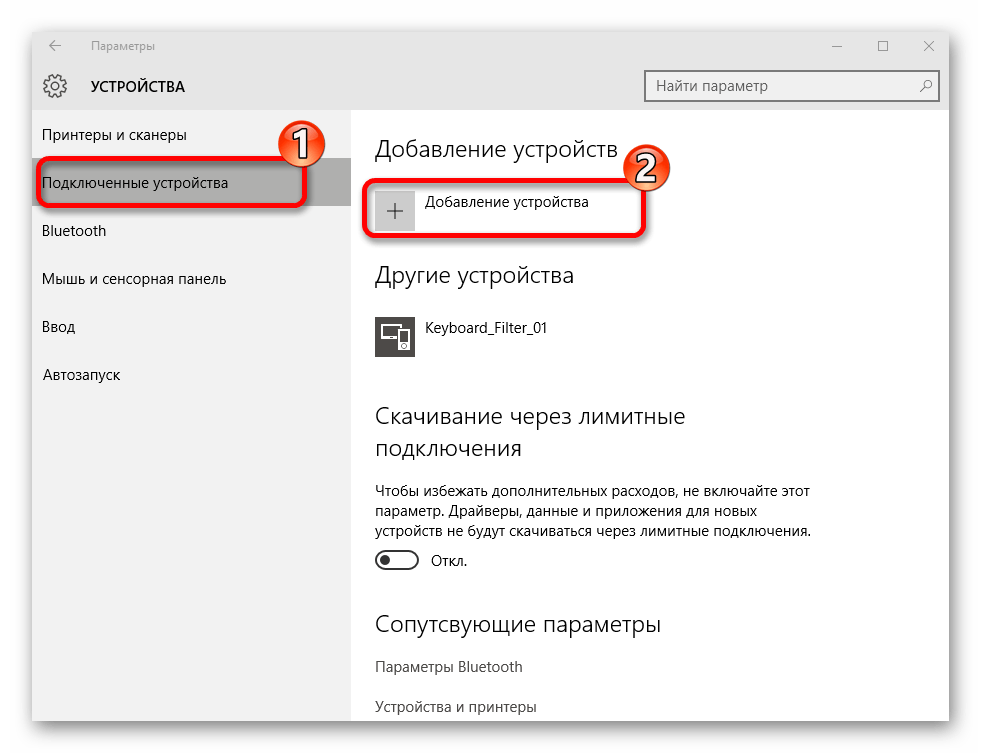
- В открывшемся окне нужно кликнуть на иконку добавления устройств. В этот момент запустится поиск девайсов по близости.

- В окне добавления устройств выбираем пункт «Всё остальное» или «Беспроводной дисплей», в зависимости от устройства;
- И если второе устройство включено и у него активирован Wi-Fi, оно отобразится в списке и станет доступно к выбору.

- После инициализации сопряжения на втором девайсе нужно подтвердить подключение. После этого можно использовать передачу как файлов, так и медиа-потока.


Передача файлов
Чтобы включить Wi-Fi Direct на ноутбуке Windows 10 для передачи файлов, придётся использовать сторонний софт. Наиболее удобным будет приложение «Wi-Fi Transfer», которое можно найти в магазине приложений Windows.

Его же потребуется установить на телефон.
После запуска утилиты на обеих девайсах потребуется дать им имена, а затем на ПК выставить переключатель в положение «Send».

На телефоне надо переключиться на вкладку «Receive», где вам будет показан код для сопряжения.
После успешного сопряжения принимающее устройство, в нашем случае телефон, будет отображен в окне программы на компьютере. Кликом на наименование смартфона откроется область для загрузки файлов.

После добавления данных нужно нажать на кнопку «Send files» и они уйдут на телефон.
Горячие клавиши
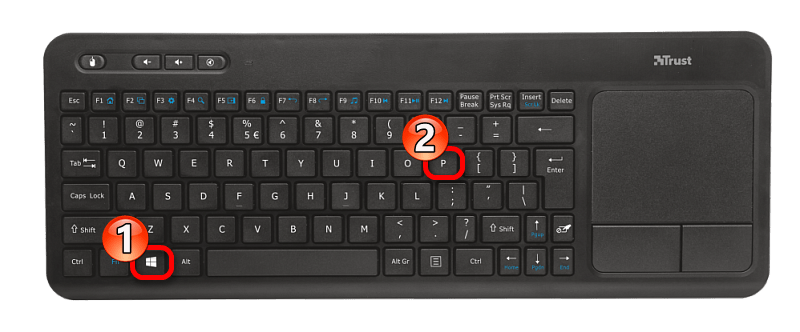
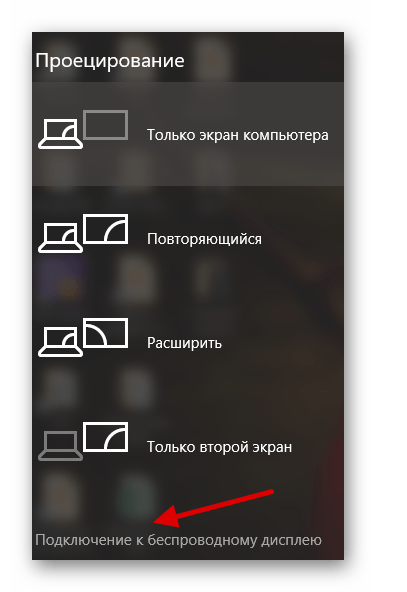
Для быстрой активации Direct для проецирования экрана ПК на смартфон или ТВ есть быстрое сочетание клавиш, которое вызывает встроенный менеджер транслирования изображения.
Для запуска потребуется:
- Включить miracast на принимающем устройстве.
- На клавиатуре нажать сочетание Win + P.

- Далее «Подключение к беспроводному дисплею» и выбираем устройство.

Активирование через сеть
Настройку Wi-Fi Direct на ПК можно выполнить с помощью проводника. Устройства должны быть подключены к одной сети.
Далее потребуется:
- Открыть «Проводник» и перейти в раздел «Сеть»;

- Следующим шагом нужно включить сетевое обнаружение и общий доступ к файлам.
- Сеть должна быть частной, если это не так, нужно ее создать.
- В сетевой инфраструктуре появятся устройства, с которыми можно работать.


WiFi Direct в телефоне настраивается легче.
Для этого нужно:
- Перейти в настройки системы и выбрать там пункт «Wi-Fi»
- В следующем окне перейти в «Дополнительно» и там выбрать пункт «Wi-Fi Direct».


Если в зоне видимости смартфона будут устройства, на которых сейчас запущено сопряжение или поиск по нужному нам протоколу, они появятся в перечне и их можно будет выбирать.
Если между собой сопрягаются смартфоны, то после выбора одного из них в перечне устройств, на втором потребуется подтверждением подключения.
Стоит заметить, что здесь не используется ввод ПИН-кода, поэтому нужно быть аккуратнее, ведь подключившись не к тому устройству, можно подвергнуть опасности файлы, находящиеся во внутренней памяти смартфона.
Если требуется настройка в беспроводном телевизоре, пользователю потребуется зайти в параметры системы. В них выбрать раздел «Сеть» и перейти в отдельный пункт «Wi-Fi Direct»

В остальном варианты включения директа на устройствах выполняется по тем же принципам, что описаны выше.
Включаем в Windows 7
Для настройки Direct на семёрке потребуется использовать сторонний софт, так как сама система не располагает необходимым ПО.
К примеру, если нужно вести удалённую передачу изображения с ПК на телевизор или экран, потребуется установить специальное приложение, которое называется Intel Wireless Display».
После её установки и запуска система автоматом перейдёт в режим поиска окружающих устройств и, если они будут найдены, их список будет выведен в окне программы. С кнопкой «Connect».

После попытки подключения нужно будет ввести ПИН-код принимающего устройства, и сопряжение будет завершено.
Для передачи файлов через Wi-Fi Direct в Windows 7 тоже потребуется использовать сторонние решения. К примеру, можно организовать доступ к файлам на телефоне через FTP, либо при помощи ShareIt. Её версия есть как для ПК, так и для Андроида.
Важно! Перед тем, как настроить и запустить Wi Fi Direct на ноутбуке Windows 7, нужно убедиться, что устройство работает на процессоре поколения Core i3, Core i5 или Core i7, а также встроенный сетевой адаптер от производителя Broadcom, либо Intel.
Возможные проблемы и решения
- При проблемах, в первую очередь, проверьте настройки сети.
- Нередко проблемы с беспроводными сетями создают антивирусы. Если такая ситуация произошла, защитное ПО можно остановить, настроить, или заменить на другое.
- Если используется подключение в диапазоне 2.4 ГГц, есть вероятность, что подключение прерывается другими сетями Wi-Fi, такое бывает в местах с большим количеством роутеров, либо радиопомех. Данная проблема может решиться путем поиска наименее «захламленного» канала, т.е. того, на котором сейчас находится меньше всего устройств.
Technology rapidly changes and each new device we acquire has a set of new features that need proper understanding before we use them.
In this guide, we’ll focus on Wi-Fi Direct, a feature that can be helpful in some situations yet many users seem to overlook its benefits.
Want to know more about Wi-Fi Direct in Windows 10? This manual has got you covered.
Let’s get into it.
Wi-Fi Direct Explained

If you want to transfer files to someone else’s device, but without having to go through the procedure of registering an account for cloud-based storage or a file transfer service website and potentially compromising the files’ security, the best option would be a direct transfer.
There are only a few methods to make a direct transfer, like Bluetooth.
But, for transferring larger files with better speed and more stability, most would agree that Bluetooth is just not enough.
Thankfully, WiFi Direct is a superior feature, allowing two devices to connect through a peer-to-peer connection and transfer files with better speed, up to 250 Mbps. Additionally, unlike Bluetooth which has quite a limited distance range before the connection interrupts, WiFi Direct supports a connection within ranges of up to 200 meters, meaning you have much better freedom of moving and still not interrupting the file transfer, screencast, or whatever it is that you’re using this feature for.

Although the name WiFi Direct is immediately associated with the need for a router, you should know that this feature requires no wireless router or access to a nearby WiFi internet connection, as the devices that have this feature can connect directly to each other, without the need of internet or an access point (AP).
Most modern devices already have the WiFi Direct feature, and chances are that you’ve used it without knowing, as some of the popular services such as Miracast already rely on this technology to allow users to cast their screen on their smart TV screens.
The possibilities are even broader if you use WiFi Direct on Windows, so in the next section, we’ll help you find out whether or not your PC supports this feature.
Is My PC Compatible With WiFi Direct?

If you’re not sure whether your computer is compatible with WiFi Direct and can use that feature, there are ways to check, and we’ll show you how.
- Simultaneously press the Windows + S buttons on your keyboard to bring up the Windows Search bar.
- Type in Windows PowerShell, then right-click the first result and choose Run as Administrator.


- You may see a prompt asking for permission to launch the elevated version of the PowerShell app. Choose Yes to grant permission.
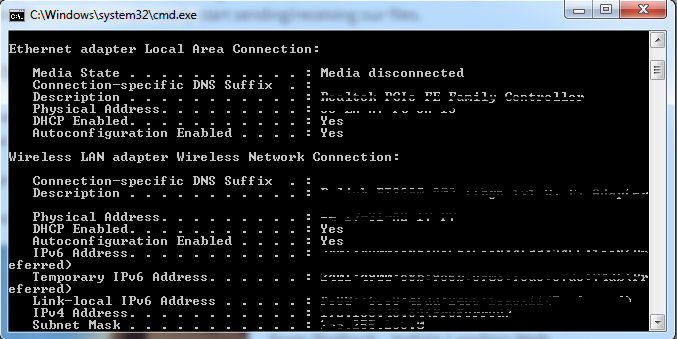
- When the PowerShell panel is open on your screen, type in ipconfig /all and press Enter to execute the command.

- You’ll now see a list of network adapters and connections. If you see Microsoft Wi-Fi Direct Virtual Adapter on the list, it means your PC supports this feature and can establish WiFi Direct connections.


If you don’t see the WiFi Direct Adapter on the list, you’ll need to acquire and plug in a USB device capable of utilizing the WiFi Direct feature. We cannot say exactly which product to acquire, but there are many choices available on the market, so finding one shouldn’t be difficult.
Setting Up WiFi Direct On Windows 10

To set up and start using WiFi Direct on your Windows 10 PC, follow the steps below:
- Simultaneously press Windows + I on your keyboard to open the Windows Settings Panel.
- Click Network & Internet, then choose Manage WiFi Settings.
- Find WiFi Direct on the menu, then enable it based on the instructions specific to your device.
- Remember or write down the Network Name and Passcode, as you’ll need them to connect your PC later on.
- Open the Windows Search Bar, type in Manage Wireless Networks, and click on the first result. Choose Add, then select the WiFi Network of your WiFi Direct device and type in the passcode as the final step.
Your PC is now successfully linked to the WiFi Direct network. Feel free to utilize it any way you find it beneficial.
Conclusion
Now you know more about the WiFi Direct feature and its broad use case. Hopefully, this will help you improve your experience the next time you require a feature superior to Bluetooth, whether that’s for transferring files, casting your device’s screen on a Smart TV, or more.
For more information, you can always visit the official WiFi Direct informative webpage and learn more from first-hand information provided by the organization.
What Is ETD Control Center And Do You Need It?
WiFi Direct Windows 10 – How to Send Files on Laptop Faster Offline
WiFi Direct is a connection between two devices for transferring files in a fast way. It is not necessarily better than USB 3.0 in speed, but the advantages of WiFi Direct drive a lot of people to wonder “How to use WiFi Direct on laptop running in Windows 10?” After a long-time search, however, most people are still at a loss and can’t even where the switch of WiFi Direct is on the devices. Don’t worry. In this article, we are going to introduce one of the best methods to send files in Windows 10.
Why A Better File Transfer Method Is Required?
When it comes to file transfer from or to a Windows computer, using USB flash drive is the best answer in several years ago. However, there is a limit of files too large (over 4GB) for USB in FAT32 format, and it has been so long a time since people suffer from the unstable yet tedious performance of pen drives, there are actually many more methods to share files in Windows 10 without USB.
Furthermore, the need of file transfer has generally moved to Windows to mobile phone and in reverse, or to be more specific and realistic, people mostly want to transfer files between Android devices and Windows computers.
Given the conditions above, Bluetooth and MTP (through USB cable) are still two candidates for moving data between laptop and mobile phone. A lot of people love Bluetooth, but Bluetooth is not satisfying enough in many cases, such as large file or massive transfer. As for MPT, just have a search and see how many people are stuck at Android USB device not recognized but charging only.
Tips: These methods are still widely used by many people. In addition to the problems mentioned above, there is also risk of losing important files during the transfer. In case you also lose the original copies, don’t hesitate to recover permanently deleted files from your laptop with the best data recovery software – iReparo for PC.
WiFi Direct Introduction
WiFi Direct has been introduced since over a decade ago, only a few years later Bluetooth. However, it is apparently not as famous as Bluetooth. WiFi Direct can be regarded as a sort of Bluetooth over WiFi.
Is WiFi Direct the perfect choice? WiFi Direct exceeds the above options in transfer speed, wireless connection, no need of internet connection. However, WiFi Direct is not as obvious as it should be.
How to Check If WiFi Direct Is Available on Laptop Windows 10
WiFi Direct is supported in various electronic devices, like computers, smartphones and TVs. As long as your computer is not 10 years old, it is very likely compatible with WiFi Direct. In case you want to confirm it, here is how to check it out.
- Step 1. On Windows 10, press Windows + R, type CMD and hit Enter.
- Step 2. In the pop-up Command Prompt window, type ipconfig/all and hit Enter.
- Step 3. Scroll up or down to find an entry labeled Microsoft Wi-Fi Direct Virtual Adapter.
If you find the entry mentioned above, your computer hardware should be compatible with WiFi Direct. Android devices support WiFi Direct since Android 2.3 and Apple devices have had it since iOS 7 (existing as AirDrop and Airplay). As for entertainment devices, like Smart TV, you need to confirm it with the manufacturer or seller.
To use WiFi Direct, you need to turn on the option on both devices before building a connection. It should be noted that WiFi Direct could be altered in mobile phones running on aftermarket OS, such as Xiaomi, Samsung, Huawei, etc. The option may be either invisible or changed to another name.
- Step 1. On Windows 10, click Start menu, type Connect and open it.
- Step 2. On your Android phone, go to Settings > WiFi, switch on WiFi Direct.
- Step 3. On the available list found by your phone, tap and connect to your laptop.
- Step 4. Send files between the two devices by following the onscreen instruction.
Unless the manufacturers have made specific improvement, the files transferred through WiFi Direct are not properly organized. You may find all photos or videos in one folder. A few third-party tools allow users to transfer files from point to point without internet access basing on the feature of WiFi Direct, such as Shareit and Feem, but some of the functions are exclusive for paid users.
Final Thought
Again, WiFi Direct is far from being the best method to transfer files between two devices. It is worth of considering when you have problem transferring files by USB cable or the USB driver transfer speed is super slow. There is no universal way for file transfer, for example, you will need a special way to copy files without changing date stamp. Check out the tutorials for file transfer and share them to your friends if you find them useful.
Все способы:
- Включаем Miracast в Windows 10
- Способ 1: Сочетание клавиш
- Способ 2: «Параметры» системы
- Решение некоторых проблем
- Вопросы и ответы: 6
Miracast – это технология, которая была разработана компанией Microsoft для беспроводной передачи изображения, звука на дисплей телевизора и других гаджетов. Эта функция доступна для всех устройств, которые имеют соответствующий Wi-Fi-адаптер. В данной статье будет описан процесс включения Miracast в Windows 10, а также решение некоторых проблем, связанных с его работой.
Включаем Miracast в Windows 10
Беспроводная технология Miracast обеспечивает точную передачу изображения без использования HDMI-кабеля на различные устройства, которые поддерживают такую функцию. Из недостатков можно выделить недоработанный функционал и редкие сбои.
Способ 1: Сочетание клавиш
Настройка и запуск функции Wi-Fi Direct с помощью сочетания клавиш может занять всего несколько минут. Данный процесс немного схож с подключением компьютера к другому устройству посредством Bluetooth.
- Включите Миракаст на подключаемом устройстве. Если такого нет, то попробуйте запустить Wi-Fi.
- Теперь на клавиатуре компьютера зажмите Win+P.
- В самом низу списка найдите пункт «Подключение к беспроводному дисплею».
- Начнётся процесс поиска.
- Выберите необходимый компонент в списке.
- После нескольких секунд вы должны увидеть результат на подключаемом устройстве.
Теперь вы можете наслаждаться качественным изображением и звуком на другом устройстве без использования кабелей.
Способ 2: «Параметры» системы
Вы также можете подключить всё через «Параметры» системы. Этот способ отличается от первого только путём его реализации, но вы получаете аналогичный результат.
- Зажмите Win+I или перейдите в «Пуск», а после кликните на «Параметры».
- Откройте «Устройства».
- Во вкладке «Подключенные устройства» вы можете найти и связать свой компьютер с другим объектом. Для этого кликните на «Добавление устройства».
- Начнётся поиск. Когда система найдёт нужный объект, подключите его.
Вот так просто вы можете добавить устройство через «Параметры» и использовать возможности Миракаст.
Решение некоторых проблем
- Если вам на компьютере появляется сообщение о том, что он не поддерживает Miracast, скорее всего, у вас нет необходимых драйверов или встроенный адаптер не поддерживает такую функцию. Первую проблему можно решить переустановкой или обновлением драйверов с официального сайта.
- Если устройства подключаются слишком долго, причина также может быть в неправильных или неактуальных драйверах.

Подробнее:
Программы для установки драйверов
Установка драйверов стандартными средствами Windows
Включить Miracast в Виндовс 10 довольно легко, поэтому у вас не должно возникнуть сложностей. К тому же данную технологию поддерживает большинство современных девайсов, что делает передачу изображения и звука намного проще.
Наша группа в TelegramПолезные советы и помощь
Windows computers are equipped with numerous features when it comes to connectivity. Whether you want Bluetooth, Wireless, or wired connectivity, the Windows computers allow you to have a seamless experience in straightforward manners. WiFi Direct is one of those effective tools for Windows which you can use to establish secure and reliable wireless connections with your PC operating system. This feature will help you to share your files offline without using a Bluetooth connection.
This technology uses a peer-to-peer, direct WiFi connection to do the whole thing. It works like just an ad-hoc network but here you will not use any WiFi adapter to create this connection.
Your computer and the receiving device will work in a direct network configuration where you will be free to share files in any direction. Maintaining a suitable distance for the WiFi connection would be important for you.
WiFi direction works as a single-hop network instead of a multi-hop connection where you are free to connect any two supported devices just by using a WiFi connection. Having WiFi Direct Virtual Adapter will be important to create a connection and use it for transferring and receiving files.
Wireless Direct network has no feature to allow your devices to use this feature on its own. That means you will need software to enable this feature and create a connection that works.
We are going to cover all these things below in this article. But, before that, we would like to answer some of your questions related to the Wireless network. So, without further discussions, let’s get started without any delay.
Table of Contents
What is WiFi Direct in Windows 10 with Exact Functionality?
WiFi Direct (Earlier Known as Wi-Fi Peer-to-Peer) is a popular WiFi system used for establishing peer-to-peer wireless connections. There are numerous uses of this technology. But, the most common and trending concept is wireless sharing these days. Because WiFi Direct enables the users to share their files at a very high speed with other devices, it is in huge demand just because of this reason.
We can also use Wireless direct network not only for file sharing but also for screen sharing, wireless printing, and various other things like that.
Latest Smart Televisions, Laptops, Computers, and now equipped with this feature. So, sharing our data from one device to another has become pretty easy with this technology.
As we have discussed earlier, it is required to have a working WiFi connection along with a WiFi Direct supported device, we can effectively utilize this tool to have various features.
If you want to know more about What is WiFi Direct, you can freely read this article on Wikipedia about this technology. So, now we hope you have got the answer to what is a wireless network.
Now, we should go further and know some more details about it.
Is WiFi Direct safe?
Yes, WiFi Direct is an inbuilt feature offered by not only Windows but Android and various other devices too. So, you can trust this technology without any issue. The files can be shared offline, so you do not have to worry about anything even if you do not have an internet connection with yourself.
The main thing to keep in mind here is the app or software you are using to establish the connection. Because, you have to install some third-party tools to enable and use this system, make sure to download only the software which is fully trusted. We are going to give you details about the same too so no need to worry about it.
So, yes, if you want to know Is wireless direct network safe? The answer is Yes. You can use this feature to share any sort of file and they will not be harmed in any way.
However, sharing your files using wired mediums is always a better option to increase security. In simple words, using WiFi Direct for any sort of file sharing work is pretty much safe in all the terms.
What is WiFi Direct screen mirroring and how to use it?
WiFi Direct Screen Sharing is an impressive feature that will allow you to share your computer or Android screen on your Smart Televisions. This would happen only if you have a TV with inbuilt wireless direct network technology. Most of the latest Android and other Smart Televisions are coming up with this feature which you would definitely love to have.
Just like the ordinary Miracast screencasting technology, your PC can easily be used to share your screen across devices. So, if you want, you can have that watching experience on a bigger screen from a smaller screen.
Share your screen using Wireless Connectivity?
The process is pretty simple. Just turn on the Wi-Fi Direct on your Smart TV or any other device you want to make your main targeted device. It means, if you are looking to share your Android screen on a Smart TV, you will have to make your Smart TV the central hub for the connection. For that, you can use the process given below.
- Turn on the Wi-Fi Direct feature on your TV or Computer
- Search for the available Wi-Fi networks on your Android or Computer device.
- Click on Connect
- Now, you can either use the traditional Miracast feature or third-party software to start your screen mirroring.
Now, with this process, you might have become aware of how to enable wifi direct. Now, you can use this technology to not only share your computer screen on a bigger screen but various other combinations too.
Since you will not find any specific app to use the wireless direct network for any purpose or change its settings, establishing the WiFi connection is the best first thing to do in this process.
Then you can make use of a good app and software on both your devices. If you want to know how to set up wifi direct in Windows 10, we are going to give you a detailed guide for the same.
As we have discussed the process of sharing your screen from Windows 10 to the Smart TVs, now we are going to reveal the process of sharing files from Android to the computer and vice versa.
Picking the right software is crucial to establish a connection between both devices. Xender, Shareit, Beam, and various other apps are utilizing the wireless direct network technology to help the users easily and effectively share any kind of files with each other.
But, you have to make a good decision while picking the right software for you.
Check if your Windows computer supports WiFi Direct?
Before proceeding with the connection process, it would be important to check if your computer has this feature inbuilt or not. If it is not there, you would never be able to get the results you are looking for.
That means you will have to use this feature in your PC, your PC must have the hardware and drivers to support it. The process of doing this check is as follows.
- Press Windows+R together to Enter the Run Command Menu
- Enter CMD and hit Enter
Type the WiFi direct command : ipconfig/all
- Now, see the Menu Wireless LAN Adapter Local Area Connector.
- Check-in front of the description for Microsoft Wi-Fi Direct Virtual Adapter.
- If this thing is written there that means, your PC supports Wi-Fi Direct. If not, then the feature is missing on your PC.
This is perhaps the best and most suitable way of checking if your computer has Wi-Fi Direct Features. You can easily follow this method in any version of Windows and you are good to go.
Now, without any further discussion, let’s know how you can easily connect your PC to an android device using Wi-Fi Direct and use this connection to share files seamlessly.
Connect your Windows PC with another Device with a Wireless Direct network
As we all are aware, there is no direct method of sharing your files through Wi-Fi Direct from one device to another. You can definitely connect your PC to another device through Wi-Fi Direct connection but when it comes to sharing files, screens, or huge files, you would need a platform to do the same.
So, we are going to use free and genuine software which you can easily use on your system.
- You can use Feem to do things easier for you. (WiFi direct feature is free in this software).
- Just install this device in your Windows computer and the Android or other device which you want to connect for sharing purposes.
- Now, open the app on both devices and connect them through WiFi.
- Start sharing and Enjoy.
Connect Wifi Direct Enabled Scanner/Printer for file sharing/printing
Wireless Printing and file sharing are perhaps the most common applications of this technology. That means, we can definitely use this technology to print any sort of document with our printers without using a wired connection.
The process is pretty simple to use. But, keep in mind that you will need a printer with supported Wi-Fi Direct technology. We will come to that too below but now let’s know how you can Connect Wi-Fi Direct Enabled Scanner printer for printing?
Turn On your Printer and make its WiFi Direct option on (Read User-Manual if you don’t know how to do it).
- Open the Feem Software which we have installed above.
- Connect your computer to the laptop using your WiFi.
- Now, use your software to print anything you want.
8 Best WiFi Direct Printers for Windows PC
Epson WorkForce Pro
WorkForce Pro is an impressive and high-performance printer that suits best for companies and small enterprises. This printer is equipped with effective features such as Dash Replenishment, and fast printing speed, etc.
The printer has a speed of 20 ppm for black and white and 10 ppm for color printing.
Pros:
- More performance than laser
- Precision core
- Keep track of ink usage
- Low Printing Cost
Cons:
- Support only Epson Cartridge
- Large in size
HP OfficeJet 3830
HP OfficeJet offers numerous features as a printer and scanner. AirPrint, WiFi Direct, Scan, Fax, and Instant Ink are some of the offerings. You can easily print anything from your smartphone or computer wirelessly. The printer is compact in size and offers affordable printing options to the users.
You can also get your documents printed from Dropbox, iCloud, and Google Drive as well. The printer is also effective for photograph printing too.
Pros:
- Compact in size
- Work with Alexa
- 7 days a week web support
- 35 sheet auto document feeder
Cons:
- Auto 2 sided printing is not supported
- The smart task feature is missing
Epson Expression Home
This is another impressive printer with scanner and copying functions. This printer has 2 sided printing features supported. Also, you can get the files printed from your Android, iPad, or iPhone pretty easily.
The printer is not much compact in size but you can get any type of document printed because of its versatile features.
The printer work with its Instant Dry Clarian Ink that works great for both documents and photographs
Pros:
- Hands-Free voice-activated printing
- Individual cartridges at an affordable price
- 2.4 inches Color LCD
- 100 Sheet feed tray
Cons:
- Only support Epson Cartridge
- Not having a compact design
Epson Workforce WF-2860
This is another great printer that supports NFC, Wi-Fi Direct, and numerous other features at an affordable price. The printer will also work with Ethernet, Scanner, Copier, etc. The printer produces laser-quality outputs that you may not get in any other printer in this range.
The printer is powered with PrecisionCore so that you can expect a great performance from this printer for sure. The printer can effectively handle both printing and scanning features.
Pros:
- 2-sided Printing to save the maximum number of papers
- 2.4 inches color LCD screen
- 150 sheets of paper capacity
- Mobile printing supported
Cons:
- Only works with Epson cartridges
- Slow printing speed
Canon Pixma TR4520
This is another amazing printer with Dash Replacement, mobile printing, and various other advanced features. Using the Canon print app, you can use this printer for wireless printing in an effective manner. Printing documents from your smartphones is pretty easy with this printer.
AirPrint, ADF, Morea Print Service, are some of the main features of this printer. Ink saving printing technology is also very effective in this printer.
Pros:
- Save 10% ink with dash replenishment
- Easy to use wireless connectivity feature
- Automatic ink measurement
- Auto power on/off feature
Cons:
- Disc label printing feature is not supported
- Maximum paper size is 11’x17’
HP OfficeJet 250 Portable Printer
This printer is best for labels, envelopes, photo paper, and other High resolution and various other sorts of things. This printer is best for not only printing but also for scanning, copying, etc. Using the HP ePrint app, you can have the best printing experience from your smartphone too.
You can use Bluetooth and WiFi Direct to get your documents printed using wireless connectivity. The printer has a 2.65” color touchscreen to help you navigate through the settings pretty easily.
Pros:
- Long-Lasting battery
- 10 sheets auto document feeder
- Useful for Scan and copy
- Compact in size
Cons:
- 2-sided printing is not supported
- Slow printing speed as compared to the competitors.
HP OfficeJet 200 Portable Printer
This is another great deal if you need something compact and impressive in this domain. This printer is highly impressive when it comes to the best facilities for mobile and wireless printing. You just have to install the ePrint app on your smartphone and you can have the most amazing mobile printing services.
Along with all these features, the company has kept the price at a very low end. The printer can easily be purchased from Amazon with a 1-year hardware warranty.
Pros:
- 50 sheets of input-output capacity
- Compact in size
- Easy to use
- Effective mobile and wireless printing features
Cons:
- Auto 2-sided printing is missing
- Mono display
- No automatic document feeder
- No scanning and fax features
HP OfficeJet Pro 7720
This is another impressive printer you can effectively use for wireless printing, scanning, and copying purposes. This is a wide-format printer that will suit best for official printing tasks. It can do a 17×17 scan and copy it in a very easy manner. The color printing quality is just impressive and you also get a fast printing speed with this.
With the help of the HP Smart App, you can get any sort of document printer with this from anywhere you want. There are various other features that make this printer one of the best in its class.
Pros:
- High Printing Speed 22 ppm for b/w and 18 ppm for color
- 35-sheet auto-document feeder
- 2.65 inches color touchscreen
- 250 sheet input/output feature
Cons:
- Pretty Expensive as compared to the others
- Not suitable for official works
Final Verdict:
We hope you have now found your answer to what is Wi-Fi Direct, its applications, and connection processes. The article was written by doing complete research so we hope you have got the genuine information from us.
But, before doing any setting change or purchase, make sure to do brief research. Also, changing any unwanted settings on your computer can cause numerous irreversible harms to your system. But, if you follow the process we have shown in this article, you are good to go.
If you have found this article helpful in this regard, make sure to share your valuable feedback in the comment section. Also. give us your suggestions and complaints about this article.
It would be appreciated if you share this article with others too. Also, we keep posting regular articles on this type of topic so stay in touch with us and stay reading.