
Networking issues in Windows aren’t limited to working of either router, DNS server or your system drivers but depends upon registry configuration of your machine too. So if the network registry entries are corrupted or missing, you may not able to connect to the web.
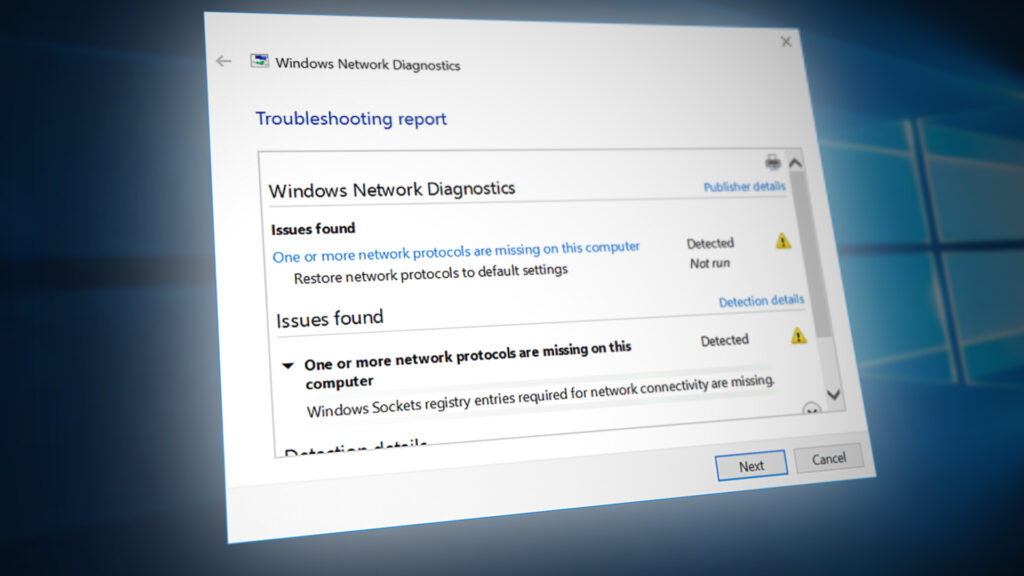
This article addresses one such problem, where you can’t get online due to malfunctioning of registry entries. In this scenario, if you perform network troubleshooting using Network Adapter troubleshooter, you may receive this error:
Page Contents
One or more network protocols are missing on this computer
Windows Sockets registry entries required for network connectivity are missing.
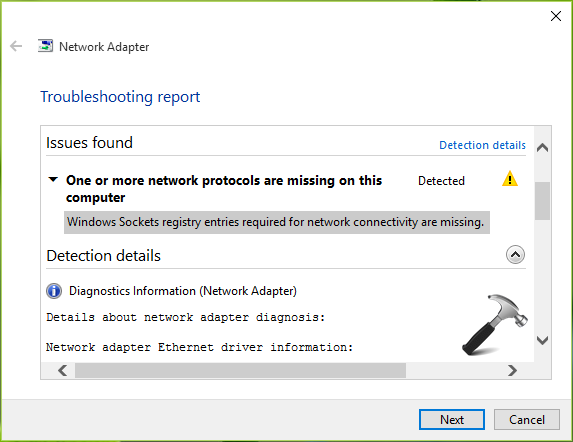
The error in this troubleshooting report clearly indicates that Windows Sockets (Winsock and Winsock2 subways) registry entries are not working properly. Windows Sockets is basically a programming interface and supporting program that manages incoming and outgoing network requests in Windows OS. So it is obvious, if the network requests aren’t processed, the network won’t work at all. You can try following fixes to solve this problem.
FIX : Windows Sockets Registry Entries Required For Network Connectivity Are Missing In Windows 10/8.1/8/7
FIX 1 – Reset Winsock Using Command Prompt
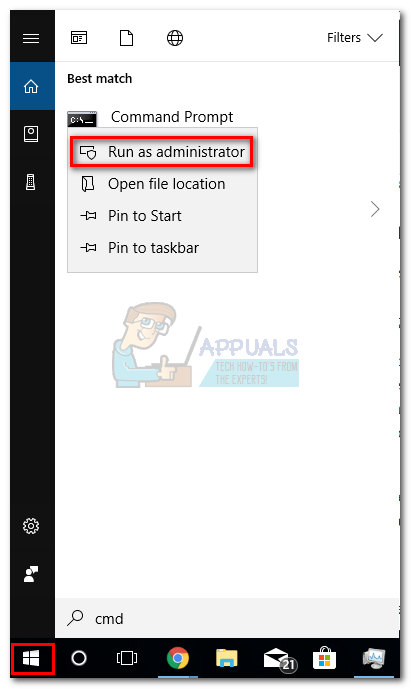
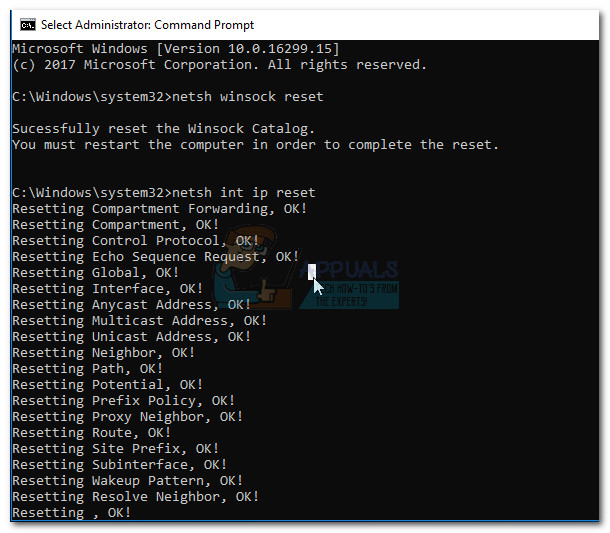
The most simple approach that is suggested to solve this problem is to reset Windows Sockets entries using Command Prompt. So open administrative Command Prompt and type following command and hit Enter key then:
netsh winsock reset

Once the command is successfully executed, you’ll be asked to reboot, in order to complete the reset. So do the needful and after restarting the machine, check the status of problem. If the issue got resolved, you’re good to go. In case if the problem still persists, you may need to reset Windows Sockets registry manually, because it may have affected TCP/IP settings as well. FIX 2 shares you the manual steps.
FIX 2 – Delete Winsock Registry And Reinstall TCP/IP
Registry Disclaimer: The further steps will involve registry manipulation. Making mistakes while manipulating registry could affect your system adversely. So be careful while editing registry entries and create a System Restore point first.
1. Press + R and put regedit in Run dialog box to open Registry Editor (if you’re not familiar with Registry Editor, then click here). Click OK.

2. In the left pane of Registry Editor, navigate to following registry key:
HKEY_LOCAL_MACHINE\SYSTEM\CurrentControlSet\Services\WinSock2
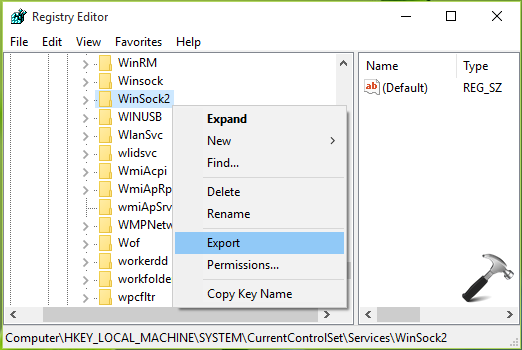
3. At this registry location, right click WinSock2 key and select Export. Save the backup of the registry entry to a suitable location. Then again do a right on same registry key, and select Delete.
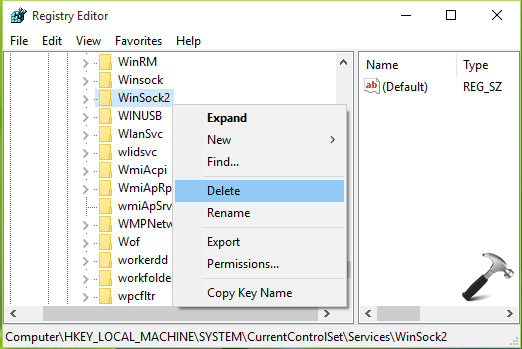
4. Perform step 3 with WinSock (HKEY_LOCAL_MACHINE\SYSTEM\CurrentControlSet\Services\Winsock) registry key as well. Close Registry Editor.
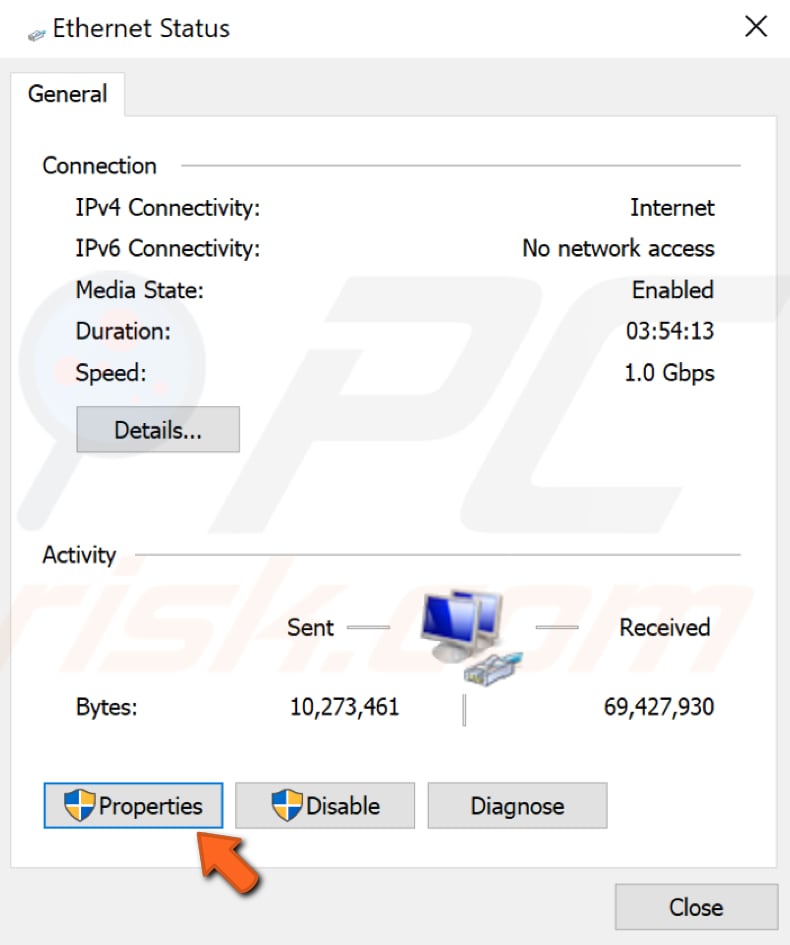
5. Open Control Panel and navigate to Network and Internet > Network Connections. Here, do a right click on your Local Area Connection or Ethernet connection and select Properties.
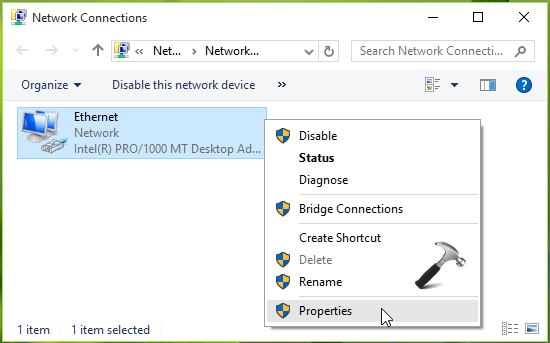
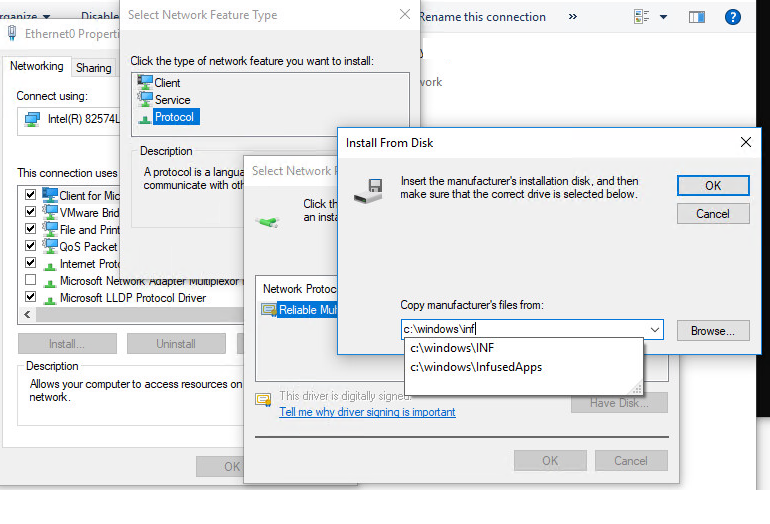
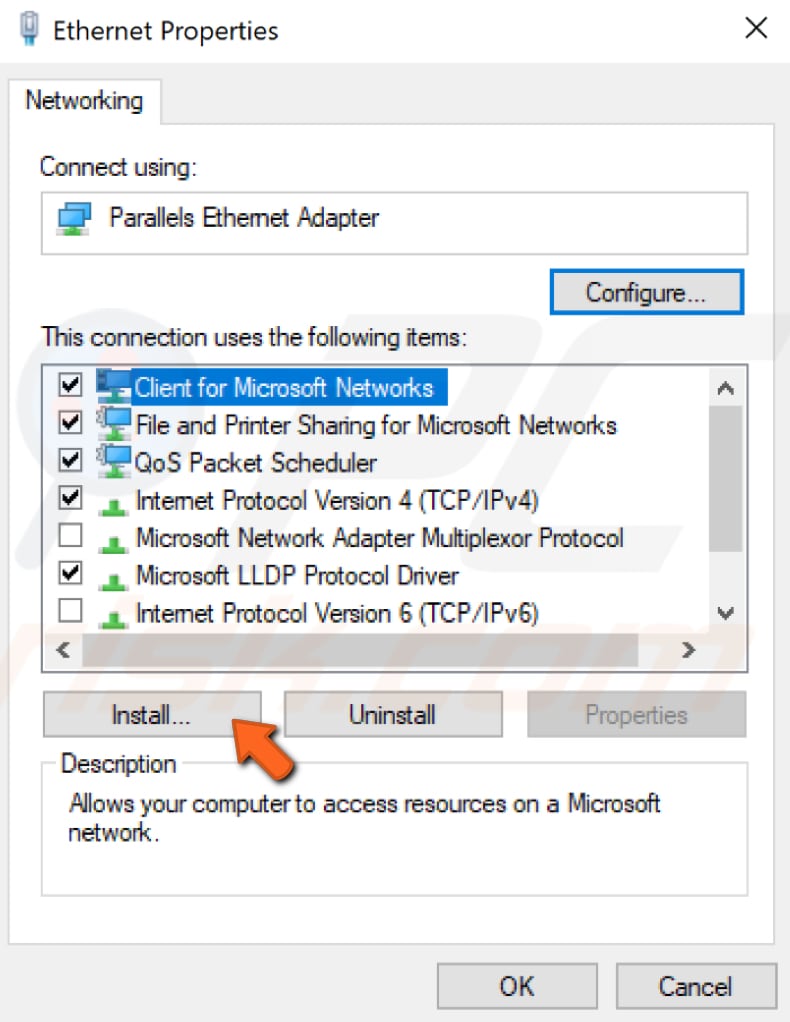
6. In the Local Area Connection or Ethernet connection property sheet, click Install.
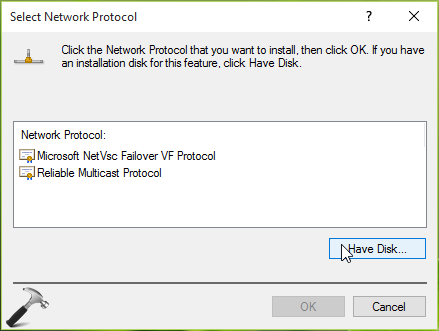
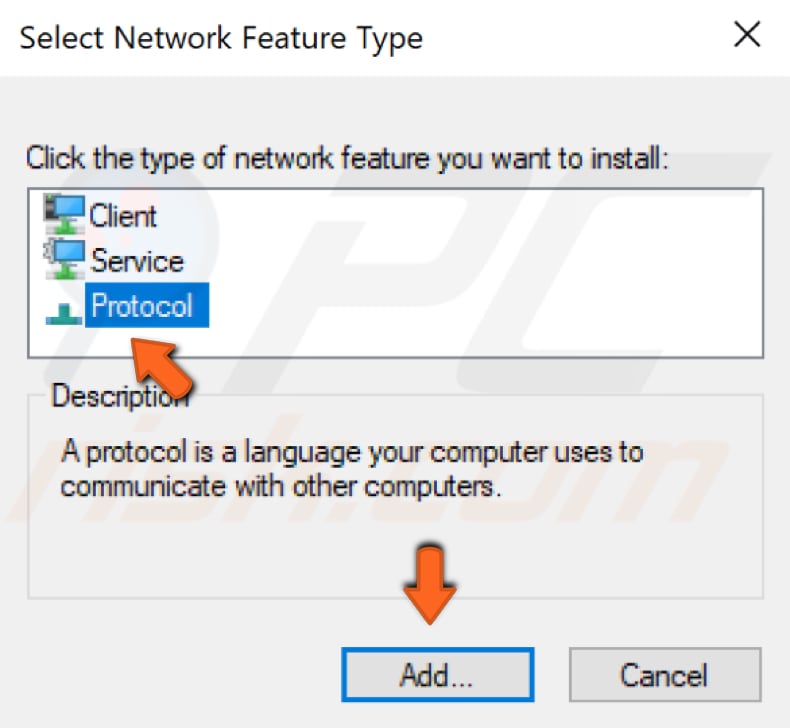
7. Next, select Protocol under Select Network Feature Type and click Add.
8. Then click Have Disk in Select Network Protocol window.
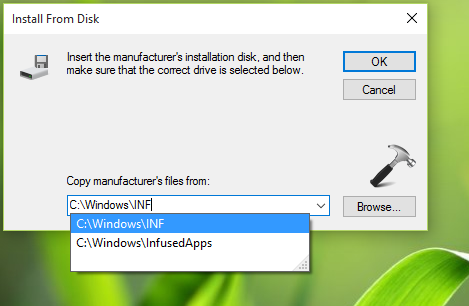
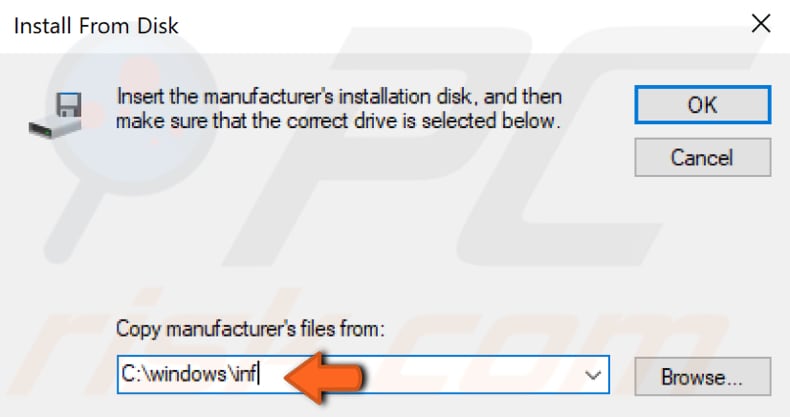
9. Moving on, in the Install From Disk window, type C:\Windows\inf for Copy manufacturer’s files from section. Click OK.
*Substitute C: with your system root drive.
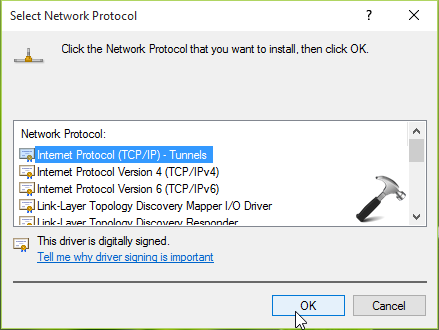
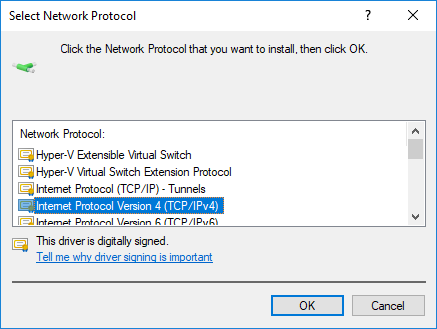
10. Finally, in the Select Network Protocol window which populates list of Internet Protocols, select Internet Protocol (TCP/IP) – Tunnels. Click OK. Close Network and Sharing Center, restart your machine.
In this way, the registry configuration is re-created after reboot, which ultimately solves the problem.
FIX 3 – From Feedback/Comments (UPDATE: 5 APRIL 2016)
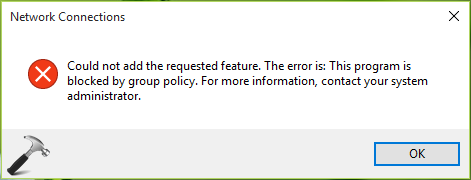
Many users after reading this fix has reported that they could not go beyond step 10 in FIX 2 and hence they can’t follow it completely. When they click OK in step 10, they receive following message:
Could not add the requested feature. The error is: This program is blocked by group policy. For more information, contact your system administrator.
If you also get this message, follow this:
1. Download Windows Sockets registry files imported from another Windows OS (we’ve done it from Windows 8.1 64-bit machine) using following links:
Download Winsock registry file
Download WinSock2 registry file
2. Now open Registry Editor on machine having issue, click File > Import. Browse for the above downloaded files and click OK.

After importing both registry files, reboot the machine and retry FIX 2. This time you won’t face any error and hence you could complete FIX 2 which solves the problem finally.
Checkout illustration of this method in following video:
Hope something helps!
RELATED ARTICLES
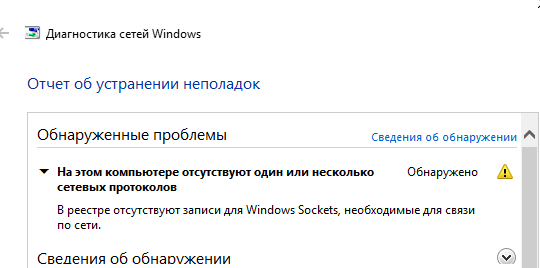
У коллеги на домашнем компьютере с Windows 10 стал периодически (раз в 2-3 дня) пропадать доступ в интернет (статус “Ограничено” у подключения), а при запуске мастера диагностики сетей Windows (запускается при щелчке мыши по значку с ошибкой сетевого подключения или через Параметры -> Обновление и безопасность -> Устранение неполадок -> Запустить средство устранения неполадок подключения к Интернету) появляется характерная ошибка:
На этом компьютере отсутствуют один или несколько сетевых протоколов.
В реестре отсутствуют записи для Windows Sockets, необходимые для связи по сети.
One or more network protocols are missing on this computer.
Windows Sockets registry entries required for network connectivity are missing.
Коллега обычно решал проблему перезагрузкой Windows и роутера, после чего подключение в интернет работало какое-то время, но через день-два проблема повторялась. Недавно он попросил меня попробовать исправить ошибку с отсутствующими сетевыми протоколами. Вот что получилось у меня.
При такой плавающей проблеме обычно рекомендуется начать с самого простого — сбросить текущие настройки TCP/IP и Windows Sockets. Если у вас на компьютере IP адрес настроен вручную, а не через DHCP, следующие команды сбросят ваши сетевые настройки. Поэтому предварительно нужно записать текущие настройки IP адреса, маски, шлюза и DNS серверов для ваших сетевых подключений (подробнее про сброс сетевых настроек в Windows).
netsh winsock reset
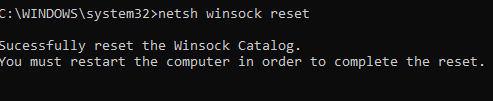
Sucessfully reset the Winsock Catalog.
You must restart the computer in order to complete the reset.
netsh interface ipv4 reset
Resetting Compartment Forwarding, OK!
Resetting Compartment, OK!
Resetting Control Protocol, OK!
Resetting Echo Sequence Request, OK!
Resetting Global, OK!
Resetting Interface, OK!
Resetting Anycast Address, OK!
Resetting Multicast Address, OK!
Resetting Unicast Address, OK!
Resetting Neighbor, OK!
Resetting Path, OK!
Resetting Potential, OK!
Resetting Prefix Policy, OK!
Resetting Proxy Neighbor, OK!
Resetting Route, OK!
Resetting Site Prefix, OK!
Resetting Subinterface, OK!
Resetting Wakeup Pattern, OK!
 Resetting Resolve Neighbor, OK!
Resetting , OK!
Данные команды сбросят настройки протокола TCP/IP для всех сетевых адаптеров и все обработчики (Winsock Layered Service Providers) к начальному, чистому состоянию. В результате вы удалите все сторонние обработчики, которые были встроены в ваш стек Winsock сторонними программами. Чаще всего в стек Winsock встраивают свои библиотеки-обработчики антивирусы, сниферы, файерволами и даже некоторые вирусы :).
После выполнения всех команду нужно перезагрузить компьютер и проверить интернет-подключение.
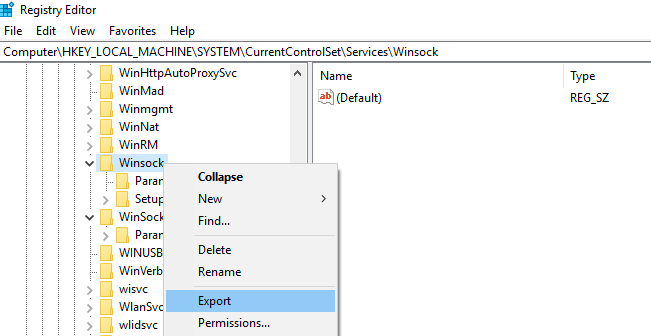
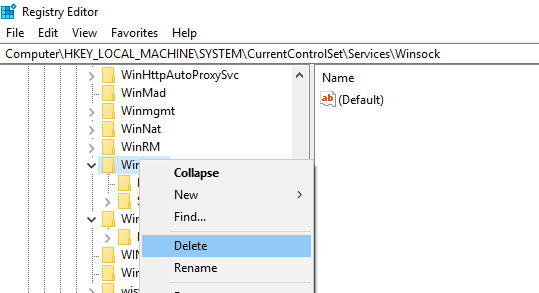
Если проблема не решилась, нужно через реестр удалить текущие настройки Windows Sockets.
- Откройте редактор реестра и перейдите к ключу HKEY_LOCAL_MACHINE\SYSTEM\CurrentControlSet\Services\WinSock. Создайте резервную копию ветки реестра, экспортировав ее в reg файл (ПКМ -> Export);

- Удалите ветку (ПКМ -> Delete);
- Выполните эти же действия для ветки HKEY_LOCAL_MACHINE\SYSTEM\CurrentControlSet\Services\Winsock2;
После этого вам нужно вручную переустановить компоненты протокола TCP/IP.
- В панели управления сетевыми подключениями (ncpa.cpl) откройте свойства вашего сетевого адаптера и нажмите кнопку Install;
- Выберите Protocol в списке компонентов для установки (Select Network Feature Type);
- Затем выберите, что вы хотите установить компонент с диска и укажите путь к каталогу
C:\Windows\INF
;
- В списоке переустанавливаемых сетевых протоколов выберите Internet Protocol version 4 (TCP/IPv4) и перезагрузите компьютер.
.
В моем случае при переустановке компонентов TCP/IP появилась ошибка:
Network Connections
Could not add the requested feature. The error is: This program is blocked by group policy. For more information, contact your system administrator.
Чтобы исправить ошибку нужно вручную импортировать с другого компьютера с той же версий ОС и применить на проблемном ПК следующие ветки реестра: HKLM\SYSTEM\CurrentControlSet\Services\Winsock и HKLM\SYSTEM\CurrentControlSet\Services\Winsock2.
Можете скачать готовые файлы для чистой Windows 10 x64 LTSC по ссылкам ниже:
- Winsock.reg
- Winsock2.reg
После импорта reg файлов нужно перезагрузить компьютер и попробовать еще раз переустановить протокол TCP/IP (в самом крайнем случаем воспользуютесь своими ветками ресстра winsock, сохранными ранее, но лучше использовать чистые).
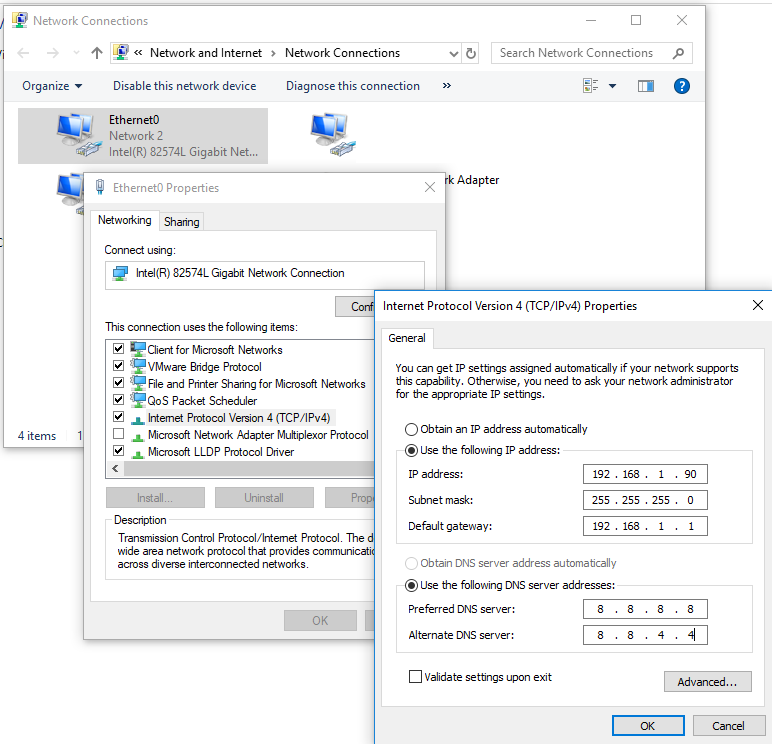
Теперь в свойствах вашего сетевого подключений проверьте, что он настроен на получение динамического IP адреса и настроек DNS серверов, либо укажите IP адрес и DNS сервера вручную (в моем случае после сброса статические настройки IP просто очистились ). Для домашнего компьютера можно указать использовать следующие статические адреса DNS серверов Google: 8.8.8.8 и 8.8.4.4.
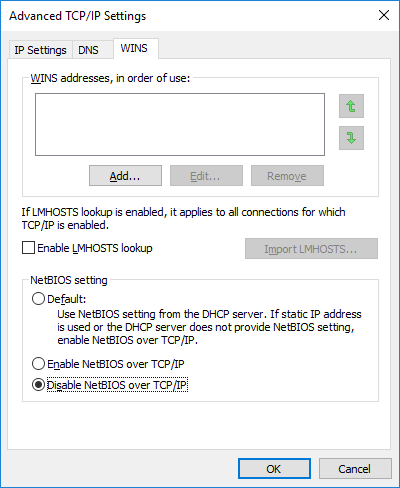
Здесь же нажмите на кнопку Advanced и на вкладке WINS отключите просмотр LMHOSTS и NetBIOS через TCP/IP. Эти сетевые ротоколы являются устаревшими и не нужны в современных сетях .
После этого проблема с периодическим отключением интернета с ошибкой “отсутствуют один или несколько сетевых протоколов” в Windows 10 исчезла. Если вам и это не помогло, я бы попробовал дополнительно переустановить (обновить) драйвера ваших сетевых адаптеров. Возможно проблема еще и с ними.
How To Fix «Windows sockets registry entries required for network connectivity are missing» Problem On Windows 10?
Windows 10 networking issues are widespread. Recently, Windows released a new security upgrade, after which many people started getting the «Windows Sockets registry entries required for network connectivity are missing» error. In this article, we provide several ways to fix this problem.

Why does «Windows sockets registry entries required for network connectivity are missing» Error Occur?
Initially, the Windows 10 system fails to connect to the Internet due to router, DNS server, or system driver problems. Registry configuration problems might also cause this issue. If you are unable to connect to the Internet, network registry entries may be damaged or missing.
The missing sockets registry entry is specific to the Internet, as it is associated with Windows Sockets, or «Winsock» for short. «Winsock» is an application vital in connecting to the Internet, so you can see why this error will disrupt connections.
It can be difficult to ascertain what is causing this error, so you need to try several possible solutions in the process of elimination. These include restarting your router, deleting Winsock keys from your system registry, reinstalling TCP/IP, resetting Windows sockets, disabling IPv6 and your network adapter, updating your network adapter drivers, and so on.
Video Showing How to Fix «Windows sockets registry entries required for network connectivity are missing» Problem:
Table of Contents:
- Introduction
- Restart Your Router
- Delete Winsock Keys And Reinstall TCP/IP
- Reset Winsock
- Disable IPv6
- Reset Network Adapter
- Disable Proxy
- Update/Uninstall Your Drivers
- Use ipconfig Commands
- Video Showing How to Fix Windows Sockets Registry Entries Required For Network Connectivity Are Missing
Download Computer Malware Repair Tool
It is recommended to run a free scan with Combo Cleaner — a tool to detect viruses and malware on your device. You will need to purchase the full version to remove infections. Free trial available. Combo Cleaner is owned and operated by Rcs Lt, the parent company of PCRisk.com read more.
Restart Your Router
Restarting your router may be the easiest solution to this problem, and we suggest you try this first before considering more complex solutions. If there is an «On/Off» button on your router, simply press it to turn off your router, and then turn it on again. If there is no button on your router, then simply disconnect it from the power supply. When your router has restarted, try restarting your computer as well, and see if this helps. Otherwise, continue reading other possible solutions below.
[Back to Table of Contents]
Delete Winsock Keys And Reinstall TCP/IP
Deleting Winsock keys from the registry and reinstalling TCP/IP is a more complex solution, so carefully follow the steps below to perform it correctly.
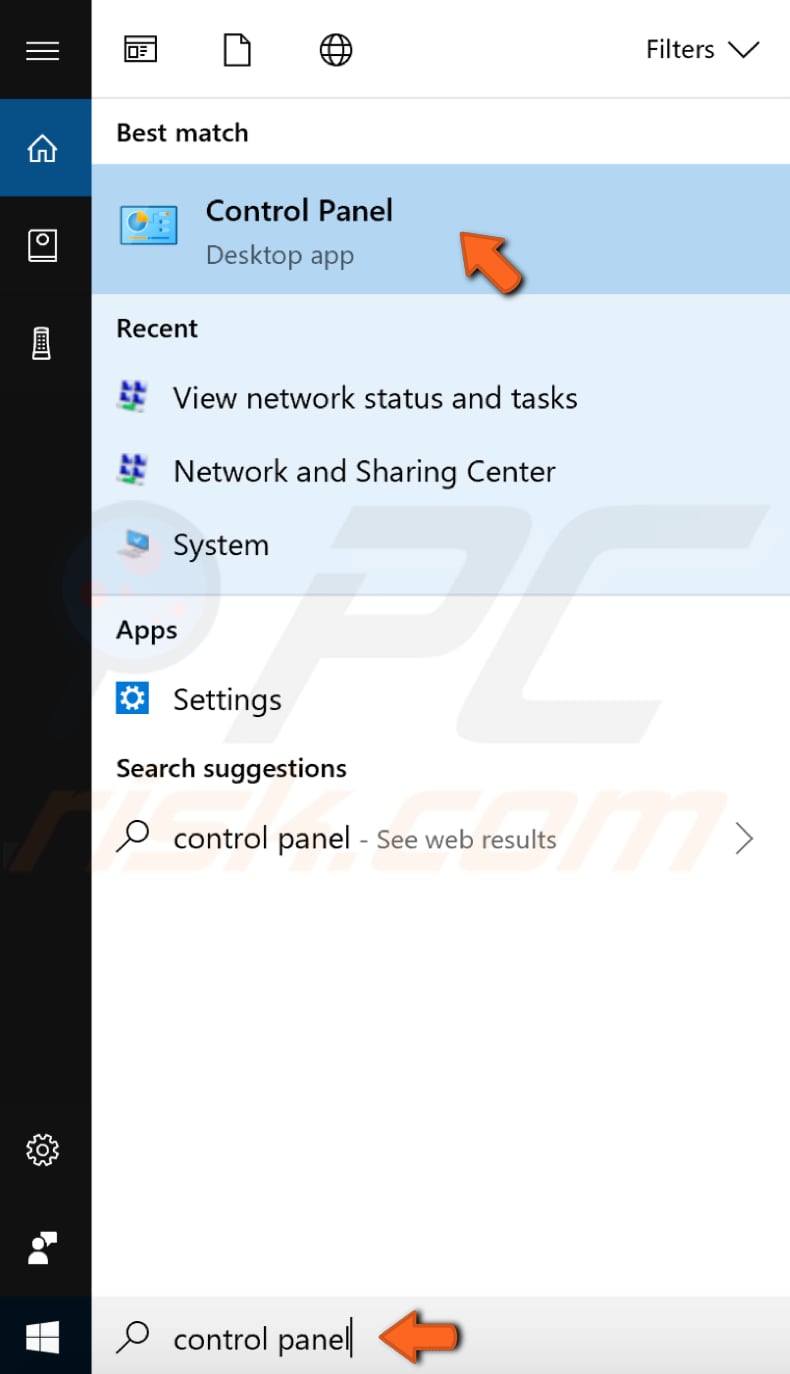
To delete Winsock keys from the registry, access Registry Editor. Type «run» in Search and open the Run application.

In the Run box, type «regedit» and click «OK» to open Registry Editor.

In Registry Editor, find the «Winsock» and «Winsock2» keys. Follow this path to find them:
«HKEY_LOCAL_MACHINE\System\CurrentControlSet\Services». Then, right-click each in turn and then select «Export» in the drop-down menu.

In the «Export Registry File» window, you will be asked where you want to save your registration files. Name them and save them to a location where you can easily find them. Click «Save.» You can use them as a backup if something goes wrong.
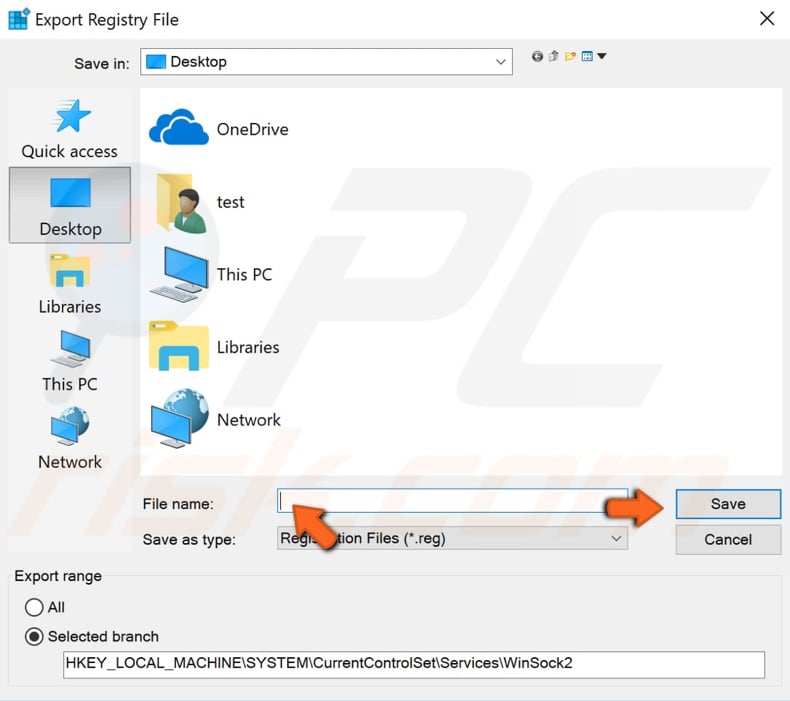
Now you can delete them by right-clicking each and choosing «Delete» from the drop-down menu. Close Registry Editor when the registry files are deleted.
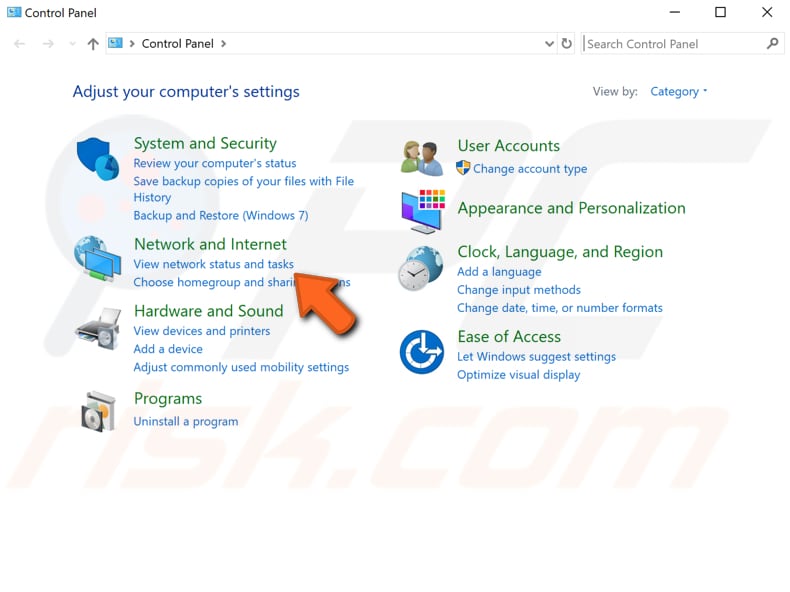
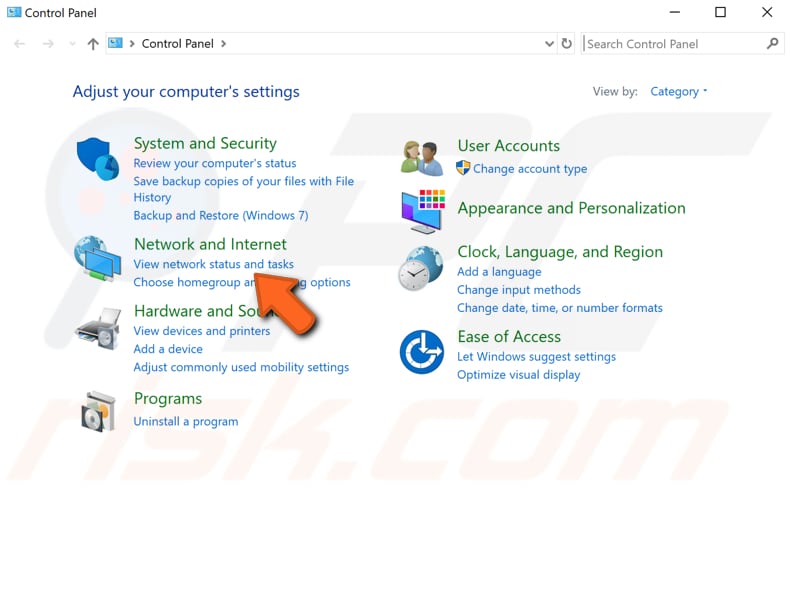
Now that you have deleted Winsock files, you must reinstall TCP/IP, which we earlier mentioned in this guide. Go to Network and Sharing Center. To open it, first type «control panel» in Search and click the «Control Panel» result.
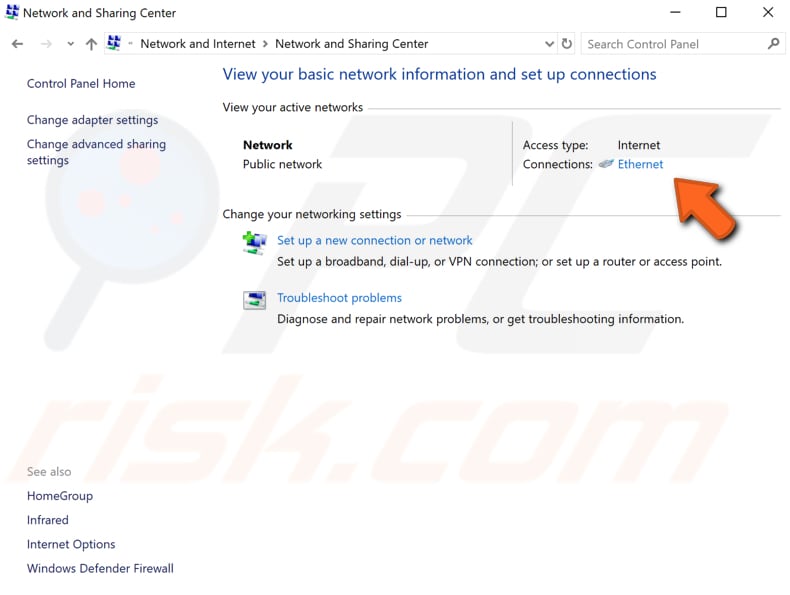
In Control Panel, click «View network status and tasks» under «Network and Internet.»
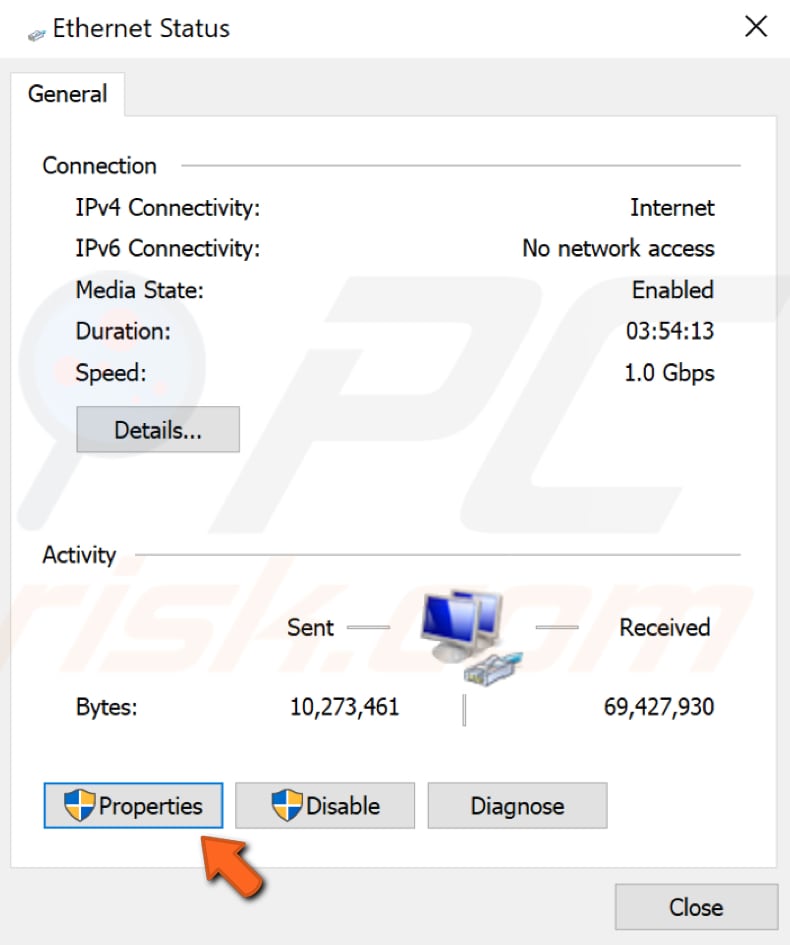
Click your current connection name (in our case, «Ethernet»).
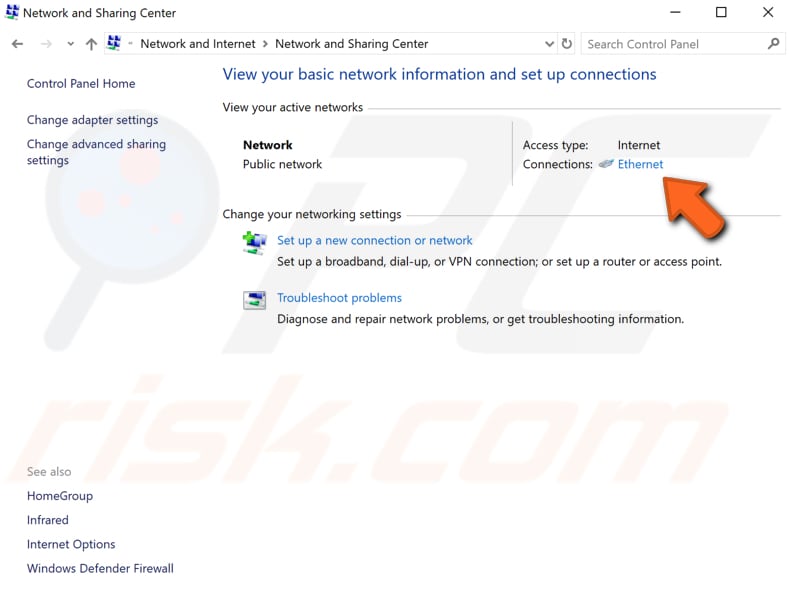
In the opened connection status window, click «Properties.»
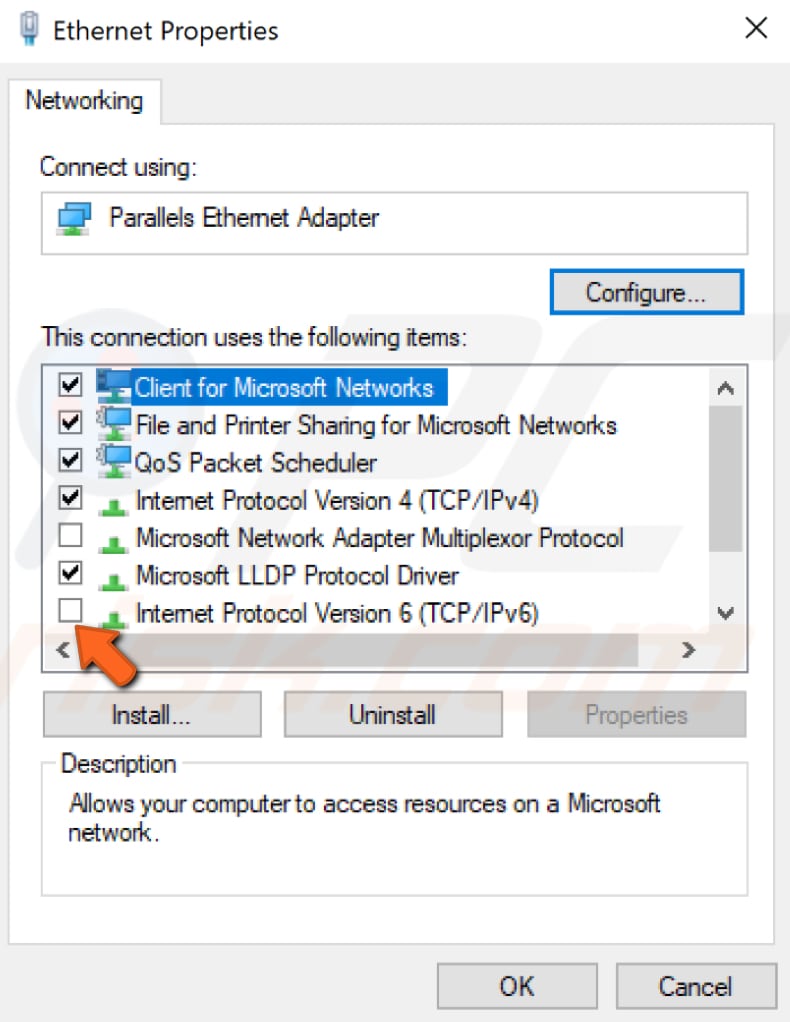
In your connection properties window, click «Install.»
You will be asked to select the network feature type you wish to install. Select «Protocol» and click «Add…».
Select a network protocol. Click «Have Disk…».

In the «Copy manufacturer’s files from:» box, type «C:\windows\inf» and click «OK.»
Select «Internet Protocol (TCP/IP)» and click «OK.»

Deleting your Winsock keys and then reinstalling your IP should fix this issue if it is related to Winsock. Restart your computer to see if this helps. If you are still having the same problem, continue reading this guide.
[Back to Table of Contents]
Reset Winsock
This one is quite easy — you simply need to type a single command into Command Prompt. To open Command Prompt, type «command prompt» in Search and right-click the «Command Prompt» result. Select «Run as administrator» from the drop-down menu to run it with administrator privileges.

Type the «netsh winsock reset» command in the Command Prompt window and press Enter on your keyboard to execute this command. This will reset your Winsock.

[Back to Table of Contents]
Disable IPv6
Disabling the IPv6 feature might help you solve the «Windows sockets registry entries required for network connectivity are missing» problem.
The easiest way to disable IPv6 on the Windows operating system is via the Network and Sharing center. To open it, go to Control Panel and click «View network status and tasks» under «Network and Internet».
Click your connection (in our case, «Ethernet»).
In your connection status window, click «Properties.»
In your connection properties window, find «Internet Protocol Version 6 (IPv6)» and unmark the checkbox beside it to disable it. Click «OK.»
[Back to Table of Contents]
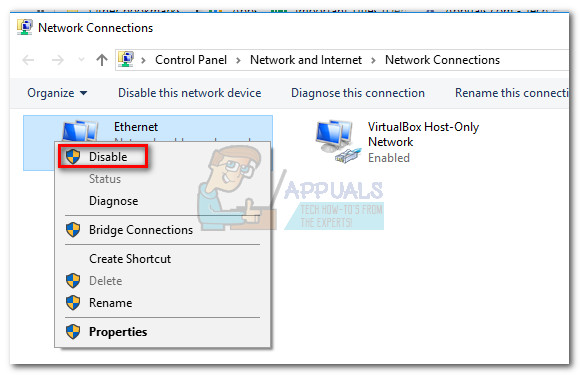
Reset Network Adapter
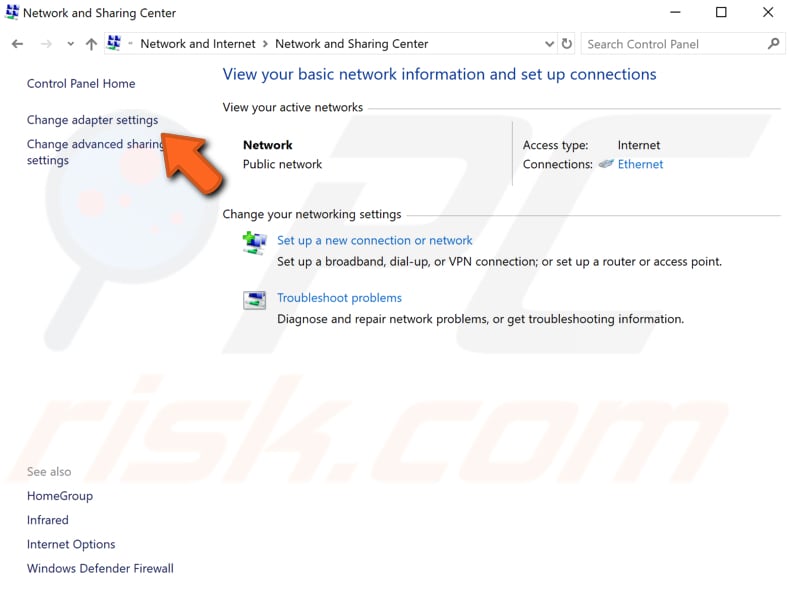
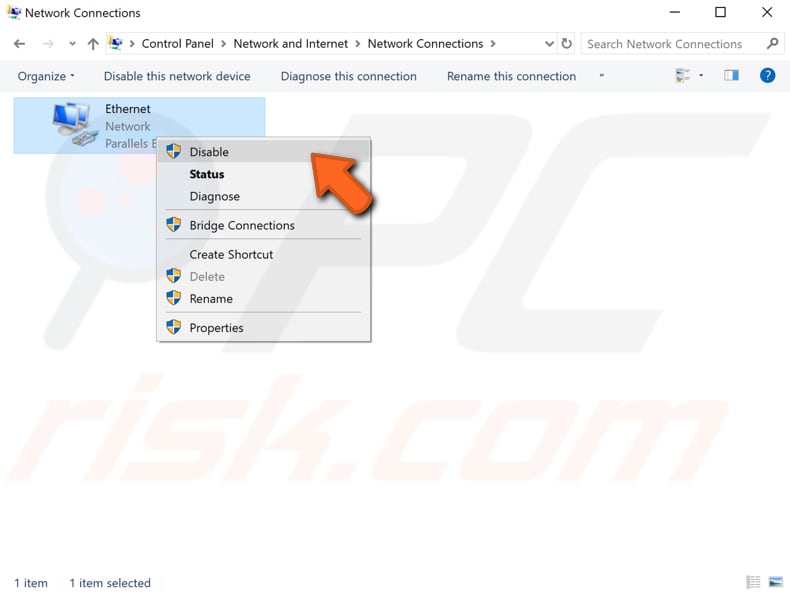
For this one, open Network and Sharing Center through the Control Panel and click «Change adapter settings» on the left pane.
Find your network connection and right-click on it, and select «Disable» from the drop-down menu. We suggest you wait for about half a minute and then enable it again by right-clicking on the same network connection and selecting «Enable» from the drop-down menu.
[Back to Table of Contents]
Disable Proxy
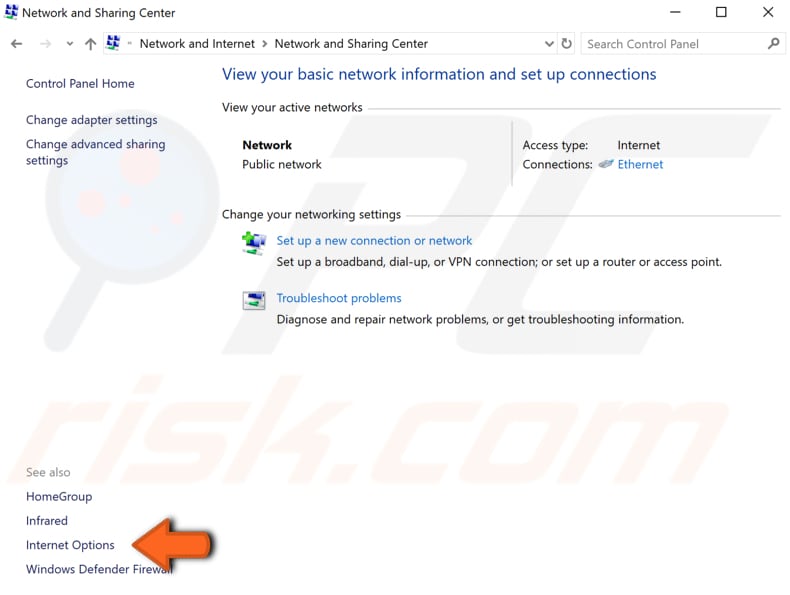
To disable proxy, go to the Network and Sharing center. To open it, go to Control Panel and click «View network status and tasks» under «Network and Internet». Then click «Internet options.»
In the Internet Properties window, click the «Connections» tab and click «LAN settings.»
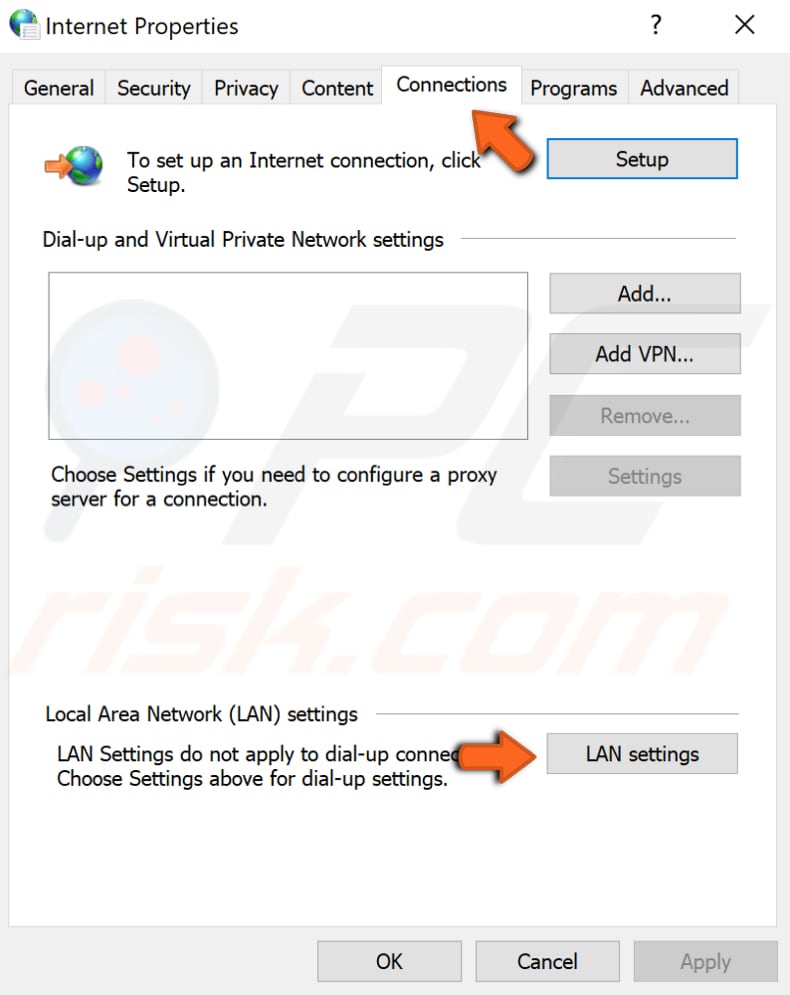
In the Local Area Network (LAN) Settings window, ensure that the «Use a proxy server for your LAN» checkbox under «Proxy server» is not marked. Click «OK» to save these settings.

[Back to Table of Contents]
Update/Uninstall Your Drivers
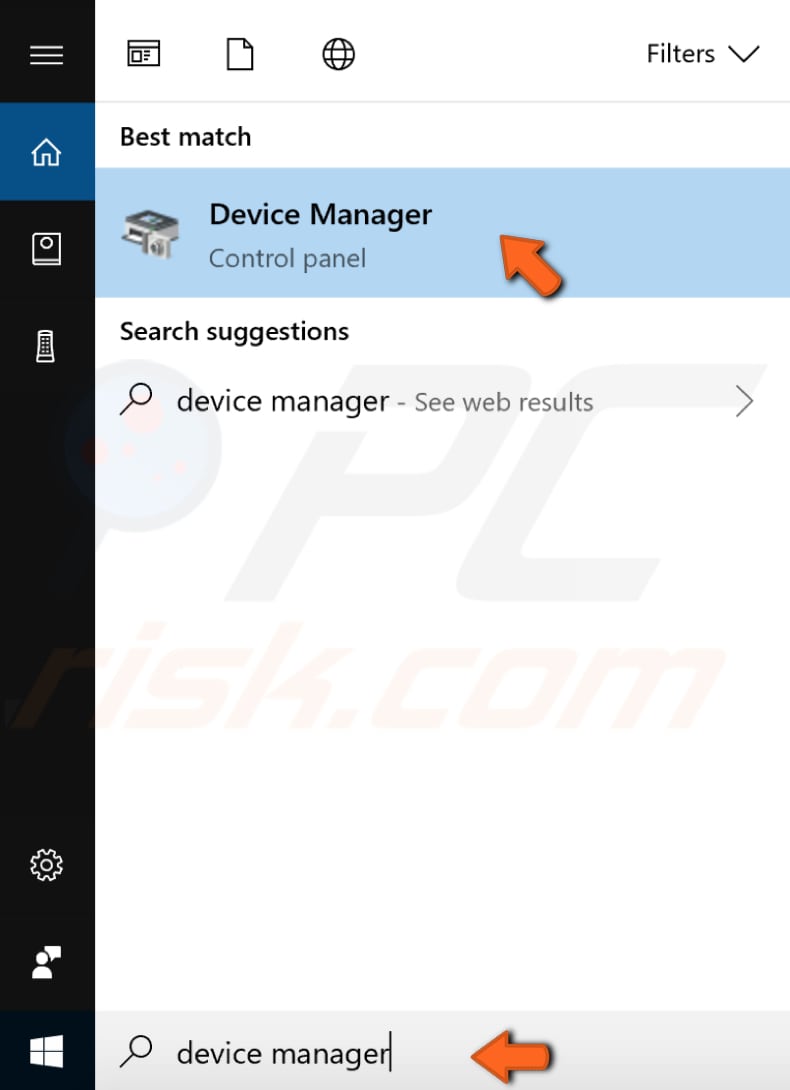
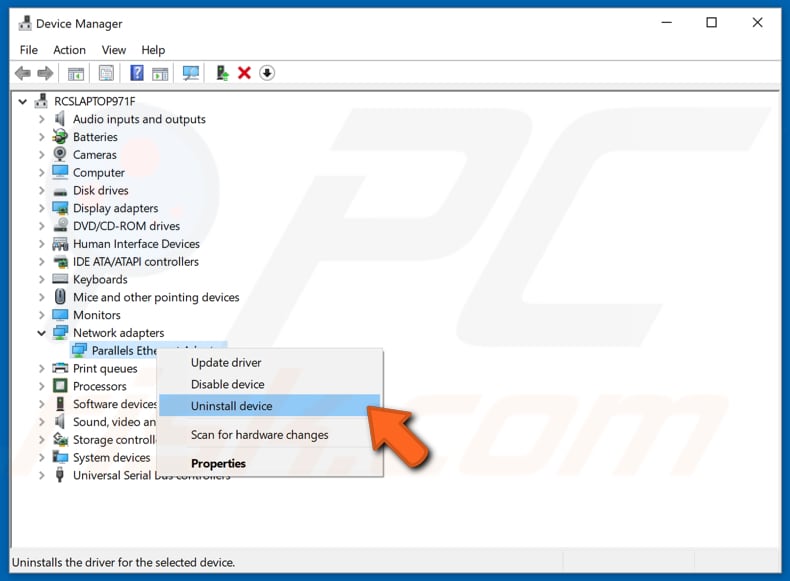
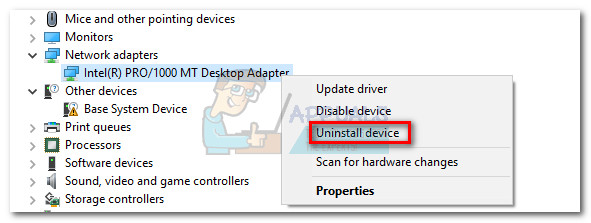
The «Windows sockets registry entries required for network connectivity missing» error can occur after updating to the latest version of Windows 10. This occurs because your drivers may need to be updated as well. To download the latest drivers, visit your network card manufacturer website and download the latest drivers for your device. Alternatively, you can try to uninstall the network adapter driver and then let the Windows 10 operating system reinstall it automatically the next time you start your machine. To uninstall your network adapter driver, go to Device Manager. Type «device manager» in Search and click the «Device Manager» result.
Find «Network adapters,» expand it in the Device Manager window, and right-click on your network device. Then choose «Uninstall» from the drop-down menu.
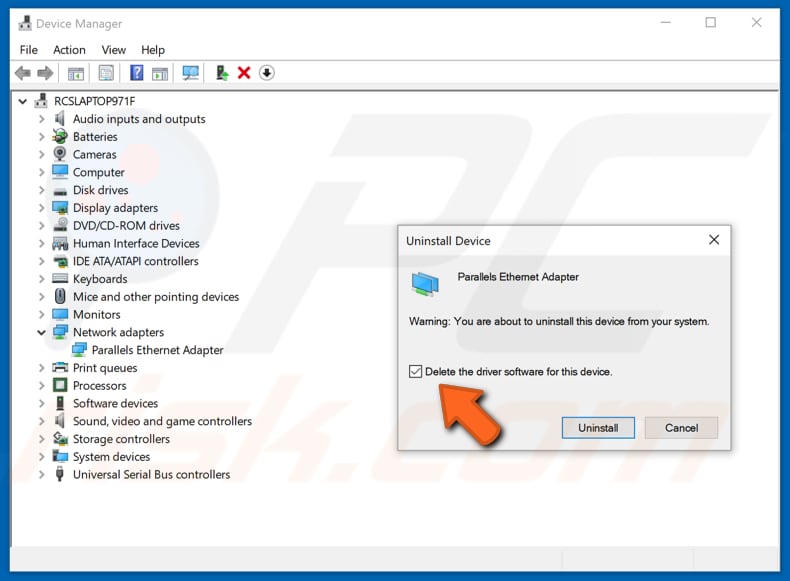
You will be asked to confirm the uninstallation. Click «OK.» Mark the «Delete the driver software for this device» checkbox» if you see one.
Restart your PC for the changes to take effect and see if this helps to solve this problem.
[Back to Table of Contents]
Use ipconfig Commands
“Windows sockets registry entries required for network connectivity are missing” can also be fixed using «ipconfig» commands in Command Prompt. Open Command Prompt by typing «command prompt» in Search. Right-click on the «Command Prompt» result and select «Run as administrator» to run it with administrator privileges.

Once Command Prompt starts, enter the following commands (press Enter after each to execute):
netcfg -d
ipconfig /release
ipconfig /renew
ipconfig /flushdns
ipconfig /registerdns

When you have finished entering these commands, restart your computer and check if this helps solve the “Windows sockets registry entries required for network connectivity are missing” problem.
The “Windows sockets registry entries required for network connectivity are missing” error message can cause many problems, so we hope that you managed to fix this issue by following one of the solutions provided in this guide.
[Back to Top]
The error message “Windows Sockets registry required for network connectively are missing” in Windows 10 is fairly frustrating. So, what should you do to fix the issue? MiniTool Solution offers some effective solutions in this post and you can try them to easily get rid of the error.
Windows Sockets Registry Entries Missing Windows 10
Network access is important for Windows users, but unfortunately, many Windows 10 users always report the network issues. In our previous posts, we discussed limited network connectivity error, network connection error 0x00028002, and more.
Additionally, we will introduce another error to you today – Windows Sockets registry missing. When investigating a network issue with the built-in troubleshooter, Windows may give you the following error message: “Windows Sockets registry entries required for network connectivity are missing”.
This error is related to Windows Sockets (Winsock) which is a programming interface that acts as a supporting application by managing incoming and outgoing network requests. The internet connection won’t work at all if the network requests are not processed by Winsock.
Actually, the Windows Sockets registry entries are not really missing. To be precise, they are corrupted or have been changed to something different from what the system expects.
So, how can you fix the issue of Windows Sockets registry missing in Windows 10? Get the answer from the following part.
Solutions to Windows Sockets Registry Entries Missing Windows 10
Reset Winsock
The simplest way to fix the network issue is to reset Winsock. Just follow these steps:
Step 1: Open Command Prompt as administrator.
Step 2: Type the netsh winsock reset command and press Enter.
Step 3: Restart your computer and check if the issue is resolved.
Use Ipconfig Commands
Some users report that the missing Windows Sockets registry entries error can be fixed by using ipconfig commands in Windows 10.
Step 1: Run Command Prompt with admin privileges.
Step 2: Input these commands in turn and press Enter after each one:
netcfg –d
ipconfig /release
ipconfig /renew
ipconfig /flushdns
ipconfig /registerdns
Step 3: Reboot the PC and see if the issue disappears.
Delete Winsock Keys and Reinstall TCP/IP
This solution involves modifying Windows Registry. To avoid some potential issues, it is advised to back up registry keys before you do. Then, follow these steps:
Step 1: Input regedit to the search box in Windows 10 and click the result to open the Registry Editor.
Step 2: Go to HKEY_LOCAL_MACHINE\System\CurrentControlSet\Services.
Step 3: Locate Winsock and WinSock2, right-click each folder and choose Delete.
Step 4: Open Run by pressing Win + R, input ncpa.cpl and click OK to open Network Connections.
Step 5: Right-click your network and choose Properties.
Step 6: Go to Install, choose Protocol and click Add in the Select Network Feature Type window.
Step 7: Click Have Disk, enter C:\Windows\inf and click OK.
Step 8: Select Internet Protocol (TCP/IP) – Tunnels and click OK.
Restart your computer and check if the Windows 10 Winsock registry entries missing issue is fixed.
Disable IPv6
Disabling Internet Protocol version 6 (IPv6) could be helpful to solve the “Windows sockets registry entries required for network connectivity are missing” error.
Step 1: Right-click your network icon and choose Open Network and Sharing Center.
Step 2: Click your connection and choose Properties in the new window.
Step 3: Uncheck the box of Internet Protocol Version 6 (TCP/IP) and save the change.
Reset Network Adapter
This is a simple solution but it may be helpful to fix the issue of Windows Sockets registry entries missing Windows 10. Do as the following steps:
Step 1: Open Network and Sharing Center.
Step 2: Click Change adapter settings.
Step 3: Right-click your network and choose Disable.
Step 4: Right-click the same adapter and choose Enable.
Update or Reinstall Network Adapter Drivers
The missing Windows Sockets registry entries error may happen after Windows 10 update and many users reported that installing the latest network adapter drivers can fix the issue.
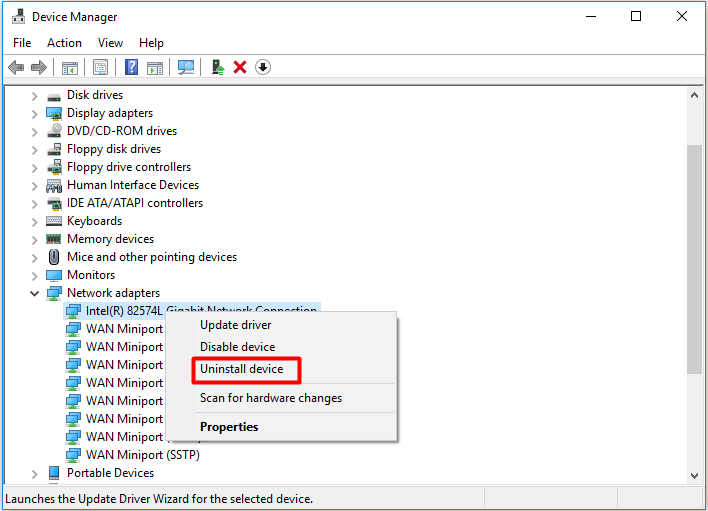
Step 1: In Device Manager and expand Network adapters.
Step 2: Right-click one device to choose Update driver and let Windows automatically search for updated driver software.
Alternatively, you can choose Uninstall device to uninstall the driver. Then, reboot your PC and Windows will install the driver automatically.
Now, almost common solutions to fix Windows Sockets registry entries missing are told to you. Additionally, you can try to disable proxy, restart the router, set DNS, etc. to fix the issue. Just try them if the solutions mentioned above don’t work for you.
The “Windows sockets registry entries required for network connectivity are missing” error refers to corruption inside Windows Sockets (also known as Winsock) registry entries. Windows Sockets is a programming interface that acts as a supporting program by managing incoming and outgoing network requests. If the network requests aren’t processed by Winsock, the internet connection will not work at all. Many of us hoped the launch of Windows 10 will put an end to random network issues. Unfortunately, that was not the case, since many Windows 10 users are reporting errors that prevent them from connecting to the internet.Upon investigating the issue with the built-in troubleshooter, Windows reports the following: “Windows Sockets registry entries required for network connectivity are missing”. As you might expect, the chances of Windows Troubleshooter automatically fixing the issue are virtually non-existent.
Here’s a shortlist of the most common causes that will trigger the “Windows Sockets registry entries required for network connectivity are missing” error:
- One or more network protocols are missing on this computer
- Windows Sockets registry entries missing
Strangely enough, the problem first started appearing after a Windows update (KB3034229). Immediately after applying the update, a lot of users have been left without the possibility of connecting to the internet. The issue is also linked with the upgrade to Windows 10 that ends up messing with the Winsock registry.
The good news – your registry entries are not really missing. A more accurate way to put it is that the entries have become corrupted or have been modified to something different from what the system expects. Another scenario is that a 3rd party application is preventing the entries from being modified.
The bad news – you need to be prepared for an extensive troubleshooting session, as the issue is known to be caused by a lot of different factors. Depending on your situation, the error can be misleading and the actual problem might have nothing to do with Windows Sockets.
Now that we know the potential causes, let’s get to the fixing part. Below you have a collection of fixes that have successfully helped Windows 10 users to solve the “Windows Sockets registry entries required for network connectivity are missing” error and connect to the internet again. Please follow each method in order until you encounter a fix that works for your situation.
Method 1: Resetting the Winsock component
Winsock is a specification guideline that defines how the built-in Windows network software is accessing the network services. If a corrupted Winsock is what’s causing the problem, the simplest and most effective way to solve the issue is to reset the Windows Sockets using Command Prompt. If this is the underlying cause of the error, it’s likely that it also affected TCP/IP settings as well.
Let’s try running a series of commands in Command Prompt to reset Winsock and the TCP/IP settings. Follow the quick step-by-step guide below and see if the issue is resolved:
- Click the Windows start bar (bottom-left corner) and search for “cmd”. Right-click on Command Prompt and choose Open as Administrator.

- Type/paste the following commands into Command prompt and press the Enter key after each one:
netsh winsock reset
netsh int ip reset
ipconfig /release
ipconfig /renew
ipconfig /flushdns
- Reboot your computer and see if you managed to solve the issue. If the “Windows Sockets registry entries” error is still preventing you from connecting to the internet, move to Method 2.
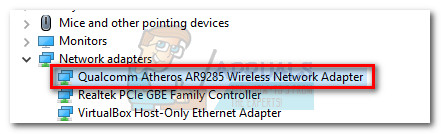
Method 2: Uninstalling the network adapter drivers
If a Winsock reset didn’t allow you to restore the normal functionality of your network components, let’s eliminate the possibility of a faulty network driver. Although it’s not that common, there are cases where the ethernet adapter is not installed properly. This typically happens when the user upgrades from Windows 7 or Windows 8 to Windows 10.
Some users have managed to fix the “Windows Sockets registry entries required for network connectivity are missing” error by uninstalling the network adapter drivers and reinstalling them after a clean reboot. Here’s a quick guide to doing just that:
- Press Windows key + R to open a Run window, type “devmgmt.msc” and hit Enter to open Device Manager.

- In Device Manager, scroll down to Network adapters and expand the drop-down menu. Depending on your setup, you might have one, two or more drivers under Network adapters.
- Typically, the first entry is the ethernet adapter driver that needs to be reinstalled. Right-click on it and hit Uninstall device.

Note: If you use a laptop, also uninstall the Wireless Network Adapter.

- Once the network adapter driver has been uninstalled, trigger a system reboot in order to force Windows to reinstall the missing driver. If the error was caused by the ethernet adapter driver, you should be able to connect to the internet once the system reboots. If you have the same problem, move to Method 3.

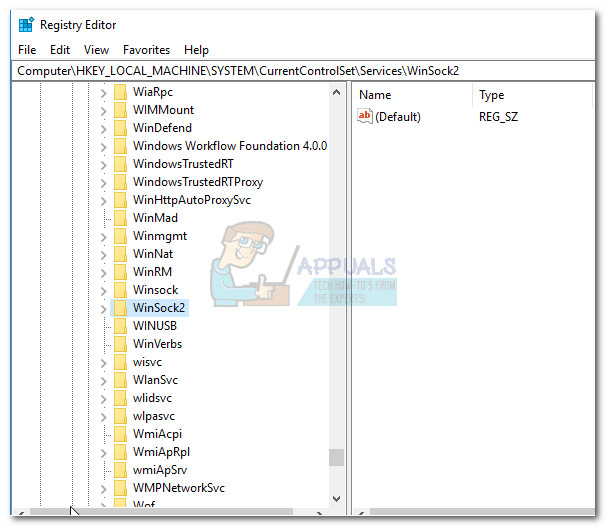
Method 3: Deleting the Winsock Registry and Reinstalling TCP/IP
To absolve Winsock of any implications regarding the “Windows Sockets registry entries required” error, let’s go the long way and completely delete the Winsock Registry and reinstall TCP/IP. While this method takes longer than a simple Winsock reset, it will ensure that your Winsock registry entries are free of corruption.
Note: This procedure involves manipulating registry files. While following the steps below correctly poses no risk, any mistake might lead to unexpected system problems. It’s highly recommended that you create a System Restore point before attempting this method.
Once you have the restore point in place, follow the steps down below:
- Press Windows key + R, type “regedit” and hit Enter to open Registry Editor.

- In Registry Editor, use the left pane to navigate to the following location: HKEY_LOCAL_MACHINE \ SYSTEM \ CurrentControlSet \ Services \ WinSock2

- Right-click on the WinSock2 key and choose Export, then save the registry backup to a safe location. This step is done as a backup, just in case.
- Once the backup is in place, right-click on WinSock2 again and select Delete.
- Repeat step 3 and step 4 with the WinSock folder. Now you can safely close Registry Editor.
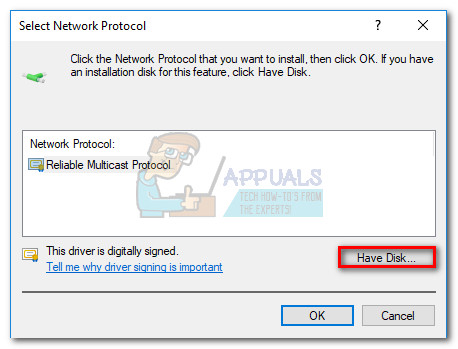
- Press Windows key + R to open a Run window, type “ncpa.cpl” and press Enter to open Network Connections.
- Right-click on your Local Area Connection (or Ethernet) and select Properties.
- In the Properties window, hit the Install button.
- Select Protocol under Select Network Feature type and click on Add.
- In the Select Network Protocol window, click on Have Disk.

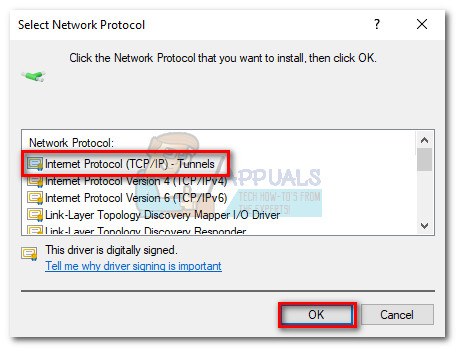
- When you get to the Install From Disk window, type C:\Windows\inf and hit Enter.

- Under Select Network Protocol, select Internet Protocol (TCP/IP) – Tunnels and click OK.

- Restart your machine and see if the issue is resolved.


Method 4: Disabling the VPN / Proxy connection
If you burned through the first three methods without a result, you can at least be certain that the Winsock registry is intact.
If you use a VPN / Proxy solution to protect your anonymity and browse safely, you should definitely do some investigations. As some users have reported, the “Windows Sockets registry entries” error is sometimes occurring when the connection with the VPN / Proxy is weak or unstable.
Note: If you don’t use a VPN or Proxy, move straight to Method 5.
See if your VPN / Proxy is to blame for the issue by disabling the connection and restarting your system. If the error “Windows Sockets registry entries required for network connectivity are missing” is not appearing while the VPN/Proxy is disabled, you’ll need contact support from your VPN/Proxy provider and see if they can be of any help. Else, you might need to look for a different solution to protect your anonymity.
If you’re using a Virtual Private Network (VPN) that is appearing in your Network Connections window, you might be able to temporarily fix the issue by disabling and re-enabling the ethernet adapter. To do this open a Run window (Windows key + R), type “control ncpa.cpl”, and hit Enter. Once in the Network Connections window, right-click on the Ethernet adapter and choose Disable. When the adapter is disabled, right-click on it again and Enable it again.
Method 5: Uninstalling the external antivirus suite
Another potential culprit that might be causing the “Windows Sockets registry entries required for network connectivity are missing” error is your antivirus suite. From what we gathered, this issue is not known to be caused by Windows Defender and is only confirmed to happen with a few external antivirus suites.
Note: If you don’t use an external antivirus suite, scroll down to Method 6.
BitDefender and Avira are often reported as culprits, but there could be more 3rd party security suites that will trigger this issue. Although the reasons why some antivirus suites are causing WinSock problems are unclear, there is speculation that some security solutions might be overprotective with the registry files.
Unfortunately, disabling the antivirus temporarily will not reveal if the suite is the underlying cause of the issue. The only way to test this issue is to uninstall the antivirus suite, reboot the system and see whether the error is removed. If the issue is still appearing, move to the method below.
Method 6: Uninstalling legacy games and applications
Legacy applications and games are bound to cause compatibility problems on the newest versions of Windows. Some users have reported that the “Windows Sockets registry entries required for network connectivity are missing” error started appearing after the installation of a legacy game or application.
Even if the game in question installs and runs perfectly well with Compatibility mode on Windows 10, there’s a high chance that the installation kit will be bundled with old drivers that are incompatible or no longer supported by the new OS.
If you recently uninstalled an old game or application that was not configured to run on Windows 10, try uninstalling it along with any drivers that were included in the installation kit. Once every trace of the legacy program is removed, reboot your system and see whether you’re able to connect to the internet. If the issue persists, move to Method 7.
Method 7: Resolving a static IP conflict
If you use a static IP for your computer, you might want to investigate if you’re dealing address conflict. Duplicate IP address conflicts are known to produce the “Windows Sockets registry entries required” error. A conflict like this occurs when two endpoints are assigned the same IP address.
Most of the time, an IP conflict happens because the system administrator mistakenly assigns two computers on the local area network the same IP address. However, an IP conflict could also be produced if one computer is configured with multiple adapters or if the ISP accidentally assigns two customers the same IP address.
If you’re using a static IP, start by making sure you don’t have another device in your local area network that was assigned the same IP. If the issue is not local, go for a different static IP and see whether that fixes the issue.
Method 8: Manually changing the DNS server address
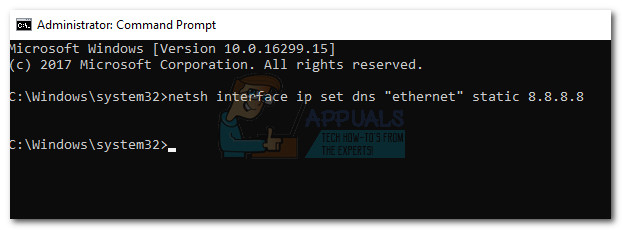
Netsh, the built-in utility in Windows can do a lot of cool thing with your local network, but it has also helped some users solve the “Windows Sockets registry entries required” error.
To be specific, they managed to resume their network connection by using Netsh to manually change the DNS servers address. Here’s how:
- Click the Windows start bar (bottom-left corner) and search for “cmd”. Right-click on Command Prompt and choose Open as Administrator.
- In Command Prompt, type ” netsh interface ip set dns “Ethernet” static 8.8.8.8″ and hit Enter.

Note:
Replace ethernet with your adapter name, if it’s different than in our scenario. - Reboot and see if the error is solved.
Method 9: Changing the Wireless Mode
If you’re experiencing the issue on a wireless connection, it might have something to do with the Wireless Mode. Some users have managed to remedy the issue by changing the wireless mode from 802.11b+g+n to 802.11g.
From what we gathered, Windows 10 does’t really like the 802.11b+g+n wireless mode and will often act up when working with a wireless network connection of that type. This is known to happen mostly on Dell laptops running Windows 10.
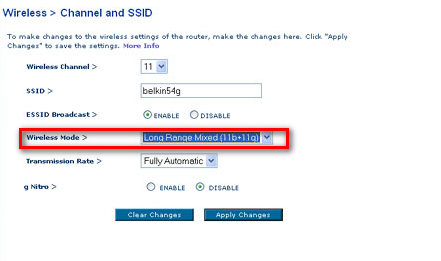
If you can access your router settings, look for an entry named Wireless Mode. If you have it set to 802.11b+g+n, set it to 802.11g or anything else.
Method 10: Resetting the router/modem to factory state
If nothing has been successful, you might want to turn your attention towards the router. Start light by unplugging/turning off your router in order to force it to reconfigure the network settings.
If that doesn’t yield results, use the Reset button on the back. All routers/modems have a reset button – it’s usually located on the back and requires something sharp to push since it’s out of reach.
Note: Depending on the model, resetting your router to factory settings might also reset the router’s password. To protect against any unexpected developments, search online for the specific reset procedure related to your modem/router model.
If you have another router/modem laying around, you can also try setting the other one up and see it produces the same “Windows Sockets registry entries required” error. If it doesn’t, you’ll need to do a firmware reset on the faulty router/modem. Keep in mind the exact procedure varies from manufacturer to manufacturer.