
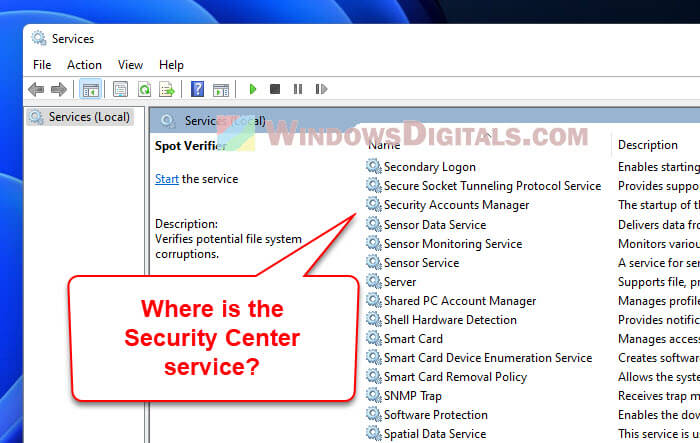
If you’ve recently been hit by a virus or malware attack and notice that the Windows Defender Security Center Service is gone from the services.msc on your Windows 11 or 10 PC, it’s a pretty serious issue you’re facing right now. This means that Windows Defender is not active at the moment to protect your computer and you might be at risk for more attacks.
In this post, we’ll talk about why this happens and show you some steps to get the missing Windows Security Center Service back.
What is the problem?
Here’s the issue: you try to turn on Windows Defender after a malware mess, and get a message saying, “Security at a glance – Page not available” when you try to look at the Windows Security settings. When you peek into Services.msc, the Windows Security Center Service isn’t there, which means you can’t turn on Windows Defender.
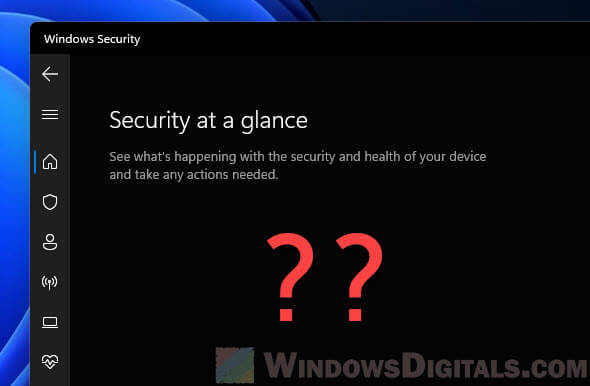
Sometimes, you might even see a pop-up saying “You’ll need a new app to open this windowsdefender link” when trying to open the Windows Security settings.
Well, there are a few things that can cause this issue. In most cases, it’s because of a very intelligent virus or malware that has messed up your Security Center service and making it disappear so you cannot turn it on. The very first thing you should try is to restart your computer and see if the service comes back. If not, proceed to the following solutions.
Related issue: Windows 11 Security Tab Missing in Properties
How to fix Windows Security Center Service not found issue
Well, there are a few workarounds to fix the missing Windows Security Center Service issue. We’ll go through the fixes below.
Reinstall Windows Defender
First off, try reinstalling Windows Defender. This can bring back all the needed services for Windows Defender and Security Center. You can do this with a few methods, like using a simple PowerShell command. Give this a shot first and see if it sorts out the problem. If not, move on to the next step.
Restore Windows Defender Service using registry
If reinstalling didn’t help, you can get the Windows Defender Service back in Windows 11 or 10 using a registry file. But, you’ll need to start regedit.exe as TrustedInstaller first.
Also see: Windows Registry Key “Access is Denied” Error
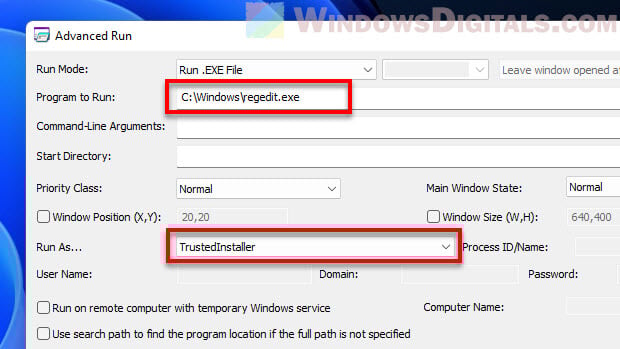
Run regedit.exe as TrustedInstaller using Advanced Run
Advanced Run is a very useful tool from Nirsoft that lets you run programs with extra permissions, like as an administrator or TrustedInstaller. It’s great for when you need special access to run certain programs, such as this situation now. With Advanced Run, you can start regedit.exe as TrustedInstaller to add the registry key needed to get the Windows Defender Service back.
- Get Advanced Run from Nirsoft and unzip it somewhere on your computer.
https://www.nirsoft.net/utils/advanced_run.html
- Open the folder and double-click on the “AdvancedRun.exe” file.
- Hit the “Browse” button and find the Registry Editor executable file (regedit.exe) or type in the path: “C:\Windows\regedit.exe“.
- In the “Run As” section, pick “TrustedInstaller” from the list.
- Press the “Run” button to open regedit.exe as TrustedInstaller.

Import the Windows Defender Service restoration registry file
With regedit.exe running as TrustedInstaller, you can now add the registry file to get the Windows Defender Service back.
Warning: Messing with the registry can be risky. If you’re not sure, it might be better to ask for help from someone who knows what they’re doing. Always make a system restore point or back up the registry before changing anything, just to be safe.
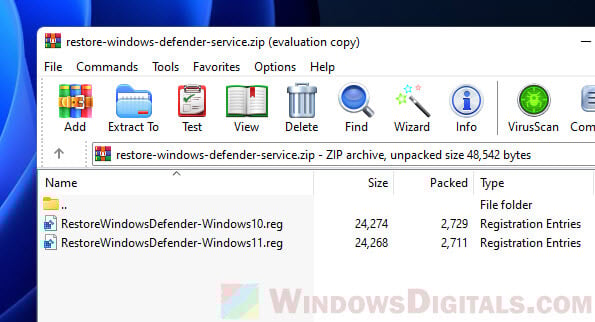
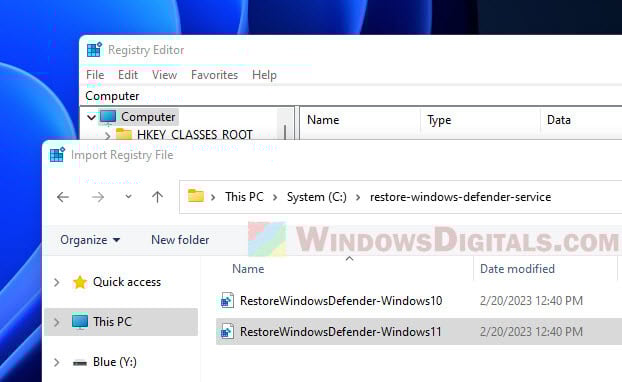
- Download our restore Windows Defender service registry fix.
- Unzip the file (better to do it on the C: drive).

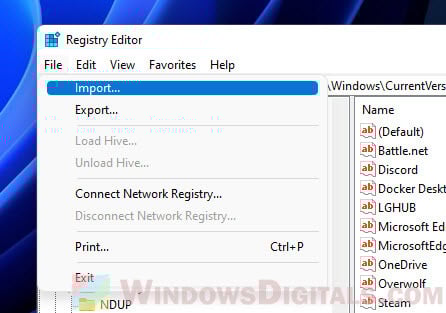
- In the Registry Editor, click File and choose Import.

- Find the registry file for your version of Windows. If you’re on Windows 11, pick the RestoreWindowsDefender-Windows11.reg file.

- Click Yes when asked for confirmation.
- Close the Registry Editor and restart your computer.
After a restart, check if the Security Center Service is back. If it is, make sure to update Windows Defender right away.
If the Security Center Service is still missing, you might have to think about resetting or doing a clean install of Windows 11/10.
Reset or clean reinstall Windows 11/10
If nothing else worked, you might need to reset or do a clean install of Windows 11 or 10. Resetting Windows lets you keep your files (not all files) but removes apps and drivers, while a clean install wipes everything and starts fresh. These steps might take some time but can help restore the missing Windows Defender or Security Center service.
But, a clean install should always only be considered as a last resort. And always back up your important files that you couldn’t afford to lose before doing so.
Repair Windows Security services with SFC and DISM
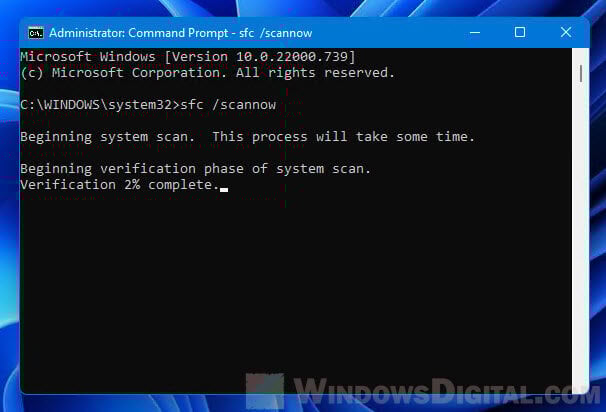
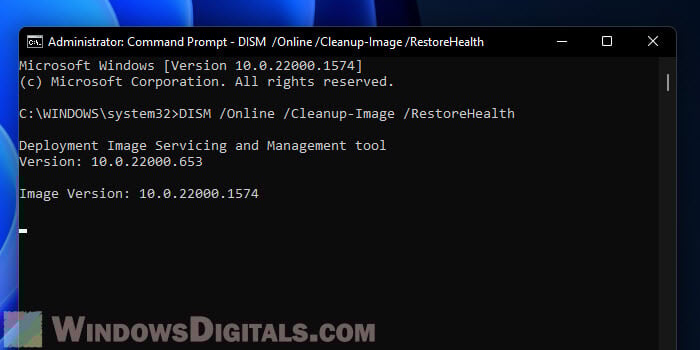
When things like this happen, it’s a common practice to try running the SFC (System File Checker) and DISM (Deployment Image Servicing and Management). This is to fix any corrupted or missing system files, which include things like the Windows Defender Security Center Service.
To run SFC, open Command Prompt as an admin and type “sfc /scannow” then press Enter. It might take a while, but it will tell you if it found and fixed any issues.
To run DISM, open Command Prompt as admin and type “dism /online /cleanup-image /restorehealth” then press Enter. This scan can also take a bit but can help fix system image issues.
What to do if the Windows Security Center Service disappears again
If the Windows Security Center service vanishes again, it might mean your computer is still under attack by the same or different malware. In this situation, you’ll have to react quickly and use a trusted antivirus to run a full scan on your system. Pick a well-known antivirus that’s good at finding and getting rid of malware and viruses.
If it finds anything, follow the antivirus’s advice to remove the malware. After the threats are gone, you can try to get the Windows Security Center service back again.
Some final words
To prevent similar issue from happening again, keep everything updated, use reliable antivirus software, and be careful online. Avoid sketchy websites, don’t download stuff from people you don’t trust, and watch out for scams. We hope this guide helps you fix the missing Windows Defender Security Center Service issue.
Нередко значок встроенного «Защитника» пропадает из трея Windows 10 пропадает после установки сторонней антивирусной программы, поскольку безопасность обеспечивается одним из средств, что позволяет избежать конфликты в системе.
Читайте также: Удаление антивируса с компьютера
Способ 1: Системные «Параметры»
Чаще всего значок «Защитника» автоматически сворачивается в отдельное меню на панели уведомлений. Это происходит для того, чтобы не забивать трей различными иконками. Вернуть иконку в трей несложно:
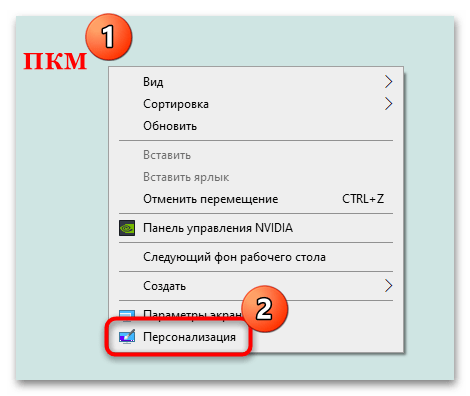
- Щелкните правой кнопкой мыши по свободной области рабочего стола. В контекстном меню выберите пункт «Персонализация».
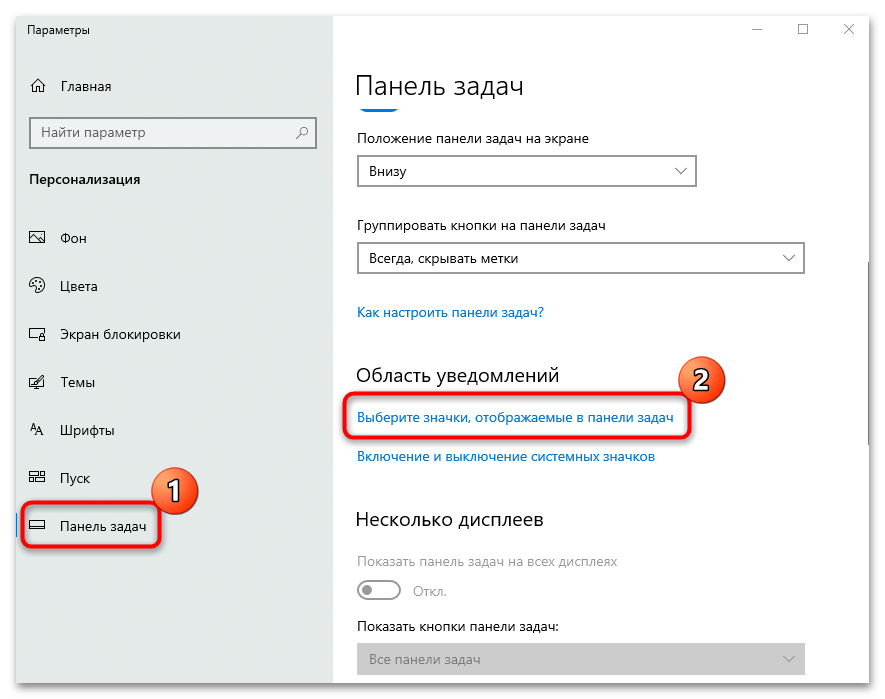
- Перейдите на панели слева в раздел «Панель задач». Главное окно прокрутите вниз до раздела «Область уведомлений» и кликните по строке с выбором значков, отображаемых в панели задач.
- Если у строки с значком «Защитника» тумблер переведен в неактивное состояние, включите отображение иконки.

Значок штатного инструмента Windows 10, обеспечивающий безопасность, вернется на панель.
Способ 2: «Командная строка»
Если пропал значок «Защитника» в трее в Windows 10, а удаление стороннего антивирусного ПО не вернуло иконку, то восстановить ее можно через консоль «Командная строка»:
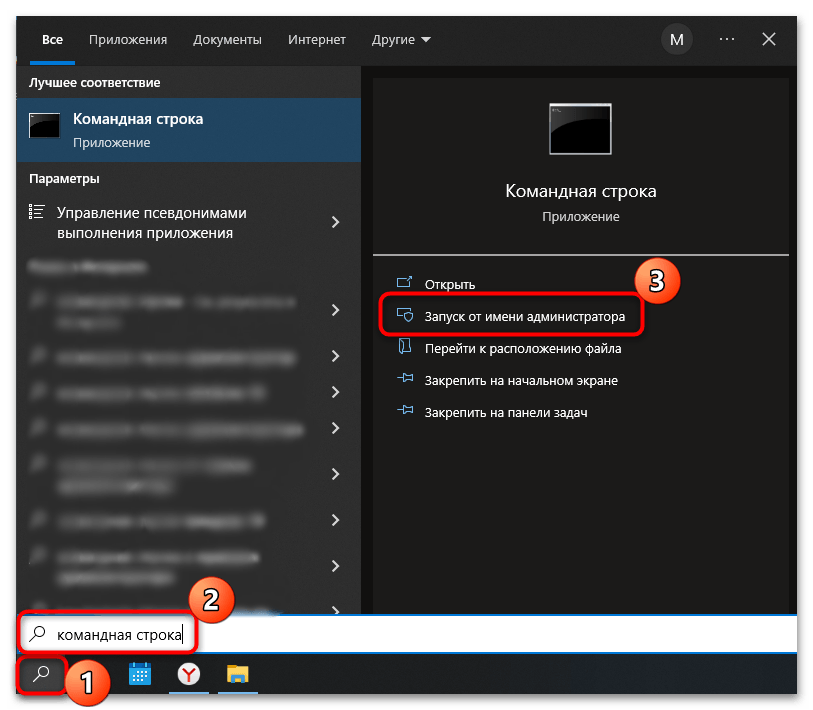
- Откройте «Командную строку» с расширенными правами. Введите соответствующий запрос в строке системного поиска и выберите пункт запуска консоли от имени администратора.
- В интерфейсе терминала вставьте команду
reg add HKLM\SOFTWARE\Microsoft\Windows\CurrentVersion\Run /v "SecurityHealth" /t reg_expand_sz /d %windir%\system32\SecurityHealthSystray.exe /f & shutdown.exe -r -t 0. Нажмите на клавишу «Enter», после чего компьютер автоматически перезагрузится.

Способ 3: «Редактор реестра»
Если способ с вводом команды не подходит, то внести изменения в реестр можно вручную. Для этого используется штатное средство «Редактор реестра»:
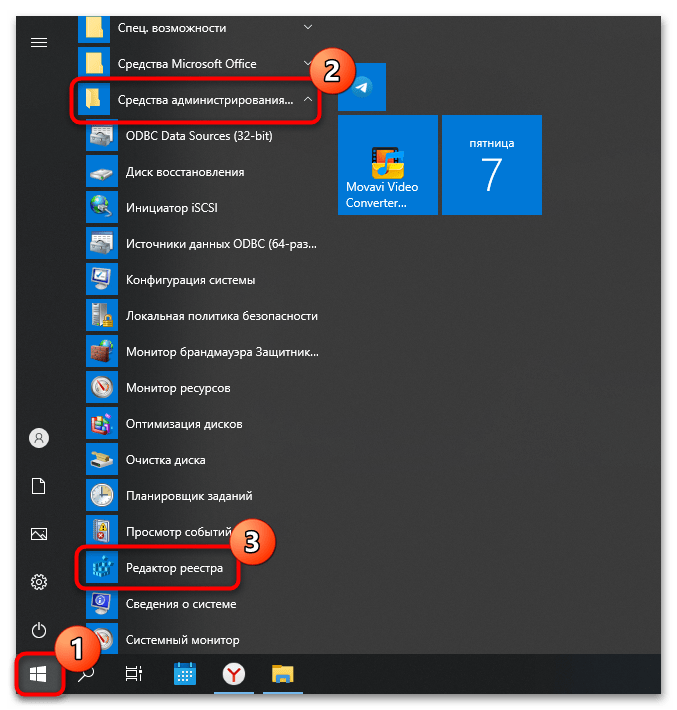
- Запустите инструмент. Его исполняемый файл находится в главном меню в папке «Средства администрирования Windows».
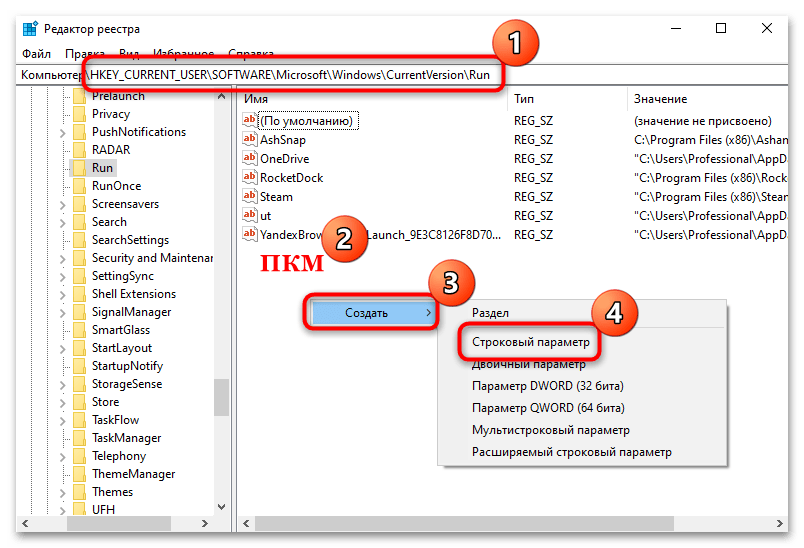
- В открывшемся окне разверните ветки
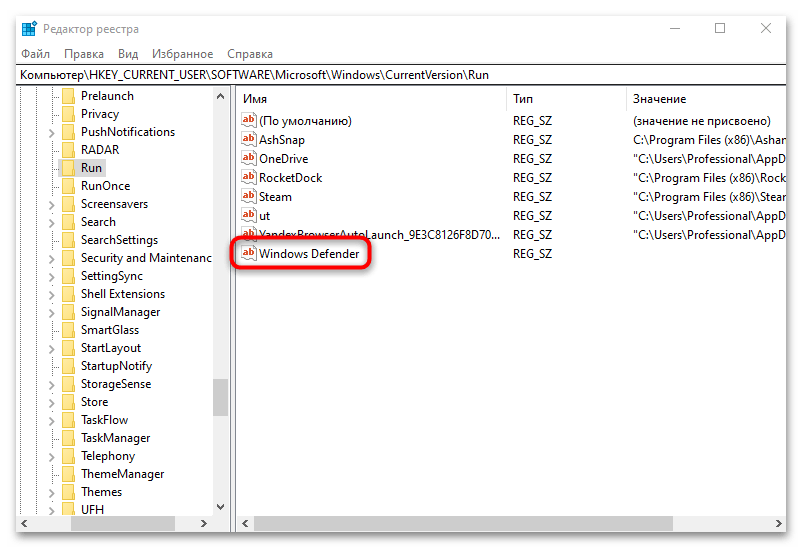
HKEY_CURRENT_USER/SOFTWARE/Microsoft/Windows/CurrentVersion/Run. Нажмите на папку «Run» и по свободной области кликните правой кнопкой мыши и наведите курсор на пункт «Создать». Выберите параметр строкового типа. - Задайте ему имя «Windows Defender». Дважды щелкните левой кнопкой мыши по новому параметру.
- В окне с изменением вставьте и скопируйте следующее значение:
"%ProgramFiles%\Windows Defender\MSASCui.exe"-runkey. Нажмите на кнопку «ОК».
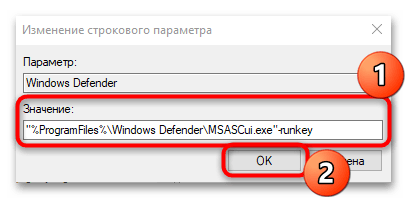
Значение строкового параметра является путем к исполняемому файлу «Защитника» операционной системы. Для того чтобы настройки вступили в силу, перезагрузите Windows.
Наша группа в TelegramПолезные советы и помощь
Every Windows computer comes with Windows Defender as its anti-malware tool by default. It is like the first line of defense in your Windows PC against malware/viruses. Although it has been found in many cases that the Windows defender is not showing up or Windows defender is missing on Windows 11/10 PCs.
One of the many issues users encounter while using Microsoft’s built-in antivirus on their system is that they can’t find Windows defender on their PC/laptops. Users have previously expressed dissatisfaction with Windows 11 Defender being disabled. However, several users were unable to locate the software at all on their PC.
Why Is There No Windows Defender On My Windows 11 PC
If you are wondering why don’t you have Windows defender on your Windows 11 PC?
- This could be due to many reasons including malware invasion and service issues.
- Additionally, modifications to the registry that disable Windows Defender could be the root of the problem.
With all said, now let us see the possible fixes for the issue.
Read Also: Is Windows Defender Good Enough For PC Protection
How to Fix Windows Defender Missing on Windows 11/10 PC
This article describes how to install Windows Defender on Windows 11/10 PC/laptops using the Settings app or PowerShell. So without further ado, Let’s get started.
Method 1: Install Windows Defender via PowerShell
You cannot install Windows Defender like you can other programs since it is not installed on your PC in the same way as other programs. Instead, utilize a PowerShell code to complete the task by following these instructions. It can take five seconds to several minutes to finish.
- Press the Windows key with the key X to open the WinX
- Now from the list, choose Windows terminal (Admin).
- Then paste these exact commands and press the Enter key after each command:
Set-ExecutionPolicy Unrestricted
Get-AppXPackage -AllUsers | Foreach {Add-AppxPackage-DisableDevelopmentMode – Register “$($_.InstallLocation) \AppXManifest.xml”}.

All default Windows applications can be reinstalled with the command above. This is extremely helpful if a file error during an update prevented Windows Defender from being installed on Windows 11.
Read Also: What To Do If Windows Defender Keeps Saying Threats Found
Method 2: Repair and install Windows Defender
Windows Defender can occasionally be installed improperly or incompletely. In Windows 11, the command listed below will disassemble every component of the computer and reinstall it from the scratch.
- Press the Windows key with the key X to open the WinX
- Now from the list, choose Windows terminal (Admin).
- Then paste this exact command and press the Enter key:
Get-AppxPackage Microsoft.SecHealthUI-AllUsers | Reset-AppxPackage

Read Also: How To Enable Ransomware Protection In Windows Defender?
Method 3: Reset Windows Defender
- Press the Windows key with the key I to open Settings and click on
- Now click on Default Apps.

- Scroll down to the bottom of the page and click Reset in front of Reset all default apps.


Read Also: How To Clear The Windows Defender Protection History On a PC
To Wrap This Up
So, in this way you can fix this Windows Defender missing on Windows 11/10 PCs. Contrary to several other problems, this one is simple to resolve, as was just explained above. We sincerely hope that this useful advice will help you reactivate Windows Defender to safeguard your computer.
Subscribe to our newsletter to ensure that you never miss a tech update. And for more such troubleshooting guides and tips & tricks related to Windows, Android, iOS, and macOS, follow us on Facebook, Instagram, and YouTube
Next Read: 5 Solutions to Fix the “Windows Defender Failed to Initialize” Issue
Способ 1: Параметры ОС
Чтобы включить Защитник, интегрированный в ОС Windows 10, не подвергавшееся серьёзному вмешательству и не повреждённая, необходимо:
— Открыть «Параметры» ОС.

— Перейти в настройки Windows с названием «Обновление и безопасность».

— В меню слева нажмите «Безопасность Windows».

— Откройте изменения модуля «Защита от вирусов и угроз».

— Нажмите «Включить» под уведомлением «Защита в режиме реального времени отключена.».

— После выполнения приступайте к настройке работы Windows Defender либо продолжите эксплуатацию защищённого антивирусом от Microsoft ПК.

Способ 2: Изменение групповой политики
Если включение Защитника невозможно по схеме выше (кнопка включения/переключатели неактивны или в «Параметрах» ОС появилось сообщение об ограничениях со стороны организации) решением послужит изменение параметров групповой политики Windows.

— Откройте Редактор групповой политики Windows 10. Воспользуйтесь для этого поиском.

— Поочерёдно нажмите по пунктам слева от Редактора групповой политики перечня: «Конфигурация компьютера» — «Административные шаблоны».

— Раскройте папку «Компоненты Windows».

— В перечне каталогов нажмите «Антивирусная программа «Microsoft Defender»».

— Перейдите в правую часть Редактора, дважды нажмите «Выключить антивирусную программу «Microsoft Defender»».

— Нажмите «Отключено», и подтвердите изменение параметра через «ОК».

— В развёрнутой папке «Антивирусная программа «Microsoft Defender» «присутствует «Защита в режиме реального времени» — нажмите на нее.

— Дважды нажмите на название параметра «Выключить защиту в реальном времени».

— В открывшемся окне установите значение «Отключено» и подтвердите внесенное изменение «ОК».

— Затем поочередно дважды кликая по указанным на следующем скриншоте трём элементам,

в открывающихся диалоговых окнах отметьте «Не задано».

— Закройте Редактор и перезагрузите компьютер. В результате проблем с запуском Защитника Windows, если они были вызваны настройками групповых политик, возникать не должно.

Способ 3: Системный реестр
Если предыдущий способ запуска Windows Defender не может быть применен или не дает желаемого результата, решение кроется во внесение правок в реестр ОС от Microsoft.
— Запустите Редактор Реестра Windows, используя поиск по системе.

— Перед любыми действиями в системном реестре рекомендуем создать резервную копию. Для этого выберите пункт «Экспорт» в меню «Файл» Редактора.

— В окне Редактора слева откройте по очереди папки «HKEY_LOCAL_MACHINE» и «SOFTWARE».

— Далее «Policies» и нажмите «Microsoft».

Нажмите на наименование каталога «Windows Defender».

— Справа дважды нажмите на «DisableAntiSpyware».

— В открывшемся окне введите 0 (ноль) в поле «Значение» и нажмите «ОК».

— Откройте папку «Real-Time Protection» в директории «Windows Defender».

— Аналогичным образом присвойте значение 0 параметру «DisableRealtimeMonitoring».

— Закройте Редактор, перезагрузите компьютер, далее активируйте антивирусное ПО по инструкции «Способ 1» или убедитесь, что это произошло автоматически.

Решение возможных проблем
В тех случаях, когда задача не решается через наши рекомендации, то это свидетельствует о повреждение компонентов Windows 10. Для устранения проблемы необходимо запустить проверку и восстановление системных файлов ОС.
0
Readers help support Windows Report. We may get a commission if you buy through our links.
Read our disclosure page to find out how can you help Windows Report sustain the editorial team. Read more
Windows Defender missing on Windows 11 is one of the numerous problems users face when using Microsoft’s default antivirus on their PC.
In the past, users have complained that Windows 11 Defender is turned off. But some could not even find the app on their PC at all.
Thankfully, the fixes for this problem are not far-fetched, with a little tweak needed in most cases. Read on to find out what to do if Windows Defender is not installed on your Windows 11 device.
Why can’t I find Windows Defender?
There are various reasons why Windows Defender is not found in Windows 11, but we will highlight the most important ones:
- Malware infection – Usually, the first thing a virus or malware does is disable or eliminate the antivirus. Good third-party antiviruses are harder to counter.
- The service is not running – Though Windows Defender should show up even when the service is not running, this, coupled with other issues, can make the app inaccessible.
- Registry problems – Changes to the registry, wherein Windows Defender is disabled, could be an underlying cause. The administrator could take action in case you are using an office computer.
So, let’s find out how to fix things if Windows Defender is not working in Windows 11.
Quick Tip:
If you want to protect your PC on all fronts, use a security utility with multi-layered protection. ESET HOME Security Essential’s feature set aims to protect you from today’s cyber threats.
It includes advanced banking and payment protection, webcam and microphone security, parental controls, anti-malware, anti-ransomware, and more.
ESET HOME Security Essential
ESET technology protects every click, screen tap, and step in your digital life.
How can I fix the Windows 11 Windows Defender missing issue?
1. Install Windows Defender Using PowerShell
-
1.Right-click on the Start icon in the Taskbar, and then select the Windows Terminal (Admin) option.

-
2.Click the Yes button to allow Windows Terminal to make changes to your PC.
-
3. Paste the following commands individually and hit Enter after each:
Set-ExecutionPolicy UnrestrictedGet-AppXPackage -AllUsers | Foreach {Add-AppxPackage -DisableDevelopmentMode -Register "$($_.InstallLocation)\AppXManifest.xml"}
Using the commands below via Powershell should reinstall Windows Defender on your Windows 11 PC and solve the missing issue in no time.


The command above helps to reinstall all default Windows apps. This is especially useful if Windows Defender is not installed in Windows 11 due to file corruption during an upgrade.
2. Repair and reinstall Windows Defender
- Press Windows + S to open the Search menu, enter Terminal in the text field, right-click on the relevant search result, and select Run as administrator.

- Click Yes in the UAC prompt.

- Type/paste the following command and hit Enter:
Get-AppxPackage Microsoft.SecHealthUI-AllUsers | Reset-AppxPackage


Sometimes, Windows Defender might be installed, but the installation is either incorrect or incomplete. The command above will remove all components from the PC and reinstall Windows Defender in Windows 11.
To learn more, don’t miss our guide on how to reinstall Windows Security on Windows 11.
3. Perform a Windows update
- Press the Windows key, and select the Settings app.
- Select the Windows Update option on the left pane.

- Click the Check for updates button in the right pane.

- If an update is listed after the scan, download and installs it on the computer.


Windows update comes with fixes for bugs and other errors in the previous versions.
If Windows Security is missing in Windows 11, an update should have fixes for the bugs responsible for the error. Also, if it is due to an incomplete or incorrect update, this should solve the problem if done correctly.
4. Perform a System Restore
- Press Windows + R to launch the Run command, enter rstrui.exe in the text field, and click OK.

- Select Next in the System Restores window to proceed.

- Choose a restore point from the options provided, and click Next.
- Verify the restore details, and click on Finish to initiate the restore process.


If you noticed the Windows Defender link missing after installing an update in Windows 11 or making changes to the system, this fix could help you return to the previous state.
Select a restore point created before installing the new update, and things should return to normal.
- May 2025 Patch Tuesday finally brings Recall & other AI features to Copilot+ PCs
- Microsoft releases Windows 11 (KB5058411, KB5058405) May 2025 Patch Tuesday
- You can now share an app/browser window with Copilot Vision to help you with different tasks
- Windows 11 24H2’s Settings now bundles FAQs section to tell you more about your system
Does Windows 11 have a built-in antivirus?
Yes, Windows 11 comes with Windows Security as the built-in antivirus. In case you are confused between the two, Windows Defender and Windows Security are the same thing.
The program efficiently identifies and eliminates malware and performs other essential functions to ensure security. But, in case you were looking for advanced security, we recommend using an effective third-party antivirus.
The Windows 11 Defender not installed problem is not the first faced by users. There have been complaints that Windows Defender is not opening or not enabled, among other issues.
Unlike some of these issues, this problem is not hard to fix, as shown above. We hope you find the helpful guide and get Windows Defender back to protect your PC.
Also, if you are wondering, Windows Defender can be downloaded from the Microsoft Store. This will download the Windows Defender 64-bit version in Windows 11.
Besides, find out what to do if you get the You’ll need a new app to open this windowsdefender link error in Windows 11.
Feel free to discuss the solution that worked for you in the comments section. You can also state any solution you tried successfully that is not in this guide.
Ola-Hassan Bolaji
Windows Hardware Expert
A Computer Engineering graduate, he has spent most of his life reading and writing about computers.
He finds joy in simplifying complex topics into simple solutions for PC users. The quality of his work and providing step-wise tested and proven solutions to PC issues are all that matter to him.
Away from computers, he is either reading or watching football!