
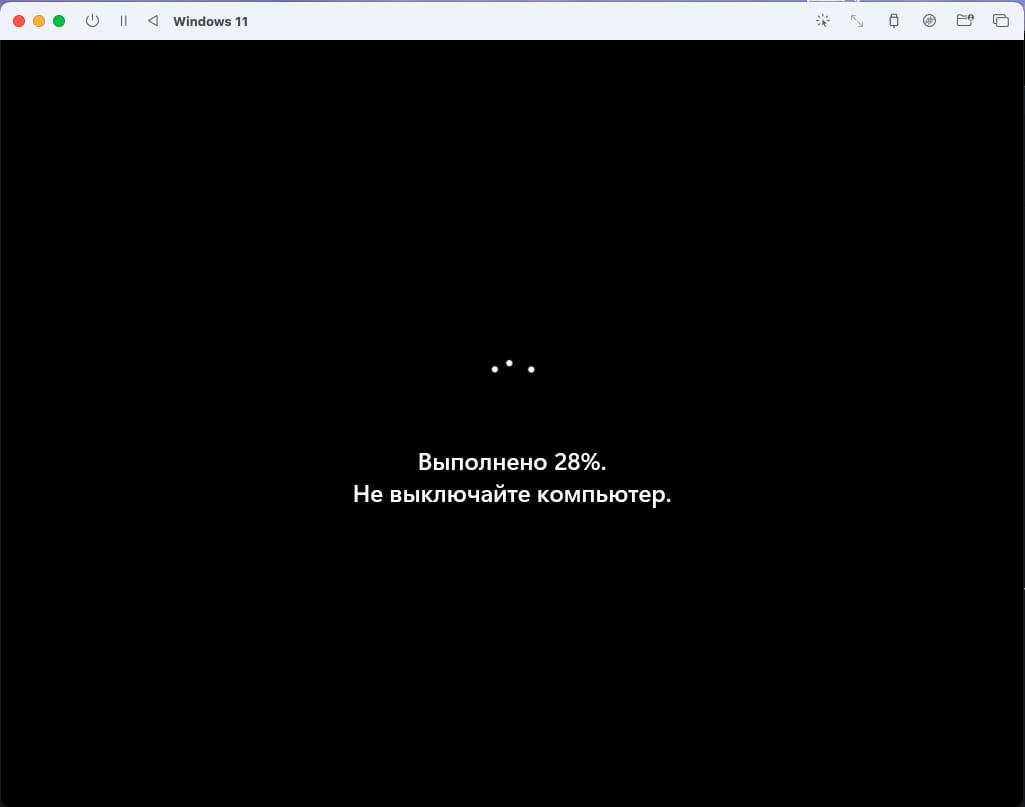
- Installation
- Windows 10 and higher
- Windows XP and higher
- Download
- SPICE WebDAV
In order to use all the features of UTM, you should install the Windows Guest Tools in the virtual machine guest. The tools support Windows XP or higher on x86_64 (excluding Windows XP), i386, and arm64 builds.
Installation
Windows 10 and higher
If the guest tools ISO is mounted on a second CD drive, then it can be installed automatically during Windows Setup.
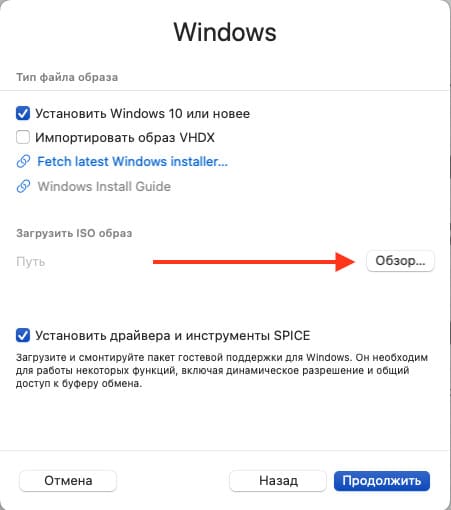
- In the UTM new virtual machine wizard, make sure to select “Windows”
- Check “Install Windows 10 or higher”
- Check “Install drivers and SPICE tools”
Once the wizard completes, the Windows Guest Tools will download automatically and it will be mounted to the newly created virtual machine. Wait until the download completes and start the virtual machine. After finishing the installation, all drivers and the guest tools will be installed.
Windows XP and higher
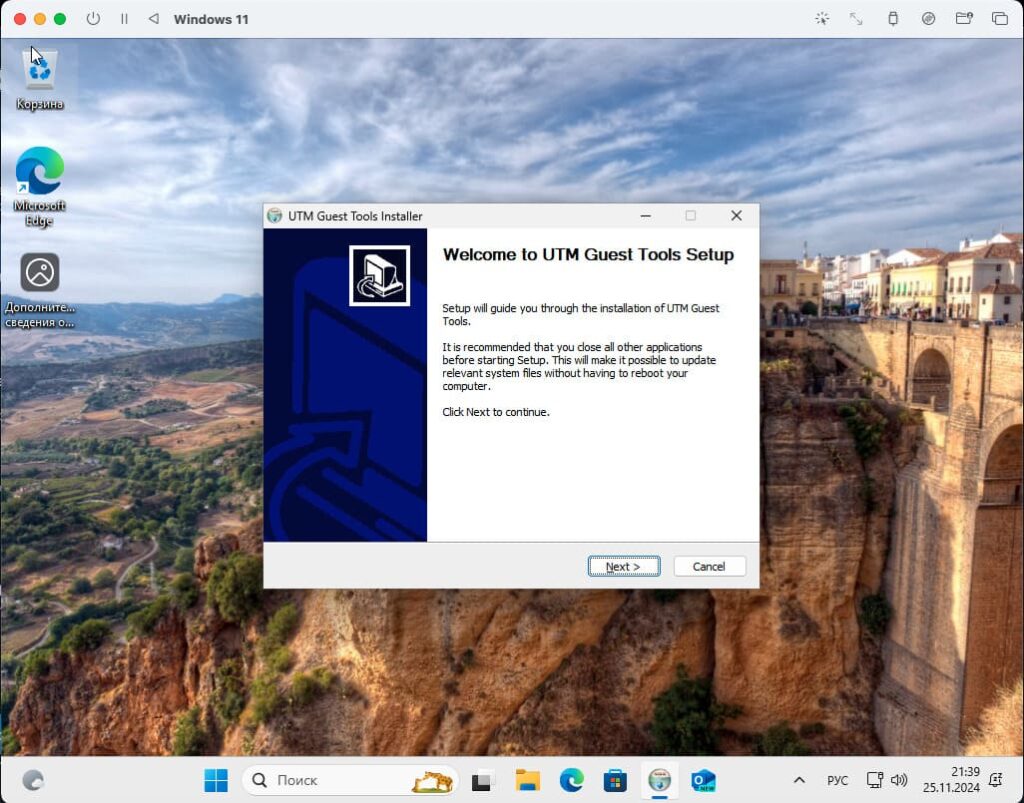
If you are running an older version of Windows or if you have already completed Windows Setup, you can install the guest tools manually.
iOS
- Open the action menu and select “Install Windows Guest Tools…”
- Wait for the tools to finish downloading and it should be automatically mounted on the last removable drive.
- Start the virtual machine.
macOS
- Start the virtual machine.
- On the toolbar click the CD icon and select “Install Windows Guest Tools…”
- Wait for the tools to finish downloading and it should be automatically mounted on the last removable drive.
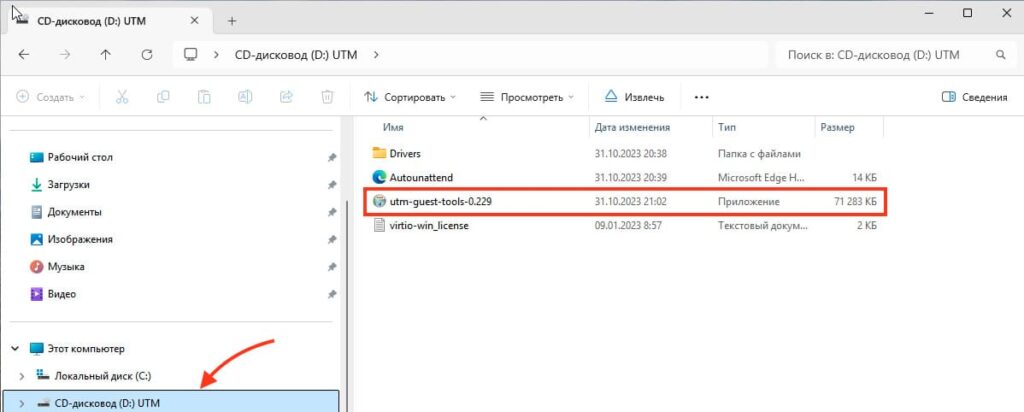
- Once Windows starts up and you are logged in, open “My Computer” and find the CD drive labeled “UTM”.
- Launch
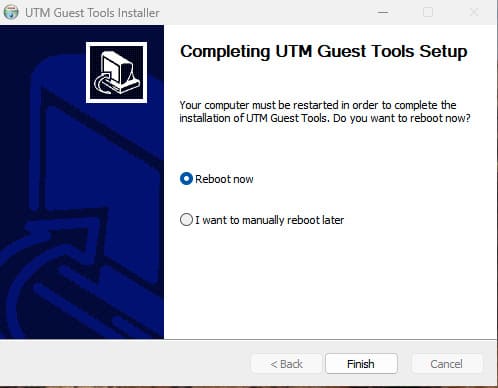
spice-guest-tools-xxx.exewherexxxis the version number. - Follow the setup wizard to install the guest tools.
Download
You can manually download the guest tools ISO here.
SPICE WebDAV
If QEMU SPICE WebDAV directory sharing is enabled, you can access it from “My Computer” as a network drive.
If you do not see the network drive, run C:\Program File\SPICE webdavd\map-drive.bat.
In 2020, Apple introduced Mac computers with Apple silicon, with the first chip being the Apple M1.
This was a major change, and it affected many third party applications to the point where they simply don’t run on the M1 Mac.
One application that doesn’t run on M1 Macs is VirtualBox. Prior to the M1 Mac, we could use VirtualBox to install Windows on our Mac. VirtualBox is a free virtualisation application that enables you to install virtual machines (with other operating systems) on your Mac.
Fortunately, there’s a free alternative to VirtualBox – UTM.
In this article, I install Windows 10 on an M1 Mac. The key to doing this is to use the UTM virtualisation application instead of VirtualBox.
It also involves installing the Windows 10 on ARM Insider Preview. This requires an account with the Windows Insider Program (you can register for free).
Install UTM
First step is to install UTM (it’s free). UTM employs Apple’s Hypervisor virtualization framework to run ARM64 operating systems on Apple Silicon at near native speeds.
Basically, it enables us to create virtual machines on our M1 Mac. We can use UTM to install other operating systems (such as Windows) on our M1 Mac.
So to install UTM:
- Go to the UTM website and click
Download. - Once downloaded, double click the
UTM.dmgfile to launch it. - Drag the
UTM.appicon to yourApplicationsfolder.
The program is now installed. You can open it just as you can open other applications (e.g. by double clicking on its icon).
Download Windows
- Go to the Windows Insider Preview Downloads page.
- The instructions on the page depend on whether you’re logged in, and whether you’re part of the Windows Insider Program. If you are already logged in and you’re part of the Windows Insider Program, you’re good to go. If you’re not logged in or part of the program, follow the instructions on the page to log in and/or join the Windows Insider Program. Once done, the page will display the download link for the installation file.
- Click the button to download the installation file. In my case this blue button reads Windows 10 Client ARM64 Insider Preview – Build 21354.
It’s quite a large file (mine is 9.74 GB), so it might take a while to download.
Download the SPICE Guest Tools
- Go to the UTM Support page.
- Under the SPICE Guest Tools and QEMU Drivers (Windows) heading, click Download.
We will use this later, when we install Windows.
Convert the VHDX Image to a QCOW2 Image
According to the UTM documentation, sometimes the QEMU handling of VHDX images will result in Windows becoming corrupted. To prevent this, we’re advised to convert the VHDX file to a QCOW2 file, as follows.
The following steps require that Homebrew is installed. You can install it with the command on the Homebrew website.
With Homebrew installed, open a Terminal window and run the following:
brew install qemuIf you get an error that reads “Cannot install in Homebrew on ARM processor in Intel default prefix”, your Homebrew might not be configured for your M1 Mac. In this case, try this fix.
With QEMU now installed, run the following to convert the VHDX file to QCOW2:
qemu-img convert -p -O qcow2 ~/UTM_VM/Windows10_InsiderPreview_Client_ARM64_en-us_21354.VHDX ~/UTM_VM/Windows10_InsiderPreview_Client_ARM64_en-us_21354.qcow2In my case, I’d placed both the Windows file and the SPICE guest tools into a folder called ~/UTM_VM. You can put them elsewhere if you prefer, but be sure to replace ~/UTM_VM with your own path to the file.
Also, you may need to rename the Windows file (for example, replace 21354 with the applicable number on your file).
We can now use the QCOW2 image when creating the virtual machine below. It is recommended you do this with a fresh VHDX from Microsoft in case your image was already corrupted.
Create a Virtual Machine
Now we can go ahead and use UTM to create a virtual machine with which we will install Windows 10.
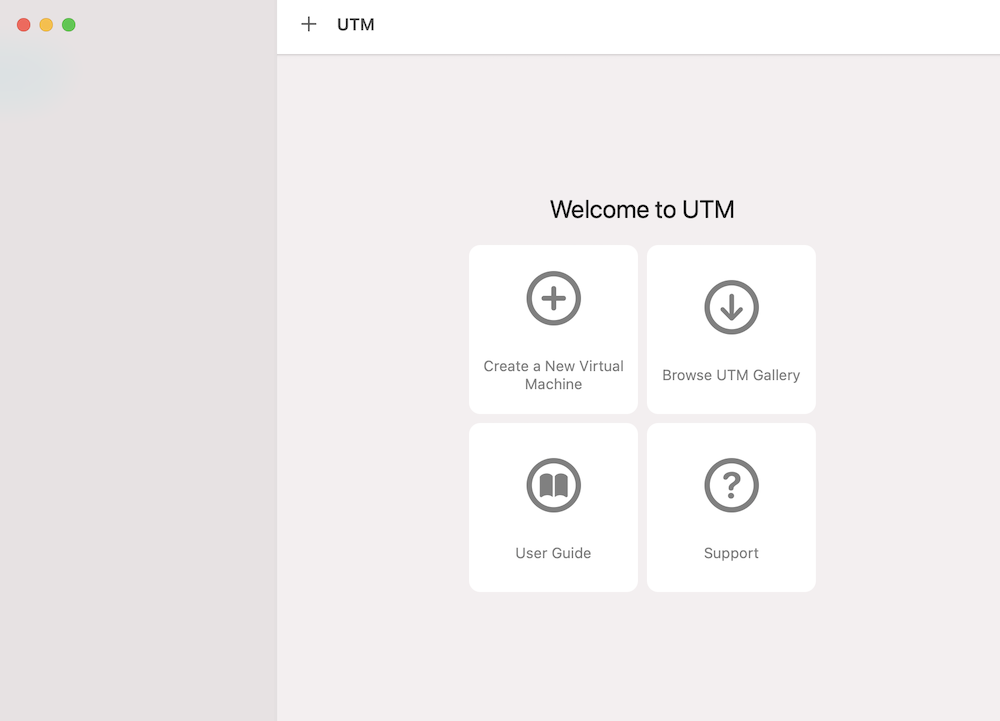
Open UTM and click Create a New Virtual Machine:
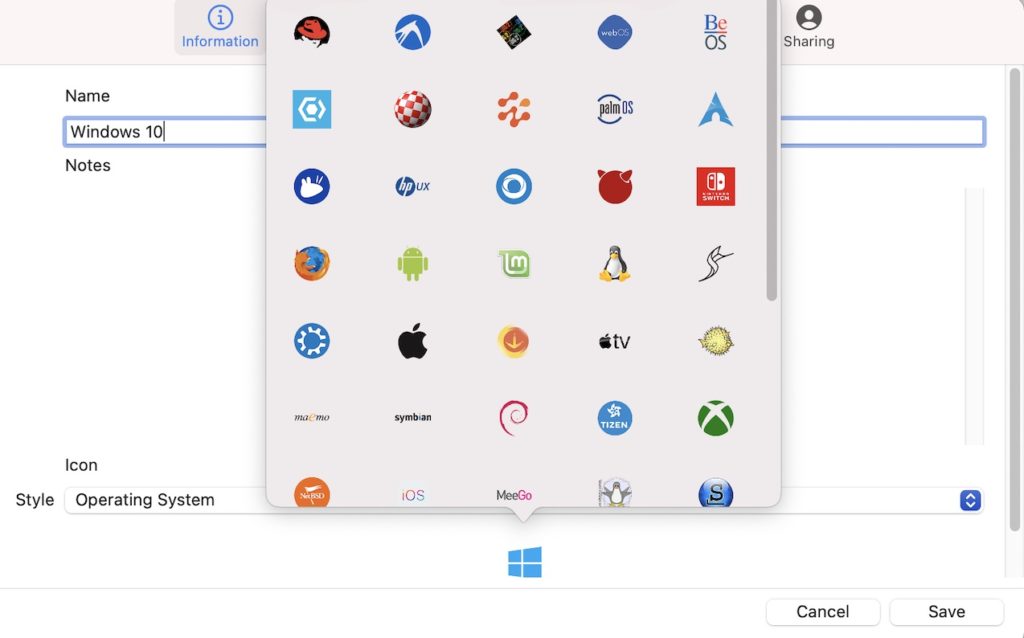
Enter a name for the VM. You can optionally choose an icon by selecting Operating System in the bottom drop down menu. This makes an icon appear below it. If its not the right icon, click it (which brings up a menu of other icons), and select the Windows icon:
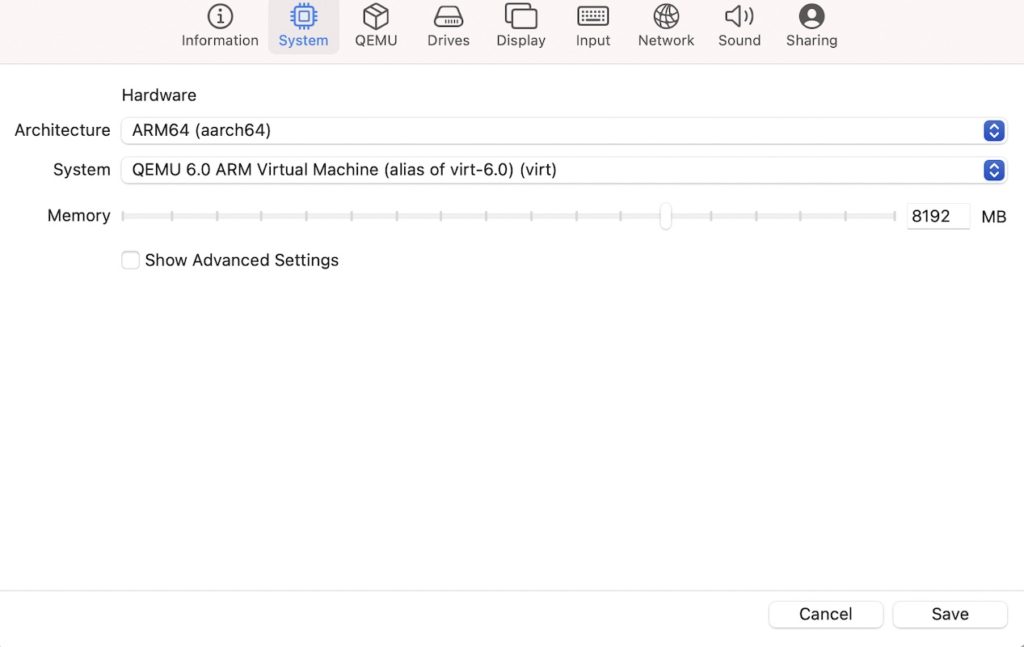
Now click the System button in the top menu and select ARM64 (aarch64) architecture. Also specify the amount of memory. At least half of your computer’s total memory is recommended for performance:
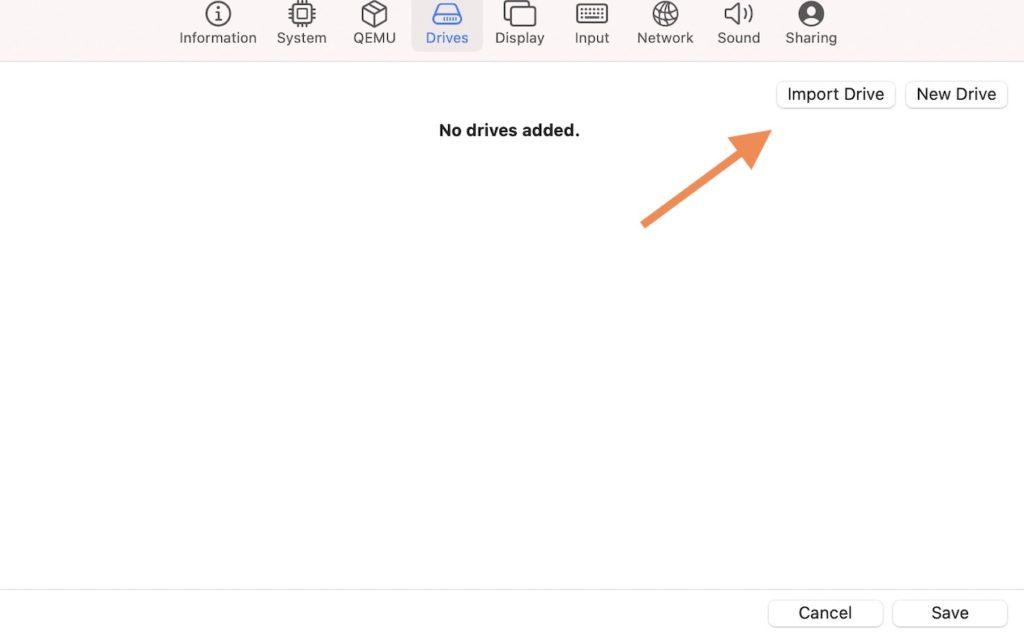
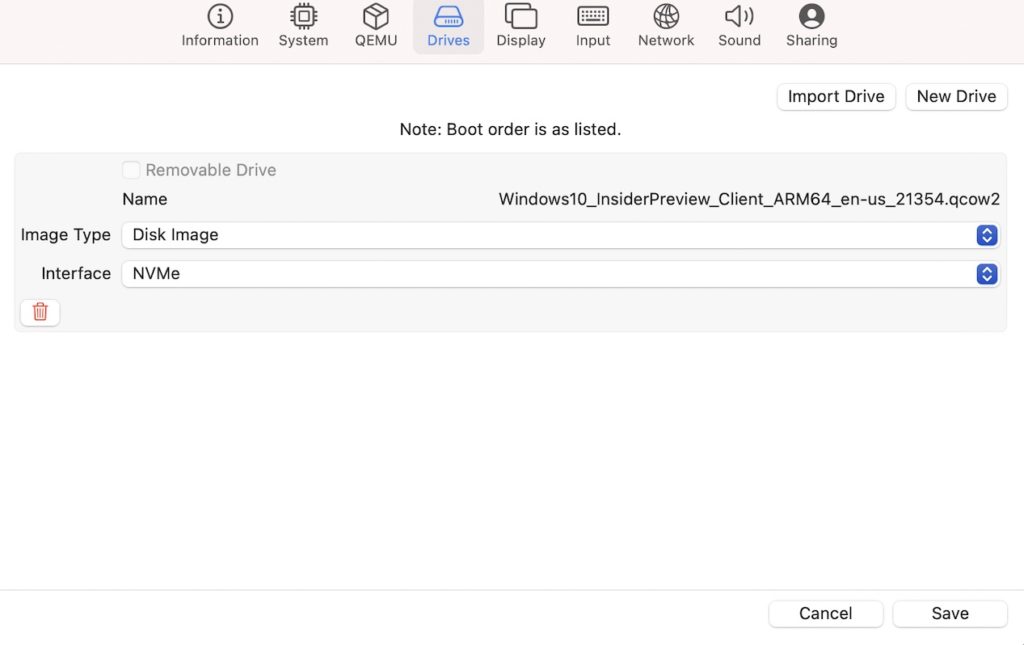
Click Drives from the top and then click Import Drive:
Browse to, and select the Windows 10 QCOW2 that you converted from the VHDX file previously. Once selected, set the interface to NVMe:
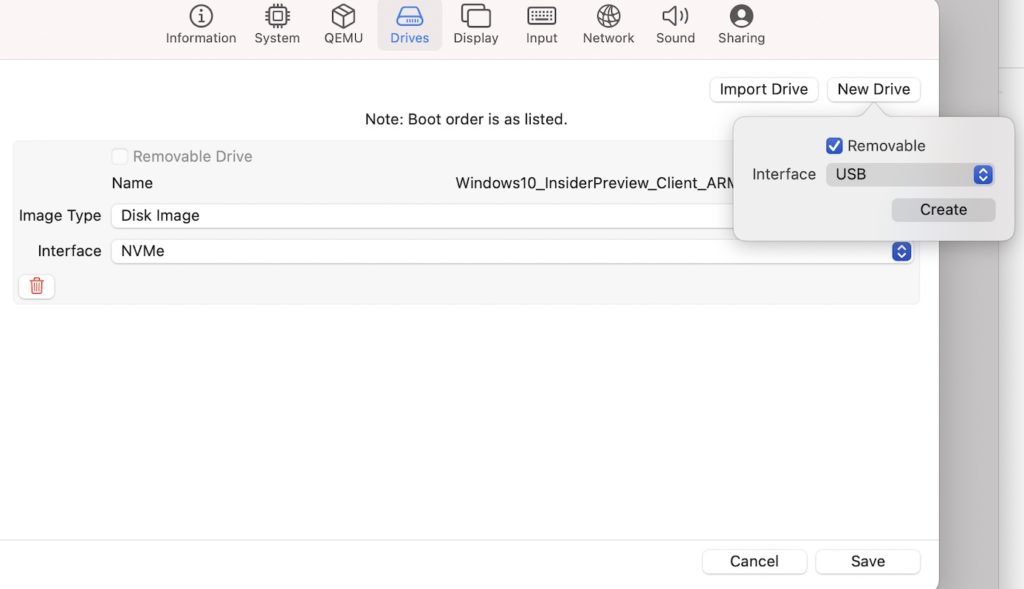
Now click New Drive and check Removable and click Create to add a CD drive:
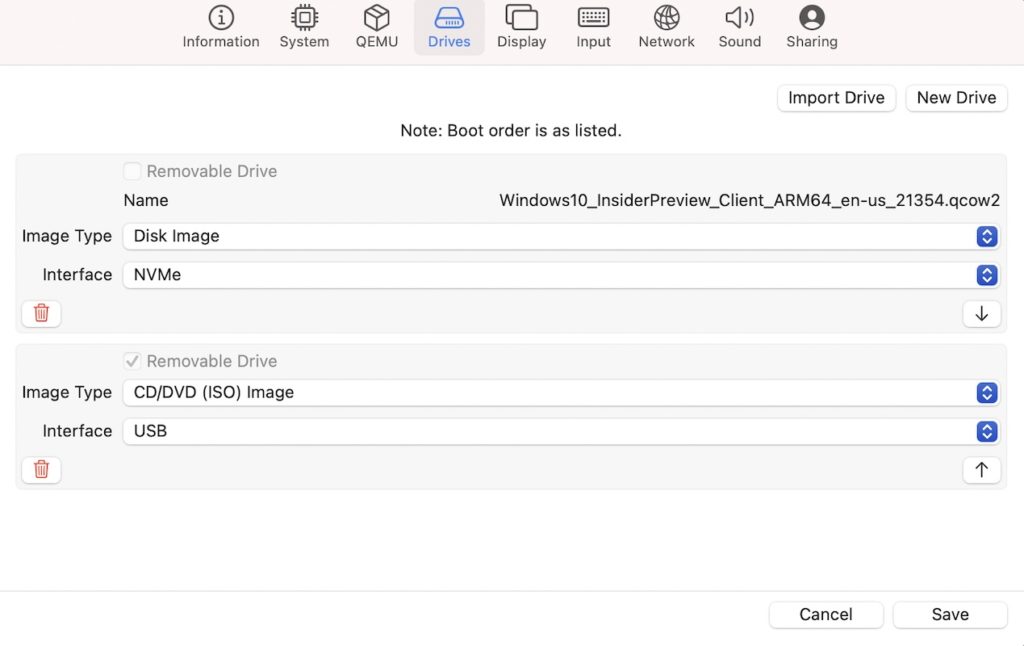
It should now look like the following screenshot. Click Save:
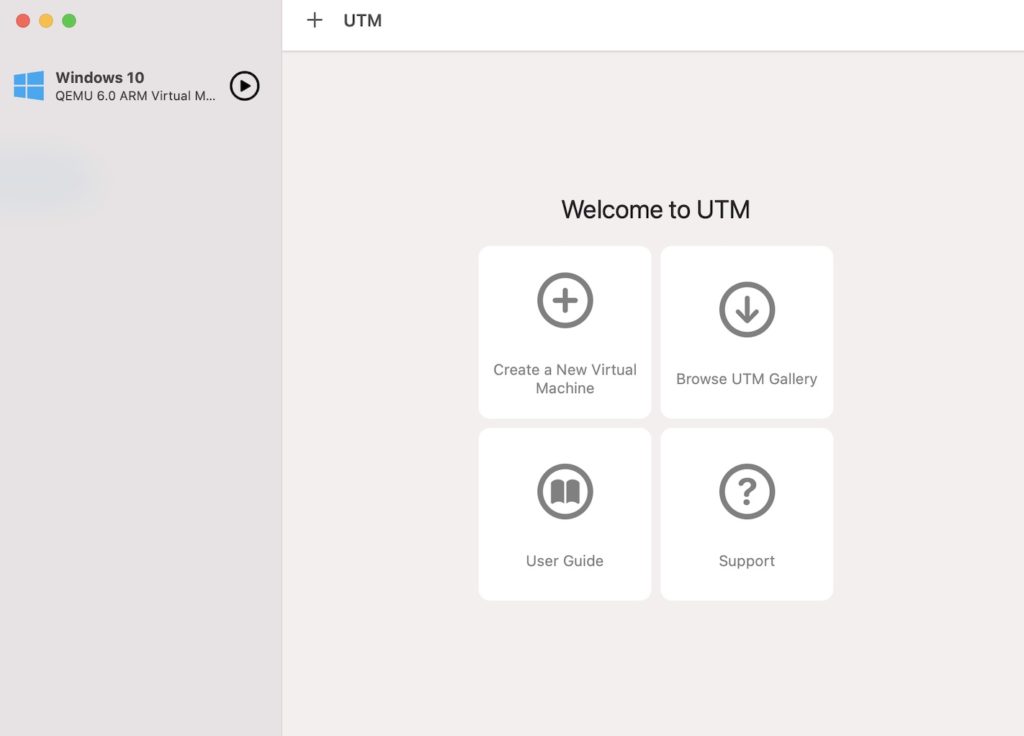
The VM now appears in the sidebar:
Click on the Windows 10 option in the left menu, and then select Browse (at the bottom of the right pane):
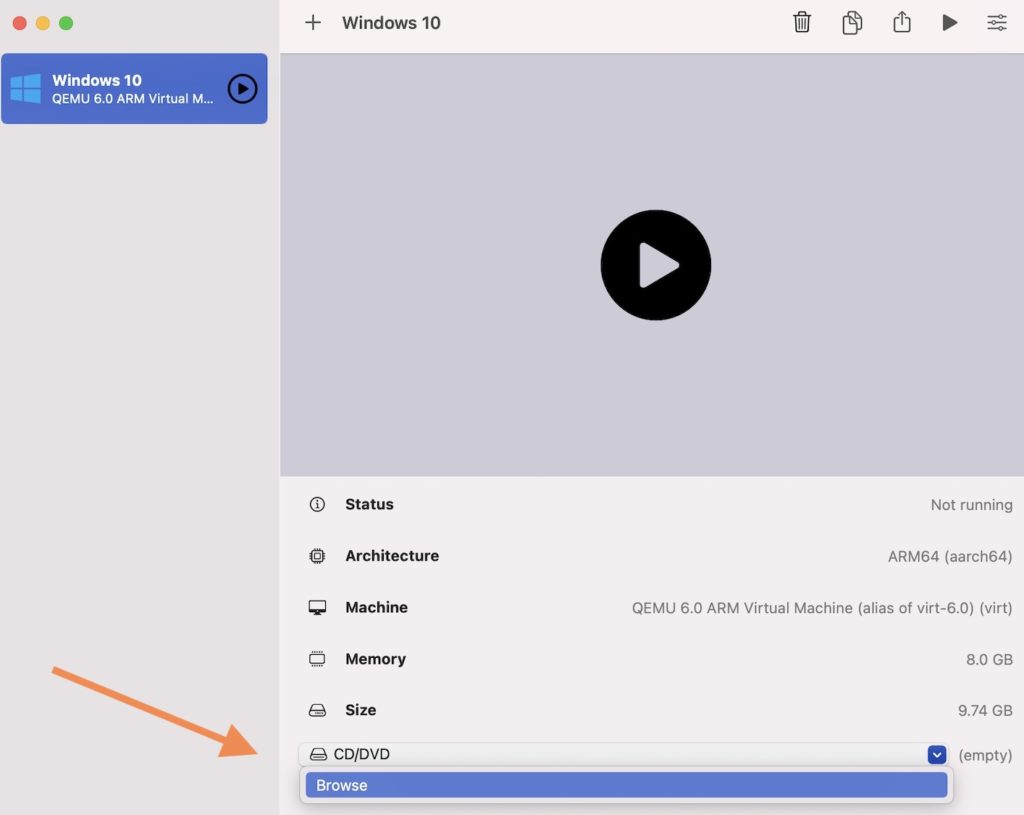
Browse to the SPICE guest tools ISO and click Open:
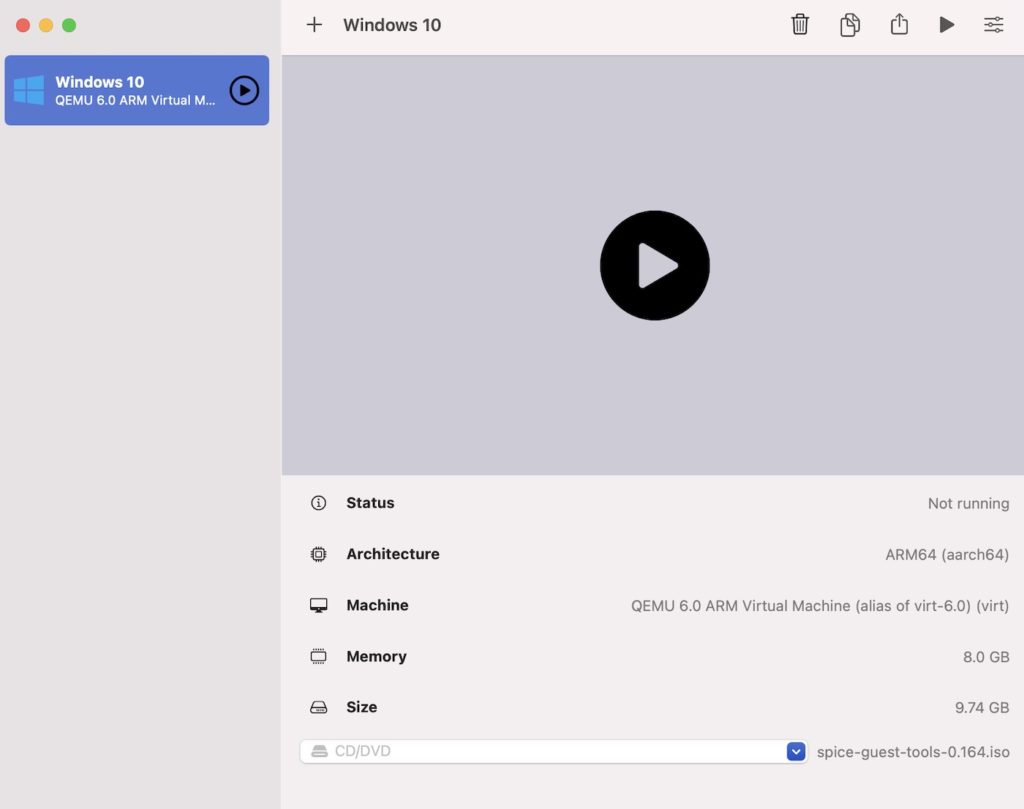
The name of the file now appears at the bottom of the screen, to the right of the dropdown.
The virtual machine is ready to use. If you need to change/check any of the settings, you can right click on the machine and select Edit.
We’re now all set to install Windows.
Click the big “Play” button in the middle of the screen to start the installation:
This launches a new window that boots up the Windows installation wizard:
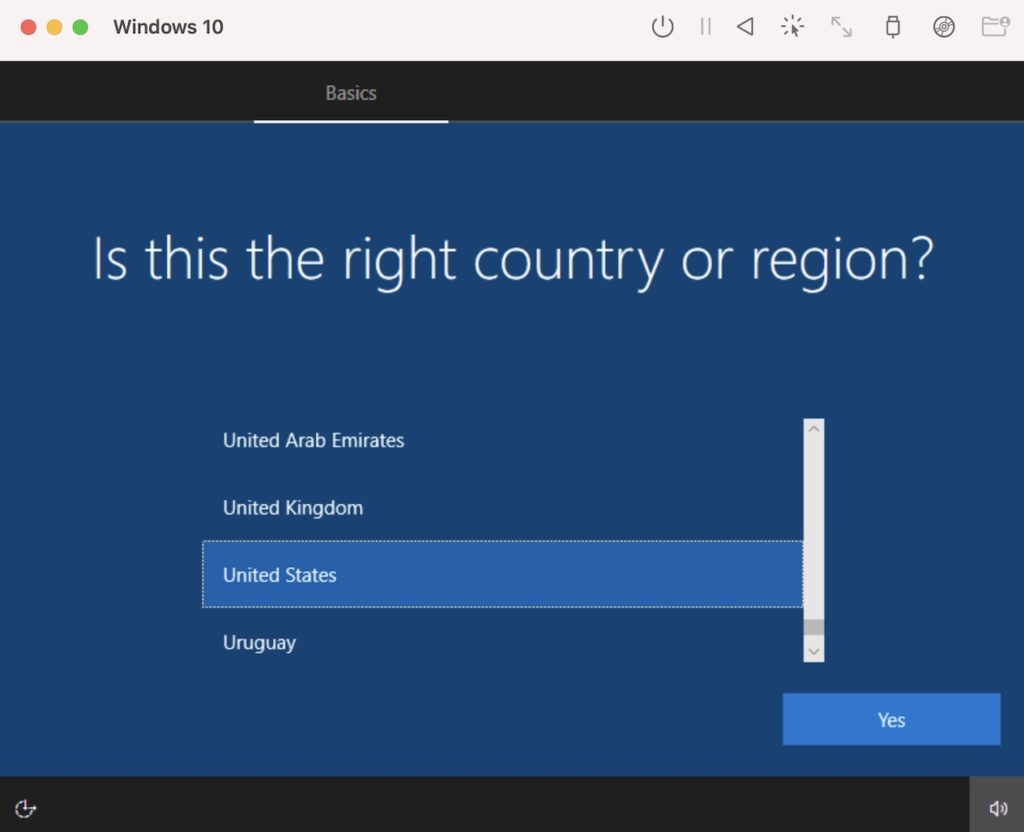
Follow the prompts to install Windows.
If you get a “no bootable device” error, check that you selected ARM64 (aarch64) architecture on your virtual machine. From the UTM main screen, right click on the the virtual machine in the left and select Edit and select the System tab.
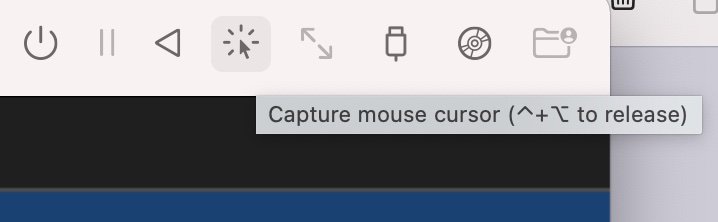
If your cursor suddenly seems to disappear, click the mouse capture button in the toolbar to send mouse input directly. Press Control+Option together to exit mouse capture mode.
When asked to connect to the internet, select I don’t have internet. This is because we won’t have internet until we install the SPICE guest tools (next).
Once the installation is complete, the Windows desktop appears:
Install SPICE Guest Tools
There’s one more thing we need to do – install the SPICE guest tools.
From within our freshly installed Windows machine (i.e. in the guest machine), open the File Explorer and select the D drive. From there, double click the SPICE guest tools executable file (in my case, this is called spice-guest-tools-0.164.exe):
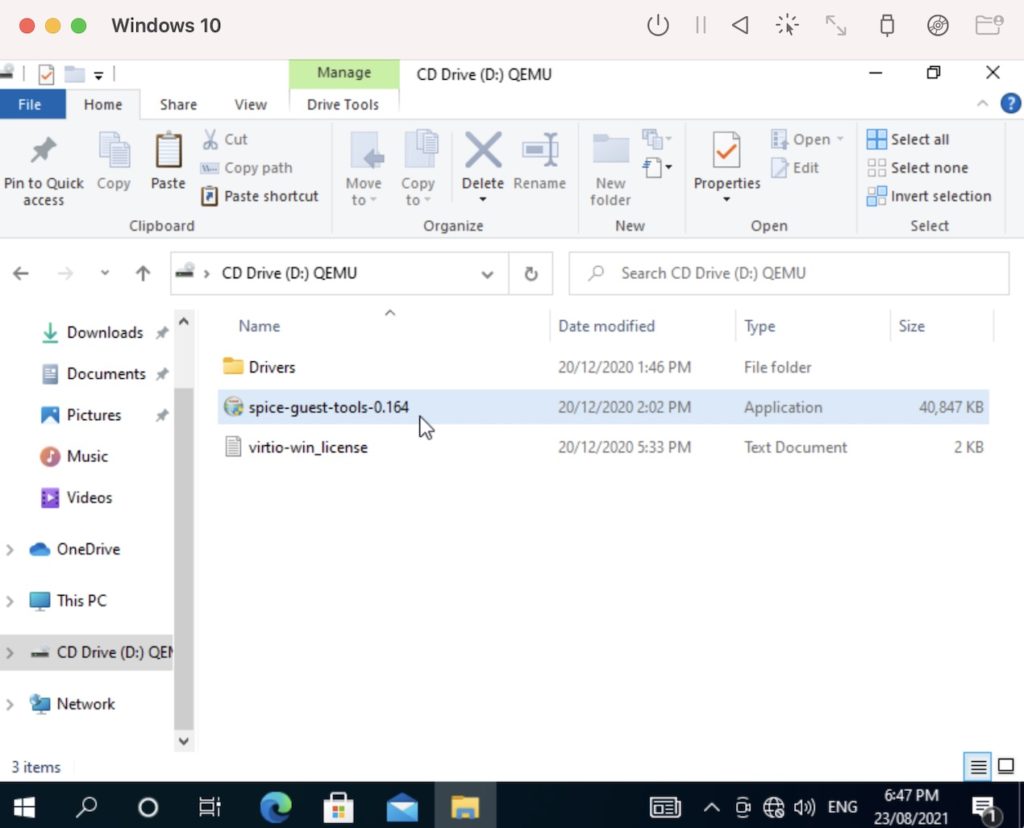
This launches the installation wizard. Follow the prompts to install the SPICE guest tools. This installs various drivers, including one that enables an internet connection.
Windows 10 is now installed on our M1 Mac and ready to use.
Для пользователей Mac с процессорами Apple Silicon (M1/M2/M3/M4) существует несколько способов установки Windows. Среди бесплатных решений утилита UTM является оптимальным выбором благодаря высокой производительности и простоте настройки. В этой статье подробно разберём, как установить Windows с использованием UTM, включая все этапы настройки и полезные советы.
Приобрести оригинальные ключи активации Windows 11 можно у нас в каталоге от 1690 ₽
Способы запуска Windows на Mac с Apple Silicon
На данный момент существуют три основных способа установки Windows на Mac с процессорами M1/M2 и выше:
— Parallels Desktop: простое и удобное решение, но требует покупки лицензии.
— VMware Fusion: бесплатное решение, инструкция по установке есть в нашей другой статье.
— UTM: бесплатный эмулятор и виртуализатор, отлично работающий на macOS.
В этой инструкции остановимся на UTM как на самом надёжном бесплатном решении.
Этапы установки Windows через UTM
1) Скачивание и установка UTM
— Перейдите на официальный сайт UTM и скачайте приложение для macOS.
— Либо скачайте его напрямую с нашего сервера.
— Установите UTM, откройте dmg файл и переместите файл в папку «Applications».
2) Подготовка образа Windows
Скачайте ISO-образ Windows для ARM, несколько вариантов:
— Воспользуйтесь нашим каталогом и скачайте официальный дистрибутив Windows 11 ARM.
— Используйте официальный сайт Microsoft.
— Альтернативно, воспользуйтесь утилитой Crystal Fetch для создания ISO-образа на macOS.
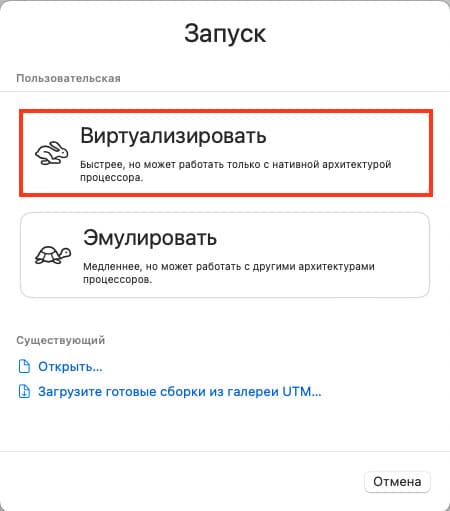
3) Запуск UTM
— Откройте UTM. В стартовом окне будет предложено выбрать режим работы:
— Эмуляция: используется для образов на базе Intel, работает медленно.
— Виртуализация: оптимальный режим для образов Windows, собранных для ARM-архитектуры. Выберите этот режим для работы на процессорах M1/M2.
4) Настройка виртуальной машины
— В UTM выберите создание новой виртуальной машины Windows.
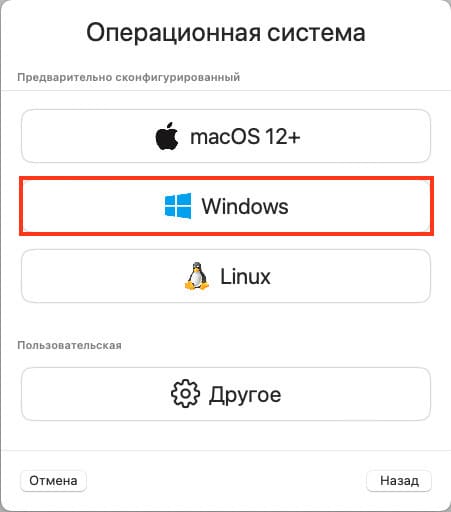
— Выберите недавно скаченный iso образ Windows 11 ARM, и нажмите продолжить
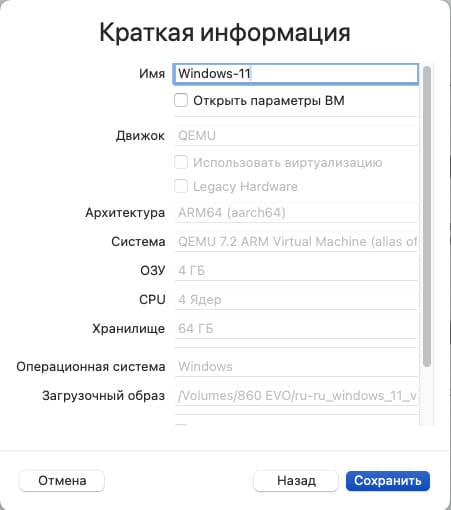
— Укажите параметры для вашей виртуальной машины:
— Память: выделите минимум 4-6 ГБ оперативной памяти.
— Процессоры: выберите 2-4 или больше ядер.

— Жёсткий диск: создайте виртуальный диск с минимальным объёмом 64 ГБ.

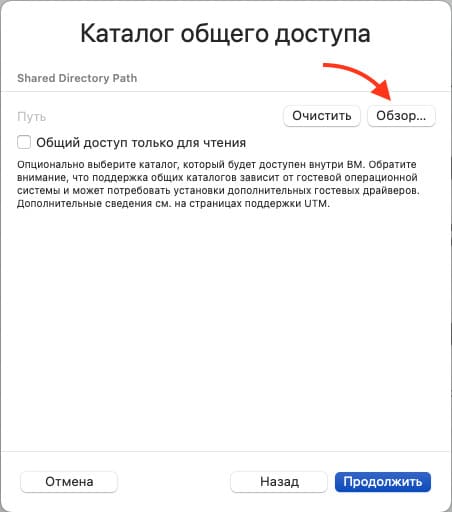
— Папка обмена: создайте папку для передачи файлов между macOS и Windows.
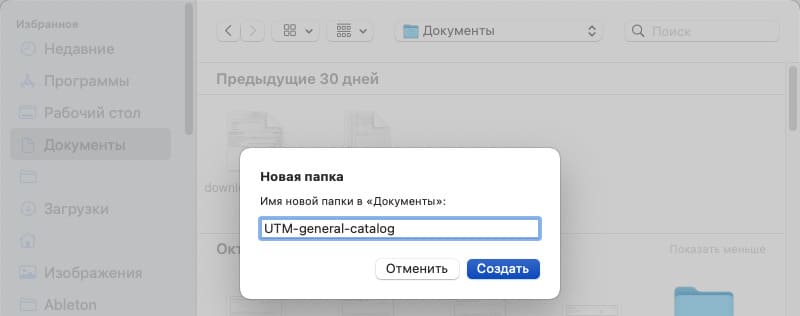
— Дайте название вашей виртуальной машине
5) Запуск установки Windows
1. Нажмите кнопку «Play», чтобы запустить виртуальную машину.
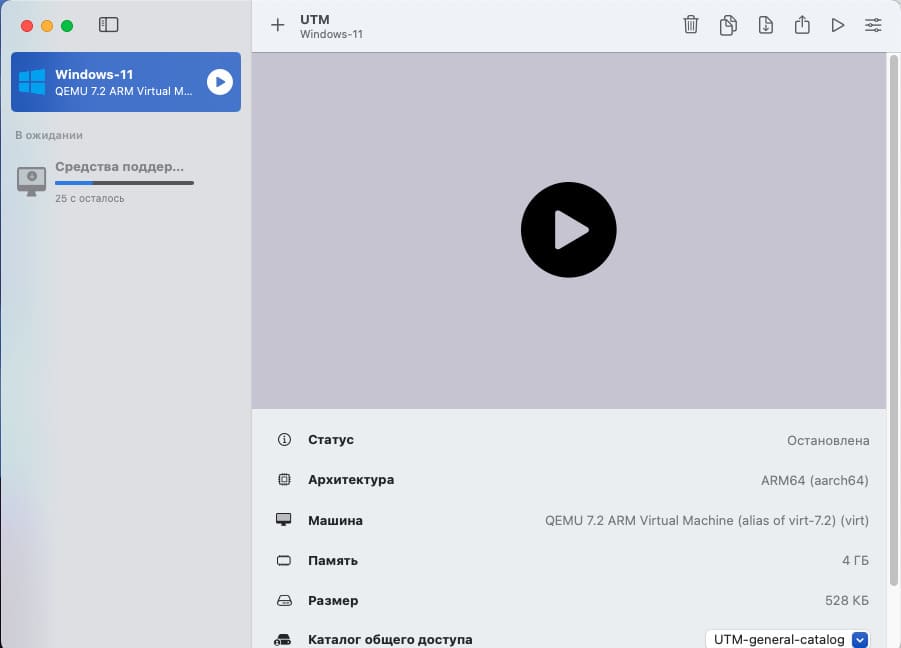
Если вдруг у вас пустой экран и ничего далее не происходит:
— Нажмите на виртуальную машину правой кнопкой мыши > Изменить
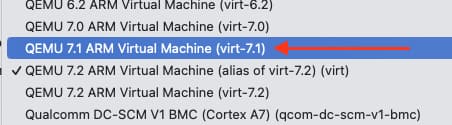
— В разделе «Система», выберите QEMU virt на одну версию ниже, к примеру virt-7.1

— Нажмите сбросить, после чего сохраните изменения и снова попытайтесь запустить виртуальную машину, в нашем случае все заработало.
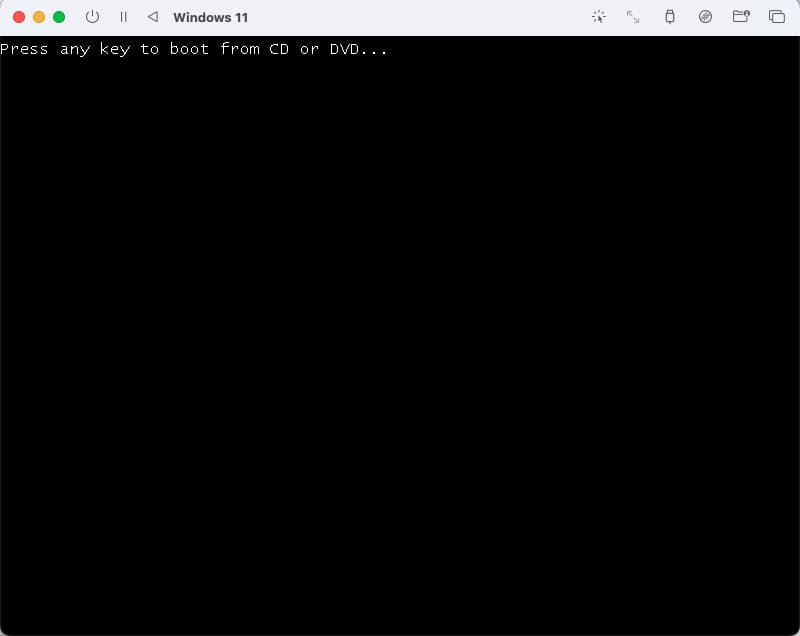
2. При появлении сообщения «Press any key to boot from CD or DVD», нажмите любую клавишу для начала установки.
Процесс установки Windows
После запуска установки следуйте стандартным шагам:
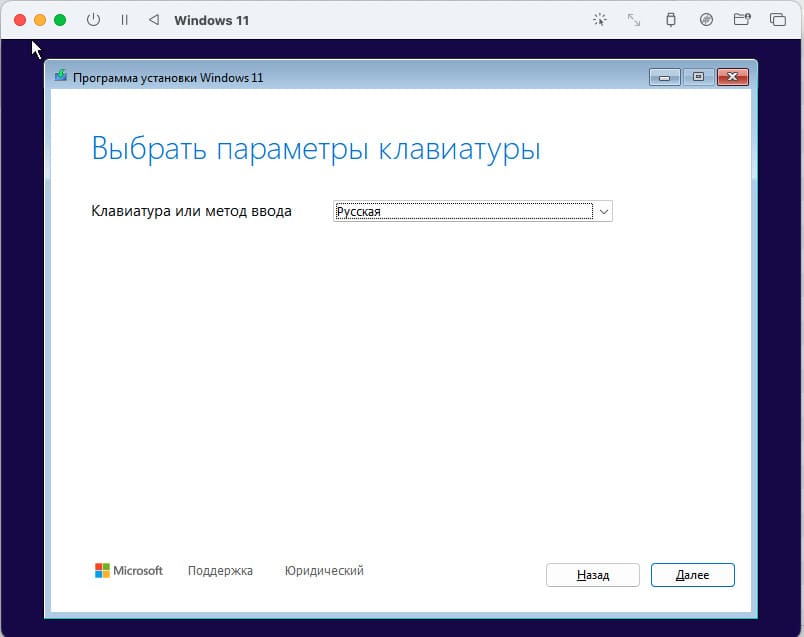
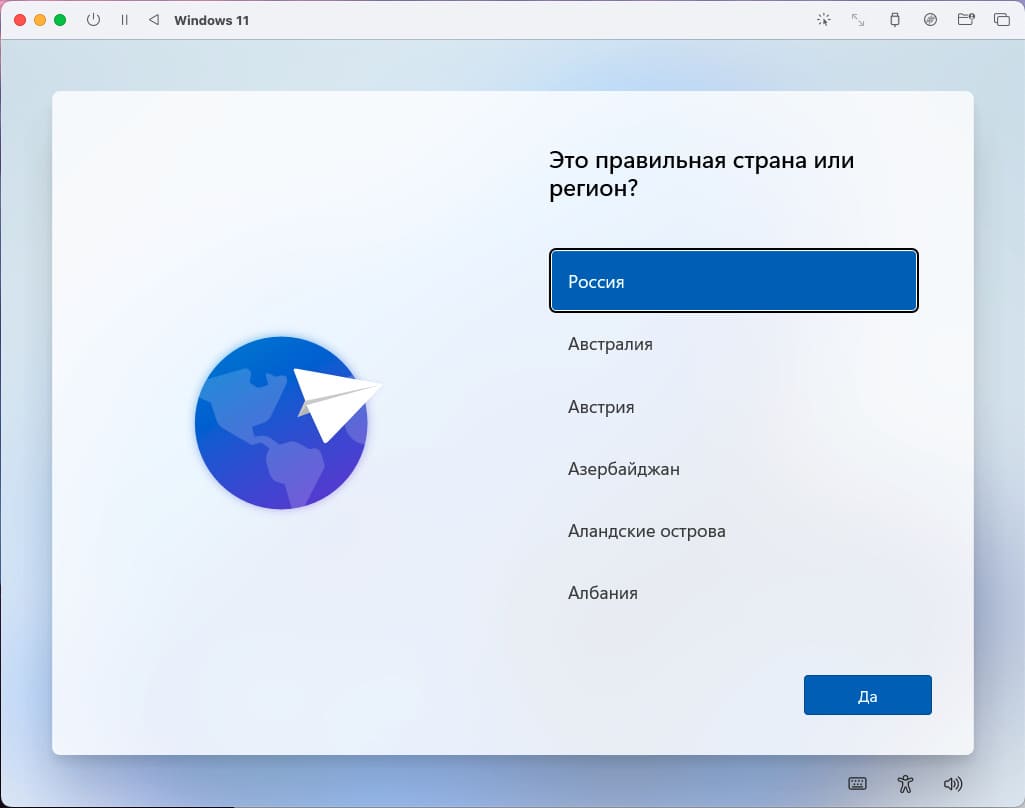
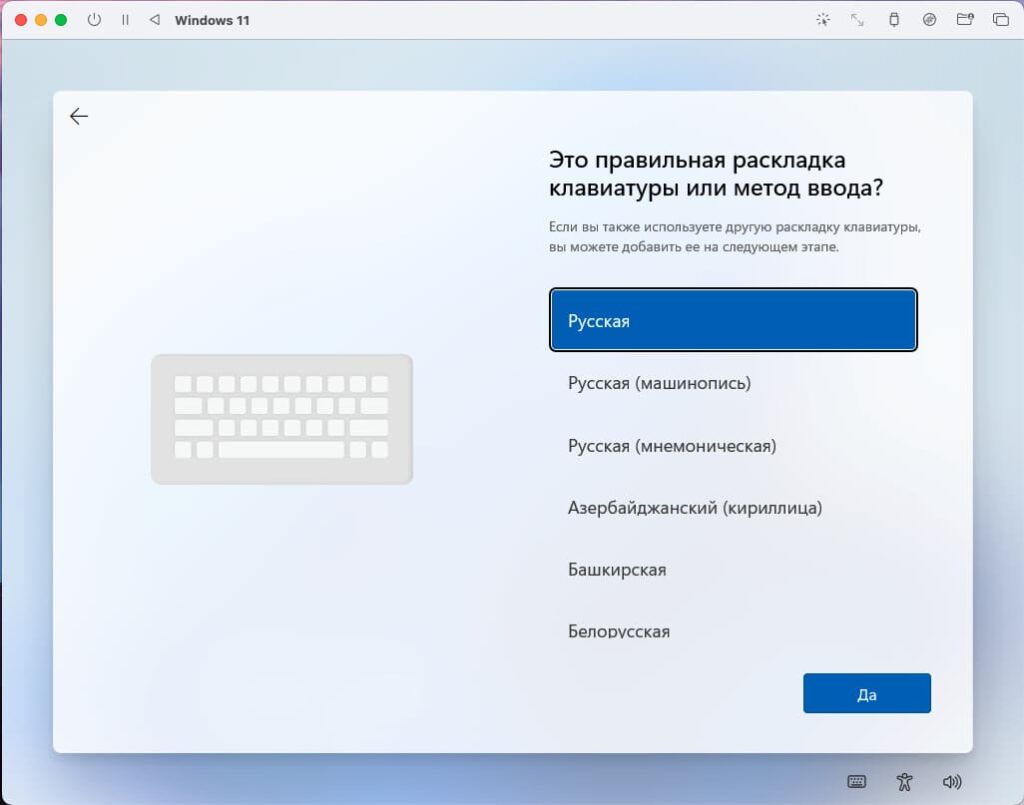
1) Выберите язык системы, раскладку клавиатуры и регион.

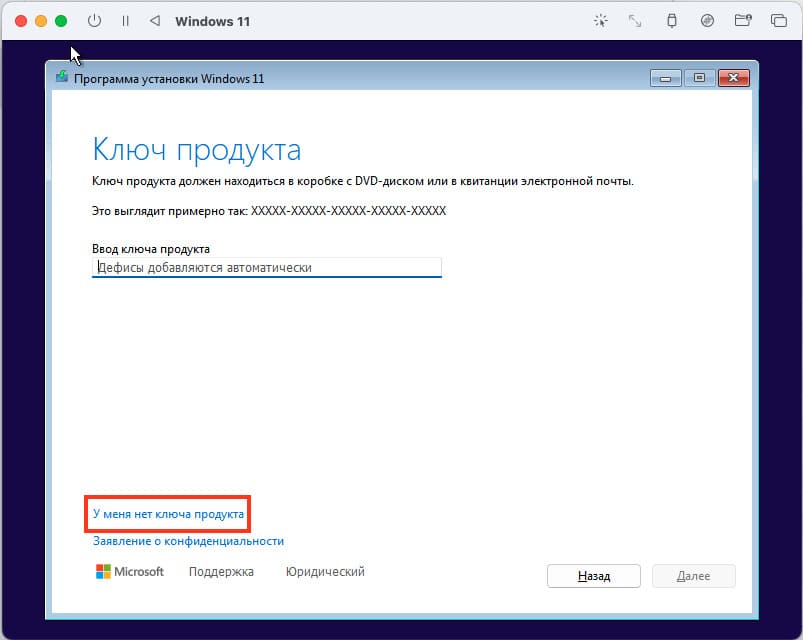
2) При просьбе ввести ключ активации, выберите «У меня нет ключа продукта», активировать Windows можно будет позже, уже в самой системе.
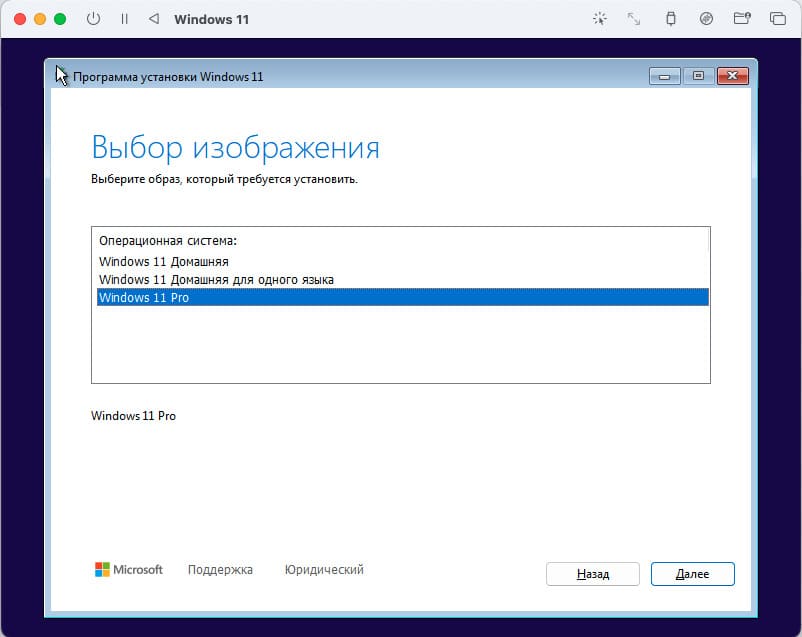
3) Выберите версию Windows 11, в нашем примере мы установим Pro версию.
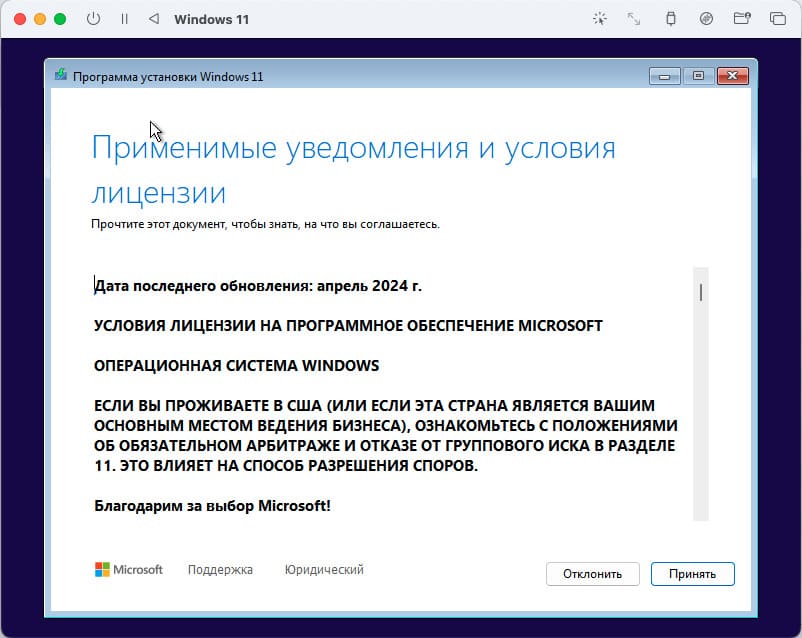
4) Примите лицензионное соглашение
— Укажите диск для установки (созданный ранее виртуальный диск)
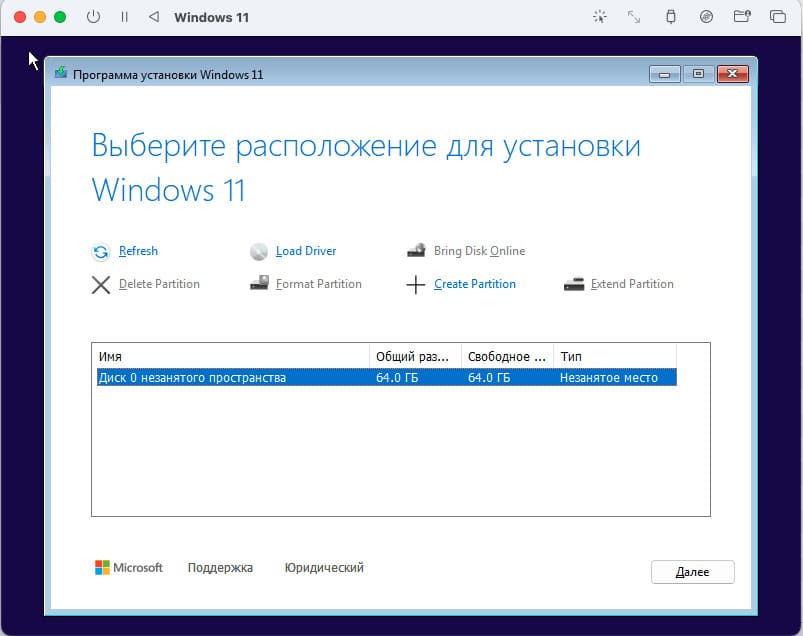
— Нажмите «Далее» и дождитесь завершения установки.
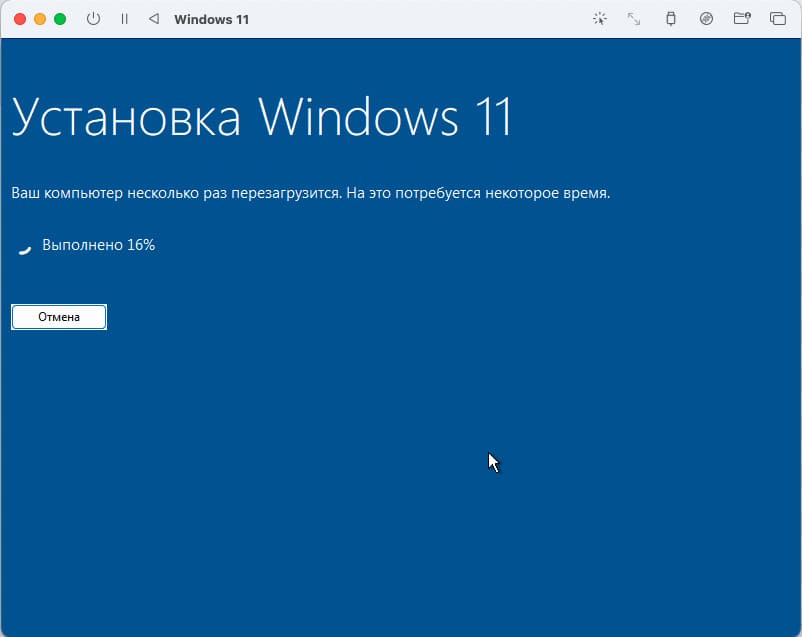
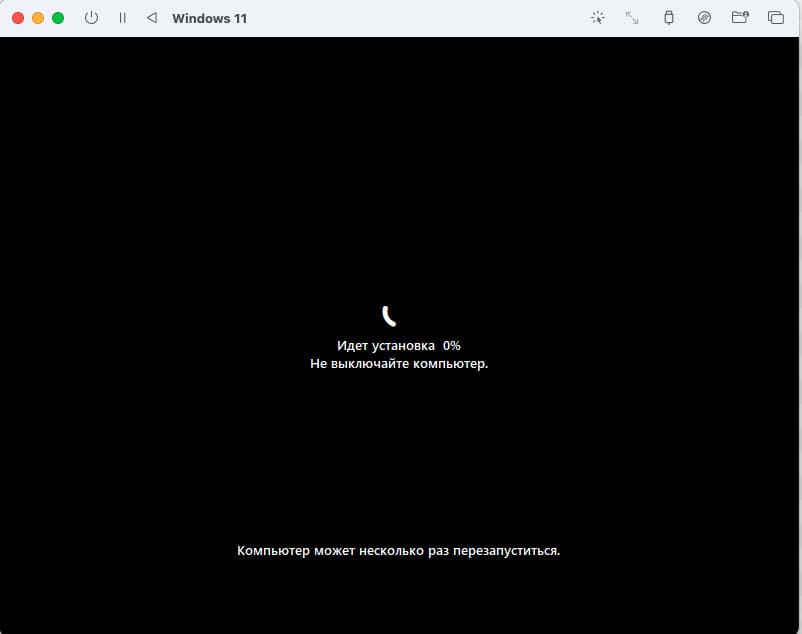
Ваша виртуальная машина может несколько раз перезагрузиться, если вдруг она зависнет при перезагрузки, попробуйте выключить ее и включать заново через кнопку питания
Настройка Windows после установки
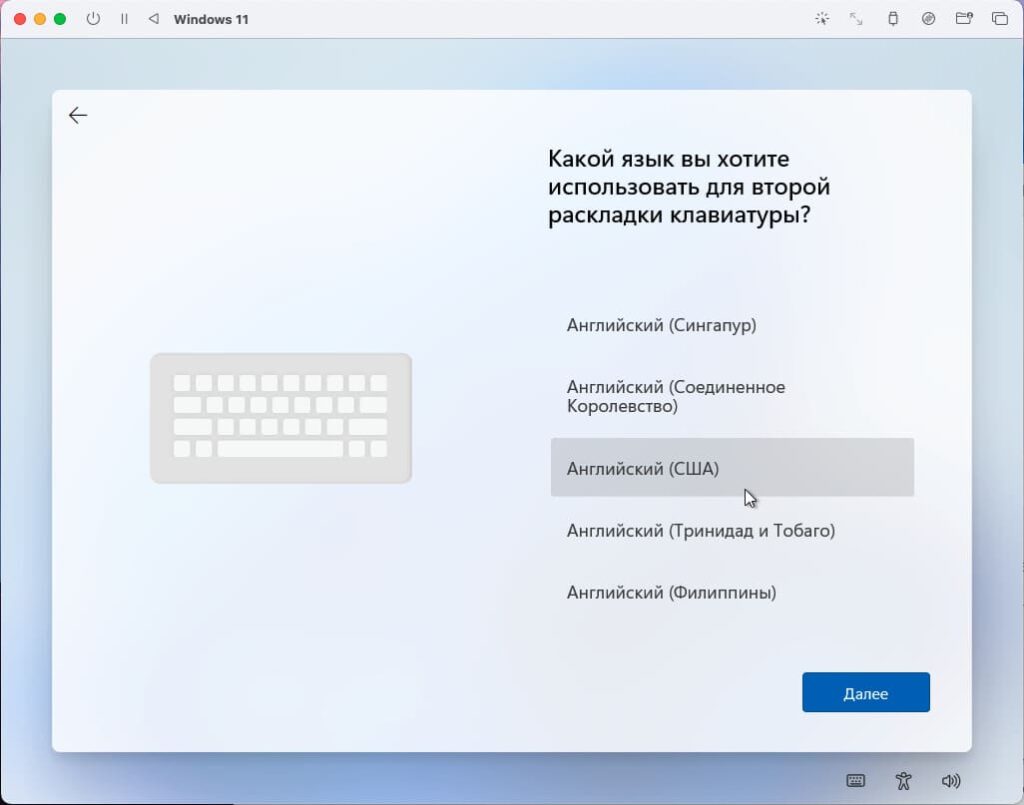
1) Далее запустится стандартная настройка Windows перед окончательной установкой. Выберите Язык и вашу раскладку.
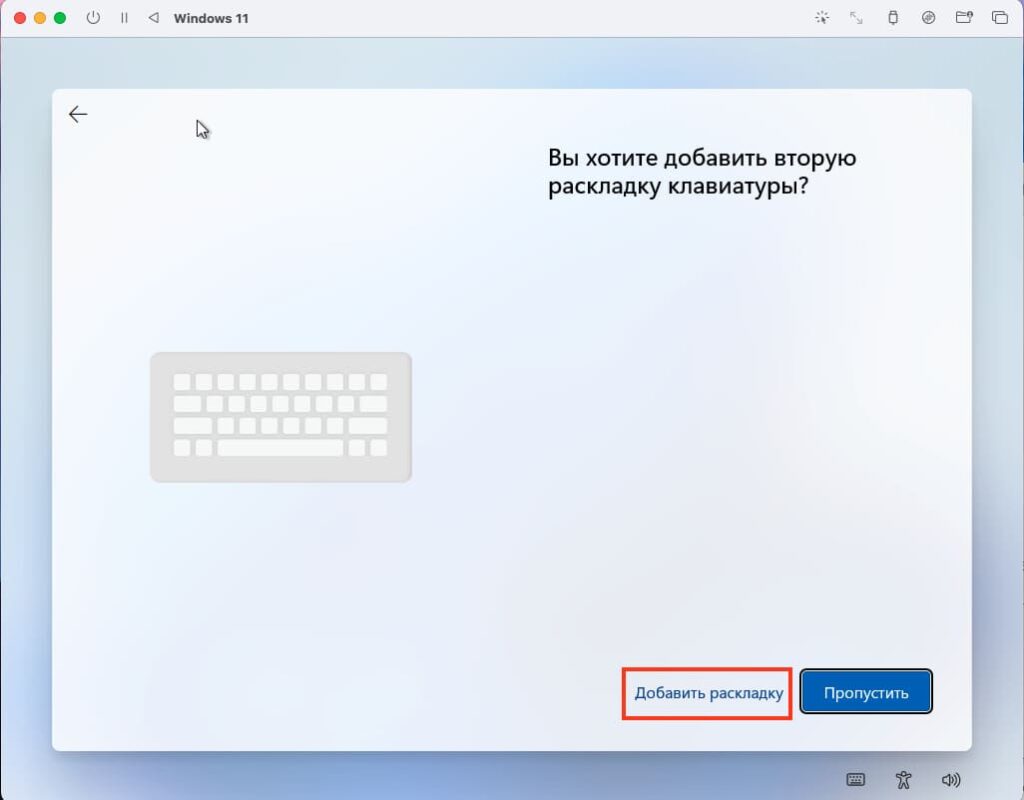
2) Выберите дополнительную Английскую раскладку.
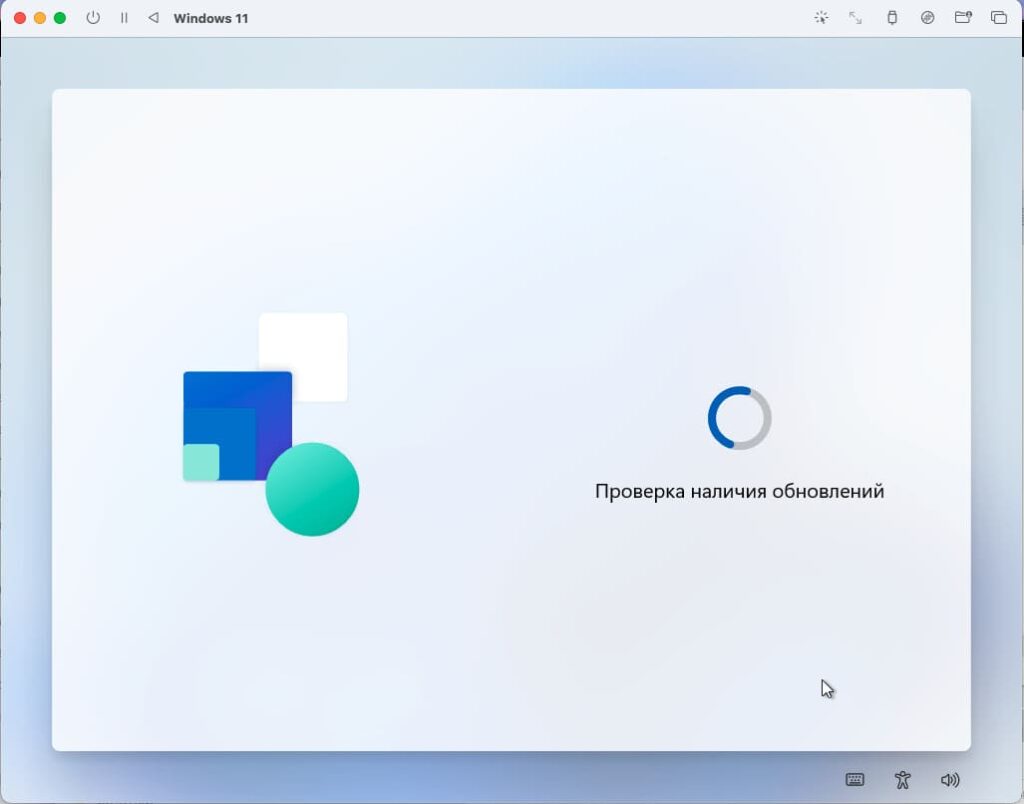
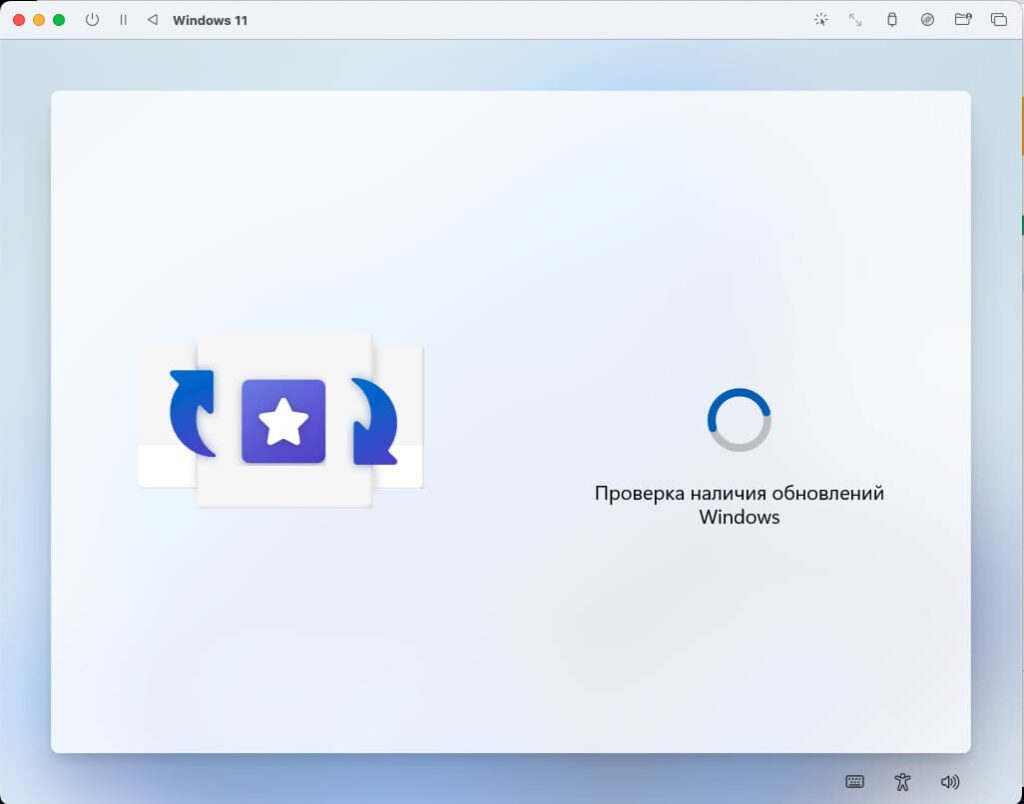
3) Начнется проверка обновлений, после которой виртуальная машина перезагрузится.
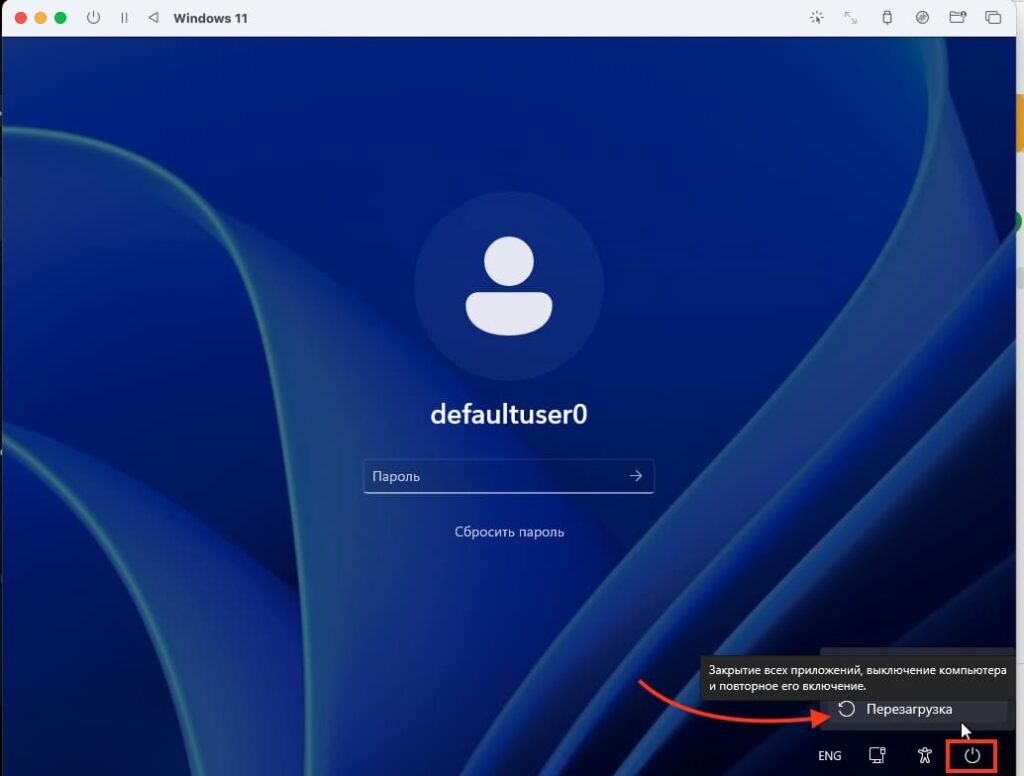
— У некоторых пользователей может сразу появиться вход в систему под неким defaultuser0, это стандартная ошибка Windows при установке когда вы еще не создали свою собственную учетную запись, просто Перезагрузите систему и настройка продолжится.
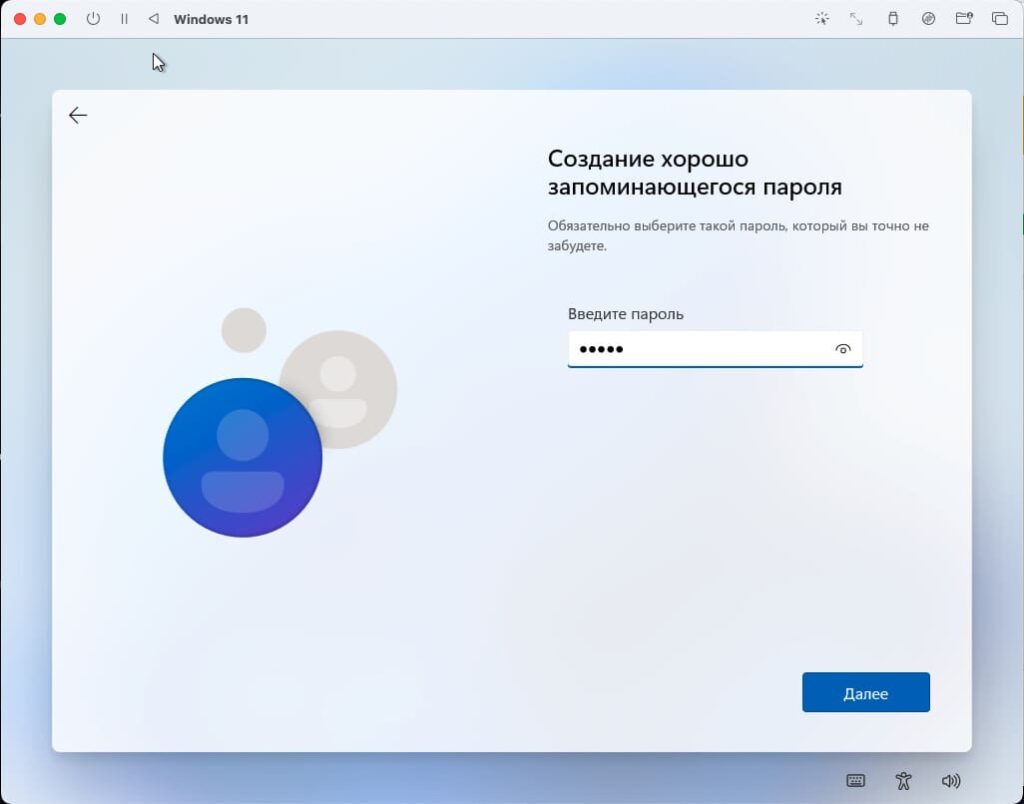
4) Введите имя вашей будущей Windows 11 и создайте пароль
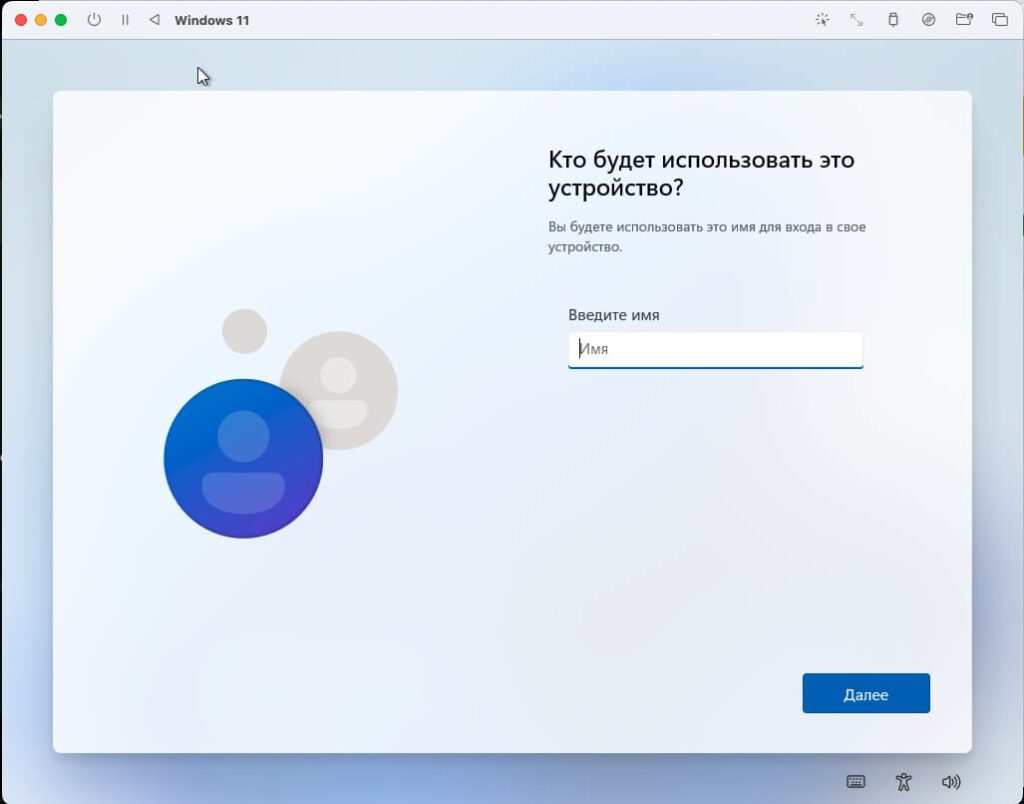
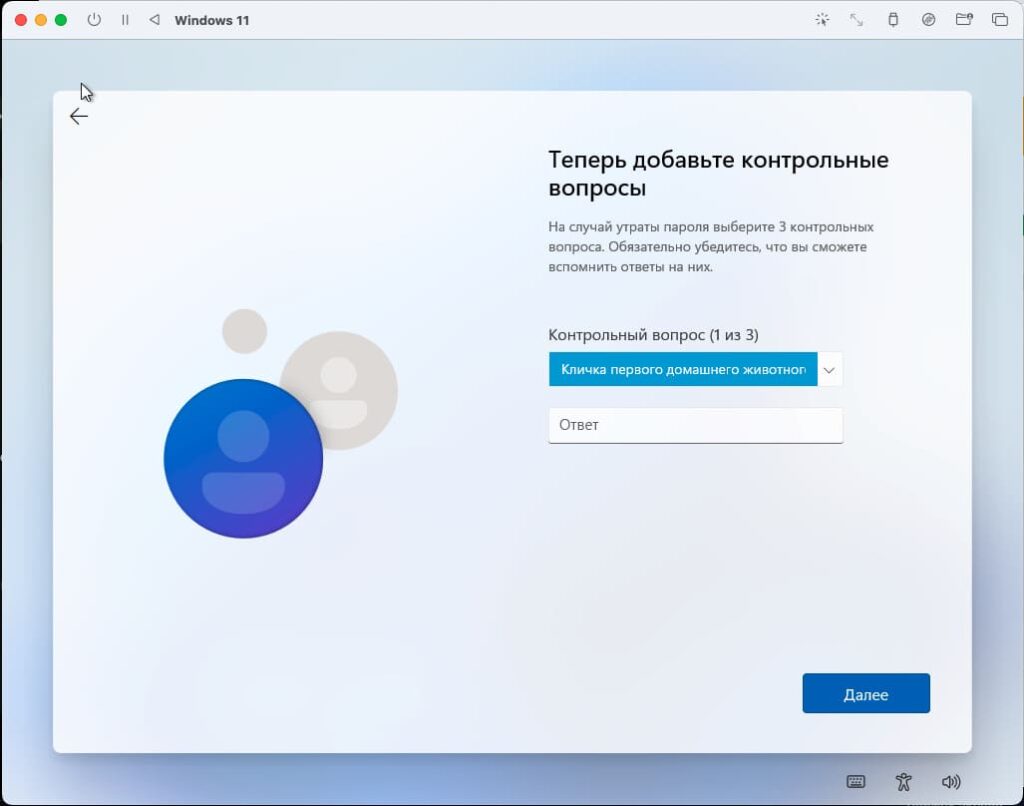
— Так же вас попросят создать 3 вопроса и 3 ответа на эти вопросы, для восстановления пользователя если вы забудете пароль.
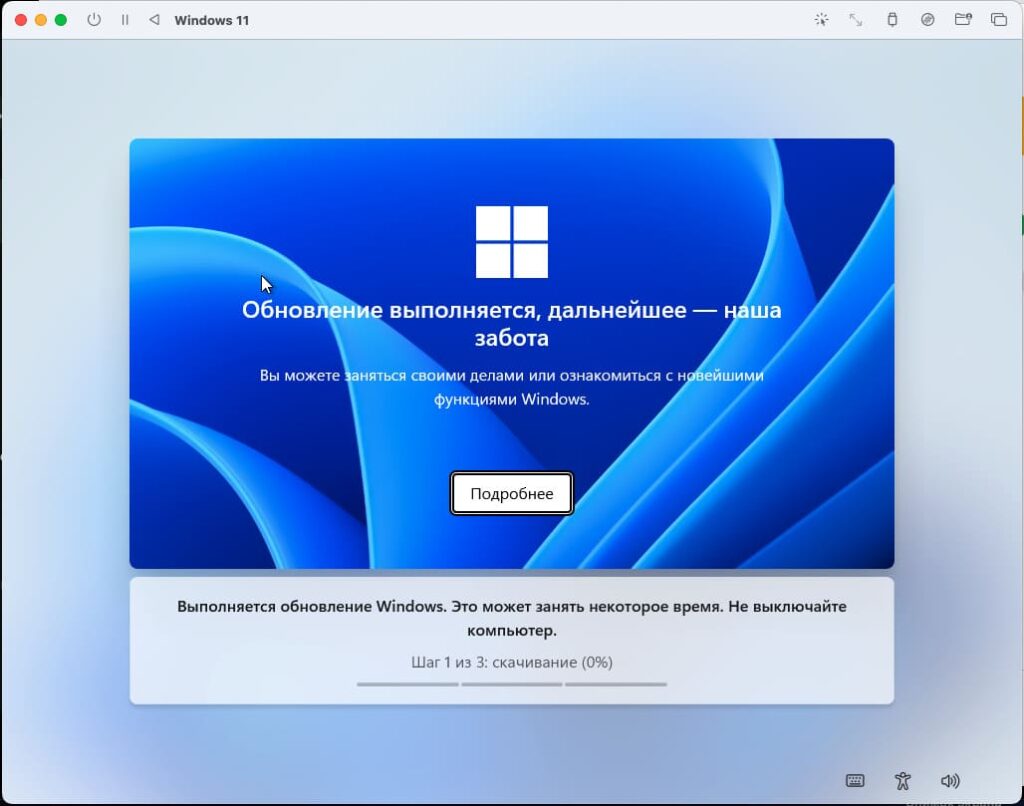
5) После чего начнется обновление и окончательная установка Windows 11 ARM, здесь нужно немного подождать.
6) Виртуальная машина перезагрузится и далее пустит вас в Windows, уже под вашим пользователем.
7) Начнется подготовка рабочего стола, это займет буквально пару минут

 По итогу Windows 11 ARM запустится и предложит вам установить драйвера, просто нажмайте Next и дождитесь окончания установки, после чего перезагрузите виртуальную машину..
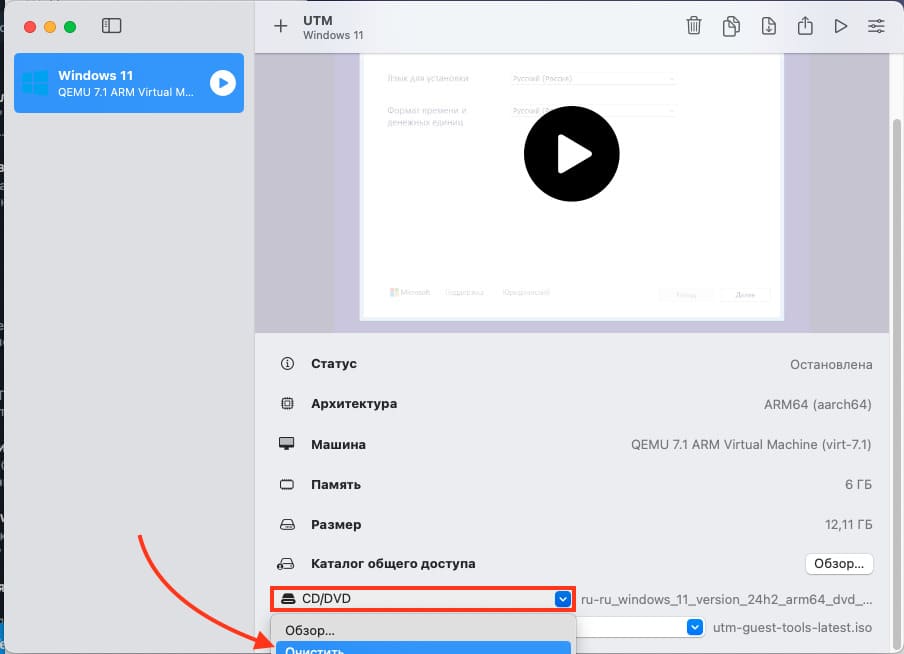
— Если этого не произошло, тогда перейдите в проводник и найдите там установщик драйверов в дисководе с названием UTM и запустите его вручную.
— Если вдруг после перезагрузки виртуальной машины, она открыла вам меню установщика Windows, вместо вашей уже установленной системы. В этом случае нужно очистить дисковод от iso образа, после этого виртуальная машина начнет запускать Windows, а не установщик.
9) Проверьте работу следующих функций:
— Интернет: убедитесь, что виртуальная машина имеет доступ к сети.
— USB: подключите USB-устройства и проверьте их работу.
— Папка обмена: используйте её для передачи файлов между Windows и macOS.
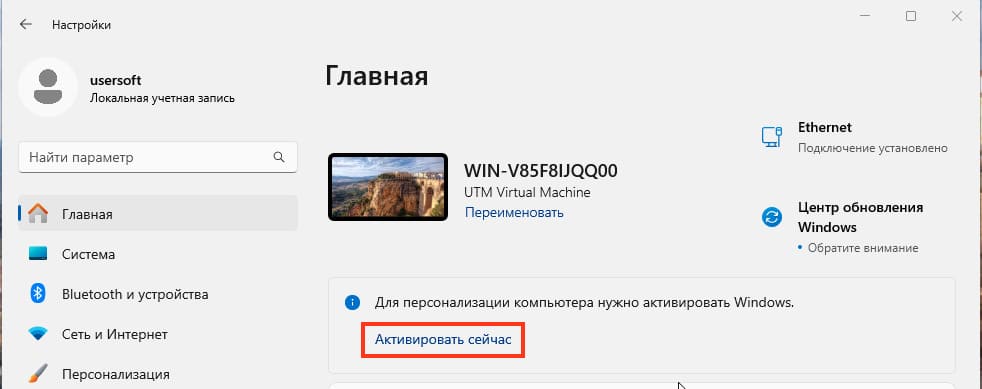
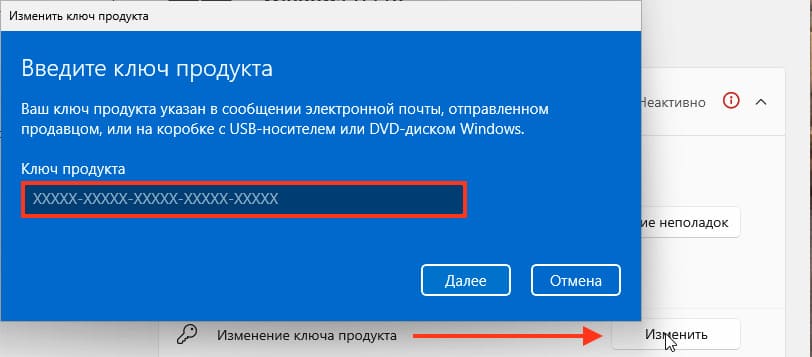
10) Активируйте вашу Windows для полноценного использования, перейдите в Параметры > Главная > Активировать сейчас, после чего «Изменить» и введи ключ активации, который вы можете приобрести у нас в каталоге от 1690 ₽.
Преимущества UTM
— Поддержка ARM-архитектуры, что обеспечивает быструю и стабильную работу Windows.
— Возможность гибкой настройки ресурсов виртуальной машины.
— Бесплатное использование без необходимости покупки лицензии.
Утилита UTM позволяет легко установить Windows на Mac с процессорами Apple Silicon. Это отличное бесплатное решение для тех, кто хочет пользоваться Windows на macOS без значительных затрат.
Thanks to the work of @agraf, @KhaosT, @imbushuo, and others, we have Virtualization.framework working on M1 Macs. These changes have been merged with QEMU v5.2.0 RC3 (will rebase once the final release is out) and integrated with UTM, a brand new QEMU frontend designed in SwiftUI for iOS 14 and macOS 11.
Downloads
- UTM
- Windows for ARM
- Windows 10 ARM.utm
- VirtIO Drivers
Usage
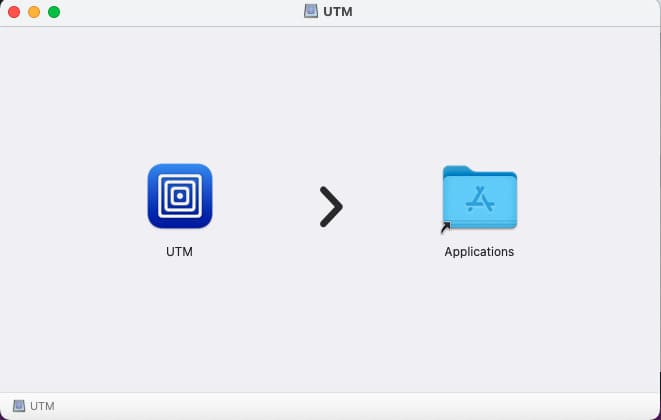
- Install UTM.app to your Applications directory.
- Copy/move
Windows10_InsiderPreview_Client_ARM64_en-us_20231.VHDXtoWindows 10 ARM.utm/Images/. - Double click
Windows 10 ARM.utmto import into UTM. - Click UTM -> Preferences in the menu bar and select «Try to use hardware hypervisor when available».
- By default the VM will allocate 8GB of RAM, you may want to lower that by configuring the VM if your Mac only has 8GB of RAM.
- Run the VM.
Install Network Drivers
These directions were taken from this gist.
-
Mount device drivers by selecting the VirtIO drivers ISO in the main window or from the toolbar.
-
Disable device driver signature enforcement:
Boot Windows, then right click Windows Start button, then select Command Prompt (Admin).
Use BCDEdit to enable test-signed device drivers.
Bcdedit.exe -set TESTSIGNING ONThen reboot Windows.
See here for the details.
-
Install driver:
Once Windows booted again, then right click Windows Start button, then select Device Manager.
In Device Manager, select View menu then Devices by Connection.
Navigate in the device tree, select
ACPU ARM64-based PC,Microsoft ACPI-Compliant System,PCI Express Root Complex, then you will see threeUnknown devicethere. Select the first one.
(There are manyUnknown devicein tree but the first one underPCI Express Root Complexis the VirtIO NIC.)Right click
Unknown devicethen select Update Drivers, then Browse my computer for drivers, then selectD:\NetKVM\w10\ARM64.Click Next to install
Red Hat VirtIO Ethernet Adapter.
Known Issues
BUGCODE_USB_DRIVERBSOD on boot: This happens sometimes and you can just reboot a few times and it will go away. This will be fixed in the next release.
Help & Support
Please report bugs and crashes to Github (after searching) to help improve the project! If you want help or to discuss the project, visit our Discord.
I talked on the show a while back about how the one downside to an M1 Mac is that you can’t run Windows, or at least not without a lot of faffing about. I was actually surprised that in Knightwise’s recording about how much value he’s getting from his M1 MacBook Air, he never mentioned that as a downside. Knightwise’s mantra is “making technology work for you” and the center of that is being a slider who can use the best tool for the job, rather than being fanatically attached to one company’s technology (like some people we know). He has touted the Mac as the best platform because he can run macOS, Linux, and Windows all on one piece of hardware.
When I asked him about this limitation of the M1 he said he didn’t see it as an issue (not sure why) but that he hadn’t yet looked into whether the open source virtual machine software VirtualBox would run on the M1, at least to run a Linux distribution (or distro as the cool kids say.)
I did a bit of poking around looking into what virtual machine software runs on the M1s and discovered that VirtualBox from Oracle and the commercial software VMware Fusion do not, but Parallels Desktop does. And then I discovered an open source virtual machine app I hadn’t heard of called UTM which runs on M1 and even on iOS. Sadly, it requires you to jailbreak your iOS device so I declined that opportunity but running this on macOS Big Sur sounded like good fun.
UTM project on GitHub:
UTM Website for macOS and iOS
Under the hood of UTM is QEMU, a decades-old, free and open source emulation software that is widely used and actively maintained. The value that UTM brings to QEMU is that it’s a graphical user interface not requiring a plethora of command line options and flags, so the learning curve is much more gentle.
I found an article by Steve Sande on the OWC blog where he walks through the steps to configure UTM on an M1 Mac, and install Windows on ARM for free, legitimately. As I mentioned before, Windows on ARM isn’t really supported to do this, and even if I succeed, apps would have to be compiled for 64-bit ARM to run on it. This makes this a fun experiment, possibly a colossal waste of time, and when I’m done I’ll have something I don’t need. Of course, that’s all the motivation I needed to proceed.
Let’s Do This!

I’m not going to go through the installation in detail, because Steve Sande does a fabulous job of it. He tells you what to download, how to configure it, and which buttons to push to make it go, all with screenshots to make sure it’s clear what he’s telling you to do. I will, however, go through an overview of how this works though so you have context for my discovery in going through his steps.
Virtual machine software works by creating an image that is the virtual machine. You need two things to make an image work properly: an operating system and what are called Guest Tools tailored to your hardware. Without the Guest Tools, your mouse and keyboard may not work, your WiFi won’t be recognized, perhaps sounds won’t come out of your speakers, and more.
To run Windows 10 for ARM64, it turns out Microsoft allows you a free download if you sign up for a free membership in the Windows Insider Program. Those are the words I wanted to hear so I signed up. The file you download has an extension of VHDX, which stands for Hyper V virtual hard disk.
Windows Insider Program ARM64 Preview Download
The UTM virtualization software points you to a gallery of operating system virtual machines you can download, which are mostly different distributions of Linux (which may be even more fun than running Windows). You will see the ARM64 version of Windows 10, but if you’re on an Intel-based Mac you can only run Windows 7 or Windows XP. Kinda weird that you can’t get Windows 10 on Intel but maybe Microsoft doesn’t let you have that one for free because it’s actually useful!
Steve’s instructions walk you through how to configure a virtual machine, including setting the architecture to ARM64, choosing how much RAM to allocate, how to create the virtual disks for the operating system, and the Guest Tools, which for UTM are called Spice Guest Tools to make it work with your hardware.
And it Went Horribly Wrong

When Steve explains how to add drives, he shows how to point to the Windows 10 OS that you’ve already downloaded from Microsoft. Then he explains how to create a virtual CD/DVD Drive and point it to the Spice Guest Tools. As soon as I pointed to the Spice Guest Tools, UTM crashed.
When I opened UTM back up, my image for Windows hadn’t been preserved. No worries, it’s just a few steps. As soon as I tried to point it at the Windows VHDX file, I got an error saying that it couldn’t be copied to images because an item with that name already exists. I was faced with some temporary file not having gotten flushed when it crashed, but where on earth would I find this temp file?
Luckily, UTM is an open source project on GitHub, and under the Issues tab, I found Morac2 describing the same issue. Even luckier, Morac2 figured out where this temporary file was so I could delete it and try again.
Github issue 2576 – Spoiler, the file is in $TMPDIR/com.utmapp.UTM/Images
On my second time through the image creation instructions from Steve, I was able to save without a crash. However, when I tried to point at the Spice Guest Tools on the virtual removable drive, I got another error saying it couldn’t restore removable drives.
Ok, back to the Googles and I found someone with the same problem and they were advised to clear the Spice Guest Tools from the CD/DVD and try booting to Windows without it. Presumably, that would get a clean boot into Windows and then we could back out and try the Spice Guest Tools again.
Sadly, after getting stuck at the boot loader for ages and ages, I got a Microsoft stop code of INACCESSIBLE BOOT DEVICE and that it was going to restart. Which just happened over and over again. I believe, based on the baby blue background, that I was experiencing a blue screen of death.
As much fun as this was, I decided it was time to abandon that whole path and see if I could get something normal like Ubuntu to install.
Ubuntu 20.04

From the UTM gallery, I downloaded the Ubuntu 20.04 image, but it directed me to download Ubuntu server. I didn’t want Ubuntu server, so I hunted down the Ubuntu desktop operating system for ARM on my own. Not hard but it was another step. The step-by-step instructions on the UTM website were super easy to follow. And yet, I was unable to boot into Ubuntu.
I went back to the beginning of the instructions on the UTM website and realized that to use UTM with Ubuntu, you install the server first and then install the desktop version from there. Convoluted much?
I created the VM again, and as soon as I tried to point to the OS installer, it said I didn’t have permissions to “Images”. Well, that makes no sense, you let me access them a minute ago, how could permissions have changed like that? Let’s just turn it off and on again. I quit UTM and reopened and then it let me point at the Ubuntu Server ISO file. Yay.
Now I’ve got my Ubuntu VM configured exactly per the instructions, even including changing the icon to look like Ubuntu. And when I hit the big play button … it fails to load and gets stuck at the UEFI Interactive Shell. The only thing on this entire page I recognize is the acronym EFI, which is what firmware on a Mac is called.

At this point, someone with less fortitude (or more common sense) would have given up, but not me. Off to the Googles yet again and I find this issue on the UTM app’s GitHub pages as well. The interesting thing is that one of the developers tests a fix, closes the issue and then shortly after that reopens the issue because the failure didn’t go away. Luckily, he posted a fix in the troubleshooting section of the Ubuntu installer page for UTM.
GitHub Issue 2333
Workaround: mac.getutm.app/gallery/ubuntu-20-04#troubleshooting
You’re going to love the answer. All I had to do is verify that I saw FS0: Alias(s):CD0h0a0a::BLK1: at the top of the UEFI Interactive Shell window, then type in fs0:\efi\boot\bootaa64.efi and then I should see GRUB and be able to select Ubuntu Server. You know that’s what I was thinking of typing, just good to verify, right?
I typed in that bunch of glop I don’t understand and the shell came back with the response Command Error Status: Unsupported. I’m not joking.
My only move after that was to make a comment on the GitHub issue on the topic and move along.
How about ArchLinux for ARM?

I just could not let this go without getting ONE operating system to work as a VM with UTM. I looked at all of the other options and chose ArchLinux ARM, mostly because I’d never heard of it. Unlike Ubuntu where it gave the an ISO image of the OS, ArchLinux gave me a .utm file which is a fully-configured virtual machine, so I double clicked it. It opened inside UTM and I didn’t have to do any setup at all.
UTM for ArchLinux for ARM: https://mac.getutm.app/gallery/archlinux-arm
I clicked the play button and it typed a lot of unixy-looking glop on screen for me, pausing for dramatic effect from time time time and then starting to change again. And then it stopped changing for a really long time. I hit the enter key just for grins and giggles.
It responded with alarm login:. Well, on the download page it says the username and login are root and root so what the heck, I’ll try that.
It spat a bunch more glop on screen including a whole bunch of process ids, none of which made any sense to me, and ended with a simple command line prompt that says [root@alarm ~]#. And again, I’m stuck. Remember how this UTM software was supposed to hide the command line work that I would have had to do in QEMU? Yeah, not so much.
Debian ARM (Xfce)

I was determined that I was not going to let this virtual machine software defeat me. I kept plowing ahead and moved on to try Debian ARM (Xfce). Evidently this Xfce version of Debian is intended to be a lightweight desktop environment, which sounded fun. Debian also downloaded as a fully-configured UTM file and with a double click I was off to the races.
You’re not going to believe this, but it worked. I was as shocked as you are. It simply booted up and I was in Linux! The screen resolution was super low so I found in settings how to change the display and it looked grand. I opened up Firefox and navigated to podfeet.com (as one does) and it looked dandy.
But then when I went to move the window around, the screen tearing was simply awful. I thought maybe it was because the default installation was set to only 2GB of RAM, so I changed it to 8GB but that had no effect. Then I realized there isn’t a guest tools installer for this distribution. I did a short hunt for them online, but I have to admit that after spending about 3 hours on this little project, it wasn’t my best effort. I never did find the guest tools but I declared victory and ended my little project.
And Yet…

And yet there was still a little niggle in my brain that said the instructions from Steve Sande should have worked to install Windows on Arm. Earlier in some of my googling I’d run across a video about installing Windows on the M1 using UTM by someone who goes by the name Mr. Macintosh and I decided to watch his video to see if there was something I missed.
About 3.5 minutes in he hit the spot where I realized my mistake. In Steve Sande’s instructions, he clearly said that when adding the drive in the virtual machine for Windows that you had to choose NVMe as the interface. I’m 100% certain I did that the very first time, but I’m relatively certain I didn’t remember to set that in any of my subsequent attempts. I’m pretty sure I left it at the default of VirtlO, whatever the heck that is.
I had to try just one more time. And guess what? It WORKED! I had to answer a whole bunch of annoying Windows questions like three security questions that I bet 100% of you could answer with about a minute of googling, but then I was in. (And no, of course, I didn’t tell the truth on the security questions.) Once I had Windows 10 up in UTM, and I got a screenshot so I could prove it worked, it was time to get it working even better. The first improvement I wanted to make was to raise the screen resolution as it defaulted to 640×480. Mr. Macintosh gave instructions on how to interrupt the boot-up of the VM and get to the Device Manager to change the preferred resolution all the way up to a maximum of 1024×768.
I did that, rebooted…and Windows failed to launch. It gave me a blue screen of death with the beloved Stop code: 0xc00002e3 which evidently means “something has gone horribly wrong.” I tried booting into the Device Manager and undoing the crime of setting my screen resolution higher than a postage stamp but Windows was clearly mad at me and refused to boot. I started from scratch. Again.
After the new VM was created, it booted just fine, albeit at 640×480 but I left that well enough alone. The VM wasn’t recognizing my wired or wireless Ethernet cards, so I decided to try to get that sorted. A VM without networking isn’t much fun. I shut down Windows, closed the VM, and went into settings and found a Network tab in UTM where I could choose my real network card. Great! When I restarted Windows it blue screened again.
Through repeated experiments, I determined that Windows 10 is one-time use if running in UTM on an M1 Mac mini. I circled back with Steve Sande and he dusted off his Windows 10 installation in UTM from last March when he wrote the article, and he confirmed that he now gets a blue screen of death as well.
I opened an issue on GitHub and he added his configuration and information to my issue. It would have been nice if Steve had said, “You dummy, you forgot to…” But getting confirmation that something is broken is the second-best thing.
GitHub issue 2646
One More Thing
I was finishing up this article after finally calling it quits when Steve Sande mentioned that he did get Ubuntu working with UTM. You know what I had to do, right? I simply had to try again. I’ll not take you through all of it but after a few fits and starts that took maybe only another couple of hours, I actually got it working too. In fact, I did the write-up here about Ubuntu from inside the Ubuntu 20 virtual machine on UTM.

I’m pretty chuffed that I got it working, and it’s better than anything else I tried, but it does have the same screen tearing problem that I had with Debian. Networking is working, and I can play audio through it, and I can even copy and paste between macOS and Linux. I haven’t figured out how to install apps yet, but as soon as I do, I’ll be installing 1Password now that it’s available for Linux. I don’t need Linux but it sure is fun to be able to play with it.
Bottom Line
I couldn’t get Windows to run in a VM which was my original goal, but at least I finally got a workable Linux VM to run. I think I should put a pin in this by taking you back to one of the first things I said: “This makes this a fun experiment, possibly a colossal waste of time, and when I’m done I’ll have something I didn’t need.”