
(Image credit: Future)
Windows 10 makes it easy to connect to a network and the internet using a wired or wireless connection. However, sometimes, you may still need to manually manage settings or troubleshoot connectivity problems, which is when the built-in command-line tools can come in handy.
Regardless of the issue, Windows 10 will likely have a Command Prompt tool to help you resolve the most common problems. For instance, ipconfig and ping are among the most important tools for viewing network settings and troubleshooting connectivity issues. If you are dealing with a routing problem, the route command can display the current routing table to examine and determine related problems, and with the nslookup tool, you can diagnose DNS problems.
You also have tools like arp to troubleshoot switching problems and determine the MAC address from an IP address. The netstat command-line tool allows you to view statistics for all the connections. And you can use the netsh tool to display and change many aspects of the network configuration, such as checking the current configuration, resetting settings, managing Wi-Fi and Ethernet settings, enabling or disabling the firewall, and a lot more.
This guide highlights eight Command Prompt tools that should help you manage and troubleshoot networking problems on your device and across the network.
1. IPConfig
On Windows 10, ipconfig (Internet Protocol configuration) is among the most common networking tools that allow you to query and show current TCP/IP (Transmission Control Protocol/Internet Protocol) network configuration. The command also includes options to perform different actions, such as refreshing Dynamic Host Configuration Protocol (DHCP) and Domain Name System (DNS) settings.
Display network configuration
To get started with ipconfig on Windows 10, use these steps:
All the latest news, reviews, and guides for Windows and Xbox diehards.
- Open Start.
- Search for Command Prompt, right-click the top result, and select the Run as administrator option.
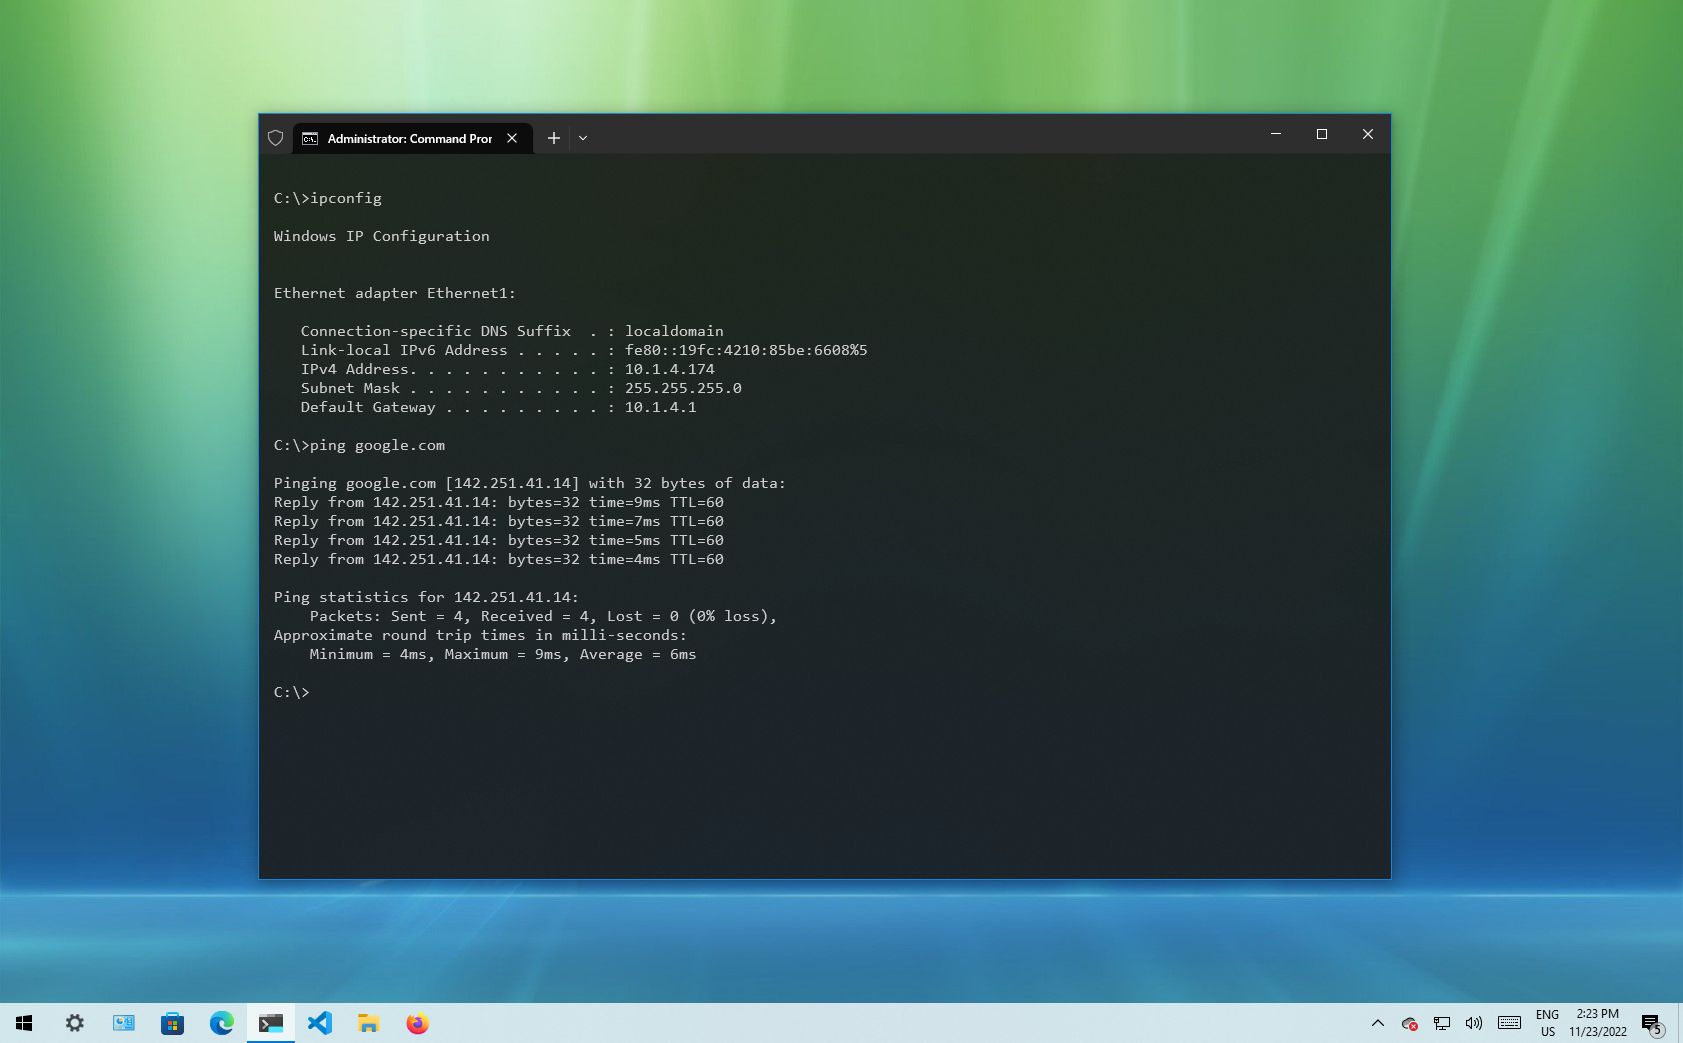
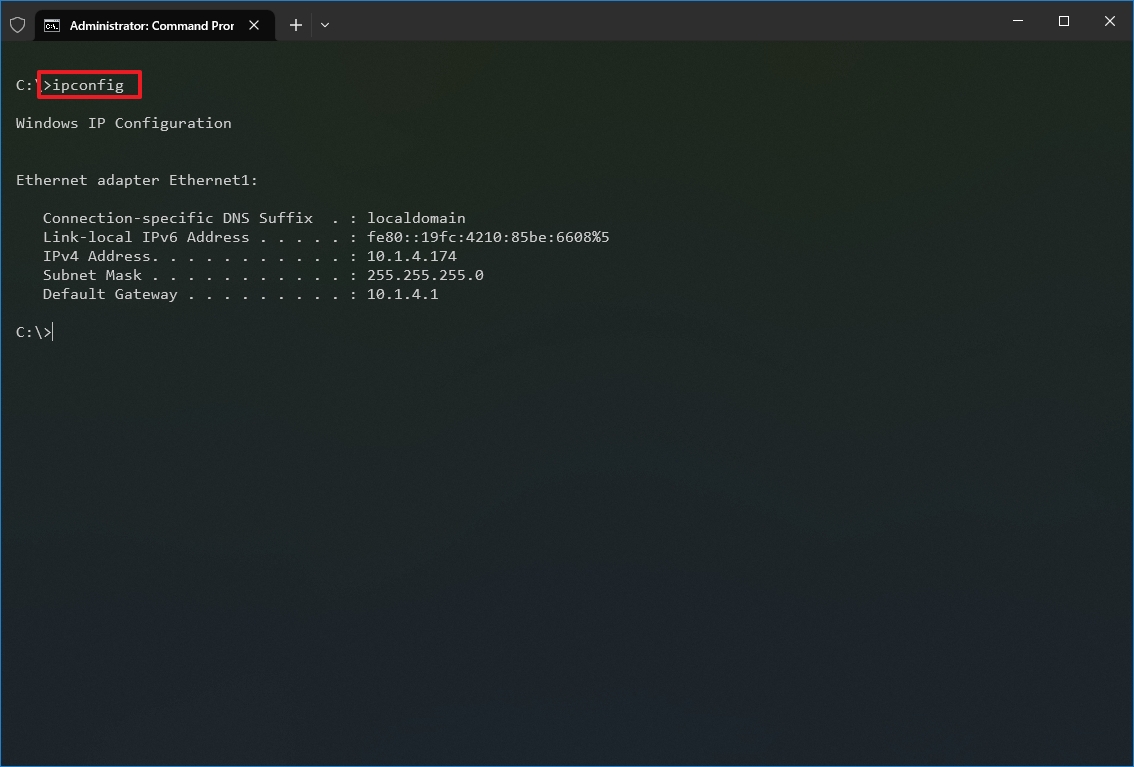
- Type the following command to view a summary of the TCP/IP network configuration and press Enter: ipconfig
- Quick tip: In Command Prompt, you can use the CLS command to clear the screen after you no longer need the information to continue running commands without clutter.
- Type the following command to view the complete TCP/IP network configuration and press Enter: ipconfig /all
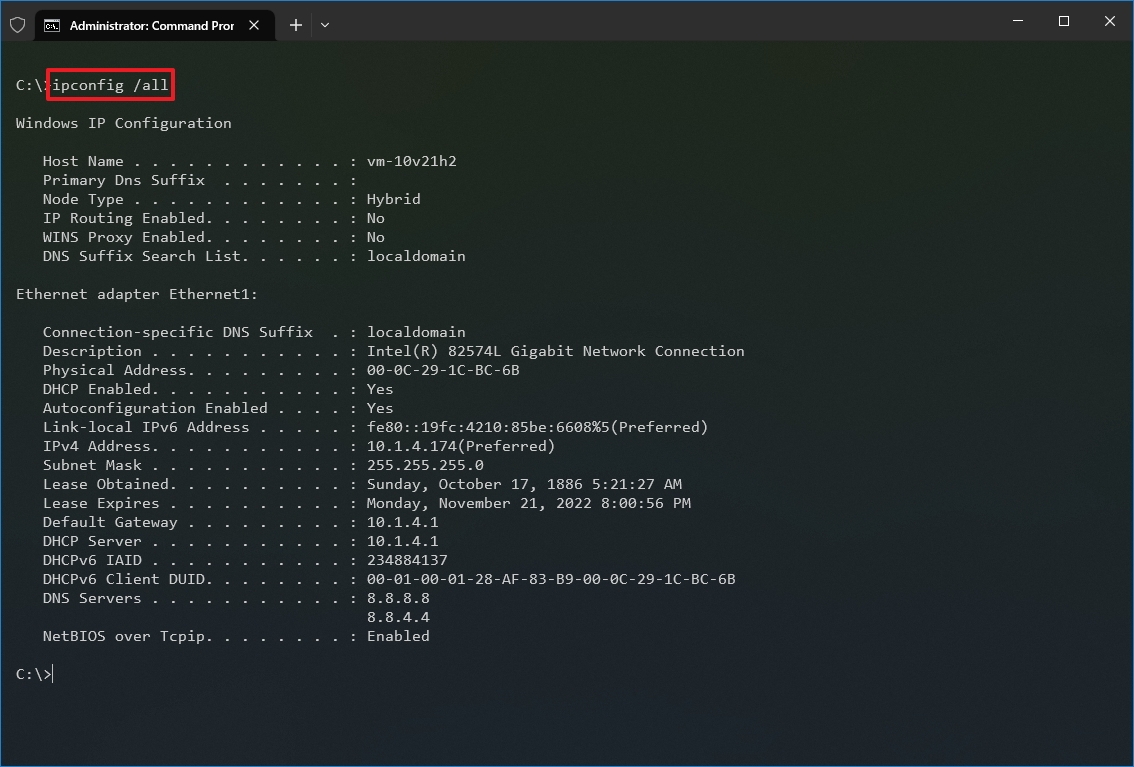
Once you complete the steps, you will have an overview of the PC’s entire TCP/IP configuration.
Refresh network settings
To release and renew the network configuration with Command Prompt, use these steps:
- Open Start.
- Search for Command Prompt, right-click the top result, and select the Run as administrator option.
- Type the following command to remove the current network configuration and press Enter: ipconfig /release
- Type the following command to reconfigure the network configuration and press Enter: ipconfig /renew
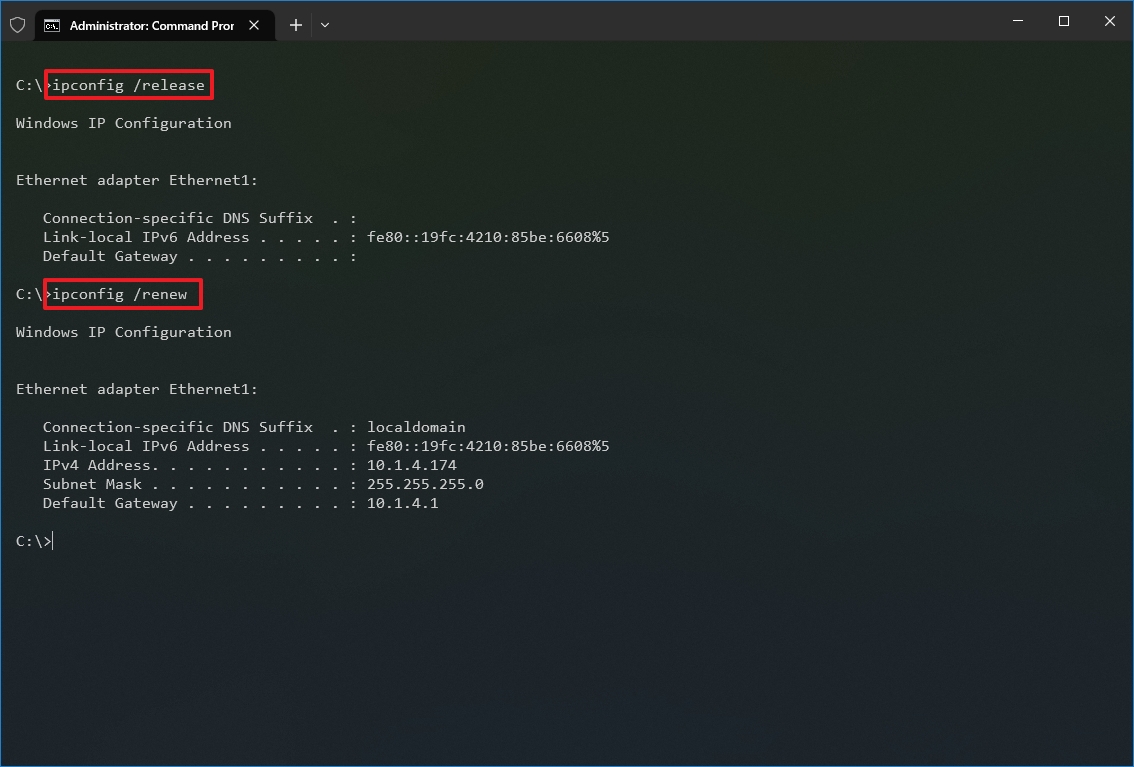
After you complete the steps, the first command will clear the current configuration, and the second command will fetch new settings from the DHCP server to resolve connectivity issues. If the dynamically assigned settings have not expired in the server, it is common to see the same IP address reconfigured on the device.
Refresh DNS settings
To flush and rebuild the current DNS cache entries on Windows 10, use these steps:
- Open Start.
- Search for Command Prompt, right-click the top result, and select the Run as administrator option.
- Type the following command to clear the DNS system cache on the device and press Enter: ipconfig /flushdns
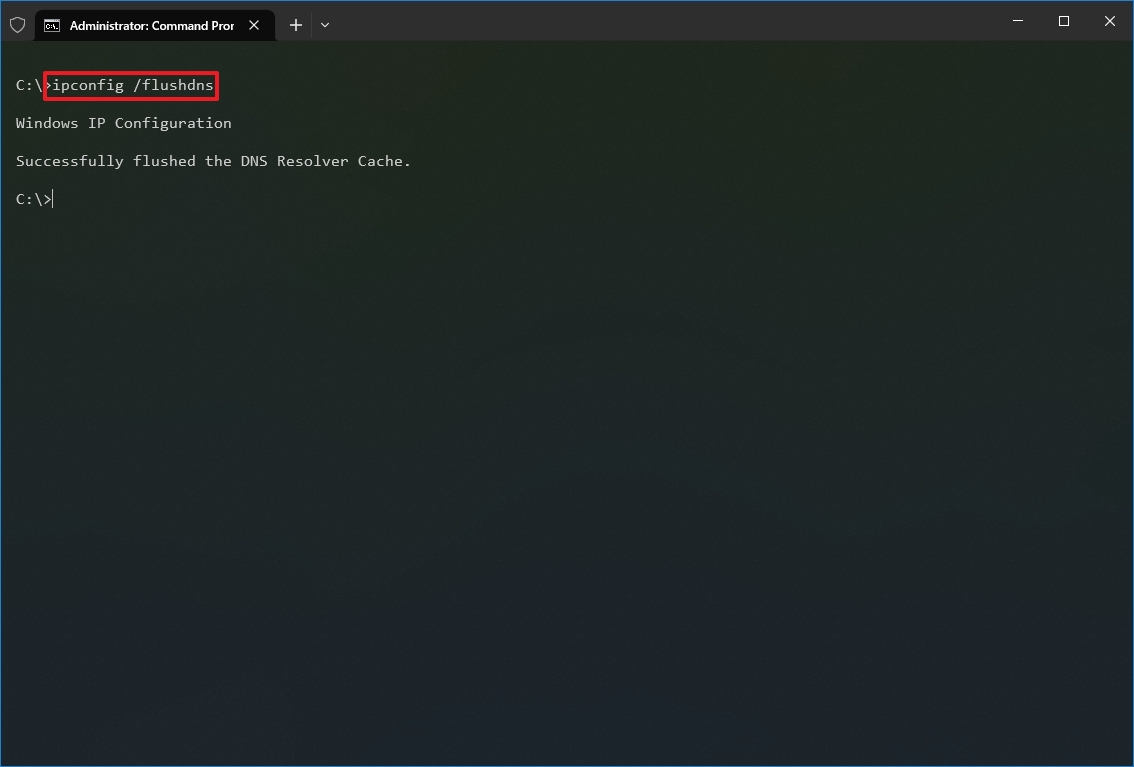
Once you complete the steps, the entries stored in the DNS cache of Windows 10 will be deleted and refreshed. Usually, this command will come in handy when you cannot connect to another computer or website using the host or domain name due to outdated information in the local cache.
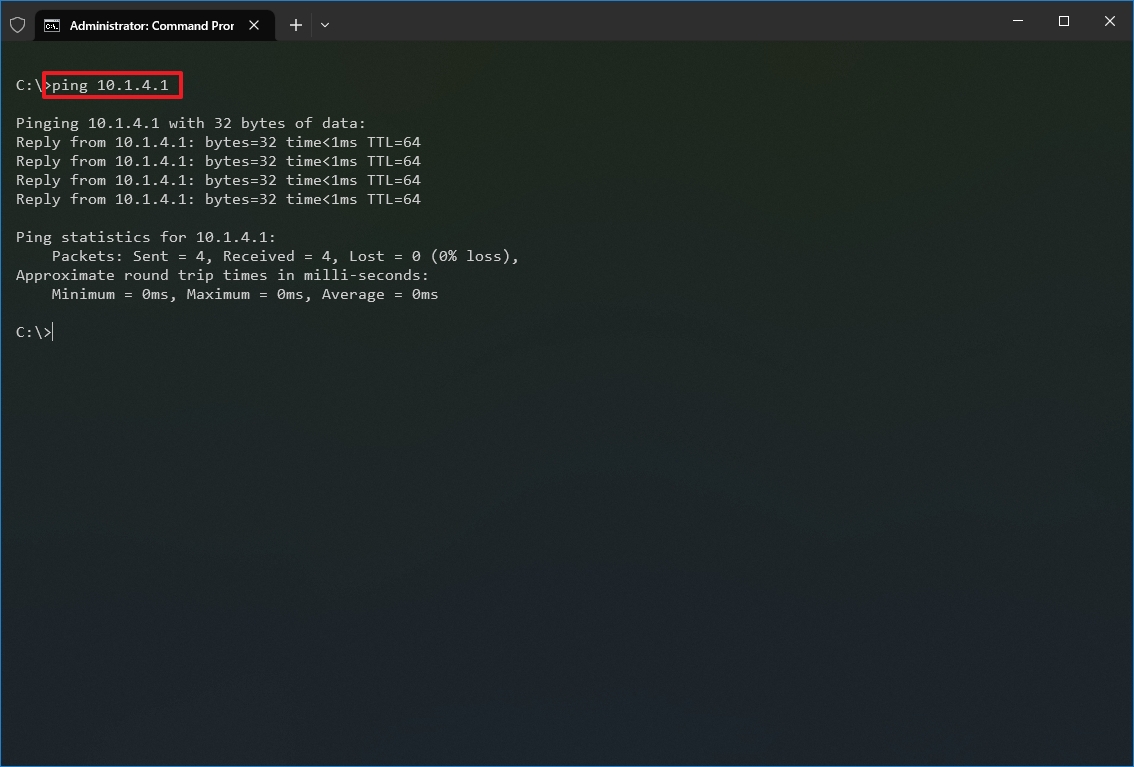
2. Ping
Ping is another essential networking tool because it allows you to send ICMP (Internet Control Message Protocol) echo request messages to test the IP connectivity with other devices, whether it is another computer in the network or internet service.
Test device connectivity
To test the network connectivity with the ping command on Windows 10, use these steps:
- Open Start.
- Search for Command Prompt, right-click the top result, and select the Run as administrator option.
- Type the following command to send ICMP echo requests to test connectivity and press Enter: ping IP-OR-DOMAIN
In the command, replace IP-OR-DOMAIN with the actual IP address or domain name of the computer or service you want to test. For example, this command tests the communication between the local device and router: ping 10.1.4.1
- Quick tip: If you use the -a option (for example, ping -a 10.1.4.1), the command will also resolve the address to a hostname.
- (Optional) Type the following command to test the local computer networking stack and press Enter: ping 127.0.0.1 or ping loopback
- Quick note: The 127.0.0.1 is a well-known address, and it is referred to as the loopback address. When you run the command, if you get a reply, it means that the networking stack on Windows 10 is up and running. This is the same as pinging the device using its own network address.
Once you complete the steps, receiving four successful echo replies from the destination means the device can talk with the remote host. If the request times out, there is a problem between the host and the remote device.
If you are dealing with connectivity problems, start pinning the local computer to ensure the network stack is working. Then test the router’s connection to ensure the issue is not in the local network. Then try to ping a website to find out whether there is a problem with the internet connection or the remote host.
You should also know that the ping command will always time out if the remote device or service blocks the ICMP protocol.
Diagnose packet loss activity
The ping command includes many options that you can access with the «ping /?» command, and one of these options is the ability to set the time you want to run the tool, which can come in handy to examine packets lost when you are troubleshooting connectivity problems.
To run the ping command for a specific period, use these steps:
- Open Start.
- Search for Command Prompt, right-click the top result, and select the Run as administrator option.
- Type the following command to continue pinging until stopped and press Enter: ping IP-OR-DOMAIN -t
In the command, replace IP-OR-DOMAIN with the actual IP address or domain name of the computer or service you want to test. For example, this command tests the communication between the local device and router: ping 10.1.4.1 -t
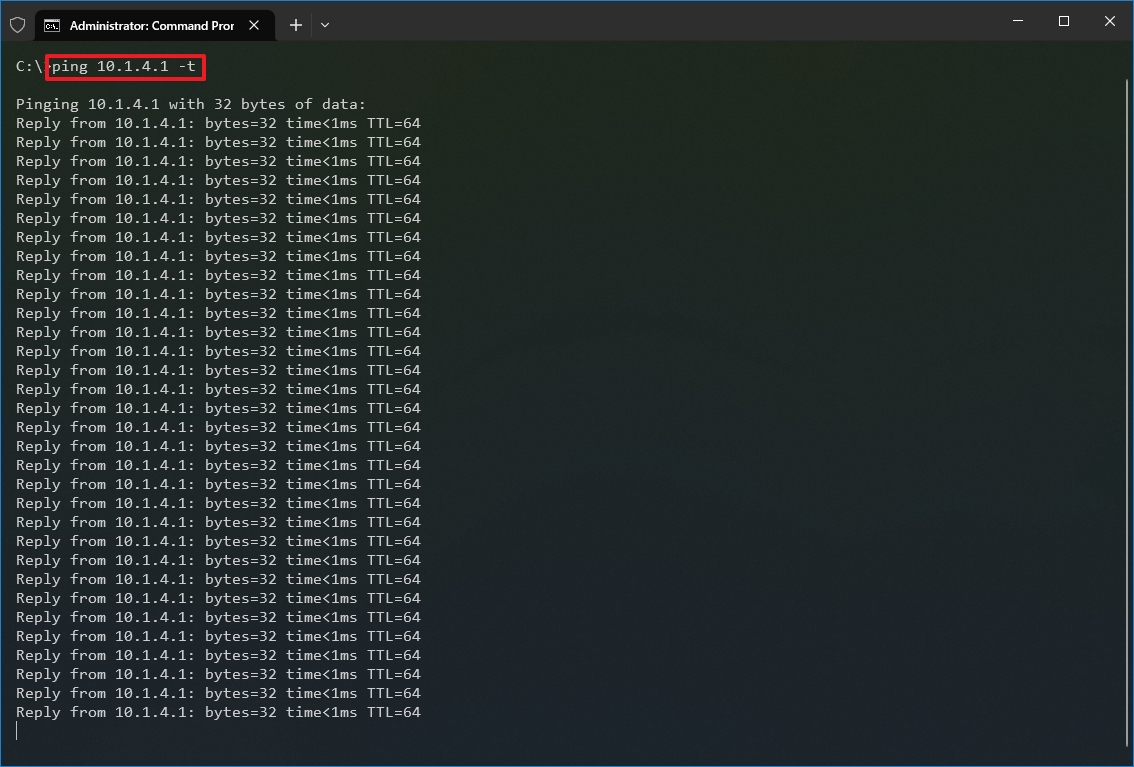
- Use the «Control + C» keyboard shortcut to stop the ping.
After you complete the steps, you will be able to see the successful and lost requests that can give you a clue on how to continue troubleshooting and resolving the connectivity problem. Administrators usually use the ping command in a local network to find out when a service goes down quickly. Also, the tool can be used as a quick way to know when the server is up and running again when restarting a server remotely.
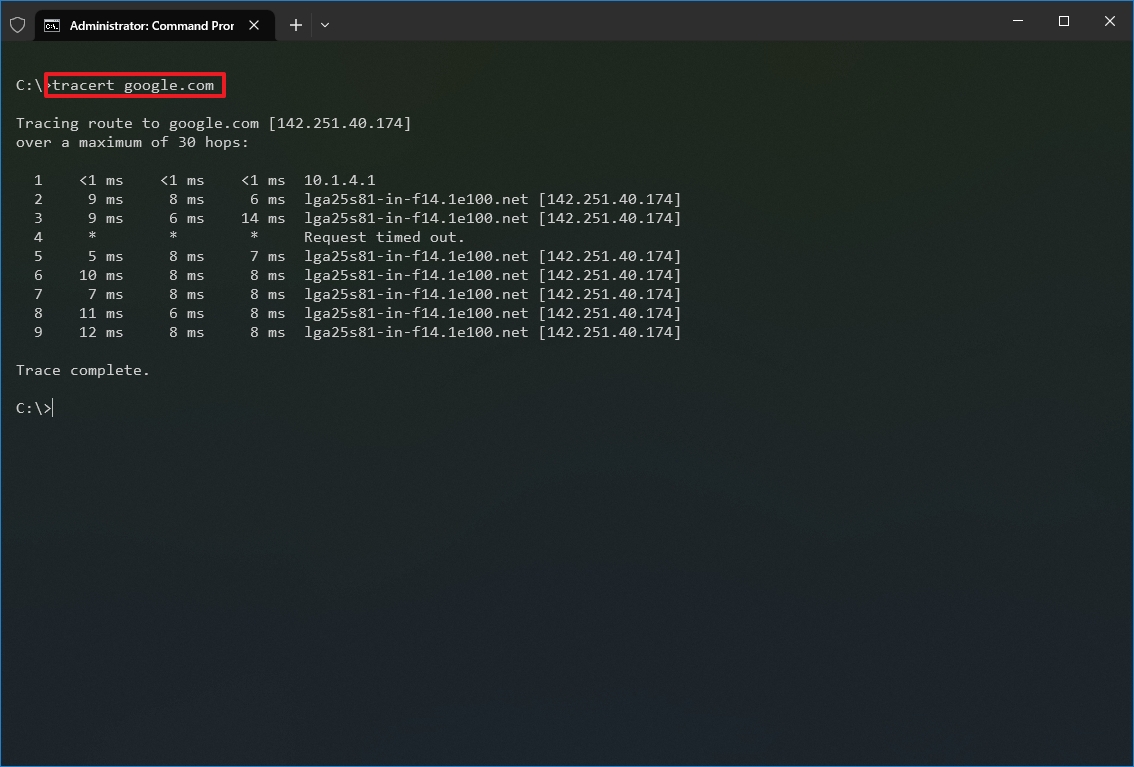
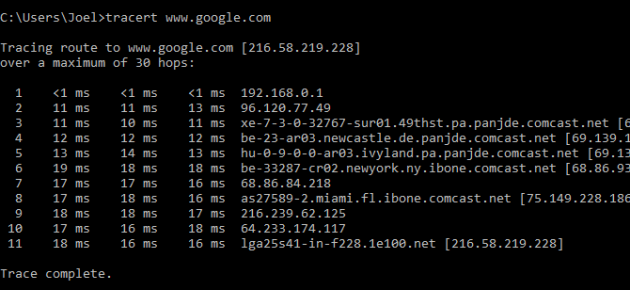
3. Tracert
Windows 10 also includes tracert (Trace Route), a diagnostic tool to determine the network path to a destination using a series of ICMP echo requests. However, unlike the ping command, each request includes a TTL (Time to Live) value that increases by one each time, allowing to display of a list of the route the requests have taken and their duration.
To trace the route to a destination with Command Prompt on Windows 10, use these steps:
- Open Start.
- Search for Command Prompt, right-click the top result, and select the Run as administrator option.
- Type the following command to understand the path taken to the destination and press Enter: tracert IP-OR-DOMAIN
In the command, replace IP-OR-DOMAIN with the actual IP address or domain name for the destination you want to troubleshoot. For example, this command allows you to view the path the packets are taking to reach Google.com: tracert google.com
- (Optional) Type the following command to adjust the hop counts to the destination and press Enter: tracert -h HOP-COUNT IP-OR-DOMAIN
In the command, replace IP-OR-DOMAIN with the actual IP address or domain name for the destination you want to troubleshoot and HOP-COUNT for the number of hops you want to trace. For example, this command puts the limit of 5 hops (nodes) to the destination: tracert -h 5 google.com
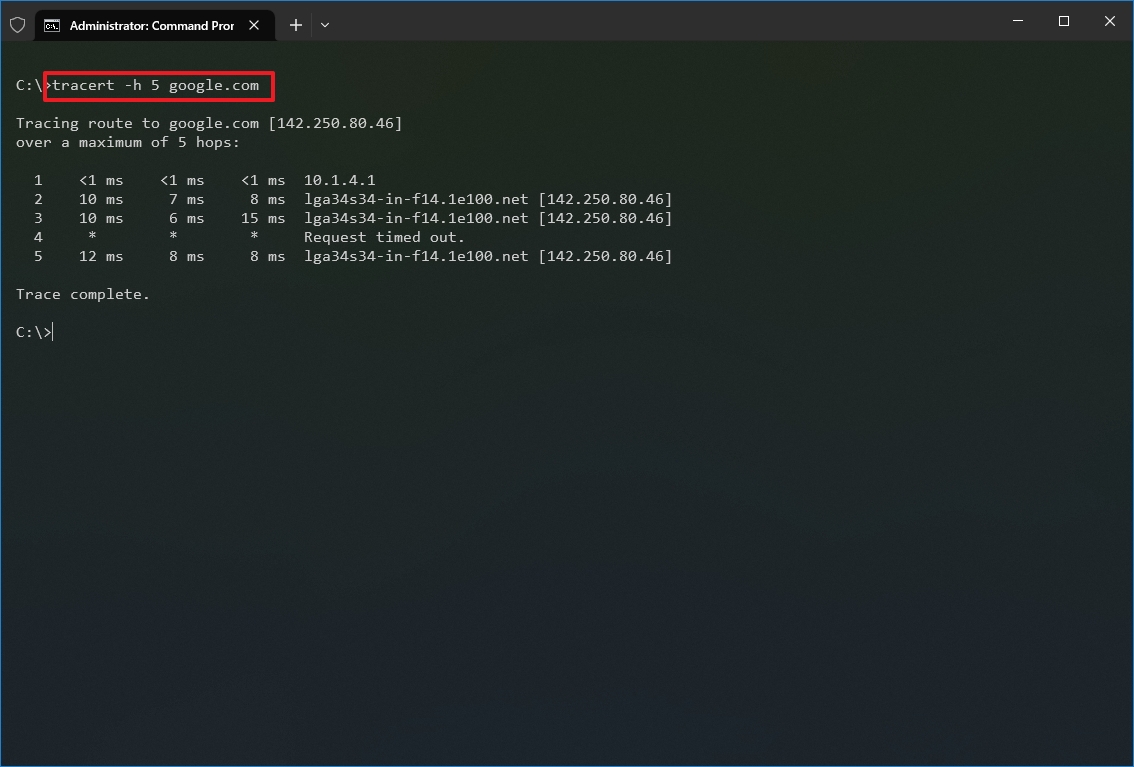
Once you complete the steps, you will know if the destination is reachable or if there is a networking problem along the way.
Similar to the ping tool, tracert includes several options, which you can view with the «tracert /?» command.
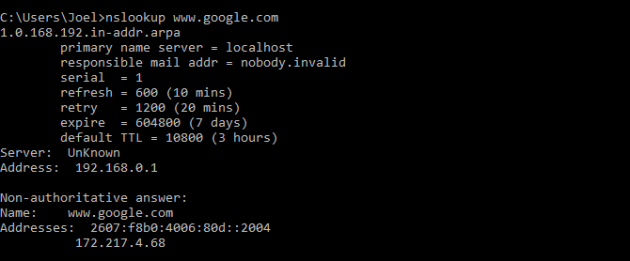
4. NSLookup
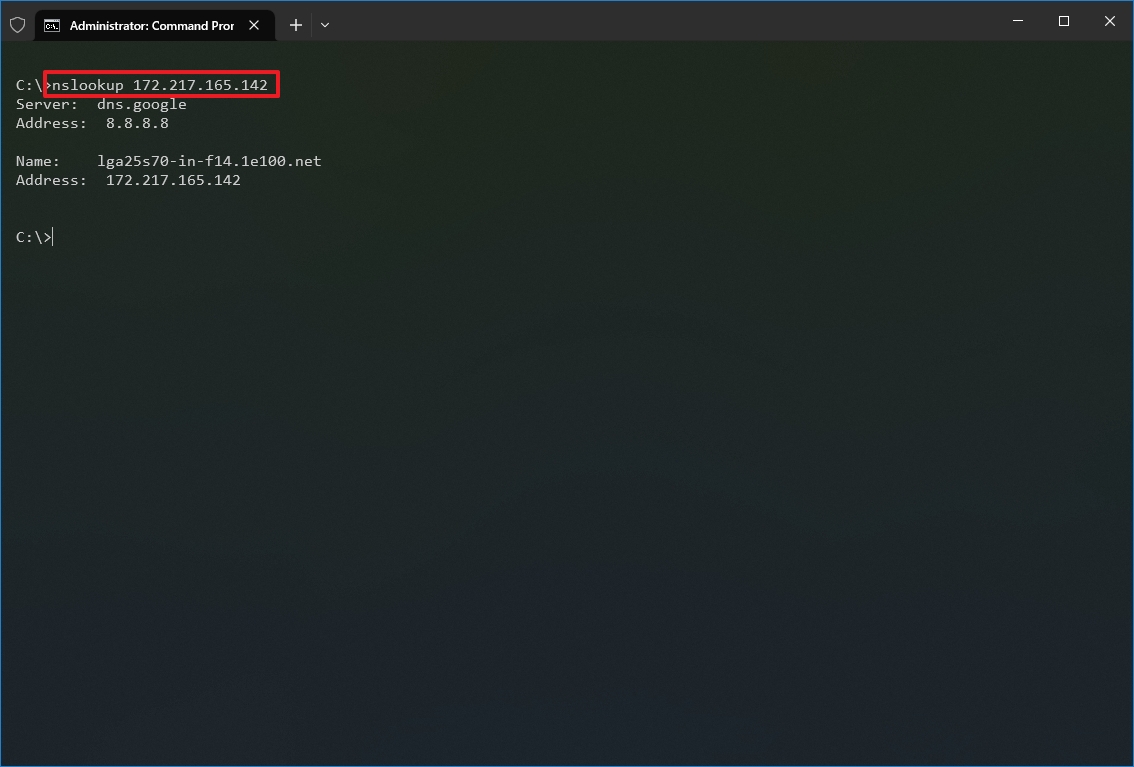
The nslookup (Name Server Lookup) tool can show valuable details to troubleshoot and resolve DNS-related issues. The tool includes an interactive and non-interactive modes. However, you will be using the non-interactive mode more often than not, which means you will type the full command to obtain the necessary information.
You can use this command to display the default DNS name and address of the local device and determine the domain name of an IP address or the name servers for a specific node.
To get started with nslookup on Windows 10, use these steps:
- Open Start.
- Search for Command Prompt, right-click the top result, and select the Run as administrator option.
- Type the following command to look up the local DNS name and address and press Enter: nslookup
- Quick note: This command also happens to open the nslookup interactive mode.
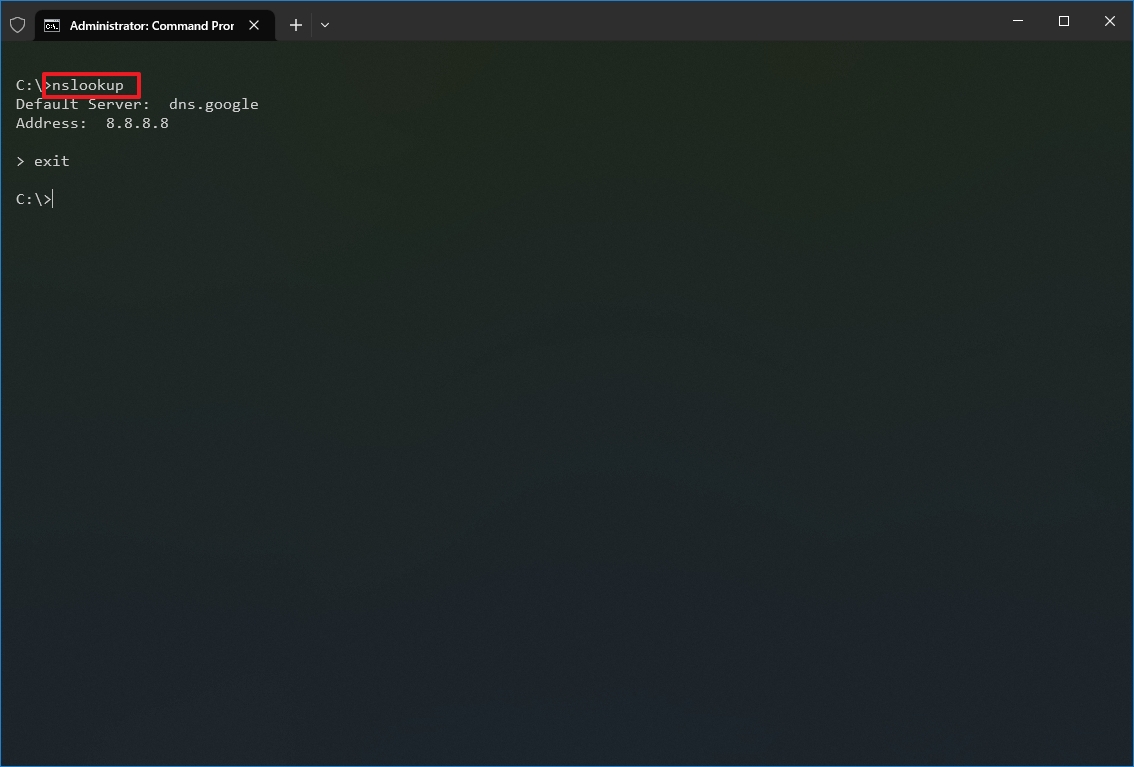
- Confirm the current DNS information.
- Type the following command to exit the interactive mode and press Enter: exit
- Type the following command to determine the name and address of a specific server and press Enter: nslookup IP-ADDRESS
In the command, replace the IP-ADDRESS with the address of the remote device. For example, this command looks up the IP address 172.217.165.142 address: nslookup 172.217.165.142
- Type the following command to determine the address of a specific server and press Enter: nslookup DOMAIN-NAME
In the command, replace the DOMAIN-NAME with the address of the remote device. For example, this command looks up the IP address Google.com address: nslookup google.com
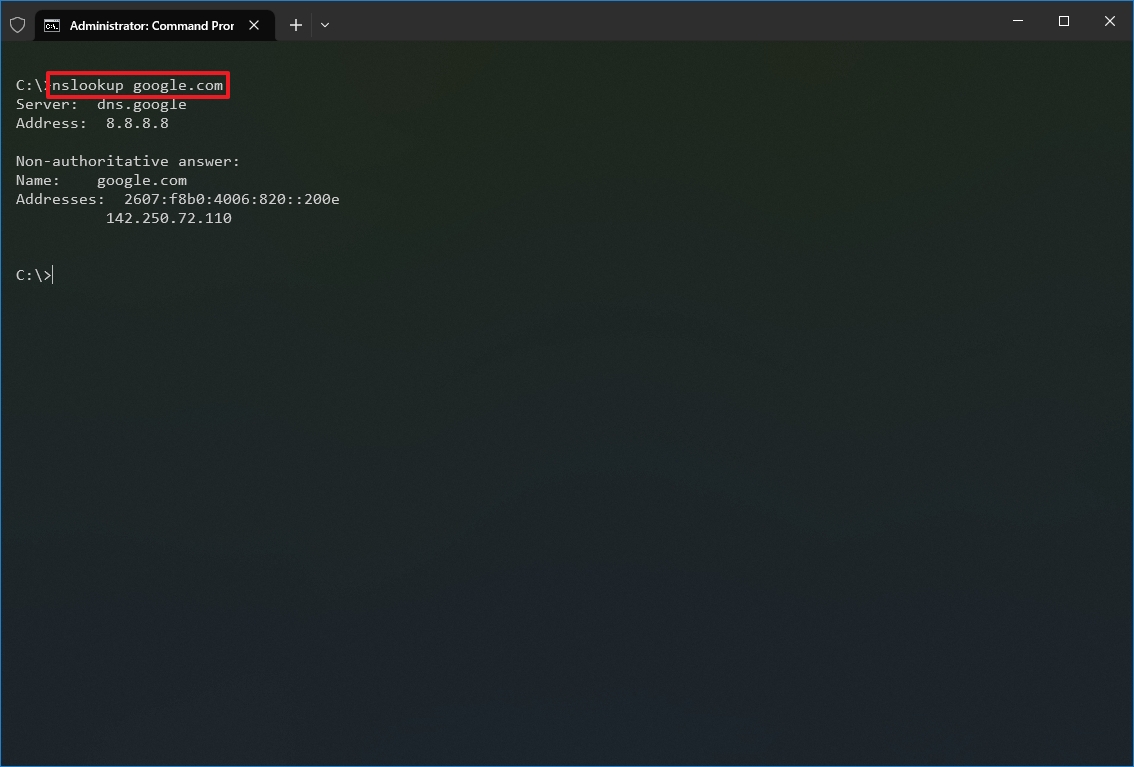
After you complete the steps, depending on the command, you will know whether the device has a DNS resolver and the IP address or domain and vice versa of the remote host.
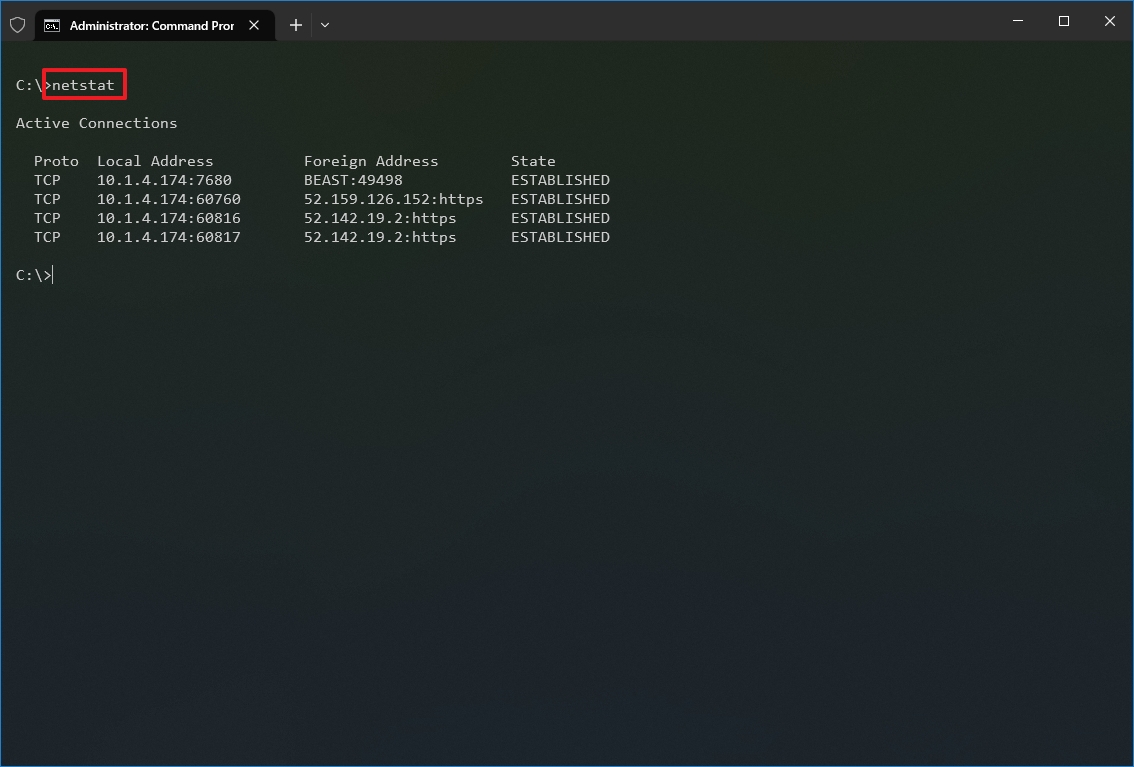
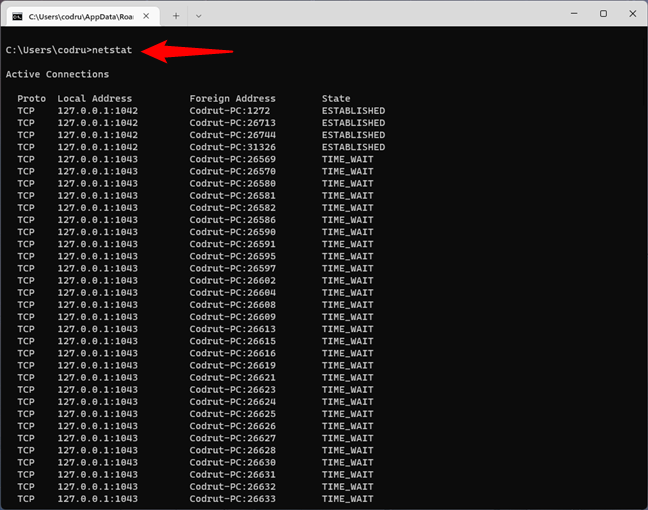
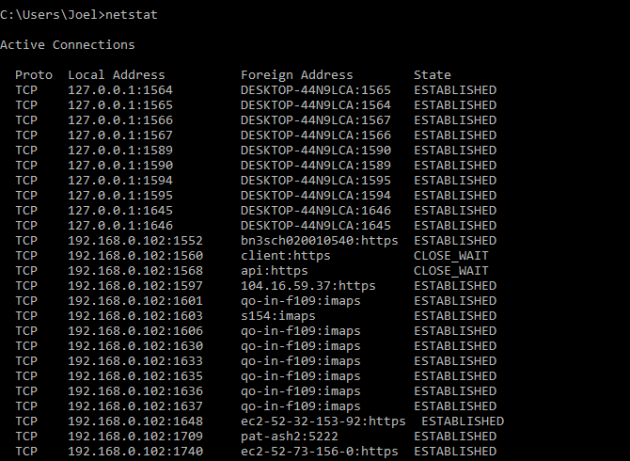
5. NetStat
The netstat (Network Statistics) tool displays statistics for all network connections. It allows you to understand open and connected ports to monitor and troubleshoot networking problems for Windows 10 and apps.
When using the netstat tool, you can list active network connections and listening ports. You can view network adapter and protocol statistics. You can even display the current routing table and much more.
To get started with netstat, use these steps:
- Open Start.
- Search for Command Prompt, right-click the top result, and select the Run as administrator option.
- Type the following command to show all active TCP connections and press Enter: netstat
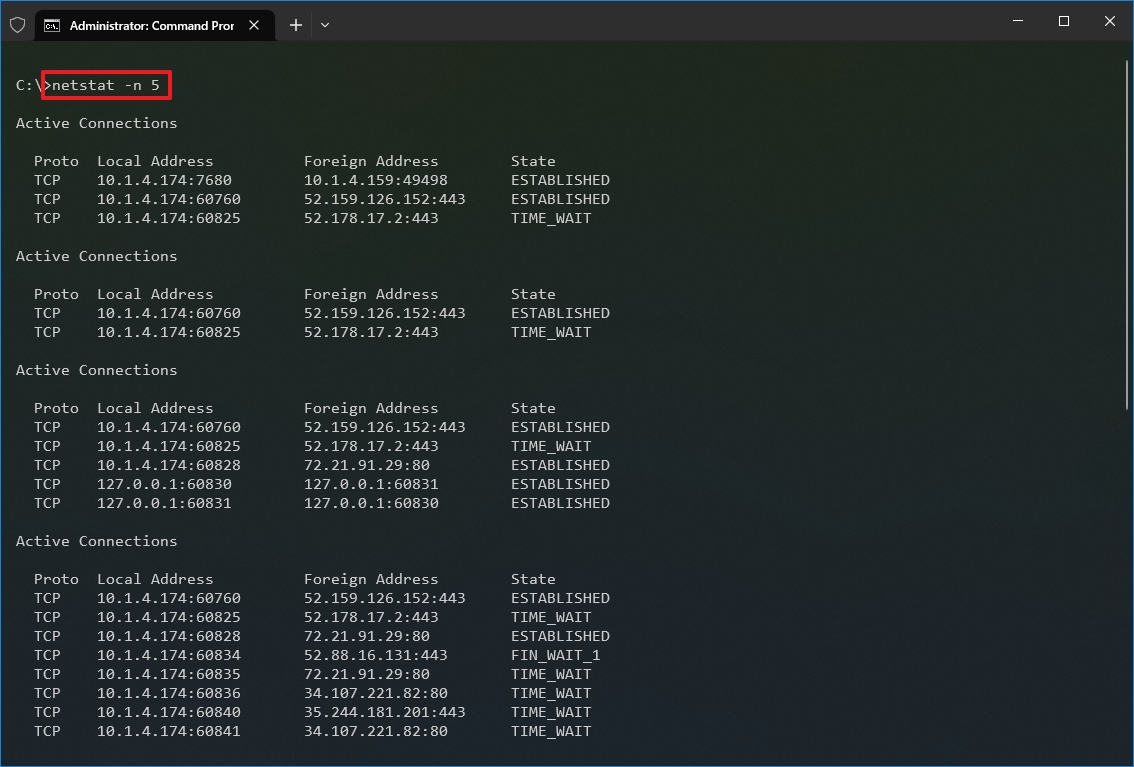
- (Optional) Type the following command to display active connections showing numeric IP address and port number instead of trying to determine the names and press Enter: netstat -n

- (Optional) Type the following command to refresh the information at a specific interval and press Enter: netstat -n INTERVAL
In the command, make sure to replace INTERVAL for the number (in seconds) you want to redisplay the information. This example refreshes the command in question every five seconds: netstat -n 5
- Quick note: When using the interval parameter, you can terminate the command using the «Ctrl + C» keyboard shortcut in the console.
Once you run the command, it will return a list of all active connections in four columns, including:
- Proto: Displays the connection protocol, including TCP or UDP.
- Local Address: Displays the device’s IP address followed by a semicolon with a port number of the connection. The double-semicolon inside brackets indicates the local IPv6 address. The «0.0.0.0» address also refers to the local address.
- Foreign Address: Shows the remote computer’s IP (or FQDN) address with the port number after the semicolon port name (for instance, https, http, microsoft-ds, wsd).
- State: Shows whether the connection is active (established), if the port has been closed (time_wait) and if the program has not closed the port (close_wait). Other statuses available include closed, fin_wait_1, fin_wait_2, last_ack, listen, syn_received, syn_send, and timed_wait.
6. ARP
Windows 10 maintains an arp (Address Resolution Protocol) table, which stores IP to Media Access Control (MAC) entries that the system has resolved. The arp tool lets you view the entire table, modify the entries, and use it to determine a remote computer’s MAC address.
Usually, you do not need to worry about MAC addresses, but there are scenarios when this information may come in handy. For example, when troubleshooting network problems at the data link layer (switching) or when restricting access or filtering content through the network for specific devices.
To get started with arp on Windows 10, use these steps:
- Open Start.
- Search for Command Prompt, right-click the top result, and select the Run as administrator option.
- Type the following command to view the current arp table cache on Windows 10 and press Enter: arp -a

- Type the following command to determine the MAC address of a remote device and press Enter: arp -a IP
In the command, make sure to replace IP with the address of the destination. For example, this command reveals the physical address of the 10.1.4.120 destination: arp -a 10.1.4.120

- Confirm the MAC (physical) address for the remote device.
After you complete the steps, you will be able to view the entire arp table and MAC address of a specific IP address.
If you want to know all the available options, use the «arp /?» command to list the available options with their corresponding descriptions.
7. Route
The route tool displays the routing table that allows Windows 10 to understand the network and communicate with other devices and services. The tool also offers some options to modify and clear the table as needed.
Like the arp tool, you typically do not have to worry about the routing table, but the command-line tool will come in handy when troubleshooting related problems.
To view or flush the routing table available on Windows 10, use these steps:
- Open Start.
- Search for Command Prompt, right-click the top result, and select the Run as administrator option.
- Type the following command to view the routing table known to Windows 10 and press Enter: route print

- Confirm the routing table information.
- (Optional) Type the following command to clear the routing table and press Enter: route -f
- Quick note: When running this command, the device will lose network connectivity since the system no longer understands the network topology. After running the command, restart the machine to allow the networking stack to rebuild the routing table. Usually, you should not have to clear the table unless you modify some of the entries and you need to reset the table.
Once you complete the steps, you will understand the routing table and how to clear the information.
You can also use the «route /?» command to view a list of available options, including options to change networking metrics, specify a gateway, add a new route, and much more. However, modifying these settings is usually not recommended unless you understand how the network works.
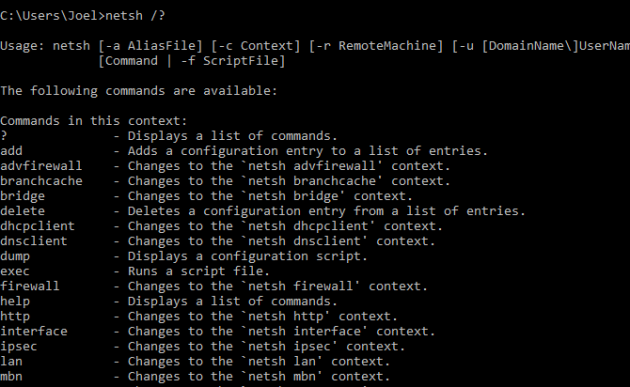
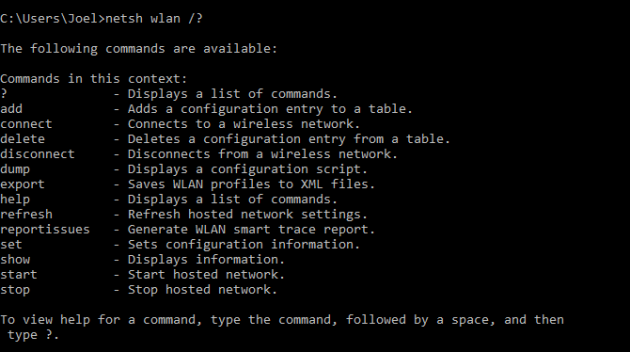
8. Netsh
On Windows 10, netsh (Network Shell) is a legacy command-line tool that allows you to display and change virtually any network configuration. For instance, you can use the tool to view the current network configurations, manage wireless connections, reset the network stack to fix most common problems, enable or disable the firewall, and a lot more.
To get started with the netsh command-line tool, use these steps:
- Open Start.
- Search for Command Prompt, right-click the top result, and select the Run as administrator option.
- Type the following command to view a list of the available commands (contexts) and press Enter: netsh /?
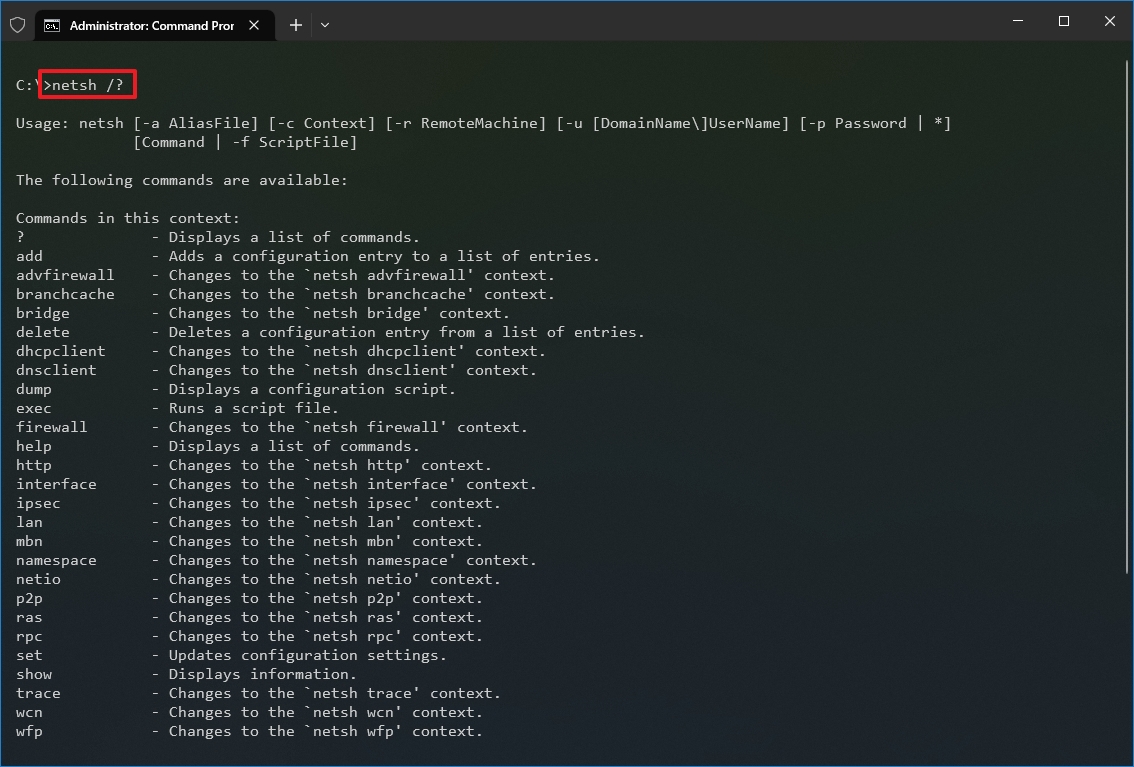
- Type the following command to view the list of available subcommands (subcontexts) for a specific option and press Enter: netsh CONTEXT-COMMAND
In the command, change the CONTEXT-COMMAND for the command that includes additional options. For example, this command shows the commands available to manage the firewall with netsh: netsh advfirewall /?
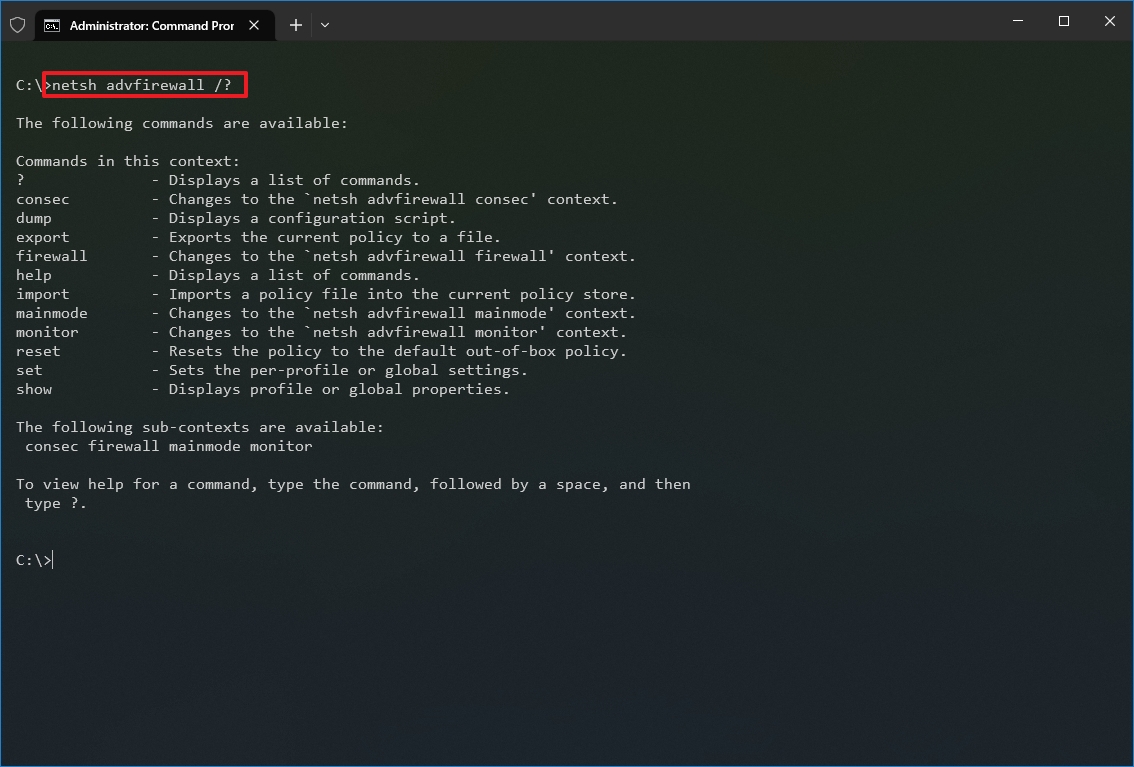
Once you complete the steps, you will know how to navigate the netsh contexts and subcontexts command to manage networking settings.
Reset system network stack
To reset the network stack to resolve common connectivity problems, use these steps:
- Open Start.
- Search for Command Prompt, right-click the top result, and select the Run as administrator option.
- Type the following command to reset the winsock stack and press Enter: netsh winsock reset
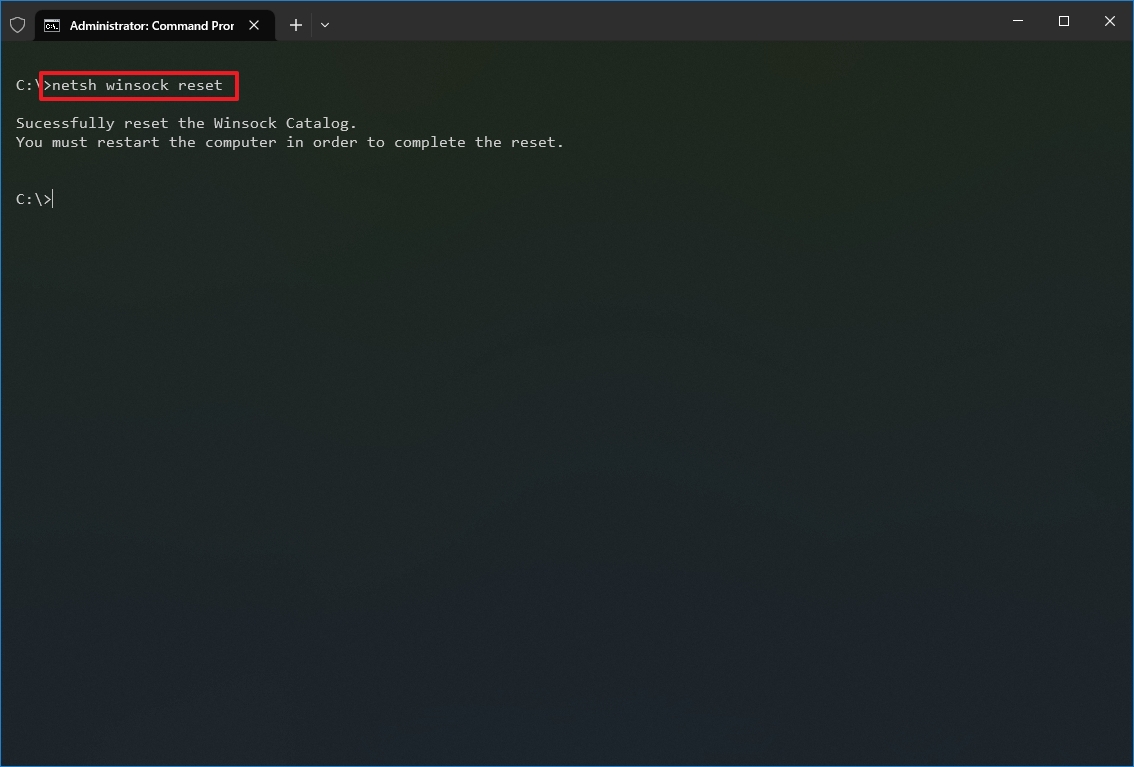
- Restart your computer.
After you complete the steps, the winsock configuration will reset, hopefully fixing the problems connecting to a network and the internet.
Export and import network configuration
To export the network configuration with netsh on Windows 10, use these steps:
- Open Start.
- Search for Command Prompt, right-click the top result, and select the Run as administrator option.
- Type the following command to export the current configuration for all the network adapters and press Enter: netsh -c interface dump>PATH\TO\EXPORTED.txt
In the command, replace the PATH\TO\EXPORTED.txt with the path and name of the file to store the configuration. For example, the following command exports the settings to the netshconfig.txt file: netsh -c interface dump>c:\netshconfig.txt
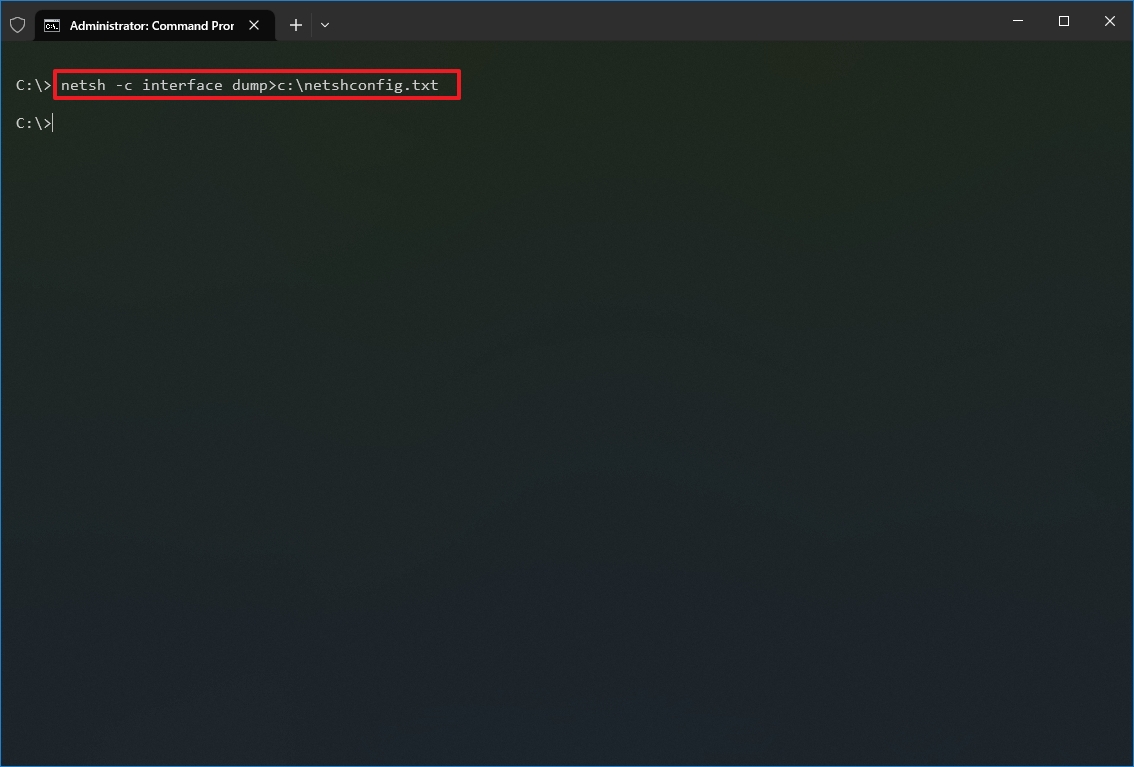
Once you complete the steps, you can open the file with any text editor to view the exported configuration.
Import network configuration
To import the network configuration settings with netsh, use these steps:
- Open Start.
- Search for Command Prompt, right-click the top result, and select the Run as administrator option.
- Type the following command to import the network configuration and press Enter: netsh -c interface dump>PATH\TO\IMPORTED.txt
In the command, replace the PATH\TO\EXPORTED.txt with the path and name of the file you want with the exported configuration. For example, the following command imports the settings from the netshconfig.txt file: netsh -f c:\netshconfig.txt
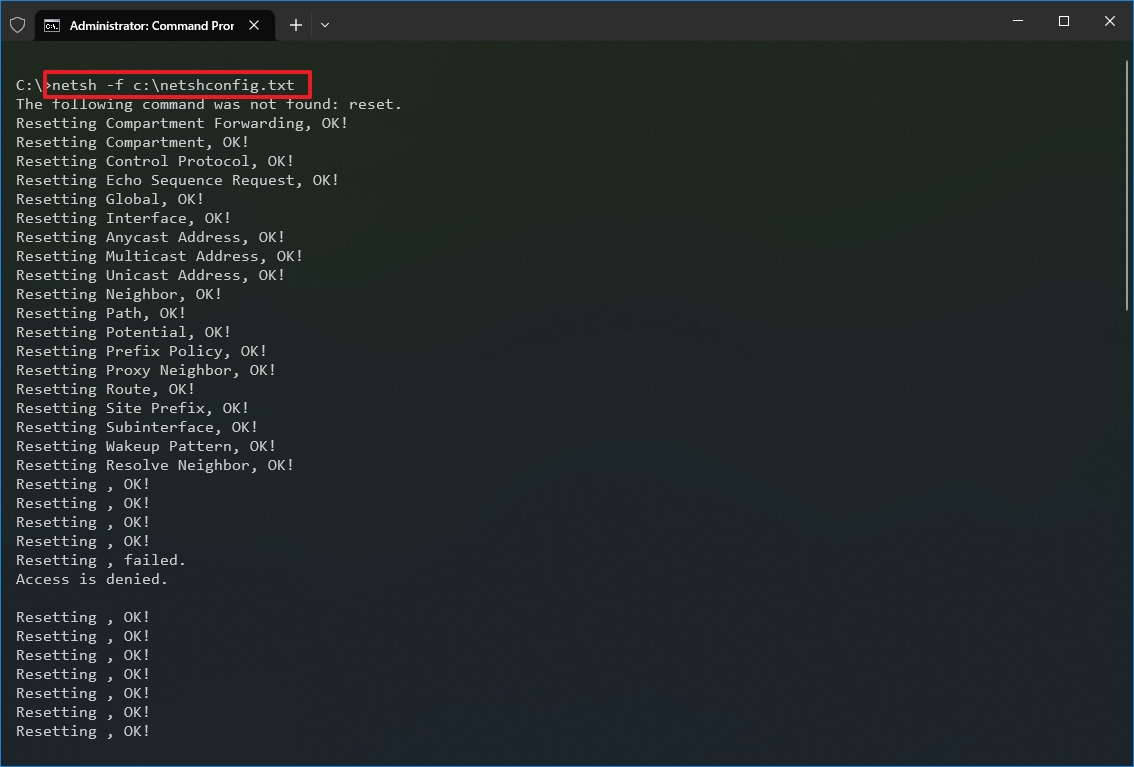
After you complete the steps, the new networking configuration will be imported and applied to Windows 10.
Enable and disable firewall
To enable the Windows 10 firewall with netsh, use these steps:
- Open Start.
- Search for Command Prompt, right-click the top result, and select the Run as administrator option.
- Type the following command to enable the default firewall and press Enter: netsh advfirewall set currentprofile state on
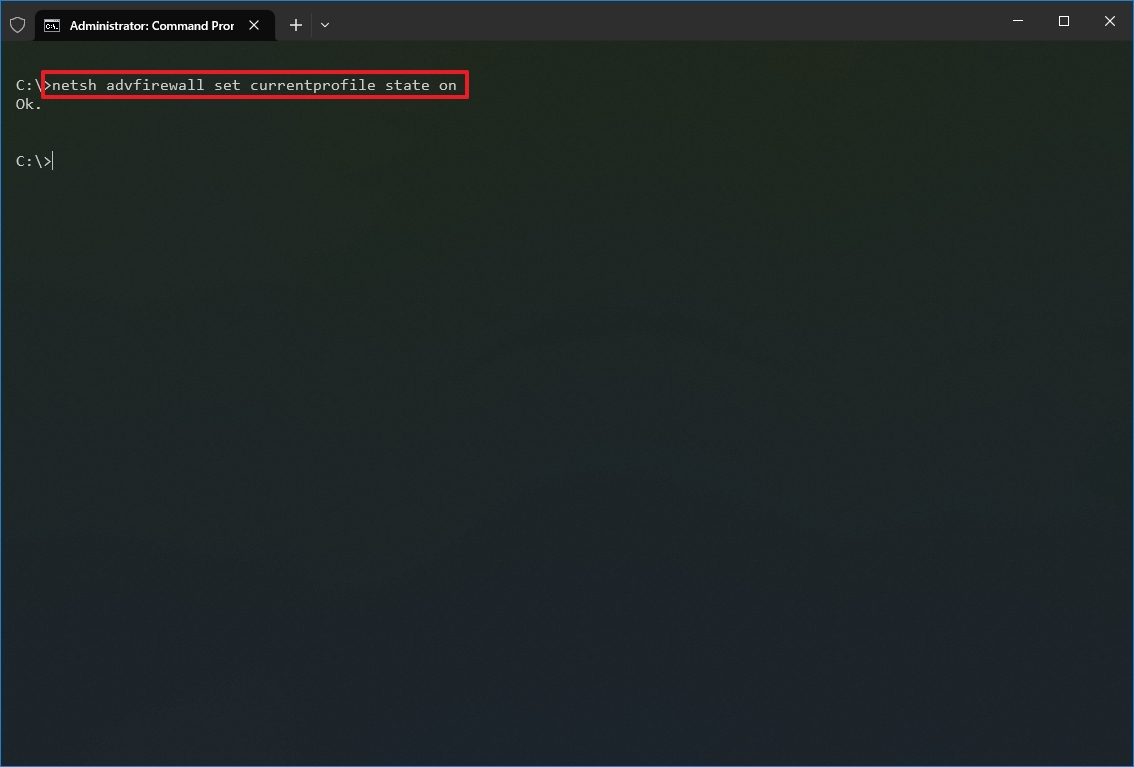
Once you complete the steps, the Windows Defender Firewall will enable on the device.
Disable firewall
To disable the Windows 10 firewall with netsh, use these steps:
- Open Start.
- Search for Command Prompt, right-click the top result, and select the Run as administrator option.
- Type the following command to disable the default firewall and press Enter: netsh advfirewall set currentprofile state off

Once you complete the steps, the Windows Defender Firewall will be disabled on the device.
On Windows 10, there are many tools you can use to change settings and troubleshoot networking issues using Command Prompt, PowerShell, and graphical applications. However, in this guide, we only focus on getting you started with some of the most common tools available in Command Prompt.
More resources
For more helpful articles, coverage, and answers to common questions about Windows 10 and Windows 11, visit the following resources:
- Windows 11 on Windows Central — All you need to know
- Windows 10 on Windows Central — All you need to know
Mauro Huculak has been a Windows How-To Expert contributor for WindowsCentral.com for nearly a decade and has over 15 years of experience writing comprehensive guides. He also has an IT background and has achieved different professional certifications from Microsoft, Cisco, VMware, and CompTIA. He has been recognized as a Microsoft MVP for many years.
Command Prompt proved to be one of the best tools for running basic commands that allow you to work with files and folders from Windows. However, the Command Prompt is much more powerful than just that. You can take things to the next level by learning and using a couple of advanced commands, including a range of handy network-related commands. Today, we’re going to learn how to use Command Prompt to check the internet connection, and your PC’s network connections, view information about network devices and watch the connections between your PC and other devices. So without further ado, let’s begin:
NOTE: The commands shared in this tutorial apply to Windows 11, Windows 10, and even older Microsoft operating systems such as Windows 7. Before going any further, if you don’t know how to open the Command Prompt, read: How to open Command Prompt (14 ways).
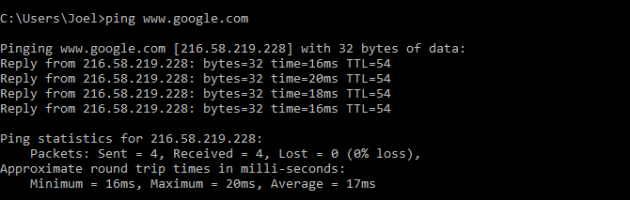
1. How to check the internet connection in CMD
To check whether your internet connection works, you can use Command Prompt to test the connection to a particular website or internet location. To do that, you can use the ping network command, followed by a web address or IP address. For instance, you can check the connectivity to Digital Citizen without opening a web browser by typing the command:
ping www.digitalcitizen.life
Then press Enter on your keyboard.
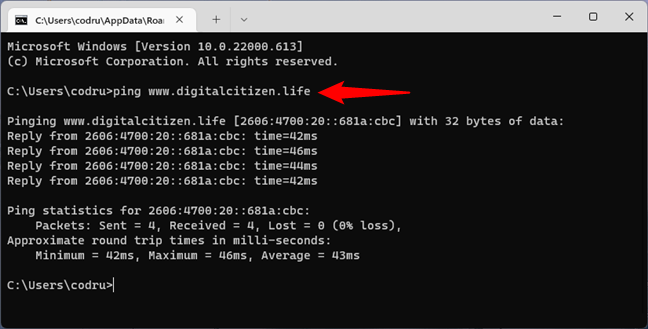
How to ping a website in CMD
If the ping statistics don’t show any loss of packets, your internet connection is working as it should. However, if you get lost packets, either your internet connection is broken or the website you pinged is not online. To double-check your internet connection, ping at least another website, preferably one that’s always on, such as www.google.com.
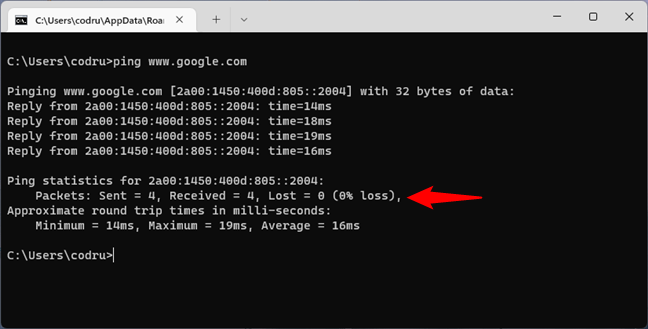
Double-check by pinging a popular website
The ping command also allows you to use the handy -t parameter, which enables you to ping the specified address forever until it’s manually stopped. For instance, we typed
ping -t www.digitalcitizen.life
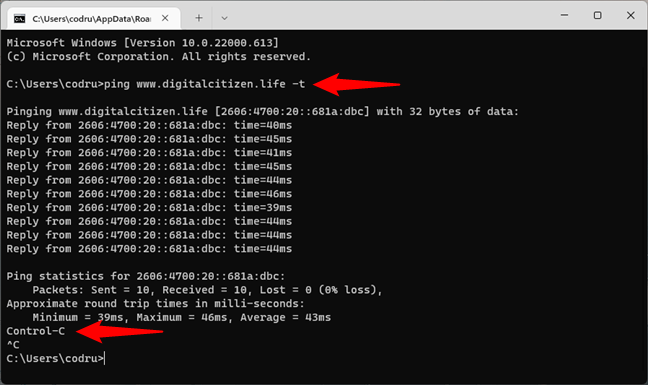
How to run a continuous ping in a CMD prompt
After some time, we wanted to see some connection statistics, and we used the keyboard combination: CTRL + Break. This shows the averages of the ping commands run until then. However, it only works in the default Command Prompt. If you run Command Prompt inside the Windows Terminal, there’s a bug that makes CMD treat Ctrl + Break as Ctrl + C ending the command instead of pausing it. Obviously, if you want to terminate the command, use the keyboard combination:
CTRL + C
That makes CMD stop the endless cycle of ping commands to the specified address.
TIP: If you want to delve deeper into what the ping command is and what it does, we’ve covered it in detail here: What is the ping command? What is ping in apps and games? How to use ping in Windows?.
2. How to traceroute in CMD (tracert command) to troubleshoot network and internet problems
Tracert might be the best command to use in CMD if you want to check your network and internet connection. Why do we say that? Well, tracert is a command that works much like the ping command but provides you with additional information. While ping only tells you whether a network device, a website, or an internet resource is available, tracert also tells you the route taken by packets over the network/internet. For example, when loading a website in your web browser, the data packets aren’t transferred directly from its server to your computer. Instead, those packets follow a path via multiple servers before arriving on your PC. Tracing the route to it allows you to see which are those servers and identify where the line of communication breaks. To trace the route to a network or internet resource, run:
tracert [website or network location or IP address]
Here’s what the tracert command looks like and what it outputs in CMD when we check the route of data packets to digitalcitizen.life from one of our computers:
tracert www.digitalcitizen.life
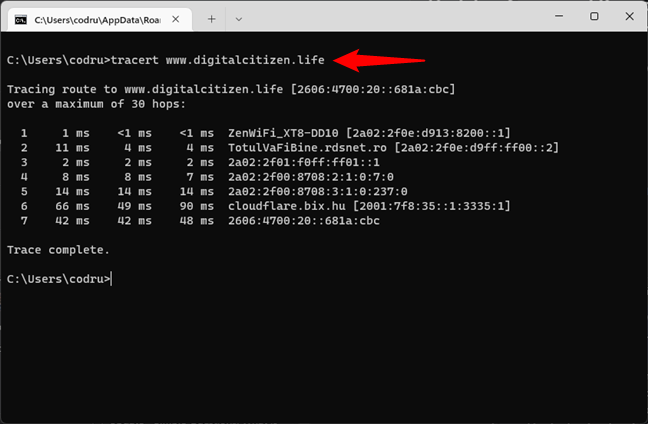
How to traceroute in CMD (tracert)
As you can see, for our PC to load digitalcitizen.life, data goes through the router (ZenWiFi_XT8-DD10 in the screenshot), then through a server from our internet provider, and then through other servers out in the world.
This information can help troubleshoot network and internet problems. For example, if the communication stops after packets leave your router and don’t make it to one of your ISP’s servers, the problem is somewhere in between your network and the internet provider. Or, if the packets are lost before the last hop, the website you’re trying to load is probably down.
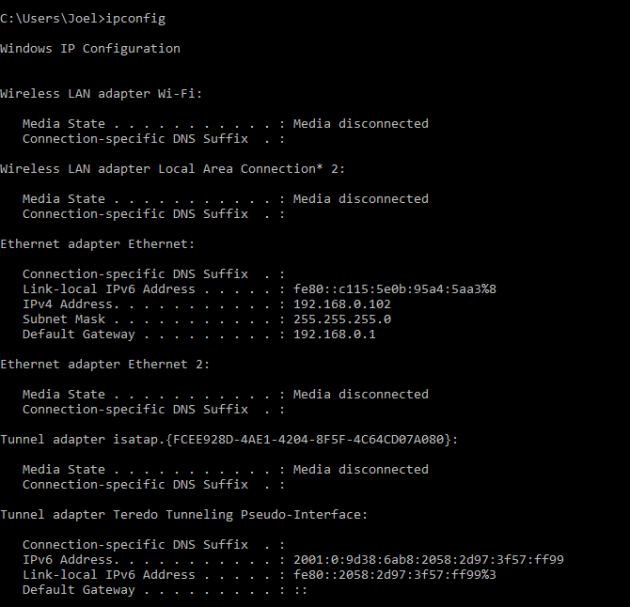
3. How can I see all the network adapters on my computer using CMD?
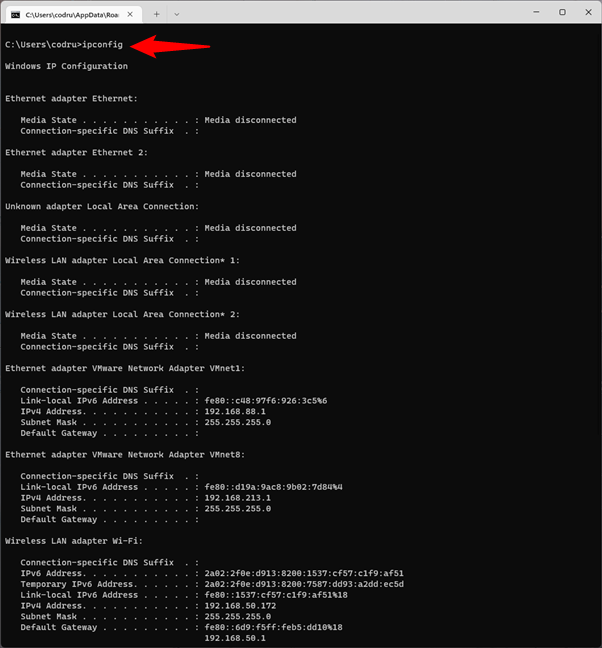
To obtain detailed information about your network adapters and connections, use the ipconfig command. Open Command Prompt, type:
ipconfig
… and press Enter. As you can see in the screenshot below, when you run this command, Windows displays the list of active network devices, whether they’re connected or disconnected, and their IP addresses. You also get details such as their default gateway IP addresses, subnet masks, and the state of each network adapter.
Getting CMD NIC info (information about the Network Interface Card) by running ipconfig
If you add the /all switch to the ipconfig command, you can get to a whole new level of detail: DNS information, the MAC (Media Access Control) (in the Physical Address field), and other information about each network component. Check out the picture below to see a sample of what you get from this command:
ipconfig /all
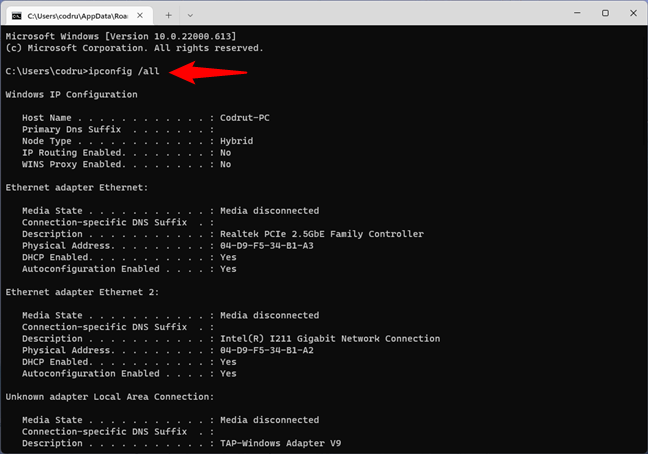
Running ipconfig with the all parameter to get detailed NIC information
4. How to check your network connection in CMD
If you want to check whether your network connection to the router is operating as it should, you can use a combination of the commands ipconfig and ping. First, get some CMD NIC info about your adapter. In other words, open Command Prompt and run ipconfig. In the results list, identify the network adapter used for connecting to the network you want to test. Then, in its details, find your router’s IP address and note it down. For example, if we’d want to check our Ethernet network connection, we’d run ipconfig and see that our router’s IP address is 192.168.50.1.
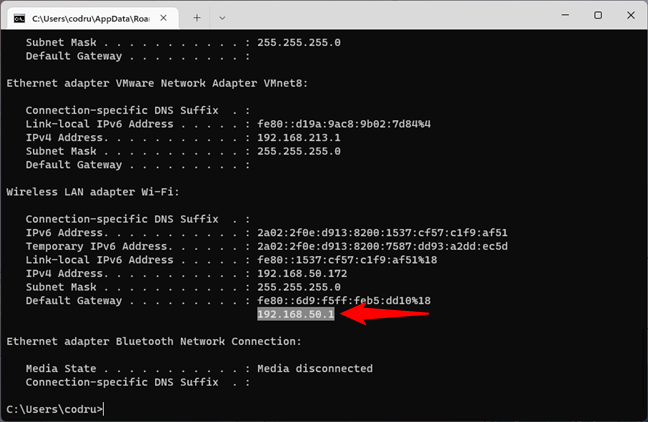
Running ipconfig to identify the IP address of the router
The next step is to check that the network connection between the router and the computer is OK. To do that, it’s enough to run the ping command on the router’s IP address. In our example, that would mean that we have to run this command in CMD:
ping 192.168.50.1
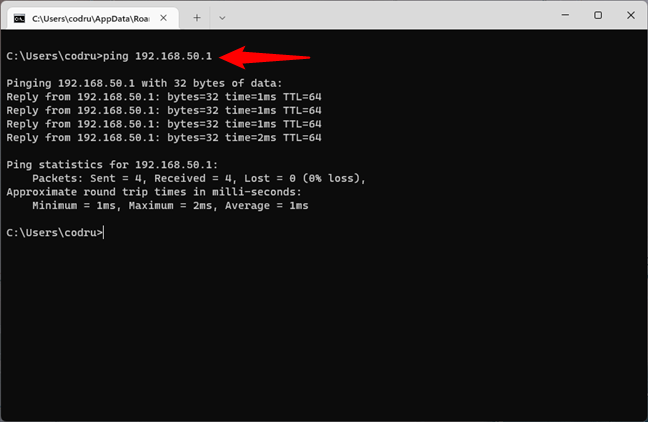
Pinging the router to check the network connection
If no packets are lost, the network connection tested is running well. Otherwise, there’s a problem somewhere between your computer and the router. You should check that your PC’s network adapter is configured correctly, the Ethernet cable is OK (if you’re using a wired connection) and that the router is configured correctly.
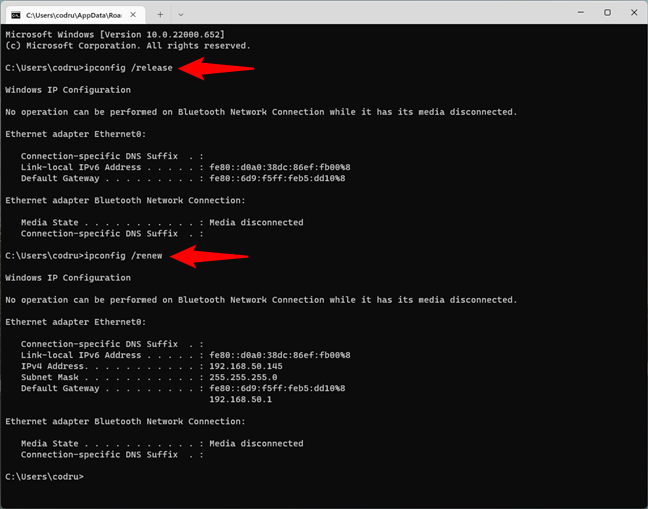
5. How to renew the IP address of your network adapter
When your network connection doesn’t work as it should, your network adapter might not have the correct IP address assigned. A quick way of solving this issue is to renew its IP address, and, fortunately, you can do that quickly, straight from the Command Prompt. Open CMD and run the following commands:
ipconfig /release
ipconfig /renew
The first one — ipconfig /release — forces your network adapter to drop its assigned IP address, while the second command — ipconfig /renew — renews the network adapter’s IP address.
Running ipconfig commands in CMD to reset the IP address
Note that you can also instruct CMD to run both commands in one line by typing:
ipconfig /release & ipconfig /renew
If you type them like this, Command Prompt executes the first command, and when it’s done, it automatically runs the second one. Cool, right? 🙂
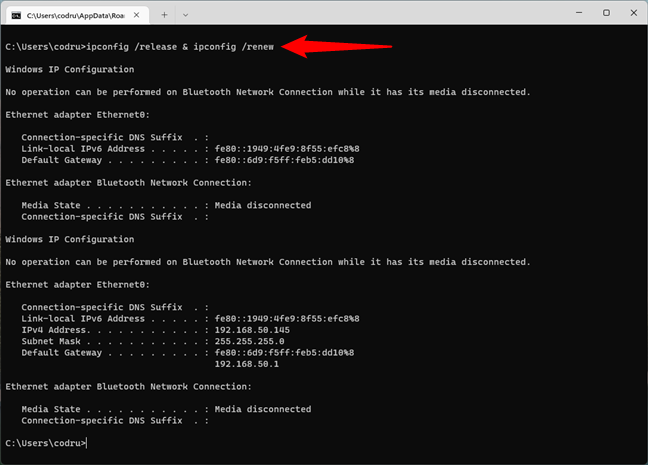
How to reset IP in CMD in one line
The release and renew parameters are useful in networks that use DHCP (Dynamic Host Configuration Protocol) to distribute IP addresses automatically. Your system gives up its current address and requests a new one from the DHCP server, and that can help you troubleshoot certain network issues.
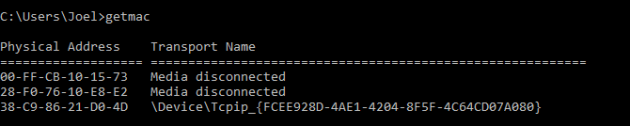
6. How to get NIC info about your network adapter’s MAC addresses
One of the fastest and easiest ways to obtain the MAC addresses of your network adapters is to use the getmac command. In Command Prompt, type
getmac
… and press Enter, as seen in the image below.
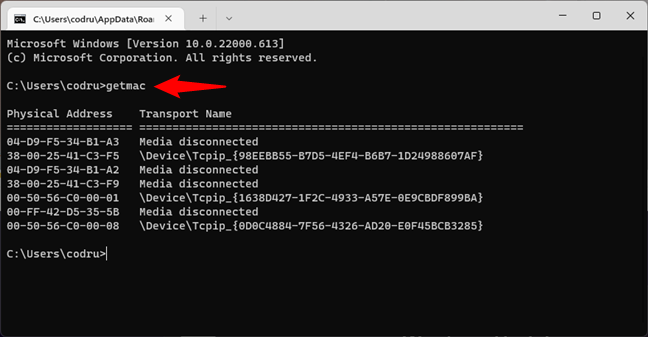
Getmac displays the physical addresses of all the network adapters
7. How can I see the computers and devices connected to my network using CMD?
In some cases, you might want to see what computers and devices are connected to the same network as you are. One of the easy and friendly ways to do that is to use the net view command. Launch Command Prompt and run
net view
After a while, you should see a list of the computers and devices in your network.
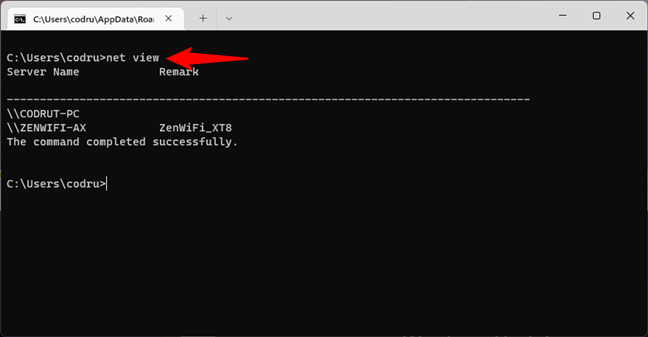
Net view can show the computers and devices connected to the same network
However, there’s a caveat about this command. Net view doesn’t show all the computers and devices in the same network as you. Although it works well enough for private networks, it fails to identify devices such as smartphones or printers and has issues with computers running different operating systems. If you want to get a clear view of everything connected to your network, you should also check the following command.
8. How to list all the devices on the network using CMD?
The best way to list all IP addresses on the network in CMD is to use the arp command. Open Command Prompt and run:
arp -a
The IP address shown first, next to Interface, displays your network adapter’s IP address. Then, there’s a list of IP addresses and MAC addresses (Physical Addresses). All the IP addresses that start with the same numbers as your network adapter are in the same network or subnet as you are. They are all devices connected to your network.

Arp shows all the devices connected to the same network
The next ones are not real devices but IP addresses used for multicasting. Your real devices commonly use them for streaming media on your network. In our example, the devices connected to the same network as our computer are all the ones that have IP addresses starting with 192.168.50.
If you want to see what those devices are, in a more human-friendly way, copy their MAC addresses and look them up on the internet using Google or on websites that let you check which vendors assign specific MAC addresses, such as DNS Checker. For instance, if you’re looking for the MAC address 04-d9-f5-b5-b1-f0, you find that it’s a device made by ASUS. In truth, it’s an ASUS ZenWiFi mesh system.
9. How to check your computer’s network connections and open ports
You can get other helpful CMD NIC info from this command:
netstat
It lets you see the network connections between your system and any other systems on your network or the internet, except for those in a Listening state.
Netstat shows the active network connections and open ports
If you add the -a parameter to the netstat command, you can get the complete list of open ports, including idle ones (the ones marked as Listening), like in the image below.
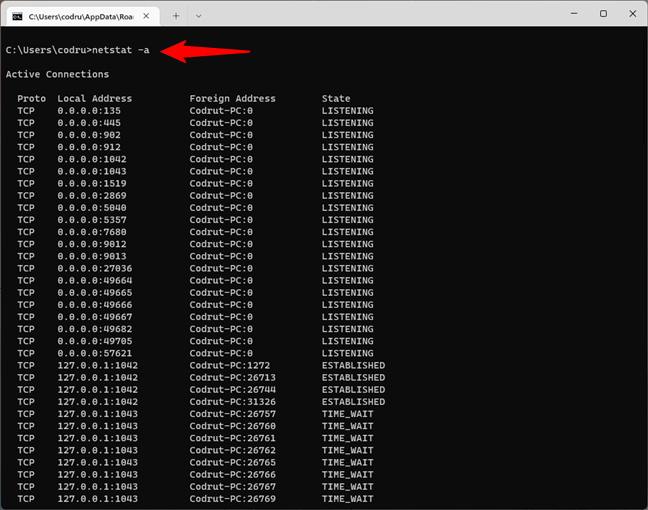
Netstat with the -a parameter shows the active network connections, including the ones in a listening state
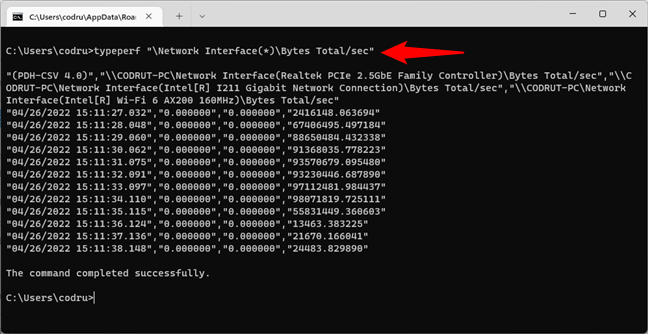
10. How to check the network traffic in Windows’ command line
Windows allows you to see the network traffic easily in the Task Manager. However, that’s a visual tool, and some users might want to get network utilization from the command line. Fortunately, there’s a command for that too. It’s called typeperf and lets you check the network traffic from CMD, although not in a friendly manner. Here’s the full command with arguments that you must run in Command Prompt:
typeperf “\Network Interface(*)\Bytes Total/sec”
How to check the network traffic in Command Prompt
The typeperf command will then start to show the number of bytes sent and received each second, for all the network cards available on your Windows computer. The first line of the command’s output tells you the order in which the network interfaces are listed, while the next lines of text update each second with new measurements. Unfortunately, this command can’t show the network traffic in percentage.
TIP: The typeperf command can be used for gathering other types of network information too. Here are other useful variations of it with different counters you can monitor:
typeperf “\Network Interface(*)\Current Bandwidth
typeperf “\Network Interface(*)\Bytes Received/sec
typeperf “\Network Interface(*)\Bytes Sent/sec
typeperf “\Network Interface(*)\Packets/sec
typeperf “\Network Interface(*)\Packets Received/sec
typeperf “\Network Interface(*)\Packets Sent/sec
As you can see, the names of the counters are self-explanatory, monitoring bandwidth, as well as bytes and packages sent and received on your PC. Have fun playing with them!
NOTE: If you want to learn more about this command, check the official documentation from Microsoft: typeperf — Microsoft Docs.
Do you know other useful CMD network commands?
The networking commands that you can run in the Command Prompt can be helpful when you need to find information about devices connected to your network or when you want to test your network connection state. They’re also convenient when you have networking issues and you’re trying to troubleshoot them yourself. If you have questions about these networking commands, if you need help, or if you want us to add others to the list, leave us a comment below.
Панель управления Windows предлагает довольно ограниченный список возможностей для контроля над сетью. Если вам нужен доступ ко всем командам, которые может предложить ваша система, вам следует начать пользоваться командной строкой.
Не переживайте, если никогда не пользовались командной строкой раньше. Это довольно просто. Мы расскажем вам обо всём, что необходимо для того, чтобы приступить к её использованию. Ниже вы найдёте несколько наиболее важных команд для настройки вашей домашней сети.
1. PING
PING — одна из базовых и самых полезных CMD-команд. Она отображает качество связи, показывает, может ли ваш компьютер высылать данные по целевому IP-адресу, и если может, то с какой скоростью.
Вот пример использования команды:
Команда действует по следующему принципу: она высылает определённое количество пакетов данных и определяет, сколько из них вернулось обратно. Если некоторые из них не вернулись, она сообщает о потере. Потеря пакетов ведёт к низкой производительности в играх и интернет-трансляциях. Это отличный способ протестировать ваше интернет-соединение.
По умолчанию команда высылает четыре пакета с тайм-аутом для каждого в четыре секунды. Вы можете увеличить количество пакетов следующим образом: ping www.google.com -n 10
Вы можете также увеличить длительность тайм-аута (значение отображается в миллисекундах): ping www.google.com -w 6000
2. TRACERT
TRACERT означает Trace Route. Как и PING, команда высылает пакет данных для решения сетевых проблем. Однако она определяет не скорость отправки и возврата пакета, а его маршрут.
Пример использования:
Команда отображает список всех маршрутизаторов, через которые проходят данные на пути к конечному узлу. Почему мы видим три показателя длительности для каждого маршрутизатора? Потому что TRACERT высылает три пакета данных на случай, если один из маршрутизаторов потеряется или по какой-то причине потребует слишком много времени.
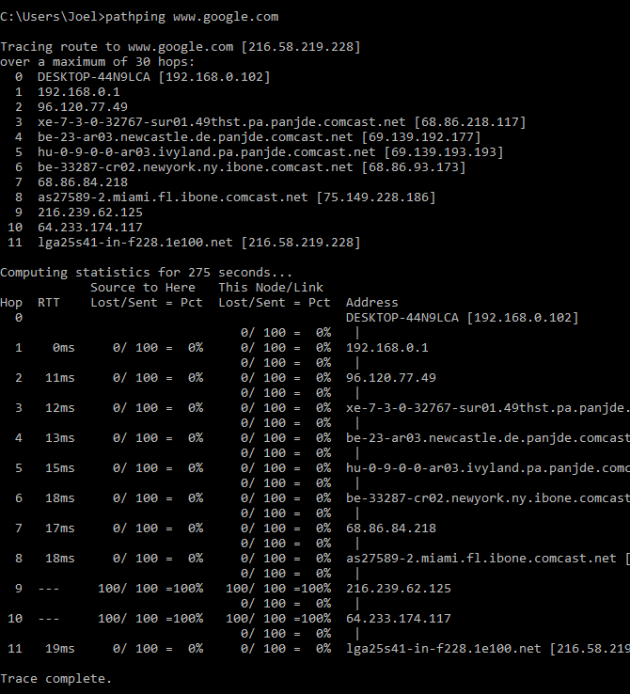
3. PATHPING
Команда PATHPING аналогична TRACERT, однако она более информативна, а потому требует больше времени для исполнения. Она анализирует маршрут пакетов данных и определяет, на каких промежуточных узлах произошла потеря.
Пример использования:
4. IPCONFIG
Эта команда наиболее часто используется для отладки сетей в Windows. И дело не только в объёме информации, которую она предоставляет, но и в том, что она комбинируется с несколькими ключами для выполнения определённых команд.
Пример использования:
При вводе без ключей IPCONFIG отражает все сетевые адаптеры на вашем компьютере, а также то, как они работают. IPv4 Addres и Default Gateway содержат наиболее важную информацию.
Чтобы очистить DNS-кеш, используйте следующий ключ: ipconfig /flushdns
Эта операция может помочь, если интернет работает, однако вы не можете попасть на некоторые сайты или сервера.
5. GETMAC
Каждое совместимое со стандартами IEEE 802 устройство имеет уникальный MAC-адрес (Media Access Control). Производитель присваивает каждой единице оборудования свой собственный адрес, который прописан в самом устройстве.
Пример использования:
Вы можете увидеть несколько MAC-адресов, в зависимости от того, сколько сетевых адаптеров установлено на вашем компьютере. Например, интернет-соединения Wi-Fi и Ethernet будут иметь отдельные MAC-адреса.
6. NSLOOKUP
NSLOOKUP означает Name Server Lookup. Потенциал этой утилиты огромен, но большинству людей он не нужен. Для рядовых пользователей важна лишь возможность определить IP-адрес какого-либо доменного имени.
Пример использования:
Имейте в виду, что некоторые домены не привязаны к одному IP-адресу, что означает, что вы будете получать разные адреса при каждом новом вводе команды. Это вполне нормально для больших сайтов, потому что они загружаются с огромного количества компьютеров.
Если вы хотите преобразовать IP-адрес в доменное имя, просто введите его в строку браузера и вы увидите, куда он ведёт. Однако не все IP-адреса ведут к доменным именам. Многие из них нельзя достичь через веб-браузер.
7. NETSTAT
Эта утилита является средством для сбора статистики, анализа и диагностики. Она довольна сложна, если использовать весь её потенциал (например, настраивать локальную сеть предприятия).
Пример использования:
По умолчанию команда показывает все активные подключения в вашей системе. Активное подключение не означает, что идёт обмен данными. Оно указывает лишь на то, что где-то открыт порт, а устройство готово к подключению.
У команды также есть несколько ключей, которые меняют тип отображаемой информации. Например, ключ -r выведет таблицы маршрутизации.
8. NETSH
NETSH означает Network Shell (сетевая оболочка). Эта команда позволяет настроить почти любой сетевой адаптер на вашем компьютере более детально.
При вводе NETSH командная строка переходит в режим оболочки. Внутри неё есть несколько контекстов (маршрутизация, связанные с DHCP команды, диагностика).
Увидеть все контексты можно следующим образом:
А увидеть все команды в рамках одного контекста можно так:
Вы можете копнуть глубже и увидеть список всех подкоманд в рамках одной команды:
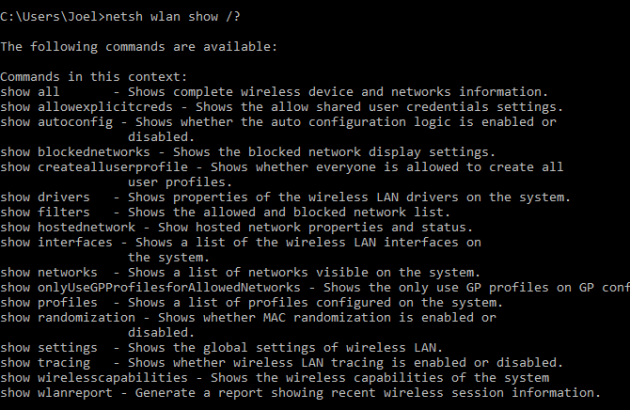
Например, вы можете ввести следующую команду, чтобы увидеть все сетевые драйвера и их характеристики в вашей системе: netsh wlan show drivers
Имейте в виду, что если вы действительно хотите достичь серьёзных успехов в настройке вашей сети посредством командной строки, вам придётся освоить эту команду.
Командная строка Windows (CMD) — мощный инструмент, который предоставляет доступ к широкому набору команд для выполнения различных задач, от работы с файлами до настройки сети и автоматизации процессов. В статье рассмотрим 100 популярных команд CMD, которые пригодятся как новичкам, так и опытным пользователям. Для удобства они разделены по категориям.

Разделы
- Общие команды CMD
- Сетевые команды CMD
- Команды для управления процессами
- Команды для управления файловой системой
- Команды для управления пользователями
- Команды для управления безопасностью
- Команды для диагностики и устранения неполадок
- Команды для скриптинга и автоматизации
- Команды для управления сетевыми подключениями
- Команды для управления печатью
- Дополнительные команды в Windows
Общие команды командной строки (CMD) позволяют пользователям управлять ОС Windows через интерфейс командной строки. Они нацелены на различные задачи – от получения справочной информации до управления процессами.
- hel — выводит список всех доступных команд и их краткое описание, что полезно для получения информации о базовых командах.
- cls — очищает экран командной строки. Если в окне CMD много текста, этой командой можно убрать весь вывод и начать работу «с чистого листа».
- exit — завершает текущую сессию командной строки и закрывает окно CMD.
- echo — выводит сообщения в консоль или включает/выключает отображение команд в пакетных файлах – echo Hello, World! выведет Hello, World! на экран.
- ver — отображает версию операционной системы Windows.
- title — изменяет заголовок окна командной строки. Например, title Моя Командная Строка изменит заголовок на «Моя Командная Строка».
- pause — временно приостанавливает выполнение скрипта, но при нажатии любой клавиши можно продолжить работу.
- date — позволяет узнать или изменить текущую дату в системе.
- time — отображает или изменяет текущее время в системе.
- tasklist — выводит список всех запущенных процессов с их PID (идентификатором процесса).
- powercfg — управляет настройками энергопотребления и профилями питания.
- fc — сравнивает два файла и отображает их различия.
Сетевые команды CMD
В разделе собраны основные сетевые команды CMD, которые помогут управлять подключениями, диагностировать сетевые проблемы и выполнять разнообразные операции с сетью. Они незаменимы для системных администраторов и пользователей, нуждающихся в решении сетевых задач.
- ping — проверяет связь с удаленным узлом, отправляя ему пакеты данных. Например, ping google.com проверит доступность сервера Google.
- ipconfig — отображает конфигурацию сетевых интерфейсов системы (IP-адреса, маску подсети и шлюзы).
- netstat — выводит информацию о сетевых соединениях и открытых портах
- netstat -an — показывает все активные соединения.
- tracert — отслеживает маршрут пакета до целевого узла – tracert yandex.ru покажет все узлы, через которые проходит запрос.
- nslookup — используется для проверки информации о DNS-серверах.
- nslookup example.com — отображает IP-адрес сайта example.com.
- arp — выводит или изменяет записи ARP (Address Resolution Protocol) –: arp -a покажет текущие записи ARP.
- route — управляет таблицей маршрутизации сети – route print выведет все существующие маршруты в системе.
- net use — подключает сетевые диски. Например, net use Z: \\server\folder подключит сетевой ресурс как диск Z:.
- netsh — позволяет настраивать различные параметры сети через командную строку.
- netsh wlan show profiles — отображает сохраненные профили Wi-Fi.
Команды для управления процессами
Команды ниже позволяют эффективно управлять процессами и службами на вашем ПК: помогают запускать службы, планировать задачи, управлять активными процессами, а также выключать или перезагружать систему. С их помощью можно автоматизировать выполнение задач, получать информацию о состоянии системы и контролировать её работоспособность.
- sc — управляет службами Windows. Пример: sc start servicename запустит службу с именем servicename.
- schtasks — управляет планировщиком задач. Так, schtasks /create /tn «Моя Задача» /tr notepad.exe /sc once /st 12:00 создаст задачу для запуска.
- start — запускает программу или команду в новом окне. Например, start notepad откроет блокнот.
- wmic — взаимодействует с системой через Windows Management Instrumentation – wmic process list brief покажет список процессов.
- shutdown — выключает, перезагружает или завершает работу системы. Так, shutdown /s /f /t 0 немедленно выключит компьютер.
- systeminfo — выводит информацию о системе, включая версию Windows, параметры оборудования и установленные обновления.
Команды для управления файловой системой
Команды для управления файловой системой в CMD позволяют работать с файлами и папками: просматривать содержимое директорий, перемещаться между папками, создавать и удалять файлы и каталоги, копировать данные с использованием различных опций.
- dir — отображает список файлов и каталогов в указанной директории. Пример: dir C:\Windows выведет содержимое папки Windows.
- cd — меняет текущий каталог. Так, cd C:\Users перейдет в папку пользователей.
- md NewFolder — создает новую папку.
- rd — удаляет пустую папку. Пример: rd NewFolder удалит папку NewFolder.
- copy — копирует файлы из одного места в другое.
- move — перемещает файлы или папки.
- del — удаляет файлы. Например, del file.txt удалит файл file.txt.
- xcopy — копирует файлы и директории, включая их структуру. Так, xcopy C:\Source D:\Destination /s /e скопирует все файлы и папки из Source в Destination.
- robocopy — более продвинутая версия xcopy, используется для надежного копирования данных. Например, robocopy C:\Source D:\Destination /mir синхронизирует две папки.
Команды для управления пользователями
Команды для управления пользователями предоставляют средства для администрирования учетных записей, настройки групповых прав и управления политиками безопасности. А также позволяют администраторам эффективно управлять пользователями в системе, добавлять новых пользователей, изменять их права и настраивать параметры учетных записей.
- net user — управляет учетными записями пользователей.
- net user UserName /add — добавляет нового пользователя с именем UserName.
- net localgroup — управляет локальными группами пользователей.
- net localgroup Administrators UserName /add — добавляет пользователя в группу администраторов.
- whoami — выводит имя текущего пользователя и информацию о его правах.
- runas — позволяет запускать программы от имени другого пользователя. Так, runas /user:administrator cmd запустит CMD с правами администратора.
- net accounts — управляет параметрами учетных записей, например, минимальной длиной пароля и периодом его действия.
- gpupdate — обновляет групповые политики на локальном компьютере, что полезно для администраторов, управляемых сетей.
- taskview — открывает таймлайн Windows, показывая историю активности пользователя, полезно для управления и поиска ранее использованных файлов и приложений.
- msg — отправляет сообщение пользователям, подключенным к системе. Пример: msg «Система будет перезагружена через 5 минут» отправит сообщение всем пользователям.
Команды для управления безопасностью
Команды для управления безопасностью предназначены для обеспечения защиты данных и управления доступом к файлам и системным ресурсам, что позволяет шифровать файлы, проверять целостность системных файлов и управлять правами доступа.
- cipher — управляет шифрованием файлов на дисках NTFS.
- cipher/e — зашифровывает файлы в указанной директории.
- sfc — проверяет целостность системных файлов и автоматически восстанавливает их при обнаружении повреждений.
- sfc /verifyonly — проверяет системные файлы на наличие повреждений, но не исправляет их автоматически.
- sfc /scannow — выполняет полную проверку системы.
- cacls — изменяет права доступа к файлам. Пример: cacls file.txt /g UserName:F даст пользователю полный доступ к файлу.
- icacls — расширяет возможности команды cacls и предоставляет дополнительные параметры для управления правами доступа.
- takeown — позволяет взять владение файлом или директорией. Так, takeown /f file.txt предоставит доступ к файлам.
- attrib — изменяет атрибуты файлов и папок. Например, attrib +r file.txt сделает файл доступным только для чтения.
Команды для диагностики и устранения неполадок
Команды из раздела помогают находить и устранять неполадки в системе, восстанавливать загрузочные параметры и проверять целостность данных на диске, а также они позволяют решать проблемы, связанные с запуском операционной системы или со сбоями на уровне файловой системы.
- chkdsk — проверяет диск на наличие ошибок и исправляет их. Так, chkdsk C: /f выполнит проверку диска C.
- bootrec — восстанавливает загрузочный сектор.
- bcdedit — управляет параметрами загрузки системы.
- bcdedit /set {current} safeboot minimal — включает безопасный режим.
Команды для скриптинга и автоматизации
Команды, приведенные ниже, предназначены для создания сложных сценариев выполнения команд, что позволяет автоматизировать повседневные задачи и более эффективно управлять процессами.
- for — создает цикл для выполнения команд. Например, for %i in (1 2 3) do echo %i выведет числа 1, 2, 3.
- if — выполняет условное выполнение команд.
- goto — перенаправляет выполнение скрипта к определенной метке.
- call — вызывает другую команду или скрипт.
Команды для управления сетевыми подключениями
Команды для управления сетевыми подключениями предоставляют возможности для настройки, диагностики и оптимизации сетевых параметров и соединений, позволяя управлять IP-адресами, подключаться и отключаться от сетей.
- ipconfig /release — освобождает текущий IP-адрес, назначенный DHCP сервером, что позволяет при необходимости сбросить сетевое подключение.
- ipconfig /renew — обновляет IP-адрес, полученный от DHCP сервера. Часто используется после команды ipconfig /release для восстановления подключения.
- ipconfig /flushdns — очищает кэш DNS, если изменился DNS-сервер или необходимо устранить проблемы с доступом к сайтам.
- ipconfig /displaydns — выводит содержимое кэша DNS, часто используется для диагностики проблем с DNS.
- netsh interface ip set address — используется для назначения статического IP-адреса сетевому интерфейсу. Пример: netsh interface ip set address Ethernet static 192.168.1.100 255.255.255.0 192.168.1.1.
- netsh wlan show drivers — выводит информацию о драйверах беспроводной сети, что полезно при настройке Wi-Fi подключения.
- netsh wlan show interfaces — отображает текущие активные беспроводные подключения и их параметры, например, мощность сигнала.
- netsh wlan connect — подключает к указанной Wi-Fi сети. Для этого нужно ввести: netsh wlan connect name=MyWiFi.
- netsh wlan disconnect — отключает текущее беспроводное подключение.
- netsh advfirewall set allprofiles state — управляет состоянием брандмауэра Windows – netsh advfirewall set allprofiles state off отключает брандмауэр для всех профилей.
- netsh int ip reset — сбрасывает настройки IP стека (TCP/IP) к значениям по умолчанию, помогая при сетевых неполадках.
- route add — добавляет маршрут в таблицу маршрутизации. Например, route add 192.168.2.0 mask 255.255.255.0 192.168.1.1 добавит маршрут для подсети 192.168.2.0 через шлюз 192.168.1.1.
- route delete — удаляет указанный маршрут из таблицы маршрутизации.
- netsh interface show interface — выводит список всех сетевых интерфейсов в системе, включая их состояние и тип.
- net view — отображает список компьютеров в локальной сети – net view \\server покажет общие ресурсы на указанном сервере.
- net use /delete — удаляет существующее подключение к сетевому ресурсу. Так, net use Z: /delete отключает сетевой диск Z:.
- ftp — открывает FTP-клиент для передачи файлов между локальной и удаленной системами. Например, по команде ftp ftp.example.com ПК подключится к FTP-серверу.
- telnet — используется для подключения к удаленным системам через Telnet-протокол. Так, telnet example.com 23 подключит ПК к серверу на порту 23.
- getmac — выводит MAC-адреса всех сетевых интерфейсов компьютера.
Команды для управления печатью
В этом разделе команды для управления печатью позволяют эффективно управлять процессом печати (включая очередью на печать), настройками принтеров и заданиями на печать.
- print — отправляет файл на печать. Например, print C:\Documents\file.txt отправит текстовый файл на принтер по умолчанию.
- rundll32 printui.dll,PrintUIEntry — открывает диалоговое окно для установки или управления принтерами – rundll32 printui.dll,PrintUIEntry /in /n\\server\printer установит сетевой принтер.
- net print — отображает список заданий на печать – net print \\server\printer покажет очередь печати на указанном принтере.
- net stop spooler — останавливает службу диспетчера очереди печати (spooler), особенно когда требуется устранить зависшие задания печати.
- net start spooler — запускает службу диспетчера очереди печати после её остановки.
- wmic printer list brief — выводит список установленных принтеров с краткой информацией о каждом из них.
- wmic printer where default=true get name — выводит имя принтера, установленного по умолчанию.
- wmic printer where name=’PrinterName’ delete — удаляет указанный принтер из системы.
- wmic printerconfig — отображает информацию о конфигурации принтера, включая его настройки и параметры печати.
- cscript prnjobs.vbs — используется для управления заданиями печати через скрипт prnjobs.vbs, который можно использовать для удаления, приостановки или возобновления заданий.
Дополнительные команды в Windows
В дополнение к основным инструментам для управления системой, командная строка Windows предоставляет ряд дополнительных команд, которые расширяют возможности администрирования и диагностики.
- wevtutil — управляет журналами событий Windows. Например, wevtutil qe System выведет события из системного журнала.
- tzutil — управляет настройками часовых поясов. tzutil /s Pacific Standard Time установит часовой пояс на Тихоокеанское стандартное время.
- taskkill — завершает процесс по его PID или имени. Так, taskkill /F /PID 1234 завершит процесс с PID 1234.
- powercfg /hibernate off — отключает режим гибернации.
- powercfg /energy — создает отчет об использовании энергии системой.
В Windows есть некоторые вещи, которые моно сделать только с использованием командной строки, в связи с тем, что они попросту не имеют варианта с графическим интерфейсом. Некоторые другие, несмотря на имеющуюся графическую версию, бывает проще запустить из командной строки.
Я, конечно, не смогу перечислить все эти команды, но об использовании некоторых из них, которыми пользуюсь сам, постараюсь рассказать.
Ipconfig — быстрый способ узнать свой IP адрес в Интернете или локальной сети
Узнать свой IP можно из панели управления или зайдя на соответствующий сайт в Интернете. Но быстрее бывает зайти в командную строку и ввести команду ipconfig. При разных вариантах подключения к сети, вы можете получить различную информацию с использованием данной команды.
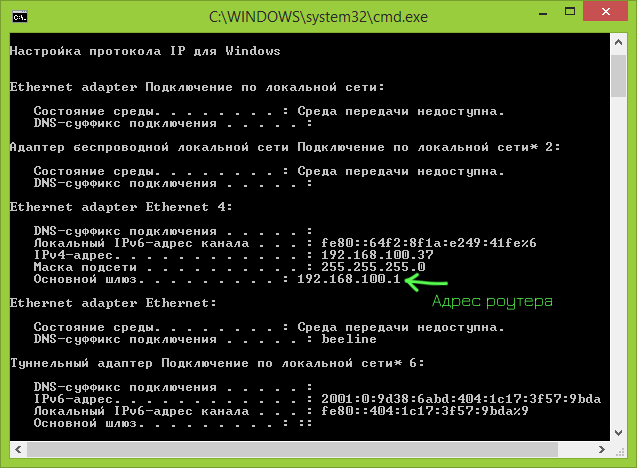
После ее ввода, вы увидите список всех сетевых подключений, используемых вашим компьютером:
- Если ваш компьютер подключен к Интернету через Wi-Fi роутер, то основной шлюз в параметрах подключения, используемого для связи с роутером (беспроводное или Ethernet) — это адрес, по которому вы можете зайти в настройки роутера.
- Если ваш компьютер находится в локальной сети (если он подключен к роутеру, то он так же находится в локальной сети), то вы можете узнать свой IP адрес в этой сети в соответствующем пункте.
- Если на вашем компьютере используется подключение PPTP, L2TP или PPPoE, то вы можете увидеть свой IP адрес в Интернете в параметрах этого подключения (однако лучше воспользоваться каким-либо сайтом для определения своего IP в Интернете, так как в некоторых конфигурациях IP адрес, отображаемый при выполнении команды ipconfig, может не соответствовать ему).
ipconfig /flushdns — очистка кэша DNS
Если вы изменили адрес DNS сервера в настройках подключения (например, из-за проблем с открытием какого-либо сайта), или постоянно видите ошибку наподобие ERR_DNS_FAIL или ERR_NAME_RESOLUTION_FAILED, то эта команда может пригодиться. Дело в том, что при изменении адреса DNS, Windows может не использовать новые адреса, а продолжать пользоваться сохраненными в кэше. Команда ipconfig /flushdns очистит кэш имен в Windows.
Ping и tracert — быстрый способ выявить проблемы в работе сети
Если у вас возникают проблемы со входом на сайт, в те же настройки маршрутизатора или другие проблемы с сетью или интернетом, команды ping и tracert могут пригодиться.

Если вы введете команду ping yandex.ru, Windows начнет посылать пакеты в адрес Яндекса, при их получении, удаленный сервер будет уведомлять ваш компьютер об этом. Таким образом, вы можете увидеть, доходят ли пакеты, какая среди них доля потерянных и с какой скоростью происходит передача. Часто это команда пригождается при действиях с роутером, если, к примеру, не удается зайти в его настройки.
Команда tracert отображает путь передаваемых пакетов к адресу назначения. С помощью нее, к примеру, вы можете определить, на каком узле происходят задержки при передаче.
netstat –an — отображение всех сетевых подключений и портов

Команда netstat полезна и позволяет увидеть самую разнообразную сетевую статистику (при использовании различных параметров запуска). Один из наиболее интересных вариантов использования — запуск команды с ключом –an, который открывает список всех открытых сетевых подключении на компьютере, портов, а также удаленных IP адресов, с которых осуществляется подключения.
telnet для подключения к серверам Telnet
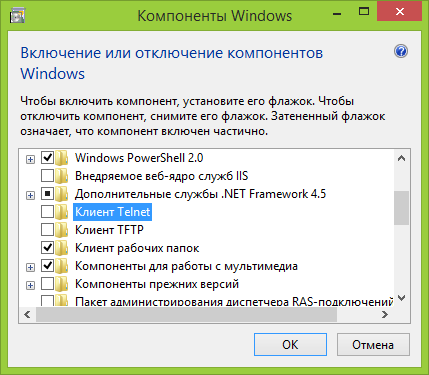
По умолчанию, в Windows не установлен клиент для Telnet, однако его можно установить в «Программы и компоненты» панели управления. После этого, можно использовать команду telnet для подключения к серверам без использования какого-либо стороннего программного обеспечения.
Это далеко не все команды такого рода, которые вы можете использовать в Windows и не все варианты их применения, есть возможность вывода результата их работы в файлы, запуска не из командной строки, а из диалогового окна «Выполнить» и другие. Так что, если эффективное использование команд Windows вам интересно, а общей информации, представленной здесь для начинающих пользователей, недостаточно, рекомендую поискать в Интернете, там есть.