

Про Windows File Recovery
Средство восстановления файлов Microsoft Windows не имеет графического интерфейса — это всего лишь утилита командной строки. Мы покажем вам, как его использовать, но это более сложный процесс, чем вы могли бы ожидать от официальной утилиты Microsoft, доступной в Магазине Windows 10.
Для этого инструмента требуется установленное майское обновление 2020 года для Windows 10 или более новая версия Windows 10. Он не работает в старых версиях Windows.
Может ли инструмент Microsoft действительно найти и восстановить удаленный файл, зависит от диска? Удаленные файлы не удаляются сразу с жестких дисков, но часто они сразу удаляются с твердотельных дисков. Если вы удалили много данных на устройстве, таком как SD-карта, то после удаления файла, вероятно, данные файла могли быть перезаписаны. Даже если вам удастся восстановить файл, вы можете получить только некоторые данные файла — файл может быть поврежден. Вы можете получить только те данные, которые еще находятся на диске. Здесь нет никаких гарантий, и поэтому резервные копии так важны.
Утилита также имеет несколько режимов, предназначенных для разных ситуаций и файловых систем. Мы как их использовать.
Как установить Windows File Recovery
Для начала установите Windows File Recovery из Магазина Microsoft, чтобы начать. Вы можете открыть Магазин и выполнить поиск «Windows File Recovery» или просто щелкнуть эту ссылку, чтобы открыть Магазин.
После установки откройте меню «Пуск» и выполните поиск и запустите ярлык Windows File Recovery один раз и нажмите «Да» для запроса UAC.

Вы увидите окно командной строки с доступом администратора. Здесь вы будете запускать команды восстановления файлов.
Вы можете использовать другие среды командной строки, такие как Windows Terminal и PowerShell, но не забудьте запустить их с правами администратора. (В меню «Пуск» щелкните правой кнопкой мыши тот файл, который хотите использовать, и выберите «Запуск от имени администратора».)

Как восстановить удаленные файлы в Windows 10
Чтобы использовать этот инструмент, вы запустите команду winfr, указав диск, на котором вы хотите найти удаленный файл, место назначения, куда вы хотите сохранить его, и различные ключи, которые управляют тем, что инструмент ищет и как он ищет. Вы должны сохранить удаленный файл на другой диск.
Вот формат команды:
winfr source-drive: destination-drive: /switches
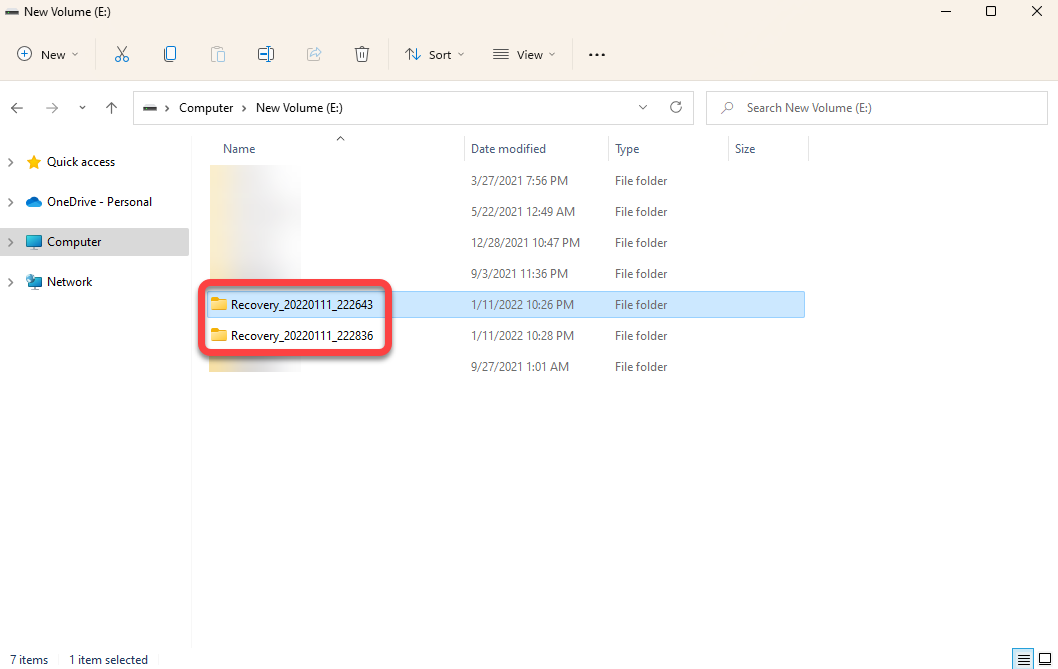
После выполнения команды инструмент автоматически создаст каталог с именем Recovery_ [дата и время] на указанном целевом диске.
Какой режим использовать?
Прежде чем продолжить, вы должны определить режим, в котором вы хотите выполнить поиск удаленного файла. Существует три режима: Default, Segment и Signature. Default это самый быстрый режим, Segment похож на него, но медленнее и тщательнее. Режим Signature может искать файлы по типу — он поддерживает файлы ASF, JPEG, MP3, MPEG, PDF, PNG и ZIP. (При поиске файлов «ZIP» также будут найдены документы Office, хранящиеся в таких форматах, как DOCX, XLSX и PPTX.)
Вам нужно знать, в какой файловой системе отсканирован диск, который вы будете сканировать. Чтобы найти это, откройте проводник, щелкните правой кнопкой мыши диск в разделе «Этот компьютер» и выберите «Свойства». Вы увидите файловую систему, отображаемую на вкладке «Общие».

Вот когда вы должны использовать разные режимы:
- Вы пытаетесь найти файл, который вы недавно удалили, на диске, отформатированном в NTFS, которая является файловой системой Windows 10 по умолчанию? Используйте режим Default.
- Если вы сканируете диск NTFS в другой ситуации — например, если вы удалили файл некоторое время назад, отформатировали диск или имеете дело с поврежденным диском — сначала попробуйте режим Segment, а затем — режим Signature.
- Вы пытаетесь найти файл, сохраненный на диске FAT, exFAT или ReFS? Используйте режим Signature. Режимы Default и Segment работают только в файловых системах NTFS.
Если у вас есть сомнения, просто начните с режима Default. Затем вы можете попробовать Segment, а затем Signature, если режим по умолчанию не работает.
Как восстановить файл в режиме Default
Чтобы использовать режим Default, нужно написать /n, а затем путь поиска:
- Для поиска файла с именем
document.docxвы должны использовать/n document.docx. Вы также можете указать полный путь к файлу, например/n UsersAlexDocuments document.docx - Чтобы найти все файлы, которые были в папке «Документы», если ваше имя пользователя — Alex, вы должны использовать
/n UsersAlexDocuments. - Для поиска с wildcard используйте звездочку
*. Например,/n UsersAlexDocuments*.docxнайдет все файлы DOCX, которые были в папке «Документы».
Давайте соединим все это сейчас в примере. Чтобы найти все файлы DOCX на диске C: и скопировать их на диск D:, вы должны выполнить следующую команду:
winfr C: D: /n *.docx
Вам нужно будет набрать y, чтобы продолжить.

Как мы упоминали выше, вы найдете восстановленные файлы в каталоге с именем Recovery_ [дата и время] на целевом диске, который вы указали в командной строке.
![Recovery_ [дата и время]](https://legacy.merionet.ru/images/kak-vosstanavlivat-fajly-v-microsoft-windows-file-recovery/6.png "Recovery_ [дата и время]")
Чтобы найти все файлы со определенным словом в названии, используйте wildcard. Итак, чтобы найти все документы со словом «project» в любом месте в их имени, вы должны выполнить:
winfr C: D: /n *project*
Вы можете указать несколько поисков за раз с помощью нескольких ключей /n. Итак, чтобы найти все файлы Word, Excel и PowerPoint, вы должны выполнить следующее:
winfr C: D: /n *.docx /n *.xlsx /n *.pptx
Чтобы найти определенный файл с именем important_document.pdf, находящийся в папке UsersAlexDocuments на диске C:, а затем сохранить его на диске D: вы должны использовать:
winfr C: D: /n UsersAlexDocumentsimportant_document.pdf
Как восстановить файл в режиме Segment
Режим Segment работает почти так же, как режим Default. Чтобы использовать режим Segment, который проверяет сегменты записи файла, нужно использовать /r в дополнение к /n.
Другими словами, вы можете создавать команды восстановления в режиме Segment так же, как вы строите команды режима Default — просто добавьте /r.
Например, чтобы восстановить все удаленные файлы MP3 с вашего диска C: и сохранить их на диске D: вы должны выполнить:
winfr C: D: /r /n *.mp3
Поэтому, если поиск в режиме Default не находит того, что вы ищете, добавьте /r и попробуйте снова.

Как восстановить файл в режиме Signature
Режим Signature работает немного по-другому. Он проверяет типы файлов, поэтому он может найти только удаленные файлы определенных типов файлов. Чтобы использовать режим Signature, вам нужно использовать /x, чтобы указать режим Signature, и /y: чтобы указать список групп типов файлов, которые вы хотите найти.
Вот список поддерживаемых типов файлов и групп, в которые они отсортированы, взяты из документации Microsoft:
- ASF: wma, wmv, asf
- JPEG: jpg, jpeg, jpe, jif, jfif, jfi
- MP3: mp3
- MPEG: mpeg, mp4, mpg, m4a, m4v, m4b, m4r, mov, 3gp, qt
- PDF: pdf
- PNG: png
- ZIP: zip, docx, xlsx, pptx, odt, ods, odp, odg, odi, odf, odc, odm, ott, otg, otp, ots, otc, oti, otf, oth
Обратите внимание, что группа «ZIP» включает ZIP-файлы в дополнение к документам Microsoft Office и OpenDocument.
Вы можете открыть этот список в любое время, выполнив следующую команду:
winfr /#

Допустим, вы хотите найти на диске E: изображения в формате JPEG и сохранить их на диске D:. Вам нужно запустить следующую команду:
winfr E: D: /x /y:JPEG
Вы можете указать несколько групп файлов, разделяя их запятой. Итак, если вы хотите найти файлы JPEG, PDF и Word, вы должны выполнить:
winfr E: D: /x /y:JPEG,PDF,ZIP

Больше помощи с winfr
Более подробная информация доступна на официальной странице документации Microsoft winfr. На этой странице вы также найдете подробный список всех параметров командной строки winfr.
Для того чтобы изучить основы, просто запустите winfr или winfr /?.
Есть также дополнительные параметры, которые вы можете увидеть, запустив winfr /!.

From Wikipedia, the free encyclopedia
Windows File Recovery
| Other names | winfr |
|---|---|
| Developer(s) | Microsoft |
| Operating system | Microsoft Windows |
| Type | Command |
| License | Proprietary commercial software |
| Website | Official website |
Windows File Recovery is a command-line software utility from Microsoft to recover deleted files.[1][2] It is freely available for Windows 10 version 2004 (May 2020 Update) and later from the Microsoft Store.[3]
Windows File Recovery can recover files from a local hard disk drive (HDD), USB flash drive, or memory card such as an SD card.[4][5] It can work to some extent with solid-state drives (SSD).[6]
The program is run using the winfr command.[4] It has a mode designed for NTFS file systems, that will attempt recovery of files from a disk that is corrupted or has been formatted.[5] Another mode will attempt recovery of specific file types from FAT and exFAT (predominantly found on external devices) and ReFS file systems.[5][6]
- Data remanence
- Data recovery
- List of data recovery software
- File History
- Trash (computing)
- Undeletion
- ^ «Microsoft Releases Windows File Recovery Tool». Paul Thurrott. 27 June 2020. Retrieved 2020-07-02.
- ^ «Windows File Recovery tool lets you recover deleted, lost files on Windows 10». Hindustan Times Tech. 29 June 2020. Retrieved 2020-07-02.
- ^ «Microsoft releases its own Windows File Recovery tool». Independent Online (South Africa). Retrieved 2020-07-02.
- ^ a b Team, BS Web (2 July 2020). «How to recover deleted files using Microsoft’s Windows File Recovery tool». Business Standard India. Retrieved 2020-07-02.
- ^ a b c Warren, Tom (29 June 2020). «Microsoft’s new Windows File Recovery tool lets you retrieve deleted documents». The Verge. Retrieved 2020-07-02.
- ^ a b «Microsoft offers its own File Recovery Tool for Windows 10». techxplore.com. Retrieved 2020-07-02.
- Official website
Windows File Recovery — полезная утилита, которая поможет восстановить удаленные или поврежденные файлы (например фотографии, видео, документы и пр.) на жестком диске, SSD (ограниченного TRIM), USB-накопителе или карте памяти.
Приложение поддерживает восстановление различных типов файлов, присутствует режим Signature, позволяющий работать с различными файловыми системами (отличающихся от NTFS), и умеет восстанавливать данные с цифровых камер, SD-карт и других устройств хранения данных.
Ключевые функции Windows File Recovery
- Поддерживается работа с JPEG, PDF, PNG, MPEG, файлы Microsoft Office, MP3 & MP4, ZIP-архивы и т.д.
- Возможность указать названия целевых файлов, ключевые слова, пути к файлам или расширения.
- Умеет восстанавливать данные с HDD, SSD, USB-накопителей и карт-памяти.
- Поддержка различных файловых систем, включая NTFS, FAT, exFAT и ReFS.
ТОП-сегодня раздела «Восстановление данных»
Recuva 1.54.120
Recuva — мощная утилита для восстановления данных, которые были удалены на жестких дисках и…
Disk Drill 5.7.916
Disk Drill — бесплатная программа для восстановления удаленных данных для Windows. Без проблем…
R.saver 9.5 / 2.5.1
R.saver – бесплатная программа для восстановления данных с различных версий файловых систем…
Отзывы о программе Windows File Recovery
Admin
Отзывов о программе Windows File Recovery 0.0.11761.0 пока нет, можете добавить…
Время на прочтение2 мин
Количество просмотров16K

В конце июня 2020 года Microsoft выпустила бесплатный программный инструмент для восстановления удаленных файлов — Windows File Recovery (WINFR).
Утилита работает только с ОС Windows 10 версии 2004 (build 19041 или старше), причем у нее нет графического интерфейса, нужно использовать командную строку. Для полноценной работы WINFR (winfr.exe) также лучше запускать с правами администратора системы. WINFR не поддерживает сетевые и облачные хранилища.
WINFR поддерживает:
- HDD, SSD (есть ограничения из-за использования TRIM), внешние USB-диски и карты памяти;
- файловые системы: NTFS, FAT, exFAT и ReFS;
- различные типы файлов, в том числе JPEG, PDF, PNG, MPEG, Office (doc/xlsx), MP3, MP4, ZIP и другие.
Windows File Recovery может работать в трех режимах — Default (используется Master File Table), Segment (только для NTFS), и Signature (поиск по сигнатурам файлов, это рекомендуемый Microsoft режим при восстановлении данных с внешнего устройства хранения).
Подробная инструкция по утилите WINFR доступна на портале Microsoft.
Примеры команд WINFR в режиме Default (папки для восстановления данных нужно создавать заранее, WINFR их не создает):
- восстановление определенного файла с диска C: в отдельную директорию на диске D:
winfr C: D: /n \Users\<username>\Documents\QuarterlyStatement.docx - восстановление файлов с расширением jpeg и png из папки «Изображения» в отдельную директорию на диске D:
winfr C: D: /n \Users\<username>\Pictures\*.JPEG /n \Users\<username>\Pictures\*.PNG - восстановление папки «Документы» в отдельную директорию на диске D:
winfr C: D: /n \Users\<username>\Documents\
Примеры команд WINFR в режиме Segment (/r):
- восстановление файлов с расширением PDF и DOCX с диска С: в отдельную директорию на диске D:
winfr C: D: /r /n *.pdf /n *.docx<username>\Documents\ - восстановление любого файла со словом invoice в имени на диска С: в отдельную директорию на диске D: (используются символы-шаблоны):
winfr C: D: /r /n *invoice*
Примеры команд WINFR в режиме Signature (/x):
- восстановление файлов с расширением JPEG (jpg, jpeg, jpe, jif, jfif, jfi) с диска С: в отдельную директорию на диске D:
winfr C: D: /x /y:JPEG,PNG - восстановление файлов с расширением ZIP (zip, docx, xlsx, ptpx и другие) с диска С: в отдельную директорию на диске D:
winfr C: D:\RecoveryTest /x /y:ZIP
Вдобавок энтузиасты на портале ghacks.net также опубликовали инструкцию по использованию Windows File Recovery, где описали основные моменты работы инструмента. Оказывается, что, например, в WINFR процесс сканирования довольно медленный, хотя это зависит от объема и содержимого дискового накопителя, а после завершения процесса восстановления можно сразу просмотреть восстановленные файлы в Проводнике. В процессе своей работы WINFR создает log-файл с подробной информацией о сохраненных файлах.
См. также:
- «В Windows 10 появился собственный сниффер трафика pktmon, как запустить и пользоваться»

Windows 10 May 2020 update (i.e., Windows 10 version 2004 build 19041) introduced Windows users to the Windows File Recovery tool. The Microsoft Recovery Software is available on the Microsoft Store. However, if you’re running an older version of Windows, you won’t be able to install Windows File Recovery.
Also, note that the utility doesn’t have a graphical UI and can be used only through the Command Prompt or PowerShell. If you’re not comfortable working with command-line utilities or using an older version of Windows, consider using a robust third-party recovery tool.
Windows File Recovery software (also called WinFR) is a recovery tool created by Microsoft. It can help you scan your hard drive’s file system for lost files. The utility can scan storage devices like HDD, SDD, flash drives, and SD cards with file systems like NTFS, FAT, exFAT, and ReFS.
WinFR came with three recovery modes—Default, Segment, and Signature—when it was first introduced. However, the recovery options have since been boiled down to two: Regular and Extensive.
- Regular mode is a quick scan only for NTFS partitions. There are no limitations on the devices you can scan though. You can recover files from many devices including SSDs, external HDDs, or flash drives as long as they’re formatted as NTFS. Regular mode is best suited when you’re trying to recover files that were deleted only recently.
- Extensive mode performs a more thorough scan and supports NTFS, FAT, exFAT, and ReFS partitions. If you’re trying to recover files from a corrupted or formatted disk, or files that you deleted a while ago, you should use the Extensive mode.
Note: Microsoft recommends using the Extensive mode in most cases, except when you’re recovering recently deleted files from an NTFS partition.
How to Install and Start to Use Windows File Recovery
Windows File Recovery software isn’t similar to using other recovery tools because of one reason—it’s a command-line utility that doesn’t have a GUI. In this guide, we’ll walk you through how to use the Windows File Recovery app for recovering your files within a few minutes.
Installing and using Windows File Recovery software is quick and easy. Following are the steps involved in using Windows File Recovery for recovering deleted files.
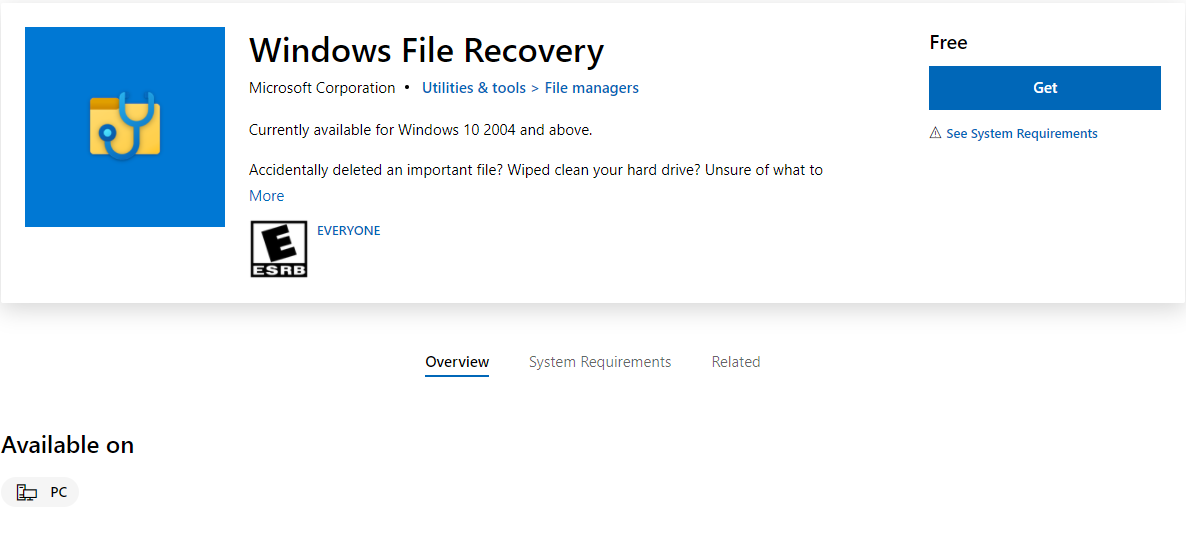
Step 1:Download and Install Windows File Recovery
You can download and install the Windows File Recovery utility from Microsoft Store for free.
- Once you find the utility in the store, click on the Get button to start installing it.

- Once the download completes, click on the Open button.

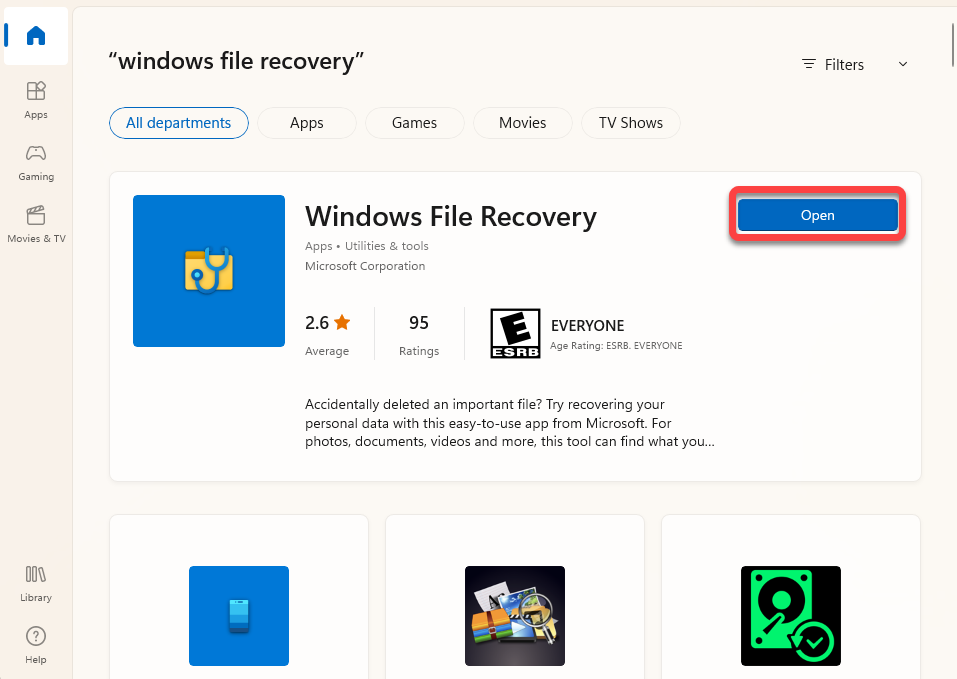
You’ll see an elevated Command Prompt window pop up. You can also use the Windows Terminal or PowerShell if you prefer, but be sure to launch them with administrative privileges.
Step 2:Run Windows File Recovery Commands
At this point, you’ll need to execute Windows File Recovery commands to start recovering files on your Windows PC. Here’s the basic format to execute a Windows File Recovery command:
winfr source-drive: destination-drive: [/mode] [/switches]
In this syntax, “source-drive” corresponds to the drive you want to scan for deleted files. The “destination-drive” is where you want to put your recovered files, which should be a different drive from the source drive.
The “mode” refers to how Windows File Recovery should scan your device. You can choose between two basic recovery modes: Regular and Extensive modes.
- Use the /regular mode as a standard recovery option to scan a healthy NTFS system for recently deleted files.
- Use the /extensive mode for a more comprehensive scan and recovery process. Extensive mode is applicable for data loss due to corruption, formatting, and files deleted a long time ago, among other scenarios. This mode is applicable for NTFS, FAT, and exFAT file systems.
Remember that an Extensive scan will take longer than a regular scan. Both modes, however, will try to scan and recover all files in your source location, including hidden files.
The following is an example command for regular mode data recovery:
Winfr C: D: /regular /n \Users\<your_username>\Pictures\
The command above scans and recovers your Pictures folder from the C: drive and places it in the recovery folder on a D: drive. The last parameter, “\Users\<your_username>\Pictures\ “, is the specific location where Windows Recovery Tool would try to find any recoverable files.
But that’s not the only way to search and recover your files using Windows File Recovery. Here’s a table that summarizes the parameters you can use for file recovery:
| Parameter/Switches | Description |
| /n<filter> | Used to scan for specific file names, paths, and wildcards |
| /ntfs | Refers to the NTFS mode, the most optimized mode to scan healthy NTFS drives using the master file table |
| /segment | Refers to the Segment mode, which is used to scan NTFS drive using file record segments |
| /signature | Refers to the Signature mode, which is used to scan all file system types using file headers |
| /a | Used to override user prompts |
| /u | Used to recover undeleted files, for example, from the Recycle Bin. |
| /k | Used to recover system files. |
| /g | Used to recover files that do not have primary data streams |
| /e | Used to disable the default filtering of some file types in the scan results |
You can visit Microsoft’s Windows File Recovery manual to check out their notes for the current version of the app.
How to Look for Specifics
Windows File Recovery offers you a lot of flexibility to scan and recover specific files. Here are some of the templates for scanning your storage device according to your data recovery needs:
- Scan specific folders – If you know where the deleted file was stored, you can add a location filter in the command
Winfr C: E: /regular /n “\Program Files\”. Where the folder name Program Files is enclosed in quotation marks as a rule for names with spaces. - Search for a specific file – If you remember the exact name of the file you want to recover, you can follow this format to find it:
winfr D: E: /extensive /n “Projects\2022\Client ABC.pdf”. - Search for a specific file type – If you don’t remember the name of the file, you can search only for a certain file type. For instance, if you want to search only for MS Word documents, you can use the following command:
winfr D: E: /extensive /n “Projects\2022\*.docx”
If you want to recover more than just one file type, you can add as many of them as you wish. For instance, here’s how you can scan for both Word and PDF files:winfr D: E: /extensive /n "Projects\\2022\\* .docx" /n "Projects\\2022\\*.pdf"
- Search file with a specific text string – Say you remember only a part of the file name but want to narrow down your search to save time. For instance, you know that the file name has the word “client”. Regardless of where the text string is in the file name, you can do so using the following command:
winfr D: E: /extensive /n “Projects\2022\*Client*”.
Step 3:Access recovered files
Once the scan completes, go to the destination folder path. You’ll find a folder with a name that starts with the word “Recovery” and that’s where you’ll find the recovered files.
An Alternative of Windows File Recovery
Windows File Recovery is a nifty tool. However, it requires some familiarity with using command-line utilities, which means it’s not all that user-friendly. It also comes with limitations like not being able to run a regular scan for file systems other than NTFS.
A smart recovery tool like Disk Drill can come in handy when you need an easy recovery solution. Plus, you shouldn’t have to search for appropriate commands online when you need to recover files quickly. Disk Drill has a user-friendly interface that can help you recover data. You can recover up to 500MB of data on the free version.
Following are the benefits of using a robust tool like Disk Drill:
- User-friendly GUI
- Supports a large number of file systems and file types
- Intelligent algorithm that scans your devices accurately
- Option to preview files before recovering them
- Built-in features for backup and data protection
Here’s a quick guide on how you can recover files with Disk Drill:
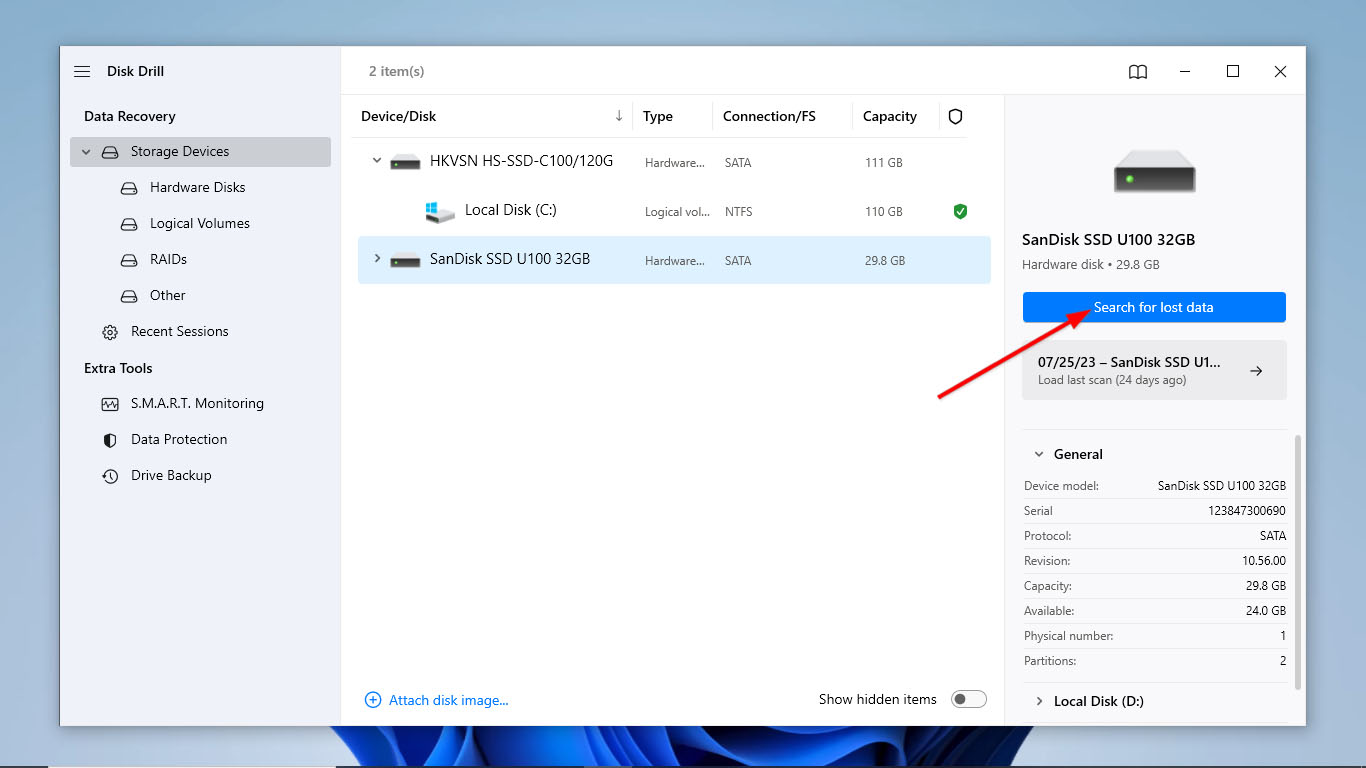
- Download Disk Drill. Once the download is complete, open the installer and follow the prompts to install the app.
- Now, open the Disk Drill app. The main screen will show you the list of drives you can scan. Pick the drive you want to recover data from and hit the Search for lost data button to begin scanning your drive.

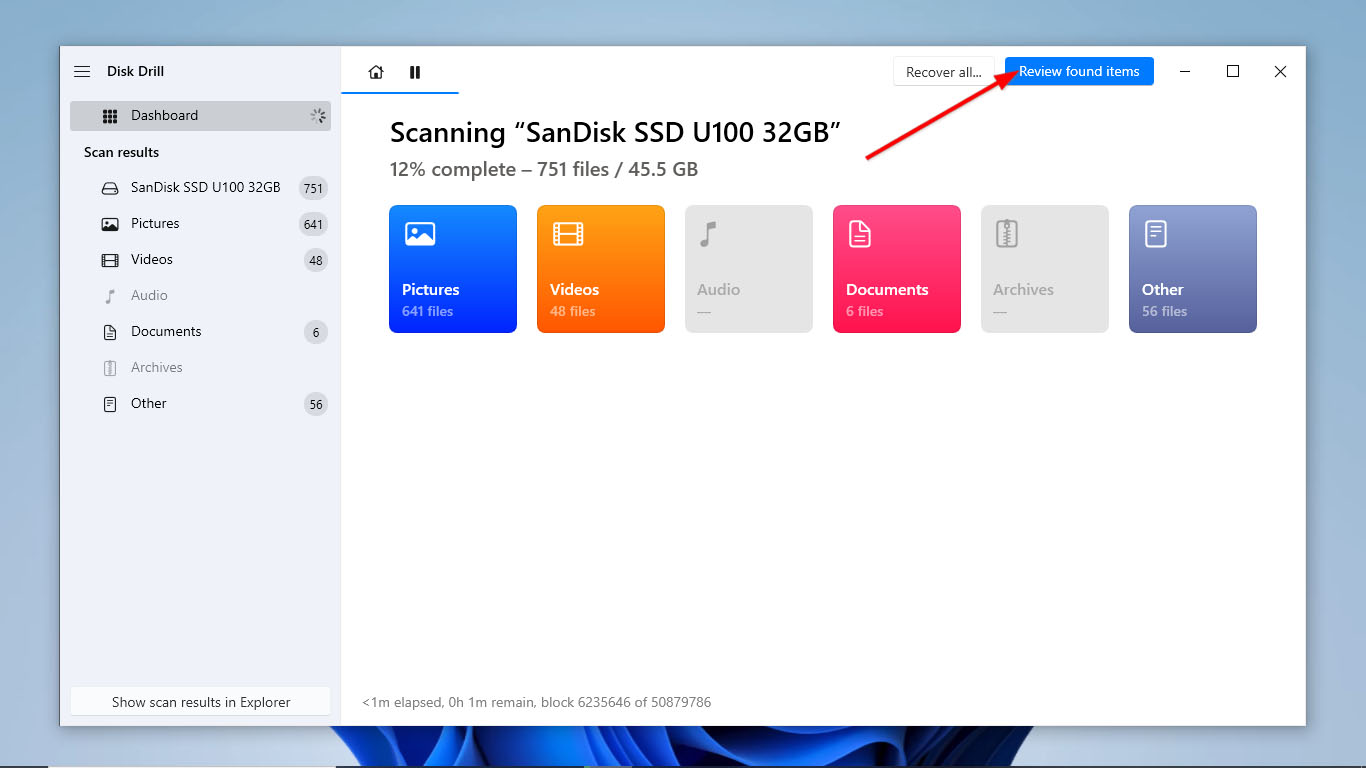
- If you want to see the files Disk Drill has found so far, click the Review found items button at the top-right corner. To let the scan finish first, skip this step and move on to the next one.
- Once the scan finishes, go ahead and click Review found items.
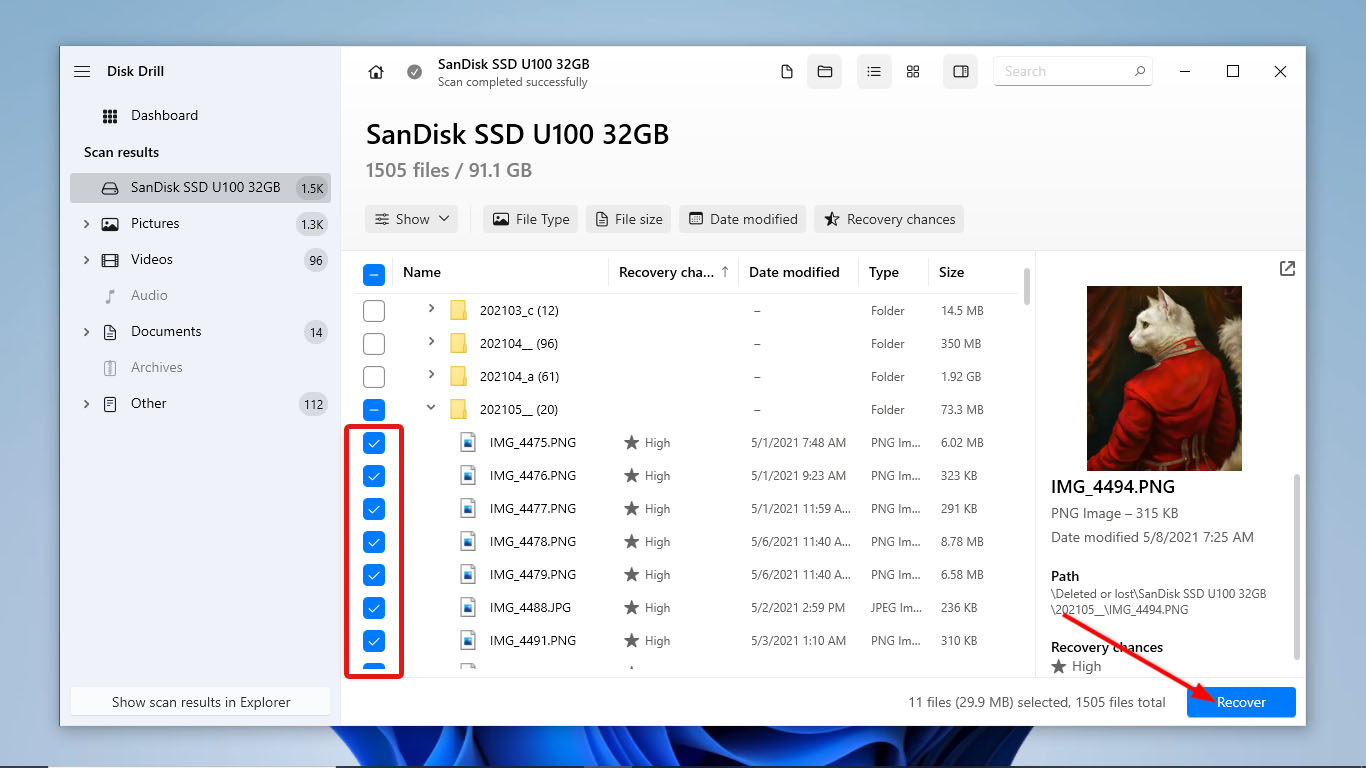
- After that, choose the files you want to recover by ticking the checkboxes beside their file names. Then, click Recover.
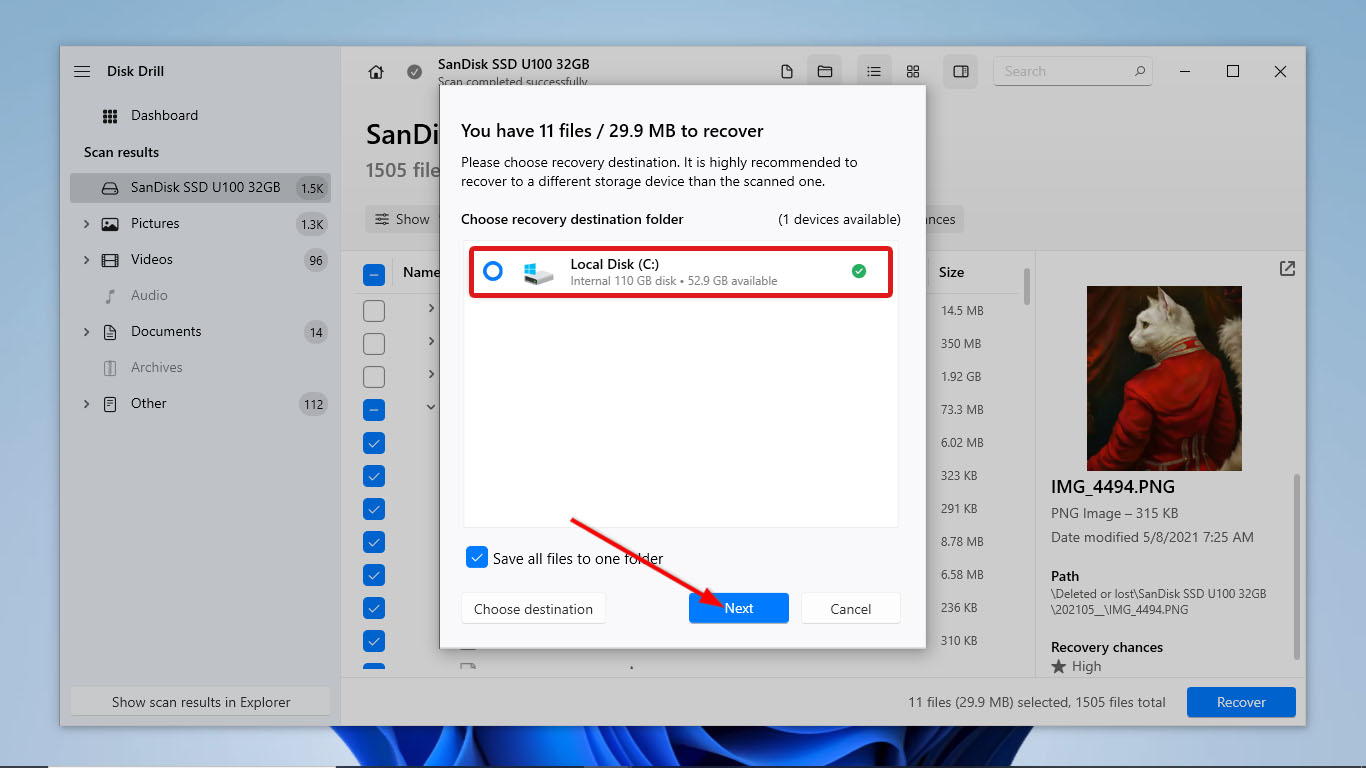
- Upon clicking, Disk Drill will now prompt where you want to place your recovered files. Ensure that your destination drive is different from the one you scanned. After that, click Next to start the recovery process.
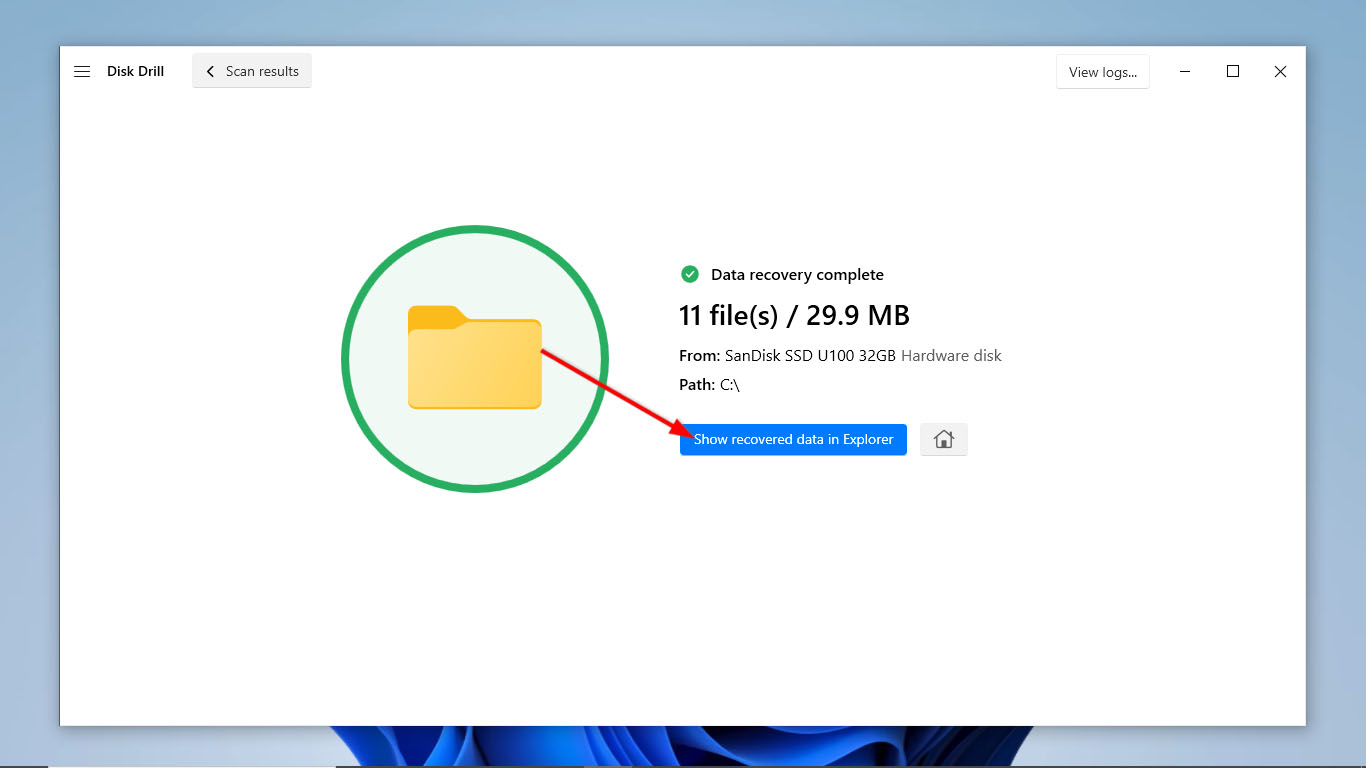
- Finally, Disk Drill will display the details of the retrieved files once the recovery process is complete. Click Show recovered data in Explorer to open your files in File Explorer.
Conclusion
Windows File Recovery Tool is a free tool made by Microsoft to restore deleted files. It runs on a command line interface and has powerful commands to recover everything from deleted documents to critical system files. By understanding what each of their parameters does, you can create a command that suits your specific data recovery needs.
But if you’re seeking a more user-friendly and versatile solution, alternatives like Disk Drill can serve as a great option. With its modern GUI, easy-to-follow recovery steps, and intelligent scanning algorithms, among other extra features, you can perform data recovery easily, even without being tech-savvy.
FAQ
Yes. Windows File Recovery tool is Microsoft’s command line tool that effectively recovers deleted or lost files without the need for third-party software.
Windows File Recovery tool is a fairly reliable tool for data recovery on Windows systems. It has different command and scanning options that you can play with to scan your device according to your needs. However, like any other data recovery tool, its effectiveness still depends on factors like the extent of data loss and the condition of your storage device.
To use Windows File Recovery in Windows 11, follow these steps:
- Open the Command Prompt as an Administrator.
- Type the following command: winfr source-drive: destination-drive: [/mode] [/switches]
Replace source-drive with the letter of the drive you want to scan.
Replace destination-drive with the letter of the drive where you want to save the recovered files.
Use /mode to specify the recovery mode (regular, extensive, etc. depending on your scanning preferences).
Utilize various /switches to customize the data recovery process - Press Enter to execute the command and start the recovery process.
Note that this information is based on Windows 11 at the time of writing. Updates and changes to parameters and functions may have been changed since.