
In computing, netstat is a command-line network utility that displays open network sockets, routing tables, and a number of network interface (network interface controller or software-defined network interface) and network protocol statistics. It is available on Unix, Plan 9, Inferno, and Unix-like operating systems including macOS, Linux, Solaris and BSD. It is also available on IBM OS/2 and on Microsoft Windows NT-based operating systems including Windows XP, Windows Vista, Windows 7, Windows 8 and Windows 10.
netstat
|
The |
|
| Developer(s) | Various open-source and commercial developers |
|---|---|
| Initial release | 1983; 42 years ago |
| Written in | Plan 9: C |
| Operating system | Unix, Unix-like, Plan 9, Inferno, OS/2, Microsoft Windows, ReactOS |
| Platform | Cross-platform |
| Type | Command |
| License | OS/2, Windows: Proprietary commercial software net-tools, ReactOS: GPLv2 Plan 9: MIT License |
It is used for finding problems in the network and to determine the amount of traffic on the network as a performance measurement.[1] On Linux this program is mostly obsolete, although still included in many distributions.
On Linux, netstat (part of «net-tools») is superseded by ss (part of iproute2). The replacement for netstat -r is ip route, the replacement for netstat -i is ip -s link, and the replacement for netstat -g is ip maddr, all of which are recommended instead.[2][3][4][5]
Netstat provides statistics for the following:
- Proto – The name of the protocol (TCP, UDP, etc.). On some systems, the protocol name may be followed by «4» or «6», depending on whether the protocol is running over IPv4 or IPv6.
- Local Address – The IP address of the local computer and the port number being used. The name of the local computer that corresponds to the IP address and the name of the port is shown unless the
-nparameter is specified. An asterisk (*) is shown for the host if the server is listening on all interfaces. If the port is not yet established, the port number is shown as an asterisk. - Foreign Address – The IP address and port number of the remote computer to which the socket is connected. The names that corresponds to the IP address and the port are shown unless the
-nparameter is specified. If the port is not yet established, the port number is shown as an asterisk (*). - State – Indicates the state of a TCP connection. The possible states are as follows: CLOSE_WAIT, CLOSED, ESTABLISHED, FIN_WAIT_1, FIN_WAIT_2, LAST_ACK, LISTEN, SYN_RECEIVED, SYN_SEND, and TIME_WAIT. For more information about the states of a TCP connection, see RFC 793.
Parameters used with this command must be prefixed with a hyphen (—) rather than a slash (/). Some parameters are not supported on all platforms.
| Name | Description | Windows | ReactOS | macOS | BSD | NetBSD | FreeBSD | Linux | Solaris | OS/2 |
|---|---|---|---|---|---|---|---|---|---|---|
| -a | Displays all active connections and the TCP and UDP ports on which the computer is listening. | Yes | Yes | Yes | Yes | Yes | Yes | |||
| -b | Displays the binary (executable) program’s name involved in creating each connection or listening port. (Windows XP, Windows Server 2003 and newer Windows operating systems; not Microsoft Windows 2000 or older). | Yes | No | No | ||||||
| -b | Causes -i to report the total number of bytes of traffic. | No | Yes | Yes | No | |||||
| -e | Displays ethernet statistics, such as the number of bytes and packets sent and received. This parameter can be combined with -s. | Yes | Yes | No | ||||||
| -f | Displays fully qualified domain names <FQDN> for foreign addresses (only available on Windows Vista and newer operating systems). | Yes | No | No | ||||||
| -f Address Family | Limits display to a particular socket address family, unix, inet, inet6 | No | Yes | No | ||||||
| -g | Displays multicast group membership information for both IPv4 and IPv6 (may only be available on newer operating systems) | No | No | Yes | ||||||
| -i | Displays network interfaces and their statistics | No | No | Yes | Yes | Yes | Yes | Yes | ||
| -m | Displays the memory statistics for the networking code (STREAMS statistics on Solaris). | No | No | Yes | Yes | Yes | Yes | Yes | ||
| -n | Displays active TCP connections, however, addresses and port numbers are expressed numerically and no attempt is made to determine names. | Yes | Yes | Yes | Yes | Yes | Yes | Yes | Yes | |
| -o | Displays active TCP connections and includes the process id (PID) for each connection. You can find the application based on the PID in the Processes tab in Windows Task Manager. This parameter can be combined with -a, -n, and -p. This parameter is available on Microsoft Windows XP, Windows Server 2003, and Windows 2000 if a hotfix is applied.[6] | Yes | No | No | ||||||
| -p protocol | Shows connections for the protocol specified by protocol. In this case, protocol can be tcp, udp, tcpv6, or udpv6. If this parameter is used with -s to display statistics by protocol, protocol can be tcp, udp, icmp, ip, tcpv6, udpv6, icmpv6, or ipv6. | Yes | Yes | Yes | Yes | Yes | Yes | |||
| -p | Show which processes are using which sockets (similar to -b under Windows) (you must be root to do this) | No | No | Yes | ||||||
| -P protocol | Shows connections for the protocol specified by protocol. In this case, protocol can be ip, ipv6, icmp, icmpv6, igmp, udp, tcp, or rawip. | No | No | Yes | ||||||
| -r | Displays the contents of the IP routing table. (This is equivalent to the route print command under Windows.) | Yes | Yes | Yes | Yes | Yes | Yes | Yes | Yes | Yes |
| -s | Displays statistics by protocol. By default, statistics are shown for the TCP, UDP, ICMP, and IP protocols. If the IPv6 protocol for Windows XP is installed, statistics are shown for the TCP over IPv6, UDP over IPv6, ICMPv6, and IPv6 protocols. The -p parameter can be used to specify a set of protocols. | Yes | Yes | Yes | Yes | Yes | Yes | Yes | Yes | |
| -t | Display only TCP connections. | No | Yes | Yes | ||||||
| -u | Display only UDP connections. | No | No | Yes | Yes | |||||
| -W | Display wide output — doesn’t truncate hostnames or IPv6 addresses | No | No | Yes | No | |||||
| -x | Displays NetworkDirect connections, listeners, and shared endpoints. | Yes | ||||||||
| -y | Displays the TCP connection template for all connections.Cannot be combined with the other options. | Yes | ||||||||
| -v | When used in conjunction with -b it will display the sequence of components involved in creating the connection or listening port for all executables. | Yes | No | No | ||||||
| Interval | Redisplays the selected information every Interval seconds. Press CTRL+C to stop the redisplay. If this parameter is omitted, netstat prints the selected information only once. | Yes | Yes | No | ||||||
| -h | Displays help at the command prompt. | Yes | No | Yes | Yes | Yes | Yes | Yes | Yes | No |
| -? | Displays help at the command prompt. | Yes | No | No | No | No | No | No | No | Yes |
| /? | Displays help at the command prompt. | Yes | Yes | No | No | No | No | No | No | No |
On macOS, BSD systems, Linux distributions, and Microsoft Windows:
To display the statistics for only the TCP or UDP protocols, type one of the following commands:
netstat -sp tcp
netstat -sp udp
On Unix-like systems:
To display all ports open by a process with id pid:
netstat -aop | grep "pid"
To continuously display open TCP and UDP connections numerically and also which program is using them on Linux:
netstat -nutpacw
On Microsoft Windows:
To display active TCP connections and the process IDs every 5 seconds, type the following command (works on NT based systems only, or Windows 2000 with hotfix):
netstat -o 5
To display active TCP connections and the process IDs using numerical form, type the following command (works on NT based systems only, or Windows 2000 with hotfix):
netstat -no
| Command | Explanation |
|---|---|
netstat -a |
Shows all sockets, both listening and non-listening, all protocols like TCP, UDP etc. |
netstat -at |
Shows only TCP connections (-au shows only UDP connections) |
netstat -ant |
Shows all TCP connections with no DNS resolution (show IP addresses instead). |
netstat -al |
Shows only listening sockets. |
netstat -aep |
Also show PID and to which program each socket belongs, e adds extra info like the user. Run as root to see all PIDs. |
netstat -s |
Shows network statistics. |
netstat -r |
Shows kernel routing information. This is the same output as route -e. |
netstat -i |
Displays a table of all network interfaces. Add -e to get output similar to ifconfig. |
netstat -ct |
Displays TCP connections continuously. |
netstat -g
|
Display multicast group membership information for IPv4 and IPv6. |
netstat -lntu
|
Display all services listening for TCP and UDP, all free open ports on the local machine. |
netstat -atnp | grep ESTA
|
Displays all currently «established» TCP connections. |
Netstat uses an asterisk * as a wildcard which means «any». An example would be
Example output:
....Local Address Foreign Address State
... *:smtp          *:*   LISTEN
Under «Local Address» *, in *:smtp, means the process is listening on all of the network interfaces the machine has for the port mapped as smtp (see /etc/services for service resolution). This can also be shown as 0.0.0.0.
The first *, in *:*, means connections can come from any IP address, and the second *, in *:*, means the connection can originate from any port on the remote machine.
Some versions of netstat lack explicit field delimiters in their printf-generated output, leading to numeric fields running together and thus corrupting the output data.
netstat commandnetstat commandUnder Linux, raw data can often be obtained from the /proc/net/dev to work around the printf output corruption arising in netstat’s network interface statistics summary, netstat -i, until such time as the problem is corrected.[citation needed]
On the Windows platform, netstat information can be retrieved by calling the GetTcpTable and GetUdpTable functions in the IP Helper API, or IPHLPAPI.DLL. Information returned includes local and remote IP addresses, local and remote ports, and (for GetTcpTable) TCP status codes. In addition to the command-line netstat.exe tool that ships with Windows, GUI-based netstat programs are available.
On the Windows platform, this command is available only if the Internet Protocol (TCP/IP) protocol is installed as a component in the properties of a network adapter in Network Connections.
On the Windows platform running Remote Desktop Services (formerly Terminal Services) it will only show connections for the current user, not for the whole computer.
On macOS, the /System/Library/CoreServices/Applications folder (or /Applications/Utilities in OS X Mountain Lion and earlier) contains a network GUI utility called Network Utility, the Netstat tab of which runs the netstat command and displays its output in the tab.
- ss, a Linux utility to investigate sockets from iproute2 meant to replace netstat
- lsof -i
- bmon
- ^ «IBM Systems Information Center». ibm.com. 8 May 2007.
- ^ «net-tools». linuxfoundation.org. Archived from the original on 2016-06-11. Retrieved 2014-08-02.
- ^ «Arch Linux». archlinux.org. 8 June 2011.
- ^ «Deprecated Linux networking commands and their replacements». Doug Vitale Tech Blog. 21 December 2011.
- ^ «netstat man page (notes section)». Retrieved 2 August 2014.
This program is obsolete. Replacement for netstat is ss. Replacement for netstat -r is ip route. Replacement for netstat -i is ip -s link. Replacement for netstat -g is ip maddr.
- ^ «The netstat command can now display process IDs that correspond to active TCP or UDP connections in Windows 2000». Archived from the original on 24 August 2007.
- Dyson, Peter (1995). Mastering OS/2 Warp. Sybex. ISBN 978-0782116632.
- Stanek, William R. (2008). Windows Command-Line Administrator’s Pocket Consultant, 2nd Edition. Microsoft Press. ISBN 978-0735622623.
netstat(8)– Linux Programmer’s Manual – Administration and Privileged Commandsnetstat(1)– FreeBSD General Commands Manualnetstat(8)– Solaris 11.4 System Administration Commands Reference Manualnetstat(1)– Inferno General commands Manual- Microsoft TechNet: Netstat – documentation for the Windows netstat.exe command-line program
- net-tools project page on SourceForge
- Netstat Command: WindowsCMD.com Archived 2022-01-11 at the Wayback Machine
netstat is a command-line network tool that is a handy troubleshooting command. Its cross-platform utility means you can use it on Linux, macOS, or Windows.
netstat can be very handy in the following.
- Display incoming and outgoing network connections
- Display routing tables
- Display number of network interfaces
- Display network protocol statistics
Let’s get it started…
Show all connections
To start with netstat, let’s see the command that displays all connections.
netstat -aType the above command and hit enter. You will see all the active connections from different states as shown below.
C:\Windows\system32>netstat -a

Active Connections

Proto Local Address Foreign Address State
TCP 192.168.43.15:139 DESKTOP-A0PM5GD:0 LISTENING
TCP 192.168.43.15:52484 153:https ESTABLISHED
TCP 192.168.43.15:52532 ec2-13-228-49-204:https TIME_WAIT
UDP [fe80::998c:d2d:17df:65d9%12]:58903 *:*
You will see a header with Proto, Local Address, Foreign Address, and State. Let’s see brief info about them.
- Proto – defined the protocol type (TCP, UDP, etc..,) of the socket.
- Local Address – displays your computer IP address and port, local end of the socket.
- Foreign Address – displays remote computer that your computer is connected to, the remote end of the socket.
- State – defines the state of the socket (LISTENING, ESTABLISHED, CLOSE_WAIT, TIME_WAIT).
We can filter the connections in different ways. Let’s see them.
Show only established connection
We have seen the state in the connection information. You can use below syntax to view all established connections from/to your Windows server.
netstat | findstr ESTABLISHEDC:\Windows\system32>netstat | findstr ESTABLISHED
TCP 172.16.179.128:49375 a23-77-202-113:http ESTABLISHED
C:\Windows\system32>
Note: to view LISTEN, CLOSE_WAIT, TIME_WAIT you can just use as follows.
To see the connections that are in LISTENING state change ESTABLISHED keyword in the previous command to LISTENING. You will get the information about connections that are in the listening state as follows.
netstat | findstr LISTENINGC:\Windows\system32>netstat | findstr LISTENING TCP 192.168.43.15:139 DESKTOP-A0PM5GD:0 LISTENING
Similarly, run the following command to see all the connections that are in CLOSE_WAIT state.
netstat | findstr CLOSE_WAITC:\Windows\system32>netstat | findstr CLOSE_WAIT TCP 192.168.43.15:52581 ec2-52-1-183-160:https CLOSE_WAIT TCP 192.168.43.15:52584 ec2-34-227-121-63:https CLOSE_WAIT
Finally, use the TIME_WAIT flag to get information about all the connections that are in TIME_WAIT state.
netstat | findstr TIME_WAITC:\Windows\system32>netstat | findstr TIME_WAIT
TCP 192.168.43.15:52590 server-13-33-179-97:https TIME_WAIT
Show PID used by port number
Every connection is a process internally. And every process has an ID, and its called PID. We can see the PID of every socket connection using the following command.
netstat -oThe above command displays all the connections with PID. Let’s run the command and see how we get the result.
C:\Windows\system32>netstat -o

Active Connections

Proto Local Address Foreign Address State PID
TCP 192.168.43.15:50664 40.90.189.152:https ESTABLISHED 3676
TCP 192.168.43.15:50733 40.90.189.152:https ESTABLISHED 10556
We got an extra column called PID. And its the process identifier.
A very handy when you have to find out which PID is using the particular port number.
netstat –o | findstr $portnumberYou can see the following info if you use the above command.
C:\Windows\system32>netstat -o | findstr 50664
  TCP 192.168.43.15:50664 40.90.189.152:https ESTABLISHED 3676
Show statistics of all protocols
Useful when you have to find out for any received header error, received address error, discarded packet, etc. It will list out statistics from IPv4, IPv6, ICMPv4, ICMPv6, TCP, UDP, etc.
netstat –sYou will see the statistics of all protocols as shown below.
C:\Windows\system32>netstat -s
IPv4 Statistics

Packets Received = 1097370
Received Header Errors = 0
Received Address Errors = 9
Datagrams Forwarded = 0
Unknown Protocols Received = 0
Received Packets Discarded = 1425
Received Packets Delivered = 1098173
Output Requests = 743601
Routing Discards = 0
Discarded Output Packets = 43
Output Packet No Route = 23
Reassembly Required = 0
Reassembly Successful = 0
Reassembly Failures = 0
Datagrams Successfully Fragmented = 0
Datagrams Failing Fragmentation = 0
Fragments Created = 0

IPv6 Statistics

Packets Received = 24
Received Header Errors = 0
Received Address Errors = 0
Datagrams Forwarded = 0
Unknown Protocols Received = 0
Received Packets Discarded = 208
Received Packets Delivered = 519
Output Requests = 1507
Routing Discards = 0
Discarded Output Packets = 0
Output Packet No Route = 0
Reassembly Required = 0
Reassembly Successful = 0
Reassembly Failures = 0
Datagrams Successfully Fragmented = 0
Datagrams Failing Fragmentation = 0
Fragments Created = 0

ICMPv4 Statistics

Received Sent
Messages 52 143
Errors 0 0
Destination Unreachable 52 143
Time Exceeded 0 0
Parameter Problems 0 0
Source Quenches 0 0
Redirects 0 0
Echo Replies 0 0
Echos 0 0
Timestamps 0 0
Timestamp Replies 0 0
Address Masks 0 0
Address Mask Replies 0 0
Router Solicitations 0 0
Router Advertisements 0 0

ICMPv6 Statistics

Received Sent
Messages 0 25
Errors 0 0
Destination Unreachable 0 0
Packet Too Big 0 0
Time Exceeded 0 0
Parameter Problems 0 0
Echos 0 0
Echo Replies 0 0
MLD Queries 0 0
MLD Reports 0 0
MLD Dones 0 0
Router Solicitations 0 15
Router Advertisements 0 0
Neighbor Solicitations 0 5
Neighbor Advertisements 0 5
Redirects 0 0
Router Renumberings 0 0

TCP Statistics for IPv4

Active Opens = 4405
Passive Opens = 5
Failed Connection Attempts = 164
Reset Connections = 347
Current Connections = 19
Segments Received = 980542
Segments Sent = 674787
Segments Retransmitted = 5759

TCP Statistics for IPv6

Active Opens = 48
Passive Opens = 10
Failed Connection Attempts = 38
Reset Connections = 2
Current Connections = 0
Segments Received = 680
Segments Sent = 552
Segments Retransmitted = 128

UDP Statistics for IPv4

Datagrams Received = 117977
No Ports = 1385
Receive Errors = 1
Datagrams Sent = 54516

UDP Statistics for IPv6

Datagrams Received = 1036
No Ports = 208
Receive Errors = 0
Datagrams Sent = 1131
To find out any errors quickly you can use syntax.
netstat -s | findstr ErrorsC:\Windows\system32>netstat -s | findstr Errors Received Header Errors = 0 Received Address Errors = 0 Received Header Errors = 0 Received Address Errors = 0 Errors 0 0 Errors 0 0 Receive Errors = 0 Receive Errors = 0 C:\Windows\system32>
The above command filters all the errors from statistics of all protocols.
Show routing information
To display Route Table, you can use the below syntax. The following syntax will also list all interfaces.
netstat –rIf you use the above command, then you see the info about routing as shown below.
C:\Windows\system32>netstat -r
===========================================================================
Interface List
4...8c 16 45 32 4d 3c ......Realtek PCIe GBE Family Controller
16...d4 6d 6d 27 8a 9a ......Microsoft Wi-Fi Direct Virtual Adapter
5...d6 6d 6d 27 8a 99 ......Microsoft Wi-Fi Direct Virtual Adapter #2
12...d4 6d 6d 27 8a 99 ......Intel(R) Dual Band Wireless-AC 3165
10...d4 6d 6d 27 8a 9d ......Bluetooth Device (Personal Area Network)
1...........................Software Loopback Interface 1
===========================================================================

IPv4 Route Table
===========================================================================
Active Routes:
Network Destination Netmask Gateway Interface Metric
0.0.0.0 0.0.0.0 192.168.43.1 192.168.43.15 55
127.0.0.0 255.0.0.0 On-link 127.0.0.1 331
127.0.0.1 255.255.255.255 On-link 127.0.0.1 331
127.255.255.255 255.255.255.255 On-link 127.0.0.1 331
192.168.43.0 255.255.255.0 On-link 192.168.43.15 311
192.168.43.15 255.255.255.255 On-link 192.168.43.15 311
192.168.43.255 255.255.255.255 On-link 192.168.43.15 311
224.0.0.0 240.0.0.0 On-link 127.0.0.1 331
224.0.0.0 240.0.0.0 On-link 192.168.43.15 311
255.255.255.255 255.255.255.255 On-link 127.0.0.1 331
255.255.255.255 255.255.255.255 On-link 192.168.43.15 311
===========================================================================
Persistent Routes:
Network Address Netmask Gateway Address Metric
0.0.0.0 0.0.0.0 10.30.28.1 Default
===========================================================================

IPv6 Route Table
===========================================================================
Active Routes:
If Metric Network Destination Gateway
1 331 ::1/128 On-link
12 311 fe80::/64 On-link
12 311 fe80::998c:d2d:17df:65d9/128
On-link
1 331 ff00::/8 On-link
12 311 ff00::/8 On-link
===========================================================================
Persistent Routes:
None
Show Interface Statistics
To view the status of all interface, you can use the following syntax. This will display Received & Sent details.
netstat -eC:\Windows\system32>netstat -e Interface Statistics Received Sent Bytes 8988576 2105244 Unicast packets 12972 11880 Non-unicast packets 0 0 Discards 0 0 Errors 0 0 Unknown protocols 0 C:\Windows\system32>
Show Fully Qualified Domain Name of foreign address (remote host)
If you are tracking some issues and would like to know FQDN of the remote host, then you can use the following syntax.
netstat –fIf you run the above command, then you will see a similar result as follows.
C:\Windows\system32>netstat -f
Proto Local Address Foreign Address State
TCP 192.168.43.15:50664 40.90.189.152:https LISTENING
TCP 192.168.43.15:51437 104.27.119.115:https ESTABLISHED
Note: you can combine findstr syntax to show precise results like below.
netstat –f | findstr ESTABLISHEDThe above command will filter the connections and displays only established connections. Let’s see an example.
C:\Windows\system32>netstat -f | findstr ESTABLISHED
TCP 192.168.43.15:51437 104.27.119.115:https ESTABLISHED
We can filter the connections using the domain with the following command.
netstat –f | findstr $domainnameifyouknowSpecify the domain in the command and you will see the filtered connections as follows.
C:\Windows\system32>netstat -f | findstr ec2-52-202-6-97.compute-1.amazonaws.com
TCP 192.168.43.15:52573 ec2-52-202-6-97.compute-1.amazonaws.com:https ESTABLISHED
I hope this helps you get familiar with netstat command usage on Windows. If you are interested in learning Windows administration then I would suggest checking out this course.
6. Netstat
For a network service to
receive incoming communications, it must listen for communications on a
specific TCP or UDP port. When troubleshooting network problems, you
might want to view the ports on which your computer listens for incoming
connections to verify that a service is properly configured and that
the port number has not changed from the default.
Netstat (Netstat.exe) is a
useful command-line tool for identifying network services and the ports
they listen on. Listing the ports a computer listens on is useful for
verifying that a network service is using the expected port. It is
common practice to change the port numbers that services listen on, and
Netstat can quickly identify nonstandard listening ports.
To view open ports and active incoming connections, open a command prompt and run the following command.
netstat -a -n -o
Netstat will display a list of listening ports as well as outgoing connections and the Process
Identifiers (PIDs) associated with each listener or connection. The
following edited output from Netstat shows the listening ports on a
computer running Windows that has Remote Desktop enabled.
Active Connections

  Proto  Local Address          Foreign Address        State           PID
  TCP    0.0.0.0:135            0.0.0.0:0              LISTENING       884
  TCP    0.0.0.0:3389           0.0.0.0:0              LISTENING       1512
  TCP    0.0.0.0:49152          0.0.0.0:0              LISTENING       592
  TCP    192.168.1.132:139      0.0.0.0:0              LISTENING       4
  TCP    192.168.1.132:3389     192.168.1.196:1732     ESTABLISHED     1512
  TCP    [::]:135               [::]:0                 LISTENING       884
  TCP    [::]:445               [::]:0                 LISTENING       4
  TCP    [::]:2869              [::]:0                 LISTENING       4
  TCP    [::]:3389              [::]:0                 LISTENING       1512
  UDP    [fe80::28db:d21:3f57:fe7b%11]:1900  *:*                       1360
  UDP    [fe80::28db:d21:3f57:fe7b%11]:49643  *:*                      1360
  UDP    [fe80::a54b:d9d7:1a10:c1eb%10]:1900  *:*                      1360
  UDP    [fe80::a54b:d9d7:1a10:c1eb%10]:49641  *:*                     1360
Notice that the line in bold is
listening for incoming connections on TCP port 3389, which Remote
Desktop uses. Because the Foreign Address column shows an IPv4 address,
you can tell that a user is connected to the computer using Remote
Desktop from a computer with the IP address of 192.168.1.196. If you
notice that a computer is listening for incoming connections on
unexpected ports, you can use the value in the PID column to identify
the process. Tools such as the Processes tab in Task Manager can reveal
which process is associated with a PID.
Note:
To identify processes by PID
in Task Manager, select the Processes tab. On the View menu, click
Select Columns. Select the PID (Process Identifier) check box and then
click OK.
Alternatively, if you can open a command prompt with elevated privileges, you can use the –b parameter to resolve applications associated with active connections. The following example demonstrates that using the –b parameter shows the associated process in brackets before each connection.
netstat -a -n -o -b

Active Connections

  Proto  Local Address          Foreign Address        State           PID
  TCP    0.0.0.0:135            0.0.0.0:0              LISTENING       828
  RpcSs
 [svchost.exe]
  TCP    0.0.0.0:3389           0.0.0.0:0              LISTENING       1444
  Dnscache
 [svchost.exe]
  TCP    0.0.0.0:49152          0.0.0.0:0              LISTENING       508
 [wininit.exe]
  TCP    0.0.0.0:49153          0.0.0.0:0              LISTENING       972
  Eventlog
 [svchost.exe]
  TCP    0.0.0.0:49154          0.0.0.0:0              LISTENING       1236
  nsi
 [svchost.exe]
  TCP    0.0.0.0:49155          0.0.0.0:0              LISTENING       1076
  Schedule
 [svchost.exe]
  TCP    0.0.0.0:49156          0.0.0.0:0              LISTENING       564
 [lsass.exe]
  TCP    0.0.0.0:49157          0.0.0.0:0              LISTENING       552
 [services.exe]
  TCP    169.254.166.248:139    0.0.0.0:0              LISTENING       4
TCPView,
a free download from Microsoft, provides similar functionality with a
graphical interface.
7. Network Monitor
Network Monitor 3.3, a free download from http://www.microsoft.com/downloads/,
is the most capable—and complicated—tool for analyzing network
communications. Network Monitor is a protocol analyzer (commonly known
as a sniffer)
capable of capturing every byte transferred to and from a computer
running Windows 7. An experienced system administrator can use Network
Monitor to troubleshoot a wide variety of problems, including:
-
Network performance problems.
-
TCP connection problems.
-
IP protocol stack configuration problems.
-
Problems caused by network filtering.
-
Application-layer
problems with text-based protocols, including Hypertext Transfer
Protocol (HTTP), Post Office Protocol (POP), and Simple Mail Transfer
Protocol (SMTP).
Network
Monitor performs a significant amount of interpretation of captured
information by separating the different protocols involved in network
communications. Network
Monitor can even interpret most common application-layer protocols. For
example, when analyzing HTTP traffic, Network Monitor automatically
identifies the packet containing the HTTP request and lists the request
method, Uniform Resource Locator (URL), referrer, user agent, and other
parameters included in the request. This information is extremely useful
when troubleshooting compatibility problems with a specific browser.
To analyze network traffic by using Network Monitor, follow these steps:
-
Download
and install Network Monitor and then restart the computer to enable the
Network Monitor driver for your network adapters. -
Click Start, click All Programs, click Microsoft Network Monitor 3.3, and then click Microsoft Network Monitor 3.3.
-
Click New Capture.
-
With the New Capture tab selected, click the Select Networks tab and select one or more network adapters.
-
Click Start to begin capturing communications.
-
Switch
to the application from which you want to capture the network traffic
and then perform the steps to generate the traffic. For example, if you
want to capture a request to a Web server, switch to Windows Internet
Explorer and enter the Web address. After you have generated the traffic
that you want to capture, return to Network Monitor. -
On the Capture menu in Network Monitor, click Stop.
-
On the Network Conversations page, click the application you want to monitor.
-
In the Frame Summary pane, browse the captured frames. Click a frame to view its contents.
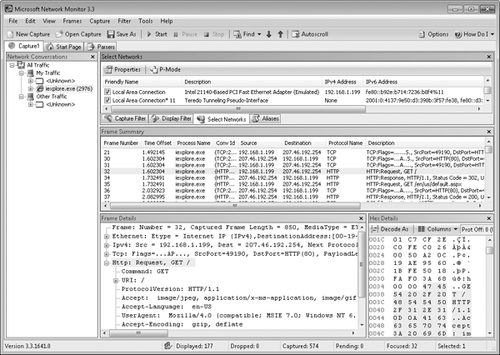
Figure 1
shows a capture of a TCP connection and an HTTP request created by
visiting a Web site with a browser. Because Iexplore.exe is selected in
the Network Conversations pane, only frames sent to or from Internet
Explorer are displayed. The Frame Summary pane lists the captured
packets. The first three frames show the three-way TCP handshake. As you
can see from the Frame Details pane, the selected frame shows Internet
Explorer requesting / from the Web server. The following frame is the
response, which is an HTTP 302 redirection to a different page. Frame 35
is Internet Explorer requesting the page to which it was directed, /en/us/default.aspx.
Figure 1. Use Network Monitor to capture and analyze traffic.
Все способы:
- Используем команду netstat для просмотра открытых портов
- Отображение всех подключений и ожидающих портов
- Постраничное отображение открытых портов
- Запись результатов в текстовый файл
- Поиск по содержимому
- Вопросы и ответы: 2
Netstat — одна из встроенных команд операционной системы Windows. В ее функциональность входит отображение состояния сети со всеми требуемыми деталями. Пользователь задействует встроенный синтаксис, чтобы отфильтровать результаты или задать дополнительные действия для этой утилиты. В рамках сегодняшнего материала мы бы хотели рассказать о доступных методах просмотра открытых портов с помощью этого стандартного инструмента.
Используем команду netstat для просмотра открытых портов
Портами называют натуральные числа, которые записываются в заголовках протоколов передачи данных (TCP, UDP и так далее). Они определяют процесс получения и передачи информации в рамках одного хоста и в большинстве случаев используются онлайн-программами для установки соединения. Просмотр открытых портов может понадобиться в случае определения работоспособности приложений или при стандартном мониторинге сети. Лучше всего с этим справится команда netstat, а ее активация доступна с применением разных аргументов.
Отображение всех подключений и ожидающих портов
Самый простой аргумент, применяемый к утилите netstat, имеет обозначение -a, и отвечает за вывод сведений обо всех активных подключениях их портов, которые ожидают соединения. Такая информация доступна к просмотру без применения прав администратора и выводится на экран следующим образом:
- Поскольку рассматриваемая команда является консольной, потребуется запустить приложение, чтобы ее выполнить. Откройте меню «Пуск», найдите там «Командную строку» и запустите ее. О других методах перехода в консоль читайте в другом нашем материале по следующей ссылке.
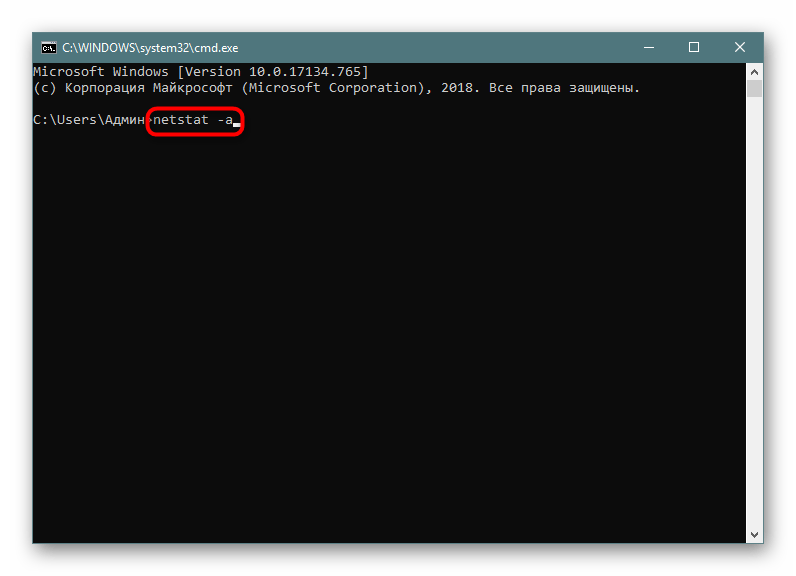
- В поле ввода напечатайте
netstat -a, а затем нажмите на клавишу Enter. - На экране тут же начнет появляться список с доступными адресами.
Подробнее: Открытие командной строки в Windows 10
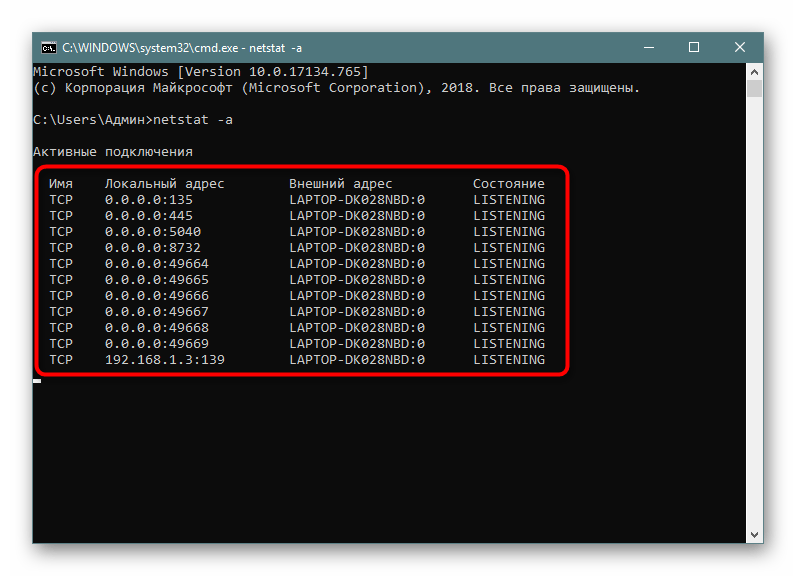
Мониторинг производится в режиме реального времени, поэтому не все результаты будут доступны к просмотру сразу. Придется подождать немного времени, чтобы все они могли прогрузиться. Во время этого не закрывайте консоль, если не хотите прервать процесс, ведь при повторном запуске команды все начнется заново.
Постраничное отображение открытых портов
К сожалению, приведенный выше вариант отображает не все необходимые данные об открытых портах, поскольку выводит он только те параметры, которые на текущий момент находятся в состоянии LISTENING. К тому же там не указывались уникальные идентификаторы процессов (PID), что тоже играет важную роль во время определенного мониторинга. Потому советуем обратить внимание немного на другие аргументы.
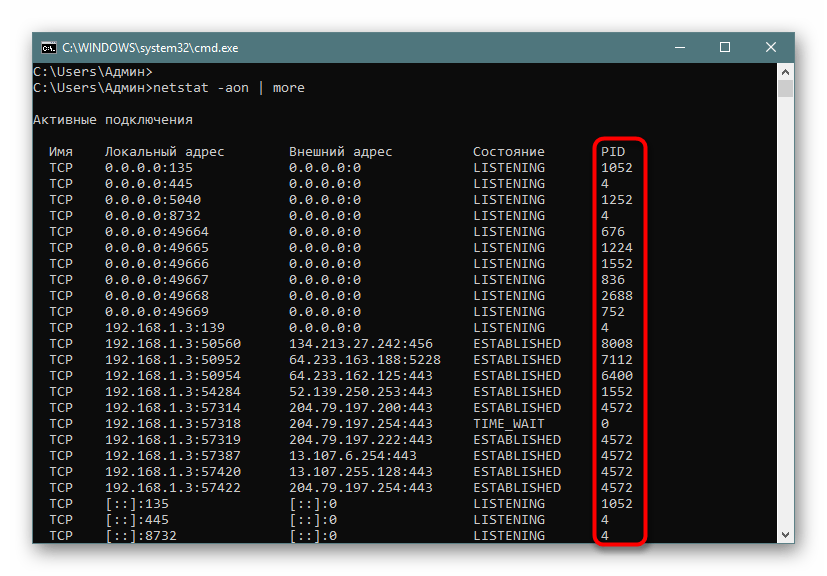
- В консоли пропишите
netstat -aon | moreи нажмите на Enter. - Здесь сразу же появится вся важная информация о портах, которые находятся в разных состояниях. В пятой колонке обозначаются идентификаторы.
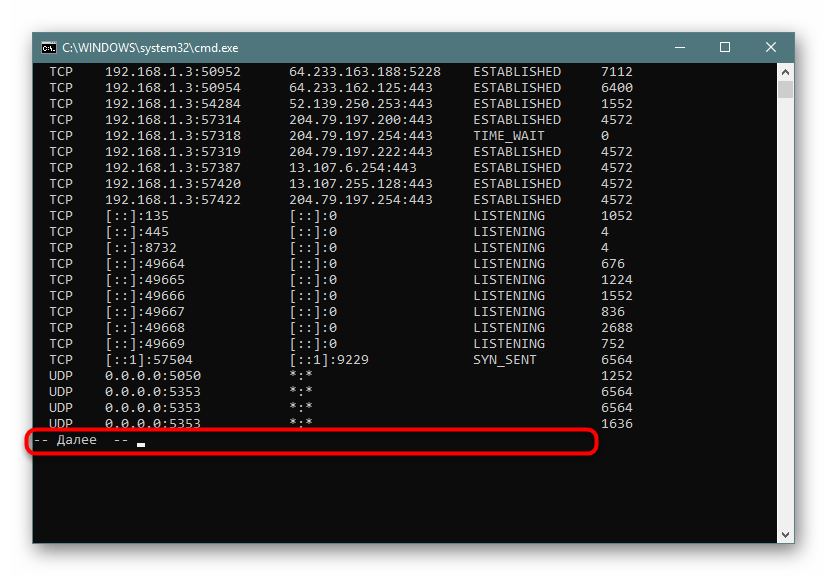
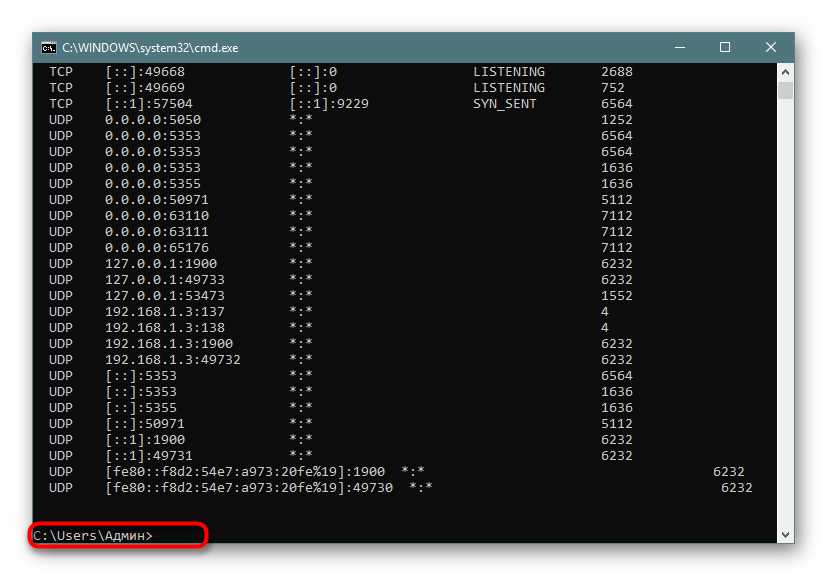
- Не все порты выводятся сразу, поэтому нужно жать на Enter, чтобы каждый раз отображать еще по одной строке.
- Если вы увидите поле ввода, значит все страницы были успешно выведены на экран.
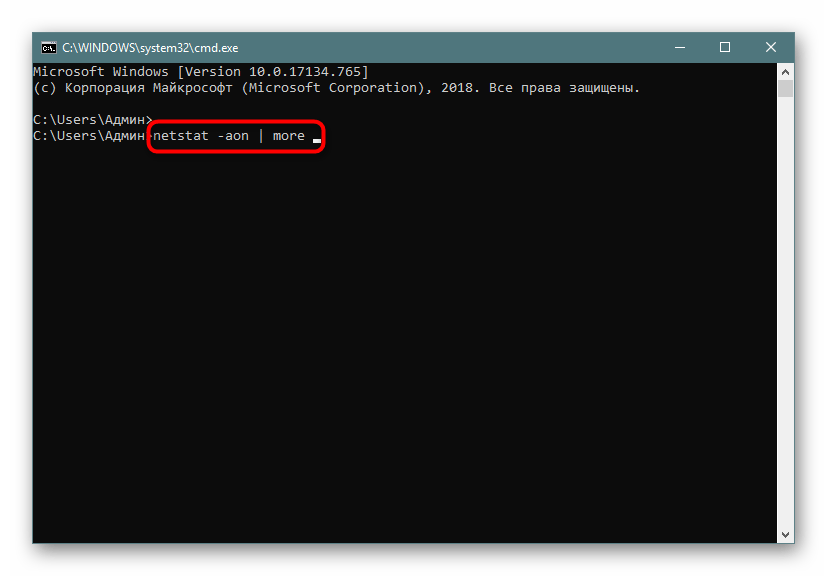
Теперь хотелось бы поговорить про используемые аргументы и значение увиденных параметров. Давайте сначала затронем знакомые буквы синтаксиса:
| Аргумент | Описание |
|---|---|
| -a | Отображает сведения обо всех подключениях |
| -o | Отвечает за включение колонки с идентификатором каждого адреса |
| -n | Переводит адреса портов и их номера в числовой формат |
| more | Постраничный вывод элементов |
Важно также уточнить и состояние портов, поскольку они могут являться открытыми, но на этот момент не использоваться или ожидать своего подключения. В колонке «Состояние» могут отображаться такие показатели:
| Показатель | Описание |
|---|---|
| CLOSE_WAIT | Подключение ожидает своего закрытия |
| CLOSED | Подключение было успешно закрыто |
| ESTABLISHED | Активная работа соединения |
| LISTENING | Ожидается соединение или еще говорят: «Слушается порт» |
| TIME_WAIT | Время ответа было превышено |
Эти объяснения должны разобраться помочь не только с составлением запросов для netstat, но и без проблем разобраться с полученной информацией.
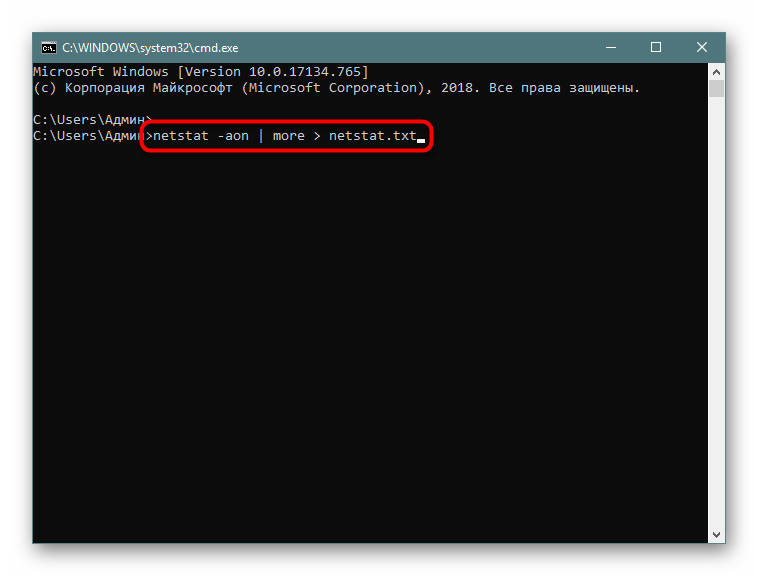
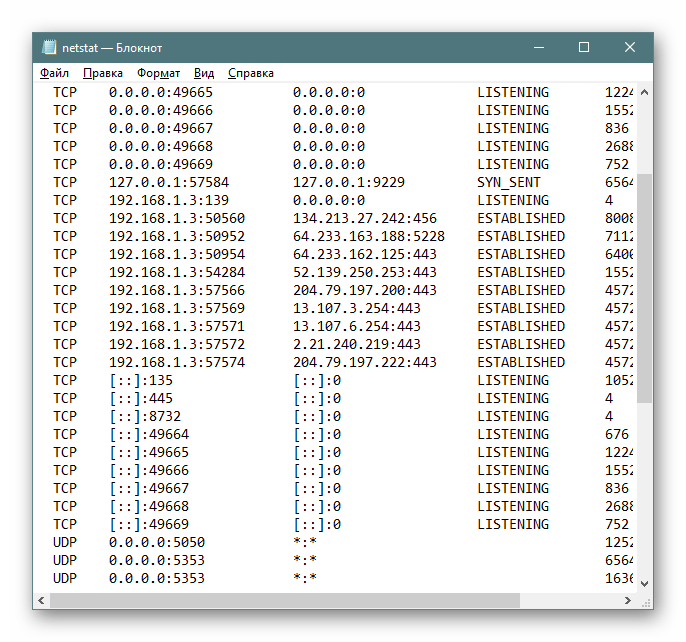
Запись результатов в текстовый файл
Иногда требуется сохранить готовые результаты мониторинга в текстовый файл, чтобы выполнить дальнейшие действия, ведь копировать информацию прямо из консоли не всегда удобно, да и займет это намного больше времени, нежели просто указать дополнительный аргумент при вводе команды.
- Напишите, например,
netstat -aon | moreилиnetstat - a, а затем добавьте> netstat.txt, что означает запись результатов в указанный файл (он будет создан в пользовательской папке). После ввода нажмите на Enter. - Запустите файл, введя его название и формат в консоли.
- Теперь вы можете управлять содержимым и сохранить его в любом другом удобном месте.

Поиск по содержимому
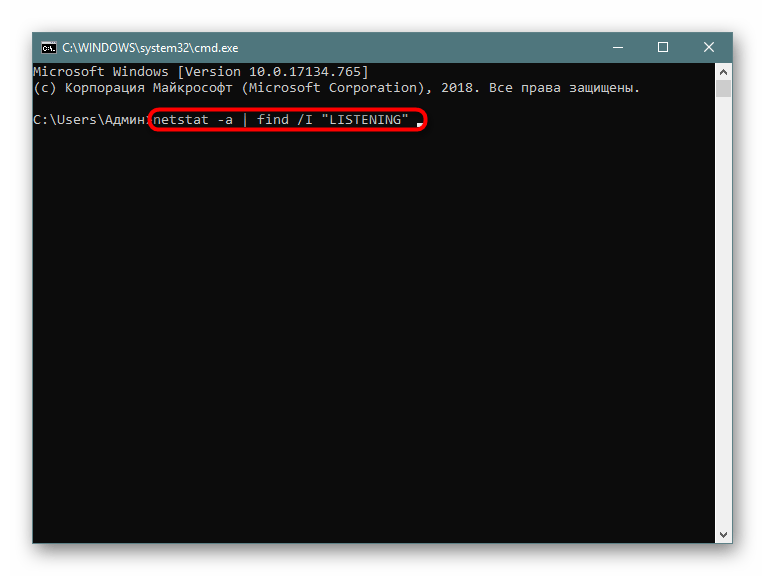
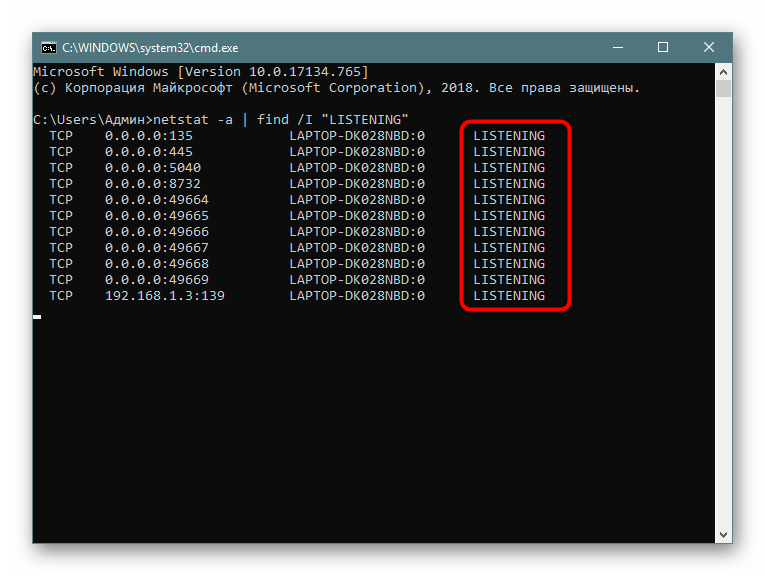
В случае необходимости отображения только подключений с определенными параметрами или адресами лучше всего использовать дополнительную команду find, которая перед выводом сведений произведет фильтрацию данных, и это освободит вас от надобности вручную искать каждый соответствующий пункт. Тогда полная консольная команда приобретает следующий вид:
- Введите
netstat -a | find /I "LISTENING", что задаст параметр отображения только портов с состоянием LISTENING, аргумент /I при этом используется для отмены учета регистра символов. - В результатах отобразится только подходящая информация.
Выше вы узнали о методах определения открытых портов через встроенную команду netstat. После этого можете приступить к работе с программами или пробросу других портов в случае необходимости. К слову, этой теме посвящен отдельный материал на нашем сайте. Перейдите по указанным ниже ссылкам, чтобы ознакомиться с подробными инструкциями.
Читайте также:
Открываем порты на роутере
Открываем порты в брандмауэре Windows 10
Команда netstat всегда показывает правильные результаты, однако если хотите убедиться в открытости порта другим путем, рекомендуем задействовать специальные онлайн-сервисы, позволяющие справиться с поставленной задачей.
Читайте также: Сканирование портов онлайн
Наша группа в TelegramПолезные советы и помощь
Windows 7 / Networking
For a network service to receive incoming communications, it must listen for communications
on a specific TCP or UDP port. When troubleshooting network problems, you might want
to view the ports on which your computer listens for incoming connections to verify that a
service is properly configured and that the port number has not changed from the default.
Netstat (Netstat.exe) is a useful command-line tool for identifying network services and
the ports they listen on. Listing the ports a computer listens on is useful for verifying that a
network service is using the expected port. It is common practice to change the port numbers
that services listen on, and Netstat can quickly identify nonstandard listening ports.
To view open ports and active incoming connections, open a command prompt and run
the following command.
netstat -a -n -o
Netstat will display a list of listening ports as well as outgoing connections and the Process
Identifiers (PIDs) associated with each listener or connection.
Notice that the line in bold is listening for incoming connections on TCP port 3389, which
Remote Desktop uses. Because the Foreign Address column shows an IPv4 address, you
can tell that a user is connected to the computer using Remote Desktop from a computer
with the IP address of 192.168.1.196. If you notice that a computer is listening for incoming
connections on unexpected ports, you can use the value in the PID column to identify the
process. Tools such as the Processes tab in Task Manager can reveal which process is associated
with a PID.
Note To identify processes by PID in Task Manager, select the Processes tab. On the View
menu, click Select Columns. Select the PID (Process Identifier) check box and then click OK.
Alternatively, if you can open a command prompt with elevated privileges, you can use
the -b parameter to resolve applications associated with active connections. The following
example demonstrates that using the -b parameter shows the associated process in brackets
before each connection.
netstat -a -n -o -b
TCPView, a free download from Microsoft, provides similar functionality with a graphical
interface. TCPView is described later in this tutorial.