
Все способы:
- Перенос данных в Виндовс 10
- Способ 1: PCmover
- Способ 2: USMT
- Заключение
- Вопросы и ответы: 7
Пользователи Виндовс 10 нередко задаются вопросом – можно ли в случае замены компьютера перенести данные со старого на новый? , ведь эта опция присутствовала в более старых версиях «окон»? В статье далее мы ответим на этот вопрос и рассмотрим методы переноса настроек и информации.
Перенос данных в Виндовс 10
Первое, что нужно отметить – в «десятке» отсутствует оснастка «Средство переноса данных», поэтому подходящий инструментарий придётся загружать и устанавливать самостоятельно. Таковых решений существует два: консольное приложение USMT, идущее в составе пакета Windows Assessment and Development Kit (Windows ADK), а также программа от стороннего производителя под названием PCmover. Начнём с последней.
Способ 1: PCmover
Решение Microsoft удалить стандартное средство переноса пользовательских файлов вызвало много споров, поэтому компания предложила альтернативу – программу PCmover, созданную сторонним разработчиком, но официально сертифицированную создателями Windows.
Официальный сайт PCmover
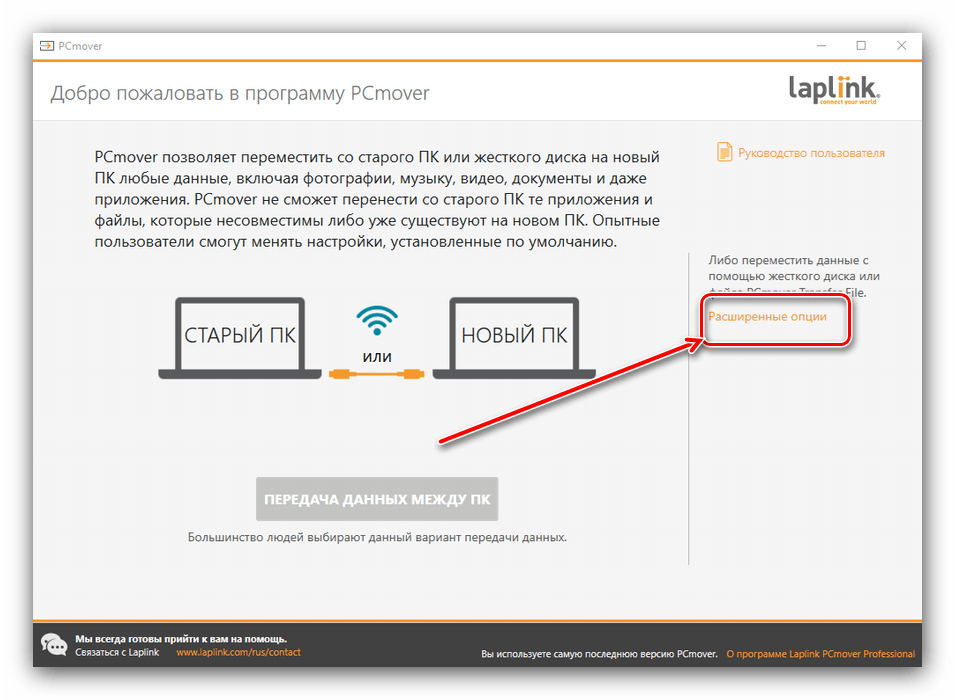
- Начнём операцию со старой машины. После установки приложения запустите его с ярлыка на «Рабочем столе».
- В правой части главного окна кликните по пункту «Расширенные опции».
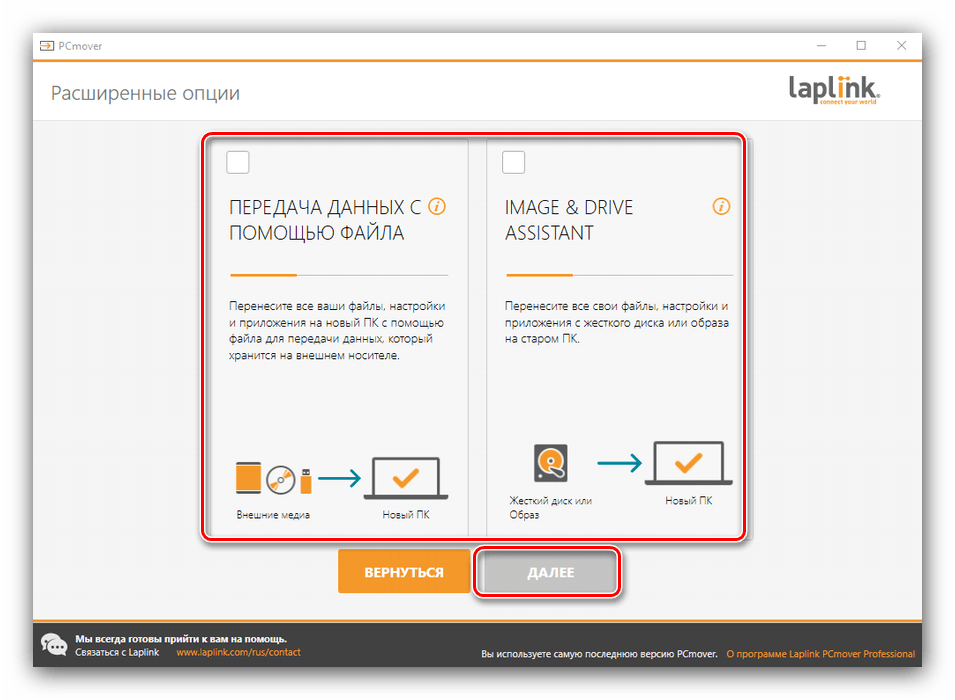
- Доступны два варианта переноса: посредством архива в специальном формате и образа жесткого диска. Выберем архив как более совместимый вариант.
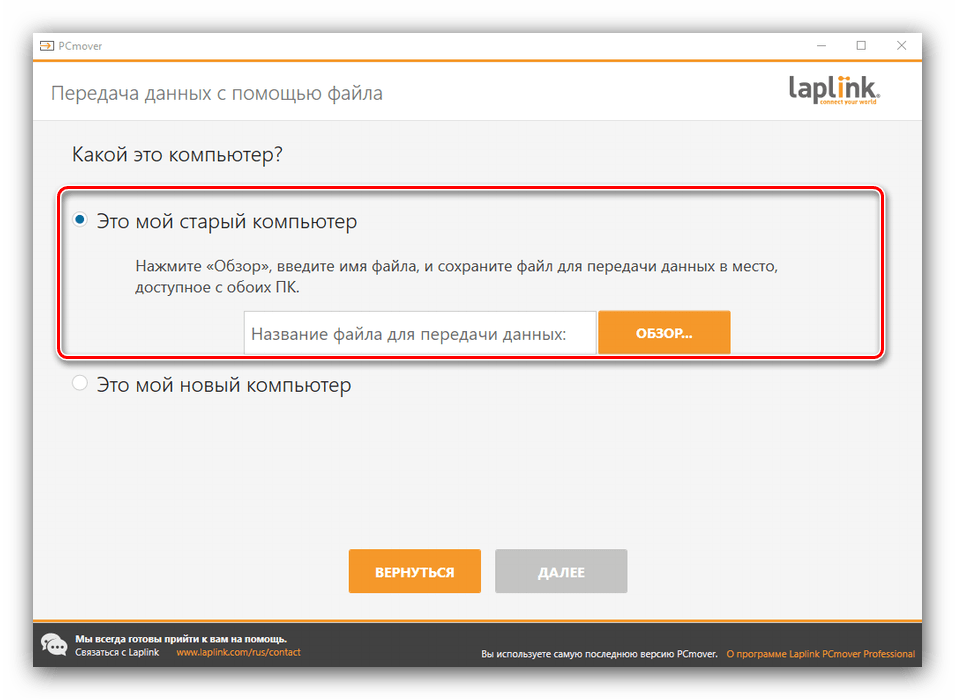
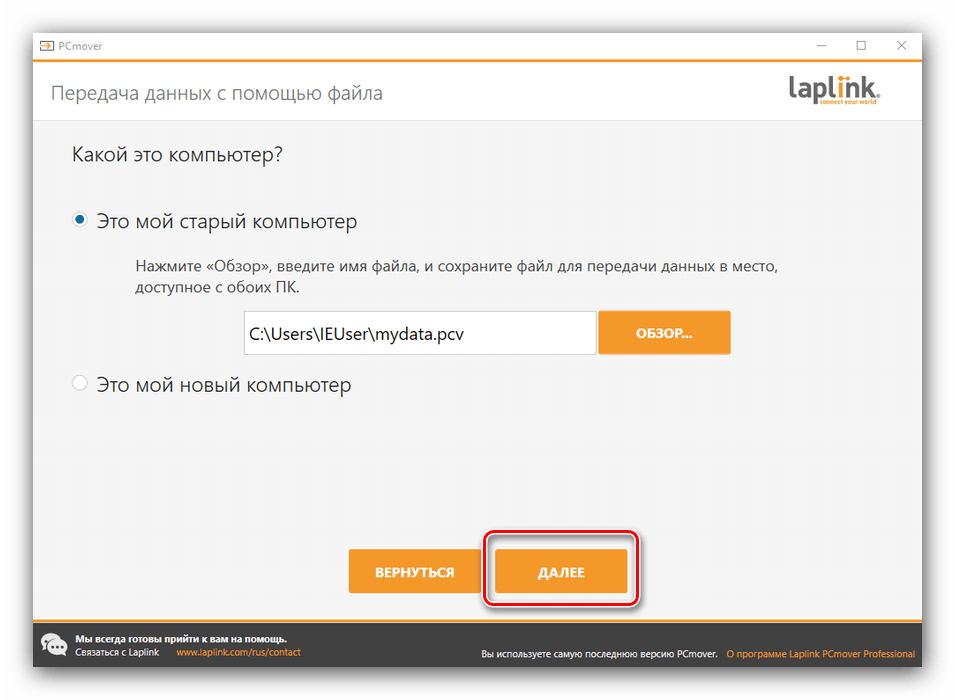
- В следующем окне кликните по «Это мой старый компьютер».

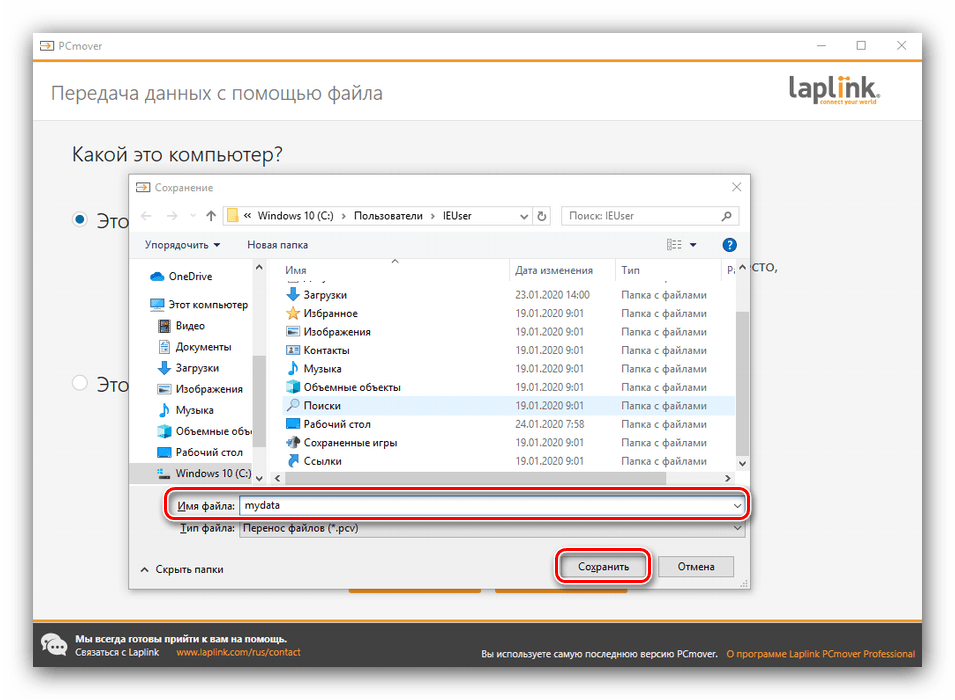
Далее воспользуйтесь кнопкой «Обзор», задайте место на жестком диске (желательно внешнем) и имя архива с информацией. Затем щёлкните «Сохранить» и «Далее».
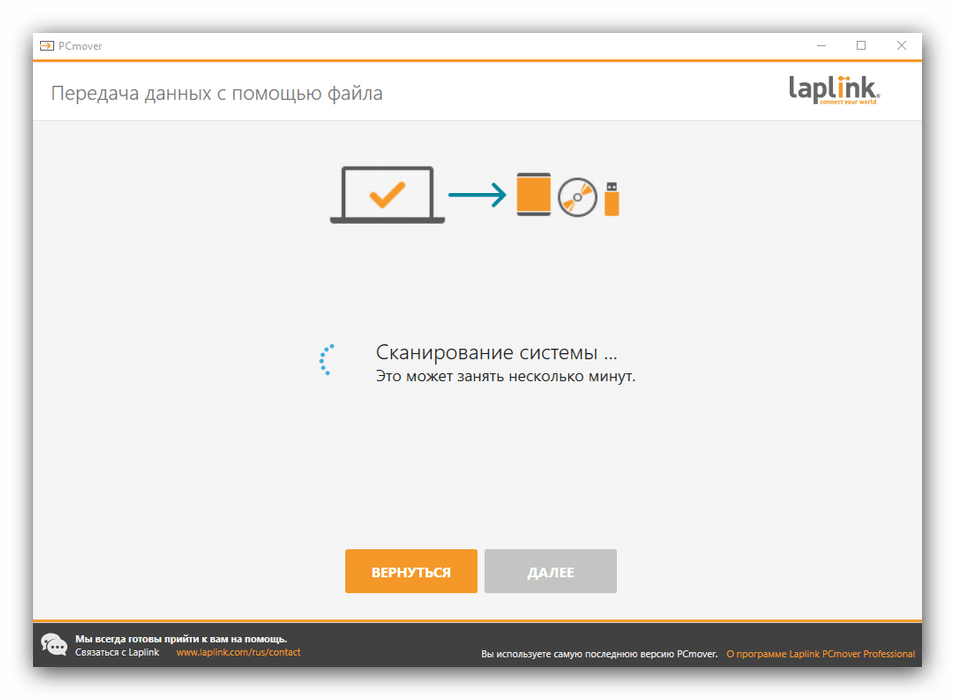
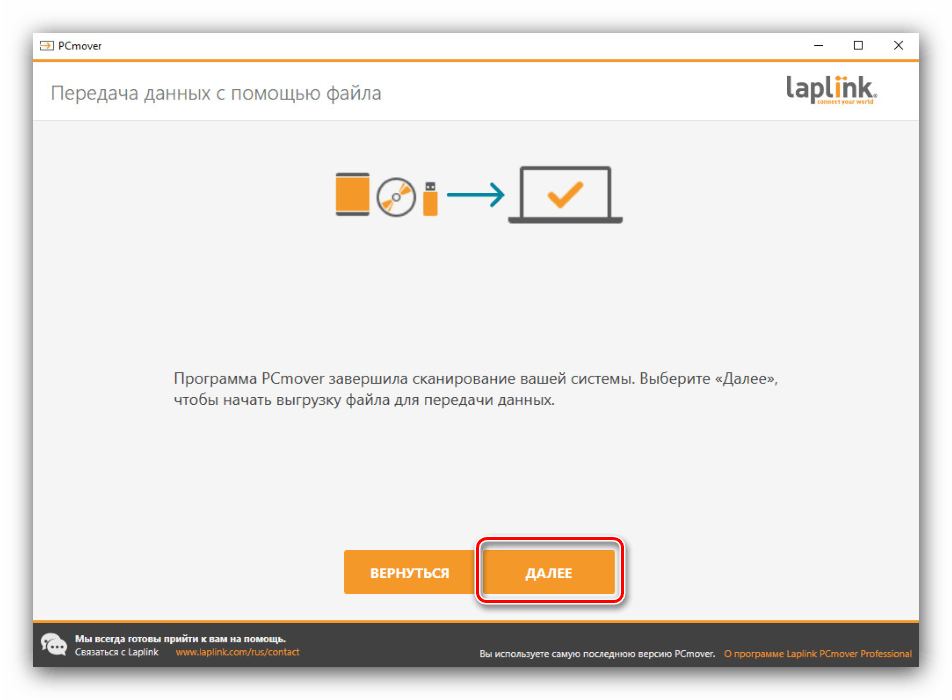
- Начнётся проверка системы для поиска данных переноса. Она может занять длительное время. По её окончании нажмите «Далее».
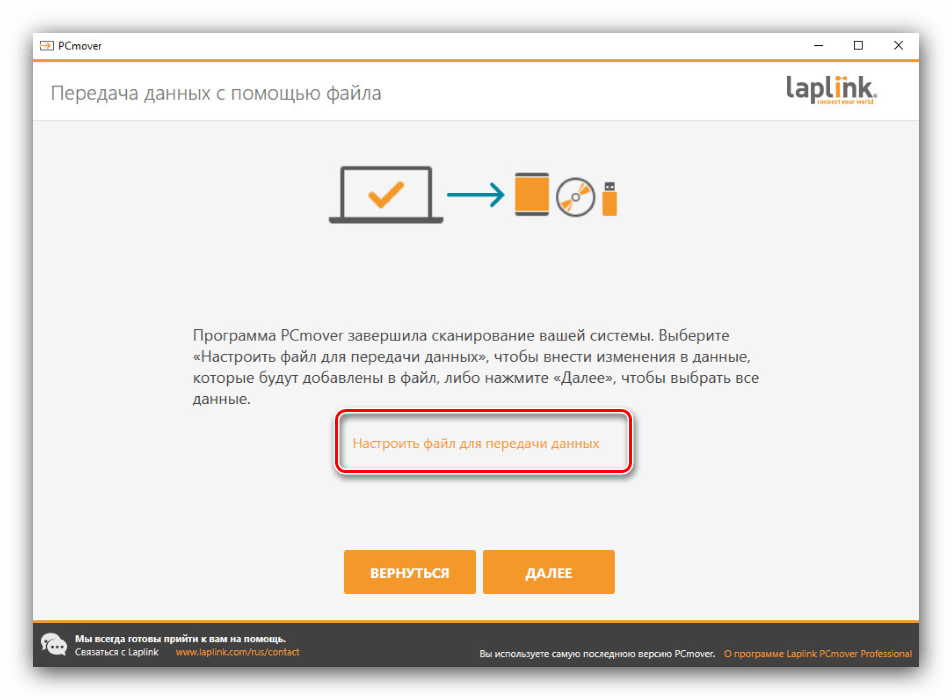
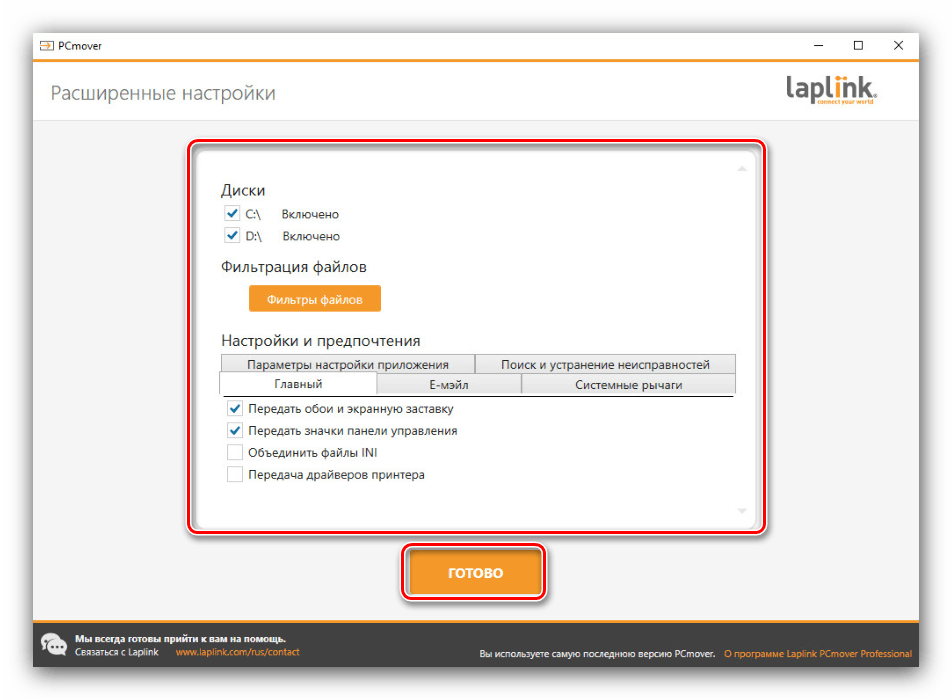
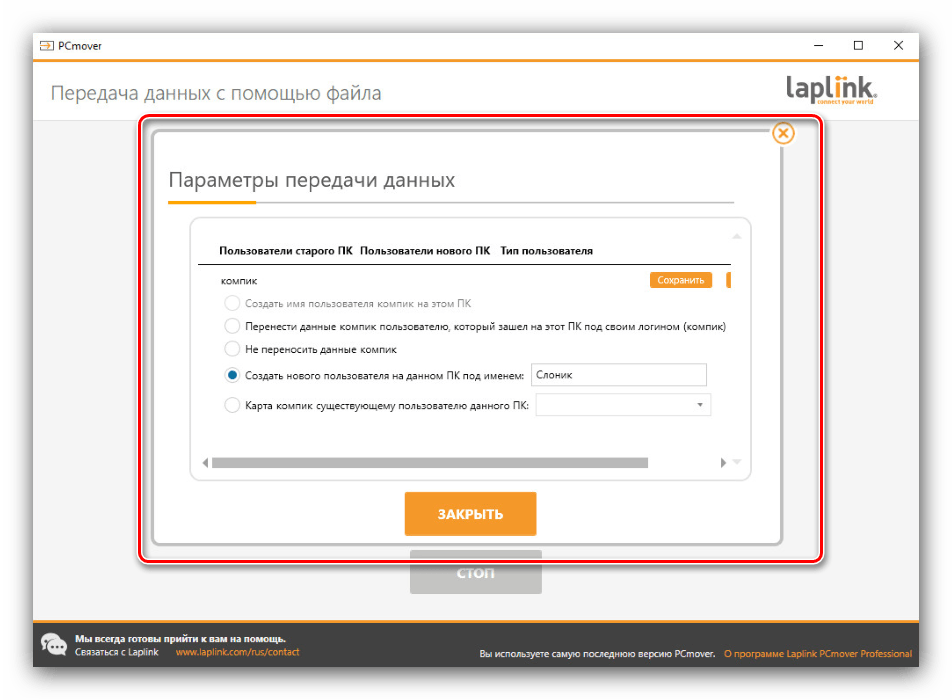
- После сканирования вам будет предложено настроить полученный образ.

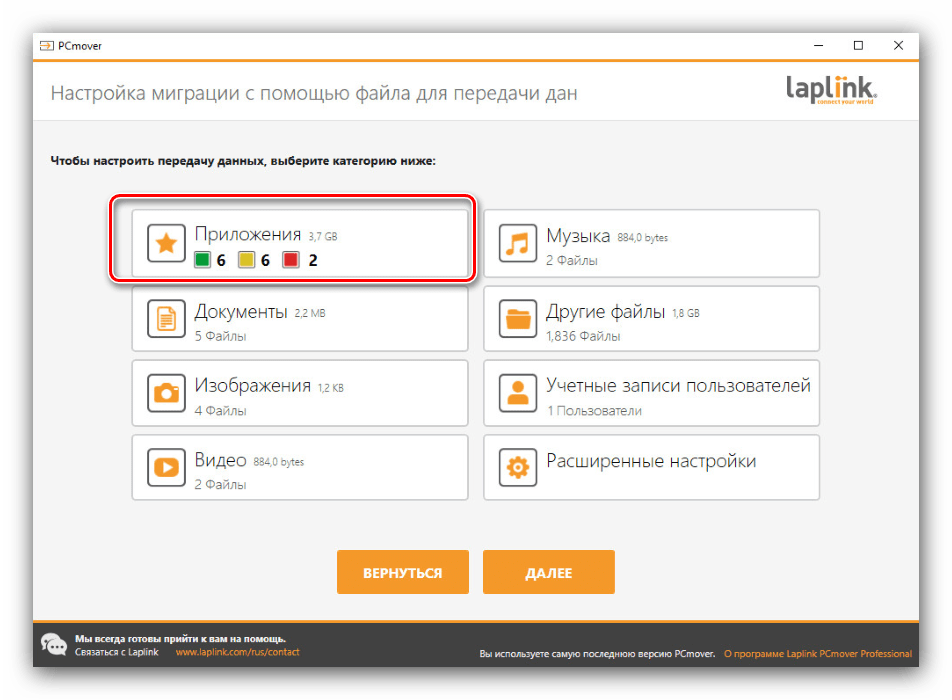
Первым делом обратите внимание на пункт «Приложения».
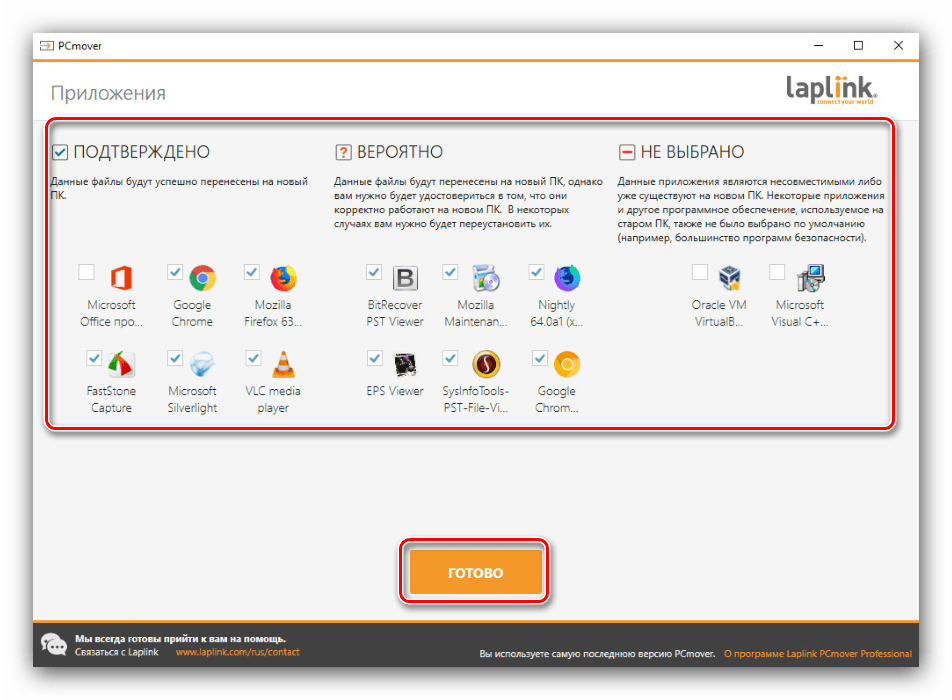
Нажатие на соответствующую кнопку откроет перед вами список из трёх категорий программ – первая, «Подтверждено», означает, что всё ПО из этого списка будет перенесено. Вторая, «Не подтверждено» – информация будет перенесена, но её работоспособность не гарантируется. Третья, «Не выбрано» – приложения из этой категории либо несовместимы, либо уже присутствуют на целевом компьютере.
По похожему алгоритму организована настройка остальных категорий, единственное отличие – «Расширенные настройки», в которых можно задать фильтрацию по типам файлов.
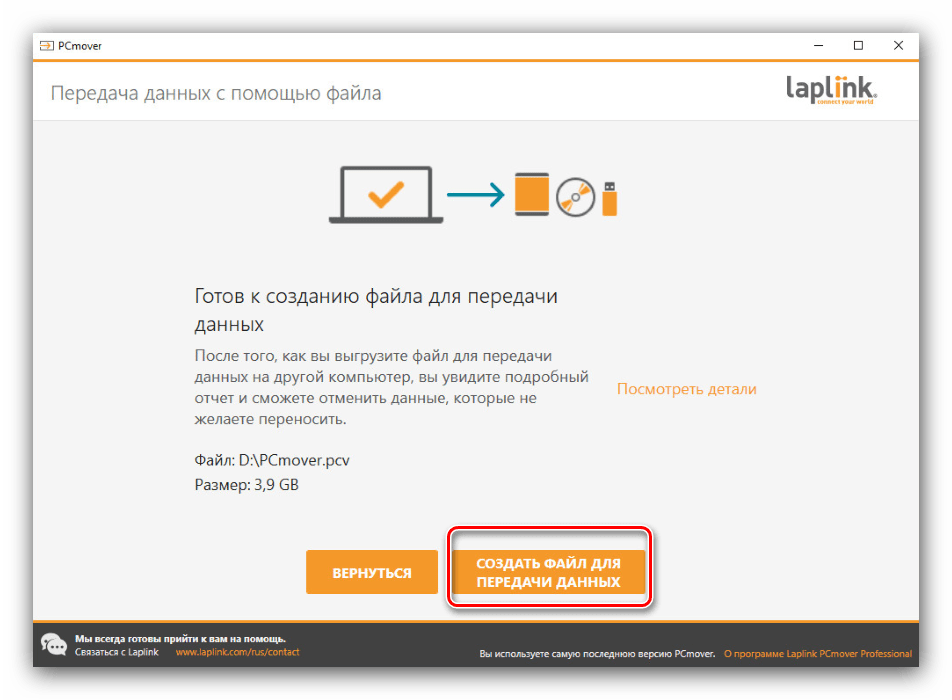
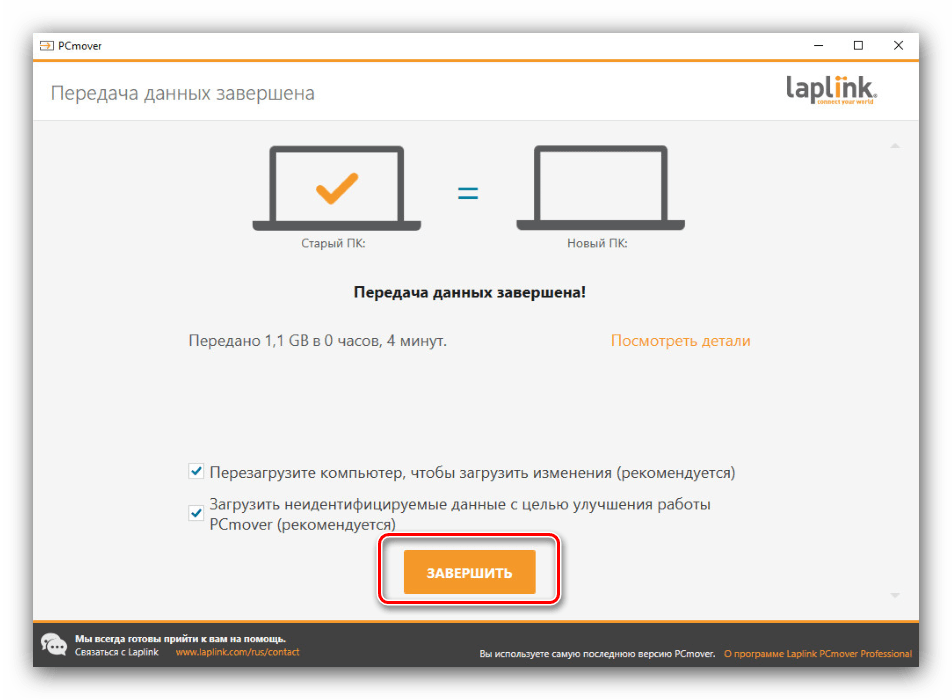
- После настройки всего необходимого нажмите «Далее». Затем кликните по кнопке «Создать файл для передачи данных» и подождите, пока операция будет завершена.
Нажмите «Завершить» и переходите к новой машине.
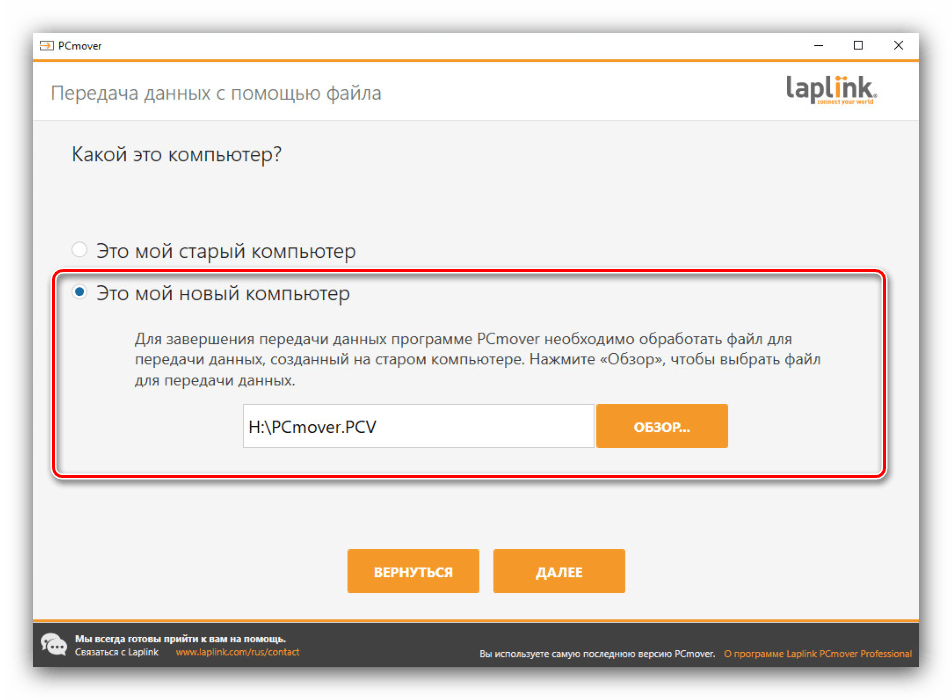
- Первым делом повторите шаги 1-4, только на последнем выберите опцию «Это мой новый компьютер».
С помощью кнопки «Обзор» выберите созданный ранее файл в формате PCV и нажмите «Далее».
- Подождите, пока приложение просканирует систему, затем снова воспользуйтесь кнопкой «Далее».
- Режим передачи данных лучше оставить по умолчанию, после чего запускайте процесс передачи информации.
- По окончании процесса закройте приложение – компьютер автоматически перезагрузится, после чего будет полностью готов к использованию.
PCmover представляет собой мощный инструмент переноса пользовательских профилей, но идеальным его не назовёшь по двум причинам. Во-первых, приложение распространяется исключительно на платной основе без каких-либо ознакомительных или пробных версий. Во-вторых, это пусть и сертифицированная, но сторонняя программа, что некоторые пользователи могут счесть небезопасным.
Способ 2: USMT
Компания Microsoft выпустила пакет миграции пользовательской среды, в комплекте с которой идёт утилита переноса данных.
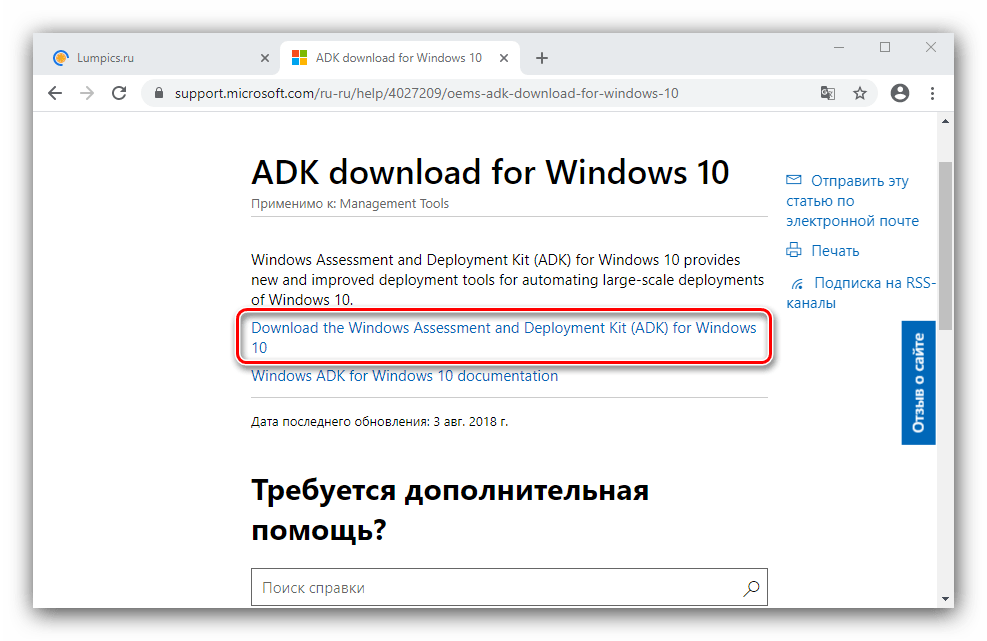
Страница загрузки пакета Windows ADK
- Откройте ссылку выше. Прокрутите страницу до надписи «Download Windows Assessment and Development Kit» и нажмите на неё.
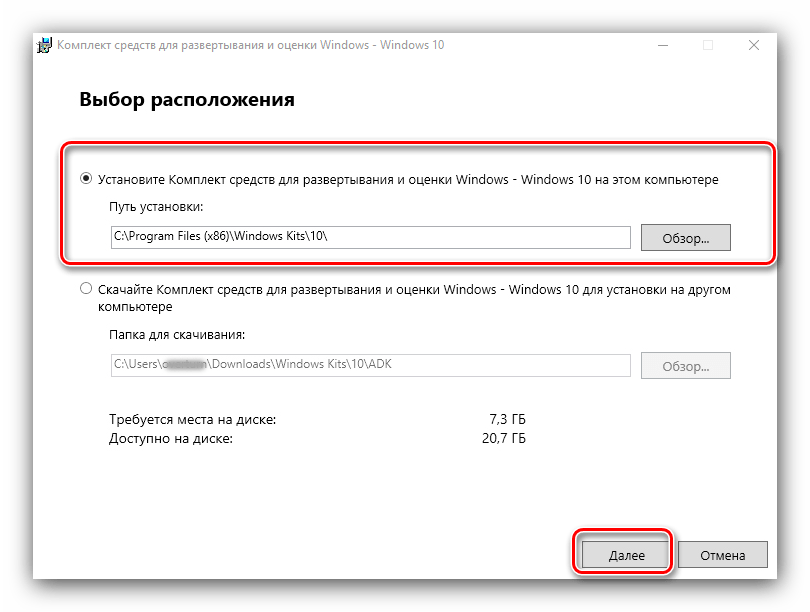
- Загрузите инсталлятор на компьютер, затем запустите его. Выберите каталог, в который желаете установить средство.
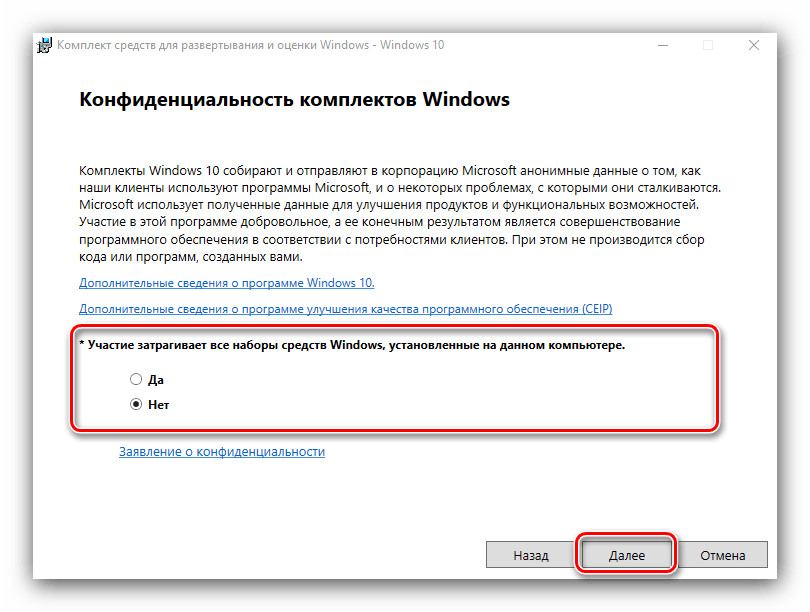
- Выберите, хотите ли отправлять в Майкрософт сведения об использовании ADK.
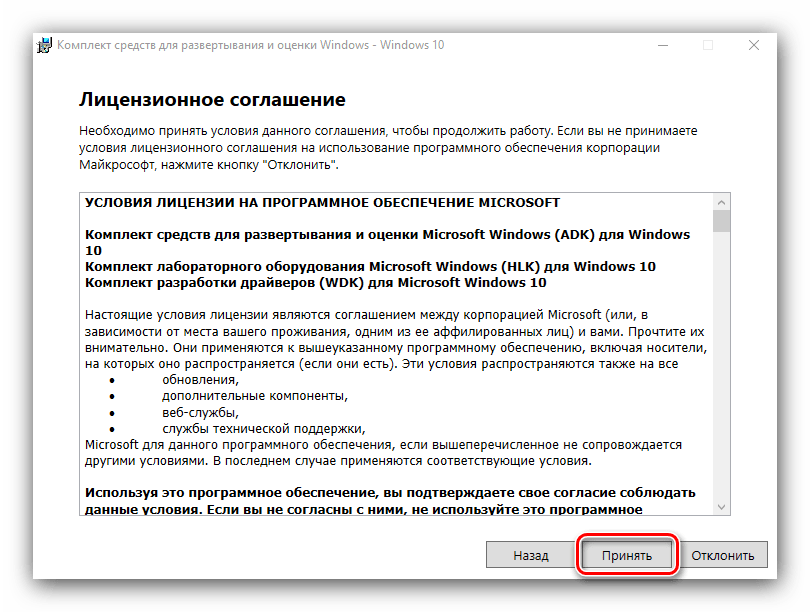
- Примите лицензионное соглашение.
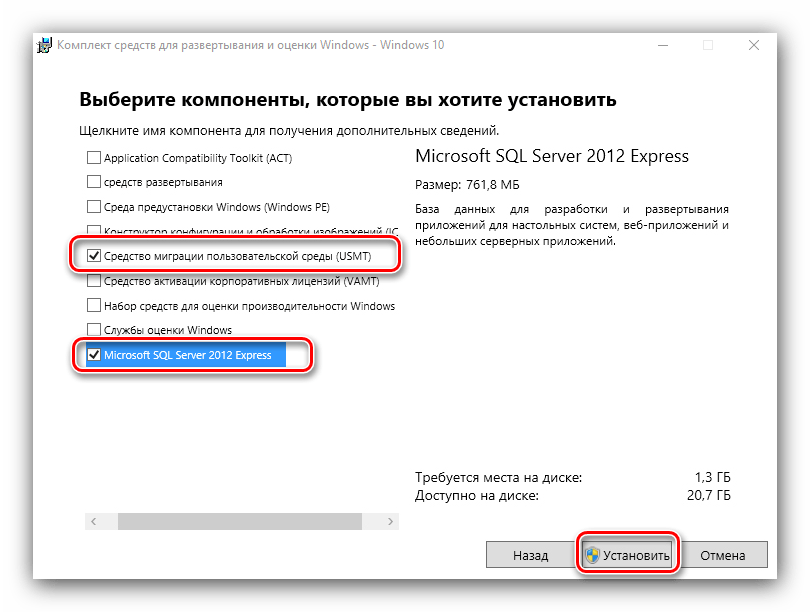
- Дождитесь, пока выбранные компоненты будут загружены. Станет доступен список компонентов пакета. Для нашей сегодняшней цели достаточно оставить только «Средство миграции пользовательской среды (USMT)» и «Microsoft SQL Server 2019».
- Повторите установку на целевом компьютере, куда хотите перенести данные.
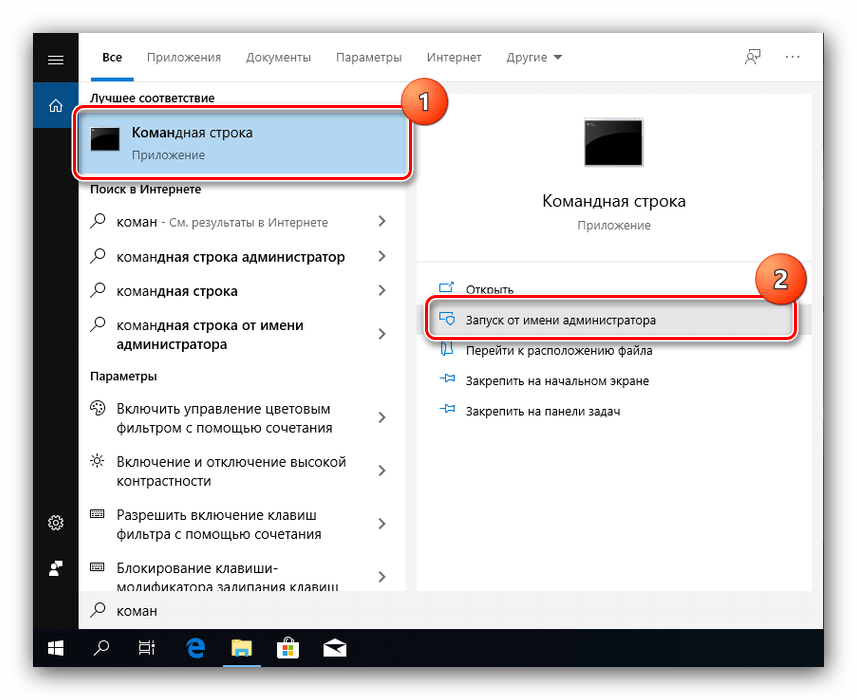
- На старой машине откройте «Командную строку» от имени администратора – например, найдя её через «Поиск» и воспользовавшись нужным пунктом правого меню.

Читайте также: Как открыть «Командную строку» от имени администратора в Windows 10
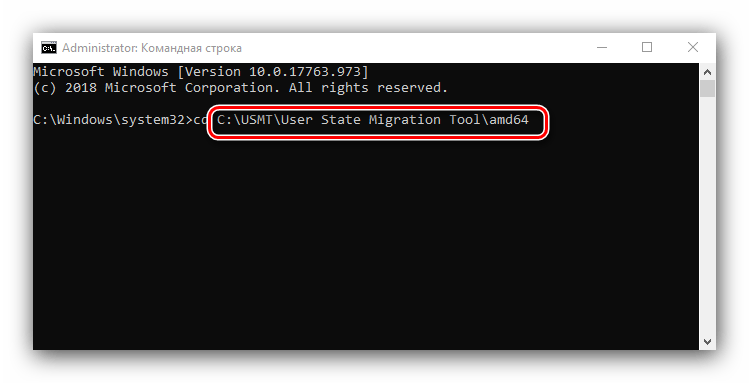
- Введите команду вида:
CD /D *местоположение USMT*Вместо
*местоположение USMT*укажите адрес папки, в которой находятся исполняемые файлы средства, по умолчанию это C:\Program Files (x86)\Windows Kits\10\ADK\User State Migration Tool\amd64. - Далее введите следующие операторы:
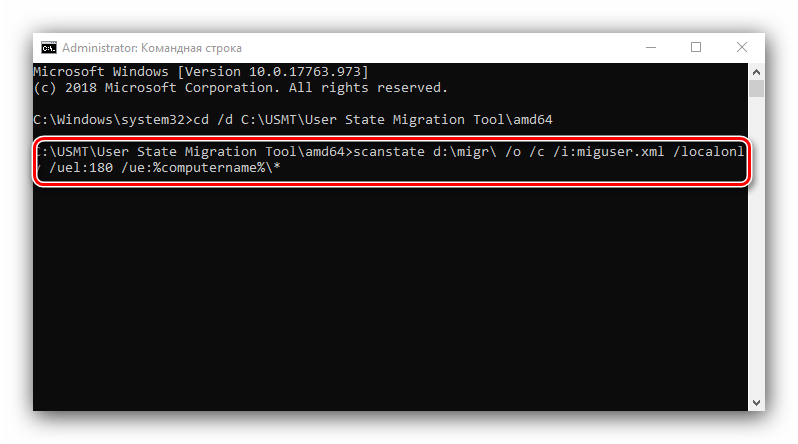
scanstate d:\migr\ /o /c /i:miguser.xml /localonly /uel:180 /ue:%computername%\*Эта команда сохранит пользовательскую информацию с основного системного накопителя за последние полгода. Вместо
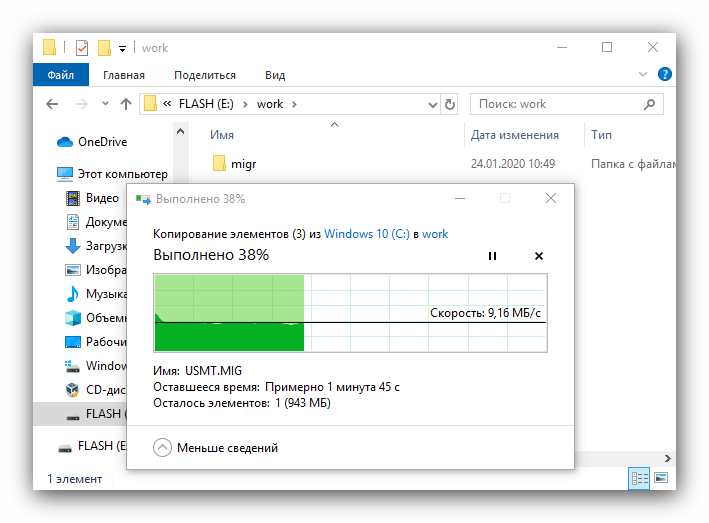
d:\migrможно вписать любое подходящее местоположение и имя каталога. - Дождитесь, пока средство создаст архив с файлами. Далее перейдите по адресу, куда сохранили бэкап, скопируйте его и перенесите на новый ПК или лэптоп.
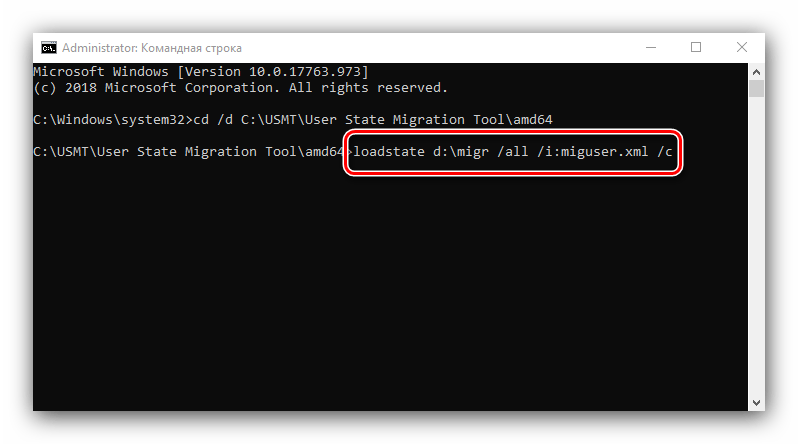
- На машине-адресате переноса повторите действия шагов 7-8, после чего введите в «Командной строке» следующее:
loadstate *адрес папки с бэкапом* /all /i:miguser.xml /c - Подождите, пока данные будут загружены, после чего перезагрузите компьютер и зайдите под перенесённой учётной записью. На этом работа со средством миграции окончена.
Использование утилиты USMT чуть более сложное, в сравнение со сторонней программой, однако данное средство совершенно бесплатно.
Заключение
Таким образом, мы разобрались, что произошло со средством переноса данных в Windows 10 и чем его можно заменить. Как видим, альтернатив немного и все они так или иначе не лишены недостатков, пусть и эффективны в решении поставленной задачи.
Наша группа в TelegramПолезные советы и помощь
One of the most popular tools to migrate user profiles from one Windows computer to another is the set of CLI utilities — User State Migration Tool (USMT), which is a part of the Windows Assessment and Deployment Kit. USMT tool allows you to automate and simplify the process of migrating the users’ environment and profiles while deploying Windows, migrating users between different Active Directory domains, and in other cases.
The transfer of user’s data takes place in two steps, one of which takes place on the old one and the other one on the new computer. USMT can migrate operating system settings, applications, and even access control lists (ACLs). This means that the user’s access permissions on the target computer will be the same as they were on the source system.
Hint. USMT migrates application settings but does not migrate the applications themselves. For applications to work correctly, you will have to install them on the target computer.
Migrating User Profiles Using USMT
The latest currently available version of USMT 10 allows you to migrate user’s settings and profiles and apply settings from operating systems starting from Windows 7 and up to Windows 10. The important difference from the previous version of this utility is the ability to collect the settings in the Offline mode (not while running the operating system). If you want to use USMT on legacy systems (Windows XP, Windows Vista), then you must use version USMT 3.0.1.
You can download the ADK for Windows 10 here.
To install ADK on your admin’s workstation or the source computer, run adksetup.exe file and select User State Migration Tool (USMT) to install:

After the installation is complete, you can find the USMT files in the directory C:\Program Files (x86)\Windows Kits\10\Assessment and Deployment Kit\User State Migration Tool (later you can copy these files to the source computer).
This utility consists of two command-line programs scanstate.exe and loadstate.exe, as well as a set of XML files describing the process of collecting and applying settings.
Both tools must be run under an account with local administrator permissions.

Data transfer using USMT can be performed in two steps: exporting data from the source computer using the ScanState command and importing data on the target computer using the LoadState.
Hint. A separate tool EnbUSMTUtils.exe is used to remove the local migration store.
USMT allows you to write data to a local disk, removable USB drive, or a shared network folder, but cannot transfer data across the network directly from the source to the target computer.
Saving a User Profile with USMT
The first step of the transfer takes place on the source (old) computer. To collect the user’s data, the scanstate command is used.
Scanstate.exe scans the computer according to the specified requirements, creates a repository, and collects users’ profiles and accounts, application and OS settings, files, registry keys, and other data.
Note. From Windows 10 1607, USMT can’t migrate the start menu layout. Instead, you must use Export-StartLayout and Import-StartLayout PowerShell cmdlets.
The USMT utility creates 4 migration files (in .XML format) that store rules for migrating various kinds of data:
- MigApp.xml — contains rules for transferring users’ data;
- MigUser.xml — contains rules for transferring users’ profiles;
- MigDocs.xml — document transfer rules;
- Config.xml — covers information on the components that are excluded from the transfer.
To migrate all accounts and user settings from one computer to another, run the command:
scanstate \\fs1\migr\userdata /i:miguser.xml /i:migapp.xml /o

The following data in the user profile is migrated by default:
- Standard directories from the user’s profile: Documents, Video, Music, Pictures, Desktop, Start menu, Quick Launch settings, Favorites;
- File types: accdb, .ch3, .csv, .dif, .doc*, .dot*, .dqy, .iqy, .mcw, .mdb*, .mpp, .one*, .oqy, .or6, .pot*, .ppa, .pps*, .ppt*, .pre, .pst, .pub, .qdf, .qel, .qph, .qsd, .rqy, .rtf, .scd, .sh3, .slk, .txt, .vl*, .vsd, .wk*, .wpd, .wps, .wq1, .wri, .xl*, .xla, .xlb, .xls*.
By default, all users’ profiles on a computer are migrated. You can specify which users to migrate using the include and exclude options.
To migrate only two user accounts from one computer to another:
scanstate \\fs1\migr\userdata /ue:** /ui:corpuser1 /ui:corpuser2 /i:miguser.xml /i:migapp.xml /o
You can only migrate users who have recently logged into the computer. For example, you can specify that only users who have logged into this computer within the last 50 days should be migrated. For this, the /uel:50 option is used. User profiles are selected by the Last Modified date of the Ntuser.dat files in the user directories under the C:\Users folder.
Or you can exclude certain accounts from migration:
/ue:”corp\user1” /ue:”corp\user2’
You can exclude all domain users’ profiles:
/ue:corp\*
Or just local ones:
/ue:%computername%\*
Scanstate supports the use of Volume Shadow Copy Service. This means you can transfer even files that are locked (used) by currently running applications. The /vsc parameter is used for this.
For example, to create an encrypted store (with an encryption key — StR0n51) on a network shared folder using specified configuration files, you can use the following command:
scanstate \\fs1\migr\mystore1 /i:migapp.xml /i:miguser.xml /o /config:config.xml /encrypt /key:"StR0n51"
By default, compression is used when saving profile files. This allows the user to reduce the storage file size, but it takes longer to create the archive. You can disable compression with the /nocompress option.
Also, you can use USMT to perform offline profile migration. Boot your computer into the Windows РЕ environment and run the ScanState to export users’ profile settings.
After creating a store, you can check its integrity with the command:
USMTutils.exe /Verify
Another interesting way to use the USMT is to perform a backup of users’ profiles on some critical computers.
Migrating and Deploying a User Profile with USMT
The second step of transferring the user profile is performed on the target (new) computer. To complete the migration, use the loadstate.exe command. The loadstate tool imports (extracts) all store items to the target computer.
To load all profiles on a source computer from the store created earlier, run:
loadstate \\fs1\migr\userdata /i:miguser.xml /i:migapp.xml
Hint. Please note that you should not logon to the computer under a new user before migrating his profile via loadstate.exe. If this user already exists on the computer, then when restoring the profile, the LoadState error return code: 71 will appear. In this case, you need to delete the user’s profile in the registry key HKEY_LOCAL_MACHINE\SOFTWARE\Microsoft\Windows NT\CurrentVersion\ProfileList.
If you want to transfer a user’s profile and move a user from one domain to another:
loadstate \\fs1\migr\userdata /mu:/ui:corpuser:/ui:corp2user /i:miguser.xml /i:migapp.xml
Note. When you use the LoadState command to migrate domain users, the computer doesn’t need access to the target or source domain controller to apply user profiles.
With the /md:OldDomain:NewDomain option you can specify a new domain for users. This option is used to change the user’s domain during migration. If the username in the source and destination domain is different, you can match the account names in the old and new domain:
/mu:OldDomain\User1:NewDomain\NewUser1
For example, to load user profiles from an encrypted store on a shared network folder run the command:
scanstate \\fs1\migr\mystore1 /i:migapp.xml /i:migapp.xml /i:miguser.xml /decrypt /key:"StR0n51"
The USMT utility easily integrates with SCCM and MDT. It makes it easier and more automated to move users. The administrator only needs to make preliminary settings, and user migration can be done completely automatically.
Cyril Kardashevsky
I enjoy technology and developing websites. Since 2012 I’m running a few of my own websites, and share useful content on gadgets, PC administration and website promotion.
Updated on Apr 28, 2025
Do you want to streamline your Windows 10 experience by effortlessly transferring your operating system to a new, high-performance drive? OS migration software helps you efficiently transfer your operating system to a new, faster disk on Windows 11/10/8. We’ve selected the most reliable free OS migration tool to make it easy for you to migrate your OS to another system, SSD, or HDD.
EaseUS explores free OS migration software for Windows 10 to ensure easy and secure migration. You’ll also find a step-by-step tutorial for transferring your OS and data. Follow along to ensure a smooth migration process and avoid potential issues.
What Is the Best Free OS Migration Software
To help you easily transfer your OS, we’ll now discuss a free OS migration software for Windows 10 that stands out among the rest. EaseUS Partition Master Free is the best free Windows OS migration and feature-rich tool. It offers a range of features that make it particularly valuable for users looking to migrate their operating systems, clone disks, and recover lost partitions.
This free disk cloning software allows you to migrate your OS to a new SSD or HDD without reinstalling the system. It simplifies the process, making it easy to transfer your entire operating system and data without risks.
Advantages & Features in EaseUS Partition Master Free:
- Data Disk Cloning: Users can easily clone entire data disks to another HDD or SSD. This feature ensures that all files, applications, and settings are copied exactly, making it ideal for upgrading or replacing storage devices.
- System Partition Migration: The software also supports migrating system partitions, which are essential for users who want to transfer their operating system to a new drive. This process includes all necessary boot files, ensuring the new drive is bootable after cloning.
- User-Friendly Interface: EaseUS Partition Master provides a straightforward interface that guides users through the cloning process with simple wizards, making it accessible even for those with limited technical expertise.
- Two Cloning Modes: The software offers two main modes for cloning: disk clone and partition clone. This flexibility allows users to choose whether they want to clone an entire disk or just specific partitions based on their needs.
Let’s learn how to use EaseUS Partition Master in the following part.
How to Migrate Windows OS for Free
Ready to migrate your OS instantly? No more waiting—follow the tutorial below to transfer your Windows 10 operating system quickly, without any risks or hassle, using EaseUS Partition Master.
Step 1. In EaseUS Partition Master, select «Disk Clone» from the left menu. Click «Clone Partition» and «Next».
Step 2. Select the source partition you want to clone from and click «Next».
Step 3. Choose your the target partition and click «Next «to continue.
- If you clone partition to the existing partition, you should transfer or back up data before cloning to prevent it being overwritten.
- Check warning message and confirm «Yes».
Step 4. Click Start and wait for the clone to complete.
You can check how to clone partition or system reserved partition on this video tutorial.
Key Features of EaseUS Partition Master:
- Clone HDD to SSD in Windows 11
- Migrate Windows OS from HDD to SSD
- Clone system disk to SSD
- Copy a partition to another hard drive
By following this guide, you’ll migrate OS and avoid common issues that may arise during the process. Try EaseUS Partition Master for a smooth, stress-free OS migration and data transfer experience. Share this free OS partition cloning tool with more users online:
Conclusion
Now, you can feel very confident with the EaseUS Partition Master when it comes to migrating your operating system onto a new drive. As a strong tool, it guarantees a smooth and safe transfer process while ensuring that you do not need to worry about possible data loss or an urgent need to reinstall Windows. With its user-friendly interface, support for multiple disks, and proven reliability, EaseUS Partition Master is ideal for OS migrations.
Whether upgrading to a faster drive or just system relocation, this tool will do the job easily and without stress. We highly recommend EaseUS Partition Master for transferring OS without worries and risks. Give it a try today to discover an easier way of upgrading your system!
Have more queries about Os migration? Check the FAQs below!
1. Can I migrate Windows OS for free?
Yes, you can migrate Windows OS for free using specialized software. Many free OS migration tools, like EaseUS Partition Master, allow you to transfer your operating system to a new drive.
2. How do I clone Windows OS for free?
Cloning your Windows OS is straightforward using free tools like EaseUS Partition Master.
Here’s how:
- Launch EaseUS Partition Master and select the «Clone» feature.
- Select the disk containing your Windows OS.
- Choose the new disk where you want to clone the OS.
- Click «Next».
- Click «Start» to initiate the cloning process.
3. What is the best free data migration software?
Several free data migration tools are highly rated, including EaseUS Partition Master, MiniTool Partition Wizard, and AOMEI Backupper.
With improvements in computers and computer parts, everything is getting faster and faster. And one of the biggest such examples are SSDs which are replacing traditional hard drives at a very fast rate. If you are not familiar with SSDs, these stand for Solid State Drives and offer much faster much access speeds than a mechanical hard drive. Because of this, a large number of people are switching to SSDs in their computers. While you can reinstall Windows in your SSD from scratch, that can take a lot of time. In such a case you are better off migrating your existing Windows installation to your SSD.
But as a lot of people are getting SSDs, there are various options available out there when it comes to such tools. Therefore today we are here with the Top 8 Windows 10 Migration Tool in World. These tools can be quite beneficial if you are going to upgrade to an SSD. And in this article, you will learn everything about these tools. You will be able to select the right SSD migration tool according to your needs and requirements. And since we have provided the pros and cons of all the SSD migration software, you can easily compare them with each other.
Why You Need A Windows Migration Tool?
If you have recently added an SSD in your computer, then you have to make sure that the operating system and all of the programs are installed on it. Because if that’s not the case, you will not use the full performance of your SSD! While you can manually re-install the operating system along with all of the programs on your SSD, that can take a lot of time. And this time can be increased even further if you have some data stored in your hard drive that you would want to transfer to your SSD.
On the other hand, if you are using a migration tool for Windows 10, you can simply migrate Windows 10 to your SSD. In other words, the complete OS partition of your hard drive will be cloned onto your SSD as it is. Due to this, if you are using any SSD migration tool, you will not feel a difference when compared to manually installing the operating system and moving all programs. Apart from that some software even comes with extra features like file backup which can be quite useful for many users.
What Is The Best Windows 10 Migration Tool?
Now that you know the benefits of using this tool, chances are that you also want one on your computer. But since a lot of people are buying SSDs these days, there are a lot of such tools and software available out there. Therefore, choosing the correct software according to your needs and requirements can be a little difficult. Different data migration software comes with a different set of features which set them apart from each other.
Not only that but some these software do not even work properly. Thankfully, today we are here with the best SSD migration software. And we have provided all the important information about these tools. So, if you are also looking to migrate your current operating system over to your SSD, you can go through the following Windows 10 migration tools and choose the best one for you:
- 1. EaseUS Todo PCTrans
- 2. AOMEI Backupper Professional
- 3. Laplink Software Inc. PCmover Professiona
- 4. Tranxition Software Migration Manager
- 5. Windows 10 Migration Accelerator
- 6. PCMover Express
- 7. MiniTool Partition Wizard
- 8. Windows Easy Transfer
EaseUS Todo PCTrans
EaseUS is known for making various storage-related tools like partition manager, file backup, data recovery, and most importantly SSD migration software. And EaseUS Todo PCTrans is their offering as a great migration tool Windows 10. It offers a very simple yet interactive user interface which will be liked by almost everyone. Even though this migration software is quite easy to use, it still offers a lot of features. Due to this reason, EaseUS Todo PCTrans is a great option for both basic as well as advanced users. While it does offer a paid premium version of the software with extra features, the free version will be more than enough for most users as it offers various features which are required for SSD cloning.
Pros:
- Easy to use user interface design
- Multiple features even in the free version
- Allows you to select between different partitions or disks for cloning
Cons:
- The free version is trial only
- Continuous backups are not supported
- Lacks a few advanced features in the free version
AOMEI Backupper Professional
AOMEI Backupper Professional is another great option when it comes to SSD migration. It is one of the simplest to use data migration tool available out there. One of the biggest issues while cloning an SSD is when the target drive is smaller than the original one. In such a case most migration tools will not work. Thankfully, that is not the case with AOMEI Backupper Professional. This is one of the best features of this tool that it is able to clone a large disk to a smaller by moving just the operating system files. But you can also find many other features in this tool which can be useful while cloning SSDs.
Pros:
- Free to use
- Clones to SSD of smaller size
- Basic yet functional user interface
- Copies boot records
Cons:
- Migration could have been faster
- No data backup or recovery option for safer migration
Laplink Software Inc. PCmover Professional
If you are new to SSD cloning and data migration, then the Laplink Software Inc. PCmover Professional can be a great choice for you. Not only it offers you an easy to use design and user interface, but you will also get 24×7 assistance. If you have purchased this tool, then you will be able to use its free 24×7 assistance feature. It essentially allows you to contact Laplink who will help you in solving all sorts of issues. Apart from that, this tool is also quite fast. It even includes features which are not present in most migration software available out there. And due to this, it is one of the best choices if you are new to SSD cloning and want a user-friendly tool.
Pros:
- Easy to use and operate
- Free 24×7 assistance for SSD data migration
- Auto-connect feature
- USB 3.0 support for external drives
- Undo feature for reverting any accidental operations
Cons:
- No free version available
- The user interface could have been simpler
- Data backup and recovery options are missing
Tranxition Software Migration Manager
The Tranxition Software Migration Manager is one of the only few SSD migration tools available out there which provide you with automation support. This feature will be highly appreciated by IT professionals who have to manage multiple computers at once. In such cases, manually starting the SSD migration process can be quite time-consuming. On the other hand, Tranxition Software Migration Manager allows you to setup up automated disk cloning schedules which can automatically migrate your data from one drive to another. Not only that but it even imports all of the user data along with the operating system. And you can also find all other standard features in this software.
Pros:
- Automation support for disk cloning
- Free trial available for trying out different features
- Fast SSD cloning speed for a large amount of data
- Technical assistance provided for registered users
Cons:
- The user interface can be a little overwhelming
- Made for IT professionals and not consumers
- Creating automated process needs knowledge of automation
Windows 10 Migration Accelerator
As the name suggests, this SSD migration utility essentially accelerated the whole cloning process. This is another popular migration tool that can work on Windows 10 and which is used by IT professionals. Due to this, this single software can be used for both consumer PCs as well as cloud servers. And as you would expect, Windows 10 Migration Accelerator offers you with all kind of features and options which can be useful while migrating your data from one drive to another. Not only that but since this software is also used for servers, you also get technical assistance. This can be a relief for a lot of users who are new to SSD cloning and do not know much about data migration and related software.
Pros:
- Integration support for using along with other software
- Migrates OS, drivers, apps, files, profiles, etc
- Great for advanced IT professionals
Cons:
- Pricing can be steep for the premium version
- The user interface is complicated
- Lacks automation support
PCMover Express
The PCMover Express is another great offering from Laplink which is cut down version of the Laplink Software Inc. PCmover Professional mentioned earlier in this article. In other words, while it lacks some features when compared to other offerings by Laplink, it is certainly a cheaper and much more viable option for a lot of users. Even though you will not find any advanced features in this utility, it is still more than enough for most users. But the best part about the Laplink PCMover Express is that it has the same user interface as its bigger brother. Due to this, if you have ever used the Laplink Software Inc. PCMover Professional, then you will feel right at home while using the Express version.
Pros:
- Supports various operating systems ranging from Windows XP to Windows 10
- Undo feature for revert accidental operations
- Easy to use and navigate user interface
- Allows you to select files to be migrated to your SSD
Cons:
- Lacks SSD migration technical assistance
- No support for external drives
- Applications have to be moved manually
MiniTool Partition Wizard
MiniTool Partition Wizard is another great choice. It offers various versions of this software for both home and business users. Not only that but some of these versions are even free which is a bonus for a lot of users. While the paid versions offer you with many more features and options, the free version is quite sufficient for most PC users at home. But if you are running a business with multiple servers, then you should consider getting the paid version. One of the best things about this data migration software is that it also allows you to perform other operations as well. For example, you can manage your disk partitions, perform data recovery, diagnose issues with your drive, and much more.
Pros:
- Easy to use
- Multiple available versions for different users
- Various extra features like partition manager, data recovery, disk diagnosis, etc
- Allows you to analyze and manage disk space before migration
Cons:
- No included tech support assistance
- Advanced features not available in the free version
Windows Easy Transfer
Windows Easy Transfer is a software developed by Microsoft itself. It was primarily developed for transferring your data from an older version of Windows to recent ones. But you can also use it for migrating your operating system along with all of its data to an SSD drive. And since it is developed by Microsoft, it will work on your computer no matter which version of Windows you are using. Apart from that, this one is also quite easy to use. It allows you to easily migrate your operating system to your SSD without any issues.
Pros:
- Easy to use
- Multiple available versions for different users
- Various extra features like partition manager, data recovery, disk diagnosis, etc
- Allows you to analyze and manage disk space before migration
Cons:
- No included tech support assistance
- Advanced features not available in the free version
Best Software to Recover Deleted Files on Windows and Mac
Even though all of these SSD migration tools and software work without any major issues, there is always a chance of failure. And in such a case you might end up losing some of your files. But chances are that these are files are quite important for you and you would like to get them back. In such a case you can try using a data recovery software to get your files back.
Unfortunately, not all of such tools work properly and some of them are not even free. If you are also facing such an issue on your Windows or Mac device, it will be better to rsort to the third-party software. 4DDiG Windows Data Recovery or UltData Mac Data Recovery allows you to easily recover any deleted files from your device. And the best part about it is that it is available on both Windows and Mac. For those of you who got their files deleted while performing SSD migration, you can follow the given steps to recover your data:
Step 1First, visit install 4DDiG Windows Data Recovery on your device according to your platform.
Step 2After that, open the program and select the location of the files which were deleted.
Step 3Now, click on the Scan option after which it will search for any deleted files.
Step 4Finally, select all the files that you want to recovery, and click on the Recover option.
4DDiG Windows Data Recovery will then store these files in your desired location after their successful recovery.
Conclusion
We hope that you’ve found this article useful and successfully migrated your operating system to your SSD. You can easily choose the best Windows 10 migration tool for your needs using this article. We have provided all the major pros and cons of these tools. Not only that but if you have accidentally some of your files while migrating, you can use 4DDiG Windows Data Recovery or 4DDiG Mac Data Recovery to recover them as shown. In case you liked this article, then make sure to share it on social media. If you have any doubts regarding any of the solutions, feel free to ask any queries in the comments section below.