
Last updated on April 19, 2024
Please provide the English content you want translated, and I’ll do my best to translate it into Chinese.
| Solutions That Work | Step-by-Step Troubleshooting |
|---|---|
| Run Fdisk on Windows 10/11 | #1. Open Fdisk via Command Prompt…Full Steps
#2. Open Fdisk via Run Prompt…Full Steps |
| Use Fdisk on Drives in Windows 10/11? | #1. Create Primary Partition…Full Steps
#2. Format Hard Disk Partition…Full Steps #3. Extend Partition…Full Steps #4. Delete All Volumes…Full Steps |
| Beginner’s Choice: Partition Disk with Partition Master | Step 1. Check available space. To partition a disk into multiple ones, you must ensure that there’s…Full Steps |
Are you looking to learn how to run fdisk on Windows 10/11? If so, you’ve come to the right place. Today, we’ll delve into the details about fdisk, its purpose, and other relevant information. Before diving deep into the guide, it’s essential to understand why fdisk is crucial for Windows users. The answer is simple! Fdisk is a utility that is particularly useful for formatting or preparing hard disk drives for storing data. It aids in partitioning disks, allowing you to install an operating system separately on one drive while installing necessary items on others.
What is Fdisk?
FDISK is a simple command-line utility that offers disk partitioning capabilities for Windows. This tool has been around since the early days of Windows and is used to manage partitions via the command line, primarily by IT administrators. Users can create partitions, add or remove space, organize storage on new drives, format, and reorganize older drives with this utility.
However, one significant drawback of the tool is its inability to manage storage space exceeding 64 GB. This poses a substantial issue, especially when managing and backing up servers. It forces users to split backup files into smaller segments or opt for smaller partition sizes.
Chances are that most people’s PCs have a terabyte of storage these days. That’s where the DISKPART tool comes in.
Diskpart is the perfect successor that has replaced fdisk, serving Windows 10 and even the latest Windows 11 users in partitioning hard drives and utilizing disk space. It not only handles larger disk sizes but also offers more features and stability.
Fdisk is outdated and unavailable on modern platforms like Windows 10 and Windows 11. Instead, you can use the diskpart utility to perform the same tasks and more.
In this article, we will share with you several ways to run Fdisk in Windows 10/11. Please feel free to share this article with others who might need it if you find it helpful.
«&nbps;» translates to Chinese as » «, which represents a non-breaking space character. In web page coding, it is used to indicate a blank space that prevents a line break.
How to Run Fdisk in Windows 10/11?
Since fdisk has some limitations and isn’t available in Windows 10/11, we’ll have to use the diskpart tool instead. If you’re not familiar with it, our step-by-step guide is here to help.
If you’re looking to learn how to open fdisk on Windows 10/11, you can do so through either the Command Prompt or the Run prompt. Follow the steps below to open fdisk on Windows 10/11 using these two alternative methods.
#1. Launch Fdisk through the Command Prompt
Step 1: Type “Command Prompt” in the search bar next to the Start button in Windows, and run it as an administrator. This will open the Command Prompt window.

Step 2: Now, type diskpart in the Command Prompt window, and press Enter. This will open the Disk Management window.

#2. Access Fdisk through the boot prompt
Step 1: In the search bar next to the Windows Start button, type Run and press the Enter key. You can also open the Run prompt using the Windows + R keys.
Step 2: Type diskpart, then press Enter. You’ll see a User Account Control prompt. Click the Yes button to launch Diskpart directly in Command Prompt.
Open Disk Management from the Command Prompt Type diskpart at the command prompt:

How to Use Fdisk to Format a Disk on Windows 10/11?
When managing hard drives with the diskpart command in Windows 10/11, we’ll provide you with four optimal methods, so follow all the steps perfectly.
Let’s take a closer look at each of these four ways.
## 1. Create Primary Partitions
To create a primary partition using Diskpart, follow these steps:
Step 1: Press Windows + R simultaneously, then type cmd. Launch it with Shift + Enter to run it as an administrator.
Step 2: Type diskpart and press Enter. This will open the Disk Management console, where you should type list disk to view all the disks on your system.
Step 3: Now type select disk (number) to choose the disk you want to work with. If you have existing partitions, you can use the command clean to erase all partition information and data from the disk. If the disk is brand new, you can skip this step. This is useful if you need to reformat an older drive.

Step 4: Now type create partition primary size=* and press Enter. Next, type format override fs=NTFS and hit Enter.

Notice:
- Replace * with the size of the primary partition you plan on making.
- The format override helps to eliminate any permission errors that may arise. You can also just use `format`.
- The `label` option allows you to add a name to your primary partition, this is optional.
Step 4: Type list volume, which will show all volumes available on the storage device. Then type select volume (number) to choose the newly labeled volume.
Replace (number) with the digit displayed in the list.

Step 5: Now type assign letter=X to assign the new letter to the disk, for example, assign letter=D. Type list volume again, and you should see the new partition that was assigned or created.
#2. Format the hard drive partition to NTFS/FAT32
To format a hard drive partition to NTFS/FAT32 using Diskpart on a US English system, follow these steps:
1. First, press the `Win + X` keys and choose «Command Prompt (Admin)» or «Windows PowerShell (Admin)» to open the terminal with administrator privileges.
2. In the terminal, type the following command and hit Enter to launch the `diskpart` tool:
«`
diskpart
«`
3. You’ll see the `DISKPART>` prompt. Enter the following command and press Enter to list all disks:
«`
list disk
«`
4. Identify the hard drive you want to format. Note its number (usually 0, 1, 2, etc.). For instance, if it’s Disk 0, type this command and hit Enter to select that disk:
«`
select disk 0
«`
5. Next, enter this command and press Enter to list all partitions on that disk:
«`
list partition
«`
6. Locate the partition you want to format and jot down its number. If Partition 1 is the one, type this command and hit Enter to choose that partition:
«`
select partition 1
«`
7. Now, choose the file system you need. To format to NTFS, type:
«`
format fs=ntfs quick
«`
For FAT32, enter:
«`
format fs=fat32 quick
«`
Adding `quick` speeds up the process but remember to back up your data since it will delete everything on the partition.
8. Wait for the formatting to finish. Once done, you’ll be returned to the `DISKPART>` prompt. To exit `diskpart`, type:
«`
exit
«`
9. Finally, close the terminal window.
Your hard drive partition is now formatted to the chosen file system.
Step 1: Press Windows + R simultaneously, type cmd, right-click on «Command Prompt,» and select Run as administrator. Now type diskpart and press Enter. Allow Diskpart to run with administrative permissions by clicking Yes. This will open the Diskpart window.
Step 2: Type the following commands, pressing Enter after each line.
- diskpart
- list disk
- select disk (number): ‘number’ represents the disk’s number
- list partition: Get the number of partitions on the selected disk
- select partition (number): ‘number’ represents the partition’s number
- format fs=ntfs quick
Step 3: Once you’re done, type exit to close the «Disk Management» window.

#3. Extended Partition
To extend a partition using Diskpart, follow these steps:
1. Right-click the Windows icon, and select «Search.» Type in cmd, then press Enter. Type in diskpart and press Enter again. Click «Yes» to open Diskpart.
Step 2: Follow the instructions below, and press Enter after each one.
- List Volumes
- Select Volume 1 (replace with your system disk number)
- Extend
#4. Run Windows 10/11 Fdisk to Delete All Volumes
You can delete or reset the hard drive from your system by diskpart delete all partitions, follow the steps below.
Step 1: Press Windows + R simultaneously, type cmd, right-click on «Command Prompt,» and select «Run as administrator.» Now type diskpart and hit the Enter key. Allow diskpart to run with administrative privileges in the Windows environment by clicking Yes. This will open the diskpart window.
Step 2: In the Disk Management window, type list disk and press the Enter key. This will display a number for each disk.
<Step 3>: Highlight each drive and press the Enter key. This will show a number next to the drive, indicating that it has been selected. Type clean all and press Enter.

4. When you’re done, type exit to close the diskpart window.
Beginner’s Choice: Use Fdisk Alternative Tools for Disk Partitioning in Windows 11/10
If you’re a beginner without any computer tech knowledge, we recommend using Partition Master as the perfect alternative to fdisk. This tool can quickly and safely replace fdisk and diskpart for disk partition management. Let’s learn more about its features and functions.
Step 1: Run AOMEI Partition Assistant, and check the free space of the disk in «Partition Management».
- • If you have unallocated space on your hard drive, skip to Step 3 to create the partition. • If you do not have any unallocated space, proceed to Step 2.
Step 2. Shrink the partition to create unallocated space.
Right-click on the target partition with lots of free space, and choose “Resize/Move.”

Then, you can shrink the partition by dragging the sliders on either side of it to free up enough unallocated space. You can see how much space you’ve reduced it by in the “Size in MB” field. Click “OK.”

Click “Perform XX Task,” and then click “Apply” to save all changes.

Back in the “Disk Management” tool, you should see the unallocated space on the same disk. You can now proceed to create a new partition on your hard drive.
Step 3. Create a new partition on the target drive using the unallocated space.
Right-click the unallocated space and choose New.
Create Partition Step 1

Customize the partition size, drive letter, volume label, file system (NTFS, FAT32, EXT2/3/4, exFAT), etc. in the «Advanced Settings.» Click «OK.»
Create Partition Step 2

Finally, click “Execute * Tasks” and “Apply” to create the partition with the unallocated space on the disk. Repeat these steps to partition hard drive and create more partitions.
Create Partition Step 3

«Partition Master is one of the highly rated professional partitioning tools, equipped with unique features such as»
- Migrate Windows 10/11 to a new SSD with just one click.
- Conveniently expand or manage partitions in Windows 10/11.
- Combine two SSDs into one without losing any data.
Some advanced features of Partition Master tools
- Migrate/Resize/Move Partition
- Clone/Create/Format/Delete Partition
- Copy Disk/Partition
- Migrate OS to SSD
- Dynamic Volume Management
- Partition Recovery
Fdisk is no longer the way to partition disks | Here are better options
If you’ve stuck with us until now, you surely have a deep understanding of fdisk/diskpart and what it’s for. Diskpart is the ultimate replacement for fdisk for every Windows user on Windows 10/11. However, it’s not the safest nor the best disk partitioning method for newbies without technical knowledge. We recommend using the most reliable third-party tool, none other than Partition Master, because it’s safer, simpler to manage, and almost never results in data loss.
Fdisk is the oldest disk partition tool with DOS program. Since you have Fdisk in your Windows 10, you can use it to divide disk. However, the earlier Fdisk has no format functions to meet your requirements of formatting partitions and allocating file systems after dividing.
To do so, follow these steps: Boot into Windows 10. Press the Windows key and C to open the charm bar. Type cmd. Click Command Prompt. When Command Prompt opens, type diskpart. Press Enter.
How do I use fdisk on Windows?
Fdisk is an external command that is available for the following Microsoft operating systems. With MS-DOS 3.3x and below, fdisk.com was used as the external file. MS-DOS 4. x and later including versions of Windows that support the command, use fdisk.exe as the external file.
How do you use fdisk?
5.1. fdisk usage fdisk is started by typing (as root) fdisk device at the command prompt. device might be something like /dev/hda or /dev/sda (see Section 2.1.1). p print the partition table. n create a new partition. d delete a partition. q quit without saving changes. w write the new partition table and exit.
How do I use fdisk in command prompt?
FDISK Type: External (2.0 and later) Syntax: FDISK. FDISK [/status] Purpose: Prepares a fixed disk to accept DOS files for storage. Discussion. FDISK provides a set of options related to the preparation of a fixed disk. NOTE: This command is implemented in different ways by different manufacturers.
Does Windows 10 have fdisk?
Fdisk is the oldest disk partition tool with DOS program. Since you have Fdisk in your Windows 10, you can use it to divide disk. However, the earlier Fdisk has no format functions to meet your requirements of formatting partitions and allocating file systems after dividing.
How do I manage drives in Windows 10?
Way 1: The easiest way to open Disk Management in Windows 10 is from computer Desktop. Right click on Start Menu (or press Windows+X hotkey) and then select “Disk Management”.
What is the use of fdisk command?
fdisk command in Linux with examples. fdisk also known as format disk is a dialog-driven command in Linux used for creating and manipulating disk partition table. It is used for the view, create, delete, change, resize, copy and move partitions on a hard drive using the dialog-driven interface.
How do I fdisk C drive?
Format Hard Drive Type “c: /s” at the DOS prompt and press the Enter key. Press Y at the warning prompt, then press the Enter key to format your hard drive. Type a name for your hard drive or leave the name blank and press the Enter key.
What does fdisk MBR do?
The fdisk /mbr command is an undocumented switch used with the fdisk command (MS-DOS 5.0 and higher) that recreates the master boot record on a hard drive.
How do I start fdisk?
At the a: prompt type fdisk then hit enter. Click yes you want to use large disk support. To Delete the existing partition, Type 3 and press Enter. Select shown partition by typing the displayed number of partition and press Enter for confirmation for deleting partition.
What is the output of fdisk?
The first five lines of output from the fdisk –l /dev/sda command are summary information about the device itself, /dev/sda. The example output shows a 21.5 GB virtual disk (sda) with 41943040 sectors. The partition table is displayed after the summary information.
What fdisk command will allow you to change a partition type?
If you want to change the type, press l to get a list of partition types and then press t to change the type. Use the default values for the partition number, first and last sectors. This will create a partition that will use all available space on the disk. If you want to delete a partition, use the d command.
How do I format fdisk?
Linux Hard Disk Format Command Step #1 : Partition the new disk using fdisk command. Following command will list all detected hard disks: Step#2 : Format the new disk using mkfs.ext3 command. Step#3 : Mount the new disk using mount command. Step#4 : Update /etc/fstab file. Task: Label the partition.
How do I run Gdisk?
Under Windows, you can right-click the Command Prompt program and select the “Run as Administrator” option, then use the resulting window to run gdisk. You launch gdisk in much the same way as fdisk, although gdisk supports very few command-line arguments.
What is Lsblk command?
lsblk lists information about all available or the specified block devices. The lsblk command reads the sysfs filesystem and udev db to gather information. The command prints all block devices (except RAM disks) in a tree-like format by default. Use lsblk –help to get a list of all available columns.
How do I see all disks in Windows 10?
See drives in Windows 10 and Windows 8 If you’re running Windows 10 or Windows 8, you can view all mounted drives in File Explorer. You can open File Explorer by pressing Windows key + E . In the left pane, select This PC, and all drives are shown on the right.
How do I create a Windows 10 repair disk?
To create a recovery drive in Windows 10: In the search box next to the Start button, search for Create a recovery drive and then select it. When the tool opens, make sure Back up system files to the recovery drive is selected and then select Next. Connect a USB drive to your PC, select it, and then select Next.
How can I repair my Windows 10?
Here’s how: Navigate to the Windows 10 Advanced Startup Options menu. Once your computer has booted, select Troubleshoot. And then you’ll need to click Advanced options. Click Startup Repair. Complete step 1 from the previous method to get to Windows 10’s Advanced Startup Options menu. Click System Restore.
The evolution of computer technology has brought forth a plethora of advanced tools and utilities designed to empower users in managing their storage devices. One such tool that has stood the test of time is FDISK, a command-line utility that has been a part of the Microsoft Windows operating system since its early days. FDISK has been instrumental in helping users partition and manage their hard drives, making it an indispensable tool for system administrators and power users alike. However, with the introduction of Windows 10, many users have found themselves wondering: Where is FDISK in Windows 10?
1. The Changing Landscape of Disk Management
In the early days of computing, when hard drives were relatively small and operating systems were less sophisticated, FDISK was the go-to tool for managing disk partitions. Its simple command-line interface allowed users to create, delete, and modify partitions, making it a powerful tool for optimizing storage space and organizing data. However, as hard drives grew larger and operating systems became more complex, the limitations of FDISK became apparent.
2. The Rise of Graphical User Interfaces
With the advent of graphical user interfaces (GUIs), users began to demand more intuitive and user-friendly ways to manage their storage devices. Microsoft responded to this demand by introducing the Disk Management utility in Windows XP. Disk Management provided a graphical interface for managing partitions, making it much easier for users to perform tasks such as creating, deleting, and resizing partitions. FDISK, with its command-line interface, was gradually phased out in favor of the more user-friendly Disk Management utility.
3. FDISK’s Continued Presence in Windows 10
Despite the dominance of Disk Management, FDISK has not been completely abandoned in Windows 10. It is still available as a command-line tool, although it is no longer included in the default installation of Windows 10. To access FDISK, users must first enable it through the Control Panel. Once enabled, FDISK can be launched from the Command Prompt or PowerShell.
4. When to Use FDISK in Windows 10
While Disk Management is generally the preferred tool for managing partitions in Windows 10, there are still some situations where FDISK may be the better choice. For example, FDISK can be used to:
- Create or delete partitions on a hard drive that is not recognized by Disk Management.
- Modify the size of a partition without losing data.
- Convert a dynamic disk to a basic disk or vice versa.
- Repair damaged partitions.
5. How to Use FDISK in Windows 10
Using FDISK in Windows 10 is a relatively straightforward process, although it is important to note that it is a powerful tool and should be used with caution. To use FDISK, follow these steps:
- Open the Command Prompt or PowerShell as an administrator.
- Type «fdisk» and press Enter.
- You will see a list of the partitions on your hard drive.
- Use the arrow keys to select the partition you want to modify.
- Press the «D» key to delete the partition.
- Press the «C» key to create a new partition.
- Press the «R» key to resize a partition.
- Press the «W» key to write the changes to the hard drive.
Concluding Remarks
FDISK is a powerful tool that can be used to manage partitions in Windows 10. While it is no longer the default tool for this purpose, it still has its uses. If you are comfortable working with command-line tools, FDISK can be a valuable addition to your toolkit.
Frequently Asked Questions
-
What is FDISK?
FDISK is a command-line utility that can be used to manage partitions in Windows 10. -
Why is FDISK no longer included in the default installation of Windows 10?
FDISK has been replaced by the more user-friendly Disk Management utility. -
When should I use FDISK in Windows 10?
FDISK can be used to create or delete partitions, modify the size of a partition, convert a dynamic disk to a basic disk or vice versa, and repair damaged partitions. -
How do I use FDISK in Windows 10?
To use FDISK in Windows 10, open the Command Prompt or PowerShell as an administrator, type «fdisk» and press Enter, select the partition you want to modify, and then use the appropriate commands to perform the desired operation. -
What are some of the limitations of FDISK?
FDISK is a powerful tool, but it can be difficult to use for novice users. Additionally, FDISK does not have a graphical user interface, which can make it difficult to visualize the changes you are making to your hard drive.
Do you know what FDISK is? Have you ever used FDISK format tools? If you have no idea about what is FDISK and its FDISK format tool, don’t worry. This article will introduce you what is FDISK and show you how to format partition with a perfect FDISK Windows 10 alternative.
FDISK is the oldest and most classic disk partition tool that is included in all versions of MS-DOS and earlier versions of Windows system. With FDISK, you’re able to delete, create, and partition your hard drive. However, with the introduction of Windows XP, FDISK was replaced with the graphical Windows Disk Management utility and Diskpart command. In this case, some users may not know what is FDISK. Here I will give you a brief introduction about what is FDISK.
What Is FDISK
Some users who have not heard about FDISK may wonder: what is FDISK, what is it for? Let’s see FDISK’s definition on Wikipedia.
For computer file systems, fdisk is a command-line utility that provides disk partitioning functions. It is available in DOS, FlexOS, OS/2 and Microsoft Windows operating systems. In versions of the Windows NT operating system line from Windows 2000 onwards, fdisk is replaced by a more advanced tool called diskpart. Similar utilities exist for Unix-like systems.Wikipedia
Originally, FDISK is one kind of DOS program so it can only work in DOS. With FDISK, you can divide disk into one primary partition and multiple logical partitions. After dividing, you need to format partition and allocate file systems for partitions.
However, earlier FDISK has no format function so that partitioning and formatting need to be done step by step, which means more operations and more DOS commands. For users who are not familiar with DOS, they are likely to operate with errors.
Finally, with continuous developing, FDISK has been added with FDISK format tool besides FDISK partition tool. After FDISK has been improved in compatibility with operating systems, disk size, and partition size, many users choose FDISK to manage partition.
FDISK Is Replaced by Diskpart
As FDISK is too difficult for common users, FDISK has been replaced by Diskpart, a command-line disk partitioning utility included in Windows 2000 and later. Diskpart is simpler than FDISK. Users can use Diskpart to partition hard drive, delete partition, format partition and so on.
Although Diskpart has satisfied users’ demands for partition management to some extent, it is still a little complicated to manage for users who are not familiar with DOS commands.
In this case, it is strongly suggested to use MiniTool Partition Wizard that has a graphical interface and simpler operations. With MiniTool Partition Wizard, you can create, delete or format partition in just a few clicks. Besides, it also provides high-end features like Copy disk, Partition Recovery etc. It’s a perfect Diskpart and FDISK alternative.
MiniTool is a perfect FDISK Windows 10 alternative with its powerful features and simple steps. Compared with FDISK format tool, MiniTool Partition Wizard has better compatibility. It supports major 32-bit/64-bit PC operating systems, as well as hard drives with common ports like IDE, ATA, STATA, SCSI. Now let’s see how to format with FDISK Windows 10 alternative MiniTool Partition Wizard Free Edition.
Step 1. Download MiniTool Partition Wizard Free Edition by clicking the following button and install the free FDISK format tool alternative on your computer. Then, run it to get the main interface.
MiniTool Partition Wizard FreeClick to Download100%Clean & Safe
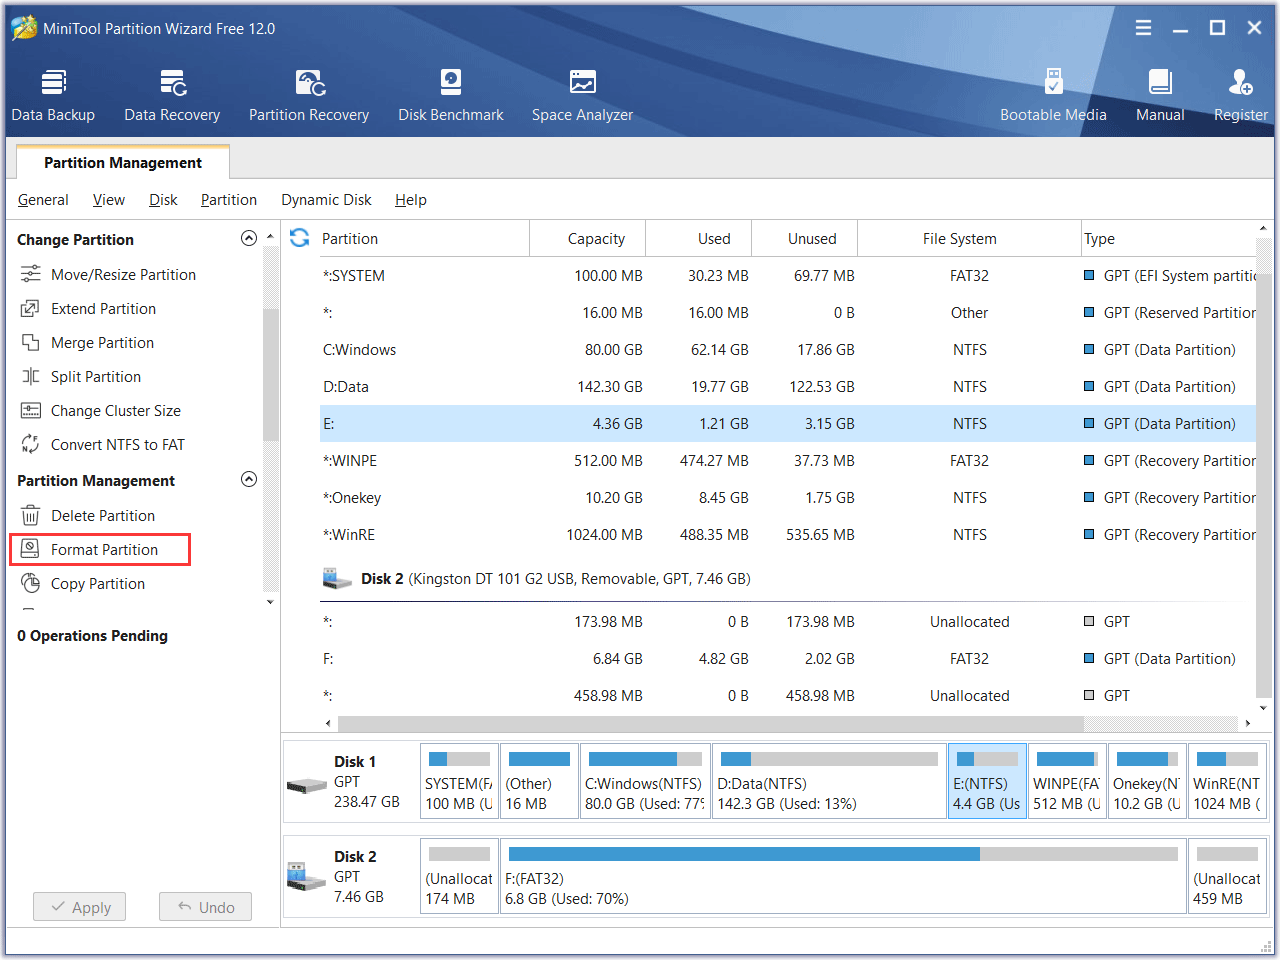
Step 2. Choose a partition that you want to format and click Format Partition from the left.
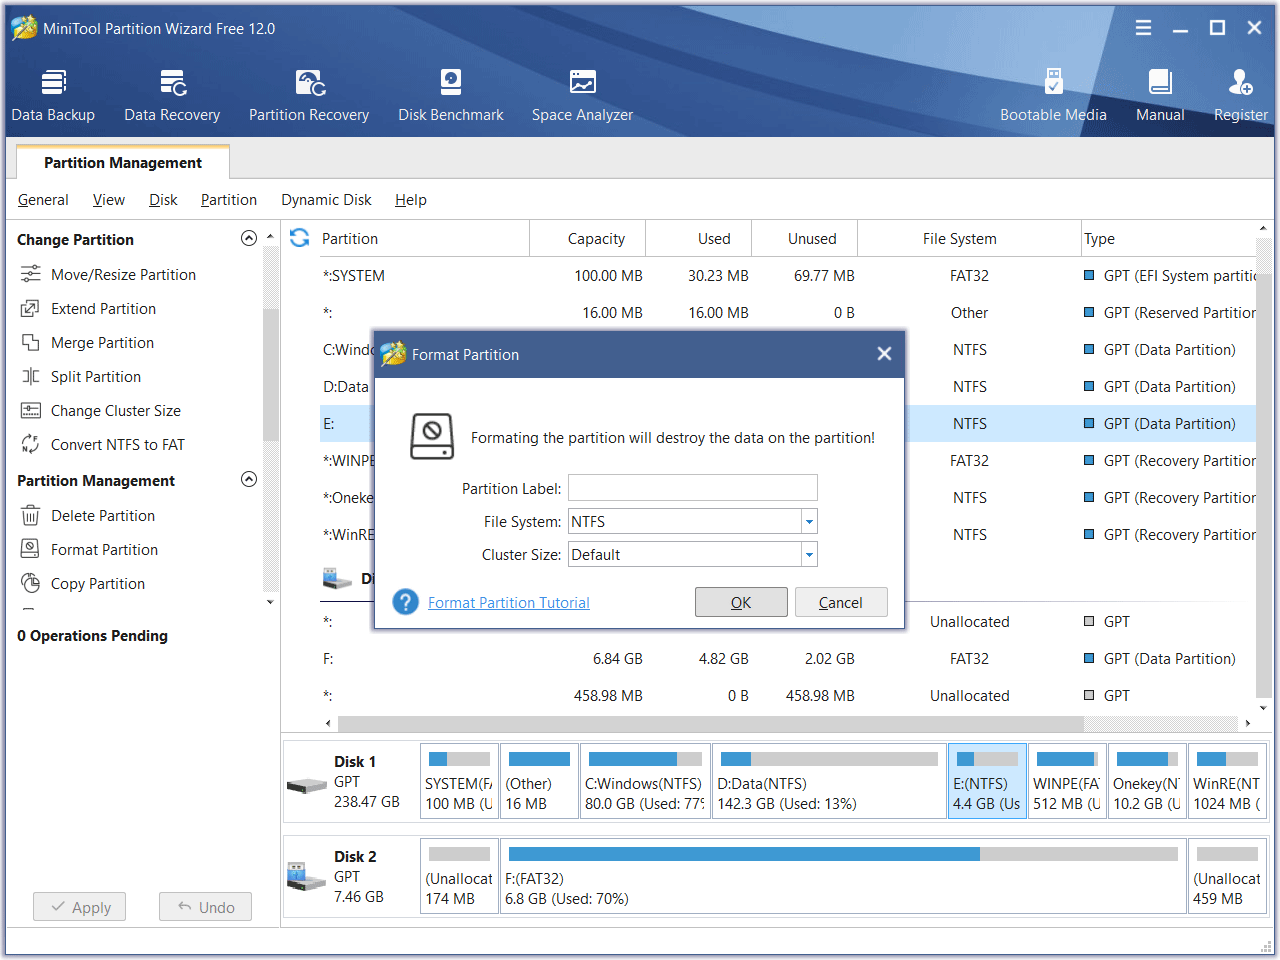
Step 3. You may reset the partition label, file system and cluster size by yourself. Then click OK.
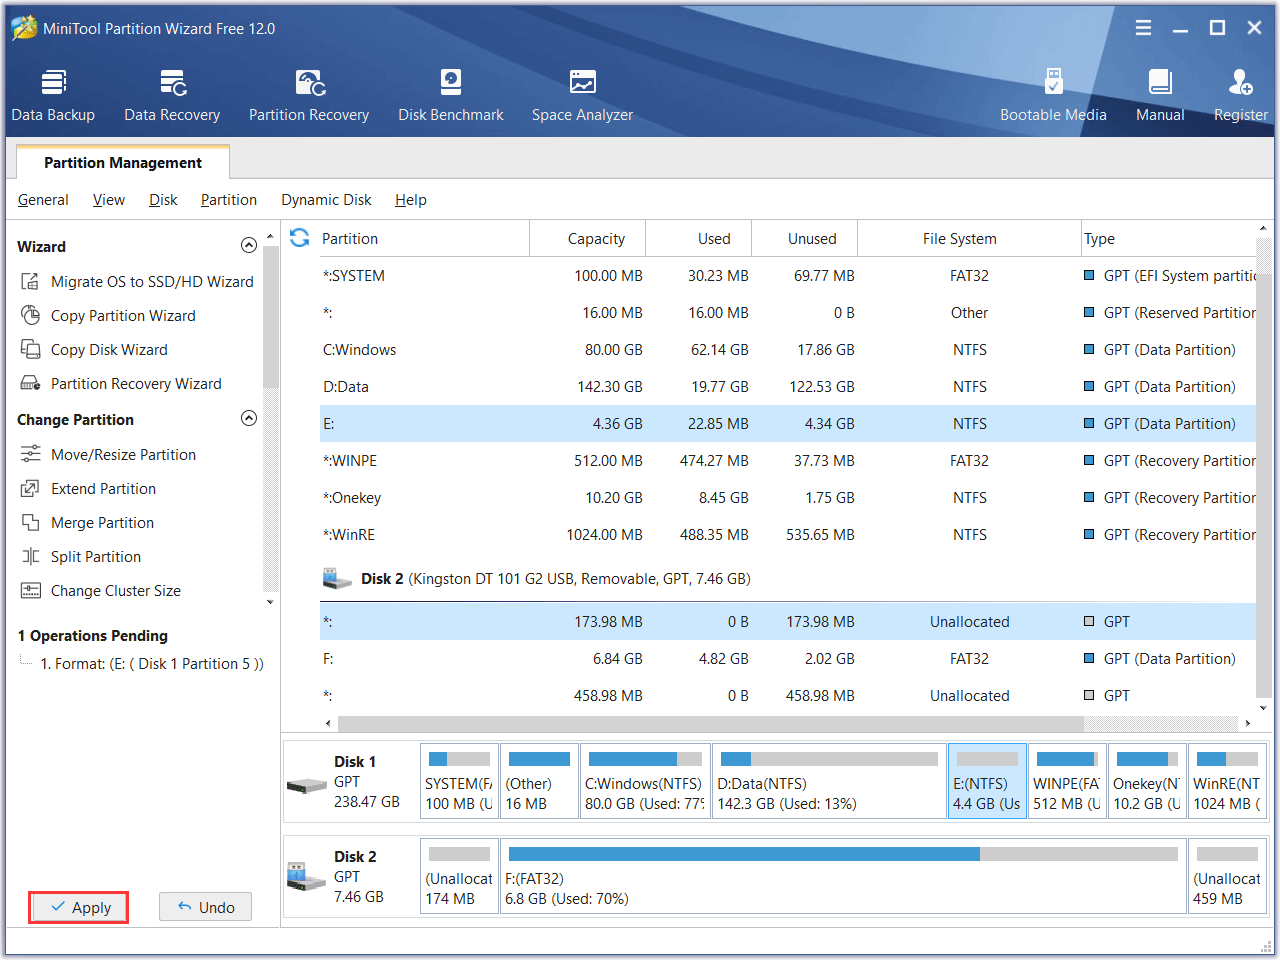
Step 4. At the main interface, you may click Apply on the upper left corner to allow the change.
This is how I format a partition with MiniTool Partition Wizard Free Edition. Clear and visualized interface helps me finish format work in a short time.
FDISK format tool is just one part of FDISK tools. Similarly, format function is only one part of MiniTool Partition Wizard functions, too. MiniTool Partition Wizard provides us with daily needed partition management functions that most of the FDISK tools cannot do and it is free of charge. Download to optimize your disk performance now!
MiniTool Partition Wizard FreeClick to Download100%Clean & Safe
“I successfully formatted a partition in just a few clicks by using MiniTool Partition Wizard. Hopes this post helps more friends who need an excellent format tool to format partition.”Click to Tweet
Conclusion
To sum up, MiniTool Partition Wizard is not only an alternative to FDISK, but has already surpassed FDISK and become indispensable partition magic with its multiple functions.
If you have any question about FDISK format tools or how to format partition with MiniTool Partition Wizard, you can leave a message on the following comment zone and we will response as soon as possible. If you need any help when using MiniTool software, you can contact us via [email protected].