Все способы:
- Способ 1: Настройка локальной политики
- Способ 2: Переустановка RSAT
- Способ 3: Перерегистрация библиотеки wups2
- Вопросы и ответы: 1
Столкнуться с ошибкой с кодом 0x8024001d можно при установке или обновлении компонента Remote Server Administration Tools (RSAT), позволяющего управлять Windows 10 с удаленного клиентского компьютера. Сбой установки может быть вызван повреждением файлов RSAT, некоторых ключей реестра, а также некорректных настроек политик Windows.
Способ 1: Настройка локальной политики
Наиболее вероятной причиной описываемой ошибки является недоступность необходимых пакетов компонента при попытке его установки через доменный WSUS. Чтобы Windows 10 смогла скачать RSAT непосредственно из «Центра обновлений», в локальных политиках нужно включить и настроить один параметр.
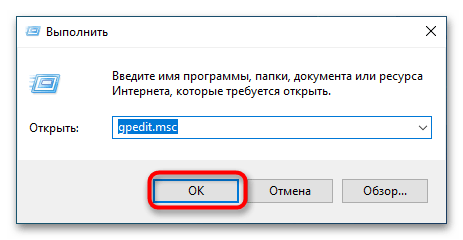
- Откройте «Редактор локальных групповых политик», для чего выполните в вызванном нажатием комбинации Win + R окошке команду
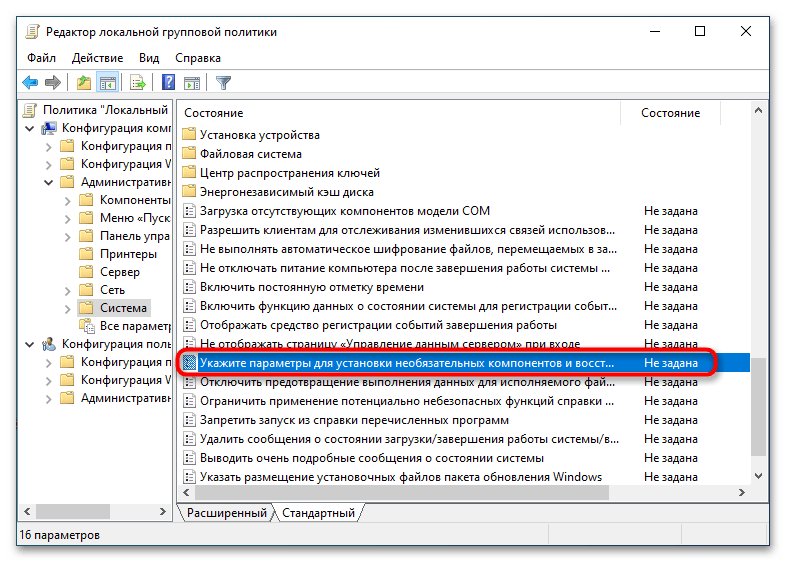
gpedit.msc. - В левой колонке открывшейся оснастке перейдите по цепочке «Конфигурация компьютера» → «Административные шаблоны» → «Система» и дважды кликните по политике «Укажите параметры для установки необязательных компонентов и восстановления компонентов» в правой колонке, чтобы открыть ее настройки.
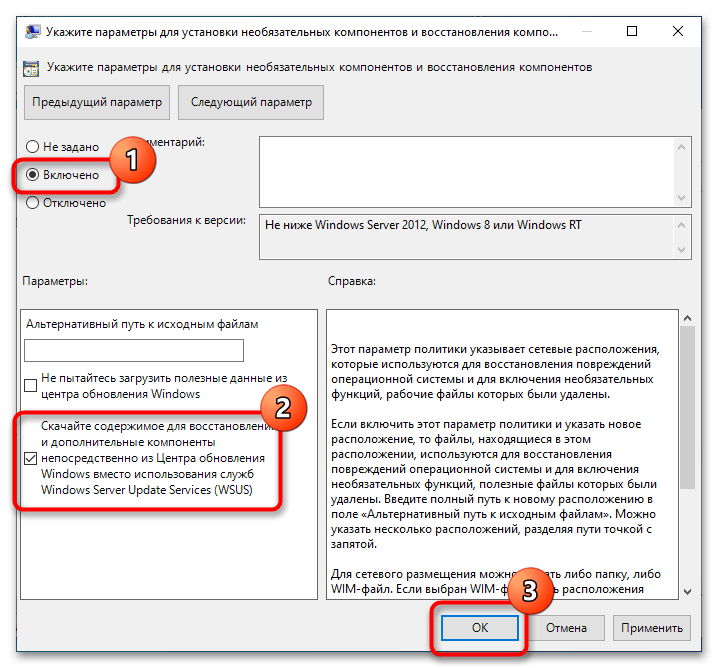
- Включив политику, отметьте флажком опцию «Скачайте содержимое для восстановления и дополнительные компоненты непосредственно из Центра обновления Windows вместо использования служб Windows Server Update Services (WSUS)». Сохраните настройки.
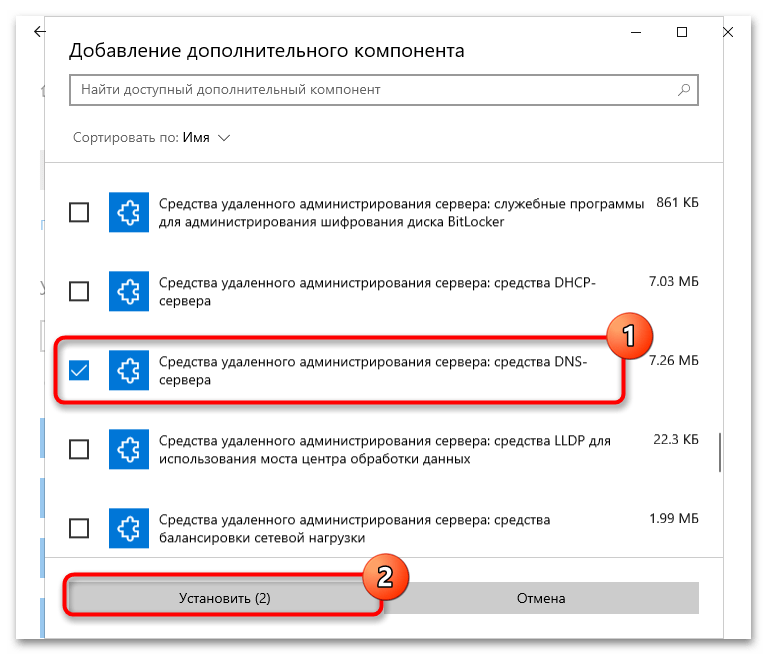
Готово, можете устанавливать RSAT через приложение «Параметры», перейдя в раздел «Приложения и возможности» → «Добавить компонент» → «Дополнительные компоненты».
Способ 2: Переустановка RSAT
Поскольку ошибка также может быть вызвана повреждением файлов компонента, стоит попробовать выполнить переустановку средства удаленного администрирования сервера.
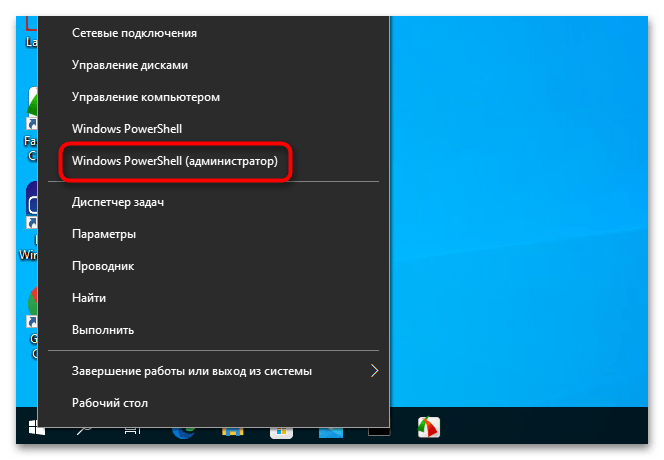
- Запустите от имени администратора «Командную строку» или «Windows PowerShell».
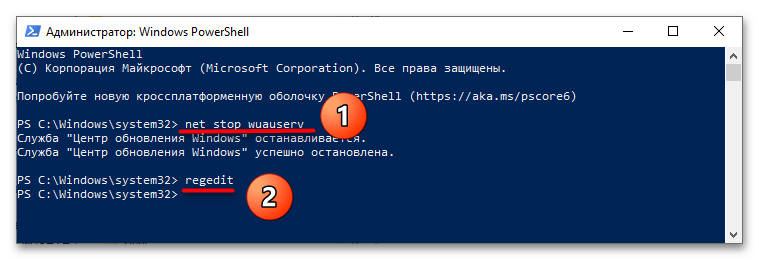
- Выполните в ней команду
net stop wuauserv, чтобы остановить службу компонента обновления. - Откройте «Редактор реестра», для чего тут же в консоли выполните команду
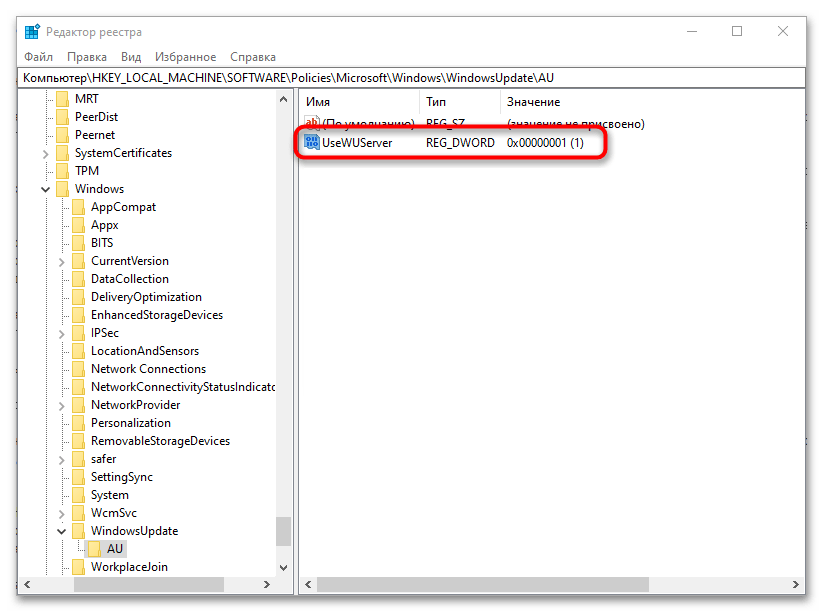
regedit. - Разверните в левой колонке ветку
HKLM\SOFTWARE\Policies\Microsoft\Windows\WindowsUpdate\AUи дважды кликните по параметру «UseWUServer» в правой колонке. - В открывшемся диалоговом окошке измените его значение с «1» на «0». Не закрывайте окно редактора.
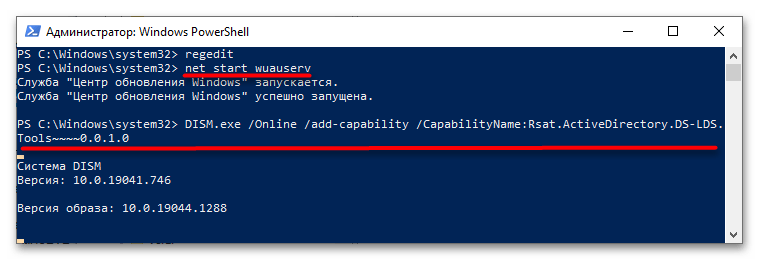
- Вернитесь в «Командную строку» и выполните одну за другой две эти команды:
net start wuauserv
DISM.exe /Online /add-capability /CapabilityName:Rsat.ActiveDirectory.DS-LDS.Tools~~~~0.0.1.0 - Вернитесь в «Редактор реестра» и восстановите исходное значение «UseWUServer», то есть «1».
Перезагрузите компьютер. В результате RSAT будет переустановлен.
Способ 3: Перерегистрация библиотеки wups2
Менее трудоемким, но и менее надежным решением является перерегистрация системной библиотеки wups2.dll. Воспользоваться этим способом вы можете, если модули RSAT не устанавливаются в разделе «Дополнительные компоненты» приложения «Параметры».
- Откройте «Редактор реестра» командой
regeditкак было показано выше. - Перейдите к ключу
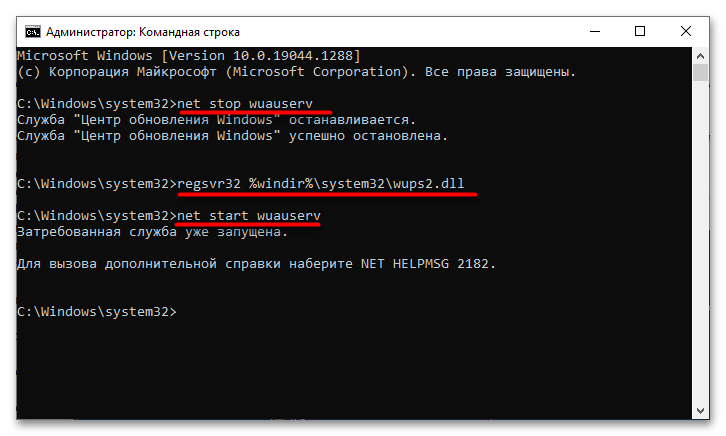
HKLM\SOFTWARE\Policies\Microsoft\Windows\WindowsUpdate\AUи измените значение параметра UseWUServer с «1» на «0» (см. шаги 4-5 в предыдущем способе). - Откройте от имени администратора «Командную строку» или «Windows PowerShell» и последовательно выполните три эти команды:
net stop wuauserv
regsvr32 %windir%\system32\wups2.dll
net start wuauserv - Восстановите исходное значение параметра «UseWUServer» (см. шаг 7 в предыдущем способе).
Перезагрузите компьютер и попробуйте установить RSAT через «Дополнительные компоненты» (как это сделать, написано в конце Способа 1).
Если избавиться от ошибки 0x8024001d не получается, можно решиться на радикальную меру — сброс Windows 10 к исходному состоянию.
Подробнее: Возвращаем Windows 10 к заводскому состоянию
Наша группа в TelegramПолезные советы и помощь
Windows 10 offers automatic method for the users to install a new rollout through Settings app. However, the process is not as smooth as it seems always rather; you might end up encountering errors and complications. Some error codes may appear preventing the system from looking for the new patches or even installing them after downloading. 0x8024001d is such an annoying error code responsible for the failure to install an update. Furthermore, “RSAT installer encountered an error: 0x8024001d” may occur when you attempt to re-install the tool after the successful installation of a patch.
It’s hard to assume truly from where error 0x8024001d is generated and forbidding the update installation to the system. Generally, such issues occur from wrongly configured Windows Registry entries, invalid Date & Time, corrupted Windows file system, and internet access problems. Besides, defective Windows Update services, misconfigured hard disk, malware infection can bring forth the same. Although, some common fixes might rectify the error.
Windows Update Error 0x8024001d
Here is how to Fix Windows update Error 0x8024001d –
1] Prepare Windows 10 for successful RSAT installation
After upgrading Windows 10, you find Remote Server Administration Tools missing from your system. Once you download RSAT tool manually and try to install it, the process throws error 0x8024001d. If the same happens to you, go through the below steps for a successful installation.
- Press – Windows + S.
- Type – cmd.
- Right-click on Command Prompt and choose – Run as administrator.
- To allow User Account Control, click – Yes.
- In the black pane, insert –
net stop wuauserv. - Hit – Enter.
- Minimize Command Prompt.
- Now, Open Registry Editor.
- Navigate to –
HKEY_LOCAL_MACHINE\SOFTWARE\Policies\Microsoft\Windows\WindowsUpdate\AU
- From right-pane, double-click – UseWUServer.
- Put 0 in the Value data box.
- Click – OK.
- Go back to Command Prompt.
- Run –
net start wuauservcommand. - Thereafter, copy the following command-line and paste the same in elevated Command Prompt –
DISM.exe /Online /add-capability /CapabilityName:Rsat.ActiveDirectory.DS-LDS.Tools~~~~0.0.1.0- Press – Enter.
- Now, revert the UseWUServer value to 1 that you changed through Registry Editor.
- Reboot Windows 10.
- When the system powers up, try installing RSAT again.
- This will fix 0x8024001d RSAT error.
2] Run System File checker
Oftentimes, the system finds it complicated to read the files necessary to complete an installing process. Hence, some unexpected errors might show up one of which is Windows update Error 0x8024001d. To obliterate these error codes, fixing the system files is only the option.
Some errors are too associated with missing system components or corrupted ones. The one tool that can fix all of these torments is System File Checker. But if the found corruption is too much complicated, you might need to run DISM tool to make the System File checker work. Therefore, we will run the DISM command-line prior to SFC scan in order to save some time.
- Click search icon present on taskbar.
- Type – cmd.
- Press – Ctrl+ Shift+ Enter.
- Permit User Account Control by hitting – Yes.
- Copy-paste the following commands in the black pane one by one and hit Enter after each–
dism /online /cleanup-image /scanhealth
dism /online /cleanup-image /checkhealth
dism /online /cleanup-image /restorehealth
- Once you are done running the above commands, type in
sfc /scannowand then press – Enter. - Wait and let the scanning process ends fully.
- If the found corruption gets fixed, close Command Prompt and reboot the PC.
3] Set correct the Date & Time
Windows update process often fails to initiate if the Date & Time settings are incorrect. This happens when someone changes time zone and the automatic syncing of time is not toggled on. However, this can be easily settled by adjusting Date & Time Settings. Here are the steps to follow –
- Press – Windows + R.
- In the Run command, type – control.
- Click – OK.
- Set the View by option to Category.
- Click – Clock and Region.
- From the right pane of the subsequent page, hit – Date and Time.
- Shift to Internet Time tab.
- Click – Change settings.
- Check the box set before Synchronize with an Internet time server.
- Hit – Update now.
- Finally, click – OK.
4] Reconnect internet connection
The autonomous Windows updating process starts only when a stable internet connection is available. If you have encountered Windows update Error 0x8024001d unexpectedly, check the internet connection first for proper connectivity.
When everything seems alright, disconnect the computer from Wi-Fi connection or remove the ethernet cable for the time being. After some time, reconnect the connections and try updating Windows again. This will possibly resolve the issue.
5] Reset Windows Update Service
In order to function Windows updating Process properly, number of services work together. If accidentally any of these services are unavailable in Windows, the updating process will end up in trouble and may bring forth error 0x8024001d. Resetting the Windows Update Service and other associate components may help in such a case.
- Click the Start button.
- Type in – cmd.exe.
- Press – Ctrl + Shift + Enter.
- When User Account Control prompts, click – Yes.
- Copy the following commands in turn and paste them into the appearing black pane. Don’t forget to press Enter after each line –
net stop wuauserv

net stop cryptSvc

net stop bits

net stop msiserver

ren C:\Windows\SoftwareDistribution SoftwareDistribution.old

ren C:\Windows\System32\catroot2 Catroot2.old

net start wuauserv

net start cryptSvc

net start bits

net start msiserver
- Close Command Prompt.
- Restart your Windows machine.
- After signing back in, check whether the error shows up anymore.
6] Start Windows in Clean Boot to fix 0x8024001d RSAT
Clean Boot is a specialized startup process where Windows negates all third-party services, applications, and settings and runs with default setup only. Quite often detrimental third-party suits, services are too responsible to block the Windows updating process hence you can see Error 0x8024001d on screen. To eliminate this issue, boot Windows in Clean Boot and see if it helps. Guidelines are as following –
- Press – Windows key.
- Type – msconfig.exe.
- Hit – Enter to launch System Configuration.
- Select the radio button present before Selective startup.
- Uncheck – Load startup items.
- Shift to Services tab.
- Tick the checkbox set for Hide all Microsoft services.
- Click – Disable all.
- Move to the Startup tab.
- Click the link – Open Task Manager.
- When the dedicated window turns up, disable all startup programs.
- For that, right-click on each application individually and choose – Disable.
- Go back to System Configuration window.
- Click Apply and then OK.
- Restart the PC.
- When PC starts in clean boot mode, try updating Windows.
7] Unplug USB devices
USB peripherals like speaker, mouse, keyboard, scanner/printers are also found to be causing trouble in Windows updating process hence you can experience Error 0x8024001d. This might seem strange and the exact reason behind this is yet to be known. There is no official explanation from Microsoft as well to settle down the matter.
For instance, you can unplug the USB device that is causing trouble until the Windows updating process ends up smoothly. If you don’t know which specific accessory is at fault, pull out cords of all peripherals gently. Reconnect necessary peripherals when the system finishes installing updates successfully.
8] Run Windows Update Troubleshooter
This is quite normal that the Windows update entangled with numerous bugs and issues from time to time. Starting from searching the latest patches to installing them to Windows, you may come across error codes obstructing the process. Hence, Microsoft came up with a suitable utility so that users can fix the associated issues and have the latest patches installed smoothly. Windows Update Troubleshooter exists in every version of the Operating System and makes sure you utilize this in case of problems.
- Press – Windows + I.
- Click – Update & Security.
- From the left sidebar, choose – Troubleshoot.
- Move to right-pane and then click – Additional troubleshooters.
- Select – Windows update.
- From the expanded tray, click – Run the troubleshooter.
- Comply with on-screen instructions to continue the process.
- After scanning the system; if the utility comes with a resolution, click – Apply this fix.
9] Fix the hard Disk corruption
Check disk tool is an amazing utility that can bring forward hard disk defective areas and resolve them automatically. Since error 0x8024001d is often caused by poor portions in the Hard Disk, running the tool may help to resolve the issue. Follow the below steps to run the utility in Windows –
- Open Command Prompt as administrator.
- In the command prompt, insert –
chkdsk C: /f /r /x - Hit – Enter.
- If the volume is currently in use, press Y to initiate the scanning process at the next startup.
10] Uninstall third-Party anti-virus
Anti-malware programs often misinterpret the update components as malware and block them eventually. This doesn’t only obstruct the Windows Update but also generates error codes like 0x8024001d. You can uninstall the third-party anti-malware programs straightway following the below instructions –
- Right-click Start button and choose – Run.
- In the dialog box, type – appwiz.cpl.
- Click – OK.
- When the ‘Programs and Features’ window shows up, look for the third-party antivirus program installed on your system.
- Right-click the same and then select – Uninstall.
- Comply with on-screen instructions to finish the removal process.
11] Disable Default Windows Firewall
Disabling the Firewall is not recommended at all since malware is always looking for a sleek chance to break into the system. However, we have found some update files might have issues with the Windows Firewall. Keeping the service enabled, you cannot accomplish the installation process and therefore, disable Firewall temporarily using the below steps –
- Press – Windows key.
- In the search bar, type – firewall.cpl.
- Hit – Enter.
- From the left sidebar of the newly appeared window, click – Turn Windows Defender Firewall on or off.
- Select the checkboxes of Turn off Windows Defender Firewall (not recommended) for both Private network settings and Public network settings.
- Click – OK.
Note – Don’t forget to enable Windows Firewall after resolving the update error.
12] Download the update from Windows Update Catalog
Windows Update Error 0x8024001d mostly arises when the system tries to install updates through an autonomous process. And most of the time, it gets fixed when you initiate the process manually. Doing so is quite simple if you follow the below steps precisely –
- Visit the webpage of Windows Update Catalog.
- Click the search bar of the website.
- Type KB number you want to get.
- Click – Search.
- When the result appears, look for the version that matches your PC specs.
- Click Download present next to the suitable package.
- Doing so will bring forth a new window.
- Click the link available there.
- If prompted, opt for Save File and then click – OK.
- Double-click the msu file you downloaded.
- Allow User Account Control by clicking – Yes.
- Comply with on-screen instructions to finish the process.
Methods list:
1] Prepare Windows 10 for successful RSAT installation
2] Run System File checker
3] Set correct the Date & Time
4] Reconnect internet connection
5] Reset Windows Update Service
6] Start Windows in Clean Boot
7] Unplug USB devices
8] Run Windows Update Troubleshooter
9] Fix the hard Disk corruption
10] Uninstall third-Party anti-virus
11] Disable Default Windows Firewall
12] Download the update from Windows Update Catalog
That’s all!!!
Did you fail to update Windows 10 because of an error code 0x8024001D on your device? If so, read this tutorial in detail as we discuss why it occurs and what are the possible ways to fix it. Usually, this bug arises due to corrupted Windows Components, missing system files, or stored cache. This bug may also appear due to missing RSAT file, wrongly configured Date & Time, or disabled Windows Update Services.
Whatever is the cause that triggered error code 0x8024001d while updating Windows 10 in your case, you may solve this by applying the below solutions sequentially –

- Check Internet Connectivity
- Unplug USB devices
- Reinstall Remote Server Administration Tools
- Check and correct the corrupted Windows 10 image
- Correct Date & Time
- Run Windows Update Troubleshooter
- Purge Windows Cache Folders
- Run CHKDSK
- Perform a Clean Boot
If you are not able to update Windows 10 because of an error code 0x8024001D, try out the below suggestions –
1. Check Internet Connectivity
The first and foremost thing that you must ensure before downloading any pending update is a stable net connection. So, go and check if you are able to browse online smoothly or not. If not, try disconnecting to the Wi-Fi or remove/re-attach the ethernet cable. In case you are accessing the internet via a Mobile hotspot, put your phone in Airplane mode then turn it off. A simple restart of the network should resume the download and thus solve this error code.
2. Unplug USB devices
The presence of secondary devices like wireless mouse/keyboard, speaker, printer, etc. may also cause such errors while upgrading Windows 10. To settle down this issue then, you have to identify the buggy device and unplug that from your device. In case you are not able to find the faulty device, unplug all the peripheral devices, and restart your PC. Use a wired mouse and keyboard from the next logon.
3. Reinstall Remote Server Administration Tools (RSAT)
A missing RSAT file on your computer may also trigger error code 0x8024001d while installing Windows 10 updates. It is therefore advised to download the Remote Server Administrator Tool and install it manually. Here’s how to perform this task –
- Open Command Prompt as Administrator.
- On the elevated prompt, execute the following code –
net stop wuauserv
- Minimize the Console window and press WinKey + S to launch the Search window.
- Type
regeditand double-click on the top result. - When the UAC window prompts, hit Yes.
- On the registry, navigate to the following –
HKEY_LOCAL_MACHINE\SOFTWARE\Policies\Microsoft\Windows\WindowsUpdate\AU
- When you reach out to the above path, move to the right side and double-click on UseWUServer.
- Inside the Value Data Field, put “0” and hit OK.
- Re-launch the Command Prompt and run the below codes one after another. Make sure to press the Enter key after each command –
net start wuauserv
DISM.exe /Online /add-capability /CapabilityName:Rsat.ActiveDirectory.DS-LDS.Tools~~~~0.0.1.0
- Re-visit the registry window, and undo the changes that you performed there i.e. change the “UseWUServer” value back to “1”.
- Restart your Windows PC and the RSAT file gets installed in the meantime.
4. Check and correct the corrupted Windows 10 image
If the Windows 10 image has corrupted on your device, the system finds it pretty difficult to read the files required to process a pending update. That’s the reason why it throws an error code 0x8024001d. To resolve this issue then, you must check for a corrupted Windows 10 image and if so, correct the same using the below steps –
- Make a right-click on the Windows icon and select Run.
- Type “cmd” and press Ctrl + Shift + Enter keys altogether.
- Doing so will invoke the Command Prompt having Admin rights.
- Copy/paste the following and press Enter.
dism /online /cleanup-image /scanhealth
dism /online /cleanup-image /checkhealth
dism /online /cleanup-image /restorehealth

- The first two codes will scan and check if there are any issues on your device. Running the last code will resolve whatever problems it encountered during the first two code run.
- After the Windows Corruption is revoked, type
sfc /scannowand then press – Enter. - The system file checker will commence immediately afterward and check if there are any issues with the system files. If it does find any problem, the same gets resolved automatically by the SFC.
- In the end, type exit and press Enter to come out of the Command Prompt.
- Restart Windows 10 to make the changes effective from the next sign-in.
5. Correct Date & Time
Incorrectly configured Date & Time on your PC may also result in an update process failing on error code 0x8024001d. So, go and check if your device matches the Date & Time with the Time Zone of the region where you reside. Here are the steps to work upon –
- Right-click on the right corner of the Taskbar and click Adjust date and time.
- Slide the toggle switches of the following to the right –
- “Set time automatically”
- “Set time zone automatically”
- Next, click on the button – Sync now.

- Doing so will update the date and time on your device matching with the region where you live.
6. Run Windows Update Troubleshooter
Windows update doesn’t processing and instead throwing some error codes is quite normal these days. If you haven’t been able to solve the error code 0x8024001D yet, running the update troubleshooter might help or at least let you know why this is occurring in the first place. Here’s how to perform Windows troubleshooting –
- Press Windows key + I.
- Select
Update & Security > Windows Update. - Move to the right pane and click Additional troubleshooters.
- Click to expand Windows update and hit Run the troubleshooter.

- Follow the on-screen instructions to continue the process.
- In case, it appears with a resolution, hit – Apply this fix.
7. Purge Windows Cache Folders
Whenever you update your system, some information about the update gets stored inside the Cache folders. There are basically two such folders and they are – SoftwareDistribution and Catroot2. Over a period of time, these folders get accumulated with a lot of information and thus result in different error codes. You never know whether this indeed is the case or not. So, it would be better if you purge the above-mentioned folders.
Note: Make sure to stop all update-related services in advance so that no other bugs start appearing on your PC.
8. Run CHKDSK
The update error code 0x8024001d must have resolved by now. If not, check whether the HDD is all okay on your computer or not. CHKDSK is a great in-built tool by Microsoft for such purposes. Here’s how to use this tool –
- Open Command Prompt having administrative privileges.
- Type the following near the blinking cursor and press Enter –
chkdsk C: /f /r /x

- You will receive a message saying – “The volume is currently in use”. Type “Y” to initiate the hardware scanning the next time you restart your PC.
9. Perform the Clean Boot
If none of the above workarounds help to resolve this error code, try performing a clean boot on your PC. Clean Boot is basically a startup process wherein Windows stop all third-party apps and services. With all external applications and services turned off, you will get to know if the issue is still occurring or gets resolved.
In case this does solve the issue, you need to get rid of all third-party apps and services. Otherwise, download and clean install Windows 10 on your PC.
Resolved — Install RSAT Tools on Windows Installer encountered an error 0x8024001d
While working on few Active Directory automation tasks I wanted RSAT tools to be installed on one of the VDI to test and write few scripts. From https://www.microsoft.com/en-in/download/details.aspx?id=45520 I downloaded installation files.
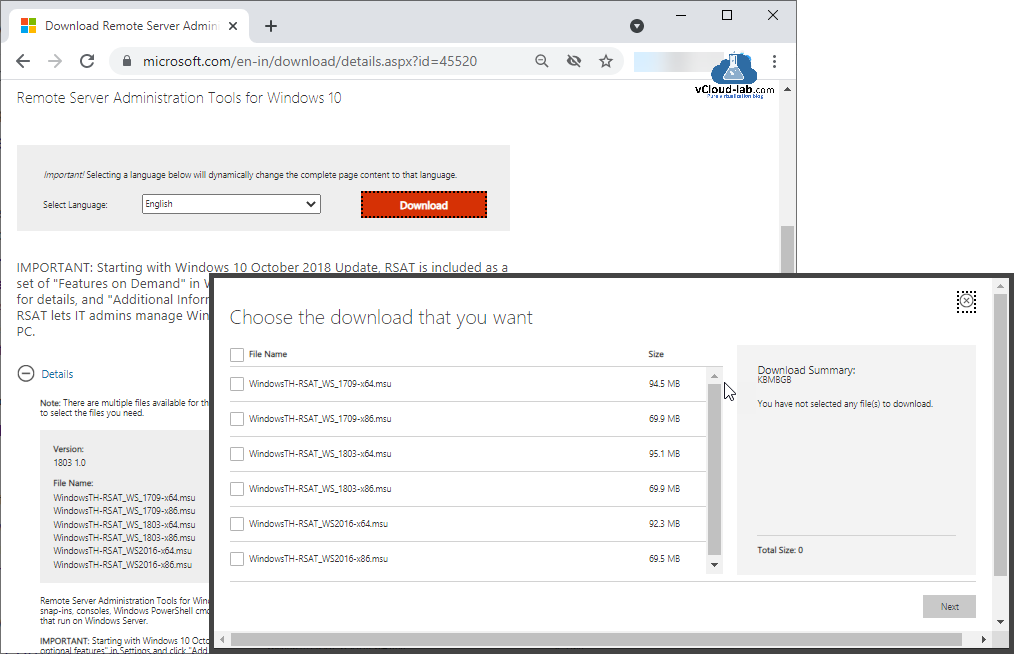
While installation I was keep receiving this error: Windows Update Standalone Installer — Installer encountered an error: 0x8024001d. I tried all the options to install server but it didn’t work.
To install RSAT tools (Remote Server Administration Tools for Windows) it can be done using PowerShell from online, To get the list of all RSAT related tools or any optional feature run below first command, second command will install complete RSAT tools. If you want to install single tool use third command with name. (Make sure you open PowerShell as an administrator to install tools).
⚡ Gdd-WindowsCapability -Name RSAT* -Online
⚡ Get-WindowsCapability -Name RSAT* -Online | % {Add-WindowsCapability -online -Name $_.Name}
⚡ Add-WindowsCapability -online -Name <RSAT tool NAME>
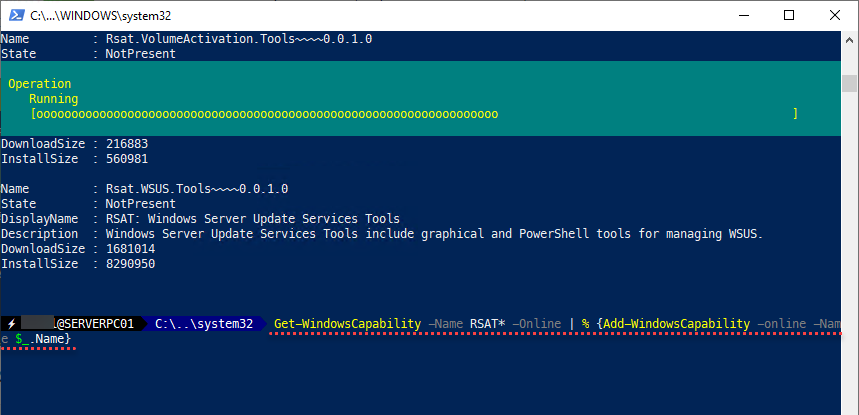
Below are the the list of RSAT tools names with description what they do.
Name         : Rsat.ActiveDirectory.DS-LDS.Tools~~~~0.0.1.0
State        : Installed
DisplayName  : RSAT: Active Directory Domain Services and Lightweight Directory Services Tools
Description  : Active Directory Domain Services (AD DS) and Active Directory Lightweight Directory Services (AD LDS)
               Tools include snap-ins and command-line tools for remotely managing AD DS and AD LDS on Windows Server.
DownloadSize : 5230259
InstallSize  : 17352199

Name         : Rsat.BitLocker.Recovery.Tools~~~~0.0.1.0
State        : Installed
DisplayName  : RSAT: BitLocker Drive Encryption Administration Utilities
Description  : BitLocker Drive Encryption Administration Utilities include tools for managing BitLocker Drive
               Encryption features. BitLocker Active Directory Recovery Password Viewer helps to locate BitLocker
               drive encryption recovery passwords in Active Directory Domain Services (AD DS).
DownloadSize : 42909
InstallSize  : 61772

Name         : Rsat.CertificateServices.Tools~~~~0.0.1.0
State        : Installed
DisplayName  : RSAT: Active Directory Certificate Services Tools
Description  : Active Directory Certificate Services Tools include the Certification Authority, Certificate Templates,
               Enterprise PKI, and Online Responder Management snap-ins for remotely managing AD CS on Windows Server
DownloadSize : 1570788
InstallSize  : 5561462

Name         : Rsat.DHCP.Tools~~~~0.0.1.0
State        : Installed
DisplayName  : RSAT: DHCP Server Tools
Description  : DHCP Server Tools include the DHCP MMC snap-in, DHCP server netsh context and Windows PowerShell module
               for DHCP Server.
DownloadSize : 1655744
InstallSize  : 7234391

Name         : Rsat.Dns.Tools~~~~0.0.1.0
State        : Installed
DisplayName  : RSAT: DNS Server Tools
Description  : DNS Server Tools include the DNS Manager snap-in, dnscmd.exe command-line tool and Windows PowerShell
               module for DNS Server.
DownloadSize : 1333944
InstallSize  : 6203230

Name         : Rsat.FailoverCluster.Management.Tools~~~~0.0.1.0
State        : Installed
DisplayName  : RSAT: Failover Clustering Tools
Description  : Failover Clustering Tools include the Failover Cluster Manager snap-in, the Cluster-Aware Updating
               interface, and the Failover Cluster module for Windows PowerShell
DownloadSize : 9867882
InstallSize  : 32580188

Name         : Rsat.FileServices.Tools~~~~0.0.1.0
State        : Installed
DisplayName  : RSAT: File Services Tools
Description  : File Services Tools include snap-ins and command-line tools for remotely managing the File Services
               role on Windows Server.
DownloadSize : 5322476
InstallSize  : 17245782

Name         : Rsat.GroupPolicy.Management.Tools~~~~0.0.1.0
State        : Installed
DisplayName  : RSAT: Group Policy Management Tools
Description  : Group Policy Management Tools include Group Policy Management Console, Group Policy Management Editor,
               and Group Policy Starter GPO Editor.
DownloadSize : 4276409
InstallSize  : 18923408

Name         : Rsat.IPAM.Client.Tools~~~~0.0.1.0
State        : Installed
DisplayName  : RSAT: IP Address Management (IPAM) Client
Description  : IP Address Management (IPAM) Client is used to connect to and manage a remote IPAM server. IPAM
               provides a central framework for managing IP address space and corresponding infrastructure servers
               such as DHCP and DNS in an Active Directory forest.
DownloadSize : 232337
InstallSize  : 876616

Name         : Rsat.LLDP.Tools~~~~0.0.1.0
State        : Installed
DisplayName  : RSAT: Data Center Bridging LLDP Tools
Description  : Data Center Bridging LLDP Tools include PowerShell tools for remotely managing LLDP agents on Windows
               Server.
DownloadSize : 23411
InstallSize  : 23289

Name         : Rsat.NetworkController.Tools~~~~0.0.1.0
State        : Installed
DisplayName  : RSAT: Network Controller Management Tools
Description  : Network Controller Management Tools include PowerShell tools for managing the Network Controller role
               on Windows Server.
DownloadSize : 168544
InstallSize  : 783679

Name         : Rsat.NetworkLoadBalancing.Tools~~~~0.0.1.0
State        : Installed
DisplayName  : RSAT: Network Load Balancing Tools
Description  : Network Load Balancing Tools include the Network Load Balancing Manager snap-in, the Network Load
               Balancing module for Windows PowerShell, and the nlb.exe and wlbs.exe command-line tools.
DownloadSize : 274229
InstallSize  : 878974

Name         : Rsat.RemoteAccess.Management.Tools~~~~0.0.1.0
State        : Installed
DisplayName  : RSAT: Remote Access Management Tools
Description  : Remote Access Management Tools include graphical and PowerShell tools for managing the Remote Access
               role on Windows Server.
DownloadSize : 7025683
InstallSize  : 27795507

Name         : Rsat.RemoteDesktop.Services.Tools~~~~0.0.1.0
State        : Installed
DisplayName  : RSAT: Remote Desktop Services Tools
Description  : Remote Desktop Services Tools include snap-ins for Remote Desktop Licensing Manager, Remote Desktop
               Licensing Diagnostics and Remote Desktop Gateway Manager. Use Server Manager to administer all other
               RDS role services.
DownloadSize : 976546
InstallSize  : 3751601

Name         : Rsat.ServerManager.Tools~~~~0.0.1.0
State        : Installed
DisplayName  : RSAT: Server Manager
Description  : Server Manager includes the Server Manager console and PowerShell tools for remotely managing Windows
               Server, and includes tools to remotely configure NIC teaming on Windows Server and Best Practices
               Analyzer.
DownloadSize : 6626365
InstallSize  : 31092464

Name         : Rsat.Shielded.VM.Tools~~~~0.0.1.0
State        : Installed
DisplayName  : RSAT: Shielded VM Tools
Description  : Shielded VM Tools include the Provisioning Data File Wizard and the Template Disk Wizard.
DownloadSize : 18270690
InstallSize  : 20813386

Name         : Rsat.StorageMigrationService.Management.Tools~~~~0.0.1.0
State        : Installed
DisplayName  : RSAT: Storage Migration Service Management Tools
Description  : Provides management tools for storage migration jobs.
DownloadSize : 124644
InstallSize  : 417249

Name         : Rsat.StorageReplica.Tools~~~~0.0.1.0
State        : Installed
DisplayName  : RSAT: Storage Replica Module for Windows PowerShell
Description  : Includes PowerShell module to remotely manage the Storage Replica feature on Windows Server 2016.
DownloadSize : 462423
InstallSize  : 1575932

Name         : Rsat.SystemInsights.Management.Tools~~~~0.0.1.0
State        : Installed
DisplayName  : RSAT: System Insights Module for Windows PowerShell
Description  : System Insights module for Windows PowerShell provides the ability to manage System Insights feature.
DownloadSize : 56363
InstallSize  : 147496

Name         : Rsat.VolumeActivation.Tools~~~~0.0.1.0
State        : Installed
DisplayName  : RSAT: Volume Activation Tools
Description  : Volume activation Tools can be used to manage volume activation license keys on a Key Management
               Service (KMS) host or in Microsoft Active Directory Domain Services. These tools can be used to
               install, activate, and manage one or more volume activation license keys, and to configure KMS settings
               on Windows Server.
DownloadSize : 216883
InstallSize  : 560981

Name         : Rsat.WSUS.Tools~~~~0.0.1.0
State        : Installed
DisplayName  : RSAT: Windows Server Update Services Tools
Description  : Windows Server Update Services Tools include graphical and PowerShell tools for managing WSUS.
DownloadSize : 1681014
InstallSize  : 8290950
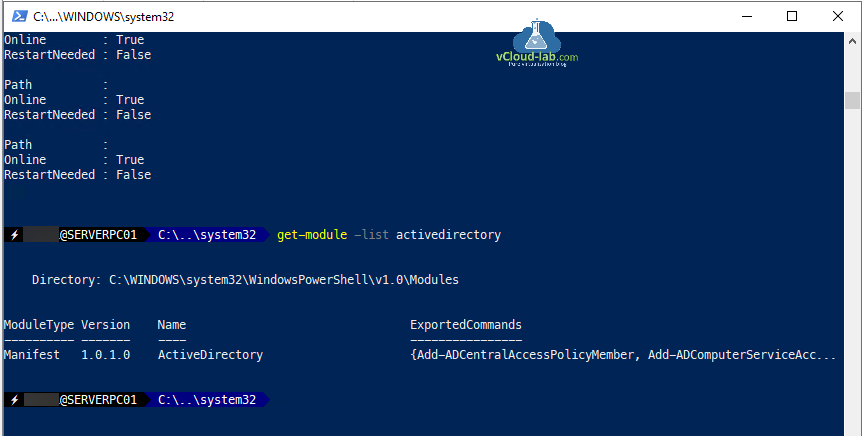
Once RSAT tools is downloaded and installed, it can be verified, module for ActiveDirectory is available with below command.
Get-Module -List ActiveDirectory
Useful Articles
POWERSHELL: INSTALLING AND CONFIGURING ACTIVE DIRECTORY
POWERSHELL ACTIVE DIRECTORY: ADD OR UPDATE (CHANGE) MANAGER NAME IN ORGANIZATION TAB OF USER
POWERSHELL ACTIVE DIRECTORY: ADD OR UPDATE PROXYADDRESSES IN USER PROPERTIES ATTRIBUTE EDITOR
Add multiple proxy addresses with Microsoft PowerShell in Active Directory Groups
Creating a password reset tool with PowerShell GUI
Powershell one liner: Create multiple user accounts
Active Directory Powershell: Create bulk users from CSV file
Active Directory Powershell: Aduser A value for the attribute was not in the acceptable range of values
Powershell Active Directory: ADGroup Managedby — Checkbox Manager can update membership list
Go Back
Started getting Error 0x8024001D on Microsoft Update last week. Ended up renaming C:\windows\softwaredistribution\DataStore to C:\windows\softwaredistribution\DataStore.poo and that reset Microosft Update. Installed again and I’m back in business. Astonishing lame.
UPDATE: If you’re getting error 0x80070057, you can rename c:\windows\SoftwareDistribution\Download to c:\WINDOXP\SoftwareDistribution\Download.poo and all updates will be downloaded and applied again.
About Scott
Scott Hanselman is a former professor, former Chief Architect in finance, now speaker, consultant, father, diabetic, and Microsoft employee. He is a failed stand-up comic, a cornrower, and a book author.
About Newsletter
Hosting By
