
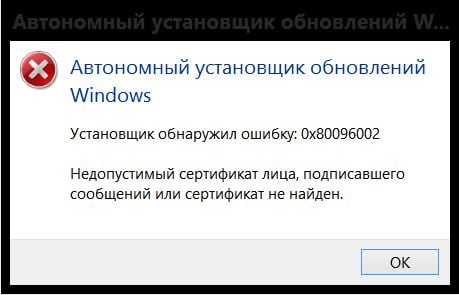
Во время использования автономных установщиков обновлений Windows вы можете столкнуться с ошибкой 0x80096002. В сегодняшней статье мы расскажем вам, почему возникает данная ошибка и как ее можно исправить, чтобы установить нужное обновление.
Почему возникает ошибка 0x80096002?
Ошибка 0x80096002 может быть вызвана некоторыми проблемами с сертификатом обновления, устанавливаемого в систему. Например, сертификат может быть поврежден, недействителен либо он и вовсе отсутствует.
Однако зачастую ошибка 0x80096002 возникает по причине того, что устанавливаемое обновление не подходит для операционной системы пользователя. Помимо прочего, данная ошибка еще может появляться при установке BitLocker To Go или средства подготовки диска для BitLocker.
Методы решения ошибки 0x80096002
В этой статье мы посмотрим на следующие методы решения:
- запуск автономного установщика обновления в режиме совместимости;
- активация Windows Identity Foundation;
- использование средства устранения неполадок Центра обновления.
Мы рекомендуем вам выполнять методы в том порядке, в котором они выстроены в нашей статье.
Метод №1 Запуск автономного установщика обновления в режиме совместимости
Возможно, вы не можете установить нужное вам обновление по причине того, что оно не совсем совместимо с вашей операционной системой. Это можно попробовать исправить, запустив автономный установщик обновления в режиме совместимости. Для этого вам нужно сделать следующее:
- нажмите правой кнопкой мыши на исполнительный файл автономного установщика и выберите «Свойства»;
- перейдите во вкладку «Совместимость»;
- кликните на кнопку «Запустить средство устранения проблем с совместимостью»;
- подождите немного и кликните на пункт «Использовать рекомендованные параметры»;
- нажмите на кнопку «Проверить программу…».
Если проблема действительно заключалась в совместимостью, то никакой ошибки 0x80096002 перед вами не появится.
Метод №2 Активация Windows Identity Foundation
Некоторые пользователи утверждают, что им удалось избавиться от этой ошибки, активировав в своей системе компонент Windows Identity Foundation. Для активации этого компонента вам нужно сделать следующее:
- нажмите Windows+S;
- пропишите в пустую строчку «Панель управления» и выберите найденный результат;
- откройте раздел «Программы»;
- кликните на пункт «Включение и отключение компонентов Windows» под разделом «Программы и компоненты»;
- найдите в списке компонент «Windows Identity Foundation» и поставьте возле него галочку;
- сохраните изменения и перезагрузите компьютер.
Попытайтесь установить обновление для системы еще раз. Ошибка 0x80096002 могла исчезнуть.
Метод №3 Использование средства устранения неполадок Центра обновления
Если ничего из вышеуказанного не помогло вам, то мы советуем воспользоваться услугами средства устранения неполадок Центра обновления. Подобное средство помогает не так часто, как бы того хотелось, но попробовать все же стоит.
Для запуска этого средства сделайте следующее:
- нажмите на клавиатуре Windows+I и откройте раздел «Обновление и безопасность»;
- теперь перейдите во вкладку «Устранение неполадок»;
- нажмите на пункт «Центр обновления Windows» и кликните на кнопку «Запустить средство устранения неполадок»;
- следуйте инструкциям на своем экране, которые предоставит вам средство устранения неполадок.
Мы надеемся, что данный материал был полезен для вас в решении ошибки 0x80096002.
Windows 10 can be installed or updated to in several different ways and Microsoft has made sure that you are provided with a variety of different options if you want to use their newest installment in their Windows OS series.
However, sometimes even this is not enough as there are always certain conflicts no matter which method you choose to install Windows with. There are a lot of different error codes whose meaning doesn’t really tell much about how to solve the problem or what to do in order to avoid it. Check out below to see some info about this particular error code.
Windows Update Standalone Installer 0x80096002 Error
This particular error message is related to the process where users try to install Windows 10 or some other update to your OS using the standalone installer which is used to perform the updating process manually.
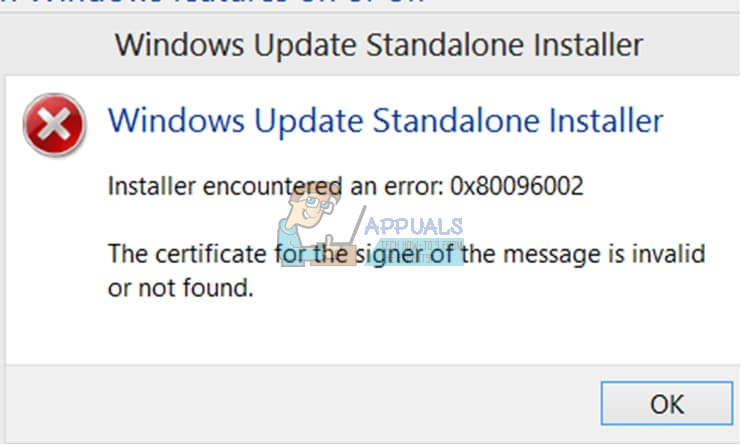
The error message is quite rare but a lot of people complained about not being able to conduct the updating process correctly when using the standalone installer. There are a couple of solutions for this problem so please check out below in order to see just how to deal with this issue effectively.
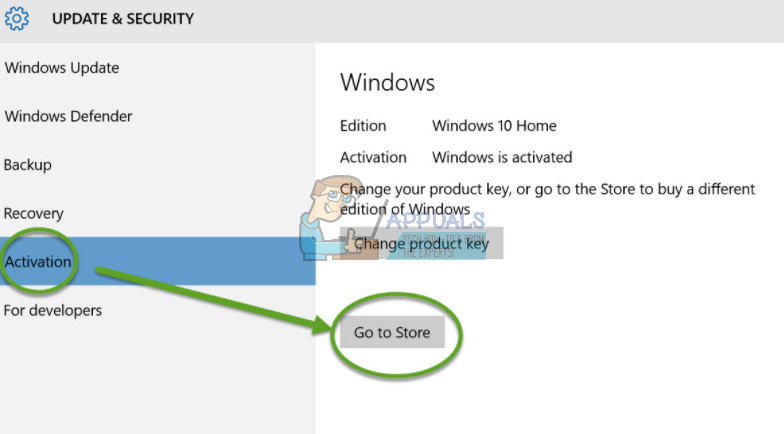
Solution 1: You Are Downloading a Program Not Designed For Your Operating System
If you are trying to download and install an update or a program which is not supported by your version of Windows, this issue is bound to appear. For example, several users who were running Windows 10 Home were trying to install BitLocker Drive Encryption, which is a tool designed for Windows 10 Pro and Enterprise versions.
If you are running Windows 10 Home, you need to update to Windows 10 Pro if you really want to use the program. Follow the instructions below:
- If you are already running Windows 10 Home, you can purchase an upgrade to Windows 10 Pro through the Windows Store.
- Click Start >> Settings >> Update & Security >> Activation >> Go to Store, click $99.00 USD.

- Please note, Easy Upgrade will preserve your personal files, applications and settings, it simply unlocks the edition, the process is quite similar to the Windows Anytime Upgrade in Windows 7.
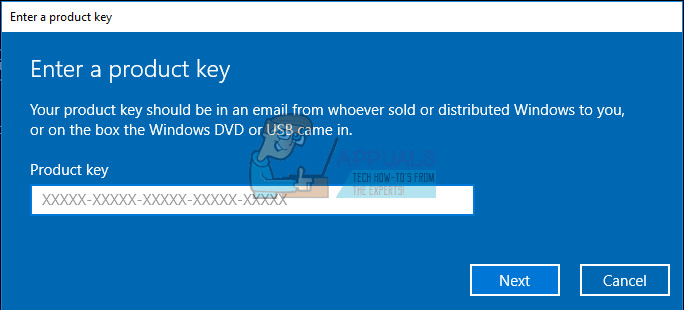
- You can also upgrade to Windows 10 Pro or Enterprise Using an Existing Product Key.
- Once you have your Windows 10 key ready select System.
- Select About and then click on Change product key or upgrade your edition of Windows.
- Click Yes if User Account Control comes up.
- Enter your product key for the edition you are upgrading to, whether it is Pro or Enterprise and wait while the product key verified.

- Make sure all open applications are closed and your work is saved then start the upgrade. Wait while the upgrade process kicks off; your computer will be restarted several times throughout this process.
- The amount of time the upgrade takes will vary between systems. But in my experience, it only took 5 to 10 minutes.
- That’s it! Close out of the upgrade complete verification screen and start using your new edition of Windows.
- Try downloading or installing the update again.
Solution 2: Install the Program You Wanted in Compatibility Mode for Your Operating System
If you are not willing to pay to upgrade your current version of Windows 10, you can also try to run the program in compatibility mode for your version of Windows in order to install it successfully. It’s a long shot but this particular solution is pretty easy to try and you should try it just in case.
Compatibility mode runs the program in the current version of Windows using the settings from previous version of Windows.
- Download the software setup file from the link.
- Right-click on the setup file and click on properties.
- Click on the compatibility tab, check the box
- Run this program in compatibility mode for, select Windows 10 operating system from the drop down menu and proceed with the installation. Once this is done…
- Restart the computer and check if the changes are effective.
Solution 3: Troubleshoot Windows Update and Windows Installer Services
These two processes are crucial if you are trying to perform a Windows Standalone Update and you should definitely take a look at this solution if you are still trying to figure out the problem you are facing. The troubleshooter may also fix the problem for you without requiring you to do anyting at all.
Windows Update Troubleshooter:
- Click on Search bar which is next to Start Menu.
- Type “Troubleshooting” without the quotes and click on Troubleshooting.
- Then click on View All on the left panel of the screen.
- Click on both Windows Update.

- Click on Next and follow the prompts to run the troubleshooter.
- If the issues still persist, refer to the method below.
Windows Installer Services:
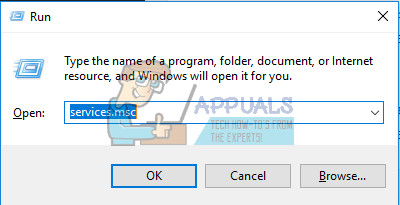
- If you are using a version of Windows older than Windows 10, the easiest way for you to access the services running on your PC is clicking on the Start button and navigating to the Run dialog box.
- Type “services.msc” in the dialog box and wait for the list of services to open.

- If you are using Windows 10, you can also access Services by using the Ctrl + Shift + Esc key combination in order to bring up Task Manager.
- Navigate to the Services tab in Task Manager and click on Open Services at the bottom of its windows, next to the gears icon.
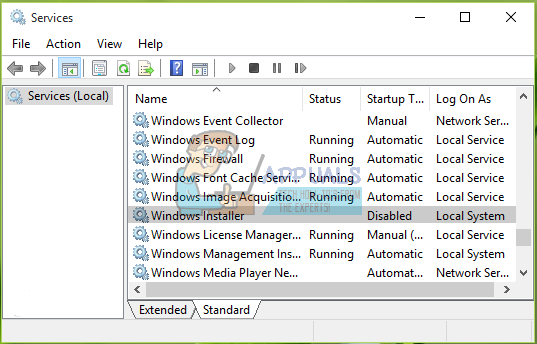
After you have successfully opened Services, follow the instructions below.
- Locate the Windows Installer service by clicking on the Name column in order to sort the services in an alphabetical order.
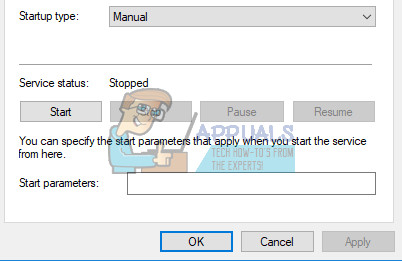
- Right-click on the the service and click on Properties.
- Navigate to the Startup type and set it to Automatic (Delayed Start).

- If the service is not running, you will be able to click on Start just under the Service status.
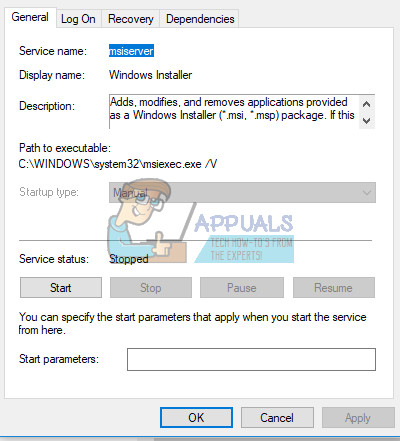
The service should start now and you won’t have any problems dealing with it in the future. However, you may receive the following error message when you click on Start:
“Windows could not start the Windows Installer service on Local Computer. Error 1079: The account specified for this service differs from the account specified for other services running in the same process.”
If this occurs, follow the instructions below to fix it.
- Follow the steps 1-4 from the instructions below in order to open Windows Installer properties.
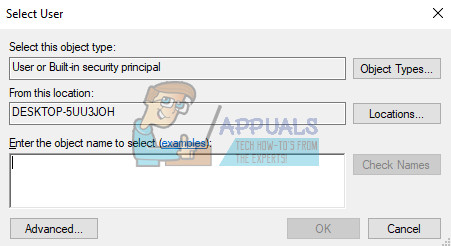
- Navigate to the Log On tab and click on the Browser… button.
- Under the “Enter the object name to select” box, type in your computer’s name and click on Check Names and wait for the name to become authenticated.

- Click OK when you are done and type in the administrator password in the Password box when you are prompted with it.
- Click OK and close this window.
- Navigate back to Windows Installer’s properties and click Start.

- Close everything and check to see if the service is still running.
Solution 4: Try a Different Method
If you tried to install a Windows Update manually by downloading it from Microsoft Update Catalog and you received the following error, you may want to try updating your computer differently. Windows 10 updates itself automatically each time a new update is released but you should check if your automatic updating system works.
You can check for updates manually by following the steps below:
- Use the Windows Key + I key combination in order to open Settings on your Windows PC. Alternatively, you can search for “Settings” by using the search bar located at the taskbar.
- Locate and open the “Update & security” section in the Settings app.

- Stay in the Windows Update tab and click on the Check for updates button under the Update status in order to check whether there is a new version of Windows available.
- If there is one, Windows should proceed with the download process automatically.


Alternatively, if your updating process is experiencing difficulties, you can try to reset your Windows 10 Update components in order to see just where the problem is. This particular fix is able to fix around 80% of all Windows Update related problems so you should definitely check this out if you are determined to update your Windows to the latest version.
- Open a Command Prompt. To do this, use one of the following methods, depending on your version of Windows:
Windows 10: Press and hold (or right-click) the Windows logo button on the taskbar and then select Command Prompt (Admin). Select Yes when the User Account Control box appears.
Windows 8.1 and Windows 8: From the Start screen, swipe in from the right side to display the charms, select Search, and then search for cmd. (Or, if you are using a keyboard and mouse, type cmd at the Start screen.) In the search results, press-and-hold or right-click Command Prompt, and then select Run as Administrator.
Windows 7 and earlier versions: Press the Windows logo key + R, type cmd in the Run box, and then press Enter. Right-click cmd, and then select Run as Administrator.
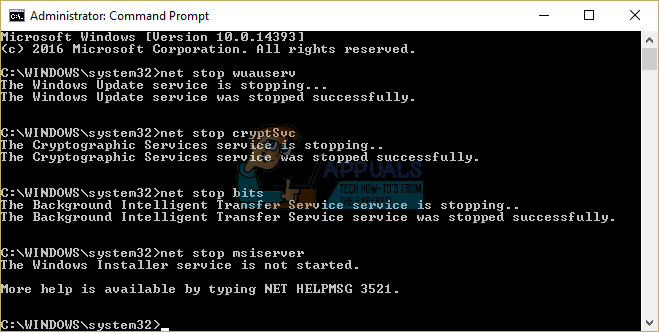
- Stop the BITS service, the Windows Update service, and the Cryptographic service. To do this, at a command prompt, type the following commands. Make sure that you press Enter after you type each command.
net stop bits
net stop wuauserv
net stop appidsvc
net stop cryptsvc
- Delete the qmgr*.dat files. To do this, at a command prompt, type the following command, and then press Enter:
Del “%ALLUSERSPROFILE%\Application Data\Microsoft\Network\Downloader\qmgr*.dat”
- Rename the softare distribution folders backup copies. To do this, at a command prompt, type the following commands. Make sure that you press Enter after you type each command.
Ren %systemroot%\SoftwareDistribution SoftwareDistribution.bak
Ren %systemroot%\system32\catroot2 catroot2.bak
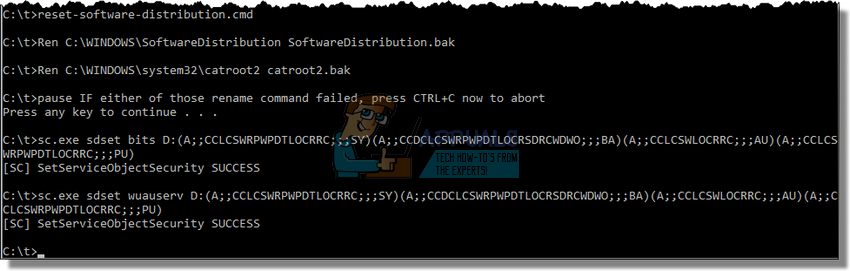
- Reset the BITS service and the Windows Update service to the default security descriptor. To do this, at a command prompt, type the following commands. Make sure that you press Enter after you type each command.
sc.exe sdset bits D:(A;;CCLCSWRPWPDTLOCRRC;;;SY)(A;;CCDCLCSWRPWPDTLOCRSDRCWDWO;;;BA)(A;;CCLCSWLOCRRC;;;AU)(A;;CCLCSWRPWPDTLOCRRC;;;PU)
sc.exe sdset wuauserv D:(A;;CCLCSWRPWPDTLOCRRC;;;SY)(A;;CCDCLCSWRPWPDTLOCRSDRCWDWO;;;BA)(A;;CCLCSWLOCRRC;;;AU)(A;;CCLCSWRPWPDTLOCRRC;;;PU)
- At a command prompt, type the following command, and then press Enter:
cd /d %windir%\system32
- Reregister the BITS files and the Windows Update files. To do this, at a command prompt, type the following commands. Make sure that you press Enter after you type each command.
regsvr32.exe atl.dll
regsvr32.exe urlmon.dll
regsvr32.exe mshtml.dll
regsvr32.exe shdocvw.dll
regsvr32.exe browseui.dll
regsvr32.exe jscript.dll
regsvr32.exe vbscript.dll
regsvr32.exe scrrun.dll
regsvr32.exe msxml.dll
regsvr32.exe msxml3.dll
regsvr32.exe msxml6.dll
regsvr32.exe actxprxy.dll
regsvr32.exe softpub.dll
regsvr32.exe wintrust.dll
regsvr32.exe dssenh.dll
regsvr32.exe rsaenh.dll
regsvr32.exe gpkcsp.dll
regsvr32.exe sccbase.dll
regsvr32.exe slbcsp.dll
regsvr32.exe cryptdlg.dll
regsvr32.exe oleaut32.dll
regsvr32.exe ole32.dll
regsvr32.exe shell32.dll
regsvr32.exe initpki.dll
regsvr32.exe wuapi.dll
regsvr32.exe wuaueng.dll
regsvr32.exe wuaueng1.dll
regsvr32.exe wucltui.dll
regsvr32.exe wups.dll
regsvr32.exe wups2.dll
regsvr32.exe wuweb.dll
regsvr32.exe qmgr.dll
regsvr32.exe qmgrprxy.dll
regsvr32.exe wucltux.dll
regsvr32.exe muweb.dll
regsvr32.exe wuwebv.dll
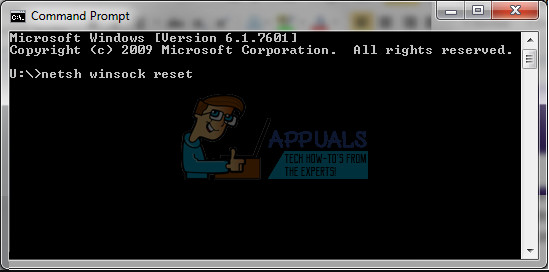
- Reset Winsock. To do this, at a command prompt, type the following command, and then press Enter:
netsh winsock reset
- If you are running Windows XP, you have to configure the proxy settings. To do this, at a command prompt, type the following command, and then press Enter:
proxycfg.exe -d
- If you are running other versions of Windows, at a command prompt, type the following command, and then press Enter:
netsh winhttp reset proxy
- Restart the BITS service, the Windows Update service, and the Cryptographic service. To do this, at a command prompt, type the following commands. Make sure that you press Enter after you type each command.
net start bits
net start wuauserv
net start appidsvc
net start cryptsvc
- Windows Vista only: Clear the BITS queue. To do this, at a command prompt, type the following command, and then press Enter:
bitsadmin.exe /reset /allusers
- Install the latest Windows Update Agent.
- Restart the computer.
- Try to update your version of Windows by checking for updates from the Update & security section in Settings and also try to perform the update via the Standalone Installer.
Readers help support Windows Report. We may get a commission if you buy through our links.
Read our disclosure page to find out how can you help Windows Report sustain the editorial team. Read more
When users try to install a version of this program that is incompatible with their operating system, they may encounter the 0x80096002 Windows Update Standalone Installer error. This error indicates an incompatibility issue between the software and the user’s operating system.
The topic under consideration is the resolution of 0x8024800c Windows Update error on Windows 11, which we have already discussed in depth.
Nonetheless, in this article, we will focus on fixing this pesky error and provide a comprehensive guide to troubleshooting it. Join us as we unravel the necessary steps to rectify this vexatious issue.
What is error code 0x80096002?
This is an error that occurs while using Windows Update Standalone Installer, and it’s caused by the following:
- Missing components such as Windows Identify Foundations.
- Issues with Windows Update.
How can I fix the 0x80096002 error?
1. Enable Windows Identity Foundations
- On your home screen search bar type Turn Windows features on or off and open it.

- Check mark the Turn Windows features on or off option that pops up.
- Scroll down to locate the Windows Identity Foundations and check it.
- Click OK to save.

- Lastly, reboot your PC.


2. Extend the operation duration of WSUS cookie with Command Prompt
- On your home screen search bar, type cmd and Run as Administrator.

- When the command window opens enter the line command and tap Enter:
wuauclt /resetauthorization /detectnowAfter doing that, check if 0x80096002 is gone.


- Recent Windows 11 update lets you disable profanity filter in voice typing
- Meta under fire after AI chatbot caught having sexual talks with minors
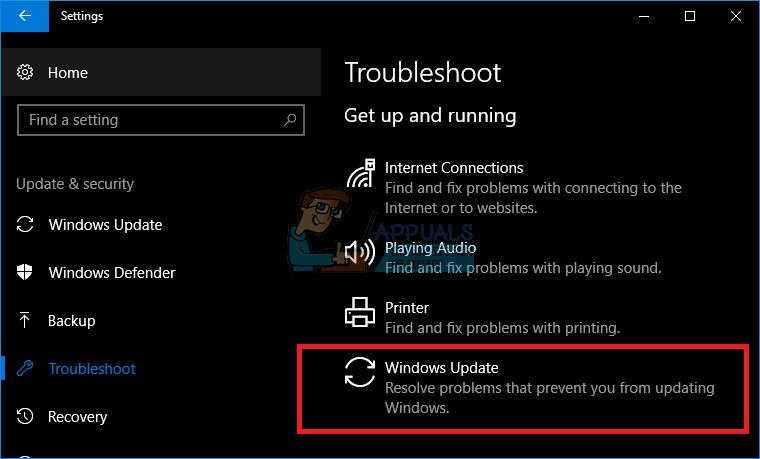
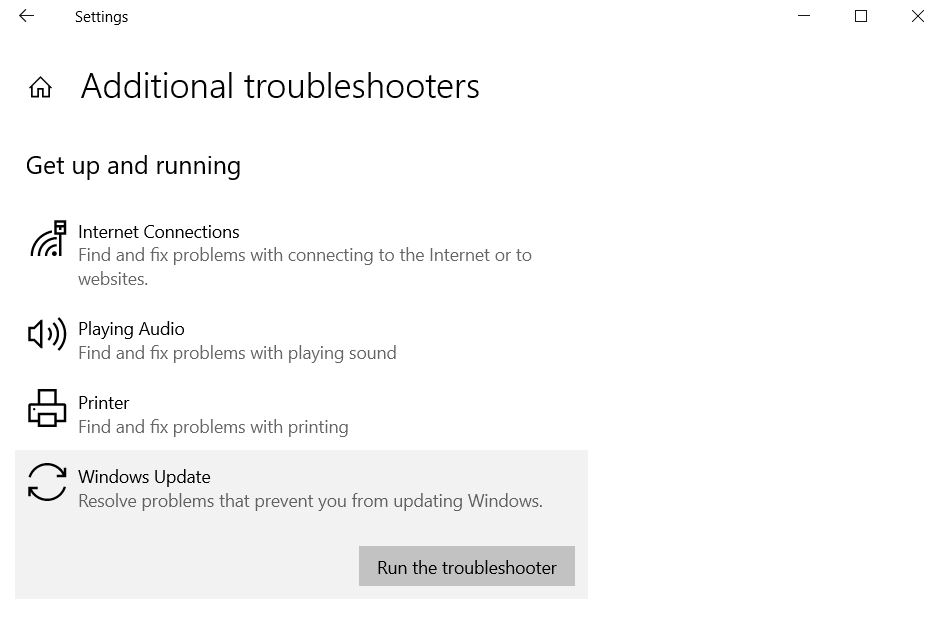
3. Troubleshooting Windows Updates
- Tap the Windows key on your PC and inside the search bar, type Troubleshoot settings and open it.

- Now select the Other troubleshooters.

- Lastly, click Run on the Windows Updates section.


We are confident that this guide has provided you with the necessary assistance to address your concern. While it may initially seem daunting, as demonstrated, resolving this issue is not as difficult as it may seem.
However, if you encounter any further difficulties, we suggest referring to our comprehensive guide on how to run Windows Update Troubleshooter. This invaluable resource provides solutions that could be precisely what you need.
We are eager to hear your feedback on this matter. Please don’t hesitate to comment below and let us know which solution proved most effective for you. Your insights are highly respected and appreciated.
Loredana Harsana
Windows Software Expert
Loredana is a passionate writer with a keen interest in PC software and technology. She started off writing about mobile phones back when Samsung Galaxy S II was on top of the world and she fell in love with tech of all sorts.
Whenever she’s not at her work desk, you’ll find her enjoying refreshing tea flavors, spilling stories on paper, and listening to the radio.
Updated May 2025: Stop error messages and fix your computer problem with this tool. Get it now at this link
- Download and install the software.
- It will scan your computer for problems.
- The tool will then fix the issues that were found.
To run the standalone installer in Compatibility Mode, follow these instructions:
Open an elevated command prompt window. Type msiexec /i.msi /qb COMPABILITY1
Enable Windows Identity Foundation
Navigate to HKLM\SOFTWARE\Microsoft \Windows NT\CurrentVersion \ Software Protection Platform
Create or modify a DWORD Value named DisableUserAssertions with a value of 1.
Run the installation again.
Use Windows Update Troubleshooter
If you are getting the following error while trying to install Microsoft Updates, it could be due to one of the following reasons:
1. You might be facing issues related to Windows 10 update KB4024708. This issue occurs because of a problem with the Windows Update Service. In this case, you need to restart your computer.
2. Your system might be infected with malware. If this is the case, you must scan your PC with anti-malware software like Malwarebytes Anti-Malware Premium.
3. There might be some problems with your network connection. Try connecting to the Internet via cable or Wi-Fi.
4. Make sure that there is enough free space on your hard disk.
5. Check whether the Windows Store app is installed properly. 6. Restart your device.
Install a different version of the software.
Microsoft Office 365 ProPlus is one of the most popular office suites around. However, it does come with some drawbacks. One of those is that you cannot use it without Microsoft Account. If you do not want to sign up for an account, there are ways to install another version of the software. Here are three different alternatives to consider:
1. OpenOffice
OpenOffice is free and open source software that works just like Microsoft Office. You can download it here. There are many versions of the software, including LibreOffice, NeoOffice, StarOffice, etc. Each one offers a slightly different set of features. For example, LibreOffice is less expensive than OpenOffice, while StarOffice includes additional templates.
2. Google Docs
Google Docs is a cloud-based word processor that allows you to collaborate online. While it doesn’t include all the functions of Microsoft Word, it does offer basic editing tools such as tables, charts, images, and fonts. You can find out more about Google Docs here.
3. Zoho Writer
Zoho Writer is a simple word processing tool that lets you write documents, spreadsheets, presentations, forms, and much more. It’s easy to use and requires no installation. To learn more about Zoho Writer, check out our guide here.
Use the Windows Features tool.
Press Windows button to open the Start Menu. Then type “Windows features” into the Search bar. Click on the “Turn Windows features on or off” option. Select “On”. Now you can easily turn on/off Windows 10 features like Cortana, Action Center, etc.
How to Enable Windows Defender Antivirus Again
Step 1: Open Control Panel.
Step 2: Go to Programs & Features.
Updated: May 2025
We highly recommend that you use this tool for your error. Furthermore, this tool detects and removes common computer errors, protects you from loss of files, malware, and hardware failures, and optimizes your device for maximum performance. This software will help you fix your PC problems and prevent others from happening again:
- Step 1 : Install PC Repair & Optimizer Tool (Windows 11, 10, 8, 7, XP, Vista).
- Step 2 : Click Start Scan to find out what issues are causing PC problems.
- Step 3 : Click on Repair All to correct all issues.
Troubleshoot Windows Updates
Windows Update Troubleshooter helps you fix problems associated with updating Windows 10. You can use it to find out whether there are pending updates, resolve errors, check for missing updates, download and install updates, and even rollback updates.
If you’re having trouble installing updates, then you can try running the troubleshooting steps manually to see if that fixes the problem.
Repair your Errors automatically
Error fixing is one of the most annoying tasks while working online. You spend hours trying to find out what went wrong with your site and how to fix it. But, don’t worry, we are here to help you. In this article, we will give you some tips about error fixing. Let’s start.
Using a VPN client, you can protect your privacy online.
VPN stands for virtual private network. This type of software creates a secure tunnel between your computer and a remote server. All information transmitted through this connection is encrypted, making it impossible for anyone else to intercept it. You can use a VPN to browse the web privately, protect yourself against hackers, and access geo-blocked content. In addition, many people use VPNs to unblock certain types of media like video games and movies.
The best way to choose a VPN provider is to look for one that offers good customer support, reliable servers, and a wide selection of features. There are several different kinds of VPN clients available for Windows, Mac OS X, Android, iOS, Linux, ChromeOS, and even routers. Most of the providers offer free trials, although some require registration.
Data recovery tools can stop files from being lost for good.
Your hard disk might fail. Or it could just stop working one day. If you lose data because of a hardware failure, there are ways to recover those files. This article explains how to retrieve deleted files from a crashed hard drive.
If you don’t want to pay for professional help, you can use free software programs like Recuva and PhotoRec to restore files from a damaged storage device. These applications scan the entire drive looking for files that have been overwritten. They’re effective at recovering photos, documents, videos, music, and even emails.
You should always back up your most important files. Backups protect against accidental deletion, malware attacks, system crashes, power failures, and natural disasters. There are many types of backup solutions, including cloud storage, local network backups, external drives, and online services. For example, Dropbox lets you sync files across multiple devices and computers.
RECOMMENATION: Click here for help with Windows errors.
Frequently Asked Questions
I’m having trouble installing updates or getting an error (such as 0x80073712). How can I help?
Here are some things you can try if you can’t get updates to install:
Make sure your device can reach the internet. To download updates, you need to be connected to the internet.
Try to install the updates by hand if you’re connected to the internet. Click Start, then Settings, then Update & Security, then Windows Update, then Check for updates.
Look for changes.
Run the troubleshooter for Windows Update. Start, then Settings, then Update and Security, then Troubleshoot. Click Windows Update under “Get up and running.”
How do I update my PC by Manually?
Some updates might not be available on all devices at the same time. We’re making sure updates are ready and compatible.
To keep your computer up to date, click Start, then Settings, then Update & Security, then Windows Update, and then Check for updates.
You may encounter several issues or error code messages while updating your Windows device to a newer version. Windows Update Standalone Installer error is one of those issues that may hinder you from upgrading the OS.
So, if you’re stuck with a standalone installer error on Windows 10, here are a few fixes that will allow you to get past this issue.
Also read: What Is Conhost.Exe And Why Is It Running In My Task Manager.
Let’s get started.
Why is Windows Update Standalone Installer Error Caused?
If the specific update is not intended for your device or it takes exceptionally long for the OS to fetch new updates, you may encounter this hindrance. Another possible cause for the Windows Update Standalone Installer error can be due to corrupted system file entries and bad RAM allocation that causes load on the CPU.
But majorly, if you’re trying to install an update that is not compatible with your OS, you may have to experience the Standalone Installer error code message popping the screen.
Also read: How to Fix Windows Update Error 0x80240034.
How to Fix Standalone Installer Error on Windows 10
Solution #1: Run Compatibility Troubleshooter
The first solution that we have listed in our post guides you to fix any incompatibility issue between the OS and update the installer package. Here’s what you need to do.
Right-click on the installer file, select the “Properties” option from the context menu and switch to the “Compatibility” tab.
From the drop-down menu, pick your Windows version on which you’re currently operating.
If you’re not aware of the version, you can tap on the “Run Compatibility Troubleshooter” button to automatically select a choice.
Hit the “Apply” button to save your changes. Exit all windows and then re-installing the Windows to check whether the issue persists.
Solution #2: Windows Identity Foundation
Windows Identity Foundation (WIF) is one of Windows in-built features that you can use for fixing the Windows update standalone Installer error. WIF is majorly intended for developers to externalize user access from various apps and services.
To fix the Standalone Installer error, it is advised to enable the Windows Identity Foundation feature from the list of Windows services. Here’s what you need to do:
Launch the Start menu search, type “Turn Windows Features on or off.” Hit Enter.

In the Windows Features window, look for “Windows Identity Foundation” and then enable this option.
After making these recent changes, try upgrading your device to a newer version to check whether you’re still experiencing any technical difficulties.
Solution #3: Windows Update Troubleshooter
Another workaround you can adopt is using the Windows Update Troubleshooter to scan and fix update issues on your device. To use Windows Update Troubleshooter, follow these quick steps.
Tap the Windows icon, select the gear-shaped icon to open Windows settings.
In Windows Settings, select the Update and Security option.

Tap on the “Troubleshoot” option from the left menu pane. Select the “Windows Update” and then hit the “Run Troubleshooter” option.
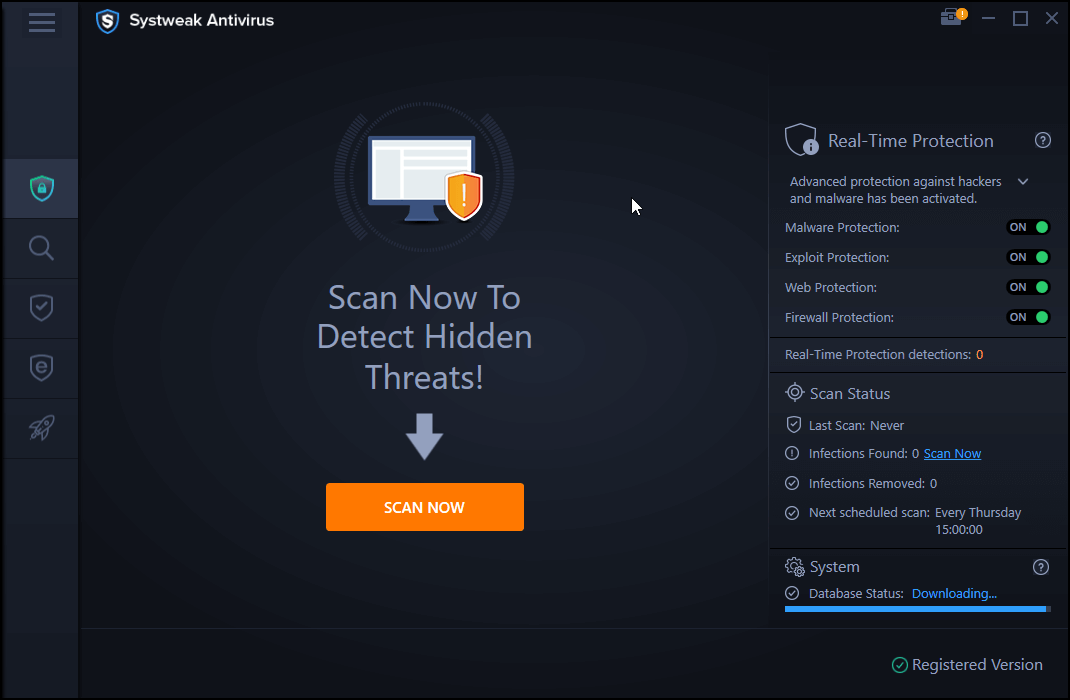
Solution #4: Scan your Device for Viruses or Malware
Last but not least, you can run a thorough scan on your device to ensure that your system is 100% free from threats or infections. Wondering which antivirus suite you should pick? We might have a recommendation for you. Download Systweak antivirus for Windows to safeguard your device against viruses, malware, spyware, or any malicious threats that may harm your device or sabotage sensitive data.
We hope the above-mentioned solutions work out well for you and allow you to get rid of Windows update standalone Installer error on your device. No matter which OS you use, whether Windows, macOS, Android, or iOS, updating your device to the latest version is your best bet to keep your device optimized in the long run.