
If you are trying to install Windows updates but unable to do so, then it’s possible that Windows updating might be failing with error code 0xc8000222. The error is caused because of a number of issues such as corrupt Windows Update files, cache issue, virus or malware, etc. Sometimes it fails because the Update service might not have been running. So without wasting any time, let’s see how to actually fix Windows Update Error 0xc8000222 with the help of below-listed troubleshooting steps.

Table of Contents
Make sure to create a restore point just in case something goes wrong.
Method 1: Run Windows Update Troubleshooter
1.Now type “troubleshooting” in Windows Search bar and click on Troubleshooting.
2.Next, from the left window pane select View all.
3.Then from the Troubleshoot computer problems list select Windows Update.
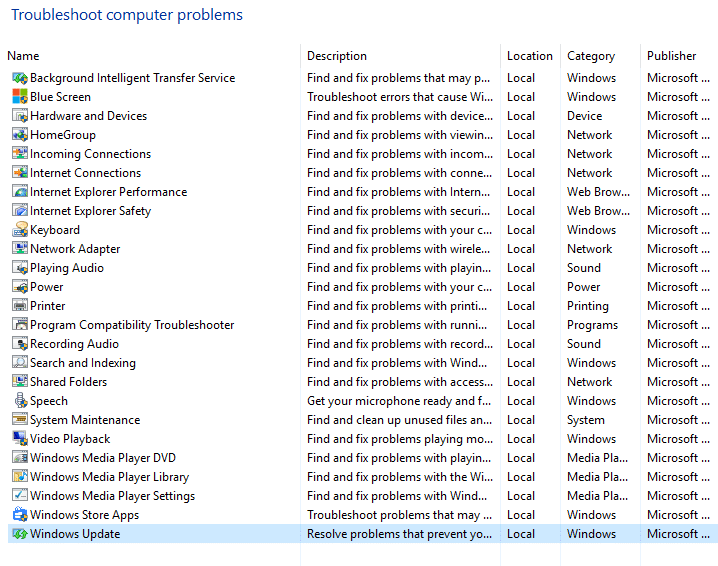
4.Follow on-screen instruction and let the Windows Update Troubleshoot run.
5.Restart your PC and you may be able to Fix Windows Update Error 0xc8000222.
Method 2: Temporarily Disable Antivirus and Firewall
1.Right-click on the Antivirus Program icon from the system tray and select Disable.
2.Next, select the time frame for which the Antivirus will remain disabled.

Note: Choose the smallest amount of time possible for example 15 minutes or 30 minutes.
3.Once done, again try to run Windows Update and check if the error resolves or not.
4.Press Windows Key + I then select Control Panel.
5.Next, click on System and Security.
6.Then click on Windows Firewall.

7.Now from the left window pane click on Turn Windows Firewall on or off.
8.Select Turn off Windows Firewall and restart your PC. Again try to open Update Windows and see if you’re able to Fix Windows Update Error 0xc8000222.
If the above method doesn’t work make sure to follow the exact same steps to turn on your Firewall again.
Method 3: Rename SoftwareDistribution Folder
1.Press Windows Key + X then select Command Prompt (Admin).
2.Now type the following commands to stop Windows Update Services and then hit Enter after each one:
net stop wuauserv
net stop cryptSvc
net stop bits
net stop msiserver

3.Next, type the following command to rename SoftwareDistribution Folder and then hit Enter:
ren C:\Windows\SoftwareDistribution SoftwareDistribution.old
ren C:\Windows\System32\catroot2 catroot2.old
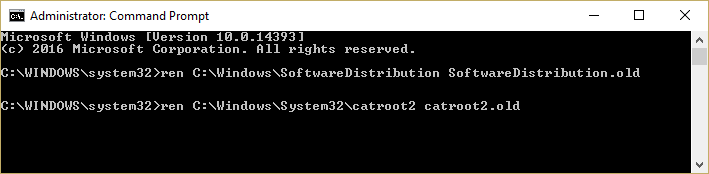
4.Finally, type the following command to start Windows Update Services and hit Enter after each one:
net start wuauserv
net start cryptSvc
net start bits
net start msiserver

5.Reboot your PC to save changes and check if you are able to Fix Windows Update Error 0xc8000222.
Method 4: Perform Clean boot
Sometimes 3rd party software can conflict with Windows and can cause Windows Update error. In order to Fix Windows Update Error 0xc8000222, you need to perform a clean boot on your PC and diagnose the issue step by step.
Method 5: Run SFC and CHKDSK
1.Press Windows Key + X then click on Command Prompt (Admin).
2.Now type the following in the cmd and hit enter:
Sfc /scannow
sfc /scannow /offbootdir=c:\ /offwindir=c:\windows

3.Wait for the above process to finish and once done restart your PC.
4.Next, run CHKDSK from here Fix File System Errors with Check Disk Utility(CHKDSK).
5.Let the above process complete and again reboot your PC to save changes.
Method 6: Run DISM
1.Press Windows Key + X then click on Command Prompt (Admin).
2.Now type the following in the cmd and hit enter after each one:
a) Dism /Online /Cleanup-Image /CheckHealth
b) Dism /Online /Cleanup-Image /ScanHealth
c) Dism /Online /Cleanup-Image /RestoreHealth

3.Let the DISM command run and wait for it to finish.
4. If the above command doesn’t work then try on the below:
Dism /Image:C:\offline /Cleanup-Image /RestoreHealth /Source:c:\test\mount\windows
Dism /Online /Cleanup-Image /RestoreHealth /Source:c:\test\mount\windows /LimitAccess
Note: Replace the C:\RepairSource\Windows with the location of your repair source (Windows Installation or Recovery Disc).
5.Reboot your PC to save changes and see if you’re able to Fix Windows Update Error 0xc8000222.
Method 7: Run CCleaner and Malwarebytes
1.Download and install CCleaner & Malwarebytes.
2.Run Malwarebytes and let it scan your system for harmful files.
3.If malware is found it will automatically remove them.
4.Now run CCleaner and in the “Cleaner” section, under the Windows tab, we suggest checking the following selections to be cleaned:
5.Once you’ve made certain the proper points are checked, simply click Run Cleaner, and let CCleaner run its course.
6.To clean your system further select the Registry tab and ensure the following are checked:
7.Select Scan for Issue and allow CCleaner to scan, then click Fix Selected Issues.
8.When CCleaner asks “Do you want backup changes to the registry?” select Yes.
9.Once your backup has completed, select Fix All Selected Issues.
10.Restart your PC to save changes. This would Fix Windows Update Error 0xc8000222 but if it didn’t then continue to the next method.
Method 8: Reset Windows Update Components
If you receive a Windows Update error, try the steps listed in this guide to reset the Windows Update components.
Recommended for you: Fix Missing Open With Option From Right-click Context Menu
That’s it you have successfully fixed Windows Update Error 0xc8000222 but if you still have any queries regarding this post then feel free to ask them in the comments section.
- IT
- Cancel
При установке обновлений Windows возникает ошибка 0xc8000222.
Как и у большинства проблем и у этой есть решение.
1. Запускаем Командную строку (cmd) от имени администратора
2. Останавливаем службу обновлений Windows:
net stop WuAuServ3. Открываем C:\Windows (%windir%) и ищем папку «SoftwareDistribution». Переименовываем её в SD.old
4. Снова запускаем службу обновлений Windows:
net start WuAuServ5. Теперь снова запускаем установку обновления.
Вот такое вот простое решение.
Так же можно воспользоваться средством устранения неполадок Microsoft FixIt для сброса параметров центра обновления. В интернетах говорят, что помогает. Сам не пробовал 
Взято с
https://www.it-35.ru/windows/102-oshibka-pri-ustanovke-obnovleniy-0xc8000222.html
Estimated reading: 3 minutes
407 views
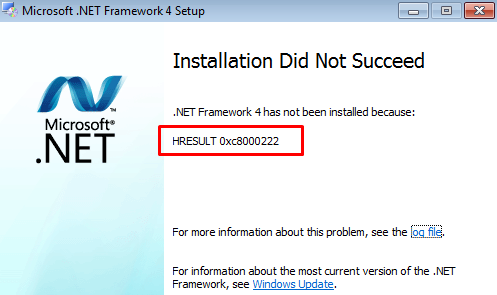
Microsoft .NET Framework is used by many Windows applications. But, while installing the .NET Framework on your computer, you might face this message “Installation did not succeed. HRESULT ox0xc8000222” on the setup page.
In this article, we will guide you through some methods to fix the above error.
Solution 1. Stop the Windows Update service
The main reason why you are facing this disruption is the windows update services is running on the system.
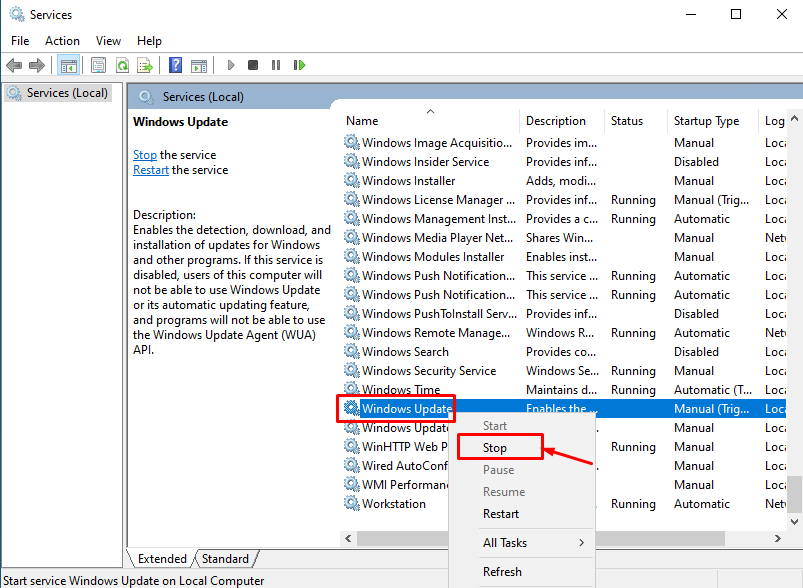
Step 1. Search “services” after hitting the Win+S keys together.
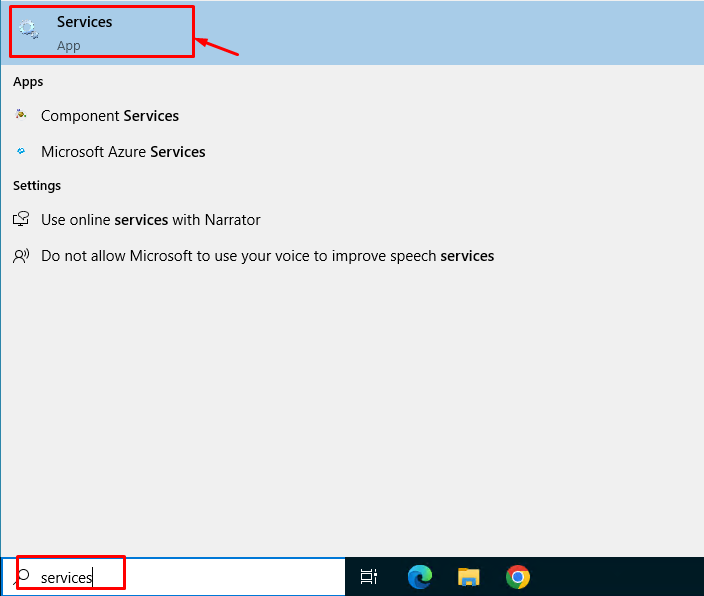
Step 2. When you are there, scroll all the way to the bottom to find the “Windows Update” service.
Step 3 . Next, right-click that service and tap “Stop“.
Step 4. Coming back to the main Services page, find the “Background Intelligence Transfer Service“.
Step 5. Rigt-click that service and click “Stop” to halt that as well.
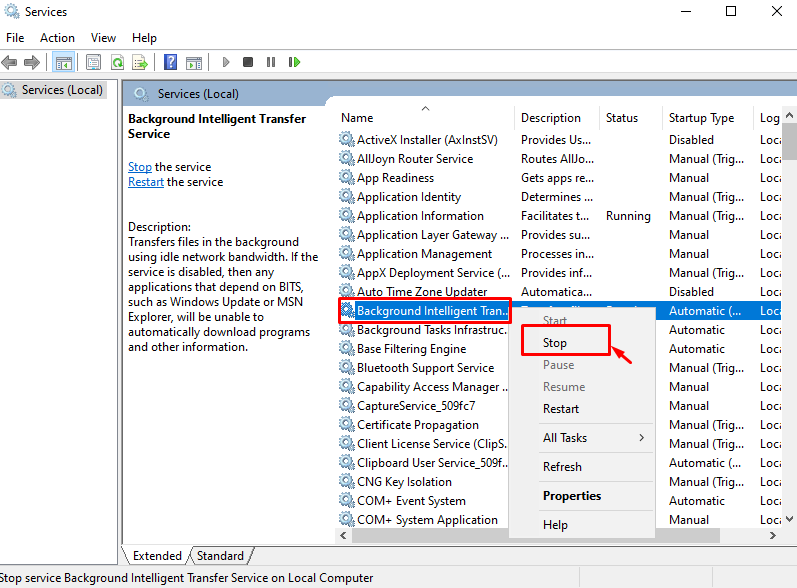
After halting these services, quit the Services page.
Step 6. Now, hit the Windows+R buttons together.
Step7. Later, type this and hit Enter.
%windir%
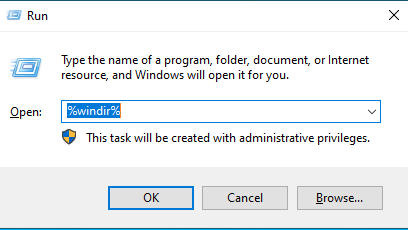
Step 8. This will take you to the Windows directory. Look for the “SoftwareDistribution” folder.
Step 9. Right-click that and tap the “Rename” icon from the context menu.
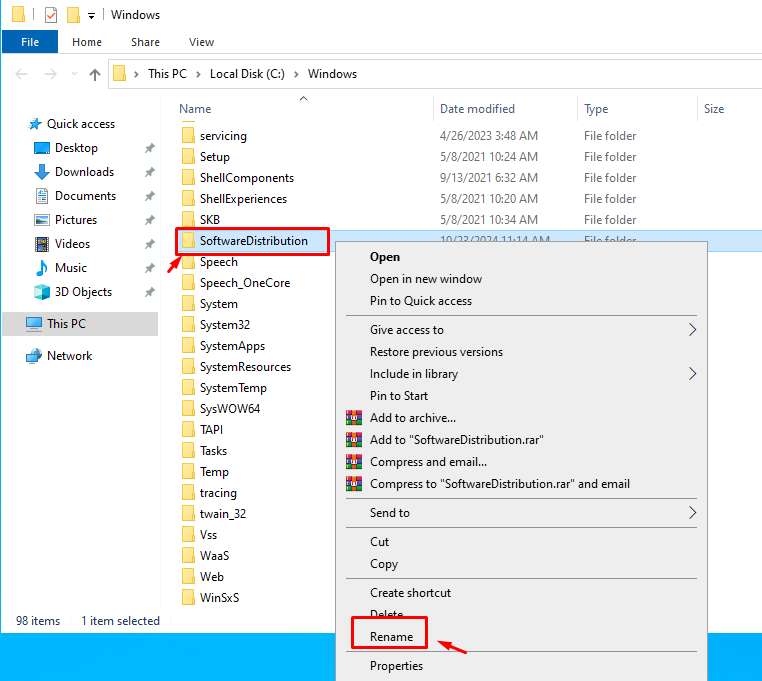
Step 10. Rename this to “SDold” and hit Enter.
Step 11. As this is a system folder, Windows will show up a cautionary message. Ignore that and click “Continue“.
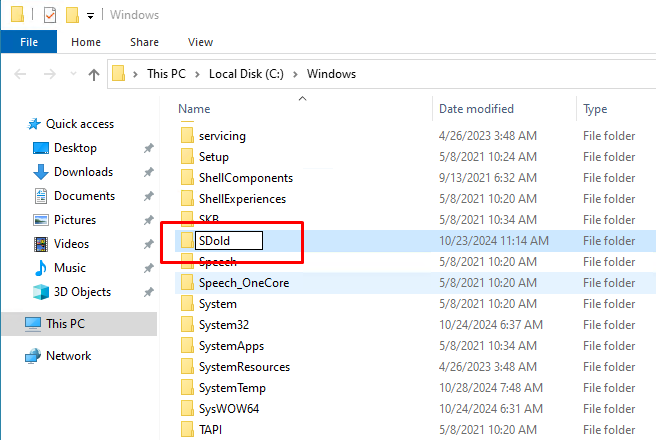
This way, you have to change the name of the SoftwareDistribution folder.
After this, run the .NET Framework package installer and complete the setup process. Restart your computer after this and you are good to go!
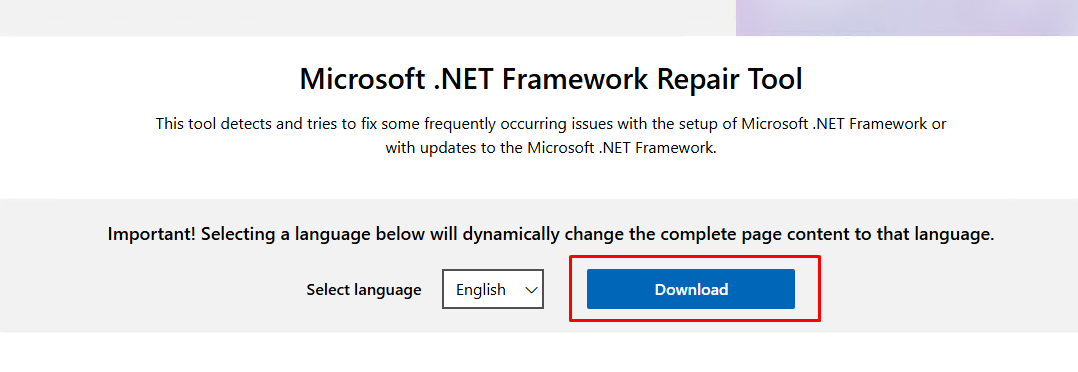
Solution 2. Run the .NET Repair tool
If you have a prior version of .NET Repair tool, download and run the repair tool to fix the problem.
Step 1. Download the .NET Framework Repair tool.
Step 2. Tap “Download” to download it.
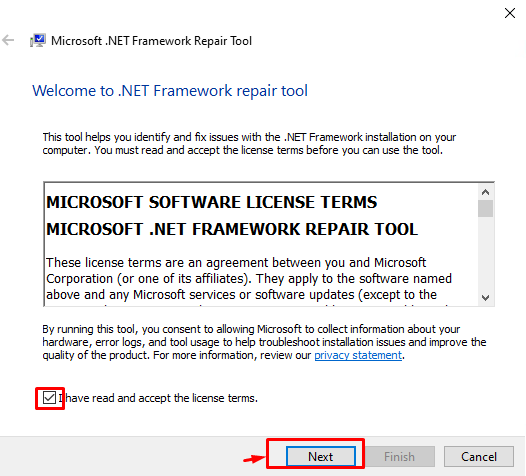
Step 3. Run this repair tool on your system.
Step 4. It will prescribe solutions for your system. So, tap “Next“.
Finally, run the original .NET Framework installer and complete the installation.
You won’t get any “HRESULT Error 0xc8000222” again in the .NET Framework setup.
Solution 3. Check Windows Update
Some of the crucial .NET Framework updates on Windows 11, 10 are delivered through the Windows updates.
Step 1. Open the Settings page and get to the “Windows Update” tab.
Step 2. Tap “Check for updates” to check for the latest updates on your system.
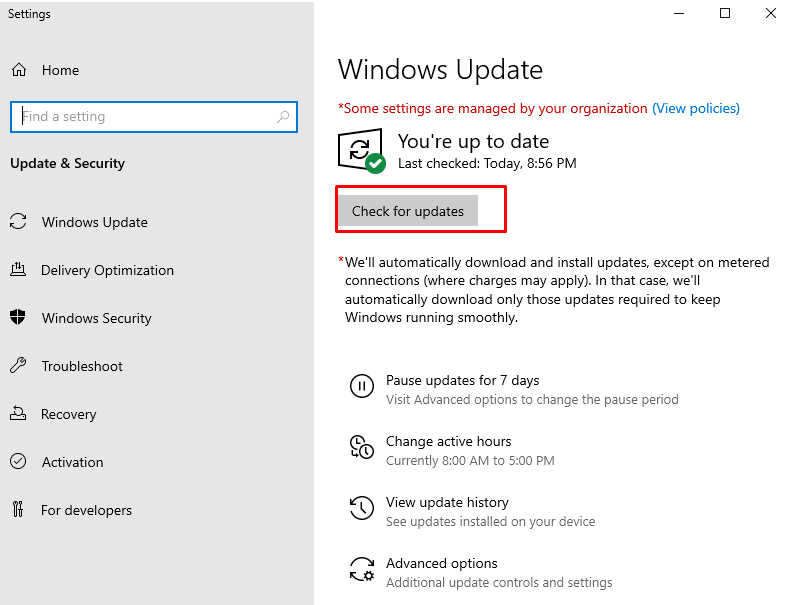
Step 3. After this, tap “Restart now” to complete the system.
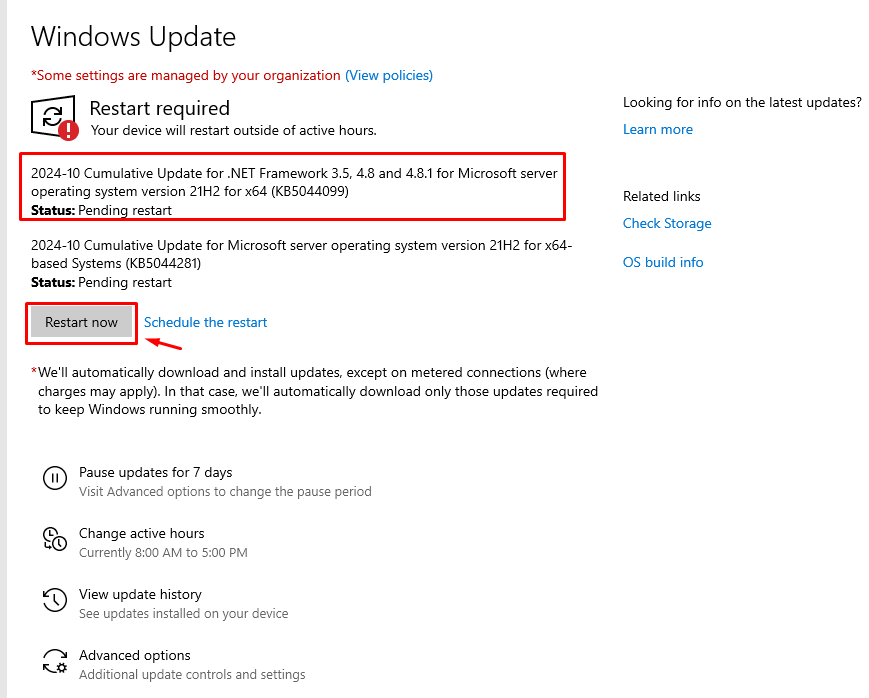
After this, try running the .NET Framework installer once more.
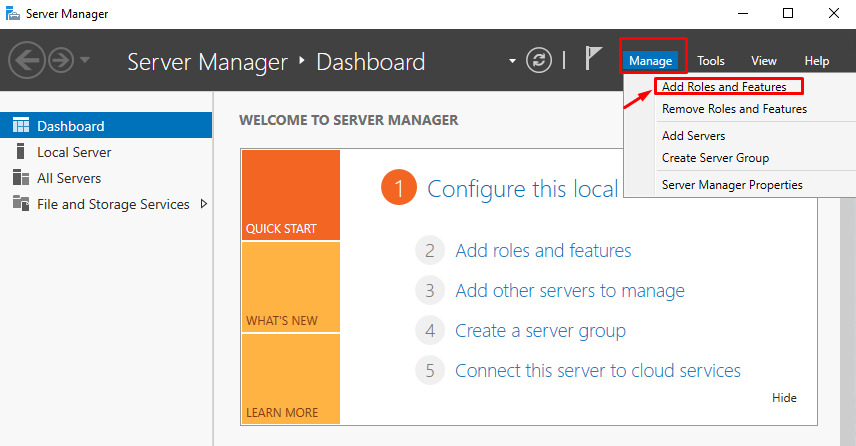
Solution 4. Enable the .NET Framework feature
Step 1. Press the Windows key and type Server Manager
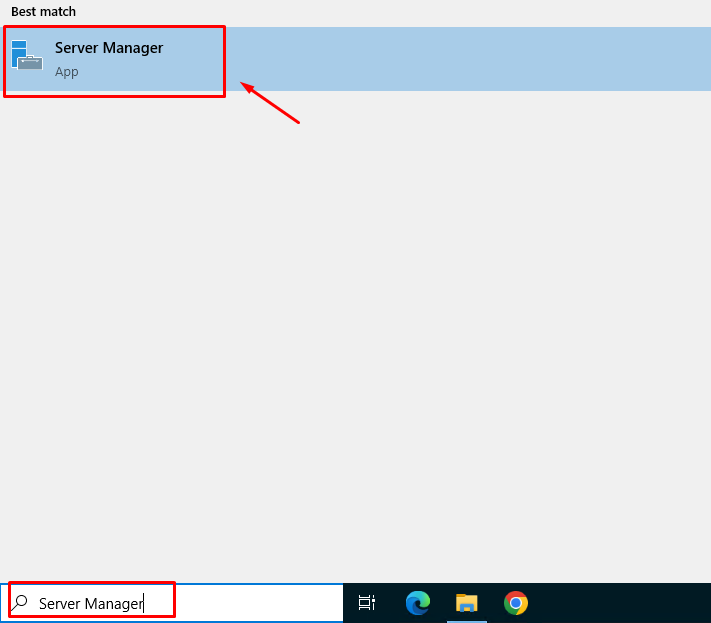
Step 2. In Manage select Add roles and Features.
Step 3. Step forward to “Installation Type” and select “Role-based or feature-based installation”
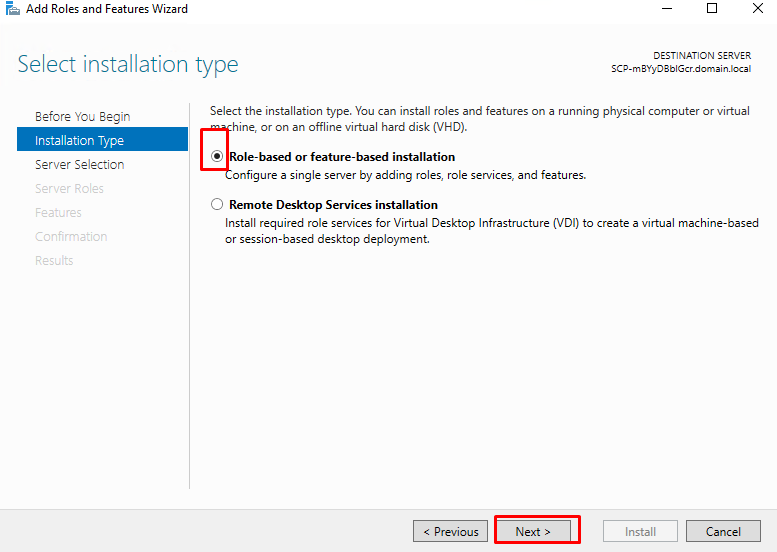
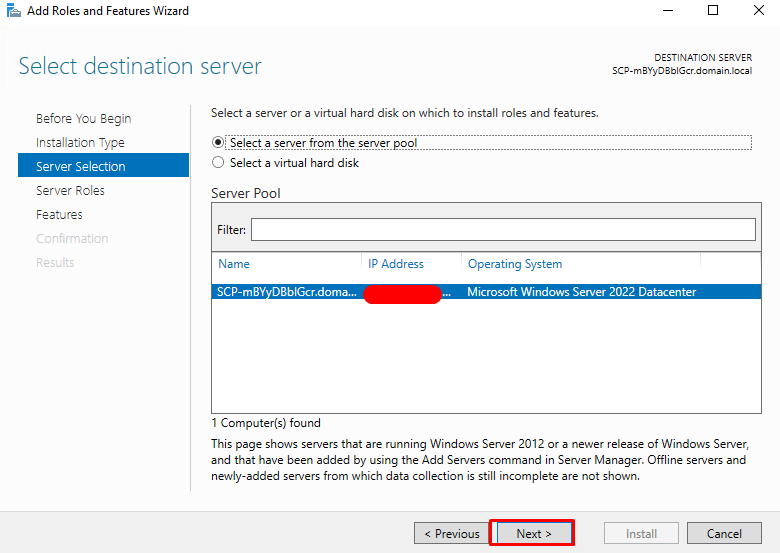
Step 4. Select the destination server for installation.
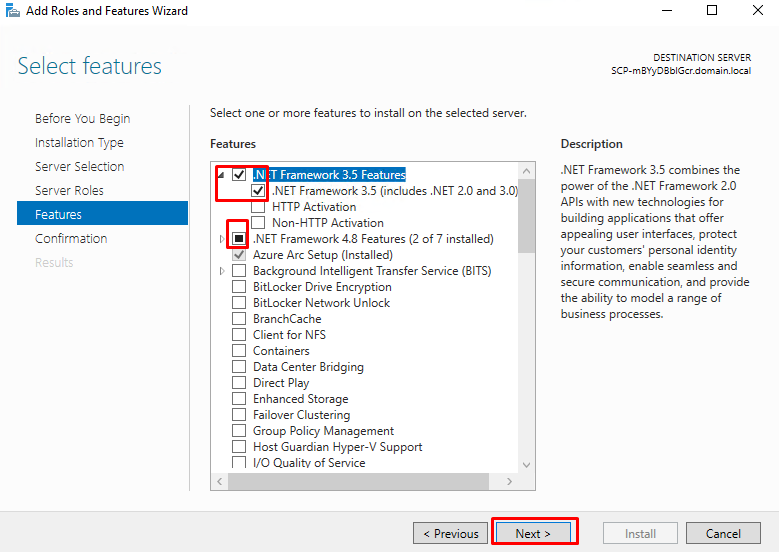
Step 5. Click on “Features”, select the sub-feature ” .NET Framework 3.5 (includes 2.0 and 3.0)” under .NET Framework 3.5 Features and .NET Framework 4.8
Step 6. Now, we get to the “Confirmation” step. Click “Install” to begin the installation.
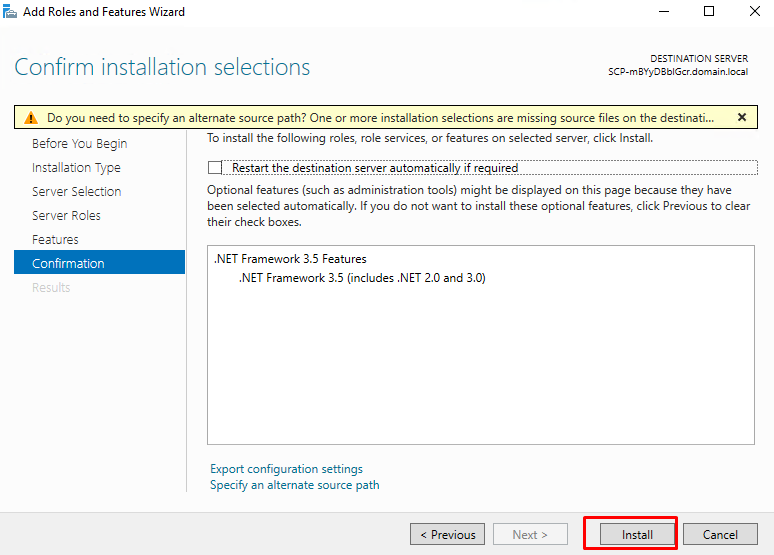
After this, Windows will automatically get this feature and install it on your computer. No need to use the standalone installer any more.
Step 7. Step Once completed, restart your Windows then try again.
Conclusion
In our case after performing the above steps, we did not see the error again.
Hopefully, this article will be helpful for you. Good luck!

Have you encountered the Windows Installer Error 0xc8000222 while trying to update your computer? This issue has been a concern to many Windows users.
If you see the “installer encountered an Error 0xC8000222” notification, you were likely trying to install specific Windows Updates or the Windows Update System Readiness Tool.
Here’s a classic user example of the Installer Error 0xc8000222:
“When I run Windows6.1-KB982018-v3-x64.msu, it immediately fails with error 0xc8000222.”
This user was trying to update a specific Windows Update – kb/982018 – before being prompted with the error message. In most cases, when this Windows Update error occurs, an error window will pop up and prompt the user with the following messages:
“Go for Windows Update.”
“Send a problem report to Windows using its error reporting service.”
“Windows could not search for new updates.”
“Installer encountered an error 0xc8000222”
Important!
The error 0xc8000222 can be result of Windows misconfiguration, junk files and system file conflicts. You can optimize your Windows performance automatically, using a quality PC Repair software. You can download it here.
Download PC Repair
Why Does the Windows Installer Error 0xc8000222 Happen?
The most common cause of the Windows Installer Error 0xc8000222 is broken or corrupt Windows system files. This causes the needed information for the proper functioning of the important Windows files, programs, and applications to be unavailable, which results in the Windows Update error code.
Other causes of the Windows Installer Error 0xc8000222 include:
- Improper system shutdown
- Hardware malfunction
- Malware or virus attack of the system
- Corrupted shared library files
- Deleted or corruption of file registry entries
- Incomplete installation or uninstallation or a program or application
- Misconfiguration of Windows Update system
- Corrupt or incomplete downloaded files cache
Note: These causes that we’ve listed here are the most common, as reported by many users. There might be other possible causes that are not listed here.
Fix the Windows Installer Error 0xc8000222
The following solutions will help you get rid of the Windows Installer Error 0xc8000222 so that you can continue with your Windows Update process.
Note: Most of these solutions will require you to use the elevated Command Prompt (or Command Prompt admin). This means you will need to open the Command Prompt as an administrator and allow the User Account Control (UAC) if prompted.
Scan Your System with a Quality Antimalware
When you see the ‘installer encountered an Error 0xc8000222’ notification, you shouldn’t rule out a virus or malware infection. This problem is known to cause many unexpected errors in the Windows operating system. Scanning your system with a quality antimalware software can help flush out the malware or viruses and restore your PC to its normal function.
Run the Windows Update Troubleshooter
When you encounter any Windows Update error, the Windows Update Troubleshooter should be your first troubleshooting solution to scan, identify, and repair damaged Windows Update components.
To run the Windows Update Troubleshooter:
- Press Win + S keys.
- On the search bar, type
troubleshooter - Click Troubleshooting.
- From the list of Troubleshoot computer problems, select Windows Update.
- Follow the on-screen instruction to let the Windows Update Troubleshoot run.
- After completion, restart your PC to save changes.
Temporarily Disable Third-Party Antivirus or Firewall
Some antivirus or antimalware software can be sensitive and cause unnecessary PC errors. Depending on your computer’s third-party antivirus program, follow the manufacturer’s instructions to disable it until you’re done with the Windows Update that you’re running.
You can also consider disabling your PC’s firewall using the following steps:
- Open Windows search, then type
control panel. - Open the Control Panel, the select System and Security.
- Click Windows Defender Firewall.
- Click on Turn Windows Defender Firewall On or Off.
- Now, select the Disable option for both the radio button.
Run System File Checker and CHKDSK
- Right-click Windows Start, then select Command Prompt (Admin).
- In the Command Prompt, type
sfc/ scannow(no quotes). Press Enter to run the command. - Again, input this command in the Command Prompt, then press Enter:
sfc /scannow /offbootdir=c:\ /offwindir=c:\windows - Scanning the system will begin automatically. Wait for the process to complete (it can take a few minutes).
If the SFC scan finds any problem, it will repair it automatically. Once done, restart the PC and check if the Windows Update error has been resolved.
Run DISM to Fix The Error 0xc8000222
If the SFC scan fails to yield positive information, try the DISM scan.
- If the SFC scan fails to yield positive information, try the DISM scan.
- Press Win + X keys > Select Command Prompt (Admin)
- Type the following commands in the cmd and press Enter after every command:
Dism /Online /Cleanup-Image /CheckHealth
Dism /Online /Cleanup-Image /ScanHealth
Dism /Online /Cleanup-Image /RestoreHealth - Let the DISM commands run to completion. It might take some time, so be patient.
- If the above commands don’t find anything to fix, type (copy and paste) the following commands in the Command Prompt again and press Enter after each command:
Dism /Image:C:\offline /Cleanup-Image /RestoreHealth /Source:c:\test\mount\windowsDism /Online /Cleanup-Image /RestoreHealth /Source:c:\test\mount\windows /LimitAccess
Once done, reboot your PC to save the changes you’ve made and see if they were able to fix the Windows Update Error 0xc8000222.
The DISM commands can also solve such errors like DISM error 0x800f081f and many Windows update issues like 0xc000012f.
Clear the Windows Update Configuration and Cache
You may need to clear the cache and rename the Windows Update service. To do so:
- Right-click on Start Menu > Command Prompt (Admin).
- If User Account Control (UAC) is enabled, select Yes.
- In the Command Prompt, type
net stop wuauserv. Then, wait for the message that indicates, “The Windows Update service was stopped successfully.” - Again, execute this command:
ren c:\windows\SoftwareDistribution softwaredistribution.oldNote: This command will rename the old Windows Update directly and cause the Windows Update service to recreate this folder. - Again, run this command:
net start wuauserv
Wait for the message that says, “The Windows Update service was started successfully”.
Perform a Clean Boot
Sometimes the third-party software in your computer can conflict with Windows essential services and cause the Windows Update error. If you perform a clean boot, you’ll get the opportunity to diagnose the issue step by step.
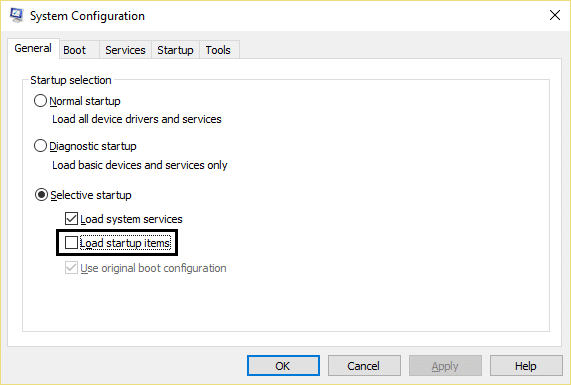
To conduct a clean boot in Windows 10:
- Sign in to your PC as an administrator.
- Open the search box, then type
msconfig. - Click System Configuration, then go to the Services tab.
- Check the box of ‘Hide all Microsoft services’ and then click Disable all.
- Move to the Startup tab in the System Configuration > then select Open Task Manager.
- In the Task Manager, go to Startup.
- For each startup item in the list, select the item and then select Disable.
- Once you’ve disabled all the tasks, close the Task Manager.
- Now, still in the System Configuration Window, go to the Startup tab and select OK.
Now, try again to conduct the Windows Update and see if it works without the error.
ГлавнаяОшибки Windowshresult 0xc8000222 ошибка: как исправить
Решили вы поставить новую версию Visual Studio, а при установке внезапно выпадает сообщение, в котором указана hresult 0xc8000222 ошибка. Как исправить этот сбой в установке и почему он появляется, мы сегодня рассмотрим в нашей статье.
Откуда растут ноги у ошибки hresult 0xc8000222?
Большинство программистов и опытных системных администраторов, а порой и инженеров знают, что установка среды программирования и разработки проектов на разных платформах/языках требует дополнительных средств. В нашем случае, основным компонентом, который устанавливается дополнительно, является – “.NET Framework 4.0 | 5.0”. Что это такое, вы можете узнать со справочника Windows, а нас интересует ошибка, которую выдает данный фреймворк при установке.
Такая ошибка является следствием конфликта обновлений, а что бы ее решить, нужно сделать несколько действий, которые, с первого взгляда, могут показаться «не по теме». Следующий алгоритм избавит вас от ошибки hresult 0xc8000222 и поможет ее исправить.
- Войдите в меню «Службы». Как это сделать:
- Для всех ОС Windows кроме 8, 8.1 – через кнопку Пуск, дальше «Панель управления» а затем выберите вкладку «Администратирования».
- Для 8, 8.1 – нажмите кнопку с эмблемой окошка на клавиатуре, нажмите на поле поиска и введите «Службы»
- Остановите службу центра обновлений: ПКМ – «Остановить».
- То же самое необходимо сделать для следующих служб: «Фоновая интеллектуальная СП», «Центра обеспечения безопасности»
- В стандартном проводнике (!), поищите папку softwaredistribution, а затем смените имя, добавив к названию исходящей приставку _OLD справа.
- Верните работоспособность остановленных служб, выполнив те же действия, однако замените на «Запустить» – «Остановить».
- Следует запустить процесс установки всех доступных обновлений.
После такого небольшого экскурса по «службам», перезагрузите вашу «машину» и запустите установку фреймворка снова. После этого ошибка не дает о себе знать и вы вскоре забудете о hresult 0xc8000222, но как исправить ее будете знать и поможете друзьям с такой же проблемой, которая у вас была.
Похожие записи
KernelBase dll ошибка как исправить
Сегмент пользователей персональных компьютеров непрерывно растёт за счёт школьников, студентов или аспирантов из-за необходимости в вычислительной технике и офисных программ для документов или рефератов. Довольно часто стала…
Ошибка 0xc00000ba – как исправить
Windows очень «любит» полоскать мозги пользователю различными ошибками, которые появляются в самый «неподходящий» момент и просто отбивают желание что-то делать на компьютере или ноутбуке. Самой «интересной» ошибкой при запуске приложений,…
Ошибка 502 bad gateway – как исправить
Больше всего пользователи интернета не любят встречать какие-то странные ошибки при работе в браузере. Второй по «популярностью» ошибкой после 404 Not Found, является 502 bad gateway. Как исправить ее и что вообще это за ошибка – мы рассмотрим в данной…

При работе за компьютером мы довольно часто попадаем в ситуации, когда во время установки обновлений, системных компонентов или программ возникают неполадки, выражающиеся в появлении окон с кодами и описанием. В этой статье мы поговорим о том, как избавиться от ошибки HRESULT 0xc8000222.
Исправление ошибки HRESULT 0xc8000222
Данный сбой обычно происходит при установке обновлений системы или ее компонентов. Одной из наиболее распространенных ситуаций является инсталляция .NET Framework, поэтому разберем процесс на его примере. Существуют и другие варианты, но во всех случаях действия будут одинаковые.

Поскольку компонент .NET Framework является системным (правда, таковым его можно назвать с некоторой натяжкой), то его установкой или апдейтом занимаются соответствующие службы, в частности «Центр обновления Windows» и «Фоновая интеллектуальная служба передачи (BITS)». Их некорректная работа и приводит к возникновению ошибки. Второй фактор это наличие вызывающих конфликт файлов в системной папке, предназначенной для временного хранения данных для обновлений – «SoftwareDistribution». Далее мы приведем два способа решения проблемы.
Способ 1: Стандартный
Суть данного способа заключается в перезапуске служб и устранении конфликта. Делается это довольно просто:
- Вызываем строку «Выполнить» и пишем команду для запуска оснастки «Службы».
services.msc
- Находим «Центр обновления Windows», выделяем его в списке и нажимаем на ссылку «Остановить».
- Те же действия повторяем и для «Фоновой интеллектуальной службы передачи (BITS)».
- Далее заходим на системный диск и открываем директорию «Windows». Здесь ищем папку «SoftwareDistribution» и даем ей другое имя, например, «SoftwareDistribution_BAK».
- Теперь возвращаемся к службам и снова их запускаем, нажав на соответствующую ссылку в левом блоке, после чего система создаст новую директорию с прежним именем.
- Выполняем перезагрузку ПК.


Способ 2: Командная строка
Если по каким-то причинам обычным способом не удается остановить службы или переименовать папку, то сделать это можно, используя «Командную строку».
- Заходим в меню «Пуск», переходим к разделу «Все программы» и открываем папку «Стандартные». Кликаем по нужному нам пункту ПКМ и выбираем запуск от имени администратора.
- Первым делом останавливаем службы по очереди командами, указанными ниже. После ввода каждой строки жмем ENTER.
net stop WuAuServи
net stop BITS
- Переименовать папку нам поможет другая команда.
renameДля того чтобы она сработала, дополнительно указываем путь к исходному каталогу и его новое имя. Адрес можно взять здесь (открыть папку «SoftwareDistribution», скопировать и вставить в «Командную строку»):
Полностью команда выглядит вот так:
rename C:WindowsSoftwareDistribution SoftwareDistribution_BAK - Далее запускаем службы командами
net start WuAuServи
net start BITS - Закрываем консоль и перезагружаем компьютер.


Заключение
Как видите, исправить ошибку HRESULT 0xc8000222 в Windows 7 не так уж и сложно. Главное здесь – четко следовать приведенным инструкциям. Не забудьте, что для корректного выполнения команд следует запускать консоль с администраторскими правами, а после всех действий нужно перезагрузить машину для вступления изменений в силу. Мы рады, что смогли помочь Вам в решении проблемы.Опишите, что у вас не получилось. Наши специалисты постараются ответить максимально быстро.
Помогла ли вам эта статья?
Для работы многих игр и приложений на операционной системе Windows может потребоваться создание той или иной среды. Часто для запуска тех или иных приложений операционная система Windows может потребовать установки компонентов .NET Framework или Visual Studio. Тем не менее при попытке установить их из официального пакета, скачанного с сайта Microsoft, система может выдать ошибку hresult 0xc8000222.

Причины появления ошибки hresult 0xc8000222
Как правило, подобную ошибку провоцирует конфликт некоторых вносимых изменений с Центром обновления Windows. На официальном сайте Microsoft спецификации и подробное описание ошибки hresult 0xc8000222 говорит о проблеме с системным сервисом WuAuServ.
Как исправить ошибку hresult 0xc8000222
Процесс устранения подобной проблемы состоит из четырех шагов и потребует от вас максимально внимательного и точного выполнения всех процедур, описанных ниже.
Шаг 1:
- Откройте меню Пуск и найдите системное приложение с именем cmd.
- Кликните на найденном приложении правой клавишей мыши и после открытия контекстного меню выберите вариант запуска с правами Администратора.
Шаг 2: Выполнение пунктов первого шага запустит Командную строку Windows с максимально возможными правами и допуском к редактированию любых системных параметров.
- Не закрывая и не сворачивая Командную строку нажмите кнопки Win и R на клавиатуре.
- В запущенном системном окне наберите команду %windir%, которая выполнит автоматическое открытие окна проводника с выбранной папкой Windows. (Обратите внимание, что при выполнении всех последующих процедур, папка Windows обязана находиться у вас на виду. Закрывать и сворачивать ее нельзя!)
- На черном фоне командной строки введите net stop WuAuServ и подтвердите выполнение этой команды, нажав клавишу Enter.
- Если все было сделано верно, система сообщит вам о том, что WuAuServ остановлена.
- Перейдите в папку Windows и отыскав каталог SoftwareDisribution, смените его имя на любое другое. Например, SoftwareDisribution.old.
Шаг 3:
- Не убирая с рабочего стола окно с папкой Windows, вернитесь в Командную строку и выполните net start WuAuServ.
- Дождитесь запуска службы и проверьте в папке Windows, появился ли новый каталог SoftwareDisribution.
Шаг 4:
- Закройте все открытые окна.
- Повторите попытку запуска и установки .NET Framework или Visual Studio.
Нашли опечатку? Выделите текст и нажмите Ctrl + EnterИспользуемые источники:
- https://howwindows.ru/errors/hresult-0xc8000222/
- https://lumpics.ru/how-fix-hresult-error-0xc8000222-in-windows-7/
- https://gamesqa.ru/kompyutery/hresult-0xc800022-2410/