
Windows has many core processes that keep it running smoothly, and Windows Modules Installer is one of them. In a nutshell, the process helps keep Windows up-to-date, ensuring that you have all the latest features, as well as performance and security upgrades and patches. But if you have ever seen it using a lot of CPU or disk space, you might be concerned and wonder what it is and if you should disable it.
Here’s everything you need to know about Windows Modules Installer.
What Is the Windows Modules Installer?
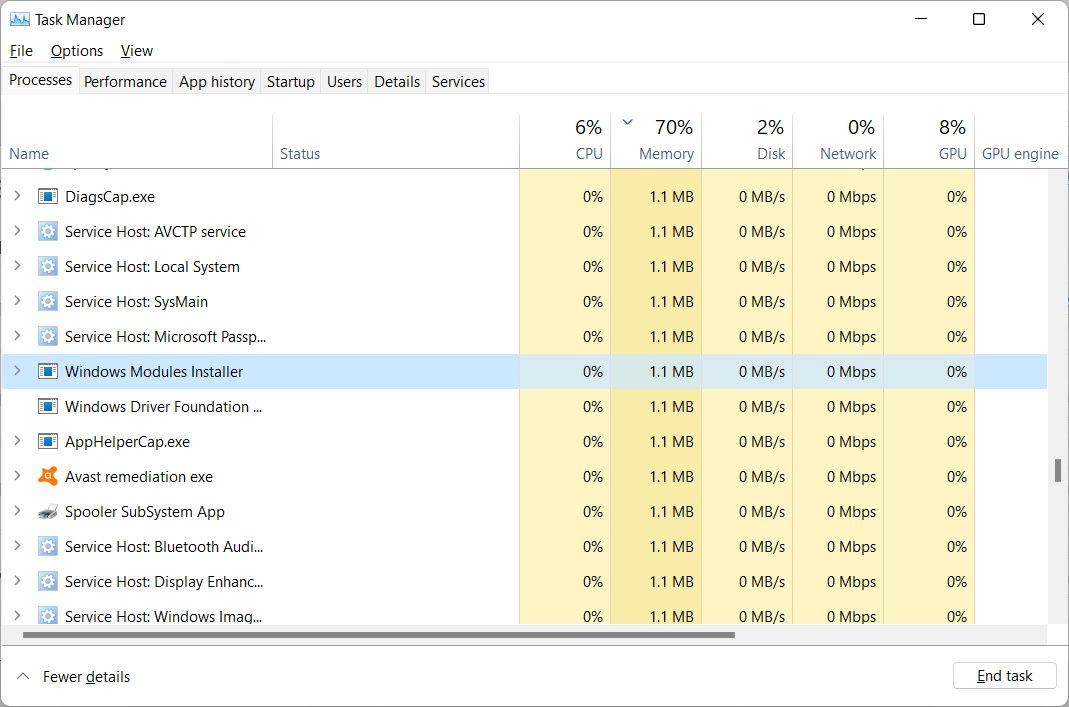
Windows Modules Installer is a system process that constantly checks for available Windows updates and installs them for you. So the next time you see a notification telling you that the OS is downloading and installing updates and other components, just know that it is Windows Modules Installer hard at work.
Windows Modules Installer also goes by other names too, including TiWorker.exe, TrustedInstaller.exe, Windows Modules Installer Worker, or WMIW. If you see any of these running in Task Manager, don’t panic, as it’s not malware making unknown changes to your PC.
Can You Disable Windows Modules Installer?
Yes, you can disable Windows Modules Installer. Since the process is part of Windows Update, the best way to stop it is to disable automatic updates in Windows 10 or disable them in Windows 11.
Keep in mind that doing this will prevent Windows from installing updates automatically, which means that you’ll have to do it manually. As such, you might not get important performance and security updates as soon as they’re available, which can momentarily leave your PC vulnerable. That’s why we don’t recommend disabling Windows Modules Installer unless you’re the type of person who installs updates the moment you get a notification that they’re available.
What to Do if Windows Modules Installer Is Causing 100% CPU or Disk Usage
Downloading and installing updates on your Windows PC is no small task, which is why you might notice that Windows Modules Installer is causing high CPU or disk usage. Considering that the process only runs occasionally, the best way to handle it hogging system resources is to just let it do its thing. Afterward, your PC should go back to running normally.
There are times, however, when the process can take a long time to complete, keeping your computer in a state of 100% CPU or disk usage for hours. That is not normal. When this happens, you can use a handy little tool known as the Windows Update Troubleshooter to get things moving again.
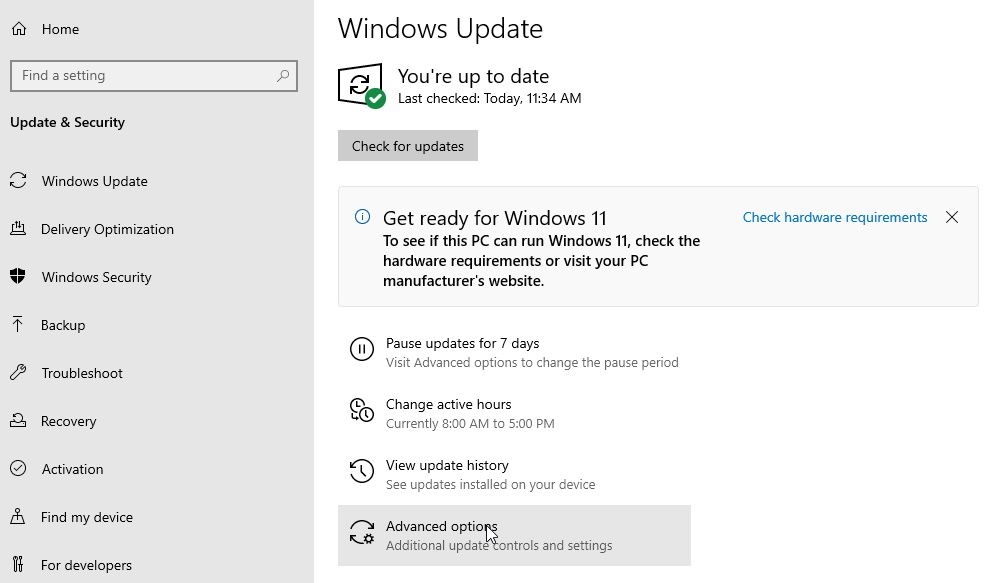
Let’s start by looking at how you can run the Update Troubleshooter in Windows 10. Right-click Start and click on Settings. Then, click on Update & Security on the left sidebar and then Troubleshoot.
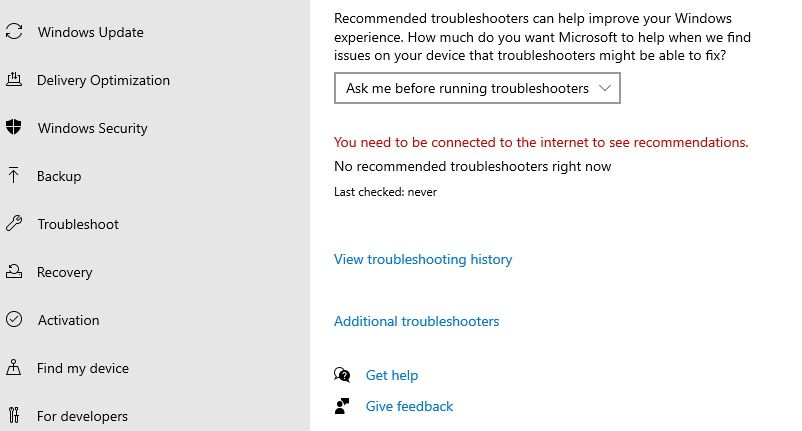
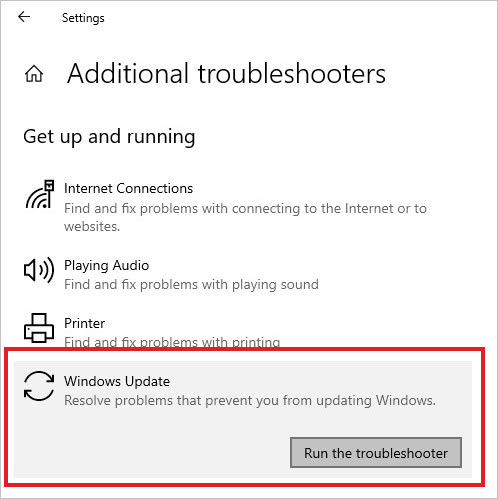
Next, click on Additional troubleshooters on the right.
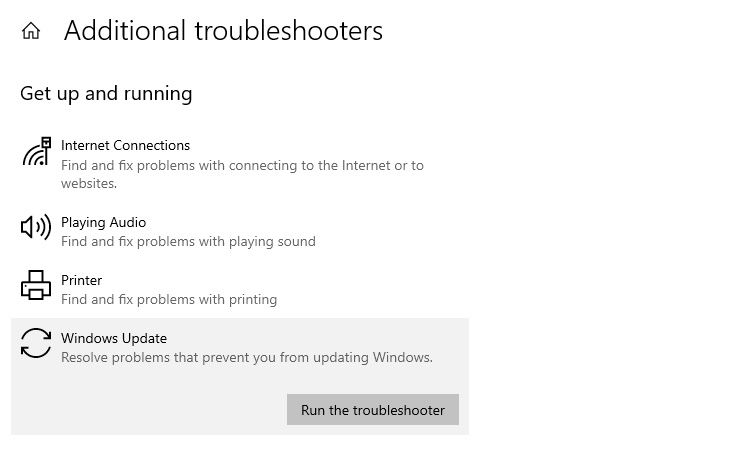
Under Get up and running, click Windows Update and then on the Run the troubleshooter button.
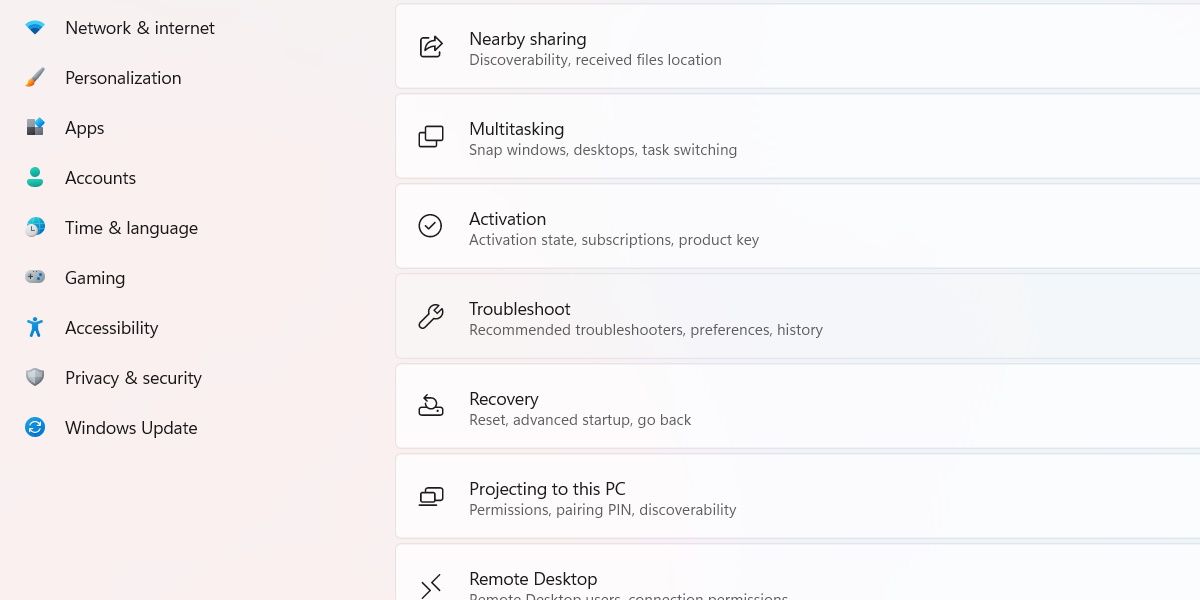
To run the Update Troubleshooter in Windows 11, Right-click Start and choose Settings. By default, it will open the System settings in the left sidebar, so scroll down and click Troubleshoot on the right.
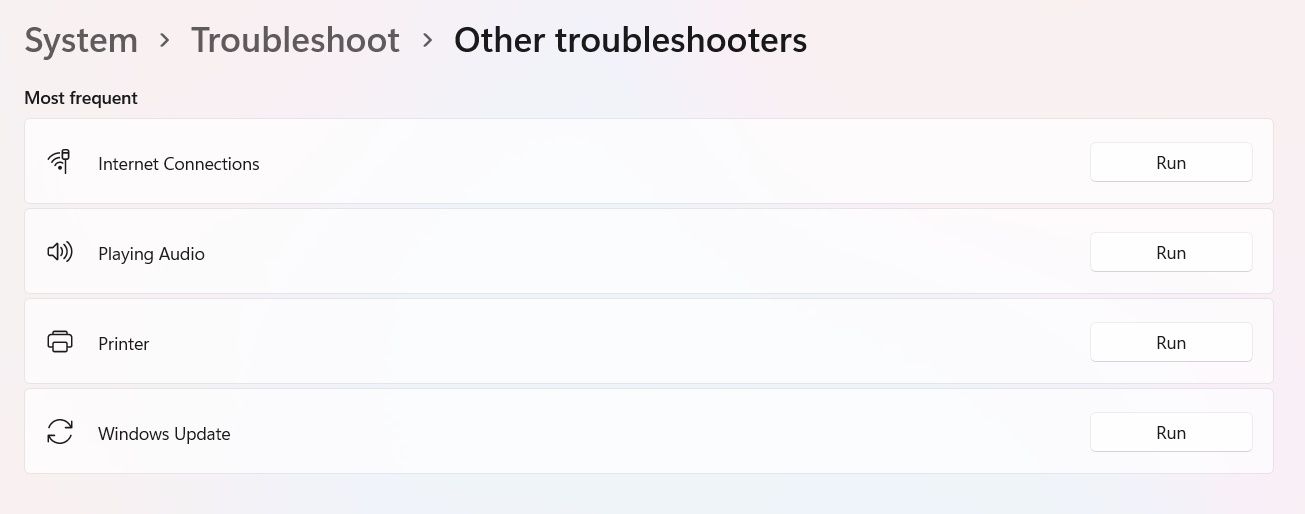
Next, click on Other troubleshooters.

Then, find Windows Updates from the list of troubleshooters under Most frequent, and click the Run button.
After the Update Troubleshooter has finished running, restart your PC and see if that fixed the issue with the Windows Modules Installer.
If you suspect that there is another reason Windows Modules Installer is making your PC sluggish, check out our guides on how to fix high CPU usage and high disk usage in Windows 10.
Long Live Windows Modules Installer
Windows Modules Installer is an essential system process that keeps your PC automatically updated. If you encounter problems with the process, just let it finish running or fire up the Update Troubleshooter to fix it. And while it is possible to disable Windows Modules Installer, you shouldn’t do it, considering the process helps your computer run smoothly and safely.
Enables installation, modification, and removal of Windows updates and optional components. If this service is disabled, install or uninstall of Windows updates might fail for your computer.
This service also exists in Windows 10, 11, 8 and Vista.
Startup Type
| Windows 7 edition | without SP | SP1 |
|---|---|---|
| Starter | Automatic | Manual |
| Home Basic | Manual | Manual |
| Home Premium | Manual | Manual |
| Professional | Manual | Manual |
| Ultimate | Manual | Manual |
| Enterprise | Manual | Manual |
Default Properties
| Display name: | Windows Modules Installer |
| Service name: | TrustedInstaller |
| Type: | own |
| Path: | %WinDir%\servicing\TrustedInstaller.exe |
| Error control: | normal |
| Group: | ProfSvc_Group |
| Object: | localSystem |
Default Behavior
The Windows Modules Installer service runs as localSystem in its own process. It does not share the executable file with other services. If the Windows Modules Installer fails to load or initialize, the error is recorded into the Event Log. Windows 7 startup should proceed, but a message box is displayed informing you that the TrustedInstaller service has failed to start.
Restore Default Startup Type of Windows Modules Installer
Automated Restore
1. Select your Windows 7 edition and Service Pack, and then click on the Download button below.
2. Save the RestoreWindowsModulesInstallerWindows7.bat file to any folder on your hard drive.
3. Right-click the downloaded batch file and select Run as administrator.
4. Restart the computer to save changes.
Note. Make sure that the TrustedInstaller.exe file exists in the %WinDir%\servicing folder. If this file is missing you can try to restore it from your Windows 7 installation media.
Yea, though I walk through the valley of the shadow of death, I will fear no evil: for thou art with me; thy rod and thy staff they comfort me.
Многие пользователи Windows 10 сталкиваются с тем, что процесс TiWorker.exe или Windows Modules Installer Worker грузит процессор, диск или оперативную память. Причем нагрузка на процессор бывает такой, что какие-либо другие действия в системе становятся затруднены.
В этой инструкции подробно о том, что такое TiWorker.exe, почему он может нагружать компьютер или ноутбук и что можно сделать в этой ситуации, чтобы исправить проблему, а также о том, как отключить этот процесс.
Что за процесс Windows Modules Installer Worker (TiWorker.exe)

Прежде всего о том, что такое TiWorker.exe — это процесс, запускаемый службой TrustedInstaller (установщик модулей Windows) при поиске и установке обновлений Windows 10, при автоматическом обслуживании системы, а также при включении и отключении компонентов Windows (в Панель управления — Программы и компоненты — Включение и отключение компонентов).
Удалить этот файл нельзя: он необходим для правильной работы системы. Даже если вы каким-то образом удалите этот файл, с большой вероятностью это приведёт к необходимости восстановления операционной системы.
Существует возможность отключить запускающую его службу, о чем тоже поговорим, но обычно, для того, чтобы исправить описываемую в текущем руководстве проблему и снизить нагрузку на процессор компьютера или ноутбука, этого не требуется.
Штатная работа TiWorker.exe может вызывать высокую нагрузку на процессор
В большинстве случаев то, что TiWorker.exe грузит процессор — это штатная работа Windows Modules Installer. Как правило, это происходит при автоматическом или ручном поиске обновлений Windows 10 или их установке. Иногда — при проведении обслуживания компьютера или ноутбука.
При этом обычно достаточно просто подождать, когда установщик модулей завершит свою работу, что на медленных ноутбуках с медленными жесткими дисками, а также в тех случаях, когда обновления давно не проверялись и не скачивались, может занять продолжительное время (вплоть до часов).
Если ждать нет желания, а также нет уверенности, что дело в вышеописанном, начать следует со следующих шагов:
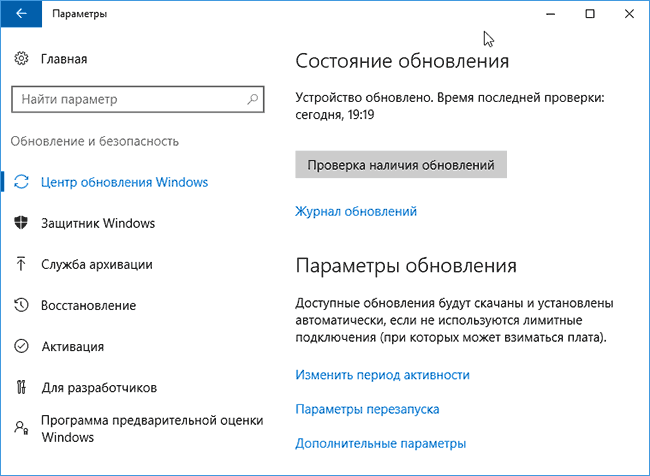
- Зайдите в Параметры (клавиши Win+I) — Обновление и восстановление — Центр обновления Windows.
- Проверьте наличие обновлений и дождитесь их загрузки и установки.

- Перезагрузите компьютер для окончания установки обновлений.
И ещё один вариант, вероятно, нормальной работы TiWorker.exe, с которым несколько раз пришлось столкнуться: после очередного включения или перезагрузки компьютера вы видите черный экран (но не так как в статье Черный экран Windows 10), по Ctrl+Alt+Del можно открыть диспетчер задач и там виден процесс Windows Modules Installer Worker, который сильно грузит компьютер. В этом случае может показаться, что с компьютером что-то не так: но по факту, через 10-20 минут всё приходит в норму, загружается рабочий стол (и больше не повторяется). Судя по всему, такое происходит, когда загрузка и установка обновлений была прервана перезагрузкой компьютера.
Проблемы в работе Центра обновления Windows 10
Следующая по распространенности причина странного поведения процесса TiWorker.exe в диспетчере задач Windows 10 — неправильная работа Центра обновлений.
Здесь следует попробовать следующие способы исправления проблемы.
Автоматическое исправление ошибок
Возможно, помочь решить проблему смогут встроенные средства поиска и устранения неполадок, для использования которых выполните следующие шаги:
- Зайдите в Панель управления — Устранение неполадок и слева выберите «Просмотр всех категорий».
- Поочередно запустите следующие исправления: «Обслуживание системы», «Фоновая интеллектуальная служба передачи», «Центр обновления Windows».


После завершения выполнения, попробуйте выполнить поиск и установку обновлений в параметрах Windows 10, а после установки и перезагрузки компьютера посмотреть, была ли исправлена проблема с Windows Modules Installer Worker.
Ручное исправление проблем Центра обновлений
Если предыдущие шаги не решили проблему с TiWorker, попробуйте следующие:
- Способ с ручной очисткой кэша обновлений (папки SoftwareDistribution) из статьи Не скачиваются обновления Windows 10.
- Если проблема появилась после установки какого-либо антивируса или фаервола, а также, возможно, программы для отключения «шпионских» функций Windows 10, это также могло повлиять на возможность загрузки и установки обновлений. Попробуйте временно их отключить.
- Выполните проверку и восстановление целостности системных файлов, запустив командную строку от имени Администратора через меню правого клика мыши по кнопке «Пуск» и введя команду dism /online /cleanup-image /restorehealth (подробнее: Проверка целостности системных файлов Windows 10).
- Выполните чистую загрузку Windows 10 (с отключенными сторонними службами и программами) и проверьте, будет ли работать поиск и установка обновлений в параметрах ОС.
Если с вашей системой всё в целом в порядке, то один из способов к этому моменту уже должен был бы помочь. Однако, если этого не произошло, можно попробовать альтернативные варианты.
Как отключить TiWorker.exe
Последнее, что я могу предложить в плане решения проблемы — это отключить TiWorker.exe в Windows 10. Для этого проделайте следующие шаги:
- В диспетчере задач снимите задачу с Windows Modules Installer Worker
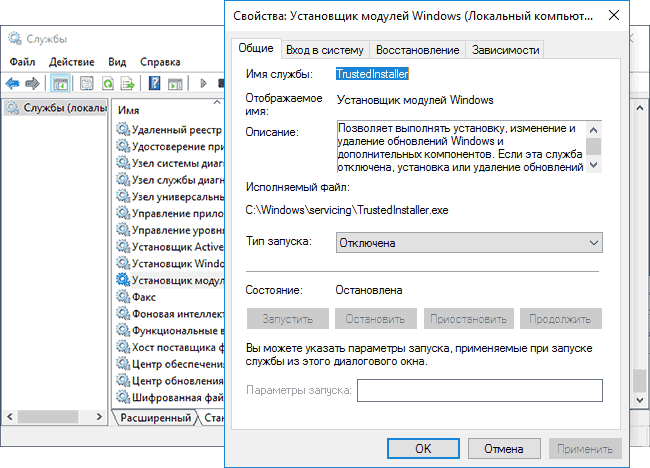
- Нажмите клавиши Win+R на клавиатуре и введите services.msc
- В списке служб найдите «Установщик модулей Windows» и дважды кликните по ней.
- Остановите службу, а в тип запуска установите «Отключена».

После этого процесс запускаться не будет. Еще один вариант этого же способа — отключение службы «Центр обновления Windows», но в данном случае исчезнет возможность устанавливать обновления вручную (как это описывается в упоминавшейся статье про не скачивающиеся обновления Windows 10).
Дополнительная информация
И еще несколько пунктов, касающихся высокой нагрузки, создаваемой TiWorker.exe:
- Иногда это может быть вызвано несовместимыми устройствами или их фирменным ПО в автозагрузке, в частности встречалось для HP Support Assistant и служб старых принтеров других марок, после удаления — нагрузка пропадала.
- Если процесс вызывает мешающую работать нагрузку в Windows 10, но это не является результатом проблем (т.е. проходит само через некоторое время), вы можете установить низкий приоритет для процесса в диспетчере задач: при этом, ему придется дольше выполнять свою работу, но TiWorker.exe будет в меньшей степени влиять на то, что вы делаете за компьютером.


Надеюсь, какие-то из предложенных вариантов помогут исправить ситуацию. Если же нет, попробуйте описать в комментариях, после чего появилась проблема и что уже предпринималось: возможно, у меня получится помочь.
If you are someone who uses a Windows-based PC, then you should be familiar with the idea of automatic updates for Windows. It is actually quite hard to miss with the constant notifications that Windows 10 shows its users to remind them to update their operating system to the latest versions. However, that doesn’t necessarily mean that everyone knows how the automatic update for Windows 10 works. To understand the process, you must know about the windows module installer. It is the process which enables your operating system to install all the updates regularly, albeit with some caveats.
What is Windows Module Installer?

Windows module installer or windows module installer worker is a process in Windows 10 that actively searches for the updates released for the OS. You can see the process running in your Task Manager as Tiworker.exe if you have turned automatic updates on for your copy of Windows. The search continues in the background as you use your PC usually. As soon as Microsoft releases a new update for its OS, the Windows modules installer automatically downloads the update. The updates get installed when you reboot your PC and voila! Your OS stays up to date without any hassle.
Problems with Windows Module Installer


Till now, everything sounds quite nice and seamless with the windows module installer worker. Well, not everything is so smooth and hassle-free in a Windows PC. Although windows module installer can keep your Windows 10 automatically updated and bug-free, it can also create some pretty huge problems.
The main problem which most users face with windows modules installer worker is a high amount of CPU usage. This can lead to various issues like a hotter than an average system, a slow down of the overall performance of your computer. In worst cases, the constant high CPU usage can also lower the longevity of the CPU of your computer.
Is Windows Module Installer a Virus?


The effects of Tiworker.exe, aka the windows modules installer worker, surely make it seem like a virus. However, it would be best if you didn’t worry about it. It is a legitimate process from Microsoft itself. It comes bundled with Windows 10, and it didn’t get installed on your PC from the internet.
But if you are worried about virus on your PC, you should install your preferred antivirus software and run a full system scan of your system. You can be sure that you will not find the windows module installer to be a virus, but you will be able to find if any other threats are present in your operating system.
How to Fix the Issues of Windows Module Installer
The problems caused by the windows module installer seem daunting, but there are a number of workarounds to fix them. If your PC is facing issues like high CPU usage or overheating etc. which are caused by windows module installer, here are some quick solutions you can try.
1. Pausing Windows Automatic Updates
Pausing Windows Automatic Updates is the quickest and easiest solution to the problems caused by windows module installer. Just go to the ‘Settings’ menu of your PC, open the ‘Update & Security’ page, click on ‘Windows Update’ and then click on the ‘Advanced options’. There you will see a section named ‘Pause updates’. From there, you can pause the automatic updates till a date of your preference.
2. Disable Windows Module Installer
Disabling windows module installer is more of a permanent solution to your problems. Although we don’t recommend it, you can still use it if it is causing too many issues with your system. Use ‘Run’ command by pressing the Windows key and R button together. Then type in ‘services.msc’ and press ‘Enter’. Search for Windows Module Installer and double-click. You’ll see a section named ‘Startup type’. Set that to ‘Disable’ to permanently stop it from updating Windows. However, we strongly recommend to set it to ‘Manual’ so that you can choose and install Windows Updates manually if you want.
3. Mark your internet as metered connection
Marking your internet as a metered connection works as a passive solution for windows module installer related issues. This makes Windows consume less data, limiting the downloading and installing of updates by windows modules installer worker. This is not a full-proof solution, but it will undoubtedly take a lot of load off your CPU.
While carrying out a resource-intensive task, a sudden spike in CPU or memory usage is common. This spike usually goes down after some time or when the task is finished. However, there are times when certain processes, like the Windows Modules Installer Worker, shows 100% disk usage in the task manager. This sudden issue leads to a stuttering and sluggish computer without any resources to handle additional tasks.
The Windows Modules Installer Worker’s CPU or memory usage skyrocketing to 100% leaves users wondering about its causes. Regardless of this spike affecting the performance, this issue is not worrisome and can be fixed easily using the methods explained below.
What is Windows Modules Installer Worker (WMIW)?
Windows Modules Installer Worker, WMIW, or TiWorker.exe, is a critical Windows core system process whose function is to check and install Windows updates automatically. This process has administrator-level permissions and works in the background to install all the necessary updates without needing any user interference.
Like any other Windows process or application, the Windows Modules Installer Worker requires some power to work efficiently. Apart from installing updates, the TiWorker.exe also ties up various important system resources like .NET to keep essential processes working smoothly.
While installing updates, it can run into problems, leading to Windows Modules Installer Worker 100% disk usage issue.
Why does the Windows Modules Installer Worker reflect High CPU Usage?
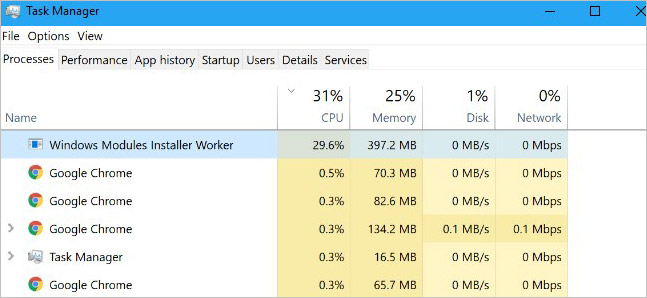
Upon checking the task manager and finding the Windows Modules Installer Worker high CPU usage issue, we assume that the process, in itself, is corrupt or causing problems.
However, there are many other reasons that can cause the Windows Modules Installer Worker high CPU usage. The reasons could be – a malware infection, broken update installer, insufficient power supply, faulty memory or disk, and more.
Windows Modules Installer Worker 100% disk usage can also be due to dust build-up and improper airflow inside the CPU cabinet, resulting in computer overheating and subsequent effects like stuttering, unexpected frame drops, and system crashing.
Methods to Fix the Windows Modules Installer Worker 100% Disk Usage
There is no single cause behind the Windows Modules Installer Worker high disk usage. Nevertheless, we have explained several fixes below that might help fix potential triggers causing this issue.
Method 1: Perform a Clean Boot
A clean boot boots the computer with a minimum set of essential processes and applications. Doing this will help you figure out if the Windows Modules Installer Worker high CPU usage is due to a background program interfering with the TiWorker.exe process. The steps to do this are simple –
- Press WINDOWS + R and type msconfig. Press Enter.
- You’ll see the System Configuration screen.
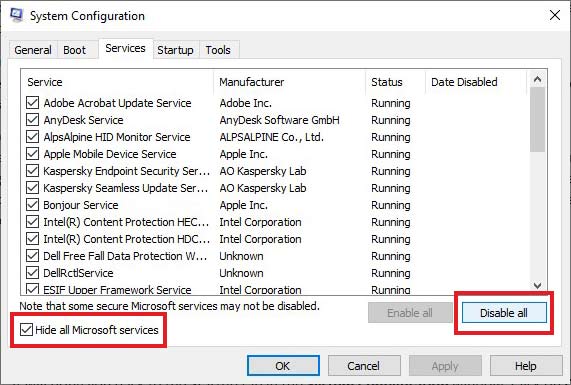
- Navigate to the Services tab and check the Hide all Microsoft services option.
- Then, click on Disable all to disable all third-party services.
- Then, go to the Startup tab and click on Open Task Manager.
- In the startup tab, disable all the applications. Close the Task Manager.
- It will bring you back to the Startup tab in the System Configuration window. Click on OK.
- Restart your computer. Your computer will boot in a clean boot environment.
Method 2: Run Memory Diagnostics
Faulty RAM module/s might be causing the Windows Modules Installer Worker high CPU usage issue on your system. You can test the memory modules via Windows’ built-in memory diagnostics tool. Here’s what to do –
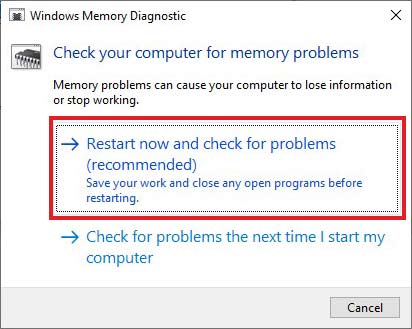
- Press WINDOWS + R and type mdsched.exe. Press Enter.
- Click on Restart now and check for the problems option.
- Wait for the tool to finish the scan and restart the computer.
Note – Make sure to save everything and close all applications before using it.
Method 3: Do a Comprehensive Malware Check
A malware inside your system might have already replaced the real Windows Modules Installer Worker process and mimicking it for suspicious activities. If you see something suspicious or you are facing the Windows Modules Installer Worker 100% CPU usage error after visiting a random webpage or connecting an unknown device to your system, perform a virus scan on your Windows PC. Use a reliable and well-renowned antivirus for this purpose.
Method 4: Set PC performance to the Best
Unwanted features like visual effects can hog up the system resources, leading to other processes like TiWorker.exe to stall or show 100% disk usage. You can fix this by opting for the best performance. To do this –
- Open My PC.
- Right-click on the blank space and click on Properties.
- Click on Advanced system settings to open the System Properties window.

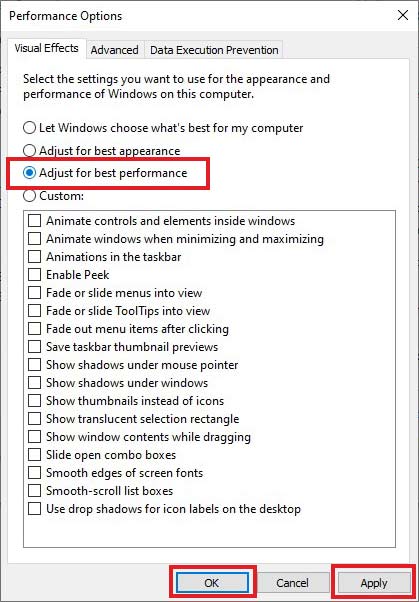
- Under the Advanced tab, go to the Performance section and click on Settings.
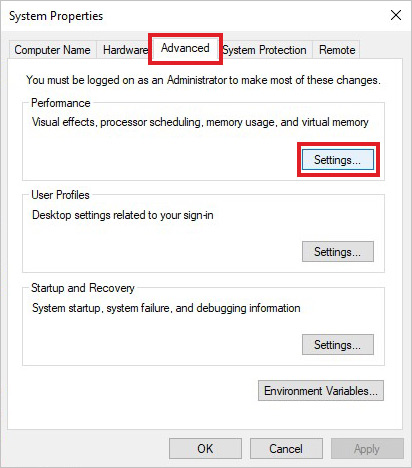
- In the Performance Options window, under the Visual Effects tab, click on Adjust for best performance.
- Click OK.
Method 5: Set Windows Modules Installer Worker to Manual
Automatic update installation in Windows is a great way to prioritize other important tasks. However, in some scenarios, it has issues that lead to Windows Modules Installer Worker 100% CPU usage. You can fix this by toggling the service to ‘manual’ mode. To do this –
- Press WINDOWS + R and type services.msc. Press Enter.
- Locate the Windows Module Installer and right-click on it. Click on properties.
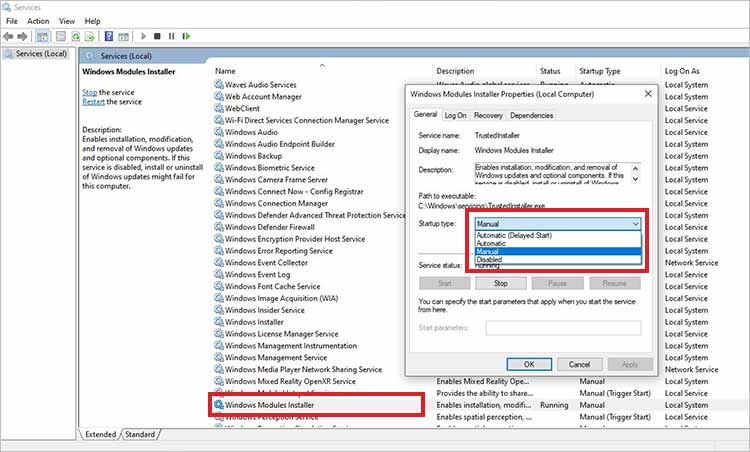
- Change the Startup type to manual.
- Click on Apply and OK.
Method 6: Delete the SoftwareDistribution Folder
SoftwareDistribution is a folder that Windows uses to temporarily store files required for installing Windows updates. These files can sometimes conflict with the Windows Modules Installer Worker process, resulting in high CPU usage errors. You can fix the TiWorker high CPU usage by deleting the SoftwareDistribution folder. Here are the steps for doing this –
- Press WINDOWS + R and type services.msc. Press Enter.
- Locate the Windows Update service and stop it.

- Close the Services Window and again press WINDOWS + R.
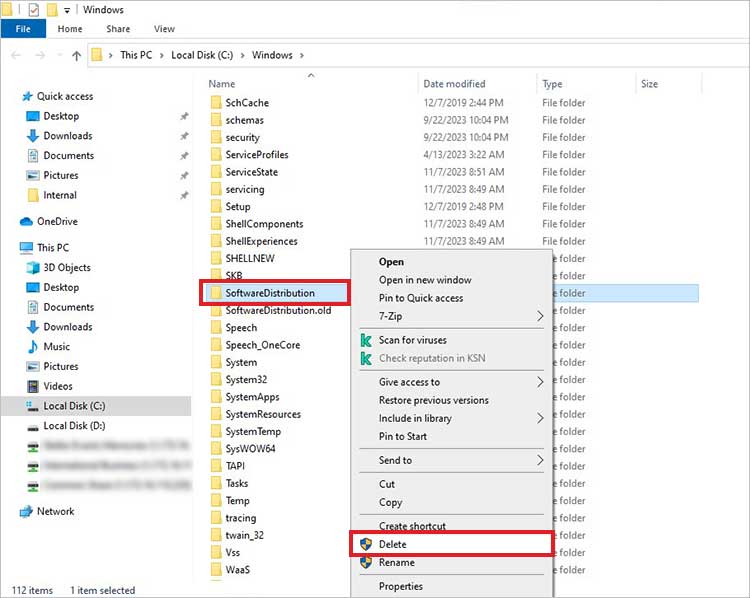
- Type C:\Windows\ and press Enter.
- Navigate to the SoftwareDistribution folder and delete it.
You can also clean other temporary files from your computer to clear all unwanted files on your computer.
Method 7: Run Windows Update Troubleshooter
If there is a problem with the Windows updater itself, it can cause the Windows Modules Installer Worker 100% usage on your Windows computer. You can resolve the underlying problem by running the Windows update troubleshooter. For this –
- Press WINDOWS + I to open Settings.
- Click on Update & Security.
- Click on Troubleshoot in the left pane.

- Click on Additional troubleshooters.
- Locate the Windows Update troubleshooter and click on it.
- Click on Run the troubleshooter. Follow the on-screen instructions afterward.
Reduce Unnecessary CPU Usage
The Windows Modules Installer Worker (WMIW) 100% disk usage is an unusual behavior indicating high CPU/disk image that can slow down the computer.
Using the methods explained above, you can fix the Windows Modules Installer Worker high disk usage issue in no time. And, if your computer is constantly stuttering and crashing due to high CPU usage, try using System Restore to restore the PC to a previous error-free state.
If you accidentally deleted some files on your sluggish computer, worry not and use a powerful Windows data recovery software to recover them.
[FIXED] — Svchost.exe High CPU usage
How to fix modern setup host high CPU usage issue?
Methods to fix WUDFHost.exe high CPU usage on Windows PCs
[FIXED] – Antimalware service executable high CPU usage issue
Is the Windows Modules Installer Worker process essential?
Yes, WMIW or Windows Modules Installer Worker is a core system process that automatically installs various OS and security updates. It also ensures that essential processes are working smoothly.
What causes 100% Disk usage?
Multiple instances of an application running simultaneously, too many applications running parallel, malware or cryptominer working in the background are some of the reasons behind high disk usage.
Will upgrading RAM or SSD solve 100% usage issue?
In some cases, if the 100% usage is due to insufficient RAM or old HDD, upgrading RAM and switching to SSD can help you resolve high CPU/memory issue.
Was this article helpful?
YES7
NO