
How to configure LDAPS, LDAP over SSL, using CA Certificate Service on Domain Controller in Windows Server 2016
This post is to provide an instruction on how to set up LDAPS (LDAP over SSL) on Domain Controller using single-tier CA hierachy.
Reasons for Enabling LDAPS
By default, LDAP communications between client and server applications
are not encrypted. This means that it would be possible to use a
network monitoring
device or software and view the communications traveling between LDAP
client and server computers. This is especially problematic when an LDAP
simple bind is used because credentials (username and password) is
passed over the network
unencrypted. This could quickly lead to the compromise of credentials.
Reasons for enabling Lightweight Directory Access Protocol (LDAP) over
Secure Sockets Layer (SSL) / Transport Layer Security (TLS) also known
as LDAPS include:
- Some applications authenticate with Active Directory Domain Services
(AD DS) through simple BIND. As simple BIND exposes the users’
credentials in clear text, use of Kerberos is preferred. If simple BIND
is necessary, using SSL/TLS to encrypt the authentication
session is strongly recommended. - Use of proxy binding or password change over LDAP, which requires LDAPS. (e.g.
Bind to an AD LDS Instance Through a Proxy Object )
- Some
applications that integrate with LDAP servers (such as Active Directory
or Active Directory Domain Controllers) require encrypted
communications. To encrypt LDAP communications in a Windows network, you
can enable LDAP over SSL (LDAPS).
Prerequisite
Active Directory Service and AD LDS has been installed prior to this installation.
How to set up Active Directory Domain Service role in Windows server 2016
Setting up AD LDS on Windows Server 2016
HOW-TO
Step 1. Add Active Directory Certificate Service on Domain Controller.


Choose Certificate Authority.


Step 2. Configure Active Directory Certificate Services.


Check the certificate on Certificae Authority


Step3. Verify LDAPS connection
Open ldp.exe.


Done.
Reference
https://social.technet.microsoft.com/wiki/contents/articles/2980.ldap-over-ssl-ldaps-certificate.aspx
Установка роли Веб-сервер (IIS 10)
Запускаем диспетчер серверов, выбираем Добавить роли и компоненты.

Выбираем роль Веб-сервер (IIS)
Выбираем компоненты:
В настройках службы ролей IIS выбираем:
Вставляем в привод установочный диск Windows Server 2016, указываем альтернативный исходный путь:

Нажимаем Установить. Завершения установки можно не ждать. После завершения установки в адресной строке браузера набираем localhost и видим веб-страницу IIS.

Установка PHP
Скачиваем PHP 7 non Thread Safe (ссылка).
Скачиваем и устанавливаем соответствующую версию распространяемого пакета VC++. Для php7 это VC++15.
Распаковываем php в папку c:\PHP\php7\
Скачиваем Microsoft Drivers for PHP for SQL Server 4.1.0 и распаковываем файл php_sqlsrv_7_nts.dll в папку c:\PHP\php7\ext\
Скачиваем wincache for PHP 7 и распаковываем файл php_wincache.dll в папку c:\PHP\php7\ext\
Файл php.ini-production сохраняем под именем php.ini. Редактируем файл php.ini
error_log = "c:\PHP\php7\logs\php_errors.log" ; место хранения логов об ошибках
post_max_size = 500M
extension_dir = "c:\PHP\php7\ext"; расположение расширений
cgi.force_redirect = 0
cgi.fix_pathinfo = 1
fastcgi.impersonate = 1
max_execution_time = 300
upload_max_filesize = 500M
date.timezone = "Asia/Yekaterinburg"
memory_limit = 768M
Настройка opcache:
opcache.memory_consumption=128
opcache.max_accelerated_files=8000
opcache.revalidate_freq=60
opcache.use_cwd=1
opcache.validate_timestamps=1
opcache.save_comments=1
opcache.enable_file_override=0
Раскомментировать строки:
extension=php_fileinfo.dll
extension=php_imap
extension=php_intl.dll
extension=php_ldap
Закомментировать строки:
extension=php_mysqli.dll
Добавить строки:
extension=php_sqlsrv_7_nts.dll
extension=php_wincache.dll
Устанавливаем PHP Manager for IIS 1.4. После установки запускаем Диспетчер служб IIS, открываем Администратор PHP.

Нажимаем Зарегистрировать новую версию PHP.

Указываем путь до файла php-cgi.exe.

Проверяем в Администраторе PHP, нет ли неоптимальных настроек. Если есть — следуем указаниям.
В папке c:\inetpub\wwwroot\ создаем файл index.php с содержимым:
<?php
phpinfo();
?>
В браузере открываем URL: http://localhost/index.php
Проверяем, что подключились нужные библиотеки:


Настроим типы MIME.

Добавим новое расширение для php.
Установка PHP завершена.
Скачиваем с официального сайта zip-архив Moodle (не Moodle installer for Windows!) и языковой пакет.
Распаковываем все содержимое архива в папку c:\inetpub\moodle\
Устанавливаем права на папку moodle на чтение для пользователей IUSR, IIS_IUSRS.
Для хранения данных создаем дополнительную папку c:\inetpub\moodledata\
Она должна располагаться вне папки moodle.
Устанавливаем права на папку moodledata на изменение для пользователей IUSR, IIS_IUSRS и для пользователей домена, если планируется LDAP-аутентификация. Также дадим права на изменение для пользователей IUSR, IIS_IUSRS для следующих папок:
c:\inetpub\moodle\theme\ - установка тем
c:\inetpub\moodle\question\type\ - установка типов вопросов
c:\inetpub\moodle\mod\ - установка плагинов
Создаем файл конфигурации moodle – config.php, скопировав файл config-dist.php и переименовав его.
Устанавливаем ODBC Driver 13 for MS SQL Server.
Задаем в этом файле настройки для подключения к БД, которая уже создана:
$CFG->dbtype    = sqlsrv;
$CFG->dblibrary = 'native';
$CFG->dbhost    = SQLServerName;
$CFG->dbname    = 'moodle';
$CFG->dbuser    = 'moodle';
$CFG->dbpass    =password;
Значения ниже (сортировка БД и т.д.) стираем. Указываем настройки домена и путь к папке moodledata:
$CFG->wwwroot   = 'http://mysite';
$CFG->dataroot  = 'c:\inetpub\moodledata';
Создаем сайт в IIS и устанавливаем Moodle
В Диспетчере служб IIS добавляем веб-сайт…

Указываем имя сайта (которое задали в config.php) и путь до папки moodle. Для сайта отключаем анонимную проверку подлинности, включаем проверку подлинности Windows.

Запускаем браузер, вводим в адресную строку доменное имя сайта. Соглашаемся с лицензионным соглашением. Проверяем, что все необходимые плагины установлены.

Далее запускается скрипт создания необходимых таблиц. Для этого у указанной в config.php учетной записи должны быть все необходимые права.

Задаем полное и короткое название сайта. Выбираем язык, страну, заканчиваем настройку.
Распаковываем языковой пакет в папку c:\inetpub\moodledata\lang\
Настройка Moodle
Устанавливаем русскую локализацию.
Переходим в Site administration – Language – Language packs. Видим, что установлены два языка – русский и английский. Возвращаемся на уровень выше и выбираем Default language – Русский язык.

Под учетной записью администратора заходим в Личный кабинет – Preferences – User account –Preferred language, ставим русский язык.
Переходим в меню Администрирование – Уведомления. Видим предупреждение «База данных не использует режим READ_COMMITTED_SNAPSHOT, что может привести к неправильным результатам, особенно при одновременном выполнении большого количества сценариев.»
Выполняем запрос в БД:
alter database moodle
      set read_committed_snapshot on;
Администрирование – Расширенные возможности:
- Включить комментарии – нет
- Включить систему обмена сообщениями — нет
- Включить статистику — Да
- Разрешить блоги — нет
Администрирование – Значки – Настройки значков:
- Разрешить подключение к внешним коллекциям наград — нет
Администрирование – Местонахождение – Настройки местонахождения:
- Принудительный часовой пояс – устанавливаем свой часовой пояс
- Страна по умолчанию – Россия
- Город по умолчанию – устанавливаем свой город
Администрирование – Безопасность – Политика безопасности сайта:
- Принуждать пользователей входить в систему – вкл
- Разрешить индексирование поисковыми системами – нигде
- Видимые роли профиля – только студент
- Разрешить в логинах дополнительные символы – да
- Длина пароля — 6
- Не буквенно-цифровых символов — 0
Администрирование – Безопасность – Уведомления
- Уведомлять об ошибках входа – да, Admin User
Администрирование – Пользователи – Учетные записи – Поля профиля пользователя:
- Добавляем два поля профиля типа «Текстовое поле» (понадобится при составлении отчетов): fio (Фамилия Имя Отчество) и position (Должность).
Администрирование – Пользователи – Права – Политики пользователя
- Скрыть поля пользователя – скрыть все, кроме описания, последний вход.
- Отображать персональные данные – Адрес электронной почты, Отдел, Учреждение
Администрирование – Пользователи – Права – Определить роли
Для роли Пользователи:
- Управлять файлами в области личных файлов – убираем права для роли Аутентифицированный пользователь
Администрирование – Курсы – Настройки курса по умолчанию:
- Принудительный язык – Русский
- Количество отображаемых объявлений – 0
- Показывать журнал оценок студентам – нет
Администрирование – Курсы – Резервные копии – Настройка автоматического резервного копирования
- Активно – Включено
- Расписание — Воскресенье
Администрирование – Оценки – Общие настройки
- Поля профиля пользователя в экспортируемой оценке — institution,department
- Настраиваемые поля профиля в экспортируемой оценке — fio, position
- Основные форматы экспорта оценок — Таблица Excel
Установим плагин Questionnaire.
Администрирование – Плагины – Установка плагинов.
Перетаскиваем в поле загрузки zip-архив с плагином.

Обновляем Moodle.
Продолжаем настройку Moodle…
Администрирование – Плагины – Аутентификация – Настройка аутентификации
- Самостоятельная регистрация по электронной почте – отключаем (клик по глазу)

- Сервер LDAP – включаем. (Настройку аутентификации через LDAP выполним позднее)
- Кнопка гостевого входа — Скрыть
Администрирование – Плагины – Блоки – Управление блоками
- Внешние RSS-ленты – выкл
- Глобальный поиск — выкл
- Комментарии – выкл
- Личные файлы – выкл
- Поиск в общественных каталогах – выкл
- Поиск по форумам — выкл
- Последние значки — выкл
- Сайты сети MNet — выкл
- Flickr — выкл
Администрирование – Плагины – Зачисления на курсы – Управление способами зачисления
- Самостоятельная запись – выкл
- Гостевой доступ — выкл
- Синхронизация с глобальной группой — выкл
Администрирование – Плагины – Зачисления на курсы – Гостевой доступ
- Добавлять этот способ для новых курсов — нет
Администрирование – Плагины- Медиаплееры – Управление медиаплеерами
- YouTube — выкл
Администрирование – Плагины – Модули элементов курса – Управление элементами курсов — Элементы курса
- Чат — выкл
Администрирование – Плагины – Хранилища файлов – Управление хранилищами файлов
- Мои личные файлы — отключено
Администрирование – Внешний вид – Календарь
- Формат времени – 24
Администрирование – Внешний вид – Навигация
- Стартовая страница по умолчанию для пользователей. — Сайт
- Разрешить гостевой доступ к странице «Личный кабинет» — нет
- Отображать полные названия курсов – да
- Показывать «Мои курсы» с категориями — да
Администрирование – Сервер – Контакты службы поддержки
- Имя техподдержки – указываем имя поддержки
Администрирование – Сервер – Производительность
- Предел дополнительный памяти PHP – 1024М
Администрирование – Сервер – Уведомления об обновлениях
- Автоматически проверять наличие обновлений — выкл
Администрирование – Сервер – Электронная почта – Настройка исходящей почты
- SMTP-серверы – указываем имя сервера
- Логин SMTP – указываем логин
- Пароль SMTP – указываем пароль
- Разрешить вложения — выкл
Убираем ссылку на восстановление пароля со страницы входа в систему. Она не нужна, т.к. будет использоваться SSO-аутентификация.

Администрирование – Внешний вид – Дополнительный HTML
Добавляем в тег HEAD строку:
<style>.forgetpass {display: none;}</style>
Настройка LDAP-аутентификации
Администрирование – Плагины – Аутентификация – Сервер LDAP
- URL сервера — ldap://domaincontroller:3268 (я использую кроссдоменную аутентификацию, поэтому указываю порт 3268. Если этого не нужно, укажите порт 389)
- Отличительное имя — CN=username, OU=Users, DC=domain, DC=local
- Тип учетной записи пользователя – MS ActiveDirectory
- Контейнеры – список контейнеров, в которых хранятся учетные записи пользователей
- Поиск в дочерних контейнерах — Да
- Атрибут пользователя – samaccountname
- NTLM SSO Включить – Да
- Подсеть – 10. Обязательное значение! У меня IP-адресация в сети начинается с 10.
- Быстрая проверка в MS IE? – Да, а в остальных браузерах использовать долгую проверку NTLM
- Формат передаваемого логина — %domain%\%username%
- Сопоставление данных (Имя) – givenName
- Обновить внутренних (Имя) – При каждом входе
- Обновить внешних (Имя) – При обновлении
- Сопоставление данных (Фамилия) – sn
- Обновить внутренних (Фамилия) — При каждом входе
- Обновить внешних (Фамилия) — При обновлении
- Сопоставление данных (Адрес электронной почты) – mail
- Сопоставление данных (Учреждение (организация)) – company
- Обновить внутренних (Учреждение (организация)) — При каждом входе
- Обновить внешних (Учреждение (организация)) — При обновлении
- Сопоставление данных (Отдел) – department
- Обновить внутренних (Отдел) — При каждом входе
- Обновить внешних (Отдел) — При обновлении
- Сопоставление данных (Должность) – title
- Обновить внутренних (Должность) — При каждом входе
- Обновить внешних (Должность) — При обновлении
- Сопоставление данных (Фамилия Имя Отчество) – displayName
- Обновить внутренних (Фамилия Имя Отчество) — При каждом входе
- Обновить внешних (Фамилия Имя Отчество) — При обновлении
Теперь нужно синхронизироваться с LDAP.
Администрирование – Сервер – Планировщик задач
- Задача синхронизации пользователей LDAP – настроить, Включить задачу.
Создаем задачу для cron
Создаем файл cron.bat с содержимым:
@echo off
set PathPHP="c:\PHP\php7\php.exe"
set PathCron="c:\inetpub\moodle\admin\cli\cron.php"
set PathLOG="c:\Setup\cron\cronlogs"
%PathPHP% -f %PathCron% >> %PathLOG%\%date"~10,4%%date:~4,2%%date:~7,2%.log
Forfiles /P %PathLOG% /S /M *.log /D -5 /C "cmd /c del /q @path"
В планировщике задач (Меню Пуск – Средства администрирования – Планировщик задач) создаем задачу, указываем время выполнения – запускать каждые 5 минут, выполнять bat-файл c:\Setup\cron\cron.bat, запускать скрипт от имени учетной записи, у которой есть права записи в папку c:\inetpub\moodle (например, от администратора).
Проверяем работу скрипта, ошибки будут писаться в папку c:\Setup\cron\cronlogs
При необходимости правим файл php.ini
Установка и настройка завершены.
Active Directory Tools Background
The Active Directory Management Tools have been with Windows Server since Windows Server 2000. On various versions of Windows the tools are sometimes included and sometimes they need to be downloaded from the Microsoft website and installed. In Server 2016 these tools are included as optional features and can be installed using the Add Roles and Features wizard in Server Manager; no download is required.
The following tools are included as part of the installation:
- Active Directory Administrative Center
- Active Directory Users and Computers Snap-in
- Active Directory Sites and Services Snap-in
- Active Directory Domains and Trusts Snap-in
- Active Directory Administrative Center Snap-in
- ADSI Edit Snap-in
- Active Directory Schema Snap-in (Not Registered)
- Active Directory Command Line Tools
- Active Directory Module for Windows PowerShell
Prerequisites for installing Active Directory Management Tools
You will require a Windows Server 2016 computer with the “Graphical Management Tools and Infrastructure” installed to install the Active Directory Management Tools using the Server Manager graphical user interface.
Instructions for installing Active Directory Management Tools
To install Active Directory Management Tools on Windows Server 2016 please follow these instructions.
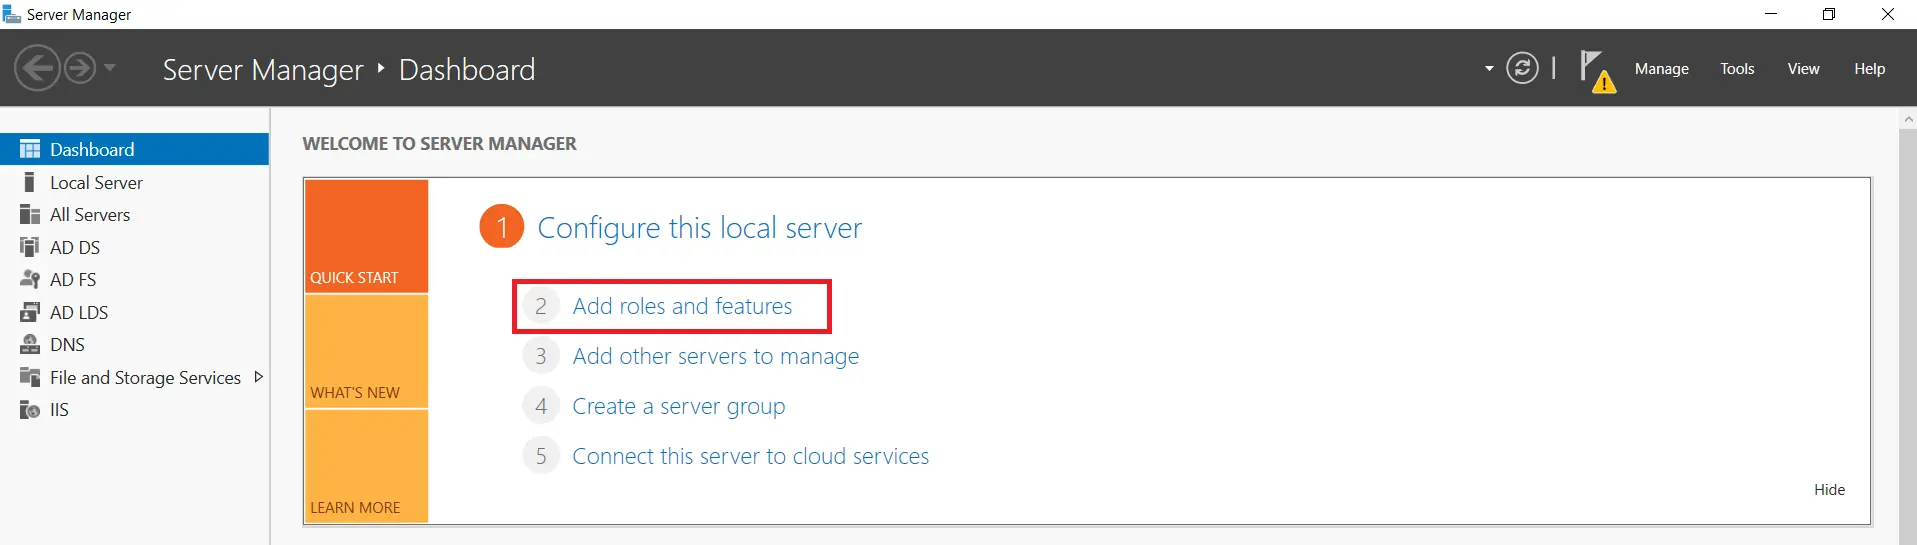
- On the Windows Server 2016 open Server Manager. If Server Manager does not start by default press the “Windows + R” keys, Type “servermanager” in the “Open” field and press “Enter” or click the OK button.
- On the Server Manager main window, in the “Quick Start” panel, click “Add roles and features”.

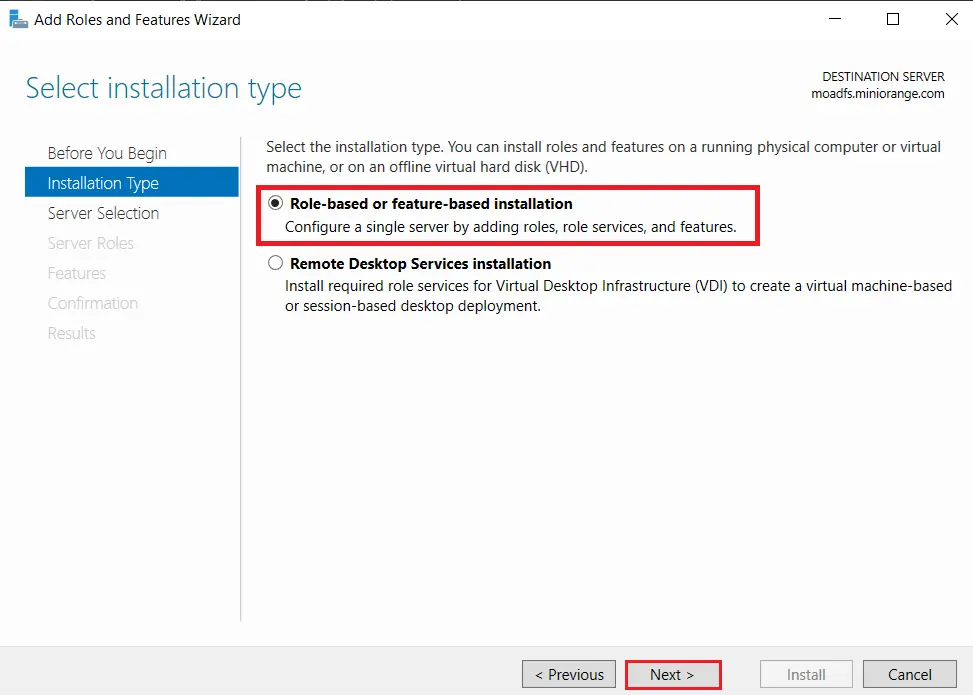
- In the “Add Roles and Features Wizard” under “Installation Type” check the “Role-based or feature-based installation” radio button and click “Next”
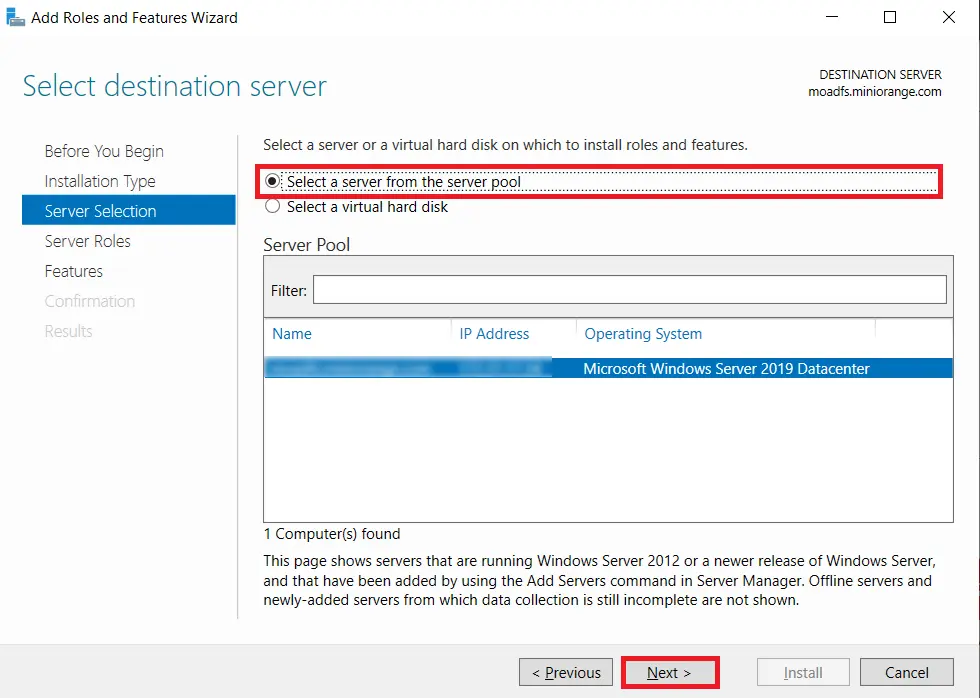
- In the “Add Roles and Features Wizard” under “Server Selection” check the “Select a server from the server pool” radio button, select the server you want to install the Active Directory Tools on and click “Next”
- In the “Add Roles and Features Wizard” under “Server Roles” do not make any changes to the check boxes, click “Next”
- In the “Add Roles and Features Wizard” under “Features” expand “Remote Server Administration Tools”, expand “Role Administration Tools” and check “AD DS and AD LDS Tools”. Click “Next”. If prompted to install any supporting roles accept the defaults and continue.
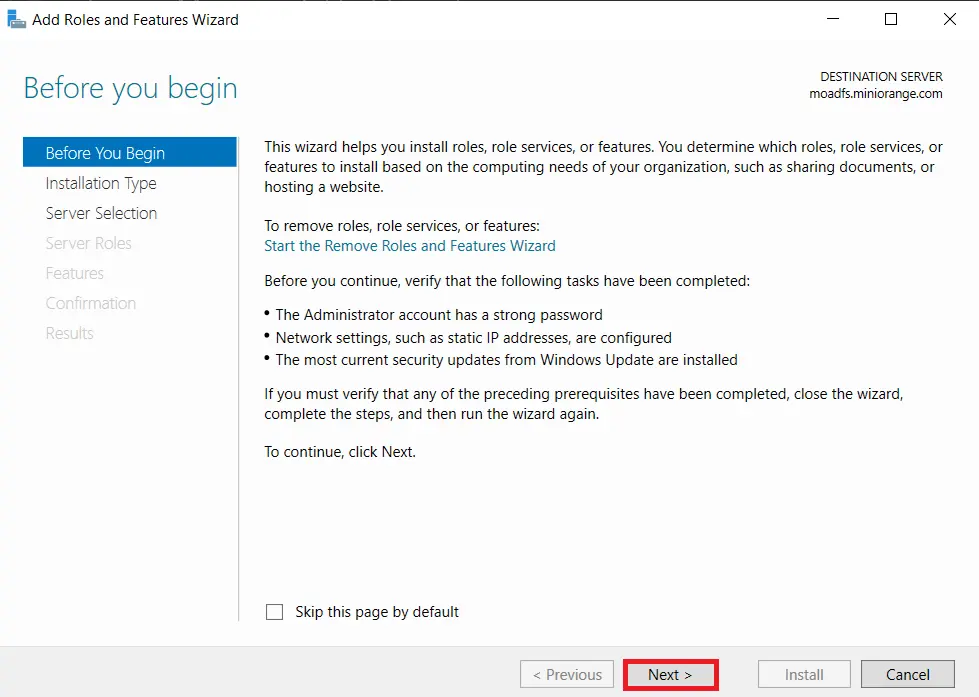
- In the “Add Roles and Features Wizard” at the “Confirmation” page click “Install” to begin the installation of the AD Tools
- The installation of the Active Directory Management Tools will begin and the progress will be displayed. This installation should not require a restart of the server.
- The Active Directory Management Tools can now be found under the “Tools” menu in “Server Manager”.


Provide feedback
Saved searches
Use saved searches to filter your results more quickly
Sign up
- Home
- Integrations
- Configure LDAPS on Windows Server
Step by step guide to setup LDAPS on Windows Server
Connect with LDAPS using miniOrange guidelines to setup LDAP over SSL and establish a secure connection with LDAP Server. Secure your LDAP server connection between client and server application to encrypt the communication. In case of simple bind connection using SSL/TLS is recommended to secure the authentication as simple bind exposes the user credentials in clear text.
1. Install Certificate Authority, Create and Export the certificate
1.1: Install «Active Directory Certificate Services» role through Server Manager roles.
- On your Windows Server Machine, click on Start -> Server Manager -> Add Roles and Features.
- After selecting Add Roles and Features and Click on Next.
- Choose Role-based or feature-based installation option and Click on Next button.
- Choose Select a server from the server pool option & Select ldap server from the server pool and click on Next button.
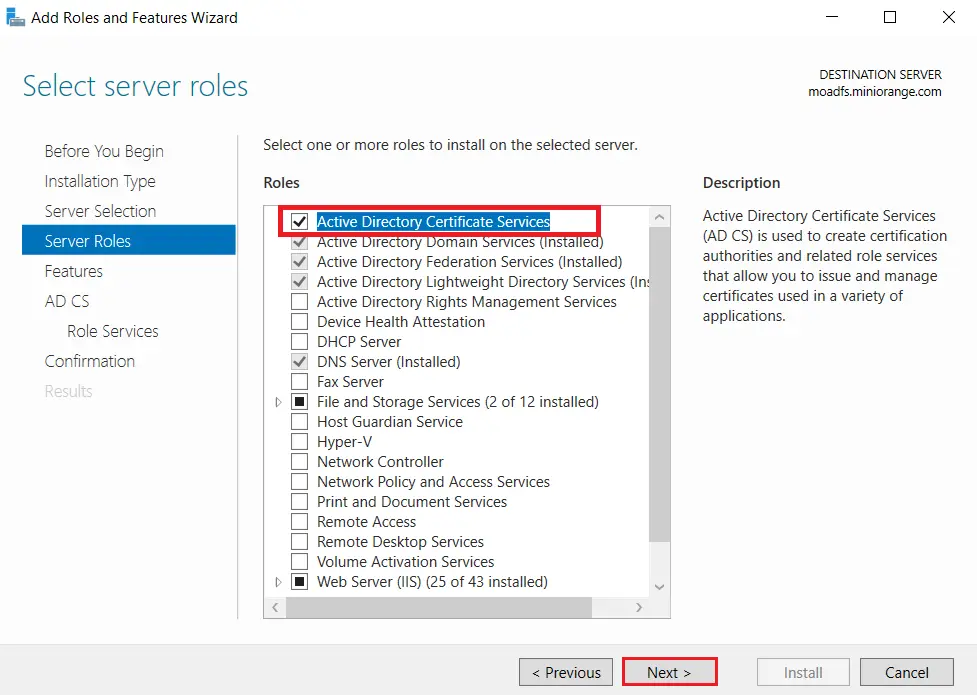
- Choose Active Directory Certificate Services option from the list of roles and click on Next button.
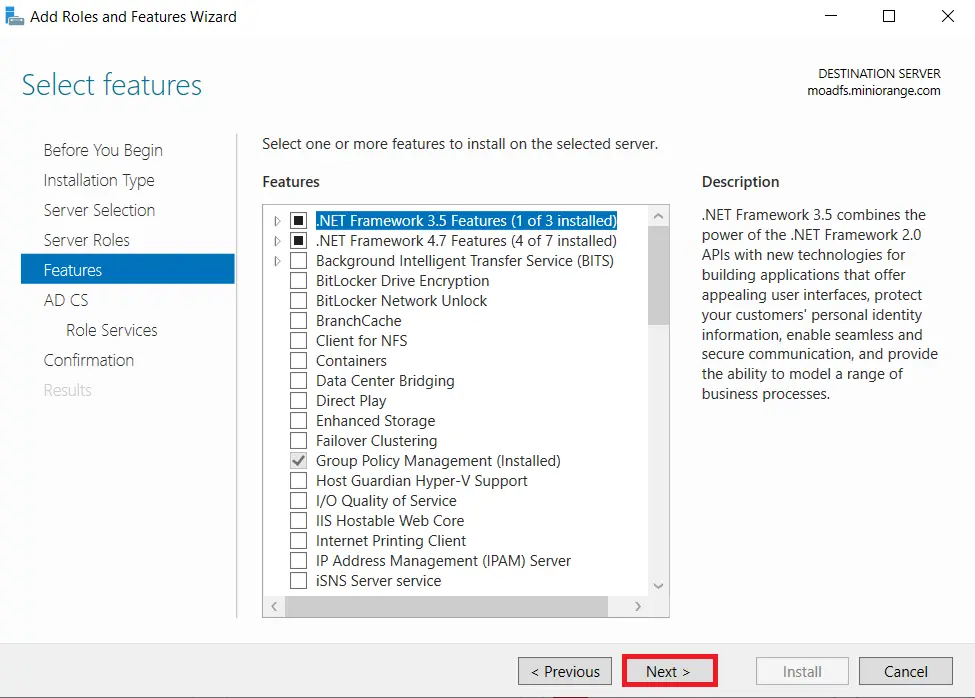
- Choose nothing from the list of features and click on Next button.
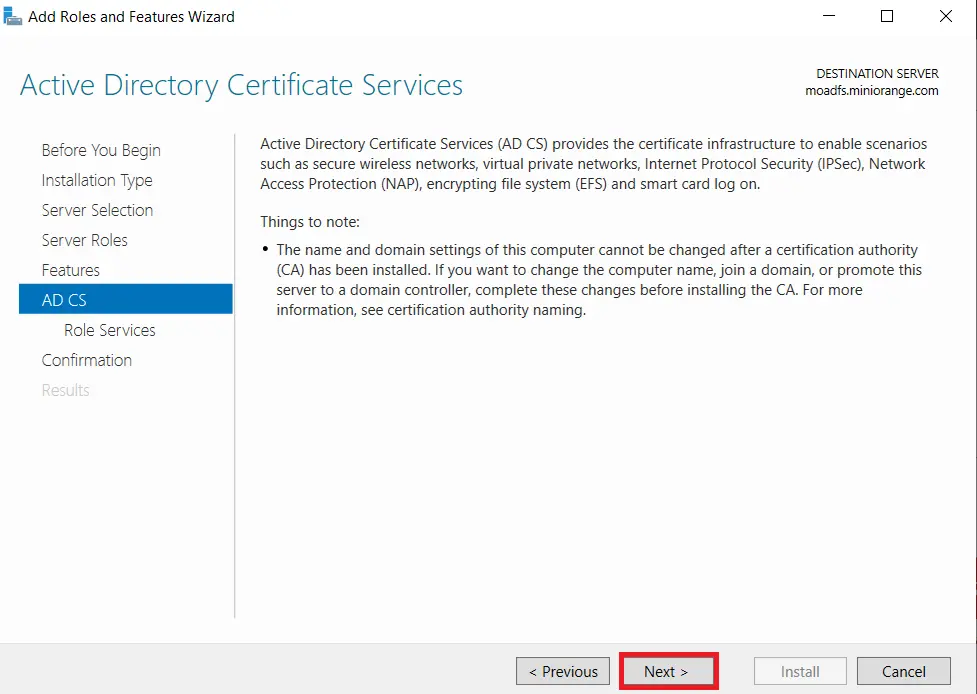
- In Active Directory Certificate Services (AD CS) choose nothing and Click on Next button.
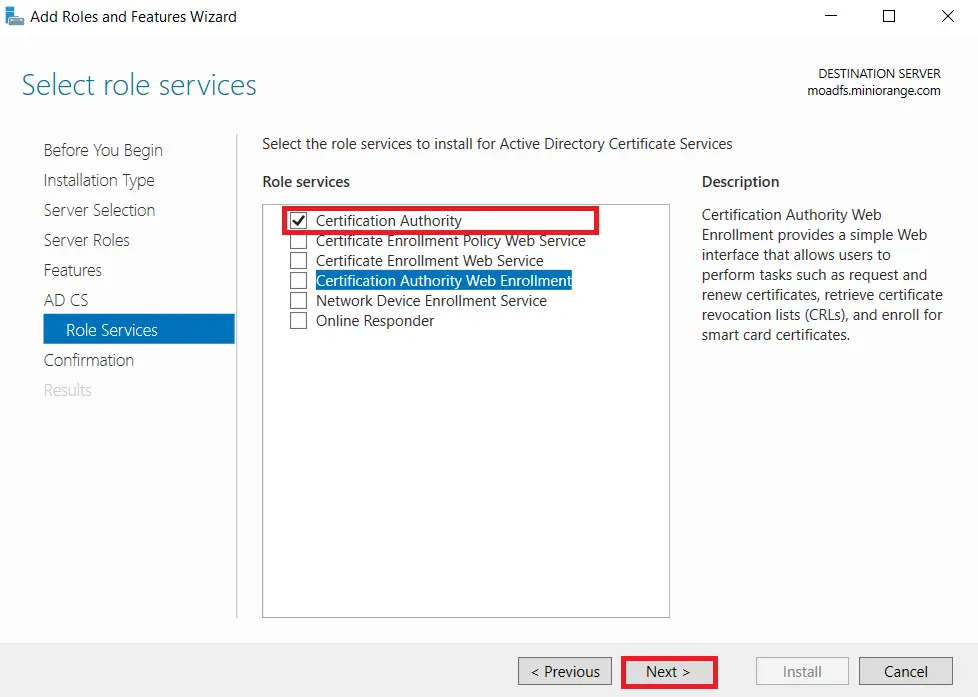
- Mark Certification Authority from the list of roles and Click on Next button.
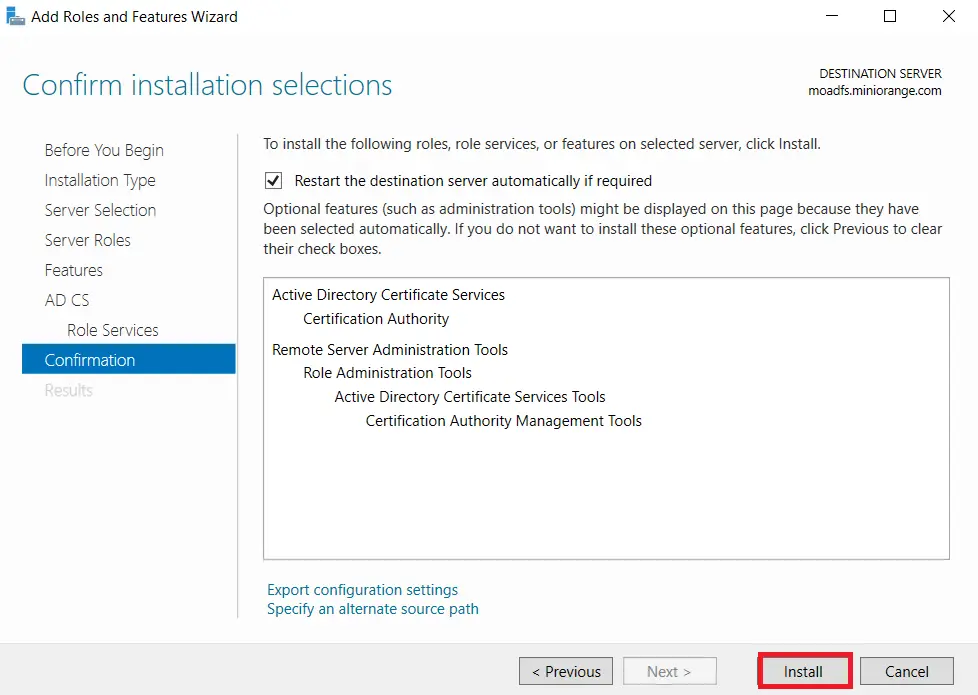
- Click on Install button to confirm installation.
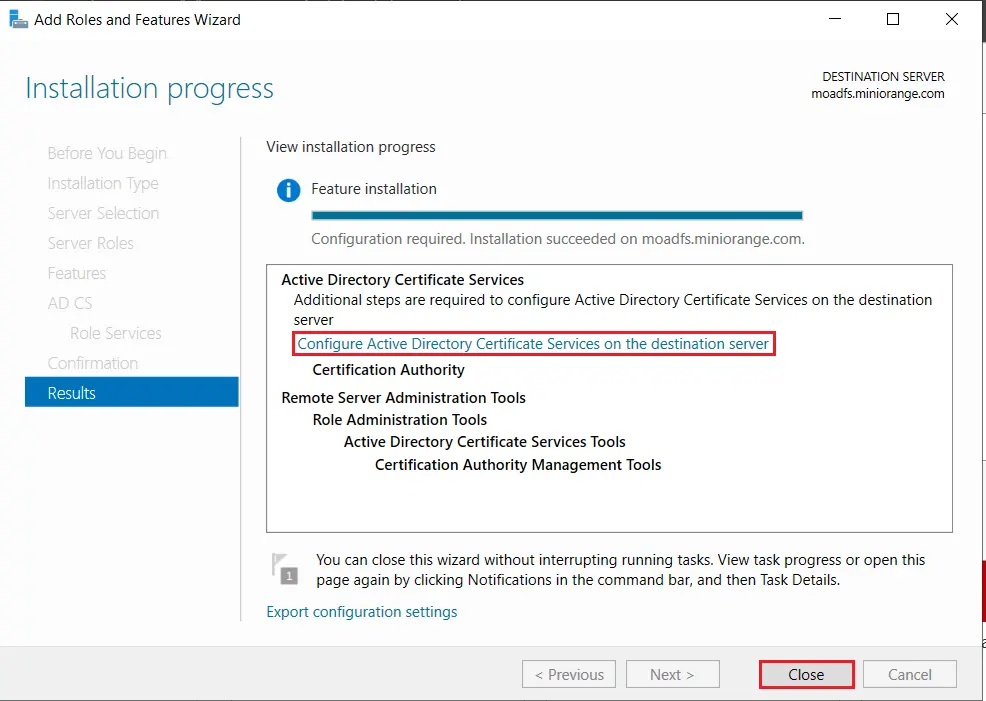
- Now, click on Configure Active Directory Certificate Services on Destination Server option and click on Close button.
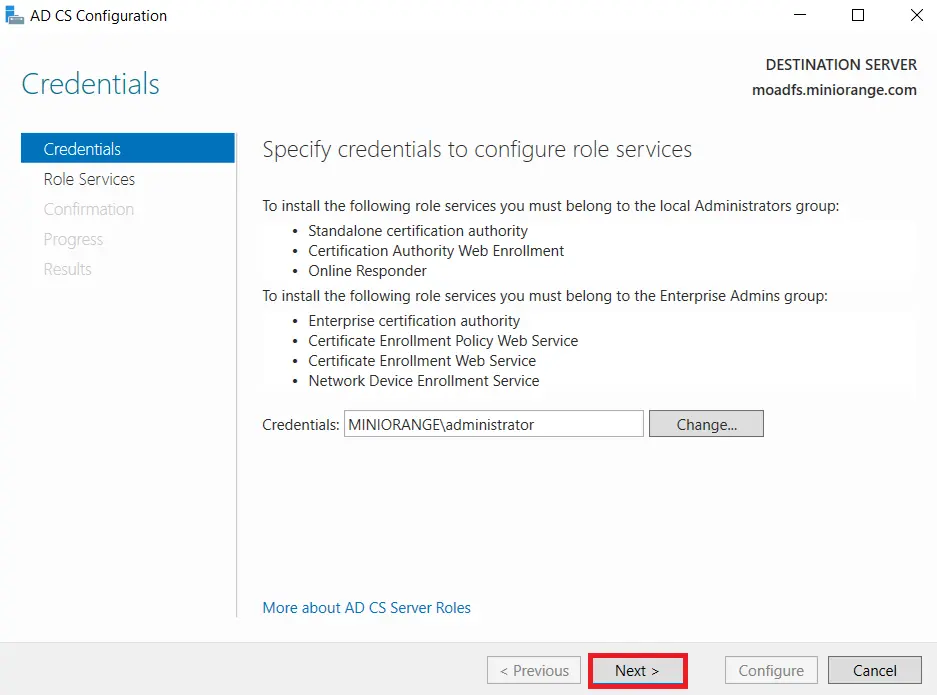
- We can use the currently logged on user to configure role services since it belongs to the local Administrators group. Click on Next button.
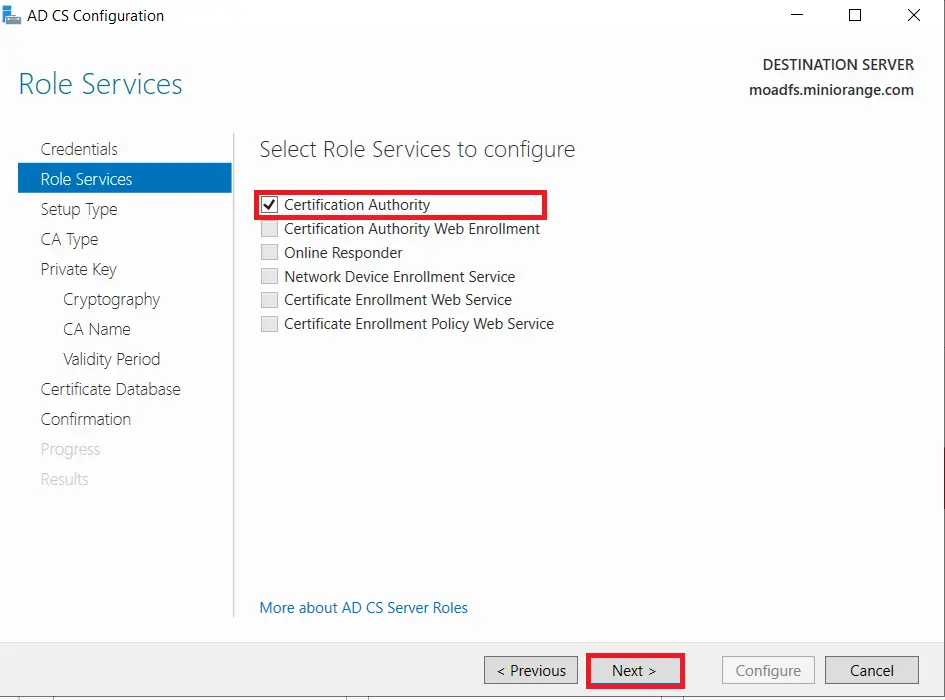
- Mark Certification Authority from the list of roles and Click on Next button.
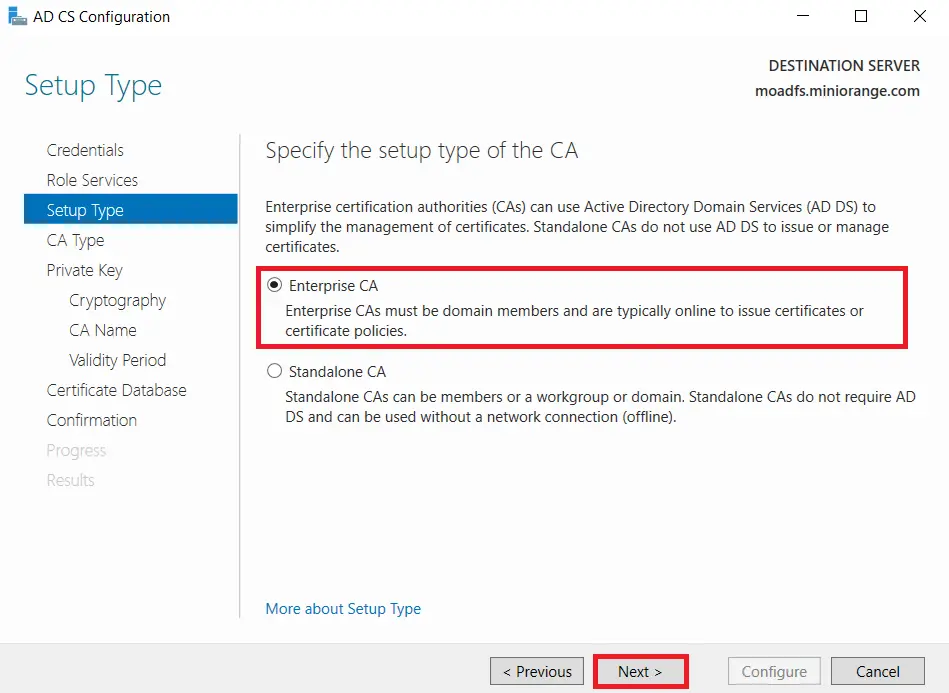
- Choose Enterprise CA option and Click on Next.
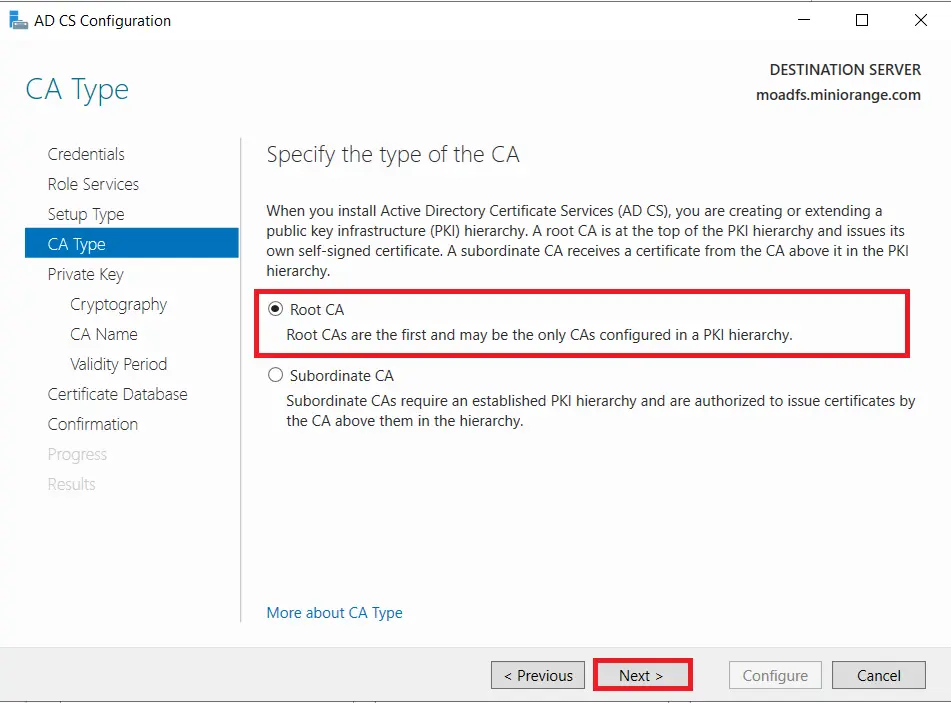
- Choose Root CA option and Click on Next button.
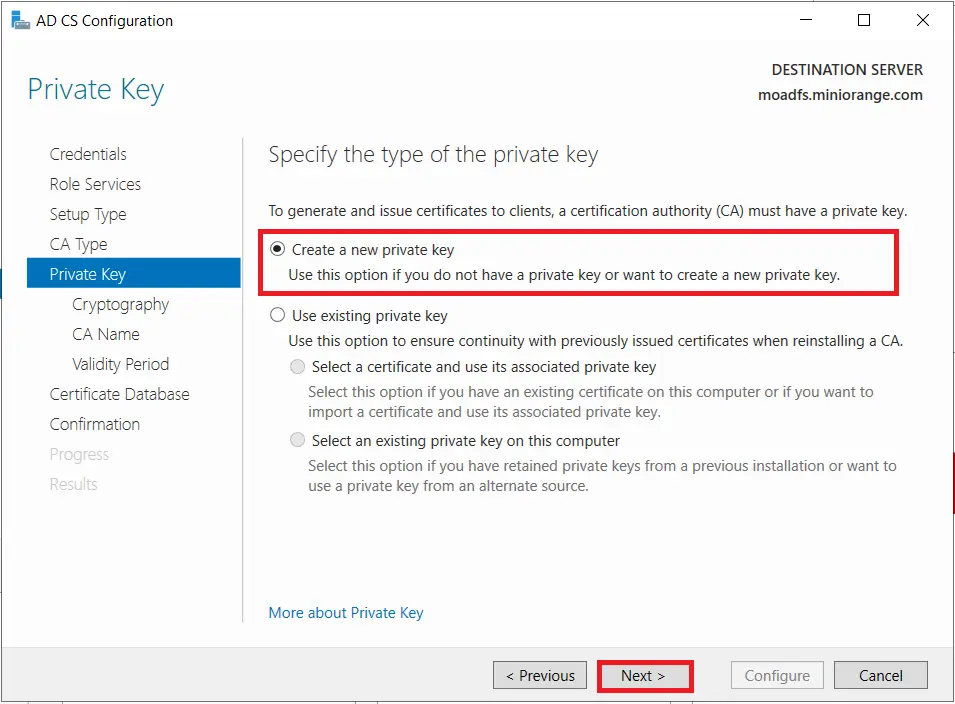
- Choose Create a new private key option and Click on Next button.
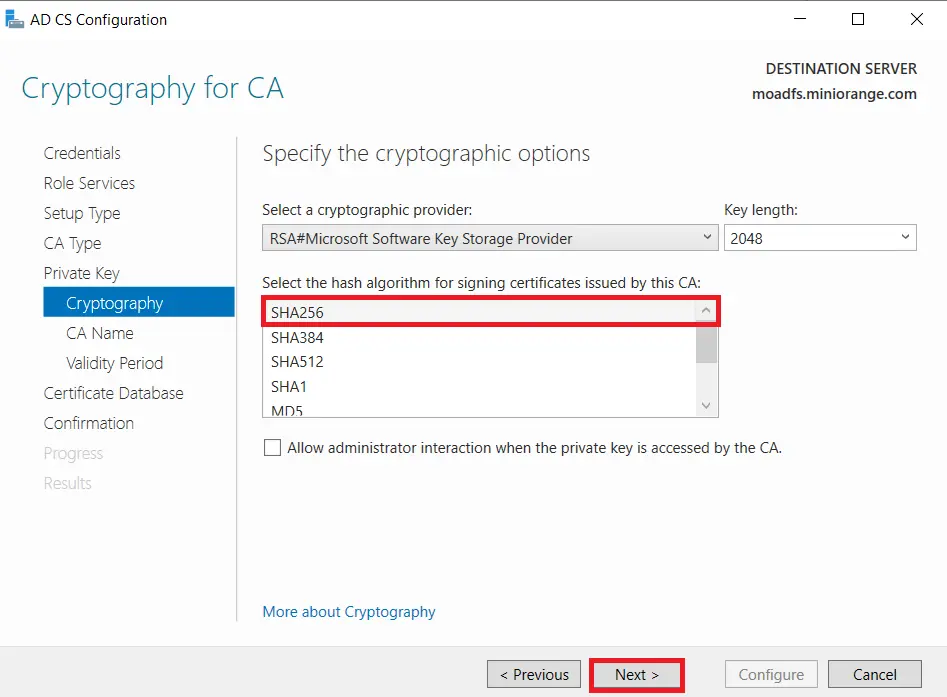
- Choose SHA256 as the hash algorithm and Click on Next.
UPDATE : Recommended to select the most recent hashing algorithm. - Click on Next button.
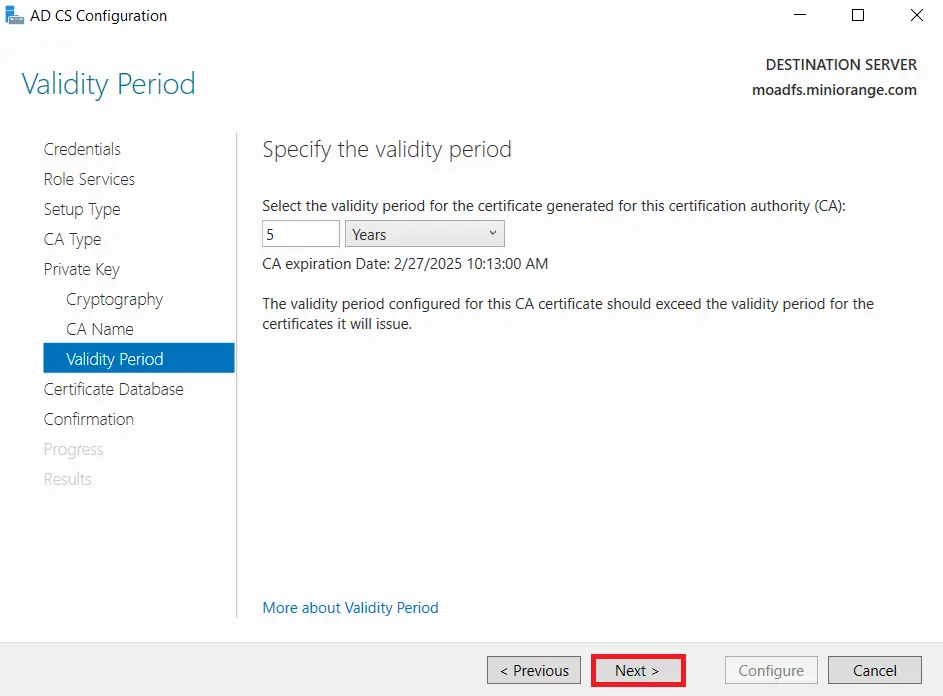
- Specify the validity of the certificate choosing Default 5 years and Click on Next button.
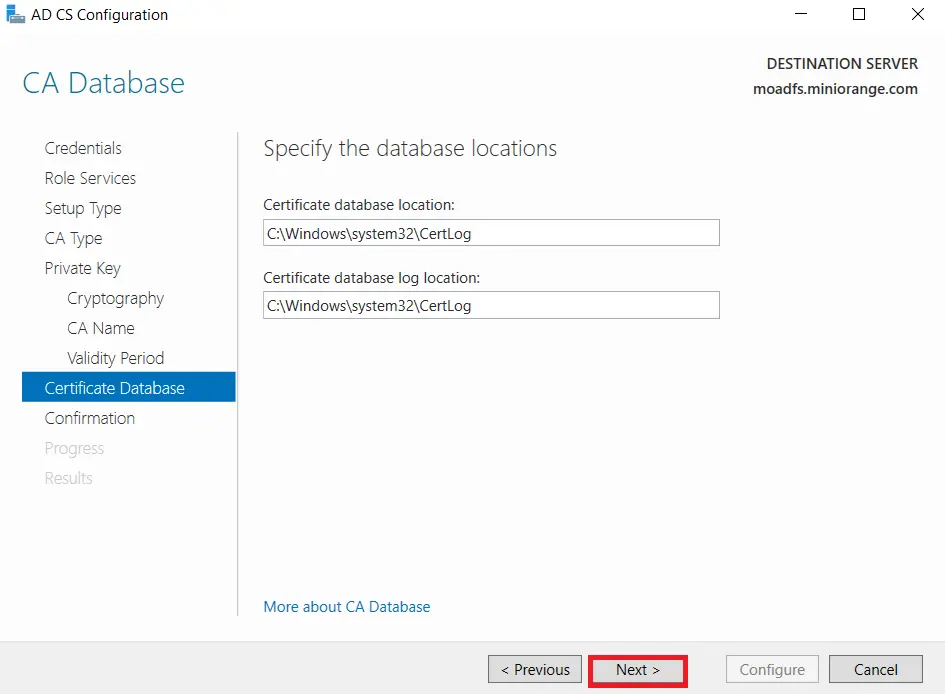
- Select the default database location and Click on Next.
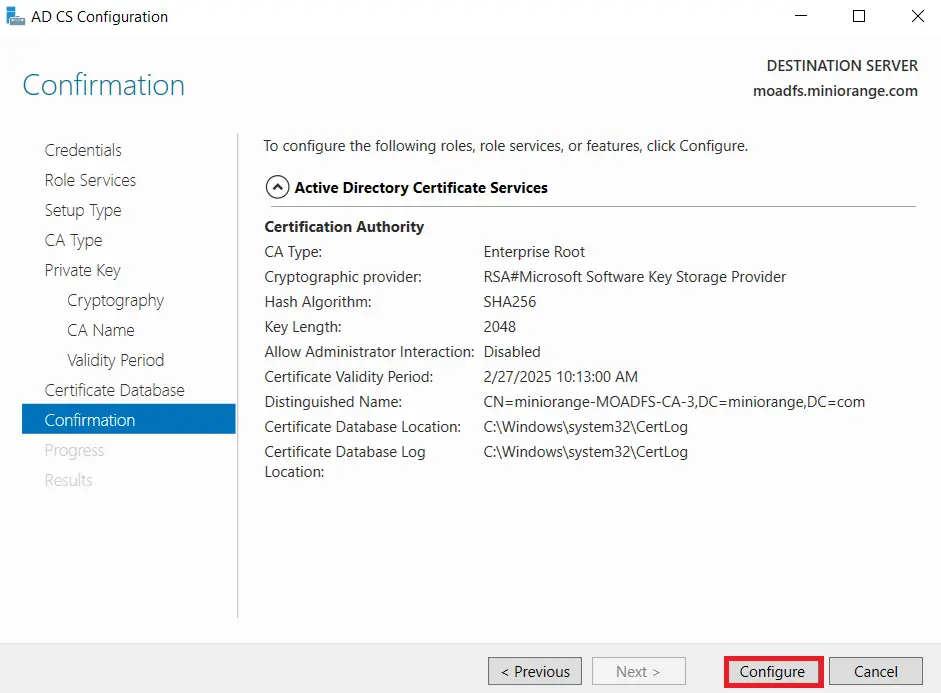
- Click on Configure button to confirm.
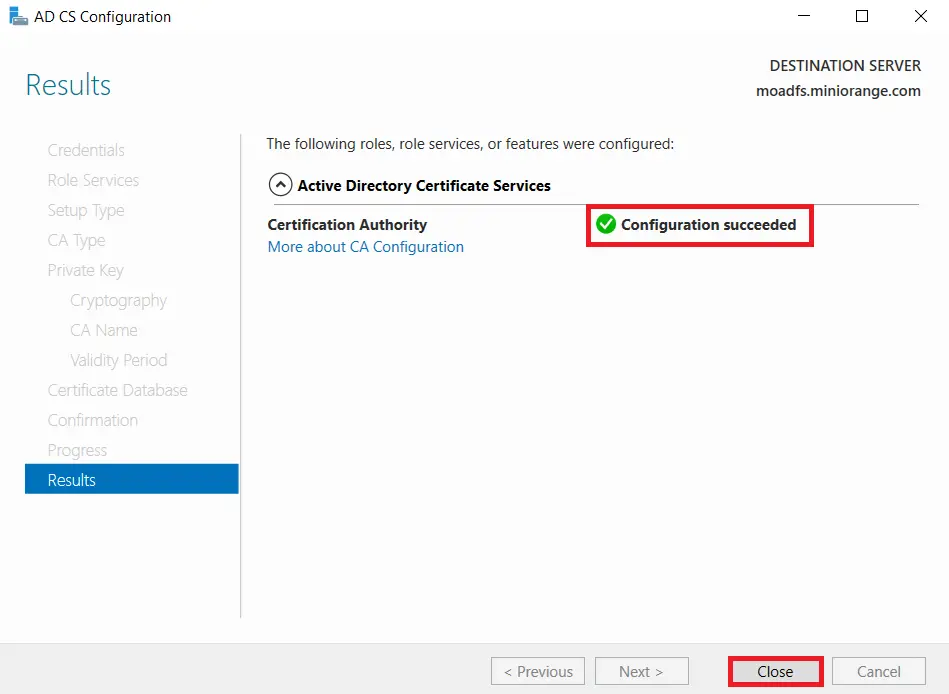
- Once the configuration succeeded and click on Close button.

1.2: Create certificate template
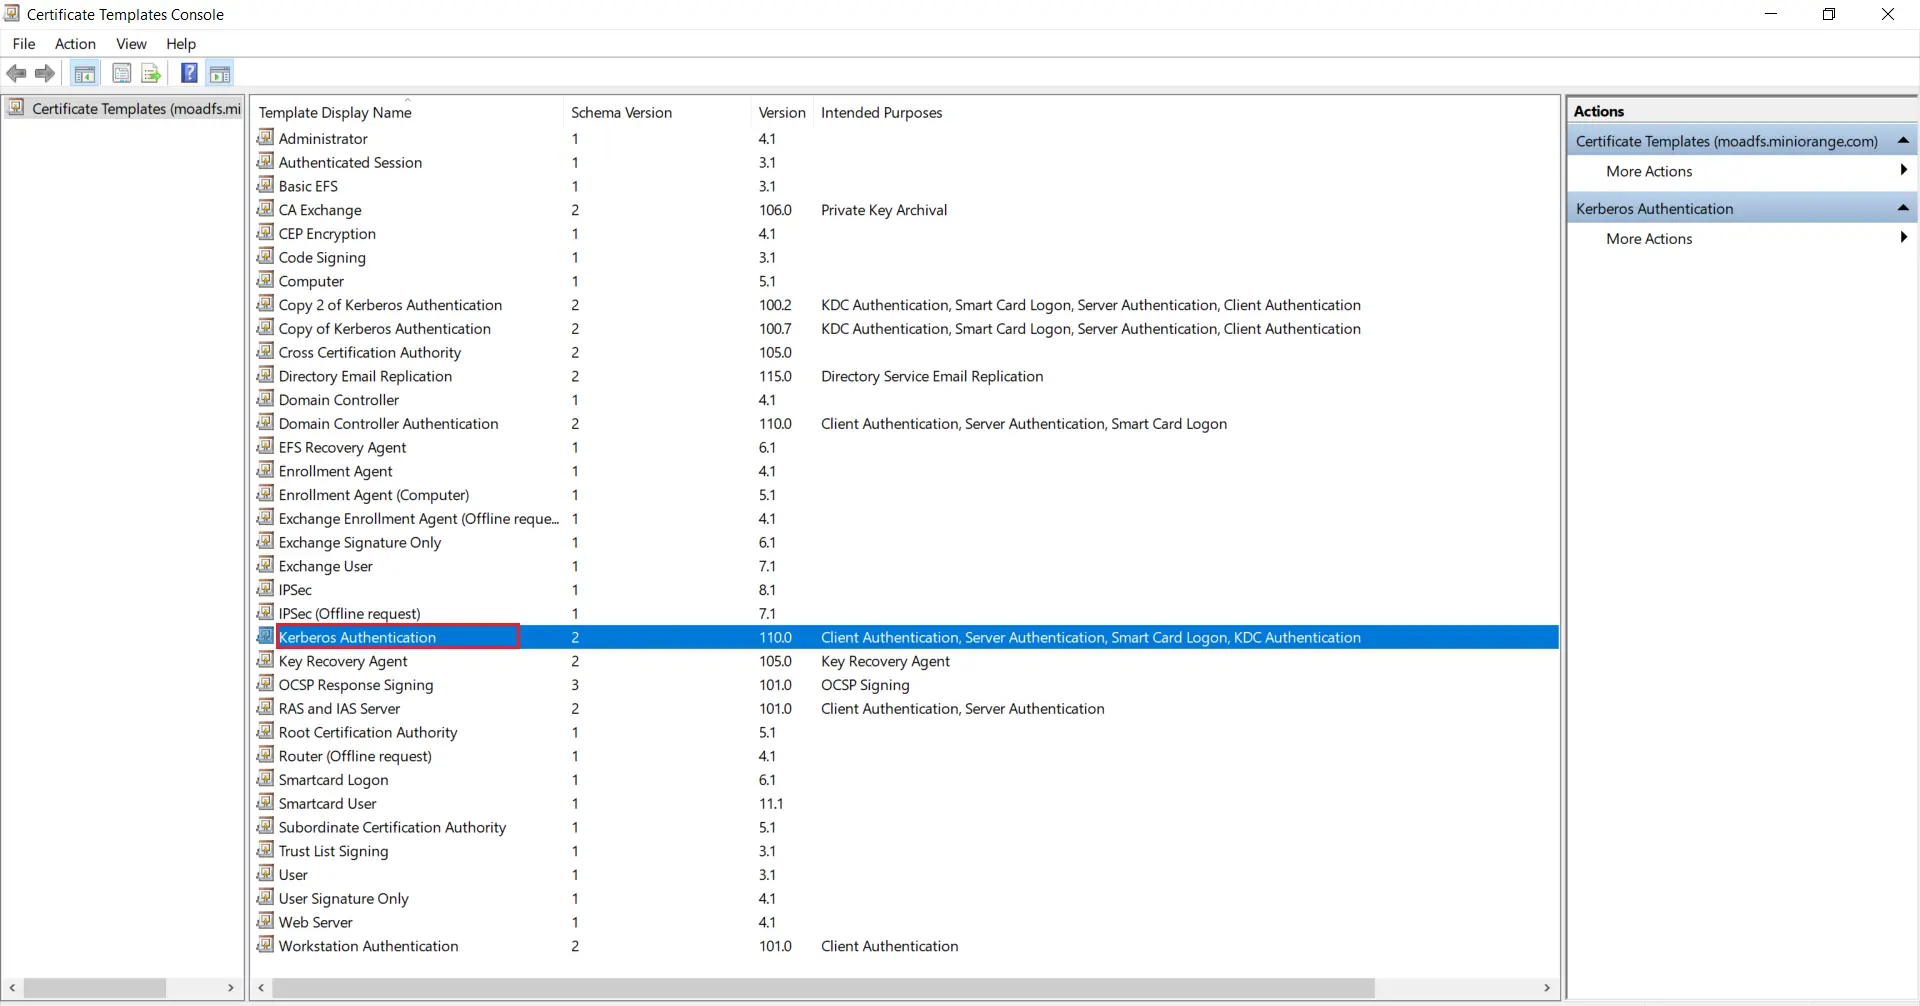
- Go to Windows Key+R and run certtmpl.msc command and choose the Kerberos Authentication Template.
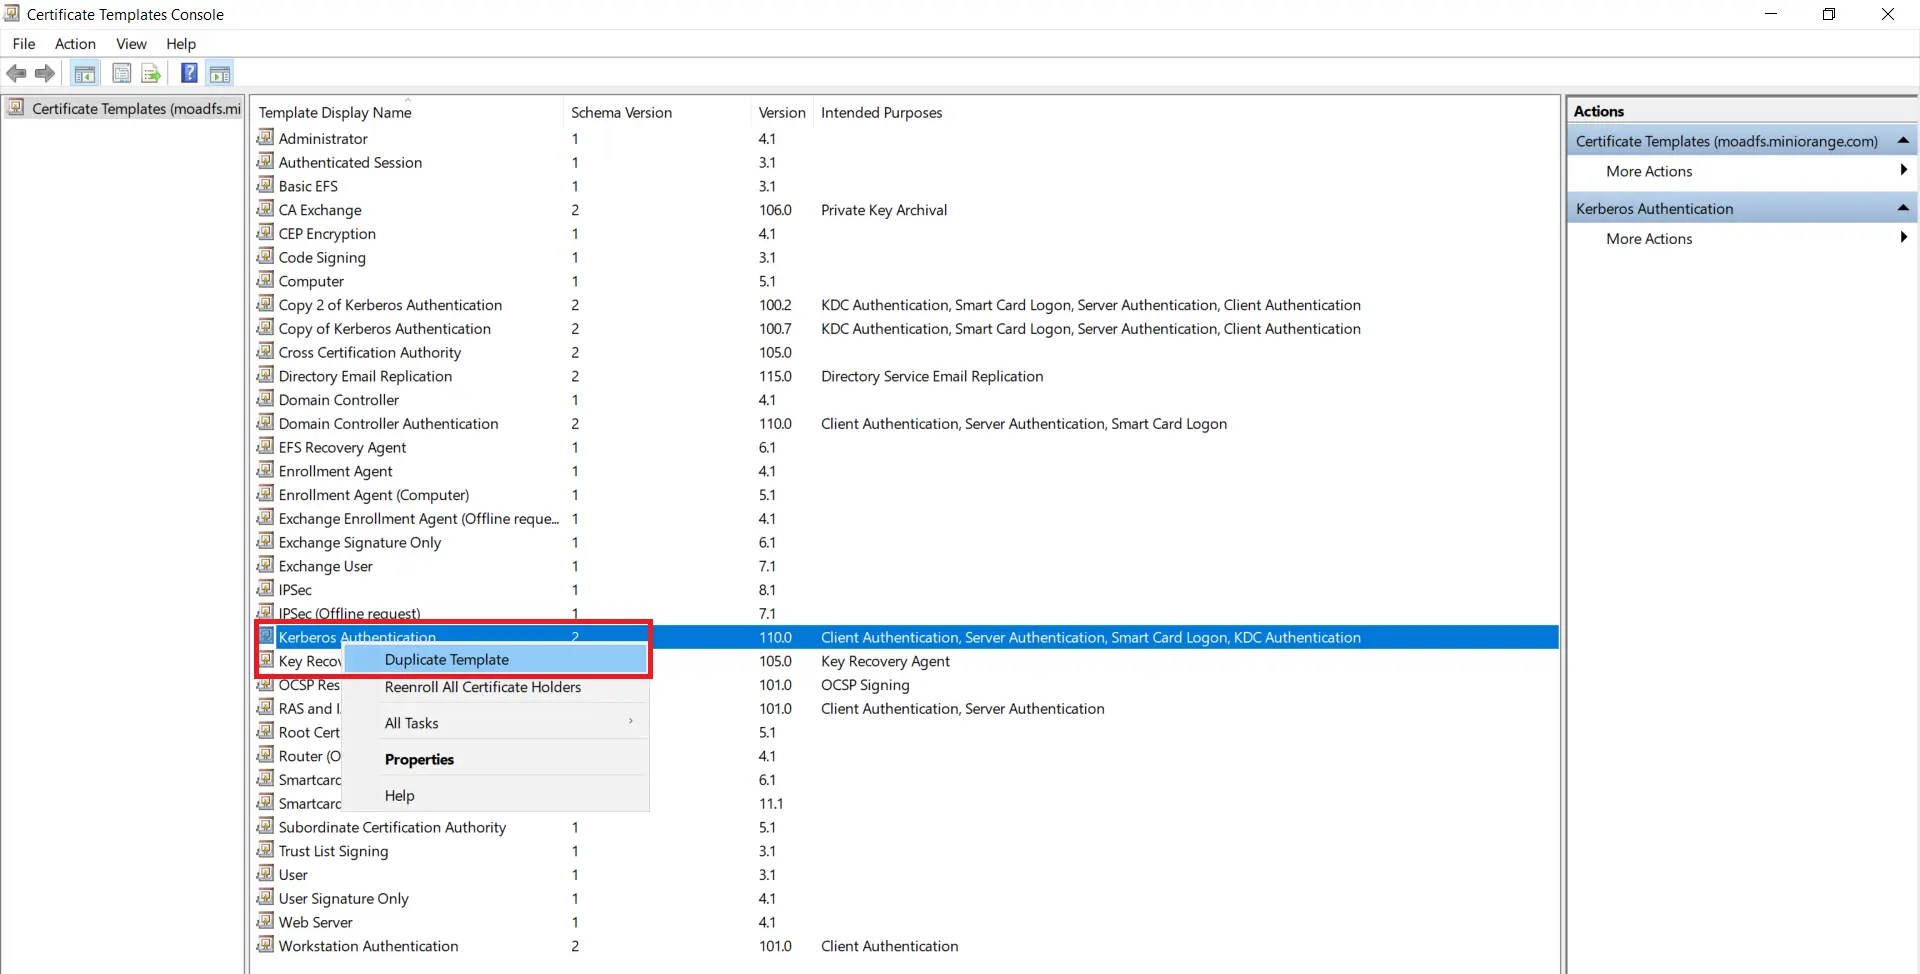
- Right-click on Kerberos Authentication and then select Duplicate Template.
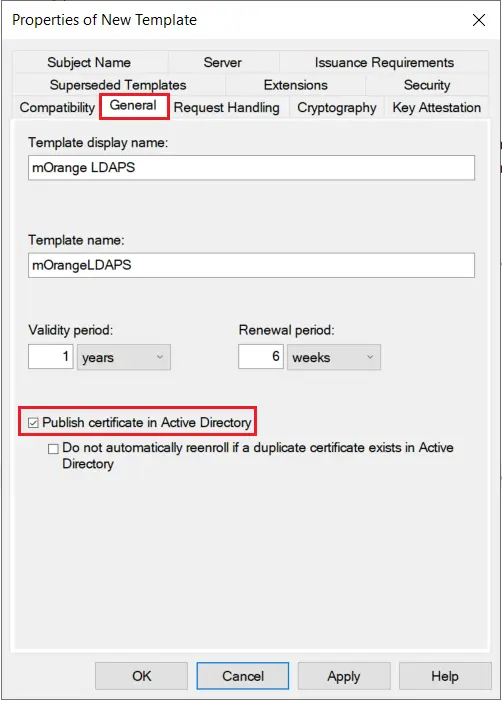
- The Properties of New Template will appear. Configure the setting according to your requirements.
- Go to the General tab and Enable publish certificate in Active Directory option.
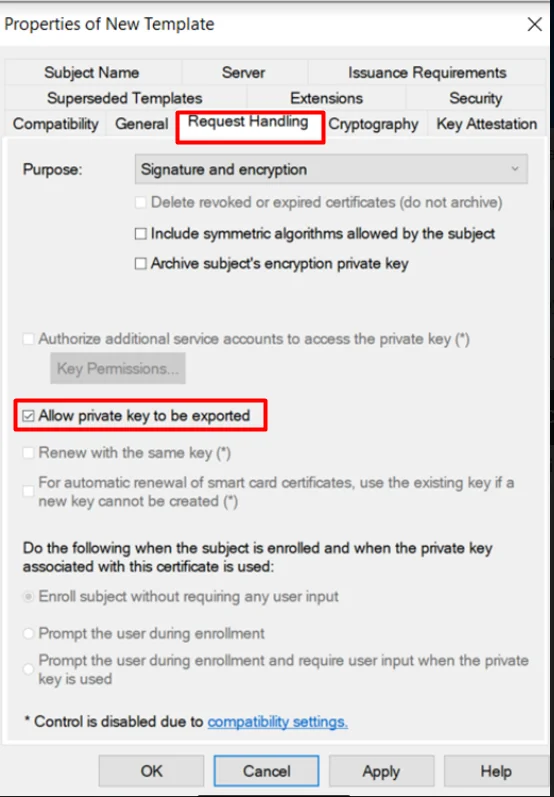
- Go to the Request Handling Tab and Enable ‘Allow private key to be exported’ option.
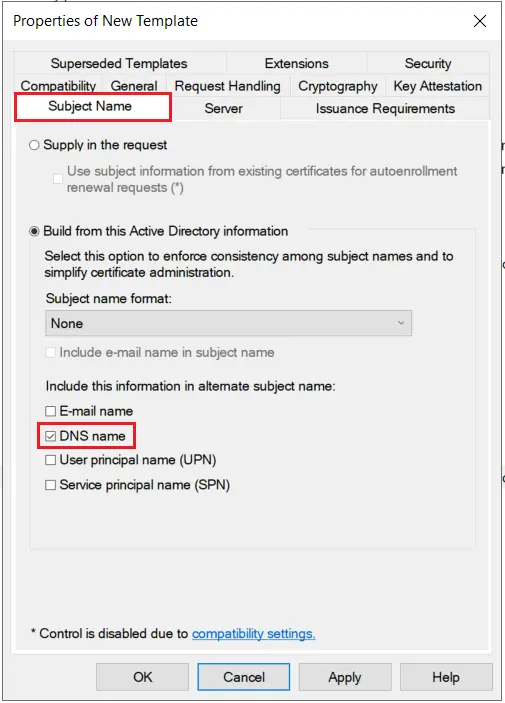
- Go to the Subject Name tab and Enable subject name format as DNS Name and click on Apply & OK button.
1.3: Issue certificate template
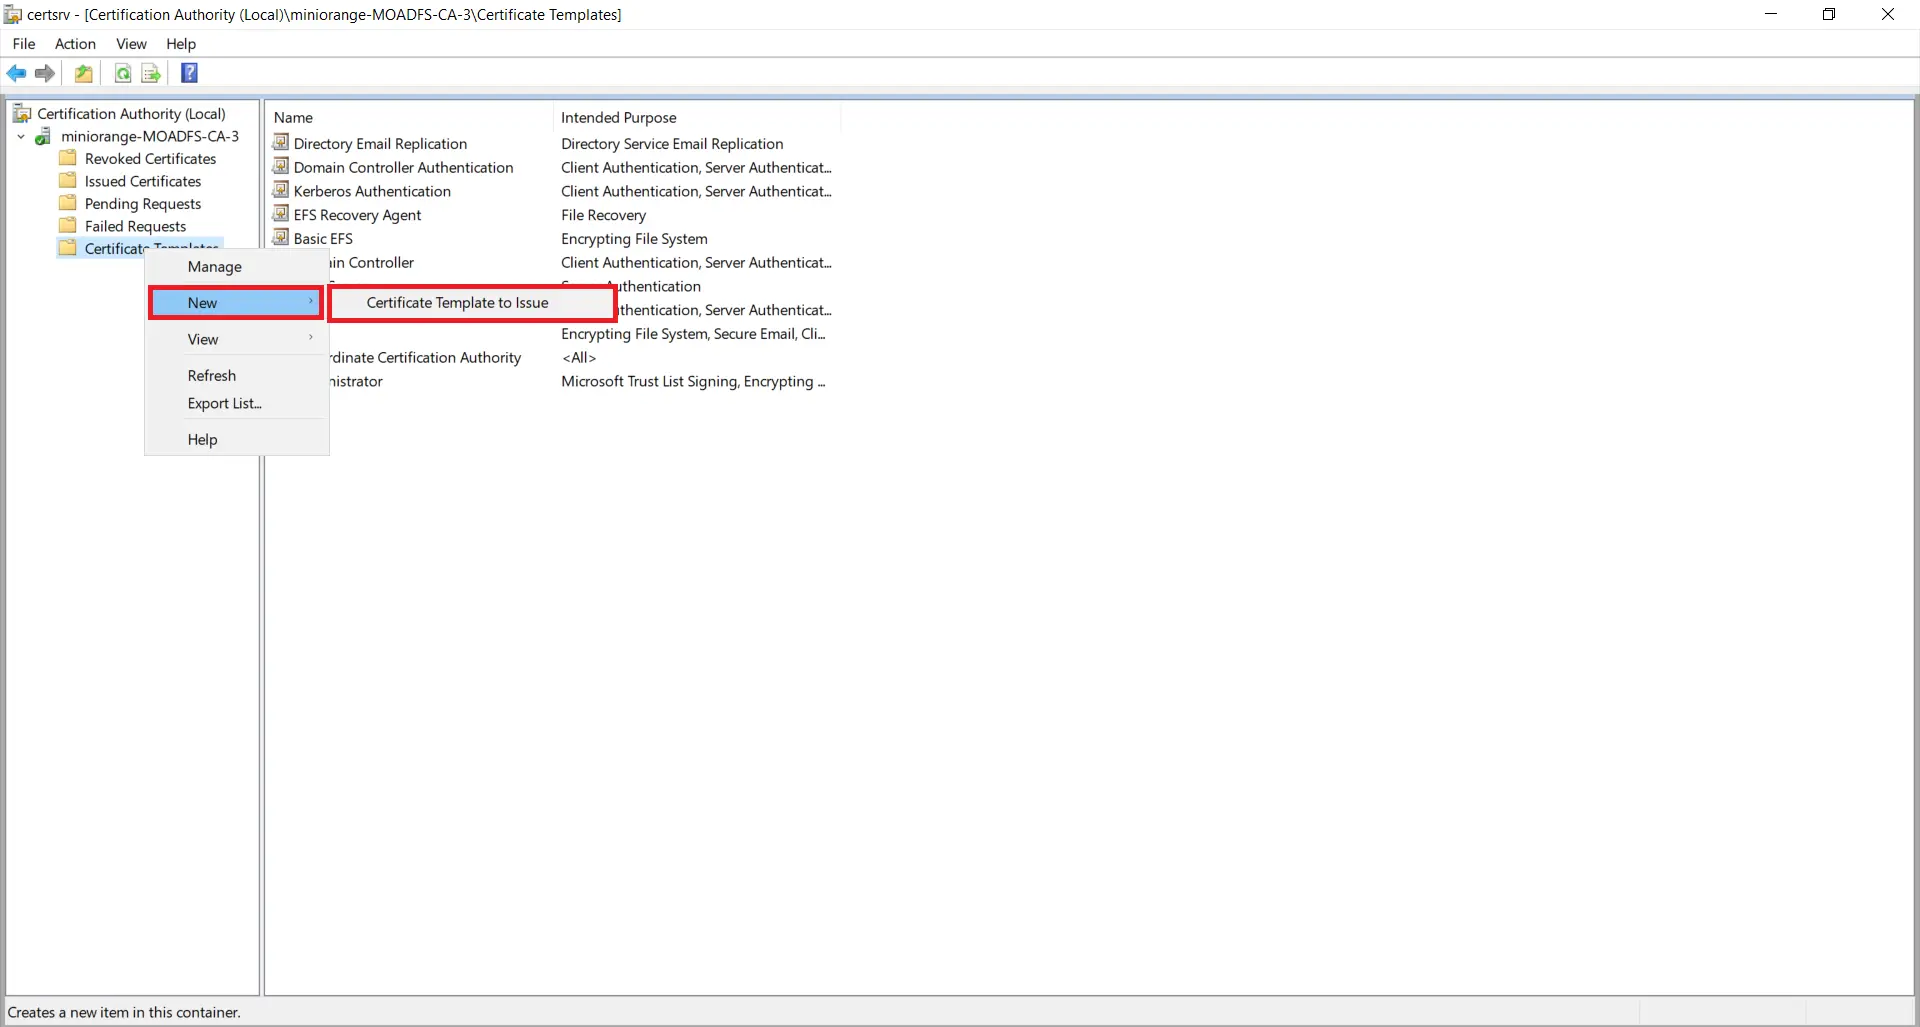
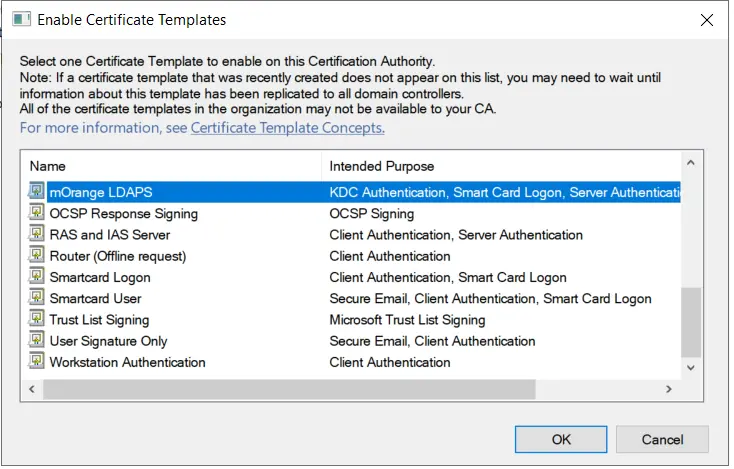
- Go to Start -> Certification Authority Right click on «Certificate Templates» and select New-> Certificate Template to Issue.
- Now, select your recently created Certificate Template and click on ok button.
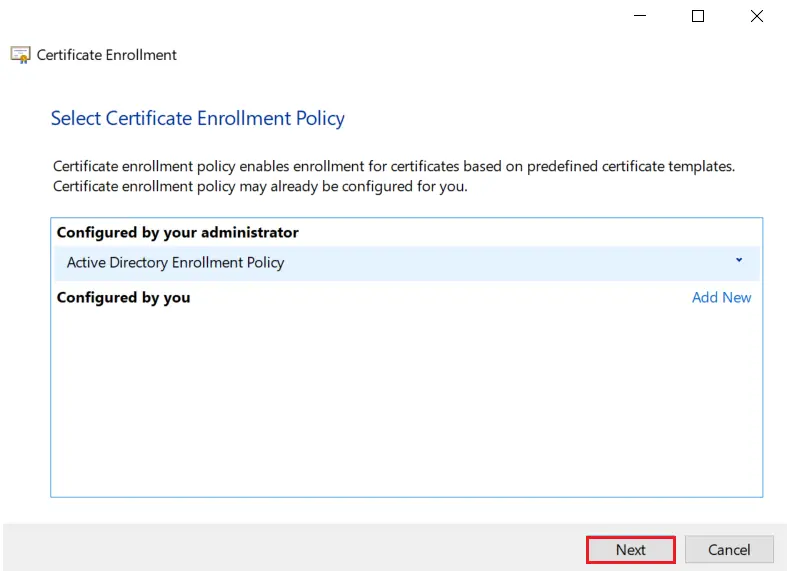
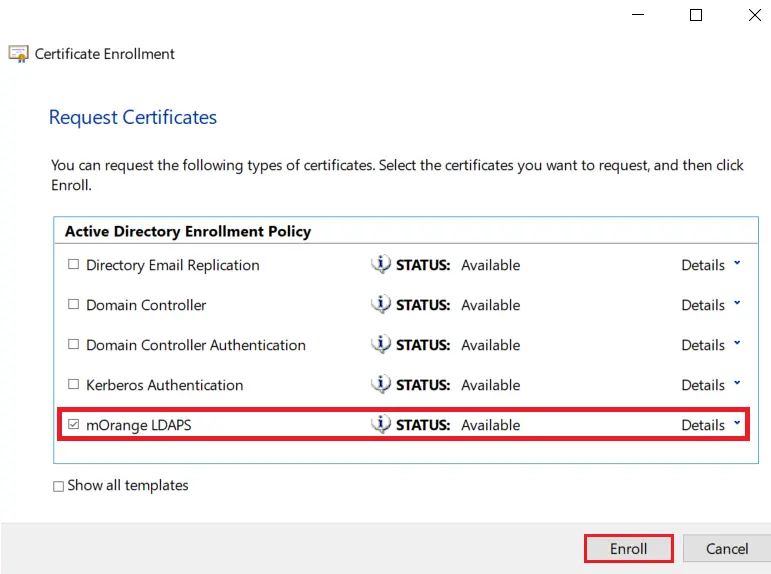
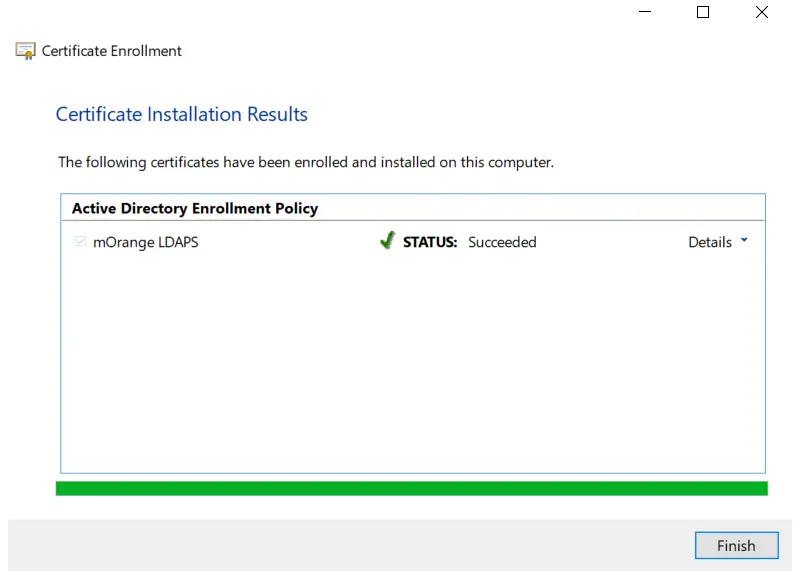
1.4: Request new certificate for created certificate template
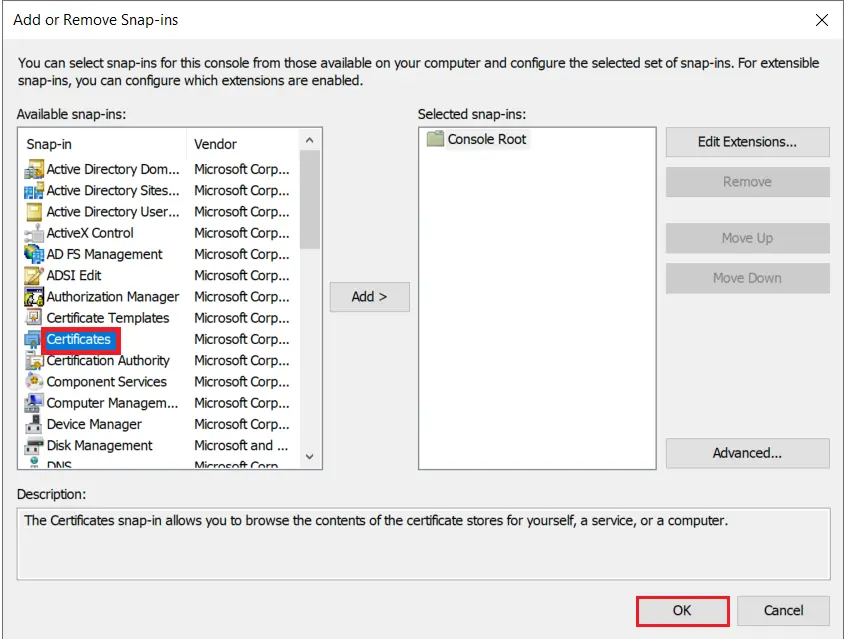
- Go to Windows Key+R -> mmc -> File -> Add/Remove snap-in. Select Certificates, and click on Add button and then click on Ok button .
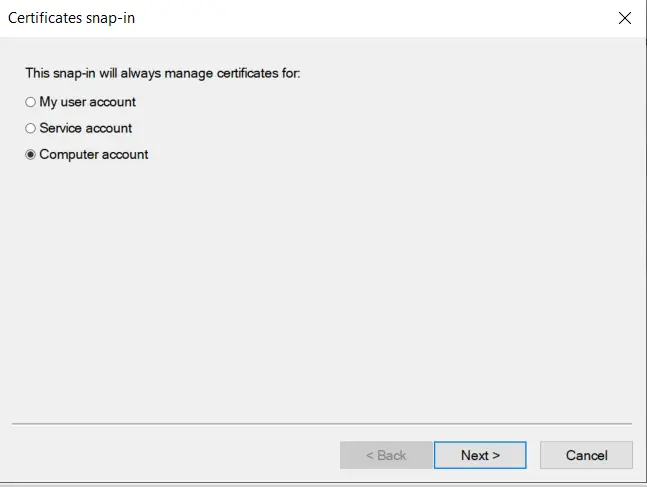
- Select Computer account option and click on Next button.
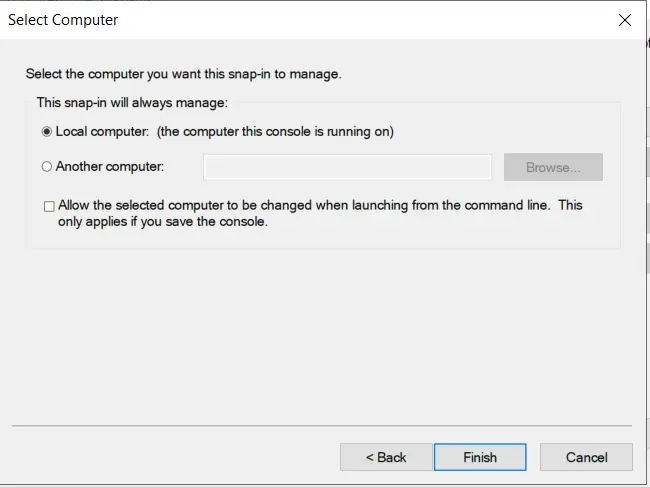
- Select Local computer option and click on Finish button.
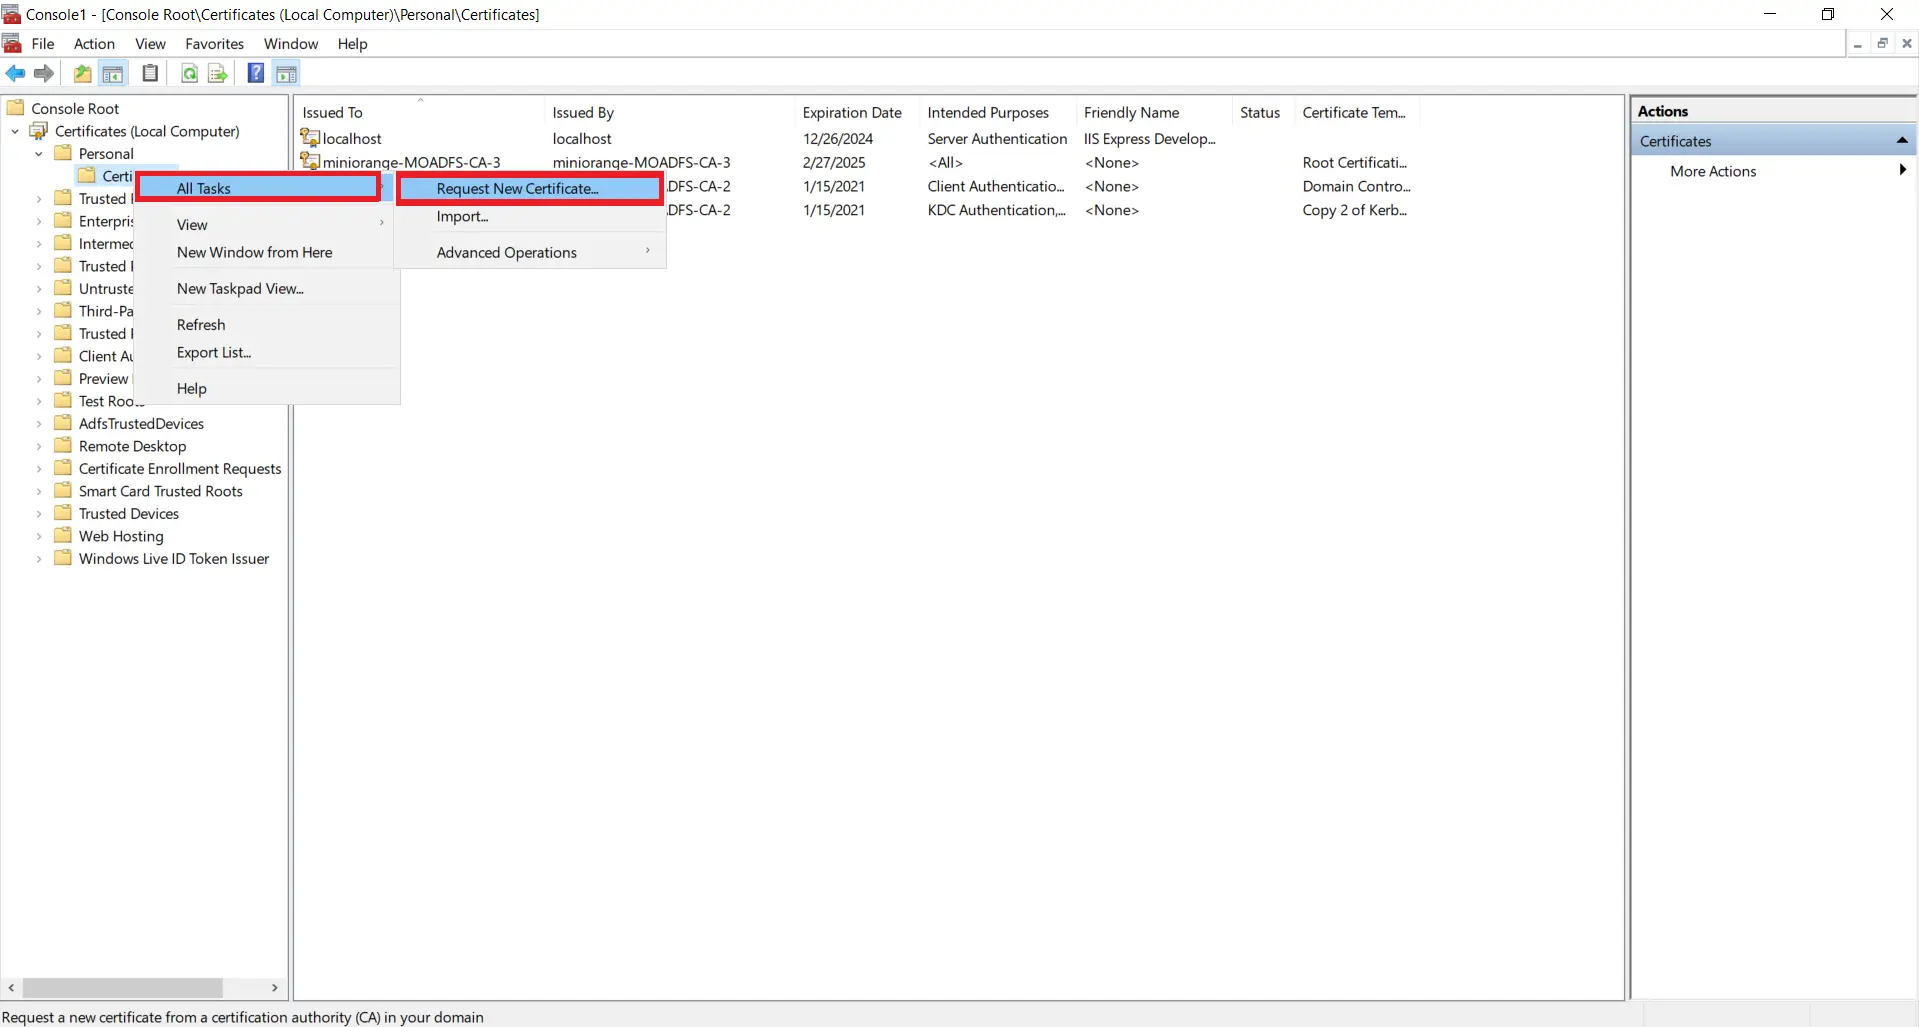
- Now, right Click on Certificates select All Tasks and click on Request for new Certificate.
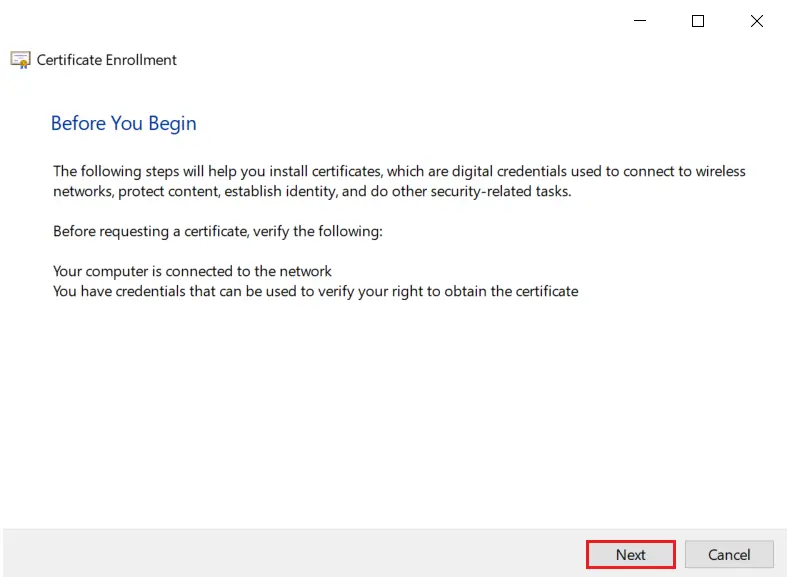
- Click on Next button.
- Click on Next button.
- Select your certificate and click on Enroll button.
- Click on Finish button.
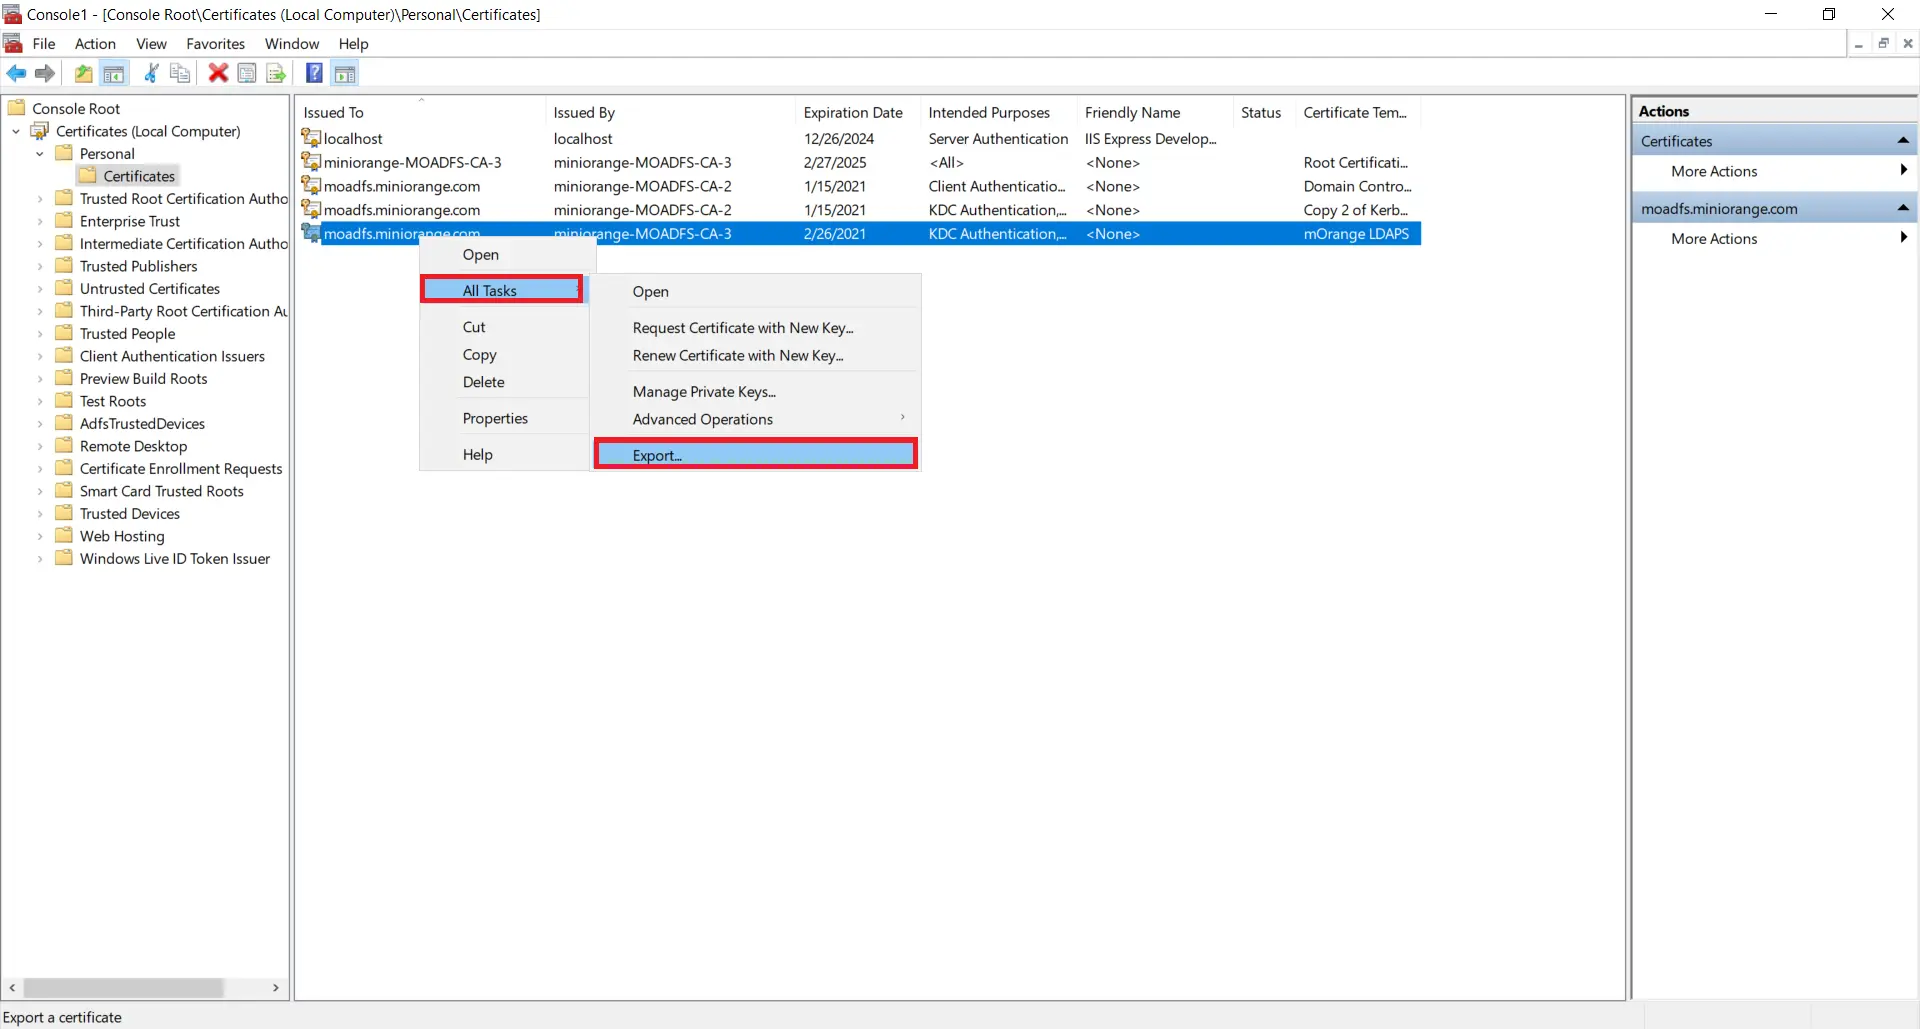
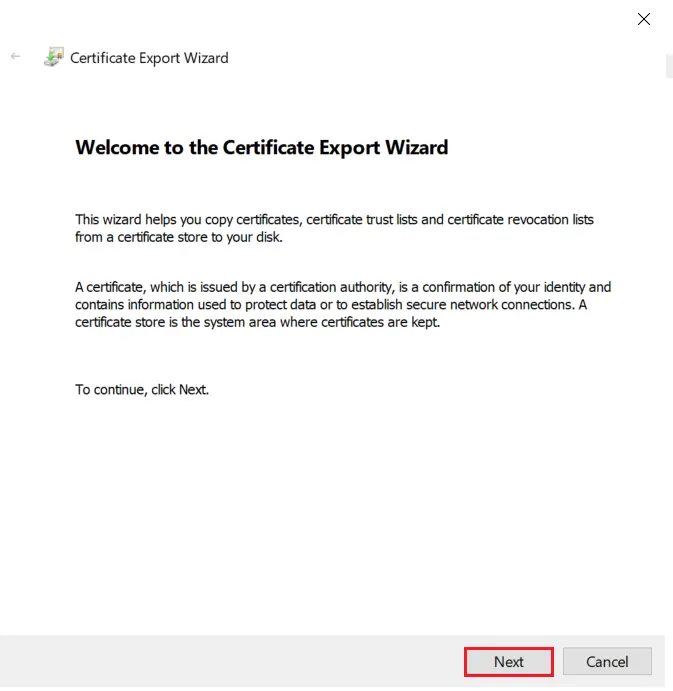
1.5: Export the created certificate
- Right click on recently generated certificate and select All tasks -> Export.
- Click on Next button.
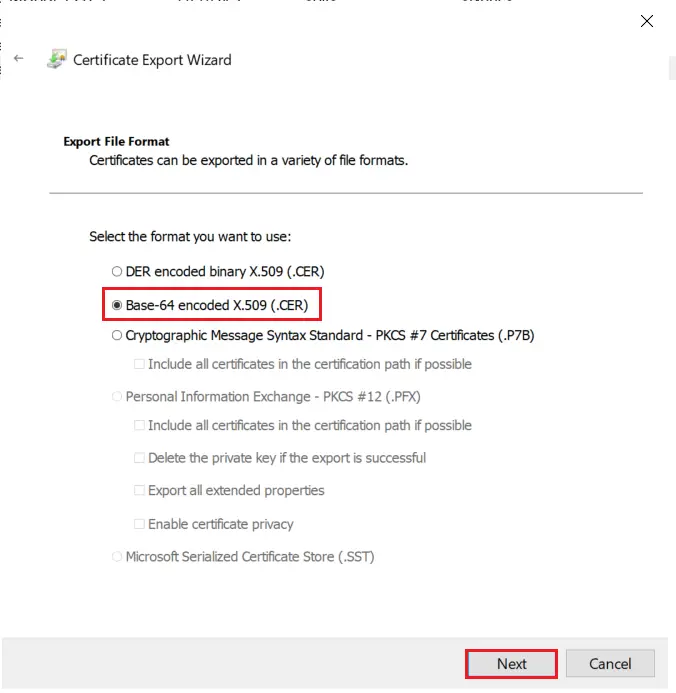
- Select Do not export the private key option and click on Next button.
- Choose Base-64 encoded X .509 file format and click on Next.
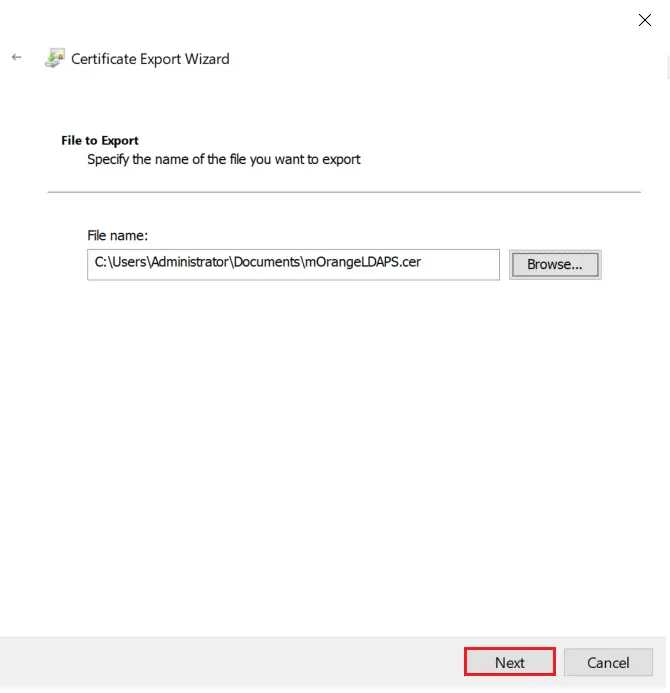
- Export the .CER to your local system path and click on Next.
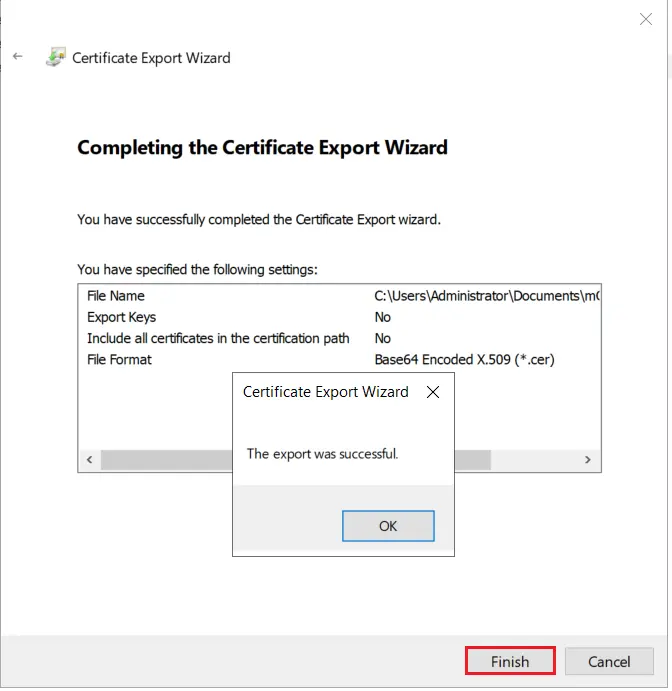
- Click on Finish button to complete the certificate export.
2. Configure LDAPS on the client side server
2.1: Convert Certificate Format and Install the Certificate using OpenSSL
- To convert the certificate from .cer to .pem format you can use OpenSSL.
- For Windows:
- You can obtain this software from here: http://gnuwin32.sourceforge.net/packages/openssl.htm if you don’t already have it.
- Copy the certificate file you generated in the previous step to the machine on which PHP is running. Run the following command:
For example:
C:\openssl\openssl x509 -in mOrangeLDAPS.cer -out mOrangeLDAPS.pem
This creates the certificate file in a form that OpenLDAP Client Library can use. - Place the .pem file generated in a directory of your choosing (C:\openldap\sysconf may be a good choice since that directory already exists.)
- Add the following line to your ldap.conf file:
TLS_CACERT C:\openldap\sysconf\mOrangeLDAPS.pem - This directive tells the OpenLDAP Client Library about the location of the certificate, so that it can be picked up during initial connection.
- For Linux:
- Run the following command to install the Openssl.
- For Ubuntu:
- For RHEL/CentOS:
- Copy the certificate file you generated in the previous step to the machine on which PHP is running. Run the following command:
For example:
/openssl x509 -in mOrangeLDAPS.cer -out mOrangeLDAPS.pem
This creates the certificate file in a form that OpenLDAP Client Library can use. - Place the .pem file generated in a directory of your choosing (/etc/openldap/ may be a good choice since that directory already exists.)
- Add the following line to your ldap.conf file:
TLS_CACERT /etc/openldap/mOrangeLDAPS.pem - This directive tells the OpenLDAP Client Library about the location of the certificate, so that it can be picked up during initial connection.
sudo apt-get install opensslyum install openssl2.2: Install certificate in JAVA Keystore.
- Run the following command to install the certificate in cacerts.
- For Windows:
keytool -importcert -alias "mOrangeLDAPS"
-keystore "C:\Program Files\Java\jre1.8.0_231\lib\security\cacerts"
-file "C:\Users\Administrator\Documents\mOrangeLDAPS.cer"- For Linux:
- Restart your web server.
keytool -importcert -alias "mOrangeLDAPS"
-keystore "/usr/java/jdk1.8.0_144/jre/lib/security/cacerts"
-file "/home/mOrangeLDAPS.cer"
3. Test Connection
- For Linux:
- ZZ: Start TLS (for LDAPS)
- h: IP/hostname of Active Directory server
- D: BindDN or User principal name
- W: Password (to be provided interactively)
- b: Base DN for search (where in the LDAP tree to start looking)
ldapsearch -ZZ -h ad_host.example.com -D some_user@EXAMPLE.COM -W -b OU=users,DC=EXAMPLE,DC=COM dn
- For Windows:
[Role Required: Admin]
- Ensure that Windows Support Tools are installed on the domain controller (DC).
- The Support Tools setup (suptools.msi) can be found in the \Support\Tools directory on your Windows Server CD.
- Select Start >> All Program >> Windows Support Tools >> Command Prompt. On the command line, type IDP to start the tool.
- From the IDP window, select Connection >> Connect and supply the local FQDN and port number (636). Also select the SSL.
- If successful, a window displays and lists information related to the Active Directory SSL connection. If the connection is unsuccessful, try restarting your system and repeat this procedure.
Further References
- What is Directory as a Service
- How to use Active Directory to login into various applications?
- Take a free trial of miniOrange SSO, MFA now!
- Know about Directory as a Service (DaaS)