
В реестре в разделах
HKLM\Software\Micros
и
HKCU\Software\Micros
Также на 64-разрядных системах сведения о 32-разрядных программах в разделах
HKLM\SOFTWARE\Wow643
HKCU\SOFTWARE\Wow643
(HKLM и HKCU — сокращения от HKEY_LOCAL_MACHINE и HKEY_CURRENT_USER.)
Можете поискать в Интернет по запросам «Microsoft\Windows\C
В этой инструкции мы покажем несколько способов получить список установленных программ в Windows 10, Windows 8 или Windows 7 с помощью командной строки. Эта методика построения списка программ в системе может пригодиться перед переустановкой системы, когда нужно найти нежелательное ПО или при выполнении инвентаризации установленного ПО на компьютерах организации.
Рассмотрим два способа: первый подразумевает использование командной строки и утилиты wmic, второй — PowerShell.
Содержание:
- Вывод списка программ с помощью утилиты командной строки WMIC
- Вывод списка программ через Windows PowerShell
Вывод списка программ с помощью утилиты командной строки WMIC
Список установленных в системе программ может быть получен с помощью утилиты командной строки WMIC, через которую можно обратиться и опросить пространство имен WMI. Запустите командную строку с правами администратора и выполните команду:
wmic product get name,version

После небольшого ожидания, на экран консоли будет выведен список названий и версия установленных в системе программ.
Этот список можно экспортировать в текстовый файл с помощью команды:
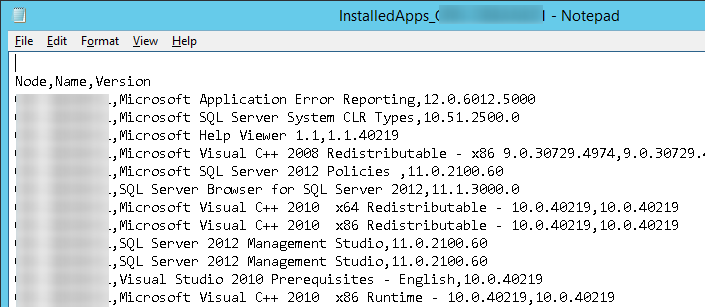
wmic product get name,version /format:csv > c:\Temp\Programs_%Computername%.csv

После окончания выполнения команды перейдите в каталог C:\Temp и найдите csv файл, имя которого начинается с Programs_[имя_ПК]. В данном файле в csv-формате помимо названия и версии ПО, также будет содержаться имя ПК (удобно для дальнейшего анализа).
Вывод списка программ через Windows PowerShell
Список установленных программ также может быть получен с помощью PowerShell. Идея метода в том, что список установленных программ, который мы видим в списке Programs and Features Панели Управления, строится на основе данных, хранящихся в ветке реестра HKEY_LOCAL_MACHINE\SOFTWARE\Microsoft\Windows\CurrentVersion\Uninstall
Наша задача – вывести содержимое данной ветки реестра. Итак, запустите консоль Powershell и выполните команду:
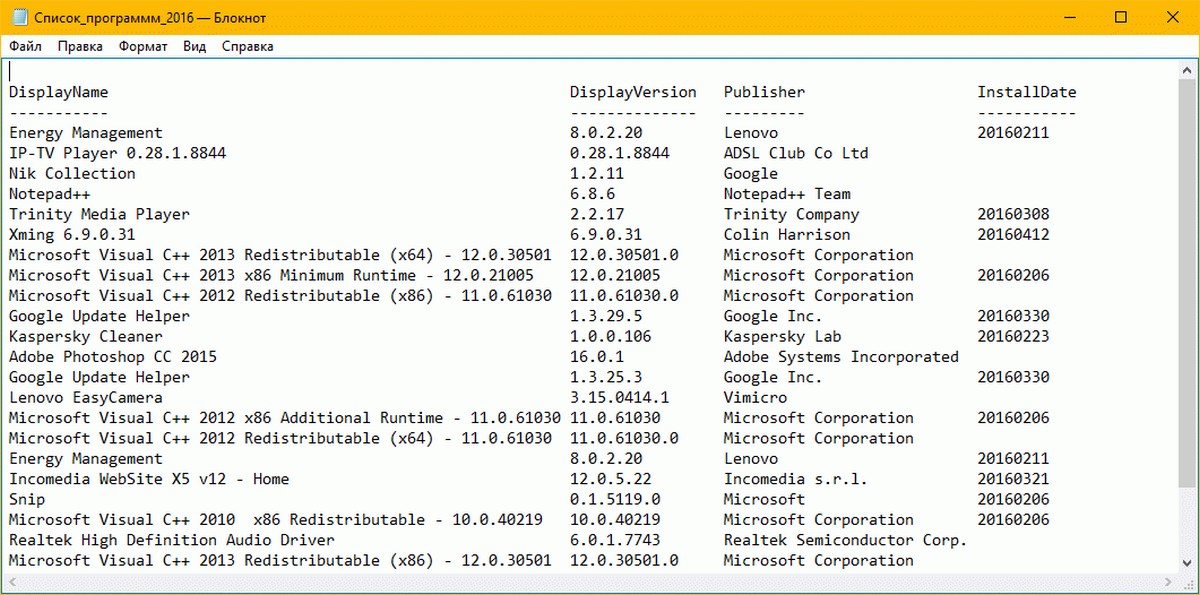
Get-ItemProperty HKLM:\Software\Microsoft\Windows\CurrentVersion\Uninstall\* | Select-Object DisplayName, DisplayVersion, Publisher, Size, InstallDate | Format-Table -AutoSize
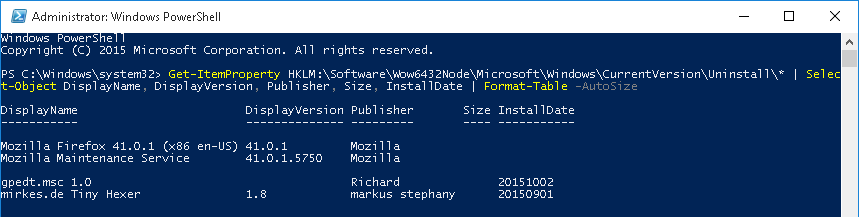
Как вы видите, в результирующем списке содержится имя программы, версия, разработчик и дата установки.
Совет. Для 32-битных приложений на x64 версиях Windows, также нужно брать данные из ветки HKEY_LOCAL_MACHINE\SOFTWARE\Wow6432Node\Microsoft\Windows\CurrentVersion\Uninstall
Экспортировать полученный список в csv файл можно так:
Get-ItemProperty HKLM:\Software\Wow6432Node\Microsoft\Windows\CurrentVersion\Uninstall\* | Select-Object DisplayName, DisplayVersion, Publisher, InstallDate | Format-Table -AutoSize > c:\temp\ installed-software.txt
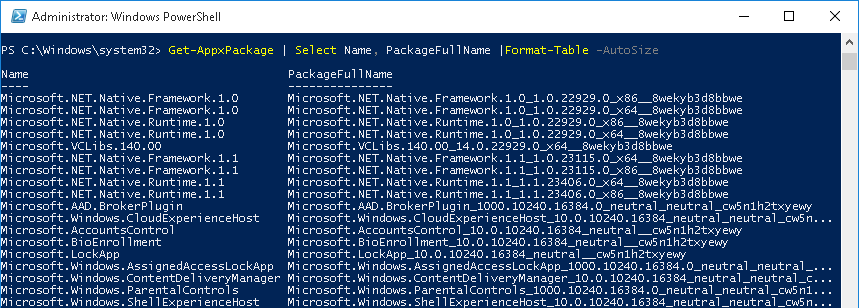
Рассмотренный выше способ позволяет вывести данные только о классический Windows приложениях. Чтобы вывести список установленных Metro приложений, воспользуйтесь командой:
Get-AppxPackage | Select Name, PackageFullName |Format-Table -AutoSize > c:\temp\installed_metro_apps.txt
Чтобы получить список установленного ПО на удаленном компьютере (к примеру, с именем wks_name11), воспользуемся командлетом Invoke-command:
Invoke-command -computer wks_name11 {Get-ItemProperty HKLM:\Software\Wow6432Node\Microsoft\Windows\CurrentVersion\Uninstall\* | Select-Object DisplayName, DisplayVersion, Publisher, InstallDate | Format-Table -AutoSize }
Чтобы сравнить списки установленного ПО, полученные с двух разных компьютеров и найти отсутствующие приложения, можно воспользоваться такой командой:
Compare-Object –ReferenceObject (Get-Content C:\temp\installed-software.txt) –DifferenceObject (Get-Content C:\temp\installed-software2.txt)

В нашем примере в двух сравниваемых списках имеются различия в двух программах.
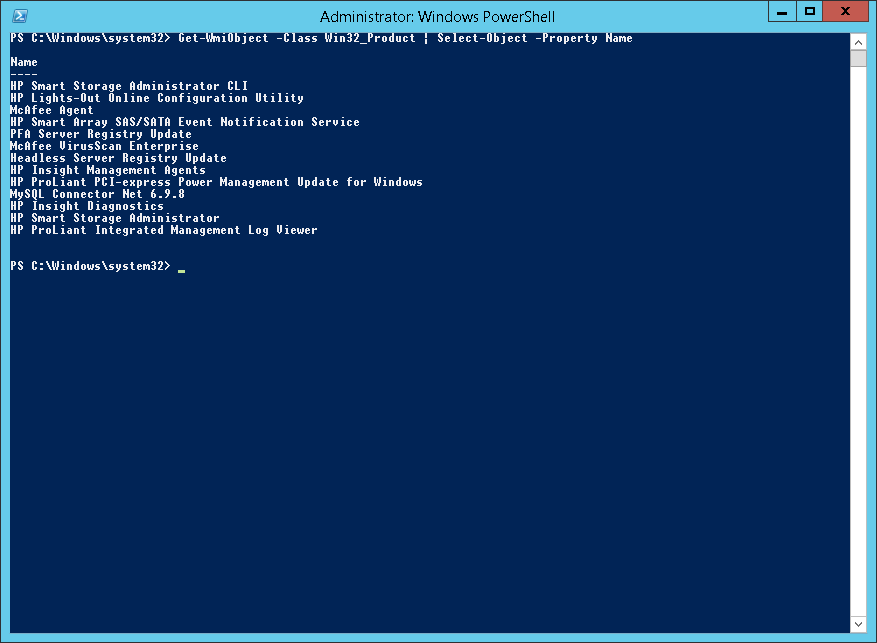
Другой способ вывести список установленных программ – воспользоваться командлетом Get-WmiObject, также позволяющего обращаться с пространству WMI:
Get-WmiObject -Class Win32_Product | Select-Object -Property Name
You’ve probably installed many programs on your Windows PC over the years, but you might not remember all of them.
That’s why it’s handy to know how to get a list of the software installed on your PC. It’s also helpful if you’re moving to a new machine and want to keep the same programs, or if you quickly want to see which apps you need to prune to free up space.
Let’s look at multiple ways to get a list of installed programs in Windows 10 and Windows 11 using a combination of Windows tools and third-party programs.
1. List Installed Programs Using Registry and PowerShell
Querying the registry is an effective way of finding out all installed programs in Windows 10 and Windows 11. You can use a combination of the registry and PowerShell (a task automation tool) to get a list of installed software.
To begin, do a system search for Windows PowerShell. Then, right-click the result and choose Run as administrator.
It’s likely that your computer has a policy enabled to stop you from running scripts, so let’s change that.
Input the following:
Set-ExecutionPolicy Unrestricted
Press A to select Yes to All. Once you’ve finished these instructions, you may wish to repeat this step and press N to return to the default state.
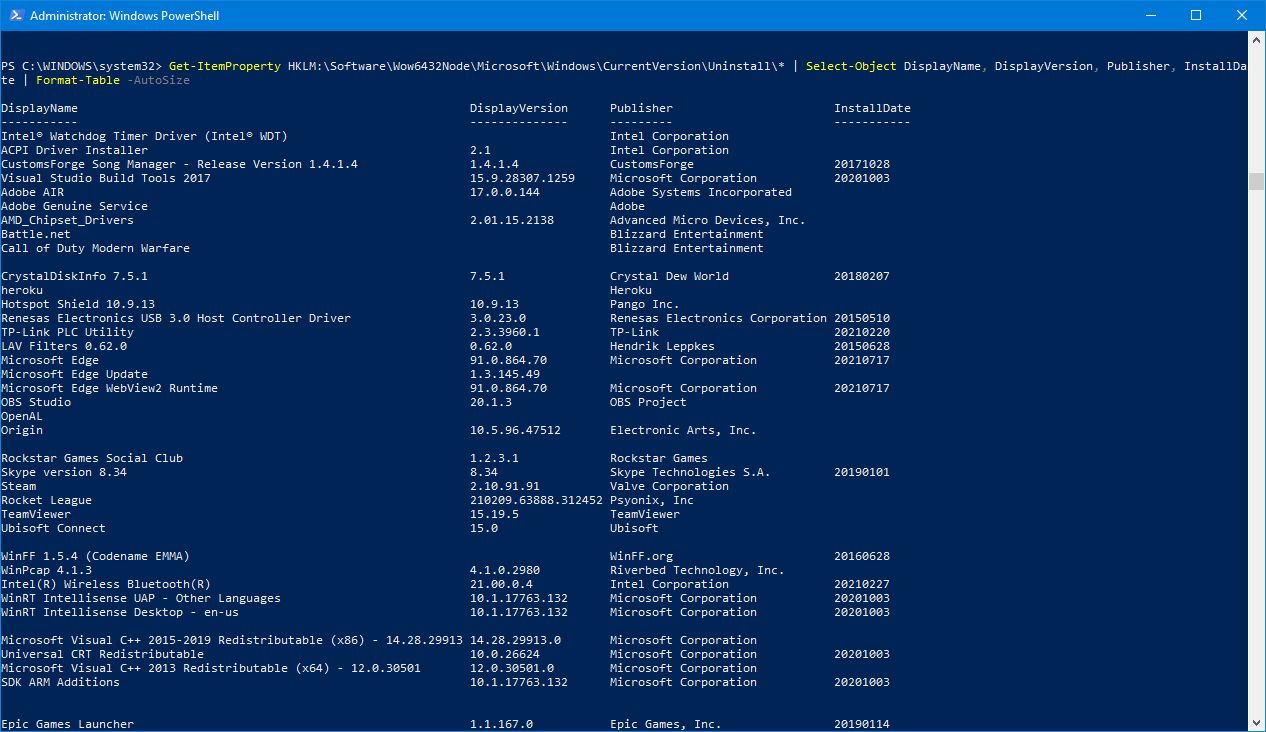
Next, input the following, which comes courtesy of a Microsoft scripting blog:
Get-ItemProperty HKLM:\Software\Wow6432Node\Microsoft\Windows\CurrentVersion\Uninstall\* | Select-Object DisplayName, DisplayVersion, Publisher, InstallDate | Format-Table -AutoSize
Press Enter to execute the command.
This command will then output a list of programs installed on your local machine, along with its version number, publisher, and date of installation (if available).
You can click and drag to highlight the list, then Ctrl + C to copy it elsewhere, like Notepad or Excel, to save the list.
2. List Installed Programs Using Settings
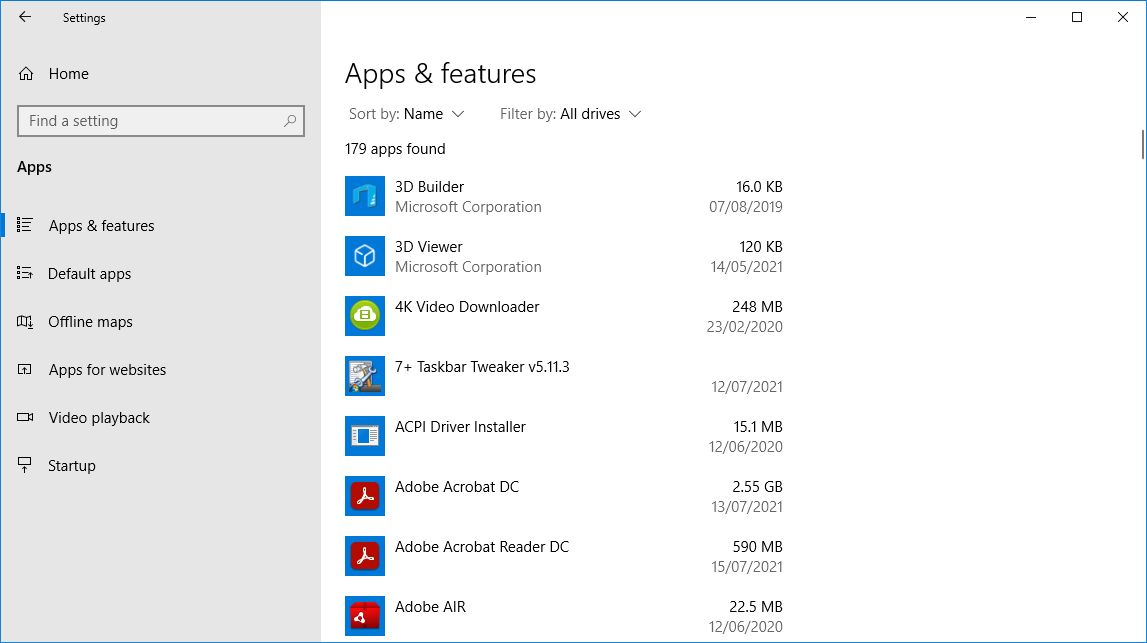
Press Windows key + I to open Settings and click Apps > Apps & features. Doing so will list all programs installed on your computer, along with the Windows Store apps that came pre-installed.
Use your Print Screen key to capture the list and paste the screenshot into another program like Paint. You will probably need to scroll down and take multiple screenshots. If this is the case, you might find it easier to paste each image into a word processor and save it as a single file.
3. List Installed Programs Using UninstallView
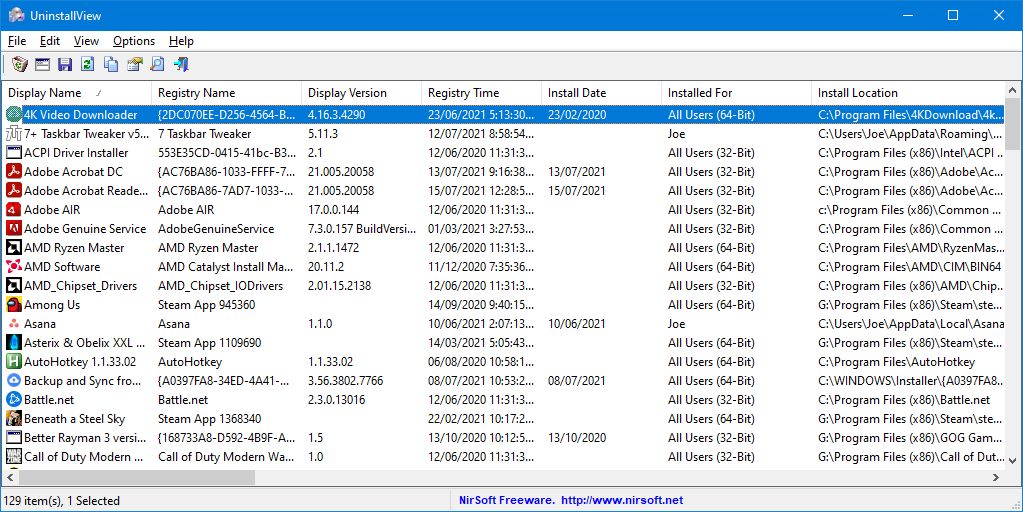
UninstallView is a program from NirSoft. While you can use it to uninstall programs, it’s also incredibly good at generating a reliable list of your installed programs.
Once downloaded, open the executable, and it will show a list of your programs. Use the Options dropdown to toggle the appearance of Windows Apps if you want them included.
Go to View > HTML Report — All Items to see an HTML export of the list. You can keep that file in the default location as per the address bar, or press Ctrl + S to save it somewhere else.
4. List Installed Programs Using CCleaner
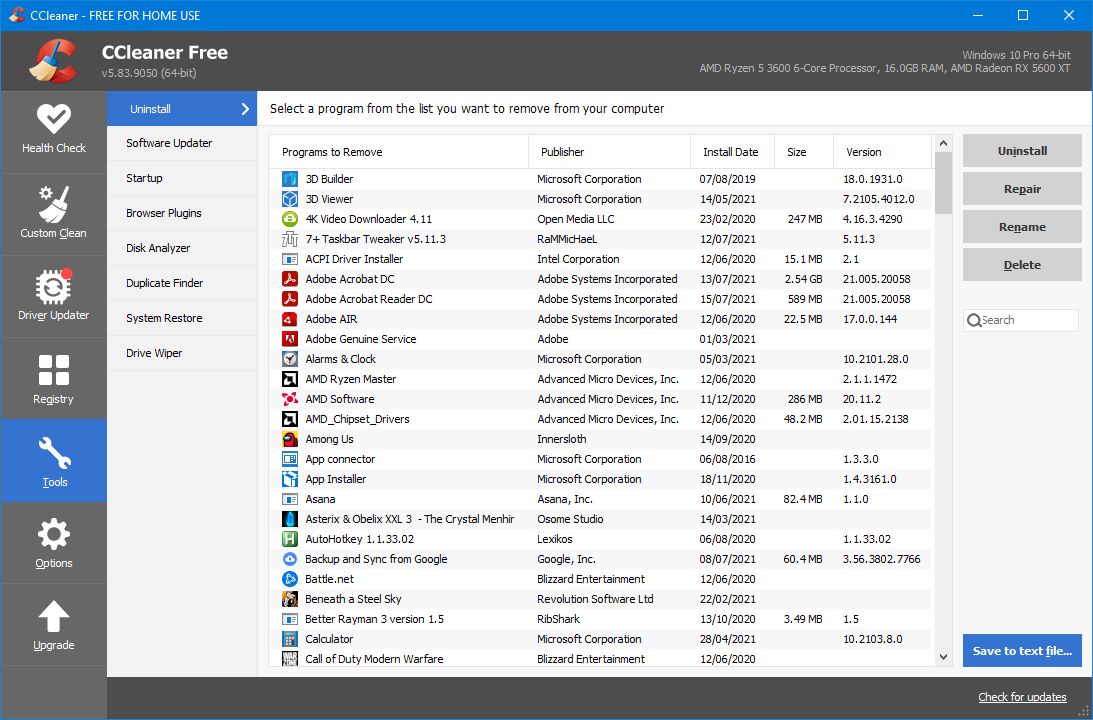
CCleaner is a Windows program designed to free up space on your PC, though CCleaner has a questionable reputation nowadays. Nevertheless, it’s handy for a single use to generate a list of installed programs on your PC; you can then save that software list to a text file.
Once installed, open CCleaner, and click Tools on the left menu. Click the blue Save to text file button in the lower-right corner. On the Save As dialog box, navigate to the folder where you want to save the installed programs list, enter a File name, and click Save.
The list of installed programs includes the company, date installed, size, and version number for each program.
The text is tab-delimited, which makes it somewhat hard to read in a text editor. However, you can import the text from this file into Excel to make it easier to read.
Convert Your List of Programs Into an Excel Worksheet
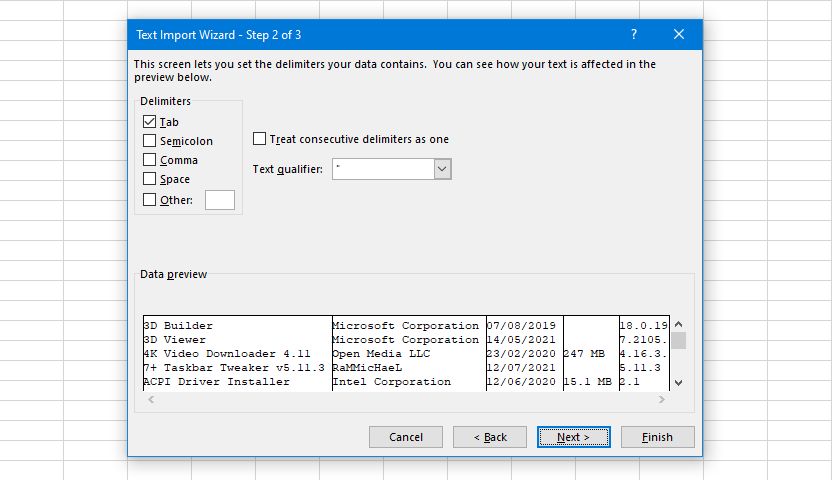
Open Excel and go to File > Open > Browse and change the dropdown next to File name to All files. Then navigate to where you exported the text file and open it.
On the first screen of the Text Import Wizard dialog box, make sure to select Delimited under Choose the file type that best describes your data. Click Next.
On the second screen, make sure Tab is checked under Delimiters.
Click Finish. Your list of programs is then imported into columns on a worksheet in Excel.
5. List Installed Programs Using Geek Uninstaller
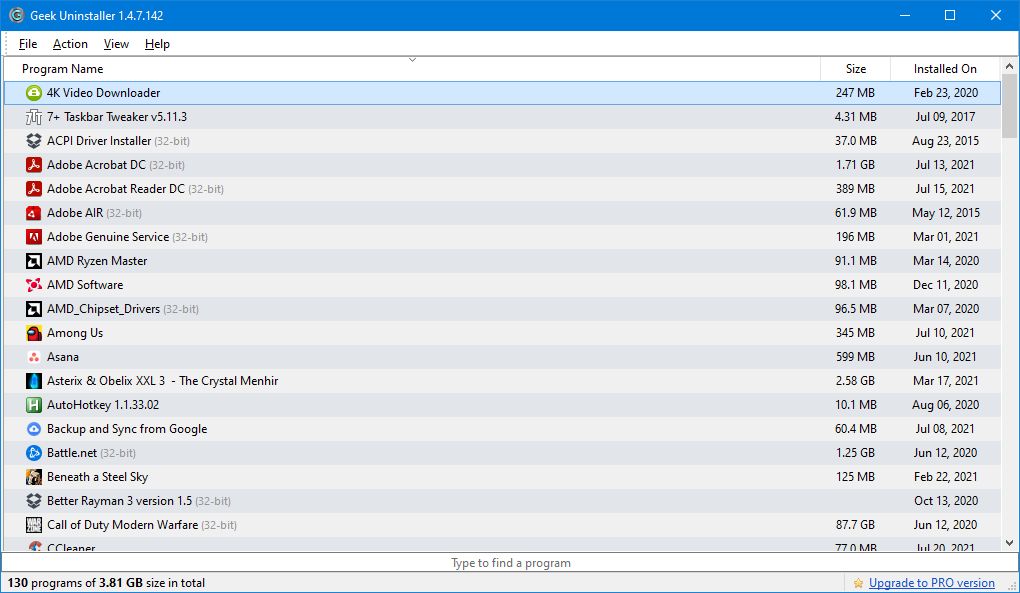
Geek Uninstaller is a free, portable Windows program used to uninstall all unused programs thoroughly. The program will also forcefully remove stubborn or broken programs. In addition, you can use Geek Uninstaller to generate and save a list of installed programs on your PC.
Open the downloaded executable—a list of installed programs will display on the Geek Uninstaller main window.
To save this list to an HTML file, press Ctrl + S. Then, on the Save As dialog box, navigate to the folder where you want to save the installed programs list, enter a File name, and click Save.
The HTML file automatically opens in the default browser once you save it. The list includes the name and size of each program and the program’s installation date.
Geek Uninstaller also allows you to display a list of apps installed from the Windows Store. Go to View > Windows Store Apps. Note that this is a separate list from the other one; it does not combine them. You can export this list to an HTML file the same way you did for the list of regular Windows programs.
And while you’re using Geek Uninstaller, you should consider uninstalling unnecessary Windows programs and apps.
6. List Installed Programs Using Belarc Advisor
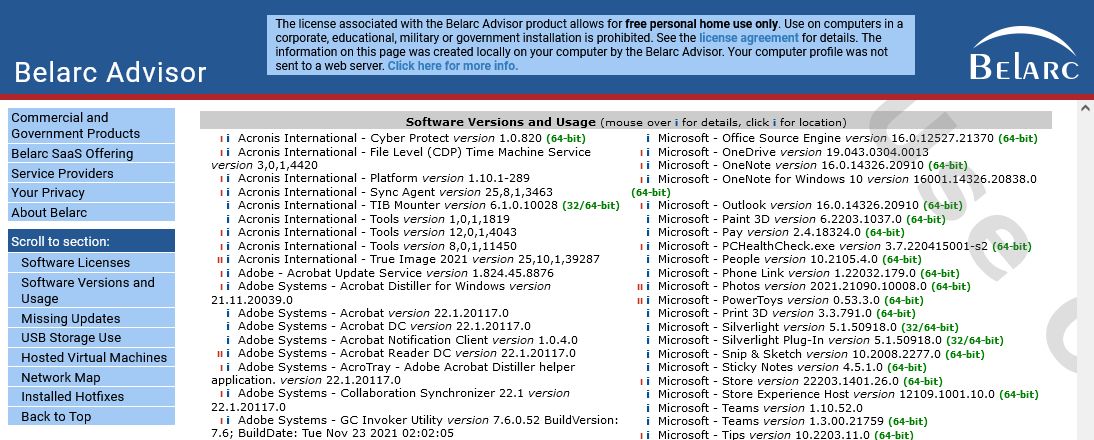
A final program you can use to list all your installed programs on Windows 10 or 11 is Belarc Advisor. This utility is free for personal use. It scans your system and produces a report on your hardware and software.
Once you’ve installed and run Belarc Advisor, it will generate the report and open it in your web browser. Scroll to the Software Versions and Usage section.
Here you’ll find a list of all the software on your system, alongside its version number. Hover the i symbol next to each line to see more information, like the file size of the program. You can also click this to see the folder and file structure of the program. Additionally, Belarc will mark software with an indicator to show when it was last used; the key for this is found at the bottom of the program list.
Move Your Programs Elsewhere
All of these techniques get you the same result, so it’s just a preference as to which one you want to use. If you want to avoid installing anything, go with PowerShell. Otherwise, a third-party app works nicely.
Now you know all the programs you have installed, consider moving those less used to a different drive to free up space.
Иногда чистая установка Windows это хороший способ, исправить серьезные проблемы с вашим компьютером. Но прежде чем переустановить Windows 10, вы можете составить список программ, которые вы в данный момент используете, и после переустановки установить их согласно списку в новую систему.
Иметь список установленных программ также полезно, если вы только что купили новый компьютер, и хотите установить те же программы, которые были на старом компьютере. Вот простой способ сделать это на Windows 10.
Быстрый способ посмотреть все установленные приложения и программы в Windows 10.
Как быстро посмотреть, все приложения установленные на вашем компьютере Windows 10? Это безусловно можно сделать с помощью меню «Пуск», и это логично, Но — Это не самый лучший вариант.
Вот небольшой трюк с помощью Проводника, который отлично подойдет для просмотра установленных программ и приложений, и позволяет легко выполнять такие же действия с ярлыками приложений, как и в меню «Пуск». Проводник покажет вам не только установленные современные приложения, но и традиционные классические программы.
Шаг 1: Откройте Проводник файлов (нажав одновременно клавиши Win + E), введите или скопируйте и вставьте в адресную строку, и нажмите Enter:
Shell:AppsFolder
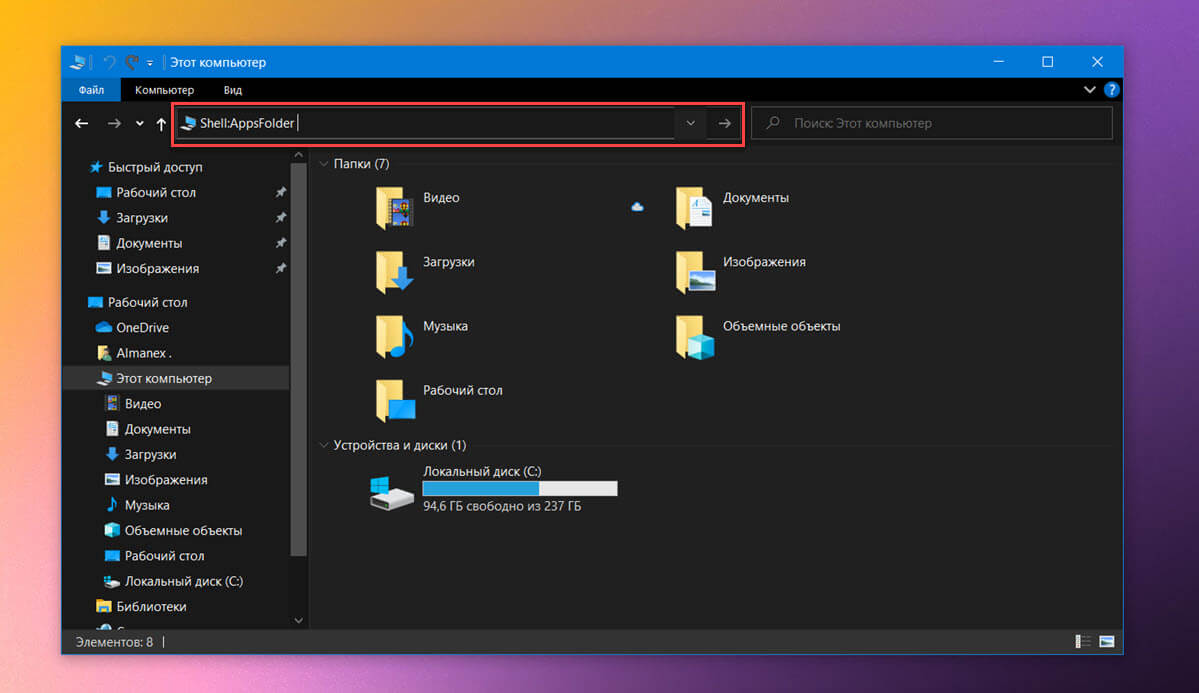
В качестве альтернативы, используйте диалоговое окно «Выполнить», введя Shell:AppsFolder, и нажав Enter.
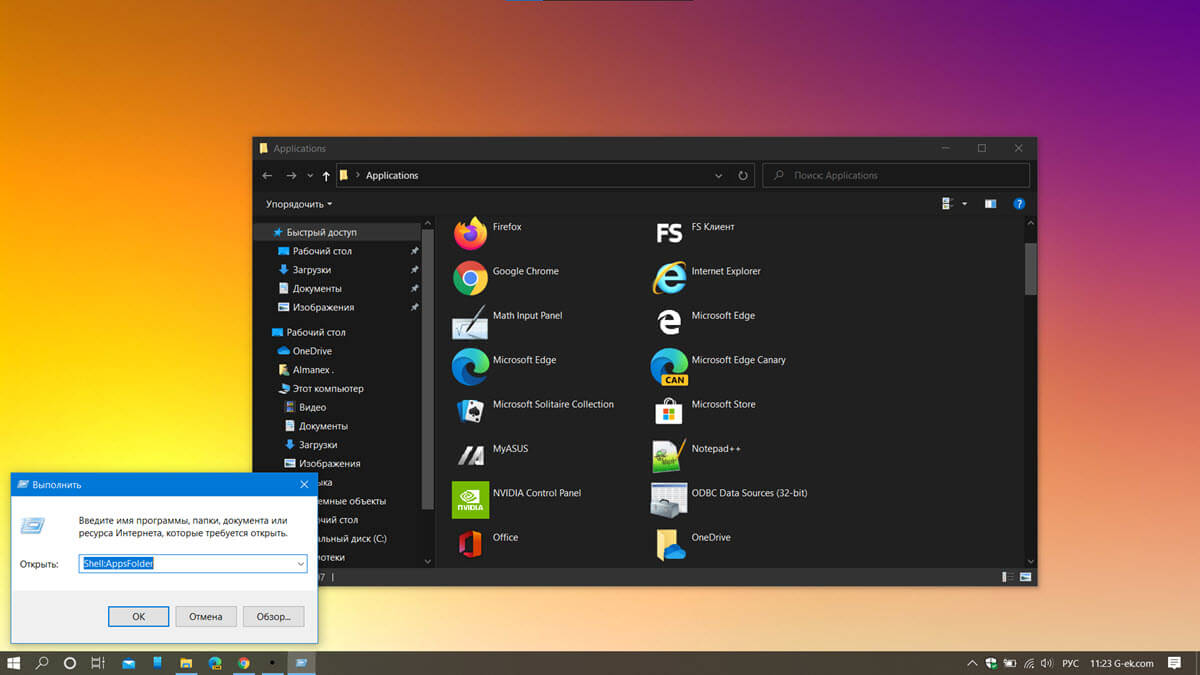
Шаг 2: В результате в окне Проводника будут показаны все установленные приложения и программы в операционной системе.
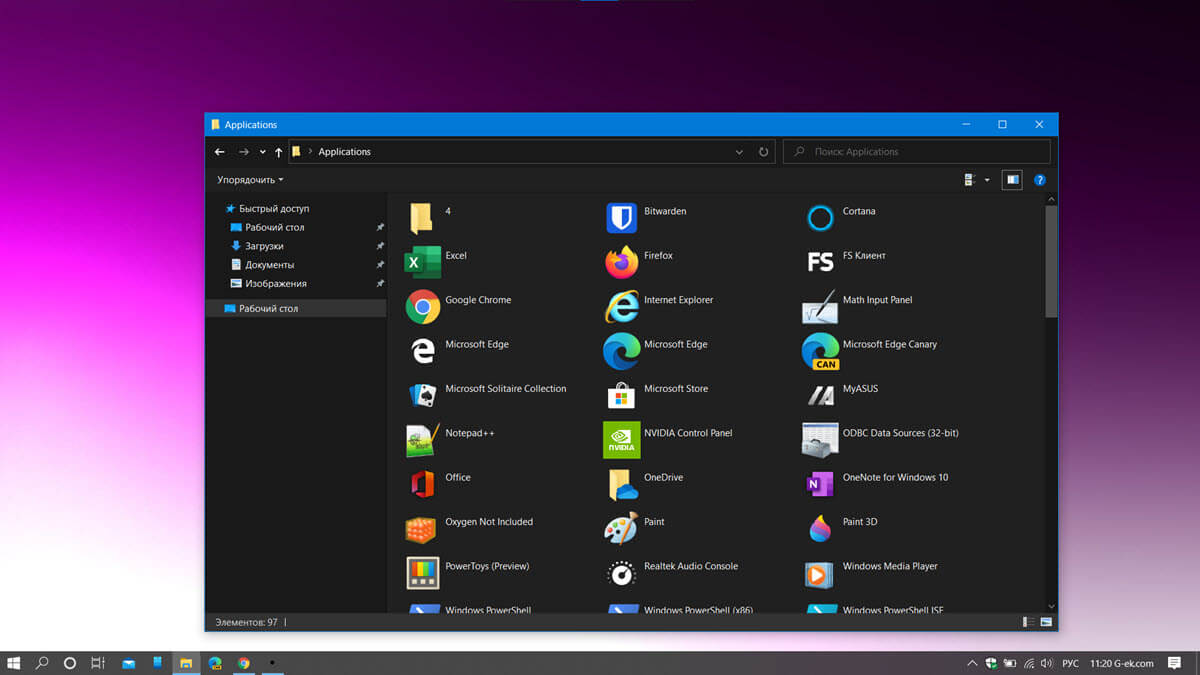
В этом окне вы можете выполнять те же функции Windows 10, как если бы вы просматривали установленные приложения в меню «Пуск \ Все Программы», открывать, удалять, закрепить / открепить на начальном экране, закрепить / открепить на панели задач, и даже создавать ярлыки на рабочем столе для современных приложений Windows 10.
Попробуйте это гораздо проще и удобней, чем возиться с меню Пуск.
Получить список установленных программ и приложений в ОС Windows 10 с помощью PowerShell.
Возможность просмотра всех установленных программ и приложений с помощью PowerShell может пригодиться во многих ситуациях. Какой бы ни была причина, есть много способов использовать PowerShell для создания списка приложений и классических программ, установленных в Windows 10.
Список установленных программ
Используя PowerShell — можно легко получить список установленных программ. На самом деле, все, что вам нужно, это одна команда, которую вы можете скопировать и вставить прямо с этой страницы.
- Откройте PowerShell, кликнув на меню «Пуск» правой кнопкой мыши и выберите Windows PowerShell (Администратор).
- Скопируйте и вставьте следующую команду, и нажмите Enter:
Get-ItemProperty HKLM:\Software\Wow6432Node\Microsoft\Windows\CurrentVersion\Uninstall\* | Select-Object DisplayName, DisplayVersion, Publisher, InstallDate | Format-Table –AutoSize PowerShell покажет вам список всех ваших программ, в комплекте с версией, именем разработчика, и даже датой когда вы установили его.

Вероятно, вы захотите сохранить (экспортировать), список программ в текстовый файл, что тоже достаточно легко. Вы можете просто отправить выходные данные с помощью символа > и добавив путь к новому текстовому файлу, который вы хотите создать.
Например:
Get-ItemProperty HKLM:\Software\Wow6432Node\Microsoft\Windows\CurrentVersion\Uninstall\* | Select-Object DisplayName, DisplayVersion, Publisher, InstallDate | Format-Table –AutoSize > C:\Список_программ.txt
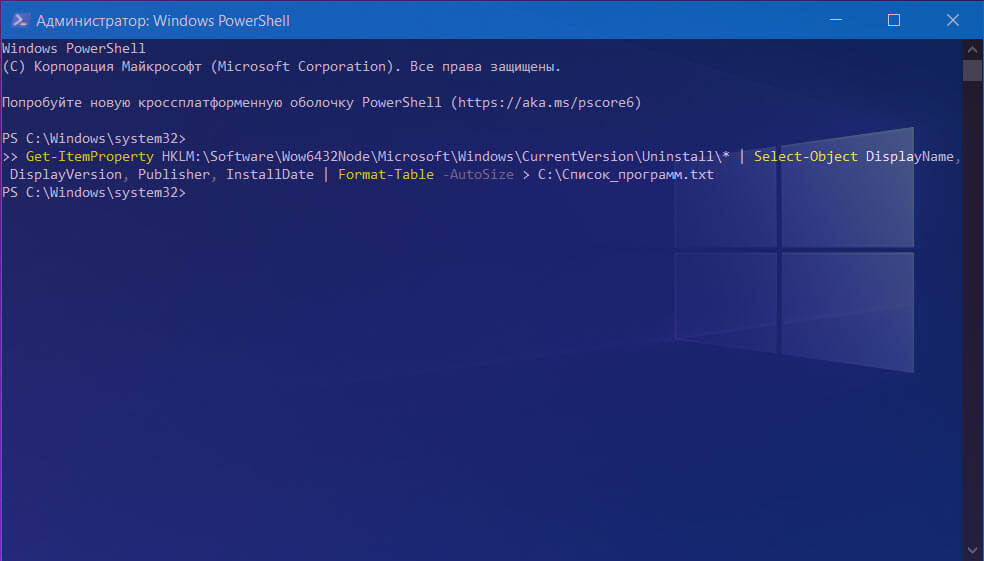
Открыв диск С:\ Вы найдете текстовый файл — «Список_программ.txt»
Вы можете изменить путь и имя списка C:\Список_программ.txt, в конце предыдущей команды.
Список установленных приложений Microsoft Store
Возможно, лучший сценарий использования этого списка — если вы пытаетесь удалить приложение Microsoft Store, которое не можете удалить обычным способом, и хотите узнать его внутреннее имя, чтобы принудительно удалить его с помощью PowerShell.
- Откройте PowerShell от имени администратора.
- Введите следующую команду, чтобы просмотреть список установленных приложений, и нажмите Enter:
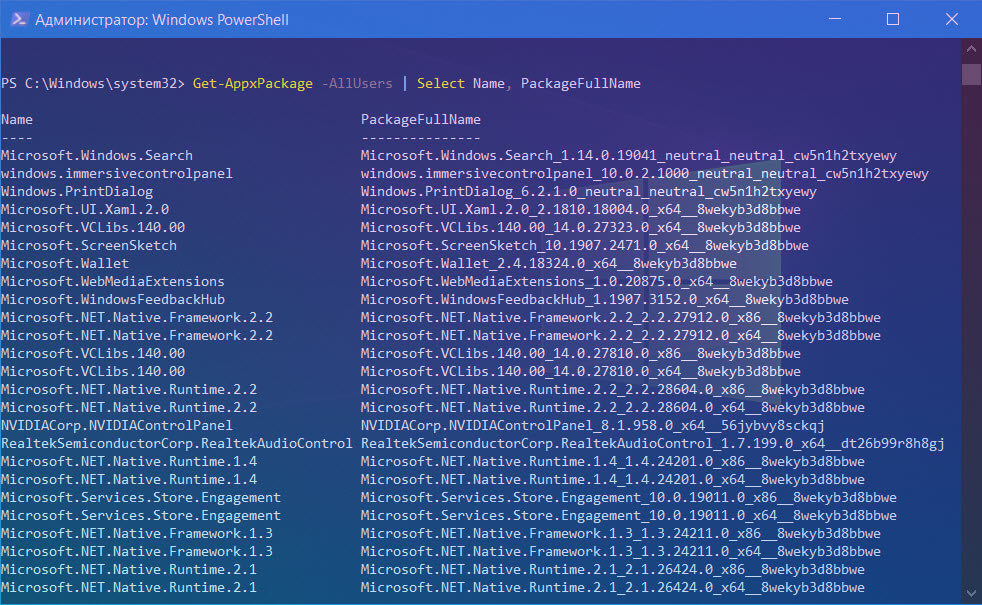
Get-AppxPackage –AllUsers | Select Name, PackageFullName
- (Необязательно) Введите следующую команду, чтобы просмотреть все приложения с подробностями, и нажмите Enter:
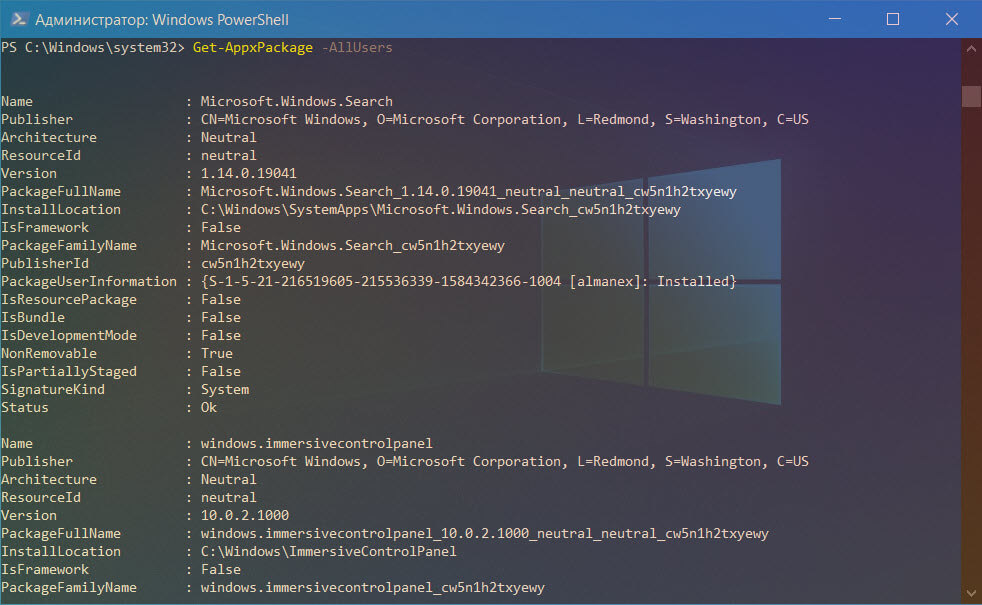
Get-AppxPackage –AllUsers
Когда вы выполните эти шаги, вы увидите список со всеми приложениями Microsoft Store, установленными в Windows 10.
- Если список слишком длинный, вы можете выполнить запрос, чтобы вывести список приложений, которые соответствуют имени или части имени.
Get-AppxPackage –Name *Имя_приложения*
В команде замените *Имя_приложения* на частичное имя приложения, которое вы хотите посмотреть. Звездочки — это подстановочные знаки, которые позволяют перечислить все приложения, которые содержат часть указанного вами имени.
В этом примере выполняется запрос любого приложения, в названии которого есть слово «edge»:
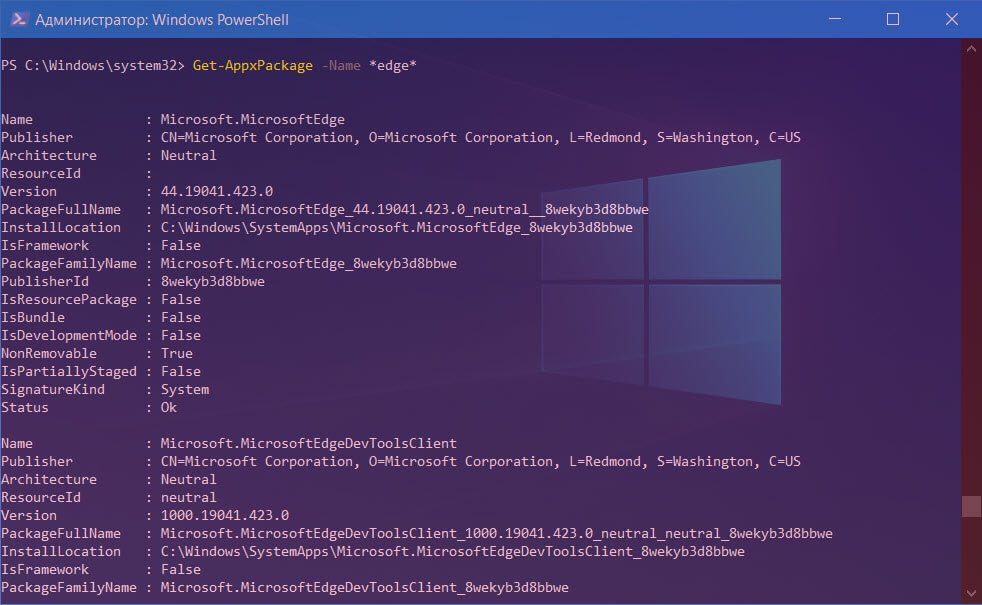
Get-AppxPackage –Name *edge*
После того, как вы выполните эти шаги, PowerShell с генерирует список приложений, который содержит часть указанного вами имени.
Затем вы можете использовать эту информацию для удаления приложения, Cortana, Microsoft Edge, Store, Xbox и многие другие, некоторые приложения заблокированы, и вы не сможете их удалить.
Вам может быть интересно: Как удалить Cortana в Windows 10
Как удалить все приложения Windows 10 с помощью одной команды PowerShell.
Получение списка установленных программ и приложений с помощью стороннего ПО
Некоторые программы деинсталляторы также позволяют экспортировать список установленных программ в виде текстового файла (txt или csv). Для получения списка программ и приложений Windows 10 мы будем использовать CCleaner.
- Запустите инструмент CCleaner
- Перейдите в раздел «Сервис» → «Удаление программ».
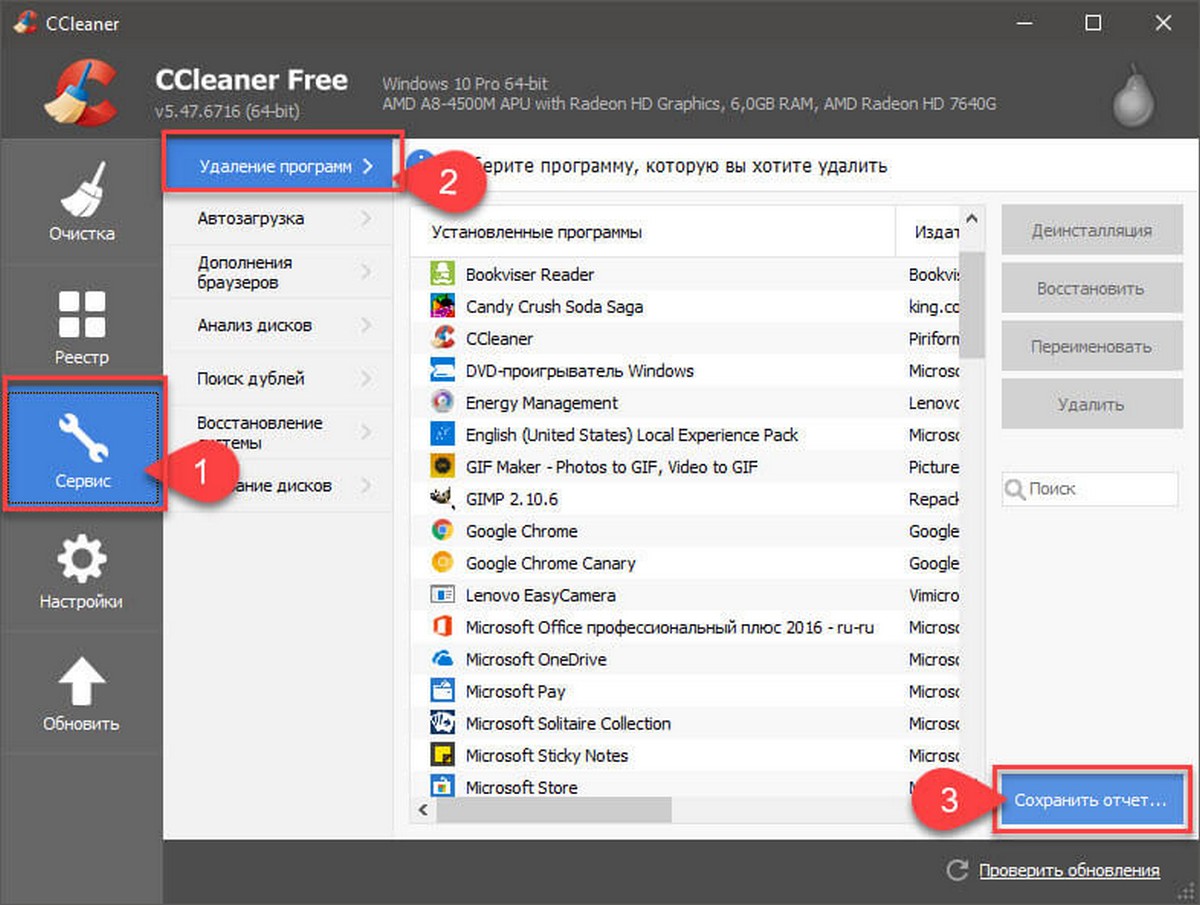
- В правом нижнем углу, нажмите кнопку «Сохранить отчет» в диалоговом окне укажите имя и место сохранения файла со вашим списком программ.
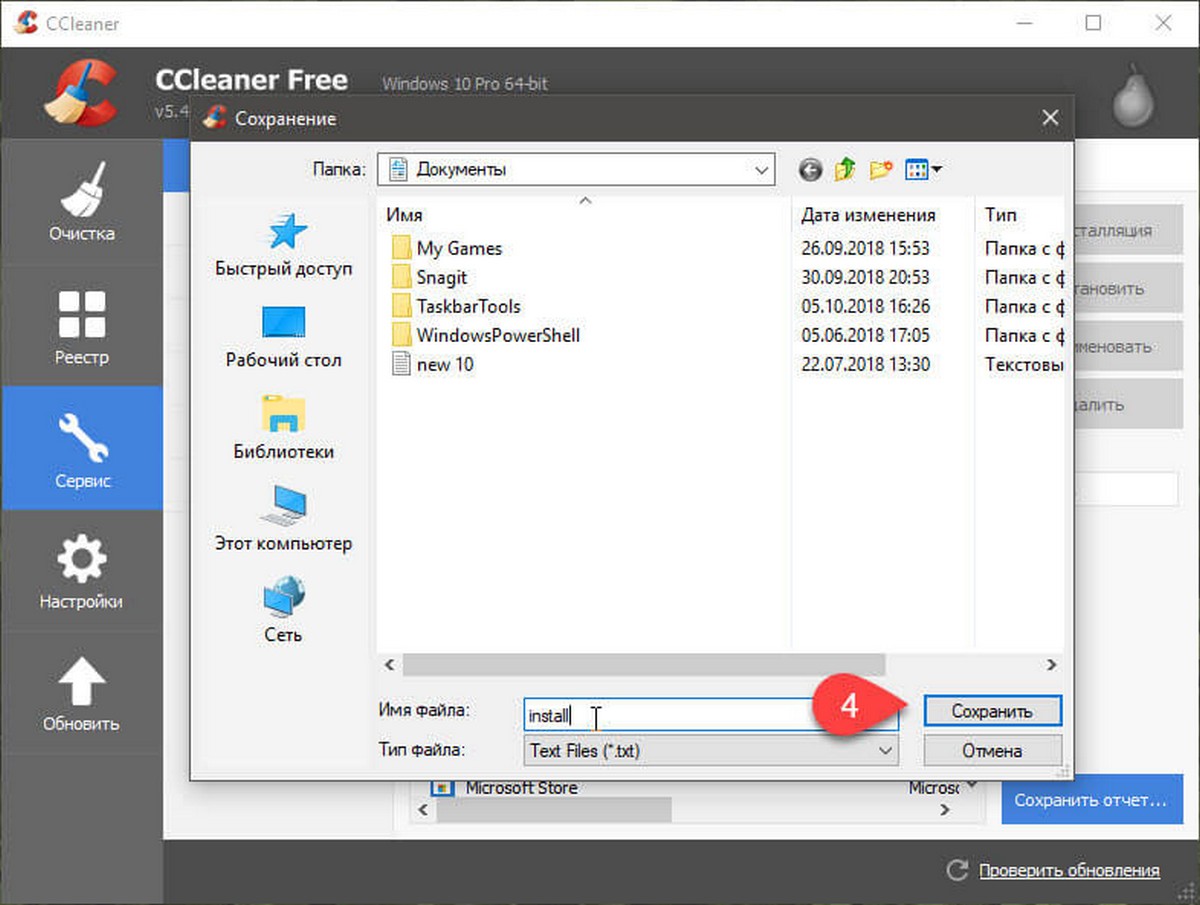
По умолчанию список программ сохраняется в папке «Документы» с именем «Install», откройте его в любом текстовом редакторе.
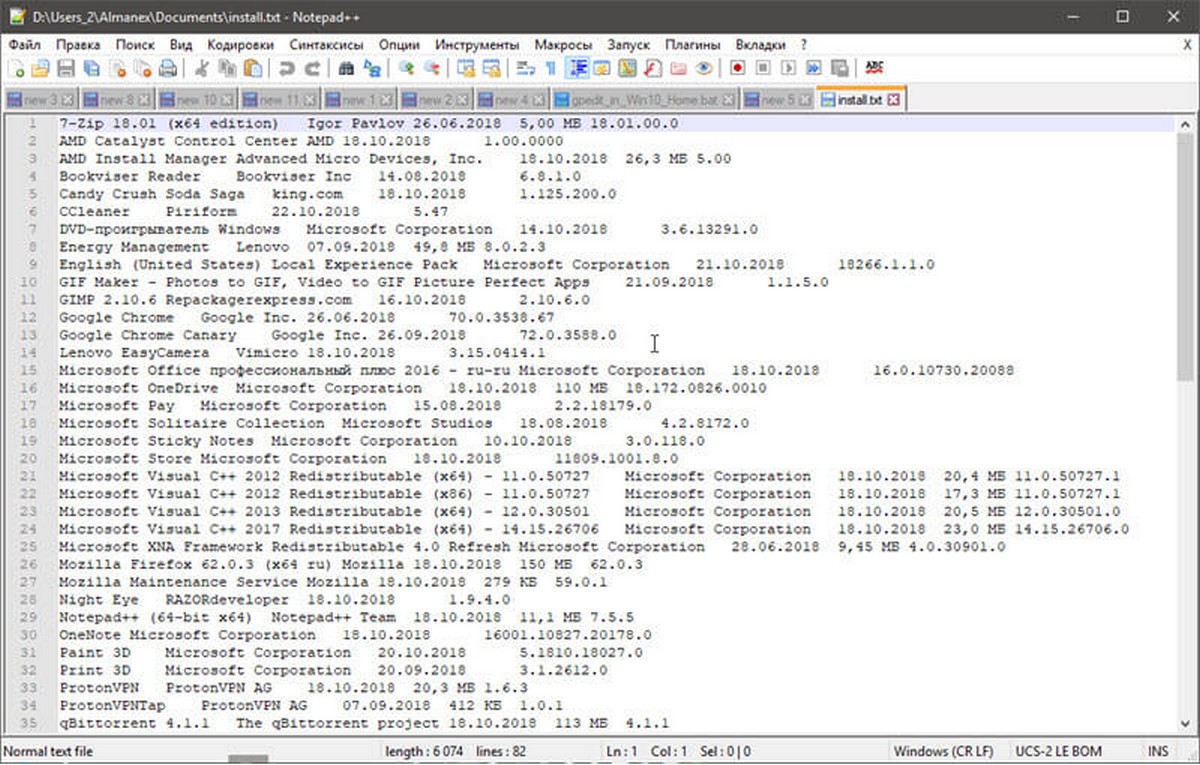
Данный способ сохраняет в списке как классические программы, так и универсальные приложения магазина Microsoft Store.
Получение списка установленных программ с помощью Командной строки
Список программ установленных в системе можно получить с помощью утилиты командной строки WMIC.
- Запустите командную строку от имени администратора и выполните команду:
wmic product get name,version
- Будьте терпеливы, через несколько секунд в консоли будет выведен список названий и версий установленных в вашей системе программ.
Список программ вы можете экспортировать в csv файл с помощью команды:
wmic product get name,version /format:csv > c:\Apps.csv

Вот, пожалуй, и всё на эту тему, надеюсь, для кого-то из читателей информация окажется полезной и найдет свое применение.
If you find that unwanted programs appear on the Programs and Features page even though you have removed/uninstalled them, or if you are unable to uninstall a specific program, then the program has likely been corrupted and it cannot be removed the conventional way.
Using the Windows Registry, you can permanently uninstall programs and apps to ensure that they do not cause further problems.
Table of Contents
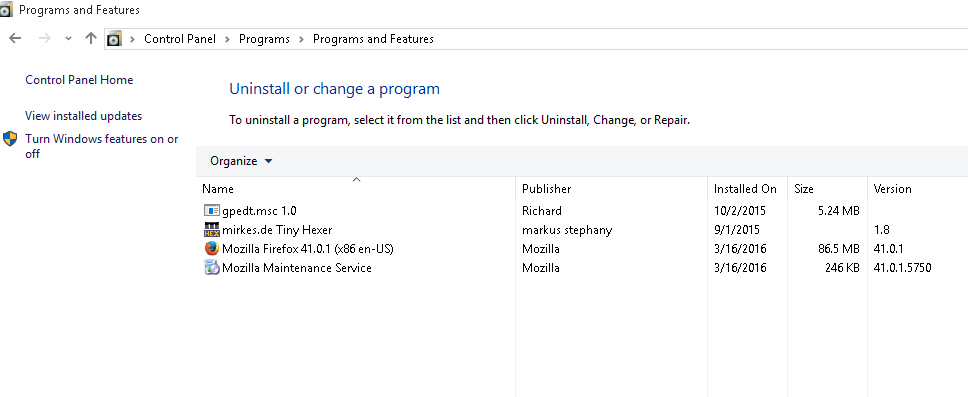
In some cases, you might have uninstalled a program through Add/Remove Program, but it still appears in the Control Panel (Run >> appwiz.cpl) list. If you try to run the program, it will not work either. It is best to attempt to remove it using the methods discussed in this post if that is the case.
Program location in Windows Registry
Each program has either a 32-Bit or 64-Bit architecture on your Windows computer. These categories of programs and apps are stored separately, both on the volume and within the Windows Registry.
The 32-bit applications and programs are stored in the following locations:
System Volume: C:\Program Files (x86)
Windows Registry: Computer\HKEY_LOCAL_MACHINE\SOFTWARE\WOW6432Node\Microsoft\Windows\CurrentVersion\
64-bit apps and programs are saved at the following locations:
System Volume: C:\Program Files
Windows Registry: Computer\HKEY_LOCAL_MACHINE\SOFTWARE\Microsoft\Windows\CurrentVersion\
The CurrentVersion keys further hold sub-keys for different apps and programs. One of the sub-keys is named Uninstall, which contains information pertaining to removing the program.
The values within the Uninstall key can be used to remove the entire program permanently from your computer, which is how we shall be deleting any program(s) that may be causing trouble, or are no longer required.
Uninstall Windows Registry key
Before we proceed to the uninstallation process, let us learn how to determine which key belongs to which program, since most sub-keys in the Uninstall key are not named directly with the associated program’s name.

If you click on the key under Uninstall, you may find the following parameters (values) and the related information:
Note: These are common values. You may see come across some values that are not mentioned in the list below.
- DisplayName
- DisplayVersion
- Publisher
- VersionMinor
- VersionMajor
- Version
- HelpLink
- HelpTelephone
- InstallDate
- InstallLocation
- InstallSource
- URLInfoAbout
- URLUpdateInfo
- AuthorizedCDFPrefix
- Comments
- Contact
- EstimatedSize
- Language
- ModifyPath
- Readme
- QuietUninstallString
- UninstallString
- SettingsIdentifier
The only parameters you should be interested in are DisplayName, QuietUninstallString, and UninstallString.
DisplayName is the identifier that will assist you to recognize to which program the key in the Windows Registry belongs. This means that you will need to click on each key before determining which key is the one that you wish to delete.
Note: Some Windows Registries may be named (correctly) after the associated program.
The values QuietUninstallString and UninstallString will be used in the process of uninstalling the program further down the article.
We can now begin to remove the program that you want to.
Uninstall/Remove programs using Windows Registry
You can uninstall the program through the Windows Registry if you are unable to do so through the program itself, or through the Programs and Features page in the Control Panel.
However, if you simply see a program on the Programs and Features page that is no longer installed but still visible, you can delete the associated Windows Registries to remove it from the list.
Since both processes involve manipulation of the Windows Registry, it is better to create a restore point before proceeding forward, in case the system is at risk of wrongful Registry manipulation.
Completely uninstall the program using Windows Registry
Since the names of the keys in the Windows Registry are ambiguous, it is better to create a backup of the Registry, and then proceed towards the uninstallation.
Here is how to do so:
- Launch the Registry Editor by typing in regedit in Run.
- Now paste the complete location of the Uninstall key in the address bar for quick navigation:
- 32-Bit:
Computer\HKEY_LOCAL_MACHINE\SOFTWARE\WOW6432Node\Microsoft\Windows\CurrentVersion\Uninstall - 64-Bit:
Computer\HKEY_LOCAL_MACHINE\SOFTWARE\Microsoft\Windows\CurrentVersion\Uninstall
- 32-Bit:
- Now look for the key that you want to remove. Remember that you can find the name of the associated program in the DisplayName value.
- When found, right-click on the key and click Export from the context menu.

- In the pop-up window, select a location to save the backup Registry file, enter the name of your choice, and click Save.
A local backup of the Windows Registry that you are about to remove has been made.
- Now, click on the associated key of the program that you want to remove, and then double-click on either of the values in the right-hand pane:
- QuietUninstallString – For quietly removing the program (no prompts or confirmation)
- UninstallString – To remove the program with complete due process
- In the Edit String popup, copy the Value Data.
- Now launch the Command Prompt with administrative privileges, paste the copied content and press Enter to run it.

- If you selected UninstallString in step 6, then you may encounter some confirmation dialog boxes or an uninstall/reinstallation wizard. Follow through with them to remove the program.
- Now confirm if the correct program has been removed through the Programs and Features page in the Control Panel. If so, you can continue to delete the manual backup of the Registry as well. If not, you may want to restore the Registry file by double-clicking it. This will bring back the deleted Windows Registry as it was before.


You will now have successfully removed the program and all of its Registries as well.
Remove programs using Windows Registry
Note: This process does not uninstall the program, but simply removes it from the list under the Programs and Features page in the Control Panel.
Perform the following steps to remove a program that no longer works on your Windows computer, but is still visible in the Programs and Features list.
- Open the Registry Editor by typing in regedit in Run, and then paste either of the following locations in the address bar for quick navigation:
- 32-Bit:
Computer\HKEY_LOCAL_MACHINE\SOFTWARE\WOW6432Node\Microsoft\Windows\CurrentVersion\Uninstall - 64-Bit:
Computer\HKEY_LOCAL_MACHINE\SOFTWARE\Microsoft\Windows\CurrentVersion\Uninstall
- 32-Bit:
- Now determine the key associated with the program that you wish to remove from the list by checking the DisplayName value.
- Once determined, right-click the key and then click Delete from the context menu.
- In the confirmation dialog box, click Yes.

- You can now confirm that the program is no longer visible in the Programs and Features page (Run >> appwiz.cpl).


Verdict
You can run either the UninstallString‘s or QuiteUninstallString‘s value in the Command Prompt when you want to uninstall a program. QuietUninstallString will simply remove the program without confirming with you.
Moreover, we would advise that you adopt these methods when no other method to remove a program has worked since manually working with the Windows Registries can turn out to be deadly for your operating system.