
В современных версиях Windows 11 22H2 и Windows 10 21H2+ появилась возможность установки и управления языковыми пакетами с помощью PowerShell. В предыдущих версиях Windows вы могли установить или удалить языковые пакеты только из графического интерфейса классической панели управления или панели Settings (команда быстрого доступа
ms-settings:regionlanguage
).
В новых версиях Windows был добавлен встроенный PowerShell модуль LanguagePackManagement. С помощью команд из этого модуля вы можете установить дополнительный языковой пакет в Windows и задать предпочтительный язык пользовательского интерфейса Windows.
Модуль LanguagePackManagement пока доступен только в клиентских версиях Windows, но не в Windows Server 2022/2019.
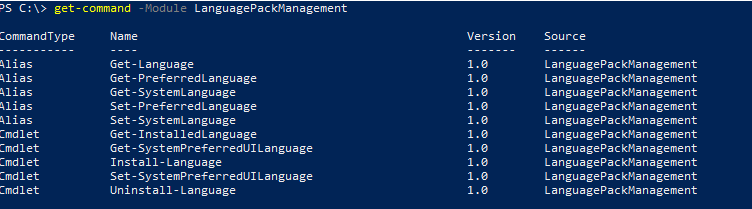
Вы можете вывести список доступных командлетов в модуле:
Get-Command -Module LanguagePackManagement
-
Get-SystemPreferredUILanguage
(
Get-PreferredLanguage
,
Get-SystemLanguage
) – текущий язык системы по умолчанию -
Set-SystemPreferredUILanguage
(
Set-PreferredLanguage
) – задать предпочтительный язык интерфейса Windows -
Get-InstalledLanguage
(
Get-Language
,
Set-SystemLanguage
) – вывести список установленных языковых пакетов и языковых функций -
Install-Language
— установить языковой пакет в Windows -
Uninstall-Language
– удалить языковой пакет
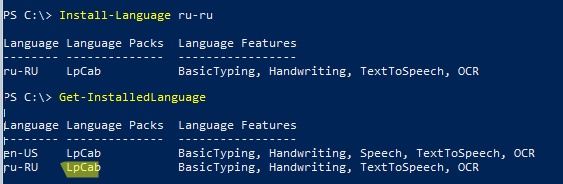
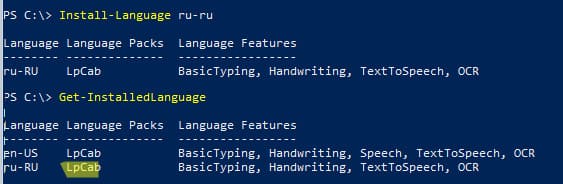
Вывелем список доступных языковых пакетов на компьютере с Windows 10:
Get-InstalledLanguage
В данном примере на компьютере установлен только английский языковой пакет (Language Packs = LpCab). Русский доступен только в качестве языка ввода.
Language Language Packs Language Features
-------- -------------- -----------------
en-US LpCab BasicTyping, Handwriting, Speech, TextToSpeech, OCR
ru-RU None BasicTyping, Handwriting, OCR

Чтобы установить русский языковой пакет, выполните команду:
Install-Language -Language ru-ru
Windows загрузит указанный языковой пакет и дополнительные компоненты с серверов Microsoft и установит их в системе.
Полный список языковых пакетов для Windows
| Тег | Описание |
| ar-SA | Arabic (Saudi Arabia) |
| bn-BD | Bangla (Bangladesh) |
| bn-IN | Bangla (India) |
| cs-CZ | Czech (Czech Republic) |
| da-DK | Danish (Denmark) |
| de-AT | Austrian German |
| de-CH | “Swiss” German |
| de-DE | Standard German |
| el-GR | Modern Greek |
| en-AU | Australian English |
| en-CA | Canadian English |
| en-GB | British English |
| en-IE | Irish English |
| en-IN | Indian English |
| en-NZ | New Zealand English |
| en-US | US English |
| en-ZA | English (South Africa) |
| es-AR | Argentine Spanish |
| es-CL | Chilean Spanish |
| es-CO | Colombian Spanish |
| es-ES | Castilian Spanish (Central-Northern Spain) |
| es-MX | Mexican Spanish |
| es-US | American Spanish |
| fi-FI | Finnish (Finland) |
| fr-BE | Belgian French |
| fr-CA | Canadian French |
| fr-CH | “Swiss” French |
| fr-FR | Standard French (France) |
| he-IL | Hebrew (Israel) |
| hi-IN | Hindi (India) |
| hu-HU | Hungarian (Hungary) |
| id-ID | Indonesian (Indonesia) |
| it-CH | “Swiss” Italian |
| it-IT | Standard Italian (Italy) |
| jp-JP | Japanese (Japan) |
| ko-KR | Korean (Republic of Korea) |
| nl-BE | Belgian Dutch |
| nl-NL | Standard Dutch Netherlands) |
| no-NO | Norwegian (Norway) |
| pl-PL | Polish (Poland) |
| pt-BR | Brazilian Portuguese |
| pt-PT | European Portuguese (Portugal) |
| ro-RO | Romanian (Romania) |
| ru-RU | Russian (Russian Federation) |
| sk-SK | Slovak (Slovakia) |
| sv-SE | Swedish (Sweden) |
| ta-IN | Indian Tamil |
| ta-LK | Sri Lankan Tamil |
| th-TH | Thai (Thailand) |
| tr-TR | Turkish (Turkey) |
| zh-CN | Mainland China, simplified characters |
| zh-HK | Hong Kong, traditional characters |
| zh-TW | Taiwan, traditional characters |
Вы можете использовать дополнительные параметры команды Install-Language:
-
-CopyToSettings
– позволяет сразу назначить данный язык в качестве языка по умолчанию и применить настройки к экрану входа в Windows и для новых пользователей;Ранее вы могли сменить языковые настройки и раскладку клавиатуры на экране входа в систему через панель управления и реестр.
В Windows 11 доступен специальный командлет, который позволяет применить скопировать языковые настройки текущего пользователя и применить его к Welcome Screen и новым пользователям:
Copy-UserInternationalSettingsToSystem -WelcomeScreen $true -NewUser $true -
-ExcludeFeatures
– позволяет исключить дополнительные компоненты языкового пакета (FoD, Features on Demand) из установки. Такие FoD (Features on Demand), как OCR, TextToSpeech или Handwriting.
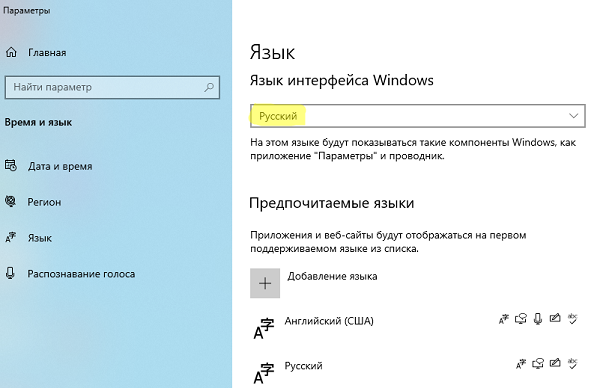
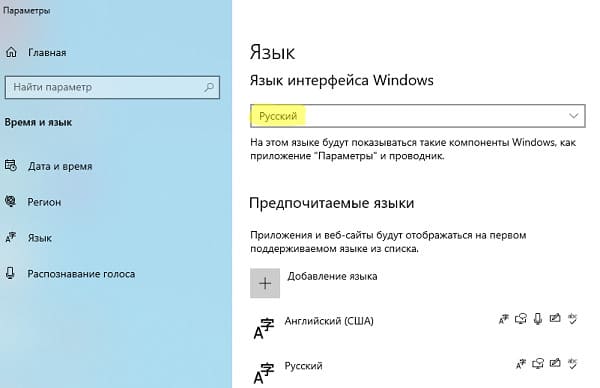
Вывести предпочтительный язык интерфейса Windows:
Get-SystemPreferredUILanguage
В данном случае язык интерфейса английский (
en-us
).
Чтобы задать русский язык в качестве основного языка Windows, нужно выполнить команду:
Set-SystemPreferredUILanguage -Language ru-ru
Чтобы применить новый языковой пакет, нужно перезагрузить Windows. Выполните команду:
Restart-Computer
После перезагрузки язык интерфейса Windows сменится на русский.
Чтобы удалить ненужный языковой пакет в Windows:
Uninstall-Language -Language ru-ru
Если ваш компьютер не подключен к интернету, вы можете установить дополнительные языковые пакеты и компоненты с помощью DISM. Для этого вам нужно скачать ISO образ с Language Pack (https://learn.microsoft.com/en-us/azure/virtual-desktop/windows-11-language-packs), смонтировать ISO образ в Windows и установить языковой пакет и компоненты с помощью команд:
Dism /Online /Add-Package /PackagePath:D:\LanguagesAndOptionalFeatures\Microsoft-Windows-Client-Language-Pack_x64_ru-ru.cab
Dism /Online /Add-Capability /capabilityname:Language.Basic~~~ru-ru~0.0.1.0 /source:D:\LanguagesAndOptionalFeatures
Dism /Online /Add-Capability /capabilityname:Language.Handwriting~~~ru-ru~0.0.1.0 /source:D:\LanguagesAndOptionalFeatures
Dism /Online /Add-Capability /capabilityname:Language.OCR~~~ru-ru~0.0.1.0 /source:D:\LanguagesAndOptionalFeatures
Dism /Online /Add-Capability /capabilityname:Language.Speech~~~ru-ru~0.0.1.0 /source:D:\LanguagesAndOptionalFeatures
Dism /Online /Add-Capability /capabilityname:Language.TextToSpeech~~~ru-ru~0.0.1.0 /source:D:\LanguagesAndOptionalFeatures
This post covers the steps to add language packs offline using DISM. We will see how to use Deployment Image Servicing and Management (DISM) to add additional language packs to a wim file. When you deploy operating system using SCCM, you deploy it with a specific language pack. In Windows 7, language packs can be installed only from the Optional Updates section in Windows Update. So if one needs a different language pack, it has to be installed manually. This is a tedious task especially when you have more than one language packs to be installed.
In large deployments, you might want to install the additional language packs for OS that you deploy. There are two ways to simplify this task. Deploy the OS and install all the language packs. Capture the OS and then use this captured wim file and deploy this wim file. There is also another way to do this. Get the wim file and using DISM add the language packs. The second method is what we are going to cover in this post.
Language packs are available as .cab files and are usually named with their locale. You need to know the locale before you add the LP to wim file. A list of all language packs available for windows 10 are listed here. In addition language packs can be downloaded from Microsoft volume licensing site. If you are using SCCM, you would have installed Windows ADK as a prerequisite. To service and prepare you images, we use DISM tool. It’s a command line tool and can be used to service wim and virtual hard disk files. More info about DISM is documented here.

If you are running Windows 10, the DISM tool comes pre-installed and is located in System32 folder. So bringing up command prompt and running DISM command should launch it. Note that when you inject language packs to a wim file, the size of wim file increases. So i would suggest you add only required language packs and not all of them unless it is really required.
How to Add Language Packs Offline Using DISM (Offline WIM File)
The below steps shows how to add language packs offline using DISM. I have got the Windows 7 wim file with me (install.wim is located in sources folder withing ISO file). Launch the command prompt as administrator and type the below commands. I am currently performing the below steps on my primary site server where ADK 1803 is installed. You may choose any other machine as well to achieve this task.
Step 1 – Determine Image Index Number
It is essential to find the image index before you proceed further. Type the following command to retrieve the name or index number. Using the below command we can find out index number and name of the image as well.
Syntax - Dism /Get-ImageInfo /ImageFile:<path to wim file>
In this example, my command looks like this
Command Used - Dism /Get-ImageInfo /ImageFile:\\corpsccm\Sources\OS\Win7\sources\install.wim
 1")
Step 2 – Mount the WIM File
The first step is to mount the wim file. Create a folder and name it as mount.
Syntax - DISM /mount-wim /wimfile:<path to wim file> /index:<image in WIM, e.g. 1> /mountdir:<mount dir path>
In this example, my command looks like this
Command Used - DISM /mount-wim /wimfile:\\corpsccm\Sources\OS\Win7\sources\install.wim /index:1 /mountdir:E:\sources\mount
 2")
Step 3 – Add or Inject Language Packs
I have got two language packs which I will be adding it to wim file. Ensure that you have language packs copied over to a folder. Create a new folder and name it as Scratch. Type the below command to add a language pack to the mounted offline image.
Syntax - dism /image:<mount folder path> /scratchdir:<scratch folder path> /add-package /packagepath: <path to .cab file>
In this example, my command looks like this
Command Used - dism /image:E:\sources\mount /scratchdir:E:\sources\scratch /add-package /packagepath:\\corpsccm\Sources\LP\ja-jp\lp.cab
 3")
Step 4 – Commit Changes
We have added the language packs offline using DISM. The last step is to commit the changes. Type the following command to commit the changes. You can now use the wim file to deploy the OS which also includes language packs.
Syntax - dism /commit-wim /mountdir:<path to mount dir>
My command looks like this
Command Used - dism /commit-wim /mountdir:E:\sources\mount
 4")
Still Need Help?
If you need further assistance on the above article or want to discuss other technical issues, check out some of these options.
When deploying Windows through offline images (ISOs) with special language requirements, it can be difficult for a sysadmin to install language packs to each system individually. Today we are going to show you how you can insert language packs directly into ISO images before you install the operating system on a computer.
Table of Contents
The process of adding new updates or features to a pre-existing Windows setup media is known as Slipstreaming. Using this method, you can keep your existing ISO images updated with the required language packs.
Learn how to add Windows Cumulative Updates to existing ISO images.
Before we begin, it would be helpful to understand the types of language packs Microsoft offers for Windows.
Add Language Packs to existing Windows ISO media
Adding language packs to existing ISO images is a step-by-step process. You can do so by performing the tasks below in the order it is given in, and you should have no problems doing so.
Note: This method is applicable for both Windows 11 and Windows 10 ISO images.
Download and install Windows Assessment and Deployment Kit (WindowsADK)
WindowsADK is a tool used to aid in the deployment of Windows OS in bulk, or on a large number of devices.
To learn more about WindowsADK, refer to this blog post.
You can also download and install WindowsADK through the guide provided in the post. We suggest that you do so before proceeding forward to the next step. This is because WindowsADK provides certain elements that are required to push the language packs into existing ISO images, such as the “Windows Kits” folder that can be found in C:\Program Files (x86).
 1")
Download and extract Windows ISO Image
If you do not already have an ISO image to begin with, you can download Windows 10 ISO image here, and Windows 11 ISO image from here.
Once downloaded, right-click on the ISO file and click Mount from the context menu. When mounted, copy its content to an empty folder.
 2")
Alternatively, you can also extract the ISO image from the context menu (using WinRAR, etc.) directly into an empty folder.
 3")
We have extracted the image to D:\Extract\. Once done, you may now proceed to the next step.
Determine image Index Number
Usually, an ISO image contains multiple editions of the same Windows, such as Professional, Education, Home, etc. Each of these editions has its own index number. An index number is an integer associated with each of these editions, which is required later when updating the ISO image with new language packs. Hence, we must determine the index number for the edition you will be deploying in the future using this ISO.
Launch the Command Prompt with administrative privileges, then use the following command to determine the index number for the OS:
Dism /Get-ImageInfo /ImageFile:<PathToExtractedFolder>\sources\install.wimReplace <PathToExtractedFolder> with the complete path to where you extracted the ISO image. Here is an example of the command above:
Note: Do not close the Command Prompt until the very end, as any work done will need to be performed all over again.
 4")
Since we will be adding language packs to Windows 11 Pro, the index number we will be using is 6.
Mount .WIM file using DISM
The next step is to mount the extracted Install.wim file to an empty folder so that changes can be applied to it.
Now that the install.wim file has been mounted successfully, it is now time to move on to the next step.
Add language pack(s)
You should now be able to add language packs to the mounted .wim file. However, you must first download the .cab files for the language packs that are right for your operating system. You can download them from the internet directly.
Once downloaded, proceed with the command shown below to mount the language pack(s) to your ISO:
Dism /Image:"<PathToNewFolder>" /Add-Package /PackagePath="<PathTo.CABLanguagePack>"In the command above, replace <pathToNewFolder> with the complete path with the folder you had created earlier (to which the .wim file is mounted) and also replace <PathTo.CABLanguagePack> with the complete version of the downloaded language pack. Here is an example:
 7")
You can now continue to add as many language packs as you like. Remember that more language packs mean the larger the footprint of the operating system.
Commit and dismount
Once the language packs have been incorporated into the .wim file, all that is left to do is save the changes and then dismount the install.wim file. Use the command given below to commit the changes and dismount.
dism /Unmount-wim /mountdir:"<PathToNewFolder>" /commitReplace <PathToNewFolder> with the complete path of the folder where install.wim file is mounted. In our case, we will be using the following command:
dism /Unmount-wim /mountdir:"D:\MountISO" /commitNote that this may take a few minutes and the Command Prompt may look like it is stuck. However, that is not the case. Please allow a few minutes to commit and dismount successfully.
 8")
Covert extracted folder back to ISO image
You may now convert the updated Windows files and folders back to an ISO image using third-party tools. Here is a guide on how to convert files and folders into ISO images.
Closing words
With lesser download volume and customized language preferences, updating an existing ISO image can be speedy. It eliminates the headache of installing multiple language packs on a number of computers later on.
Let’s learn how to add language packs offline in Windows Image using DISM. There are several methods to deploy Windows 10 or Windows 11 language packs. Here you will see the steps to add language packs for Windows Image Via DISM (Offline Servicing).
Deployment Image Servicing and Management (DISM) is a command-line tool used to update offline Windows images. There are two ways to install or remove packages offline with DISM. You can either apply an unattend answer file to the offline image, or you can add or remove the package directly from the command prompt.
Microsoft also Introduced Local Experience Packs (LXPs), which are modern language packs delivered through the Microsoft Store or Microsoft Store for Business. So you no longer have to wait for feature update releases to deliver improved translations to you.
You can create Windows images with LIP by installing the appropriate LXP from the language pack ISOs for full languages (aka SKU languages), Microsoft has not yet retired the legacy language packs (lp.cab), so you will need to continue to add lp.cab for full languages to the OS image using DISM.

The four steps process helps you to keep your Windows Image (WIM) file updated –
Modify an image offline: Start with an image file (either .wim or .ffu format). Mount the file using DISM. It appears as a group of folders. Modify it using DISM, adding drivers, languages, and more. Use DISM to unmount and commit the changes back to the original image file. Apply it to new devices.
- Intune Learn to Deploy Windows 10 Language Pack Step by Step | MEM
- How to Deploy Windows App Win32 Using Intune |Language Pack
Download Language Packs
If you have an Enterprise subscription, we recommend that you download language pack media from MSDN or VLSC (Volume Licensing Service Center).
To select and download multiple language packs at once, select MultiLanguage. If you only need one language pack, select the individual language pack.
The results will return the currently available ISO images containing language packs and local experience packs.
Important – Identify the image index before you proceed further to add Windows update. You can get more details about the Image Index. Here we are extracting the Windows 10 Enterprise Edition; you must specify /index:3.
Mount the Windows image (Install.wim) – Use DISM to mount the image into a temporary location on your PC.
- Open a command prompt or DISM (Deployment and Imaging Tools Environment) with administrator privileges.
- Type the following command for creating an empty folder/directory to mount the offline Windows image (Wim).
In this example – The directory is created inside the D drive named _Mount and WIM File location “D:\Win10 21H2\install.wim” Make sure that you adjust the paths as per your environment.
Note: Don’t mount images to protected folders, such as your User\Documents folder.
mkdir D:\_Mount

Dism /mount-wim /wimfile:"D:\Win10 21H2\install.wim" /mountdir:D:\_Mount /index:3
Add a Language package to an image – To achieve full localization of target language during OSD, generally, we install LP.cab files in an offline image using DISM.
Note – It is recommended that you copy the language packs to your computer before adding the language packs to the image.
To apply the download language pack (.cab) to your mounted image. Type the following command to install language packs to the image.
For example, the following command shows how to add a French language pack: /packagepath:<path_to_Language_Packs_directory>
Dism /image:D:\_Mount /add-package /packagepath:"D:\LanguagePack\fr-fr.cab"
Validate Language Packs Installation – Add Language Packs Offline
/Get-Intl: Displays information about international settings and languages.
- Use the
/Image:<path_to_offline_image_directory>option to display information about international settings and languages in the offline image.
Dism /image:D:\_Mount /get-intl

Output -> Execution Status
Reporting offline international settings.

Default system UI language : en-US
System locale : en-US
Default time zone : Pacific Standard Time
User locale for default user : en-US
Location : United States (GEOID = 244)
Active keyboard(s) : 0409:00000409
Keyboard layered driver : Not installed.

Installed language(s): en-US
  Type : Fully localized language.
Installed language(s): fr-FR
  Type : Partially localized language, MUI type.
  Fallback Languages en-US

The operation completed successfully.
Unmount Windows Image – Add Language Packs Offline
After you modify a mounted image, you must unmount it. If you mount your image with the default read/write permissions, you can commit your changes. This makes your modifications a permanent part of the image.
To save changes you make to the image, use the /commit option when you use DISM to unmount the image.
Dism /unmount-wim /mountdir:D:\_Mount /commit
Add a language to an existing language list
This example adds the language French (France) to the language list of the user.
Run the following PowerShell commands with user context to complete the process –
- Get-WinUserLanguageList : Get a language list for the current account.
- Set-WinUserLanguageList : Sets the language list and associated properties for the current user account.
Substitute in the command above with the actual language tag (ex: “fr-FR”) for the language (ex: “French (France)” you want to set as your display language.
- The first command gets the user language list by using the Get-WinUserLanguageList cmdlet. The command stores the result in the $OldList variable.
- The second command adds a language to the object in $OldList.
- The final command sets the language list of the current user to the revised value of $OldList.
$OldList = Get-WinUserLanguageList
$OldList.Add("fr-FR")
Set-WinUserLanguageList $OldList -Force
Troubleshooting – If you experiencing any issue while injecting language packs with any of the command lines from DISM, you can locate the log file in C:\Windows\Logs\DISM for more details.
В современных версиях Windows 11 22H2 и Windows 10 21H2+ появилась возможность установки и управления языковыми пакетами с помощью PowerShell. Ранее вы могли устанавливать языковые пакеты только через графический интерфейс панели управления или Settings. Теперь эта задача выполняется через PowerShell с помощью нового модуля LanguagePackManagement.
Приобрести оригинальные ключи активации Windows 11 можно у нас в каталоге от 1690 ₽
Этот модуль доступен только в клиентских версиях Windows, таких как Windows 11 и Windows 10, но не в Windows Server 2022/2019. Для управления языками, введите команду:
Get-Command -Module LanguagePackManagement
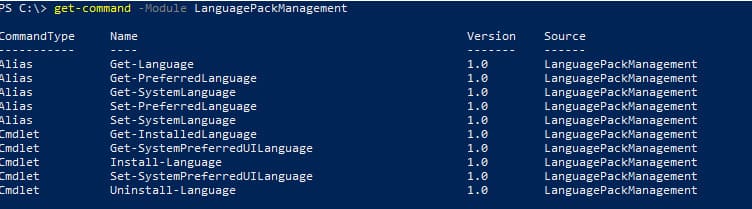
Доступные команды:
— Get-SystemPreferredUILanguage — отображает текущий язык интерфейса.
— Set-SystemPreferredUILanguage — задает предпочтительный язык интерфейса.
— Get-InstalledLanguage — выводит список установленных языковых пакетов.
— Install-Language — устанавливает языковой пакет.
— Uninstall-Language — удаляет языковой пакет.
Установка языковых пакетов
Чтобы увидеть список установленных языковых пакетов на компьютере, выполните команду:
Get-InstalledLanguage
Пример вывода:
Language Language Packs Language Features

-------- -------------- -----------------

en-US    LpCab           BasicTyping, Handwriting, Speech, TextToSpeech, OCR

ru-RU    None            BasicTyping, Handwriting, OCR

Для установки русского языкового пакета:
Install-Language -Language ru-ru
Система загрузит необходимые файлы с серверов Microsoft и установит их.
Полный список языковых пакетов для Windows:
| Тег | Описание |
|---|---|
| ar-SA | Arabic (Saudi Arabia) |
| bn-BD | Bangla (Bangladesh) |
| bn-IN | Bangla (India) |
| cs-CZ | Czech (Czech Republic) |
| da-DK | Danish (Denmark) |
| de-AT | Austrian German |
| de-CH | “Swiss” German |
| de-DE | Standard German |
| el-GR | Modern Greek |
| en-AU | Australian English |
| en-CA | Canadian English |
| en-GB | British English |
| en-IE | Irish English |
| en-IN | Indian English |
| en-NZ | New Zealand English |
| en-US | US English |
| en-ZA | English (South Africa) |
| es-AR | Argentine Spanish |
| es-CL | Chilean Spanish |
| es-CO | Colombian Spanish |
| es-ES | Castilian Spanish (Central-Northern Spain) |
| es-MX | Mexican Spanish |
| es-US | American Spanish |
| fi-FI | Finnish (Finland) |
| fr-BE | Belgian French |
| fr-CA | Canadian French |
| fr-CH | “Swiss” French |
| fr-FR | Standard French (France) |
| he-IL | Hebrew (Israel) |
| hi-IN | Hindi (India) |
| hu-HU | Hungarian (Hungary) |
| id-ID | Indonesian (Indonesia) |
| it-CH | “Swiss” Italian |
| it-IT | Standard Italian (Italy) |
| jp-JP | Japanese (Japan) |
| ko-KR | Korean (Republic of Korea) |
| nl-BE | Belgian Dutch |
| nl-NL | Standard Dutch (Netherlands) |
| no-NO | Norwegian (Norway) |
| pl-PL | Polish (Poland) |
| pt-BR | Brazilian Portuguese |
| pt-PT | European Portuguese (Portugal) |
| ro-RO | Romanian (Romania) |
| ru-RU | Russian (Russian Federation) |
| sk-SK | Slovak (Slovakia) |
| sv-SE | Swedish (Sweden) |
| ta-IN | Indian Tamil |
| ta-LK | Sri Lankan Tamil |
| th-TH | Thai (Thailand) |
| tr-TR | Turkish (Turkey) |
| zh-CN | Mainland China, simplified characters |
| zh-HK | Hong Kong, traditional characters |
| zh-TW | Taiwan, traditional characters |
Дополнительные параметры:
— -CopyToSettings — позволяет установить язык по умолчанию и применить его для Welcome Screen и новых пользователей.
— -ExcludeFeatures — исключает дополнительные функции, такие как OCR, TextToSpeech или Handwriting.
Вывести предпочтительный язык интерфейса Windows:
Get-SystemPreferredUILanguage
В данном случае язык интерфейса английский ( en-us ).
Для применения нового языка интерфейса, выполните:
Set-SystemPreferredUILanguage -Language ru-ru
Чтобы применить новый языковой пакет, нужно перезагрузить Windows. Выполните команду:
Restart-Computer
Удаление языковых пакетов
Для удаления ненужного языкового пакета выполните команду:
Uninstall-Language -Language ru-ru
Если нужно удалить ненужные языки раскладки клавиатуры:
Set-WinUserLanguageList
Установка языковых пакетов с помощью DISM
Если ваш компьютер не подключен к интернету, языковые пакеты можно установить через DISM. Сначала нужно скачать ISO-образ с языковыми пакетами, затем выполнить команды для установки языковых компонентов:
Dism /Online /Add-Package /PackagePath:D:\LanguagesAndOptionalFeatures\Microsoft-Windows-Client-Language-Pack_x64_ru-ru.cab

Dism /Online /Add-Capability /capabilityname:Language.Basic~~~ru-ru~0.0.1.0 /source:D:\LanguagesAndOptionalFeatures

Dism /Online /Add-Capability /capabilityname:Language.Handwriting~~~ru-ru~0.0.1.0 /source:D:\LanguagesAndOptionalFeatures

Dism /Online /Add-Capability /capabilityname:Language.OCR~~~ru-ru~0.0.1.0 /source:D:\LanguagesAndOptionalFeatures

Dism /Online /Add-Capability /capabilityname:Language.Speech~~~ru-ru~0.0.1.0 /source:D:\LanguagesAndOptionalFeatures

Dism /Online /Add-Capability /capabilityname:Language.TextToSpeech~~~ru-ru~0.0.1.0 /source:D:\LanguagesAndOptionalFeatures
Лицензионный ключ активации Windows от