
How to Install XAMPP on Windows Server 2016 / 2019 / 2022. In this tutorial we will introduce XAMPP, it’s components with it’s benefits and move onto installation phase
XAMPP is a cross platform software stack used to develop and test programs and web applications, created by the Apache friends organization. It simplify your web development process without installing each component separately.
What Is XAMPP?
XAMPP is the most popular open source platform that stands for Cross Platform, Apache, MySQL, PHP and Perl. This web solution kit offers Apache delivery for multiple servers and command line executables.
While releasing a client or website to the main cloud, it enables you to validate it on your computers and laptops. It is a framework that is highly efficient in providing an environment suitable for testing and verifying the project’s functionality as per Apache, Perl, MySQL, and PHP framework.
Moreover, the installation process of XAMPP is fast and straightforward. Until it is installed on a local computer, it tends to provide a local server or local host so that you can verify them before adding them to the remote web server.
XAMPP Components
The components of XAMPP are as follows:
- Apache – It is a cross platform HTTP web server that enables you to transport web material all over the world.
- MariaDB – Earlier, XAMPP used to have MySQL DBMS. However, now it has been taken over by MariaDB. This relational database management system provides storage, manipulation, retrieval, management and deletion services through the Internet.
- PHP – PHP stands for Hypertext Prepossessor. It is a backend programming language that can be used to build dynamic websites and applications.
- Perl – Perl is often considered the “generic” programming language, which is dynamic and interpretable.
- phpMyAdmin – It is a database administration tool for MariaDB.
- OpenSSL – It is an open source implementation of SSL and TLP.
- Webalizer – This web analytic software solution is used to keep track of user logs and reports on usage.
- Filezilla – This File Transfer Protocol Server not only facilitates but also supports file transfer processes.
- Tomcat – This Java based servlet provides JAVA functionality.
- Mercury – This mail server aids in the management of emails all across the internet.
- Cross Platform – Since different operating systems are installed in different configurations, cross platform is used to improve the functionality and reach of this Apache distribution package.
XAMPP benefits
The benefits of XAMPP are as follows:
- This web server is easy to install.
- It is a Multi Cross Platform that implies works on both Windows and Linux.
- It has a control panel that constitutes start and stop buttons for specific mechanisms like Apache running through the control panel.
- It enables you to start and stop the entire web server and database stack with a single command.
- It provides its users with both full and standard versions.
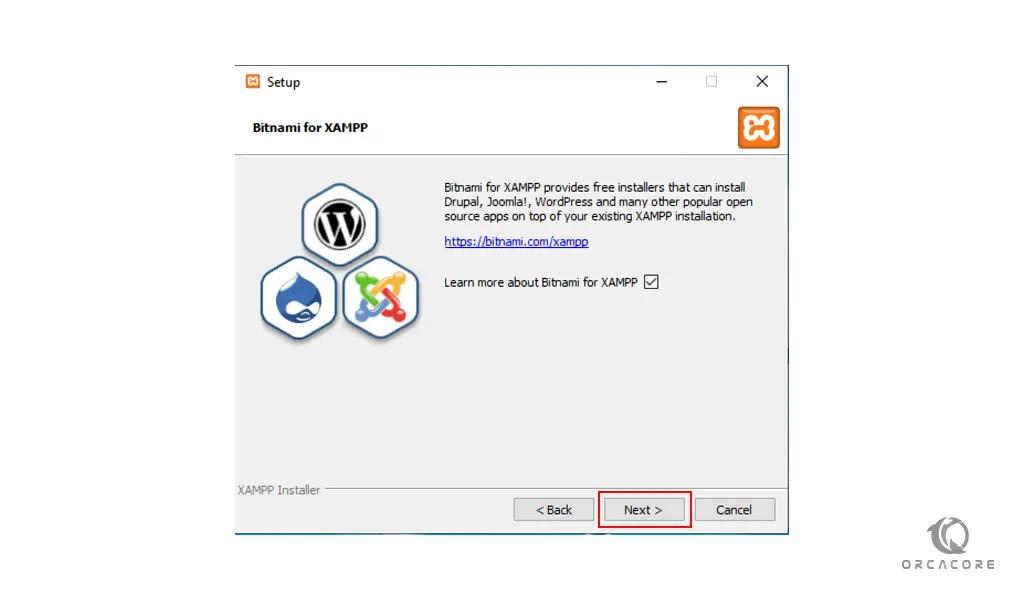
- It includes OpenSSL, phpMyAdmin, MediaWiki, Joomla, WordPress, and several additional modules.
Follow this post to learn how to install XAMPP on Windows Server 2016 / 2019 / 2022.
Install XAMPP on Windows Server 2016 / 2019 / 2022
Prerequisites
- A server running Windows Server 2019 operating system along with RDP access.
- A user with administrative privileges.
- Minimum 4 GB of RAM with 2 Cores CPU.
Download and Install XAMPP
Before starting, you will need to visit the official Apache Friends website and download the latest version of XAMPP on your server. Follow the below steps to install XAMPP on Windows Server:
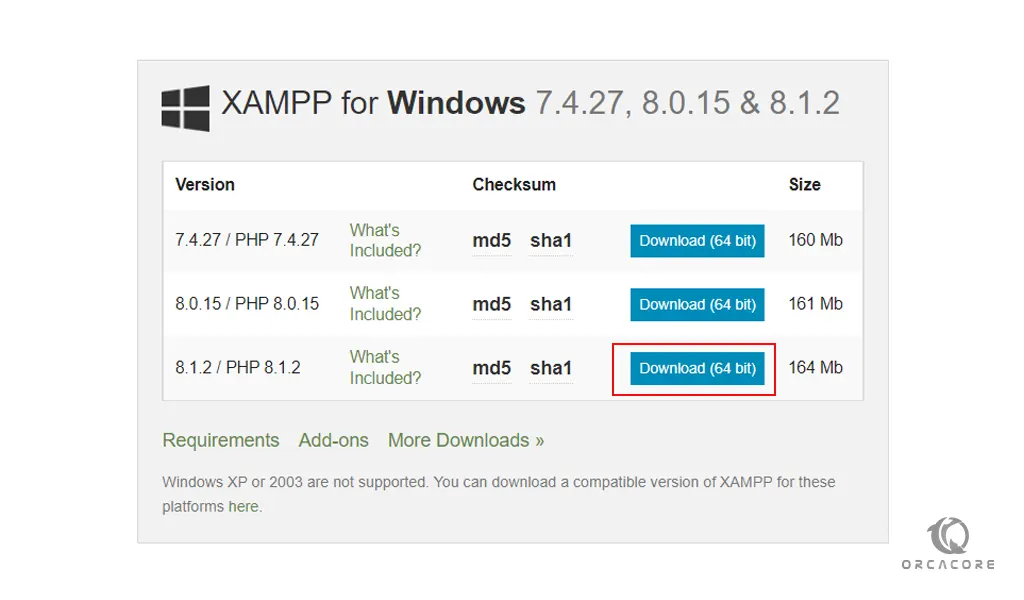
Step 1 – Click here to visit the XAMPP download page as shown below:
Step 2 – Choose your desired version and download it to your server.
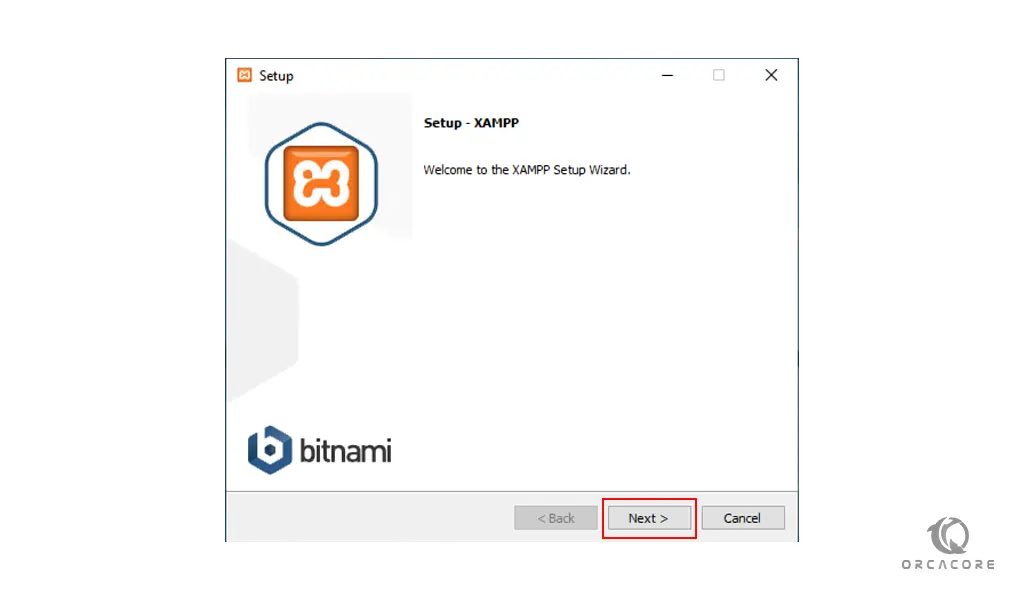
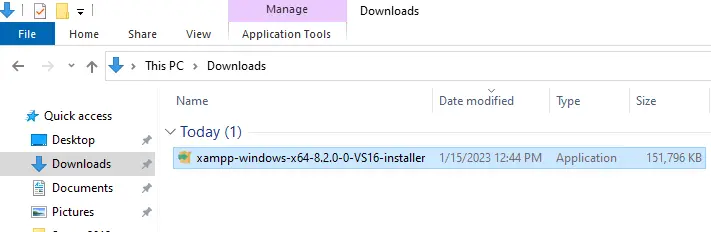
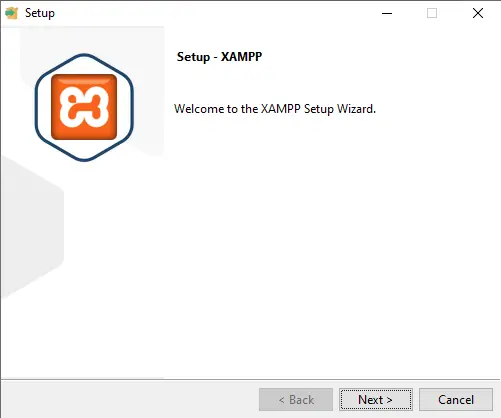
Step 3 – Once the download is completed, double click on the downloaded file to start the installation. You should see the XAMPP setup screen:
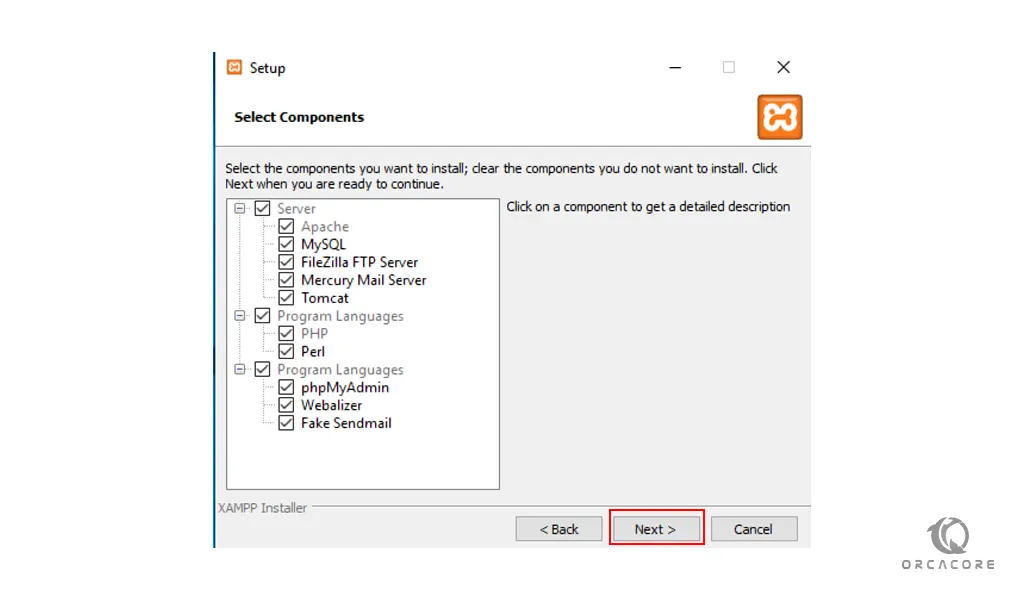
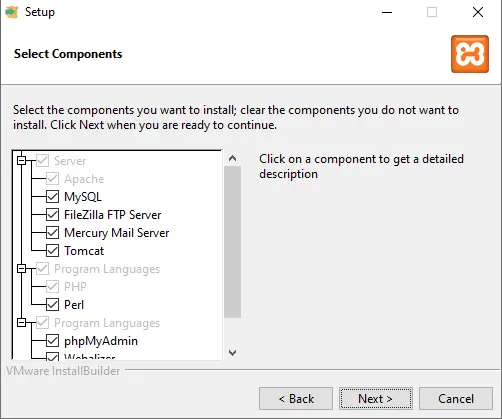
Step 4 – Click on the Next button. You should see the component selection screen:

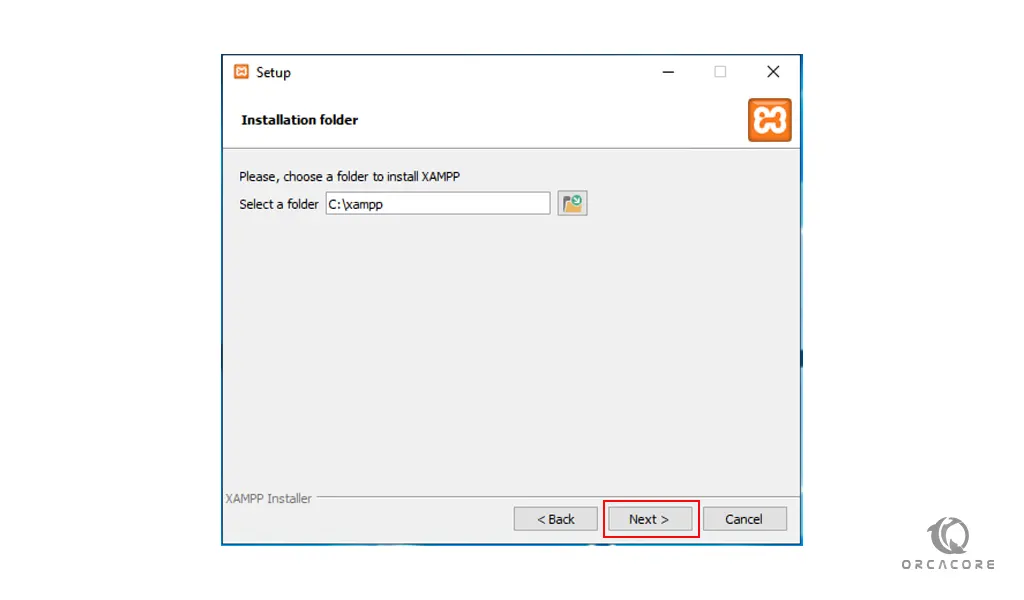
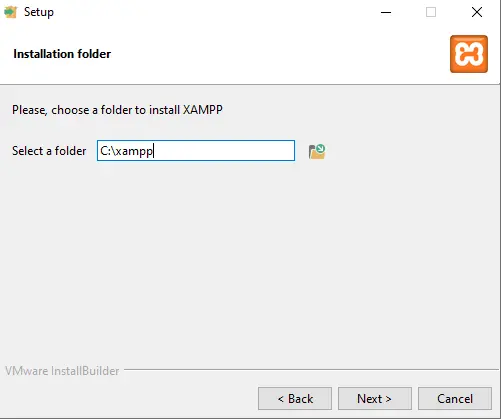
Step 5 – Select your required components and click on the Next button. You should see the installation folder selection screen:

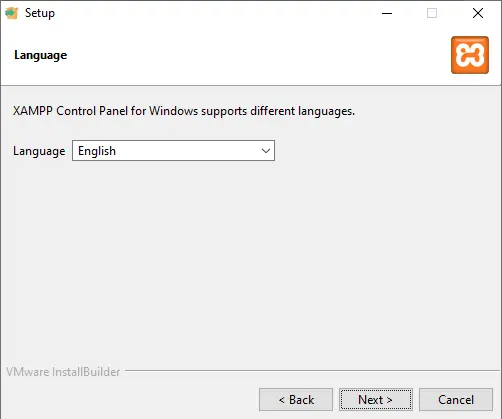
Step 6 – Define your install location and click on the Next button. You should see the language selection screen:

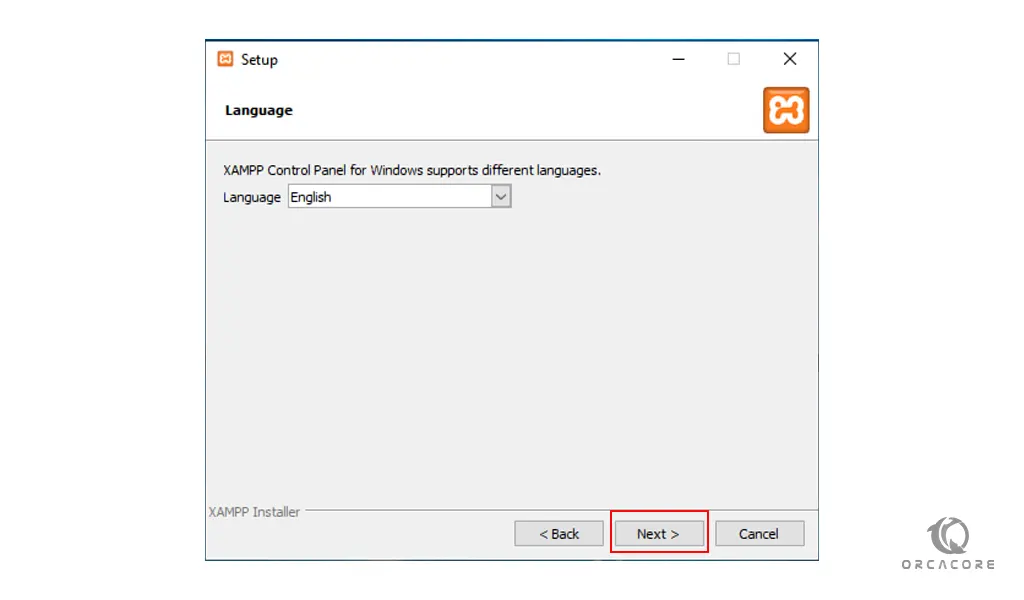
Step 7 – Select your language and click on the Next button. You should see the XAMPP information screen:

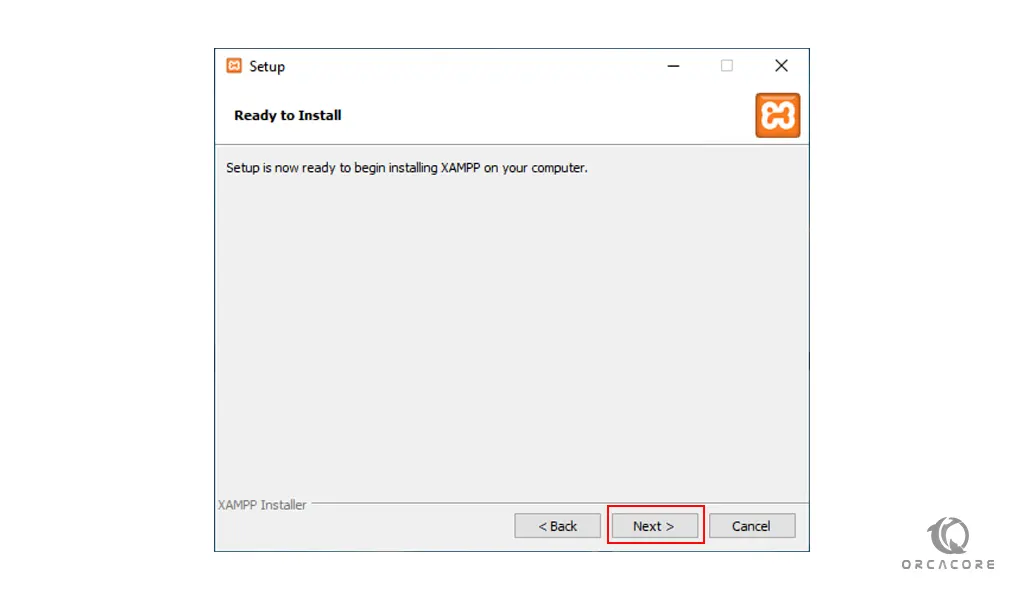
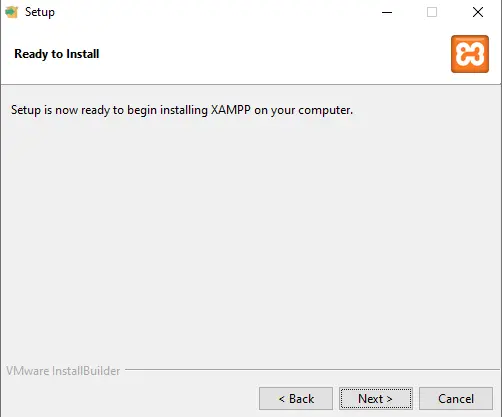
Step 8 – Read all information and click on the Next button. You should see the Ready to Install screen:
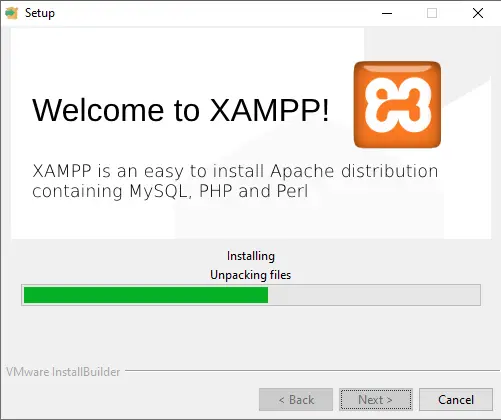
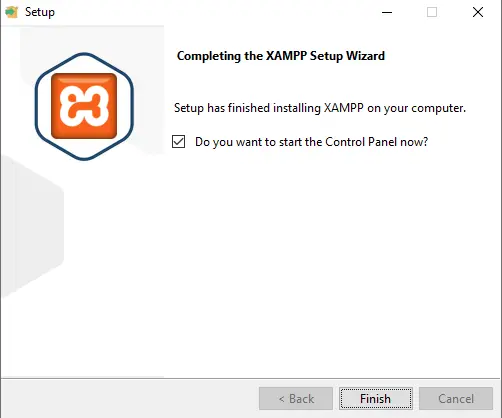
Step 9 – Click on the Next button to start the installation process. Once the XAMPP installation completes, you should see the following screen:

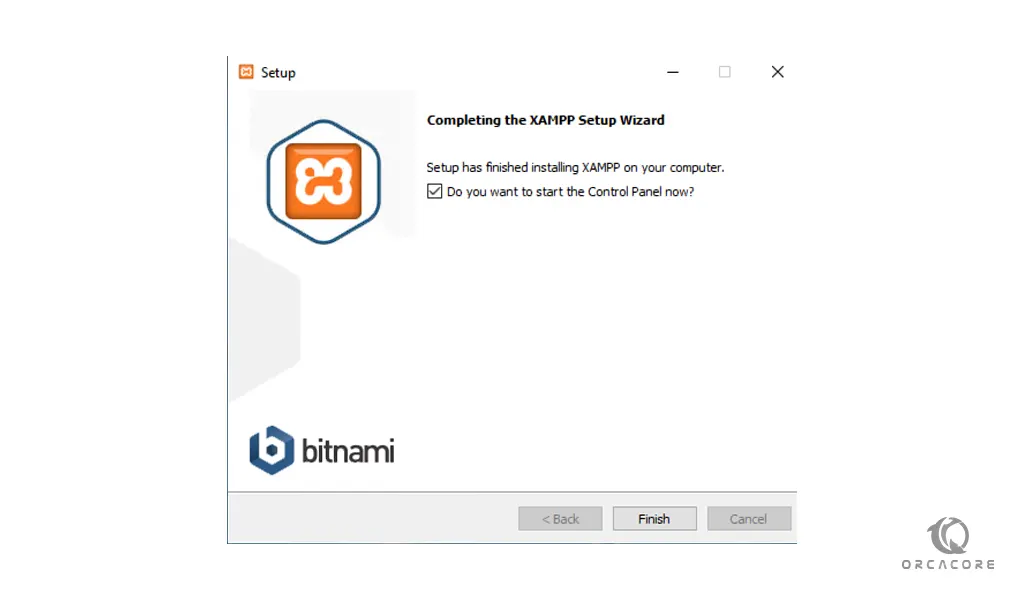
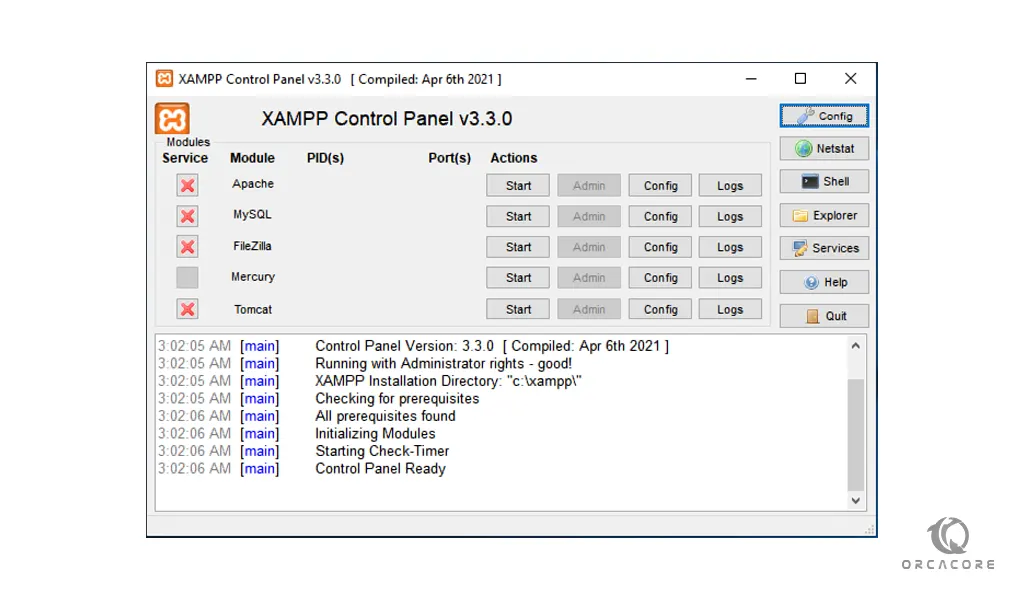
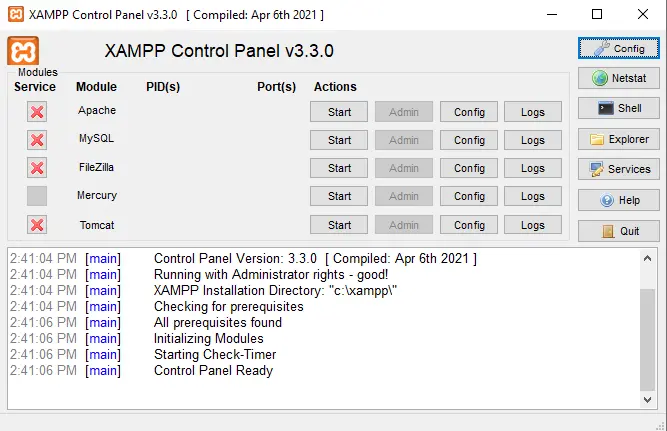
Step 10 – Click Finish to close the wizard. Once the XAMPP installation completes, it will open the XAMPP control panel as shown below:

How to Use XAMPP Control Panel on Windows Server
XAMPP provides a simple and easy to use graphical control panel to configure the various components. You can perform the following tasks:
- Start and stop different services like Apache, MySQL, Tomcat, Mercury and more.
- Access the admin page of Apache, FileZilla, MySQL/MariaDB, Mercury and Tomcat.
- Access and modify the configuration parameters of different services.
- Access the error logs.
Next in this article about how to Install XAMPP on Windows Server 2016 / 2019 / 2022 let’s see how to use each component.
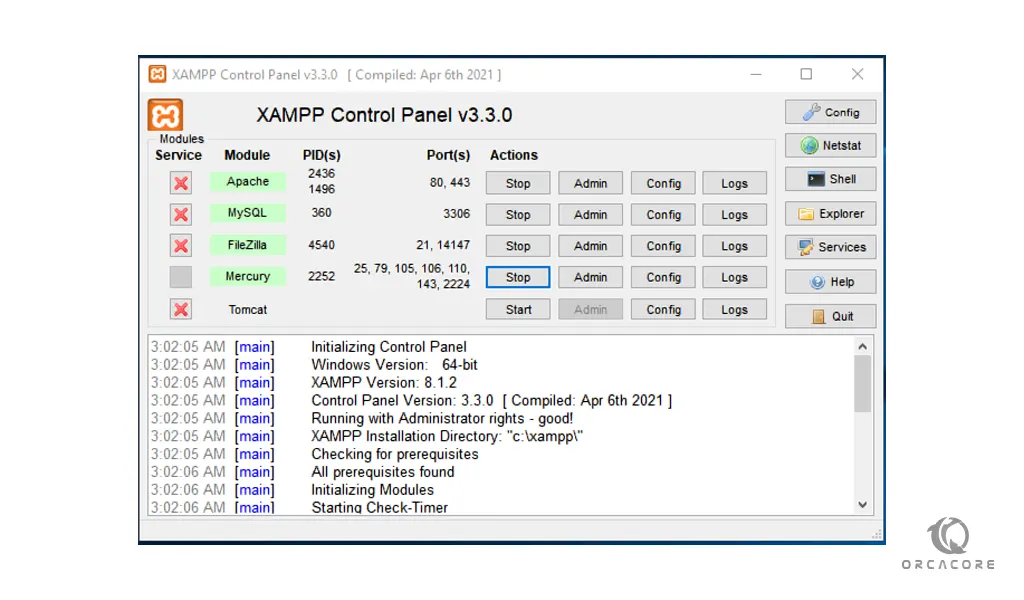
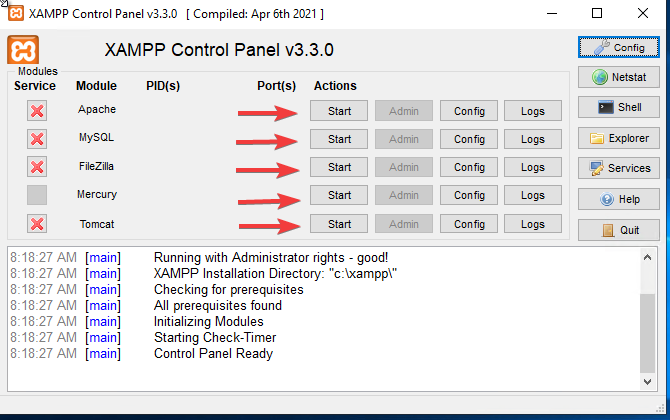
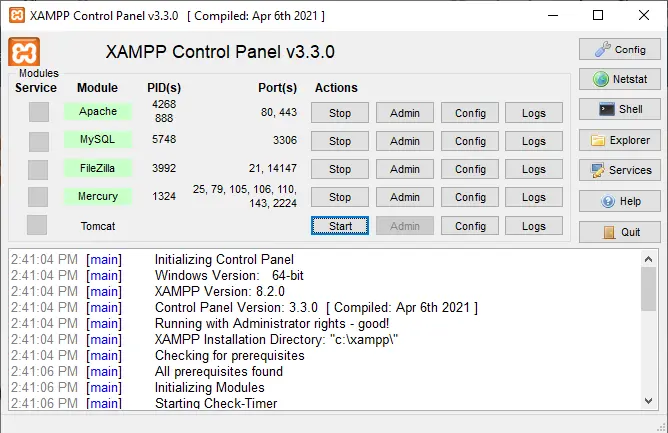
Click on the Start button in the Action column to start different services as shown below:

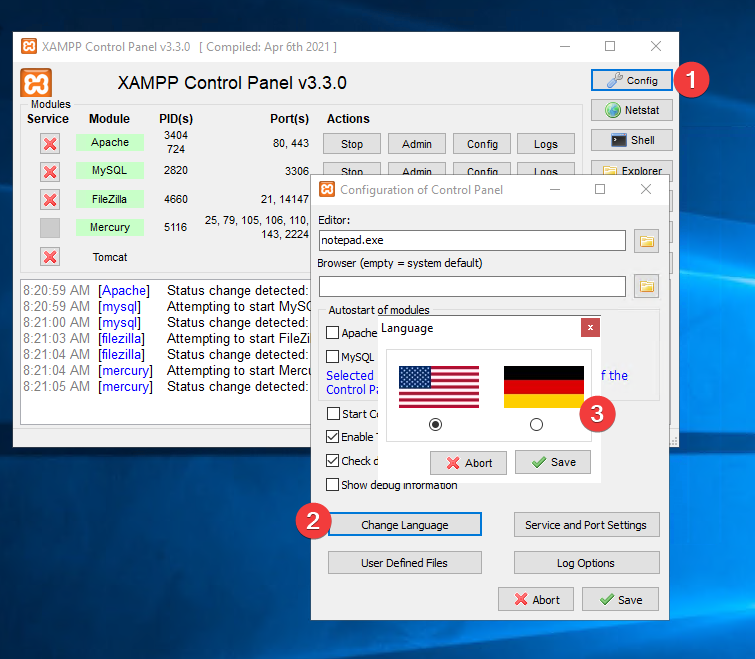
Click on the Config button to open the separate windows where you can configure all or individual components of XAMPP.
Xampp configuration panel
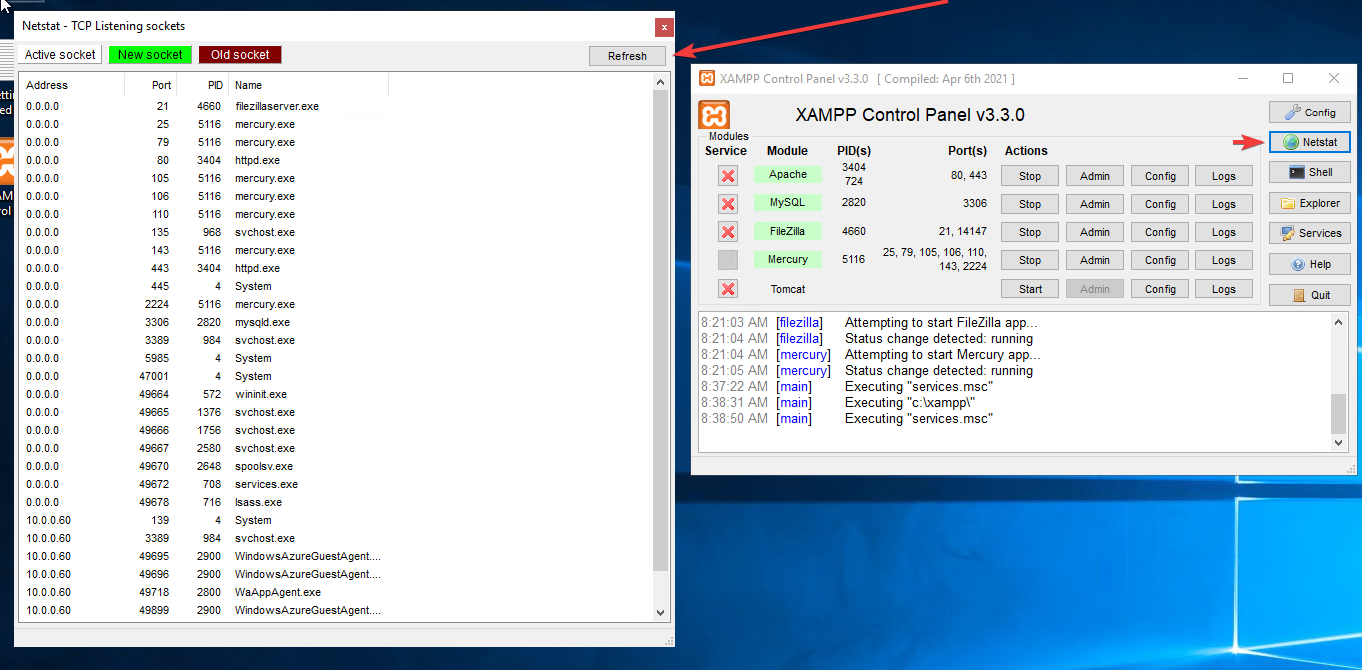
Netstat- TCP Listening sockets
Click on the Netstat button to open the Netstat interface where you can see all running processes.
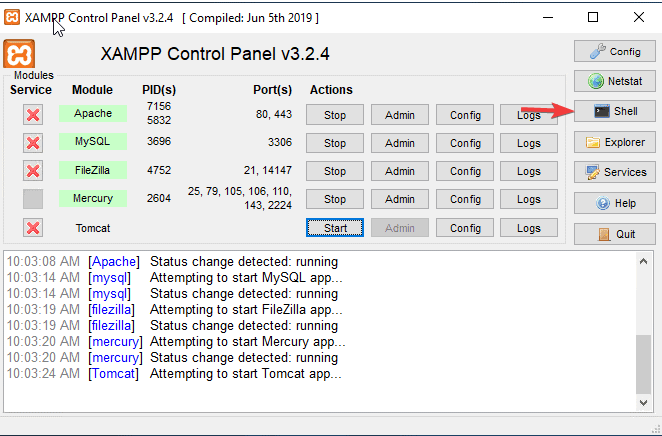
Click on the Shell button to open the command line interface where you can manage XAMPP via command line.

Manage Apache Admin
Click on the Admin in the Apache to open the Apache test page:
Mnage MySQL Admin
Click on the Admin in MySQL to open the phpMyAdmin web console where you can create and manage databases.
Great! We have learned how to Install XAMPP on Windows Server 2016 / 2019 / 2022. let’s summarize.
How to Install XAMPP on Windows Server 2016 / 2019 / 2022 Conclusion
In this post we given a brief overview of XAMPP and also explained step by step process to install XAMPP on Windows Server 2016 / 2019 / 2022. You can now install XAMPP on your local Windows machine and start testing your programs on a local webserver. Due to its ease of installation, simplicity and minimal configuration, it become very popular among web developers.
In this article, we want to teach you How To Set up or Install XAMPP on Windows Server 2019.
What is XAMPP Server?
XAMPP is a cross-platform web server that is free and open-source. XAMPP is a short form for Cross-Platform, Apache, MySQL, PHP, and Perl. It is a popular cross-platform web server that allows programmers to write and test their code on a local webserver.
It was created by Apache Friends, and the public can revise or modify its native source code. The XAMPP includes MariaDB, Apache HTTP Server, and interpreters for PHP and Perl, among other computer languages.
Because of XAMPP’s simplicity of deployment, a developer can quickly and easily install a WAMP or LAMP stack on an operating system, with the added benefit that common add-in apps like WordPress and Joomla can also be loaded.
In this guide, you will learn to set up XAMPP on your Windows server.
To complete this guide, follow the steps below.
Install XAMPP on Windows Server 2019
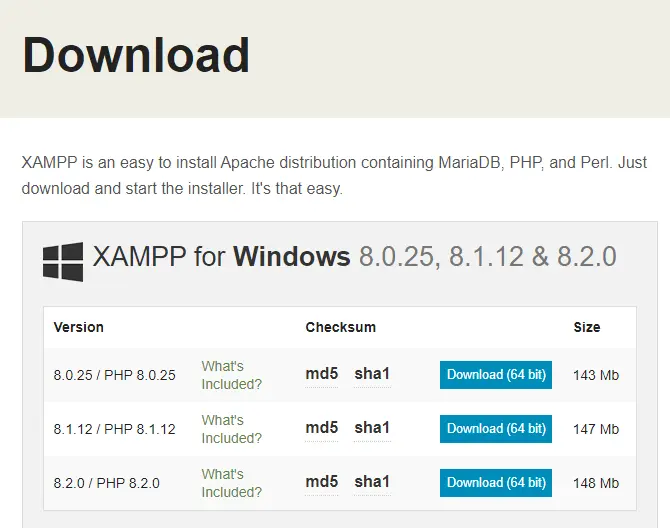
First, you need to visit the Apache Friends Downloads page and download the XAMPP from it.
Download XAMPP For Windows
You can choose your XAMPP version and download it to your Windows server. Here we download PHP 8.1.
Then, you need to open your downloaded file and the installation wizard will open.
XAMPP Server Setup
In the welcome screen, click Next.
Next, you need to choose the XAMPP components that you want to install. Here we install all the components. Select them all and click Next.
After that, in the Installation Folder, you need to choose the directory where to install XAMPP on your Windows server 2019. Accept the default location and click Next.
At this point, you need to choose the XAMPP language that you want to use and click Next.
On the next screen, just click Next.
Now your setup is ready to install XAMPP on your Windows server, click Next.
This will take some time to complete. Then, click Finish to complete your XAMPP installation.
When your installation is completed, you will see your XAMPP control panel on Windows Server 2019.
XAMPP Features
As you can see you can perform the following tasks from the XAMPP control panel on your Windows server:
- Start and stop the services of Apache, FileZilla, MySQL/MariaDB, Mercury, and Tomcat.
- Access the Admin page of Apache, FileZilla, MySQL/MariaDB, Mercury, and Tomcat.
- Change the configuration parameters.
- Access the error logs.
Also, you will see other buttons where you can perform the tasks:
- Config: opens the dialog window with options to configure all or individual components of XAMPP.
- Netstat: It shows all processes that are running on the computer.
- Shell: It opens a UNIX Shell.
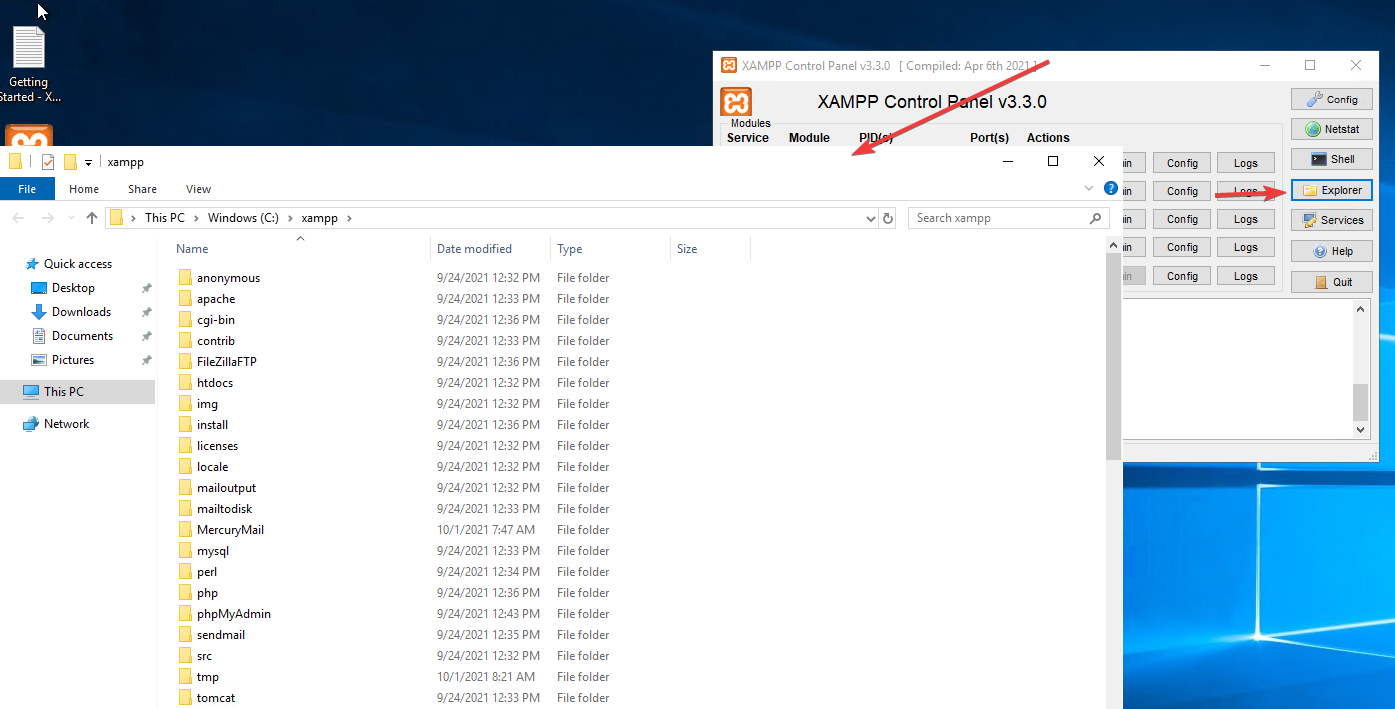
- Explorer: It opens the directory where the XAMPP is installed.
- Services: It opens the Windows Services (services.msc)
- Help: opens the dialog box with links to various blogs and forums.
- Quit: Close the XAMPP control panel.
You can use the start button to start the XAMPP modules and their services on the Windows server. When the module starts successfully, the background color of the Module name changes, and an assigned Process ID and Port are displayed under PID(s) and port(s) column.
The Admin buttons open various tools used to manage the XAMPP modules.
-Apache Module. It opens a sample webpage that contains links to view the version of PHP and PhpMyAdmin.
-MySQL/Maria DB. It opens the PhpMyAdmin web console.
-FileZilla. When we click on the Admin button of FileZilla, it opens another dialog box, where you must specify the connection parameters.
-Mercury. The admin buttons open a console that is used to manage the SMTP server.
-Tomcat. To run the Tomcat services, we must install JDK or JRE on the computer. When we click on the admin button, it opens a web-based console to manage the Tomcat application.
With the Config buttons, you can edit the configuration files of XAMPP modules.
And the Log buttons will open log files containing details of various events, warnings, and errors. Each module of XAMPP has its own set of log files.
Conclusion
At this point, you learn to Set up the XAMPP control panel on Windows Server 2019.
Hope you enjoy it.
You may be like these articles:
Install and Configure XAMPP on Windows Server 2022
Install and Configure WAMP on Windows Server 2022
Activate OpenSSH on Windows Server 2022
XAMPP is one of the widely used cross-platform web servers, which helps developers to create and test their programs on a local webserver. It was developed by Apache Friends, and its native source code can be revised or modified by the audience.
This is a quick deployment and ready-to-run image.
Simple and rapid installation. Easy to maintain.
Configuration and connection to XAMPP PHP 8.0.10 on Windows Server 2019
- To connect to the virtual machine, run the program “Remote Desktop Connection”
- Enter the IP address of the virtual machine in the “Computer” field and click “Connect”
- Next, enter your username & password that you specified when creating the virtual machine
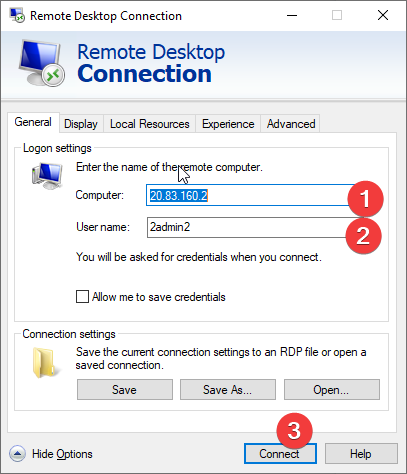
- Confirm the connection to the virtual machine
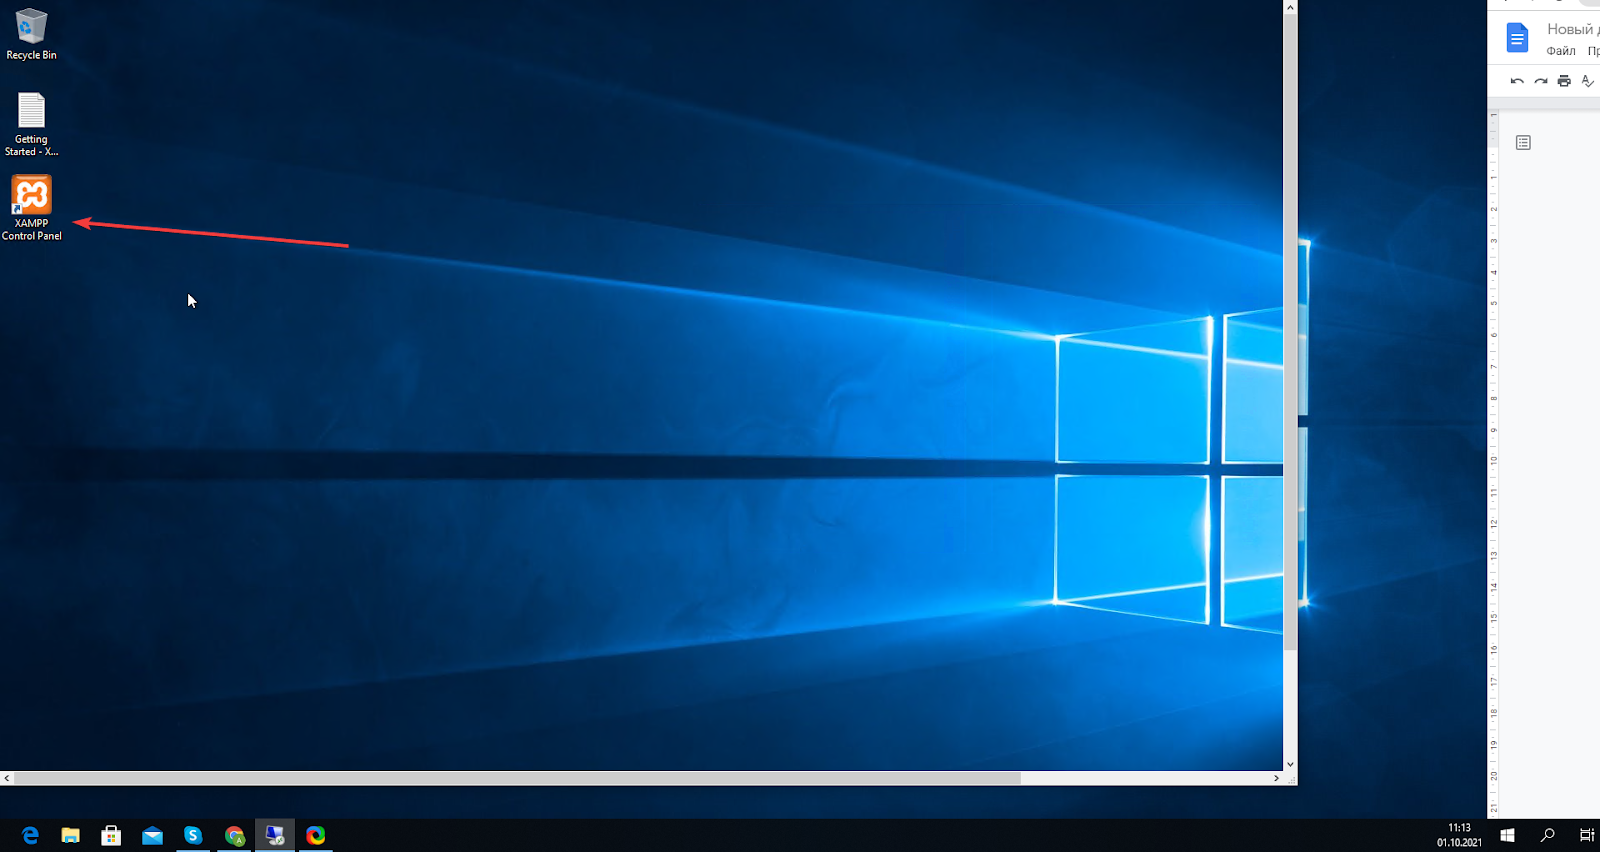
- Find the <XAMPP PHP 8.0.10 on Windows Server 2019> icon and click Open

- After that, the program will be opened, where we can start the services necessary for work by clicking Start
- In the Config tab, we can change the language by clicking Change Language (only English and German are available)
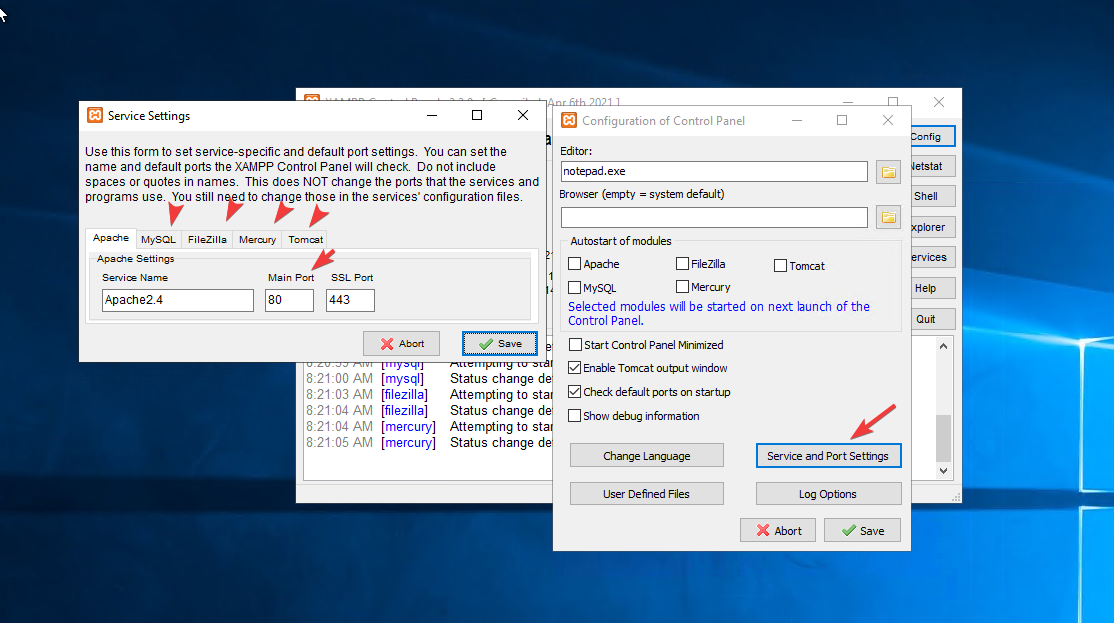
- Also, here in the Config tab we can set ports for different services by clicking Service and port Settings

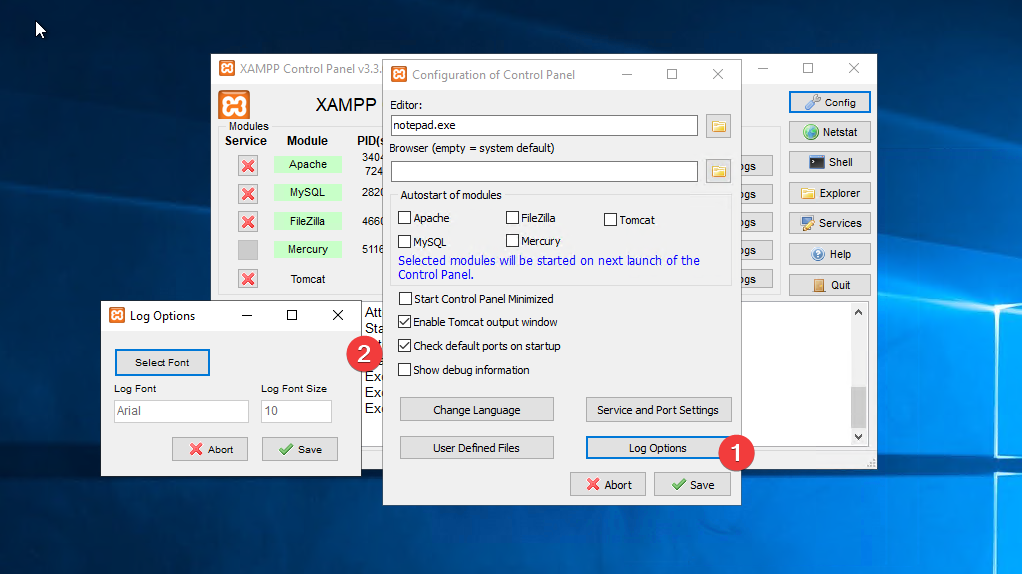
- There are log options by clicking Logs Options in the same tab as well
- In the Netstat tab, you can view statistics
- In the Shell tab, all actions with the product can be performed through PowerShell

- In the Explorer tab, we can find all files that we need to work with
- In the Services tab, we can find all services that we need to work with


- By clicking Help you’ll get the access to the support service of this product


- By clicking Quit you’ll exit the program


How To Install And Configure Xampp In Windows Xampp On Windows In this article, we are going to examine the step by step installation and configuration processes of the xampp software on windows server 2019. the first thing to do is to download xampp from the official apache friends website or filehorse website. once the setup file is downloaded, execute it, and the installation wizard opens. In order to simulate a real web server, you can install xampp as a local server on your laptop or desktop. it is an open source apache server distribution that provides mariadb (formerly mysql), php, and perl. all major operating systems support xampp, which is very simple to set up and use.

How To Install Xampp Server On Windows 10 Xampp Server Installation Steps to install xampp on windows: in the web browser, visit apache friends and download xampp installer. during the installation process, select the required components like mysql, filezilla ftp server, php, phpmyadmin or leave the default options and click the next button. To install xampp on windows server, we need a xampp installer or setup file. download the xampp installer for windows from the official apache friends website. here, different xampp versions are available. click on ‘download (64 bit)’. the selected installer will be downloaded to your system. In this post we given a brief overview of xampp and also explained step by step process to install xampp on windows server 2016 2019 2022. you can now install xampp on your local windows machine and start testing your programs on a local webserver. Steps to install and configure xampp on windows server 2022. in this guide, you will learn to set up xampp on your windows server. to complete this guide, follow the steps below. 1. download xampp for windows. first, you need to visit the apache friends downloads page and download xampp from it. you can choose your xampp version and download it.
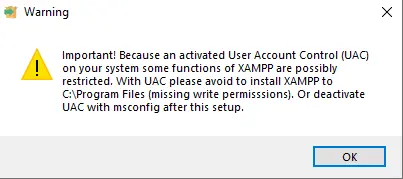
How To Install Xampp Software On Windows Server 2019 In this post we given a brief overview of xampp and also explained step by step process to install xampp on windows server 2016 2019 2022. you can now install xampp on your local windows machine and start testing your programs on a local webserver. Steps to install and configure xampp on windows server 2022. in this guide, you will learn to set up xampp on your windows server. to complete this guide, follow the steps below. 1. download xampp for windows. first, you need to visit the apache friends downloads page and download xampp from it. you can choose your xampp version and download it. This wikihow article teaches you how to install xampp on a windows computer with expert tips from technologist tyrone showers. double click the installation file in your downloads folder. click next on the start page. select the components you want to install and click next. select an installation location and click next. In this article, you will learn how to install xampp on windows server 2016 2019 2022. the apache friends organisation created xampp, a cross platform software stack used to develop and test programmes and web applications. it streamlines your web development process by eliminating the need to install each component separately. For this tutorial we are going to use windows and php 8.0. apachefriends.org download . once you’ve download the installar, run it. if you have uac enabled enabled xampp installer will recommend you not to install it into the program files folder. acknowledge by clicking ok. In this guide, you will learn to set up xampp on your windows server. to complete this guide, follow the steps below. first, you need to visit the apache friends downloads page and download the xampp from it. you can choose your xampp version and download it to your windows server. here we download php 8.1.
How To Install Xampp Software On Windows Server 2019 This wikihow article teaches you how to install xampp on a windows computer with expert tips from technologist tyrone showers. double click the installation file in your downloads folder. click next on the start page. select the components you want to install and click next. select an installation location and click next. In this article, you will learn how to install xampp on windows server 2016 2019 2022. the apache friends organisation created xampp, a cross platform software stack used to develop and test programmes and web applications. it streamlines your web development process by eliminating the need to install each component separately. For this tutorial we are going to use windows and php 8.0. apachefriends.org download . once you’ve download the installar, run it. if you have uac enabled enabled xampp installer will recommend you not to install it into the program files folder. acknowledge by clicking ok. In this guide, you will learn to set up xampp on your windows server. to complete this guide, follow the steps below. first, you need to visit the apache friends downloads page and download the xampp from it. you can choose your xampp version and download it to your windows server. here we download php 8.1.
How To Install Xampp Software On Windows Server 2019 For this tutorial we are going to use windows and php 8.0. apachefriends.org download . once you’ve download the installar, run it. if you have uac enabled enabled xampp installer will recommend you not to install it into the program files folder. acknowledge by clicking ok. In this guide, you will learn to set up xampp on your windows server. to complete this guide, follow the steps below. first, you need to visit the apache friends downloads page and download the xampp from it. you can choose your xampp version and download it to your windows server. here we download php 8.1.
Let’s have a look at how to install XAMPP Server on Windows Server. For other operating systems, the XAMPP Server installation steps are the same. Install local WordPress. XAMPP is the most famous application package that is used to set up PHP development circumstances for web services by supplying all the required software components.
During the local WordPress installation process of software deployment, the majority of the web servers use approximately similar components, so the use of XAMPP Server provides an easy transition from a local server to a live server. XAMPP is an AMP stack that stands for Cross-platform, Apache, PHP, MySQL, and Perl, with some additional administrative application tools such as PHPMyAdmin (for database access), Mercury Mail Server, FileZilla FTP server, and JSP Tomcat Server.
Other commonly known software packages, like XAMPP, are WAMPServer, LAMP, and others. The XAMPP server is used to try out PHP pages. It works as the local server. It contains a MySQL database to save or manage data on a local server.
Install XAMPP Server on Windows
Here are the steps to download and install XAMPP Server on Windows Server.
Choose the download XAMP for the Windows version.
Note: If you have any other version requirements for PHP deployment, then download the XAMPP version you need to install. If you don’t need a special version of XAMPP Server, then you have to download the oldest version, as it will help you avoid problems trying to install PHP-based applications.
Once the XAMPP Server download is completed, double-click on the XAMPP setup file to start the installation.
If you have any antivirus installed on your computer, then you might get a question window. Choose yes.
XAMPP Server installation user account control warning, choose OK.
Welcome to the XAMPP setup wizard. Choose next.
XAMPP Server installation on Windows Server
Local WordPress XAMPP offers a variety of components that you can install; we recommend leaving the default options. Click next.
Keep the default install directory. (Or choose another directory to install the application) and then choose next.
Select the language for the XAMPP Control Panel, and then choose Next.
Ready to install XAMPP? Click next.
Welcome to XAMPP! Page, XAMPP installation is in progress.
Chose the box, start the control panel now, and then click Finish.
How to Configure XAMPP on Windows Server
The XAMPP Control Panel v3.3 includes the main page. On this page, you will find all the web services available. If you find services stopped, then you need to start the service by clicking on the start button.
When we start the services, including Apache and MySQL, you will see the PID(s) process number and port(s) numbers that each service is using. For example, by default, Apache ports 80 and 443, and MySQL port 3306.
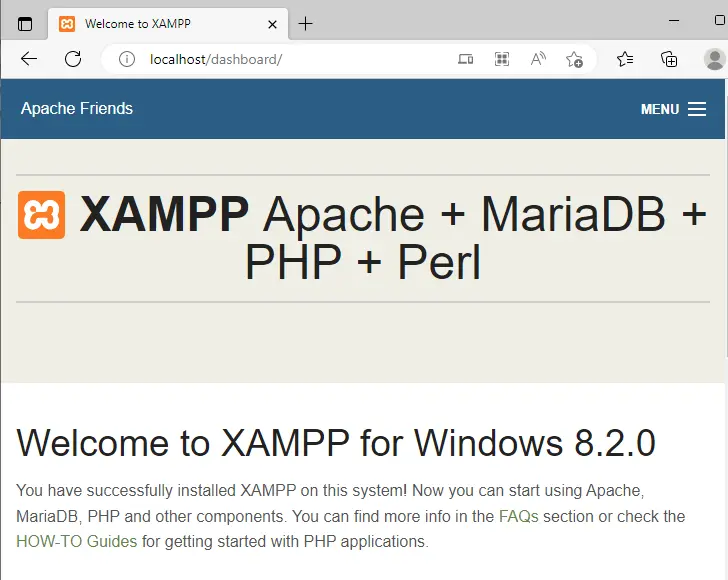
Open any of your favorite browsers, and then enter http://localhost/
Install WordPress on XAMPP Server
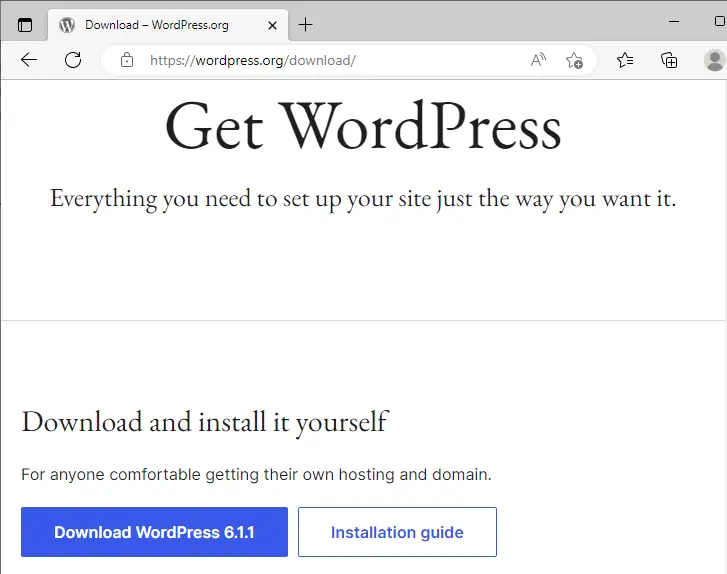
Now we are talking about downloading wordpress.org, which is a free, open-source software for website building and maintenance. Click on download WordPress.
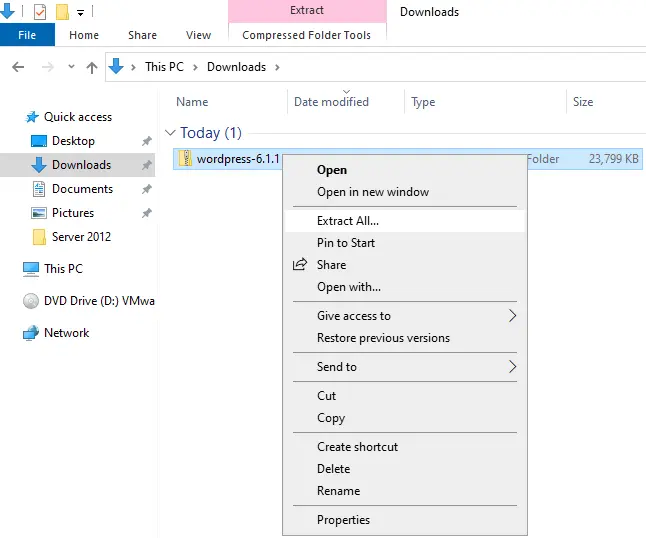
Right-click on the downloaded wordpress.zip file and then select Extract All. You can also extract wordpress.zip using WinZip or WinRAR.
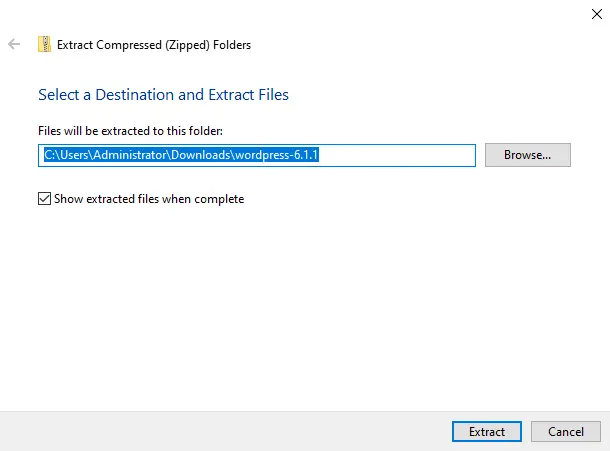
Select a destination, and then click on extract.
Right-click and copy the extracted WordPress folder.
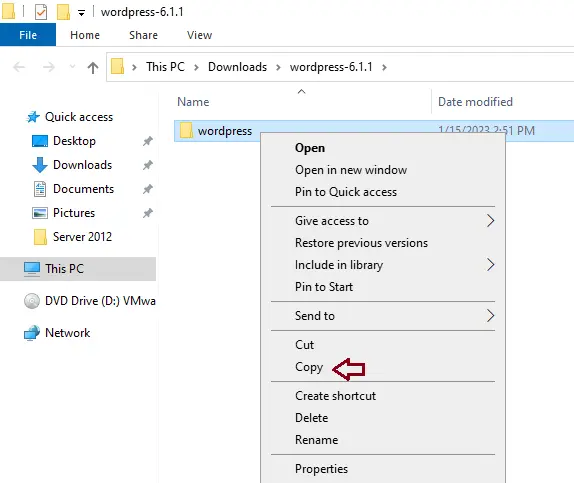
In the system where the XAMPP server files were installed in C:\xampp, you need to paste the WordPress folder in the C:\xampp\htdocs folder.
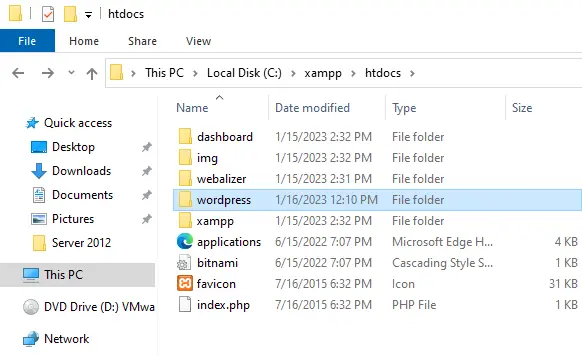
To avoid confusion in this project, you can rename this WordPress folder that you will remember, such as “mysite”, etc. Bear in mind that this will be your local WordPress site URL.
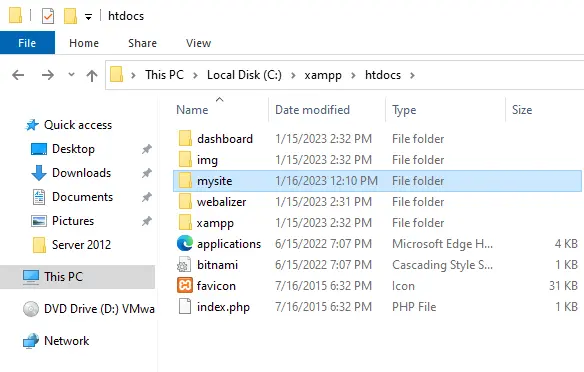
Enter the following address into your favorite browser (Firefox, Google Chrome, or Microsoft Edge): http://localhost/TestSite/, and then hit enter.
Choose a preferred language and then continue.
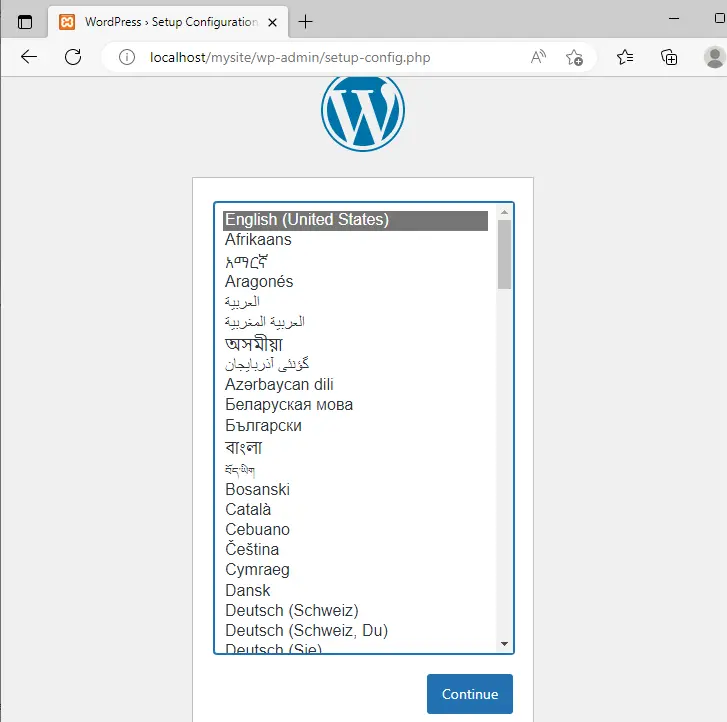
Click on Let’s Go!
Keep this window open for a while.
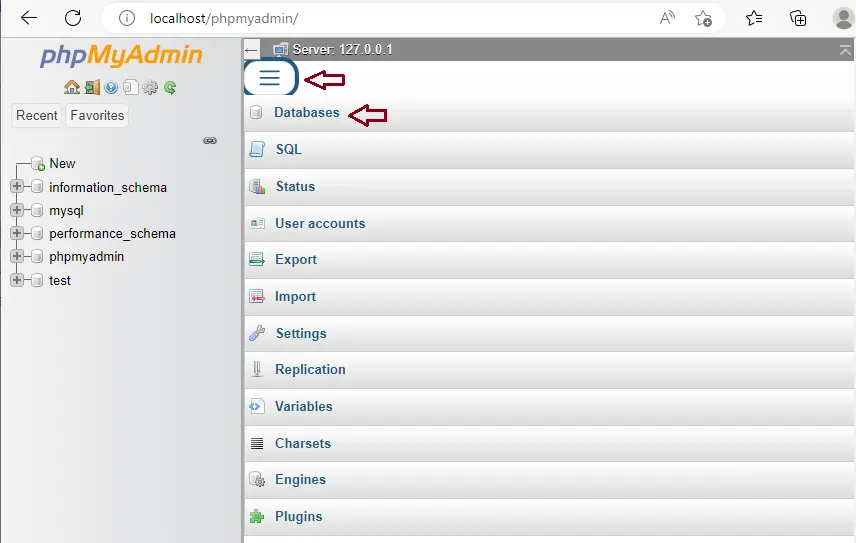
Now enter http://localhost/phpmyadmin/ in the browser and then hit enter.
Click on the menu button and then on the Databases tab in phpMyAdmin to create a new database for the XAMPP local WordPress.
Enter a database name (mysitedb) and then click on Create.
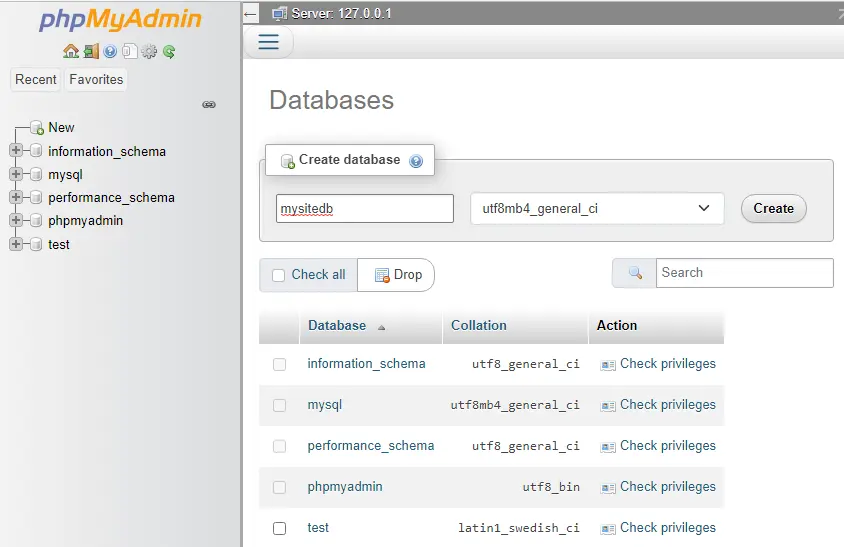
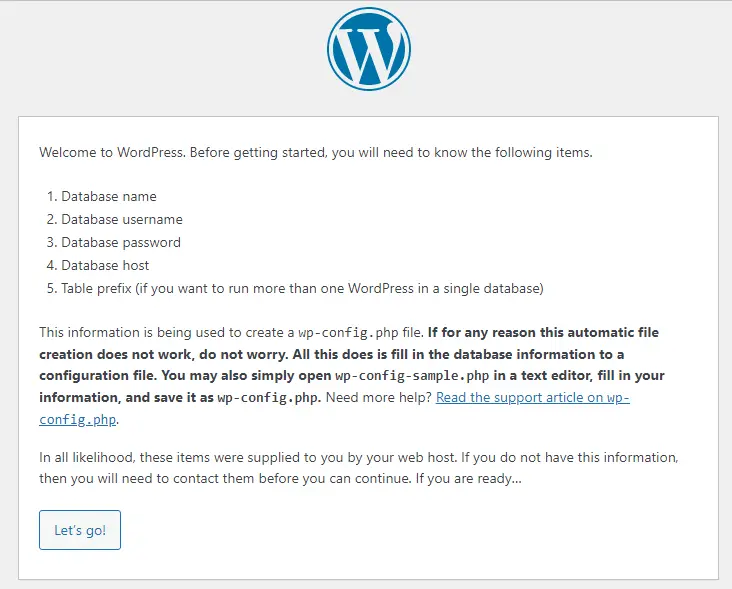
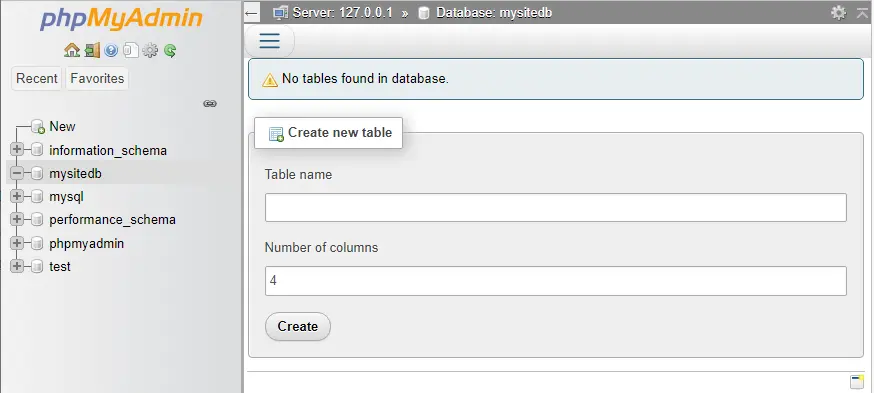
Now that your new database is ready, you are ready to install WordPress.
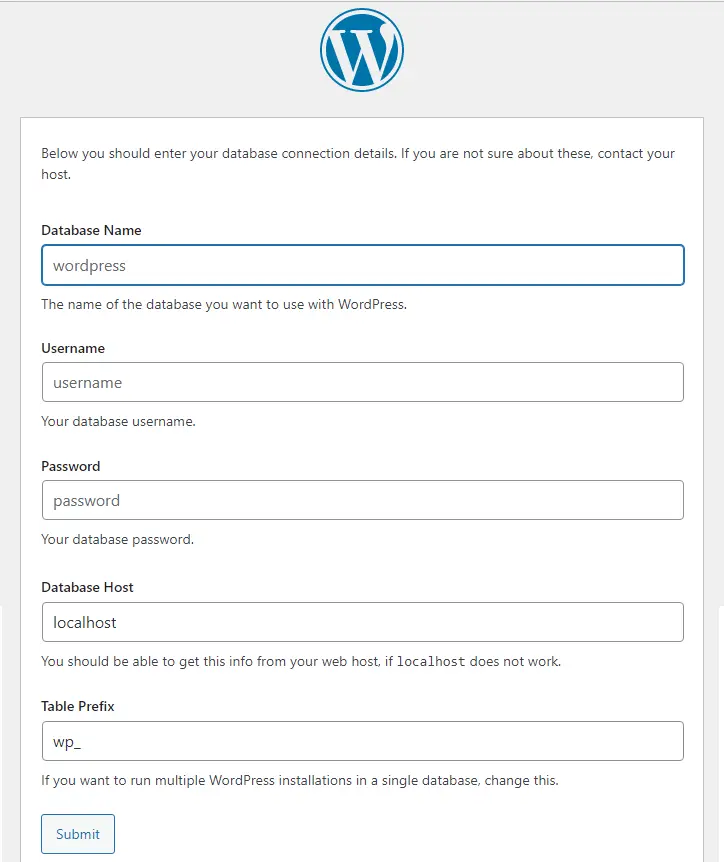
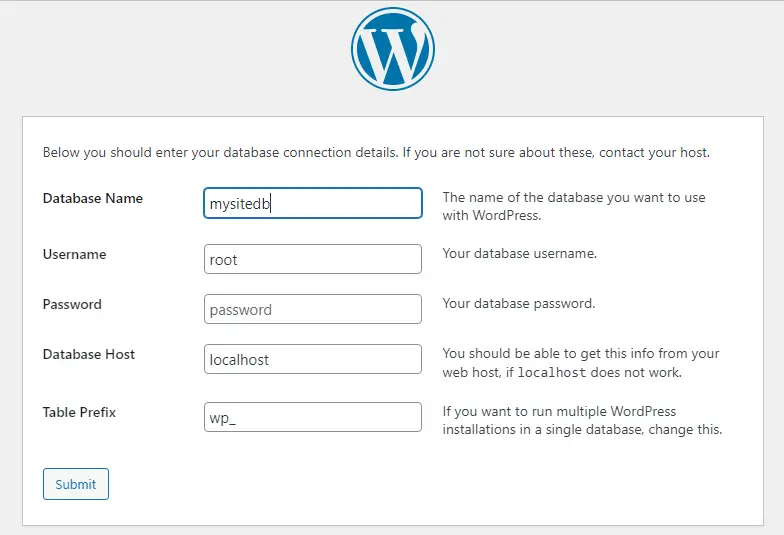
Go back to your browser’s local site: http://localhost/TestSite/ Here you can enter the database name, username/password, host, and table prefix.
I have entered the following details:.
Database Name – mysitedb
Username – root
Password – leave it blank.
Host – localhost
Table prefix – wp_
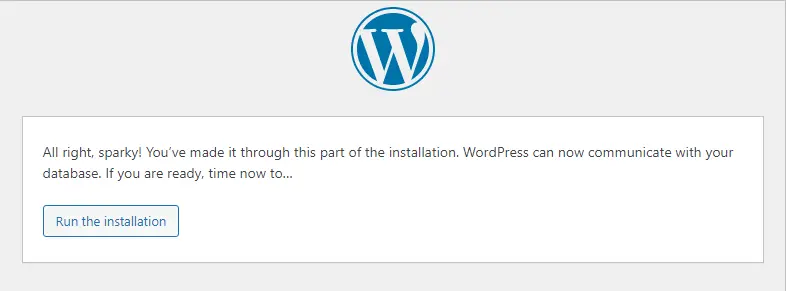
Choose Submit.
Click on Run the Installation.
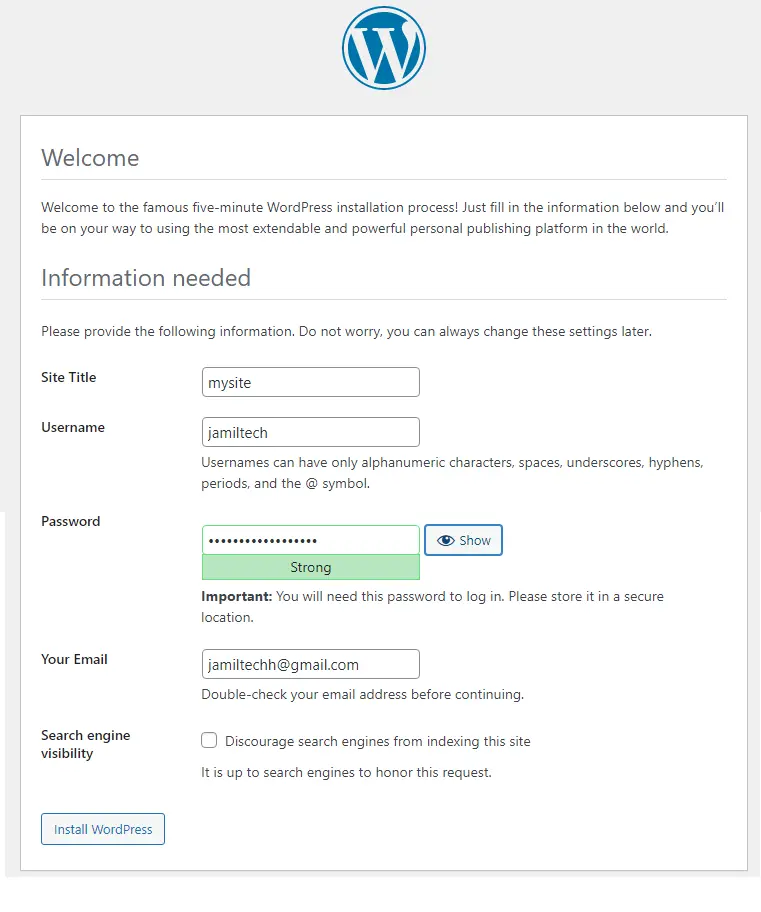
Fill in the information needed for the WordPress website.
Site name – mysite
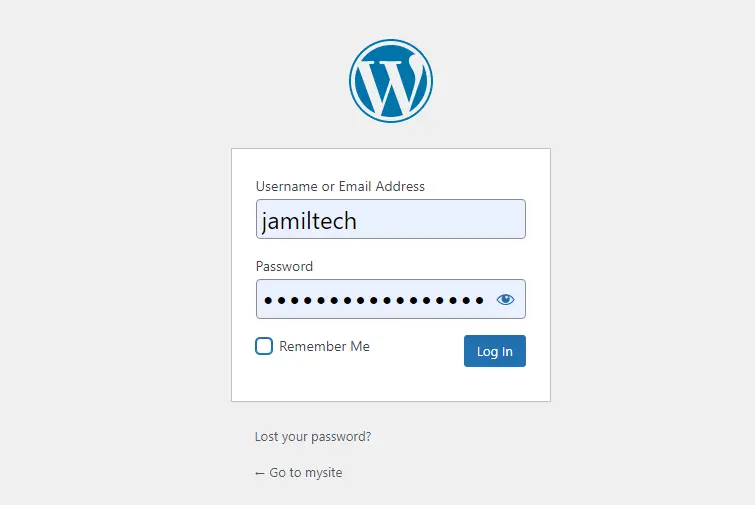
Username – jamiltech
Type the credentials, and then install WordPress.
After completing the local WordPress XAMPP installation, click on log in.
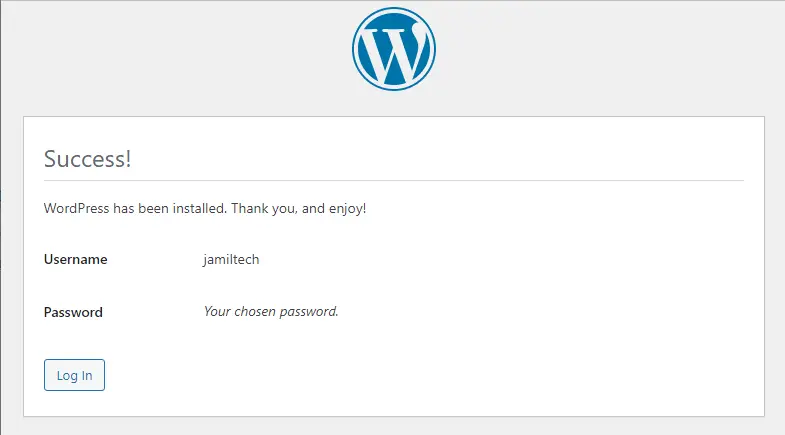
Type your credentials to log in to the WordPress dashboard and then click log in.
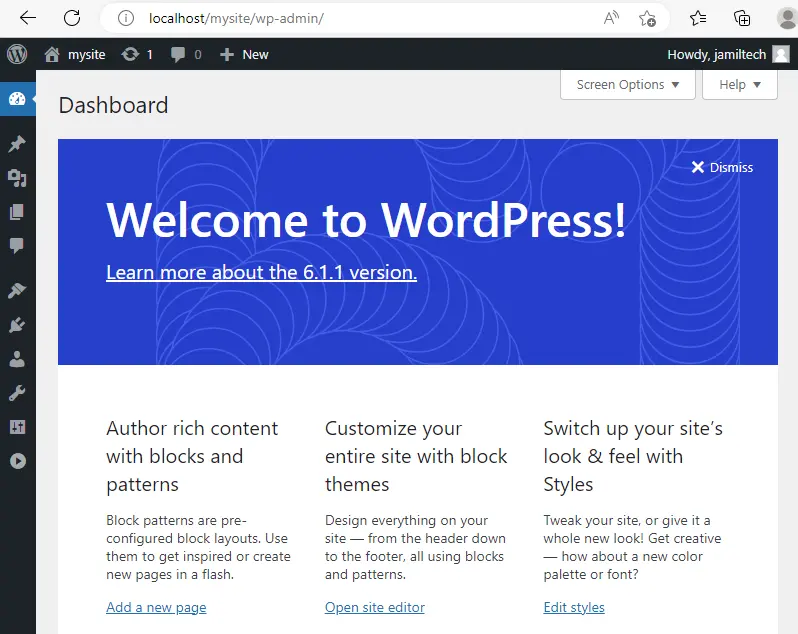
XAMPP server local host WordPress Dashboard.
Related: How to Uninstall XAMPP Server from Windows.
Jamilhttp://jamiltech.com
A Professional Technology Blog Writer | An energetic professional with more than 20+ years of rich experience in Technology, Planning, Designing, Installation, and Networking.