
We will show you how to Install Windows Server 2016 on VMWare Workstation. You can use this method to run Windows Server 2016 on your personal computer and practice new features and configurations before implementing them in a production environment. Windows Server 2016 comes with a lot of improvements and new features. And like always, Microsoft has made available different editions of Windows Server 2016 for different users and scenarios. In this article, we will focus on the Datacenter edition, which is the most feature—rich edition of Windows Server 2016.
If you want to Install Windows Server 2016 on VMWare Workstation, then follow this guide. We will show you a step—by—step process to Install Windows Server 2016 on the VMWare Workstation. For your note: this guide is also applicable for installing other versions of Windows Servers and Desktops on VMWare Workstation.
Basic Requirments To Install Windows Server 2016 On VMWare Workstation?
Before we start with the installation process, let’s have a look at the system requirements to install Windows Server 2016 on VMWare Workstation.
#1. Host Computer to run VMWare Workstation:
The Minimum computational resources needed to run Windows Server 2016 on VMWare Workstation:
-
Processor: Intel Core 2 Duo processor or later. AMD Athlon™ 64 X2 Dual Core Processor 3000+ or higher is recommended.
-
Memory: 4GB of RAM or more is recommended. The minimum support is 2GB of RAM. Note that memory requirements increase as guest operating systems are added.
-
Storage: 60GB of available storage is recommended. Additional storage may be necessary when installing guest operating systems.
-
Network: A network connection is required for installation and updates.
#2. Download Windows Server 2016 ISO File:
The first thing you need is the ISO file of Windows Server 2016. You can download it from the official website of Microsoft. Just go to this link and select the edition you want to download. In our case, we will be downloaded the Datacenter edition because it is the most feature—rich edition.
#3. Install VMWare Workstation 15 Pro:
After downloading the ISO file, the next thing you need is virtualization software. In this article, we will be using VMWare Workstation. You can also use other virtualization software like VirtualBox, Hyper-V, etc.
Just go to the official website of VMWare and download the latest version of VMWare Workstation Pro. Install it on your computer and launch it.
Now that we know the system requirements let’s start with the installation process.
How To Install Windows Server 2016 On VMWare Workstation?
Step 1. Open the new Virtual Machine Wizard
1. Fire up VMWare Workstation
2. Go to File —> New Virtual Machine or Ctrl + N
Step 2. Select Custom Configuration Wizard
Select Custom Wizard and click Next
Step 3. Choose VM Hardware Compatibility
1. Choose the compatible hardware from the drop-down
2. Click Next
Step 4. Select to install operating system later option
1. Select to install operating system later option
2. Click Next
Step 5. Select the guest operating system
1. Select Windows 10 since we don’t have the windows server option included yet.
2. Click Next
Step 6. Virtual Machine Name & Location
1. Give the Virtual Machine Name & Location
2. Click Next
Step 7. Select Firmware Type
1. You can select either BIOS or UEFI. Note: Only new boards supports UEFI.
2. Click Next
Step 8. Allocate the number of processors you need
1. Allocate how many processors you need. This depends on your host machine’s hardware.
2. Click Next
Step 9. Set the Memory for the virtual machine
1. This depends on your host machine’s hardware. You should leave the memory to run the host machine without hazels.
2. Click Next
Step 10. Select Network Connection settings for the VM
1. Four options are available to select. Please read and select your desired network setting.
2. Click Next
Step 11. Choose the appropriate storage IO controller
1. Choose the appropriate storage IO controller
2. Click Next
Step 12. Select the disk type for the VM
1. Select the available disk type on your host machine.
2. Click Next
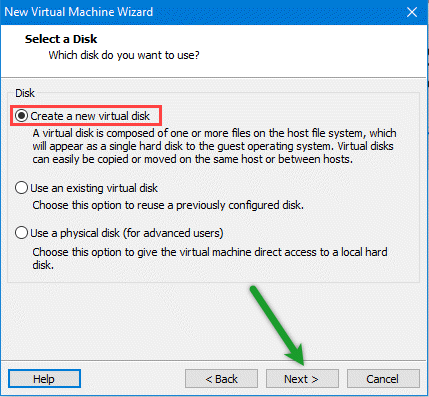
Step 13. Select the virtual disk for the VM
1. Select the virtual disk for the VM if not create a new disk
2. Click Next
Step 14. Assign the disk size for the VM
You can select a single or split virtual disk option. Selecting a single disk will increase the performance. But, if you want to move the disk to a different location you can select the split virtual disk.
Allocate the disk size and click next.
Step 15. Give the path where you want to keep the VM disk
1. Give the location where you want to save the disk.
2. Click Next.
Step 16. Create the VM
1. VM settings are ready to create the VM.
2. Click Finish
Step 17. Load the ISO image to boot the VM
1. Select use ISO image file
2. Browse the ISO image
3. Click Ok
Step 18. All set to power on the VM
Step 19. First boot screen of Windows Server 2016
Step 20. Windows Server 2016 installation wizard
The installation wizard will appear in a couple of seconds after the boot
1. Select the language time and keyboard settings
2. Click Next
Step 21. Install Windows Server 2016
Click on Install Now
Step 22. Select The Operating System You Want To Install
1. Select the version you want to install
2. Click Next
Step 23. Accept the License Agreement
Step 24. Select installation method
Select custom installation if you are doing a fresh installation. Or, select upgrade if you are upgrading your older Windows Server to Windows Server 2016.
Step 25. Select the installation disk for installation
Select the disk and click on Next to install Windows Server 2016. If you want to create additional logical partitions, then select the disk and click on new assign the partition size. You can create multiple partitions within available storage.
Step 26. Installing Windows Server 2016
Step 27. Installation is in progress…
Step 28. Windows getting ready after the installation completes
Step 29. Create Administrator User
Step 30. Windows Server is ready to use
Step 31. Windows Server 2016 Login screen
Step 32. First look at Windows Server 2016
This is how you should Install Windows Server 2016 on VMWare Workstation.
Thanks for reading the post. Please share this post with those who want to know the procedure to Install Windows Server 2016 on VMWare.
You may also like these articles:
Installing Windows Server 2016 upgrades us once again from Windows Server 2012/R2 that provides the latest and the essential updates we need. As well as this time, it has includes lots of new and features. In this lesson, you will learn about installing Windows Server 2016 step by step. Also, before installing, make sure you have pre-planned for selecting which edition to install and what to do in it.
Before installing Windows Server 2016 you need to plan for the installation. Making plan means you should choose an appropriate edition of Windows server. You should think of Hyper-v server you need for your network. You must choose an edition which have enough the Hyper-v license. Also think of more licenses you may need in the future.
Every edition of Windows server may support limited number of users. Choose the edition that meets your needs. When we talk about limitations, we don’t talk about software limitations. If you want more license you should pay for. You can upgrade from one edition to another edition. And you can buy more license for physical and virtual servers also users.
Windows server 2016 editions
- Datacenter: Highly virtualized, enterprise network and cloud environment.
- Standard: Only different with Datacenter edition is the number of Virtual servers. Datacenter edition supports more virtual servers.
- Essential: For small business up to 25 users and 50 devices.
Hardware Requirements
- Processor: 1GHZ
- RAM memory: Minimum of 2GB
- Hard Drive Space: 20GB free space
Installing Windows Server 2016 on VMware
Like the previous versions (Windows Server 2012…), the Windows Server 2016 installation is simple, what’s new is the editions that you can choose them wisely during installation.
In order to install Windows Server 2016, first, you must have an ISO image file of it and also make sure you have pre-planned choosing which edition of Windows Server 2016 and have fulfilled the system requirements.
Download Now: Windows Server 2016
Create and Customize the Virtual Machine
1. Open VMware and click on the Create a New Virtual Machine(Ctrl+N) icon. If you don’t have VMware installed on your computer, click here to download one.

2. Now select Custom (Advanced) option to specify the virtual machine with advance options. If you want you can create virtual with less options, click on Typical option. When you are finished here, click on Next button.

3. Leave the Virtual Machine Hardware Compatibility settings as default. If you want you can select your VMware version. Then click Next button.

4. Here you should add an installer image into the virtual machine. Select the Installer disc image file (ISO) option and click on the Browse button. Specify .iso file path and import it. Then click on Next button.
Note: Make sure that you are using an ISO image file, otherwise unzipped file won’t boot.

5. Specify which operating system type you want to install on the virtual machine. Select Windows Server 2016 version from the dropdown menu and click on Next button.

6. Enter a name for the virtual machine and browse a place where you want to store the installation files. For the purpose click on Browse button and specify the place. When finished, click on Next button.

7. On the Processor Configuration specify then number of processors your server need to use and click on Next button. Also notice that it refers to your virtual machine speed that how much speed the server should be.

8. Specify the amount of the memory for the virtual machine (based on MB) and click on Next button.

9. Select Use Network Address Translation(NAT) or Use bridged networking to directly connect and use internet, as a network type. Then hit Next.

10. Let the I/O Controller types by default because you don’t have the option to change the SCSI type. just hit Next.

11. Now to create new virtual disk, select create a new virtual disk for the virtual machine.
12. Specify the disk amount by typing the disk size(Recommended 60 GB) and click on Next button.

13. At this point, just check out the settings you’ve done or you can customize if you want and click Next.

Step 2. Install Windows Server 2016
Now it’s time to boot up and start the virtual machine, just click on Power on this virtual machine then wait until it boots.
1. Open VMware Workstation on your host computer. Click on Power on this virtual machine in top left.

2. When the virtual machine powered on, specify the language, time zone and keyboard then click Next.

3. Install now to install the windows server 2016 on virtual machine.

4. Select one the Windows Server editions you’ve decided and click on Next button.

5. Put a mark in the box next to I accept the license terms, then click on the Next button.

6. Go on and click on the Custom: Install Windows only (Advanced) option for installing the server custom.

7. Select the disk, you want to install the widows on and select the disk, click on New, then specify the amount (based on MB) and click on Apply button then click on Next button.

8. Now the server copies all the files to the disk, amount the files from the windows image, install features, updates, so it will take time and when finished it will reboot.

9. After the reboot, type a complex password composed of (uppercase, lowercase, symbols and numbers) and click on Finish button.

10. When the customization finished, now you’ll need to sign in, but first click on the button that is composed of three buttons (ctrl+alt+del) shown in image below or simply press Ctrl+Alt+Del and sign in to Windows Server.

And that’s it, after you have signed in, your windows server installation is completed like the shot below.

Conclusion
The Windows server 2016 is installed successfully and your server is now ready to work now. But before doing that don’t forget to install VMware tools + do initial configuration of Windows Server from the article below. For any questions, leave a comment.
Check out: Install Active Directory on Windows Server 2016 step by step
If you find it helpful, let your friends know it too by sharing this article on social media.

Install Windows Server 2016 VM on VMware Workstation :
In the previous post I have described the step by step procedure of Creating Windows Server 2016 VM. so now its turn to install Windows server 2016 on VM.
First of all open the VMware Workstation and select Windows Server 2016 virtual machine. Click on the Power on this virtual machine and VM will start on the right side of window. Please wait till its boot up completely.

- After booting the VM, on the first page where you can specify Language, Time Zone and the Keyboard.

- Click Install now to start the installation.

- Activate the Windows by entering the Product Key and click on Next

- On the next window select Windows Server 2016 Technical Preview 5 (Desktop Experience) to install GUI then click on Next

- Accept the license terms by check the checkbox next to I accept the license terms, then click on the Next button.
- Click on the Custom: Install Windows only (Advanced) option to install a fresh OS, furthermore you can also upgrade existing installed Windows server by selecting another (Upgrade) option.

- Select the disk and click Next to install the windows, it will automatically create the required partitions using whole virtual disk, However if you want to create partition table manually then select the disk, click on New and create desired partitions.

- Windows will now start the installation process including Copies all the files to the disk, Install features and updates. Windows will finally reboot when installation will be completed.

- After reboot assign the password and click Finish button.

Window server 2016 is installed now and you can enjoy it’s features. You can find the step by step procedures like How to promoting Windows server 2016 to Domain Controller, deploying the DNS server etc. in my next blog.
Note:
Please do not forget to install VM tools after installing the Windows Server.
Enjoy 🙂
Installing Windows Server 2016 on VMware Workstation 15 is a great way to set up a virtualized environment for testing, development, or evaluation purposes. VMware Workstation provides a powerful and flexible platform to run virtual machines, and it’s widely used by professionals and enthusiasts alike. In this tutorial, we’ll walk through the steps to install Windows Server 2016 on VMware Workstation 15.
Step 1: Download the Windows Server 2016 ISO file from the official Microsoft website or obtain it through other legitimate sources.
Step 2: Launch VMware Workstation 15 and click on «Create a New Virtual Machine» from the home screen.
Step 3: In the New Virtual Machine Wizard, select «Typical (recommended)» and click «Next.«
Step 4: Choose the ISO file option and browse to the location where you saved the Windows Server 2016 ISO file. Select the ISO file and click «Next.«
Step 5: Enter a name for your virtual machine and choose a location to store the virtual machine files. Click «Next» to proceed.
Step 6: Specify the disk capacity for the virtual machine. You can choose to split the virtual disk into multiple files or store it as a single file. Click «Next» to continue.
Step 7: Review the settings for the virtual machine and make any necessary adjustments. Then, click «Finish» to create the virtual machine.
Once the virtual machine is created, you can power it on and begin the installation process for Windows Server 2016. Follow the on-screen instructions to complete the installation, including selecting the installation language, entering the product key, and configuring the desired options.
| Pros | Cons |
|---|---|
| 1. Allows for easy testing, development, and evaluation of Windows Server environments without affecting a physical machine. | 1. Requires a compatible computer with sufficient hardware resources to run VMware Workstation and virtual machines. |
| 2. Provides a flexible and scalable platform to create virtualized Windows Server environments. | 2. May experience performance slowdowns or limitations depending on the host computer’s hardware capabilities. |
| 3. Enables easy snapshot and cloning features, allowing you to quickly revert to a previous state or duplicate virtual machines. | 3. Requires a valid Windows Server 2016 license to use the operating system in a virtual environment. |
By following these steps, you’ll be able to install Windows Server 2016 on VMware Workstation 15 and leverage the benefits of virtualization for your server-related projects. Remember to comply with licensing requirements and ensure that your host machine meets the necessary hardware specifications for running virtual machines effectively.
Video Tutorial:Can I install VMware workstation on Windows Server 2016?
Installing Windows Server 2016 on VMware Workstation 16 Player involves several steps. Here’s a professional guide on how to do it:
1. Ensure compatibility: Verify that your computer meets the system requirements for VMware Workstation 16 Player. This includes having a capable processor, sufficient RAM, and ample storage space.
2. Obtain Windows Server 2016 ISO: Download the Windows Server 2016 ISO file from the official Microsoft website or through authorized channels.
3. Install VMware Workstation 16 Player: Download and install VMware Workstation 16 Player on your computer. Follow the instructions provided by VMware to complete the installation process.
4. Create a new virtual machine (VM): Launch VMware Workstation 16 Player and click on «Create a New Virtual Machine.» Select the option to install the operating system later.
5. Configure VM settings: In the VM creation wizard, select «Custom (Advanced)» configuration to access more options. Choose the appropriate hardware compatibility and specify the desired number of virtual processors and RAM for your VM.
6. Allocate storage: Create a new virtual hard disk or use an existing one. Specify the size of the virtual disk as per your requirements.
7. Adjust network settings: Choose the preferred network mode in the VM settings, such as bridged, NAT, or host-only, depending on your networking needs.
8. Begin installation: Start the VM and mount the Windows Server 2016 ISO file. Follow the on-screen instructions to begin the installation process. Select the appropriate language, edition, and specify the installation destination.
9. Enter product key and license terms: Provide a valid product key for Windows Server 2016 when prompted. Read and accept the license terms to proceed.
10. Configure the Server: Customize the server settings according to your needs, including the administrator password, computer name, and any other desired configuration options.
11. Complete the installation: Once the setup completes its installation process, the VM will restart. Login with the provided credentials and set up additional configurations or roles as required.
By following these steps, you should have successfully installed Windows Server 2016 on VMware Workstation 16 Player. Remember to consult official documentation and user guides for specific instructions pertaining to your software versions.
Can I install Windows server on a workstation?
Installing Windows Server on a workstation is possible, but there are several factors to consider before doing so. Here are the key points to keep in mind:
1. Compatibility: Verify that your workstation meets the hardware requirements for running Windows Server. Workstations typically have different hardware specifications compared to servers, so it’s crucial to ensure compatibility. Check the system requirements specified by Microsoft for the specific version of Windows Server you intend to install.
2. Licensing: Make sure you have the appropriate licensing for installing Windows Server on your workstation. Windows Server licenses are typically more expensive than those for Windows desktop operating systems. Consider the cost and feasibility of obtaining the necessary licenses before proceeding.
3. Performance: Assess whether your workstation can handle the workload and demands that come with Windows Server. Workstations are generally designed for individual user tasks and may not have the hardware scalability for server-level operations. Consider factors like CPU power, RAM capacity, and storage capabilities to ensure optimal performance.
4. Virtualization: One option to consider is running Windows Server on your workstation using a virtualization platform such as Hyper-V, VMware Workstation, or VirtualBox. This approach allows you to create a virtual machine (VM) on your workstation and run Windows Server within it, separating it from your primary operating system. Virtualization provides flexibility and mitigates any potential compatibility issues.
5. Purpose and Need: Determine the specific purpose and requirements for installing Windows Server on your workstation. Is it for testing and development purposes, or do you require specific server functionality on your workstation? Understanding the reasons behind installing Windows Server will help guide your decision.
6. Backup and Data Security: Make sure to back up any important data on your workstation before proceeding with the installation. Installing Windows Server may involve formatting or partitioning your hard drive, which could result in data loss if not done carefully. Take appropriate measures to protect your data during the installation process.
Remember, installing Windows Server on a workstation may not provide the optimal performance, scalability, and reliability of a dedicated server hardware setup. If your needs involve complex server operations or hosting services, it’s generally recommended to use a dedicated server instead.
What are the requirements for Windows Server 2016 virtual machine?
Windows Server 2016 is a popular operating system commonly used in virtualized environments. When setting up a virtual machine (VM) running Windows Server 2016, there are certain requirements to ensure optimal performance and compatibility. Here are the key requirements to consider:
1. Hardware Requirements:
– Processor: A 64-bit processor with at least 1.4 GHz clock speed is recommended. Intel VT or AMD-V virtualization extensions should be present and enabled in the BIOS.
– Memory: Windows Server 2016 requires a minimum of 512 MB of RAM, but at least 2 GB is recommended for smooth operation. More RAM should be allocated if the VM will be running resource-intensive applications or services.
– Storage: The VM should have sufficient storage space to accommodate the operating system, applications, and other data. A minimum of 32 GB of available disk space is recommended, but allocating more space is advisable depending on the intended usage.
2. Software Requirements:
– Hypervisor: Windows Server 2016 can be deployed on various virtualization platforms like VMware, VirtualBox, and Hyper-V. Ensure that you have a compatible and properly installed hypervisor that supports Windows Server 2016 VMs.
– Virtualization Technology: Virtualization features such as Intel VT or AMD-V must be supported by the physical host machine and enabled in BIOS settings.
– VM Configuration: When setting up the VM, select the appropriate options such as the number of processors, RAM allocation, and network configuration based on your requirements.
3. Network Requirements:
– Network Adapter: The VM should have a virtual network adapter connected to the appropriate network, such as a virtual switch or an external network adapter.
– Network Configuration: Configure the VM’s network settings, including IP address, subnet mask, default gateway, and DNS server, to ensure proper connectivity and communication.
It is important to note that these requirements are general guidelines, and you may need to refer to the specific documentation provided by your virtualization platform for finer details and any additional requirements.
How to install Windows Server 2016 operating system?
Installing the Windows Server 2016 operating system requires following a specific set of steps. Here’s a guide on how to install Windows Server 2016:
1. Obtain the Windows Server 2016 installation media: You can download an ISO image of Windows Server 2016 from Microsoft’s official website or obtain it through other legitimate channels.
2. Create a bootable USB or DVD: Once you have the ISO image, create a bootable USB or DVD using software like Rufus or Windows USB/DVD Download Tool. If you’re using a USB drive, make sure it’s formatted correctly.
3. Prepare the server: Ensure that your server meets the minimum system requirements for running Windows Server 2016. Make sure it’s connected to a stable power source and establish a network connection if needed.
4. Boot from the installation media: Insert your bootable USB or DVD into the server and restart it. Access the server’s boot menu or BIOS settings (usually by pressing a specific key during startup, like F2 or Del) and set the boot order to prioritize the USB or DVD drive.
5. Start the installation: Once the server boots from the installation media, the Windows Server 2016 setup should begin automatically. If it doesn’t, you may need to select the installation source manually.
6. Select the installation type: Choose the installation type that suits your needs. You can either perform a fresh installation or upgrade an existing operating system. Make your selection and proceed.
7. Accept the license terms: Read and accept Microsoft’s license terms to continue with the installation process.
8. Choose the installation drive and partition: Select the drive where you want to install Windows Server 2016. You can create new partitions or select existing ones for installation.
9. Start the installation process: Once you’ve confirmed the installation drive, click on «Next» to begin the installation process. The setup will copy the necessary files, expand them, and install the operating system.
10. Set up the administrator password: After the installation is complete, you’ll be prompted to set the administrator password. Choose a strong password and ensure you remember it.
11. Customize the server settings: Follow the on-screen instructions to customize the server settings, such as computer name, time zone, and network configuration.
12. Install Windows Server updates: Once the initial setup is complete, it’s crucial to install any available updates. Go to the Windows Update settings and check for updates. This will help ensure your server is up to date and secure.
That’s it! You have successfully installed Windows Server 2016 on your server. Now you can configure and manage the server according to your specific requirements.
Can you install Windows server on a VM?
Yes, it is possible to install Windows Server on a virtual machine (VM). Here are the steps to do so:
1. Choose a virtualization platform: Select a virtualization software such as VMware, VirtualBox, or Hyper-V that supports creating and running virtual machines.
2. Download the Windows Server ISO: Obtain the ISO file for the version of Windows Server you want to install. In this case, let’s assume you have the ISO for Windows Server 2023.
3. Create a new virtual machine: Open the virtualization software and create a new VM. Specify the desired hardware resources (such as CPU cores, RAM, and storage) for the virtual machine.
4. Mount the ISO: Attach the Windows Server ISO file to the virtual machine’s virtual CD/DVD drive. This allows the VM to boot from the ISO file.
5. Install Windows Server: Start the virtual machine and proceed with the installation process of Windows Server. Follow the on-screen instructions, select your desired installation options, and complete the installation.
6. Configure the virtual machine: After the installation completes and the VM reboots, you may need to adjust settings within the virtual machine, such as network configurations or integration tools provided by the virtualization software.
7. Activate Windows Server: Once the VM is up and running, you will need to activate the Windows Server license. Follow the provided steps to activate the license using a valid product key.
With these steps, you should be able to successfully install Windows Server on a virtual machine and use it for various server-related purposes. Remember to check the system requirements and software compatibility guidelines for your virtualization software and the specific version of Windows Server you plan to install.
Installing Windows Server 2016 on VMware Workstation is a valuable skill for IT professionals who want to create a virtualized testing environment. By using VMware Workstation, you can easily set up virtual servers and test different configurations without the need for physical hardware. In this blog post, we will explore why you need to install Windows Server 2016 on VMware Workstation and provide detailed steps on how to do it.
Video Tutorial:
There are several reasons why installing Windows Server 2016 on VMware Workstation is beneficial:
1. **Cost-saving**: Using VMware Workstation allows you to create multiple virtual servers on a single physical machine, saving you money on hardware costs.
2. **Flexibility**: Virtualizing your testing environment gives you the flexibility to easily create and delete virtual servers, allowing you to test different configurations efficiently.
3. **Isolation**: By installing Windows Server 2016 on VMware Workstation, you can isolate the virtual server environment from your production environment, reducing the risk of conflicts or disruptions.
4. **Resource management**: VMware Workstation provides powerful resource management features, allowing you to allocate CPU, memory, and storage resources to each virtual server according to its requirements.
5. **Ease of use**: VMware Workstation has a user-friendly interface and provides step-by-step wizards to guide you through the installation process, making it accessible even for beginners.
Method 1: How to Install Windows Server 2016 on VMware Workstation
Before we begin with the steps, it’s essential to ensure that you have the necessary software and resources:
– VMware Workstation installed on your computer
– A Windows Server 2016 ISO file
– Sufficient disk space and memory on your computer
Now, let’s dive into the process of installing Windows Server 2016 on VMware Workstation:
1. Launch VMware Workstation and click on «Create a New Virtual Machine.«
2. Select «Typical (recommended)» and click «Next.«
3. Choose the location where you want to store the virtual machine files and select the version of Windows Server 2016 from the drop-down menu.
4. Set the amount of memory to allocate for the virtual machine. It is recommended to allocate at least 4GB of memory.
5. Create a new virtual hard disk and set its size. It is recommended to allocate at least 40GB of disk space.
6. Customize the hardware settings if necessary, such as network adapter, display, and processor configuration. Click «Next» when you’re done.
7. Select the installation media and choose the ISO file of the Windows Server 2016.
8. Enter the product key if required and provide a name for the virtual machine.
9. Choose the location for the virtual machine files and click «Finish.«
10. Power on the virtual machine, and the Windows Server 2016 installation process will begin.
11. Follow the on-screen instructions to complete the installation, such as selecting the language, accepting the license terms, and configuring the disk partition.
12. Once the installation is complete, Windows Server will restart, and you can log in using the administrator username and password.
| Pros | Cons |
|---|---|
| 1. Cost-saving by utilizing virtualization technology. | 1. Requires VMware Workstation license. |
| 2. Provides a flexible testing environment. | 2. Requires sufficient system resources for running multiple virtual servers. |
| 3. Isolates the virtual server environment from the production environment. | 3. Performance may vary compared to running on physical hardware. |
Method 2: How to Clone an Existing Virtual Machine in VMware Workstation
In some cases, you may want to clone an existing virtual machine in VMware Workstation to save time and effort. Cloning a virtual machine creates an identical copy of the virtual machine, including the operating system, applications, and configurations. Here are the steps to clone an existing virtual machine:
1. Open VMware Workstation and select the virtual machine you want to clone from the list.
2. Go to the «VM» menu and click on «Clone.«
3. Choose a name and location for the cloned virtual machine.
4. Select whether you want to create a full clone, which includes all the virtual machine files, or a linked clone, which shares the virtual disk with the original virtual machine.
5. Click «Finish» to start the cloning process.
6. Once the cloning process is complete, you can power on the cloned virtual machine and make any necessary modifications or configurations.
| Pros | Cons |
|---|---|
| 1. Saves time and effort by creating an identical copy of an existing virtual machine. | 1. Requires additional disk space for storing the cloned virtual machine. |
| 2. Allows you to test different configurations without affecting the original virtual machine. | 2. The cloned virtual machine may require a separate license for operating system or application activation. |
| 3. Provides a backup option in case the original virtual machine becomes corrupted or unusable. | 3. The cloned virtual machine may have the same IP address and hostname as the original virtual machine, leading to network conflicts. |
Method 3: How to Create a Virtual Network for Windows Server 2016
Creating a virtual network in VMware Workstation allows you to set up a network infrastructure for your Windows Server 2016 virtual machines. By having a virtual network, you can simulate real-world networking scenarios and test various network configurations. Here are the steps to create a virtual network:
1. Open VMware Workstation and click on «Edit» in the menu bar.
2. Select «Virtual Network Editor.«
3. Click on «Add Network» to create a new virtual network.
4. Choose the type of virtual network you want to create, such as a bridged network, NAT, or host-only.
5. Configure the network settings, such as IP address range, subnet mask, and default gateway.
6. Customize other network parameters, such as DHCP server settings, DNS configuration, and security settings.
7. Click «OK» to save the virtual network configuration.
| Pros | Cons |
|---|---|
| 1. Allows you to simulate real-world networking scenarios. | 1. Requires additional network adapters or physical network interfaces on your computer. |
| 2. Provides a sandbox environment to test various network configurations. | 2. The virtual network may have limited bandwidth and performance compared to a physical network. |
| 3. Enables communication between virtual machines on the same virtual network. | 3. The virtual network may not have access to the internet by default. |
Method 4: How to Create Snapshots in VMware Workstation
Snapshots in VMware Workstation allow you to capture the state of a virtual machine at a specific point in time. By taking snapshots, you can revert the virtual machine to a previous state if any issues or errors occur during the testing process. Here are the steps to create snapshots in VMware Workstation:
1. Power on the virtual machine you want to take a snapshot of.
2. Go to the «VM» menu and click on «Snapshot» and then «Take Snapshot.«
3. Provide a name and description for the snapshot to identify it later.
4. Select whether you want to include the virtual machine’s memory in the snapshot or take a snapshot of the virtual machine’s state only.
5. Click «OK» to create the snapshot.
6. To revert to a snapshot, go to the «VM» menu, click on «Snapshot,» and select the snapshot you want to revert to.
| Pros | Cons |
|---|---|
| 1. Provides a backup mechanism to revert to a previous state of a virtual machine. | 1. Snapshots can consume a significant amount of disk space, especially for virtual machines with large storage requirements. |
| 2. Allows you to test different configurations without the risk of permanent changes. | 2. Snapshots are not a substitute for regular backups and should not be relied upon as the primary backup strategy. |
| 3. Simplifies troubleshooting by allowing you to isolate and analyze specific issues. | 3. Reverting to a snapshot may result in data loss or incomplete transactions if not done properly. |
What to Do If You Can’t Install Windows Server 2016 on VMware Workstation
If you encounter any issues or errors while trying to install Windows Server 2016 on VMware Workstation, here are some recommended fixes:
1. Make sure that your computer meets the minimum system requirements for running VMware Workstation.
2. Verify that the Windows Server 2016 ISO file is not corrupted by checking its integrity or downloading it again from a trusted source.
3. Disable any antivirus or firewall software temporarily, as they may interfere with the installation process.
4. Ensure that virtualization technology is enabled in your computer’s BIOS settings.
5. Update VMware Workstation to the latest version, as newer versions may include bug fixes and compatibility improvements.
6. Restart your computer and try the installation process again from the beginning.
Bonus Tips
1. **Take regular backups**: Although VMware Workstation provides snapshot and cloning features, it is still advisable to create regular backups of your virtual machines to ensure data integrity and availability.
2. **Use linked clones for testing**: If you have limited disk space, consider using linked clones instead of full clones when testing different configurations. Linked clones optimize disk space by sharing the virtual disk with the original virtual machine.
3. **Utilize snapshots wisely**: While snapshots can be useful, it’s essential to use them judiciously and remove unnecessary snapshots to avoid excessive disk usage and potential performance degradation.
5 FAQs
Q1: Can I run Windows Server 2016 on VMware Player instead of VMware Workstation?
A1: Yes, you can run Windows Server 2016 on VMware Player, which is a free version of VMware Workstation with limited features. However, VMware Workstation provides more advanced features and better performance for creating virtualized testing environments.
Q2: Can I upgrade an existing virtual machine from an older version of Windows Server to Windows Server 2016?
A2: Yes, you can upgrade an existing virtual machine running an older version of Windows Server to Windows Server 2016. VMware Workstation provides an easy upgrade process, allowing you to retain existing configurations and settings.
Q3: Can I run multiple virtual machines simultaneously on VMware Workstation?
A3: Yes, VMware Workstation allows you to run multiple virtual machines simultaneously as long as your computer’s hardware resources, such as CPU, memory, and storage, can support the workload.
Q4: Can I migrate virtual machines created in VMware Workstation to other virtualization platforms?
A4: Yes, you can migrate virtual machines created in VMware Workstation to other virtualization platforms using tools like VMware vCenter Converter or third-party conversion tools. However, compatibility and configuration adjustments may be required.
Q5: Can I install other operating systems, such as Linux or macOS, on VMware Workstation?
A5: Yes, VMware Workstation supports a wide range of operating systems, including various versions of Windows, Linux distributions, and macOS. You can create virtual machines for different operating systems and run them concurrently on VMware Workstation.
Final Thoughts
Installing Windows Server 2016 on VMware Workstation is a valuable skill for IT professionals who want to create a virtualized testing environment. By following the methods outlined in this blog post, you can easily install Windows Server 2016, clone virtual machines, create virtual networks, and take snapshots for testing and troubleshooting purposes. Remember to take regular backups, use linked clones wisely, and utilize snapshots judiciously to optimize your virtualized testing environment in VMware Workstation