Установка windows server 2016 на esxi

Инструкция в картинках по установке операционной системы Windows Server 2016 на виртуальную машину, которая находится на гипервизоре ESXi 6.7.

Для начала создадим саму виртуальную машину, если её у нас ещё нет:

ESXi 6.7 — создаём виртуальную машину

В UI гипервизора ESXi 6.7 кликаем на нашу виртуалку. Edit:

esxi

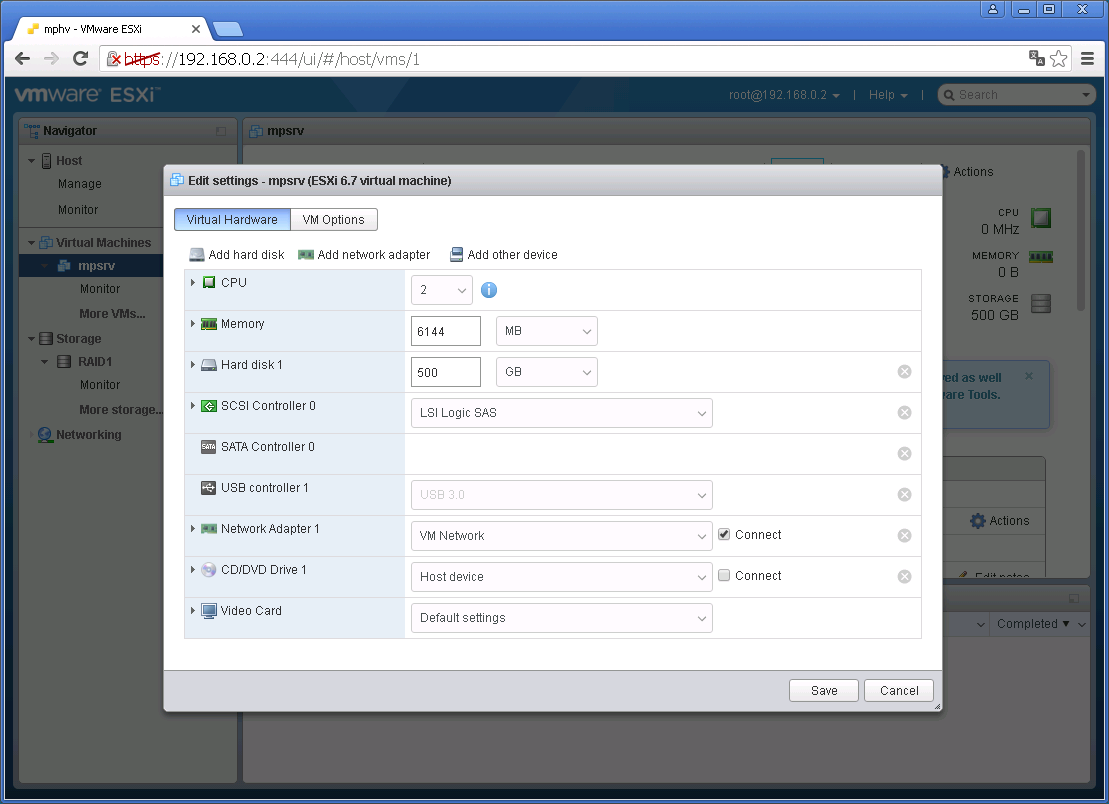
Наша задача, воткнуть ISO образ инсталлятора Windows в дисковод. В CD/DVD Drive 1 выбираем Datastore ISO file, откроется Datastore browser:

esxi

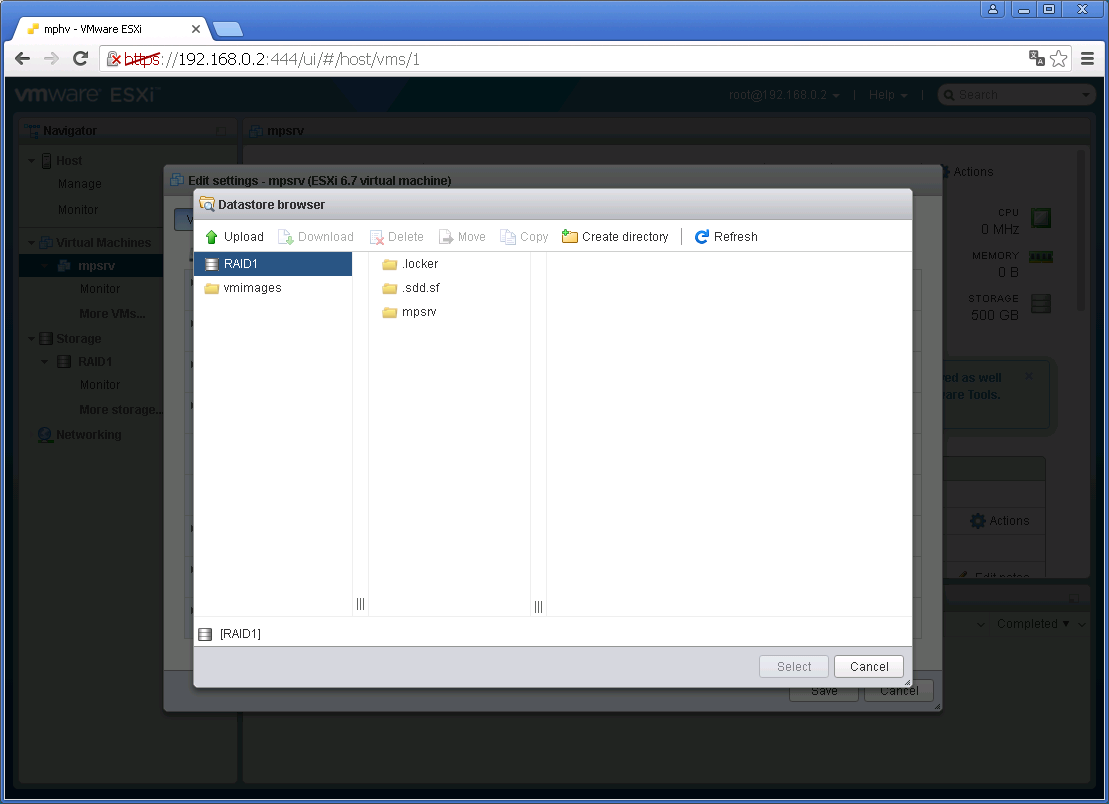
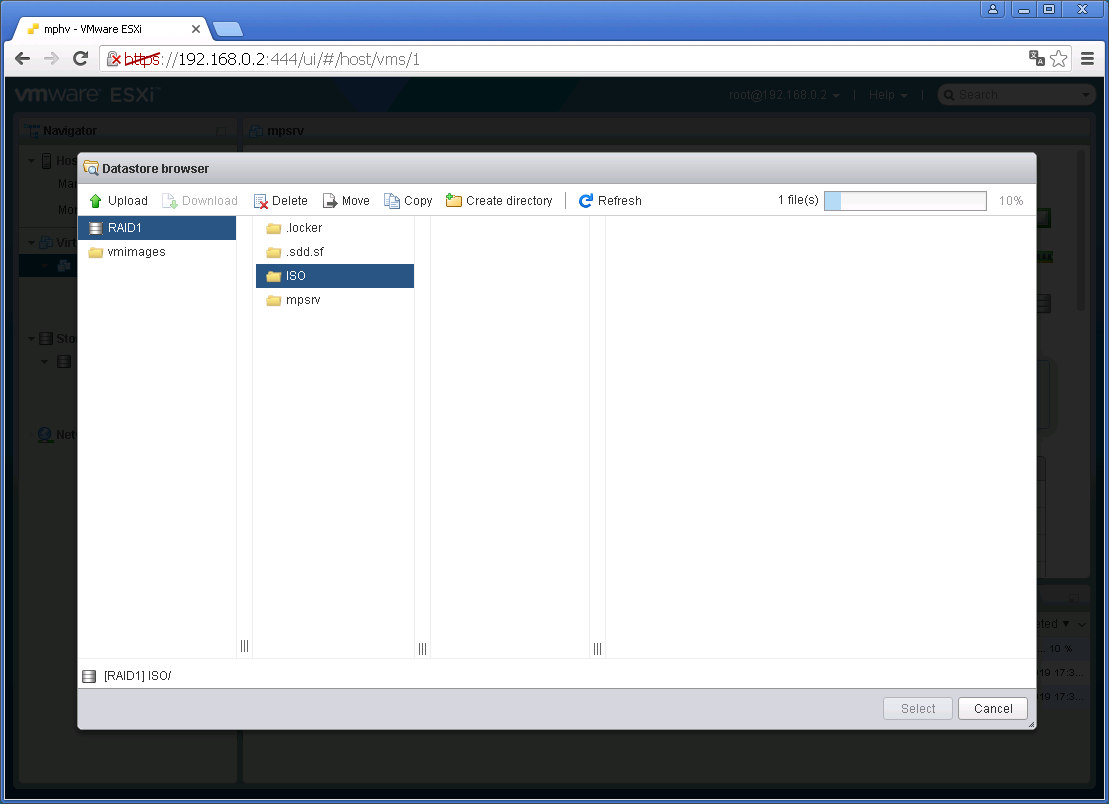
Образ у меня не загружен в хранилище, создам папочку для ISO файлов. Create directory:

esxi

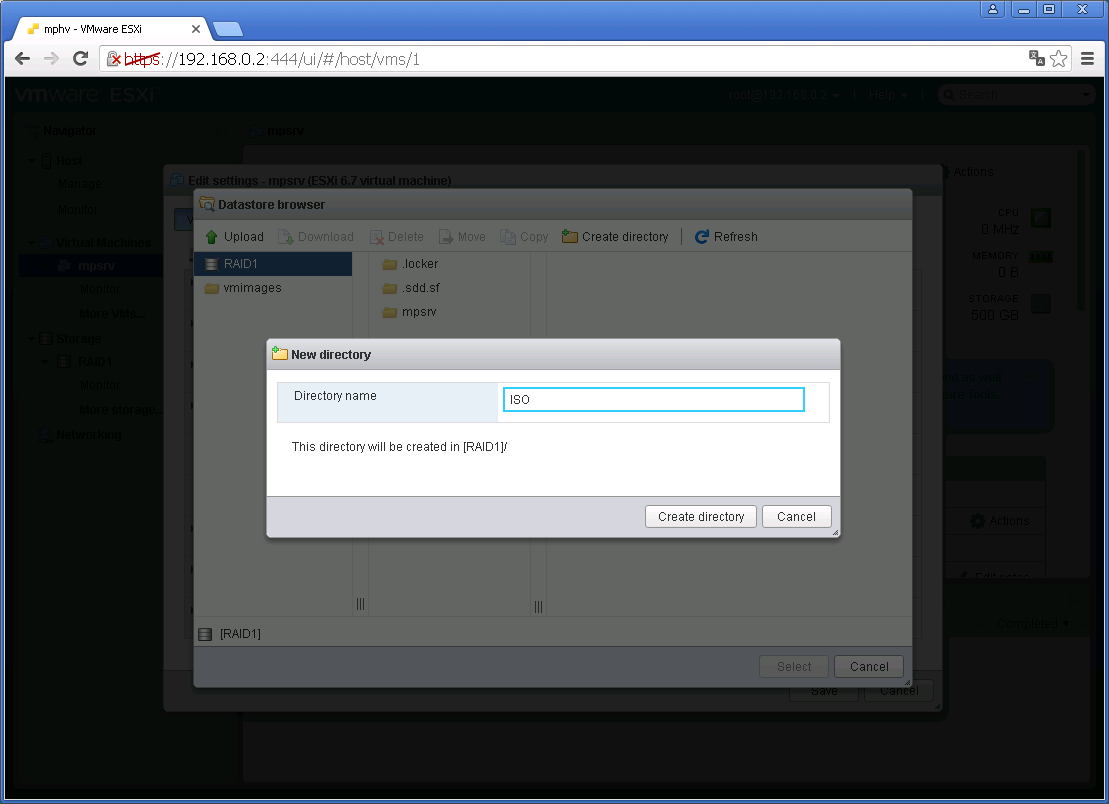
Указываем название директории, у меня будет ISO, Create directory:

esxi

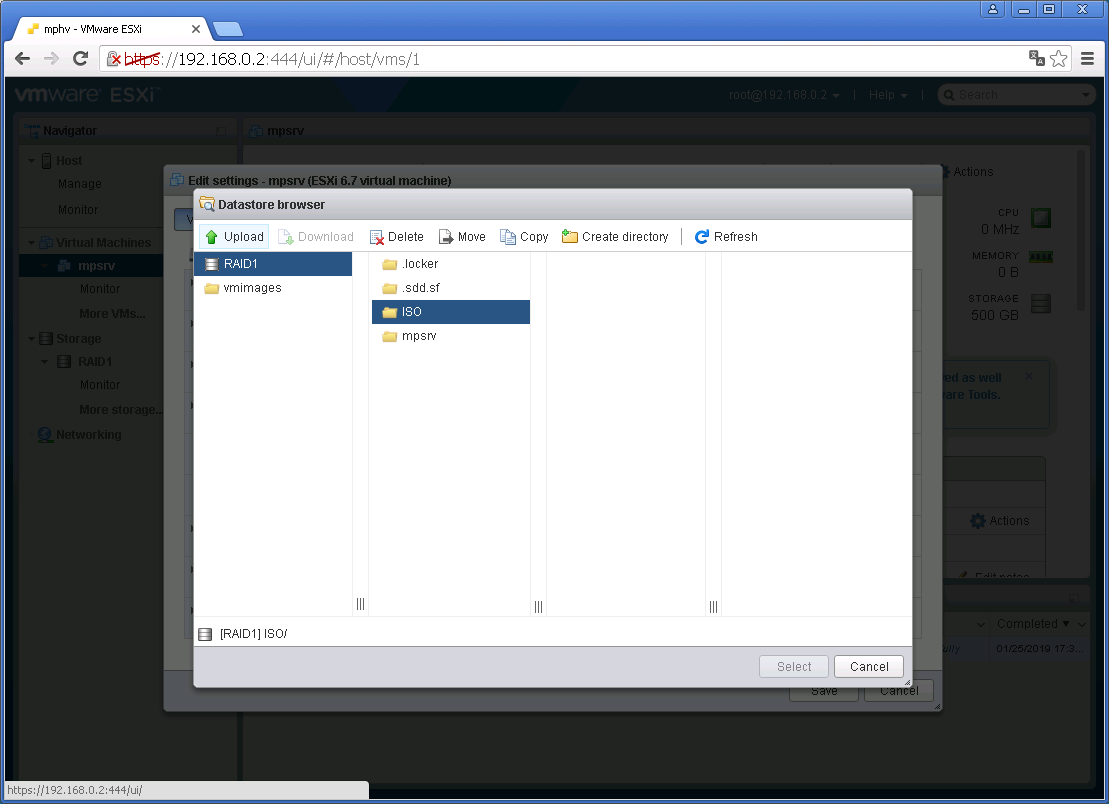
Папочка создалась. Кликаем на неё, потом Upload, выбираем ISO образ инсталлятора Windows Server 2016:

esxi

В правом верхнем углу показывается прогрусс загрузки файла. Итак, файл загрузился в хранилище, кликаем на него, потом Select:

esxi

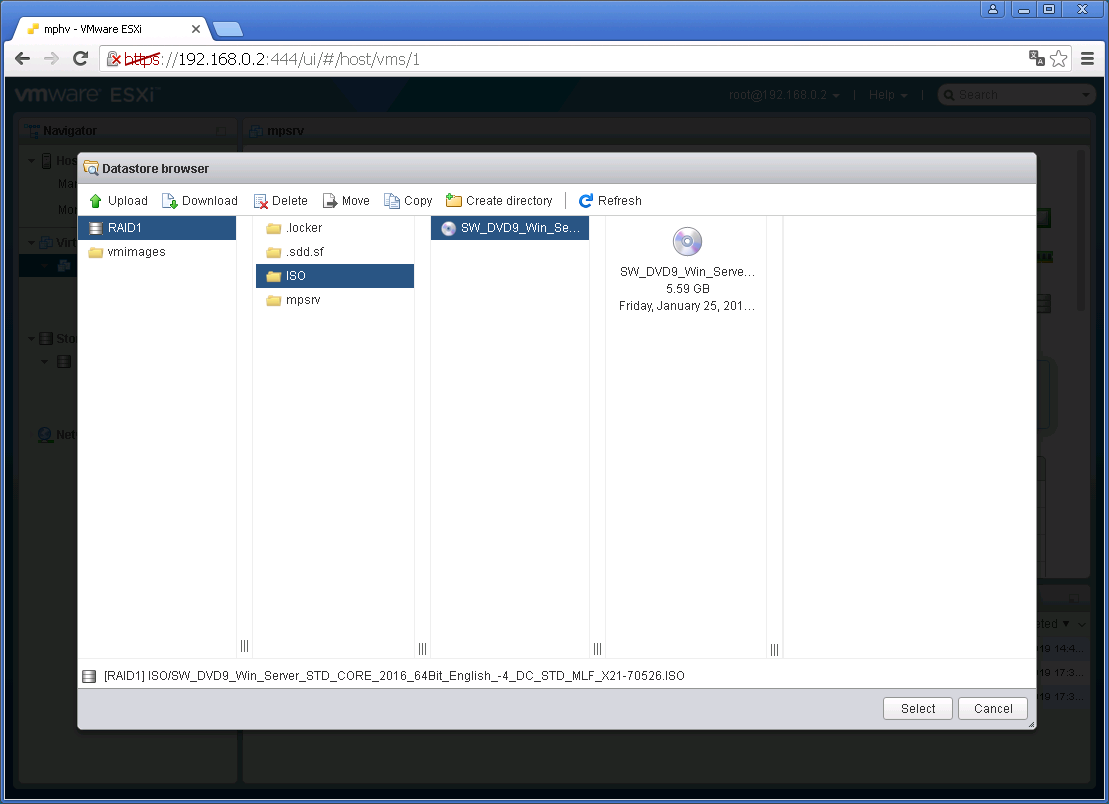
ISO образ цепляется к дисководу виртуалки:

esxi

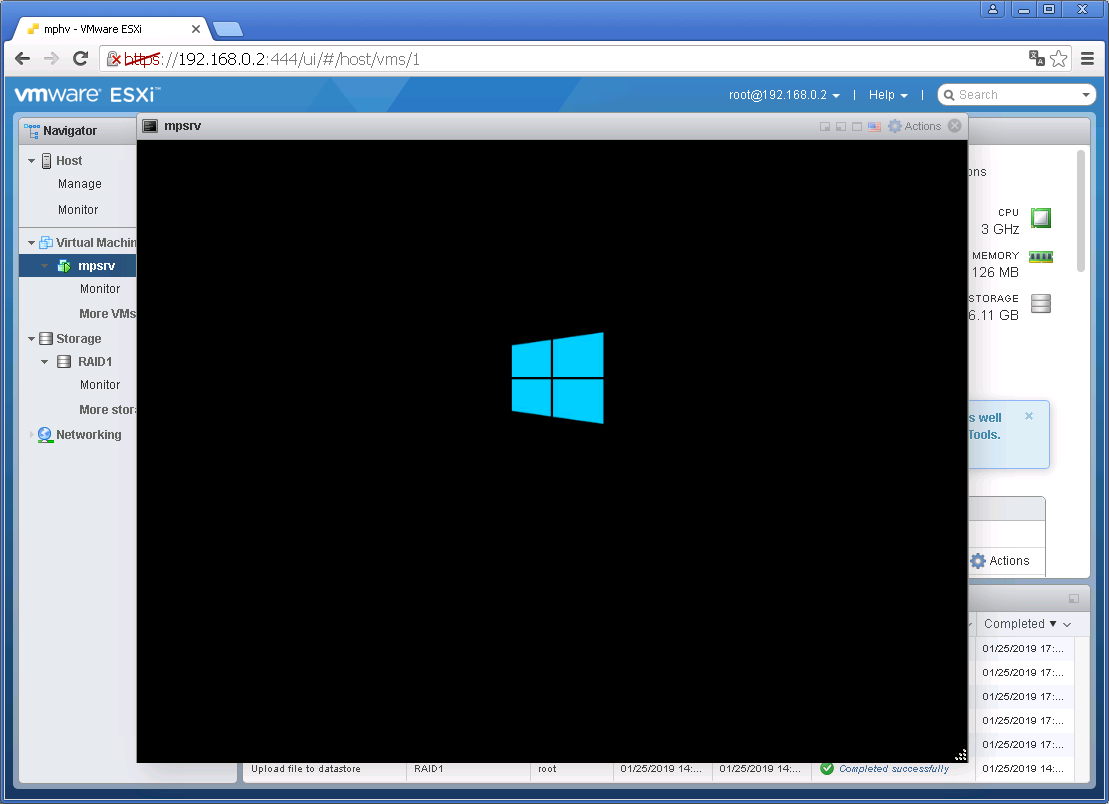
Устанавливаем две галки. Connect at power on и Connect. Save. Включаем виртуалку:

esxi

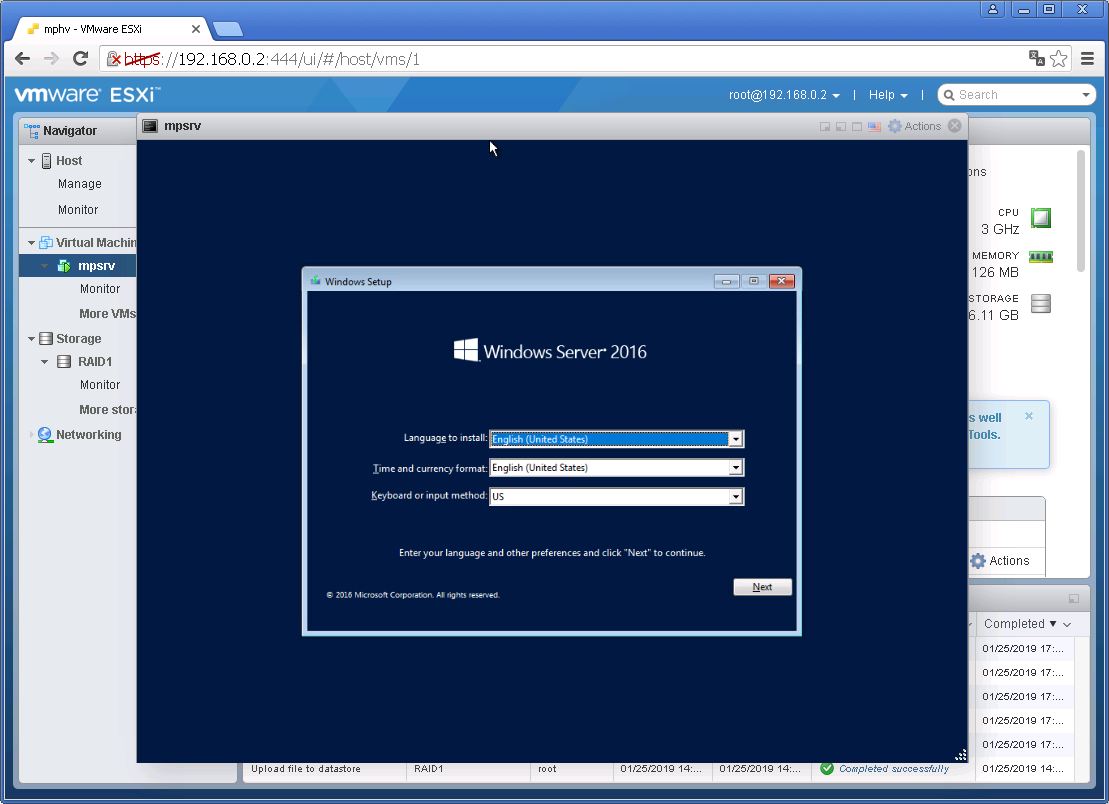
Для начала установки нужно будет успеть нажать любую клавишу. Выбираем язык, время, клавиатуру. Next.
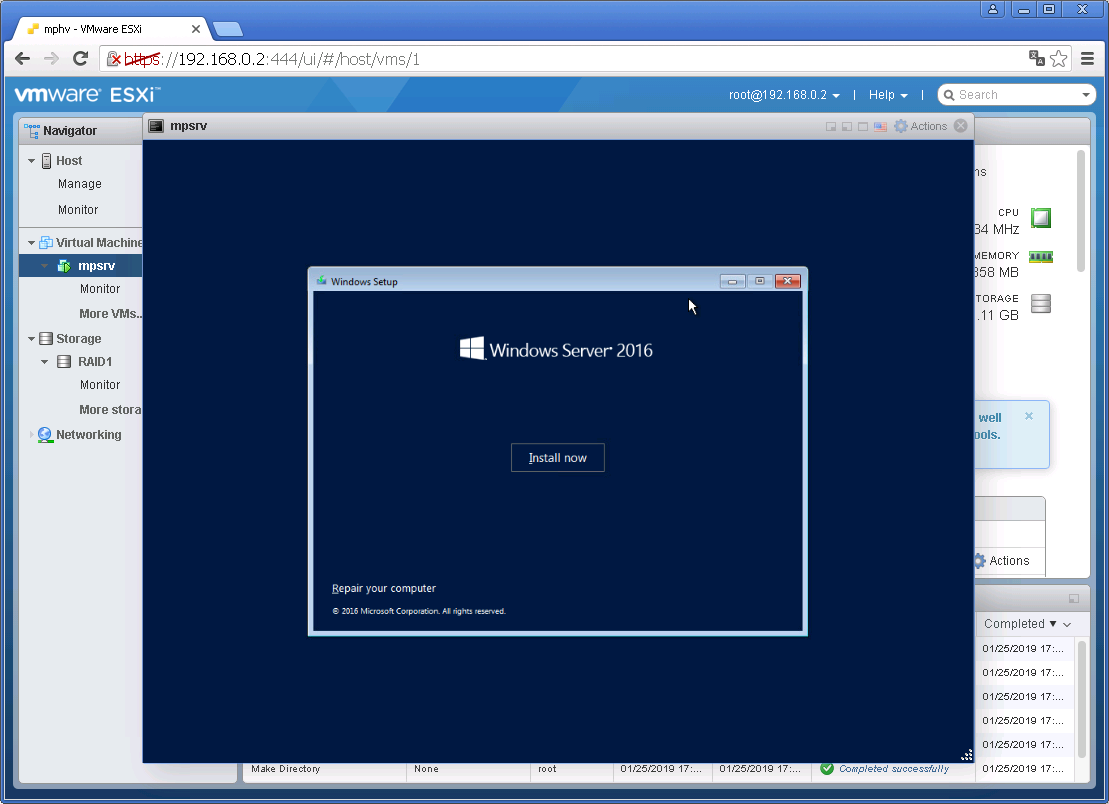
esxi

Install now:

esxi

Setup is starting:

esxi

Выбираем тип установки.

  • Standard без GUI
  • Standard с GUI
  • Datacenter без GUI
  • Datacenter с GUI

Next:

esxi

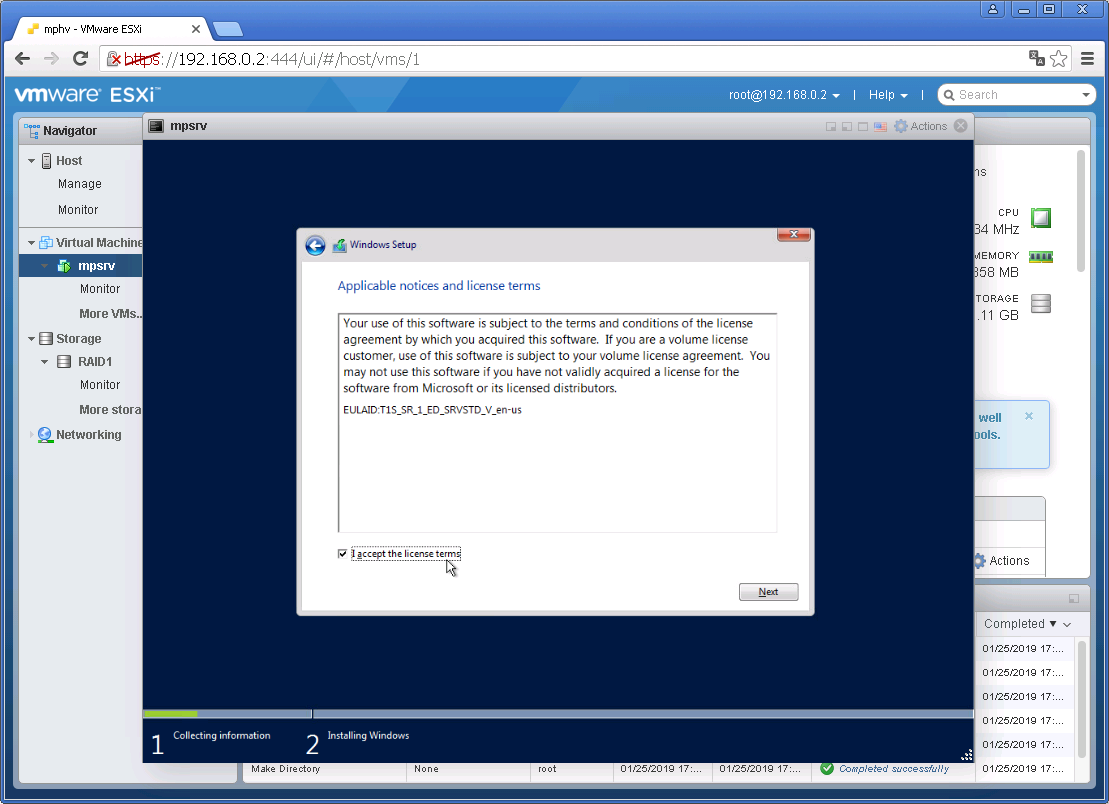
Принимаем лицензионное соглашение, Next:

esxi

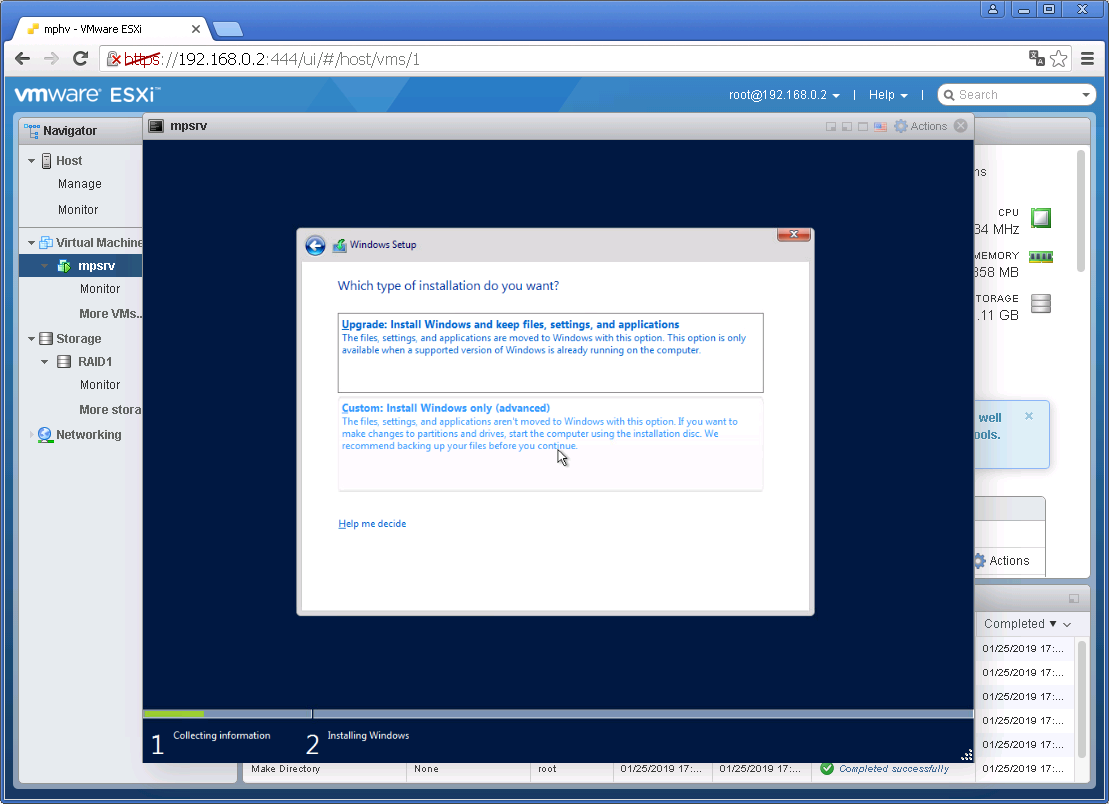
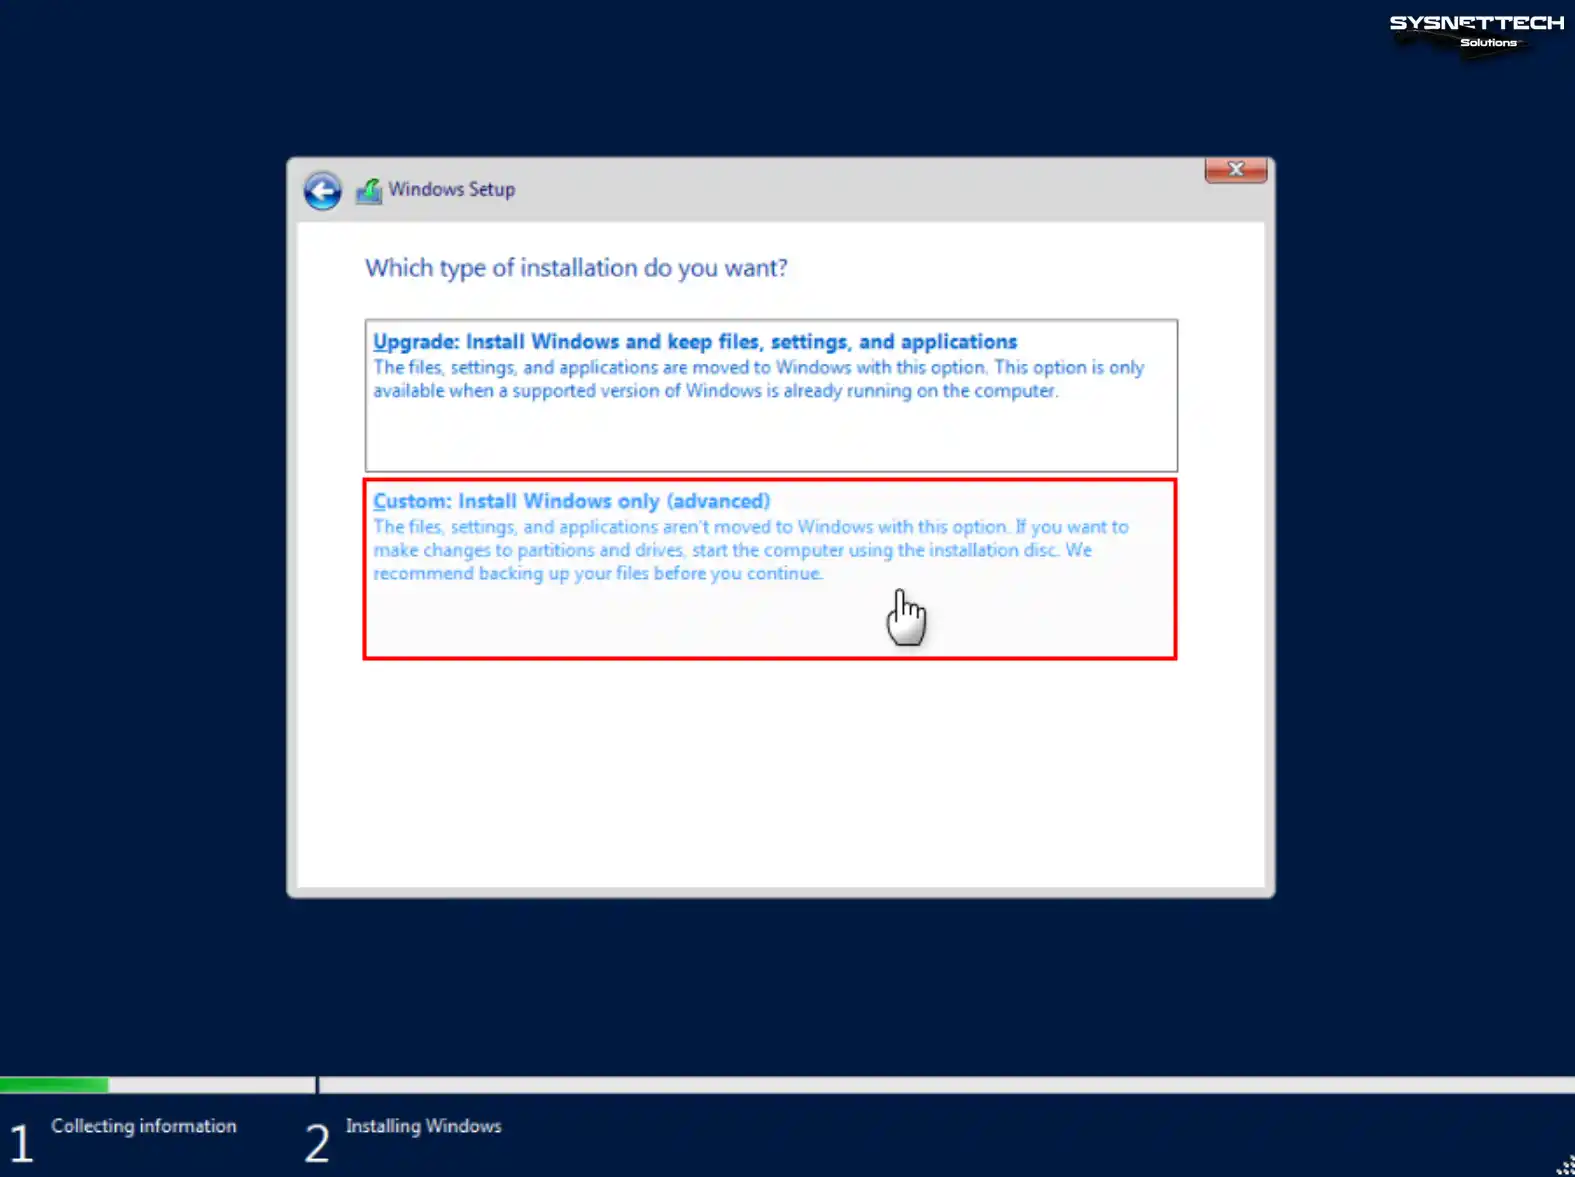
Выбираем Custom: Install Windows only (advanced):

esxi

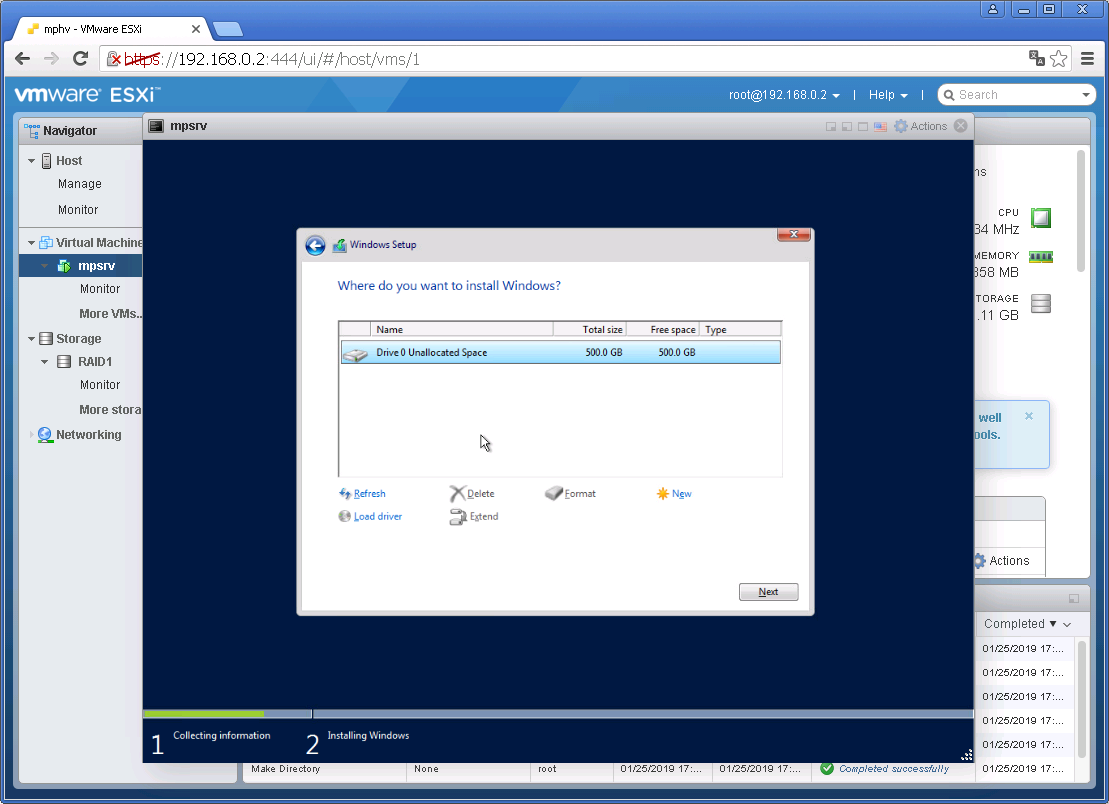
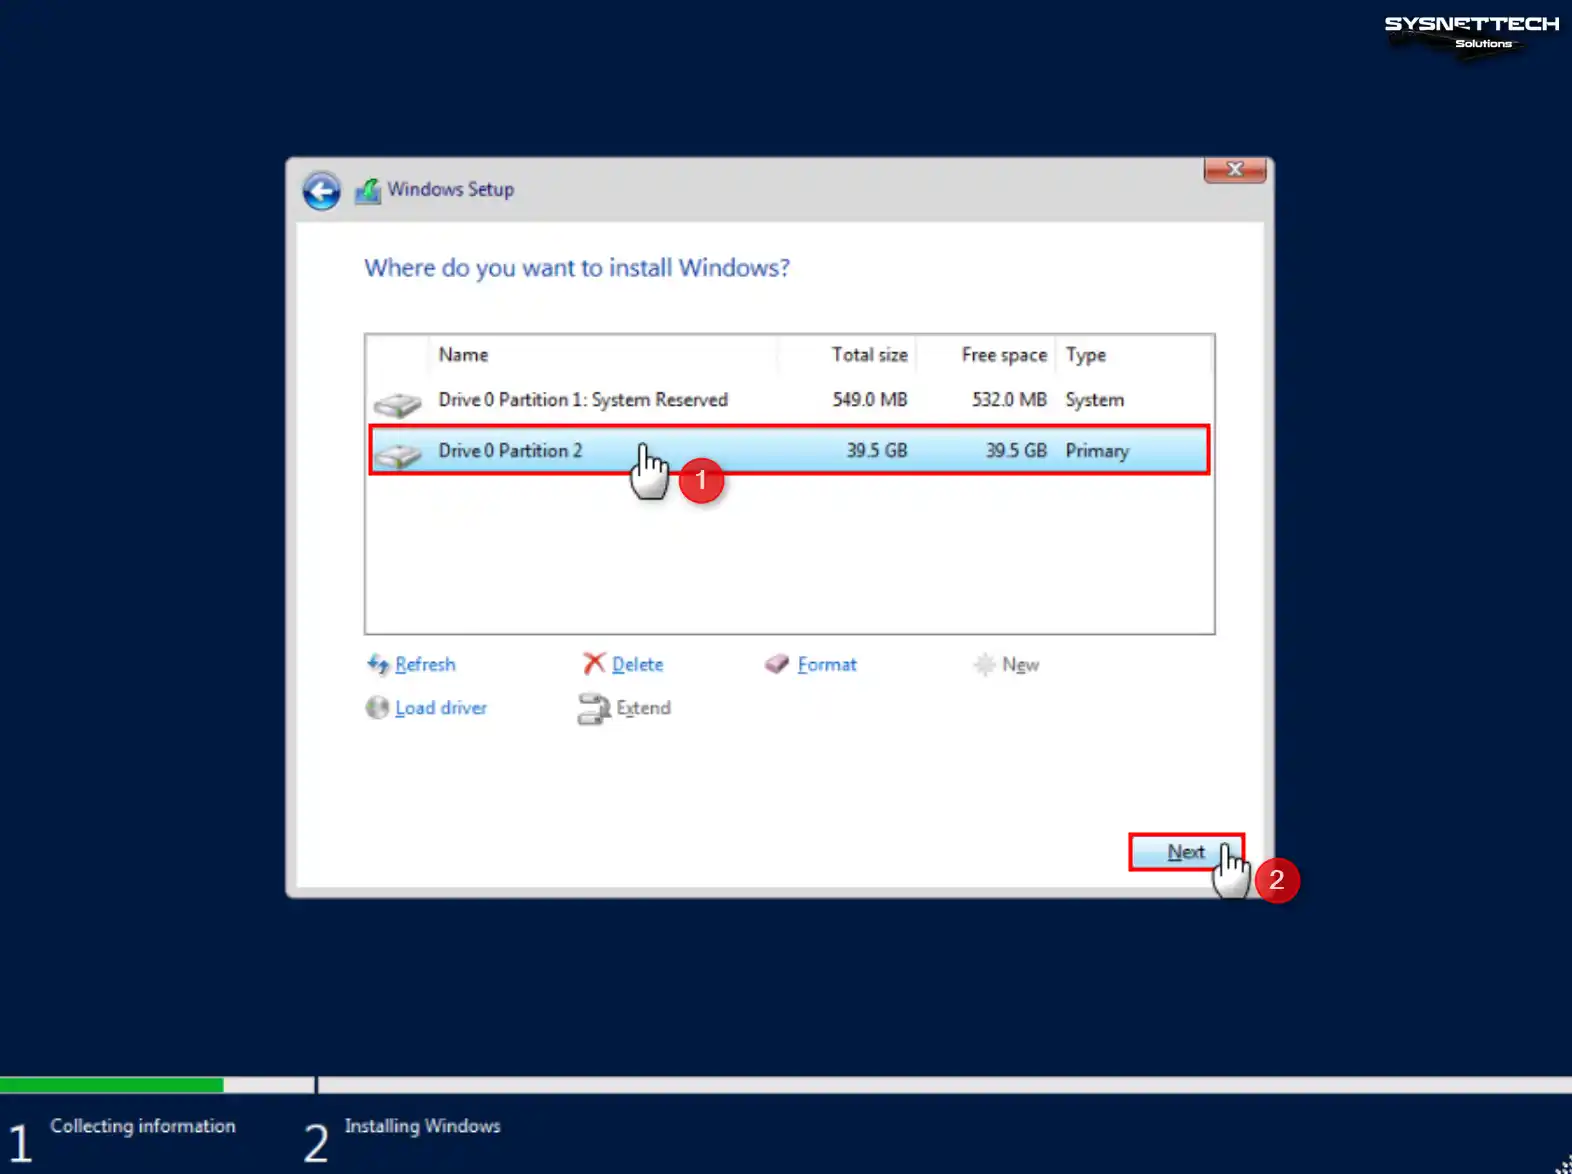
Выбираем винт, у меня он уже выбран, поскольку один. Next:
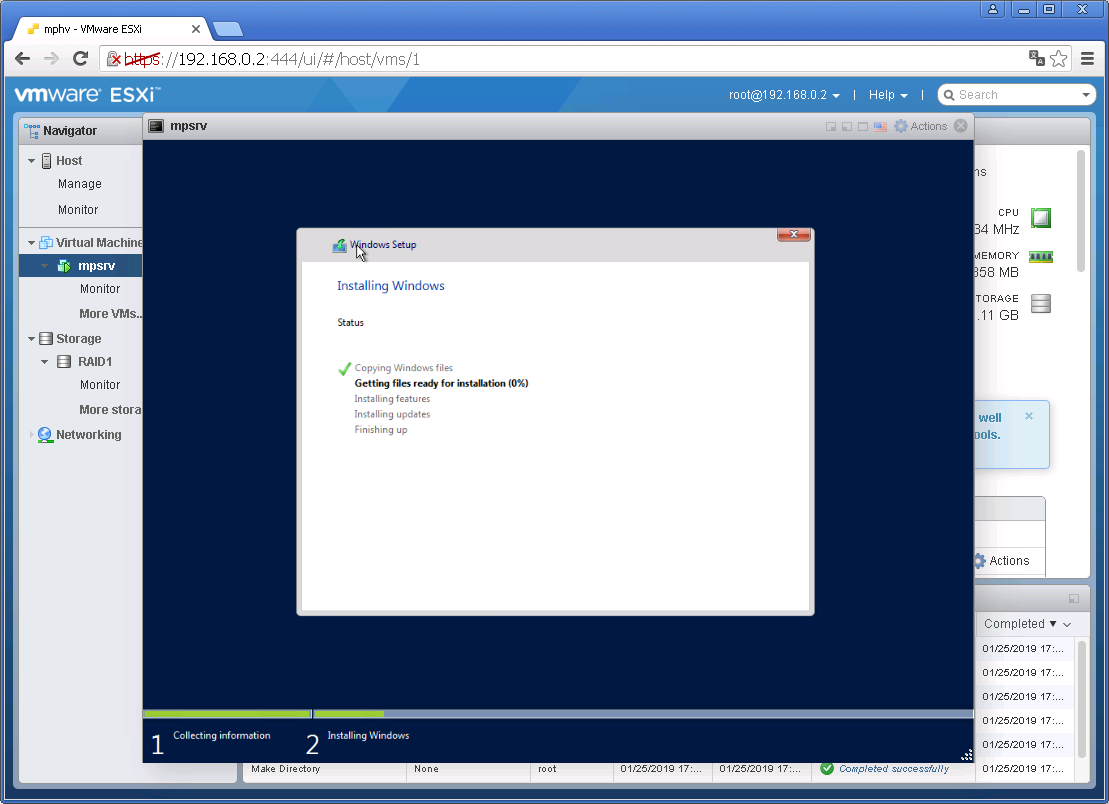
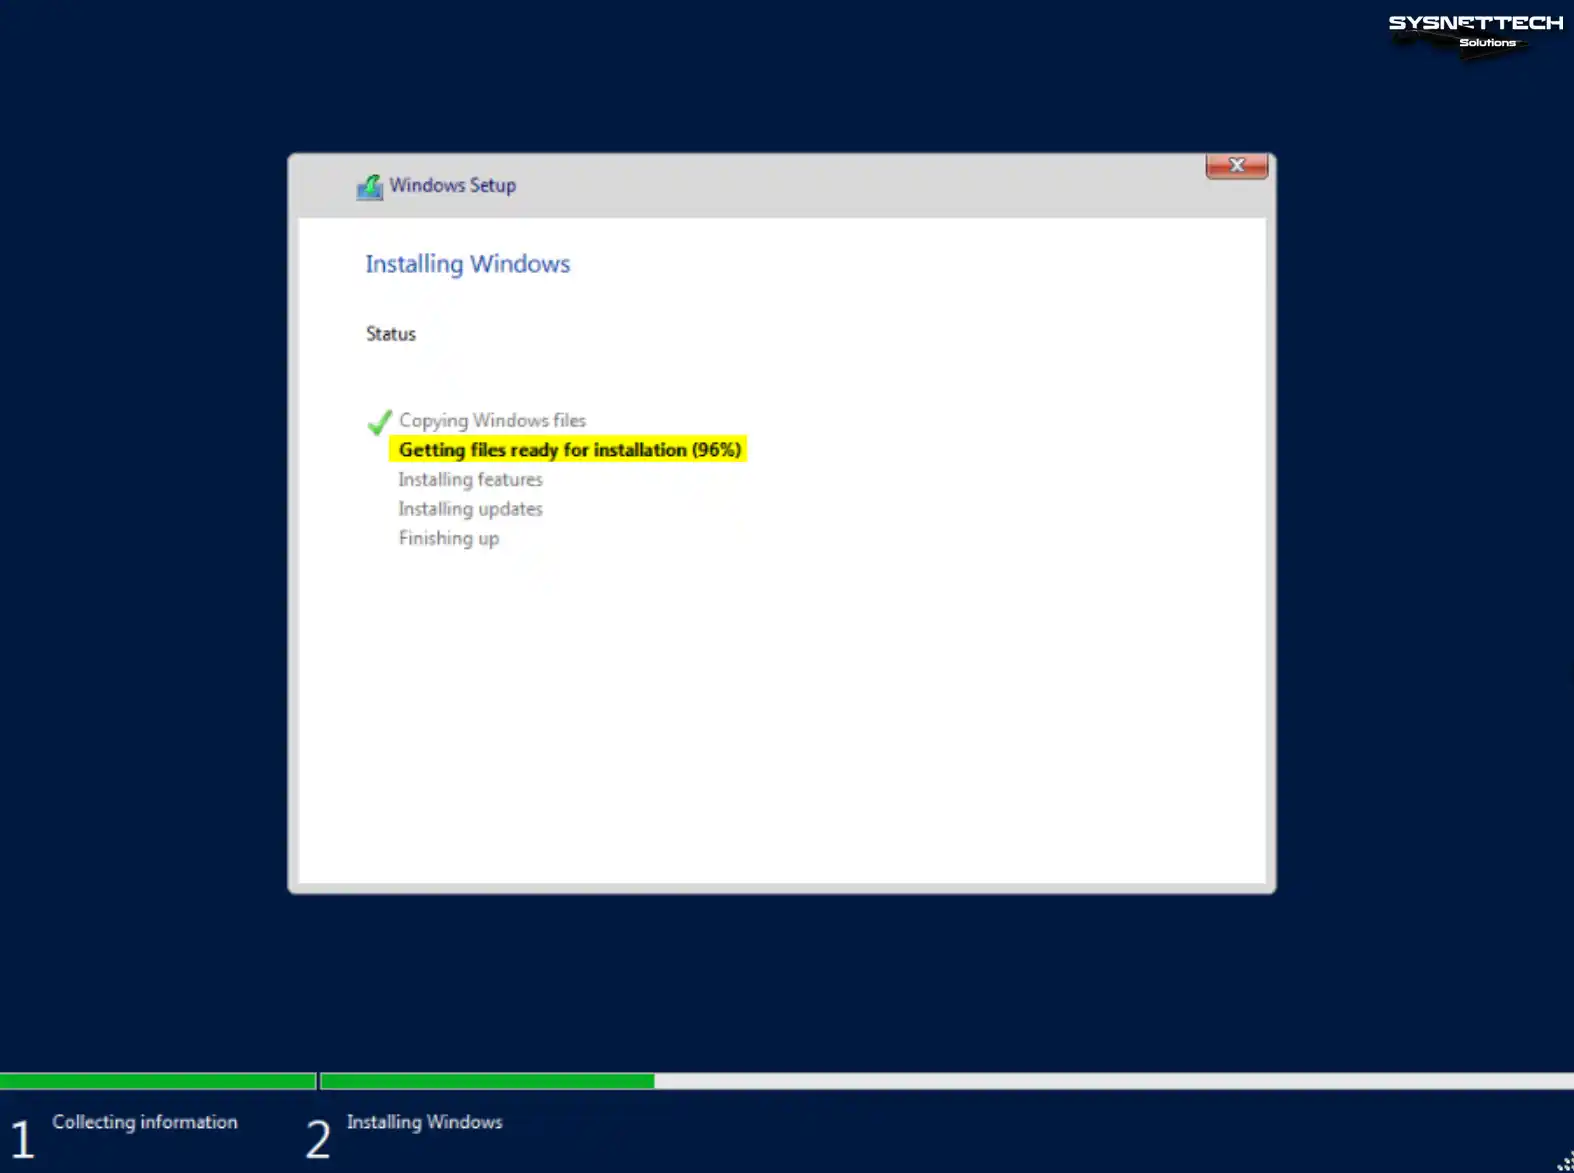
esxi

Потекло по трубам:

esxi

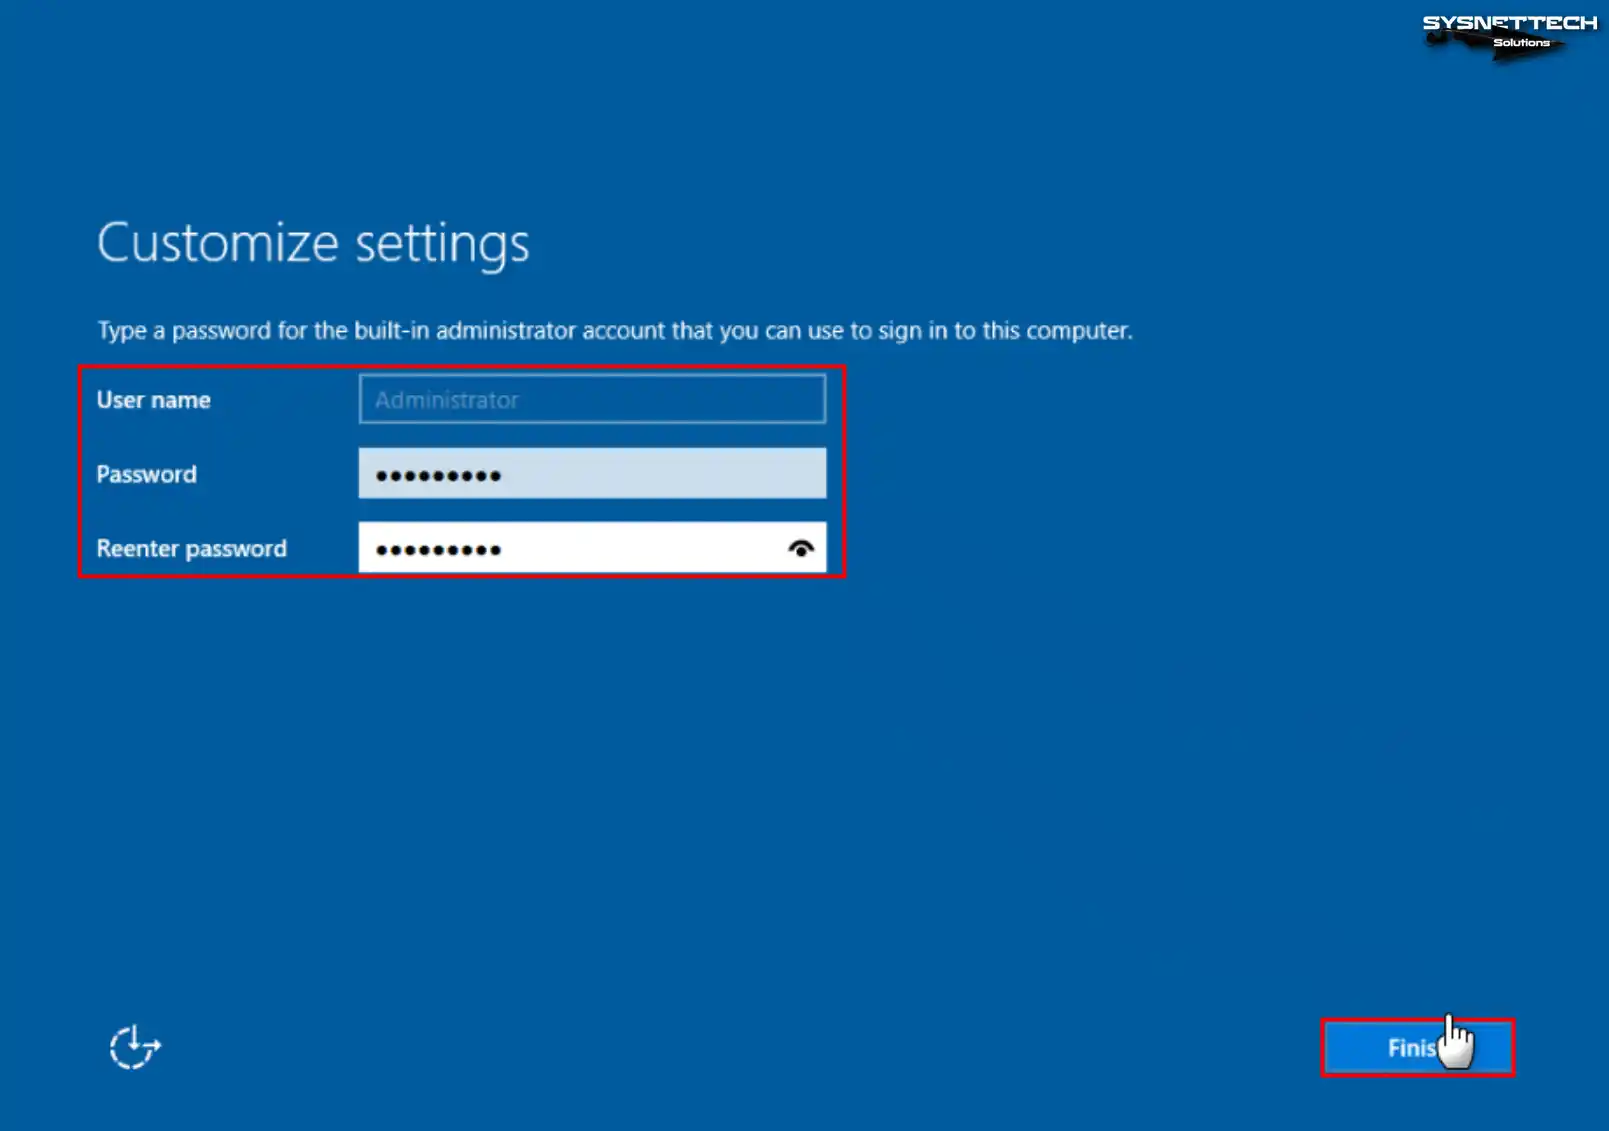
Через несколько минут нам предложат указать пароль от пользователя Administrator. Указываем, Finish:

esxi

Винда поставилась. Очень напоминает десятку.

esxi

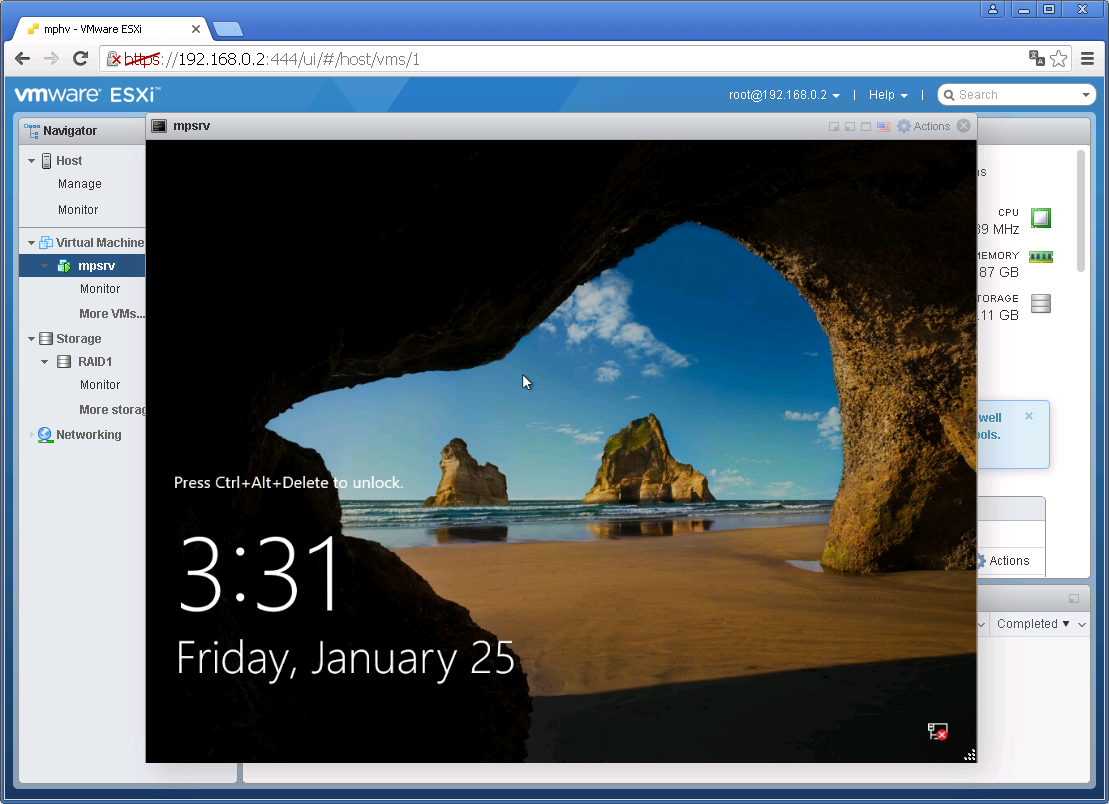
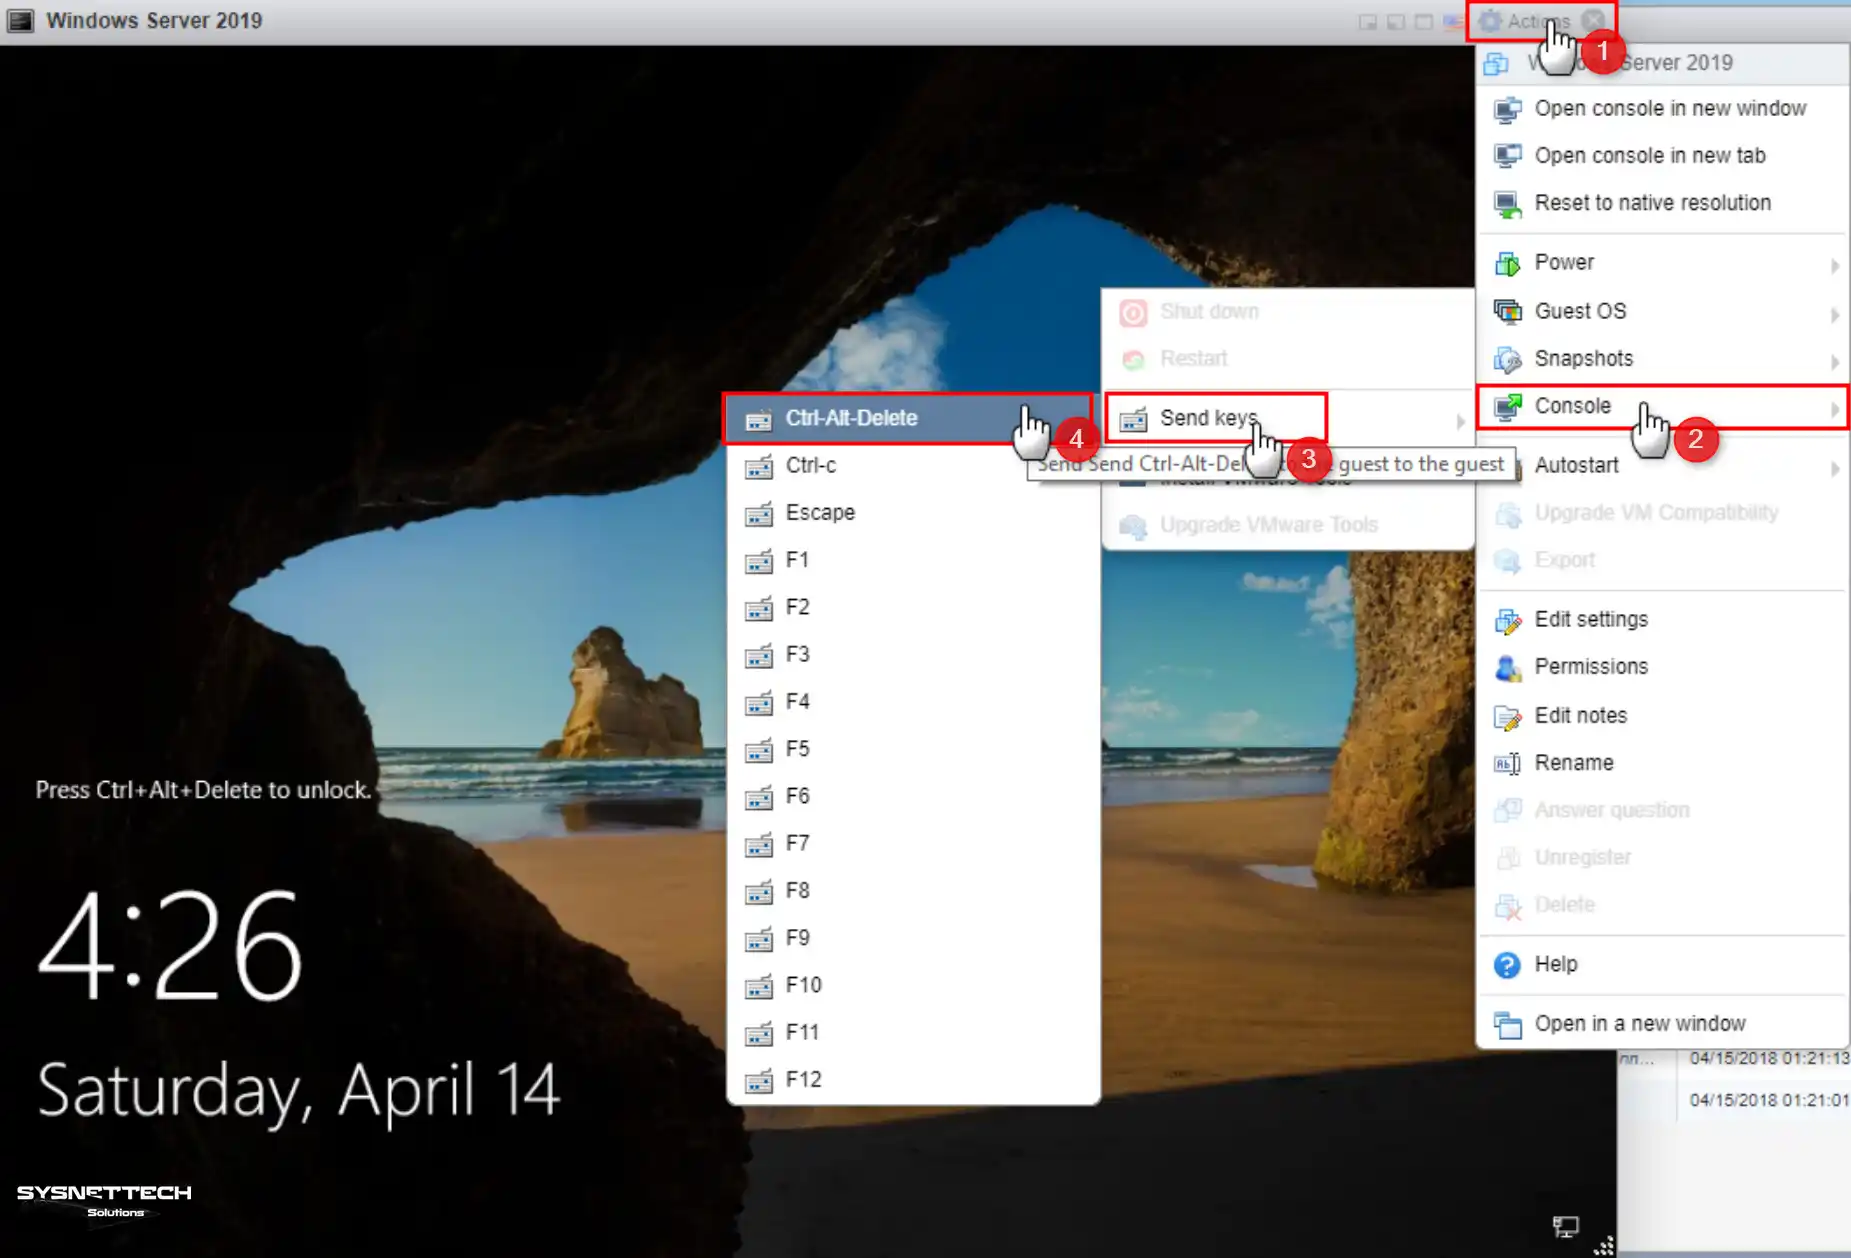
Посылаем Ctrl+Alt+Del:
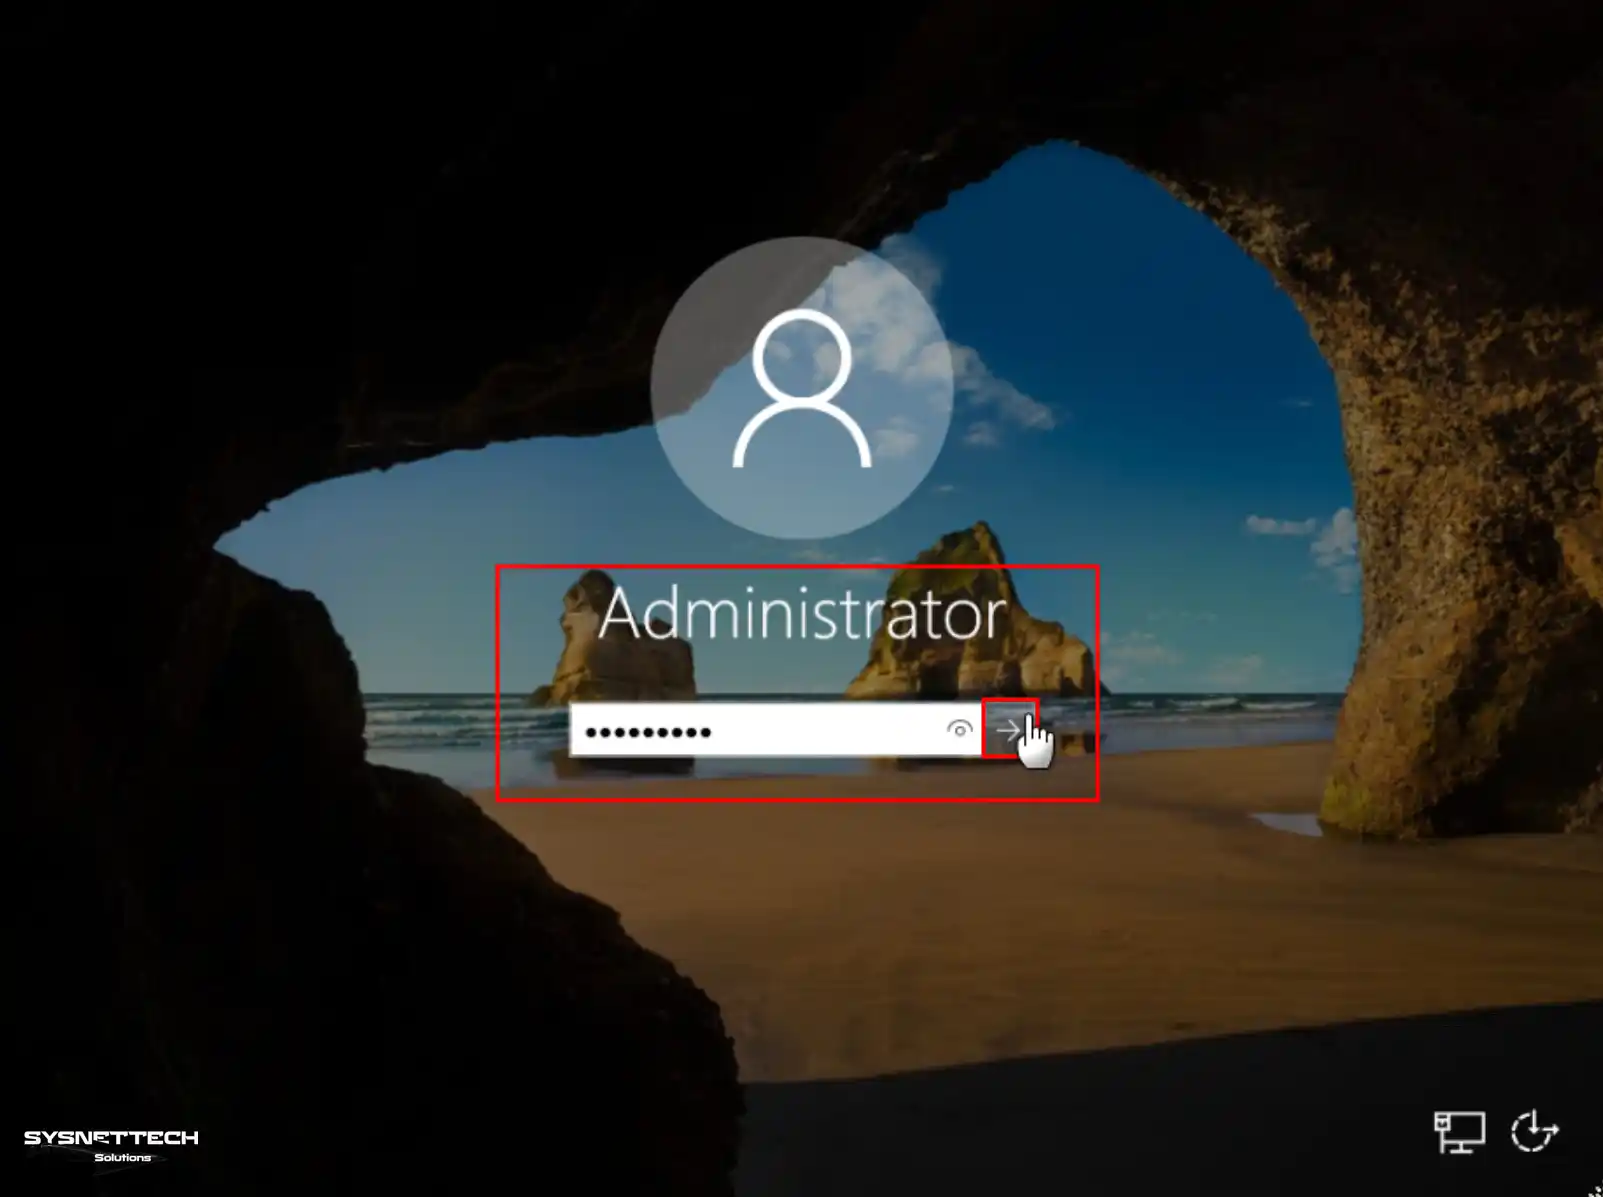
esxi

Логинимся.

esxi

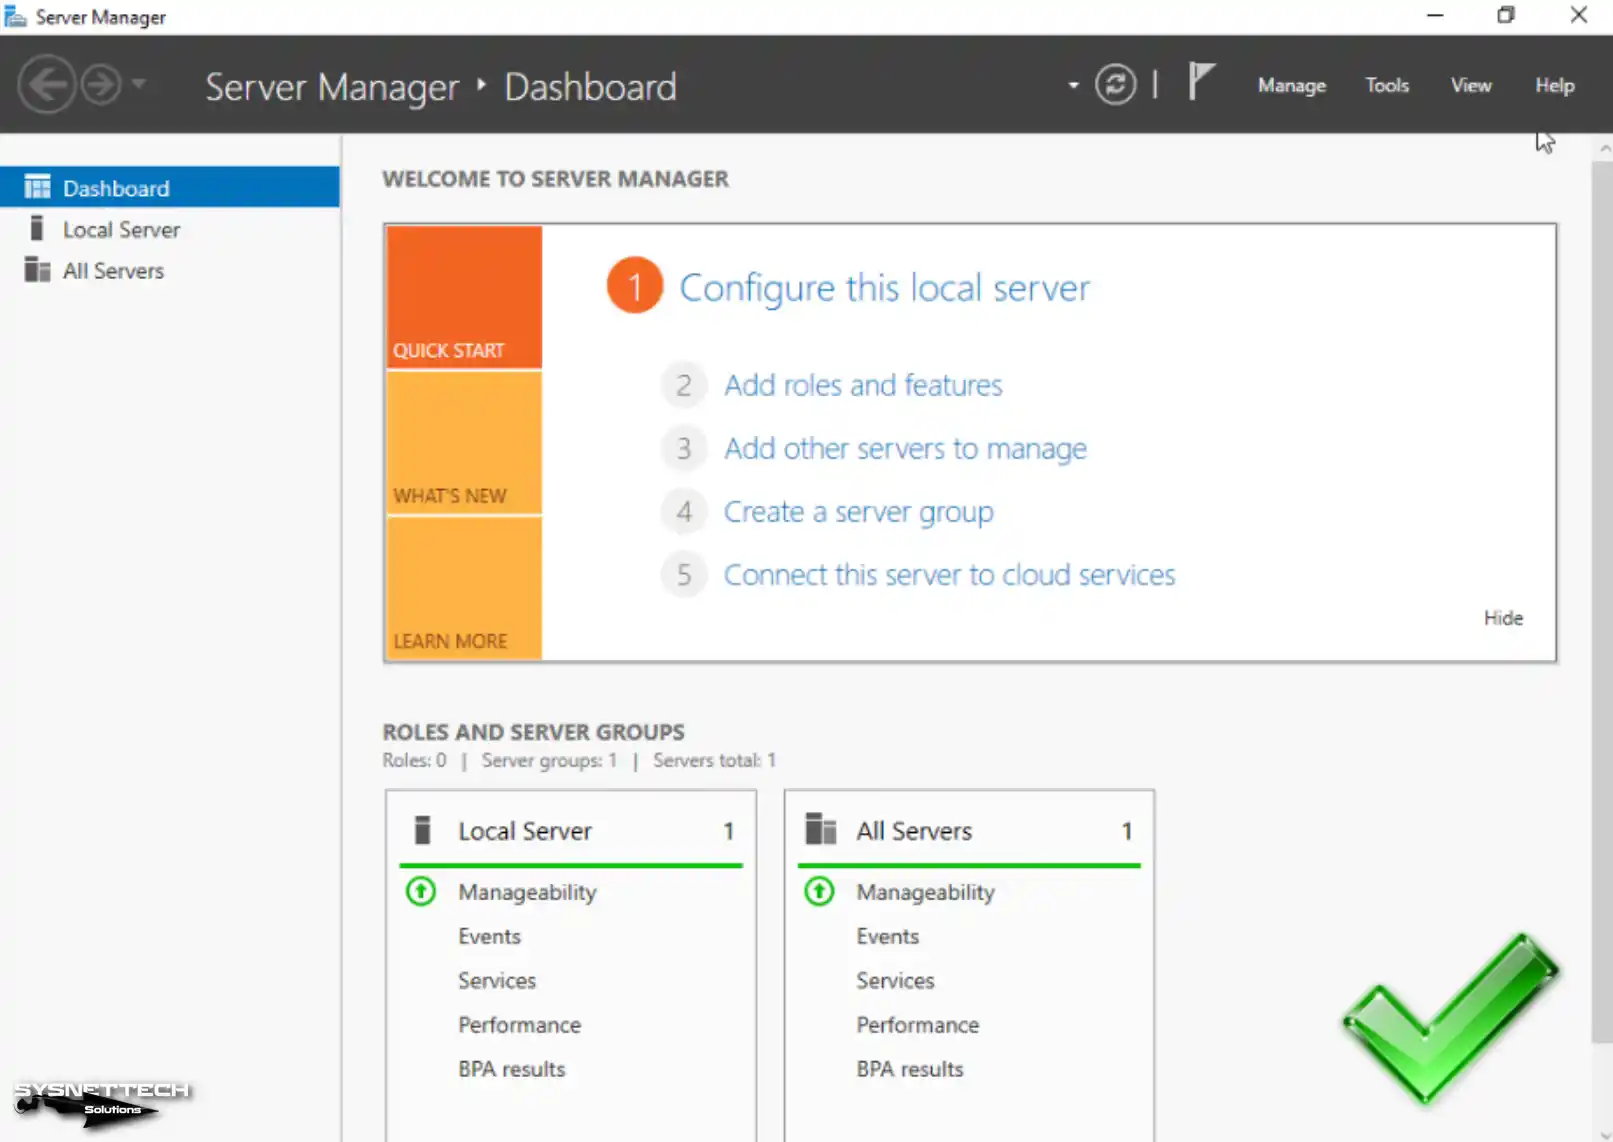
Внутри смесь десятки, метро и 2012-го сервера.

Are you planning to install Windows Server 2019, 2016, or the latest 2022 version on your VMware vSphere ESXi server? If yes, let’s check out how to install Microsoft Windows Server on either a real or a virtual server in this guide.

Technology is changing quickly, and virtualization is critical for companies to run their business better. That’s why Windows Server 2016, 2019, or 2022, which work well in virtual setups, are crucial for IT.

Installing Windows Server on ESXi Server

How to Install and Set Up the Windows Server 2016, 2019, or 2022 on VMware vSphere ESXi

Before we start setting things up, let’s understand what ESXi and Windows Server are. In particular, ESXi helps make, control, or run virtual machines. But it works well on a server when using hardware resources.

Imagine you have just one server in a network. With ESXi, you can install lots of Windows or Linux systems on that same server. This way, you save money instead of buying new computers. Eventually, you can use all those systems on just one machine.

In simple terms, with VMware’s ESXi, you can run many virtual machines at the same time. People often use this, especially in big data centers or company networks.

Microsoft’s Windows Server family works like ESXi. But it has extra virtualization stuff called Hyper-V. Still, it’s more customized and about more than virtualization like ESXi.

Why Do They Use Windows Server with ESXi?

  1. More Virtualization Capabilities
  • ESXi makes virtual machines work well. So, installing Windows Server on this server lets it do virtualization using hardware.
  1. Efficiency and Resource Management
  • ESXi makes sure hardware gets shared well. So, on one computer, you can use Windows Server, Guest OS, Linux, or macOS together.
  1. High Availability and Backup
  • ESXi helps keep things going without stopping and has backup features to keep your systems safe. This makes managing VMs better, which means your business keeps running smoothly and your systems are reliable.
  1. Resource Balancing
  • ESXi handles resources well by keeping them balanced and making sure they work efficiently even when things get hectic. So, using it allows you to take more work when things get busier quickly.
  1. Various Operating System Support
  • Because it’s all based on hardware, it can run different operating systems. So, you can use both Windows Server and other systems on it.
  1. Virtual Environment Management and Tools
  • It gives you vital tools to control your virtual space. With these tools, you can do a better job managing how well your virtual machines work and use resources.
  1. Cost and Efficiency
  • Virtualization makes it so you need fewer real servers, which lowers energy costs. This means you save money on the hardware you use. By putting Windows Server 2019 on ESXi, you can cost-effectively do things.

Pre-Installation Requirements

First and foremost, install the VMware ESXi system on your physical machine or VM. You can access the guide we prepared earlier from here.

After making sure ESXi is set up and working, you’ll need the Server ISO file. Get this image file from the official Microsoft website. Or you can get it from a trustworthy source or right here.

If you get the ISO file from Microsoft, make sure it’s good by checking its checksum.

Alternative Solutions

You can use the Windows Server operating system on ESXi and also with virtualization software. If you don’t have a real server, you can use a virtual machine (VM) to learn.

In short, you can run one of the WS 2016, 2019, or 2022 versions on a virtual machine. As an alternative to the ESXi server, you can refer to our previous articles:

  • Using a Windows Server with VMware Workstation
  • Using a Windows Server with VirtualBox

How to Create a New Virtual Machine for Microsoft Windows Server on ESXi Server

After preparing, you can start creating a new virtual machine with ESXi. At this stage, regardless of the version of your ESXi server, the logic is the same. Thus, if you cannot see the current MS version as the operating system type, choose the older one. Selecting the older version won’t cause any issues.

Now, follow these steps one after the other to install Windows Server on ESXi.

Step 1

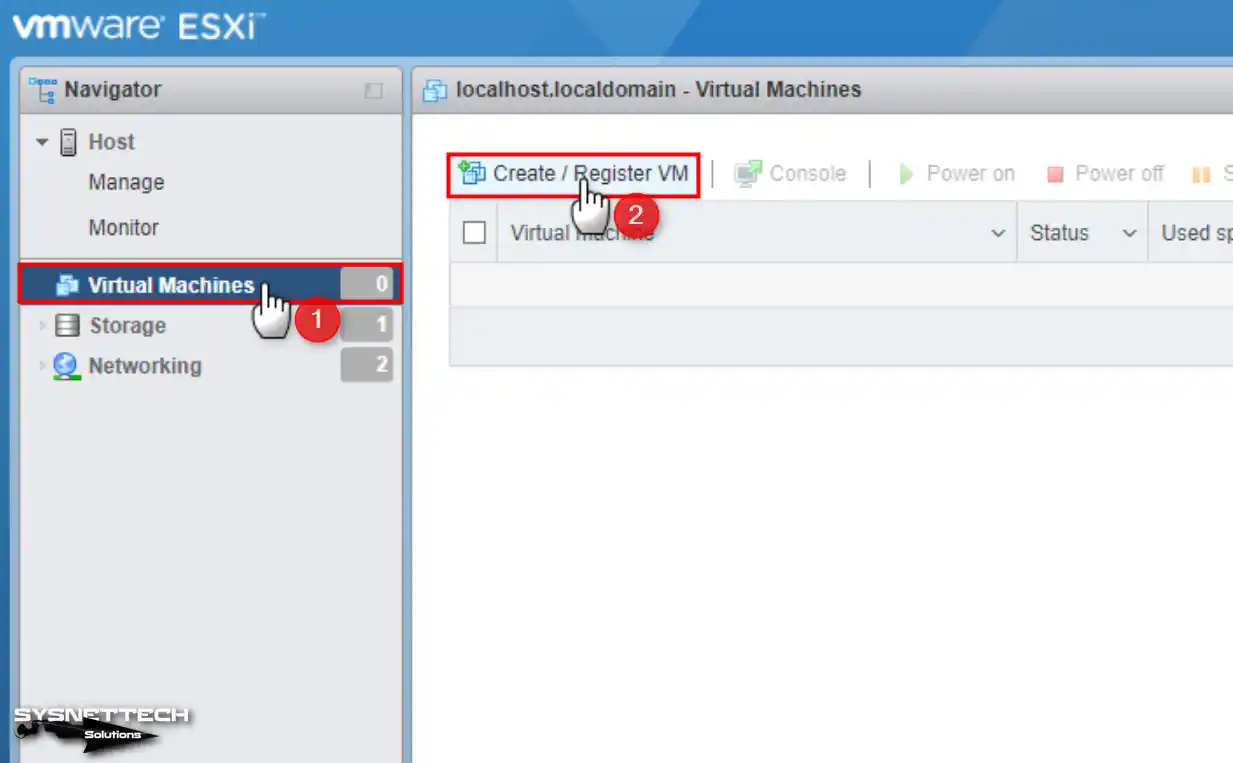
Type the IP address of your ESXi server into your PC’s web browser. When the server’s web interface pops up, log in using your Root account. After that, click on “Virtual Machines” on the left side, as you see in the picture below.

Look at the screen, and you’ll find the “localhost.localdomain – Virtual Machines” part. There, click on “Create VM / Register VM” to get a new VM ready, of course.

Starting the Virtual Machine Wizard on ESXi

Step 2

Once you click on that option, a wizard for a New Virtual Machine will pop up. On this screen, choose “Create a New Virtual Machine” for Microsoft Server and click Next.

Creating a New Virtual Machine

Step 3

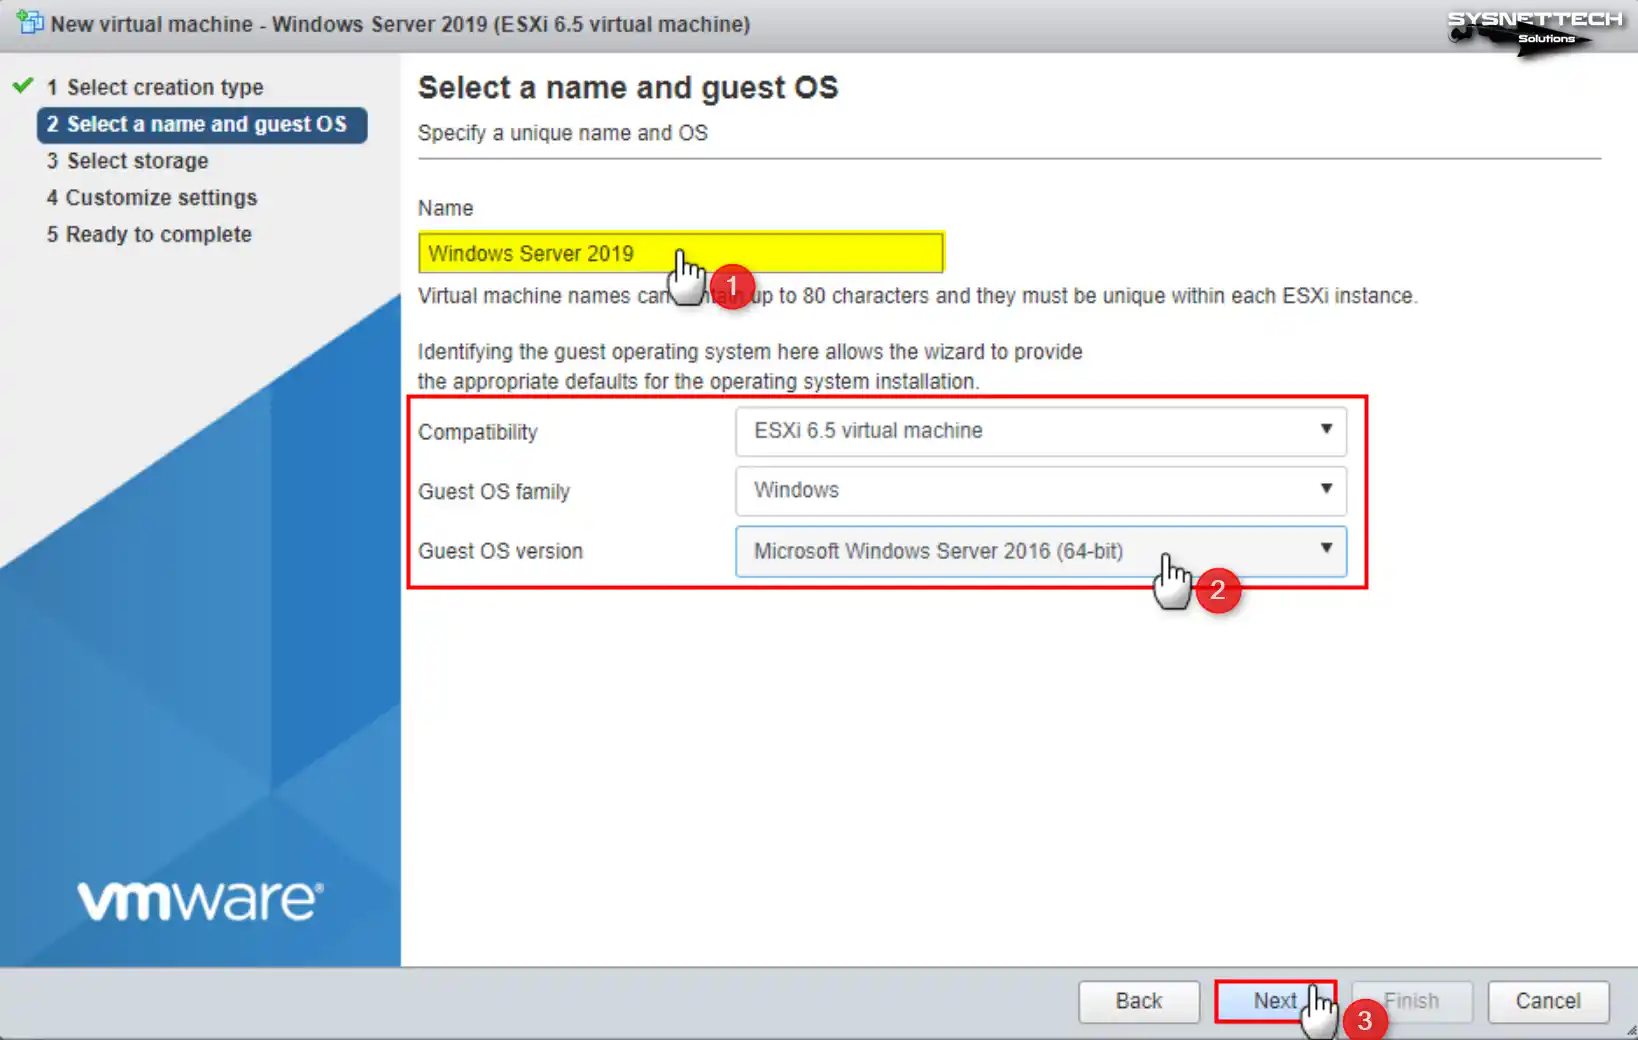
In the next window, called “Select a name and Guest OS,” you’ll see it. Here, enter any name you like for your Windows server in the “name” part. Then, set up the OS options below for your operating system installation.

  1. Compatibility
  • In this part, select the version of ESXi on your system. If you’re using a more recent version, you can choose a setting that works with older Server types.
  1. Guest OS Family
  • Since the OS family is, of course, Windows, select it.
  1. Guest OS Version
  • If you’re installing a newer version of MS Server, it might not show up here. Thus, you can make it work better by picking the previous version for compatibility.

Guest OS, Family Type, and Version Selection

Step 4

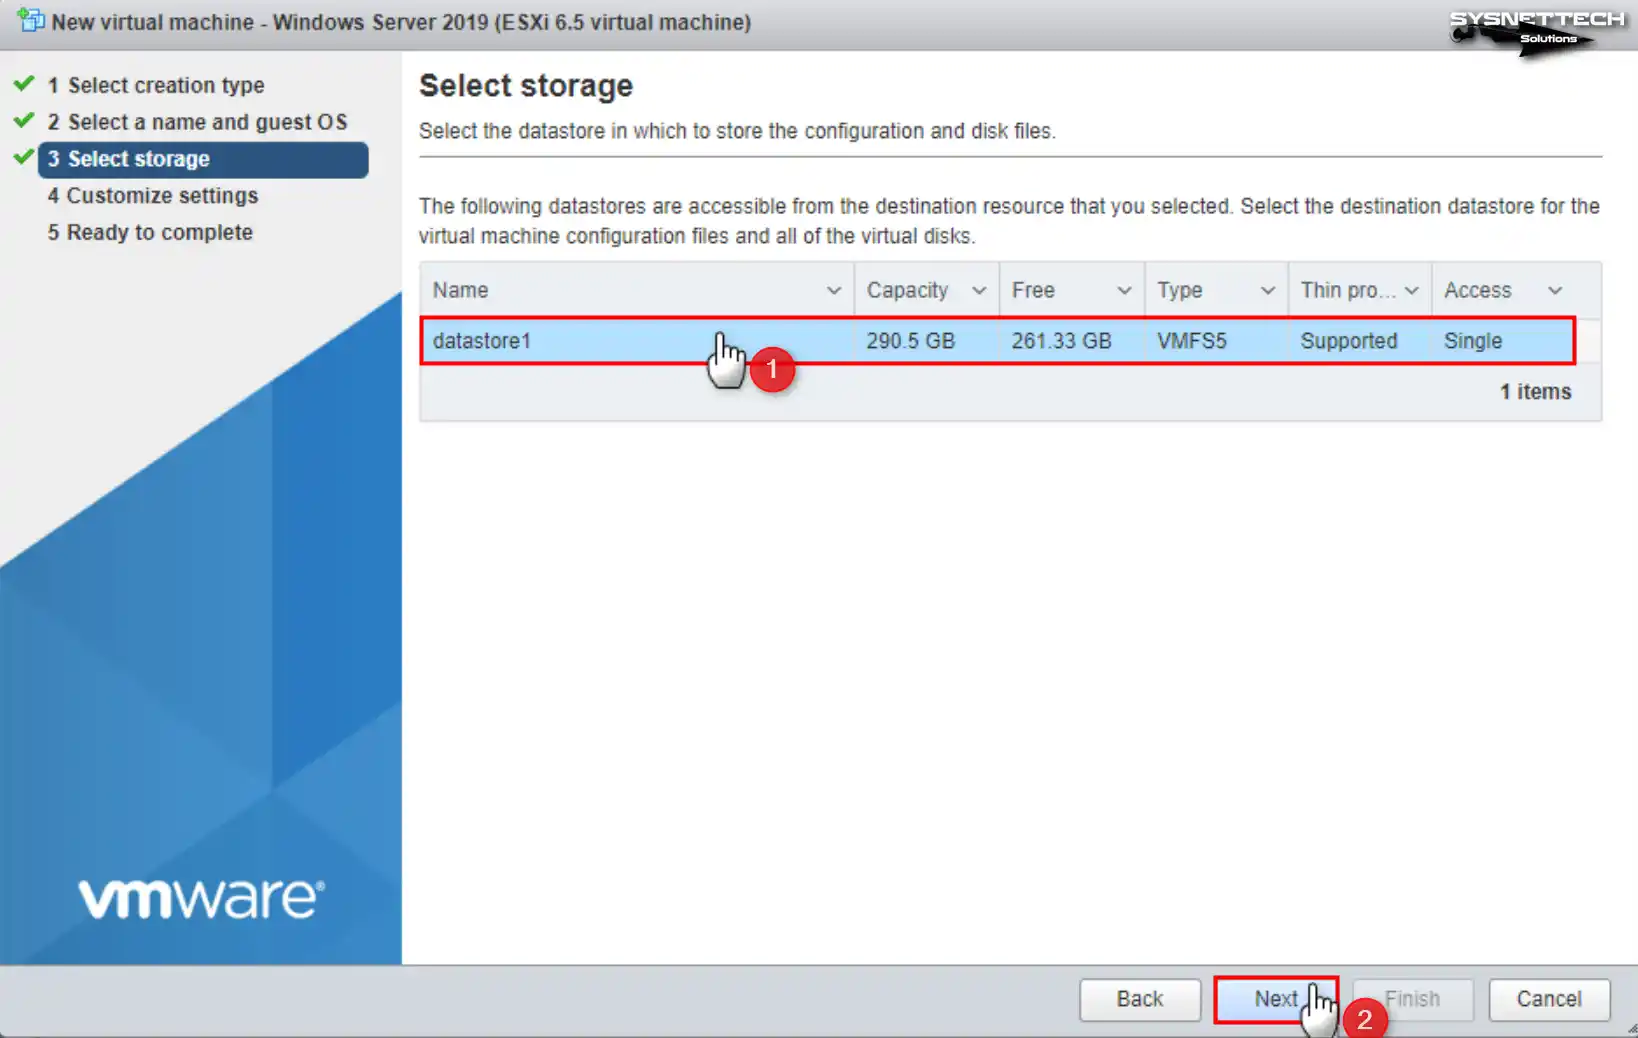
In the Select Storage window, you might see one or more data storage options. It depends on How you set up your ESXi determines the outcome. Thus, choose where you want to store the virtual disk and the setup files for Windows Server.
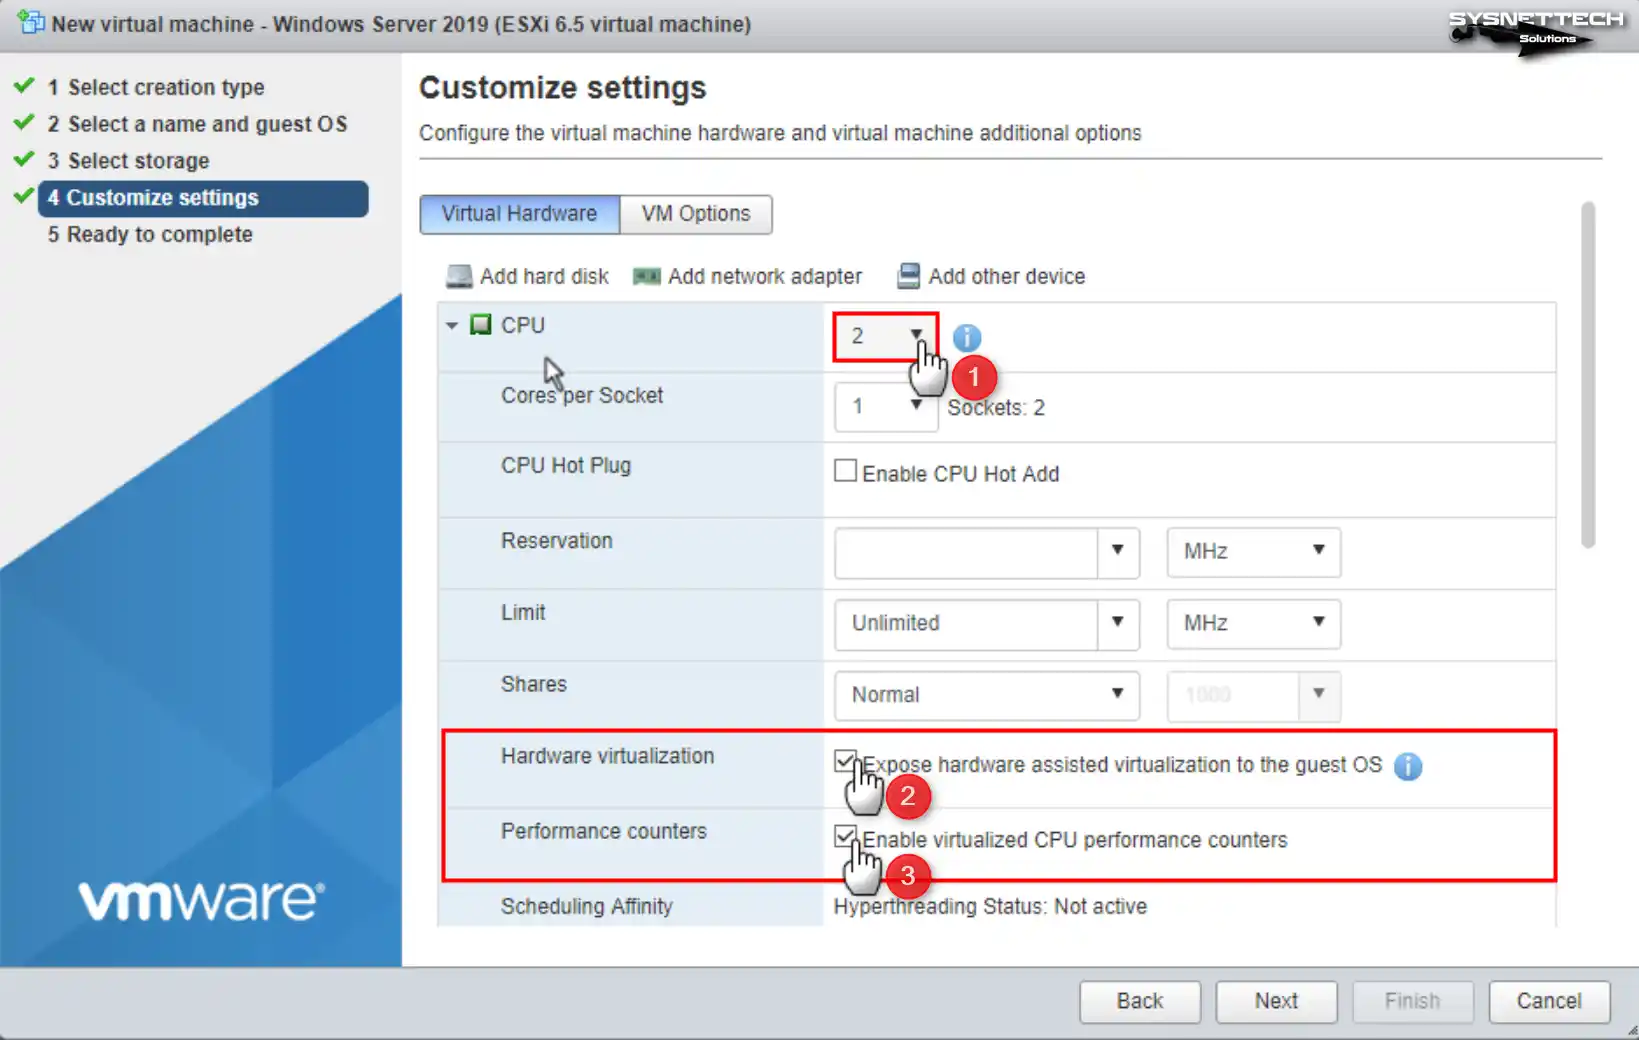
Datastore Selection for VM

Step 5

In the Customize Settings window, open up the choices for the CPU device. First, add more virtual CPUs based on what your PC can handle. After that, turn on the options below to find a better-performing server.

  • Hardware Virtualization
  • Performance Counters
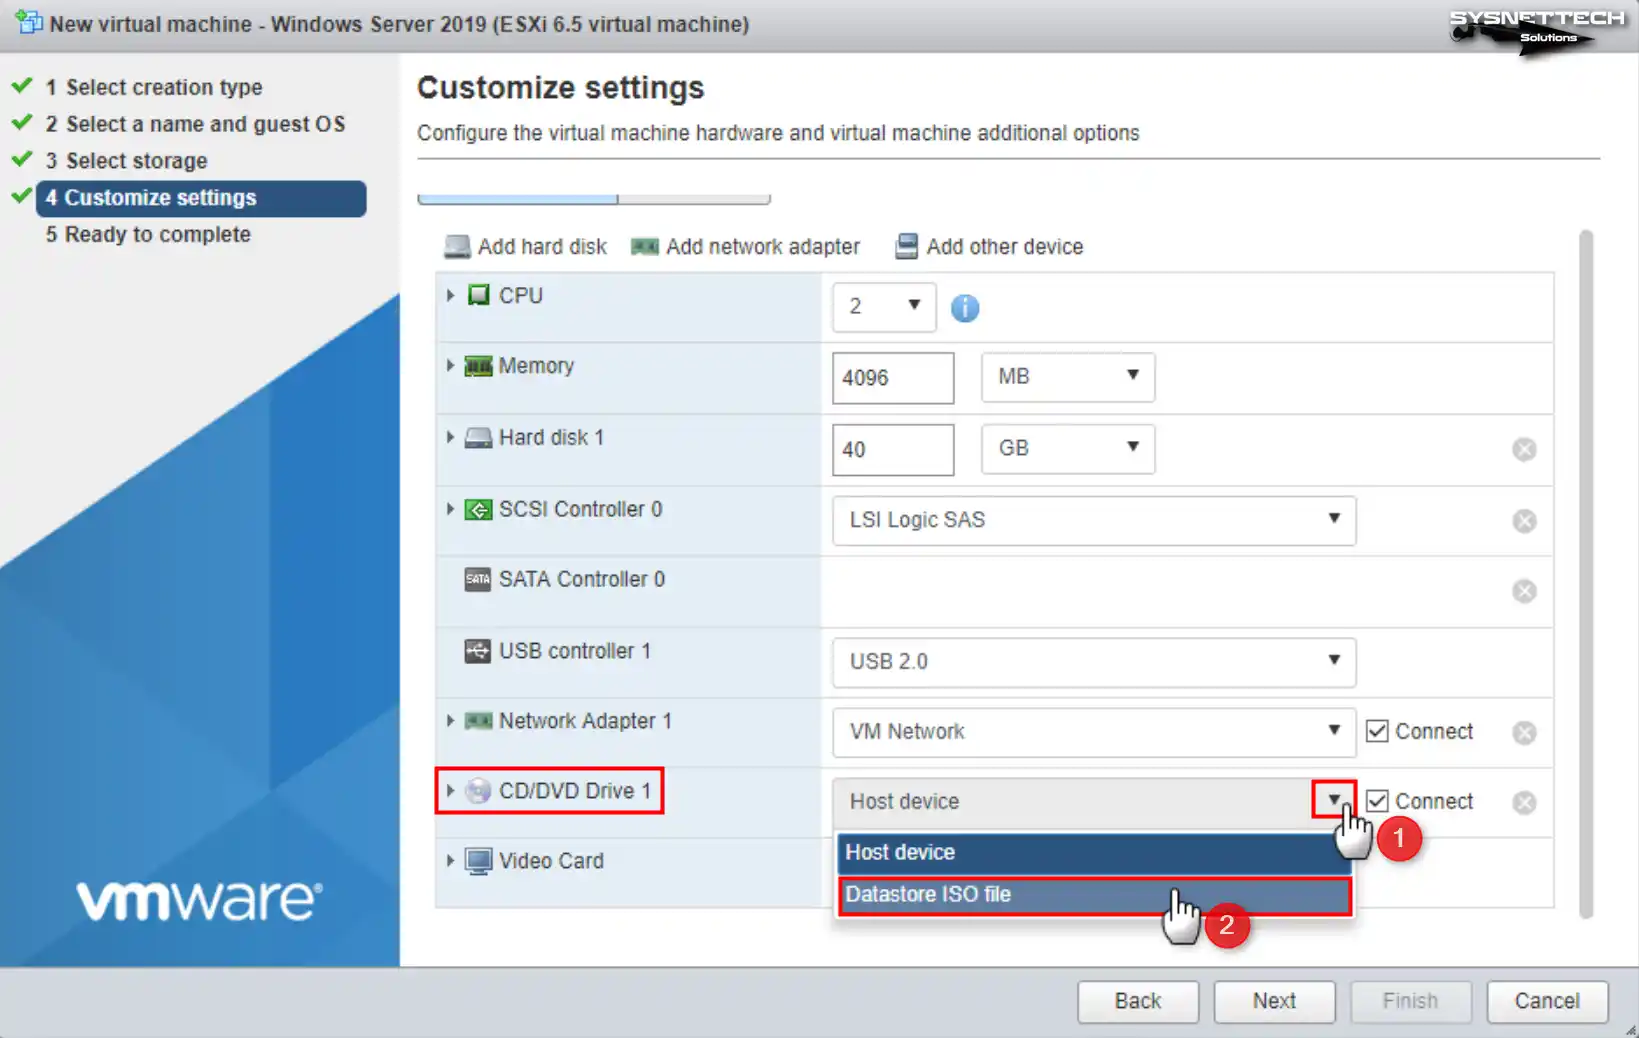
Editing the CPU Settings of the Virtual Machine

Step 6

Now, to add the Server ISO file to the VM, go to CD/DVD Drive 1. Expand the dropdown list next to this virtual device. Here, you will see two options: Host Device and Datastore ISO File.

Choose the Datastore option to tell the system where you put the Server image file you added to the server.
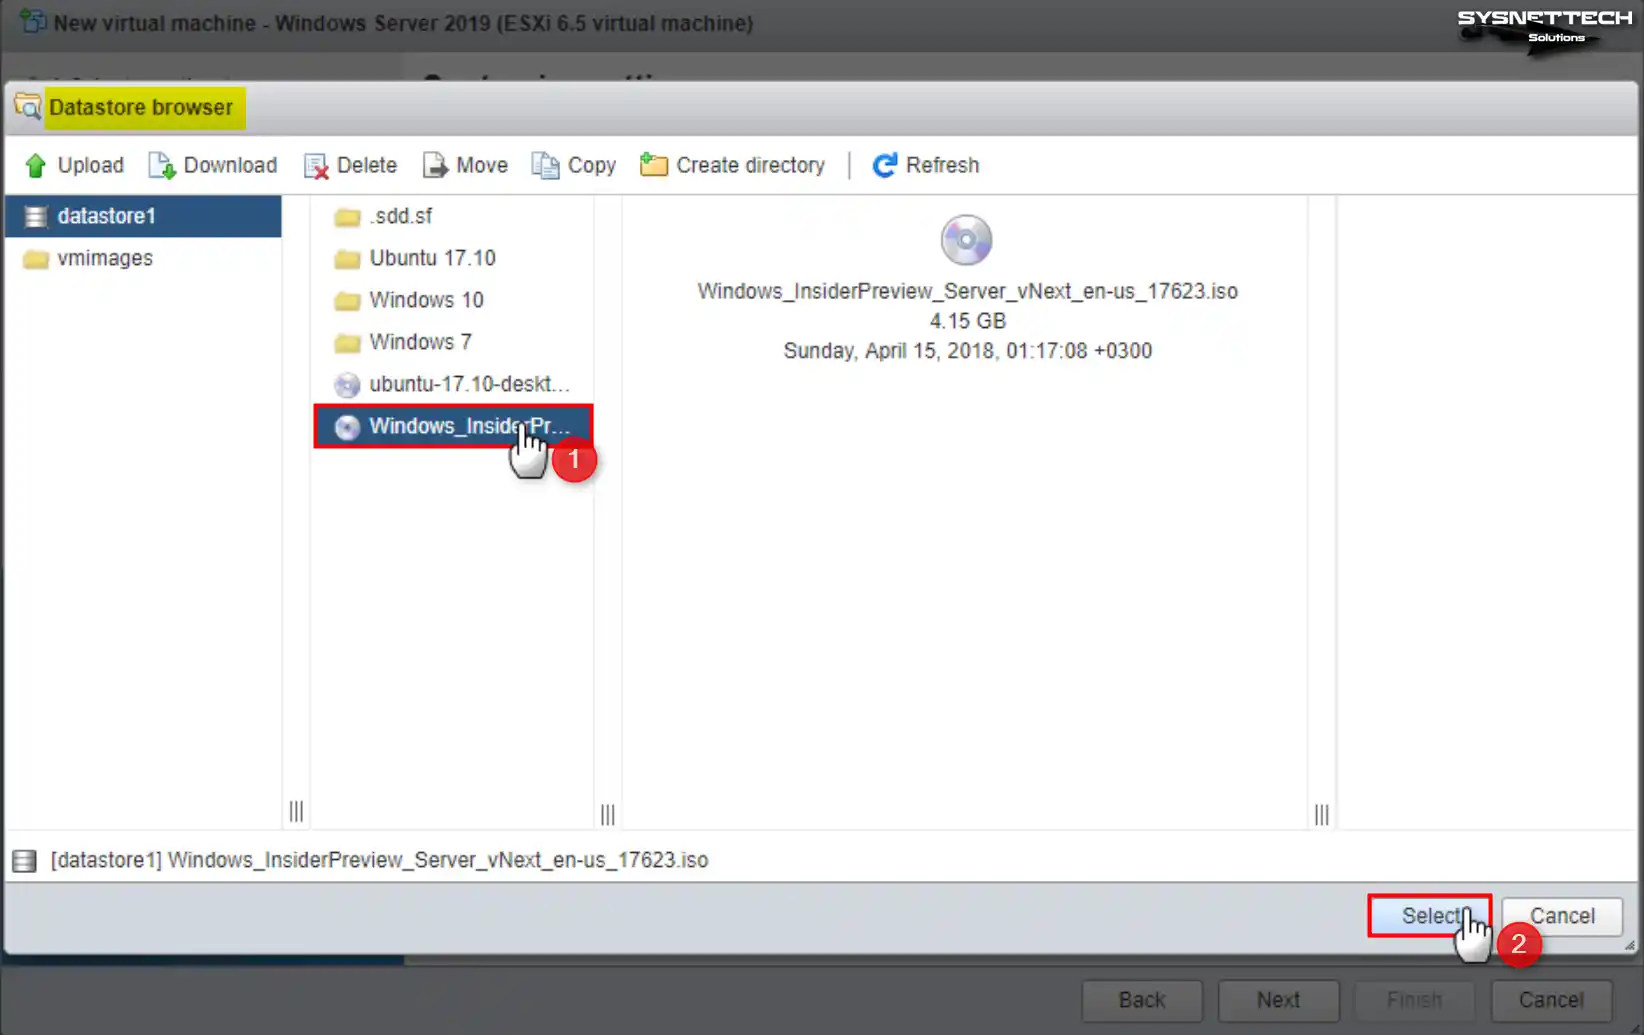
CD/DVD Drive 1 Settings

Step 7

The choice you made in the last step will open the Datastore Browser. In this window, pick the folder where the ISO file is and add it.
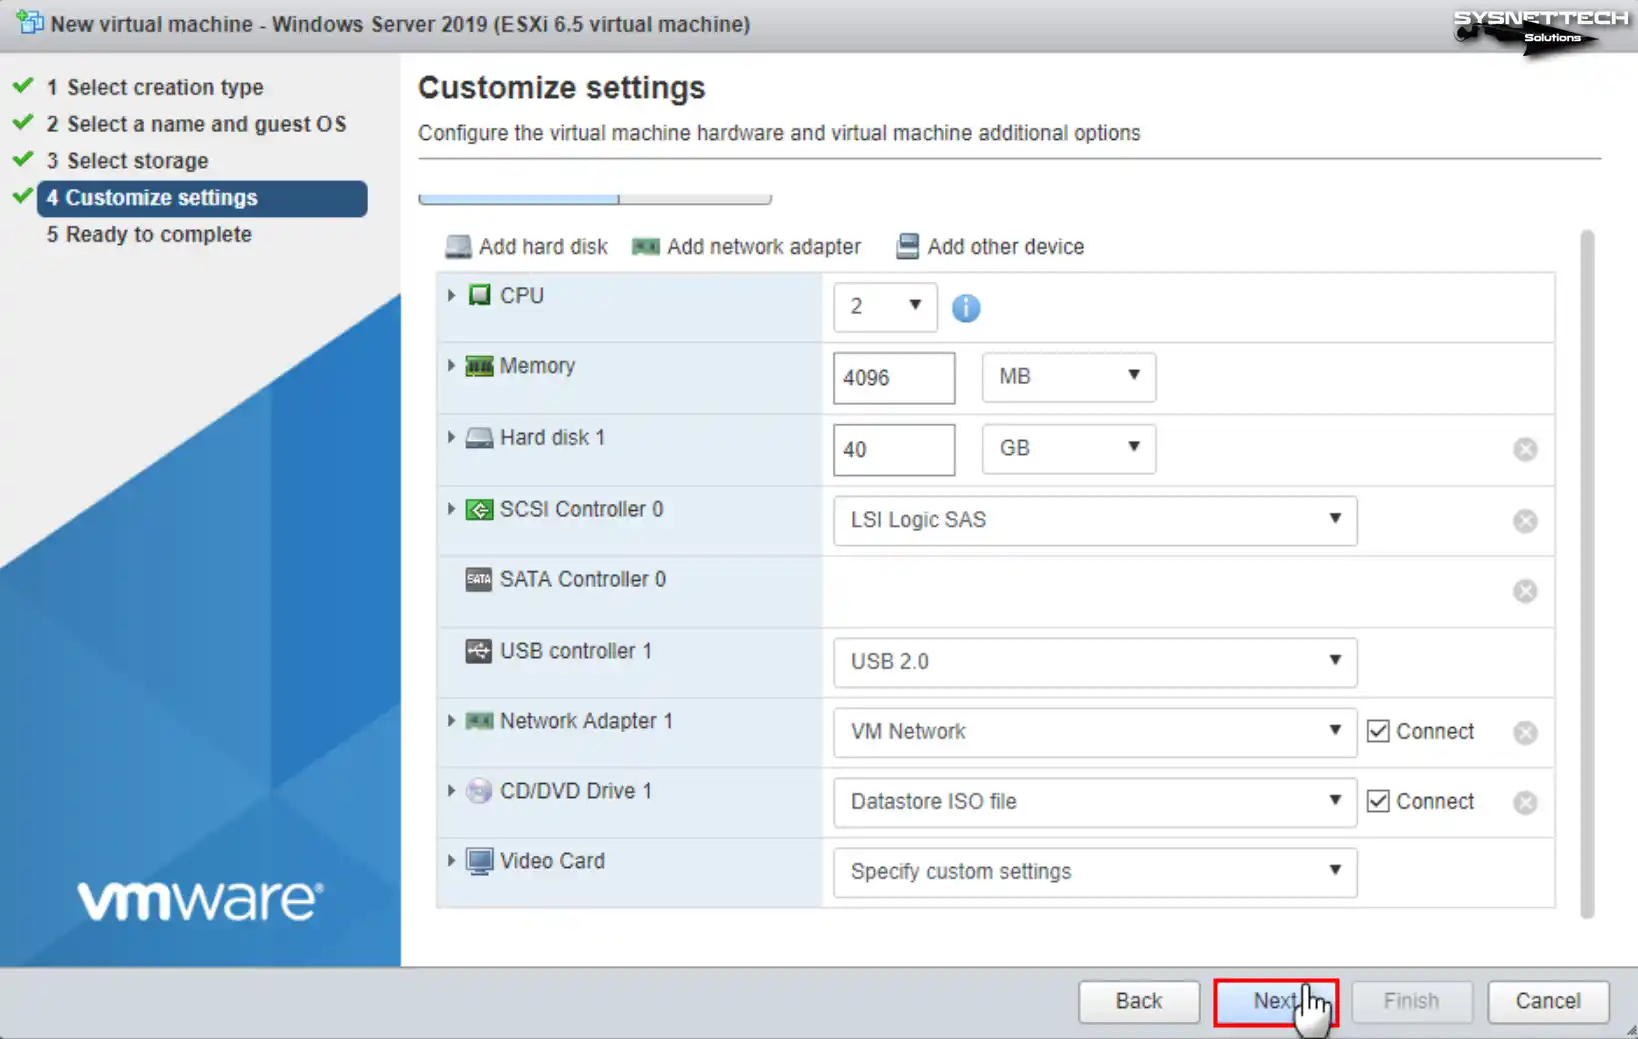
Choosing the Windows Server ISO File

Step 8

Look over the last steps you did for the Windows Server virtual machine. If there’s anything you want to change, go back and fix it.
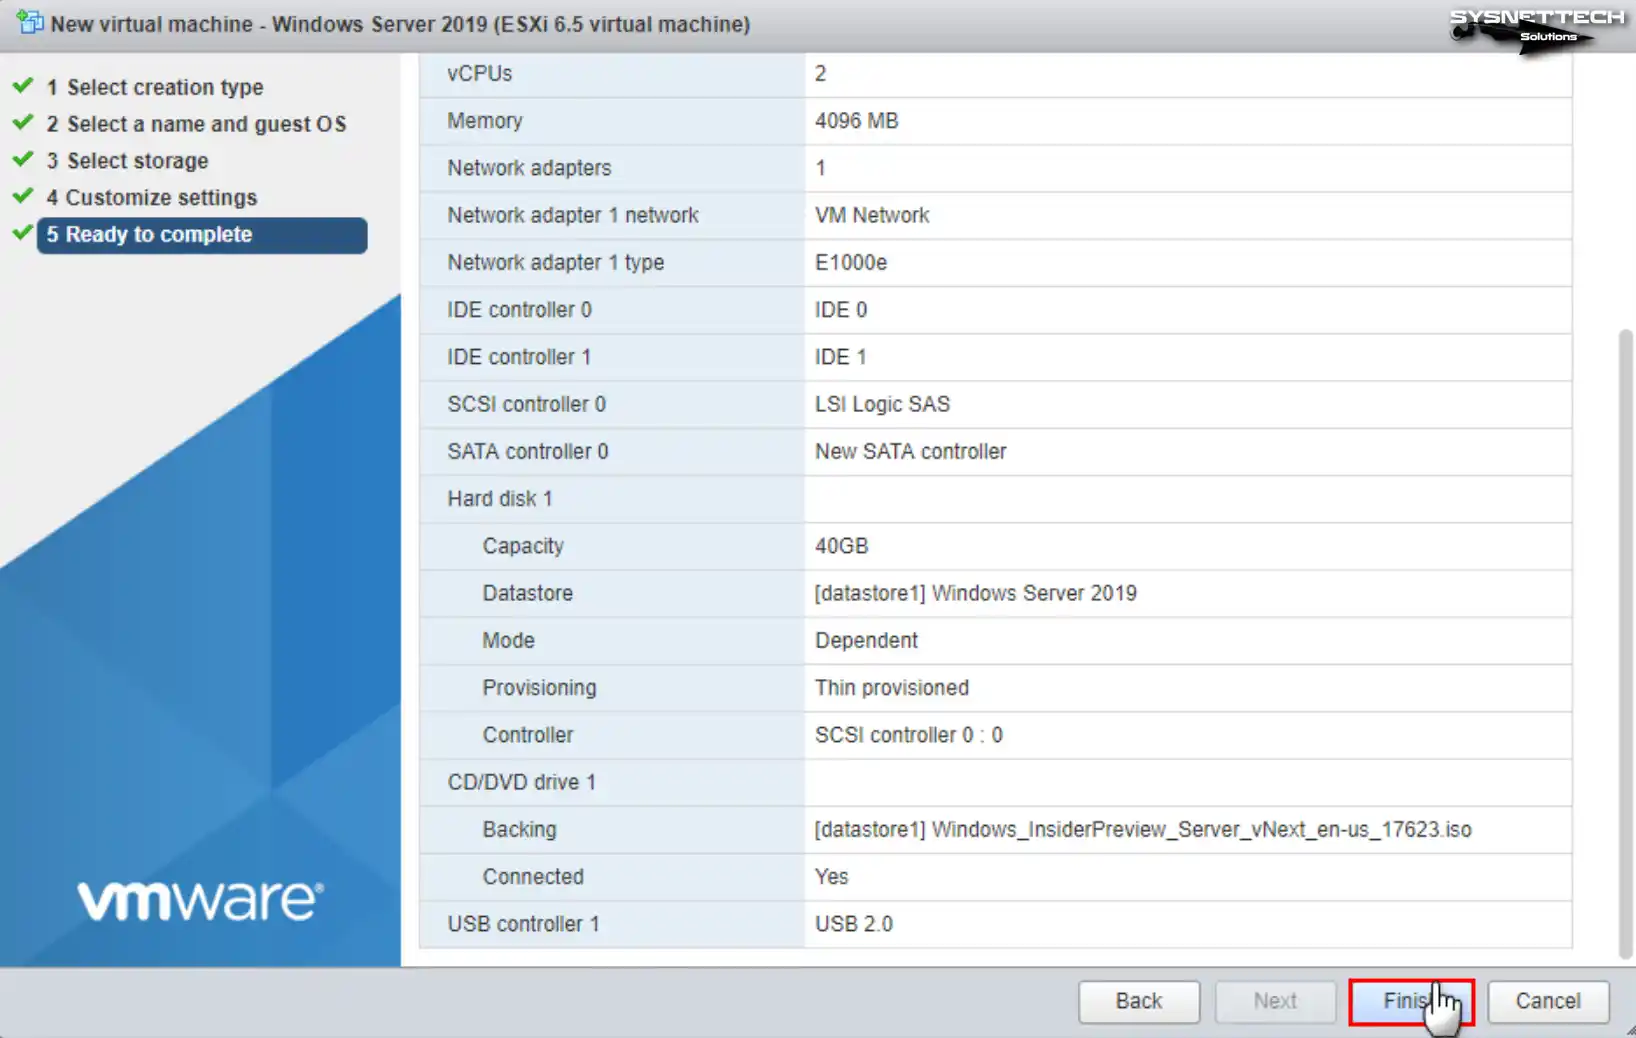
Progressing through the VM Wizard

Step 9

In the Ready to Complete, check the summary of virtual hardware settings and click Finish.
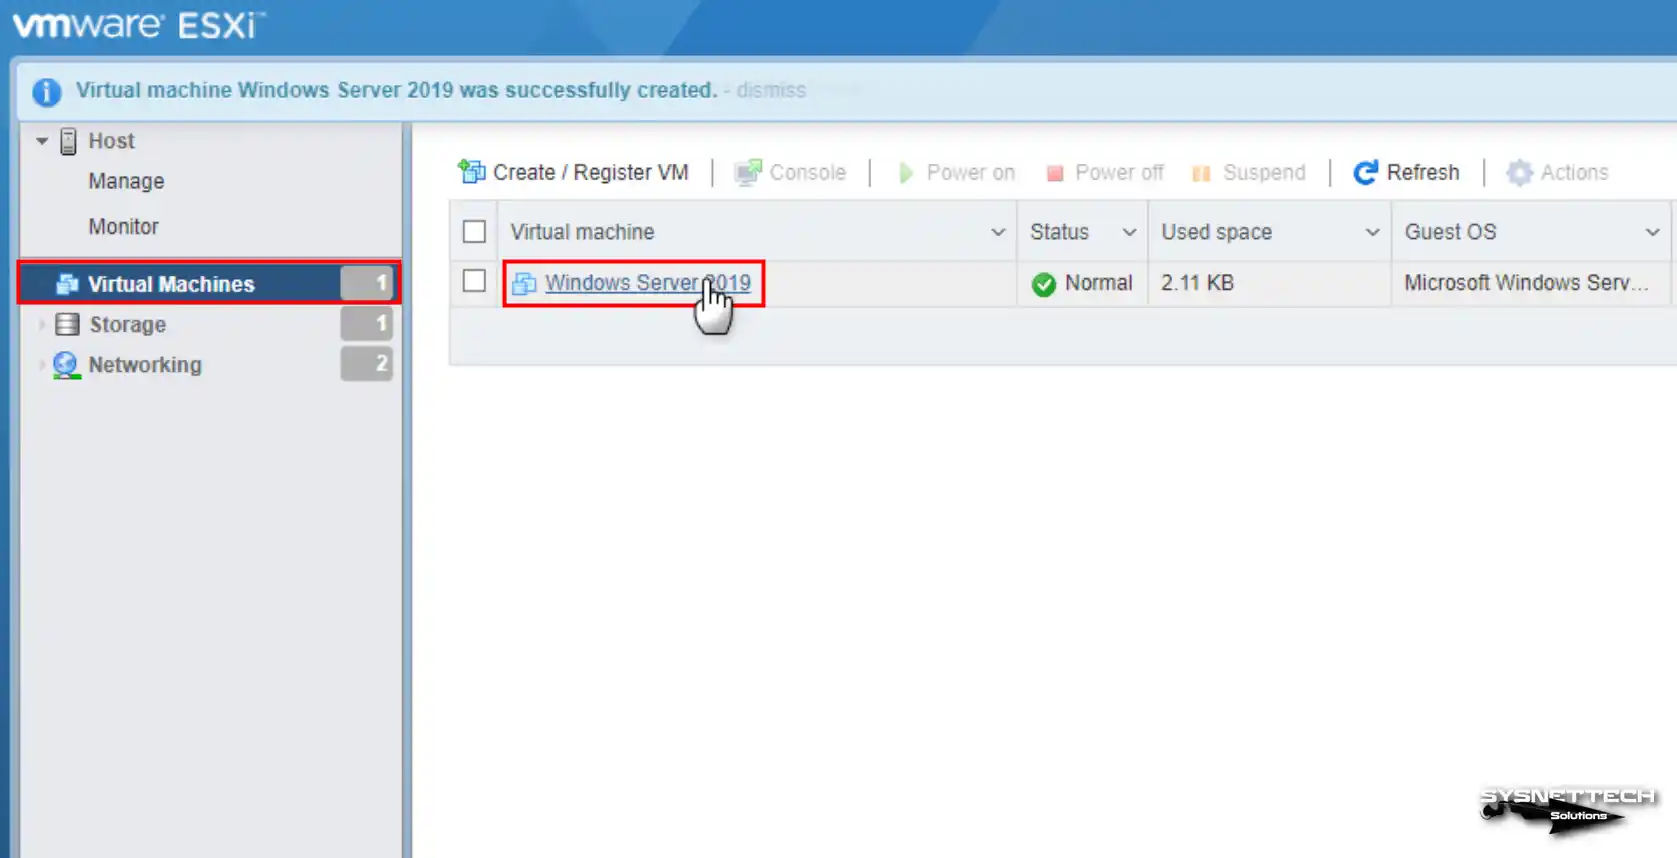
Reviewing the Settings of the Virtual Windows Server

Step 10

The server will create the Windows Server 2022, 2019, or 2016 VM. After waiting for a while, click on the name of the virtual machine.
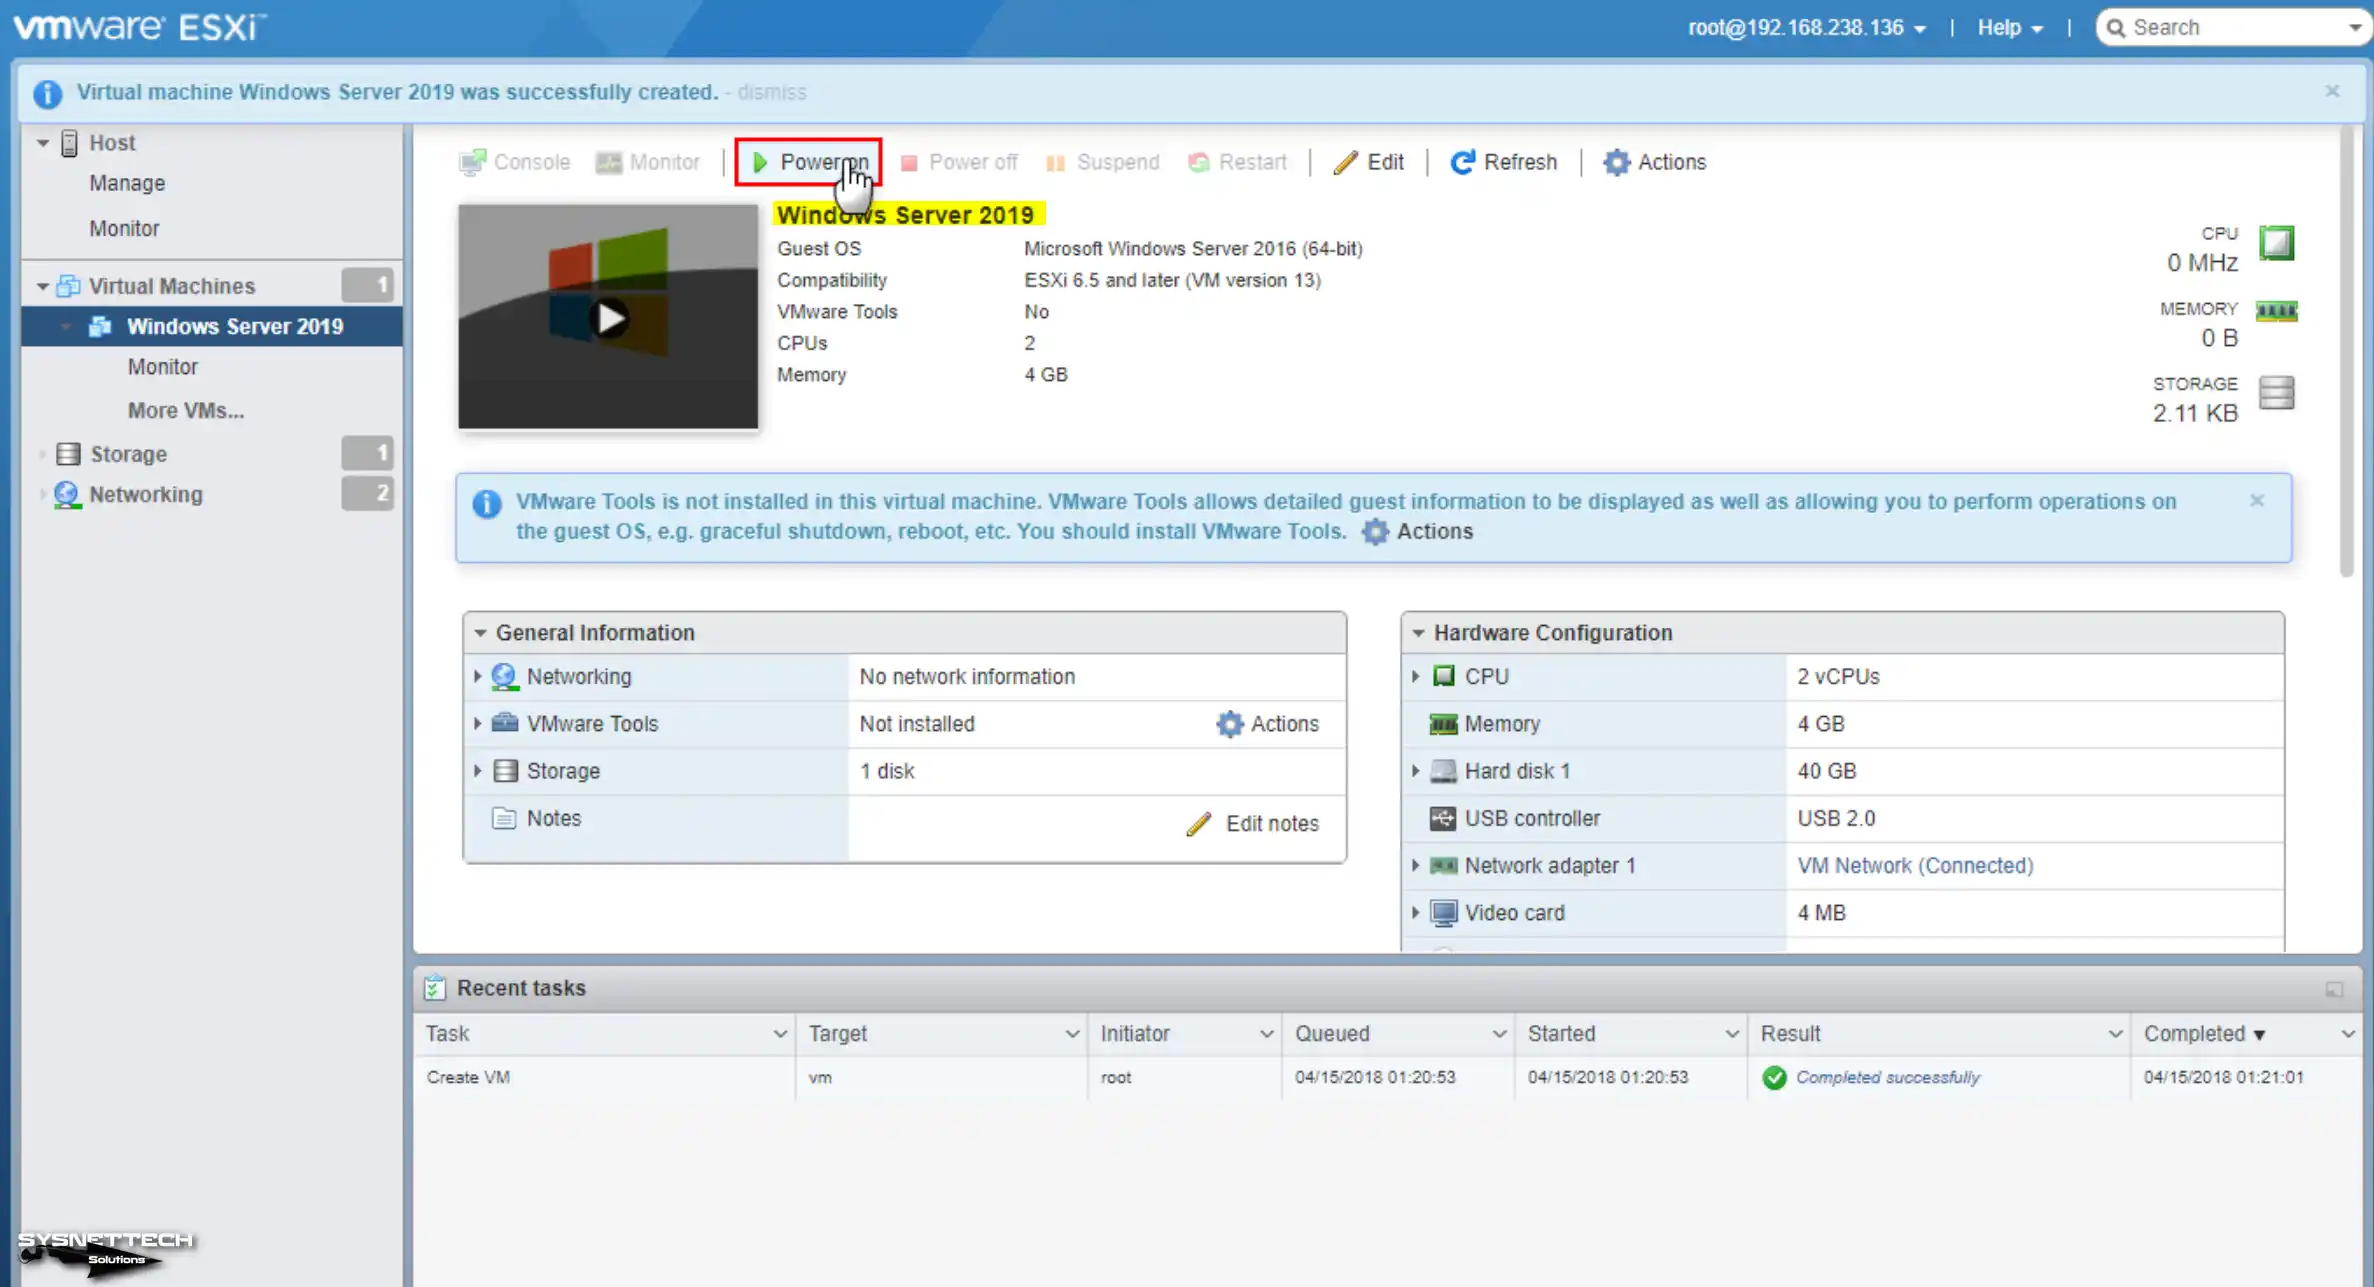
Opening the Windows Server Console

Step 11

Click on ‘Power On’ to start up the Microsoft Windows Server virtual machine.
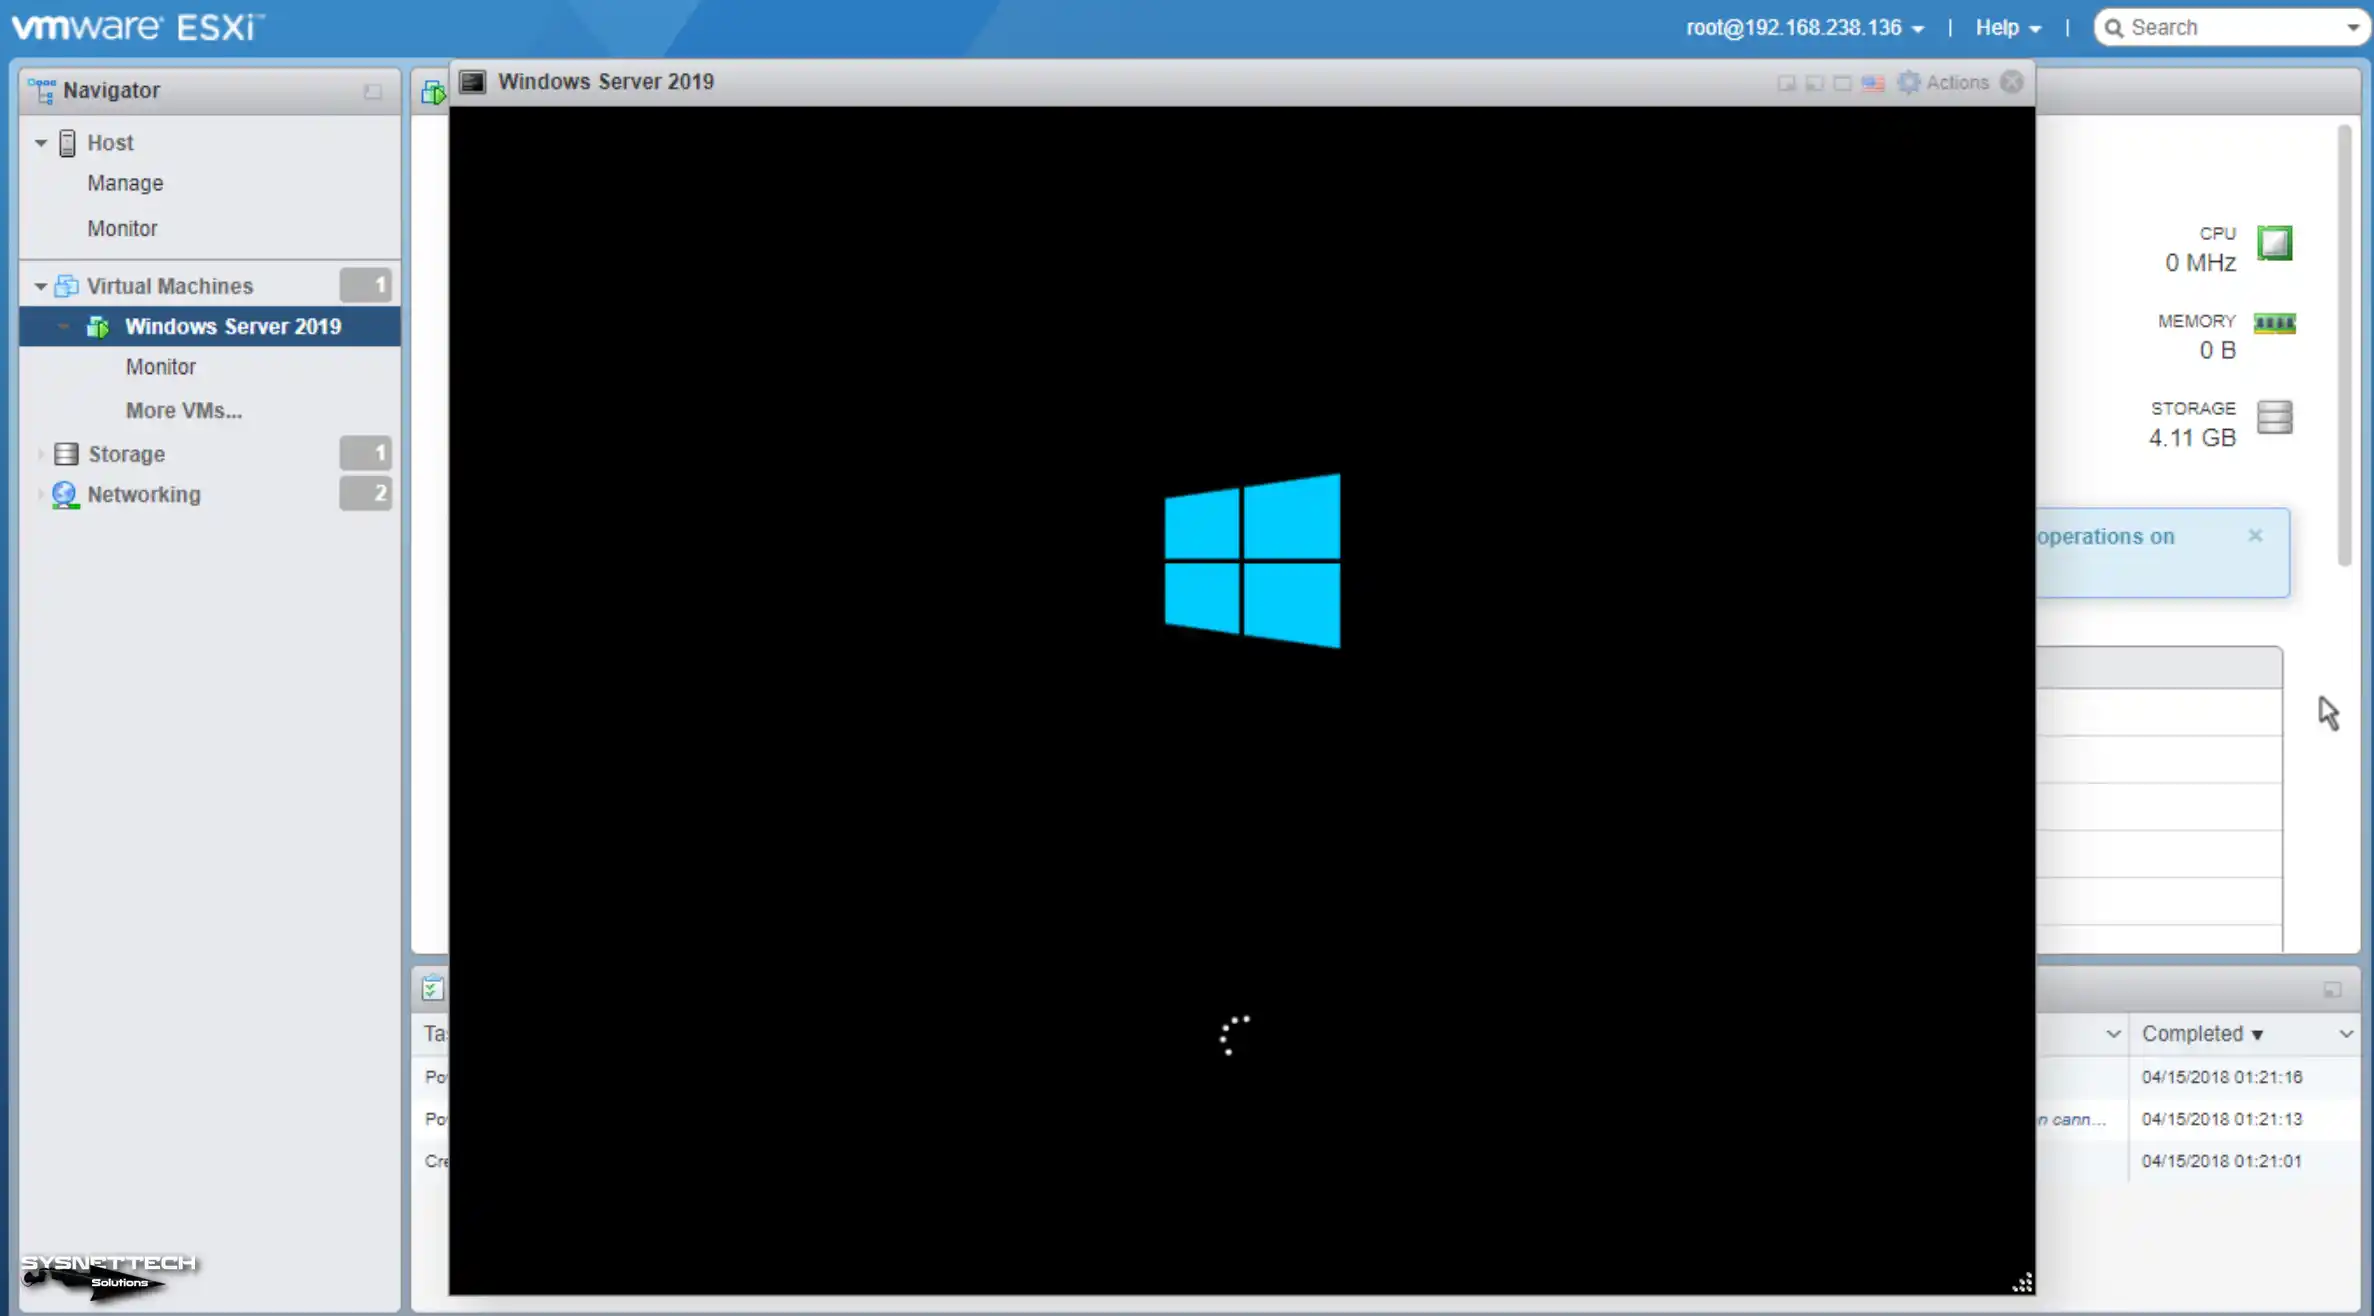
Running Windows Server VM

Step 12

At this point, your VM will boot with the ISO file you added to the ESXi host.

Booting Windows Server on ESXi from ISO File

How to Install Windows Server 2019

Once the Windows Server VM opens, it will load the boot files it needs first. After that, it will show you the Windows Setup for the initial installation. From here, you can install Server 2019 just like you would on a regular device.
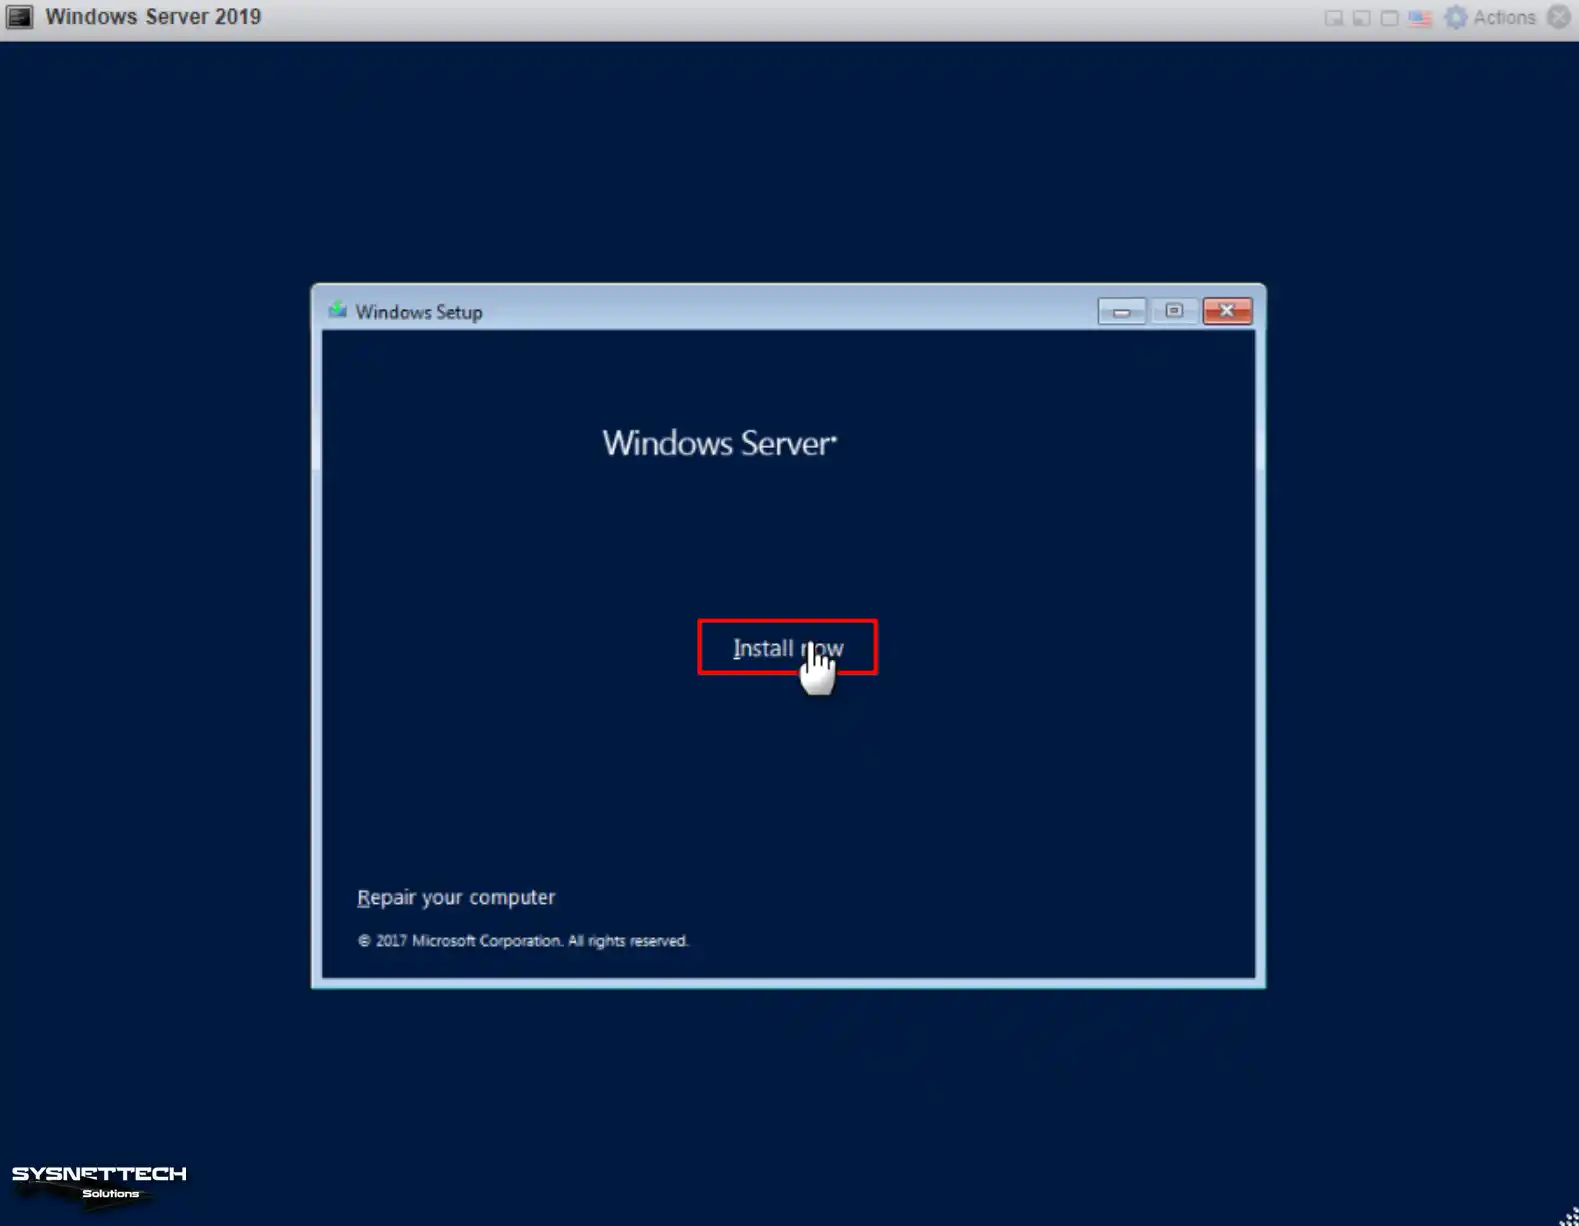
Step 1

On the Windows Setup window, click on “Install Now” first.
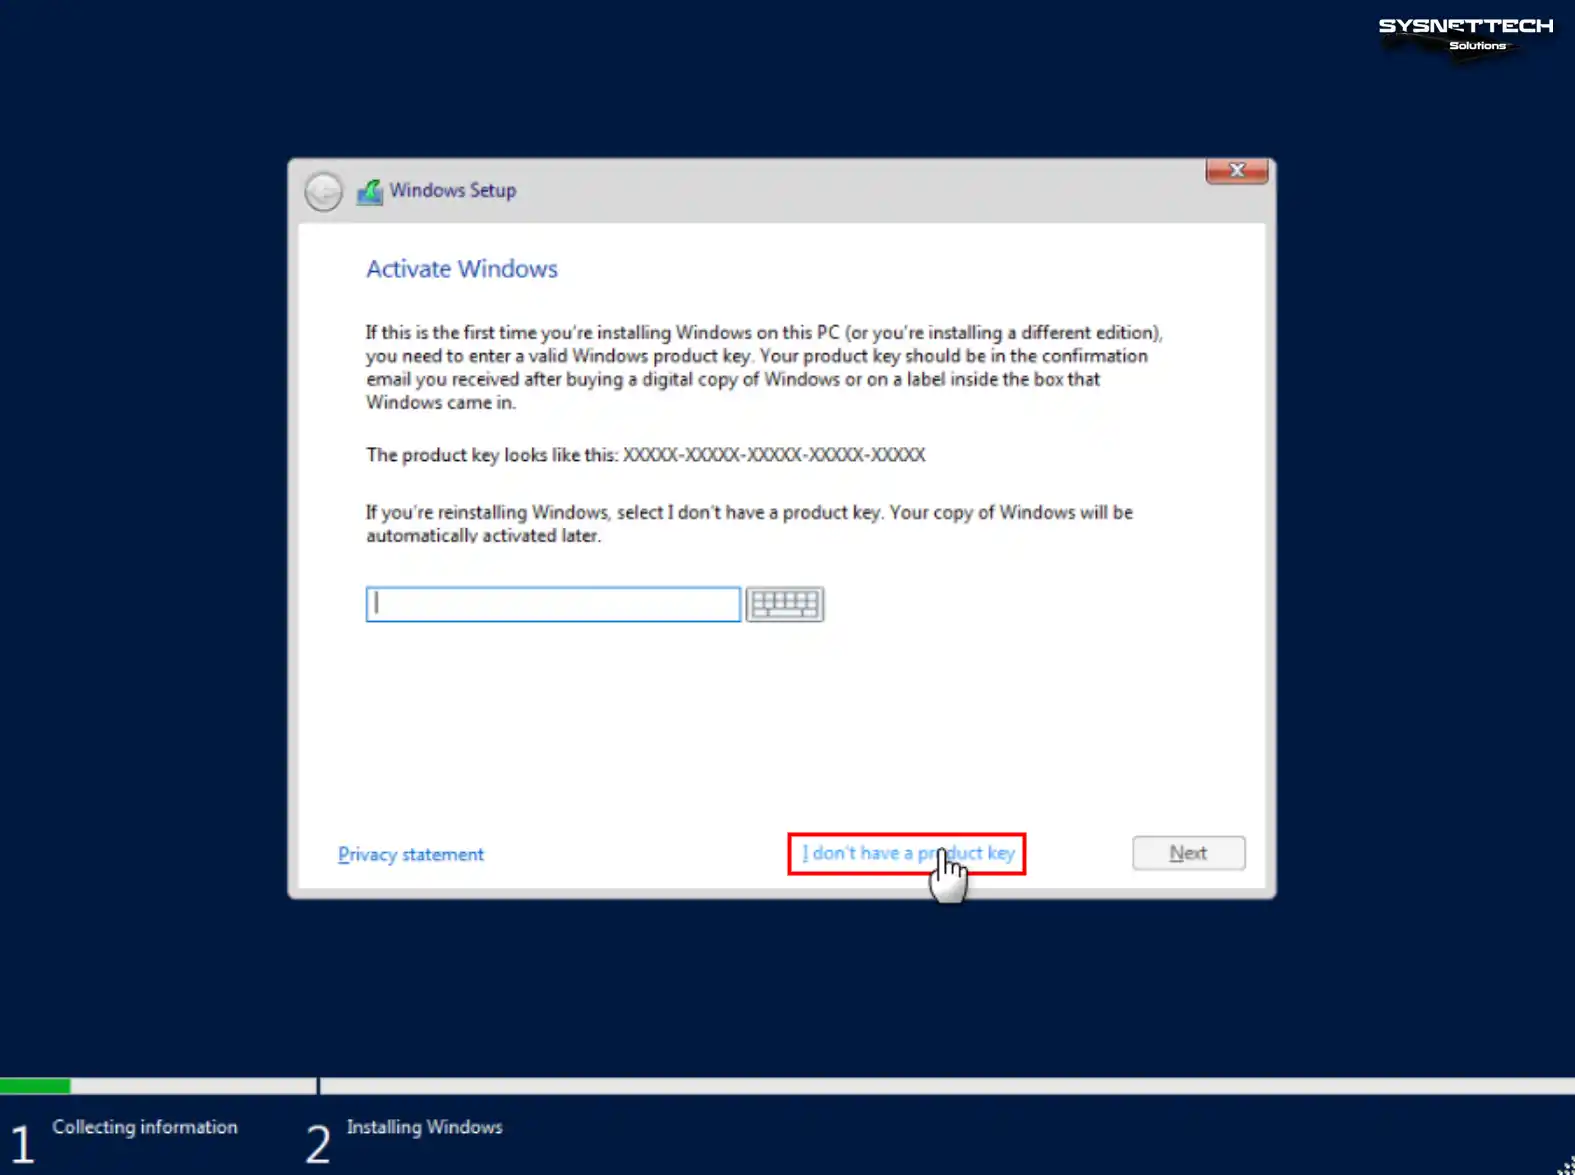
Windows Server Setup Wizard

Step 2

Put in the product key you bought for MS Server on the License key screen. If you’re using it for testing and don’t have a product key, click on “I don’t have a product key” and keep going.
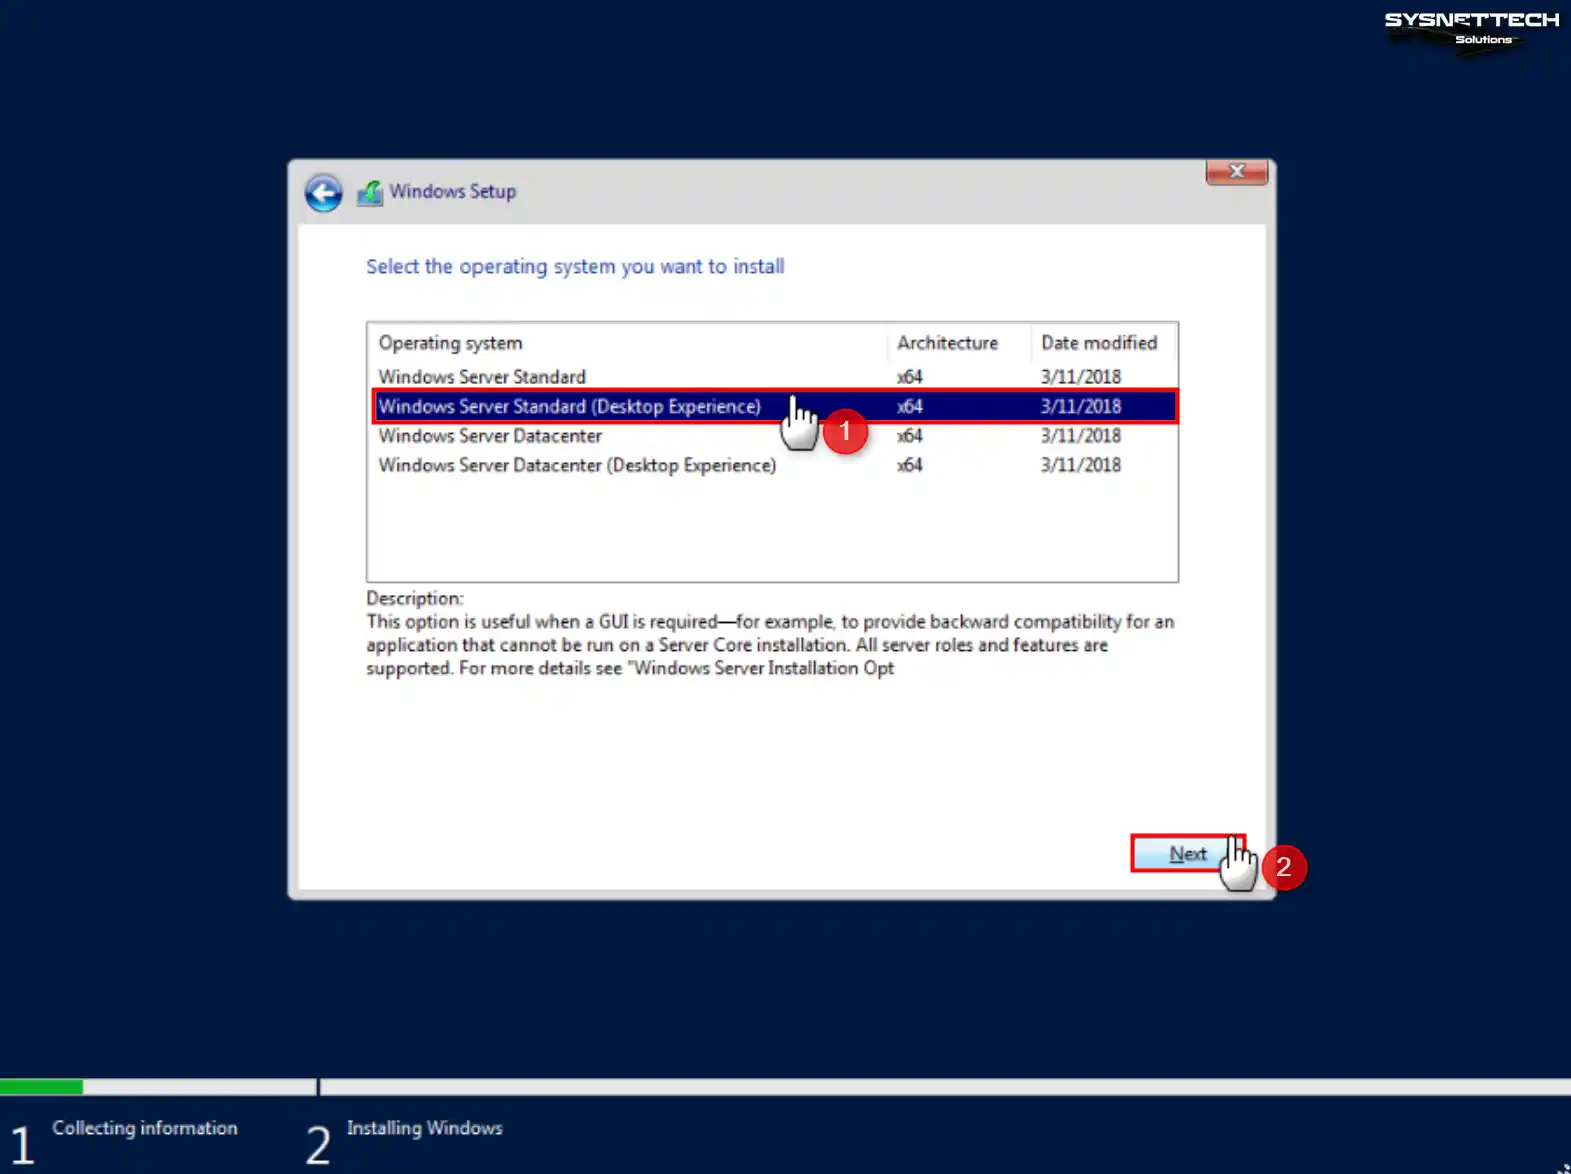
Entering a License Key for Windows Server

Step 3

GUI is valid for an application that cannot run on the Server Core. Thus, you can choose the Desktop Experience option as the server version.

  • Windows Server Standard
  • Windows Server Standard (Desktop Experience)
  • Windows Server Datacenter
  • Windows Server Datacenter (Desktop Experience)

In short, choose the type of Windows Server you want to install on this screen and proceed.
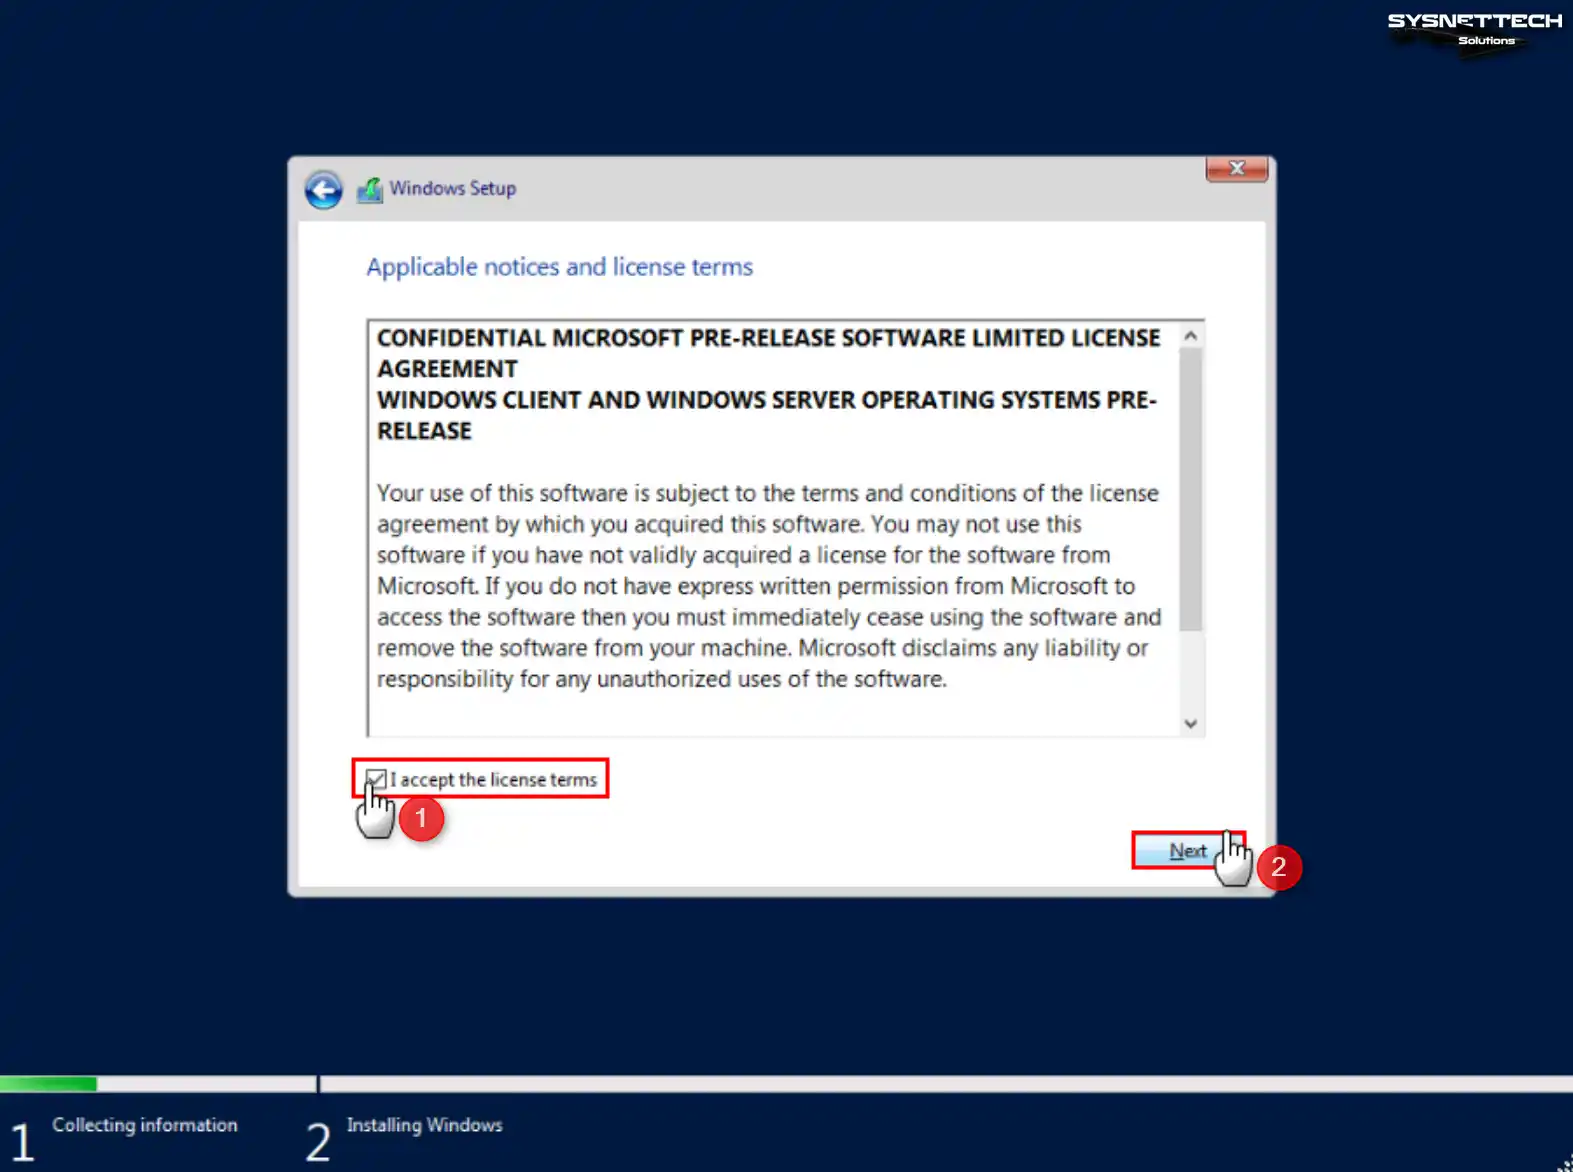
Server Operating System Type Selection

Step 4

Read the license terms for Microsoft’s Server systems. If you’re okay with them, tick “I accept the license terms” and click Next.

Accepting Server License Terms

Step 5

For the server’s installation type, go with Custom for a new setup. If you’re upgrading from a more aged version to a newer one, pick Upgrade.

Performing a Custom Installation

Step 6

On the disk setup screen, make changes to your current disk if necessary.

Configuring Disk Space

Step 7

After that, pick the disk partition where you want to install Windows Server and keep going.

Drive Partition Selection to Install the System

Step 8

The wizard is copying the files needed to install the server system.
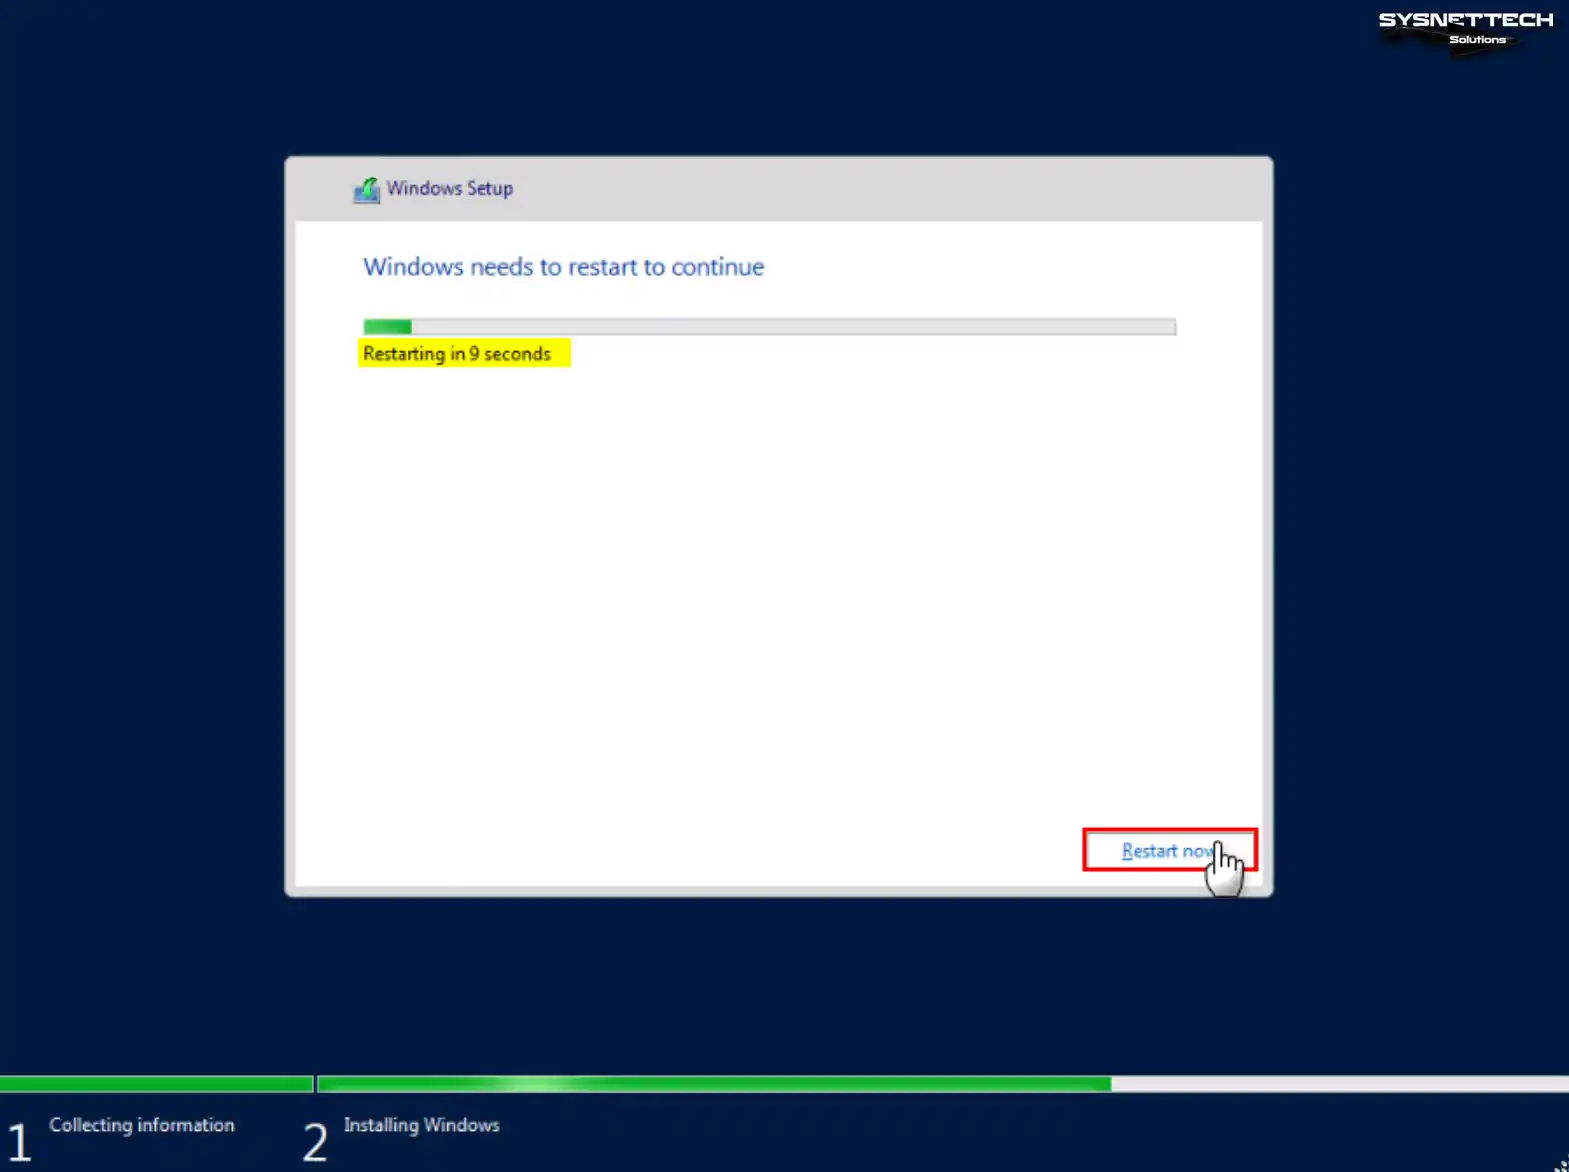
Copying Server System Files

Step 9

Click “Restart Now” when Windows tells you it needs to restart.

Restarting the Virtual Server

Step 10

As soon as your virtual server restarts, the first screen you’ll see looks like this. On this setup screen, make a strong password for your Administrator account and click Finish.
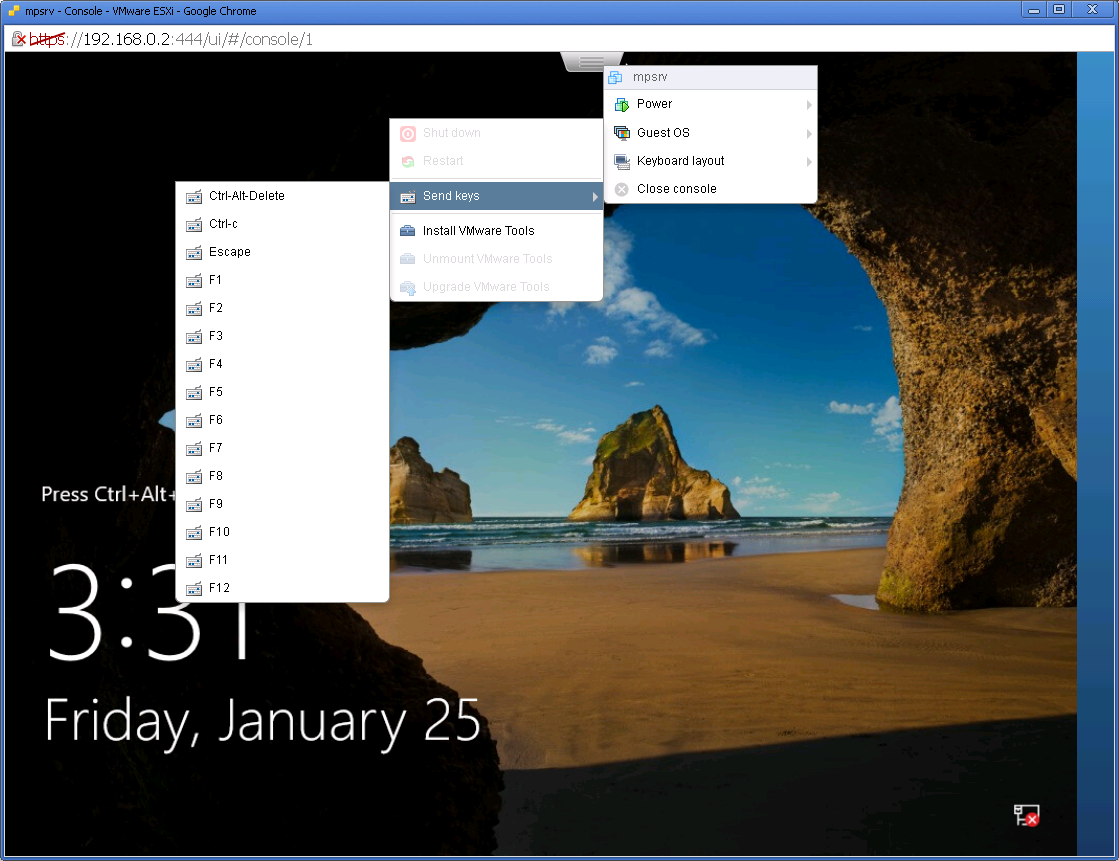
Creating a Password for the Administrator Account

Step 11

Then, when you’re on the login screen, click on “Actions” in the top toolbar of the ESXi VM. In the menu that pops up, click on Console > Send Keys > Ctrl-Alt-Delete. This allows you to unlock the login screen of Windows Server.

Sending Ctrl+Alt+Delete Shortcut Command to Virtual Server from ESXi

Step 12

Type in the unique password you made for the admin account in the earlier steps and log in.
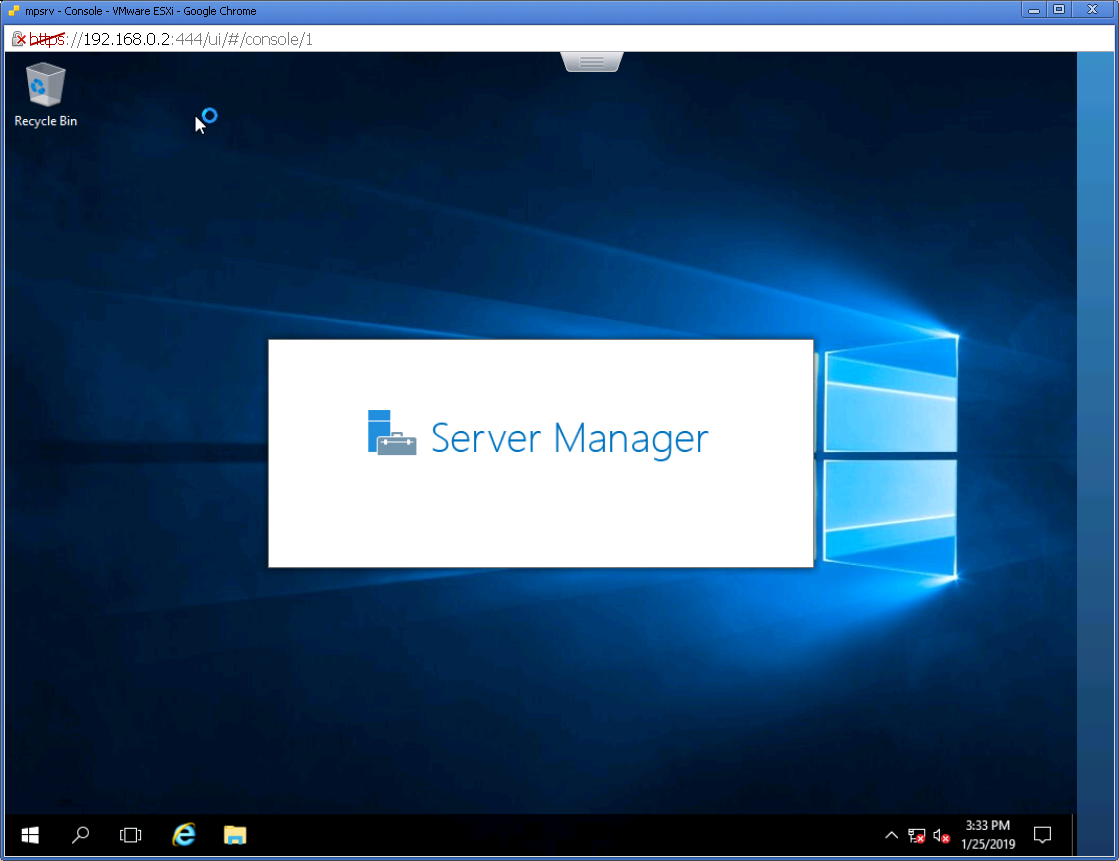
Logging In to Windows Server

Step 13

After setting up the server, you’ll see the Server Manager > Dashboard window.

Server Manager data-lazy-src=

How to Install VMware Tools for Windows Server 2019, 2022, or 2016

If you have a Windows Server on your ESXi PC, it’s a good idea to make it work better and do more things. To do that, you should install VMware Tools. This software ensures that the host and guest operating systems talk to each other smoothly. It also works as a package with practical tools and drivers.

In this part, let’s look at how to install VMware Tools on a Windows Server guest machine with easy steps.

1. Installing VMware Tools Step-by-step

Step 1

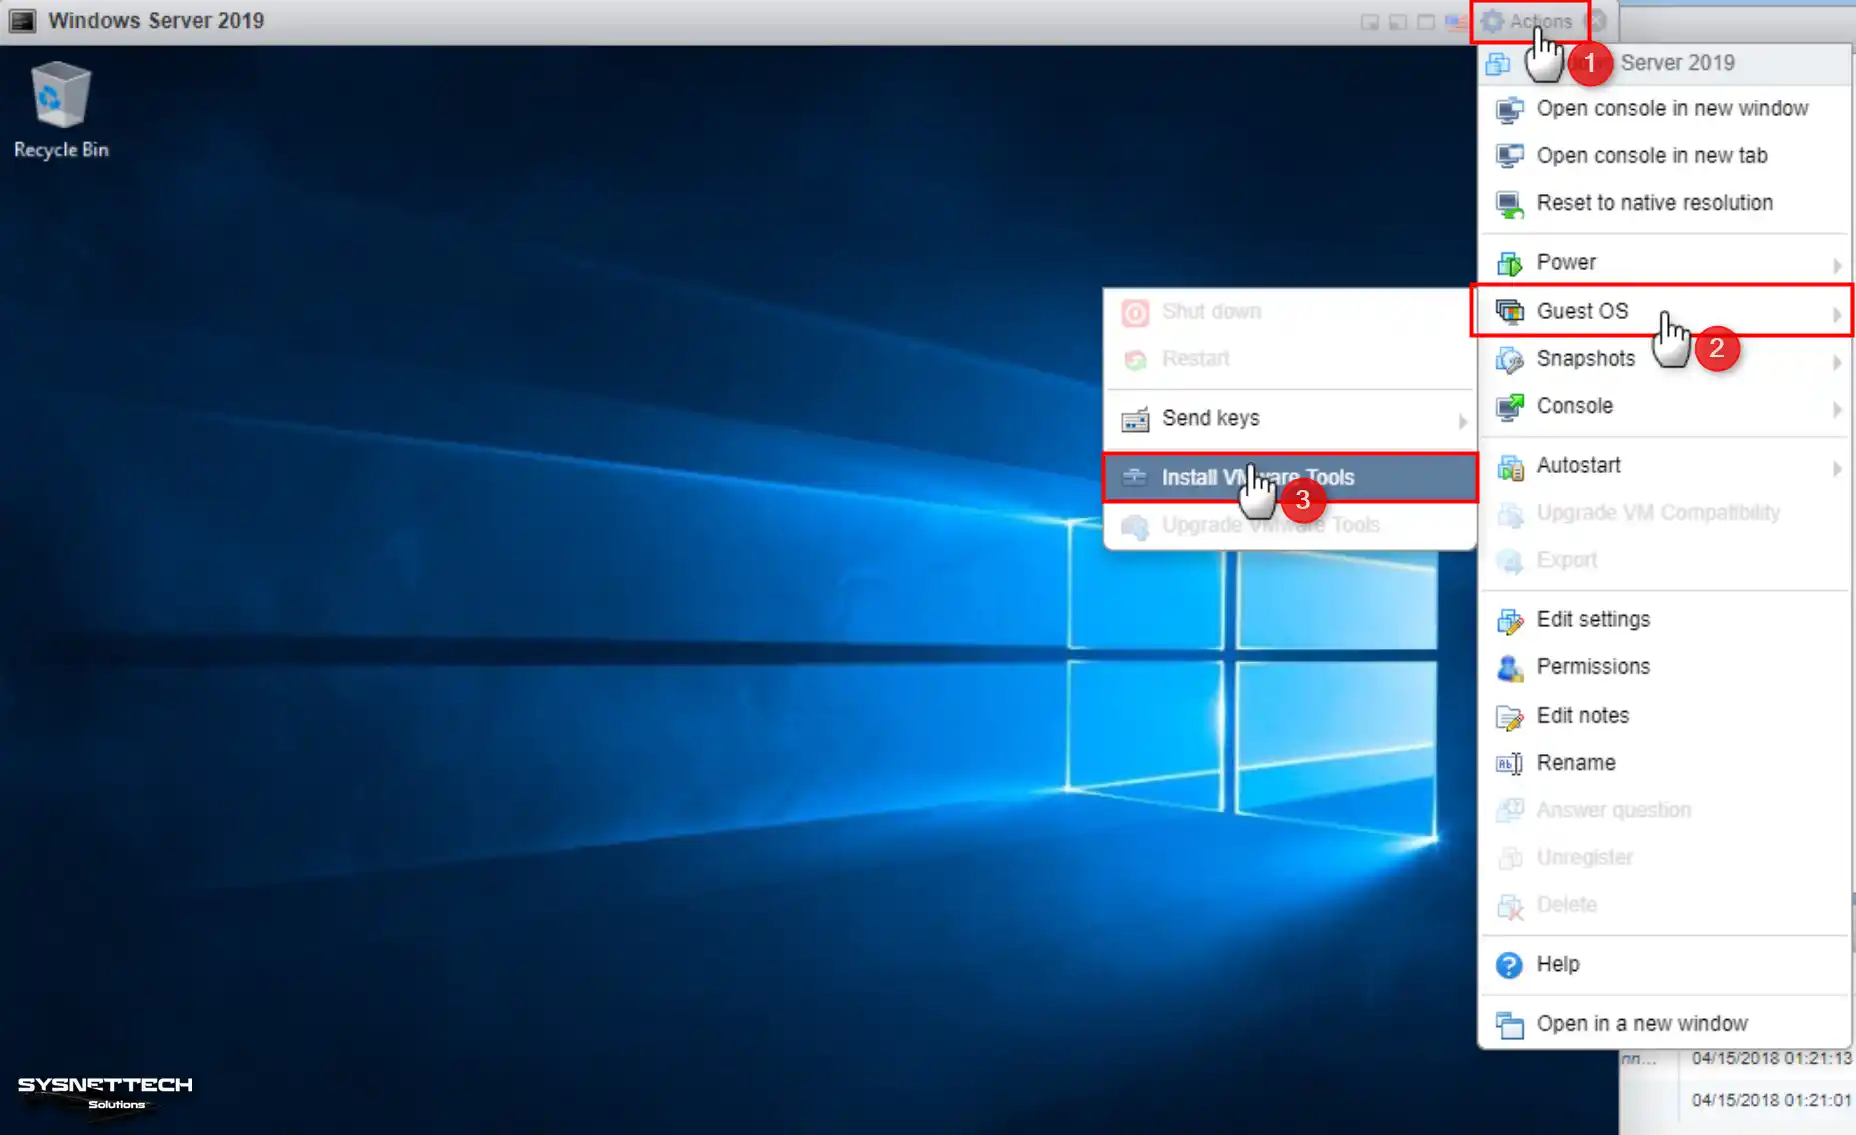
First, make sure the VM is open and running in ESXi. Then, click on “Actions” in the toolbar to see the settings for the Server VM.

From the choices you see, click on Guest OS > Install VMware Tools. This means the VM Tools image file gets added to your guest machine’s drive.

Installing VMware Tools on Windows Server

Step 2

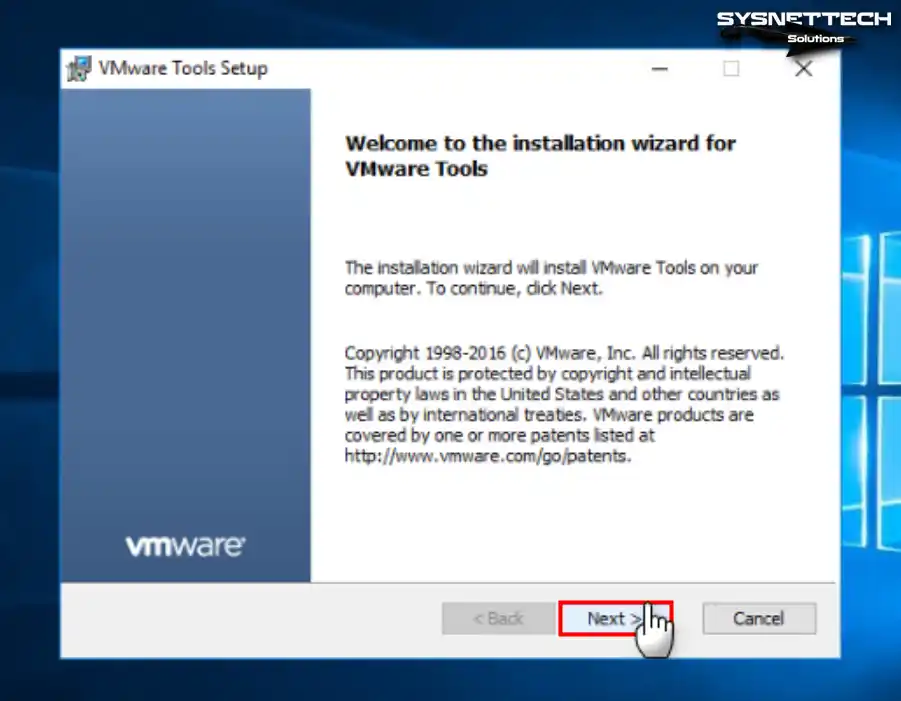
Once you open the VMware Tools Setup wizard, click “Next” to move ahead.

VMware Tools Wizard

Step 3

In the next step, on the “Choose Setup Type” screen, you’ll find three options: Typical, Complete, and Custom. If you want, you can pick the Custom type to choose specific things. But, going with the default option, Typical, is fine and won’t cause any problems.

We suggest you go with “Complete” as the installation type. This way, it adds extra features to your Windows Server virtual machine on ESXi.
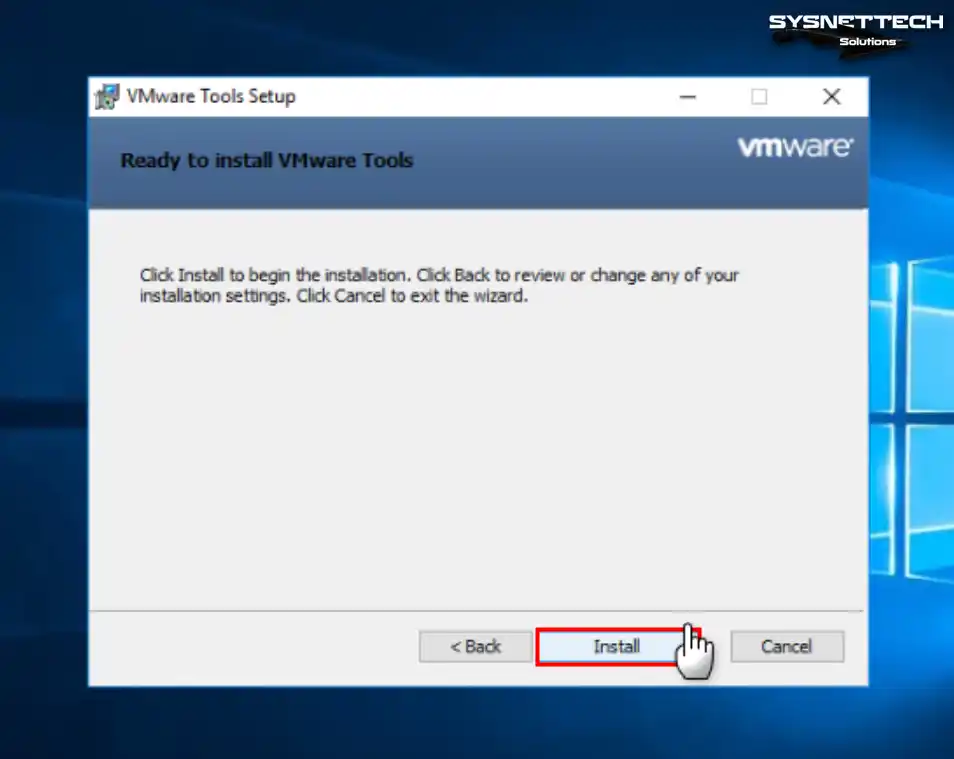
Determining the Installation Type for VMware Tools

Step 4

In the wizard’s ready-to-install stage, click “Install” to start the installation of VM Tools. It might take a few minutes, depending on how well your host or VM is working.
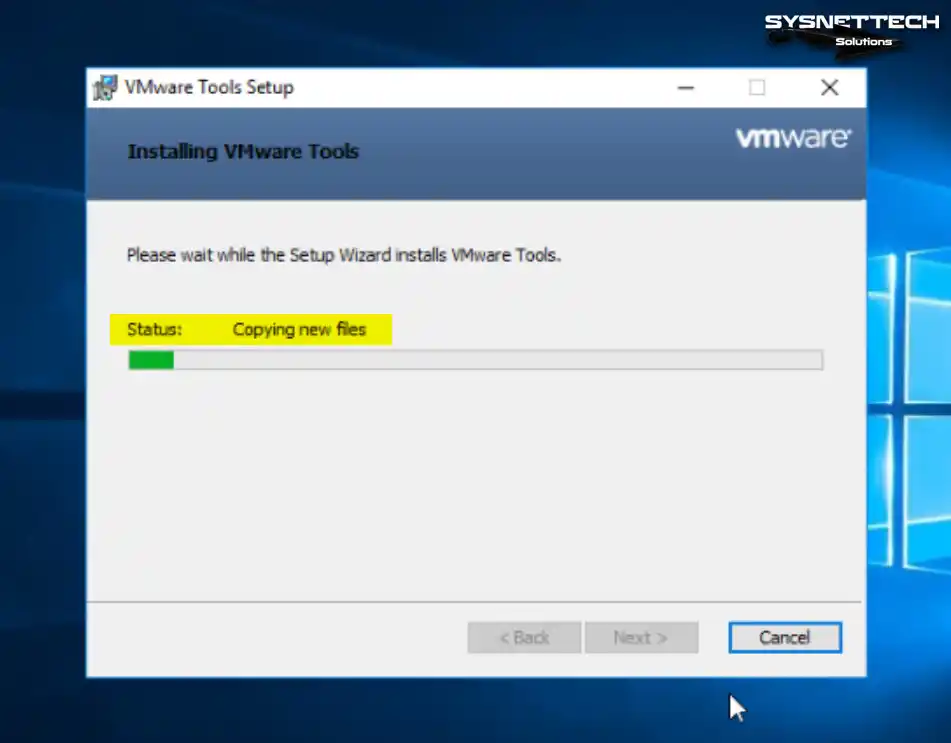
Installing Server Drivers

Step 5

Once the installation starts, the wizard will automatically install the drivers for the VM.
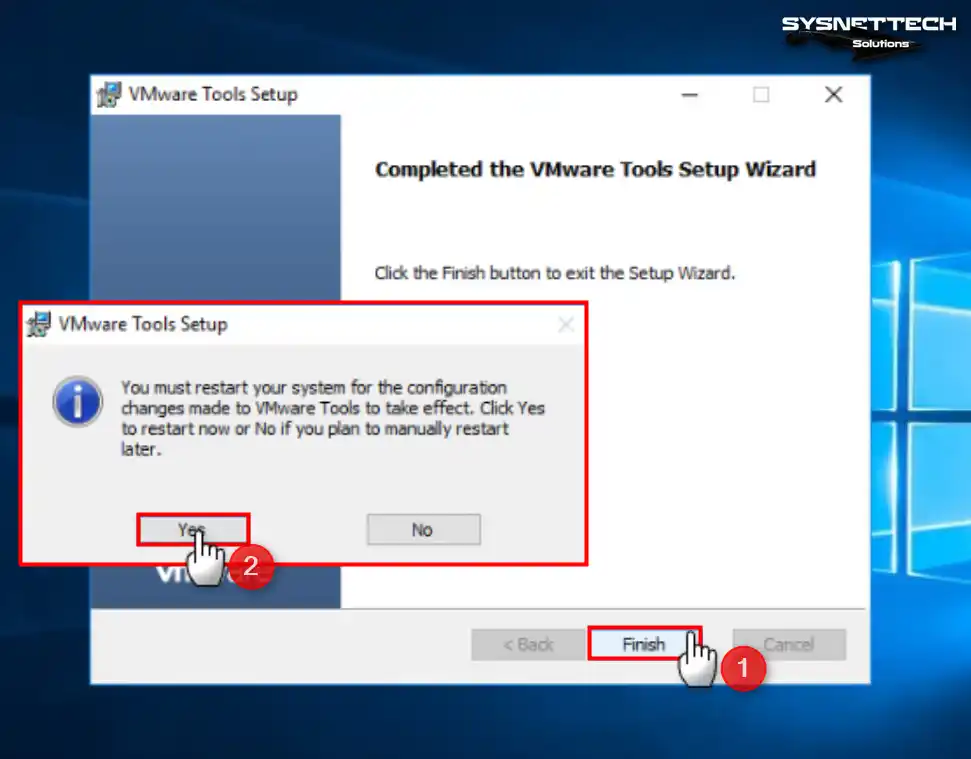
Copying Driver Files

Step 6

At the end of the wizard, you’ll see a message saying the installation was successful. On this screen, click “Yes” to restart your system after hitting “Finish.”

Restarting Windows Server Virtual Machine

2. Verifying VMware Tools

After you restart the virtual server, log in. Then, look for and open the Control Panel in the Start menu to make sure VMware Tools got installed correctly.

Look in the Control Panel, and you’ll find the VMware Tools icon. If it’s there, you know the installation worked.

Also, to check if you can change the screen resolution of the Windows Server VM:

Step 1

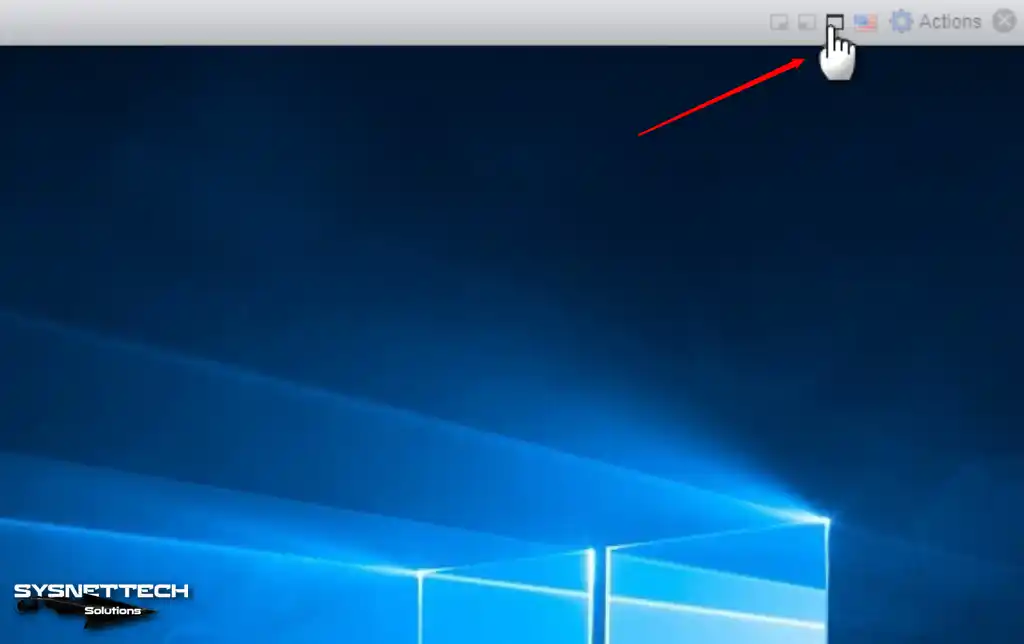
Open the Server VM, and in the menu at the top, you’ll find the Full Screen icon. Click on it, and the VM’s screen resolution will adjust to match your host screen.

Verifying VMware Tools

Step 2

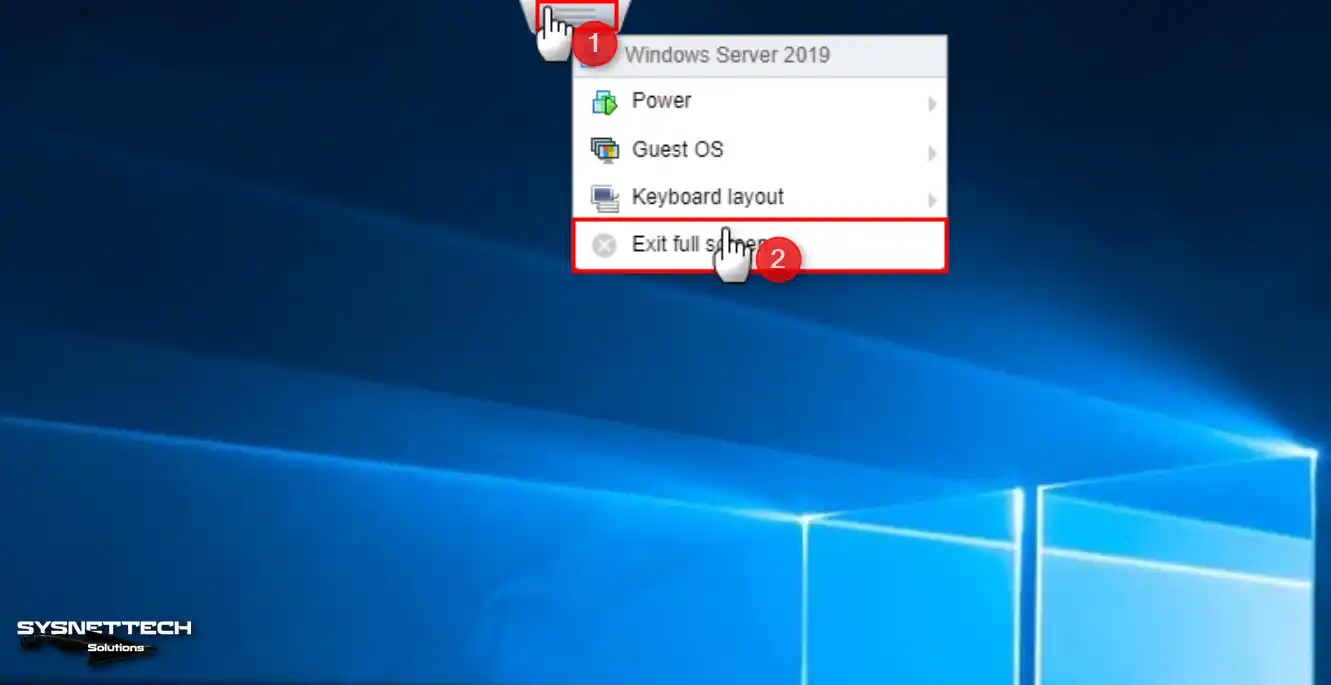
When VMware Tools is doing well, you can use your VM in full-screen mode. Plus, you’ll notice an icon in the upper-middle part. Clicking on it will show options for Power, Guest OS, Keyboard Layout, and Exit Full Screen for your VM.

To go back from full-screen mode, click on Exit Full Screen.

Windows Server Full Screen Resolution on ESXi

In summary, VMware Tools helps make your server virtual machine on ESXi work better. It’s an important step, and we really recommend doing it. By following the simple teachings in this guide, you can smoothly complete the installation.

Video

Frequently Asked Questions (FAQ) About ESXi and Windows Server

  1. Can I install Windows Server on ESXi without a license?

You can install this system on an ESXi server without a license. But there are some things you can’t do, and you can only use it for a short time. If you want to use it in an actual company, you need to get a license from Microsoft. And if you do that, you can only use this system on the ESXi platform. But remember, you can use it without a license. Note that this is for testing goals only.

  1. Are there any special hardware requirements to run this system on ESXi?

To use this Microsoft system on ESXi, you need a computer with powerful hardware. Specifically, for virtual environments, your PC should have enough CPU, RAM, and Memory. You should also turn on Intel VT-x or AMD-V in your computer’s BIOS settings if you want to.

  1. Can I install the ESXi system in a VM on my local computer in production environments?

No, ESXi is a unique software that works on big server computers. So, you can only install it on a regular computer for learning purposes. But you can still give it a try on your PC. Or, if you prefer, you can use other programs like VMware Workstation, VMware Fusion, or VirtualBox.

  1. What are the advantages of virtualizing Windows Server?

When you virtualize this system, it helps you use your resources better and makes it easier to back up and bring back if something goes wrong. This also means that you can set it up faster and have more flexibility in real work situations. And on top of that, you can keep different applications and services separate from each other to make things even better.

Conclusion

Congratulations! You have successfully installed the Windows Server system on your vSphere server. Now, you can try out Server 2016, 2019, or 2022 to see which one works best for your organization. And remember, you can also start checking out all the cool things this system can do with its advanced features and capabilities.

Also, if you follow the steps in this article, it will be easier to install. This way, you can make your server setup even better by using the benefits of VTx.

Lastly, ESXi gives you different tools to control how well your server is running and how many resources it’s using. So, make sure to keep an eye on your virtual machines and manage them well. Oh, and remember to install VMware Tools after you install in a guest operating system. This way, you can use your virtual machines better and fix any issues with the screen resolution.

Historically, the adoption rate on major server releases is slow. With Windows Server 2016 about to hit one year in the release cycle, more organizations are gearing up to deploy the operating system in their environments. That being the case, it seemed appropriate to walk through an install of Microsoft Windows Server 2016 as the guest OS in a vSphere 6.5 environment.

NOTE – Server 2016 is fully supported from ESXi 5.5 and up, as per the VMware Compatibility Guide.

Create New Windows Server 2016 Virtual Machine

From the vSphere Web Client, right-click the designated host or cluster, and select New Virtual Machine.

New Virtual Machine

The New Virtual Machine Wizard will begin. First, select the creation type. For this tutorial, we chose to Create a new virtual machine.

Create New VM

Enter the virtual machine name and select the target folder location.

VM Name

Next, select the ESXi host or cluster to run the virtual machine.

VM Compute

Select the datastore to store the virtual machine files.

VM Storage

For compatibility, select ESXi 6.5 and later.

VM Compatibility

For the Guest OS Family and Version, select Windows and Microsoft Windows Server 2016 (64-bit), respectively.

VM Operating System

Next, configure the virtual machine hardware as necessary. For this tutorial, the install will utilize a Server 2016 ISO located on a local datastore. To connect the file, select Datasore ISO File from the CD/DVD drop down. Click the Browse button to locate the ISO file.

Configure VM

Select the Server 2016 ISO from the datastore.

Lastly, check the Connect at Power On check box to ensure the VM boots into the server installer.

Customize VM

Review the configuration and select Finish to deploy the virtual machine.

VM Finish

After deployed, Power On the virtual machine.

VM Power On

Open the virtual machine’s console to begin setting up Windows.

Install Windows Server 2016

From the Windows Setup screen, select the pertinent language, time, and keyboard.

Setup Windows 2016

Next, click Install Now.

Install Windows Server 2016

Select the operating system to install. The Desktop Experience option includes the standard GUI.

Windows 2016 GUI

Read the notices and terms. Accept to continue.

Windows 2016 EULA

Select Custom for the installation type. This option is for new installs.

Server 2016 Custom Install

Choose the drive to install Windows. Click Next to begin the installation.

Server 2016 Storage

The installation of Windows will now begin.

Install Windows Server 2016

Finally, set the password for the administrator account and click Finish.

Set Server 2016 Admin Password

Windows Server Guest OS Install – VMware Documentation

If you are looking to upgrade your VMware environment to 6.5, check out this tutorial.

Virtualization has become an essential part of modern IT infrastructure. VMware ESXi enables you to run multiple virtual machines on a single physical server, providing flexibility and cost-efficiency. If you are looking to install Windows Server 2016 on VMware ESXi 6.7, this tutorial will guide you through the process step by step.

Step 1: Download the Windows Server 2016 ISO file from the official Microsoft website or obtain it from your licensing agreement.

Step 2: Open the VMware ESXi web interface by entering the IP address of your server in a web browser. Log in to the interface using your credentials.

Step 3: Create a new virtual machine by clicking on the «Create/Register VM» option on the homepage.

Step 4: In the «New Virtual Machine» window, provide a name for the virtual machine and choose the desired location on your ESXi datastore.

Step 5: Select the guest operating system as «Microsoft Windows» and choose the version as «Windows Server 2016 (64-bit).«

Step 6: Specify the amount of memory and the number of CPU cores you want to allocate to the virtual machine. Adjust these values according to your server resources and workload requirements.

Step 7: Configure the network settings for the virtual machine, such as selecting the appropriate network adapter and enabling or disabling features like IPv6 or MAC address changes.

Step 8: Add a new hard disk to the virtual machine by selecting the size and type of the virtual disk. You can choose to create a new virtual disk or use an existing one if available.

Step 9: Customize any additional settings as required, such as enabling or disabling virtual machine options, configuring boot options, or assigning a virtual CD/DVD drive.

Step 10: Click on the «Finish» button to create the virtual machine. Once created, power on the virtual machine and mount the Windows Server 2016 ISO file.

Step 11: Follow the on-screen instructions to install Windows Server 2016, including selecting the installation language, accepting the license terms, and choosing the installation type (e.g., custom or upgrade).

Step 12: Configure the desired settings during the installation, such as the partition layout, administrator password, and network settings.

Step 13: Once the installation is complete, Windows Server 2016 will be ready to use on your VMware ESXi 6.7.

Pros Cons
1. Efficient utilization of physical server resources. 1. Requires familiarity with VMware ESXi interface and virtual machine management.
2. Provides the flexibility to create and manage multiple virtual machines. 2. Requires sufficient hardware resources to run both VMware ESXi and virtual machines.
3. Simplifies server provisioning and deployment processes. 3. May incur additional licensing costs for Windows Server.

By following these steps, you can easily install Windows Server 2016 on VMware ESXi 6.7, enabling you to leverage the benefits of virtualization for your IT infrastructure. Remember to allocate appropriate resources to the virtual machine and ensure compatibility with your hardware and licensing requirements.

Video Tutorial:How to create Windows Server 2016 VM?

Does VMWare support Windows Server 2016?

Yes, VMWare supports Windows Server 2016. Here are the steps to install Windows Server 2016 on VMWare:

1. First, make sure your VMWare installation is up to date. Check for the latest updates and patches for VMWare to ensure compatibility with Windows Server 2016.

2. Obtain a copy of the Windows Server 2016 ISO image or installation media.

3. Launch VMWare and create a new virtual machine. Choose the appropriate settings such as the number of CPU cores, amount of RAM, and virtual disk size according to your requirements.

4. In the virtual machine creation wizard, select «Installer disc image file (iso)» and browse to the location of the Windows Server 2016 ISO image.

5. Proceed with the virtual machine creation process, assigning a name and location for the virtual machine files.

6. Once the virtual machine is created, power it on. VMWare will detect the bootable ISO image, and the Windows Server 2016 installation process will begin.

7. Follow the on-screen instructions to install Windows Server 2016. Make sure to select the appropriate options for disk partitioning, network settings, and administrator password.

8. After the installation is complete, install VMWare Tools in the virtual machine. This will enhance the performance and functionality of Windows Server 2016 within the VMWare environment.

9. Once VMWare Tools are installed, you can customize the virtual machine settings further, such as configuring networking, adjusting resource allocation, and setting up virtual machine snapshots for easier management.

By following these steps, you can successfully deploy Windows Server 2016 on VMWare and leverage the benefits of virtualization for your server infrastructure.

How to install Microsoft server in VMware?

Installing Microsoft Server in VMware involves a step-by-step process to ensure a successful installation. Here are the steps to follow:

1. Set up VMware: Start by installing VMware on your computer. Download the VMware software from the official website, run the setup, and follow the on-screen instructions to complete the installation process. Ensure that your computer meets the system requirements for VMware.

2. Obtain the Microsoft Server ISO: Obtain the ISO file for the Microsoft Server version you wish to install. You can either download it from the Microsoft website or acquire it through other legitimate sources.

3. Create a New Virtual Machine: Launch VMware and create a new virtual machine. This process may vary slightly depending on the version of VMware you are using. In general, you will be prompted to select the operating system and version, specify the resource allocation, such as memory and storage, and configure networking options for the virtual machine.

4. Mount the Microsoft Server ISO: Once the virtual machine is created, locate the option to mount an ISO file within the VMware interface. Choose the Microsoft Server ISO file you obtained in the previous step and attach it to the virtual machine.

5. Start the Virtual Machine: Power on the virtual machine and initiate the installation process. The virtual machine will boot from the mounted ISO, and the Microsoft Server installation wizard will appear.

6. Follow the Installation Wizard: Follow the guided steps provided by the installation wizard to complete the installation process. This typically includes accepting license terms, selecting installation type (e.g., Custom or Express), choosing the destination for installation, and configuring initial settings such as administrator password and computer name.

7. Configure Networking and Connectivity: After the installation is complete, configure network settings within the virtual machine to ensure connectivity. This might involve setting up IP addresses, DNS servers, and other network-related parameters based on your specific requirements.

8. Install VMware Tools (optional): It is highly recommended to install VMware Tools within the virtual machine to optimize performance and enable features such as drag-and-drop functionality. VMware Tools can be installed by selecting the appropriate option within the VMware interface.

With these steps completed, you should have Microsoft Server successfully installed within your VMware virtual machine. Remember to keep your Microsoft Server installation up to date with the latest patches, security updates, and best practices.

What are the requirements to install Windows Server 2016 operating system in the remote machine?

To install the Windows Server 2016 operating system on a remote machine, you need to ensure that the following requirements are met:

1. Hardware Requirements: The remote machine needs to meet the minimum hardware requirements specified by Microsoft for Windows Server 2016. This typically includes a compatible processor, sufficient RAM, and available storage space. Refer to Microsoft’s official documentation for the specific hardware specifications.

2. Network Connectivity: The remote machine should have a stable network connection to download the Windows Server 2016 installation media and any required updates or drivers. Ensure that the network connection is reliable during the installation process to prevent any interruptions.

3. Remote Access: You need to have appropriate remote access to the target machine. This could be through remote desktop software, a console connection, or similar means. Ensure that you can establish a remote connection to the machine and have the necessary permissions to perform the installation.

4. Installation Media: Obtain a valid copy of the Windows Server 2016 installation media. This could be in the form of an ISO file, a physical DVD, or other supported formats. Ensure that the installation media is accessible from the remote machine and that you have the necessary permissions to read and execute the installation files.

5. Product Key: Prepare a valid product key for activating Windows Server 2016. This key is required during the installation process. Make sure you have a genuine and valid product key to avoid any licensing issues.

6. BIOS/UEFI Settings: Before installing the operating system, verify that the remote machine’s BIOS or UEFI settings are properly configured. This may involve enabling the appropriate boot options, configuring the boot order, or other settings that allow the machine to boot from the installation media.

7. Installation Process: Once all the prerequisites are in place, initiate the installation process by booting the remote machine from the Windows Server 2016 installation media. Follow the on-screen prompts, select the desired installation options, and provide the necessary information when prompted. Be cautious during partitioning and formatting to avoid any data loss on the remote machine.

It’s important to note that the specific steps may vary depending on the remote access method, hardware configuration, and other factors. Refer to the official documentation provided by Microsoft for detailed instructions on installing Windows Server 2016.

How to install Windows Server 2016 in virtual box?

To install Windows Server 2016 in VirtualBox, follow these steps:

1. Install VirtualBox: Download and install the latest version of Oracle VM VirtualBox from the official website, ensuring compatibility with your operating system.
2. Download the Windows Server 2016 ISO: Obtain a valid copy of the Windows Server 2016 ISO file from the Microsoft website or through other official channels.
3. Create a new virtual machine: Open VirtualBox and click on «New» to create a new virtual machine. Provide a suitable name, select the appropriate version of Windows Server (e.g., Windows Server 2016 64-bit), and allocate the desired amount of RAM and storage for the virtual machine.
4. Configure virtual machine settings: On the «Create Virtual Hard Disk» step, choose the hard disk file type and storage allocation. It is recommended to select «VDI» (VirtualBox Disk Image) format and choose «Dynamically allocated» for optimal disk space usage.
5. Start the virtual machine: Once created, select the newly created virtual machine from the VirtualBox main page and click on the «Start» button. VirtualBox will prompt you to choose the Windows Server 2016 ISO file as the installation media.
6. Install Windows Server 2016: The virtual machine will boot from the ISO file, and the Windows Server 2016 installation process will start. Follow the on-screen instructions to complete the installation, including selecting language preferences, entering a product key (if required), and partitioning the virtual hard disk.
7. Configure Windows Server 2016: After installation, the virtual machine will restart, and you will be prompted to set up initial configuration settings. Customize the settings according to your requirements, such as region, keyboard layout, and administrator password.
8. Install VirtualBox Guest Additions (optional): While not mandatory, installing VirtualBox Guest Additions enhances the virtual machine’s performance and provides integration features. To install Guest Additions, click on the «Devices» menu in the VirtualBox window and choose «Insert Guest Additions CD image.» Follow the instructions to complete the installation within the virtual machine.

Following these steps will enable you to install Windows Server 2016 successfully in VirtualBox. Remember to allocate sufficient resources to the virtual machine, such as CPU cores, RAM, and storage, based on your system’s capabilities and the intended workload.

What are the installation requirements for Windows Server 2016?

When installing Windows Server 2016, there are certain installation requirements that need to be taken into consideration. Here are the steps and requirements to successfully install Windows Server 2016:

1. Hardware Requirements:
– Processor: 1.4 GHz 64-bit processor
– Memory: At least 2 GB RAM
– Storage: Minimum of 32 GB of available disk space
– Display: Super VGA (800 x 600) or higher-resolution monitor
– Network Adapter: A compatible network adapter must be installed

2. Check Compatibility:
– Ensure that your hardware meets the above requirements and is fully compatible with Windows Server 2016. Check the manufacturer’s website for compatibility information and any specific drivers or firmware updates required.

3. Gather Installation Media:
– Obtain the installation media for Windows Server 2016. This can be a DVD, USB drive, or an ISO file. Ensure that you have a valid and licensed copy of the operating system.

4. Boot from Installation Media:
– Insert the installation media into your server’s DVD drive or connect the USB drive. Restart the server and configure the BIOS settings to boot from the installation media. This process may vary depending on the server’s manufacturer and model.

5. Start Installation:
– Once the server boots from the installation media, the setup process will begin. Follow the on-screen prompts to select language, time, and currency settings.

6. Installation Options:
– Choose the installation option that suits your needs. You can select between a clean installation or an upgrade from a previous version of Windows Server.

7. Accept License Terms:
– Read and accept the license terms to proceed with the installation.

8. Select Disk Partition:
– Choose the disk or partition where you want to install Windows Server 2016. You can create new partitions or use existing ones. Select the desired partition and click Next.

9. Set Local Administrator Password:
– Set the password for the built-in Administrator account. This is an important step for security.

10. Choose Server Role and Features (Optional):
– Select the server role and features you want to install. This step can be skipped if you want to install them later.

11. Install Windows Server 2016:
– Once all the required settings are configured, click on the Install button to begin the installation process.

12. Wait for Installation to Complete:
– The installation will take some time to complete, and the server may restart multiple times during the process. Wait for the installation to finish.

13. Initial Configuration:
– After installation, you may need to configure additional settings specific to your environment, such as networking, domain membership, and security policies.

14. Perform Windows Updates:
– Once the server is up and running, it’s crucial to apply the latest Windows updates. This helps to enhance system security and ensures you have the latest features and bug fixes.

Remember to consult official documentation and resources provided by Microsoft for detailed steps and any additional requirements specific to your situation.

[GUIDE] Install Windows Server through VMware ESXi Web Client (step by step)

What is VMware ESXi?

Technical term :

VMware ESXi is an enterprise-class, type-1 hypervisor developed by VMware for deploying and serving virtual computers.
As a type-1 hypervisor, ESXi is not a software application that is installed on an operating system; instead,
it includes and integrates vital OS components, such as a kernel.

In common words:

Using VMware ESXi, one can create virtual machines. And its virtualization technique allow users to install own custom OS, for example Windows OS trail copy or macOS or any other OS.


Requirements:

  • A dedicated server with ESXi installed as Operation system

  • A Web Browser

  • Good Internet speed


Guide to Install Windows Server 2016 using VMware ESXi(6.5 Web Client)

Through out this Tutorial, I am going to use https://oneprovider.com dedicated server [https://oneprovider.com/dedicated-servers] & Windows Server 2016 Datacenter edition (free evaluation copy)

Oneprovider is a world leading company for web servers. And one of the cheapest DEDI/BOX provider in the industry(with 0 setup fee).

Also their support system is very helpful.

Their payment method includes Paypal with many other familiar payment methods.

In maximum cases, their servers comes with «one click installer», which includes VMware ESXi Web Client.

After receiving server information from Oneprovider, go to «Server manage» page and click on ‘reinstall’ tab

From there you can choose to install ESXi. [Remember- server re-installation would take 45 to 60 minutes]

Every server comes with an IP(ipv4) address. So, when installation of ESXi is finished, one can access the server on WMware ESXI web interface, simply through a web browser.

Just open

https://SERVER_IP_ADDRESS

And use your credential to log into it. [Note- use credential, which you had created during ESXi installation]

Anyway, you are welcome to choose any other Dedicated provider, which can allow you to install ESXi on your server.

For step-by-step guide, please watch the Youtube Video


Video Tutorial

[Tutorial Video] How to Install Windows Server 2016 using VMware ESXi 6.5 Web Client


Download the OS

you can have your own iso copies from Microsoft Official site here: https://www.microsoft.com/en-us/evalcenter/evaluate-windows-server

OR

Download from my Archive below:

Widows Server 2016 (evaluation copy/180 days free trial)

https://archive.org/download/windowsserver2016datacenterevaluationcopy/Windows_Server_2016_Datacenter%28EVALUATION-copy%29.ISO

Widows Server 2012 R2 (evaluation copy/180 days free trial)

https://archive.org/download/WS2012R2/WS2012R2.ISO

Widows Server 2008 R2 (evaluation copy/180 days free trial)

https://archive.org/download/windowsserver2008r2evaluationcopy/WS2008R2.iso


Download extra dependent server software

https://archive.org/download/extradependentsoftwares/Extra-Dependent-Softwares.iso


Server Speedtest

Tested on 1Gbps France(Paris) Server
https://www.speedtest.net/result/8743894889

alt text


Conclusion

VMware ESXi trial license only valid for 60 days. So it is recommended to backup your server files before its free trial get expired.

If VMware ESXi is not running, that means your VM(Virtual Machine) is also not running. So your Windows Server would not be accessible.

However, you should register a legit account at vmware.com and may ask for a free license key.

Понравилась статья? Поделить с друзьями:
0 0 голоса
Рейтинг статьи
Подписаться
Уведомить о
guest

0 комментариев
Старые
Новые Популярные
Межтекстовые Отзывы
Посмотреть все комментарии
  • Install windows 10 on qemu
  • Как выглядит клавиша windows key
  • Установка docker на windows server 2012
  • Veeam agent for windows key
  • Как закрепить иконку на панели задач windows 11