
- Компьютеры
- Cancel
Когда есть внешний жесткий диск, и не хочется тратить место на встроенном в MacBook диске (а в MacBook Air обычно и так места всегда не хватает) то можно установить Windows на внешний диск. Правда для этого придется многое сделать руками, т.к. на данный момент Ассистент Boot Camp не позволяет устанавливать Windows на внешние диски.
Для этого нам потребуется:
Установочный диск Windows или ISO образ
USB флешка на 8Гб или более
Thunderbolt диск
Подключение к интернету
Сначала создаем загрузочную флешку с Windows 7/8/8.1 через Ассистент Boot Camp.
Создавать обязательно с драйверами Boot Camp.
Ассистент Boot Camp
[singlepic id=140 w=320 h=240 float=center]
Полная версия статьи: http://blackdiver.net/it/macos/3171

Если вы хотите увидеть на нашем сайте ответы на интересующие вас вопросы обо всём, что связано с техникой Apple, операционной системой Mac OS X (и её запуском на PC), пишите нам через форму обратной связи.
К нам поступил следующий вопрос:
Привет, ребята, помогите с насущным вопросом. В довесок к Macbook Pro Retina я купил себе внешний Thunderbolt-диск Elgato. Планировал организовать работу так чтобы весь софт для макоси был на встроенном SSD, а на внешнем диске была винда и всё, что с ней связано.
Но Windows не ставится на диск Thunderbolt! Пишет какую-то чушь про контроллер, не помню уже точно. Какие могут быть проблемы с контроллером, раз установщик винды уже видит диск? Может я что-то не так делаю?
Спасибо заранее) Всегда у вас толковые советы, надеюсь мне поможете тоже
Здравствуйте!
Парадокс, но Mac OS X на внешний диск (неважно, какой именно — хоть Thunderbolt, хоть USB 3.0) установить можно, а вот Windows — нет. Есть две причины:
- во-первых, куча встроенных проверок в установщике Windows. Есть сотня поводов для того, чтобы он отказался продолжать работу
- во-вторых, странное устройство Boot Camp — технологии Mac OS X, помогающей эмулировать на Маках среду BIOS
Обойти обе проблемы можно, но приготовьтесь к тому, что здравого смысла в написанном ниже будет крайне мало 
Главная проблема установки Windows на внешний диск Thunderbolt состоит в том, что система Microsoft не знает, куда ей прописать загрузчик. Редмондским программистам давно пора оторвать за это руки, но Windows по давней традиции размещает загрузчик не там, где хочется вам, и не там, куда вы планируете ставить систему, а там, где сама сочтёт нужным — на первом по счёту диске, который она найдёт у вас в компьютере. Само собой, внутренний диск всегда считается приоритетным, поэтому прописывать загрузчик Windows хочет только туда.
В связи с этим, порядок действий должен быть таков:
- запустите Дисковую утилиту (папка Программы/Утилиты)
- выберите слева ваш диск с системой (не сам раздел, а именно диск)
- справа перейдите на вкладку «Раздел диска» и нажмите плюс внизу
- задайте для нового раздела минимально допустимый размер — 1 ГБ

- выберите для нового раздела файловую систему FAT
- примените изменения и дождитесь окончания разбивки диска
После этого вы сможете установить Windows — она найдёт на встроенном диске FAT-раздел и разместит загрузчик на нём, поэтому никаких ошибок не возникнет. Сама же система будет располагаться на внешнем диске.
Безусловно, можно попробовать принудительно переместить загрузчик на внешний диск после того, как вы загрузитесь в Windows (есть полезные терминальные команды bcdboot и bootsect). Но в Windows на Маках они работают через раз (или даже реже) — видимо, тут уже вступают в действие глюки Boot Camp.
Другой вариант решения проблемы — создать на Маке нормальный Boot Camp-раздел, поставить Windows туда, а потом клонировать раздел на внешний Thunderbolt-диск какой-нибудь специализированной утилитой, например, Norton Ghost. Не берёмся судить о том, какая из альтернатив проще
can i install windows on thunderbolt drive using boot camp as it just offers option to use mac drive
i want to install on transcend 2tb drive but boot camp only shows internal drive at 32gb option
is there a way round this as i had windows on hard drive and was running out of space and mac was running slow
itunes-OTHER,
Windows
7,
64 bit
Posted on Sep 28, 2016 3:36 AM
Posted on Sep 28, 2016 6:46 AM
You will need to use Winclone.
can i install windows on thunderbolt drive using boot camp as it just offers option to use mac drive
Home / Reviews / Gadgets / How to Install Windows 10 Boot Camp External SSD Thunderbolt
September 11, 2015
Gadgets
In this Video im going to share How to Install Windows 10 on a External SSD over Thunderbolt on the StoreJet 500
Transcend StoreJet 500 Thunderbolt SSD Prices & Availability: http://geni.us/36H5
US: http://goo.gl/U3mqsh
EU: http://goo.gl/4xfctq
There are other ways of installing Windows 10 on a external SSD, but after a lot of testing this was the most effective way that i did find for my self.
This way we can have a external SSD with Windows Boot Camp without sacrificing our internal storage, or if our internal storage is slow then this way we can get really great speeds.
One interesting thing is that on a thunderbolt unit such as the StoreJet 500 we can have besides the Windows Boot Camp Partition also a OSX installation which is great.
One downside is that we will be using a paid software but as i explain on the video is totally worth it on my opinion.
Non the less if you dont want to follow these instructions there are other ways of accomplish that shared by other users and ill share the links below. I would just like to mention that i did try those ways and i prefer the way that i show on this video specially for the simplicity, ease of use and so far i had no problems whatsoever.
This Windows 10 Boot Camp Installation on a external SSD is recorded on a Late 2013 iMac but i also made all tests successfully on my Macbook Pro Early 2015.
Other Interesting Tutorials that i have tried:
1- http://goo.gl/L22mRj
2- http://goo.gl/OuZ8NJ
Hope that the video is helpful
All the Best
RJ
Tags apple boot camp boot camp external drive boot camp external ssd boot camp guide boot camp ssd boot drive boot ssd external boot camp external boot disk external thunderbolt how to install windows 10 mac how to? imac install windows boot camp external ssd macbook pro mackintosh osx osx + windows 10 roberto jorge storejet 500 thunderbolt transcend windows + osx windows 10
About Roberto Jorge
I Love to share the experience that i have with Technology Gadgets on my Youtube channel.
You may find all sorts of Tech items on the channel, such as Android Media Players, Storage, Desktops, Laptops, Tablets, Mobile Phones and much more.
Love spending time with my family & friends, in particular my 2 Kids.
Im a teacher and Corporate Trainer in the area of Restaurant and Bar Management, Enology and Wine Tasting, which i love.
Check Also
Installing AdGuard Home and Home Assistant via ZimaOS on Any Computer 🚀🔥 CHUWI Ubox
Chuwi Ubox Windows 11: https://eu.chuwi.com/products/ubox (cupon: ROBERTOJORGEUBOX) https://cdkeysales.com/ 25% Cupom: RJT25 Win11 PRO key(€22): https://pt.cdkeysales.com/cs/RJT25-11P Win10 PRO key(€16): https://pt.cdkeysales.com/cs/RJT25-10P Win10 Home(€13): https://pt.cdkeysales.com/cs/RJT25-10H Win11 Home(€21): https://pt.cdkeysales.com/cs/RJT25-11H Office19 PRO key(€44): https://pt.cdkeysales.com/cs/RJT25-O19 Win10 PRO+Office19 PRO keys pack(€55): https://pt.cdkeysales.com/cs/RJT25-10P19 ✅ RECORDING GEAR: ✅ 🅿️ Sony ZVE-10: https://geni.us/SonyZVE10s 🅿️ Sony ZV1: https://geni.us/Sonyzv1z 🅿️ Sigma 16mm F1.4: https://geni.us/Sigma16m 🅿️ DJI Action…
If you have a Windows 10 / 8.x / 7 install ISO / WIM / ESD / SWM or VHD / VHDX file with Windows 10 / 8.x / 7 installed, you can use WinToUSB to install Windows to an external hard drive. or a USB stick as Windows Portable, then you can carry this Windows Portable anywhere and use it on any computer. This tutorial focuses on creating Windows To Go from an ISO / WIM / ESD / SWM / VHD / VHDX file, so please read this guide carefully before creating Windows To Go.
Tutorial to Install Windows to USB / Thunderbolt Drive as Portable Windows with WinToUSB.
Step 1. Connect the target external hard drive or USB flash drive to the computer with a copy of WinToUSB installed, then launch WinToUSB.
Step 2. Click the button, then click the button and in the dialog box that opens, select the Windows ISO / WIM / ESD / SWM or VHD / VHDX installation file.
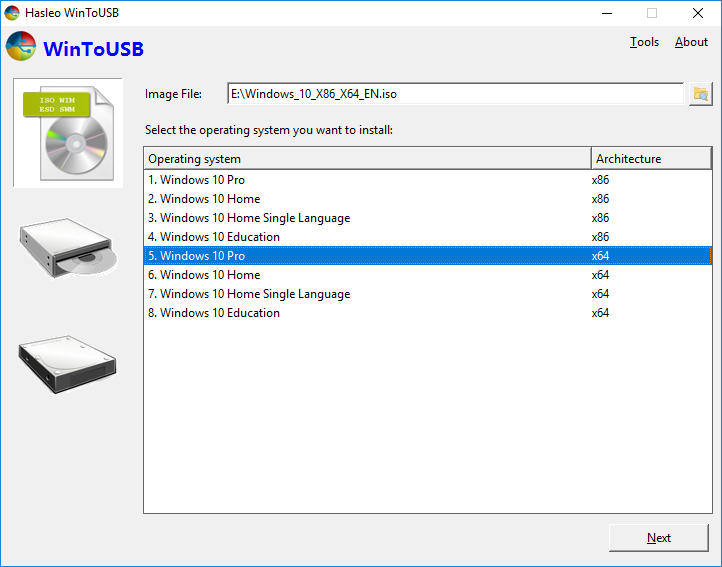
Step 3. WinToUSB scans and lists the installed operating systems. If you see the version of Windows you want to install, select it and click Next.
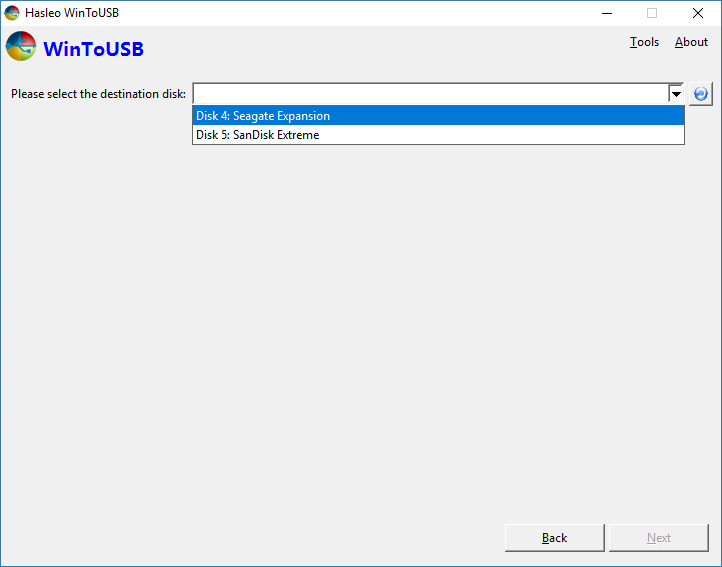
Step 4. Select the target USB or Thunderbolt drive from the drop-down list. If the USB or Thunderbolt drive is not recognized by WinToUSB correctly, you must click the button for the program to recognize the USB or Thunderbolt drive.
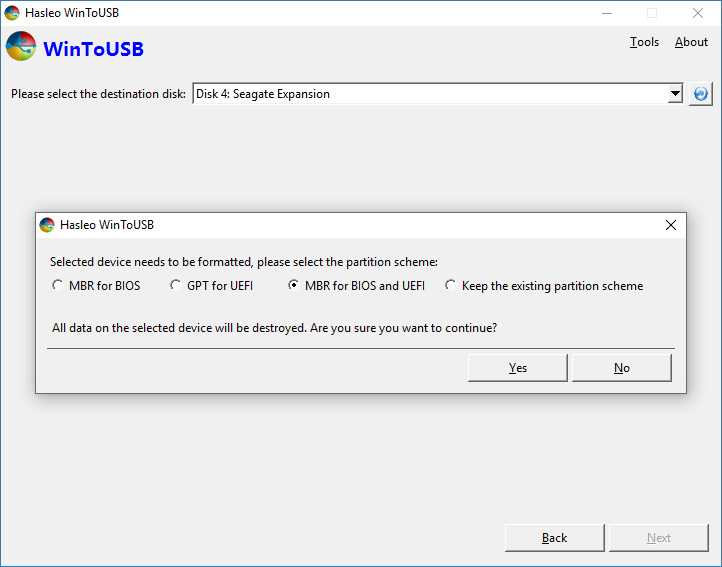
Step 5. A pop-up window will appear asking if you want to format it to continue, select the partition scheme you want to use and click “Yes” to continue.
Advice:
- BIOS MBR, UEFI GPT, and BIOS and UEFI MBR will format the target disk, so all data on the disk will be destroyed.
- If you choose Keep Existing Partition Scheme, you need to manually prepare partitions on a USB or Thunderbolt drive before this step, and here is a user ‘s guide on how to manually prepare partitions for Windows To Go.
- Note that the “Keep Existing Partition Scheme” option is only available for Windows 10 1709 and later Windows operating systems when using a USB drive to create Windows To Go.
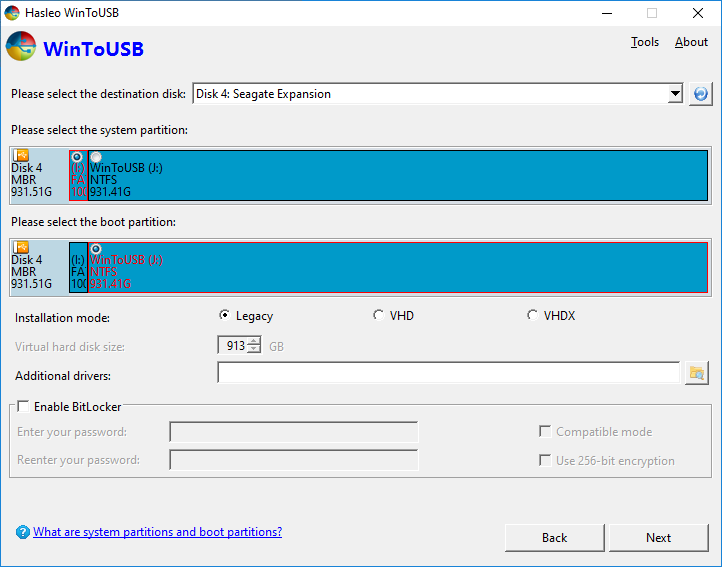
Step 6. Select the system partition and boot partition from the list of partitions, the selected partitions will be marked in red, then click “Next”.
Advice:
- Legacy mode is the best choice if you are using an external drive to create Windows To Go, it provides the best performance.
- VHD / VHDX mode is the best choice if you are using a USB drive to create Windows To Go because VHD / VHDX mode has the best compatibility based on our tests and user feedback when using a USB drive to create Windows To Go. … VHDX is a new VHD format for Windows 8 or later Windows OS, so if you want to create a Windows 10/8 To Go USB drive, we recommend using VHDX.
- The Additional Drivers option allows us to inject additional drivers into Windows when building Windows To Go, which is especially important when we have to rely on hardware drivers to complete a Windows installation, such as when building Windows To Go for Mac computers .
- The Additional Drivers Directory that you specify should only contain the drivers that you need to deploy to Windows. If this directory contains too many useless files, the driver deployment process becomes very slow.
- The Additional Drivers option is not available if the version of the Windows being installed is greater than the version of the current Windows operating system.
- Select the Enable BitLocker checkbox to encrypt your Windows To Go drive with BitLocker , you need to enter a password and select an encryption mode and the required encryption strength.
Notes: If the Enable BitLocker check box is selected, the Windows startup time will increase as it takes some time to complete the encryption operation, so please be patient.
Step 7. After clicking “Next” WinToUSB starts Windows installation.
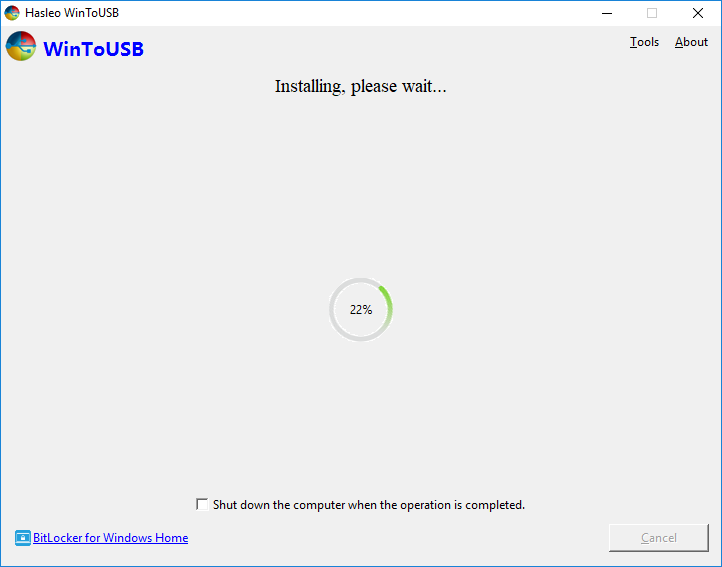
Step 8. Installation takes some time. After installation, restart your computer and change the BIOS to boot from USB stick or Thunderbolt.
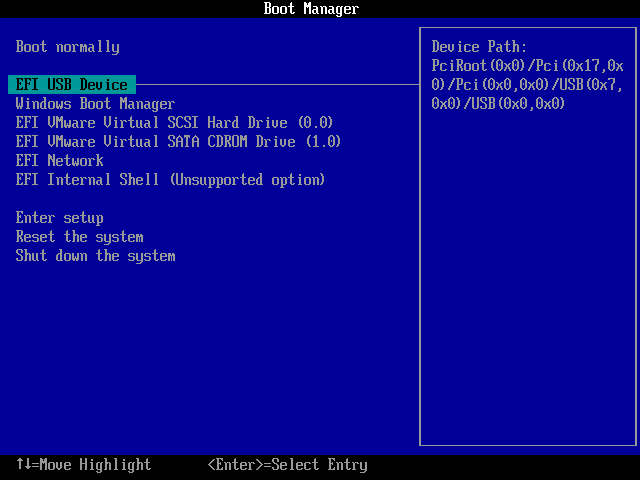
Step 9. Windows installation will begin and you need to complete all installation steps. You will have to boot from a USB or Thunderbolt drive if the Windows installation restarts your computer.
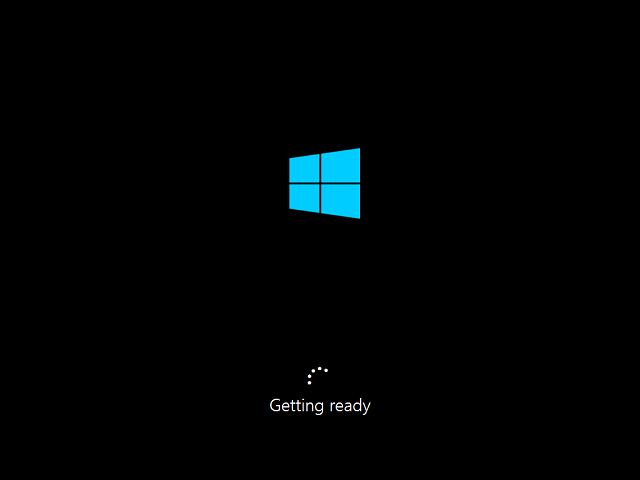
By following these simple steps, you can easily create a bootable Windows or Thunderbolt USB drive from ISO / WIM / ESD / SWM / VHD / VHDX file using WinToUSB.