
Подробное руководство.
Steam Deck – мощное портативное устройство, созданное для игр, но его потенциал можно расширить, установив Windows 11. Это позволит запускать эксклюзивы Xbox Game Pass, игры с защитой DRM и программы, недоступные в SteamOS. Разберемся, как подготовить устройство, установить Windows 11 (как единственную ОС или в Dual Boot с SteamOS), а также настроить драйверы для стабильной работы.
Подготовка
Перед началом работы выполните следующие шаги:
Загрузите драйверы для корректной работы Windows с официального сайта Steam – выберите версию для вашей модели: OLED или LCD.
Создайте загрузочные накопители.

Для SteamOS:
-
Скачайте образ SteamOS.
-
Запишите его на флешку через Rufus.
-
Запустите Rufus, выберите флешку и укажите скачанный образ.
-
Выберите схему разделов GPT.
-
Нажмите Старт и дождитесь окончания установки.
Для Windows 11:
Используйте Rufus или Media Creation Tool (официальный инструмент Microsoft).
Подробная инструкция доступна здесь.
📌 Как выбрать карту памяти для Steam Deck? 6 лучших microSD для консоли
Только Windows

Подготовка SSD:
● Войдите в Boot Menu – выключите консоль, а во время включения зажмите кнопку питания и уменьшения громкости.
● Загрузитесь с флешки с SteamOS.
● Далее откройте меню Пуск, вкладку System и запустите приложение KDE Partition Manager.
● Удалите все разделы на SSD – ПКМ по каждому разделу → Delete → Apply.
● После щелкните по SSD правой кнопкой мыши и выберите New Partition Table.
● Выберите тип таблицы разделов GPT и нажмите ОК.
● Нажмите Apply, чтобы отформатировать диск.

Установка Windows:
-
Подключите флешку с Windows к Steam Deck и зайдите в Boot Menu.
-
Выберите загрузку с USB накопителя.
-
Далее идет стандартная установка Windows. После ее завершения включите устройство и перекиньте на него скачанные ранее драйвера.
Распакуйте их из архивов и установите в таком порядке:
Драйвер APU – как приложение.
Драйвер устройства для считывания карт памяти SD – как приложение.

Аудиодрайверы – необходимо установить все скачанные (3 для OLED и 2 для LCD). Для этого перейдите в папку со скачанными драйверами, нажмите на 3 точки, Параметры, Вид и снимите галочку с параметра «Скрывать расширения для зарегистрированных типов файлов». Нажмите Применить. После этого вернитесь в папку с драйверами и найдите файлы с расширением .inf. Чтобы их установить, нужно нажать на них правой кнопкой мыши и выбрать пункт Установить.
После установите драйверы на WiFi и Bluetooth – тоже как приложения.
На этом установка Windows закончена, можете начинать настраивать и пользоваться устройством.
Windows + SteamOS (Dual Boot)

Подготовка SSD:
● Войдите в Boot Menu – выключите консоль, а во время включения зажмите кнопку питания и уменьшения громкости.
● Загрузитесь с флешки с SteamOS.
● Откройте меню Пуск, вкладку System и запустите приложение KDE Partition Manager.
● Кликните по SSD правой кнопкой мыши, выберите пункт Resize/Move.
● В открывшемся окне, в поле Free space after укажите объем в Мб, который вы хотите выделить под систему, и нажмите ОК.
● Нажмите Apply и дождитесь завершения процесса.
Установка Clover для Dual Boot
Для возможности удобно переключатся между двумя системами необходимо настроить двойную загрузку. Valve не разработала официальное приложения для Dual Boot, поэтому мы будем использовать стороннее ПО.

Инструкция:
● Перейдите в режим рабочего стола SteamOS.
● Откройте приложение Konsole.
● Введите команду passwd и установите пароль администратора.
● Введите команду sudo passwd и установите пароль Sudo.
● Загрузите программу Clover командой git clone https://github.com/ryanrudolfoba/SteamDeck-Clover-dualboot и дождитесь завершения загрузки.
● Смените каталог командой cd SteamDeck-Clover-dualboot/
● Сделайте файл установки исполняемым – chmod +x install-Clover.sh
●Установите файл – ./install-Clover.sh. При установке система потребует от вас Sudo пароль, введите его и нажмите Enter.
После начнется процесс установки, Clover попросит вас выбрать основную OC – Windows или SteamOS. Выбирайте ту, которой будете пользоваться чаще.
Установка Windows
После установки Clover выключите консоль и зайдите в Boot Menu. Выберите загрузку с вашей флешки с Windows, а как накопитель для Windows выберите созданный ранее пустой раздел. Начнется стандартная установка Windows. Когда операционная система будет установлена, установите драйверы:
Драйвер APU – как приложение.
Драйвер устройства для считывания карт памяти SD – как приложение.
Аудиодрайверы – необходимо будет установить все скачанные (3 для OLED и 2 для LCD). Для этого перейдите в папку со скачанными драйверами, нажмите на 3 точки, Параметры, Вид и снимите галочку с параметра «Скрывать расширения для зарегистрированных типов файлов». Нажмите Применить. После этого вернитесь в папку с драйверами и найдите файлы с расширением .inf. Чтобы их установить, нужно нажать на них правой кнопкой мыши и выбрать пункт Установить.
После установите драйверы на WiFi и Bluetooth – тоже как приложения.
Настройка Dual Boot

Когда закончите установку Windows и драйверов, выключите устройство и перейдите в Boot Menu. В нем необходимо выбрать пункт Clover – GUI Boot Manager. Теперь при каждом включении Steam Deck у вас будет выбор, в какую из систем вы хотите войти. А при 15-секундном бездействии в окне Clover вас автоматически загрузит в основную ОС.
* * *
Теперь ваш Steam Deck поддерживает Windows 11, что открывает доступ к тысячам игр и приложений. А если выбрали Dual Boot – наслаждайтесь гибкостью двух систем в одном устройстве. Приятной игры!
* * *
Как отключить обновления Windows 10 и 11?
Как выбрать второй монитор и сэкономить.
Добрый день уважаемая каста обладателей Steam Deck. Относительно недавно я настрочил графоманский гайд по самой базированной установке игр.
Учимся основам деководства.
Пост посвящён неофитам, которые вот только что влились в «семью деководов» и не знают с какой стороны подойти к этой чудесной вундервафле. Ну и подойдёт ещё тем, кто долгое время особо не вникал и играл в нативные версии игр для линухи из Steam (извращенцы). В этой статье мы научимся обходиться штатными средствами Дека, не прибегая к помощи других…
И в комментариях под этой статьёй всплыл очень интересный вопрос, который мучает умы всех неофитов готовящихся вот-вот войти в наши дружные ряды.
Отвечу на вопрос Алксандра. Да, такое сделать можно. Я бы даже сказал, что нужно, ибо насиловать свой Дек установкой виндузы на внутренний SSD, со сносом родной оси, будет только самый сумасшедший мазохист и извращенец.
Итак, пришло время представить героя нашей статьи и это…барабанная дробь…Windows To Go.
Windows To Go это идейное продолжение Windows PE, но намного лучше. Ибо идёт полноценная установка ОС со всеми драйверами и программами, да и она своими тентаклями не лезет на ваш внутренний накопитель
Итак, для закатки нашей пердузы на съёмный накопитель нам понадобятся:
- Съёмный накопитель (желательно NVME)
- Дистрибутив ОС
- Драйвера для нашего Steam Deck
- Программа Hasleo WinToUSB
Перво наперво скачаем драйвера на наш Steam Deck. Посещаем вот этот сайт.
На этом сайте есть драйвера для двух версий Steam Deck. Выбирайте только для своей версий.
Все архивы распаковать по своим папкам, а потом все папки запихнуть в одну, откуда программа будет тянуть драйвера.
Итак, посещаем сайт программы и скачиваем её бесплатную версию и устанавливаем.
Через бесплатную версию этой программы можно установить только Home версию Windows. Если хотите Pro, то покупайте лицензию или ищите крякнутую версию на трекерах.
В общем, мы закончили с подготовлением. Теперь приступаем к основной части этого гайда.
Запускаем Hasleo WinToUSB.
Выбираем пункт USB с Windows To Go и попадаем в другое окно.
Итак, в источнике установки выбираем образ нашей операционной системы, а целевым диском выступит наш съёмный накопитель. Всё должно выглядеть вот так.
Снизу будет маленькая стрелочка. Нужно на неё нажать, чтобы развернуть дополнительные настройки.
В пункте дополнительные драйверы выбираем папку с нашими заранее распакованными драйверами. И если у вас не стоит галочка на Автономные внутренние диски при загрузке Windows To Go то лучше её поставьте, иначе винда будет лезть своими тентаклями в наш внутренний накопитель.
Всё, подготовка закончена. Жмём Начать и ждём окончание процесса установки. Время установки составляет примерно 20-30 минут. Статус установки можно будет отследить тут.
После установки можно смело отключать наш съёмный накопитель.
Теперь берём наш Steam Deck и заходим в BIOS. Чтобы зайти в BIOS нужно на выключенном устройстве зажать + и один раз нажать на кнопку power. Держим палец на + до тех пор, пока не попадём в сам BIOS.
В биосе выбираем пункт Setup Utility. Переходим во вкладку Boot и активиру��м параметр USB Boot. После активации этого параметра вы можете загружаться с внешних носителей
Подключаем наш внешний накопитель. Заходим в Bios. Выбираем пункт Boot Menu. Вуаля, у вас пошёл запуск винды. После каждого перезапуска запускаемся через Бут меню. А так дальнейший сценарий будет точно таким же, как при первом запуске винды. Подключение к сети, своему аккаунту, загрузка обновлений и т.д. С этим вы сами разберётесь. Дам только пару советов.
- Сначала установите все обновления.
- Потом установите клиент Steam.
Если с самого начала не установить все обновления, то у вас будет тупо глохнуть Steam при запуске. А без клиента Steam, управление в самой системе будет очень кастрированное.
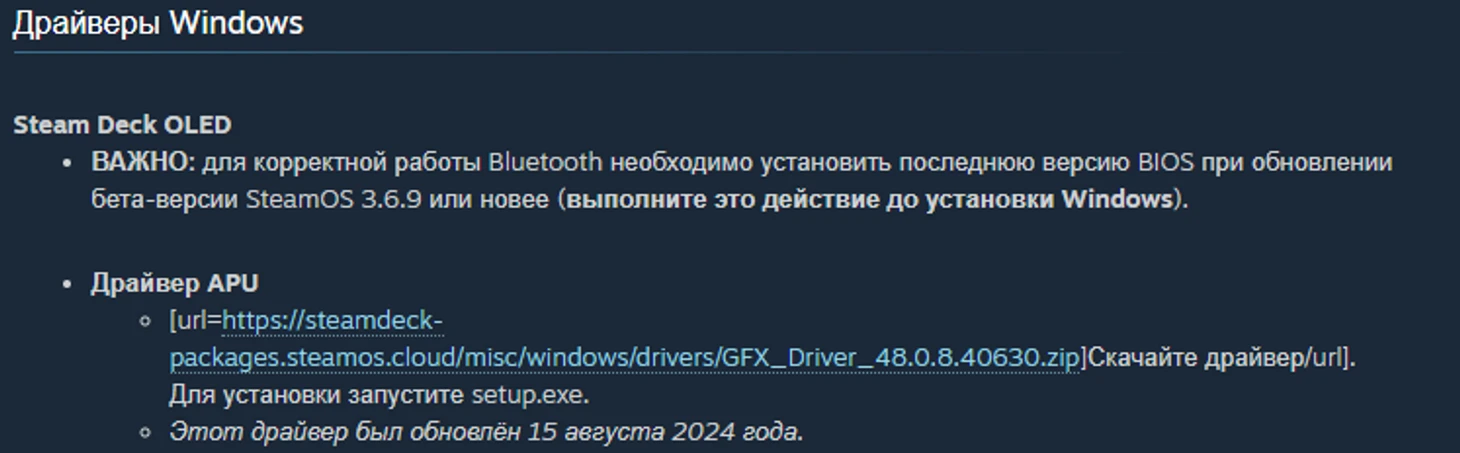
Valve сообщила, что Steam Deck OLED поддерживает Windows 11. Bluetooth-подключение в Steam Deck OLED сопровождается драйверами. Для установки операционной системы необходимо обновить BIOS консоли через SteamOS 3.6.9.
На текущей неделе компания выпустила много драйверов, чтобы обеспечить совместимость с операционной системой Windows 11, а также драйверы для чтения SD-карт, Wi-Fi, Bluetooth и аудио. Они находятся по ссылке.
Даже с этими драйверами Steam OLED не полностью совместима с Windows 11. Сообщается, что встроенная звуковая система не работает, несмотря на наличие аудиодрайверов. Но для воспроизведения звука можно использовать проводные или Bluetooth-наушники.
Официально двойная загрузка для Windows 11 и SteamOS по-прежнему недоступна на Steam Deck OLED. Чтобы установить Windows 11, необходимо удалить SteamOS с устройства, сохранив всё на SSD.
В меню загрузки можно попасть, нажав кнопку питания и удерживая кнопку уменьшения громкости. Перед установкой Windows 11 необходимо установить последнее обновление ОС. Для ввода ключа продукта понадобится USB-C хаб с портом ethernet.
Хотя нынешняя совместимость — большой шаг вперед, но пользователи надеются, что Valve улучшит совместимость Steam Deck OLED с Windows 11 и сделает её официальной.
***
Автор обложки: Valve. Источник обложки: Tech4gamers
Сейчас на главной
Login
Store
Community
About
Support
Change language
Get the Steam Mobile App
View desktop website
© Valve Corporation. All rights reserved. All trademarks are property of their respective owners in the US and other countries.
Privacy Policy
| Legal
| Steam Subscriber Agreement
| Refunds
STORE
COMMUNITY
About
SUPPORT
Install Steam
login
|
language
© 2025 Valve Corporation. All rights reserved. All trademarks are property of their respective owners in the US and other countries.
VAT included in all prices where applicable.
Privacy Policy
|
Legal
|
Steam Subscriber Agreement
About Valve
| Steamworks
| Jobs
| Steam Distribution
| Gift Cards
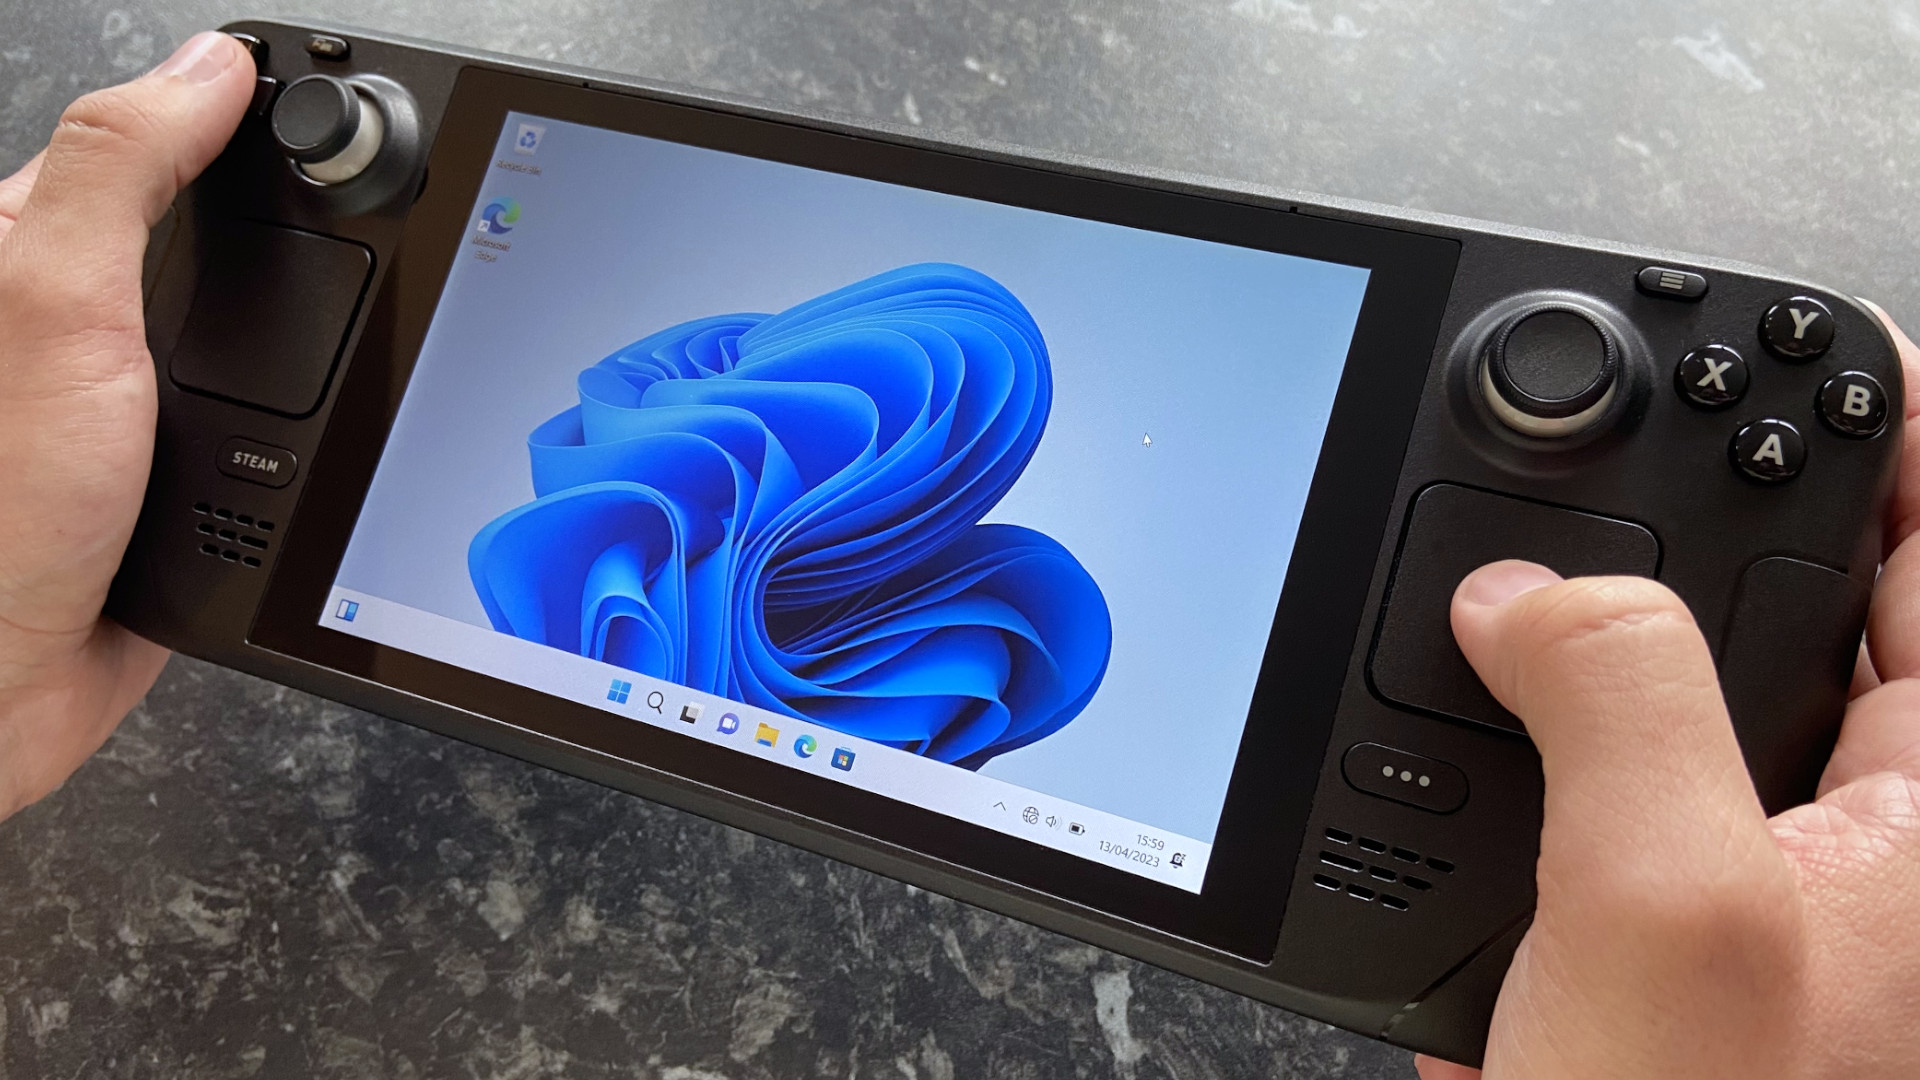
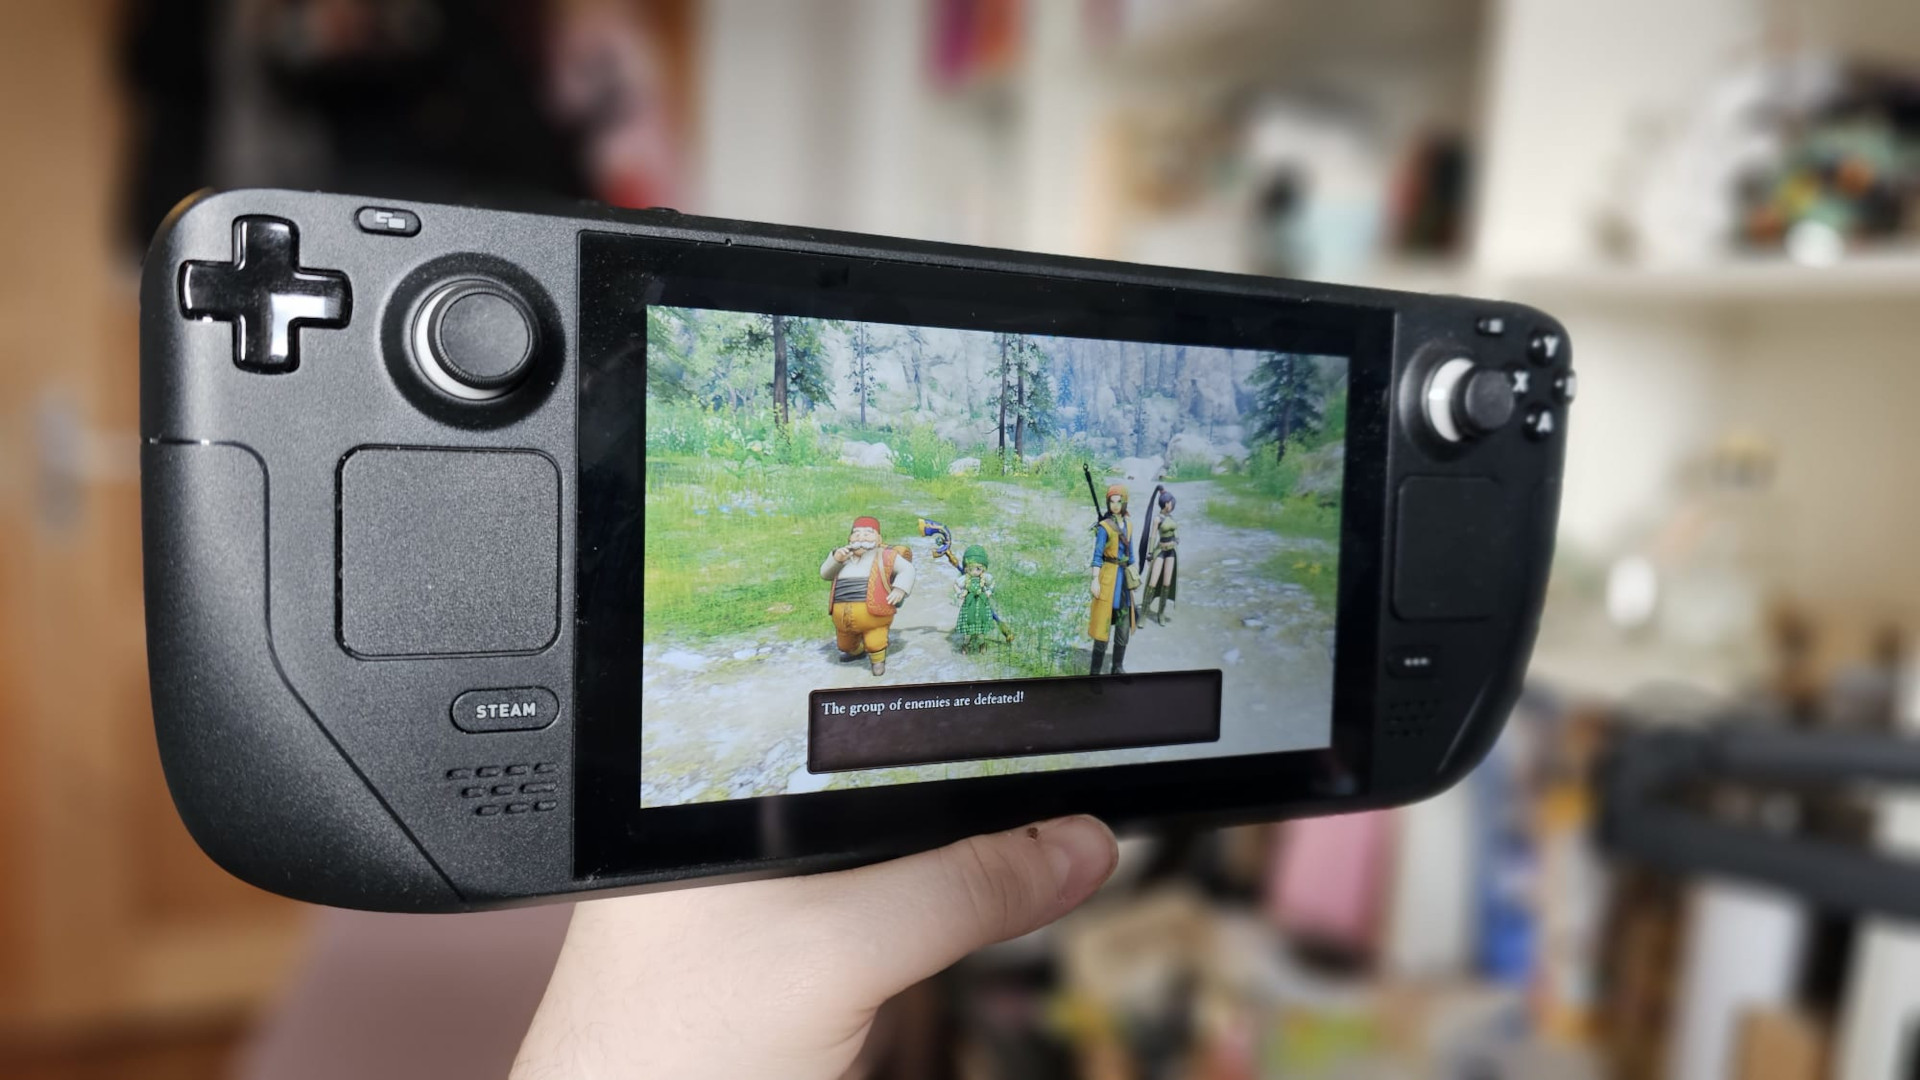
(Image credit: Ben Wilson | Windows Central)
Valve’s portable PC gaming handheld has proved to be a roaring success, but the Steam Deck has a notable limitation. It’s totally reliant on its Linux-based SteamOS operating system, which excludes specific titles from true compatibility, primarily due to reliance on anti-cheat hooks designed for Windows. Dual booting is still not an official option, but that doesn’t mean you can’t boot into Windows on your Steam Deck.
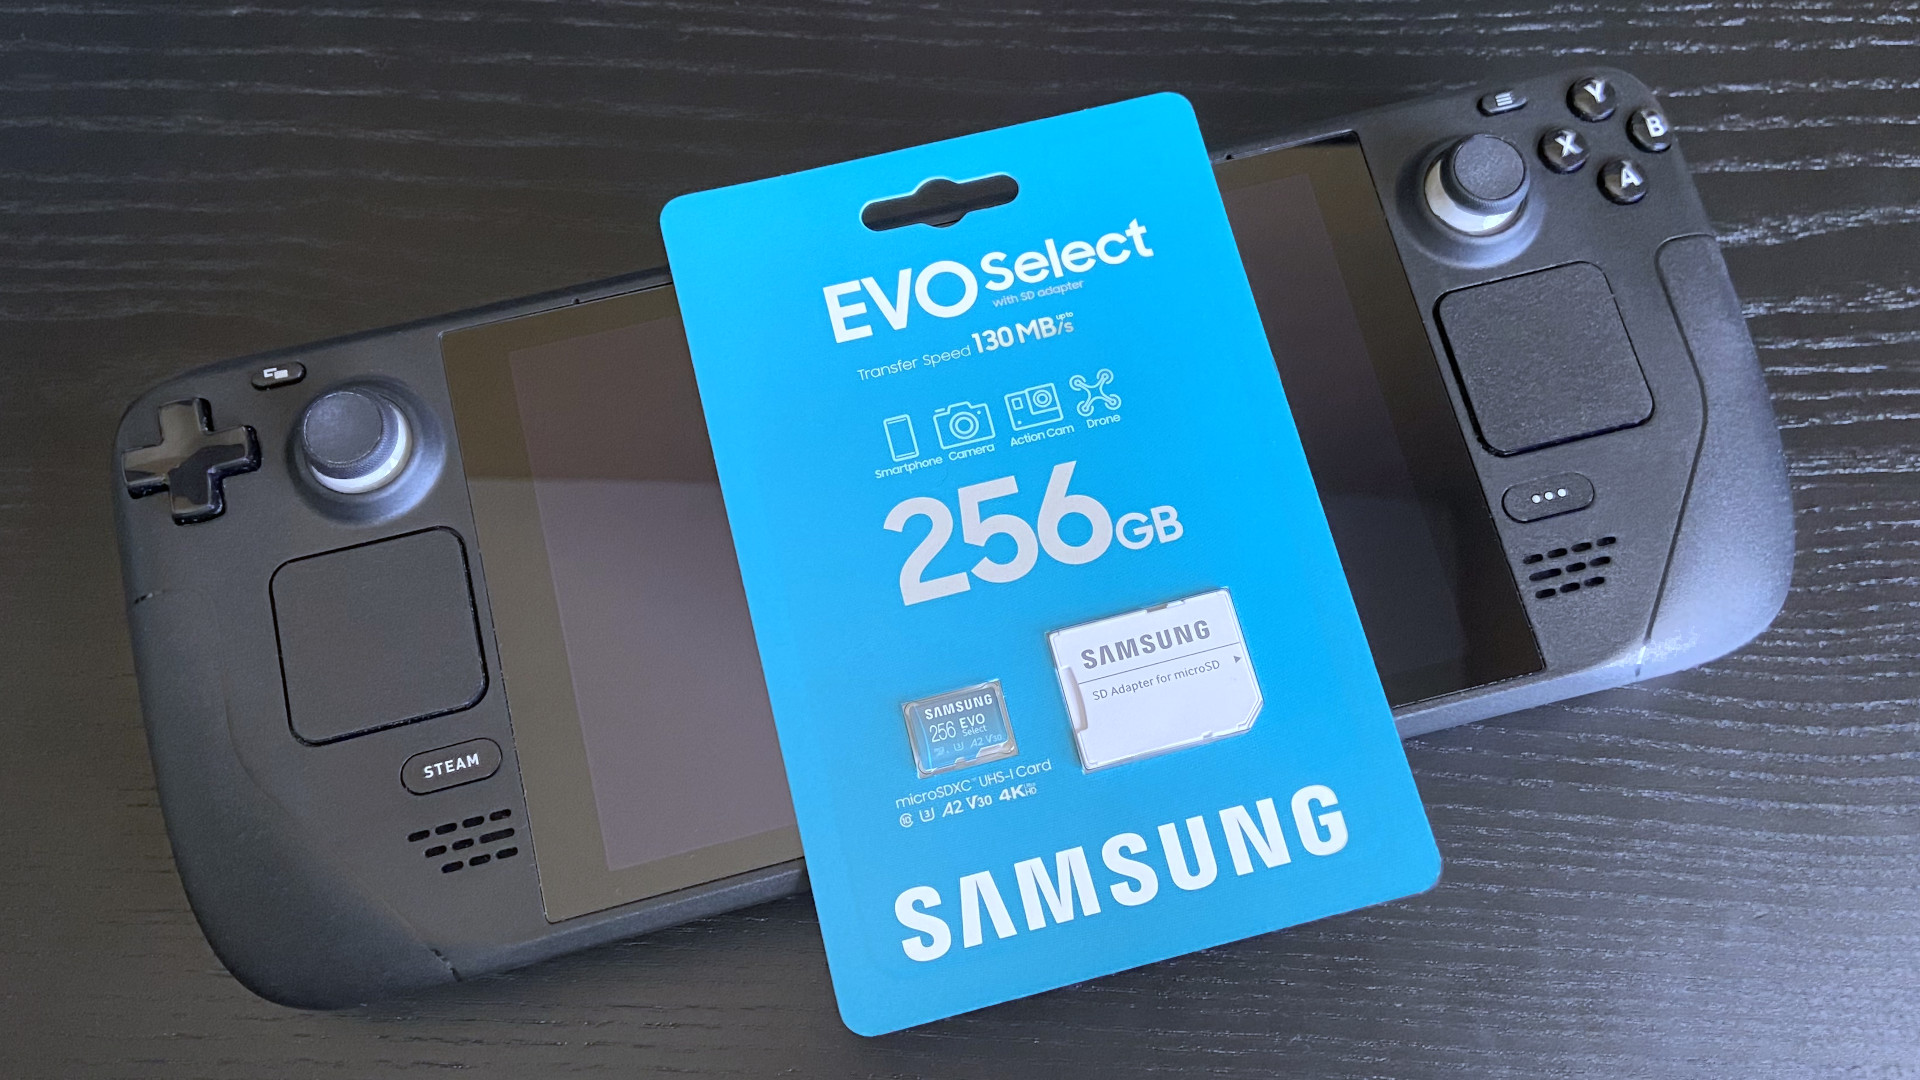
Installing Windows on an external storage device is easier than you might think. All you need is one of the best SD cards for Steam Deck and some patience. I’ve been tinkering with my 256GB model for a while, and my Samsung EVO Select card has proved more than capable of running my copy of Windows 11, so I can show you exactly how to set everything up.
Which version of Windows should I install on my Steam Deck?
Windows 11 is the preferred option for the Steam Deck since Valve routinely updates its list of drivers. Previously, Windows 10 was the stable choice, but improvements to firmware on the handheld meant that either is now viable. For this guide, I’ll be using Windows 11 Home (64-bit.)
How to prepare your SD card in Windows
Installing Windows 11 to an external storage device like a micro SD card is a much safer method for the integrity of your Steam Deck’s internal drive. If you toggle an upcoming option, it won’t affect the default SteamOS installation either. Although there is no official dual-boot solution, you can still switch to Windows when you power up the console by holding the volume down and power buttons together and accessing the standard boot menu.
- Navigate to the official Windows 11 download page.
- Under the ‘Create Windows 11 Installation Media‘ section, click Download.
- Find mediacreationtool in your downloads directly and launch the app.
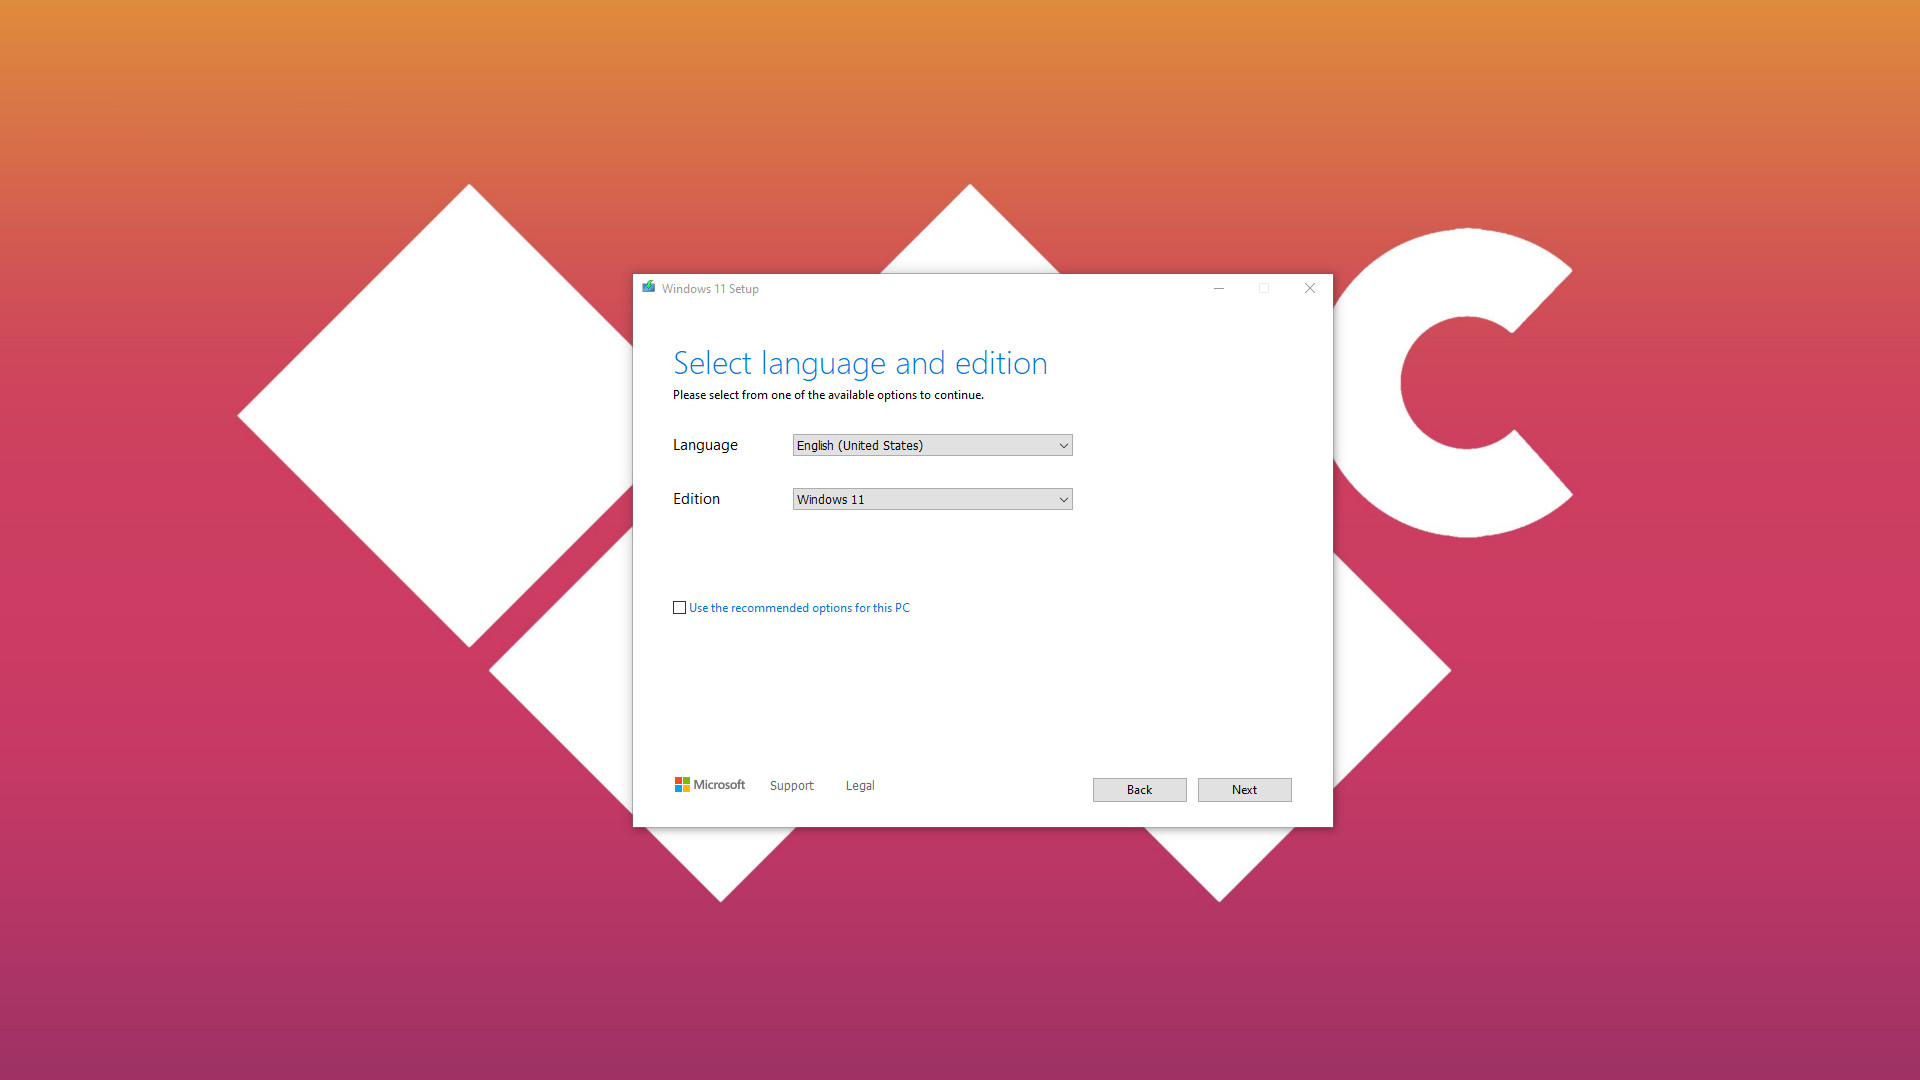
- Select the correct language for your region.
- Ensure Windows 11 is selected in the ‘Edition‘ drop-down box.
- Click ‘Next‘ and select the ‘ISO file‘ radio button.
- Choose a suitable download location for your Windows.iso and exit the app when finished.
- Navigate to the official Rufus download page.
- Under the ‘Download‘ section, click on the ‘Last updated‘ version.
- Find Rufus in your downloads directly and launch the app.
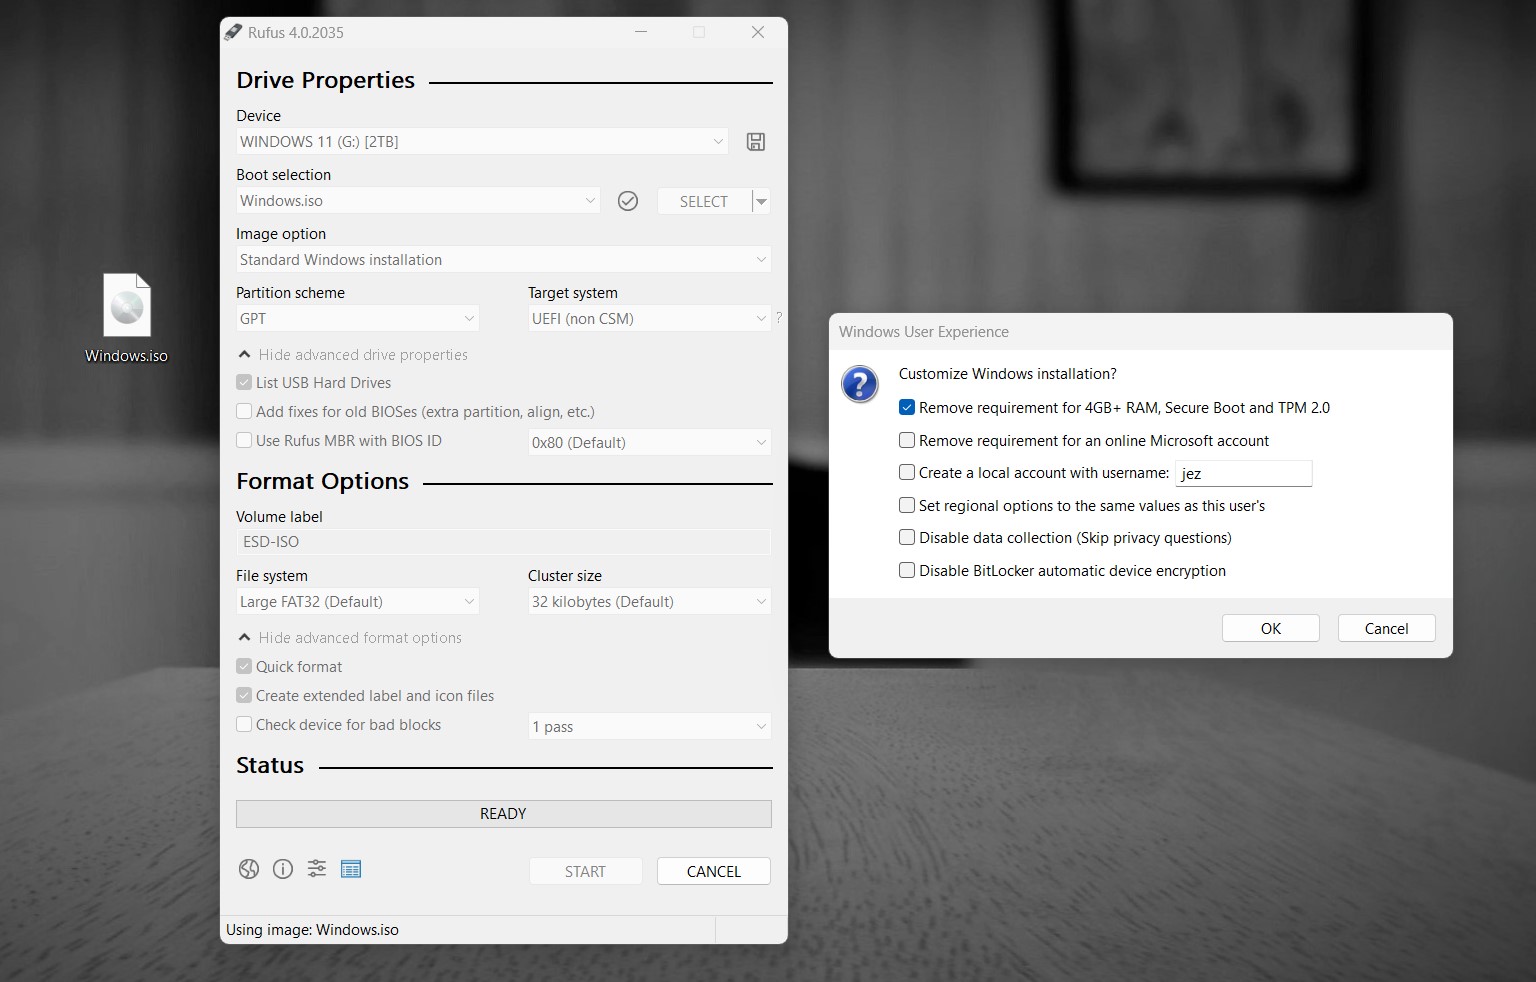
- Under the ‘Device‘ section, select your microSD card*.
- For ‘Boot selection,’ choose ‘Disk or ISO image.’
- Click the ‘SELECT‘ button, find your ‘Windows.iso,’ and click ‘Open.’
- For the ‘Image option‘ drop-down menu, choose ‘Windows To Go.’
Important: It’s critical that you follow this step carefully and choose ‘Windows To Go.’ This is what allows us to run Windows 11 directly from external storage rather than creating a boot drive to install elsewhere.
* If your device doesn’t appear, click ‘Show advanced drive properties‘ and check ‘List USB Hard Drives,’ but be careful. This is extremely risky if you select the wrong drive. If your SD card isn’t on the list, it is more likely a defective unit or a type of formatting error. Drives on this advanced list are not intended to be used with Rufus.
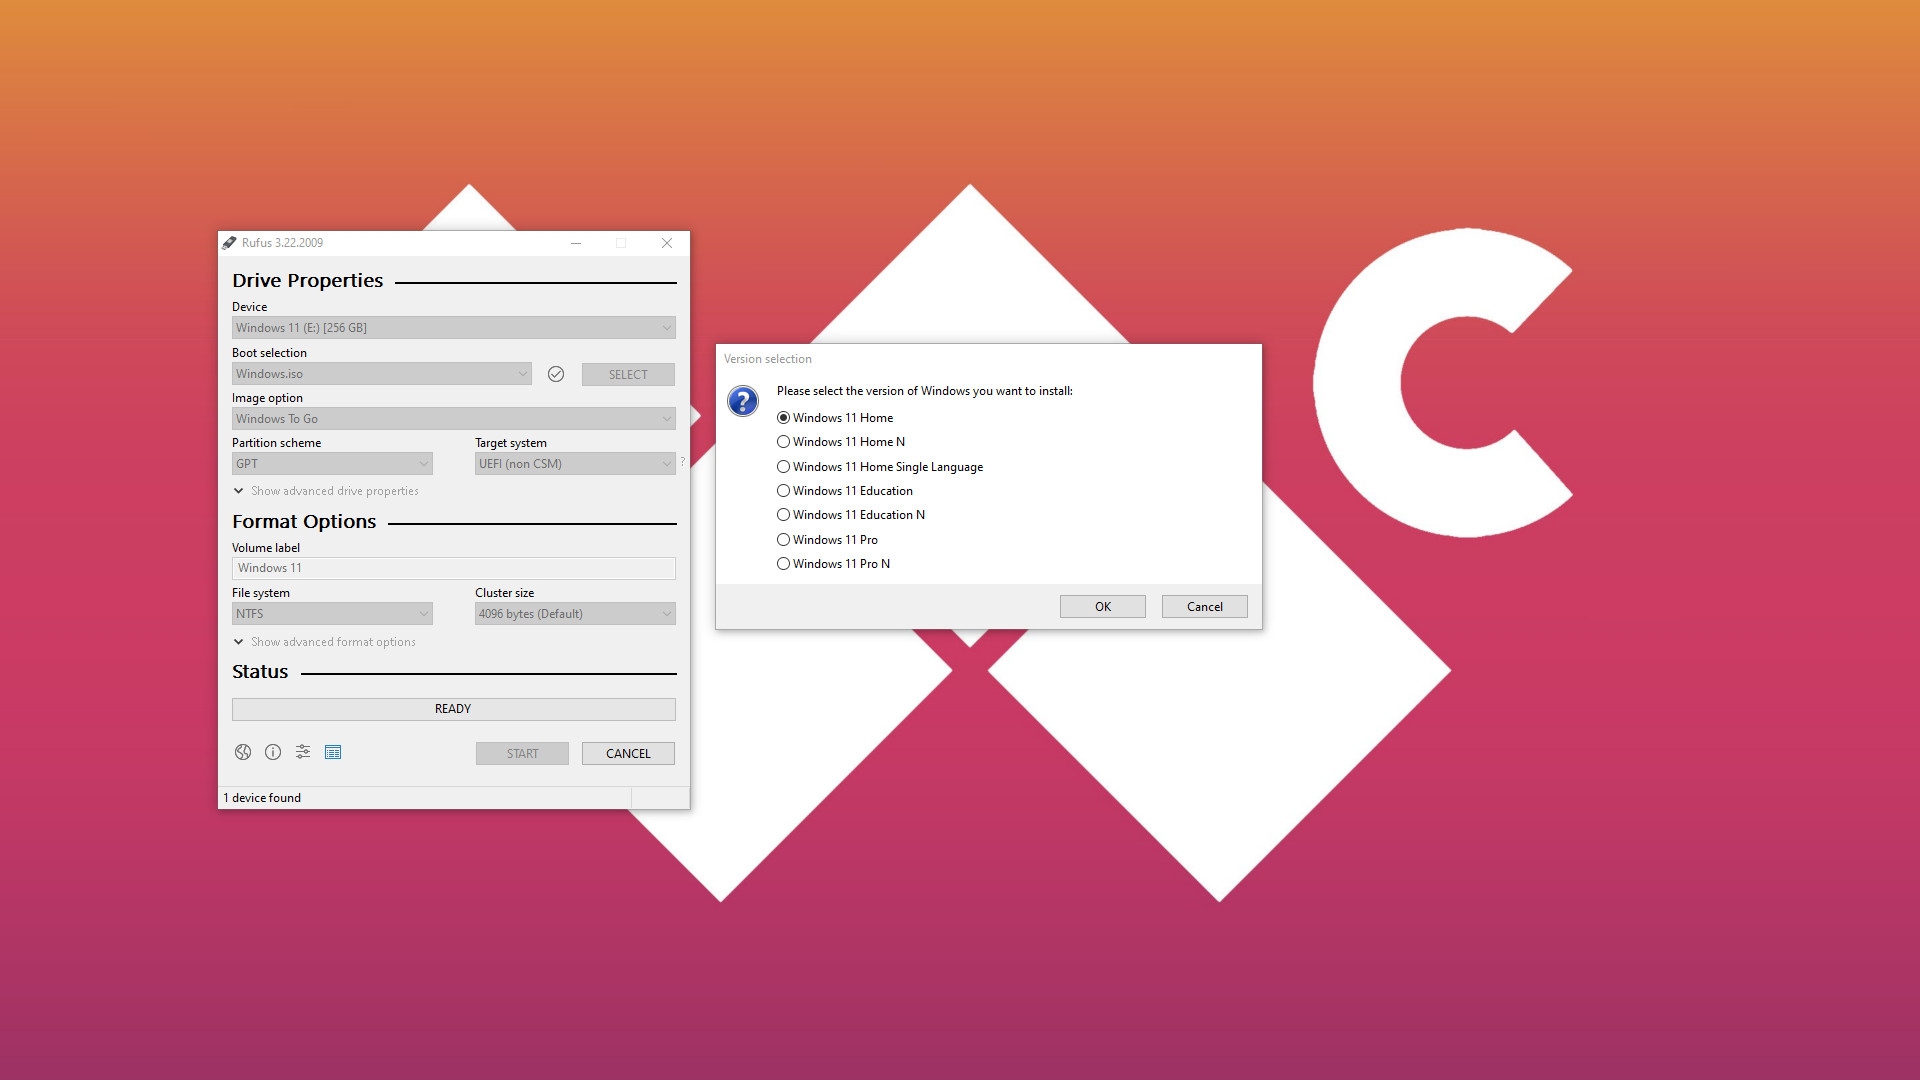
- Leave the remaining options in Rufus alone and click ‘START.’
- For ‘Version selection,’ select your matching edition and press ‘OK.’
- On the ‘Windows User Experience‘ popup, select the following:
- ✔ Prevent Windows To Go from accessing internal disks
- ✔ Remove requirement for an online Microsoft account
- ⬜ Create a local account with username: __
- ✔ Set regional options to the same values as this user’s
- ✔ Disable data collection (Skip privacy questions)
Important: The second-most vital option to check is ‘Prevent Windows To Go from accessing internal disks.’ This keeps the integrity of your Steam Deck and SteamOS intact by keeping Windows 11 isolated to your SD card. The larger the card, the more space you’ll have for games.
- Rufus will warn that all data on your card will be destroyed, press ‘OK.’
- Wait for the ‘Status‘ bar to show green* with a ‘READY‘ message.
* This part can take a long time, depending on your device. Creating a Windows To Go drive is a generally lengthy process, taking almost 34 minutes for my Samsung EVO Select 256GB micro SD card to finish. Be patient, and don’t interrupt the process or close Rufus while it’s working.
All the latest news, reviews, and guides for Windows and Xbox diehards.
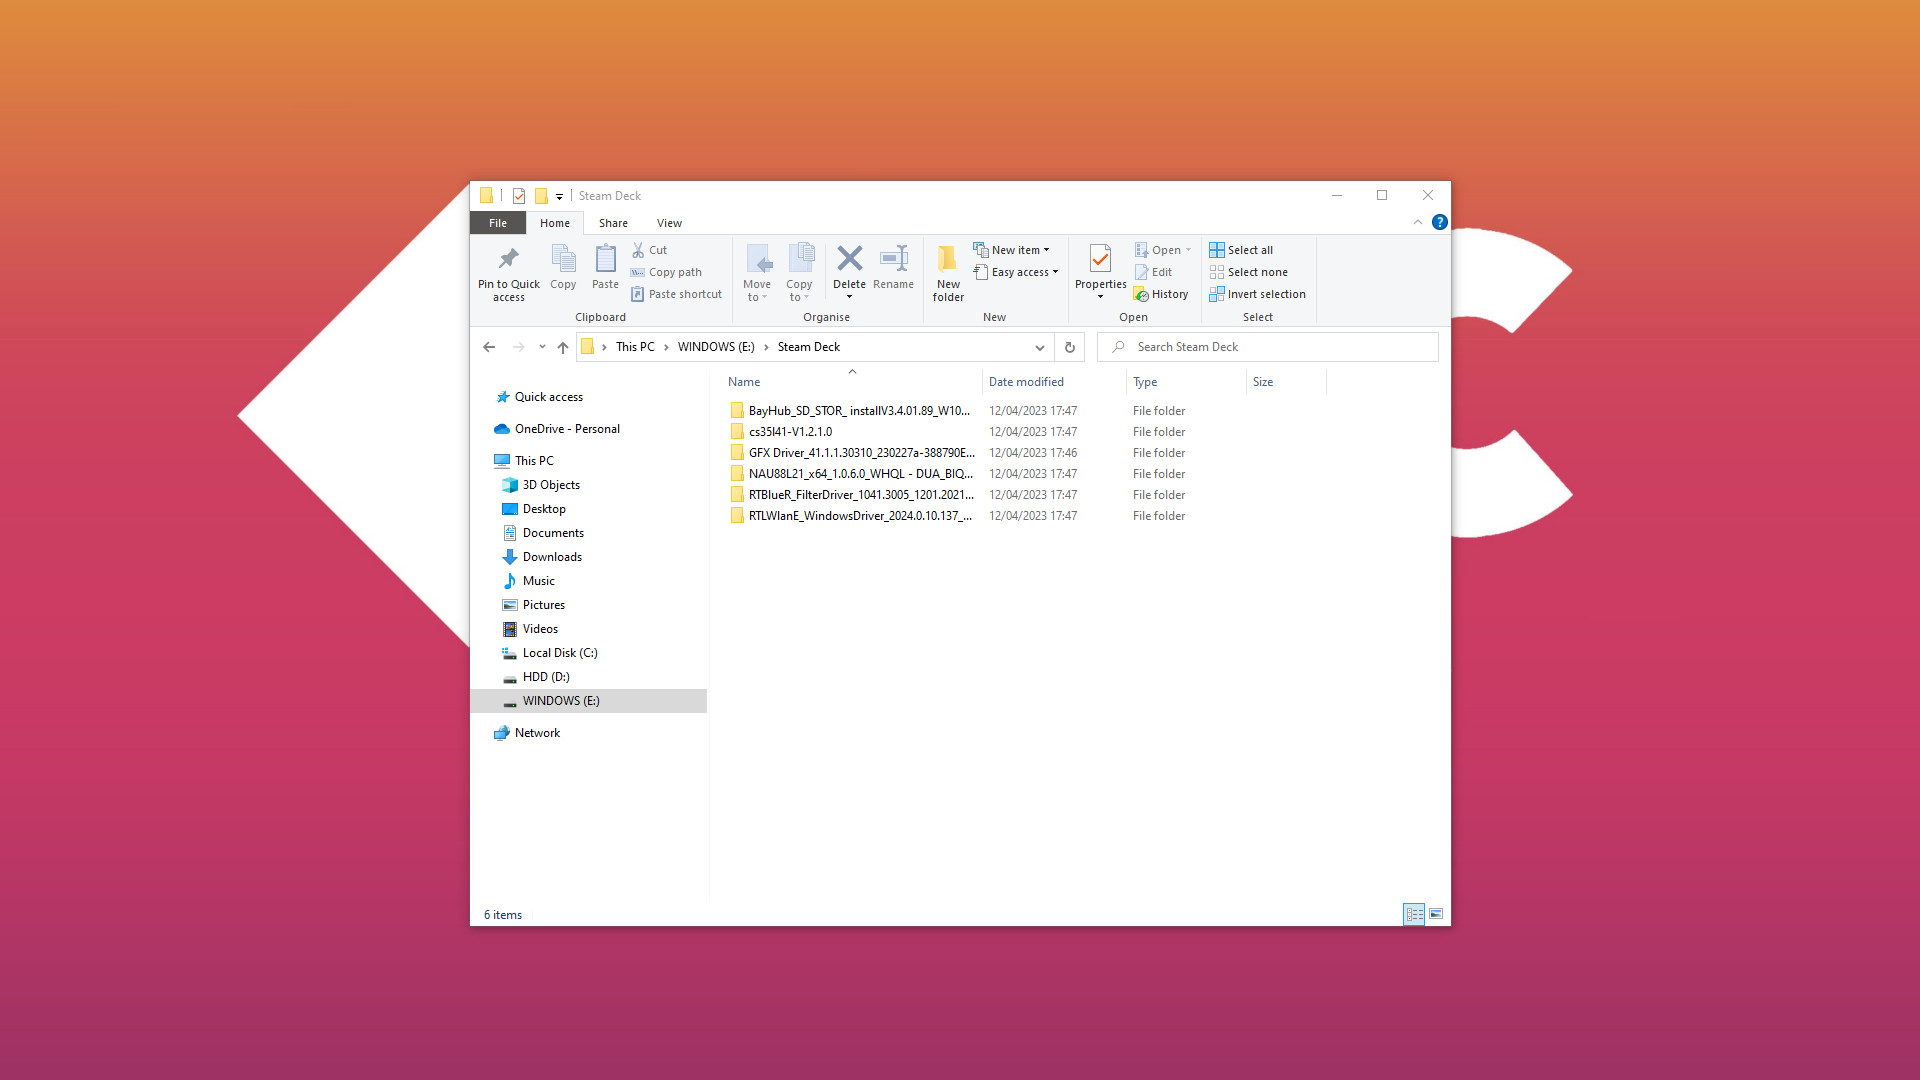
- Close Rufus and navigate to your newly created drive in File Explorer.
- Create a new folder with a name you’ll remember, like ‘Steam Deck.’
- Navigate to the official Windows Resources download page.
- Download all the driver archives* and unpack them to your new folder.
* We’ll need these drivers when Windows completes its initial installation. Although most functionality is intact with generic offerings from Microsoft, it’s important to use the packages provided by Valve to ensure compatibility. Be sure to download both audio drivers and consider saving the Windows Resources page to your bookmarks.
How to boot and install Windows on Steam Deck
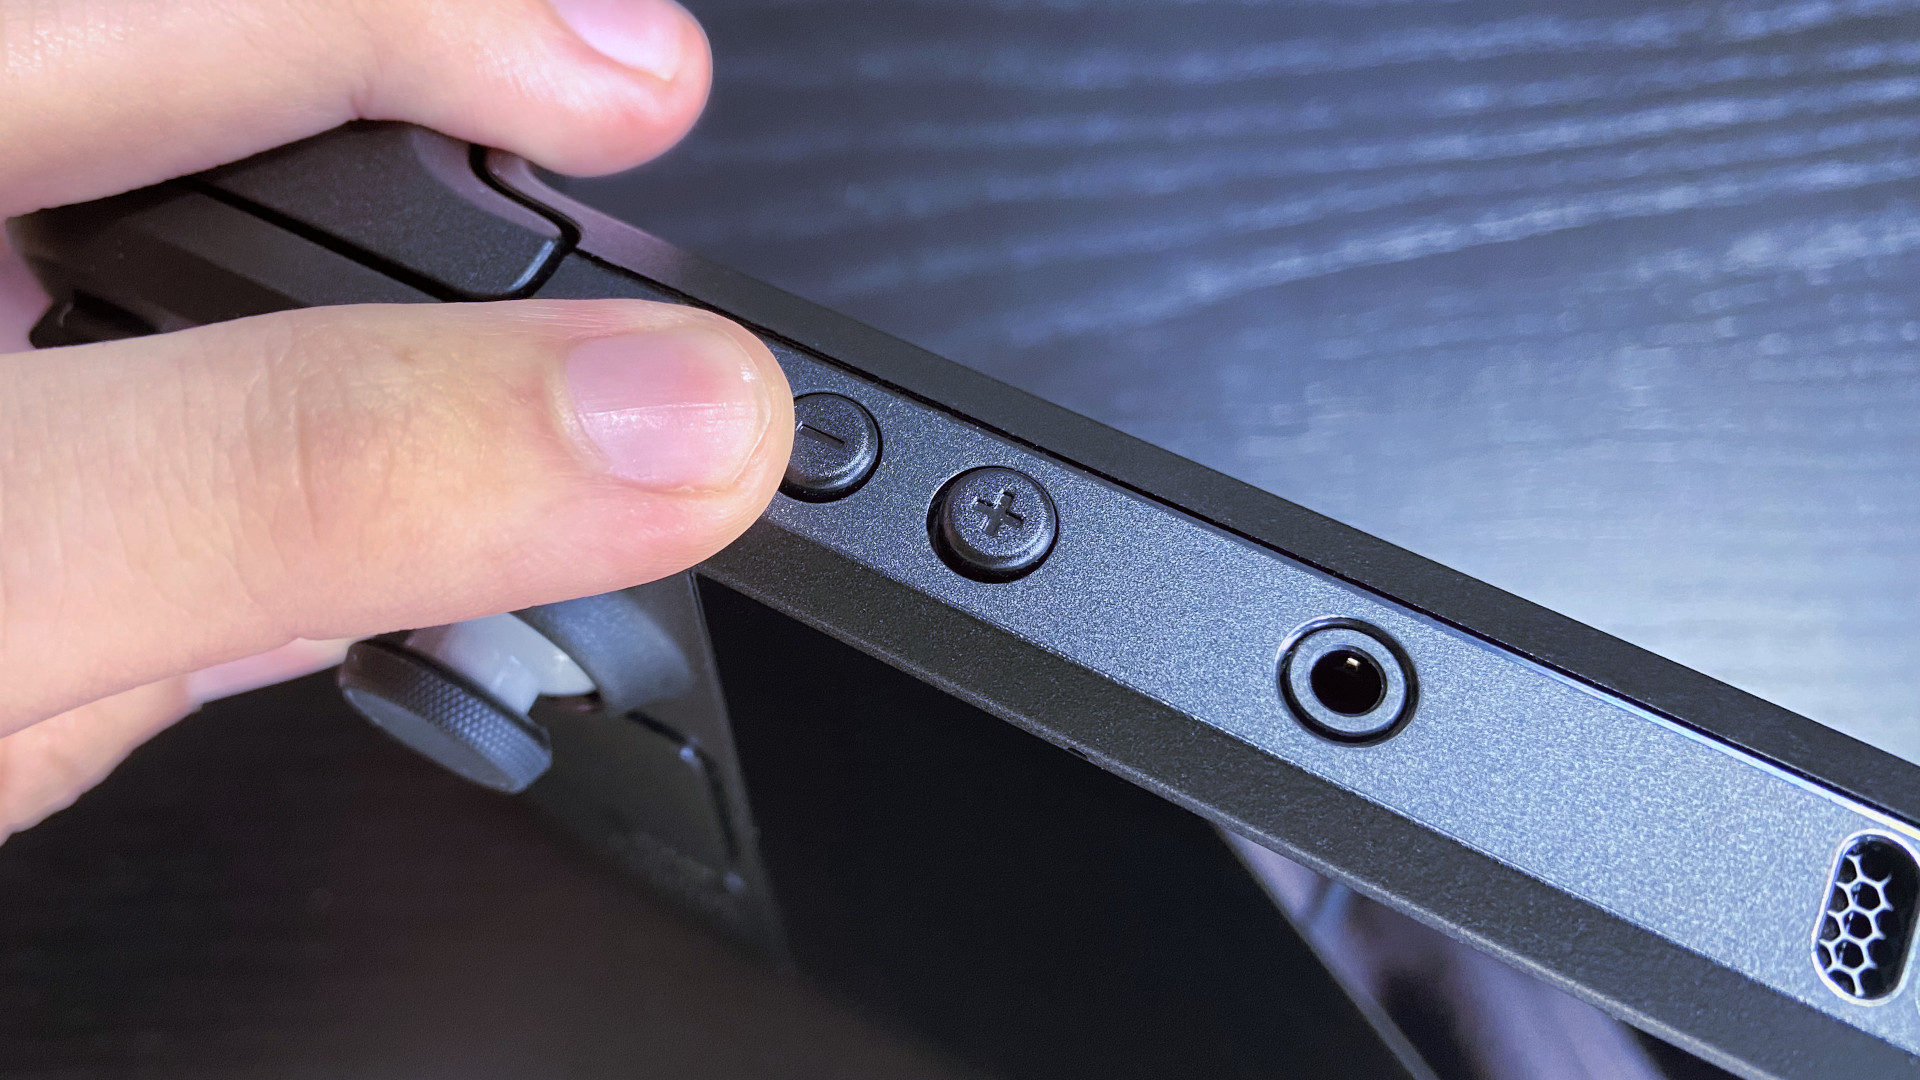
Now that you have a micro SD card set up as a portable edition of Windows, you can safely remove it from your computer. Turn off your Steam Deck by holding the power button and selecting ‘Shutdown‘ from the menu before inserting the SD card.
You’ll be accessing a hidden ‘Boot Manager‘ screen to use Windows instead of SteamOS with this method every time, at least until Valve adds proper dual-boot support. The Steam Deck touchscreen should work fine during the setup process, or you could connect a mouse via USB-C or with the official docking station or an alternative like the JSAUX Steam Deck dock.
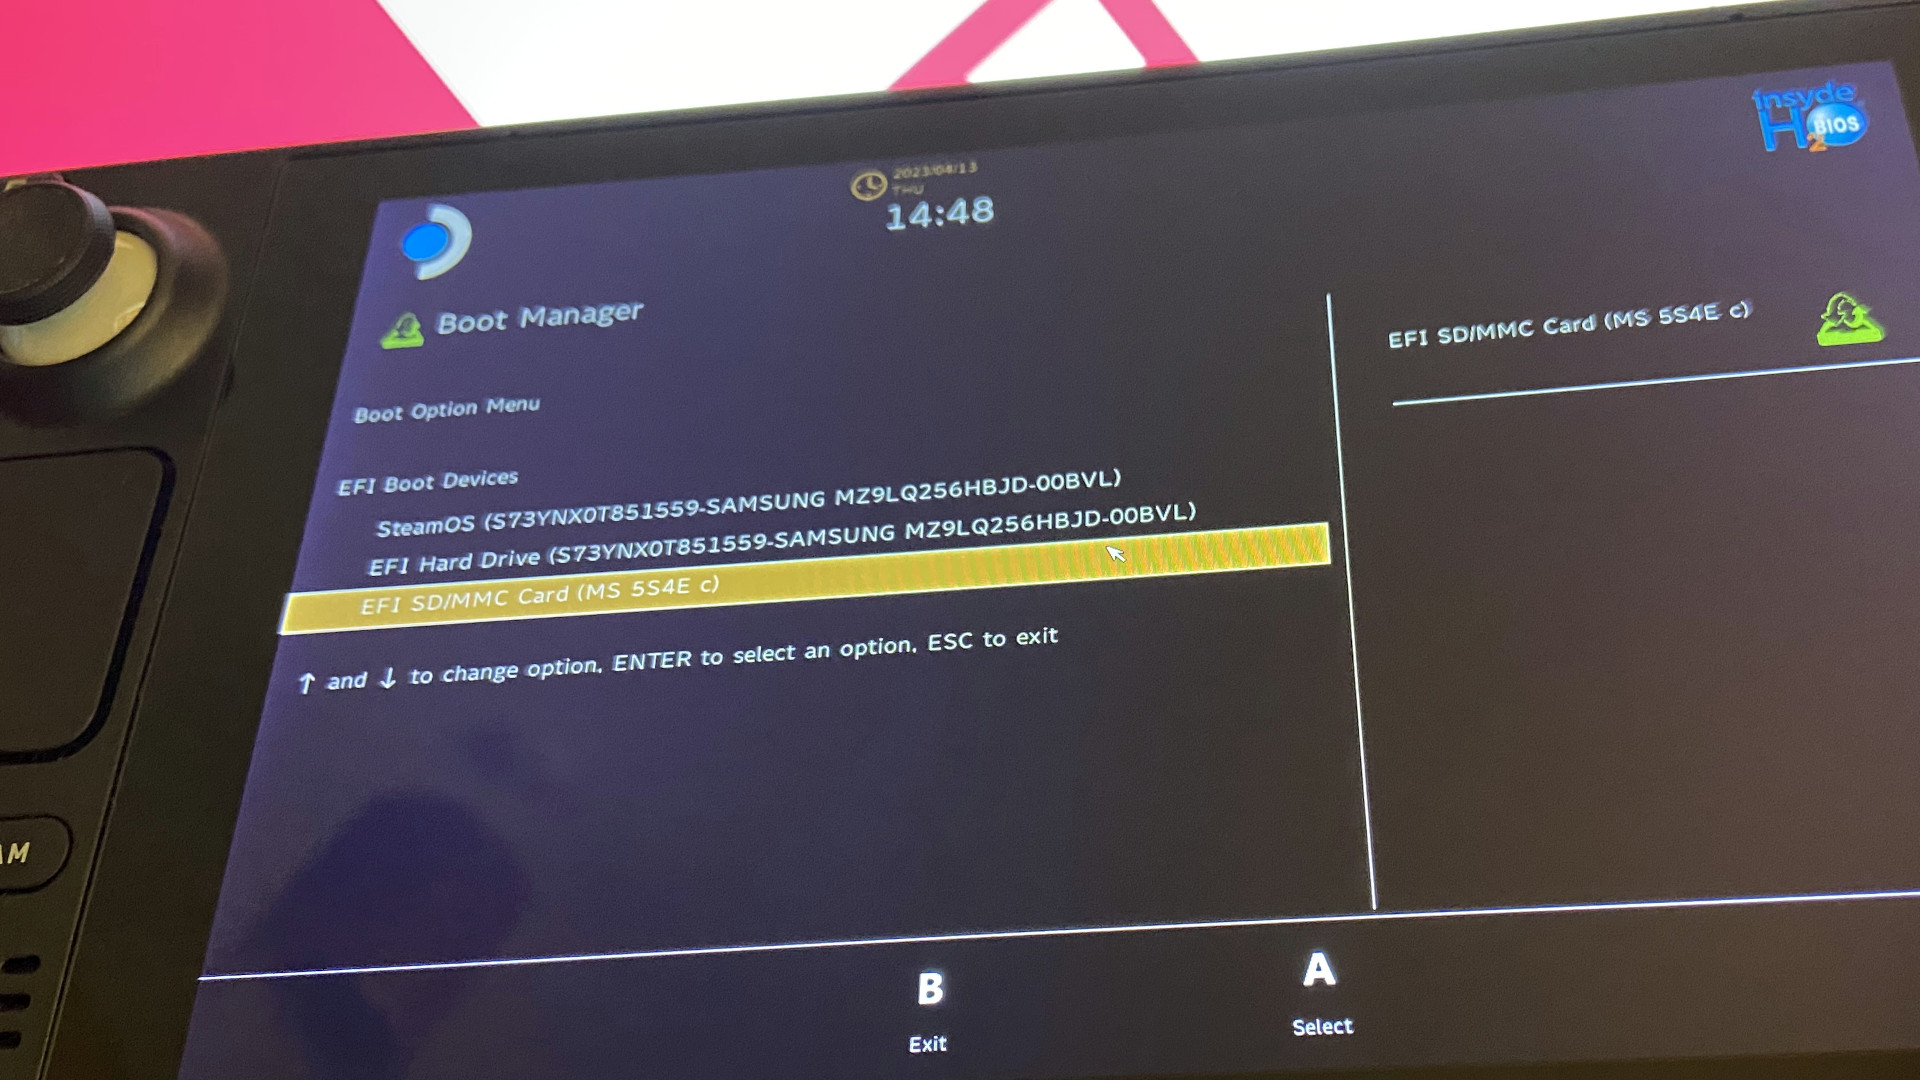
- Hold the volume down and power buttons until you hear a chime.
- In the ‘Boot Manager,’ select ‘EFI SD/MMC Card‘ and press the A button.
- You’ll see a ‘Getting ready‘ message on the screen in portrait mode.
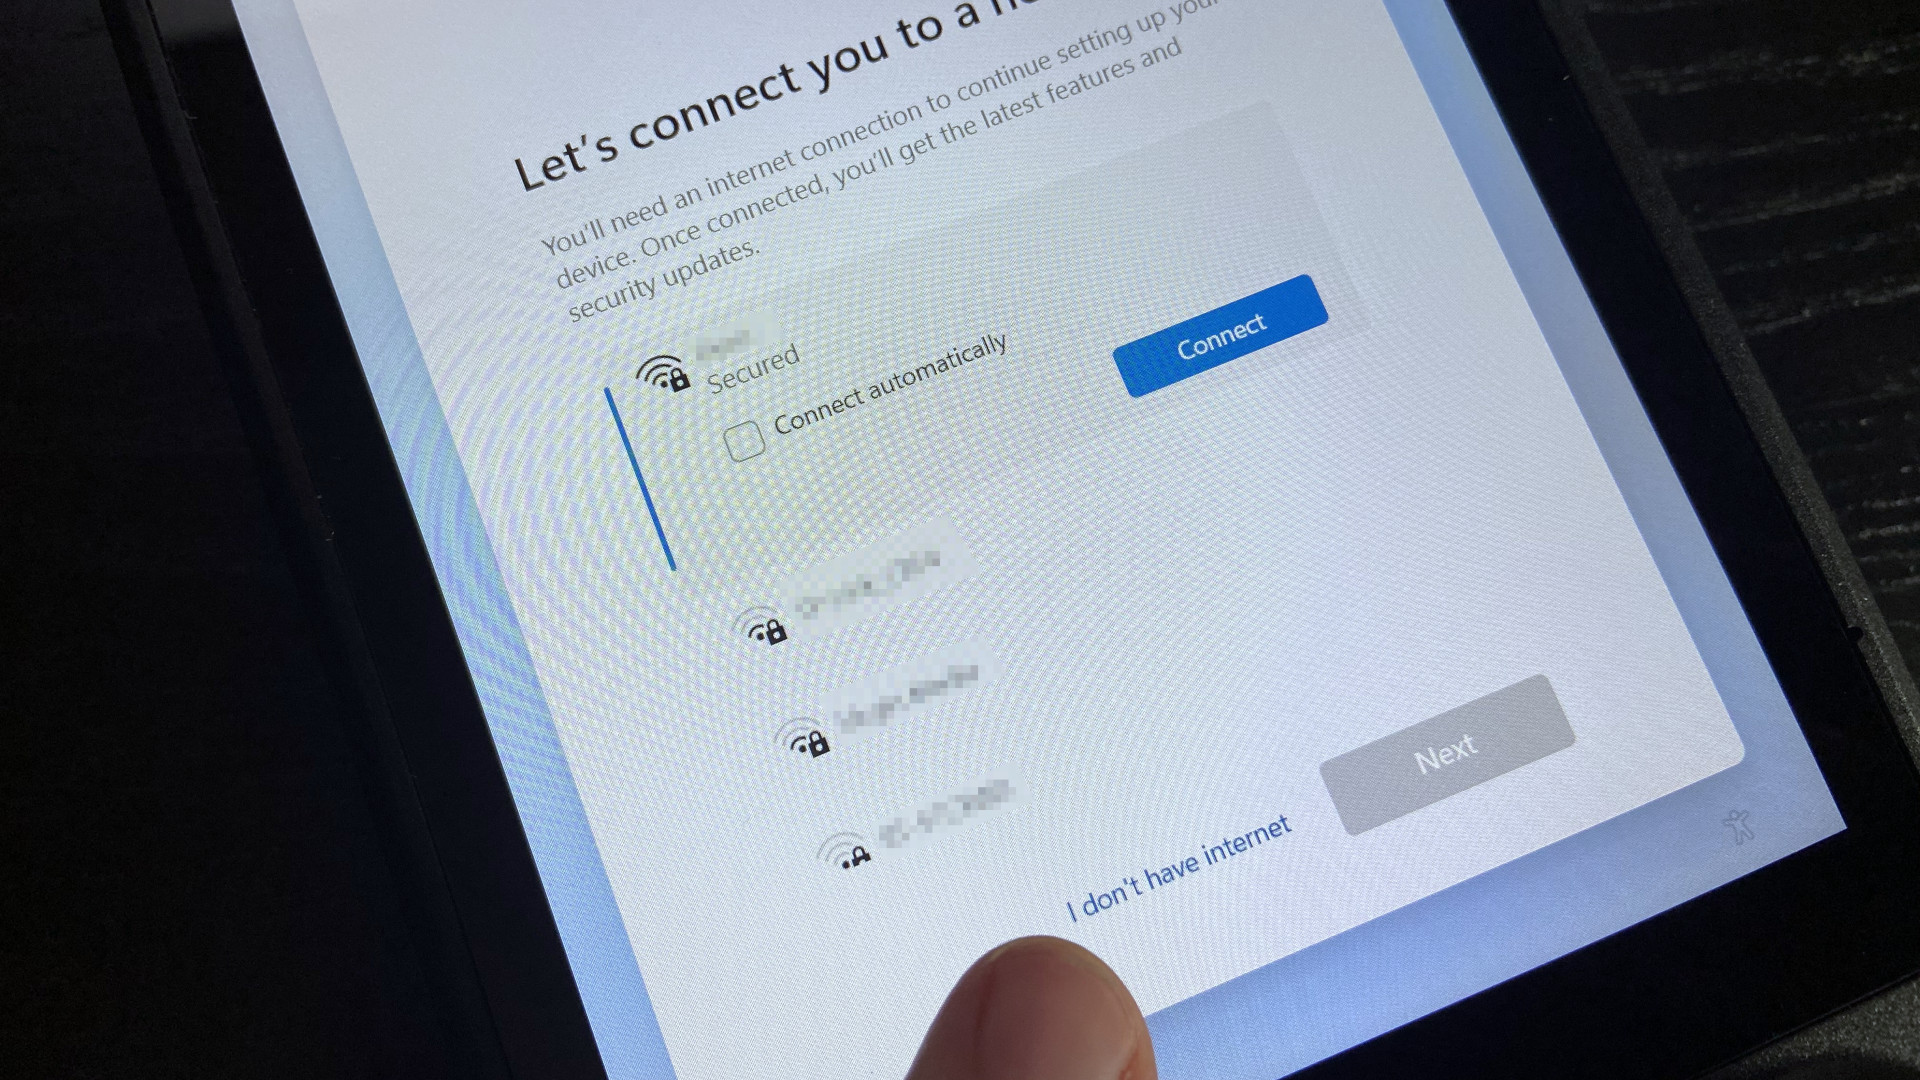
- On the ‘Let’s connect you to a network‘ screen, press ‘I don’t have internet.’
- You’ll be prompted to connect again, so press ‘Continue with limited setup.’
Although the Steam Deck can detect Wi-Fi networks and connect during the setup stage, the default drivers aren’t as capable as the ones provided by Valve. Connecting to a wireless access point now would extend the whole process since your download speeds can be significantly reduced with Microsoft’s drivers. You have better drivers on your SD card, so don’t worry about skipping this.
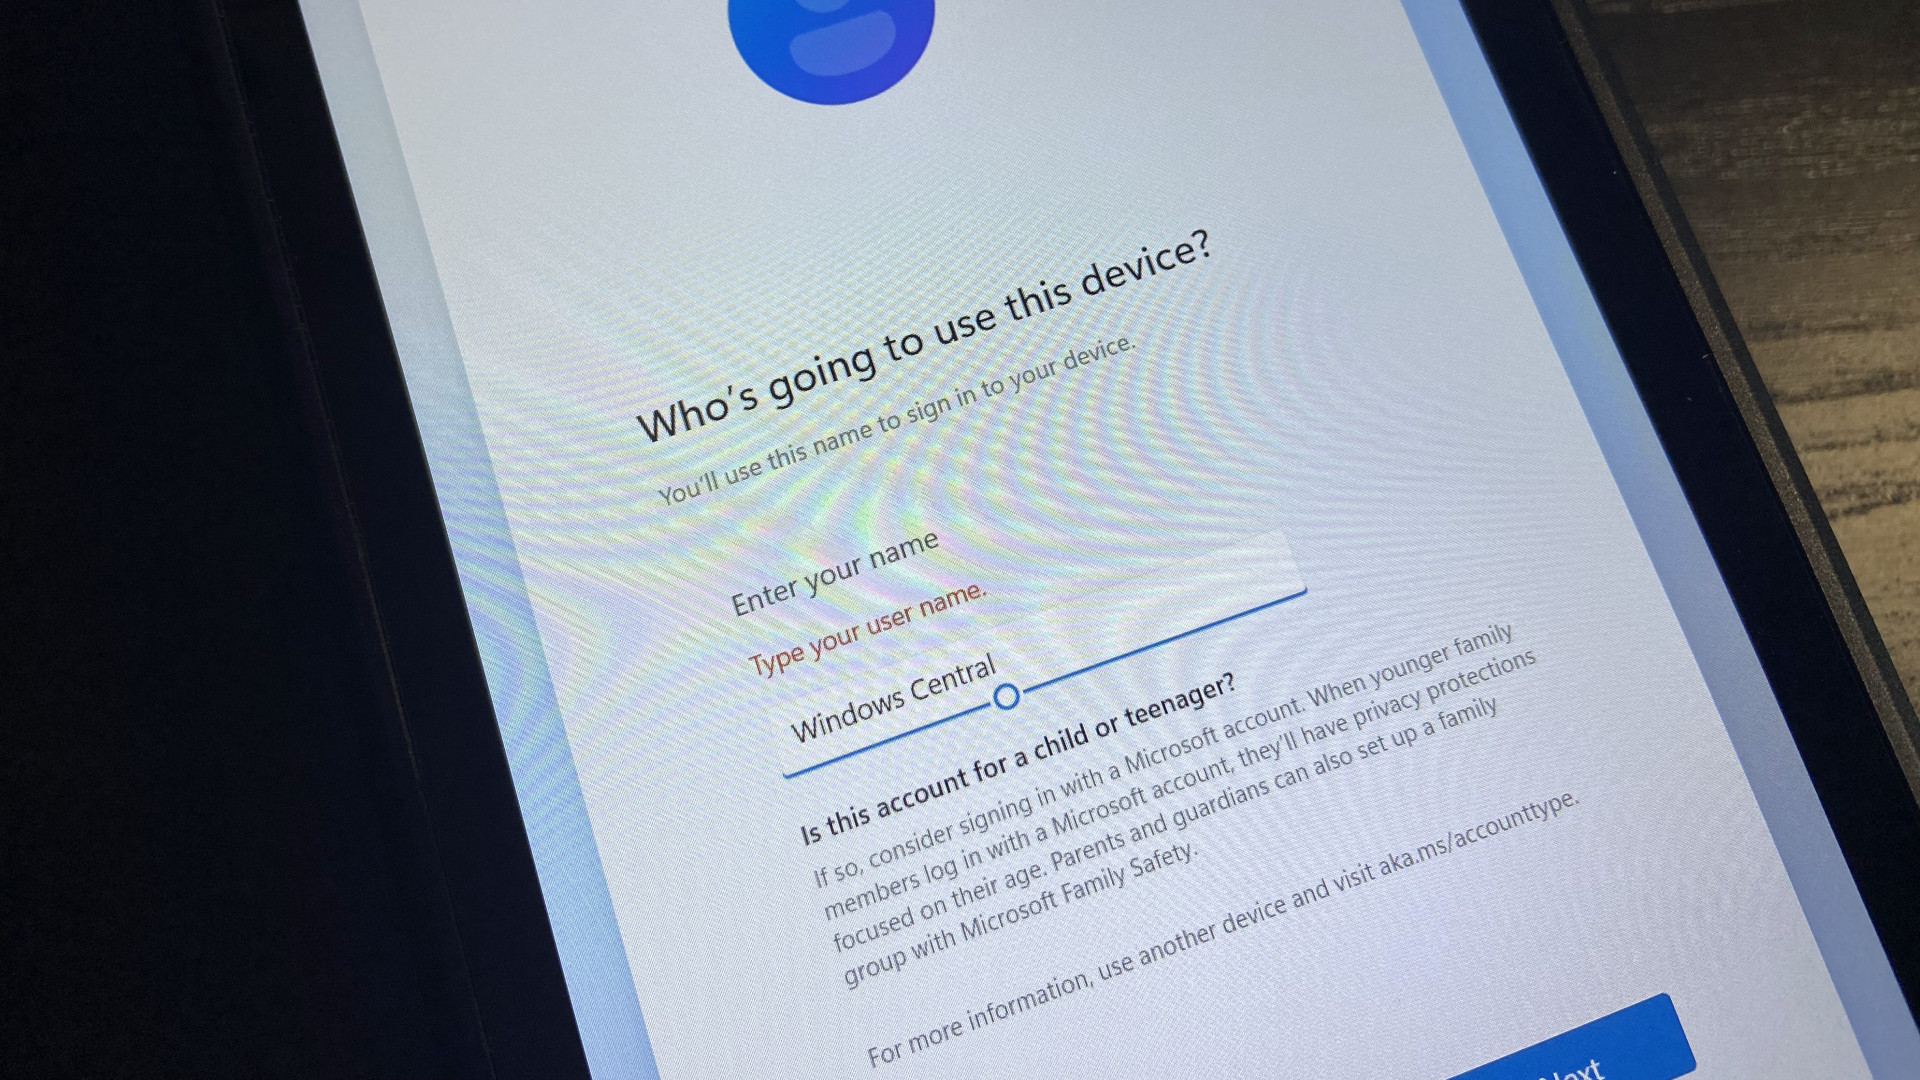
- Enter a username when asked, ‘Who’s going to use this device?‘
- The password field can be left blank, pressing ‘Next‘ to continue.
If you prefer to add a password, you can. However, booting into Windows on your Steam Deck will naturally be slightly slower since you’ll need to enter a password every time. If you only plan to use this SD card to play games otherwise unavailable on SteamOS, I recommend leaving the password blank. Still, a secure password is recommended if you’re storing sensitive files in Windows.
- Navigate to the folder you created containing drivers in the C: drive.
- Install each driver by following Valve’s instructions:
- APU driver
- Run setup.exe to install.
- Wi-Fi driver
- Run install.bat to install.
- Bluetooth driver
- Run installdriver.cmd to install.
- SD Card reader driver
- Run setup.exe to install.
- Audio drivers
- Right-click* cs35l41.inf and select Install.
- Right-click NAU88L21.inf and select Install.
* The default Windows touchscreen drivers should allow you to access the right-click menu by tapping and holding for a moment; then, the context menu will appear. Both audio drivers use .inf files, whose icons resemble a sheet of paper with a cogwheel, rather than a traditional .exe or even .bat file. If you can’t see ‘Install‘ on the right-click context menu, first press ‘Show More Options.’
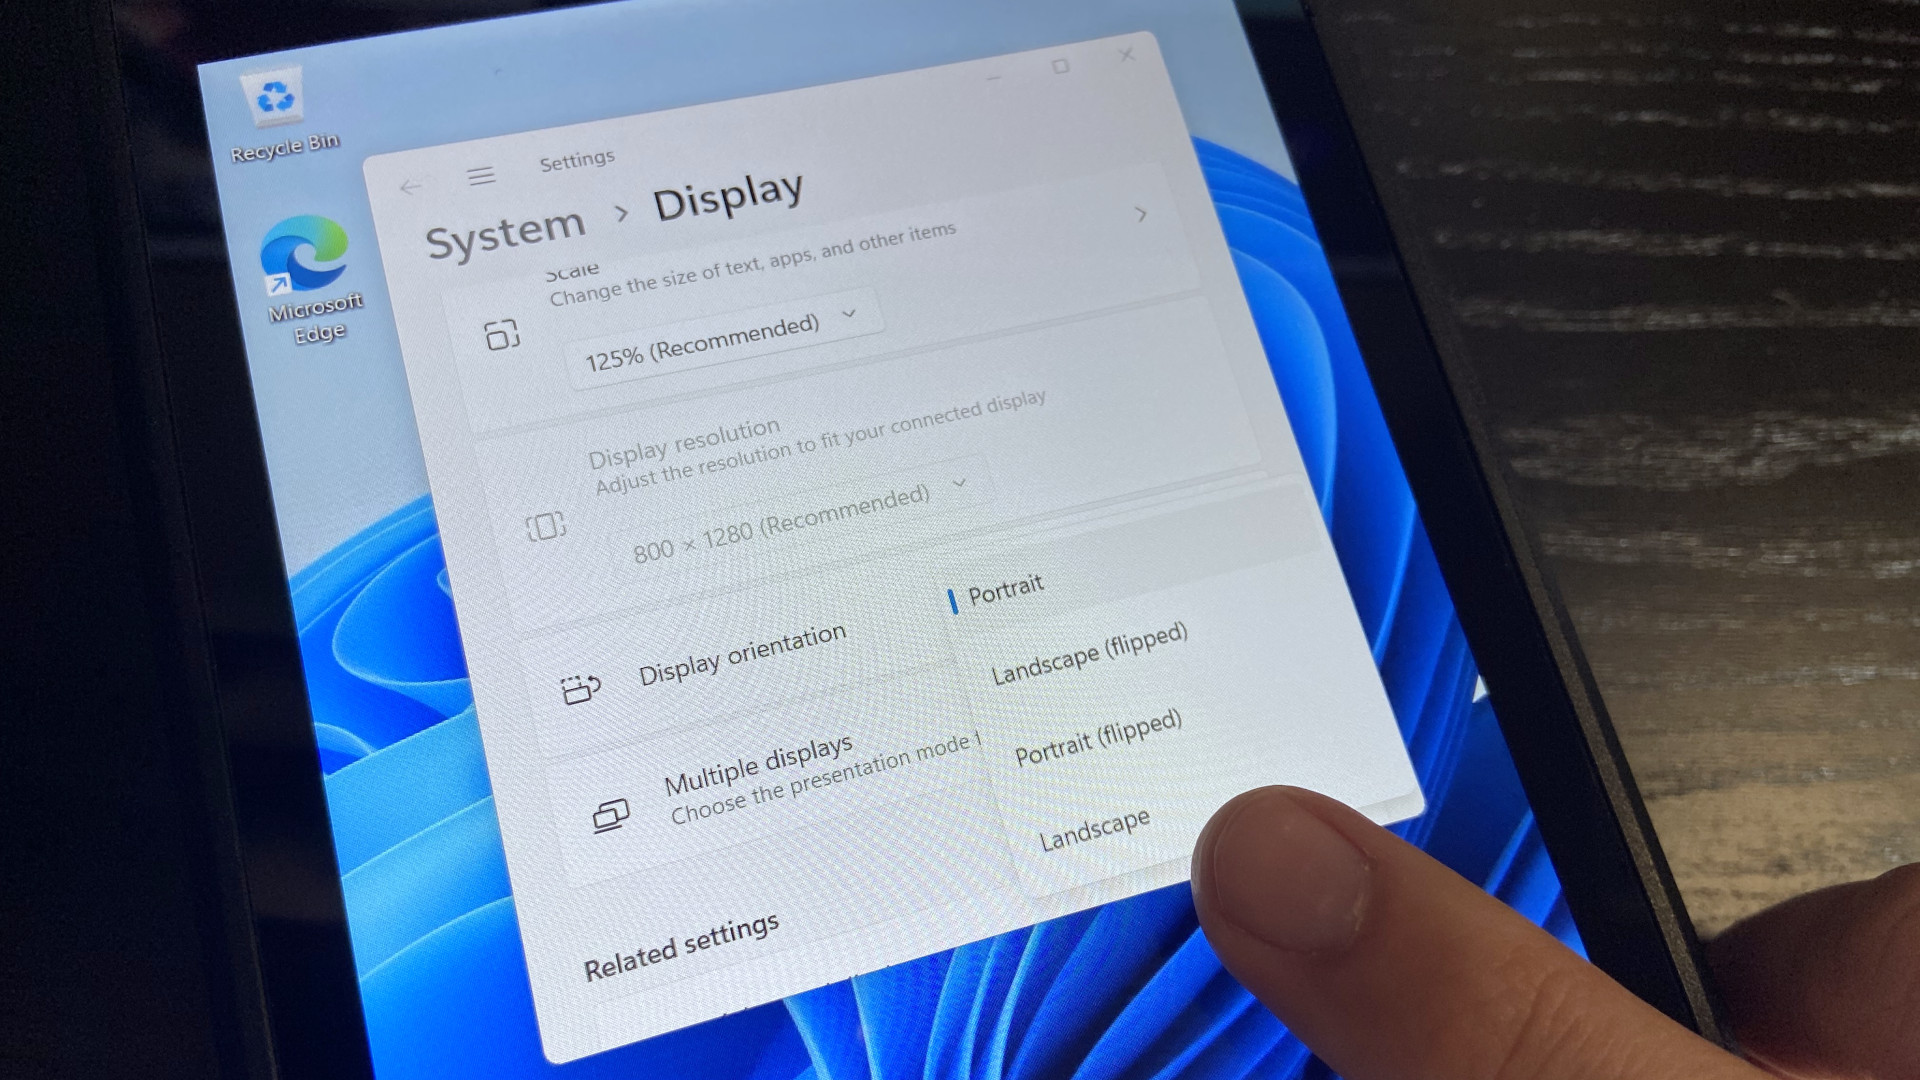
- Right-click the Windows desktop and select ‘Display settings.’
- Find ‘Display orientation‘ to select ‘Landscape‘ from the drop-down menu.
- Shut down Windows from the Start menu as you usually would.
- Again, hold volume down and power until you hear a chime.
- In ‘Boot Manager,’ select ‘EFI SD/MMC Card‘ again.
- Connect to your Wi-Fi network* in Windows.
* If you’re unfamiliar with Windows 11, follow our straightforward guide on how to connect to a Wi-Fi network. Tapping the networking icon in the system tray on the right side of the Start menu next to the clock is usually the fastest way to access a list of nearby networks.

Congratulations, now you can boot into Windows on your Steam Deck! What you install and play is up to you, but downloading the official Steam desktop client is the most obvious recommendation. Besides accessing your usual library, you’ll benefit from launching games through Steam’s Big Picture mode to use the full range of Steam Deck controls.
A few extra tools will make Windows easier to use on Steam Deck, but otherwise, you’re free to use any application or game that isn’t currently compatible with the Linux-based SteamOS. Bear in mind that the Steam Deck wasn’t designed for Windows, but Valve’s commitment to updating its collection of drivers keeps your options open. Either way, proceed with caution since this is still considered experimental territory.
Installing Windows 11 on the internal Steam Deck SSD
Installing Windows 11 to an SD Card on the Steam Deck is fine and dandy, but there are some downsides. Even with the fastest SD card that Steam Deck supports, many games, particularly 3D ones with high world streaming speed requirements, may run into problems. The internal SSD on the Steam Deck is much faster and may offer a smoother experience than running some games from the SD card. The downside of course is that in order to do this, you will have to completely wipe Steam OS from the system. It’s relatively easy to go back to Steam OS though, if you want to. Valve has a guide on how to recover Steam OS on the Steam Deck here.
In any case, if you fancy turning your Steam Deck into a full Windeck, the steps are quite similar to the above with a few exceptions.
- As above, navigate to the official Windows 11 download page.
- Under the ‘Create Windows 11 Installation Media‘ section and select Download.
- Find mediacreationtool in your downloads, and launch the app.
- Select Windows 11 from the ‘Edition‘ drop-down box.
- Click ‘Next‘ then select the ‘ISO file‘ button.
- Choose an easy-to-find location for your Windows.iso and exit the app when finished.
The next part, as before, is preparing an SD card or a USB-C flash drive with at least 64GB memory as a Windows boot device. The primary difference between these steps and the regular steps is now, we don’t want to select Windows To Go, but instead, we want to set up a standard Windows 11 installation.
- Head to the official Rufus download page.
- Under the ‘Download‘ section, select the ‘Last updated‘ version.
- Find Rufus in your files, and launch the app.
- Select ‘List USB hard drives‘ if your device doesn’t show up.
- In the ‘Device‘ section, select your microSD card or external USB storage device.
- For ‘Boot selection,’ choose ‘Disk or ISO image.’
- Click the ‘SELECT‘ button, find your ‘Windows.iso‘ that you downloaded earlier, and click ‘Open.’
- For the ‘Image option‘, make sure that ‘Standard Windows Installation‘ is selected.
- Leave all the other options alone, and click ‘START.‘
- Next, a «customize Windows installation box» will pop up. You must select ‘Remove requirement for 4GB RAM, Secure Boot, and TPM 2.0‘, since the Steam Deck doesn’t support these features. The other options can be customized to your preferences.
- For ‘Version selection,’ select your preferred edition (usually Windows 10 Home) and press ‘OK.’
- It will give you a warning about destroying data on the HDD, just hit okay. Now it’s ready to set up your device as a Windows 11 boot option.
Next, we want to prepare your shiny new Windows 11 boot device with some data for the Steam Deck. Out of the box, the Steam Deck will be missing drivers for running its hardware properly. Below is some details on what you need to bring over with your boot device.
- Exit Rufus and find your newly created boot device in File Explorer.
- Create a new folder in the root directory, with a name you’ll remember, like ‘Steam Deck Drivers.’
- Head to the official Steam Deck Windows Resources download page.
- Download all the driver archives* and unpack them to your new folder.
- You should also consider grabbing the Steam Deck Tools from ayufan which will enable gamepad support and FPS limiting to improve battery life. You’ll also need the RTSS dependency for this, which you might as well grab too. Put them all into your boot device folder.
- Navigate back up to the part of our guide on how to boot Windows on Steam Deck, and continue the steps there.
Note: As a reminder, if you want to go back to Steam OS at any time, consider Valve’s official Steam recovery guide. Also, I strongly recommend reading the below sections on must-have tools and tips and tricks for running Windows 11 on the Deck.
Must-have tools for running Windows on Steam Deck
Switching to Windows on Steam Deck has its share of benefits. Still, there are a few downsides, including the lack of a proper performance overlay and questionable controller compatibility in some of the best PC games designed for Windows. Luckily, the PC gaming community already has a handful of ready-made solutions to some roadblocks you might discover while running Windows.
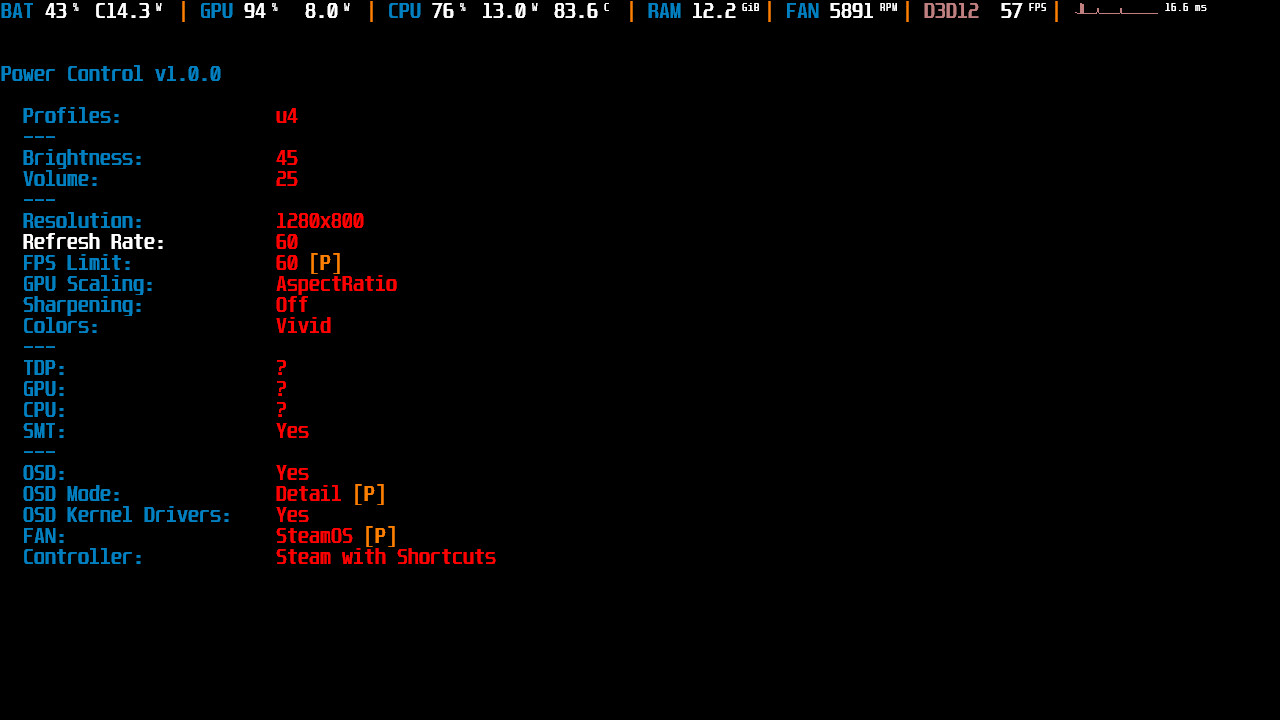
Headlined by Kamil Trzciński, also known as ayufan, the open-source (Windows) Steam Deck Tools project includes a collection of valuable extras to bring your external Windows drive almost on par with its native SteamOS. It contains an alternative to Valve’s performance overlay to show stats like battery life, power consumption, component usage and temperatures, and more.
Steam Deck Tools is particularly useful if you plan to play games from PC Game Pass since it enables full gamepad support with some helpful extra hotkeys. Power and fan control apps are also included, which can extend battery life by throttling the internal components for less demanding games. Highly recommended.
You can download the latest version from GitHub and see a complete list of applications and conditions for running the tools.
Once you’ve run Steam Deck tools, some will have red icons initially. That’s because you also need to download a RTSS dependency. Right-click on the icons and click on «RTSS not running» to instantly go to the download page to install it from your Steam Deck, or download the RTSS statistics server here.
If you’re planning to use your Steam Deck for Xbox Game Pass for PC titles, once you’ve installed RTSS, you can right-click on the monitor-looking icon and go to settings to change the default gamepad to X360. This will remove your ability to use the triggers as right and left click for browsing the OS, but the Steam Deck touchpads work just as well for that anyway.
Consider donating to ayufan for his work on this project.
UWPHook
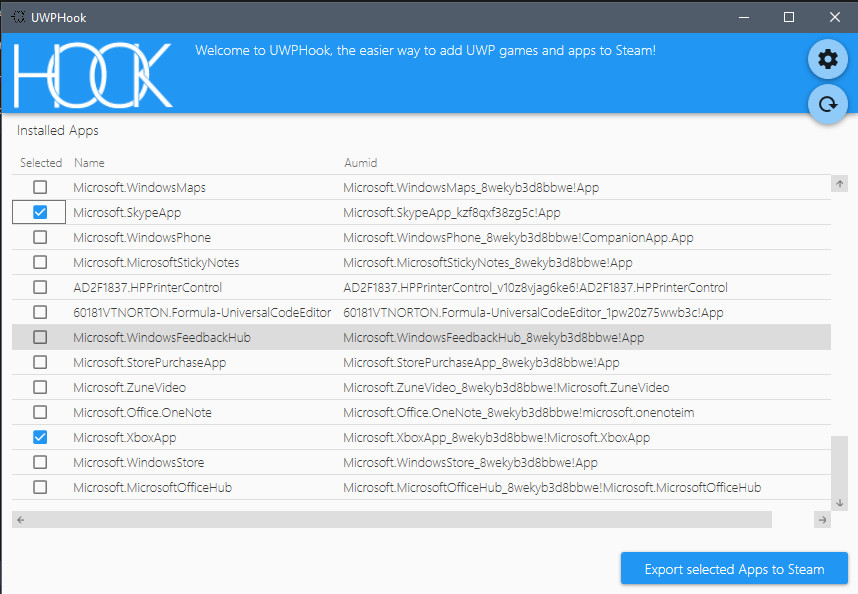
It might seem minor, but UWPHook offers the invaluable ability to add games from the Microsoft or Xbox Store to the desktop Steam app. If you install any UWP games, you can find them in UWPHook and export them to Steam.
Controller support isn’t guaranteed, but developer Brian Lima reports some users found success with the desktop mode if Big Picture mode doesn’t do the trick. Alternatively, the official UWPHook Reddit community is a good place for troubleshooting.
Download the latest version from the official UWPHook GitHub page and check out the latest bug fixes.
Steam Deck on Windows: Tips and Tricks
Since Steam Deck on Windows is only sort of semi-supported, some of the features require work arounds or more intimate knowledge of Windows to fix and improve. Over time, we’ll list some important tricks here you need to know as you get stuck in.
Settings you need to absolutely change using Steam Deck on Windows 11
There’s a range of settings that, by default, make using the Steam Deck on Windows 11 quite annoying. Thankfully, they’re easy to change and configure.
- Always show touch keyboard: By default, the touch keyboard on Steam Deck won’t open automatically when you tap on a text field, as you might expect. To fix this, use a mouse or your touchpad with triggers to go to Start Menu > Settings > Personalization > Taskbar > System Tray Icons > Touch Keyboard, and set it to show «Always.» This will add a touch keyboard icon to your system tray, so you can bring it up whenever you need it.
- Enable touch keyboard when tapping text fields: To make it so the touch keyboard always shows up when entering text fields, go to Start Menu > Settings > Time and Language > Typing > Touch Keyboard > Show the Touch Keyboard when there’s no keyboard attached. This should fix the behavior of the touch keyboard not showing up automatically.
- If you’re playing on PC Game Pass for Windows 10 or 11: Sometimes, a range of issues can stop PC Game Pass from working correctly on Windows 11. We have a full guide here to troubleshoot issues with the PC Game Pass app, from games not launching, to save sync problems, and more.
Fix slow download speeds on Steam Deck with Windows
One annoying thing about Windows on Steam Deck out of the gate is slow download speeds, in some circumstances. This can be caused by a low-quality SD card, which may have bottle necks for read/write speeds, however, it can also be caused by the RealTek Wi-Fi card drivers preventing 5 GHz Wi-Fi connections. Thankfully, it’s relatively easy to fix.
- Right click on the Start Menu and open the Device Manager.
- Select Network Adapter.
- Right click on the top menu item, titled Realtek 8822CE Wireless Lan etc., and select Properties.
- Select the Advanced tab.
- Here, select the Concurrent Operation Preference option, and set the value to «No Preference.»
- Next, go to Wireless Mode and set the value to IEEE 802.11a/n/c.
Reconnect to your home Wi-Fi as usual, and now it should try to attach to the 5 GHz band instead. You can check whether or not it worked by going to your Network & Internet properties in the Windows 11 settings menu. At the top, it should say either «Properties, public network, 5 GHz.»
At a basic level, 5 GHz is faster than 2.4 GHz, but the signal strength is often less penetrative in some environments. 2.4 GHz may work better if you’re far away from your router, otherwise 5 GHz is almost always best.
More resources
For more helpful articles, coverage, and answers to common questions about Steam Deck and Windows 11, visit the following resources:
- Steam Deck on Windows Central
- Windows 11 on Windows Central
Ben is a Senior Editor at Windows Central, covering everything related to technology hardware and software. He regularly goes hands-on with the latest Windows laptops, components inside custom gaming desktops, and any accessory compatible with PC and Xbox. His lifelong obsession with dismantling gadgets to see how they work led him to pursue a career in tech-centric journalism after a decade of experience in electronics retail and tech support.