
Время на прочтение9 мин
Количество просмотров128K
Наверняка почти у каждого пользователя ОС Linux и ОС Windows, а я имею в виду именно тех, у кого, в силу ряда причин, установлены обе системы, время от времени возникал вопрос: «А нельзя ли, черт возьми, придумать способ, с помощью которого можно было бы устанавливать эти системы в произвольном порядке? Без порчи настроек загрузчика?» Ведь если ставим сначала Windows а потом Linux всё хорошо — линуксовый загрузчик (например GRUB) обычно подхватывает bootmgr. Если ставить в обратном порядке то увы. Даже с использованием GPT + EFI. В случае с EFI нет опасности перезаписи MBR, зато таки есть один нюанс, который лично мне не нравится — установщик Windows в режиме EFI хоть и не перезаписывает сектора диска своим кодом, но зато переопределяет NVRAM, подсовывая туда путь к своему загрузчику. Так что функционал GBUB всё равно приходится восстанавливать. В настройках штатного установщика нет опций для кастомизации процесса установки загрузчика. А что если… не использовать стандартный установщик?! Ну, или почти не использовать…

И такой способ есть. И основан он на технологии установки Windows, которую мы имеем в её дистрибутивах начиная с «семерки». Способ работает для случая Windows версий 7/8/8.1/10, как в случае с MBR + BIOS системы, так в случае с EFI + GPT. Установить систему можно как в раздел HDD, так и на VHD. При этом функционал установщика нужен нам в общем-то для запуска программы настройки BCD-хранилища конфигурации загрузчика. Вместо установочного диска можно использовать загрузочный носитель на основе WinPE. Если бы утилитам bcdedit.exe и BootICE была *nix альтернатива, весь процесс развертывания системы можно было бы вообще выполнить в среде Linux.
Предположим у вас имеется компьютер, с установленным на HDD загрузчиком GRUB2 и свободным разделом, отформатированном в NTFS. Устанавливать будем Windows 7 Ultimate SP1. Для этого потребуются:
- Установочный диск с виндой
- Чистая флешка объемом >= 4 Gb
- Архиватор 7-zip соответствующей разрядности
- Утилита BootICE, желательна, но совершенно не обязательна, можно обойтись и bcdedit.exe, входящим в дистрибутив винды
1. Создаем загрузочную флешку
Дело в том, что семерка не хочет устанавливаться в EFI-режиме с DVD. Вот не хочет и всё. К тому же, на установочном носителе нам понадобятся дополнительные утилиты, которые туда надо поместить, а в случае с флешкой это несколько проще, чем в случае с DVD.
Монтируем установочный образ с виндой, допустим он лежит у нас в /home/$USER/install с именем win7-setup.iso
$ mkdir ~/iso

$ sudo mount -t udf ~/install/win7-setup.iso ~/iso
Вставляем флешку в USB-порт. Допустим, она получила имя устройства /dev/sdb. Выполним её разметку в формате MBR
$ sudo fdisk /dev/sdb
Создем на флешке один единственный раздел. После чего форматируем её в FAT
$ sudo mkfs.vfat /dev/sdb1
Копируем содержимое дистрибутива винды на флешку
$ mkdir /tmp/flash

$ sudo mount /dev/sdb1 /tmp/flash -o uid=1000,gid=100,fmask=113,dmask=002

$ cp -rv ~/iso/* /tmp/flash/
Скопируем конфиги EFI-загрузчика на уровень выше
$ cp -rv ~/tmp/flash/efi/microsoft/* ~/tmp/flash/efi/
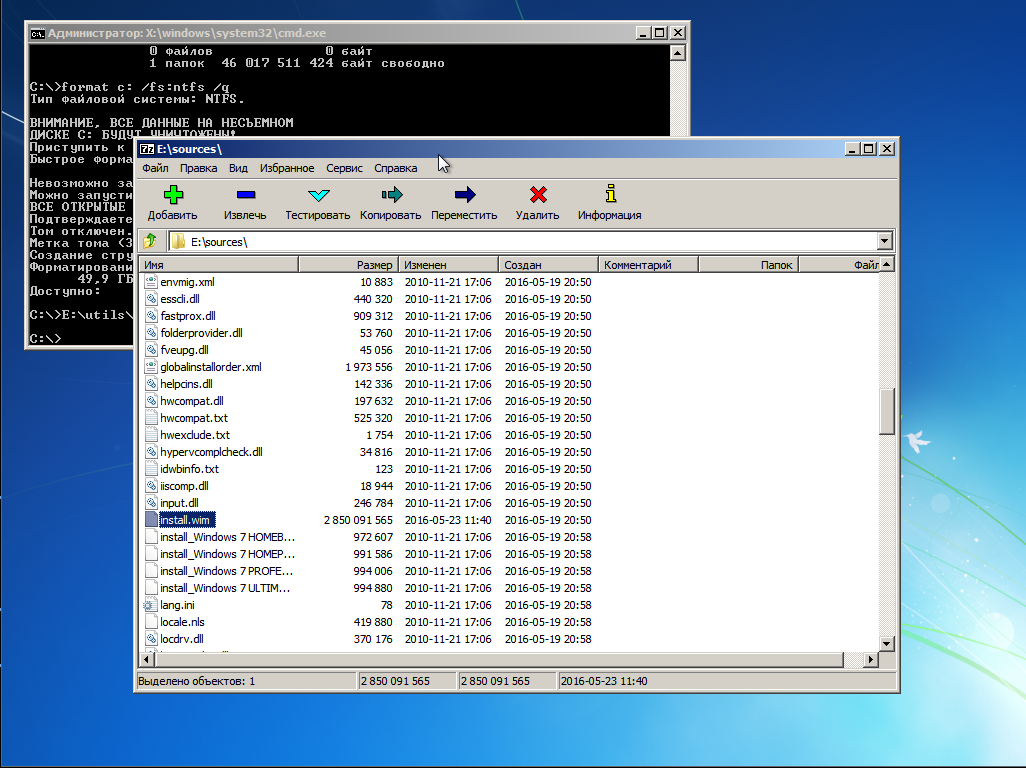
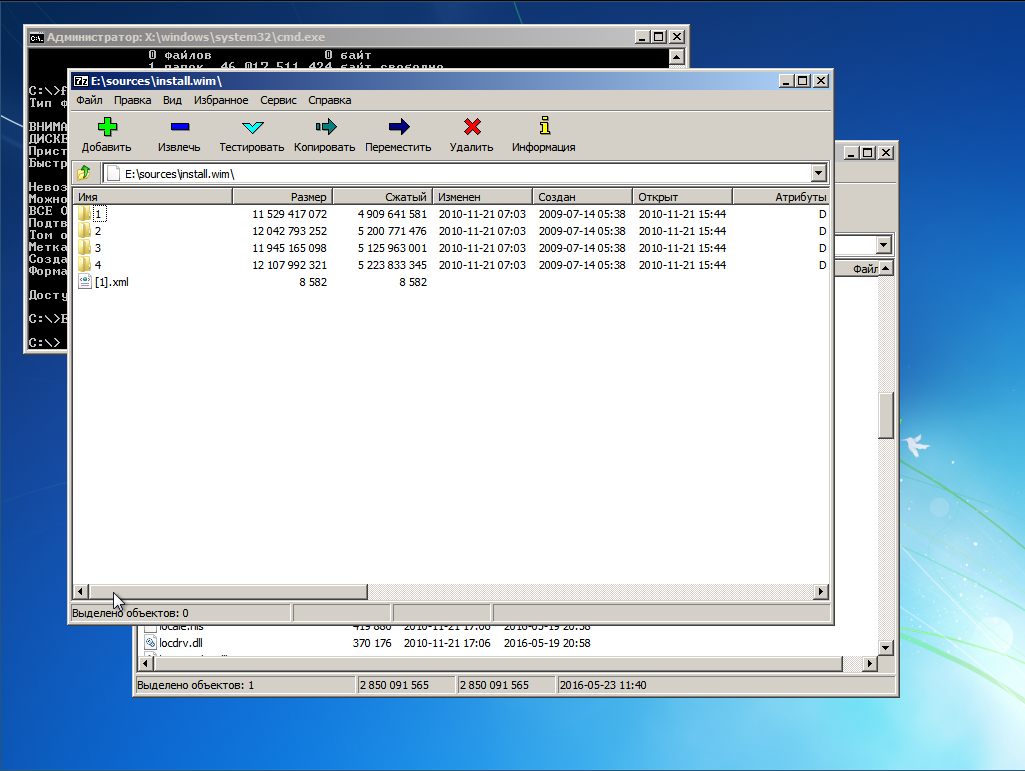
Теперь нам нужен EFI-загрузчик винды. Его придется выцарапать из дистрибутива. Это легко сделать с помощью архиватора 7-zip, который имеется в репозитории extra/p7zip. Все содержимое дистрибутива винды сжато в образ wim-формата находится на установочном DVD в файле source/install.wim. Обычно этот образ имеет следующую структуру
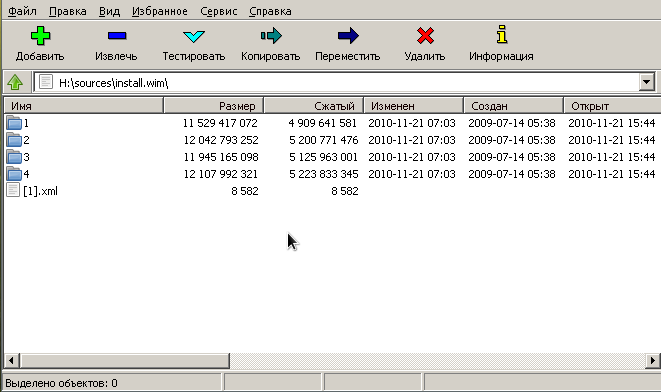
В каталогах с именами в виде цифр 1-4 находятся разные редакции винды. Чтобы выбрать нужную надо посмотреть внутрь файла с именем [1].xml. Распакуем его в /tmp
$ cd /tmp

$ 7z e ~/iso/sources/install.wim \[1\].xml
и посмотрим с помощью какого-нибудь браузера, ибо в текстовом редакторе он выглядит ужасно, а специального редактора xml у меня в наличии не оказалось. Каждую редакцию винды описывают структурой вида

где нода EDITIONID указывает на редакцию. Параметр INDEX — как раз номер каталога, в котором валяется нужная редакция. Итак, мне нужна Ultimate, а это индекс 4. Соответсвенно выковыриваем загрузчик оттуда
$ 7z e ~/iso/sources/install.wim 4/Windows/Boot/EFI/bootmgfw.efi
Оки, теперь перенесем полученный файл на флешку
$ mv bootmgfwm.efi /tmp/flash/efi/boot/bootx64.efi
Порядок, теперь у нас в наличии загрузочная флешка для установки винды. Теперь добавим на неё необходимые для установки утилиты — виндозную версию архиватора 7-zip и утилиту BootICE. Архиватор качаем с официального сайта и распаковываем на флешку в каталог utils
$ mkdir -p /tmp/flash/utils/7-Zip/

$ cd /tmp/flash/utils/7-Zip/

$ 7z x ~/downloads/7z1602-x64.exe
Туда же помещаем и bootice
$ cp ~/install/BOOTICEx64.exe /tmp/flash/utils
Уф, всё, отмонтируем флешку
$ cd ~

$ sudo umount /tmp/flash/
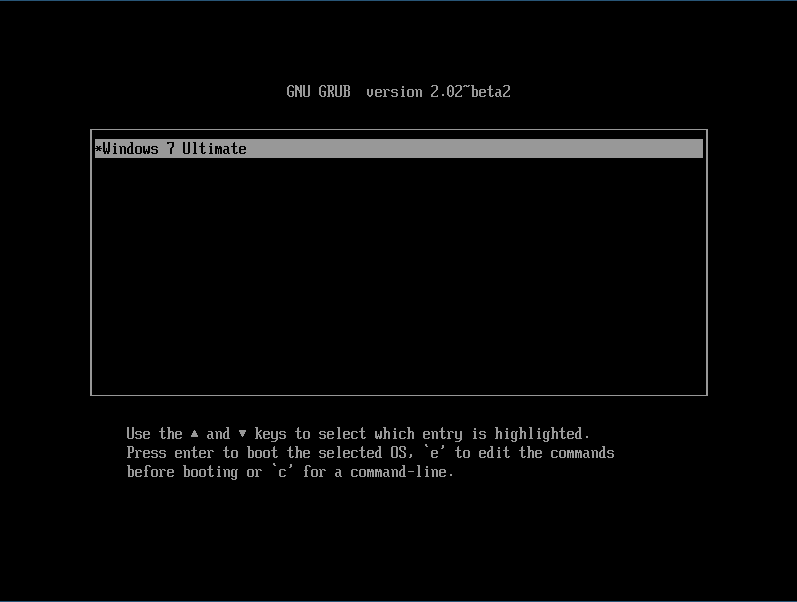
Перезагружаемся. Если у вас система с EFI и съемные диски стоят в приоритете загрузки, то компьютер загрузится в установку винды автоматом. Если же появилось таки меню GRUB, ничего страшного, жмем «С» и в консоли набиваем команду exit. Вас вывалит в меню EFI, где выбираем загрузку с флешки. Если же ваша система с BIOS, то тут чуть сложнее, ибо мы не стали заморачиваться с настройкой MBR на флешке. Тогда в консоли GRUB даем команду ls — появится список всех дисков и разделов. Находим нашу флешку, она отобразится в виде (hdX, msdosY), где X, Y — номер диска и раздела соответственно. Теперь вбиваем в консоли команды
grub> set root=hdX,Y

grub> ntldr /bootmgr

grub> boot
Начнется загрузка установщика винды. Он то загрузится, но нам он и не нужен — мы всё будем делать руками. Чтобы стало понятно, что к чему, придется рассмотреть некоторую теорию
2. О развертывании Windows из WIM-образа и капризном нраве Sysprep
Начиная с семерки установка Windows заключается в следующих этапах
- Разметка диска в соответствии с архитектурой системы инициализации оборудования. Если BIOS — установщик размечает диск в MBR. При наличии активной EFI — разметка будет GPT.
- Распаковка образа install.wim в выбранный для установки раздел
- Установка загрузчика и перезагрузка
- Инициализация оборудования. Ребут
- Локализация, ввод ключа, окончание настройки системы
Это стандартный путь. У нас же диск уже размечен. И нам не нужна автоматическая установка загрузчика — мы поставим его вручную. Разметка диска должна удовлетворять следующим требованиям
- Если система с EFI на диске должен присутствовать FAT-раздел с типом 0xEF. Если у нас уже установлен линукс с EFI-загрузчиком, то таковой раздел уже имеется
- Если система с BIOS, то раздел, в котором располагается загрузчик, а это наш NTFS-раздел должен быть активным. Это очень важно! Почему, будет объяснено ниже.
Таким образом, перед распаковкой системы мы должны убедится в том, что перечисленные требования выполнены. После того, как мы распакуем все файл системы и установим загрузчик, система перезагрузиться. После перезагрузки запустится утилита Sysprep, среди прочего настраивающая оборудования и проверяющая конфигурацию системы. Так вот, если в режиме EFI Sysprep не найдет загрузчик и его конфигурацию в EFI-разделе по пути EFI/microsof/boot, а в системе с BIOS каталог \Boot и bootmgr будут лежать в неактивном разделе, то Sysprep завершится с ошибкой sysprep generalize error, а в лог, расположенный по адресу \Windows\Panther\sysperr.log выплюнет что-то похожее на
2015-03-11 16:55:42, Error [0x0e00b3] TOOL Sysprep_Specialize_Bcd: There was an error opening the system store. Status=[0xC0000098]

2015-03-11 16:55:42, Error [0x0f0082] SYSPRP LaunchDll:Failure occurred while executing 'c:\Windows\System32\spbcd.dll,Sysprep_Specialize_Bcd', returned error code 1006

2015-03-11 16:55:42, Error [0x060435] IBS Callback_Specialize: An error occurred while either deciding if we need to specialize or while specializing; dwRet = 0x3ee
и никакие танцы с бубном нам уже не помогут. Винда требует, чтобы загручик лежал в загрузочном разделе и точка. В случае с BIOS просто делаем активным раздел NTFS в котором лежит винда и туда же кладем и загрузчик. Грузится будем всё равно с помощью GRUB, а ему все равно, какой раздел будет активным. В случае с EFI загрузчик придется положить рядом с GRUB в EFI-разделе.
3. Распаковка системы
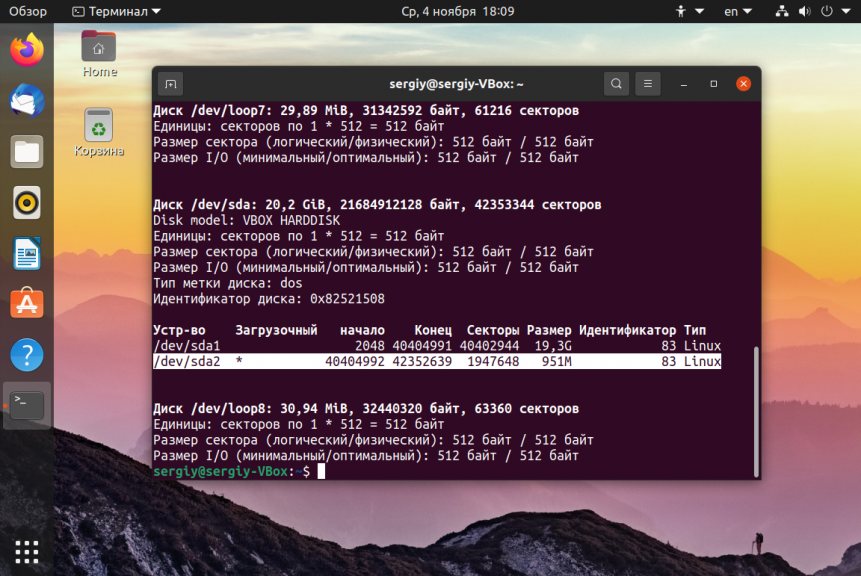
Итак, определимся, куда мы хотим ставить винду. Можно поставить в NTFS-раздел, а можно и в VHD-диск. Это уж как вам хочется. Я буду показывать процесс на примере с виртуальной машиной EFI, имеющей следующую разметку
The protective MBR's 0xEE partition is oversized! Auto-repairing.
Partition table scan:
MBR: protective
BSD: not present
APM: not present
GPT: present
Found valid GPT with protective MBR; using GPT.
Command (? for help): p
Disk /dev/loop1: 104857600 sectors, 50.0 GiB
Logical sector size: 512 bytes
Disk identifier (GUID): 0D217C93-6699-435A-9BBB-61DFAA6F30B7
Partition table holds up to 128 entries
First usable sector is 34, last usable sector is 104857566
Partitions will be aligned on 2048-sector boundaries
Total free space is 4029 sectors (2.0 MiB)
Number Start (sector) End (sector) Size Code Name
1 2048 206847 100.0 MiB EF00 EFI system partition
2 206848 104855551 49.9 GiB 0700 Basic data partition
На этом диске нет линукса, установлен только GRUB в раздел с EFI. Если мы ставим систему непосредственно в NTFS-раздел, то загружаемся с флешки, дожидаемся запуска программы установки и жмем Shift + F10, чтобы вызвать консоль. Запускаем утилиту diskpart и смотрим список подключенных томов
X:\sources> diskpart

DISKPART> list vol
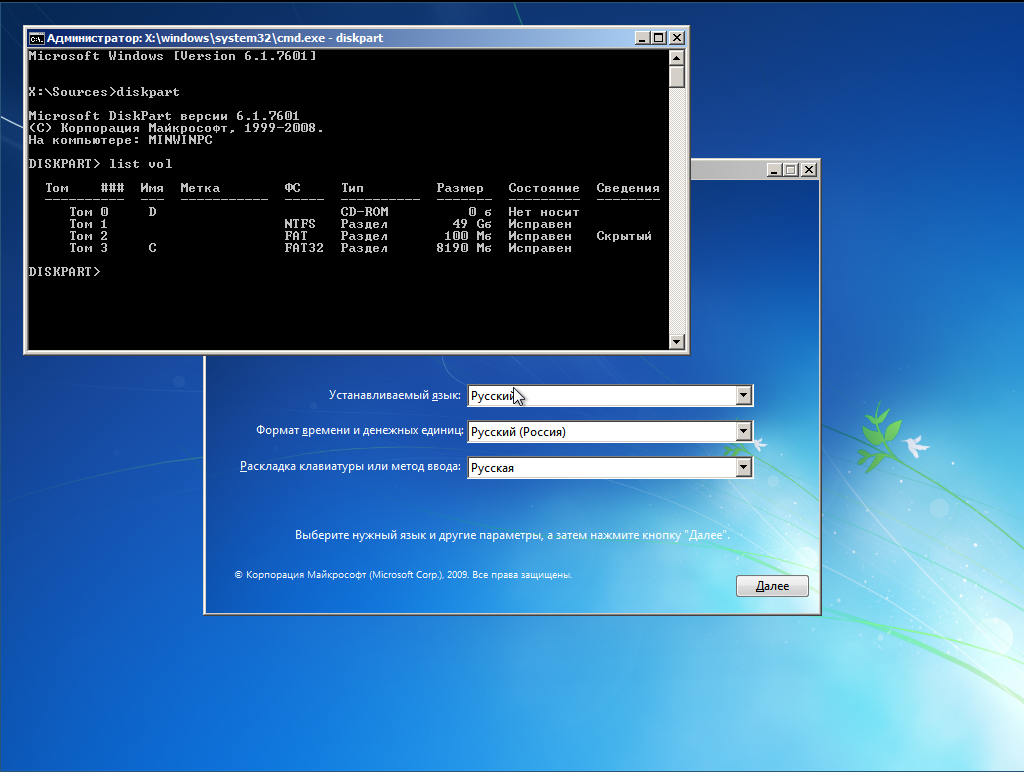
Видим, что флешка (объемом 8 Гб) подключена как диск C:, а раздел для установки вовсе не смонтирован. Непорядок. Делаем так
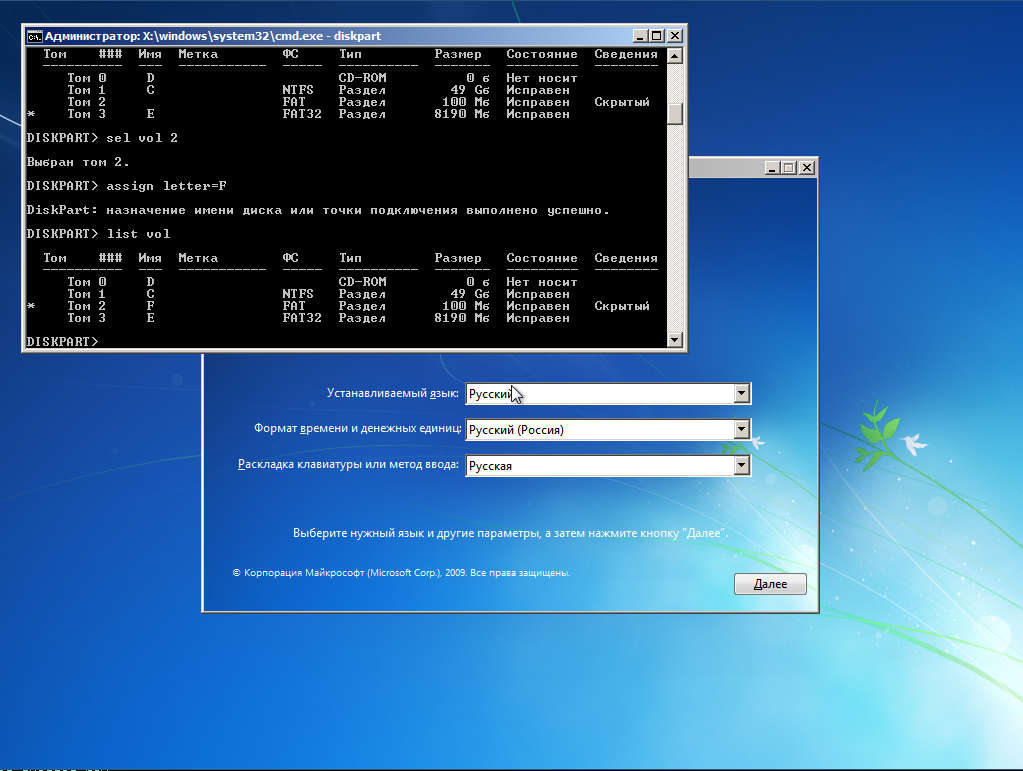
DISKPART> sel vol 3

DISKPART> remove

DISKPART> assign letter=E

DISKPART> sel vol 1

DISKPART> assign letter=C

DISKPART> list vol

DISKPART> sel vol 2

DISKPART> assign letter=F
Вот теперь порядок, диск на который будем ставить винду стал диском C:, флешка — диском E:, а EFI-раздел — диском F:
Если же мы хотим поставить систему на VHD, то делаем так
DISKPART> sel vol 3

DISKPART> remove

DISKPART> assign letter=E

DISKPART> sel vol 1

DISKPART> assign letter=G

DISKPART> exit
Для порядка создаем каталог с образами
X:\sources> md G:\vhd

X:\sources> diskpart
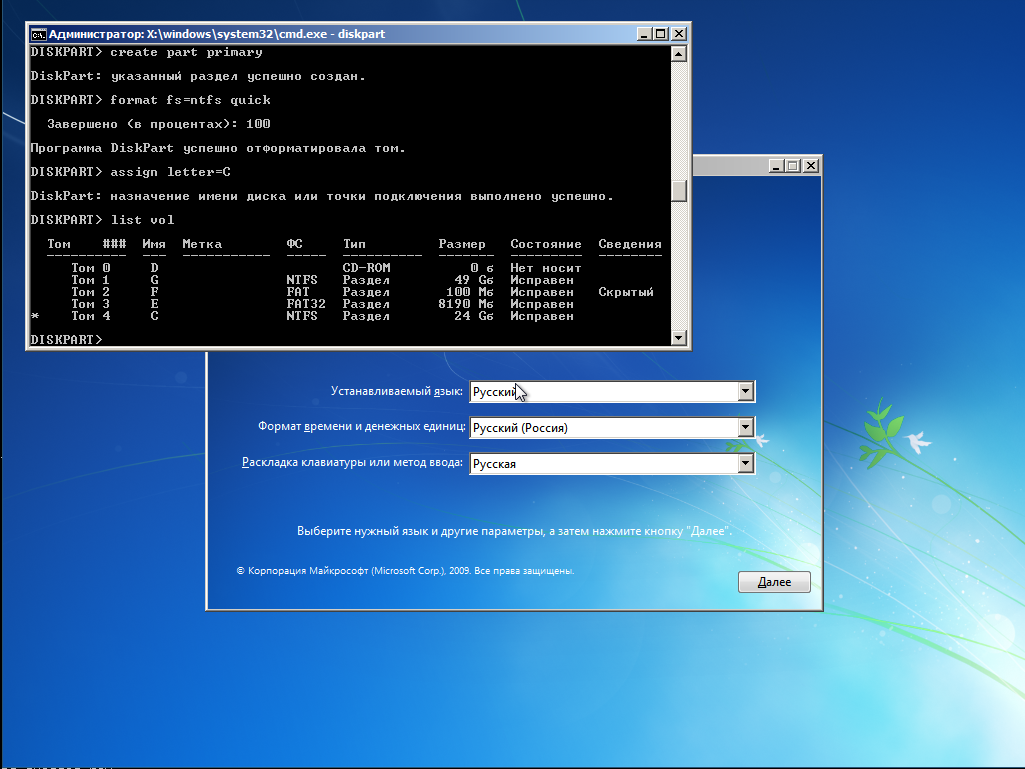
Создаем виртуальный диск, создаем на нем разметку GPT и раздел NTFS и монтируем его к C:
DISKPART> create vdisk file="G:\vhd\win7.vhd" maximum=25600 type=fixed

DISKPART> attach vdisk

DISKPART> clean

DISKPART> convert gpt

DISKPART> create part primary

DISKPART> format fs=ntfs quick

DISKPART> assign letter=C
EFI-раздел монтируем к F:
DISKPART> sel vol 2

DISKPART> assign letter=F
Получаем такую картину
Очень важно! Убеждаемся в том, что EFI-раздел отформатирован именно в FAT, а не в FAT32. Иначе Sysprep не простит нам этой ошибки. Если на компе уже есть линукс, то настройки будут верны.
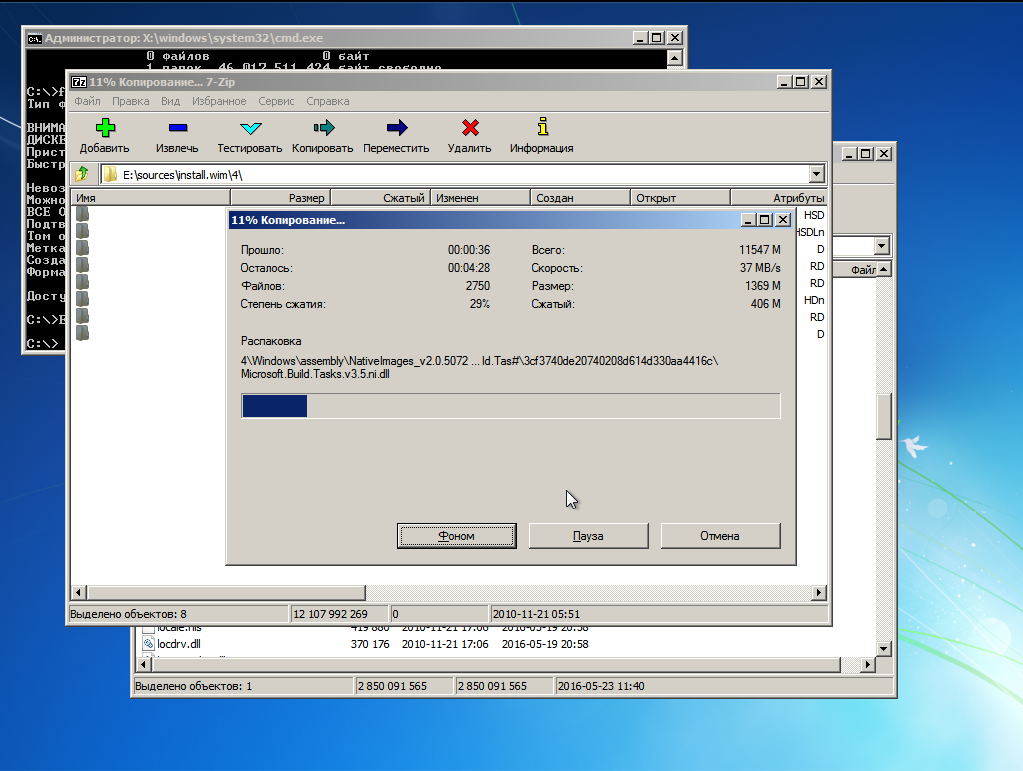
Теперь распаковываем дистрибутив на диск C:
X:\sources> E:

E:\> utils\7-Zip\7zFM.exe
Откроется GUI архиватора 7-zip. В нем открываем каталог E:\sources, находим там файл install.wim
Правой кнопкой на этом файле вызываем контектстное меню и переходим по 7-zip -> Открыть архив. Появится содержимое образа.
Лезем в папку 4 — там лежит Ultimate
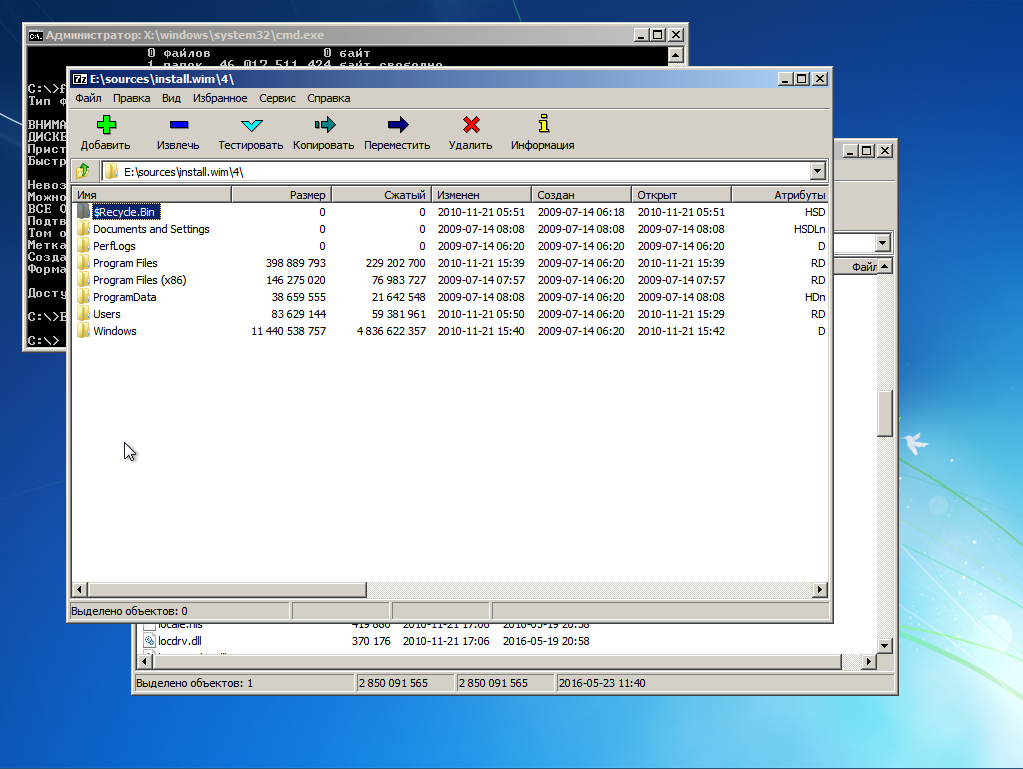
Выделяем всё Ctrl + A и жмем кнопку «Извлечь». Появится окно, где нам предложат указать путь распаковки
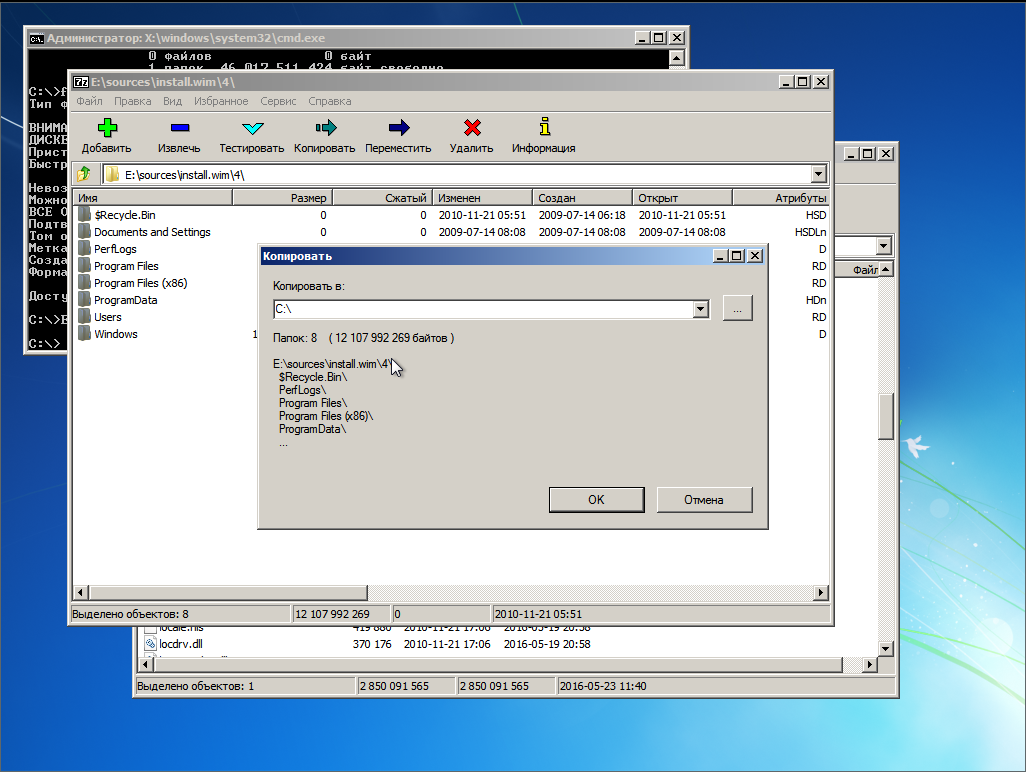
Указываем корень диска C: и жмем ОК.
Ну и теперь, как говорится: «Откиньтесь на спинку кресла и…»
4. Установка и настройка загрузчика
Итак, после некоторого время ожидания распаковка окончена. И вот тут, вот в этом месте винда обчно делает бяку, а именно портит MBR или перенастраивает NVRAM. Но мы не дадим ей этого сделать — мы установим загрузчик вручную.
В случае с EFI, переходим на раздел EFI, смонтированный к F: и создаем необходимые пути и копируем файлы загрузчика
E:\> F:

F:\> mkdir EFI\microsoft\boot

F:\> xcopy C:\Windows\Boot\EFI\* F:\EFI\microsoft\boot /s /e

F:\> mkdir EFI\microsoft\boot\Fonts

F:\> xcopy C:\Windows\Boot\Fonts\* F:\EFI\microsoft\boot\Fonts\ /s /e

F:\> copy C:\Windows\System32\config\BCD-Template F:\EFI\microsoft\boot\BCD
Отлично, загрузчик скопирован. Теперь настроим его
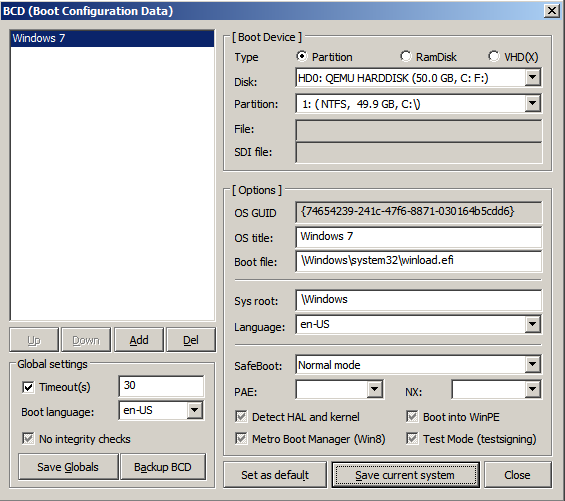
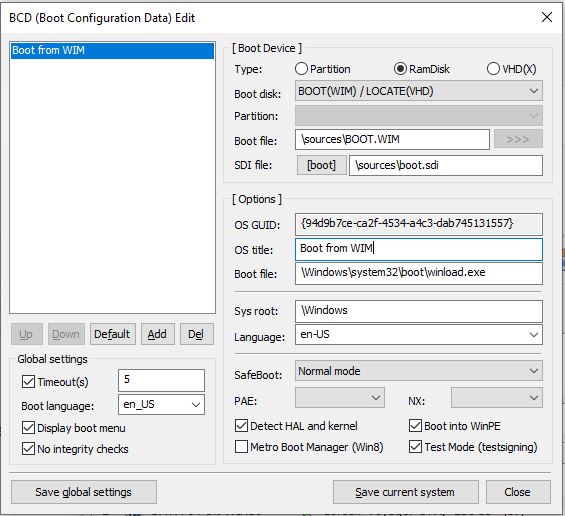
F:\> E:\utils\BOOTICEx64.exe
Открываем файл F:\EFI\Microsoft\Boot\BCD. В случае установки на раздел, его параметры задаются так
Если же мы устанавливали систему на VHD, то настройки будут такими
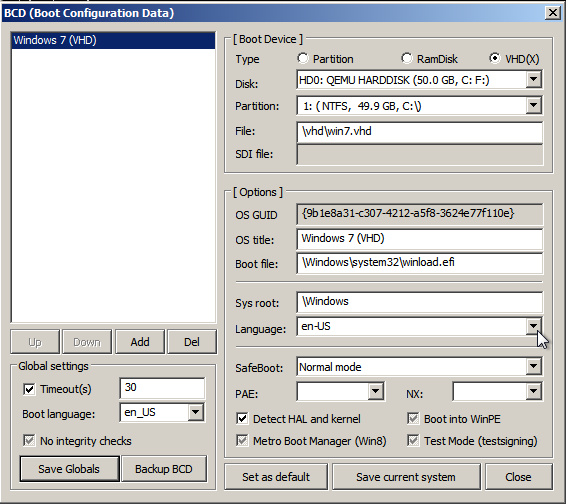
Важно! Имя вторичного загрузчика для EFI-системы winload.efi, для BIOS-системы — winload.exe.
В случае, если мы устанавливаем BIOS-систему установка загрузчика будет выглядеть так
F:\> mkdir C:\Boot

F:\> xcopy C:\Windows\Boot\PCAT\* C:\Boot /s /e

F:\> mkdir C:\Boot\Fonts

F:\> xcopy C:\Windows\Boot\Fonts\* C:\Boot\Fonts /s /e

F:\> copy C:\Boot\bootmgr C:\bootmgr

F:\> copy C:\Windows\System32\config\BCD-Template C:\Boot\BCD
Важно! Раздел, смонтированный к C: (там где размещен загрузчик) обязан быть активным! Убедитесь в этом перед перезагрузкой!
Настройку выполняем так же точно, используя BootICE.
Ну, вроде все. Закрываем все окна и идем в ребут. Флешку можно вытащить из компа.
5. Скрестим пальцы да вознесем молитвы тебе, о Великий и Ужасный Sysprep…!
GRUB у нас еще не настроен пункта для винды в меню нет. Как только появится меню GRUB жмем «C». В консоли набираем
grub> set root=hdX,Y

grub> chainloader /EFI/Microsoft/Boot/bootmgfw.efi

grub> boot
X, Y — соответственно диск и раздел, где лежит загрузчик. Это в случае EFI. В случае с BIOS делаем так
grub> set root=hdX,Y

grub> ntldr /bootmgr

grub> boot
X, Y — диск и раздел с NTFS. Там где распакована винда и лежит её загрузчик.
В режиме EFI вместо логотипа винды я увидел черный экран, так как не нашел в дистрибутиве билиотеки bootres.dll, которую надо поместить в папку EFI\Mictosoft\Boot\Resourses. В случае с BIOS всё в порядке — знакомая эмблема «семерки». А потом в обоих случаях увидим это

Это работает Sysprep. На 57% моргнет экран — настраивается видяха. И если мы все сделали верно, то надпись «Применение параметров системы» повисит довольно долго, потом система сообщит, что установка будет продолжена после перезагрузки. Если мы где-то напортачили с установкой загрузчика — неправильный EFI раздел или неактивный NTFS, то тогда будет ошибка  Но мы молодцы и у нас все получится, и после очередной перезагрузки мы увидим это

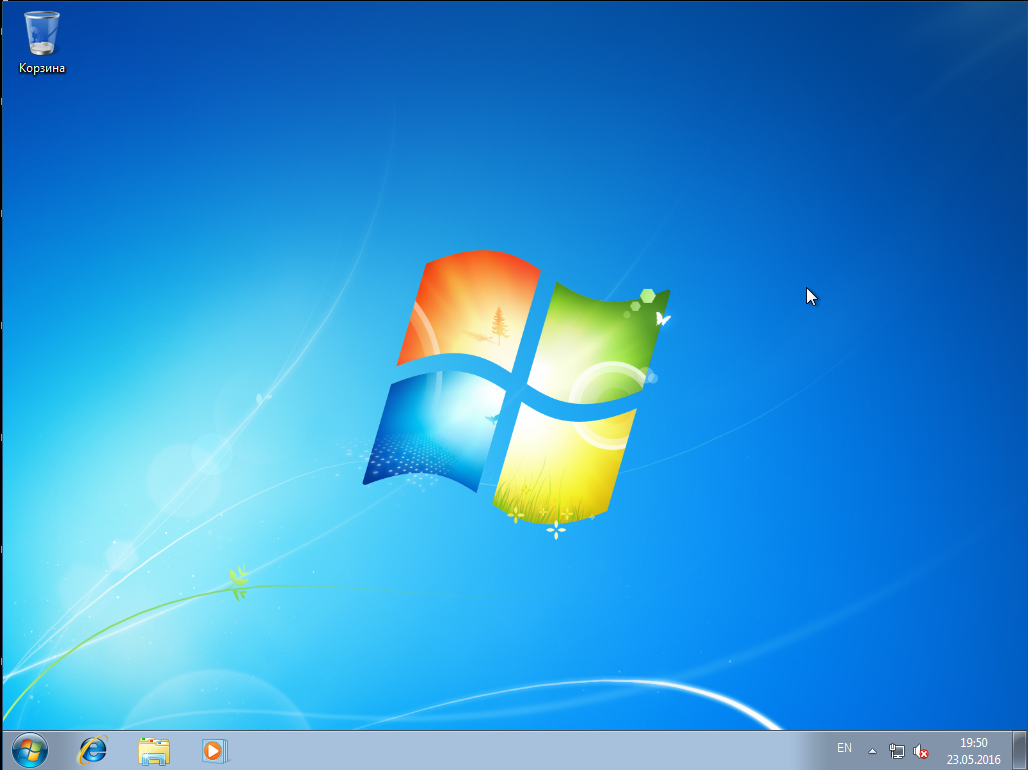
а потом, наконец вот это
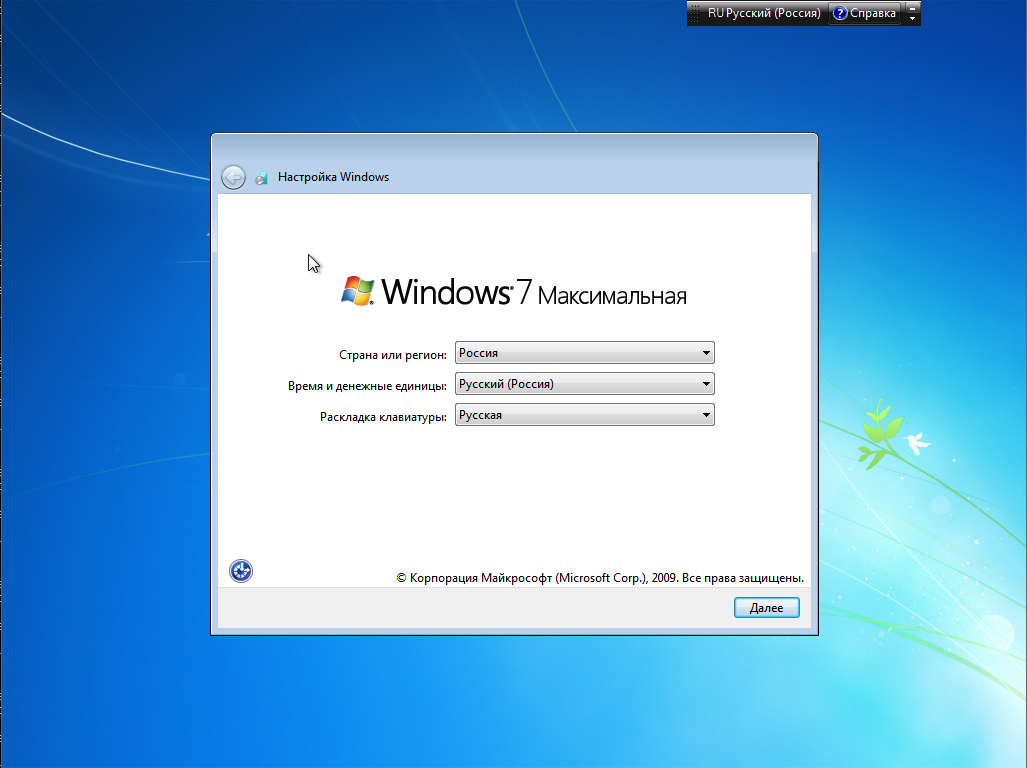
Дальше все как при обычной, штатной установке.
6. Настраиваем GRUB
Обратили внимание на то, что каждый раз мы грузим систему из консоли GRUB руками. Это очень хорошо — значит ни MBR ни NVRAM не перезаписаны коварным майкрософтом. Настало время грузится в арч и добавить в меню GRUB новый пункт
menuentry 'Windows 7 Ultimate SP1 (EFI)' {
set root=hdX,Y
chainloader /EFI/Microsoft/Boot/bootmgfw.efi
}
в случае EFI. Или
menuentry 'Windows 7 Ultimate SP1' {
set root=hdX,Y
ntldr /bootmgr
}
в случае BIOS. Применяем настройки GRUB и перезагружаемся и видем систему в пункте меню загрузки
после выбора которого получаем загруженную Windows
Заключение
Упреждая гнев профессиональных win-админов, скажу сразу — я знаю о DISM. Именно информация об этой системе и привела меня к описанному решению. Цель была одна — выяснить сколько нужно возможностей собственно Windows для установки Windows.
Оказалось вот что — для установки Windows её среда необходима только для одного — настройки BCD-хранилища. Всё. Остальное можно сделать из среды любой другой операционной системы.
Если написать аналог bcdedit.exe под Linux, то установить Windows можно будет с линуксового Live-носителя.
This method allows you to directly boot from a number of different unmodified Windows Install 7/8/10 ISOs on a bootable USB drive AND then run Setup to install Windows to a system.
No files need to be extracted from the ISO – just copy the ISO file and boot!
- Legacy, UEFI or PXE boot is supported.
- The ISO is automatically mounted as a virtual drive so Setup can find and use the Install.wim\esd file.
- 2GB or more RAM is required to be in the system (it may fail to work if not enough RAM is available).
- The Windows Install ISO file does not need to be modified in any way.
I will describe here only the outline process so that you can see how it is done. Easy2Boot uses a similar (but not identical) process when MBR-booting.
Example grub2 menus are also provided (grub4dos only MBR boots, grub2 will MBR and UEFI32 and UEFI64 boot).
PROCESS IN OUTLINE:
- Add Windows Install ISO to a grub4dos or grub2 bootable USB drive
- Add a menu for grub4dos\grub2
- The menu uses wimboot to boot to files inside the ISO
- Add in a null.cfg file which contains the full path of the ISO (except for the drive letter)
- The menu also injects a startnet.bat file and winpeshl.ini file
- For MBR booting we swap BIOS device hd0 with hd1 so that Windows does not think the boot drive is the USB drive (it may refuse to install Windows to a Removable USB drive or Setup may install the Windows boot code to a USB hard disk if we don’t do this).
- When the grub2\grub4dos menu is picked, here is what happens…
- The ISO is mounted (by grub4dos as a CD device using map or by grub2 as a loop device)
- wimboot will load the boot.wim, boot.SDI and BCD from the mounted ISO into RAM
- wimboot injects into the boot.wim\X: RAM drive a null.cfg file which contains the file path of the ISO
- wimboot injects into the boot.wim\X: RAM drive a winpeshl.ini and startup.bat file
- The boot.wim file is booted to by wimboot via bootmgr+BCD and startup.bat runs
- startup.bat finds the USB drive and installs ImDisk (which is also located in a folder on the USB drive somewhere)
- startup.bat finds the null.cfg file in X:\Windows\System32 and from this we can determine the name of the ISO that we need to load
- startup.bat uses ImDisk to load the ISO as drive Y: from the USB drive
- startup.bat runs X:\Setup.exe which will now be able to find the \sources\install.wim file on the Y: virtual DVD drive mounted by ImDisk
If required, we can also inject an XML file into the X:\Windows\System32 folder and specify this as the unattend file when we run setup.exe. This will cause Setup to be automated.
For MBR-bootong, it is necessary to swap the BIOS drives 0 (USB drive) and 1 around so that Windows will think the ‘boot’ drive is the internal hard disk and not the USB drive – otherwise Windows will refuse to install the boot code (and the Windows OS) to the first internal hard disk.
Download files – see link at the bottom of this article.
You can use VBox+VMUB to test (see Tutorial 4) but the grub2 drivemap command can cause WinPE to hang and not boot in a VM.
Example grub2 MBR menu:
menuentry "WIN10 Install" --unrestricted --class Windows {set isoname=win10.isoloopback loop /$isonamelinux16 /wimboot/wimbootinitrd16 \newc:bcd:(loop)/boot/bcd \newc:null.cfg:/wimboot/null.cfg \newc:winpeshl.ini:/wimboot/winpeshl.ini \newc:startup.bat.sdi:/wimboot/startup.bat \newc:boot.sdi:(loop)/boot/boot.sdi \newc:boot.wim:(loop)/sources/boot.wimdrivemap -s hd0 hd1boot)
Note: filenames defined after newc: must not be bigger than 31 characters or wimboot will fail.
Also grub is case sensitive so beware! – e.g. /Boot/boot.sdi instead of /boot/boot.sdi.
wimboot will try to locate a suitable bootmgr or bootxxx.efi boot file, so you don’t usually need to specify one.
You can also add in bootmgr.exe or bootmgr or bootx64.efi/bootmgfw.efi files if the wim file does not contain a suitable file (copy the files to the \wimboot folder) add an extra @bootmgr=/bootmgr.exe entry (or /bootmgr (or /bootmgfw.efi if UEFI).
iPXE wimboot is used for MBR booting but a special grub2 (unsigned, non-secure) version of grub2 with wimboot.mod is required for UEFI-booting.
Example MBR grub4dos menu:
Use Grub4dos 2020-02-29.7z (note: shows as 2020-03-04 in command prompt) (other versions may have bugs – so try this version first!)
Most files are in grub2_wimboot.zip (see end of page).
title Install Windows10x64UK_Oct_2018 using wimboot methodmap /Windows10x64UK_Oct_2018.iso (0xff)map --hookroot (0xff)# the root path now points to the files inside the ISO file# hd0,0 is the USB drive that we booted fromkernel (hd0,0)/wimboot/wimbootinitrd @null.cfg=(hd0,0)/wimboot/null.cfg @startup.bat=(hd0,0)/wimboot/startup.bat @winpeshl.ini=(hd0,0)/wimboot/winpeshl.ini @bcd=/boot/bcd @boot.sdi=/boot/boot.sdi @boot.wim=/sources/boot.wimmap (hd0) (hd1)map (hd1) (hd0)map --hookboot
IMPORTANT: order of the files in the initrd line seems to be important, the bcd and .wim file should be the last files loaded for the MBR version of wimboot.
On our USB drive we have a \wimboot folder:
- \wimboot\wimboot
- \wimboot\winpeshl.ini
- \wimboot\startup.bat
- \wimboot\null.cfg (contains the line installiso=xxxxxxxxx where xxxxxxxxx is the path and filename of the ISO using forward slashes)
- \wimboot\imdisk\(files from grub2_wimboot.zip)
- \Windows10x64UK_Oct_2018.iso
Example winpeshl.ini
[LaunchApps]
startup.bat
See Easy2Boot’s \_ISO\e2b\docs\QRUN.g4b file (search for ‘wimboot’ to see how you can use grub4dos to change null.cfg contents, etc.
ADDING A ‘WINDOWS INSTALL FROM ISO’ MENU TO THE E2B GRUB2 MENU SYSTEM
Set up your E2B drive with a second partition and the E2B grub2 menu files FIRST, then switch to the .imgPTN23 file so that the first partition contains the standard grub2 boot menu system files and the second partition contains your grub2 menu folders (e.g. \_ISO\MAINMENU, etc.) and then…
The following windows_install.grub2 menu text file can be added to the \_ISO\MAINMENU folder on the 2nd partition.
- Download the grub2_wimboot files – extract it onto the root of the 2nd partition so you have a new \wimboot folder
- Download the windows_install.grub2 file and copy it to \_ISO\MAINMENU\grub2 folder on the 2nd E2B partition. Rename it as custom_menu.grub2 if using grub2 Beta 10 or later.
- Create a new \_ISO\MAINMENU\WINDOWS folder (must be in capital letters) on the 2nd partition and place all your Windows Install ISOs in that folder.
This is for MBR booting
2nd partition (additions)
- \wimboot folder
- \_ISO\MAINMENU\grub2\custom_menu.grub2
- \_ISO\MAINMENU\WINDOWS\ (your windows isos here)
Note: E2B grub2 v10W.imgPTN already includes wimboot and a new Windows Install W menu (you just copy your ISOs to the 2nd partition!) – see next section below…
Add grub2 UEFI + wimboot (using a1ive grub2)
I suggest you use the latest E2B grub2 v10W .imgPTN file – see bottom of this page for instructions.
The following instructions are for the v10A E2B grub2 menu system and is more difficult to set up…
A1ive has added a wimboot grub2 module into his special version of grub2 (unsigned).
1. Download the grub2 UEFI zip file
2. Extract the files to the \EFI\BOOT folder on the first FAT32 partition (after switching in the E2B grub2 .imgPTN file)
3. Use the windows_install.grub2 menu file (copy to \_ISO\MAINMENU\grub2 folder)
4. Place all your Windows Install ISO files in the \_ISO\MAINMENU\WINDOWS folder – must end in .ISO or .iso.
5. Add this line into one of the customX_menu.grub2 files at the very bottom to add in the windows menu
source $isofpath/grub2/windows_install.grub2
The E2B grub2 menu system will automatically add-in any customX_menu.grub2 files but the source line is required so that it adds in the windows_install.grub2 menu (or rename it as custom3_menu.grub2 instead if you wish),
The Windows ISOs will be automatically added into the main grub2 menu when you boot. If you have placed Windows Install ISOs in the \_ISO\MAINMENU\WINDOWS folder, they should be listed in the grub2 menu when you boot.
The ISO filename can contain spaces. It must end in .ISO or .iso (case sensitive – so not .ISo for instance).
Standard Microsoft dual-architecture Install ISOs are supported, x64 will be used if the CPU is a 64-bit processor.
For MBR-booting, the menu may run bootmgr and then hang on a Virtual Machine due to the drivemap command – so test on a REAL SYSTEM if you have boot problems on a VM.
\_ISO\MAINMENU\grub2\windows_install.grub2
#WINDOWS INSTALL MENU#$isofpath e.g. (hd0,msdos2)/_ISO/LINUX - use only in if [ -e tests#$root2 e.g. (hd0,msdos2) partition containing payload files#$root e.g. hd0,msdos1 boot partition with grub2 on it#$root2uuid e.g. 1234-2123-33 (uuid of $root2)#Special variables: MBR EFI MBR32 MBR64 EFI32 EFI64 BIT32 BIT64 FAT (true if filesystem on ptn2 is FAT)#Examples:#if $BIT32 ; then echo 32-bit ; fi#if ! $BIT64 ; then echo not 64-bit ; fi#if [ $BIT64 = true and $FAT = true ] ; then echo 64-bit MBR on FAT partititon ; fi#if [ $BIT64 = true and $EFI = true ] ; then echo 64-bit EFI (same as \$EFI64) ; fi#CHECK_MNU_FOLDER sets these variables on return - do not use filename and filenamex inside menuentry#$ip e.g. /_ISO/LINUX#$ipf e.g. (hd0,msdos2)/_ISO/LINUX#$isofile e.g. /_ISO/LINUX/xxxx.iso#supports filenames with spacesfunction ListWimBoot {echo Adding WINDOWS ISO files from $ifp/WINDOWSfor file in $ifp/WINDOWS/*.iso $ifp/WINDOWS/*.ISO; doif ! test -f "$file"; then continue; firegexp -s filename "$ip/WINDOWS/(.*)" "$file"regexp -s filenamex "$ip/WINDOWS/(.*)(.[iI][Ss][oO])" "$file"# echo $filemenuentry "${filenamex}" "${filename}" {#do not use $filename inside menuentry - use $isoname instead!set isoname="$2" ; CHECK_MNU_FOLDER#ip, ipf and isofile are now set correctly after CHECK_MNU_FOLDERloopback loop "${ipf}/WINDOWS/${isoname}"set pp=if test -f (loop)/x64/sources/boot.wim; then set pp=/x64; fiif $MBR32; thenif test -f (loop)/x86/sources/boot.wim; then set pp=/x86; fifiecho Using ${pp}/sources/boot.wim...set root=$root2set installiso="${ip}/WINDOWS/${isoname}"save_env -f /wimboot/null.cfg installiso# cat /wimboot/null.cfg# readlinux16 /wimboot/wimbootinitrd16 \# newc:bootmgr:(loop)${pp}/bootmgr \newc:winpeshl.ini:/wimboot/winpeshl.ini \newc:null.cfg:/wimboot/null.cfg \newc:startup.bat:/wimboot/startup.bat \newc:boot.wim:(loop)${pp}/sources/boot.wim \newc:bcd:(loop)${pp}/boot/bcd \newc:boot.sdi:(loop)${pp}/boot/boot.sdi#swap hd0 (USB) with hd1 (internal hdd) so 'boot disk' is internal hdd#this means may only work on real systemdrivemap -s hd0 hd1boot}done}function ListWimBootEFI {echo Adding WINDOWS ISO files from $ifp/WINDOWS/for file in $ifp/WINDOWS/*.iso $ifp/WINDOWS/*.ISO; doif ! test -f "$file"; then continue; firegexp -s filename "$ip/WINDOWS/(.*)" "$file"regexp -s filenamex "$ip/WINDOWS/(.*)(.[iI][Ss][oO])" "$file"# echo $filemenuentry "${filenamex} EFI" "${filename}" {set isoname="$2" ; CHECK_MNU_FOLDER#ip ipf and isofile are now set correctly after CHECK_MNU_FOLDERloopback loop "${ipf}/WINDOWS/${isoname}"set pp=if test -f (loop)/x64/sources/boot.wim; then set pp=/x64; fiset bootmg=bootia32.efiif $EFI32; thenif test -f (loop)/x86/sources/boot.wim; then set pp=/x86; fiset bootmg=bootx64.efifiecho Using ${pp}/sources/boot.wim...set root=$root2set installiso="${ip}/WINDOWS/${isoname}"save_env -f /wimboot/null.cfg installiso# cat /wimboot/null.cfg# read#NOTE: ORDER IS IMPORTANT! May get 0xC000000f error if order is wrong! boot.wim should be first.#use wimboot --pause to see any error ( also --rawbcd --rawwim --index=1 --gui )wimboot \@:startup.bat:/wimboot/startup.bat \@:winpeshl.ini:/wimboot/winpeshl.ini \@:null.cfg:/wimboot/null.cfg \@:boot.wim:(loop)${pp}/sources/boot.wim \# @:bootmgfw.efi:(loop)${pp}/efi/boot/$bootmg \@:bcd:(loop)${pp}/efi/microsoft/boot/bcd \@:boot.sdi:(loop)${pp}/boot/boot.sdiboot}done}if ! $EFI ; then ListWimBoot; fiif $EFI ; then ListWimBootEFI; fi
If wimboot uses an incorrect bootmgr/bootgmfw.efi file you may get a 0xc000000f unknown error BSOD – it is often better to not specify this file and let wimboot find it.
Note that the full path of the ISO is placed in null.cfg which is later picked up by startup.bat.
Example startup.bat file:
@echo offTITLE %~dpnx0 (WIMBOOT startup.bat)wpeinit.exeREM prevent wpeinit from running againren X:\windows\system32\wpeinit.exe wpeinit.exe.oldfor %%I in (C D E F G H I J K L M N O P Q R S T U V W X Y Z) do if exist %%I:\wimboot\startup.bat set USBDRIVE=%%I:IF "%USBDRIVE%"=="" (echo ERROR - could not find \wimboot\startup.bat on any drive!@echo onfor %%I in (C D E F G H I J K L M N O P Q R S T U V W X Y Z) do if exist %%I:\wimboot\startup.bat set USBDRIVE=%%I:pausegoto :EOF)color 1fcls@echo FOUND USB DRIVE AT DRIVE %USBDRIVE%SET BIT=32if "%PROCESSOR_ARCHITECTURE%"=="AMD64" SET BIT=64FOR /L %%A IN (0,1,5000) DO ECHO NOTHING > nul:: get path of the ISO into MYISO e.g. /_ISO/WINDOWS/WIN10/Windows10ProBoth.isocd /d %USBDRIVE%\set MYISO=INVALID_ISO_NAME.ISOecho Looking for X:\Windows\System32\null.cfg contents...for /f "tokens=1,2 delims==" %%a in ('find "installiso=" X:\Windows\System32\null.cfg') do set isopath=%%bREM change linux forward slash to Windows backslashset string1=%isopath:/=\%if exist "%USBDRIVE%%string1%" set MYISO=%string1%if not exist "%USBDRIVE%%MYISO%" if exist X:\Windows\System32\null.cfg type X:\Windows\System32\null.cfgif not exist "%USBDRIVE%%MYISO%" echo ERROR: Can't find %USBDRIVE%%MYISO% && pause && goto :EOFif exist "%USBDRIVE%%MYISO%" echo Loading %USBDRIVE%%MYISO%...REM Load ISO using ImDiskTITLE LOAD WINDOWS ISO USING IMDISKcall \wimboot\imdisk\IMDISK_install.cmdcall \wimboot\imdisk\IMDISK_instiso.cmdREM Find mounted DVD driveset DVDDRIVE=FOR %%D IN (A B C D E F G H I J K L M N O P Q R S T U V W X Y Z) DO (DIR %%D:\SOURCES\install.* > nul 2>&1 && (call set DVDDRIVE=%%D:) && echo FOUND %%D:\SOURCES\install.*)FOR %%D IN (A B C D E F G H I J K L M N O P Q R S T U V W X Y Z) DO (DIR %%D:\SOURCES\x86\install.* > nul 2>&1 && (call set DVDDRIVE=%%D:) && echo FOUND %%D:\SOURCES\x86\install.*)FOR %%D IN (A B C D E F G H I J K L M N O P Q R S T U V W X Y Z) DO (DIR %%D:\SOURCES\x64\install.* > nul 2>&1 && (call set DVDDRIVE=%%D:) && echo FOUND %%D:\SOURCES\x64\install.*)FOR %%D IN (A B C D E F G H I J K L M N O P Q R S T U V W X Y Z) DO (DIR %%D:\x86\SOURCES\install.* > nul 2>&1 && (call set DVDDRIVE=%%D:) && echo FOUND %%D:\x86\SOURCES\install.*)FOR %%D IN (A B C D E F G H I J K L M N O P Q R S T U V W X Y Z) DO (DIR %%D:\x64\SOURCES\install.* > nul 2>&1 && (call set DVDDRIVE=%%D:) && echo FOUND %%D:\x64\SOURCES\install.*):ENDSEARCHIF "%DVDDRIVE%"=="" echo WARNING: VIRTUAL DRIVE DRIVE NOT FOUND!IF "%DVDDRIVE%"=="" echo WARNING: install.* not found on any mounted volume.IF "%DVDDRIVE%"=="" pauseecho.IF NOT "%DVDDRIVE%"=="" echo ISO FILE MOUNTED AS %DVDDRIVE%REM startnet.cmd normally only contains wpeinit.exe, custom ISOs may contain other commands, so try to run themif exist X:\WINDOWS\SYSTEM32\startnet.cmd call cmd /c X:\WINDOWS\SYSTEM32\startnet.cmdif not exist X:\WINDOWS\SYSTEM32\startup.bat exitIF "%DVDDRIVE%"=="" cmdMODE CON COLS=30 LINES=2echo DO NOT CLOSE THIS WINDOWREM X:\Sources\setup.exe /Unattend:%E2BDRIVE%\AutoUnattend.xmlREM X:\Setup.exe will allow the repair option, X:\Sources\Setup.exe will directly run SetupX:\setup.exe
THE BCD
You must use a standard Microsoft WinPE BCD which is usually already present in a standard Microsoft Windows Install ISO.
Special WinPE ISOs tend to contain non-standard BCDs which will give a BSOD.
If in doubt, make a new BCD file using BootIce and copy it to the \wimboot folder so you can use it with wimboot.
The files will be placed by wimboot into their standard locations inside the RAMDisk that it makes so you must use standard names and paths in the BCD.
For UEFI – BCD must be set to boot from \sources\boot.wim and use \boot\boot.sdi and boot file=\Windows\system32\boot\winload.efi
For MBR – BCD must be set to boot from \sources\boot.wim and use \boot\boot.sdi
and boot file=\Windows\system32\boot\winload.exe
If you get an error check that the winload file exists in the correct path inside the boot.wim by using 7Zip to open the ISO and \sources\boot.wim file.
Note: A solid black checkbox indicates ‘not defined in BCD’.
wimboot command line
wimboot will parse the following extra commands on the same line (e.g. linux16 /wimboot pause):
rawbcd Use raw (unpatched) BCD files
rawwim Use raw (unpatched) WIM files
gui Allow graphical output from bootmgr/bootmgfw
pause Pause before booting OS
pause=quiet Pause without displaying any prompt
index=n WIM boot index
initrdfile Ignored to allow to be used with syslinux
after processing the command line, the files in the initrd ramdrive will be loaded.
For UEFI:
wimboot [--gui] [--rawbcd] [--rawwim] [--pause] [--index=n] @:boot.wim:/path/to/test.wim @:bootmgfw.efi:/path/to/test.efi @:bcd:/path/to/bcd @:boot.sdi:/path/to/boot.sdi * params: * --gui or -g Display graphical boot messages. * --rawbcd or -b Disable rewriting .exe to .efi in the BCD file. * --rawwim or -w Disable patching the wim file. * --pause or -p * --index=n or -i n Use WIM image index n.
File Injection into \Windows\System32
Files named ‘BCD’, or ending in ‘.wim’ or ‘.sdi’ are ignored and are not injected into the X:\Windows\System32 folder.
All other files added using wimboot will be added to the X:\windows\system32 folder with the new name that you specify.
Make your own grub2 boot files
The bootx64.efi and bootia32.efi files are stub files which load grubx64.efi and grubia32.efi.
To build you own grub2 files, download a build from here.
C:\TEMP\builds-master\
- .gitignore
- build_grub.bat <<< run this
- grub-install.exe
- grub-mkimage.exe
- README.md
- +—arch
- | +—arm64
- | +—ia32
- | +—legacy
- | | \—ntboot
- | | \—NTBOOT.MOD
- | \—x64
- +—i386-efi
- +—i386-pc
- +—locale
- \—x86_64-efi
Double-click on build_grub.bat to make new core.img, grubx64.efi and grubia32.efi boot files.
The builtin.lst files under the arch folder contain a list of modules which will be added into grub2.
The EFI files will be unsigned and so will not Secure Boot.
EXAMPLE WINPE E2B .GRUB2 MENUS
Download custom2_menu.grub2 for WinPE files.
Create a .grub2 menu – e.g. \_ISO\MAINMENU\grub2\custom2_menu.grub2 in the 2nd E2B partition.
#WINDOWS PE EXAMPLES# uses iPXE wimboot (2017-05-1) 30242 bytes http://ipxe.org/wimboot#download# \wimboot folder on Partition 2 should contain wimboot, bootmgr, bootmgr.exe# bootmgr.exe can be found in \Windows\Boot\PXE folder - copy it to the USB:\wimboot folder#$isofpath e.g. (hd0,msdos2)/_ISO/LINUX - use only in if [ -e tests#$root2 e.g. (hd0,msdos2) partition containing payload files#$root e.g. hd0,msdos1 boot partition with grub2 on it#$root2uuid e.g. 1234-2123-33 (uuid of $root2)#Special variables: MBR EFI MBR32 MBR64 EFI32 EFI64 BIT32 BIT64 FAT (true if filesystem on ptn2 is FAT)#Examples:#if $BIT32 ; then echo 32-bit ; fi#if ! $BIT64 ; then echo not 64-bit ; fi#if [ $BIT64 = true and $FAT = true ] ; then echo 64-bit MBR on FAT partititon ; fi#if [ $BIT64 = true and $EFI = true ] ; then echo 64-bit EFI (same as \$EFI64) ; fi#CHECK_MNU_FOLDER sets these variables on return#$ip e.g. /_ISO/LINUX#$ifp e.g. (hd0,msdos2)/_ISO/LINUX#$isofile e.g. /_ISO/LINUX/xxxx.iso# ---------------------function GetWimbootFiles {#This function looks for files needed for iPXE WIMBOOT#The filenames are case-sensitive, so we try to look for most likely ones!set pp=if test -f (loop)/x64/sources/boot.wim; then set pp=/x64; fiif test -f (loop)/x64/Sources/boot.wim; then set pp=/x64; fiif test -f (loop)/x64/Sources/Boot.wim; then set pp=/x64; fiif test -f (loop)/x64/Sources/BOOT.wim; then set pp=/x64; fiif test -f (loop)/x64/Sources/BOOT.WIM; then set pp=/x64; fiif $BIT32; thenif test -f (loop)/x86/sources/boot.wim; then set pp=/x86; fiif test -f (loop)/x86/Sources/boot.wim; then set pp=/x86; fiif test -f (loop)/x86/Sources/Boot.wim; then set pp=/x86; fiif test -f (loop)/x86/Sources/BOOT.wim; then set pp=/x86; fiif test -f (loop)/x86/Sources/BOOT.WIM; then set pp=/x86; fifiunset bmeif [ -e "/wimboot/bootmgr.exe" ]; then set bme=/wimboot/bootmgr.exe ; fiif [ -e "(loop)/bootmgr.exe" ]; then set bme=(loop)/bootmgr.exe ; fiif [ -e "(loop)/BOOTMGR.EXE" ]; then set bme=(loop)/BOOTMGR.EXE ; fiif [ -e "(loop)/BOOTMGR.exe" ]; then set bme=(loop)/BOOTMGR.exe ; fiif [ -e "(loop)/Bootmgr.exe" ]; then set bme=(loop)/Bootmgr.exe ; fiunset bm1if [ -e "/wimboot/bootmgr" ]; then set bm1=/wimboot/bootmgr ; fiif [ -e "(loop)/bootmgr" ]; then set bm1=(loop)/bootmgr ; fiif [ -e "(loop)/Bootmgr" ]; then set bm1=(loop)/Bootmgr ; fiif [ -e "(loop)/BOOTMGR" ]; then set bm1=(loop)/BOOTMGR ; fiunset bcdif [ -e "(loop)${pp}/BOOT/BCD" ]; then set bcd=(loop)${pp}/BOOT/BCD ; fiif [ -e "(loop)${pp}/BOOT/bcd" ]; then set bcd=(loop)${pp}/BOOT/bcd ; fiif [ -e "(loop)${pp}/BOOT/Bcd" ]; then set bcd=(loop)${pp}/BOOT/bcd ; fiif [ -e "(loop)${pp}/Boot/BCD" ]; then set bcd=(loop)${pp}/Boot/BCD ; fiif [ -e "(loop)${pp}/Boot/bcd" ]; then set bcd=(loop)${pp}/Boot/bcd ; fiif [ -e "(loop)${pp}/Boot/Bcd" ]; then set bcd=(loop)${pp}/Boot/bcd ; fiif [ -e "(loop)${pp}/boot/BCD" ]; then set bcd=(loop)${pp}/boot/BCD ; fiif [ -e "(loop)${pp}/boot/bcd" ]; then set bcd=(loop)${pp}/boot/bcd ; fiif [ -e "(loop)${pp}/boot/Bcd" ]; then set bcd=(loop)${pp}/boot/bcd ; fiunset sdiif [ -e "(loop)${pp}/BOOT/BOOT.SDI" ]; then set sdi=(loop)${pp}/BOOT/BOOT.SDI ; fiif [ -e "(loop)${pp}/BOOT/boot.sdi" ]; then set sdi=(loop)${pp}/BOOT/BOOT.SDI ; fiif [ -e "(loop)${pp}/BOOT/Boot.sdi" ]; then set sdi=(loop)${pp}/BOOT/BOOT.SDI ; fiif [ -e "(loop)${pp}/Boot/BOOT.SDI" ]; then set sdi=(loop)${pp}/Boot/BOOT.SDI ; fiif [ -e "(loop)${pp}/Boot/boot.sdi" ]; then set sdi=(loop)${pp}/Boot/boot.sdi ; fiif [ -e "(loop)${pp}/Boot/Boot.sdi" ]; then set sdi=(loop)${pp}/Boot/BOOT.SDI ; fiif [ -e "(loop)${pp}/boot/BOOT.SDI" ]; then set sdi=(loop)${pp}/boot/BOOT.SDI ; fiif [ -e "(loop)${pp}/boot/boot.sdi" ]; then set sdi=(loop)${pp}/boot/boot.sdi ; fiif [ -e "(loop)${pp}/boot/Boot.sdi" ]; then set sdi=(loop)${pp}/boot/BOOT.sdi ; fiunset wimif [ -e "(loop)${pp}/sources/boot.wim" ]; then set wim=(loop)${pp}/sources/boot.wim ; fiif [ -e "(loop)${pp}/Sources/boot.wim" ]; then set wim=(loop)${pp}/Sources/boot.wim ; fiif [ -e "(loop)${pp}/Sources/Boot.wim" ]; then set wim=(loop)${pp}/Sources/Boot.wim ; fiif [ -e "(loop)${pp}/SOURCES/boot.wim" ]; then set wim=(loop)${pp}/SOURCES/boot.wim ; fiif [ -e "(loop)${pp}/SOURCES/Boot.wim" ]; then set wim=(loop)${pp}/SOURCES/Boot.wim ; fiif [ -e "(loop)${pp}/SOURCES/BOOT.wim" ]; then set wim=(loop)${pp}/SOURCES/BOOT.wim ; fiif [ -e "(loop)${pp}/SOURCES/BOOT.WIM" ]; then set wim=(loop)${pp}/SOURCES/BOOT.WIM ; fiunset bmefi64set t="(loop)${pp}/bootmgr.efi" ; if [ -e "$t" ]; then set bmefi64="$t" ; fiset t="(loop)${pp}/EFI/BOOT/BOOTX64.EFI" ; if [ -e "$t" ]; then set bmefi64="$t" ; fiset t="(loop)${pp}/EFI/BOOT/Bootx64.efi" ; if [ -e "$t" ]; then set bmefi64="$t" ; fiset t="(loop)${pp}/EFI/BOOT/bootx64.efi" ; if [ -e "$t" ]; then set bmefi64="$t" ; fiset t="(loop)${pp}/EFI/Boot/BOOTX64.EFI" ; if [ -e "$t" ]; then set bmefi64="$t" ; fiset t="(loop)${pp}/EFI/Boot/Bootx64.efi" ; if [ -e "$t" ]; then set bmefi64="$t" ; fiset t="(loop)${pp}/EFI/Boot/bootx64.efi" ; if [ -e "$t" ]; then set bmefi64="$t" ; fiset t="(loop)${pp}/Efi/BOOT/BOOTX64.EFI" ; if [ -e "$t" ]; then set bmefi64="$t" ; fiset t="(loop)${pp}/Efi/BOOT/Bootx64.efi" ; if [ -e "$t" ]; then set bmefi64="$t" ; fiset t="(loop)${pp}/Efi/BOOT/bootx64.efi" ; if [ -e "$t" ]; then set bmefi64="$t" ; fiset t="(loop)${pp}/efi/Boot/BOOTX64.EFI" ; if [ -e "$t" ]; then set bmefi64="$t" ; fiset t="(loop)${pp}/efi/Boot/Bootx64.efi" ; if [ -e "$t" ]; then set bmefi64="$t" ; fiset t="(loop)${pp}/efi/Boot/bootx64.efi" ; if [ -e "$t" ]; then set bmefi64="$t" ; fiunset bmefi32set t="(loop)${pp}/bootmgr.efi" ; if [ -e "$t" ]; then set bmefi32="$t" ; fiset t="(loop)${pp}/EFI/BOOT/BOOTX64.EFI" ; if [ -e "$t" ]; then set bmefi32="$t" ; fiset t="(loop)${pp}/EFI/BOOT/Bootx64.efi" ; if [ -e "$t" ]; then set bmefi32="$t" ; fiset t="(loop)${pp}/EFI/BOOT/bootx64.efi" ; if [ -e "$t" ]; then set bmefi32="$t" ; fiset t="(loop)${pp}/EFI/Boot/BOOTX64.EFI" ; if [ -e "$t" ]; then set bmefi32="$t" ; fiset t="(loop)${pp}/EFI/Boot/Bootx64.efi" ; if [ -e "$t" ]; then set bmefi32="$t" ; fiset t="(loop)${pp}/EFI/Boot/bootx64.efi" ; if [ -e "$t" ]; then set bmefi32="$t" ; fiset t="(loop)${pp}/Efi/BOOT/BOOTX64.EFI" ; if [ -e "$t" ]; then set bmefi32="$t" ; fiset t="(loop)${pp}/Efi/BOOT/Bootx64.efi" ; if [ -e "$t" ]; then set bmefi32="$t" ; fiset t="(loop)${pp}/Efi/BOOT/bootx64.efi" ; if [ -e "$t" ]; then set bmefi32="$t" ; fiset t="(loop)${pp}/efi/Boot/BOOTX64.EFI" ; if [ -e "$t" ]; then set bmefi32="$t" ; fiset t="(loop)${pp}/efi/Boot/Bootx64.efi" ; if [ -e "$t" ]; then set bmefi32="$t" ; fiset t="(loop)${pp}/efi/Boot/bootx64.efi" ; if [ -e "$t" ]; then set bmefi32="$t" ; fi#either bootmgr.exe or bootmgr is required. It can be inside the boot.wim fileif ! [ -e /wimboot/wimboot ]; then echo ERROR: /wimboot/wimboot does not exist! Please add /wimboot folder to Partition 2 ; read ; fiechoif [ "$bme" = "" ]; then echo WARNING: bootmgr.exe not found ; fiif [ "$bm1" = "" ]; then echo WARNING: bootmgr not found ; fiif [ "$bme" = "" -a "$bm1" = "" ]; then set werr=1 ; fiif [ "$bcd" = "" ]; then echo ERROR: BCD not found in ISO file ; set werr=1 ; fiif [ "$sdi" = "" ]; then echo ERROR: boot.sdi not found in ISO file ; set werr=1 ; fiif [ "$wim" = "" ]; then echo ERROR: boot.wim not found in ISO file ; set werr=1 ; fiecho Using:echo bm1=$bm1echo bme=$bmeecho bcd=$bcdecho sdi=$sdiecho wim=$wimecho bmefi64=$bmefi64echo bmefi32=$bmefi32echo --------if [ "$werr" = "1" ]; then echo Possible error: Press a key to continue anyway... ; read ; fi}# ---------- Win10PESE_x64.ISO ------if $MBR64; thenif [ -e "$isofpath/Win10PESE_x64.ISO" ]; thenmenuentry "Win10PESE_x64.ISO (BIOS WIMBOOT)" --unrestricted --class windows {set isoname=Win10PESE_x64.ISO ; CHECK_MNU_FOLDERset root=$root2loopback loop $isofileGetWimbootFileslinux16 /wimboot/wimboot pauseinitrd16 \# newc:bootmgr:$bm1 \newc:boot.sdi:$sdi \newc:boot.wim:$wim \newc:bcd:$bcdboot}fifi#This menu will be shown for 32-bit and 64-bit CPUsif $EFI; thenif [ -e "$isofpath/Win10PESE_x64.ISO" ]; thenmenuentry "Win10PESE_x64.ISO (UEFI WIMBOOT)" --unrestricted --class windows {set isoname=Win10PESE_x64.ISO ; CHECK_MNU_FOLDERset root=$root2loopback loop "$isofile"# GetWimbootFilesset pp=if test -f (loop)/x64/sources/boot.wim; then set pp=/x64; fiif $EFI32; thenif test -f (loop)/x86/sources/boot.wim; then set pp=/x86; fifiecho Using ${pp}/sources/boot.wim...wimboot --pause \@:boot.sdi:(loop)${pp}/Boot/boot.sdi \# @:bootmgfw.efi:(loop)${pp}/efi/boot/bootx64.efi \@:boot.wim:(loop)${pp}/sources/boot.wim \@:bcd:(loop)${pp}/efi/microsoft/boot/bcdboot}fifi# ------------- Win10XPE_X64.iso ----------------------#WORKS (wimboot doesn't work)if $MBR64; thenif [ -e "$isofpath/Win10XPE_x64.ISO" ]; thenmenuentry "Win10XPE_x64 (BIOS MEMDISK)" --unrestricted --class windows {set isoname=Win10XPE_x64.ISO ; CHECK_MNU_FOLDERlinux16 ($root)/boot/grub/memdisk iso rawset root=$root2initrd16 $isofile# drivemap -s (hd0) (hd1)boot}fifi# ----------- ampe64.iso ------------------if $MBR64; thenif [ -e "$isofpath/ampe64.iso" ]; thenmenuentry "ampe64.iso WORKS (BIOS WIMBOOT)" --unrestricted --class windows {set isoname=ampe64.iso ; CHECK_MNU_FOLDERset root=$root2loopback loop $isofileGetWimbootFileslinux16 /wimboot/wimboot pauseinitrd16 \# newc:bootmgr:$bm1 \newc:boot.sdi:$sdi \newc:boot.wim:$wim \newc:bcd:$bcdboot}fifi#This menu will be shown for 32-bit and 64-bit CPUsif $EFI; thenif [ -e "$isofpath/ampe64.iso" ]; thenmenuentry "ampe64.iso (UEFI WIMBOOT)" --unrestricted --class windows {set isoname=ampe64.iso ; CHECK_MNU_FOLDERset root=$root2loopback loop "$isofile"GetWimbootFilesif [ "$bmefi64" = "" ]; then echo ERROR: bootmgr EFI file not found ; fiif [ "$sdi" = "" ]; then echo ERROR: boot.sdi file not found ; fiif [ "$wim" = "" ]; then echo ERROR: boot.wim file not found ; fiif [ "$bcd" = "" ]; then echo ERROR: BCD file not found ; fiecho Using $wim...wimboot --pause \# @:bootmgfw.efi:$bmefi64 \@:boot.sdi:$sdi \@:boot.wim:$wim \@:bcd:$bcdecho boot...readboot}fifi# Strelec WinPE TEST# This menu will be shown for 32-bit and 64-bit CPUs# Make strelec_BCD using BootIce - BCD must be set to boot from \sources\boot.wim and use \boot\boot.sdi and boot file=\Windows\system32\boot\winload.efi# Need to obtain missing bootx64.efi from a standard Win10 ISO and add to \wimboot folder# Once at Desktop, right-click on Strelec ISO in Explorer and MOUNT as Y: - then run MistAll from start menuif $EFI64; thenif [ -e "$isofpath/WinPE10_8_Sergei_Strelec_x86_x64_2019.02.04_English.iso" ]; thenmenuentry "TEST WinPE10_8_Sergei_Strelec_x86_x64_2019.02.04_English.iso (UEFI WINPE WIMBOOT)" --unrestricted --class windows {set isoname=WinPE10_8_Sergei_Strelec_x86_x64_2019.02.04_English.iso ; CHECK_MNU_FOLDERset root=$root2loopback loop "$isofile"wimboot --pause \@:boot.sdi:(loop)/SSTR/boot.sdi \@:bootmgfw.efi:/wimboot/bootx64.efi \@:boot.wim:(loop)/SSTR/strelec10x64Eng.wim \@:bcd:/wimboot/strelec64_BCDboot}fifi
————————————————-
GRUB2 UEFI + WIMBOOT (IPXE)
You can use the iPXE environment instead of a grub2 environment
- \boot.ipxe – config file run by iPXE
- \ipxe64.efi – contains iPXE boot code (x64)
- \ipxe32.efi – contains iPXE boot code (32-bit)
- \wimboot – the wimboot code
- \win\boot64.wim – \win folder contains your bootable wim file (any name)
- \win\BCD2 – and name for BCD
- \win\boot.sdi – generic boot.sdi
1. Go to the ROMMatic site and create a 64-bit and 32-bit .EFI file using – Advanced – EFI PXE bootstrap xx-bit (.efi)
and paste in the following script in the Embedded script box at the bottom:
#!ipxe
chain file:/boot.ipxe
then click on Proceed and wait (if you get a timeout – try again)
2. Now you should have a ipxe64.efi file and a ipxe32.efi file which you can load from grub2:
- menuentry “iPXE wimboot” {
- chainloader /ipxe64.efi
- boot
- }
3. Create the iPXE config file \boot.ipxe
#!ipxe#use --name for UEFI when file has different name from default#add second virtual name for MBR booting#ensure BCD has standard \sources\boot.wim and \sources\boot.sdi pathsifopenkernel file:/wimbootinitrd --name bcd file:/win/bcd2 bcdinitrd --name boot.sdi file:/win/boot.sdi boot.sdiinitrd --name boot.wim file:/win/boot64.wim boot.wimechoecho Platform=${platform} BuildArch=${buildarch}echoimgstatprompt --timeout 5000 Press a key... ||boot
The same boot.sdi file can be used by all Windows 7/8/10 etc. AFAIK.
4. Use BootIce to ensure that the BCD2 file has standard file paths for the boot.wim and boot.sdi
If these paths are not ‘standard’, then you will get a BSOD 0xc000000f error!
See iPXE wimboot description for more details.
The big problem with this method is that the boot.ipxe configuration file cannot be passed the path of the boot.wim file by grub. Once grub chainloads the .efi boot file, all connections with grub are lost.
This means that you can only boot to one boot.wim OR you must prompt the user to enter path of the boot.wim file by adding scripting into the boot.ipxe file,
e.g.
echo Please enter the full path of the boot.wim file...read wimboot- and then use
initrd --name boot.wim file:$wimboot boot.wim
in the boot.iPXE menuentry…
#!ipxe#use --name for UEFI when file has different name from default#add second virtual name for MBR booting#ensure BCD has standard \sources\boot.wim and \sources\boot.sdi pathsifopen:getwimimgfreeechoechoecho Please enter the full path of the boot.wim file...echo Press ENTER for /win/boot64.wimclear wimbootechoread wimbootisset ${wimboot} || set wimboot /win/boot64.wimecho wimboot=${wimboot}#check file existsimgfetch file:${wimboot} || goto getwimread askkernel file:/wimbootinitrd --name bcd file:/win/bcd2 bcdinitrd --name boot.sdi file:/win/boot.sdi boot.sdiinitrd --name boot.wim file:${wimboot} boot.wimechoecho Platform=${platform} BuildArch=${buildarch}echoimgstatprompt --timeout 5000 Press a key... || boot
Download files
Click here (OneDrive folder) if you cannot find any file mentioned in the articles on this site or Contact Me.
Есть не так уж много вариантов использования нескольких дистрибутивов Linux на одной машине. Вы можете установить их все на жесткий диск, на виртуальную машину или сохранить в виде ISO образа и загружаться в реальном времени.
Первый и второй способы не очень выгодны так как требуют очень много места на жестком диске, с другой стороны, для третьего способа нужно иметь CD диск или USB флешку для хранения образа и загрузчика. Но есть еще один вариант — хранить ISO образ на жестком диске, и загружаться с него по мере надобности. Здесь не нужно столько дискового пространства как при установке, и не нужен внешний носитель информации. В этой статье будет рассмотрена загрузка с ISO образа в Grub.
Содержание статьи
- Что нам понадобится
- Загрузка с ISO образа в Grub
- Загрузка windows с iso образа в Grub
- Завершение настройки Grub
- Выводы
Что нам понадобится
В этой статье мы будем использовать загрузчик Grub, впрочем, он и так используется в большинстве дистрибутивов Linux. Также нам понадобится ISO образ, с которого будем загружаться и вы должны знать на каком разделе он размещён. Удобнее всего разместить его на загрузочном разделе. Чтобы узнать какой раздел диска у вас загрузочный выполните:
fdisk -l
Загрузочный раздел будет помечен знаком * в колонке Загрузочный или Boot. Например, у меня /dev/sda2 или как пишется в Grub hd0,2 — загрузочный.
Разделы /dev/sda1 и /dev/sdb3 будут называться в Grub hd0,1 и hd1,3 соответственно. В синтаксисе Grub именование дисков начинается с нуля, а именование разделов с единицы.
Сначала откройте файл /etc/default/grub и закомментируйте там эту строку если она там есть:
GRUB_HIDDEN_TIMEOUT=0
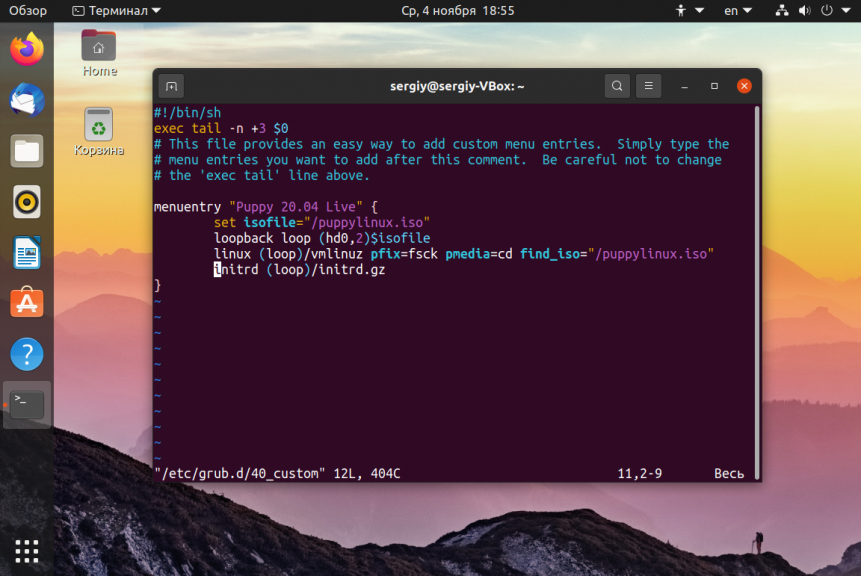
Перед строчкой должна стоять решетка. Сохраните изменения, а затем откройте файл /etc/grub.d/40_custom. Здесь мы добавим пункт для загрузки с образа, синтаксис выглядит следующим образом:
menuentry «Заголовок пункта» {
set isofile=«Адрес ISO файла»
loopback loop Раздел в форме записи Grub на котором расположен ISO$isofile
Параметры загрузки ядра
}
Перед тем, как переходить к настройке Grub надо выяснить ещё один момент. Как в оригинальном образе выполняется загрузка дистрибутива. Обычно в каждом загрузочном образе есть папка Grub в которой можно посмотреть файл grub.cfg или другой подобный, например loopback.cfg и узнать какими строками там загружается ядро:

Только перед путями к файлам надо добавить адрес (loop). Путь к образу надо указывать от начала того диска, на котором он расположен. Например, если диск расположен в корне загрузочного раздела, который монтируется в /boot, то и путь будет /файл.iso, а не /boot/файл.iso. Теперь можно переходить к примеру, запись для загрузки Puppy Linux будет выглядеть вот так:
menuentry "Puppy 20.04 Live" {

set isofile="/puppylinux.iso"

loopback loop (hd0,2)$isofile

linux (loop)/vmlinuz pfix=fsck pmedia=cd findiso="/puppylinux.iso"

initrd (loop)/initrd.gz

}
Каждый дистрибутив индивидуален и надо с каждым разбираться отдельно. Если вы хотите запускать Gparted:
menuentry "GParted Live amd64" {

set isofile="/gparted-live-0.18.0-2-amd64.iso"

loopback loop (hd0,2)$isofile

loopback loop $isofile

linux (loop)/live/vmlinuz boot=live config union=aufs noswap noprompt ip=frommedia toram=filesystem.squashfs findiso=${isofile}

initrd (loop)/live/initrd.img

}
Или даже Fedora Linux:
menuentry "Fedora Live" {

set isofile="/Fedora.iso"

loopback loop (hd0,2)$isofile

loopback loop $isofile

linux (loop)/isolinux/vmlinuz0 root=live:CDLABEL=Fedora-Live rootfstype=auto ro rd.live.image quiet rhgb rd.luks=0 rd.md=0 rd.dm=0 iso-scan/filename=${isofile}

initrd (loop)/isolinux/initrd0.img

}
Обратите внимание, что опции будут меняться в зависимости от дистрибутива и расположения в нем загрузочных файлов. Кроме того, важно то где размещен ISO образ, если ваш домашний каталог зашифрован лучше его хранить на загрузочном разделе, как в примерах выше.
Хотите больше? Можно загрузится с ISO для автоматического выполнения каких-либо действий. Например, если вы параноик и хотите иметь возможность быстро стереть свой жесткий диск можно использовать DBAN. Но будьте осторожны так как это сотрет все данные без возможности восстановления.
menuentry "Darik's Boot and Nuke" {

set isofile="/dban.iso"

loopback loop (hd0,1)$isofile

linux (loop)/dban.bzi nuke="dwipe" silent

}
Есть еще много вещей, которые можно сделать с помощью загрузки ISO образа в Grub, неважно хотите ли вы очень быструю Live систему или иметь возможность уничтожить все кончиком пальца.
Загрузка windows с iso образа в Grub
Если вам нужна загрузка Windows с ISO образа Grub, то это делается тоже не очень сложно, но немного по другому. Сначала нужно скачать syslinux и извлечь оттуда memdisk в папку /boot/. Это должна быть папка, куда установлены файлы Grub. Дальше добавьте в конфигурационный файл 40-grub.conf такие строки:
menuentry "Boot Windows" {

search -f "--set-root /Windows.iso"

insmod memdisk

linux16 /boot/memdisk iso

initrd16 /Windows.iso

}
Образ Windows должен лежать в корне одного из разделов и называться Windows.iso, дальше команда search автоматически найдет этот раздел и установит его в качестве корня. Потом останется только загрузка windows с iso образа grub.
Завершение настройки Grub
Мы все подготовили, теперь остается обновить конфигурацию загрузчика Grub, чтобы новые пункты добавились в /boot/grub/grub.cfg и появились в меню загрузки. Для Ubuntu команда будет выглядеть вот так:
sudo update-grub
В других дистрибутивах может понадобится команда:
sudo grub-mkconfig -o /boot/grub/grub.cfg
Затем можно перезагрузиться и посмотреть что получилось:
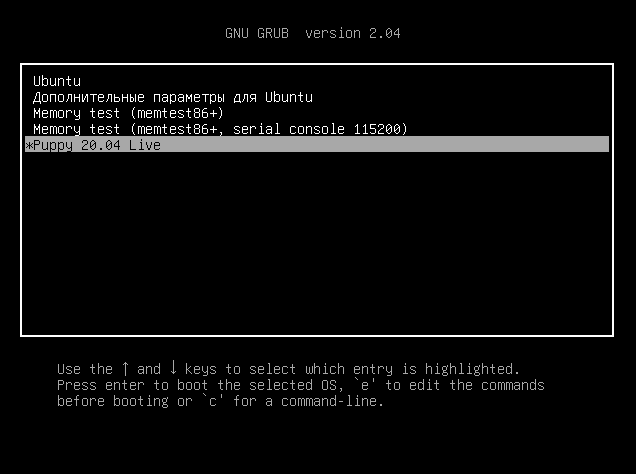
Если что-то пошло не так, вы можете нажать клавишу E и редактировать этот пункт меню чтобы попытаться исправить проблему прямо в загрузчике.
Выводы
Теперь вы знаете как выполняется загрузка iso образа grub, здесь нет ничего сложного, но зато это очень полезная возможность получить несколько систем на своем компьютере, затратив при этом минимум памяти и времени на их установки. Если у вас остались вопросы, спрашивайте в комментариях!
|
|
Отправлено: 11-Мар-2017 11:45
(спустя 39 минут)
Отправлено: 11-Мар-2017 11:45
(спустя 39 минут)
zdoba |
|
Отправлено: 11-Мар-2017 14:20
(спустя 2 часа 35 минут)
Отправлено: 11-Мар-2017 14:20
(спустя 2 часа 35 минут)
puhpol |
|
Отправлено: 11-Мар-2017 14:29
(спустя 9 минут)
Отправлено: 11-Мар-2017 14:29
(спустя 9 минут)
vovan1982 |
|
Отправлено: 11-Мар-2017 15:15
(спустя 45 минут)
Отправлено: 11-Мар-2017 15:15
(спустя 45 минут)
puhpol |
|
Отправлено: 11-Мар-2017 15:26
(спустя 10 минут)
Отправлено: 11-Мар-2017 15:26
(спустя 10 минут)
zdoba |
Качаем от сюда http://mirrors.ibiblio.org/gnu/alpha/gnu/grub/ Может это поможет? |
Отправлено: 11-Мар-2017 15:36
(спустя 10 минут)
Отправлено: 11-Мар-2017 15:36
(спустя 10 минут)
puhpol |
|
Отправлено: 11-Мар-2017 18:22
(спустя 2 часа 45 минут)
Отправлено: 11-Мар-2017 18:22
(спустя 2 часа 45 минут)
stea.61 |
38906
загрузчик можно собрать с нужными параметрами. Это делается обычно под Линукс. Приветствую. |
Отправлено: 11-Мар-2017 18:37
(спустя 15 минут)
Отправлено: 11-Мар-2017 18:37
(спустя 15 минут)
puhpol |
38914
Нет. Собрать своё загрузочное ядро (core) под Windows нельзя — только под Linux. Жаль… |
Отправлено: 11-Мар-2017 18:49
(спустя 11 минут)
Отправлено: 11-Мар-2017 18:49
(спустя 11 минут)
zdoba |
|
Отправлено: 11-Мар-2017 19:06
(спустя 16 минут)
Отправлено: 11-Мар-2017 19:06
(спустя 16 минут)
puhpol |
|
Отправлено: 11-Мар-2017 19:15
(спустя 8 минут)
Отправлено: 11-Мар-2017 19:15
(спустя 8 минут)
zdoba |
|
Отправлено: 11-Мар-2017 19:47
(спустя 31 минута)
Отправлено: 11-Мар-2017 19:47
(спустя 31 минута)
vovan1982 |
|
Отправлено: 11-Мар-2017 20:04
(спустя 17 минут)
Отправлено: 11-Мар-2017 20:04
(спустя 17 минут)
stea.61 |
38914
Нет. Собрать своё загрузочное ядро (core) под Windows нельзя — только под Linux. Прошу прощения. Последний раз редактировалось: stea.61 (2017-03-11 20:51), всего редактировалось 2 раз(а) |
Отправлено: 11-Мар-2017 20:05
(спустя 1 минута)
Отправлено: 11-Мар-2017 20:05
(спустя 1 минута)
nikzzzz |
38919
Мне «религия» не велит….. Так под Windows есть Cygwin, думаю, «религия» позволит. |
[Last updated on 2023.12.29]
Background:
GNU GRUB2 (not GRUB Legacy) is very powerful to act as the universal bootloader on a USB drive to install OSs from. There’re already many user friendly tools to customize a multi-OS installer (Rufus, WinUSB). There’re also guides around the internet explain the manual steps. The question is: how to make it “universally” and “compatible” with both BIOS and UEFI systems for different OSs. This article introduce a complete manual way to customize a multi-OS installation USB drive based on GRUB, providing multiple Linux & Window installation on a single USB drive.
Analysis:
The universal USB drive should at least meet below criteria:
- Compatible with both BIOS and UEFI.
- Multiple partitions to hold different OS installation source.
- Able to chainloader other bootloader or OS installer.
1. BIOS/UEFI compatible bootloader.
GRUB2 can support both BIOS and UEFI systems (different boot sequence) so there’s no gap in bootloader choosing.
2. Partition Table:
As long as there’s an ESP (EFI system partition) [1][5], both MBR and GPT disk can be used. However GPT disk has more benefits. Multiple primary partition support is “better to have” instead of “must have”. Most Linux Distro ISO can be booted directly via GRUB2, so putting all these ISOs in same partition won’t be a problem. Boot Windows ISO directly via GRUB2 is not always successful in both BIOS and UEFI (details later), so putting all Windows ISOs in same partition can’t be an option. Extracting all contents from different Windows installation ISOs to different folders in same partition is theoretically possible, however extra manipulation on each boot.wim are needed to make sure correct install.wim can always be found (Windows installation ISOs have very much similar file tree hierarchy from DVD_ROM root). Thus, extracting Windows installation ISO content to different partition without modification would be a better solution. Windows Boot Manager can only boot from primary partition (won’t recognize logical partition) [13], so using MBR disk will only have 3 available primary partitions (1 already assigned for ESP) to keep Windows installation files which is less flexible.
Based on above reasons, choose GPT with protective MBR [2][6] for the universal USB drive.
3. Chainloader capability.
Due to below facts, we’ll not consider booting Windows ISO from GRUB2 directly:
- Legacy grub4dos [15] only recognizes MBR but not GPT (nor GPT Protective MBR). Hybrid MBR is recognizable, but can only have 3 GPT partitions added as MBR primary. In addition, Hybrid MBR itself is kind of “messy” [3] so not recommended only for using grub4dos. Chenall’s grub4dos fork [16] for BIOS can recognize all GPT partitions, while it’s UEFI version can only recognize ESP, however with both I fail to boot a Windows ISO, although it’s possible [10].
- With memdisk (Syslinux Project) [9], GRUB 2 can boot harddisk or ISO image directly (via initrd16) on BIOS, but not UEFI (stuck on boot). In addition, memdisk will read all ISO content to memory which could exceed the total installed memory size.
GRUB2 meets below requirements as the chosen bootloader:
- Work on both BIOS and UEFI system. With protective MBR, the boot code won’t interfere each other.
- Recognize both GPT and MBR disks, partitions and different file systems.
- Boot real mode applications via linux16 (i.e. memtest for BIOS).
- Boot UEFI applications via chainloader (i.e. memtest for UEFI)
- Boot ISO via memdisk, loopback device, initrd16/initrd (i.e. Linux Distro, FreeDOS LiveCD, CloneZilla)
- Boot raw disk image.
- Boot other bootloaders via ntldr, chainloader (i.e. grub4dos, NT Loader, Windows Boot Manager)
Boot Flow:
Based on above analysis, boot flow for different purposes are listed below:
BIOS system: Boot code on BIOS Boot Partition -> GRUB2 boot directory (set by grub-install)
UEFI system: Boot code on ESP -> GRUB2 boot directory (set by grub-install)
Linux Distro, live CD or harddisk:
GRUB2 -> loopback if ISO file -> load kernel via linux, boot from ramdisk via initrd
Legacy or UEFI Application:
GRUB2 -> linux16/linux or chainloader
Bootable ISO:
GRUB2 -> memdisk iso -> initrd16/initrd16 ISO file
Windows XP installation ISO or harddisk (NT Loader):
GRUB2 ->chainloader setupldr.bin/bootsect.bin (ISO) or harddisk
Windows installation ISO, WinPE or harddisk (Windows Boot Manager) [11][12]:
Notes: Sorry for my miss, Windows installation will fail with this method “Windows could not prepare the computer to boot into the next phase of installation.” This could due to Winsetup couldn’t figure disk order if executed from a GPT USB: https://superuser.com/questions/1381492/why-does-windows-10-fail-to-install-on-uefi-gpt-laptop. Temporary solution is to deploy Windows using dism: https://learn.microsoft.com/en-us/windows-hardware/manufacture/desktop/capture-and-apply-windows-using-a-single-wim
BIOS system: GRUB2 -> memdisk harddisk -> initrd16 bootmgr VHD [7][8]
UEFI system: GRUB2 -> chainloader Windows Boot Manager for UEFI
grub4dos:
BIOS system: GRUB2 -> ntldr grldr
UEFI system: GRUB2 -> chainloader grub4dos UEFI
syslinux:
BIOS system: GRUB2 -> memdisk harddisk -> initrd16 syslinux.img
UEFI system: GRUB2 -> chainloader syslinux.efi
Detailed steps for each boot are explained in next section.
Steps:
This section explains all the details about how to make a universal bootable USB manually.
Disk Preparation:
# Start from gdisk
> sudo gdisk /dev/sdb
GPT fdisk (gdisk) version 1.0.9.1# A blank disk with no partition table
Partition table scan:
MBR: not present
BSD: not present
APM: not present
GPT: not present
Creating new GPT entries in memory.
# Destroy existing partition table and create new GPT and protective MBR (implicitly)
Command (? for help): o
This option deletes all partitions and creates a new protective MBR.
Proceed? (Y/N): y
# Create 1st partition as BIOS Boot partition to store MBR boot code
Command (? for help): n
Partition number (1-128, default 1):
First sector (34-61341662, default = 2048) or {+-}size{KMGTP}:
Last sector (2048-61341662, default = 61339647) or {+-}size{KMGTP}: +1M
Current type is 8300 (Linux filesystem)
Hex code or GUID (L to show codes, Enter = 8300): EF02
Changed type of partition to 'BIOS boot partition'
# Create 2nd partition as ESP for UEFI boot code
Command (? for help): n
Partition number (2-128, default 2):
First sector (34-61341662, default = 4096) or {+-}size{KMGTP}:
Last sector (4096-61341662, default = 61339647) or {+-}size{KMGTP}: +64M
Current type is 8300 (Linux filesystem)
Hex code or GUID (L to show codes, Enter = 8300): EF00
Changed type of partition to 'EFI system partition'
# Enter expert menu and create protective MBR. This is implicitly done on new GPT creation, so this step is just make the manual step clear
Command (? for help): x
Expert command (? for help): n
# Now let's hide BIOS boot partition from EFI and mark it bootable
Expert command (? for help): a
Partition number (1-2): 1
Known attributes are:
0: system partition
1: hide from EFI
2: legacy BIOS bootable
60: read-only
62: hidden
63: do not automount
Attribute value is 0000000000000000. Set fields are:
No fields set
Toggle which attribute field (0-63, 64 or <Enter> to exit): 1
Have enabled the 'hide from EFI' attribute.
Attribute value is 0000000000000002. Set fields are:
1 (hide from EFI)
Toggle which attribute field (0-63, 64 or <Enter> to exit): 2
Have enabled the 'legacy BIOS bootable' attribute.
Attribute value is 0000000000000006. Set fields are:
1 (hide from EFI)
2 (legacy BIOS bootable)
Toggle which attribute field (0-63, 64 or <Enter> to exit):
# Check the protective MBR in recovery menu. Hybrid MBR in same menu is not recommended.
Expert command (? for help): r
Recovery/transformation command (? for help): o
Disk size is 61341696 sectors (29.3 GiB)
MBR disk identifier: 0x00000000
MBR partitions:
# All range are covered by protective MBR.
Number Boot Start Sector End Sector Status Code
1 1 61341695 primary 0xEE
# Two partitions are ready now as the basic universal USB drive.
Recovery/transformation command (? for help): p
Disk /dev/sdb: 61341696 sectors, 29.3 GiB
Model: Cruzer Blade
Sector size (logical/physical): 512/512 bytes
Disk identifier (GUID): 6690CF32-AF0F-4667-995F-C290207BBF33
Partition table holds up to 128 entries
Main partition table begins at sector 2 and ends at sector 33
First usable sector is 34, last usable sector is 61341662
Partitions will be aligned on 2048-sector boundaries
Total free space is 61208509 sectors (29.2 GiB)
Number Start (sector) End (sector) Size Code Name
1 2048 4095 1024.0 KiB EF02 BIOS boot partition
2 4096 135167 64.0 MiB EF00 EFI system partition
# Write everything down to the disk.
Recovery/transformation command (? for help): w
Final checks complete. About to write GPT data. THIS WILL OVERWRITE EXISTING
PARTITIONS!!
Do you want to proceed? (Y/N): y
OK; writing new GUID partition table (GPT) to /dev/sdb.
The operation has completed successfully.
# Format ESP as FAT32
> sudo mkfs.vfat -F32 /dev/sdb2
mkfs.fat 4.2 (2021-01-31)
# Set a label (optional)
> sudo fatlabel /dev/sdb2 ESP
# Mount ESP to installer UEFI boot loader
> sudo mount /dev/sdb2 /mnt/data
# Install grub for BIOS (BIOS boot partition) and i386/amd64 EFI (different binary and mod folder).
> sudo grub-install --target=i386-pc --boot-directory=/mnt/data/boot --removable /dev/sdb
Installing for i386-pc platform.
Installation finished. No error reported.
> sudo grub-install --target=i386-efi --efi-directory=/mnt/data/ --boot-directory=/mnt/data/boot --removable /dev/sdb
Installing for i386-efi platform.
Installation finished. No error reported.
> sudo grub-install --target=x86_64-efi --efi-directory=/mnt/data/ --boot-directory=/mnt/data/boot --removable /dev/sdb
Installing for x86_64-efi platform.
Installation finished. No error reported.
# Unmount.
> sudo umount /dev/sdb2
Now you have a GRUB-ready USB drive for both BIOS/UEFI boot. The following sections will introduce how to configure grub.cfg for different boots.
As for partition arrangement, 1 M should be enough for BIOS boot partition [4]; ESP size is based on what content you’d like save in ESP, grub-install only takes ~18 M. I’m using 64 M here as I’ll save Windows Boot Manager VHD/ISO, grub4dos, syslinux and other applications. Other partitions are not created here, but will be described along with grub.cfg explanation.
Basic GRUB Configuration:
Most part of grub.cfg is organized by entry, but still share some common configs.
insmod part_gpt # GPT partition table
insmod part_msdos # MBR partition table
insmod fat # FAT partition
insmod exfat # exFAT partition
insmod ext2 # ext partition
insmod ntfs # NTFS partition
insmod ntfscomp # NTFS compression
insmod allvideo # Additional video and graphics
insmod chain # chainloaderif [ ${grub_platform} == "pc" ]; then
    insmod ntldr # chainloader from file without reading boot record
else
    insmod efi_uga # UEFI UGA
    insmod efi_gop # UEFI GOP
fi
GRUB provide some variables to help identify different architecture: ${grub_platform}: pc or efi, ${grub_cpu}: i386 or x86_64, so that you can use same grub.cfg for more flexible configuration. As above, ntldr is only available for BIOS, GOP driver is only available for UEFI.
In order to boot both BIOS and UEFI machine, the USB drive must be initialized as MBR disk (BIOS doesn’t recognize GPT), and should be partitioned compatible for both BIOS and UEFI can boot from. According to UEFI spec [1], UEFI boot requires ESP (EFI System Partition) which “happens” to be compatible with FAT32, and assign GPT partition type of C12A7328-F81F-11D2-BA4B-00A0C93EC93B. The ESP partition type on MBR disk is 0xEF.
Thus, only FAT32/ESP stores EFI binary could be booted for both BIOS and UEFI.
To use GRUB as the universal USB drive bootloader, you have to install BIOS/UEFI grub on FAT32 partition, write the MBR boot sector for BIOS boot. If you have large files above 4G, consider separating the boot partition with data partitions (could be FAT32, ext4, exFAT or NTFS).
System Management:
menuentry "Reboot" {
    reboot
}menuentry "Shutdown" {
    halt
}
Legacy Application:
GRUB linux16 can load image from 16-bit mode, examples like memtest and FreeDOS ISO. initrd16 can be used if initial ramdisk is required.
menuentry "MemTest86 BIOS" {
    linux16 (hd0,gpt2)/memtest86/MEMTEST
    boot
}menuentry "FreeDOS" {
    linux16 (hd0,gpt2)/bios/memdisk iso
    initrd16 (hd0,gpt3)/freedos/FD13LIVE.iso
}
UEFI Application:
Simply chainloader it:
menuentry "MemTest86 UEFI" {
    set root='(hd0,gpt2)'
    if [ ${grub_cpu} == "i386" ]; then
        chainloader /memtest86/EFI/BOOTIA32.EFI
    else
        chainloader /memtest86/EFI/BOOTX64.EFI
    fi
    boot
}
grub4dos:
Someone may prefer load Windows via grub4dos, so you can chainloader via GRUB. grub4dos fork now has UEFI support [16].
menuentry "grub4dos" {
    if [ ${grub_platform} == "pc" ]; then
        ntldr (hd0,gpt2)/boot/grub4dos/grldr
    else
        chainloader (hd0,gpt2)/boot/grub4dos/BOOTX64.EFI
    fi
}
Syslinux:
Get the latest syslinux from: https://wiki.syslinux.org/wiki/index.php?title=Download, create for BIOS and UEFI as below, then add a GRUB2 entry:
menuentry "syslinux" {
    if [ ${grub_platform} == "pc" ]; then
        linux16 (hd0,gpt2)/bios/memdisk harddisk
        initrd16 (hd0,gpt2)/bios/syslinux.img
    else
        chainloader (hd0,gpt2)/EFI/syslinux/syslinux.efi
    fi
}
BIOS:
Create a raw image which contains syslinux only as below, then copy to (ESP)/BIOS/syslinux.img, boot the raw image to syslinux.
# Prepare a empty image for syslinux
> dd if=/dev/zero of=syslinux.img bs=1M count=4# Init as MBR and create one active primary partition
> fdisk syslinux.img
Welcome to fdisk (util-linux 2.39.3).
Changes will remain in memory only, until you decide to write them.
Be careful before using the write command.
Device does not contain a recognized partition table.
Created a new DOS (MBR) disklabel with disk identifier 0xceefcff7.
Command (m for help): o
Created a new DOS (MBR) disklabel with disk identifier 0x94f80733.
Command (m for help): n
Partition type
p primary (0 primary, 0 extended, 4 free)
e extended (container for logical partitions)
Select (default p): p
Partition number (1-4, default 1): 1
# Start from sector 2048
First sector (1-8191, default 1): 2048
Last sector, +/-sectors or +/-size{K,M,G,T,P} (2048-8191, default 8191):
Created a new partition 1 of type 'Linux' and of size 3 MiB.
Command (m for help): a
Selected partition 1
The bootable flag on partition 1 is enabled now.
Command (m for help): p
Disk syslinux.img: 4 MiB, 4194304 bytes, 8192 sectors
Units: sectors of 1 * 512 = 512 bytes
Sector size (logical/physical): 512 bytes / 512 bytes
I/O size (minimum/optimal): 512 bytes / 512 bytes
Disklabel type: dos
Disk identifier: 0x94f80733
Device Boot Start End Sectors Size Id Type
syslinux.img1 * 2048 8191 6144 3M 83 Linux
Command (m for help): w
The partition table has been altered.
Syncing disks.
# Format the primary partition as ext4
> mkfs.ext4 syslinux.img -E offset=$(( 512 * 2048 ))
mke2fs 1.47.0 (5-Feb-2023)
Warning: offset specified without an explicit file system size.
Creating a file system with 3072 blocks but this might
not be what you want.
Discarding device blocks: done
Creating filesystem with 3072 1k blocks and 768 inodes
Allocating group tables: done
Writing inode tables: done
Creating journal (1024 blocks): done
Writing superblocks and filesystem accounting information: done
# Mount the partition to install syslinux
> sudo mount -o offset=$(( 512 * 2048 )) syslinux.img /mnt/data
> sudo mkdir /mnt/data/syslinux
# Copy all .c32 for BIOS, create syslinux.cfg as configuration.
> find <extracted_syslinux> -type f -name \*.c32 | xargs -i sudo cp {} /mnt/data/syslinux/
# Copy memdisk as well
> sudo cp <extracted_syslinux>/bios/memdisk/memdisk /mnt/data/syslinux/
# Install syslinux
> sudo extlinux --install /mnt/data/syslinux
/mnt/data/syslinux is device /dev/loop0
Warning: unable to obtain device geometry (defaulting to 64 heads, 32 sectors)
(on hard disks, this is usually harmless.)
> sudo umount /mnt/data
# Set MBR boot sector
> dd if=<extracted_syslinux>/bios/mbr/mbr.bin of=./syslinux.img bs=440 count=1 conv=notrunc
1+0 records in
1+0 records out
440 bytes copied, 5.0004e-05 s, 8.8 MB/s
UEFI:
Copy syslinux.efi and *.c32 files for UEFI 32/64 to (ESP)/EFI/syslinux/, create syslinux.cfg in same folder.
Linux LiveCD or Distro.:
Almost all Linux distros share the very similar steps: load the kernel and the initial ramdisk. They differ in parameters which are distro specific. Like Clonezilla, “findiso” and “toram=filesystem.squashfs” are necessary to boot LiveCD, other wise the rootfs can’t be mounted. Below’s the example for booting Clonezilla and Ubuntu from ISO.
menuentry "Clonezilla 3.1.1-27" {
    set root='(hd0,gpt3)'
    set isofile="/clonezilla/clonezilla-live-3.1.1-27-amd64.iso"
    loopback loop $isofile
    linux (loop)/live/vmlinuz boot=live union=overlay username=user config components quiet loglevel=0 noswap edd=on nomodeset enforcing=0 locales= keyboard-layouts= ocs_live_run="ocs-live-general" ocs_live_extra_param="" ocs_live_batch="no" vga=788 ip= net.ifnames=0  nosplash i915.blacklist=yes radeonhd.blacklist=yes nouveau.blacklist=yes vmwgfx.enable_fbdev=1 findiso=$isofile toram=filesystem.squashfs
    initrd (loop)/live/initrd.img
}submenu "Ubuntu 22.04.3" {
    set root='(hd0,gpt3)'
    set gfxpayload=keep
    menuentry "Try Ubuntu 22.04.3 Desktop without installing" {
        set isofile="/ubuntu-22.04.3-desktop-amd64.iso"
        loopback loop $isofile
        linux (loop)/casper/vmlinuz iso-scan/filename=$isofile boot=casper quiet splash ---
        initrd (loop)/casper/initrd
    }
    menuentry "Install Ubuntu 22.04.3 Desktop" {
        set isofile="/ubuntu-22.04.3-desktop-amd64.iso"
        loopback loop $isofile
        linux (loop)/casper/vmlinuz iso-scan/filename=$isofile boot=casper only-ubiquity quiet splash ---
        initrd (loop)/casper/initrd
    }
    menuentry "Try or Install Ubuntu 22.04.3 Server" {
        set isofile="/ubuntu-22.04.3-live-server-amd64.iso"
        loopback loop $isofile
        linux (loop)/casper/vmlinuz iso-scan/filename=$isofile boot=casper ---
        initrd (loop)/casper/initrd
    }
}
Notes for Windows:
Maybe there exists perfect solution to boot Windows ISO directly (like via grub4dos), from my experience extracting ISO contents to separate partition root and let Windows Boot Manager handle it is more straightforward and easy to configure, as describe in section 2. All subsequent Windows boot methods are assuming the ISO contents are extracted to different partition (recommend NTFS instead of FAT32 to avoid 4G file size limit)
Windows (NTLDR: NT Loader):
Not sure how many will still install Windows XP nowadays. Simply extract the ISO content to some partition and chainloder it:
menuentry "Windows XP" {
    chainloader (hd0,gpt4)/winxp/i386/setupldr.bin
    # Or chainloader (hd0,gpt4)/winxp/bootsect.bin
}
Windows (BOOTMGR: Windows Boot Manager):
bootmgr is the replacement of NTLDR since Windows Vista, the boot sequence always starts from bootmgr reading BCD file to get the actual boot device. For installation ISO (Windows Vista+), bootmgr->boot.wim (WinPE) -> install.wim (Windows). For installed Windows on disk, bootmgr -> winload. In this recommended guide, the extracted contents from different Windows ISOs need NO modification at all if saved on different partitions. We just need put correct bootmgr and BCD in expected place and chainloader bootmgr, then let bootmgr handle different Windows.
Below is the entry added to grub.cfg.
menuentry "Windows Boot Manager" {
    set root='(hd0,gpt2)'
    if [ ${grub_platform} == "pc" ]; then
        #linux16 /bios/memdisk iso
        #initrd16 /bios/bootmgr.iso
        linux16 /bios/memdisk harddisk
        initrd16 /bios/bootmgr.vhd
    else
        if [ ${grub_cpu} == "i386" ]; then
            chainloader /EFI/BOOT/BOOTIA32W.EFI
        else
            chainloader /EFI/BOOT/BOOTX64W.EFI
        fi
    fi
}
Let’s explain it with more details. For BIOS, use memdisk to load bootmgr.vhd in memory and boot it as a harddisk. For UEFI, just chainloader bootmgr, then bootmgr and BCD (BIOS: on VHD, UEFI: in ESP) will handle the actual Windows booting. Be noticed that bootmgr and BCD are different for the two platforms so need to be customized separately. GRUB can’t directly chainloder bootmgr or bootmgr.efi, but need its own boot code (MBR boot code or /EFI/Boot/bootx64.efi or /EFI/Boot/bootia32.efi).
UEFI:
Copy below files from ISO to ESP. I was using the latest WinPE, but you could also get any version of bootmgr from other Windows installation ISO.
# Copy from ISO and rename to differentiate with GRUB's boot loader.
cp /mnt/iso/EFI/Boot/bootx64.efi /mnt/SDB_ESP/EFI/BOOT/BOOTX64W.EFI# The BCD on ISO can't be used directly, copy to somewhere else (ESP isn't accessible from Windows), modify it, and copy back to ESP.
cp /mnt/iso/EFI/Microsoft/Boot/BCD (somewhere)/BCD
[bcdedit /store BCD ...]# Modify BCD, see details later
cp (somewhere)/BCD /mnt/SDB_ESP/EFI/Microsoft/Boot/BCD
# Also copy Windows memtest for diagnostic purpose on Windows Boot Menu.
cp /mnt/iso/EFI/Microsoft/Boot/memtest.efi /mnt/SDB_ESP/EFI/Microsoft/Boot/
BIOS:
Unlike UEFI boot which can directly chainloader bootmgr, BIOS need firstly boot from VHD/ISO MBR, then let bootmgr on VHD/ISO handle the actual Windows boot.
1. Use VHD:
Let’s use VHD method first. Use diskpart in Windows (or WinPE, or shift+F10 during Windows installation) to create a VHD as below:
X:\Windows\System32>diskpartMicrosoft DiskPart version 10.0.25398.1
Copyright (C) Microsoft Corporation.
On computer: MININT-I9PC50R
# Create an empty VHD file. I found NTFS need 8M to format so can't be smaller although the total files will only take less than 2M.
DISKPART> create vdisk file="c:\bootmgr.vhd" type=fixed maximum=8
100 percent completed
DiskPart successfully created the virtual disk file.
# Select the create vhd
DISKPART> select vdisk file="c:\bootmgr.vhd"
DiskPart successfully selected the virtual disk file.
# Attach the selected vhd as disk
DISKPART> attach vdisk
100 percent completed
DiskPart successfully attached the virtual disk file.
# List and select the correct disk to operate
DISKPART> list disk
Disk ### Status Size Free Dyn Gpt
-------- ------------- ------- ------- --- ---
Disk 0 Online 29 GB 16 GB *
* Disk 1 Online 8 MB 8 MB
# Create primary partition at offset 1024 and mark it as active so that it's bootable
DISKPART> create partition primary offset=1024
DiskPart succeeded in creating the specified partition.
DISKPART> list partition
Partition ### Type Size Offset
------------- ---------------- ------- -------
* Partition 1 Primary 6144 KB 1024 KB
DISKPART> select partition 1
Partition 1 is now the selected partition.
DISKPART> active
DiskPart marked the current partition as active.
# Format as NTFS. FAT32 also works but with NTFS the VHD is smaller in size
DISKPART> format fs=ntfs label="BOOTMGR" quick
100 percent completed
DiskPart successfully formatted the volume.
DISKPART> detail partition
Partition 1
Type : 07
Hidden: No
Active: Yes
Offset in Bytes: 1048576
Volume ### Ltr Label Fs Type Size Status Info
---------- --- ----------- ----- ---------- ------- --------- --------
* Volume 3 BOOTMGR NTFS Partition 6144 KB Healthy
# Assign the newly created partition a volume letter
DISKPART> list vol
Volume ### Ltr Label Fs Type Size Status Info
---------- --- ----------- ----- ---------- ------- --------- --------
Volume 0 D DVD_ROM UDF CD-ROM 332 MB Healthy
Volume 1 C WIN10_22H2 NTFS Removable 4600 MB Healthy
* Volume 3 BOOTMGR NTFS Partition 6144 KB Healthy
DISKPART> select vol 3
Volume 3 is the selected volume.
DISKPART> assign letter=V
DiskPart successfully assigned the drive letter or mount point.
DISKPART> exit
Leaving DiskPart...
# Now use bootsect to write the BIOS/MBR boot code. It has to be successful.
X:\Windows\System32>bootsect /nt60 V: /mbr
Target volumes will be updated with BOOTMGR compatible bootcode.
V: (\\?\Volume{7c5f0f54-0000-0000-0000-100000000000})
Successfully updated NTFS filesystem bootcode.
\??\PhysicalDrive1
Successfully updated disk bootcode.
Bootcode was successfully updated on all targeted volumes.
# Now manually copy necessary files to the partition. bcdboot also works but since you only need 3 files, copy them manually is straight-forward to understand. Be noticed that the BCD here won't work directly as it's copied from current system. See later sections for how to customize the BCD.
X:\Windows\System32>mkdir V:\Boot
X:\Windows\System32>copy c:\bootmgr V:\bootmgr
1 file(s) copied.
X:\Windows\System32>copy C:\Boot\BCD V:\Boot\BCD
1 file(s) copied.
X:\Windows\System32>copy c:\Boot\memtest.exe V:\Boot\
1 file(s) copied.
# Safely detach the vdisk
C:\>diskpart
Microsoft DiskPart version 10.0.25398.1
Copyright (C) Microsoft Corporation.
On computer: MININT-I9PC50R
DISKPART> list vol
Volume ### Ltr Label Fs Type Size Status Info
---------- --- ----------- ----- ---------- ------- --------- --------
Volume 0 D DVD_ROM UDF CD-ROM 332 MB Healthy
Volume 1 C WIN10_22H2 NTFS Removable 4600 MB Healthy
Volume 3 V BOOTMGR NTFS Partition 6144 KB Healthy
DISKPART> select vol 3
Volume 3 is the selected volume.
DISKPART> remove letter=V
DiskPart successfully removed the drive letter or mount point.
DISKPART> select vdisk file="c:\bootmgr.vhd"
DiskPart successfully selected the virtual disk file.
DISKPART> detach vdisk
DiskPart successfully detached the virtual disk file.
DISKPART> exit
Leaving DiskPart...
2. Use ISO:
The steps of creating a bootable ISO are much easier than VHD. With oscdimg included in Assessment and Deployment Kit, you could create a bootable ISO from the specified folder, and with customized BCD included, you could boot into different Windows partitions with one bootmgr:
# -u2 and -udfver102 give more compatibility. Unlike WinPE, here we only add 1 boot entry: legacy boot using etfsboot.com as the boot code. Check oscdimg help for all the details.
> oscdimg.exe -m -o -u1 -udfver102 -bootdata:1#p0,e,bC:\WinPE_amd64\etfsboot.com "C:\WinPE_amd64\ISO" "C:\WinPE_amd64\bootmgr.iso"OSCDIMG 2.56 CD-ROM and DVD-ROM Premastering Utility
Copyright (C) Microsoft, 1993-2012. All rights reserved.
Licensed only for producing Microsoft authorized content.
Scanning source tree
Scanning source tree complete (4 files in 2 directories)
Computing directory information complete
Image file is 3702784 bytes (before optimization)
Writing 4 files in 2 directories to C:\WinPE_amd64\bootmgr.iso
100% complete
Storage optimization saved 0 files, 0 bytes (1% of image)
After optimization, image file is 3686400 bytes
Space saved because of embedding, sparseness or optimization = 0
Done.
# Here's all files you'll need. Same as above, BCD needs customization, otherwise bootmgr can't find the correct device to boot from.
>tree C:\WinPE_amd64\ISO\ /F
Folder PATH listing for volume Windows
Volume serial number is 0000020F 589F:DC0E
C:\WINPE_AMD64\ISO
│ bootmgr
│ readme.txt
│
└───Boot
BCD
memtest.exe
BCD customization:
BCD entry is device specific, and it seems bcdedit can only modify BCD entry with the pointed device available in current system, as it relies on the device object that being identified by current running system to set the BCD entry, which relies on the USB drive present in the same system. Below is an example how it looks from WinObj and gdisk. With same USB drive present in the system, bcdedit can set correct entry based on the device element definition [14]. If create a BCD another system without the same USB drive attached, bcdedit will not set correct device, \Device\HarddiskVolume4 will point to another partition, and after copy the BCD to the USB drive, those entry will show device points to “unknown”.
umber  Start (sector)    End (sector)  Size       Code  Name
   1            2048            4095   1024.0 KiB  EF02  BIOS boot partition
   2            4096          135167   64.0 MiB    EF00  EFI system partition
   3          135168        16314367   7.7 GiB     8300  Linux filesystem
   4        16314368        25735167   4.5 GiB     0700  Microsoft basic data
Comparing the dump result of WinObj with gdisk: \Device\HarddiskVolumex can point to same partition index x from gdisk. As long as you make the BCD customization with the target USB drive attached, there’s no need to worry x will be different on other systems: BCD stores the device element by disk/partition signature and offsets.
BCD for BIOS and UEFI sit in different location: \Boot\ vs. \EFI\Microsoft\Boot\, share most part but the executable name and few other settings: winload.exe vs. winload.efi, memtest.exe vs. memtest.efi. It’s suggested to take the original BCD as the base, add customized entry, and save at (ESP)\EFI\Microsoft\Boot and (ESP)\BIOS\BOOTMGR.VHD (or BOOTMGR.ISO). Below is the example of adding Windows 10 from partition 4.
# Display boot menu in legacy style to choose which boot.wim to load
> bcdedit /store BCD /set {bootmgr} displaybootmenu yes
# Change the ramdisk device location to the partition which the specific Windows stores. HarddiskVolume4 indicate it's 4th partition.
> bcdedit /store BCD /set {default} device ramdisk=[\Device\HarddiskVolume4]\sources\boot.wim,{7619dcc8-fafe-11d9-b411-000476eba25f}
# Ditto to osdevice
> bcdedit /store BCD /set {default} osdevice ramdisk=[\Device\HarddiskVolume4]\sources\boot.wim,{7619dcc8-fafe-11d9-b411-000476eba25f}
# Change the entry description to match the actual Windows to be installed
> bcdedit /store BCD /set {default} description "Windows 10 22H2"
# Change the location of SDI
> bcdedit /store BCD /set {7619dcc8-fafe-11d9-b411-000476eba25f} ramdisksdidevice Partition=\Device\HarddiskVolume4
Below is the example of the modified BCD save at (ESP)\EFI\Microsoft\Boot\BCD. You could modify the BCD for BIOS in similar way. Be noticed that although \Device\HarddiskVolume4 is used during bcdedit, the result shows as partition C. This is what mentioned before as “bcdedit can only modify BCD entry with the pointed device available in system”. According to [14], the actual data saved as device entry is composed of disk signature and partition offset. As long as you specific the correct \Device\HarddiskVolumex or volume letter when the USB drive is attached, boot manager will parse the correct partition to boot from and won’t literally use “partition C”.
> bcdedit /store BCD_UEFI /enum allWindows Boot Manager
--------------------
identifier {bootmgr}
description Windows Boot Manager
locale en-US
inherit {globalsettings}
flightsigning Yes
default {default}
displayorder {default}
toolsdisplayorder {memdiag}
timeout 30
displaybootmenu Yes
Windows Boot Loader
-------------------
identifier {default}
device ramdisk=[C:]\sources\boot.wim,{7619dcc8-fafe-11d9-b411-000476eba25f}
path \windows\system32\boot\winload.efi
description Windows 10 22H2
locale en-US
inherit {bootloadersettings}
isolatedcontext Yes
osdevice ramdisk=[C:]\sources\boot.wim,{7619dcc8-fafe-11d9-b411-000476eba25f}
systemroot \windows
bootmenupolicy Standard
detecthal Yes
winpe Yes
ems No
Windows Memory Tester
---------------------
identifier {memdiag}
device boot
path \efi\microsoft\boot\memtest.efi
description Windows Memory Diagnostic
locale en-US
inherit {globalsettings}
EMS Settings
------------
identifier {emssettings}
bootems No
Debugger Settings
-----------------
identifier {dbgsettings}
debugtype Serial
debugport 1
baudrate 115200
Global Settings
---------------
identifier {globalsettings}
inherit {dbgsettings}
{emssettings}
Boot Loader Settings
--------------------
identifier {bootloadersettings}
inherit {globalsettings}
{hypervisorsettings}
Hypervisor Settings
-------------------
identifier {hypervisorsettings}
description Hypervisor Settings
hypervisordebugtype Serial
hypervisordebugport 1
hypervisorbaudrate 115200
Device options
--------------
identifier {7619dcc8-fafe-11d9-b411-000476eba25f}
ramdisksdidevice partition=C:
ramdisksdipath \boot\boot.sdi
Reference:
- http://www.uefi.org/sites/default/files/resources/UEFI%202_5.pdf
- https://thestarman.pcministry.com/asm/mbr/GPT.htm
- https://www.rodsbooks.com/gdisk/hybrid.html
- https://www.gnu.org/software/grub/manual/grub/grub.html#BIOS-installation
- https://superuser.com/questions/1025423/uefi-exfat-partition
- https://superuser.com/questions/1165557/how-grub2-works-on-a-mbr-partitioned-disk-and-gpt-partitioned-disk
- https://wzyboy.im/post/1049.html
- http://reboot.pro/index.php?showtopic=19516&page=2
- https://wiki.syslinux.org/wiki/index.php?title=MEMDISK
- https://superuser.com/questions/1722409/boot-windows-7-10-11-installation-in-grub-on-gpt-partittioned-usb
- https://learn.microsoft.com/en-us/windows-hardware/manufacture/desktop/configure-uefigpt-based-hard-drive-partitions
- https://learn.microsoft.com/en-us/windows-hardware/manufacture/desktop/configure-biosmbr-based-hard-drive-partitions
- https://learn.microsoft.com/en-us/windows-hardware/manufacture/desktop/windows-and-gpt-faq
- http://www.mistyprojects.co.uk/documents/BCDEdit/files/bcd.htm
- https://grub4dos.sourceforge.net/
- http://grub4dos.chenall.net/