
Download Article
Download Article
- Booting from CD
- Installing Windows 98
- Video
- Q&A
- Tips
- Warnings
- Things You’ll Need
|
|
|
|
|
|
Windows 98 was a closed source 16 bit/32bit hybrid operating system released on June 25, 1998. It succeeded Windows 95 and was succeeded by Windows ME. Upgrades were available with the release of Windows 98 Second Edition (released 5th May 1999) and Windows 98 Plus. Support ended for Windows 98 11th July 2006 so this guide is for techies who wish to relive their Windows 9x past.
-

-
Advertisement
-
-
and press ↵ Enter.
-
-
-
This is all down to personal preference but «Yes, enable large disk support» was selected in this tutorial.
-
-


Advertisement
-
and press ↵ Enter.
-
-
-
- It is recommended to use the directory that Windows recommends (in this case C:\\WINDOWS).
-
This is all down to personal preference, however, «Typical» was chosen for this tutorial.
-
«Install the most common components (Recommended)» was chosen for this tutorial but this is all down to personal preference.
-
- If the first two text boxes are filled, you may leave them.
- The «Computer Description» field is not essential for the installation.
-
-
-
-
-
-
- It’s always a good idea to read the License Agreement so you know what you’re signing up for.
-
-
-
-
-
-
-
-


Advertisement
Add New Question
-
Question
What happens if I restart windows 98 in MS-DOS mode?
It will boot into a DOS-like environment, using command-line instructions instead of a graphical interface. This is for playing MS-DOS games.
-
Question
Can I install Windows 98 while on Windows 95?
Yes. If you insert the Windows 98 installation CD while Windows 95 is running, you should be given the option to upgrade there and then. Alternatively, you can place the CD into the computer while it’s turned off, then turn it on, go into your boot menu and boot from the CD to install. If you use this method, be careful, as you might end up formatting your hard drive inadvertently. Be sure to back up your files before attempting this.
-
Question
Why would anyone do this?
If someone has a lot of DOS programs, installing Windows 98 onto either a Virtual Machine or real hardware will allow that user to use those programs again. While some DOS programs may run on newer machines, they may run into compatibility issues.
See more answers
Ask a Question
200 characters left
Include your email address to get a message when this question is answered.
Submit
Advertisement
Video
-
In this menu, it shows «Time remaining: 10» If you need more time, press either the ↑ or ↓ arrow key and you will have unlimited time to make a choice.
-
You upgrade to Windows 98 from 95 by inserting the Windows 98 installation disk into a computer running Windows 95.
Thanks for submitting a tip for review!
Advertisement
-
Modern programs may not be compatible with Windows 98.
-
Do not unplug/turn off the computer at any stage of the installation unless an instruction during the installation permits. This could cause the installation process to corrupt and will need to be repeated.
-
Windows 98 is no longer a supported operating system which makes it vulnerable to viruses.
Advertisement
Things You’ll Need
- A computer
- Windows 98 installation CD-ROM with a product key
References
About This Article
Thanks to all authors for creating a page that has been read 95,116 times.
Is this article up to date?
Тема: Помогите установить Win 98 через DOS (Прочитано 7919 раз)
0 Пользователей и 1 Гость просматривают эту тему.
Не удивляйтесь, что я решил сменить современную ОС’ку на древнюю, нет я хочу плепить 2 системы не удаляя XP. Но вот задача: я не могу установить её с XP, а с Boot не получается.
Остаётся с помощью дискеты. Я вот тока не знаю, как это делать (никогда не сталкивался)
Помогите пожалуста…
Почему с Boot не получается?
Пишет ошибку #5 Якобы программа дала сбой…
Перед установкой надо выбрать тип драйвера (всего их 2)(SCSI или чёта подобное)
У тебя что, диск от «Золотого софта»?
IDE выбирать надо.
Убедитесь что на FAT32 ставите. И не setup.exe,
а setupcor.exe выбирайте.
У тебя что, диск от «Золотого софта»?
IDE выбирать надо.
Да я все перепробовал. В другом случае ваще пишет «не правильная функция. А диск… фиг его знает от какой фирмы. Когда он бутится, то через прогу волкова. Там же: Windows ME, форматирование, Scandisk…
Вот я думаю через дискету… но я не знаю команд!
« Последнее редактирование: 13 Февраль 2006, 18:19:25 от Wladislaff »
Wladislaff у тебя в BIOSе CD-ROM стоит на первом месте? И жёсткий диск у тебя какой? Если IDE,то должно быть всё в порядке,а если новый SATA то он требует дискету с драйвером на него(сам намучился,устанавливал у друга). А ваще он должен на автомате пойти,проверить диски,свободное место и т.д. Просто надо создать новую папку,куда будешь кидать Винду! Я лично выбирал «Boot from CD-ROM» и у меня всё дальше само шло…….
Ну тут дело действительно в выборе типа драйвера.
KIR16-BIT, я давным-давно устанавливал, вродеб всё шло.
У меня сначало Сидюк стоит потом винт… (у меня не SATA)
ЗЫ у меня таким образом и ME не устанавливается. А др проги на этом диске пркт нормально…
ambar
Попробуй буква CDrom:\папка вdbyls\setup.exe (типа E:\win98\setup.exe)
Попробуй буква CDrom:\папка вdbyls\setup.exe (типа E:\win98\setup.exe)
Это через дискету?
Wladislaff, это же просто! Правда, желателен мультизагрузчик… Крайне желателен. Итак, понадобятся пакеты от Power Quest (Partition Magic+ Boot Magic), или от Acronis (DiskDirector Suite) или любые другие подобные. В общем, если не боишься текстового интерфейса, пользуйся fdiskом для Win98 или ME. Перво — наперво создай новый пустой раздел в
Partition Magic или Disk Director Suite, откусив место у имеющегося раздела, где есть свободное место! Внимание:раздел должен быть Первичным (Primary)! Затем, делаем его активным, перезагружаем компьютер, не забыв вставить бутовый компакт для win9x или подобную дискету в соответствующий привод компьютера! Если оных нет, можно создать дискету MS DOS из под Windows XP, но способ далеко не лучший, более того, нормально не работающий… но можно. Если так — дистрибутив винды должен находиться на доступном диске, перед загрузкой с дискеты, перво — наперво убери всю руссификаторскую хрень из AUTOEXEC.BAT на ней и не забудь скопировать дистрибутив винды на винт, причём обязательно, на доступный раздел. Дальше — дело техники. Всё должно получиться!
Не игнорируй сообщение Zephyrа!
Убедитесь что на FAT32 ставите. И не setup.exe,
а setupcor.exe выбирайте.
Только так и не иначе на новом железе!!!
бутовый компакт для win9x или подобную дискету
Это загрузочная дискета MS-DOS?
У меня диск разделён на 2 части, я хочу установить к примеру на вторую часть (D:\…) она у меня пустая, если её сделать ПЕРВИЧНОЙ?
Ну и второе будет ли при этом пахать XP, который присутствует в моём комьютере в данный момент?
« Последнее редактирование: 14 Февраль 2006, 16:18:19 от Wladislaff »
Это загрузочная дискета MS-DOS?
Да! но лучше, загрузочная дискета windows 98 — ME.
У меня диск разделён на 2 части, я хочу установить к примеру на вторую часть (D:\…) она у меня пустая, если её сделать ПЕРВИЧНОЙ?
Да, любой из вышеупомянутых утилит. Правда, проще сделать так — удалить раздел(D:\…) и на его месте создать новый primary, который временно, на время установки win9x, сделать активным. Потом нужно будет обязательно поставить загрузчик. Например Boot Magic, OS Selector или любой другой.
Ну и второе будет ли при этом пахать XP, который присутствует в моём комьютере в данный момент?
Да! Иначе, эти советы ни к чему!
Потом нужно будет обязательно поставить загрузчик
А, что это? Я просто не в курсе (никогда этим не занимался)))
Добавлено через 5 минут
Да ещё, что дискета от ХР не подойдёт?
А, что это? Я просто не в курсе (никогда этим не занимался)))
так… ясно… ищи на варезных сайтах (только, умоляю, не спрашивай allah weysmollah!!!что это такое!) проги Partition Magic и Boot Magic… Впрочем, про варезные сайты я зря ляпнул… можно вполне работоспособные версии скачать с любых других…
Дискета, созданная в ХР вышеуказанным способом, подойдёт только для первой загрузки, предшествующей установке новой старой системы! Системные загрузочные дискеты Windows XP не подойдут!
А вообще… Набери в Яндексе Установка двух операционок и почитай! Сам видишь — никто не горит желанием тебе всё разжёвывать, а у меня на всё просто времени не хватит.
проги Partition Magic и Boot Magic…
Я в курсе, что это за проги (не мало с ними работал)
Потом нужно будет обязательно поставить загрузчик
Partition Magic, куда? (в систему всмысле)
проще сделать так — удалить раздел(D:\…)
А потом если заново создать его (допустим) заново его можно будет вставить без форматирования диска »C»?
Ух, кажись нашёл полную инфу. Усем спасибо
А, ну и чудесно, закрываю тему!
Installing Microsoft Windows 98 in DOSBox-X

Table of Contents
- Installing Microsoft Windows 98 in DOSBox-X
-
Overview
- Windows editions this guide applies to
- External links
- DOSBox-X config file
- Dynamic vs Normal core
- Turbo mode
- Creating a Harddisk image
-
Installation Method 1: Boot from CD-ROM image
- Requirements
- Starting the installation
- Transfer Windows 98 install files to your HDD image
-
Installation Method 2
- Requirements
- Starting the installation
- Copying the contents of the CD-ROM
- Running SETUP.EXE
- Booting Windows 98 after installation
- Steps to take after installation
- Mounting CD or Diskette images
-
Enabling networking
- Enabling NE2000 in your DOSBox-X config file
- Setting up NE2000 networking in Windows 98
-
Emulated video adapter and video mode
- VESA driver
- Emulated sound card
- Enabling General MIDI
-
Enabling printing
- Print to PostScript
- Epson emulation
-
3dfx Voodoo
- Glide pass-through
- Hard Disk Read-ahead optimization
- Host Folder mounts
- Known limitations
- Outstanding issues
Overview
This guide will give a general description of installing Windows 98 in DOSBox-X, in addition to addressing some common issues.
Windows editions this guide applies to
-
Windows 98 (RTM; Original release) — Retail Full
-
Windows 98 (RTM; Original release) — OEM Full
-
Windows 98 Second Edition (98SE) — Retail Full
-
Windows 98 Second Edition (98SE) — OEM Full
|
Note |
Windows 98 or 98SE Upgrade editions have additional requirements and are not covered by this guide. |
If you don’t know which Windows 98 edition to install, we recommend that you install Windows 98SE.
DOSBox-X config file
You first need to create a DOSBox-X config file.
[sdl]
autolock=true

[dosbox]
title=Windows 98
memsize=128


vmemsize=8
vesa modelist width limit=0
vesa modelist height limit=0

[dos]
ver=7.1
hard drive data rate limit=0
floppy drive data rate limit=0

[cpu]
cputype=pentium_mmx
core=normal

[sblaster]
sbtype=sb16vibra

[fdc, primary]
int13fakev86io=true

[ide, primary]
int13fakeio=true
int13fakev86io=true

[ide, secondary]
int13fakeio=true
int13fakev86io=true
cd-rom insertion delay=4000

[render]
scaler=none

[autoexec]
Copy the above config and save it as win98.conf
|
Note |
You can increase the allocated RAM up to the Windows 98 maximum of 512MB by setting memsize=512.Larger values may be possible with tweaks but are not covered here. |
Dynamic vs Normal core
The dynamic_x86 core, which should perform much better, has been sufficiently enhanced that it can now be used for most use-cases with Windows 98.
However, for now we still recommend that you do the installation of Windows 98 using core=normal until issue #2215 is resolved.
But after the installation is finished you should be able to change to core=dynamic_x86.
Should you run into problems such as application crashes or a Windows 98 blue-screen that cannot be reproduced with core=normal, please report the problem on the DOSBox-X Git issues page.
Turbo mode
Some parts of the installation, but also starting Windows 98 can take a considerable amount of time.
You may be able to speed this up considerably (depending on the host CPU) by using the DOSBox-X Turbo mode, which can be enabled from the drop-down menu bar by selecting «CPU» followed by «Turbo (Fast Forward)».
This turbo mode is not like the old Turbo button on retro PCs, but functions more like a fast-forward, and therefore should not be used when interacting with the guest OS.
By default, the moment you press a key on the keyboard, turbo mode will disengage.
|
Warning |
Using the mouse not disengage turbo mode, and double-clicks will be almost impossible to achieve as long as turbo mode is active. |
You may also want to enable turbo mode by default to allow Windows 98 to startup quicker by merging the following settings into your DOSBox-X config file.
|
Note |
This will cause some audio distortion on Windows 98 startup, if you have the Windows startup sound enabled. |
Creating a Harddisk image
|
Note |
In addition to the below DOSBox-X command line utility, it is possible to create harddisk images from the DOSBox-X menu. Go to the «DOS» menu and select «Create blank disk image…». This option allows for various common harddisk types to be created, for less common types you need to use the command line utility. |
|
Note |
When creating your HDD image with IMGMAKE, instead of specifying a custom size, you can choose a pre-defined template. The pre-defined HDD templates can be seen by running IMGMAKE without arguments.
|
-
Diskette (floppy) images are always created as FAT12.
-
If your reported DOS version is 7.1 or higher, then harddisk images up to 512MB will use FAT16 by default.
-
Larger size harddisk images will use FAT32 by default (larger than 2GB can only be created as FAT32).
Alternatively, you can use the -fat option to instruct IMGMAKE to create a certain FAT type (assuming that is possible for the harddisk size).
First you need to start DOSBox-X from the command-line, using your newly created win98.conf.
This assumes that dosbox-x is in your path and win98.conf is in your current directory.
dosbox-x -conf win98.conf
Then in DOSBox-X you need to create a new harddisk image file with IMGMAKE.
This example uses an 8GB hard disk image with a single FAT32 formatted partition.
Technically the FAT32 filesystem is capable of supporting partitions up to 2TB, but the generic IDE driver in Windows 98 cannot handle volumes greater than 128GB.
Larger partition sizes may be possible with 3rd party drivers but are not covered here.
In later Windows versions, starting with Windows 2000, Microsoft won’t let you format a volume bigger than 32GB with FAT32 using its built-in formatting tool, this was presumably to push migrations to NTFS and later exFAT.
|
Note |
Creating a 128GB volume will cause a «SU0650 Out of Memory» warning during install, you can however continue the installation. |
IMGMAKE hdd.img -t hd_8gig
Or if you want to create a larger disk, you can create a custom type.
This is an example of a 16GB (16*1024=16384 MB) disk, which due to its size, will be formatted as FAT32.
IMGMAKE hdd.img -t hd -size 16384
Installation Method 1: Boot from CD-ROM image
Starting with Windows 98, it is possible to boot directly from the CD-ROM, as long as you have the «OEM Full» edition, in which case no separate bootdisk is needed.
This installation method allows both FAT16 (up to 2GB) and FAT32 volumes, which can be up to 128GB for Windows 98.
Requirements
This method only works with the Windows 98 OEM Full edition CD-ROM image (named «Win98.iso» in the example below).
Getting this image file is outside the scope of this guide.
Starting the installation
This assumes you have already started DOSBox-X with the win98.conf config file and created your harddisk image.
First mount the harddisk image you created earlier:
Now let’s boot from the CD-ROM and start the installation.
IMGMOUNT D Win98.iso
IMGMOUNT A -bootcd D
BOOT A:
|
Note |
If the second IMGMOUNT command gives an error «El Torito CD-ROM boot record not found«, your CD-ROM image is not bootable, and you will have to use either a different installation method or a different Windows 98 CD-ROM image.
|
You will first get a Startup menu, where you need to select «Boot from CD-ROM».
At this point it should format the harddisk and the installation process should start.
When the Windows installer reboots, and your back at the DOSBox-X Z:\> prompt.
Close DOSBox-X and edit your win98.conf config file, and add the following lines in the [autoexec] section at the end of the file:
IMGMOUNT C hdd.img
IMGMOUNT D Win98.iso
BOOT C:
Now start DOSBox-X as follows to continue the installation process:
dosbox-x -conf win98.conf
Transfer Windows 98 install files to your HDD image
This is an optional step. It is to prevent Windows from asking for the CD-ROM whenever it needs additional files.
Boot Windows 98 with the CD-ROM image mounted. In Windows 98, copy the \WIN98 directory and its contents from the CD-ROM to your C: drive.
You can copy it to any directory you want, but we assume here that you copied it to C:\WIN98
Once the files are copied, start REGEDIT and navigate to HKEY_LOCAL_MACHINE\Software\Microsoft\Windows\CurrentVersion\Setup and change SourcePath= to the location where you copied the files. e.g., SourcePath=C:\WIN98
In the case of Windows 98SE, copying the entire directory will require roughly 174MB of diskspace.
The \WIN98\OLS and \WIN98\TOUR sub-directories can however be skipped which will save roughly 54MB, bringing the total to roughly 120MB.
Installation Method 2
This method will start the installation from DOSBox-X and does not require a bootable CD-ROM image.
Requirements
A Windows 98 CD-ROM image (named «Win98.iso» in the example below).
Getting this image file is outside the scope of this guide.
Starting the installation
This assumes you have already started DOSBox-X with the win98.conf config file and created your harddisk image.
First mount the harddisk image you created earlier:
You will also need to mount the Windows 98 CD-ROM. There are a few ways of doing so, but this guide assumes you have a ISO image.
If you have a copy of the Windows 98 CD-ROM as an ISO (or a cue/bin pair), you can mount it as follows:
Copying the contents of the CD-ROM
While not strictly necessary, as it is possible to run SETUP.EXE directly from the CD-ROM (if you have the CD-ROM automatically mounted in your [autoexec] section of the config file).
It is recommended to copy the installation files (contents of the WIN98 directory on the CD-ROM) to your HDD image, as it will prevent Windows 98 from asking for the CD-ROM when it needs additional files later.
XCOPY D:\WIN98 C:\WIN98 /I /E
The files in the above example are copied to the C:\WIN98 directory.
You may want to use C:\WINDOWS\OPTIONS\CABS instead, as that is the directory that OEM installs normally use.
But if you do, be aware that the installer will attempt to install into C:\WINDOWS.000 as C:\WINDOWS already exists.

If you get the above screen during SETUP, select «Other directory» to change it back to C:\WINDOWS
Running SETUP.EXE
You can now run SETUP.EXE.

Now run through the installation process.
The actual steps will not be covered in this guide but are pretty self-explanatory and detailed guides on the Windows 98 install process can be found online such as YouTube.
When the installer reboots DOSBox-X, and you’re back at the DOSBox-X Z:\ prompt, type EXIT.
Now edit your win98.conf config file.
At the end of the file, in the [autoexec] section, add the following lines:
IMGMOUNT 0 empty -fs none -t floppy
IMGMOUNT 1 empty -fs none -t floppy -size 512,15,2,80
IMGMOUNT C hdd.img -ide 1m
IMGMOUNT D empty -t iso -ide 2m
BOOT C:
|
Note |
The current DOSBox-X release seems to have a bug where Win98 will only see the first floppy drive. |
Save the config file, and at the command-prompt of your host PC you can type the below command to continue with the next phase of the installation process.
This is also the command you use, after the installation is finished, to start Windows 98 in DOSBox-X.
dosbox-x -conf win98.conf
Booting Windows 98 after installation
After the installation is finished, you can start Windows 98 from the command-prompt of your host PC, with the following command:
dosbox-x -conf win98.conf
You can optionally create a shortcut on your desktop to start Windows 98 directly.
Steps to take after installation
Once Windows 98 is installed, here is some additional software you may want to install or update:
-
Install Microsoft .NET framework version 1.0, 1.1 and 2.0
-
Install Microsoft Visual C++ 2005 runtime
-
Update to Microsoft Internet Explorer 6.0 (rarely needed)
-
Update to Microsoft DCOM 4.71.1015.0
-
Update to Microsoft DirectX 9.0c
-
Install Microsoft Windows Installer 2.0
-
Install Microsoft WinG API 1.0 (needed by just a few games, and those games typically include it)
-
Install Microsoft GDI+ re-distributable
-
Install Adobe Acrobat Reader 6.0
-
Install/Update to Adobe Flash Player 9.0.47.0
-
Install Adobe PostScript driver 4.2.6
-
Install Apple QuickTime 6.5.2
Mounting CD or Diskette images
DOSBox-X supports mounting CD and diskette (floppy) images, and making those available to an OS booted in DOSBox-X.
To do so, an empty diskette or CD drive needs to be attached before booting a guest OS such as Windows 98, or diskette or CD images need to be attached (which will automatically cause an appropriate drive type to be emulated).
-
Disks can be changed after booting a guest OS from the drop-down menus under «DOS» → «Change current floppy image…»
-
CDs can be changed after booting a guest OS from the drop-down menus under «DOS» → «Change current CD image…»
For example, to specifying multiple image files with the IMGMOUNT command:
IMGMOUNT A disk1.img disk2.img disk3.img
IMGMOUNT D cd1.iso cd2.iso cd3.iso
You can then swap between disk images with the «DOS» → «Swap floppy drive» or «Swap CD drive» option from the drop-down menus, or using the hot-key.
Enabling networking
To enable networking, you first need to enable NE2000 adapter emulation in your win98.conf config file and select an appropriate back-end for the NE2000 emulation.
Enabling NE2000 in your DOSBox-X config file
There are two different back-ends to the NE2000 adapter emulation.
The default is backend=auto, which implies backend=slirp if SLIRP support is available, otherwise backend=pcap is implied if PCAP support is available.
backend=pcap
The PCAP back-end uses something called «Promiscuous mode».
This has the advantage that DOSBox-X can support various legacy network protocols, such as IPX and NetBIOS Frames (aka NetBEUI) in addition to TCP/IP.
This mode not only allows communication between DOSBox-X instances on the same network, but also with legacy PCs on the same network.
However, for this to work DOSBox-X needs to have very low-level access to your real network adapter.
In some cases, this is not possible, such as:
-
Network Adapter or Driver not supporting Promiscuous mode (most wireless adapters fall into this category).
-
Your Ethernet switch not allowing multiple MAC addresses on a single port or doing any kind of MAC address whitelisting.
-
Sandboxed versions of DOSBox-X (e.g., Flatpak) not allowing the required low-level access.
To enable NE2000 emulation with the pcap back-end, add the following to your win98.conf config file:
[ne2000]
ne2000=true
nicirq=10
backend=pcap

[ethernet, pcap]
realnic=list
The list value for realnic= will need to be replaced by a value representing your actual network adapter.
See Guide: Setting up networking in DOSBox-X for more information.
backend=slirp
Unlike the PCAP back-end, the SLIRP back-end does not require Promiscuous mode.
As such it will work with wireless adapters, and it will work in most sandboxed environments.
But obviously, it has its own limitations.
-
It is not supported in all platforms, such as Windows Visual Studio builds.
-
It only supports the TCP/IP protocol (other protocols must be TCP/IP encapsulated).
-
It is effectively behind a NAT (Network Address Translation) gateway, meaning that you can communicate outbound, but no systems on the LAN can instantiate a new connection to it. Which means that two DOSBox-X instances on the same LAN using
backend=slirpcannot communicate with each other.
To enable NE2000 emulation with the slirp back-end, add the following to your win98.conf config file:
[ne2000]
ne2000=true
nicirq=10
backend=slirp
Setting up NE2000 networking in Windows 98
If you enabled NE2000 support in the DOSBox-X config file, Windows 98 should detect it during installation, and you should get a screen like the following.

Change the Interrupt (IRQ) to 10 to match the nicirq= value set in your win98.conf file.
If Windows 98 did not detect the adapter during installation, or you enabled NE2000 emulation after you did the installation.
Go to «Start», «Settings» and «Control Panel» and double-click on «Add New Hardware», and let the wizard detect hardware.
It should find the emulated Novell NE2000 adapter and install the drivers.
|
Note |
By default, TCP/IP will try to get its network configuration over DHCP, if you need to manually specify the settings you can do so, in «Control Panel», double-click «Network». Once it opens, highlight «TCP/IP», and click the «Properties» button to modify the TCP/IP settings. |
|
Note |
In the Network settings, there will also be a «Dial-Up Adapter» listed, which you can safely remove. |
|
Note |
If you don’t want the Windows logon dialog on startup, and don’t care for file and printer sharing, you can remove the «Client for Microsoft Networks» component from the Network configuration settings (although, it will complain that «Your network is not complete», which you can ignore). |
|
Note |
If you want to share files between Windows 98 and Windows 10 on the network, have a look at this blog: SMB File Sharing between Win10 and Win98, but apparently this fails with the latest Win10 builds 2004 and 20H2. |
Emulated video adapter and video mode
The default video adapter that DOSBox-X emulates is the S3 Trio64, which is the best emulated video adapter that DOSBox-X offers, with the widest range of resolutions and colour depths.
In addition, this video adapter is supported out-of-the-box in Windows 98, simplifying the installation process.
The available video modes with the S3 Trio64 driver are:
-
4-bit colour (16): 640×480
-
8-bit colour (256): 640×480, 800×600, 1024×768, 1152×864, 1280×1024 and 1600×1200
-
16-bit colour (65536): 640×480, 800×600 and 1024×768
-
32-bit colour (16.7M): 640×480 and 800×600
A few enhancements have been made to the emulated S3 Trio64, compared to a real S3 Trio64:
-
No real S3 Trio64 was ever produced with more than 4MB video memory, under DOSBox-X you can optionally configure 8MB.
-
The real cards never supported wide-screen resolutions, wide-screen VESA modes can optionally be enabled in DOSBox-X.
However, these enhancements cannot be used in Windows 98 with the S3 video driver due to driver limitations.
There is no updated S3 Trio64 video driver available for Windows 98 (not even via installing DirectX 9c).
As such you will be limited to the above video modes with this driver.
VESA driver
First add the following lines to your DOSBox-X config file in the section:
allow high definition vesa modes=true
allow unusual vesa modes=true
allow low resolution vesa modes=false
Download and extract the latest VBEMP driver package and install the driver from the 032MB directory.
With these settings modes up to 1920×1080 in 32bit colour, or 1920×1440 in 16bit colour are possible.
|
Note |
Using the VBEMP driver does have a negative graphics performance impact, which when measured in WinBench96 Graphics WinMark, can be a reduction of up to 59%. |
Emulated sound card
The emulated sound card used in this guide is the SB16 Vibra, instead of the default SB16.
This is simply because the SB16 Vibra is an ISA PnP card, and therefore automatically detected by Windows.
There is no other real advantage of using the emulated SB16 Vibra over the SB16.
Both Windows 98 and 98SE include SB16 driver version 4.37.00.1998.
An optional driver update to 4.38.14 is available on the VOGONS Vintage Driver Library.
|
Note |
One often heard complaint of the real SB16 Vibra is its CQM synthesis, which was used as a low-cost replacement of the OPL3 chip found on earlier cards. However, DOSBox-X does not really emulate the CQM, instead it uses the same OPL3 emulation as for the regular SB16 model. Therefore, the CQM sound quality issues with the real SB16 Vibra do not apply to DOSBox-X. |
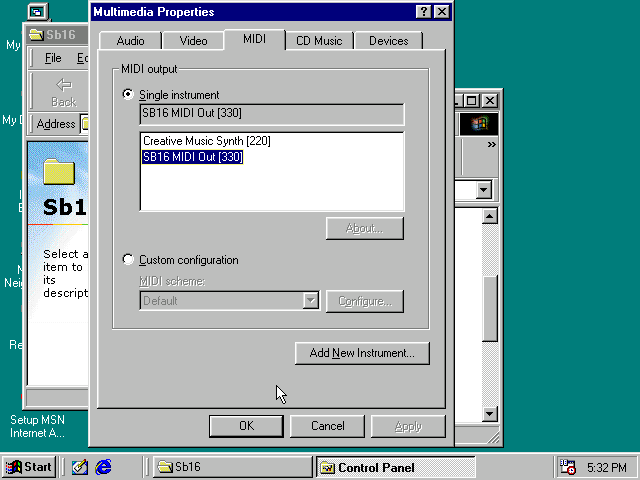
Enabling General MIDI
If you have a working DOSBox-X General MIDI setup, either emulated or real, you can use that in Windows 98.
Go to «Start», «Settings» and open «Control Panel», and then double-click on «Multimedia Properties».
Now on the «MIDI» tab, change the «Single instrument» option to «SB16 MIDI Out [330]», and click OK to close the window.
Enabling printing
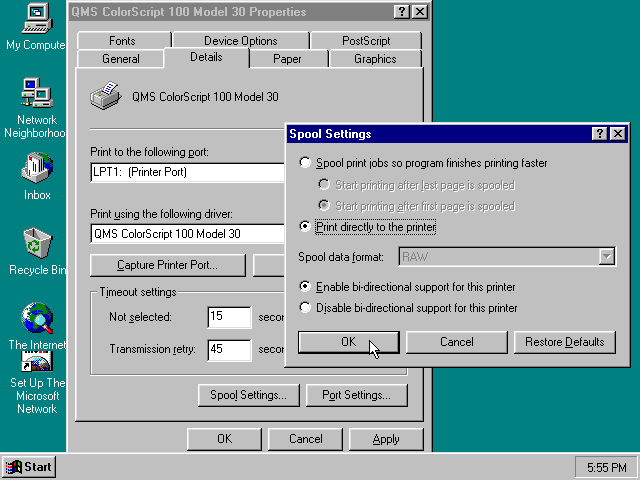
Print to PostScript
For the best print quality, you will want to print to a PostScript printer in Windows 98.
First, set up your DOSBox-X config to print to a file as such:
[dosbox]
captures=capture

[parallel]
parallel1=file timeout=2000
You can either use the PostScript driver bundled with Windows 98, or alternatively install the newer Adobe PostScript 4.2.6 driver.
If using the bundled driver, select any PostScript printer such as the «QMS ColorScript 100 Model 30», during printer setup connected to LPT1.
Once the printer is installed, open the printers properties, and on the «Details» tab click on the «Spool Settings…» button.
In the «Spool Settings», you must select «Print directly to the printer» and click OK.
|
Warning |
Failing to change the spool setting, when printing to a file, will result in corrupted PostScript files! |
|
Note |
If two files end up being generated instead of just one for a printjob, you will want to revert the above spool setting. And perhaps try changing the spool setting to «Start printing after last page is spooled». |
When you print, a .prt file in your captures= directory will be created, which despite the extension, is actually a PostScript file.
On Linux and macOS, PostScript files are natively supported and can be viewed and printed.
On a Windows host, it is necessary to install a separate PostScript viewer such as GSview.
Epson emulation
As an alternative, you can use the integrated Epson printer emulation, but the output quality will be significantly less compared to PostScript.
First, set up your DOSBox-X config to emulate an Epson printer as such:
[parallel]
parallel1=printer

[printer]
printer=true
printoutput=ps
multipage=true
timeout=2000
Next in Windows 98, select any Epson dot-matrix printer, such as the «Epson LQ-860+» option during printer setup connected to LPT1
|
Warning |
Make sure that you do not configure the Epson printer driver for a graphics resolution other than 180×180, or the output will be corrupted. |
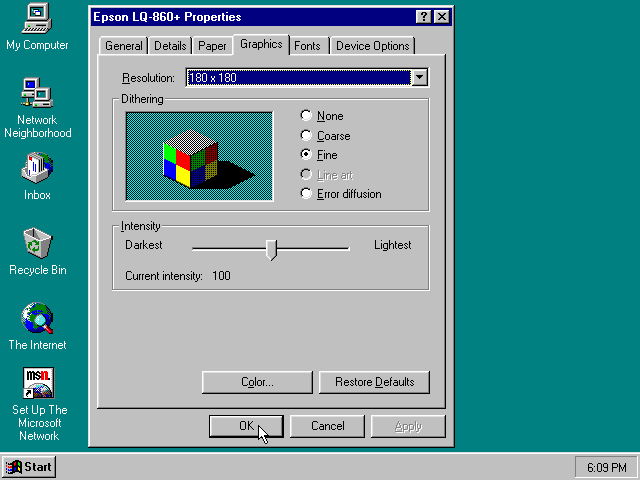
When you print, a PostScript file with the .ps extension will be created in your current working directory.
The emulated Epson printer settings can be adjusted as documented on the above linked wiki printing guide.
3dfx Voodoo
The emulated 3dfx Voodoo PCI device is enabled by default in DOSBox-X, and both Windows 98 and 98SE include a driver and will automatically detect it.
Windows 98SE includes a driver dated 4-23-1999. There is a 3.01.00 update available.
After the update it will show a date of 4-29-1999.
If for some reason you do not want 3dfx Voodoo emulation, it can be disabled by adding the following lines to your DOSBox-X config:
[voodoo]
voodoo_card=false
Glide pass-through
Glide pass-through is an optional DOSBox-X feature, and not required to use a 3dfx Voodoo game with Windows 98.
It can provide better performance, but can also be rather tricky to get working properly. As such it is not recommended for most users.
If you decide to try this method, first ensure the game works without glide pass-through using the standard 3dfx Voodoo emulation.
There are a few points you need to be aware of.
-
The DOSBox-X and glide-wrapper installed on the host need to be the same architecture.
So, if you’re using a 64bit DOSBox-X, you need to use a matching 64-bit glide-wrapper. -
The Linux SDL2 DOSBox-X does not work with OpenGlide, this is a limitation of OpenGlide (see OpenGlide issue #20).
The work-around is to use the SDL1 DOSBox-X instead.
You need to set the following DOSBox-X config option:
You will also need a specially patched GLIDE2X.DLL file which you can place in either the C:\Windows\System directory of Windows 98, or in the game directory.
But be aware that some games come with their own GLIDE2X.DLL, which typically gets installed in the game directory.
If so, you will have to remove this DLL file for glide pass-through to work.
Hard Disk Read-ahead optimization
In «System Properties», select the «Performance» tab, and click the «File System…» button.
A separate «File System Properties» window will open.
On the «Hard Disk» tab you can specify the Read-ahead optimization.
Based on benchmark results (WinBench 96), it seems that setting this to «None» gives the best performance in combination with DOSBox-X, although the difference is marginal.
This is no doubt because the host system is better at caching then the Windows 98 cache function.
Host Folder mounts
Starting with DOSBox-X 2022.08.0, there is optional support to dynamically convert a host folder mount to an emulated FAT harddisk for use when you need to boot a guest OS, such as Windows 98.
This can be accomplished in one of two ways. Either when you issue the boot command, you add the option -convertfat. e.g. boot c: -convertfat.
Or by setting the following option in your DOSBox-X config file:
[sdl]
convertdrivefat = true
When you now boot from a real image file, it will attempt to convert ALL folder mounts at the time of booting to emulated FAT Harddisks.
|
Note |
You cannot boot from such an emulated FAT harddisk. You will still need some other bootable image file to actually boot a guest OS. |
|
Note |
This conversion is dynamic, effectively creating an emulated FAT harddisk out of a folder mount. This converted FAT harddisk is not automatically stored permanently. You can however, store it as a permanent image file that you can later mount with IMGMOUNT, using the «Drive» > «drive letter» > «Save to disk image» option from the menus.Please see the «Creating harddisk images from folder mounts» section in the Guide: Managing image files in DOSBox-X for more information. |
|
Note |
There is currently no support for creating emulated CD-ROM or Floppy drives out of folder mounts with this method. Any CD-ROM or Floppy folder mounts will also be converted to harddisk folder mounts, and may not actually work for the intended purpose. |
One thing to note, is that there is no way to specify the FAT type to use for the conversion.
The FAT type will be automatically selected based on the aggregate size of files in the folder, plus 250MiB (this can be adjusted with the convert fat free space option in the DOSBox-X config file).
If the total space of files + 250MiB does not exceed 2GiB, it will convert it into a FAT16 disk. Otherwise, it will become a FAT32, which in turn will require a guest OS with FAT32 support.
Alternatively, you can also make the emulated FAT drive read-only by using the -convertfatro option with the boot command. Or by setting convert fat free space=0 option in the DOSBox-X config file.
Known limitations
-
If you intend at any point to use a Floppy or CD during your usage of Windows 98, you must attach either a floppy and/or CD image before starting Windows 98, or an empty floppy or CD-ROM drive.
If a floppy or CD drive is not present when starting Windows 98 the drive is simply missing, and you cannot add it without rebooting the guest OS. -
When mounting a CD-ROM image using
imgmount, before booting Windows 98, you may have to specify the IDE device to attach it to for it to work properly in Windows 98. e.g.imgmount d game_cd.iso -ide 2mto make the CD-ROM drive appear as the master device on the secondary IDE controller.
Outstanding issues
-
Resolve «Drive A is using MS-DOS compatibility mode file system»
Установка Windows 98 SE
Установка Windows 98 SE
Наши действия просты и незамыслованы.
Требуется:
Компьютер с RAM не менее 4 Мб и не более 512 Мб.
Диск с Windows 98 SE (пока у нас на сайте отсутствует, могу выложить образ)
Дискета (чистая)
Бубен шаманский
Этап 1. Создание загрузочного диска (если есть, пропускаем)
На работающем компьютере создаем загрузочную дискету.
Как именно — это ваш выбор. Я советую скачать самопрописывающийся образ (
http://old-dos.ru/win/boot.disk.with.cd … .98.se.zip
). При желании можете что-нибудь приписать.
Главное — чтобы поддерживался CD-ROM. Есть? Идем далее.
Этап 2. Загрузка с него
Итак, загрузились. Если компьютер дискету не увидел, то залазайте в BIOS и меняйте порядок загрузки (для тех, кто забыл: A: и B: — это дискеты. Чаще A:)
Буду расписывать как пример образ, приведенный выше.
FORMAT C:
Форматируем все глобально.
E:\setup
Запускаем программу установки (естественно, диск мы уже вставили)
Этап 3. Установка
Далее все как обычно. Если спросят — отвечайте. Если не спрашивают — не приставайте.
Возможные проблемы:
1. Размечали диск одним, потом другим, а еще порушили Partition Table и отрихтовали MBR.
Чините. Как вариант — сносите все нафиг FORMAT`ом. Потом переразметите, когда установите.
2. SCANDISK ругается на LBA/non-LBA.
Пропускайте. Слушайте этот совет, если только установка вываливается с ошибкой.
Последний раз редактировалось StrannikRiddler 30 сен 2023, 23:39, всего редактировалось 1 раз.
The show must go on!
-
StrannikRiddler - Командор софта
- Сообщения: 597
- Зарегистрирован: 18 сен 2008, 22:13
- Откуда: Russia, Moscow
- Железо: Немножко и не очень старое
-
- Сайт
- ICQ
Re: Установка Windows 98 SE
Daemon » 16 янв 2009, 15:41
Доброго времени суток.
Хотелось бы внести несколько уточнений в инструкцию по инсталлу. Во-первых: памяти должно быть несколько побольше 4МВ, кое как будет дышать на 16 метрах, комфортная работа 64. Далее, после формата, я бы посоветовал скинуть дистрибутив на винт и отсисить диск С. Перегрузиться с винта и начать установку, так мы отучим винду просить диск с дистром при всяком удобном случае.
Запускать инсталл лучше через setupcor /is, так будет меньше глюков при установке особенно на относительно новом железе (проверено). is отключит скандиск, после формата он не нужен, а если есть сомнения лучше использовать ndd. Да и ставить хорошо бы кастомайзом, нам же виднее, что нам нужно из компонентов системы
В случае проблем с разделами перед тем, как сносить все форматом, можно сделать fdisk /mbr/ Если не помогло, тогда сносим все разделы fdiskom, и пересоздаем их.
Кстати, если памяти больше 512 метров, то помогут файлики из вложения, проверено, работает. А поставить (именно поставить) систему можно и с гигом памяти.
- Вложения
-
- v32c.rar
- (202.46 Кб) Скачиваний: 1730
Последний раз редактировалось Daemon 30 сен 2023, 23:39, всего редактировалось 1 раз.
В пламени брода нет… (С) Егор Летов
-
Daemon - Мастер Даунгрейда
- Сообщения: 353
- Зарегистрирован: 16 янв 2009, 15:26
- Железо: 80286 и выше
Re: Установка Windows 98 SE
Daemon » 16 янв 2009, 15:48
Во вложении еще полезность для win 98. Решение проблемы с лба 48. Все проверено и работает
- Вложения
-
- lba48.rar
- (327.15 Кб) Скачиваний: 1665
Последний раз редактировалось Daemon 30 сен 2023, 23:39, всего редактировалось 1 раз.
В пламени брода нет… (С) Егор Летов
-
Daemon - Мастер Даунгрейда
- Сообщения: 353
- Зарегистрирован: 16 янв 2009, 15:26
- Железо: 80286 и выше
Хм….
Юрий » 15 апр 2009, 12:27
Странно. Я установил Win98SE (нашел завалявшийся лицензионный диск с этой осью) на Virtual PC. Бубна шаманского и дискеты мне не понадобилось.
Вставил диск, в меню выбрал «Boot from CD-ROM», а дальше «Setup Windows 98 from CD-ROM». И все! Даже форматирование не понадобилось!
Последний раз редактировалось Юрий 30 сен 2023, 23:39, всего редактировалось 1 раз.
-
Юрий - Мастер Даунгрейда
- Сообщения: 260
- Зарегистрирован: 13 апр 2009, 12:30
-
- Сайт
- ICQ
Re: Установка Windows 98 SE
Landa » 21 сен 2012, 18:02
StrannikRiddler писал(а):Наши действия просты и незамыслованы.
Требуется:
Компьютер с RAM не менее 4 Мб…
Интересно! У меня на 4 мегабайт устанавливалась только и исключительно серия Windows-3.xx (3.1 и 3.11), но даже Windows-95 ни в какую!!!!! А тут Windows-98…
Последний раз редактировалось Landa 30 сен 2023, 23:39, всего редактировалось 1 раз.
Не работающие, поломавшиеся компьютеры:
Pentium-1(133/166)/Celeron — 266/AMD-K-6-333/Celeron — 800/
-
Landa - Самая-самая
- Сообщения: 1866
- Зарегистрирован: 14 июл 2012, 16:04
- Откуда: Россия
- Железо: AT-486, Pentium-1(133/166mmx),P-4, Celeron-266, 366, 1100, AMD-k-6-2, AMD-64, Pentium-Core-2Duo
Re: Установка Windows 98 SE
StrannikRiddler » 21 сен 2012, 20:25
Пробовал из спортивного интереса Да, установилась и на 4, но жутко ругалась.
Последний раз редактировалось StrannikRiddler 30 сен 2023, 23:39, всего редактировалось 1 раз.
The show must go on!
-
StrannikRiddler - Командор софта
- Сообщения: 597
- Зарегистрирован: 18 сен 2008, 22:13
- Откуда: Russia, Moscow
- Железо: Немножко и не очень старое
-
- Сайт
- ICQ
Re: Установка Windows 98 SE
Landa » 22 сен 2012, 19:40
StrannikRiddler писал(а):Пробовал из спортивного интереса Да, установилась и на 4, но жутко ругалась.
Наверное мы про разные «4 мегабайт» говорим.
4 мегабайт как понимается не на современной системе, а на 386-486…
Какой смысл иметь такую запредельно низкую память даже на Pentium-1 например, если там можно иметь минимум 16Мб?
Смыла же нет! А всё что не имеет смысла, то смысла не имеет. Вот!
Зато имеет смысл иметь 4 мегабайт на 386-ом или на 486…
А на них Windows-95/98 и при памяти 4 мегабайт она не ставится, тоже проверялось многократно!
Последний раз редактировалось Landa 30 сен 2023, 23:39, всего редактировалось 2 раз(а).
Не работающие, поломавшиеся компьютеры:
Pentium-1(133/166)/Celeron — 266/AMD-K-6-333/Celeron — 800/
-
Landa - Самая-самая
- Сообщения: 1866
- Зарегистрирован: 14 июл 2012, 16:04
- Откуда: Россия
- Железо: AT-486, Pentium-1(133/166mmx),P-4, Celeron-266, 366, 1100, AMD-k-6-2, AMD-64, Pentium-Core-2Duo
Re: Установка Windows 98 SE
Zelya » 24 сен 2012, 12:49
Ранние Win 95 (не знаю насчет OSR 2) ставится и работает на 386 + 4 Мб
Последний раз редактировалось Zelya 30 сен 2023, 23:39, всего редактировалось 1 раз.
- Zelya
- Мастер Даунгрейда
- Сообщения: 191
- Зарегистрирован: 05 апр 2011, 12:23
Re: Установка Windows 98 SE
Landa » 24 сен 2012, 12:57
Zelya писал(а):Ранние Win 95 (не знаю насчет OSR 2) ставится и работает на 386 + 4 Мб
Я знаю только то (исходя из личной практики!!!!), что Windows’95 можно было ставить на такую память как 4 мегабайт только в такой версии Виндоувс-95, которая была «обновление до Windows’95 уже установленной(!) предварительно системы Windows-3.1…
Я же Вас не стану тут обманывать! У меня «чистая установка Виндоувс-95 OSR-2» (а именно о ней вообще-то в главе шла речь напомню вам!) с диска как «не обновление, а чистая установка» — Увы! не устанавливалась даже на 486 компьютер с памятью на нём 8(!) мегабайт.
Система выдавала сообщение: Недостаточная оперативная память для Windows’95.
Причём я экспериментировала и с первой версией Windows-95 не OSR-2. и при памяти в 4 мегабайт
Хотя я множество раз читала что на 4 мегабайт она должна(!) устанавливаться по инструкции!!! В чём тут дело я ей Богу не пойму…
Последний раз редактировалось Landa 30 сен 2023, 23:39, всего редактировалось 3 раз(а).
Не работающие, поломавшиеся компьютеры:
Pentium-1(133/166)/Celeron — 266/AMD-K-6-333/Celeron — 800/
-
Landa - Самая-самая
- Сообщения: 1866
- Зарегистрирован: 14 июл 2012, 16:04
- Откуда: Россия
- Железо: AT-486, Pentium-1(133/166mmx),P-4, Celeron-266, 366, 1100, AMD-k-6-2, AMD-64, Pentium-Core-2Duo
Re: Установка Windows 98 SE
Landa » 24 сен 2012, 13:01
Подчеркну, что все «лишние» резидентные драйверы были мною удалены из памяти до установки. Т.е я этот момент разумеется учитывала! Но, увы…
Последний раз редактировалось Landa 30 сен 2023, 23:39, всего редактировалось 2 раз(а).
Не работающие, поломавшиеся компьютеры:
Pentium-1(133/166)/Celeron — 266/AMD-K-6-333/Celeron — 800/
-
Landa - Самая-самая
- Сообщения: 1866
- Зарегистрирован: 14 июл 2012, 16:04
- Откуда: Россия
- Железо: AT-486, Pentium-1(133/166mmx),P-4, Celeron-266, 366, 1100, AMD-k-6-2, AMD-64, Pentium-Core-2Duo
Re: Установка Windows 98 SE
Zelya » 24 сен 2012, 13:54
Landa
У меня «чистая установка Виндоувс-95 OSR-2» (а именно о ней вообще-то в главе шла речь напомню вам!)
Укажите, пожалуйста, где шла речь именно ою SOR2? Я не заметил, и поэтому так и написал, что про OSR2 — не знаю, она, вполне возможно, более требовательна к железу. А ранние Win 95 ставятся и идут на 386/4Mb (медленно, конечно, но все же). Почему Вам выдавалось сообщение о недостаточной памяти, я, пока, затрудняюсь сказать. Возможно, была проблема с хардом (Win 95 активно свопает память при инсталяции), возможно это была SP1 или OSR1. А может, setup нужно с каким-то ключом запустить, подзабыл я, но попробовать сейчас нет возможности.
Последний раз редактировалось Zelya 30 сен 2023, 23:39, всего редактировалось 1 раз.
- Zelya
- Мастер Даунгрейда
- Сообщения: 191
- Зарегистрирован: 05 апр 2011, 12:23
Re: Установка Windows 98 SE
Landa » 24 сен 2012, 13:59
Zelya писал(а):Landa
А может, setup нужно с каким-то ключом запустить, подзабыл я, но попробовать сейчас нет возможности.
Вот вот я тоже думала частенько что может нужен был какой-либо ключ при записи?
Поскольку я сама тоже знаю что Windows-95 должен был по инструкции и по многим книгам (которые у меня кстати есть!) запускаться на 4 мегабайт и на компьютер AT-386(DX)
Последний раз редактировалось Landa 30 сен 2023, 23:39, всего редактировалось 1 раз.
Не работающие, поломавшиеся компьютеры:
Pentium-1(133/166)/Celeron — 266/AMD-K-6-333/Celeron — 800/
-
Landa - Самая-самая
- Сообщения: 1866
- Зарегистрирован: 14 июл 2012, 16:04
- Откуда: Россия
- Железо: AT-486, Pentium-1(133/166mmx),P-4, Celeron-266, 366, 1100, AMD-k-6-2, AMD-64, Pentium-Core-2Duo
Re: Установка Windows 98 SE
Daemon » 03 окт 2012, 14:20
Может быть попробовать запускать установку через setupcor.exe ?
Последний раз редактировалось Daemon 30 сен 2023, 23:39, всего редактировалось 1 раз.
В пламени брода нет… (С) Егор Летов
-
Daemon - Мастер Даунгрейда
- Сообщения: 353
- Зарегистрирован: 16 янв 2009, 15:26
- Железо: 80286 и выше
Re: Установка Windows 98 SE
Landa » 04 окт 2012, 01:16
Daemon писал(а):Может быть попробовать запускать установку через setupcor.exe ?
Спасибо Вам за такой интересный ответ, надо будет это как минимум иметь ввиду!
Последний раз редактировалось Landa 30 сен 2023, 23:39, всего редактировалось 1 раз.
Не работающие, поломавшиеся компьютеры:
Pentium-1(133/166)/Celeron — 266/AMD-K-6-333/Celeron — 800/
-
Landa - Самая-самая
- Сообщения: 1866
- Зарегистрирован: 14 июл 2012, 16:04
- Откуда: Россия
- Железо: AT-486, Pentium-1(133/166mmx),P-4, Celeron-266, 366, 1100, AMD-k-6-2, AMD-64, Pentium-Core-2Duo
Re: Установка Windows 98 SE
Палыч » 25 фев 2013, 05:14
WIN95 успешно ставится и летает на 486-ой машине с 66 мегагерцами и 8 мб озухи, при чем пишет что при этом 95% системных ресурсов свободно. 98-ая на том же железе мечет огромные кирпичи и требует накинуть озухи хотябы до 16 метров, после чего сэтап завершается.В заранее установленном виде 95-я винда успешно стартует на 386sx-25 без сопроцессора с 6 мб озу, при чем работает не слишком тормозно, примерно как ХР на Celeron-e 300
Последний раз редактировалось Палыч 30 сен 2023, 23:39, всего редактировалось 1 раз.
VISTA на athlon 2 duo? -не прет.. windows 95 на 386-sx33 вот это duo
-
Палыч - Опытный даунгрейдер
- Сообщения: 26
- Зарегистрирован: 31 дек 2011, 05:36
- Откуда: Украина, Херсон
- Железо: дык есть пару ящичков
Вернуться в Операционные системы
Кто сейчас на конференции
Сейчас этот форум просматривают: нет зарегистрированных пользователей и гости: 18
Installing Windows 98®
Part 2
Table of Contents
Running Windows 98 Setup
To install Windows 98 on a computer with a new or reformatted hard disk, you will need start Setup from MS-DOS. Note: If your computer permits booting from a CD Rom drive, you can insert the Windows 98 CD Rom disk and then restart your computer and choose to boot from the Windows 98 CD. If you are one of our customers, and depending upon when your computer was purchased, you will find either (A) a restore disk or (B) a Windows 98 Boot Disk and a Windows 98 CD Rom disk in your diskette packet.
Important: If you are one of our customers and previously ran Setup from MS-DOS using a network server or local CD-ROM drive, either the real-mode network or CD-ROM drivers must be loaded respectively before attempting to install Windows 98.
Procedural Step-by-Step Installation
After starting Setup from MS-DOS or the CD Rom Disk (or the restore disk) the Windows 98 installer performs a routine check on your computer. The installer will:
-
Run the real-mode version of ScanDisk and create the Scandisk.log file and check for errors in the directory structure, file allocation table, and file system. A surface scan is not performed, the disk is not checked for physical errors, and long file name errors are not fixed. These errors are fixed only when you run ScanDisk in protected-mode (from Windows). If ScanDisk finds errors, it will let you know. You can view the log file by selecting View Log from the ScanDisk screen; otherwise, select Exit.
-
Initialize your system and copy the necessary files for installing Windows 98.
-
Display the Windows 98 Setup screen which has an information bar on the left-hand side that displays the five steps that Setup will perform and a timer that shows the estimated time remaining to complete the installation. To begin the Setup process, click Continue.
Setup prepares the Windows 98 Setup Wizard. Then, Setup starts its five-step installation process:
- Preparing to run Windows 98 Setup.
- Collecting information about your computer.
- Copying Windows 98 files to your computer.
- Restarting your computer.
- Setting up hardware and finalizing settings.
Step One: Preparing to Run Windows 98 Setup
During this step, Setup will prepare the Windows 98 Setup Wizard, which will guide you through the installation process.
Setup:
- Displays the Windows 98 Setup dialog box.
- Creates the Setuplog.txt file in the root directory (C:\).
- Identifies the drive where Windows 98 is being installed and the source drive where the Windows 98 installation files are located (drive assignment).
- Creates the C:\Wininst0.400 temporary directory and copies Mini.cab to it. Mini.cab contains the mini-Windows program files required by Setup.
- Extracts all files in Precopy1.cab and Precopy2.cab to C:\Wininst0.400. These are the files necessary to run Setup Wizard.
Step Two: Collecting Information About Your Computer
During this step, Setup will collect information about your computer and prepare it for copying the Windows 98 files as it progresses through the following phases:
- Presents the License Agreement (License Agreement dialog box).
- Prompts you to enter the Product Key (Product Key dialog box).
- Prompts you to select a directory for installing Windows 98 (Select Directory dialog box).
- Informs you that it is preparing the directory where it will install Windows 98 and verifying that there is enough space to install it (Preparing Directory dialog box).
- Lets you choose the type of Setup you want — Typical, Portable, Compact, or Custom (Setup Options dialog box).
- Prompts you to enter your name and company name (User Information dialog box).
- Lets you install the most common components or customize your selection (Windows Components dialog box).
- Lets you add or remove components (Select Components dialog box).
- Prompts you to identify your computer on the network (Identification dialog box).
- Lets you select the location for getting region-specific information from the Internet (Establishing Your Location dialog box).
- Prompts you to create the Startup Disk (Startup Disk dialog box).
- Starts copying files (Start Copying Files dialog box).
The License Agreement
After Setup Wizard is loaded, the License Agreement is displayed. You must accept the License Agreement to continue.
Product Key
Setup prompts you to enter the Product Key.
Type the Product Key in the spaces provided. The Product Key is located either on the Certificate of Authenticity (COA) or on the back liner of your Windows 98 compact disc. You will find either one or the other in your diskette packet If the number you type is not accepted, check the following:
-
Make sure the Caps Lock key is not on.
-
If you are using the keypad to the right of your keyboard, make sure the Num Lock key is on.
Note: Corporate or network customers, the Product Key dialog box might not appear if you are installing Windows 98 from your network. This will depend on the requirements at your site.
Select Directory
After you enter your Product Key, the Select Directory dialog box appears.
The default directory is C:\Windows. If you want to install Windows in a directory other than C:\Windows, follow these steps.
To install Windows 98 in a new directory
-
In the Select Directory dialog box, click Other directory, and then click Next.
-
Type a new directory name, and then click Next. If you specify a directory that does not exist, Setup will create one for you.
The Change Directory dialog box appears.
Preparing Directory
After you select a directory, the Preparing Directory dialog box appears.
Setup checks for installed components and then checks whether there is adequate disk space for the files. It creates the Windows 98 directory structure, including all required folders under the \Windows (or \Your_InstallDirectory) and \Program Files folders.
Note: If there is not enough disk space, Setup Wizard prompts you to free some hard-disk space and then restart Setup.
Setup Options
Once Setup finishes setting up the directory structure, it prompts you to select the type of Setup you want through the Setup Options dialog box.
Each Setup option contains a specific set of components to install. When you choose a Setup option, Setup selects by default a set of appropriate components based on your choice. Later, through the Select Components dialog box, Setup gives you the choice to either accept the default selection or select your own components. We suggest that you select Custom and then work your way through each category and install all of the components you want at this time. This will save you time later in having to add a missing item.
To choose a Setup option
-
In the Setup Options dialog box, click the Setup option you want, then click Next. The Typical Setup option is selected as the default.
| Click this option | If you want |
|---|---|
| Typical |
The default setup of all of the components that are usually installed with Windows 98. |
| Portable |
This installs the options generally required for portable laptop computers. |
| Compact |
The smallest possible installation of Windows 98. If you were upgrading from Windows 3.x or Windows 95, you may want to perform a Compact installation if your hard disk does not have much free space. With this setup, no optional components are installed. Later, should you want to use an optional component, such as Games or WebTV for Windows, then you would have to install it. To install an optional component after Setup is completed, you would use Add/Remove Programs in Control Panel. |
| Custom |
The Custom setup will enable you to choose just which optional components are installed. If you know you are going to need certain Windows components and not install others, you will want to select the Custom installation and ensure that those components are included during Setup. |
User Information
After the Setup Options phase, Windows 98 Setup will ask you to type your name and company name, which Windows 98 uses to identify you for various operations. This information must be entered for Setup to continue!
Windows Components
After you provide the user information, Setup displays the Windows Components dialog box.
If you select Install the most common components, Setup continues the installation. If you select Show me the list of components so I can choose, the Select Components dialog box appears.
Select Components
The Select Components dialog box will enable you to customize your installation and choose the components you want to install.
To select which components are installed
-
In the Components list, click on a component set (for example, Communications), and then click Details. The shaded box means that only part of the component will be installed. A dialog box appears, listing the components in the category.
-
Select or deselect the component you want to add or remove, and then click OK.
-
To add a component, make sure the component is checked.
-
To remove a component, clear its check box.
-
To prevent a component from being installed, make sure the component is not checked.
-
-
Repeat this procedure for each category in the Components list in the Select Components dialog box.
-
When you are satisfied with your selections, click Next. If you want to reset the list of components to the default, click Reset.
Note: You can install or remove any of these components after Windows 98 is installed by using Add/Remove Programs in Control Panel.
Identification
After you have selected which components you want to install, Setup prompts you to identify how you want your computer to be identified on your network by displaying the Identification dialog box. Note: This dialogue box will present itself regardless of whether or not you are on a network.
-
The computer name must be unique on the network, and can be up to 15 characters long with no spaces (no blank characters). The name can contain only alphanumeric characters and none of the following special characters: ! @ # $ % ^ & ( ) – _ ‘ { } . ~
-
The workgroup name can be up to 15 characters long and uses the same naming convention as the computer name. The workgroup is used to associate groups of computers together for more efficient browsing. If you are a corporate customer, your network administrator can provide guidelines for workgroup selection by using Wrkgrp.ini. If you are on a small home network or small office network, make sure that the workgroup name is consistent with all other computers on the network.
-
The computer description can be up to 48 characters long, but it cannot contain any commas (,). This text appears as a comment next to the computer name when users are browsing the network, so you can use it to describe the department or location of the computer.
Establishing Your Location (Where in the world are you?)
Next, Setup prompts you to establish your location by displaying the Establishing Your Location dialog box.
Selecting your location will enable you to receive region-specific news and other information through media such as channels, and Web sites designed to deliver content from the Internet to your computer. Channels will become available on your Windows 98 desktop Channel Bar after a successful installation of Windows 98.
To establish a location for receiving region-specific Internet information
- From the Select your country or region from the list below list, click the country or region you want. For example, United States.
- Click Next.
Startup Disk
After establishing your location, Setup prompts you to create a Windows 98 Startup Disk by displaying the Startup Disk dialog box.
The Startup Disk is a bootable system disk with a collection of real-mode Windows 98 commands and utilities that you can use to restart your computer if you have trouble starting Windows 98 or to run diagnostic programs. We recommend that our customers create at least two new Startup Disks. You can create a Startup Disk during Setup and you can create extra copies by using Add/Remove Programs in Control Panel. To make a Startup Disk, you need one 1.44 MB floppy disk or for older machines or those equipped with a 1.2MB floppy drive, two 1.2 MB floppy disks.
To create a Startup Disk during Setup
- Click Next on the Startup Disk dialog box and Setup starts creating the Startup Disk.
- Label a floppy disk “Windows 98 Startup Disk” and insert it into drive A.
- Click OK to create the disk.
To create a Startup Disk using Add/Remove Programs in Control Panel
- In Control Panel, double-click Add/Remove Programs.
- Click the Startup Disk tab.
- Click Create Disk.
- Follow the instructions on the screen.
The following files will be found on the Windows 98 Startup Disk!
| File | Function |
|---|---|
| Aspi2dos.sys | Adaptec SCSI Adapter driver. |
| Aspi4dos.sys | Adaptec SCSI Adapter driver. |
| Aspi8dos.sys | Adaptec SCSI Adapter driver. |
| Aspi8u2dos.sys | Adaptec SCSI Adapter driver. |
| Aspicd.sys | Real-mode Adaptec CD-ROM driver. |
| Autoexec.bat | A batch file with a set of instructions that configure your computer when you boot it. |
| Btcdrom.sys | Mylex/BusLogic CD-ROM driver. |
| Btdosm.sys | Mylex/BusLogic CD-ROM driver. |
| Command.com | Command interpreter. |
| Config.sys | Loads the device drivers. |
| Drvspace.bin | Microsoft DriveSpace compression driver. |
| Ebd.cab | Cabinet file containing extract utilities. |
| Ebd.sys | A file that identifies the disk as a Windows 98 startup disk. |
| Extract.exe | File to expand the Ebd.cab file. |
| Fdisk.exe | Disk partition tool. |
| Findramd.exe | Utility to find the RAM drive during startup. |
| Flashpt.sys | Mylex/BusLogic CD-ROM driver. |
| Himem.sys | XMS Memory Manager. |
| Io.sys | System boot file. |
| Msdos.sys | Boot option information (paths, multiboot, and so on). |
| Mode.com | Lets you change display parameters such as number columns. |
| Oakcdrom.sys | Generic device driver for ATAPI CD-ROM drives. |
| Ramdrive.sys | Creates a Ramdrive during startup. |
| Readme.txt | Readme text document with information about the Windows 98 Startup Disk. |
| Setramd.bat | Searches for first available drive to be a Ramdrive. |
| Sys.com | System transfer tool. |
Important! You cannot start Windows 98 if you try to start your computer with a Windows 95 Startup Disk or other existing startup disks (of any version of Microsoft Windows other than Windows 98).
The Startup Disk includes a real-mode generic ATAPI CD-ROM driver (Oakcdrom.sys) that allows the CD-ROM to function when the protected mode of the graphical user interface is not available. This driver is a generic IDE CD-ROM driver, and it does not work with SCSI CD-ROMs. Several third-party SCSI drivers are also included on the Startup Disk. If we shipped your system with a special SCSI setup, you will find a diskette in your diskette packet marked “Windows 98 SCSI Startup Disk”. In general, most CD-ROM manufacturers include a floppy disk with the correct CD-ROM driver to use with their CD-ROM, this may be helpful if you need to use older legacy CD Rom drives. However, if for some reason the specific driver for your CD-ROM is not available, you can use the generic ATAPI/SCSI CD-ROM driver included on the Startup Disk.
Note: On some of the very early systems that we released several years ago, the CD-ROM was connected to a sound card. Therefore you will need to copy the correct drivers for your CD-ROM drive and the sound card controller to the Startup Disk, and then edit the Config.sys file on the Startup Disk so that the correct drivers are loaded. Consult the documentation for your CD-ROM drive and sound card controller to get the correct files and configuration settings. You may also obtain this information or purchase a setup disk through our Technical Support Department.
Start Copying Files
After Setup finishes creating the Startup Disk, the Start Copying Files dialog box appears. Click Next to start copying files.
Step Three: Copying Windows 98 Files to Your Computer
After Setup has collected the information it needs from your computer, it begins copying the Windows 98 files to your computer. During this phase, Windows 98 Setup does not require your input.
Important! Do not interrupt file copying. If Setup is interrupted during the file-copying phase, Windows 98 may not run when you restart your computer because Windows 98 will not have all of the necessary files to start. If you interrupt Setup during this phase, you must run Setup again.
If you started Setup over a network, from a compact disc, or removable hard drive, Setup copies the appropriate Driverx.inf files that are necessary to access the installation media (installation point on a network server, compact disc, or removable hard drive) to continue Setup after your computer is restarted. If you are running setup from a network or removable hard drive, after the installation has completed, you may need to edit the registry in order to correct the location where Windows 98 looks for the installation files.
Step Four: Restarting Your Computer
After Setup finishes copying the Windows 98 files to your computer, you are prompted to restart your computer. You can click the Restart Now button to restart your computer immediately; if you do not click the button or wait more than 15 seconds to click it, Setup restarts your computer automatically. After Setup restarts your computer, the following message appears on your screen:
"Getting ready to start Windows 98 for the first time." During this phase, Setup configures the following:
- Control Panel
- Programs on the Start menu
- Windows Help
- MS-DOS program settings
- Tuning Up Application Start
- Time zone
- System Configuration
When Setup finishes setting up hardware and configuring settings, Setup restarts your computer and asks you to log on. If your computer is connected to the network, you may be asked for a domain name and a network password. After you log on, Setup:
- Builds a driver information database.
- Updates system settings.
- Sets up personalized settings such as settings for the Internet Explorer 4 browsing software, Start menu, Online services, Volume Control, and Channels.
Then, Setup displays the Welcome to Windows 98 dialog box.
|
Once Windows 98 Setup is finished, you may find that your screen settings may not be exactly as you want them, but don’t try and change anything just yet. There may be a number of other settings and device issues that need to be resolved as well. We’ll cover resolving these device issues in the next step, “Clearing the Device Manager”. This next step will give the opportunity of checking to make sure that all of your devices have been loaded correctly by Windows 98 as well as enable you to add or change device drivers as necessary. Also, if you find that you need to troubleshoot some problems with the installation, you may want to refer to our basic Windows 98 Troubleshooter. You will also need to proceed with “Registering” (or re-registering) your copy of Windows 98 with Microsoft as well as following through with the “Connect to the Internet” procedure. Before jumping to the next step, if you are a relatively new user, take a few moments and snoop through all of the various Windows 98 menus and visit each so that you have some idea where things are located. Take the “Discover Windows 98” tour! |
|||
|