
Although the Intel NUC Skull Canyon (NUC6i7KYK) is officially compatible with Windows 7 (64-bit), you will soon realize that its installation will not be so simple.
Indeed, the Intel NUC Skull Canyon has only USB 3.0 ports and since Windows 7 does not natively support USB 3.0, installation will be impossible from the original DVD of Windows 7.
Then, you should also know that the Intel NUC Skull Canyon supports SSD in M.2 format, but also NVMe SSDs.
If you are using a M.2 SSD, it will be recognized by the Windows 7 installation wizard. But if you choose an NVMe SSD, the Windows 7 installation wizard will not detect it.
You will not be able to install Windows 7 without the following solution.
To resolve these two issues, you will need to add Intel’s USB 3.0 drivers and NVMe support to the Windows 7 (64-bit) DVD.
IMPORTANT : on the Intel website, this mini PC is officially compatible with the 64-bit version of Windows 7, 8.1, 10 and Server 2012.
But after trying to install the Windows 7 x64 drivers of this mini-PC, the Bluetooth driver provided by Intel asked us to first install the SP1 of Windows 7.
Info : Intel is providing a «Windows 7 USB 3.0 Creator Utility» program that is supposed to solve the problem of USB 3.0 drivers for installing Windows 7 on this mini-PC, but when the Windows installation wizard will ask you for a name for your PC (ie after the 1st restart of the mini-PC), the keyboard will no longer be recognized. So, you must follow our tutorial to be able to install completely Windows 7 x64 on this mini PC.
- Required files
- Preparing files
- Drivers
- Windows updates
- Windows 7 x64 installation files
- Add support for USB 3.0 and NVMe in Windows 7 x64 iso
- Mount the install.wim image
- Add USB 3.0 drivers in the installation image
- Add Windows updates in the installation image
- Unmount the wim image
- Modification of install images of other editions of Windows 7
- Replace the boot image
- Create the new iso file
- Create a bootable USB key of Windows 7
- Configure the BIOS
- Install Windows 7 on your Intel NUC canyon
- Install Windows 7 x64 drivers of your Intel NUC canyon
1. Required files
To use this solution, you will need :
- the Windows 7 x64 installation DVD (with or without SP1)
- the SP1 of Windows 7 x64 (Because by following our tutorial, the SP1 of Windows 7 will not be automatically installed, even if it was integrated in the original DVD)
- the iso of Windows 8.1 x64 (can be downloaded for free from the Microsoft server)
- the Windows 7 USB 3.0 Creator Utility program from Intel (because it contains the USB 3.0 drivers that we need). You must download the Windows 7-USB3.0-Creator-V3-Win7Admin.zip file from Intel.
- theNVMe Support Hotfix and NVMe Bugfix to support NVMe SSDs
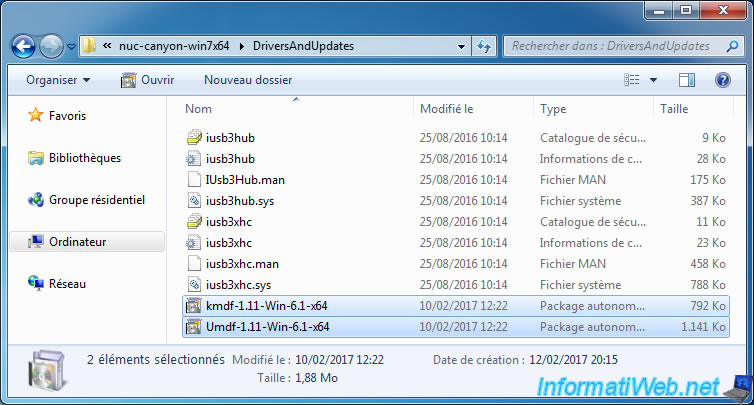
- the Kernel-Mode Driver Framework version 1.11 update for Windows 7 (only the x64 version : kmdf-1.11-Win-6.1-x64.msu)
- the User-Mode Driver Framework version 1.11 update for Windows 7 (only the x64 version : Umdf-1.11-Win-6.1-x64.msu)
- the DISM GUI program (allowing you to add drivers and updates in the Windows 7 iso). Click here for the direct download link.
- the Microsoft .NET Framework 4 to be able to run DISM GUI.
- the UltraISO program (paid software) to edit the original iso file or ImgBurn (free) to create the new bootable iso file from Windows 7
- the Windows USB/DVD Download Tool program (to create a bootable USB key to install Windows 7)
- the 7-zip program (or a similar software such as : WinRAR, Winzip, …) to extract the contents of the Windows 7 iso file
- Drivers of the Intel NUC Skull Canyon (NUC6i7KYK) for Windows 7 x64. (Select «Windows 7, 64-bit*» from the «Any operating system» list to see the list of available drivers for this OS.)
2. Preparing files
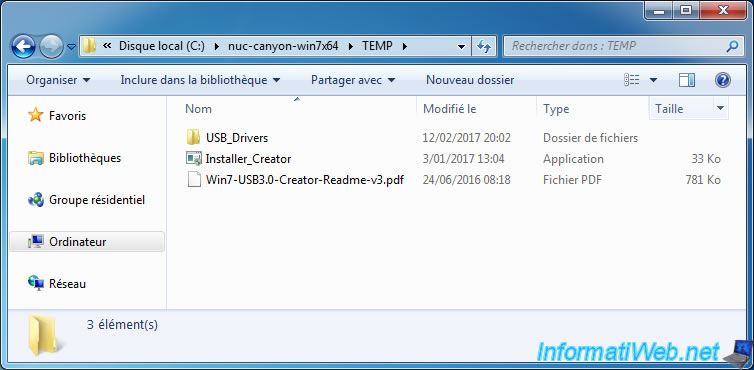
To follow this tutorial, first create a folder at the root of the C partition of your computer and create these folders :
- ISO
- install_mount
- DriversAndUpdates
- TEMP
For this tutorial, we will create these folders in a folder «nuc-canyon-win7x64».
2.1. Drivers
First, extract the contents of the Windows 7-USB3.0-Creator-V3-Win7Admin.zip file in the «Temp» folder.
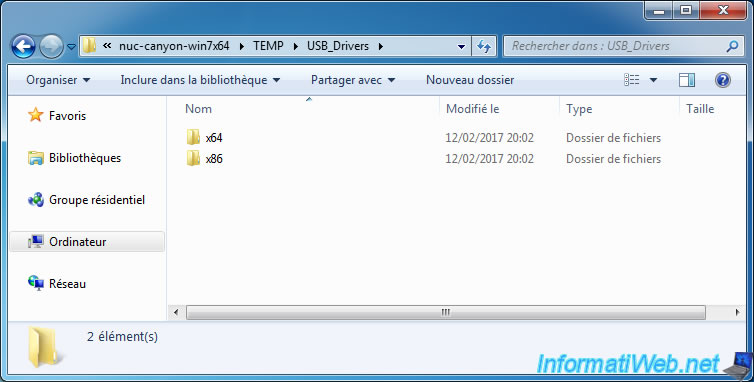
In this folder, you will find an «USB_Drivers» subfolder.
In this folder you will find 2 subfolders :
- x86 : USB 3.0 drivers for Windows 32-bit architecture
- x64 : USB 3.0 drivers for Windows 64-bit architecture
Since this mini PC is only compatible with the 64-bit version of Windows 7, we will use only the x64 version of these USB 3.0 drivers.
In the x64 subfolder, you will find 8 files, including .sys files (drivers) and .inf files (configuration files for installing these drivers).
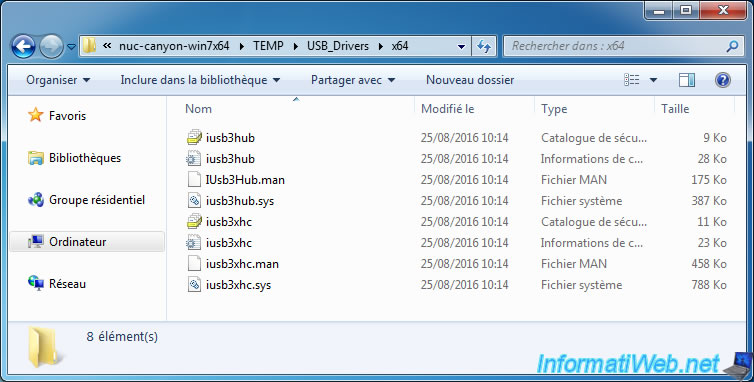
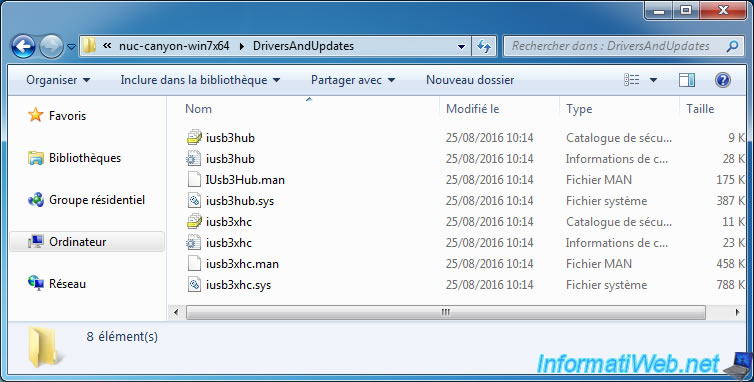
Copy these 8 files to your «DriversAndUpdates» folder.
2.2. Windows updates
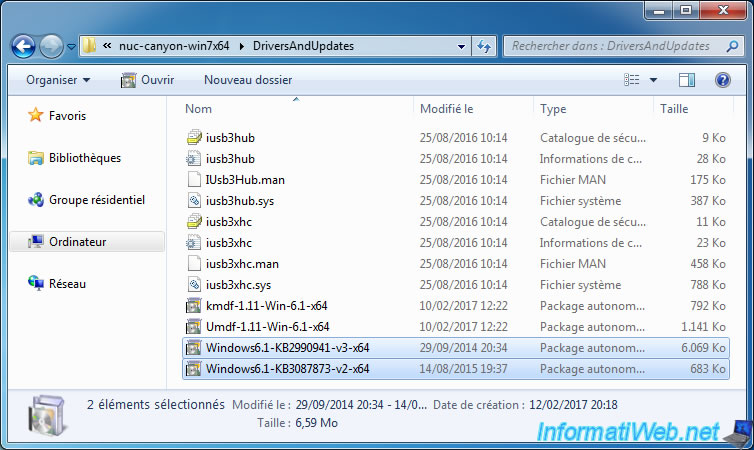
You have 2 types of updates :
- the .msu update files that are already in the correct format
- and hotfix files in .exe (which you received via email following your request on the Microsoft site) that are compressed files
For .msu files, there is nothing to do. Simply copy the 2 files to the «DriversAndUpdates» folder.
For .exe files, simply :
- run each exe file
- click on the «Continue» button
- click the «…» button to select your «DriversAndUpdates» folder.
- click OK twice
Finally, you should have 2 additional .msu files.
2.3. Windows 7 x64 installation files
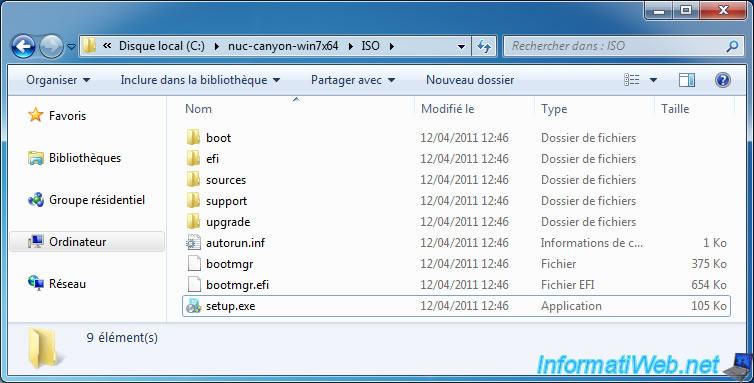
If you have a Windows 7 x64 physical DVD, then copy its contents to your «ISO» folder.
If you have an iso file of Windows 7 x64 :
- install 7-Zip
- right-click «7-Zip -> Extract files» on this iso file
- click the «…» button to select the path of your «ISO» folder
- click OK.
Finally, you will get this.
FAQ
Продукт
NUC 6 Kit, NUC 7 Kit
Установка операционной системы на NUC
Подготовка к установке
- Ознакомьтесь с таблицей, приведенной ниже, чтобы узнать о любой особенности, которая применима к Вашей модели NUC.
- Установите необходимые аппаратные компоненты в NUC (память и диск, которые приобретаются отдельно).
- Используйте другой компьютер, подключенный к Интернету, чтобы загрузить последний драйвер для сетевой карты для Вашего NUC (просто найдите модель NUC по ссылке). Сохраните его на портативном USB-устройстве.
- Подготовьте образ Windows (приобретается отдельно) на портативном USB-устройстве. Если это Windows, инструменты для создания загрузочных USB-накопителей можно найти по ссылкам ниже:
- Windows 11*
- Windows® 10
Щелкните или выберите тему для получения подробной информации:
Информация, специфичная для модели
См. таблицу для получения специальной информации, которую вы должны знать, прежде чем начать установку операционной системы. Если ваша модель NUC не указана в этой таблице, дополнительных специальных инструкций нет.
Если Вы уже приобрели устройство Intel NUC и хотите установить операционную систему Windows, то Вы можете перейти непосредственно к инструкциям по установке.
| Модель NUC Kit | Операционная система | Дополнительная информация |
| NUC7i3BNH NUC7i5BNH NUC7i7BNH |
Windows® 10 |
Если вы планируете установить как жесткий диск, так и память Intel Optane™ Memory
|
Установка Windows*
- Подключите устройство с образом установки Windows (USB-порт или USB-оптический привод, если образ Windows находится на CD/DVD).
- Включите NUC.
- При запросе во время загрузки нажмите F10, чтобы открыть меню загрузки, и выберите устройство установки.
- Следуйте всем инструкциям настройки во время установки Windows. Если Вы устанавливаете Windows 11, см. Невозможно установить Windows 11*, так как при установке требуется подключение к Интернету.
После завершения установки
- После завершения настройки Windows установите скачанный Вами драйвер для проводной или беспроводной сети из пункта Подготовка к установке — Шаг 3.
- Подключитесь к Интернету.
- Что делать, если порт локальной сети (LAN) NUC не работает
- Устранение проблем с WiFi и Bluetooth на продуктах NUC
- Установите обновления Windows (необязательно).
- Загрузите и установите все остальные драйверы NUC через Центр загрузок (просто найдите модель NUC по ссылке) или воспользуйтесь Driver & Support Assistant.
Ресурсы Linux*
- Поддержка Linux* для NUC
Ресурсы устранения неполадок ОС
- Устранение проблем с операционной системой
Эта информация была полезной?
Yes
No
- Приведенная выше информация может быть частично или полностью процитирована с внешних веб-сайтов или источников. Пожалуйста, обратитесь к информации на основе источника, который мы отметили. Пожалуйста, свяжитесь напрямую или спросите у источников, если есть какие-либо дополнительные вопросы, и обратите внимание, что ASUS не имеет отношения к данному контенту / услуге и не несет ответственности за него.
- Эта информация может не подходить для всех продуктов из той же категории / серии. Некоторые снимки экрана и операции могут отличаться от версий программного обеспечения.
- ASUS предоставляет вышеуказанную информацию только для справки. Если у вас есть какие-либо вопросы о содержании, пожалуйста, свяжитесь напрямую с поставщиком вышеуказанного продукта. Обратите внимание, что ASUS не несет ответственности за контент или услуги, предоставляемые вышеуказанным поставщиком продукта.
The following instruction tells you how to install Windows 7 on a Braswell or Skylake NUC.
Installing Windows 7 on the NUC5CPYH or NUC5PPYH (Braswell NUC) is a bit tricky. The reason is that Windows 7 starts to be rather old already and the basic installation does not support more modern hardware. Specifically it is lacking USB 3.0 support. Unfortunately the NUC does have only USB 3.0 ports, so something must be done (there are internal USB 2.0 ports, but these are rather inconvenient to use) as the only way you could control your NUC is through the USB ports.
EDIT: Intel has now released a Windows 7 USB 3.0 Creator Utility v3 that will modify your Windows 7 installation USB stick automatically. This will help you skip steps 5-22 of the instruction below. Basically it will do the same thing that is described below, so if you want to be in control of what exactly happens you can also follow the below instructions.
Without correct BIOS settings Windows 7 installation will give you blue screen right at the beginning. Without adding the USB 3.0 drivers into the installation image your keyboard and mouse will not work during the Windows 7 installation. Below I’ll explain how to avoid these pitfalls and install Windows 7 on NUC5CPYH / NUC5PPYH.
Intel has already published an instruction on how to do this, but I found it rather confusing. Thus I wrote this article. Credit goes to Travis Payton from Code A Bitwiser blog, where I read about this first. The instruction below has been adapted to work with the NUC5CPYH / NUC5PPYH though.
You will need another computer that is running Windows 7 or 8 in order to prepare the USB stick that you will use for installing Windows 7. The USB stick should have 4 gigabytes or more space and should be formatted and empty when you start. If you don’t have another computer at hand, you could even create this image at work or while visiting a friend.
Preparation
1. Download or have your Windows 7 ISO image at hand. I used the image: en_windows_7_professional_with_sp1_x64_dvd_u_676939
2. Download and install Windows USB/DVD Download Tool.
3. Plug in your USB stick to the other computer – not the NUC. The other computer should be running Windows 7 or 8.
4. Use USB/DVD Download Tool to make a bootable USB using the ISO image you downloaded. The program is really straightforward to use. You should have no trouble with this.
5. Create a new folder for the installation image manipulation. In this instruction we assume it is “wim” in the root of your c: drive (c:\wim).
6. Create two directories inside that directory: mount and usb3.

7. Download USB3 drivers for Intel Braswell NUC.
8. Copy the folders HCSwitch and Win7 that are located inside the zip file you just downloaded (these folders are under folder Drivers) to c:\wim\usb3

9. Now both these folders contain 32-bit and 64-bit versions of the drivers. Because I was installing 64-bit Windows, I deleted the folder x86 under both of these folders (x86 = 32-bit drivers, x64 = 64-bit drivers). Probably not absolutely necessary, but I wanted to only add the drivers I definitely need.
10.Then copy install.wim and boot.wim from the sources folder on your USB stick to the wim folder.
Your wim folder should look like this now. usb3 folder contains your drivers and mount is empty.

Injecting the USB 3.0 Drivers into the Installation Image
11. Open command line as administrator (Click Start menu open on Windows 7 or press Windows key on Windows 8, type in “cmd” and then right click on the cmd application and choose Run as Administrator).
A command line prompt will appear.
12. Change directory to your wim directory. In our case it should be \wim on c: drive.
C:\WINDOWS\system32>cd \wim
13. Mount the install.wim image. Note that number after parameter index depends on the Windows 7 version that you are installing! Choose the number according to the list below.
- Windows 7 Home Basic
- Windows 7 Home Premium
- Windows 7 Professional
- Windows 7 Ultimate
I’m installing Windows 7 Professional, so I’m using index 3. Some Windows 7 versions unfortunately do not follow this numbering! If all else fails, repeat the step below five times using indexes from 1 to 5.
C:\wim>dism /mount-wim /wimfile:"install.wim" /index:3 /mountdir:"mount"

Deployment Image Servicing and Management tool
Version: 6.3.9600.17031

Mounting image
[==========================100.0%==========================]
The operation completed successfully.
14. Then add the drivers into the mounted image. You should see 3 drivers being added if you completed the above steps correctly.
C:\wim>dism /image:"mount" /add-driver /driver:"usb3" /recurse

Deployment Image Servicing and Management tool
Version: 6.3.9600.17031

Image Version: 6.1.7600.16385

Searching for driver packages to install...
Found 3 driver package(s) to install.
Installing 1 of 3 - C:\wim\usb3\x64\iusb3hcs.inf: The driver package was successfully installed.
Installing 2 of 3 - C:\wim\usb3\x64\iusb3hub.inf: The driver package was successfully installed.
Installing 3 of 3 - C:\wim\usb3\x64\iusb3xhc.inf: The driver package was successfully installed.
The operation completed successfully.
15. And finally write your changes.
C:\wim>dism /unmount-wim /mountdir:"mount" /commit

Deployment Image Servicing and Management tool
Version: 6.3.9600.17031

Image File : C:\wim\install.wim
Image Index : 3
Saving image
[==========================100.0%==========================]
Unmounting image
[==========================100.0%==========================]
The operation completed successfully.
16. Next we modify the boot.wim file as well. Mount the image. Do not change the index here!
C:\wim>dism /mount-wim /wimfile:"boot.wim" /index:1 /mountdir:"mount"

Deployment Image Servicing and Management tool
Version: 6.3.9600.17031

Mounting image
[==========================100.0%==========================]
The operation completed successfully.
17. Add the drivers into the mounted image.
C:\wim>dism /image:"mount" /add-driver /driver:"usb3" /recurse

Deployment Image Servicing and Management tool
Version: 6.3.9600.17031

Image Version: 6.1.7600.16385

Searching for driver packages to install...
Found 3 driver package(s) to install.
Installing 1 of 3 - C:\wim\usb3\x64\iusb3hcs.inf: The driver package was successfully installed.
Installing 2 of 3 - C:\wim\usb3\x64\iusb3hub.inf: The driver package was successfully installed.
Installing 3 of 3 - C:\wim\usb3\x64\iusb3xhc.inf: The driver package was successfully installed.
The operation completed successfully.
18. Save the changes into the image.
C:\wim>dism /unmount-wim /mountdir:"mount" /commit

Deployment Image Servicing and Management tool
Version: 6.3.9600.17031

Image File : C:\wim\boot.wim
Image Index : 1
Saving image
[==========================100.0%==========================]
Unmounting image
[==========================100.0%==========================]
The operation completed successfully.
19. We modify the second index in the same boot.wim. Do not change the index here!
C:\wim>dism /mount-wim /wimfile:"boot.wim" /index:2 /mountdir:"mount"

Deployment Image Servicing and Management tool
Version: 6.3.9600.17031

Mounting image
[==========================100.0%==========================]
The operation completed successfully.
20. Add the drivers.
C:\wim>dism /image:"mount" /add-driver /driver:"usb3" /recurse

Deployment Image Servicing and Management tool
Version: 6.3.9600.17031

Image Version: 6.1.7600.16385

Searching for driver packages to install...
Found 3 driver package(s) to install.
Installing 1 of 3 - C:\wim\usb3\x64\iusb3hcs.inf: The driver package was successfully installed.
Installing 2 of 3 - C:\wim\usb3\x64\iusb3hub.inf: The driver package was successfully installed.
Installing 3 of 3 - C:\wim\usb3\x64\iusb3xhc.inf: The driver package was successfully installed.
The operation completed successfully.
21. And commit the changes.
C:\wim>dism /unmount-wim /mountdir:"mount" /commit

Deployment Image Servicing and Management tool
Version: 6.3.9600.17031

Image File : C:\wim\boot.wim
Image Index : 2
Saving image
[==========================100.0%==========================]
Unmounting image
[==========================100.0%==========================]
The operation completed successfully.
22. Now copy the install.wim and boot.wim from your wim folder back to the folder sources on your USB stick. Overwrite the existing ones.
23. Eject your USB stick safely.
Windows 7 Installation on the NUC
24. Insert the USB stick into the USB port of your NUC.
25. Boot your NUC and enter BIOS. Make sure that Windows 7 is chosen on the Boot configuration page. Otherwise you’ll get a blue screen during the installation.
Make sure Windows 7 is chosen before installing the OS.
26. Save settings and boot from your USB stick (if your NUC does not boot from USB, you can press F10 at the boot to choose the boot device). Start installation of Windows 7 normally. Remember to remove the USB drive when your system boots for the first time, otherwise the installation might start over again.
27. While installation is going on, it’s good idea to download the driver bundle for Windows 7 from Intel’s download center and place it on a USB stick using another computer. Windows 7 installation media does not contain drivers for the WiFi adapter nor the LAN adapter, so you will not have network connectivity after installation unless you update the drivers. It’s important to install at least WiFi/LAN drivers, graphics drivers and the chipset drivers.
Recently I stumbled upon an interesting problem. The question was, how to manage a Windows 7 install on an Intel NUC system with USB 3.0. This is causing issues, because Windows 7 doesn’t provides USB 3.0 support during setup.
The question was raised from an administrator within a German forum. He was ordered, to exchange a lot of Office PCs with Intel NUCs. The company is using Windows 7.
What’s the problem?
The user wrote, that those Intel NUCs comes with four USB 3.0 ports. After installing Windows 7, USB 3.0 controller driver is missing, so none of the USB 3.0 ports are working. So he wasn’t able to use an USB keyboard and mouse to fix this issue.
Fix #1: Use an additional USB 2.0 port
One suggestion made within the forum was to add an additional USB 2.0 port to the Intel NUC. An Intel NUC LID Additional Dual USB 2.0 Ports is offered via Internet.
Fix #2: Integrate USB 3.0 driver into install image
Another suggestion was, to integrate the required USB 3.0 driver into the Windows 7 install image. This can be done with Microsoft’s deployment tools – in case that fits, start here.
Fix #3: Use Intel’s Windows 7 USB 3.0-Creator-Utility
The coolest suggestion I ‘ve read was, to use Intel’s Windows 7 USB 3.0-Creator-Utility. This utility automates the process to create a Windows 7* installation image to include USB 3.0 drivers. You can then use the new installation image to install Windows 7 on Intel® NUC products that have only USB 3.0 ports. The Windows 7 USB 3.0-Creator-Utility may be obtained from here.
This entry was posted in issue, Windows and tagged install issue, Windows 7. Bookmark the permalink.
Note: Please note the rules for commenting on the blog (first comments and linked posts end up in moderation, I release them every few hours, I rigorously delete SEO posts/SPAM).
Сообщения без ответов | Активные темы
Модератор: 4e_alex
Куратор(ы):
DrDEVIL666
| Новая тема / Ответить | Сообщений: 14 |
| Пред. тема | След. тема | |
| В случае проблем с отображением форума, отключите блокировщик рекламы |
| Автор | Сообщение | ||
|---|---|---|---|
|
|||
|
Куратор темы Статус: Не в сети |
Долго искал, какую либо информацию, но чтобы было всё в одном месте — такого так и не встретил F.A.Q. по Intel NUC постоянно обновляется и пополняется (по мере сил и возможностей). Поэтому прежде чем задать вопрос, не стесняемся периодически туда заглядывать. Вдруг там уже есть ответ… Так же просьба ознакомиться с Правилами Конференции и Правилами Форума. Последний раз редактировалось DrDEVIL666 25.08.2016 0:16, всего редактировалось 1 раз. |
| Реклама | |
|
Партнер |
|
DrDEVIL666 |
|
||
|
Куратор темы Статус: Не в сети |
FAQ | Полезная информация Модельный ряд Intel NUC Kit NUC7i7BNH (характеристики) [url](обзор)[/url] (драйвера) Intel NUC Kit NUC7i5BNK (характеристики) [url](обзор)[/url] (драйвера) Intel NUC Kit NUC7i5BNH (характеристики) [url](обзор)[/url] (драйвера) Intel NUC Kit NUC7i3BNH (характеристики) [url](обзор)[/url] (драйвера) Intel NUC Kit NUC7i3BNK (характеристики) [url](обзор)[/url] (драйвера) Intel NUC Kit NUC6i7KYK (характеристики) (обзор) (драйвера) Intel NUC Kit NUC6i5SYH (характеристики) (обзор) (драйвера) Intel NUC Kit NUC6i5SYK (характеристики) (драйвера) Intel NUC Kit NUC6i3SYH (характеристики) (драйвера) Intel NUC Kit NUC6i3SYK (характеристики) (обзор) (драйвера) Intel NUC Kit NUC6CAYH (характеристики) [url](обзор)[/url] (драйвера) Intel NUC Kit NUC6CAYS (характеристики) [url](обзор)[/url] (драйвера) Intel NUC Kit NUC5i7RYH (характеристики) (обзор) (драйвера) Intel NUC Kit NUC5i5RYK (характеристики) (обзор) (драйвера) Intel NUC Kit NUC5i5RYH (характеристики) (обзор) (драйвера) Intel NUC Kit NUC5i5MYHE (характеристики) (обзор) (драйвера) Intel NUC Kit NUC5i3MYHE (характеристики) (драйвера) Intel NUC Kit NUC5i3RYH (характеристики) (обзор) (драйвера) Intel NUC Kit NUC5i3RYK (характеристики) (драйвера) Intel NUC Kit NUC5PPYH (характеристики) (драйвера) Intel NUC Kit NUC5PGYH (характеристики) (обзор) (драйвера) Intel NUC Kit NUC5CPYH (характеристики) (обзор) (драйвера) Intel NUC Kit D54250WYKH (характеристики)* (обзор) (драйвера) Intel NUC Kit D54250WYK (характеристики)* (обзор) (драйвера) Intel NUC Kit DC53427HYE (характеристики)* (обзор) (драйвера) Intel NUC Kit D34010WYKH (характеристики)* (обзор) (драйвера) Intel NUC Kit D34010WYK (характеристики)* (драйвера) Intel NUC Kit DC3217BY (характеристики)* (обзор) (драйвера) Intel NUC Kit DC3217IYE (характеристики)* (обзор) (драйвера) Intel NUC Kit DCCP847DYE (характеристики)* (драйвера) Intel NUC Kit DE3815TYKHE (характеристики) (обзор) (драйвера) Intel NUC Kit DN2820FYKH (характеристики)* (драйвера) Материнские платы NUC отдельно Intel NUC Board NUC5i3MYBE (характеристики) Intel NUC Board D33217GK (характеристики)* Intel NUC Board D34010WYB (характеристики)* Intel NUC Board D53427RKE (характеристики)* Intel NUC Board D54250WYB (характеристики)* Intel NUC Board DCP847SKE (характеристики)* Intel NUC Board DE3815TYBE (характеристики) Intel NUC Board D33217CK (характеристики)* * — снятые с производства или окончание поддержки, по состоянию на 20.08.2016 Установка Windows 7 через порт USB 3.0 #77 Код: dism /mount-wim /wimfile:boot.wim /index:2 /mountdir:mount # Монтируем boot.wim в образ #77 Код: dism /image:mount /add-driver:»usb3″ /recurse # Добавляем usb драйвера в образ #77 Код: dism /unmount-wim /mountdir:mount /commit # Сохраняем все изменения в файл boot.wim #77 Код: dism /Get-WimInfo /WimFile:install.wim # Смотрим индекс-номер ОС внутри файла install.wim #77 Код: dism /mount-wim /wimfile:install.wim /index:1 /mountdir:mount # Монтируем install.wim в образ #77 Код: dism /image:mount /add-driver:»usb3″ /recurse # Добавляем usb драйвера в образ #77 Код: dism /unmount-wim /mountdir:mount /commit # Сохраняем все изменения в файл install.wim #77 Материал взят с ссылка 1 и ссылка 2 Тоже самое, только в виде ролика Add usb 3.0 drivers to bootable usb windows 7 installation Установка Windows 7 на NVMe SSD #77 Код: dism /get-wiminfo /wimfile:install.wim # Смотрим индекс-номер ОС внутри файла install.wim #77 Код: dism /mount-wim /wimfile:install.wim /index:3 /mountdir:mount # Монтируем install.wim в образ #77 Код: dism /image:mount /add-package:d:\win10usb\hotfix # Добавляем hotfix в образ #77 Код: dism /get-package /image:mounth # Можно проверить успешность заливки hotfix’ов Код: dism /unmount-wim /mountdir:mount /commit # Сохраняем все изменения в файл install.wim #77 5. Берём образ Windows 10 (на примере MSDN образа) Материал взят с ссылка Полезные ссылки Инструмент проверки совместимости продукции Intel Проверка NUC’ов на совместимость с внешними устройствами Аксессуары в виде дополнительных USB/VGA/LAN и т.д. Модификации из стандартных решений корпуса, rackmount крепежи и т.д. Ещё модификации из стандартных решений даже не существующий NUC9 Цитата: Версии SYK позволяют установить один SSD формата M.2, тогда как в модификациях SYH можно разместить один SSD формата M.2 и обычный накопитель формата 2,5 дюйма с интерфейсом SATA. Последний раз редактировалось DrDEVIL666 20.02.2021 11:47, всего редактировалось 3 раз(а). |
|
NOVAK |
|
||
|
Member Статус: Не в сети |
Здравствуйте, кто-нибудь пробовал устанавливать Windows 7 x64 на NUC Kit NUC5CPYH ? Все ли драйвера устанавливаются? Все ли устройства работают? |
|
DrDEVIL666 |
|
||
|
Куратор темы Статус: Не в сети |
NOVAK писал(а): устанавливать Windows 7 x64 на NUC Kit NUC5CPYH ? Все ли драйвера устанавливаются? Все ли устройства работают? на 5-ое поколение, как и на 6-ое, всё ставится и работает без проблем (как и родные с сайта, так и samdrivers) |
|
1Yuriy |
|
||
|
Junior Статус: Не в сети |
Вообще странно, что такая интересная вищица как Наки прозебает в забытии форума. Сам сейчас выбираю из новеньких наков на i3-8109 / i5-8259u и китайских 6785r/6585r |
|
WalterWhite |
|
||
|
Member Статус: Не в сети |
По-видимому тема мертвая, но я попытаю удачу Есть NUC7CJYH, проблема следующая: иногда, очень редко, после завершения работы винды сие чудо как будто не может выключиться, продолжает подавать питание на порты, вентилятор так же продолжает работать. Выключить удавалось только выдергиванием бп из сети. В чем может быть проблема? |
|
DrDEVIL666 |
|
||
|
Куратор темы Статус: Не в сети |
1Yuriy писал(а): А бюджет не резиновый. Знать бы наперед, что из себя представляют эти «китайские наки», а то там может даже intel extreme tuning utility не пашет. У оригинала гарантия 3года — этого более чем достаточно WalterWhite писал(а): По-видимому тема мертвая, но я попытаю удачу Есть NUC7CJYH, проблема следующая: иногда, очень редко, после завершения работы винды сие чудо как будто не может выключиться, продолжает подавать питание на порты, вентилятор так же продолжает работать. Выключить удавалось только выдергиванием бп из сети. В чем может быть проблема? А винда точно в оф ушла? |
|
Uncle_Sam |
|
||
|
Junior Статус: Не в сети |
Где можно найти драйвера на WIN7-64 для NUC DC53427HYE? |
|
Йож |
|
||
|
Member Статус: Не в сети |
я тут недавно накупил NUC6CAYH так на нем виснут линуксы и хипервсервер. вин10 работает погуглил с другого конца (baytrail bug, apollo lake hang linux) и нашел, что интел не хочет делать нормальные драйвера для чегонибудь кроме вин10, потому для линуксов могут помочь (а могут и нет) параметры запуска ядра. https://linuxreviews.org/Intel_graphics буду покачто юзать виндовс |
|
mingl |
|
||
|
Junior Статус: Не в сети |
Задался целью поставить Windows 7 на NUC6CAYH (платформа Apollo Lake). Рецепт из FAQ не помог (на этапе установки мышь и клавиатура не работают). |
|
DrDEVIL666 |
|
||
|
Куратор темы Статус: Не в сети |
mingl писал(а): Задался целью поставить Windows 7 на NUC6CAYH (платформа Apollo Lake). Рецепт из FAQ не помог (на этапе установки мышь и клавиатура не работают). А точно оба файла засунули в ISO? Хотя на gen.6 проблем с USB (клава/мышь) не встречал, при условии что 7 с SP1 |
|
mingl |
|
||
|
Junior Статус: Не в сети |
DrDEVIL666 писал(а): А точно оба файла засунули в ISO? Точно помню, что добавлял оба файла. DrDEVIL666 писал(а): Хотя на gen.6 проблем с USB (клава/мышь) не встречал, при условии что 7 с SP1 Использовал чистый образ. |
|
DrDEVIL666 |
|
||
|
Куратор темы Статус: Не в сети |
mingl писал(а): Использовал чистый образ. Чистый — чистому рознь! |
|
Йож |
|
||
|
Member Статус: Не в сети |
а вдруг есть у кого дамп биоса NUC6CAYH? |
| Новая тема / Ответить | Сообщений: 14 |
—
Список форумов » Общекомпьютерные форумы » Прочее железо
Часовой пояс: UTC + 3 часа
Кто сейчас на конференции |
|
Сейчас этот форум просматривают: нет зарегистрированных пользователей и гости: 3 |
| Вы не можете начинать темы Вы не можете отвечать на сообщения Вы не можете редактировать свои сообщения Вы не можете удалять свои сообщения Вы не можете добавлять вложения |
Перейти: