
В этой статье мы рассмотрим особенности установки операционной системы Windows 10 на виртуальную машину, запущенную в среде VMware. В данном примере в качестве хостовой платформы виртуализации используется VMWare ESXi 6.0.
Официально установка WIndows 10 в качестве гостевой ОС в продуктах VMWare поддерживается в следующих версиях ESXi:
- ESXi 5.5, ESXi 5.5 Update 1, Update 2 и Update 3
- ESXi 6.0 и выше
Для установки нам понадобится образ Windows 10 в формате ISO. Его можно скачать с MSDN ил создать самому с помощью утилиты Media Creation Tool. В этом примере мы будем использовать образ Windows 10 x64 Professional. Загрузите его на хранилище VMFS или подключите каталог с образом по сети с помощью NFS.
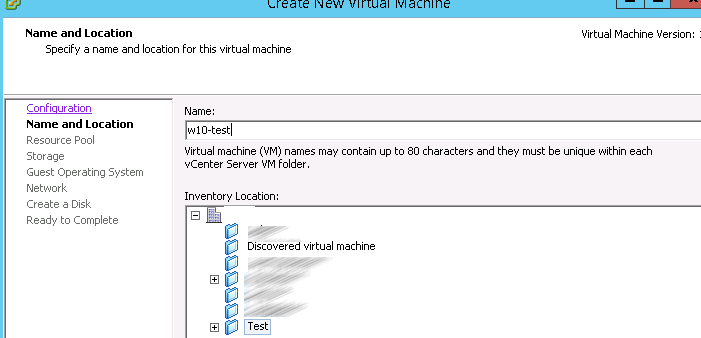
С помощью браузера или клиента vSphere откройте консоль управления VMware. Нам нужно создать новую виртуальную машину (ВМ). Выберите нужный хост ESXi, щелкните по нему ПКМ и выберите пункт New Virtual Machine.
В качестве типа ВМ выберите Typical.

Укажите имя виртуальной машины (w10test) и логический каталог, в котором она будет расположена.
Выберите VMFS датастор, в котором будут храниться файлы виртуальной машины.

В качестве версии гостевой операционной системы выберите Microsoft Windows 10 (64-bit).
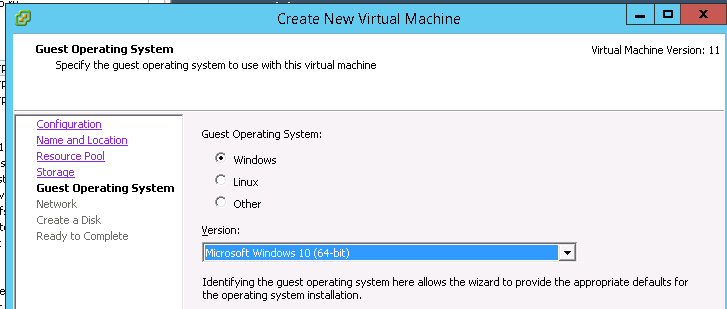
Совет. Даже если Windows 10 отсутствует в списке поддерживаемых операционных систем (например, в старых версиях ESXi), вы можете попробовать выбрать в качестве версии ОС Microsoft Windows 8 (64bit), ядро Windows у которой является сходным.
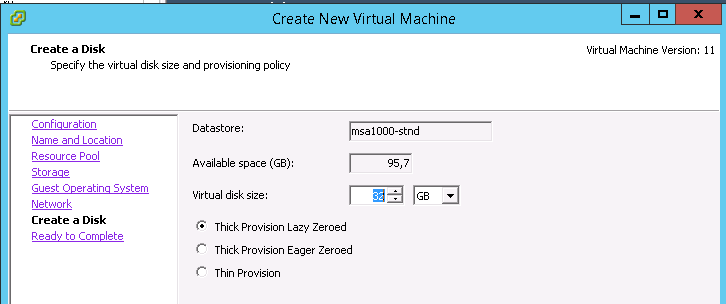
Выберите размер виртуального диска (*.vmdk). Windows10 x86 требует как минимум 16 Гб места на диске, Windows 10 x64 – 20 Гб.
На результирующем экране отметьте галку “Edit the virtual machine settings before completion”.
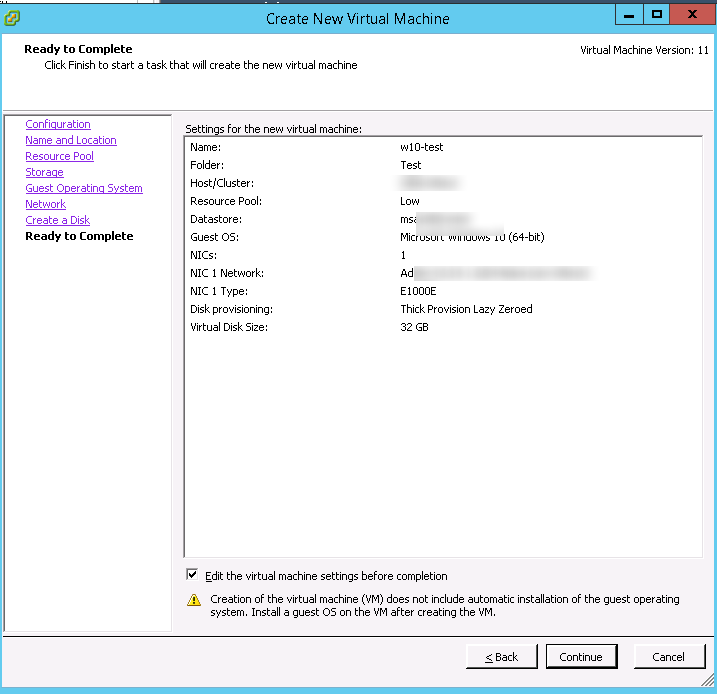
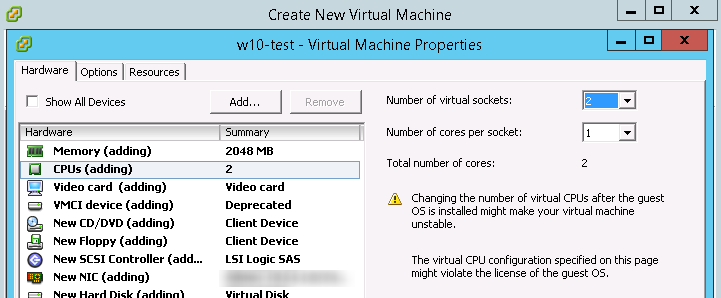
В свойствах ВМ укажите как минимум 1 Гб оперативной памяти для 32 битной Windows 10 и 2 Гб для x64, добавьте дополнительный виртуальный CPU.
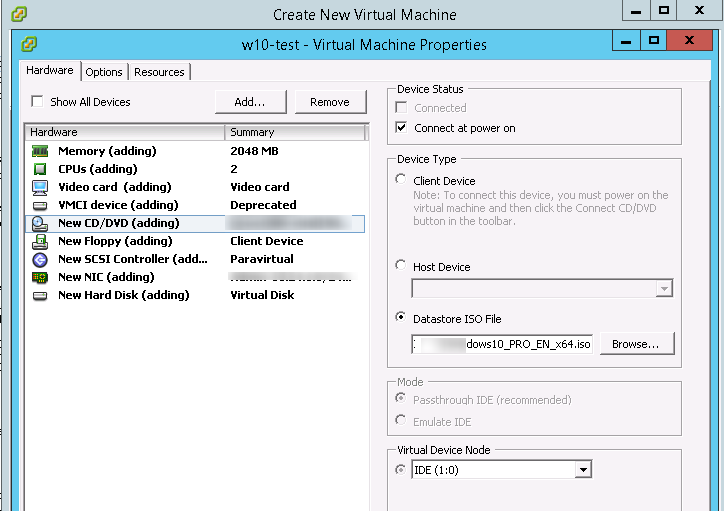
Теперь в настройках ВМ выберите CD/DVD привод. И подключите ранее загруженный ISO файл с образом Windows 10 (Datastore ISO File->Browse). В настройках укажите, что CD/DVD привод должен быть подключен при загрузке (Connect at power on). Нажмите Finish для запуска создания ВМ.
После того, как ВМ появится в консоли vSphere, запустите ее. Автоматически запустится мастер установки Windows 10.
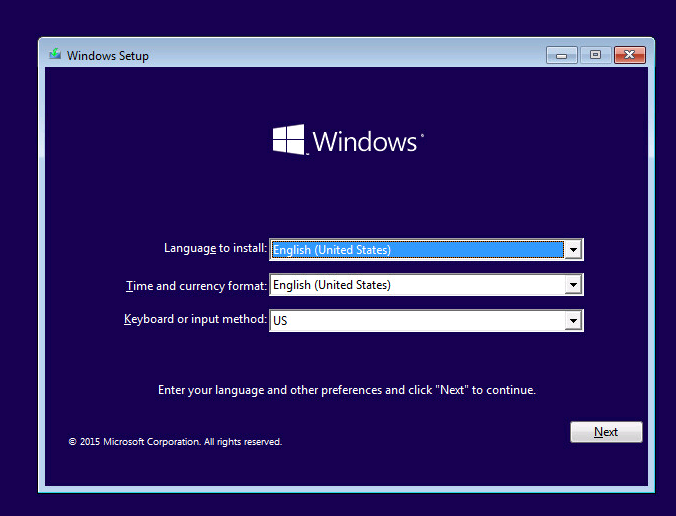
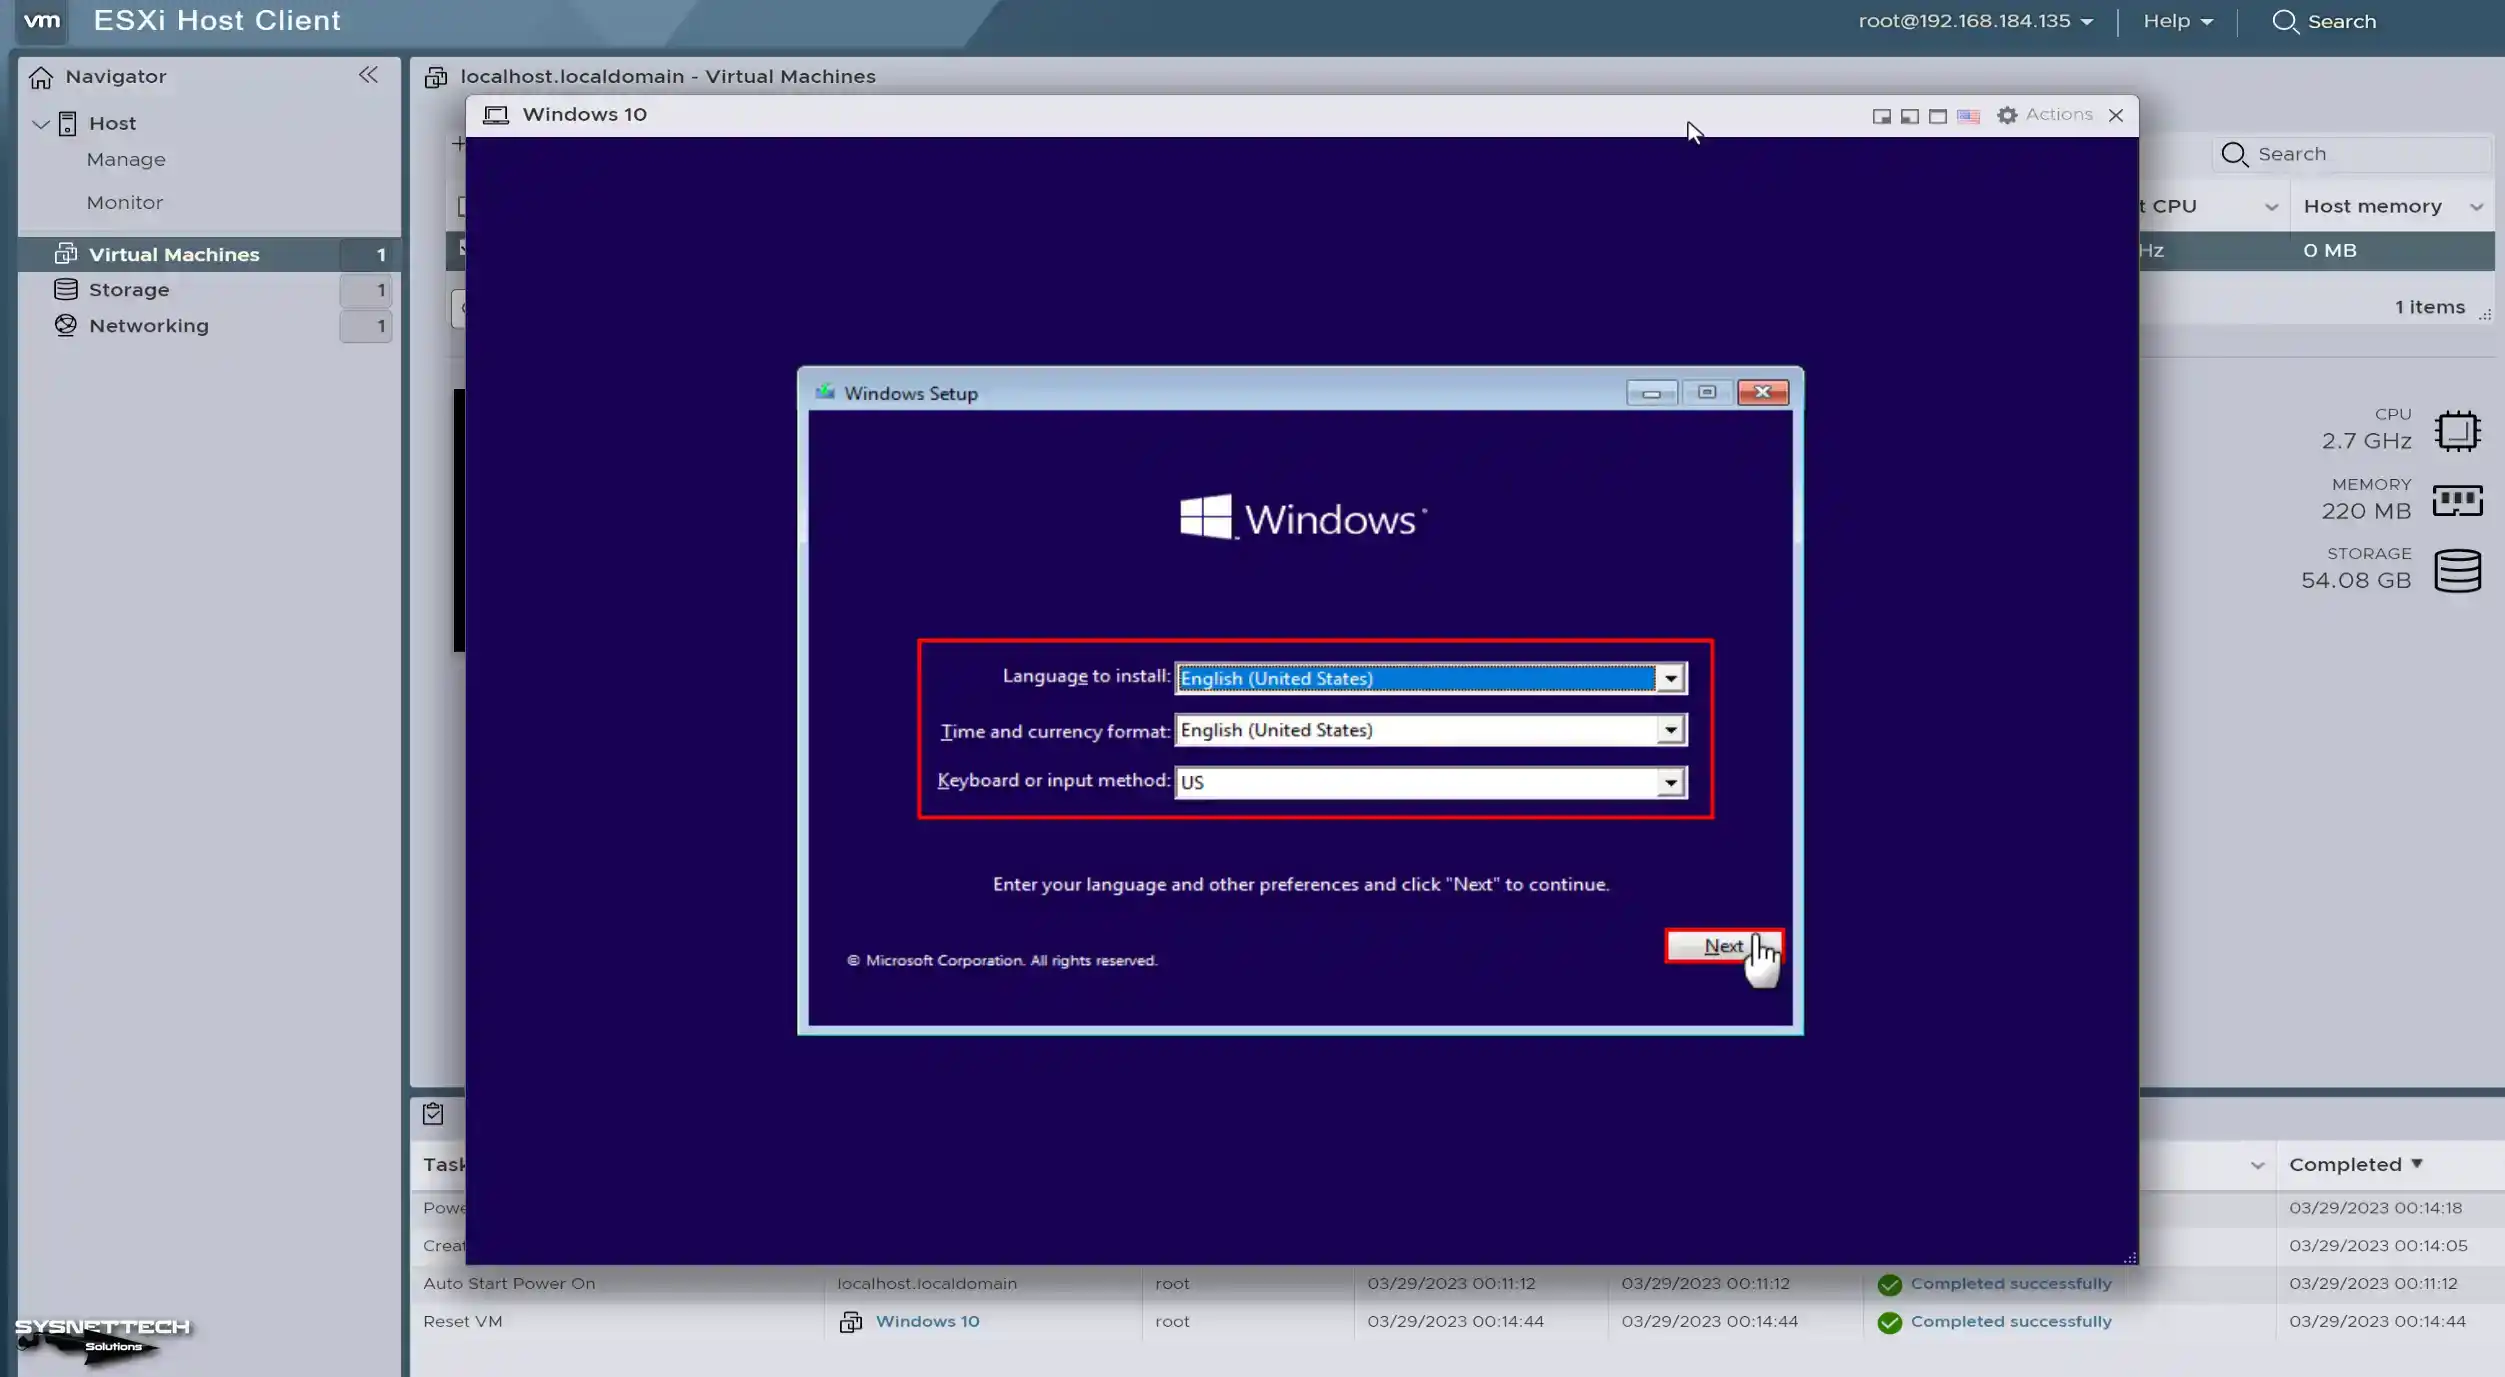
Укажите языковые настройки системы и нажмите Next.
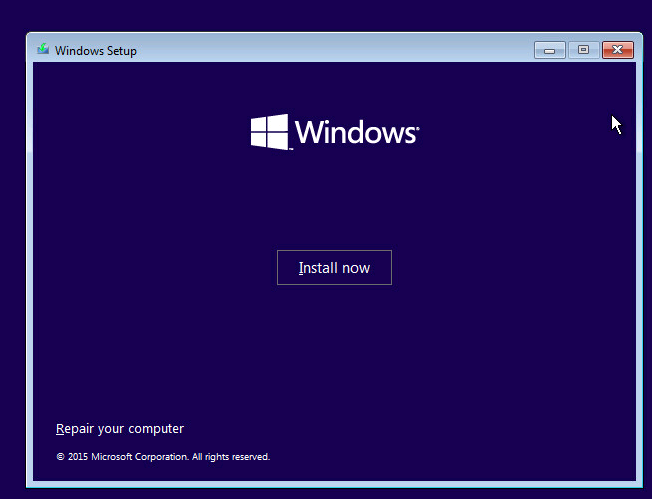
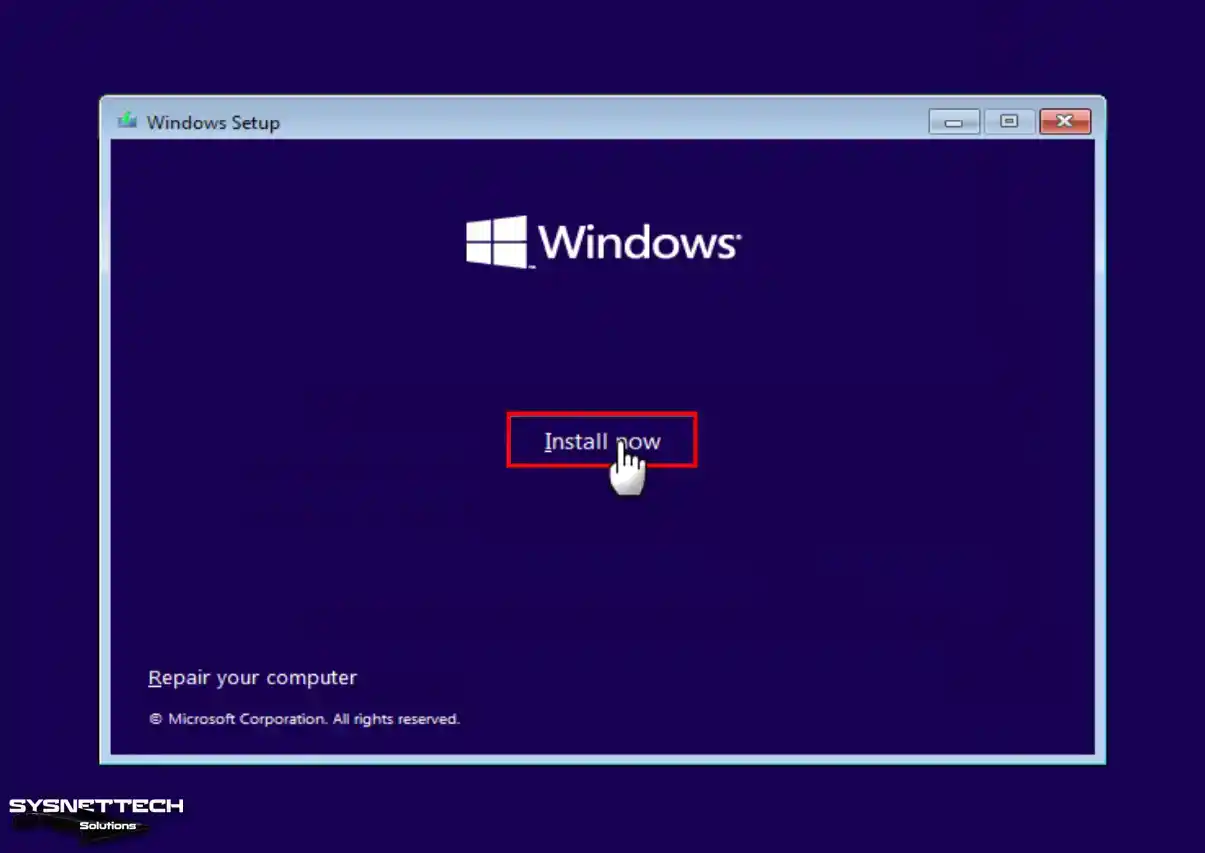
На следующем этапе нажмите единственную имеющуюся кнопку Install now.
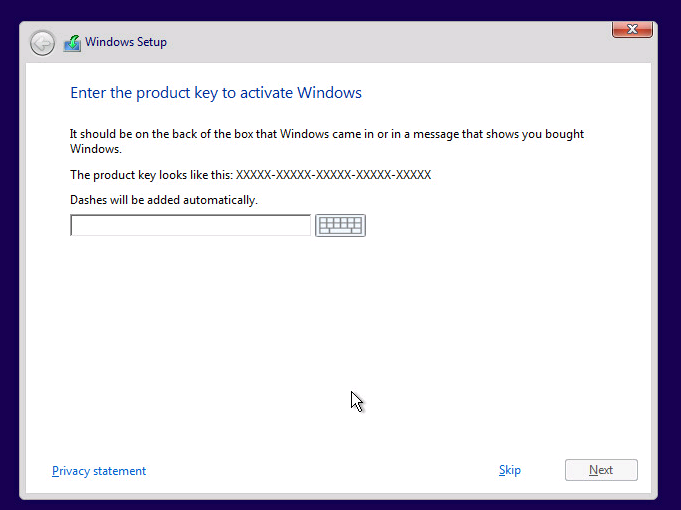
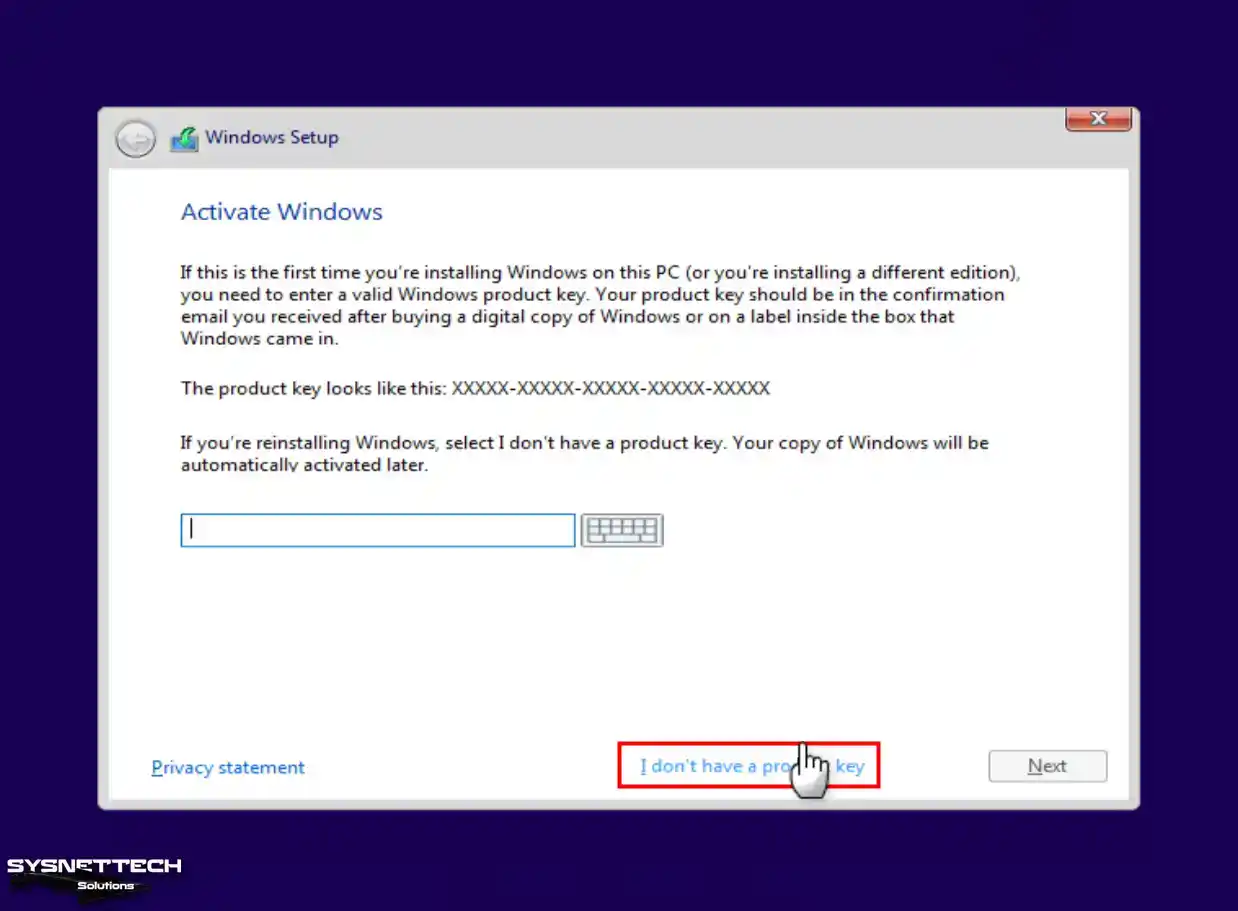
Укажите свой ключ продукта для Windows 10 или пропустите этот шаг.
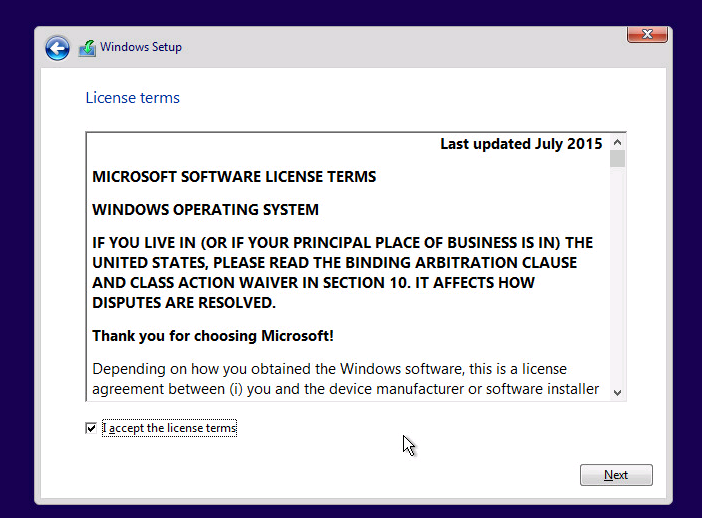
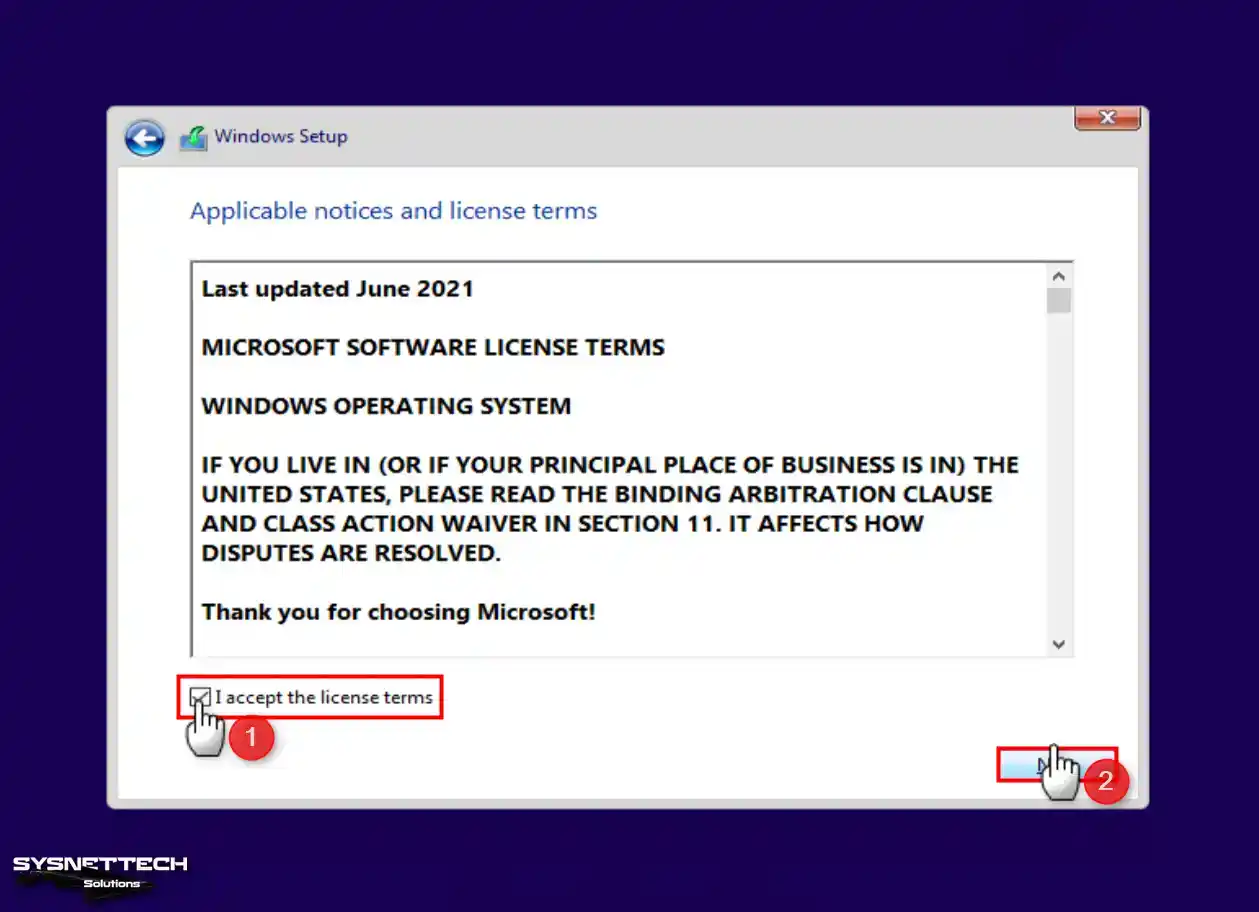
Соглашаемся с лицензионным соглашением Microsoft.
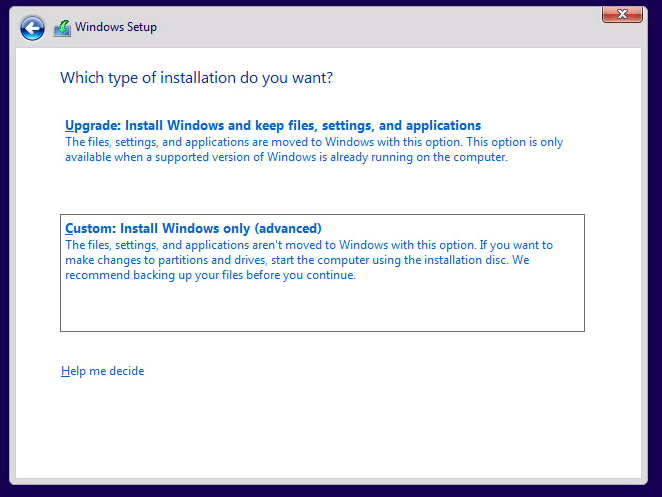
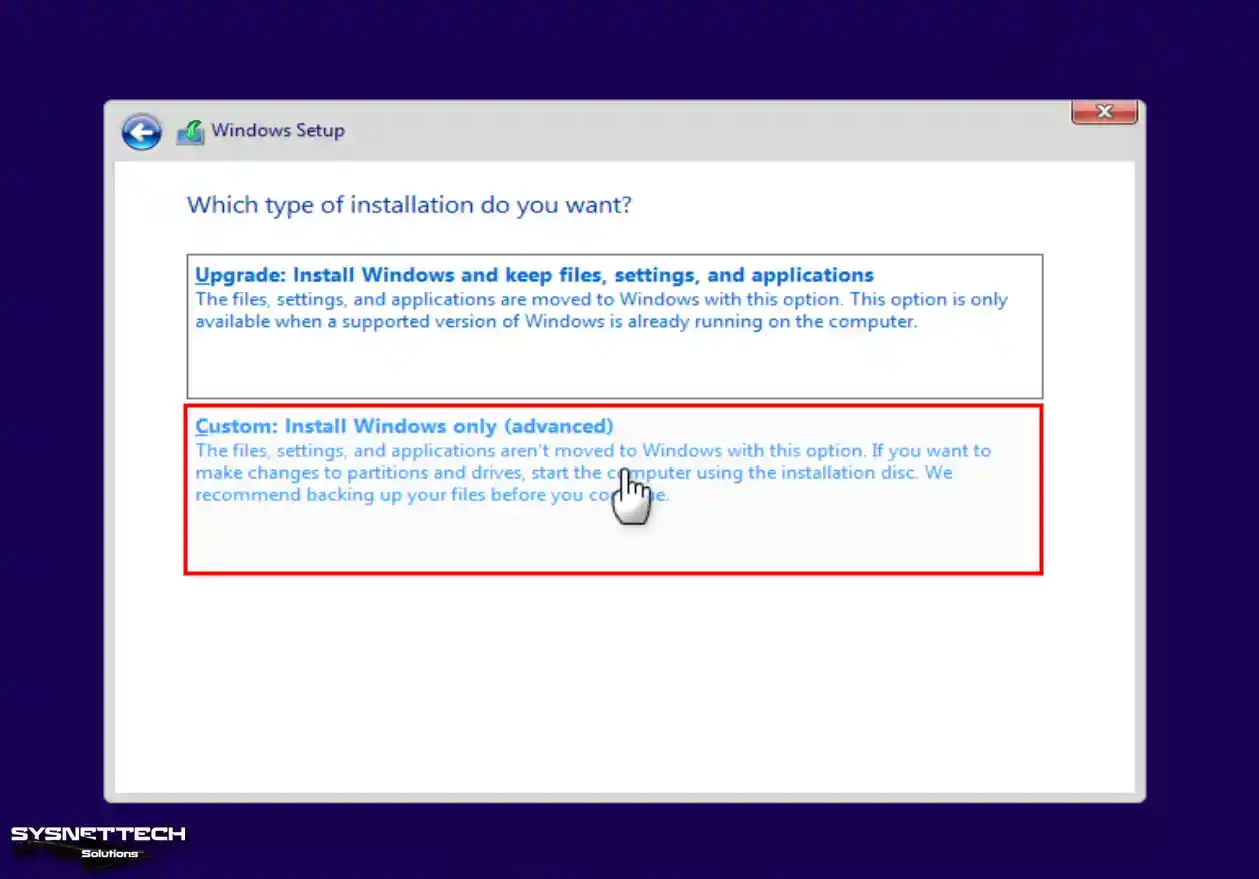
И выбираем тип установки Custom (advanced).
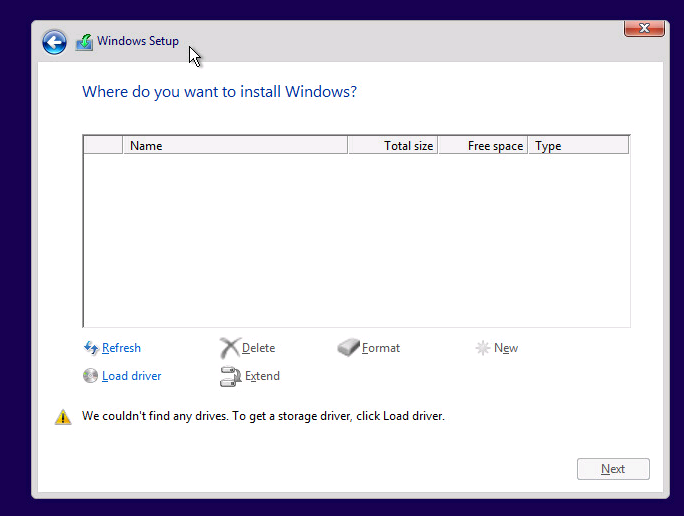
Совет. В нашем случае, в качестве виртуального SCSI контроллера мы использовали адаптер VMware Paravirtual (для контролера LSI Logic parallel процедура аналогичная). В установщике Windows 10 отсутствуют драйвера для данного контроллера, и мастера не видит локального диска виртуальной машине, показывая ошибку “We couldn’t find any drives». Чтобы загрузить драйвер, контроллера, нажмите «Load driver».
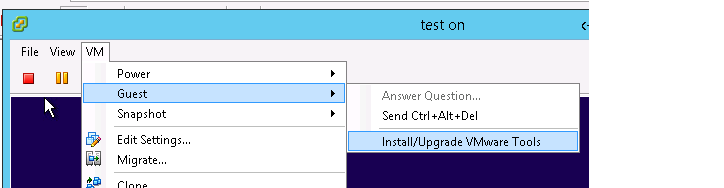
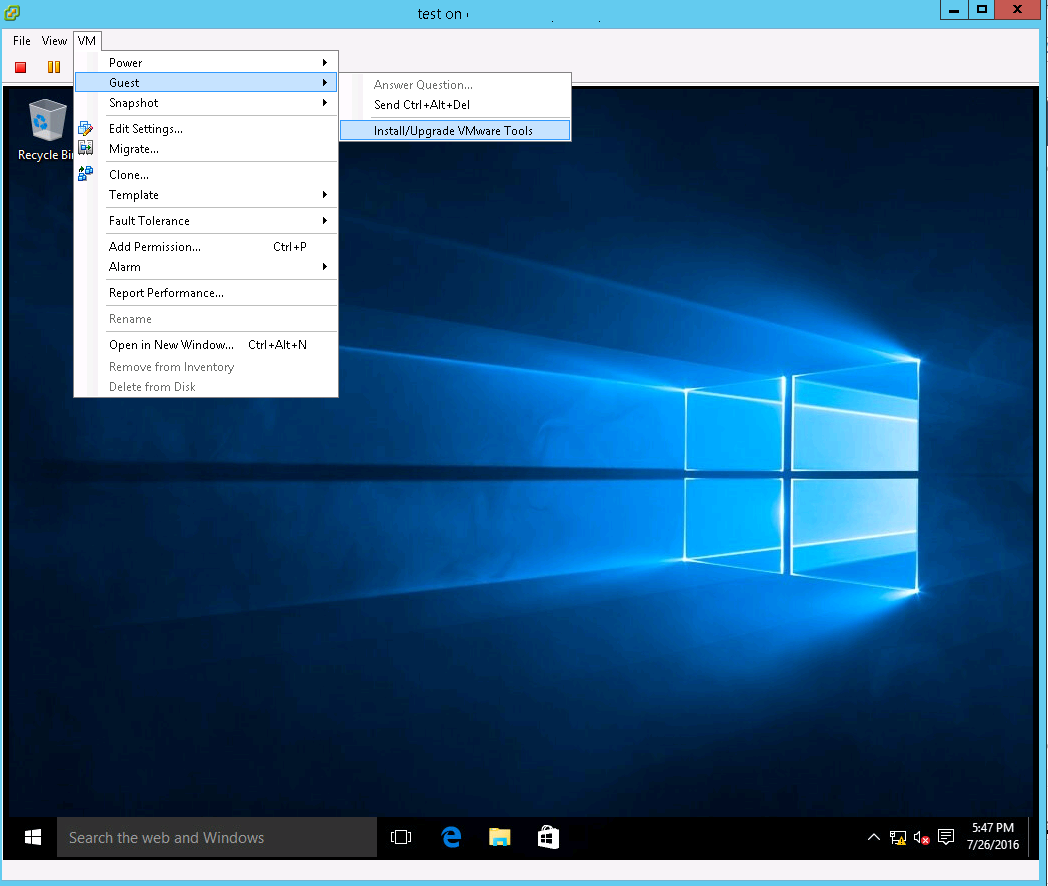
В данном случае нам нужно загрузить драйвер pvscsi. Проще всего это сделать, смонтировав диск с VMTools. В консоли ВМ выберем Guest > Install/Update VMware Tools.
Или же можно смонтировать .iso образ VMware Tools вручную:
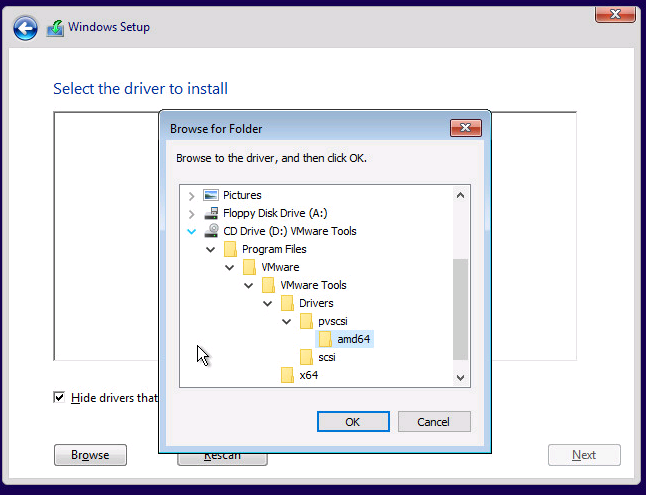
Вернитесь к экрану установки Windowsи нажмите кнопку Load Driver. Чтобы загрузить драйвер SCSI нажмите Browse и перейдите в папку D:\Program Files\VMWare Tools\Driver\pvscsi\amd64\ (путь для Windows 10 x64).
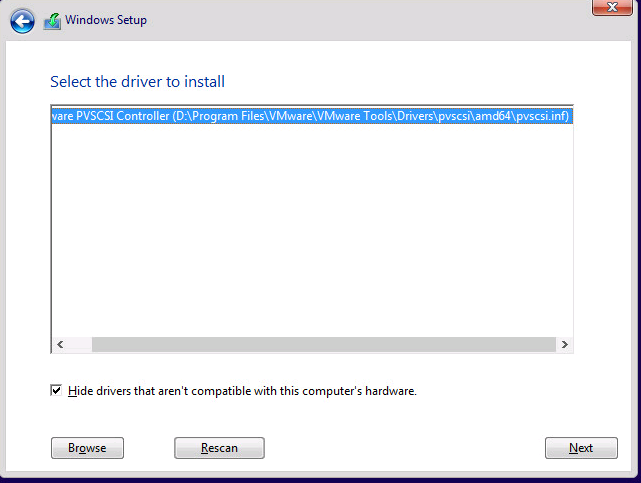
В списке драйверов выберите VMWare PVSCSI Controller (D:\Program Files\VMWare Tools\Driver\pvscsi\amd64\pvscsi.inf) и нажмите Next.
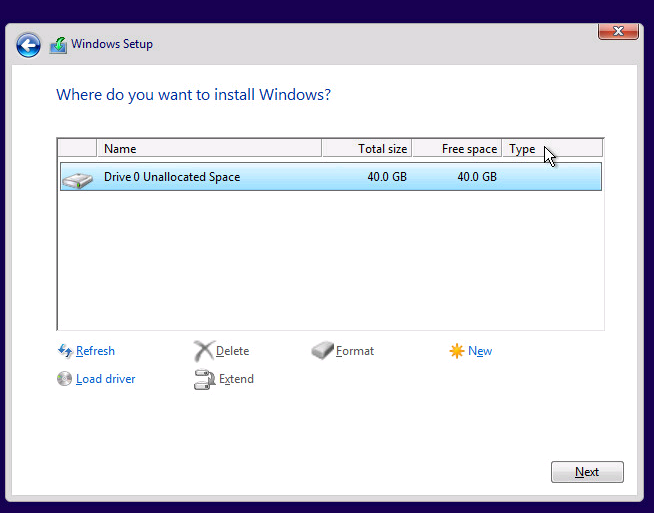
После успешной загрузки драйвера, установщик Windows 10 увидит контроллер дисков и сам диск. В настройках ВМ опять измените смонтированный ISO на установочный диск Windows 10.
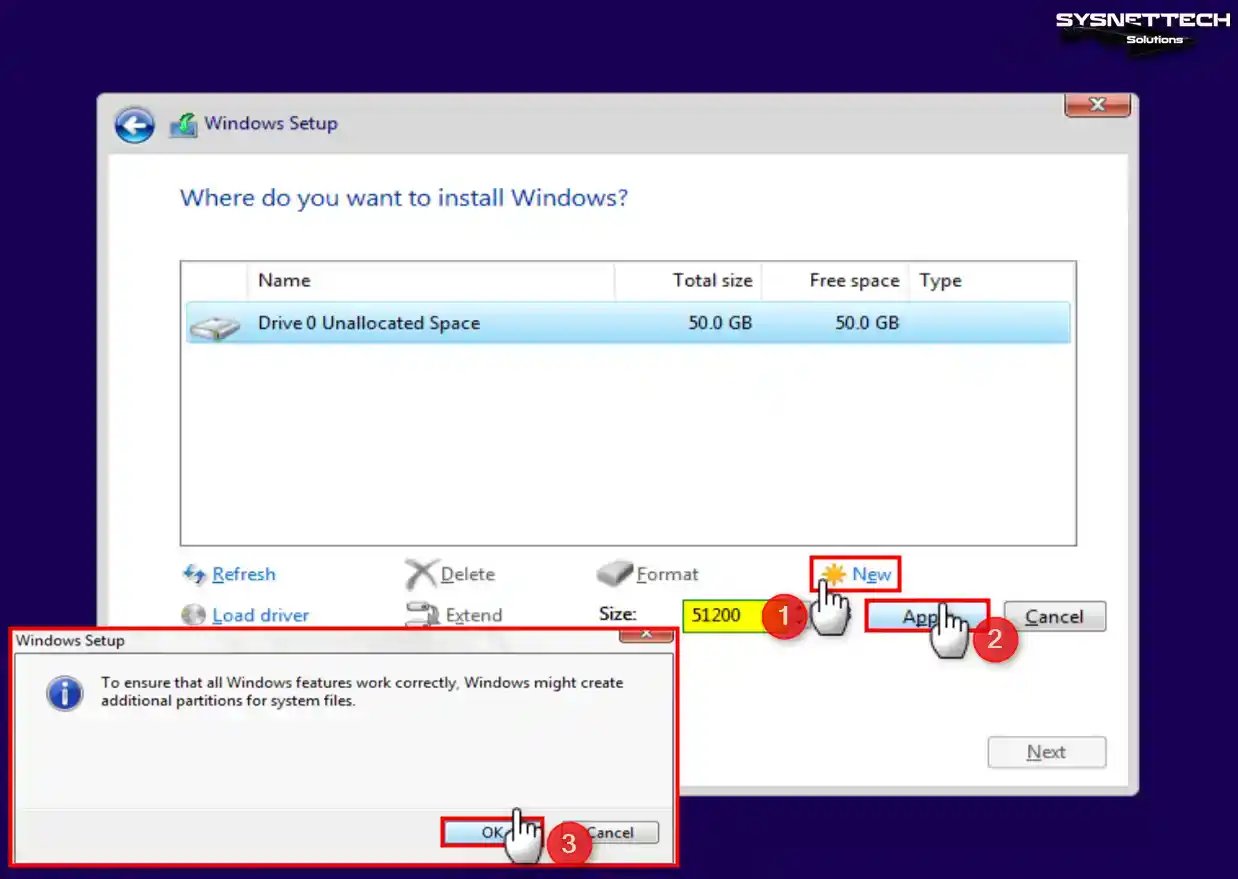
Нажмите кнопку Next и установочная программа Windows 10 автоматически создаст все нужные разделы на неразмеченной области диска (либо вы можете создать разделы в ручную на свое усмотрение).
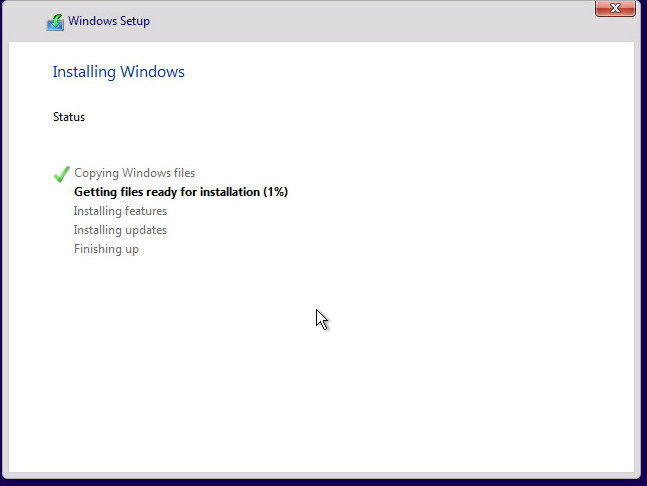
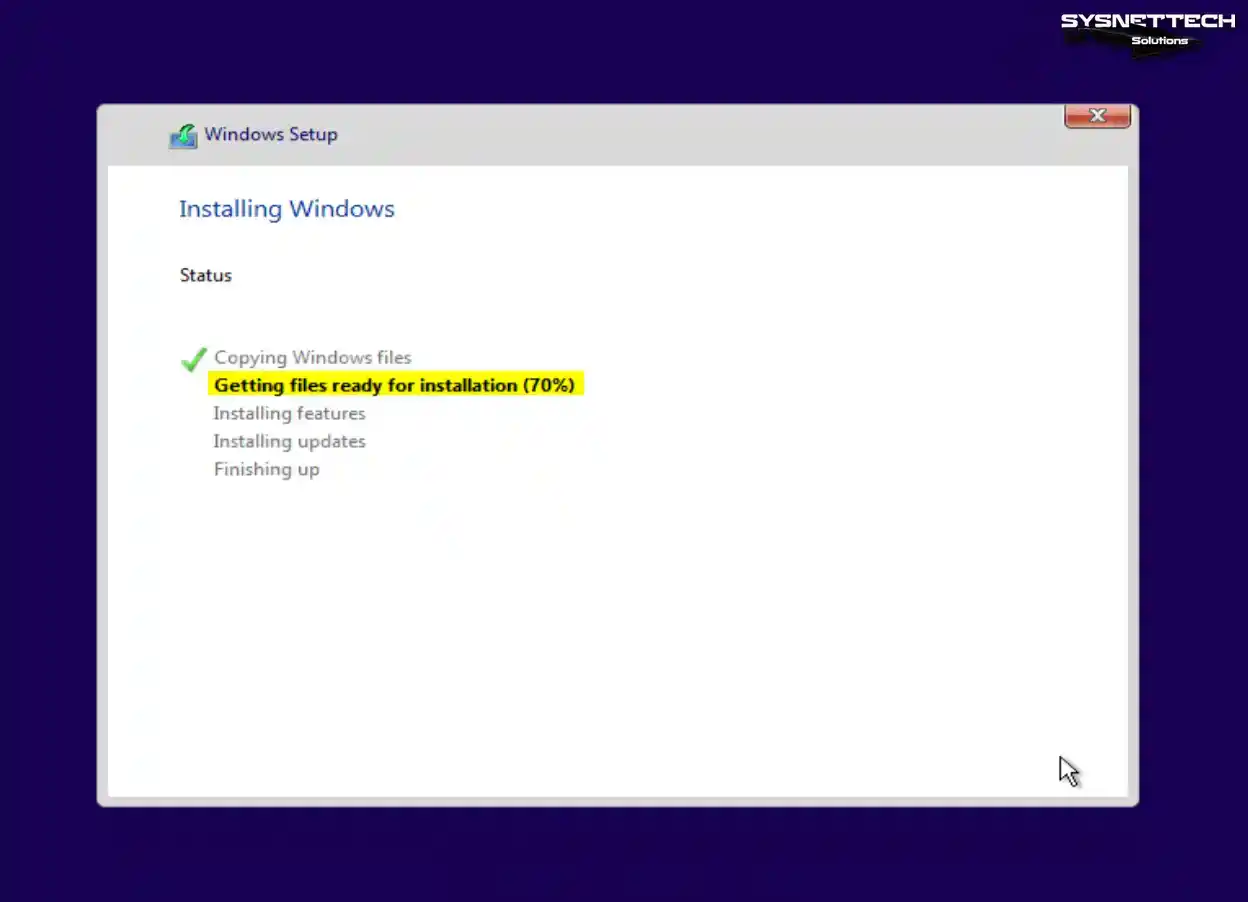
Дождитесь пока установщик скопирует и распакует установочные файлы.
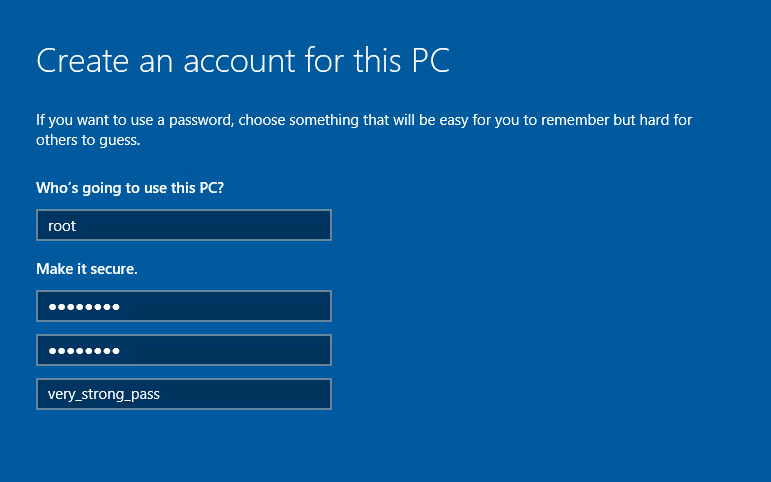
После окончания установки, ВМ перезагрузится. Вам останется указать ключ продукта (или опять пропустить этот шаг), и указать имя пользователя компьютера и его пароль.
Последнее, что осталось выполнить — установить в гостевой Windows набор утилит VMWare tools. Проще всего это сделать, выбрав в консоли ВМ пункт Guest > Install/Update VMware Tools.
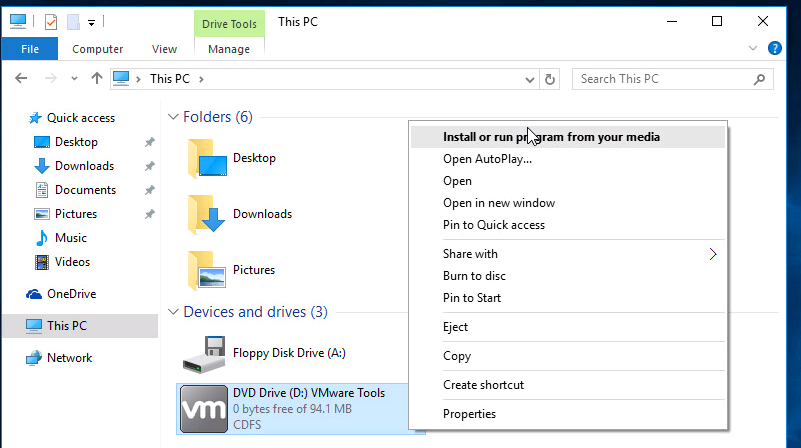
Если программа установки не запустится автоматически, щелкните в проводнике ПКМ по виртуальному DVD приводу (как правило, ему назначается буква D:) и выберите пункт Install or run program from your media.
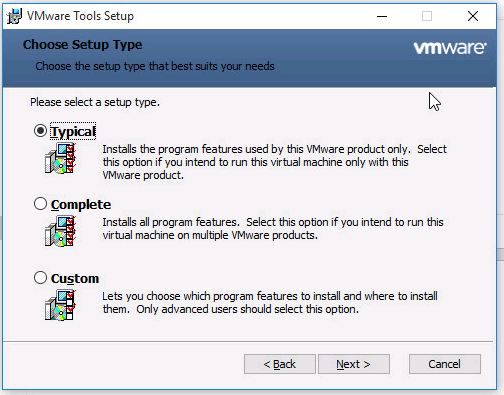
В качестве типа установки выберите Typical. После окончания установки, инсталлер попросит вас перезагрузить компьютер.
Совет. Можно выполнить и «тихую» установки VMware Tools с подавлением запроса на перезагрузку. Для этого в гостевой Windows нужно с правами администратора выполнить команду:
setup.exe /S /v /qn REBOOT=R
Итак, вы развернули на сервере VMware ESXi виртуальную машину с Windows 10, которая полностью готова к использованию.
In this article, we will examine how to set up and use the Microsoft Windows 10 operating system in a new virtual machine using the VMware vSphere Hypervisor ESXi 8.0 virtualization infrastructure on a physical server.
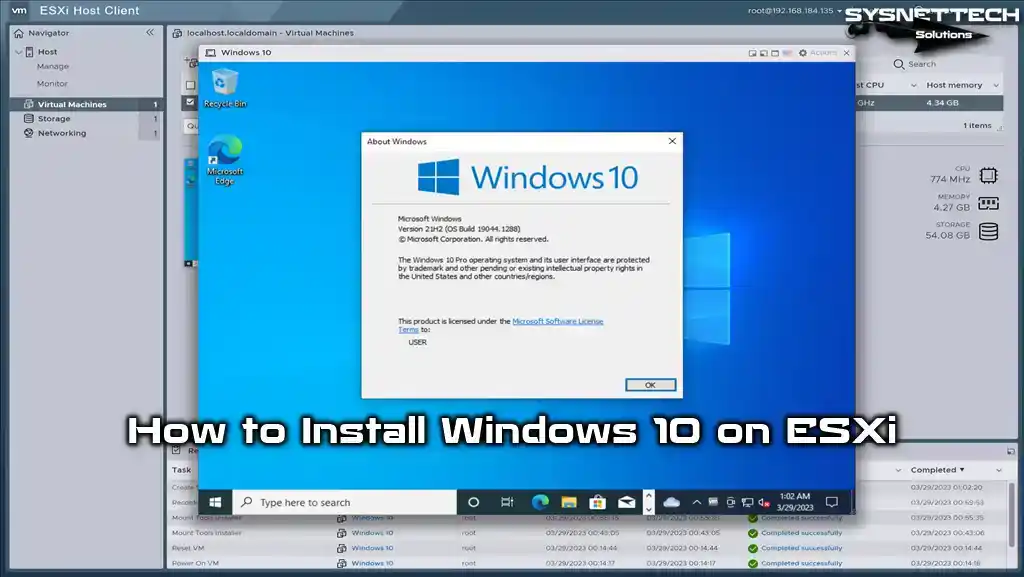
How to Run Windows 10 in a Virtual Machine on VMware vSphere Hypervisor ESXi 8.0
By using vSphere ESXi, a great virtualization technology developed by VMware, you can use a powerful physical server with multiple virtual systems instead of using a single operating system. The benefit of this is to obtain maximum efficiency from a physical server and to minimize the company’s IT costs.
A company may have more than one server or computer in IT coordination. It can make a physical server more efficient with ESXi by using DHCP service to assign automatic IP addresses, managing all computers used by users from a single server, or performing remote management control with Active Directory service. You can also run services such as DHCP and Active Directory on different systems by installing the Windows Server system on separate VMs.
One of the widely used end-user operating systems today is Windows 10. Due to licensing costs, in some cases, you can transfer one of the Windows Server services to Windows 10 and run it.
VMware ESXi is installed on a physical server in the real world, but if you have budget problems or want to gain experience, you can test it by installing it on a virtualization program. We recommend you buy a secondhand server and install ESXi on it.
How to Create a New VM for Windows 10
First, type your server’s IP address in the URL address line of the Google Chrome or Opera web browser and connect. Upload the Windows 10 ISO file to the Datastore section, and then proceed to the steps to create a virtual machine.
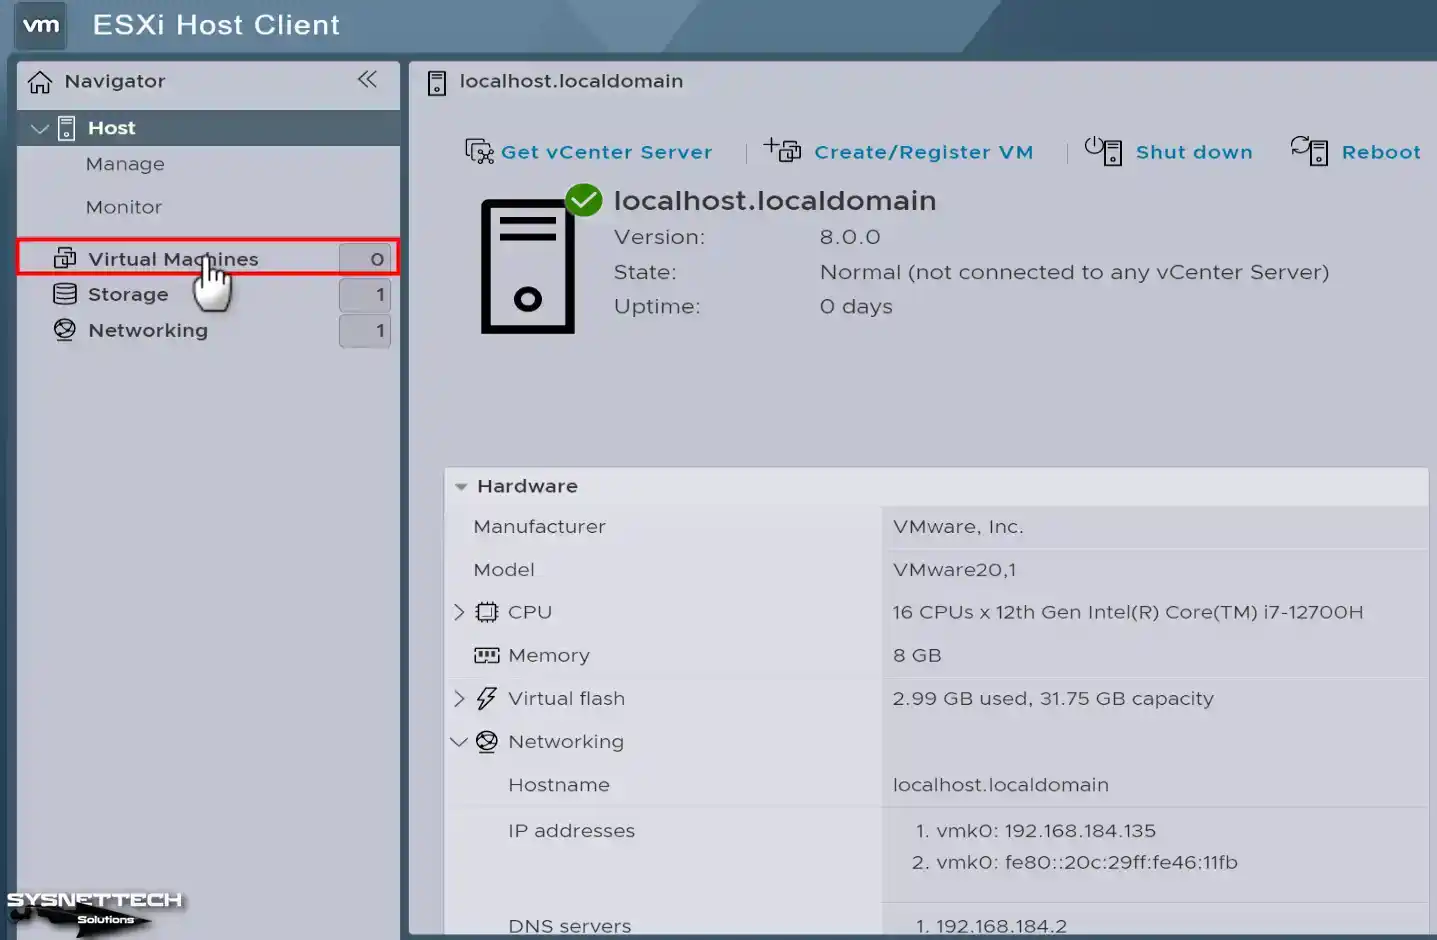
Step 1
After connecting to ESXi Host Client, click Virtual Machines on the left panel.
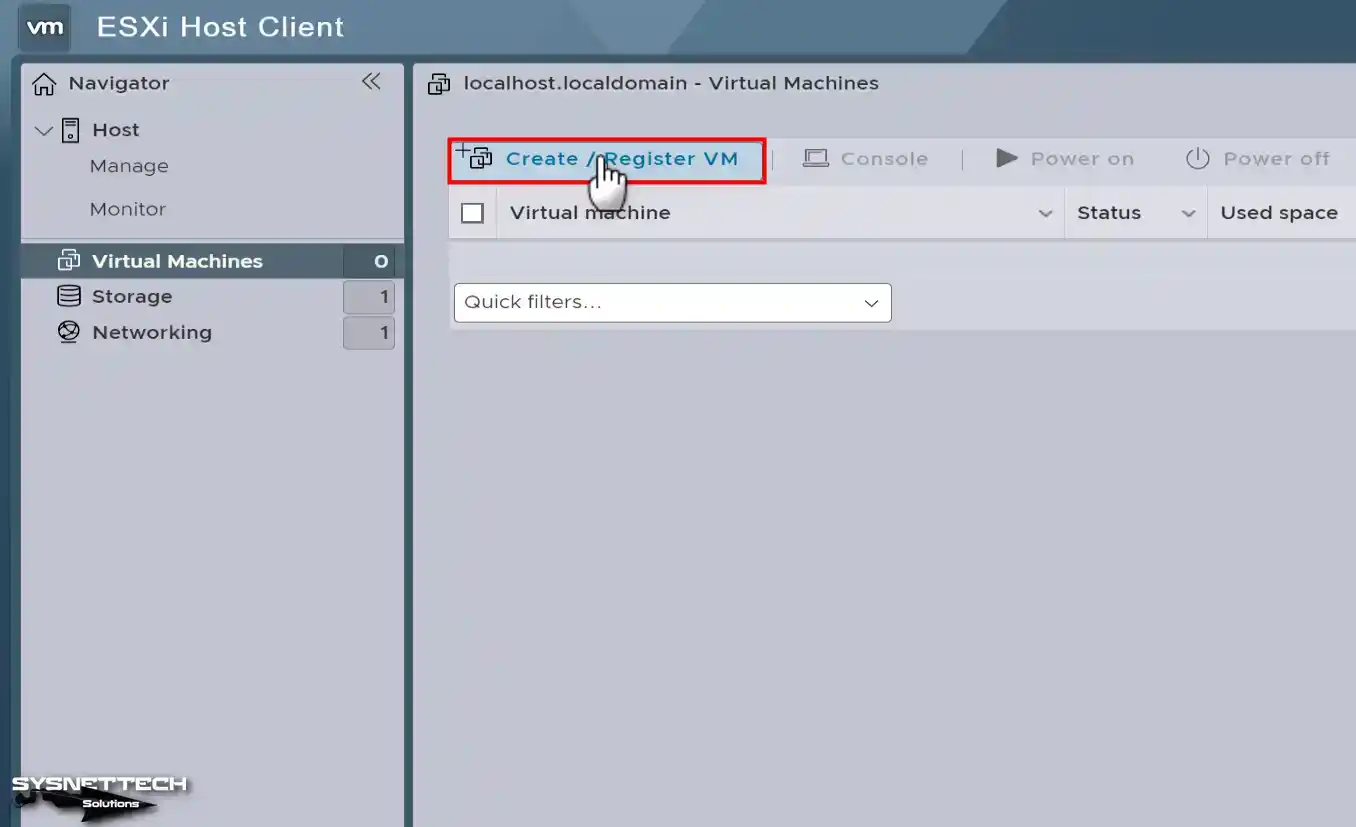
Step 2
Click on Create / Register VM as in the image below to start the new virtual machine wizard on the Virtual Machines screen.
Step 3
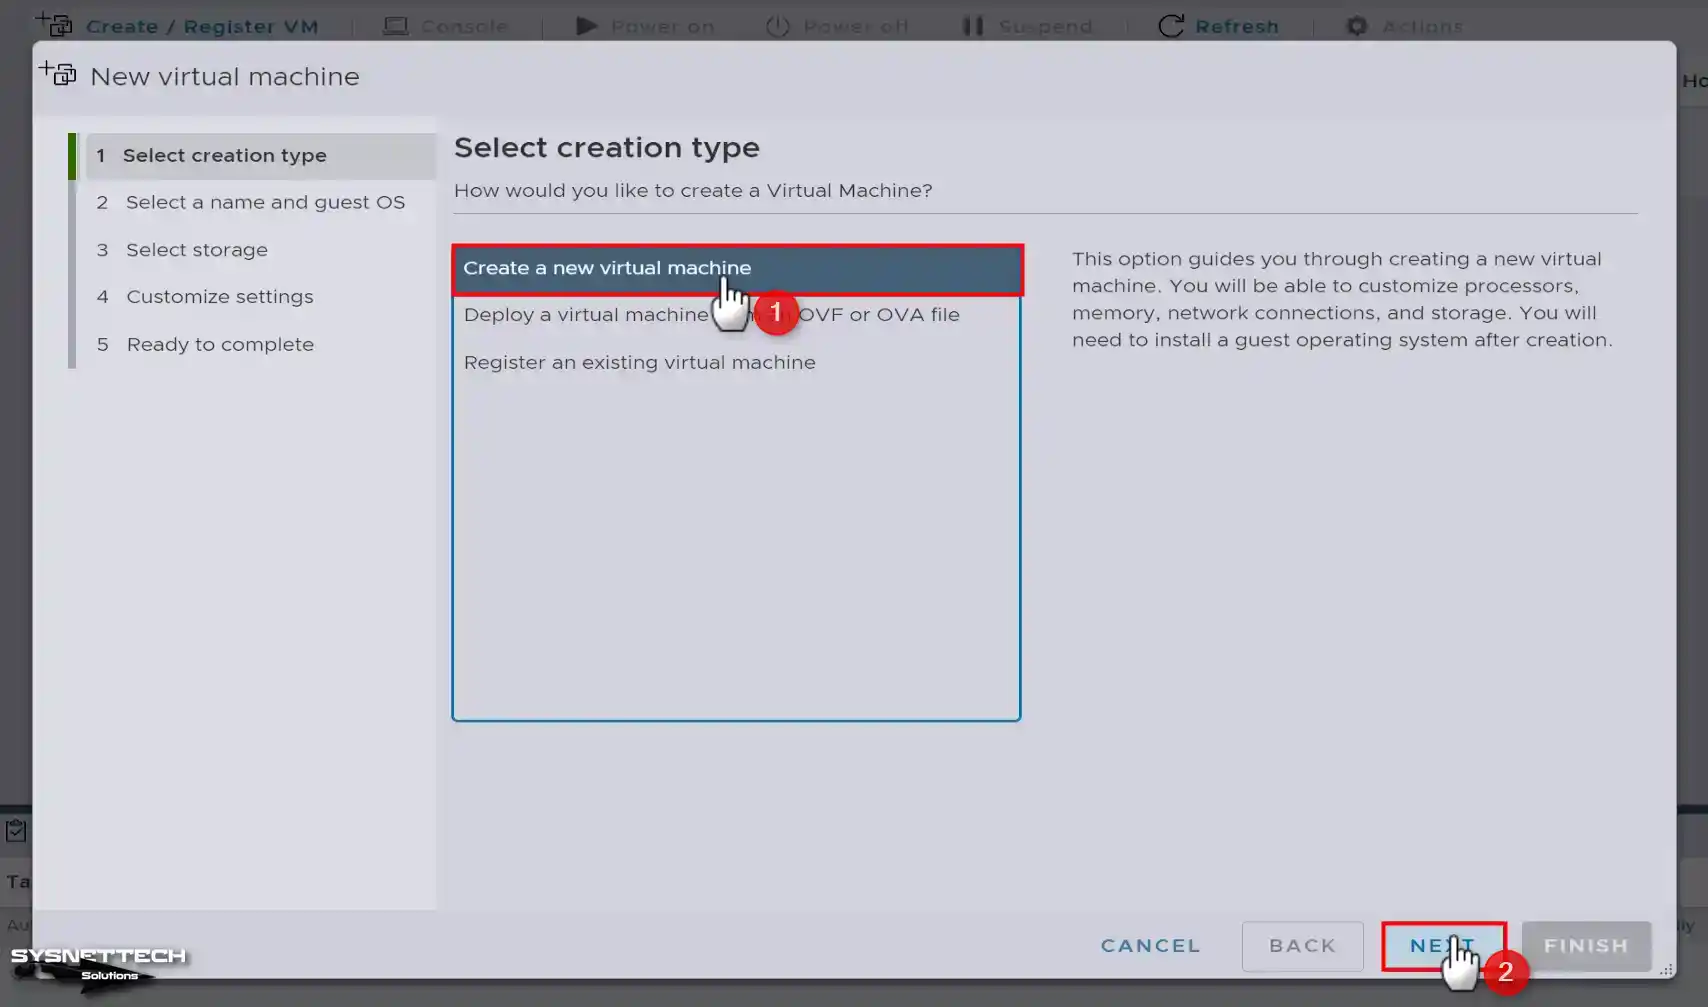
When the New Virtual Machine wizard opens, you need to continue by creating a new disk to prepare a new virtual computer. Therefore, select Create a New Virtual Machine on the Creation Type screen and click Next.
Step 4
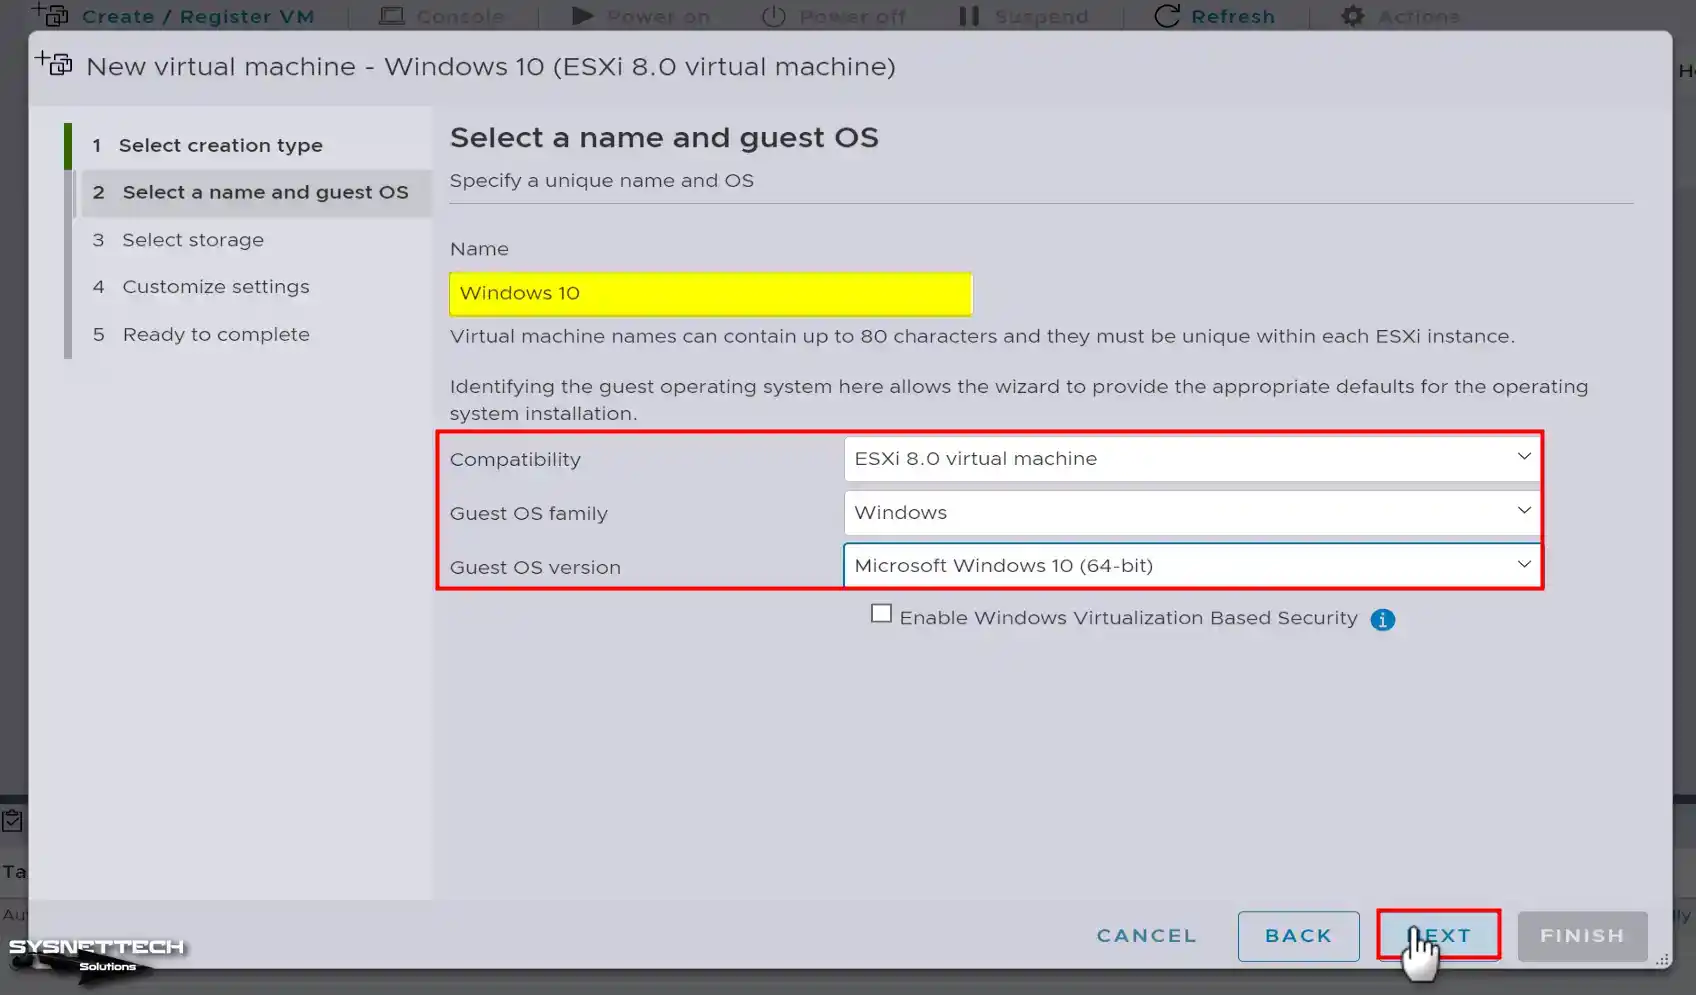
Since you will be running Windows 10 on the virtual server, type the name of the relevant system or a different name in the Name field. Next, configure the Compatibility setting to 8.0, the Guest OS Family setting to Windows, and finally, the Guest OS Version to Microsoft Windows 10 (64-bit) and continue.
- Compatibility: ESXi 8.0 Virtual Machine
- Guest OS Family: Windows
- Guest OS Version: Microsoft Windows 10 (64-bit)
Step 5
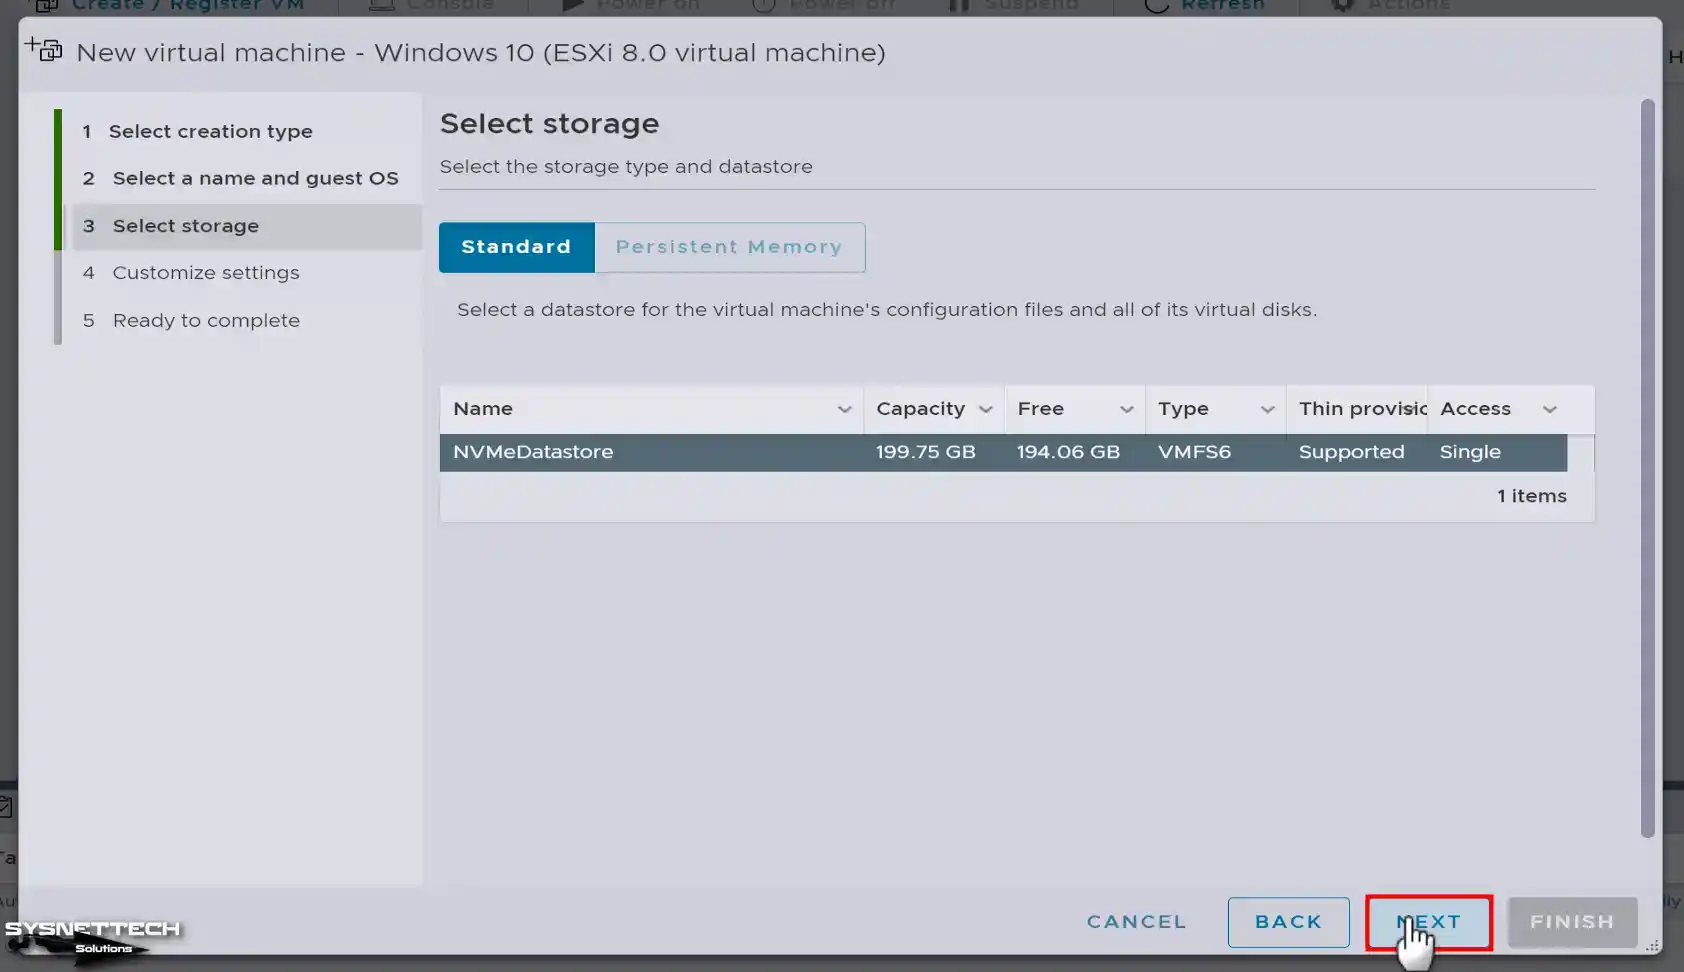
On the Select Storage screen, select the Datastore where you will install the virtual PC and click Next.
Step 6
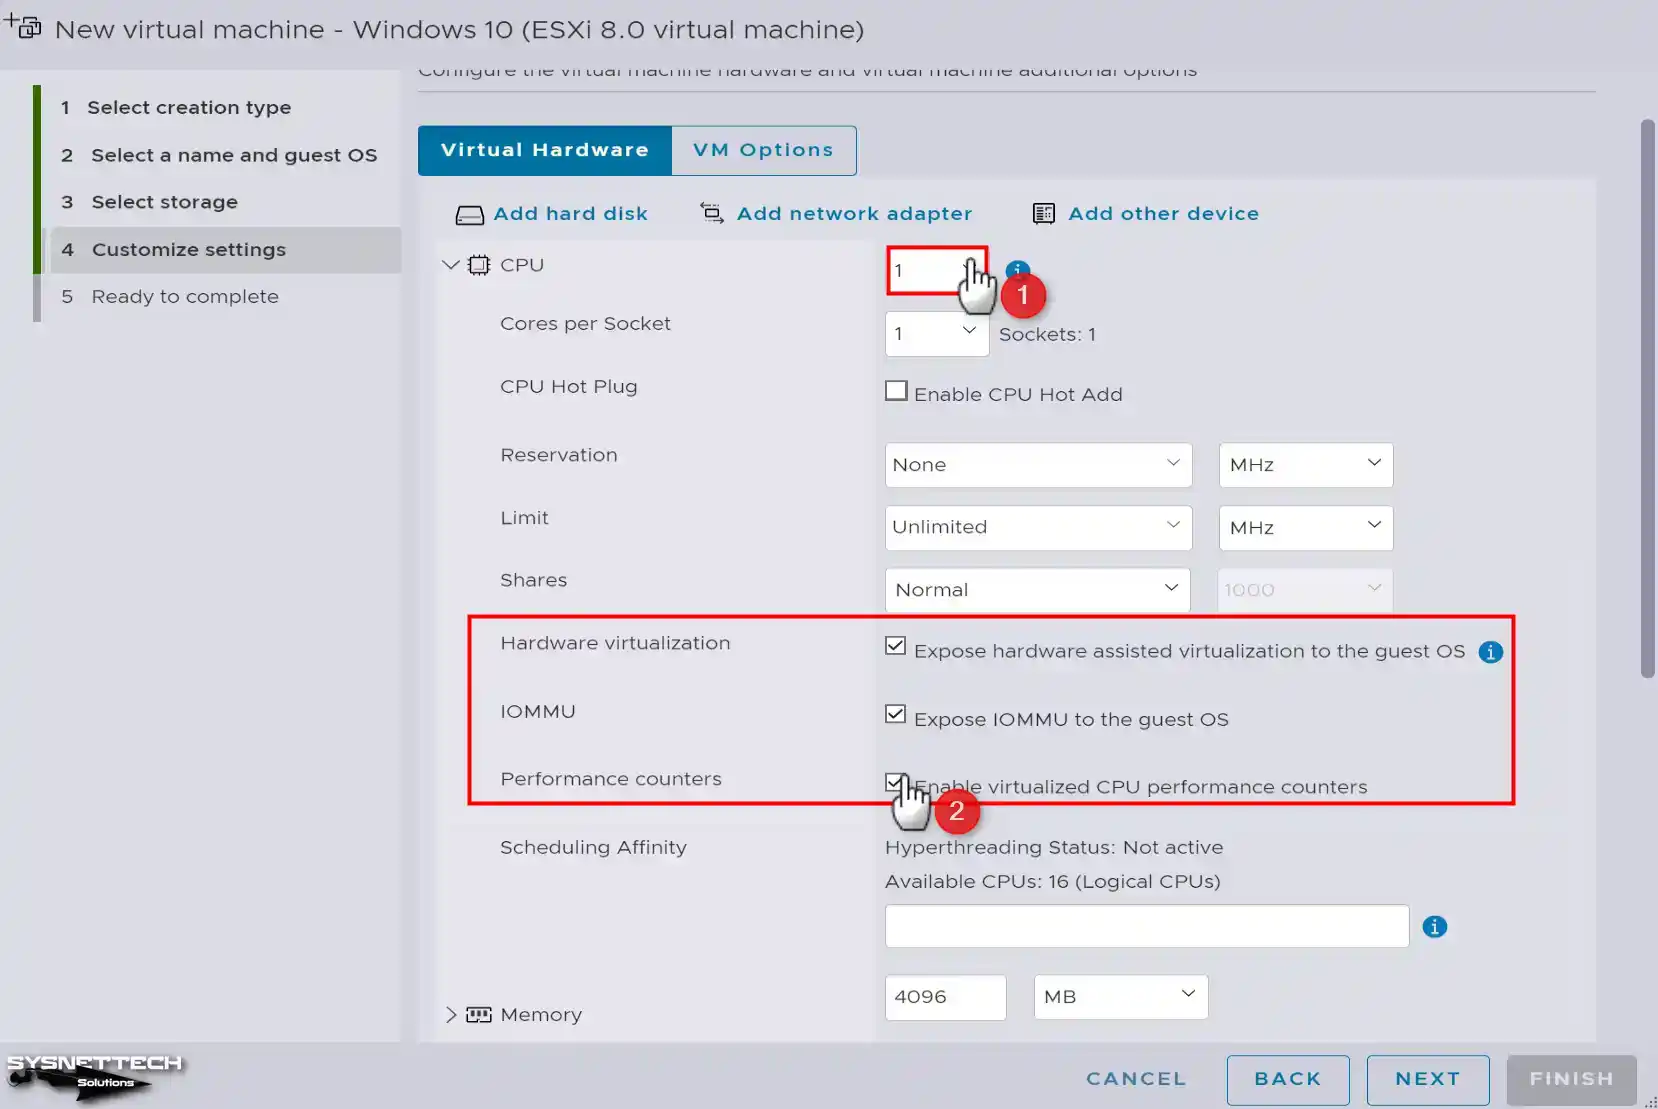
On the Virtual Hardware screen, configure the CPU number to 1 or the desired amount for Windows 10. Also, if you want to use the virtualization feature of the host machine on the guest machine, check the Hardware Virtualization option and enable the IOMMU feature for better memory management in the VM. Finally, you can use the Performance Counters feature to view information about the VM’s processor performance.
- Hardware Virtualization: Expose Hardware-Assisted Virtualization to the Guest OS
- IOMMU: Expose IOMMU to the Guest OS
- Performance Counters: Enable Virtualized CPU Performance Counters
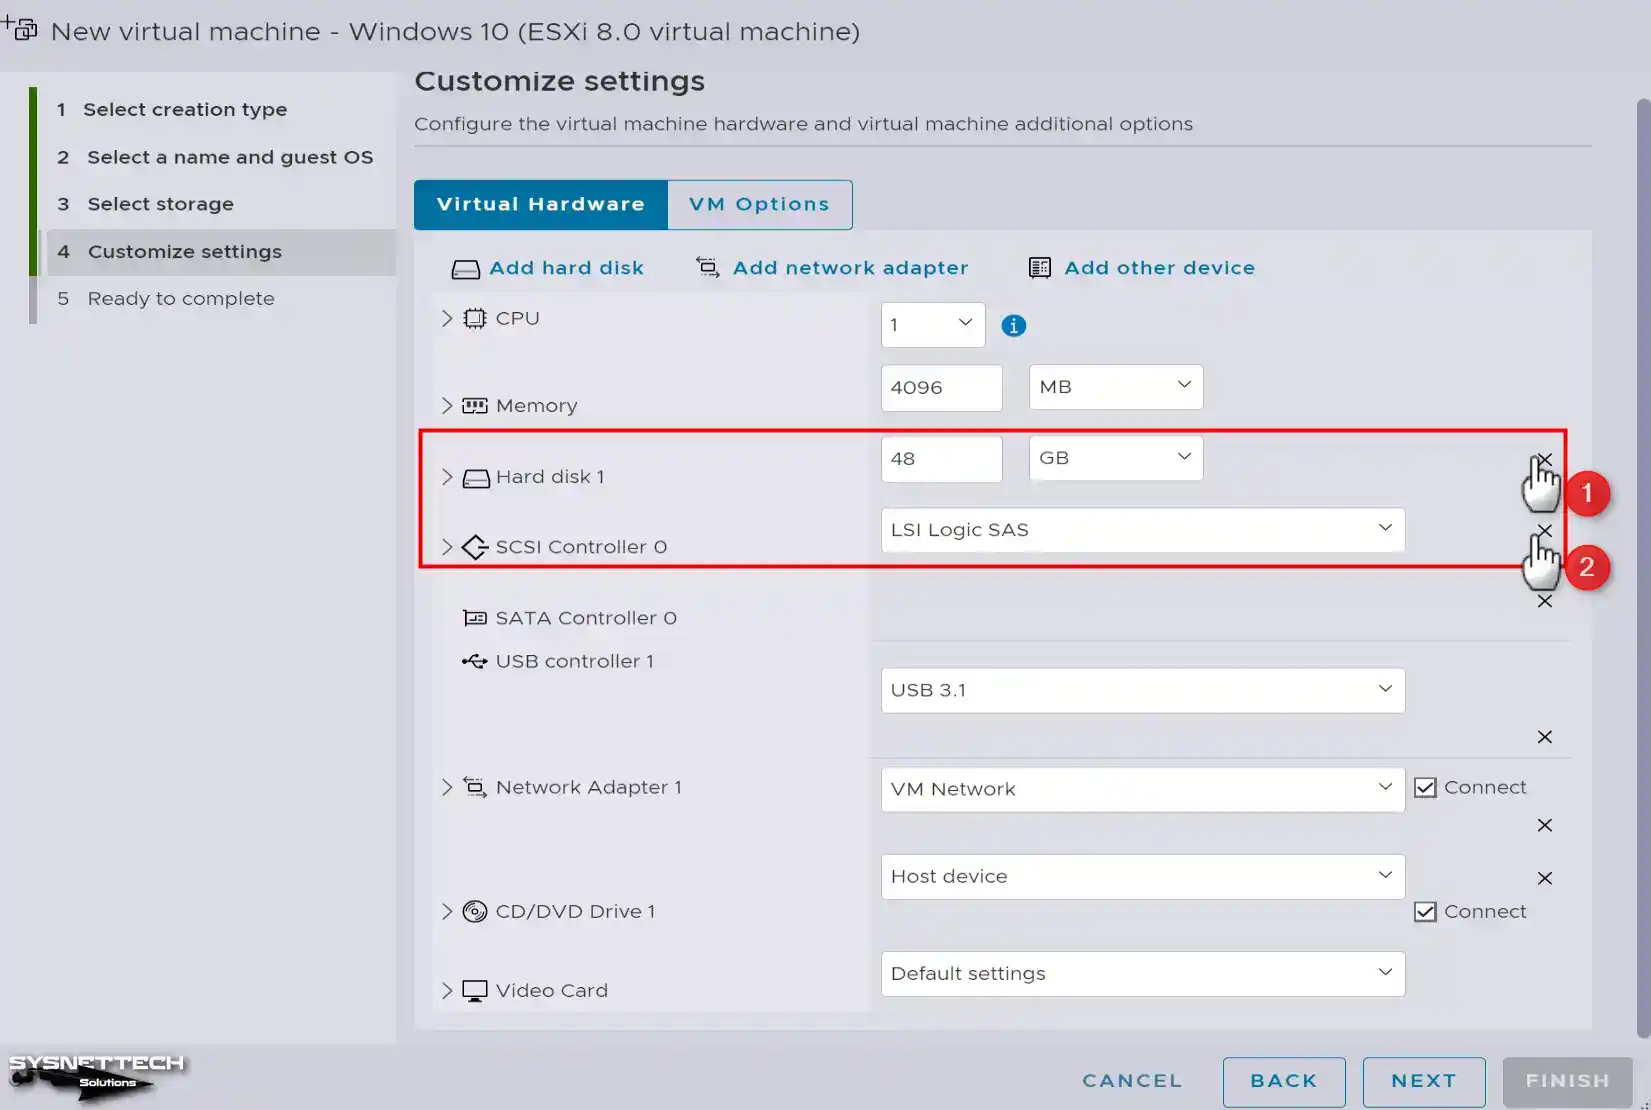
Step 7
Before you can run Windows 10 on an NVMe virtual disk, you must remove the default SCSI Controller and the disk attached to it. Click X to remove the SCSI Controller and Hard Disk 1 from the VM, as in the image below.
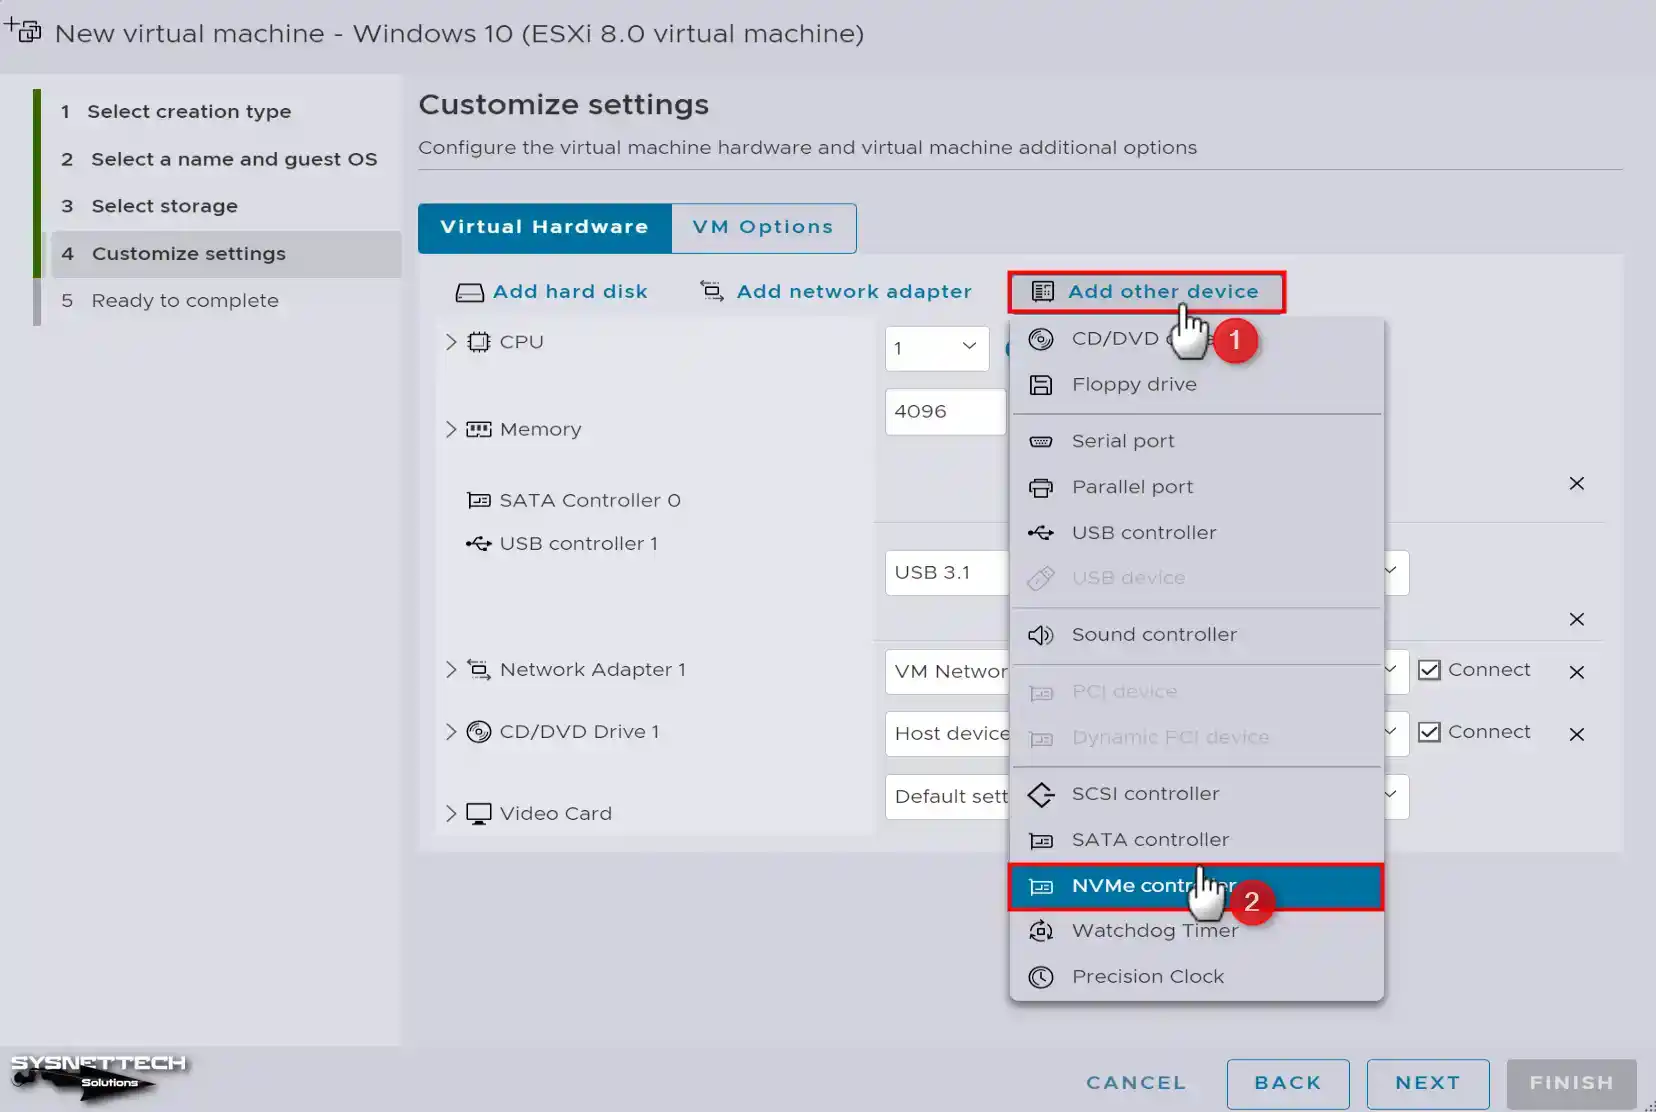
Step 8
To add a new disk controller, click Add Other Device and then NVMe Controller.
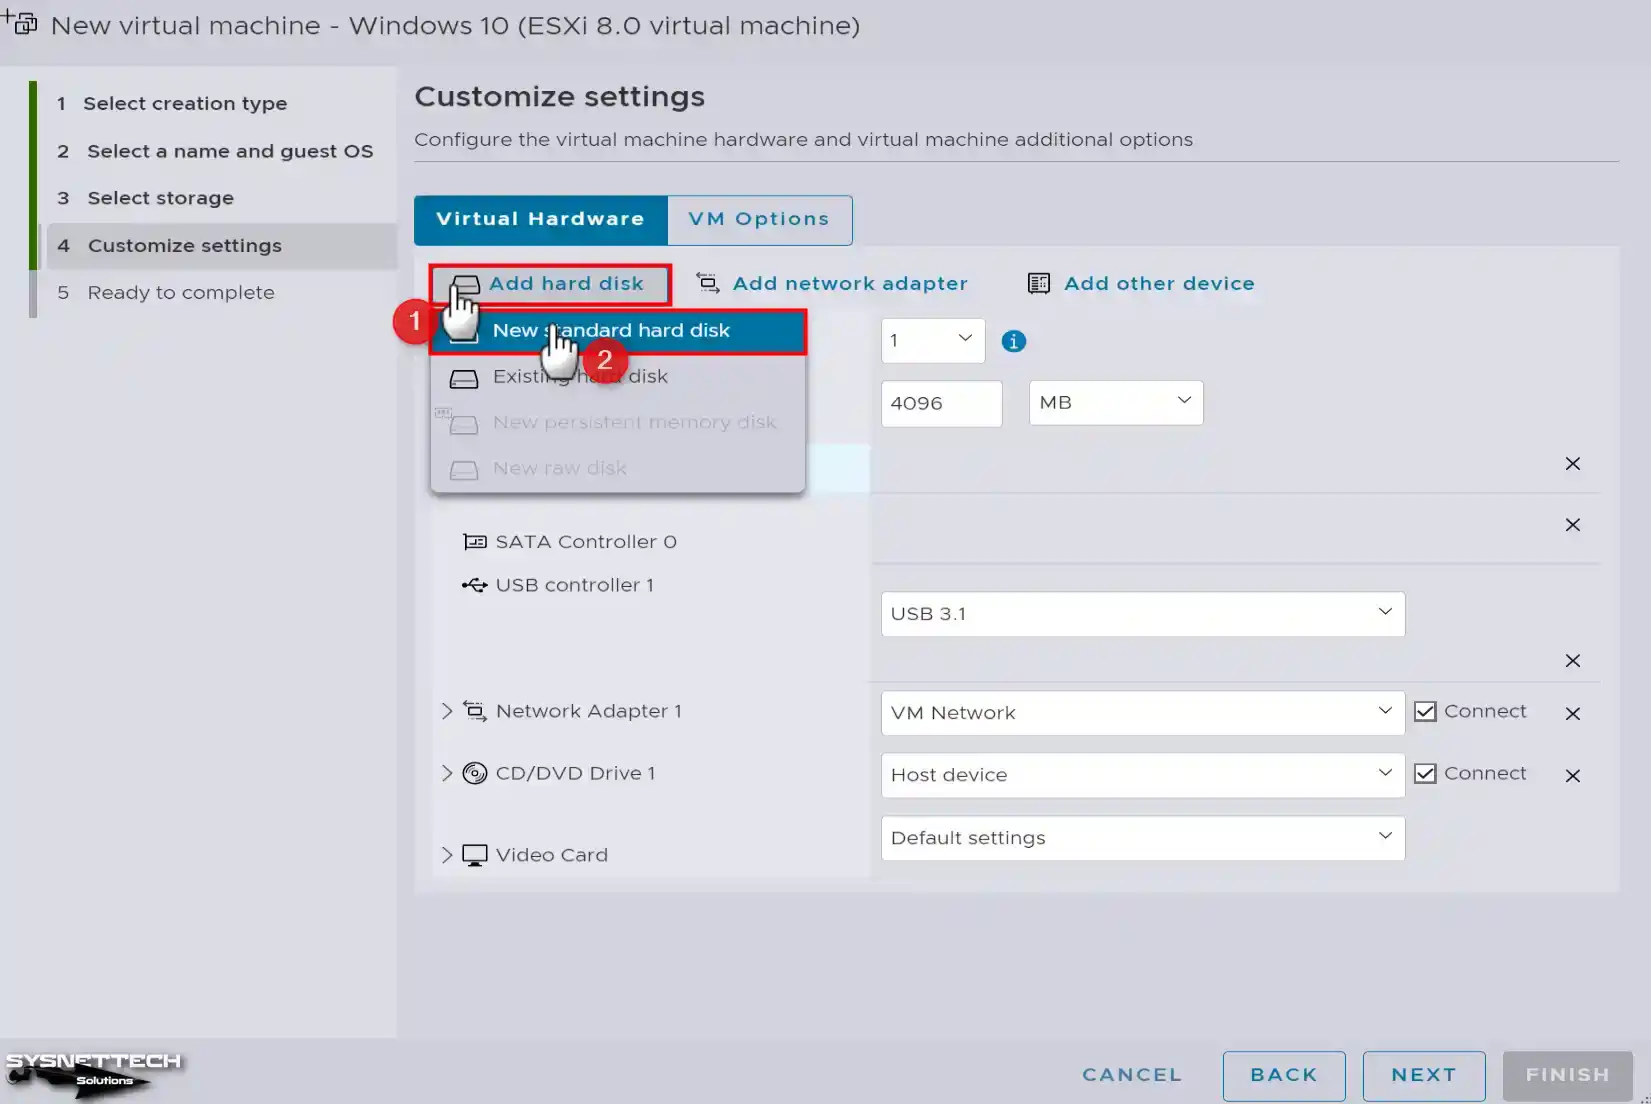
Step 9
After adding the disk controller, expand the Add Hard Disk option and click New Standard Hard Disk.
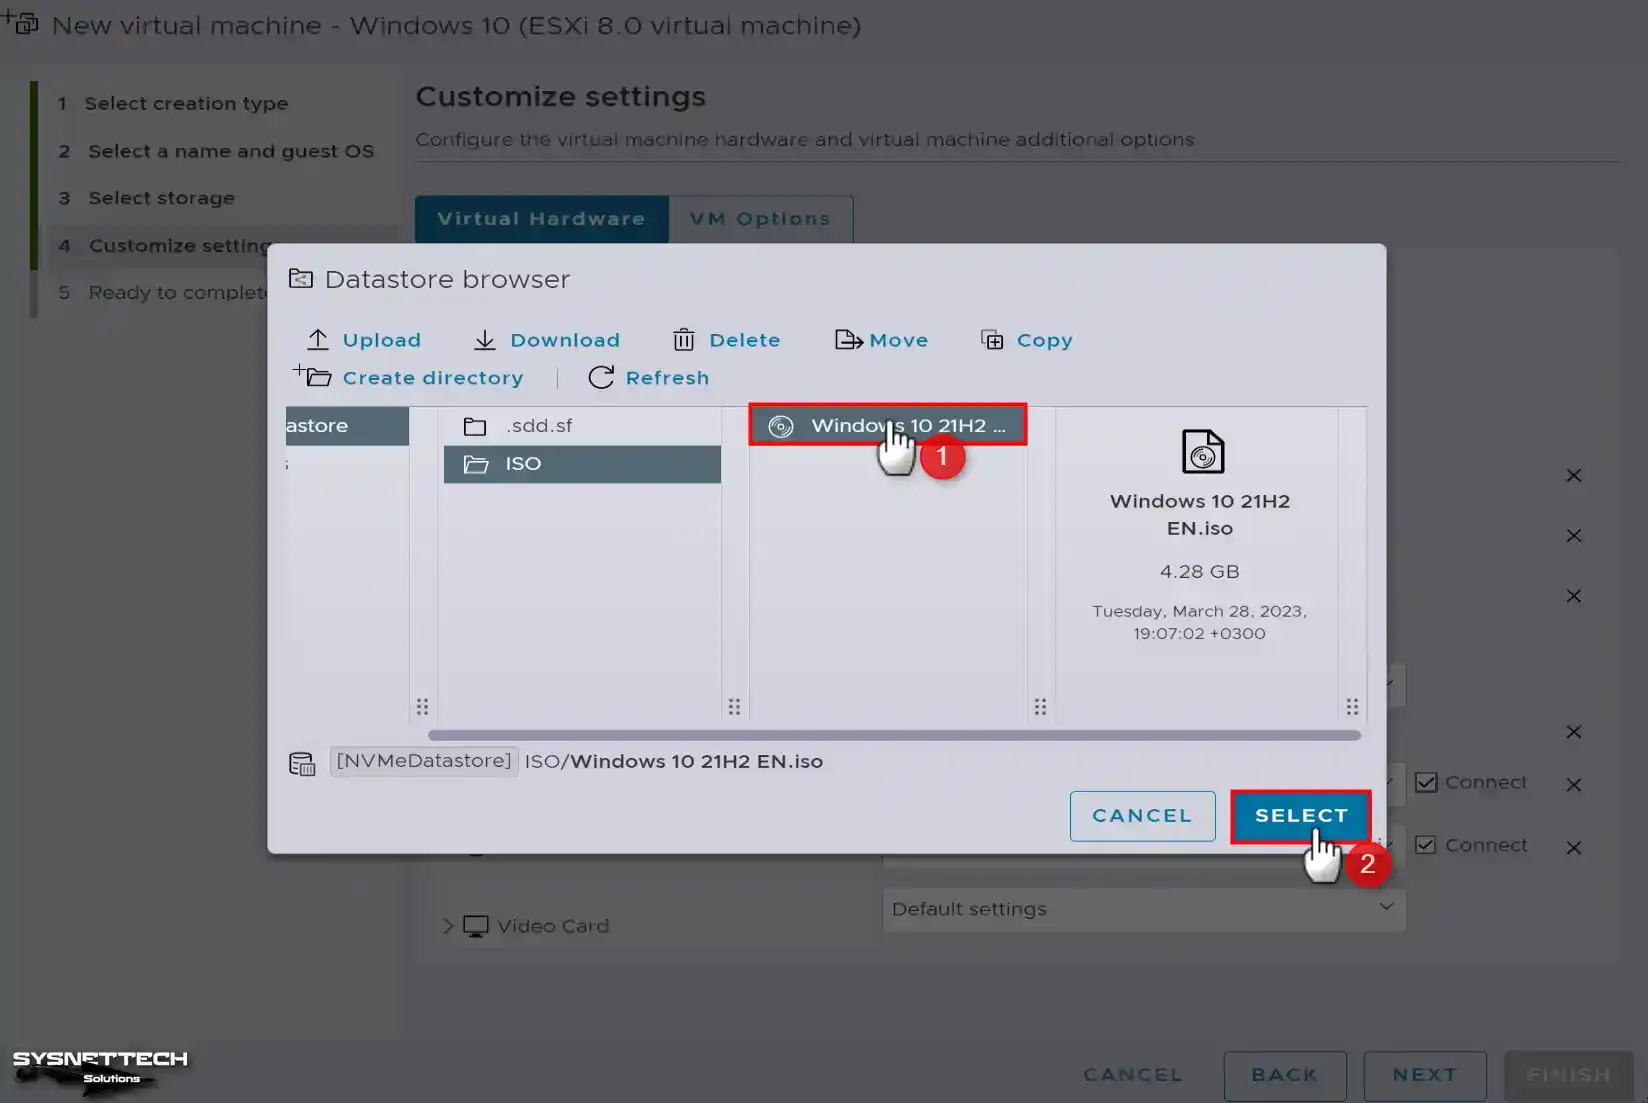
Step 10
To mount the ISO file, you add Datastore to the VM, expand the CD/DVD Drive 1 device option, and click Datastore ISO File.

Step 11
When Datastore Browser opens, open the location where you downloaded the ISO file and click SELECT after marking the file.
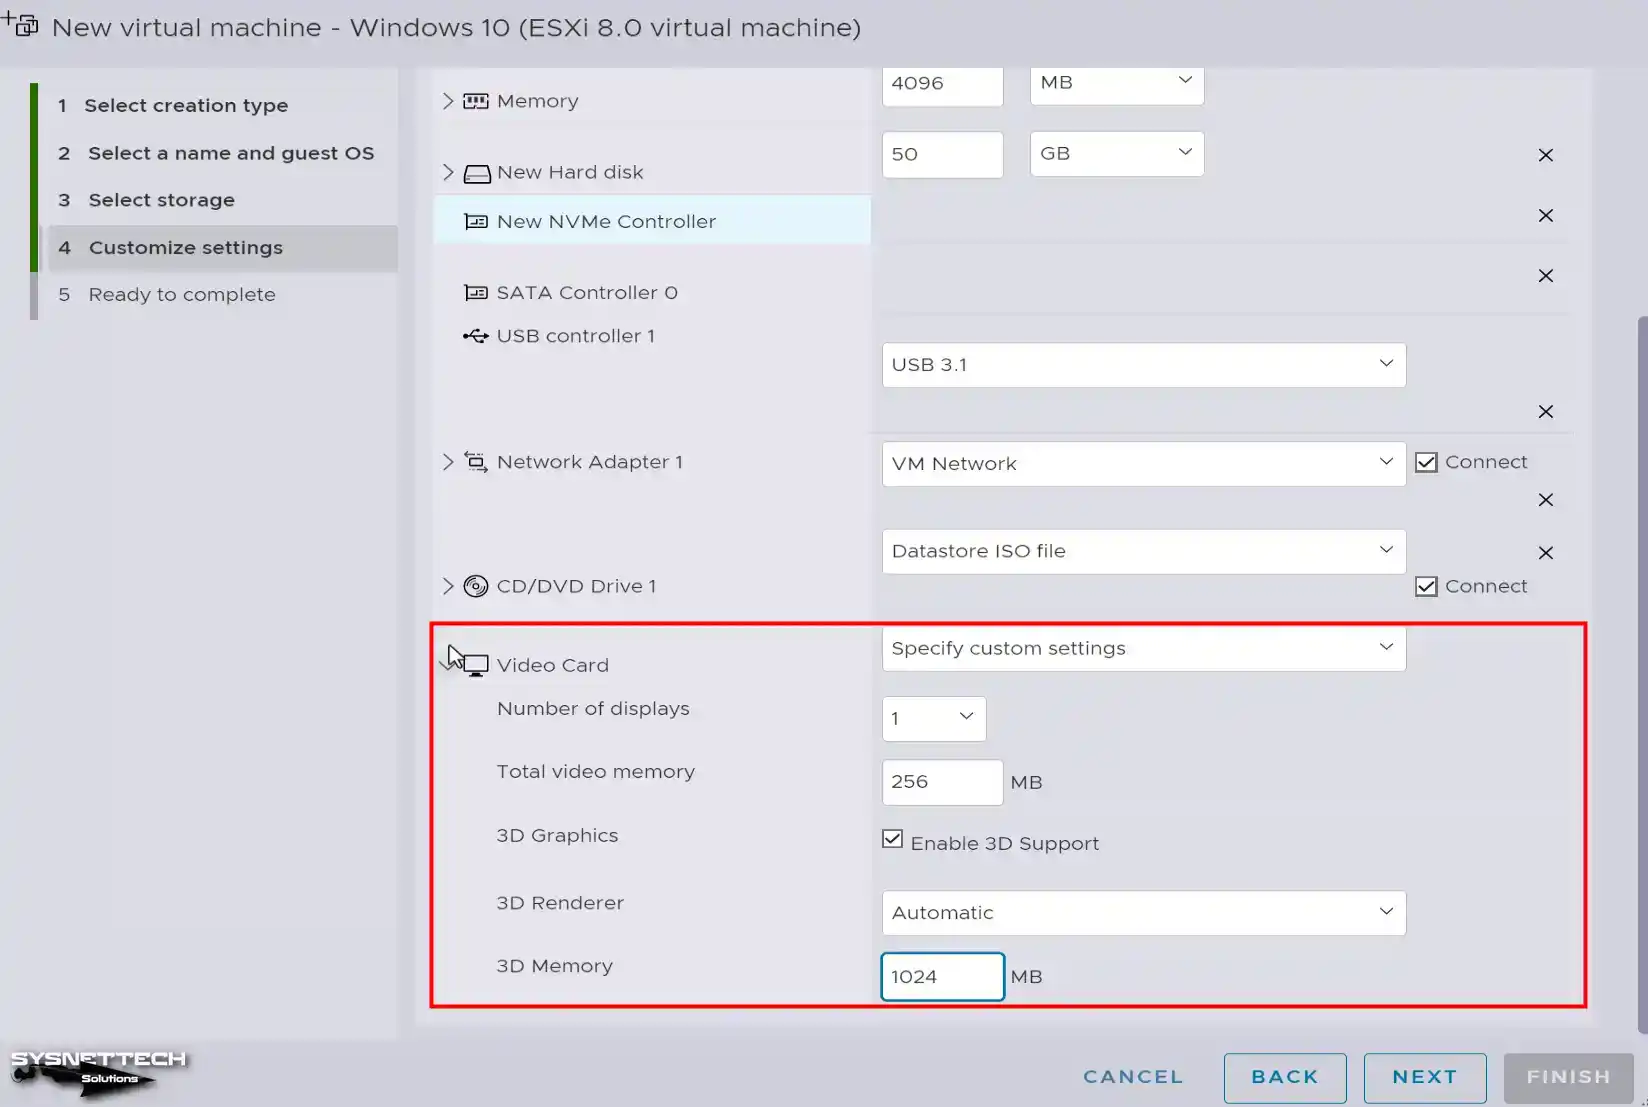
Step 12
To better adapt the screen resolution of the Windows 10 guest machine, expand the settings of the Video Card device and enable the Total Video Memory size of 256 MB, allow the 3D Graphics, and configure the 3D Memory size to 1024 MB. Depending on the graphics card of your host server, you can set the video memory sizes here to a higher value.
Step 13
After configuring the Windows 10 hardware settings in the vSphere virtual machine well, continue.
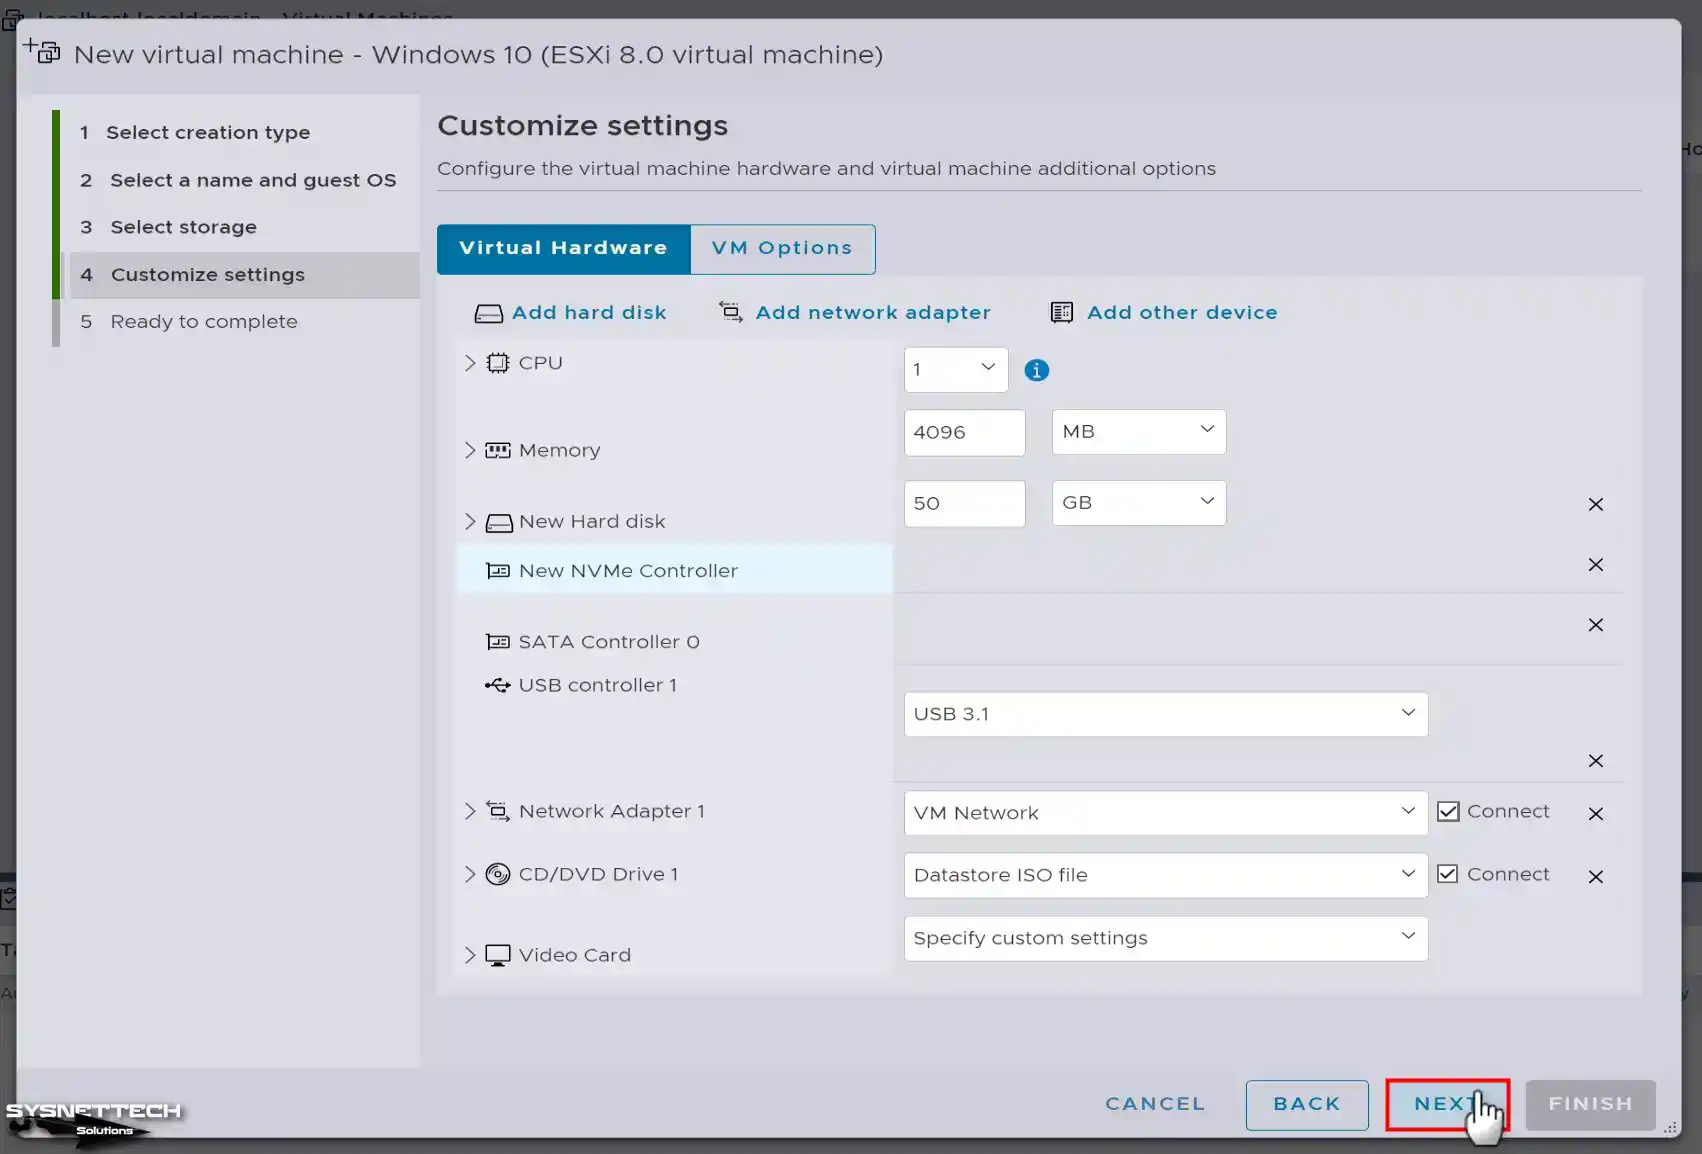
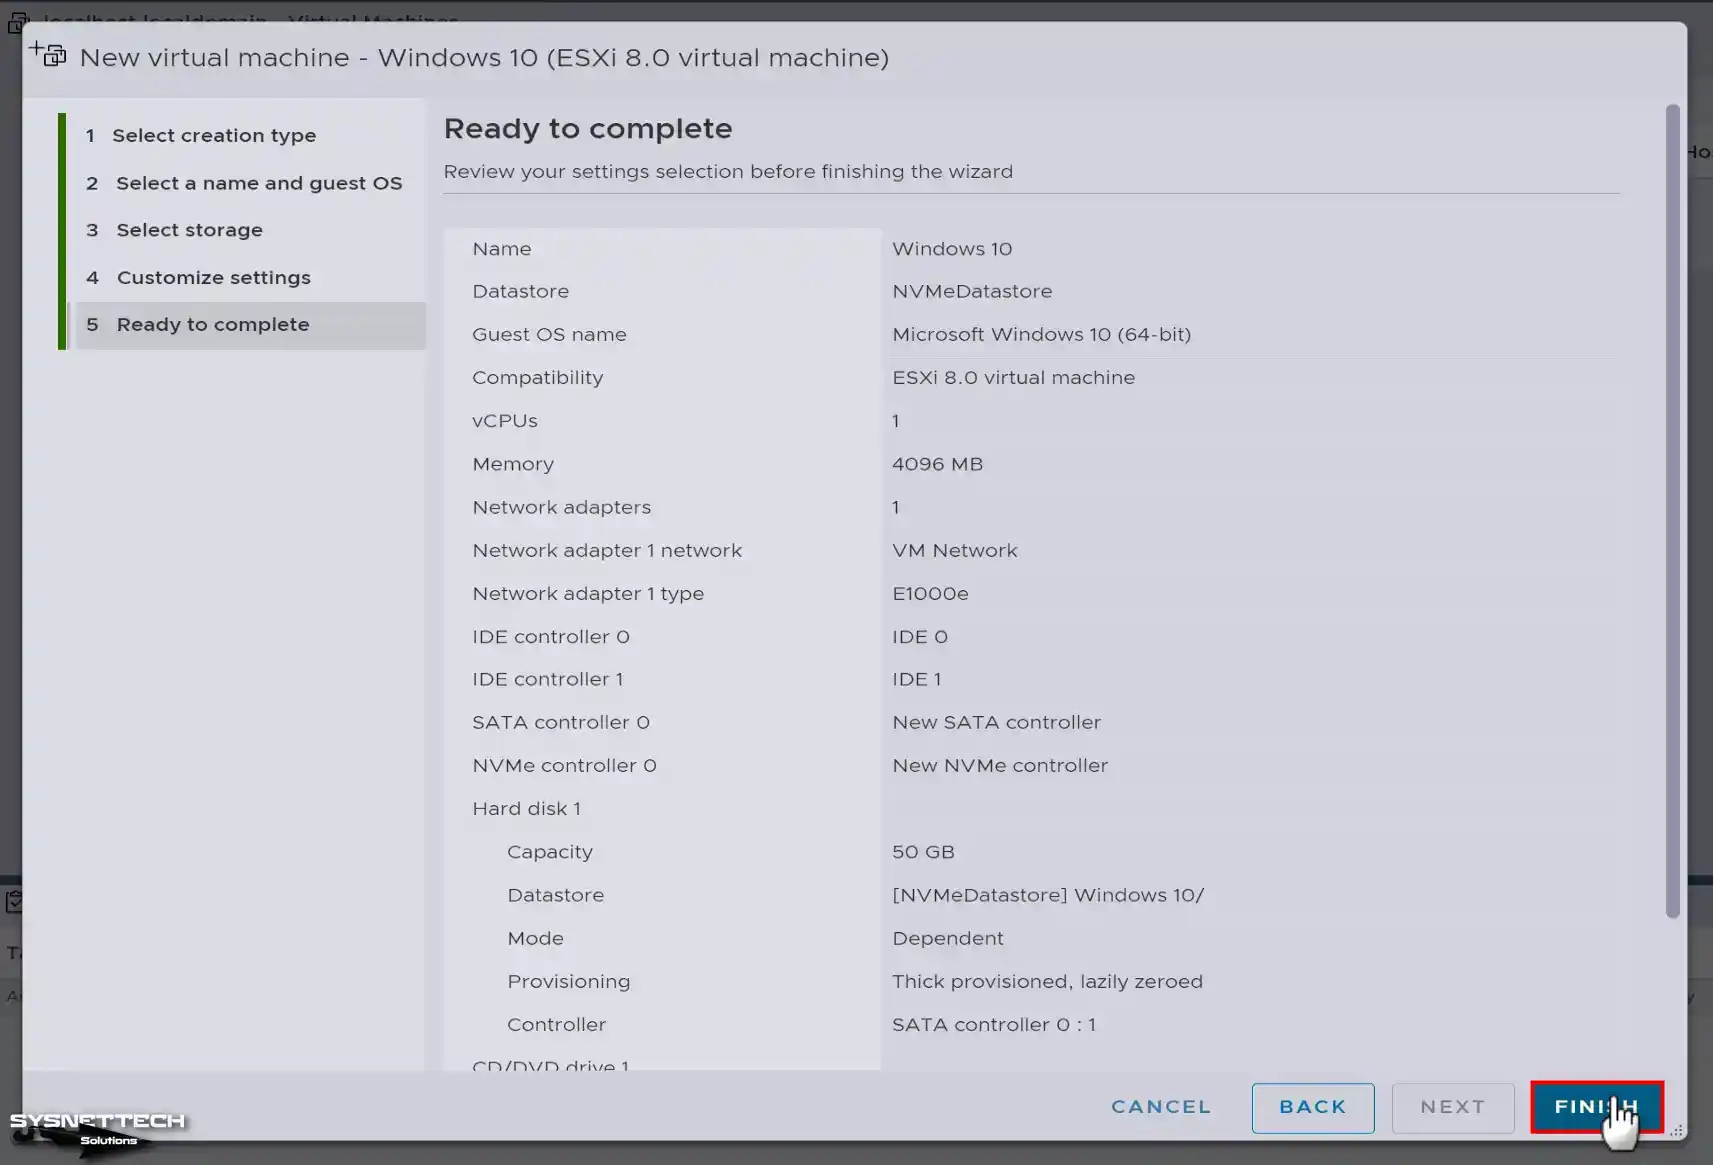
Step 14
Finally, check the hardware settings of the virtual operating system again and click FINISH to close the wizard.
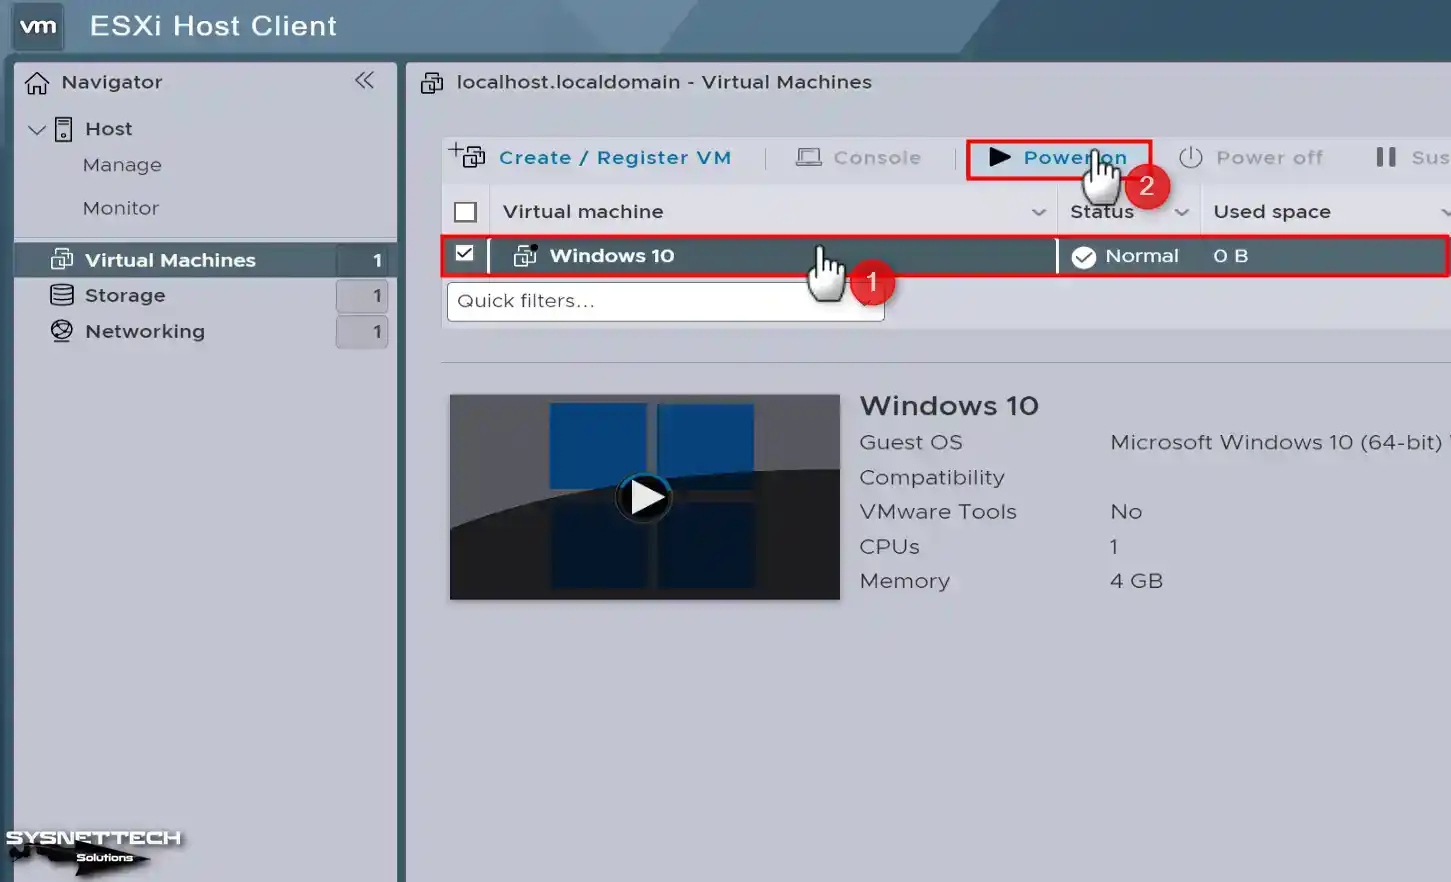
Step 15
Click Power on to start installing the operating system on the virtual computer you have prepared.
How to Install Windows 10
When you run the Windows 10 VM, it will boot with the installation media, and press any key on your keyboard to start the setup wizard on this screen.
Step 1
After starting the installation wizard, select the system display language you want to use for Win10, choose the language you use in the same way for the time and region settings to work correctly, and finally, select the keyboard layout you will use on the guest machine and click Next.
Step 2
After adjusting the critical system settings, click the Install Now button in the wizard and continue.
Step 3
If you are going to use a licensed Win10 system on your virtual computer, enter the product key you purchased on this screen and then click Next. If you only want to test the system, continue with the “I don’t have a product key” option.
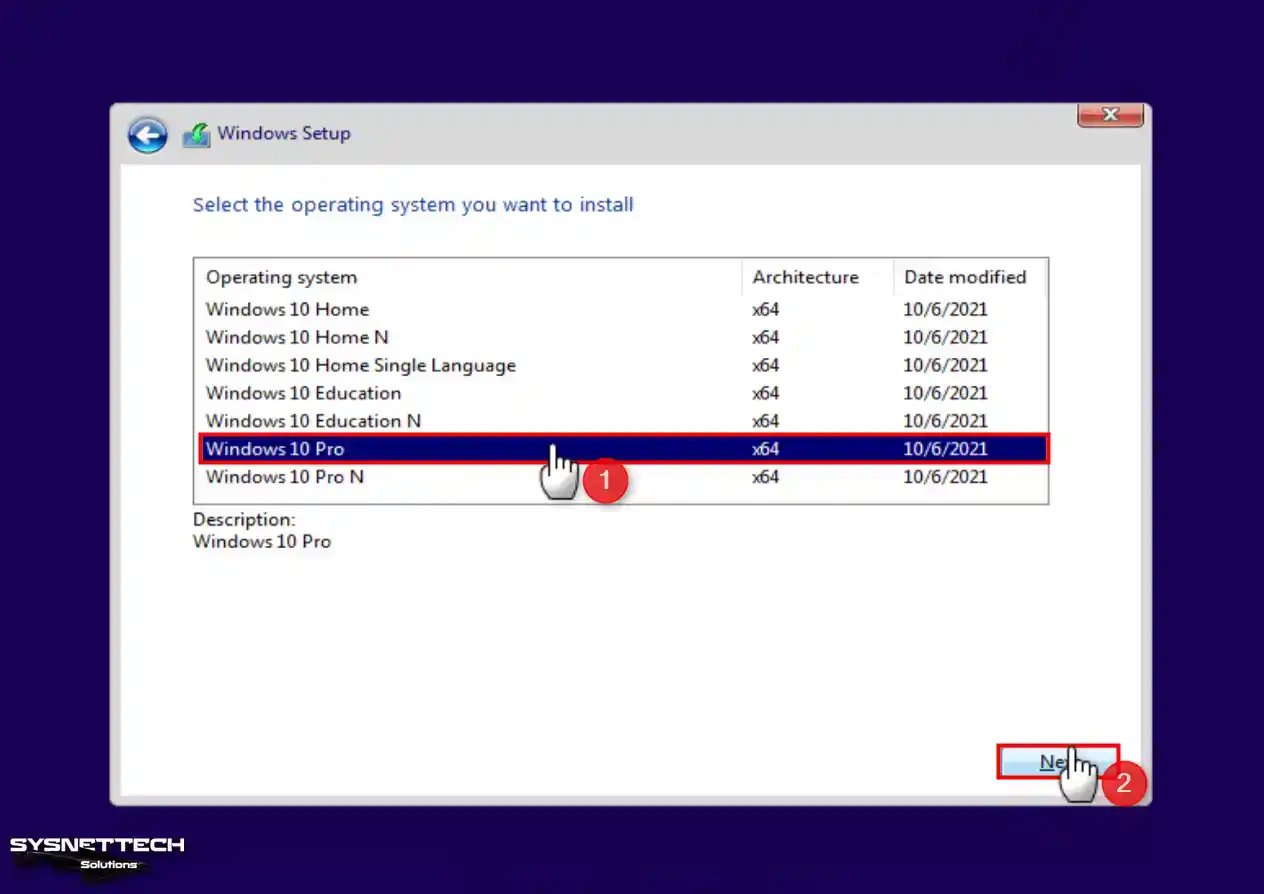
Step 4
Choose the Home, Home N, Home Single Language, Education, Education N, Pro, or Pro N versions of Windows 10 that suit you and your infrastructure. Usually, Windows 10 Pro has advanced features compared to others, so you can choose it and continue.
Step 5
If you accept the Windows Operating System license terms, which were finally updated in June 2021, select the relevant option and click Next.
Step 6
If you want to install a Windows 10 from scratch in the window containing the installation type options, select Custom: Install Windows Only (Advanced).
Step 7
If you have specified the size of the virtual disk in a larger size, you can create a partition according to your needs on the partition screen. If you want to copy the system files directly without configuring the disk, you can click Next.
To edit the unallocated disk space, click New and activate the Size section. Then click the Apply button to confirm using the automatically determined size. Finally, additional partitions should be created so that all Windows features can work correctly and continue.
Step 8
After configuring the disk, select Drive 0 Partition 3 logically and click Next.

Step 9
Wait while the wizard copies all the Windows 10 system files to the partition you selected.
Step 10
After the copying process of the necessary files is finished, you can wait for the specified time or restart your virtual system directly.

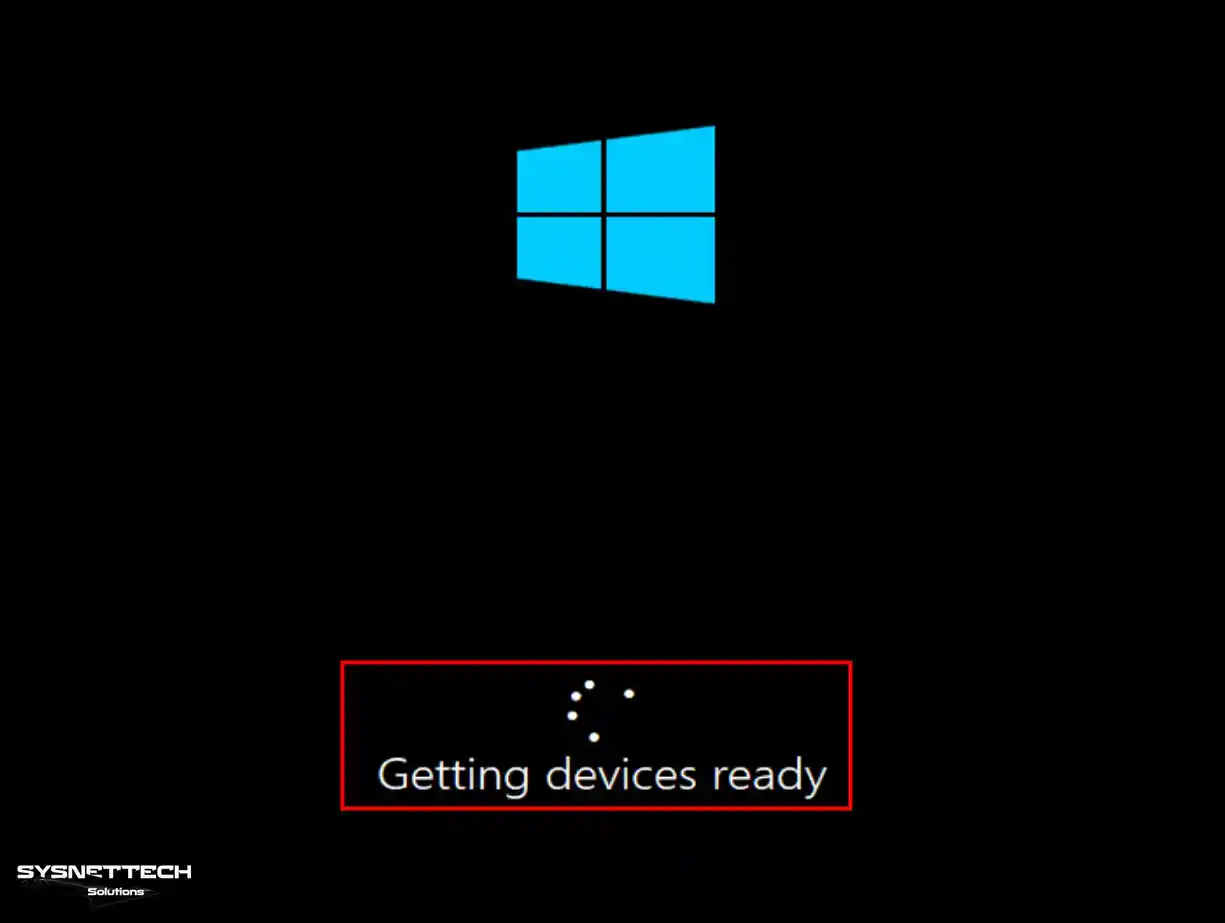
Step 11
At the first startup of Windows, wait for a while at the “Getting devices ready” screen.
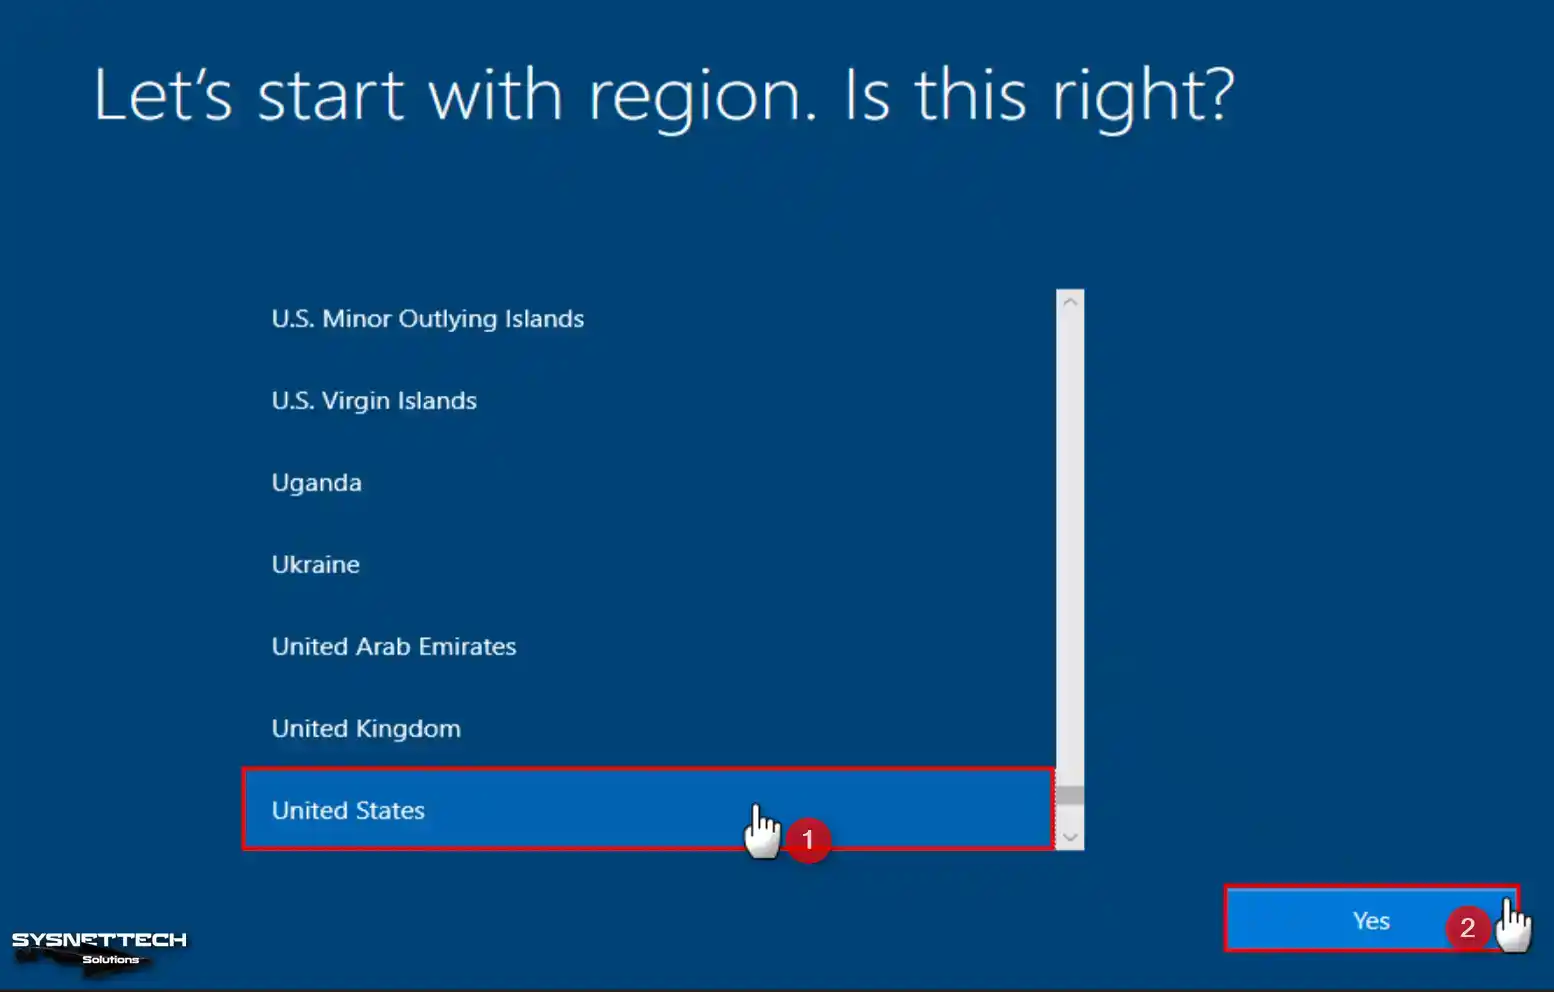
Step 12
When you reach the personalization screen, first select the location you live in from the list and continue.
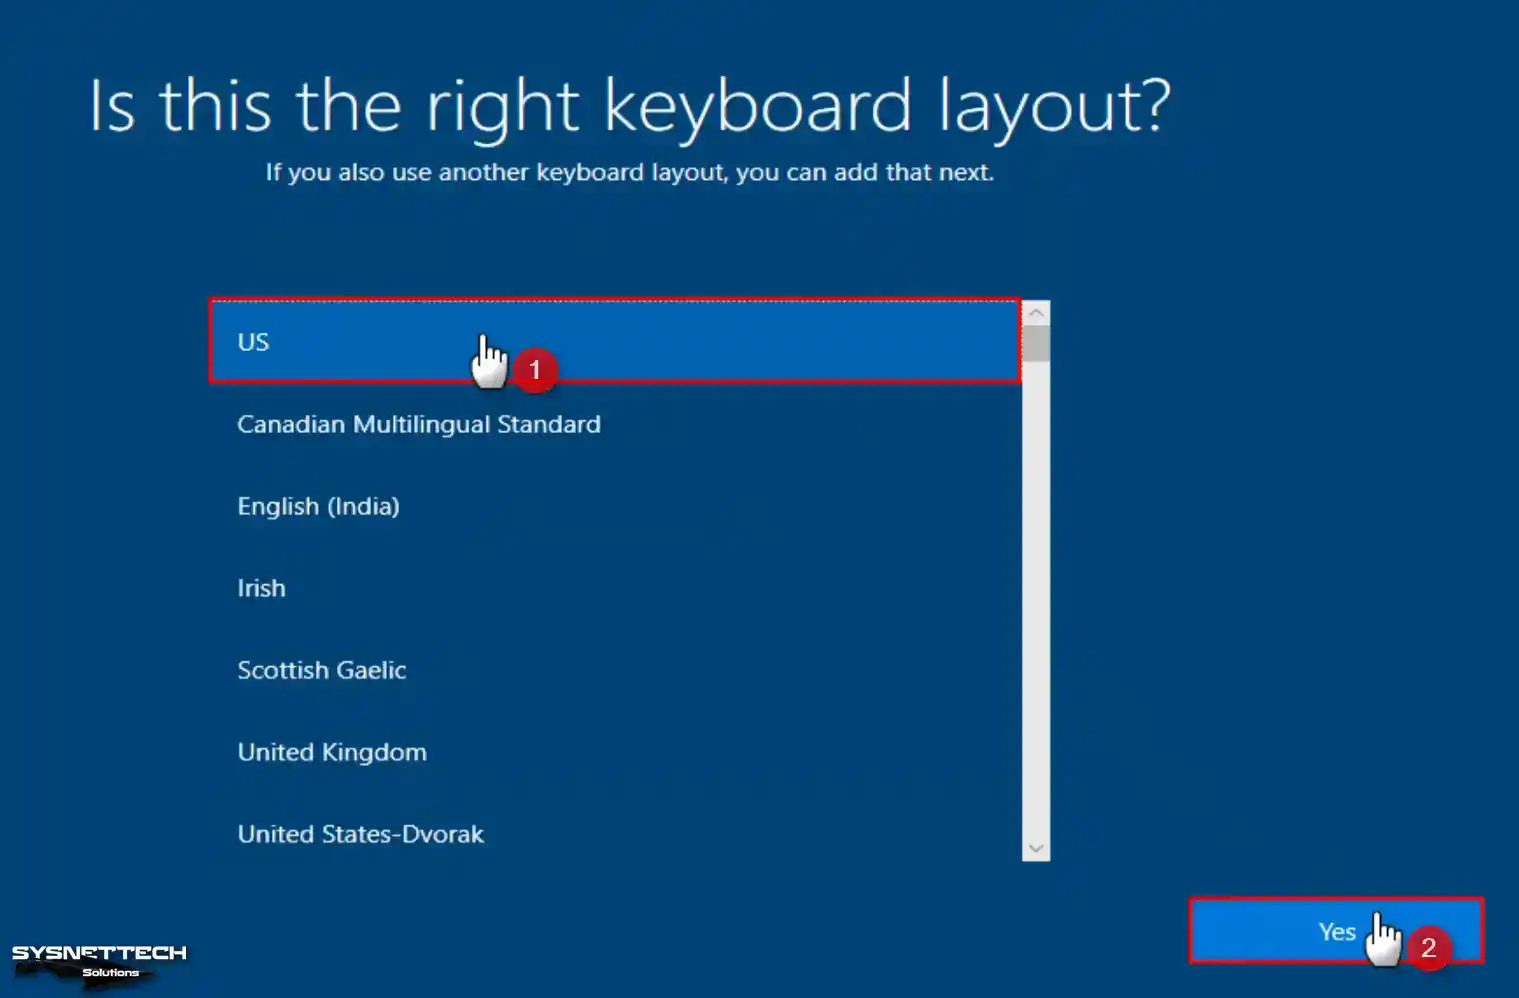
Step 13
If you want to change your keyboard layout at this stage, select the design that suits you from the list and click Yes.
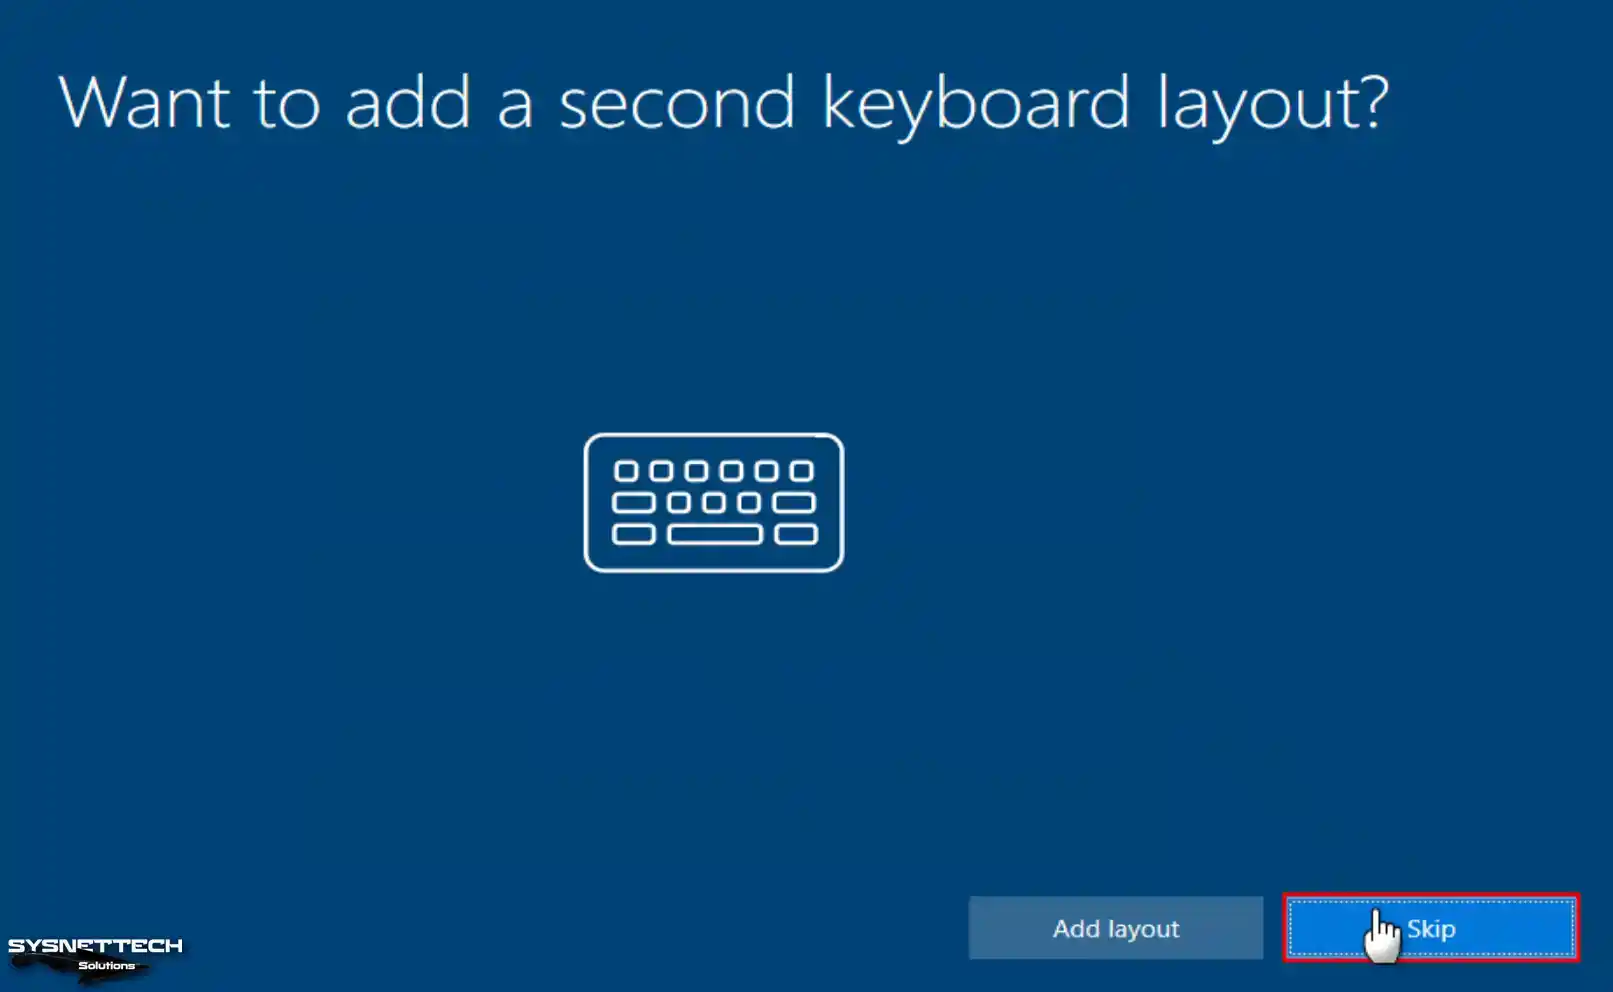
Step 14
If you don’t need a second keyboard layout, you can skip this step.
Step 15
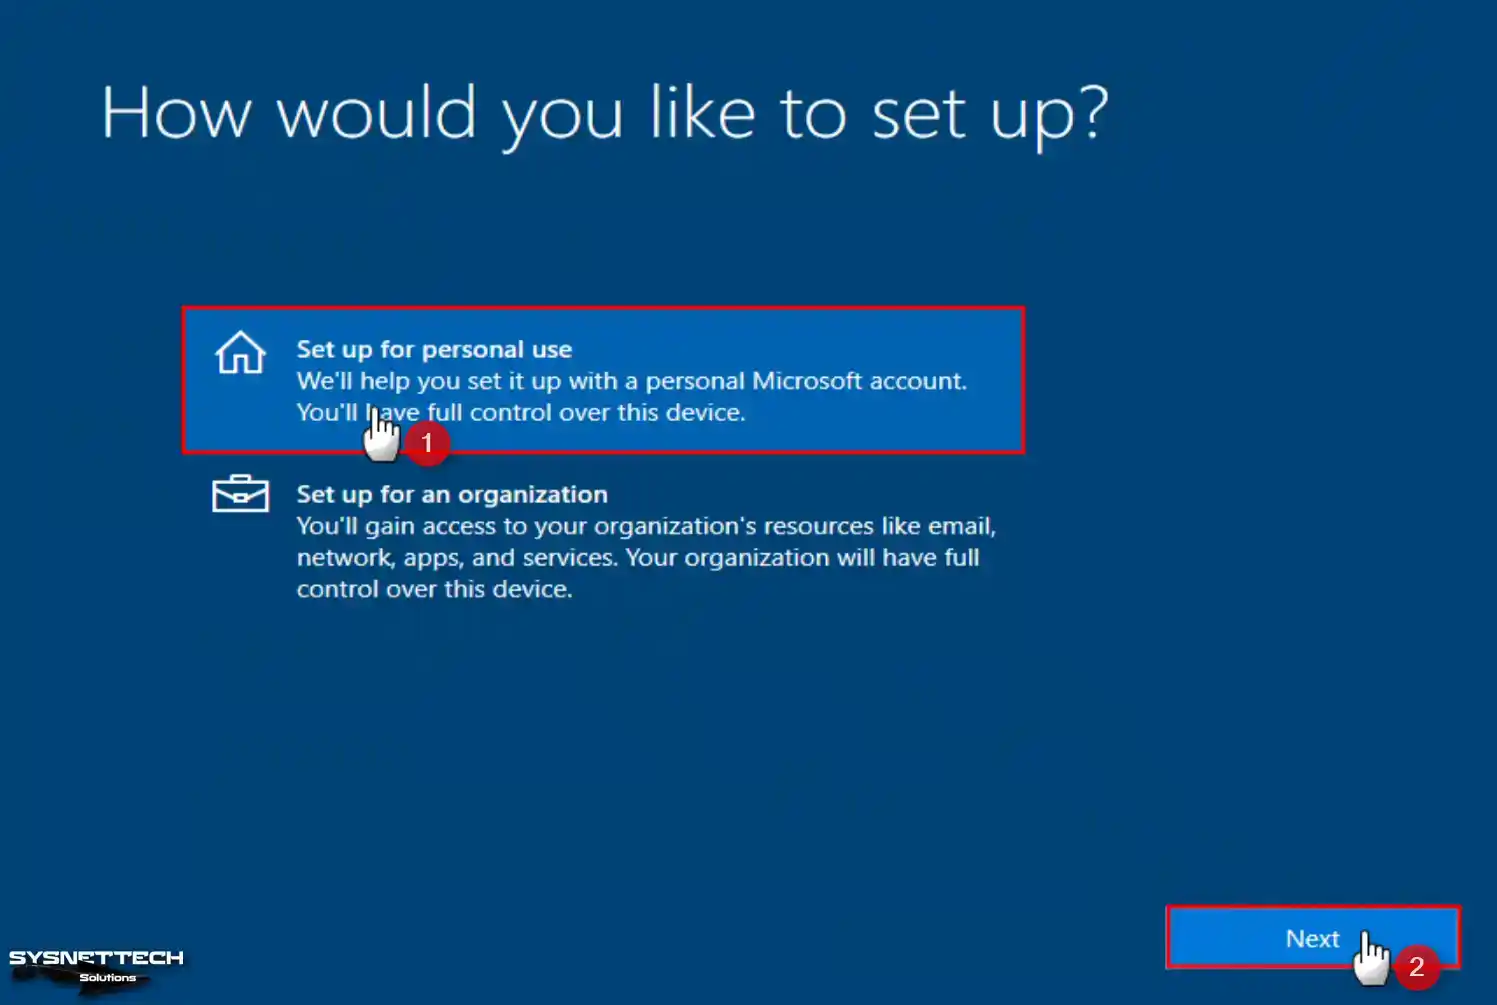
From this screen, you can choose the purpose for which you will use your guest machine. If your current network environment has Active Directory, we recommend continuing with Set Up for an Organization. Otherwise, continue with Set Up for Personal Use for a typical setup.
Step 16
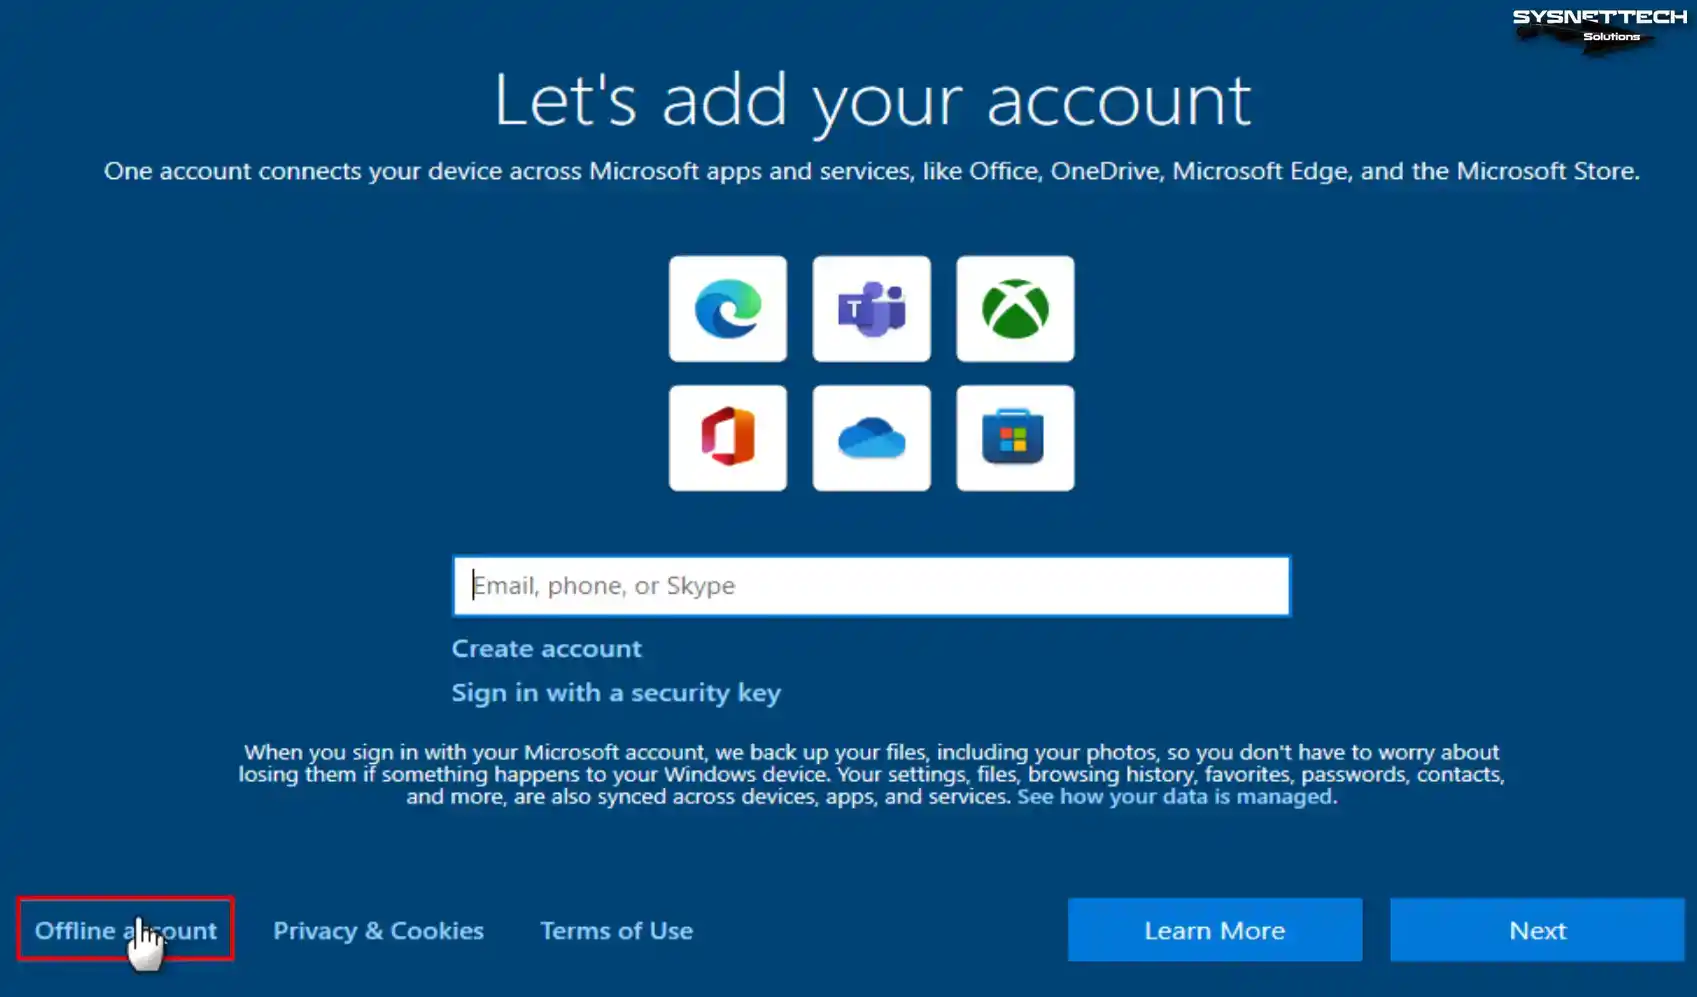
Using a Microsoft account, you can back up your files online and work in sync across your devices. However, you can choose to continue with the Offline Account.
Step 17
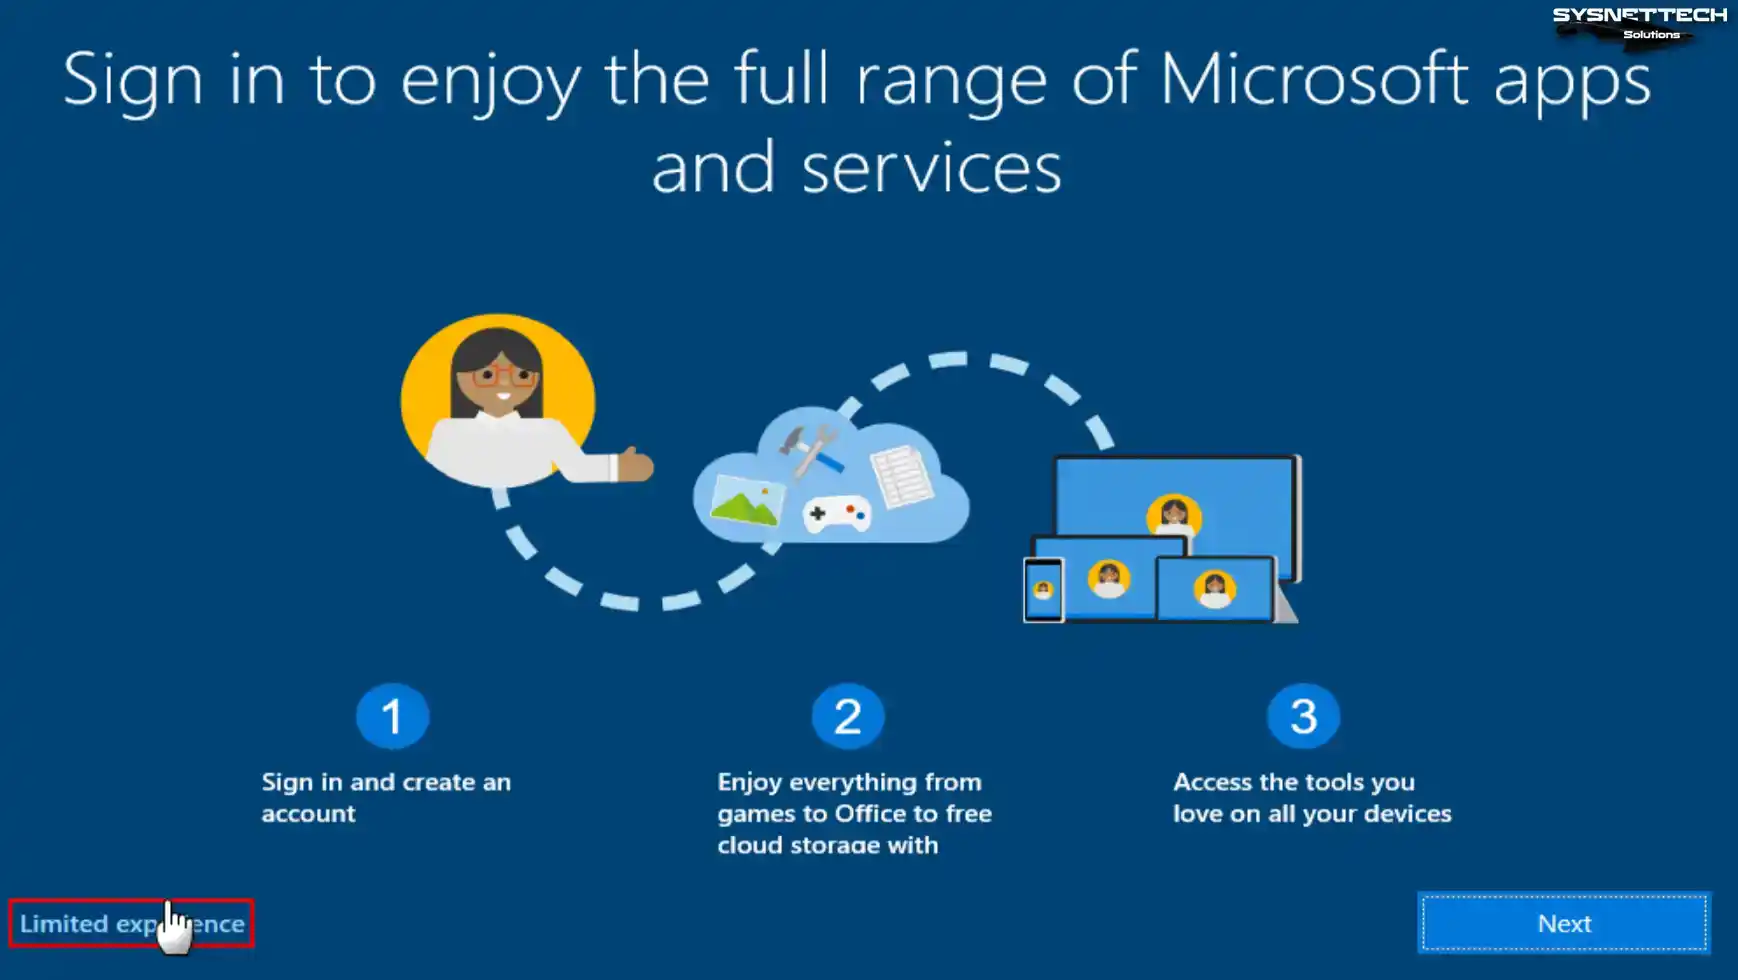
Microsoft again emphasizes the importance of using an online account, but click Limited Experience to confirm using an offline account.
Step 18
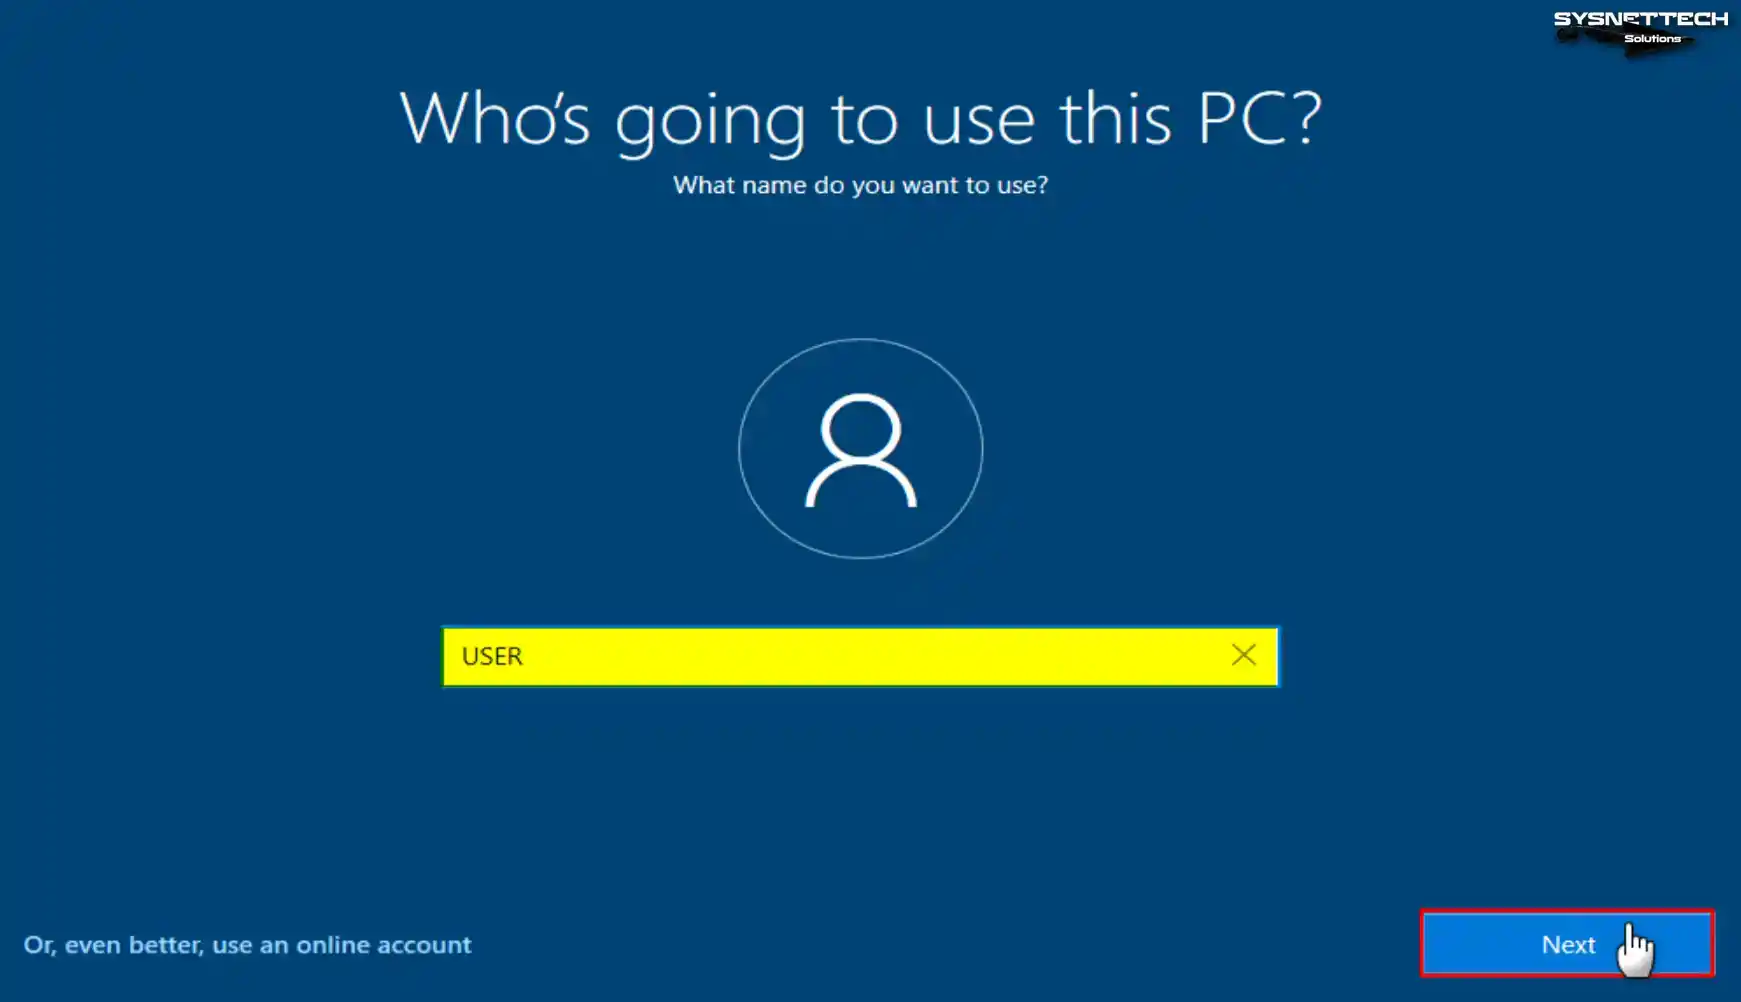
For example, if you only want to provide DHCP server service with a Win10 guest machine, you can create a user named Win10DHCP.
Step 19
Create a strong password for your user name in accordance with your company policies.

Step 20
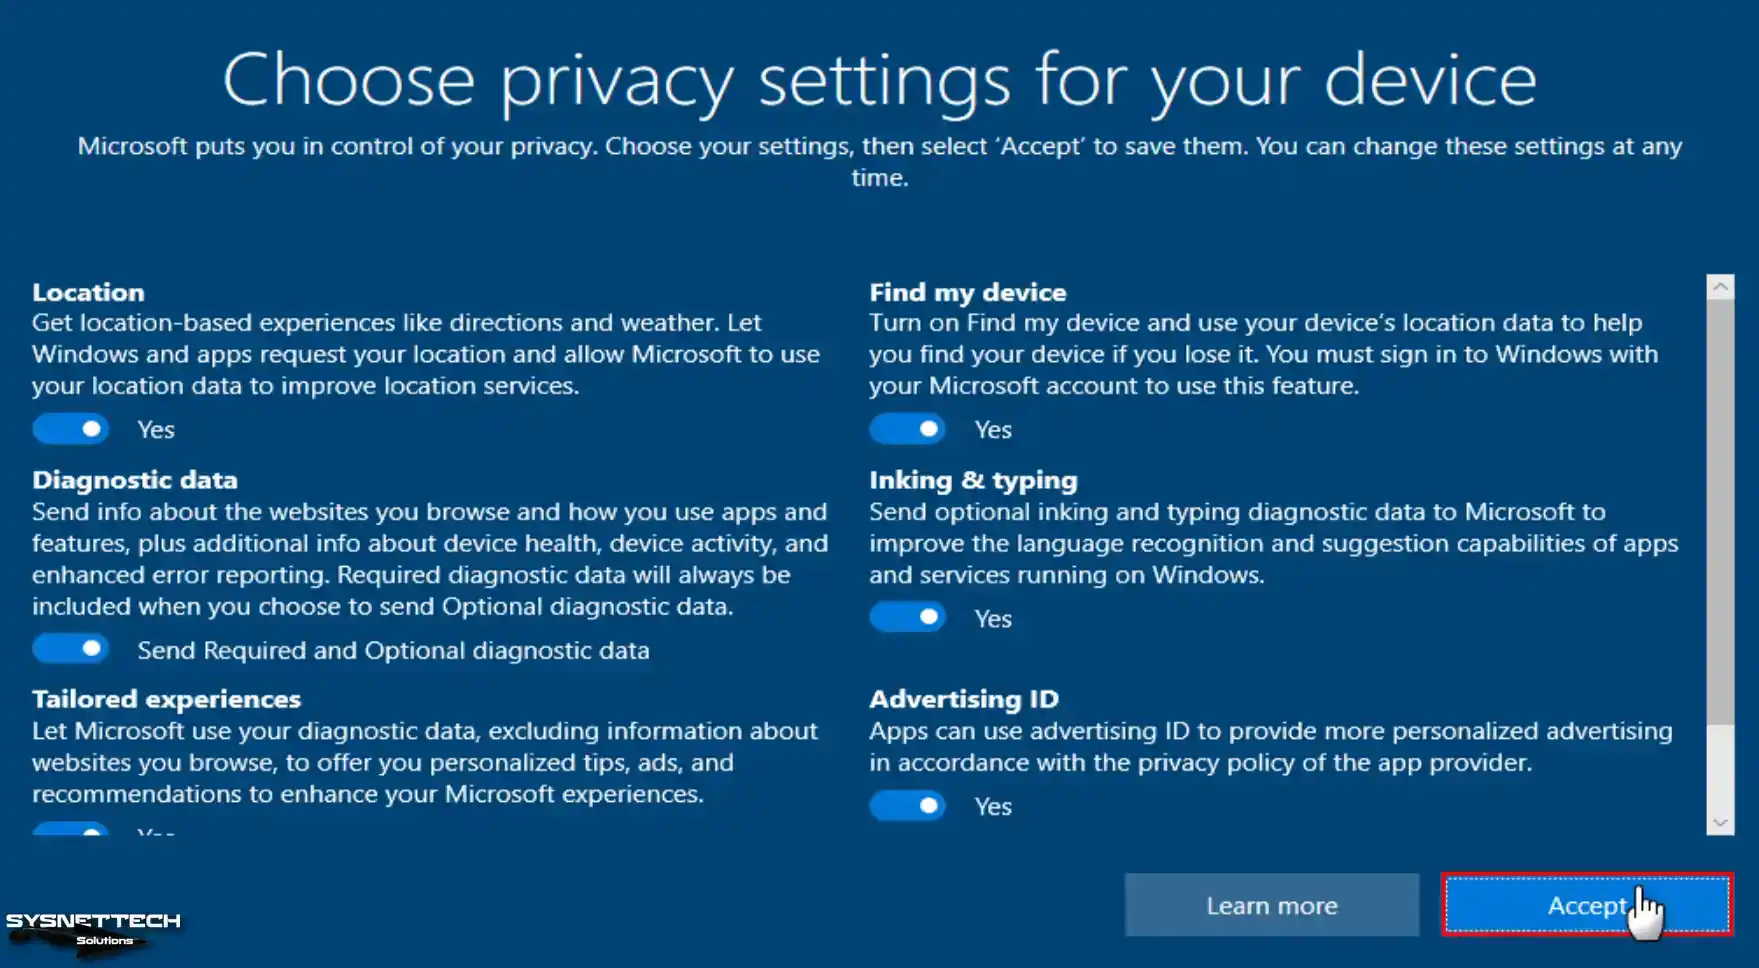
Adjust the privacy settings of your device in accordance with your company policy and continue.
Step 21
You can choose the purpose for which you will use your virtual guest operating system on the personalization screen.

Step 22
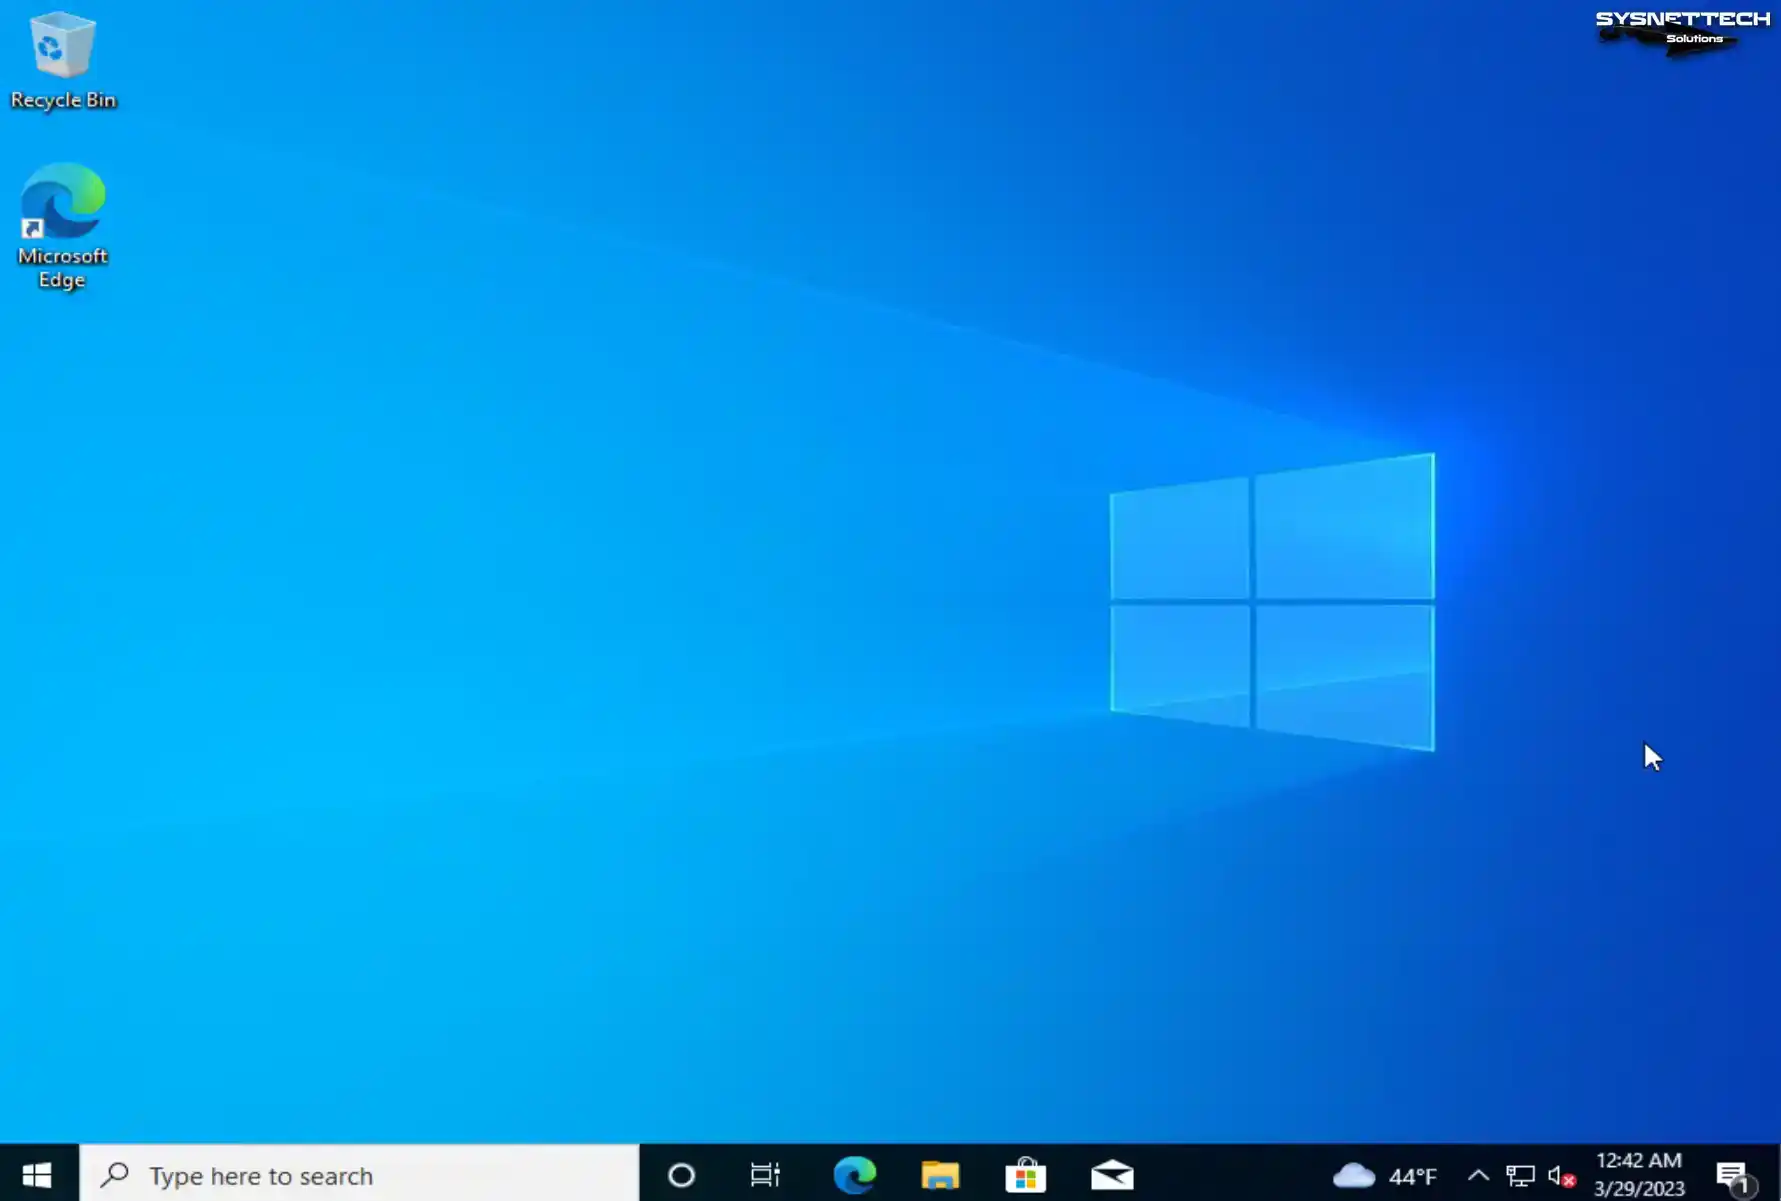
After a short time, after making system settings and personal features, Windows 10’s desktop screen will welcome you.
How to Install VMware Tools
After installing Windows 10 with VMware vSphere ESXi, you need to install VMware Tools to install the drivers for a Windows, Linux, or macOS virtual system you run on the virtual server.
Step 1
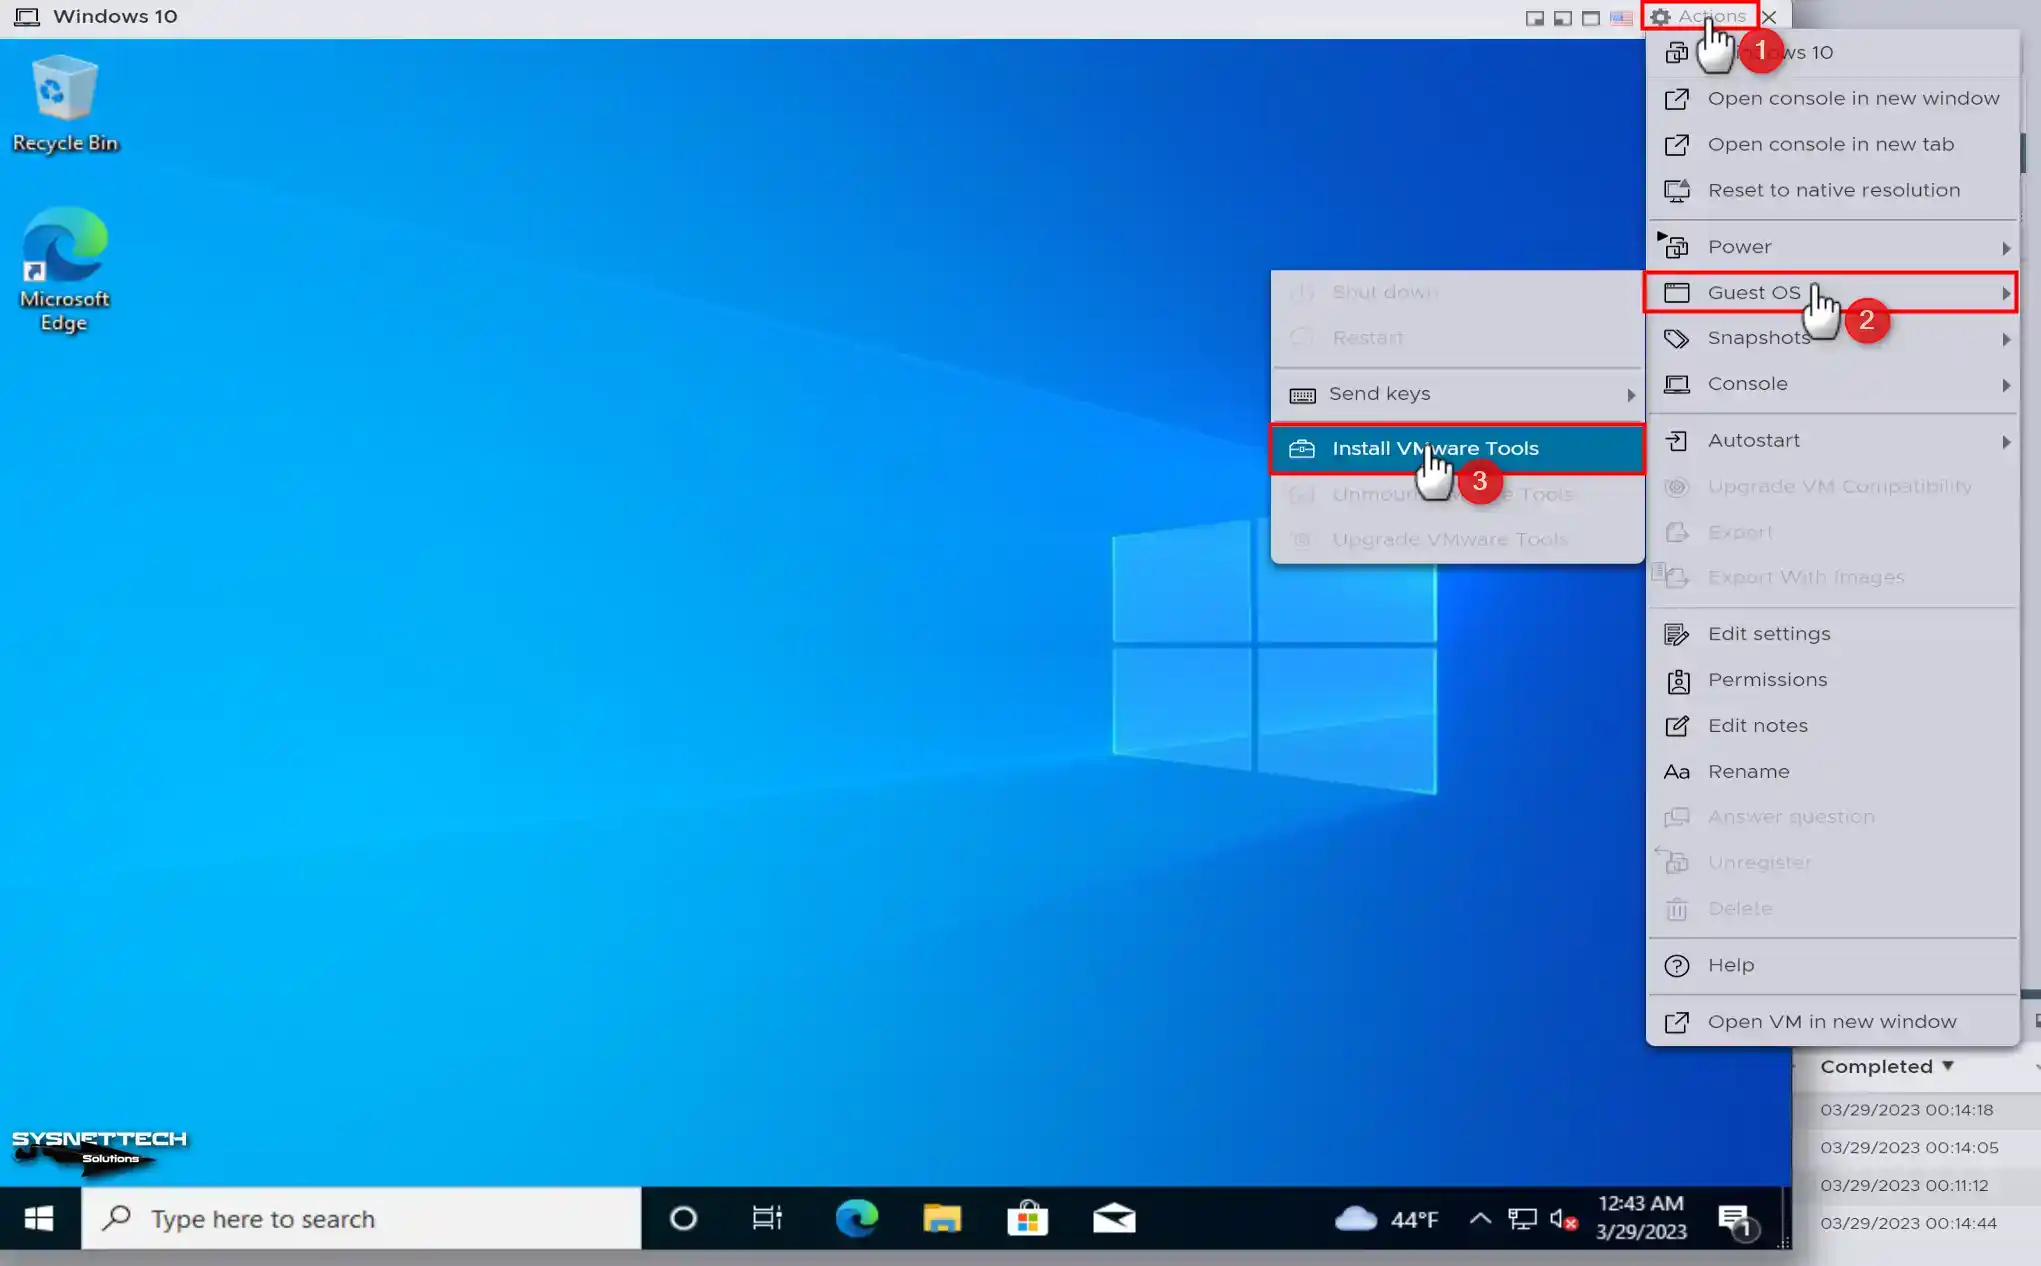
Click Actions / Guest OS / Install VMware Tools from the tool panel to install the drivers for any operating system you have installed.
Step 2
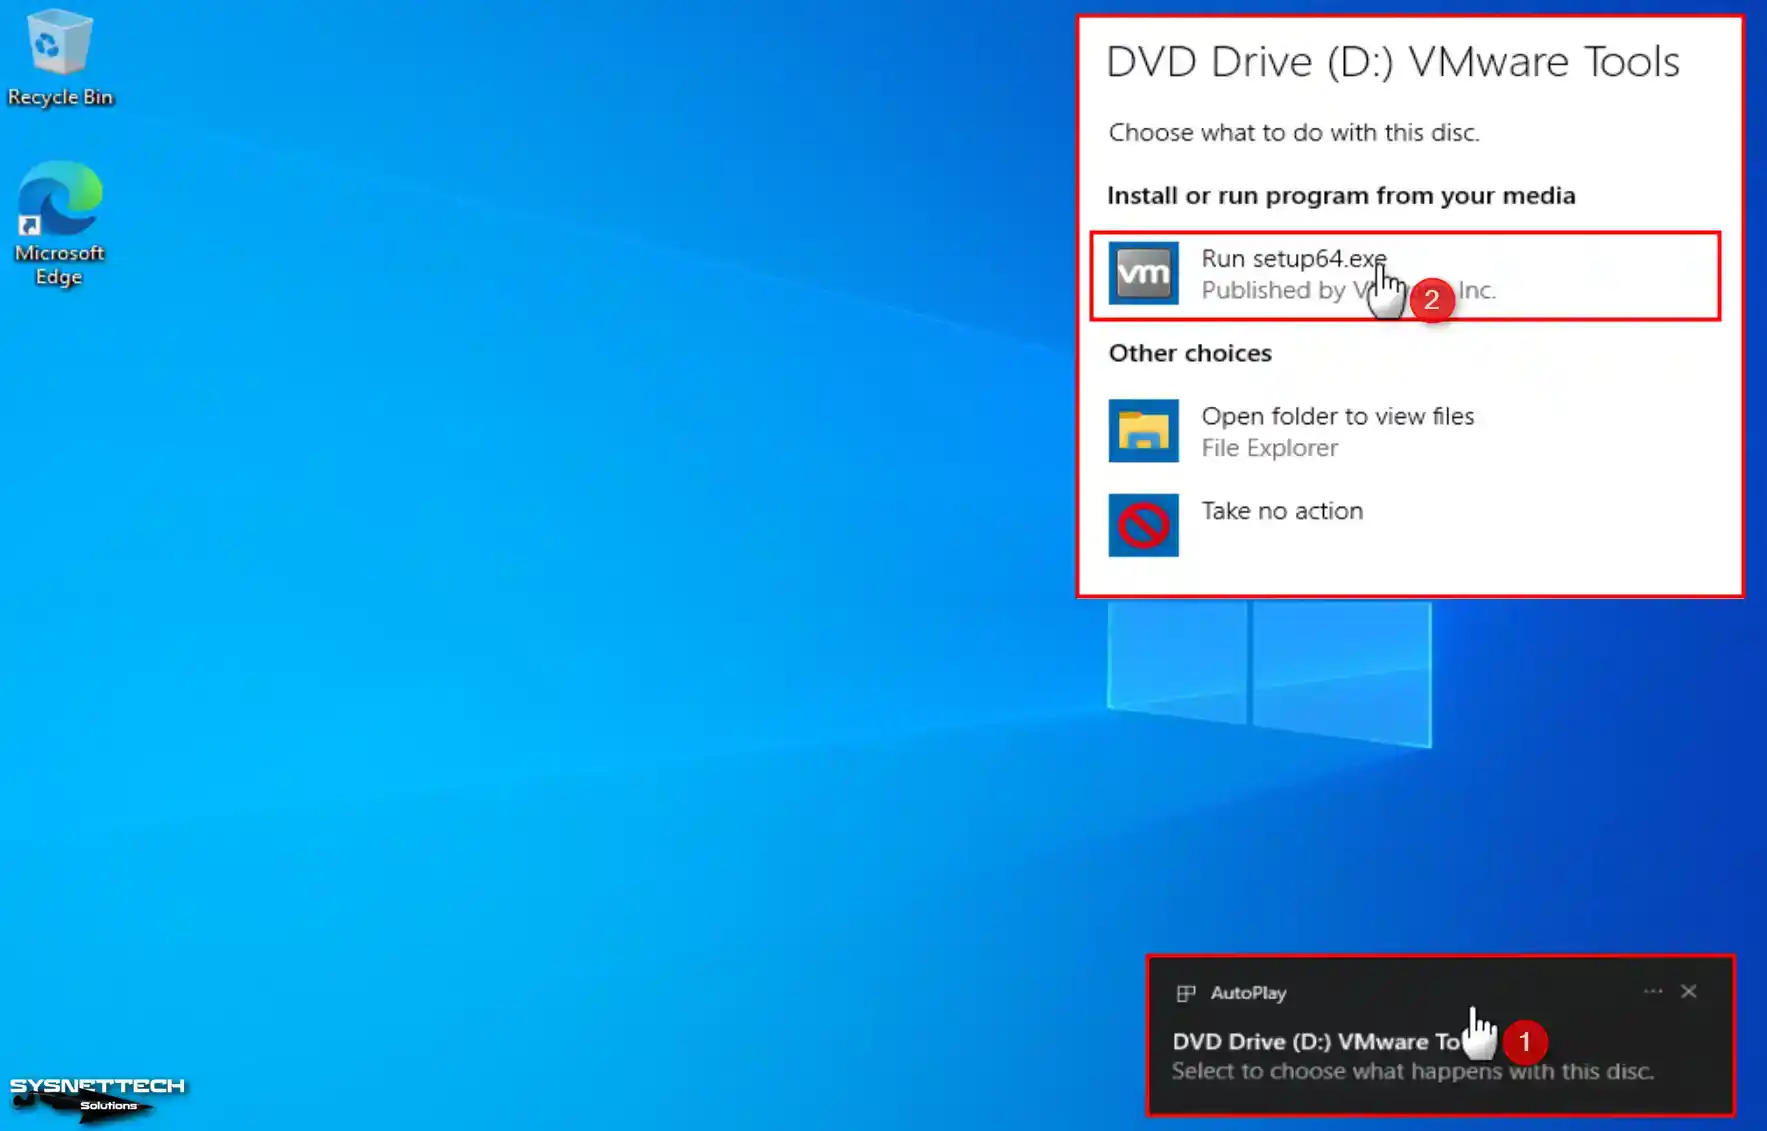
When the image file of VMware Tools is mounted on your virtual system, click the Autoplay window and click Run setup64.exe in the disk content window that opens.
Step 3
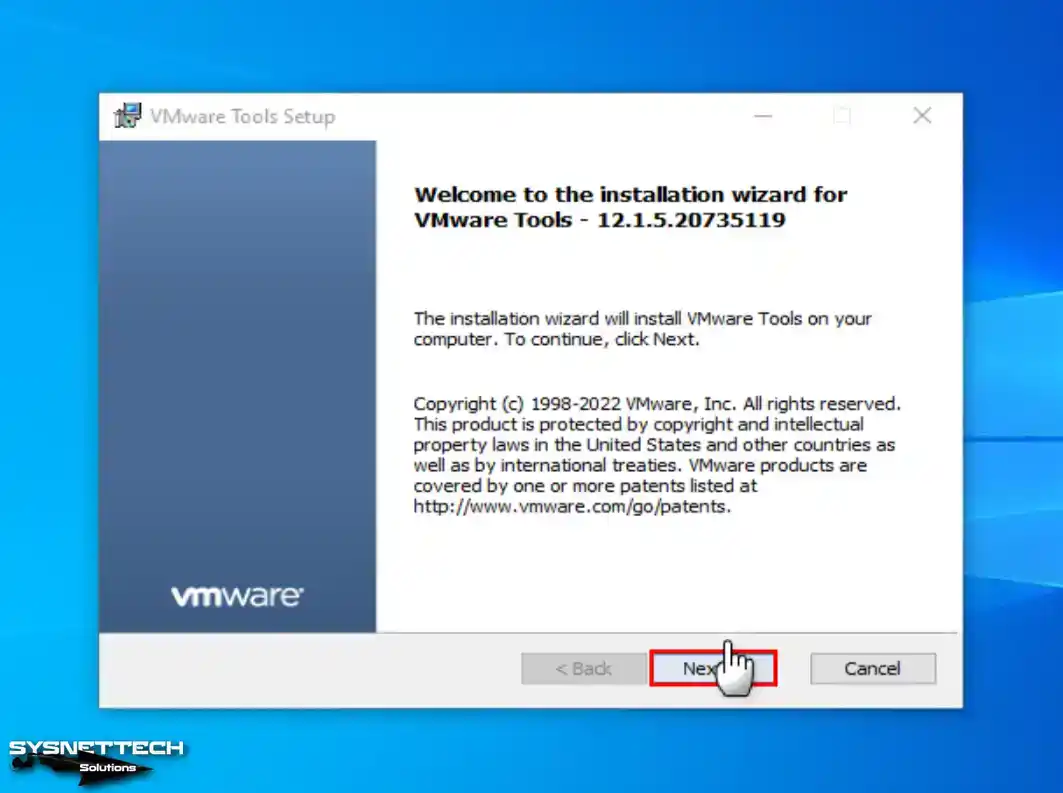
When the driver installation wizard opens, click Next after reading the information provided.
Step 4
If you want to use the virtual machine running in vSphere in other virtualization platforms developed by VMware, check Complete and click Next.

Step 5
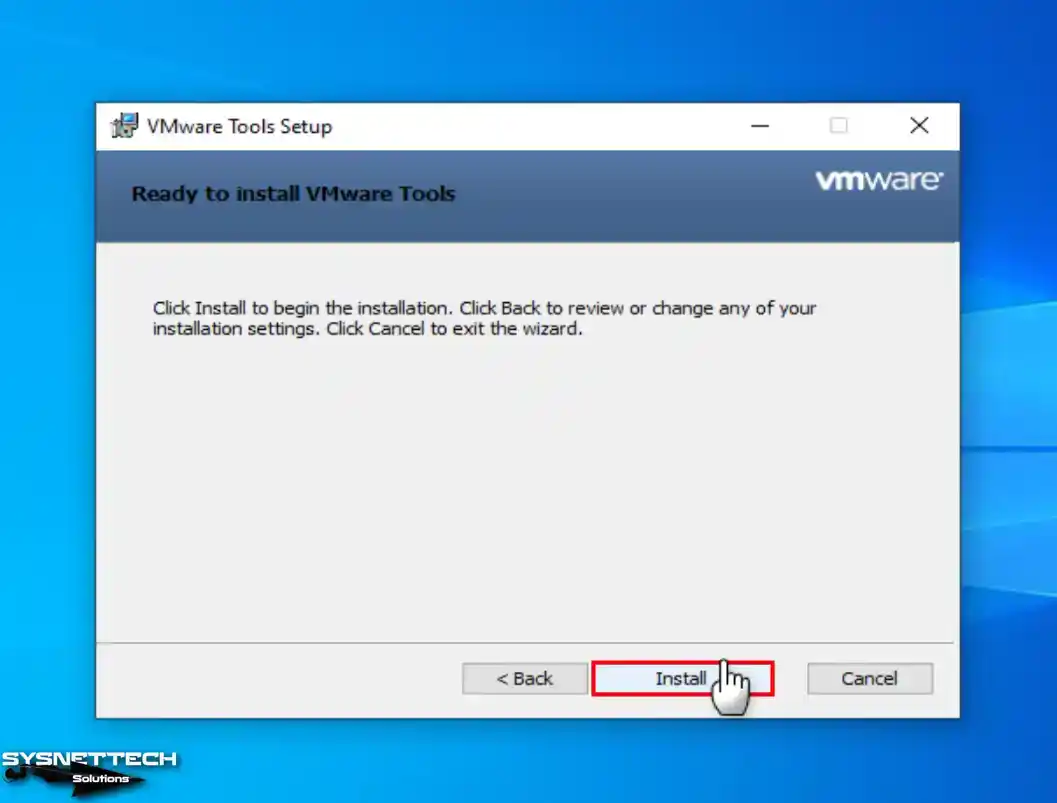
After editing the installation options, click Install to start the installation.
Step 6
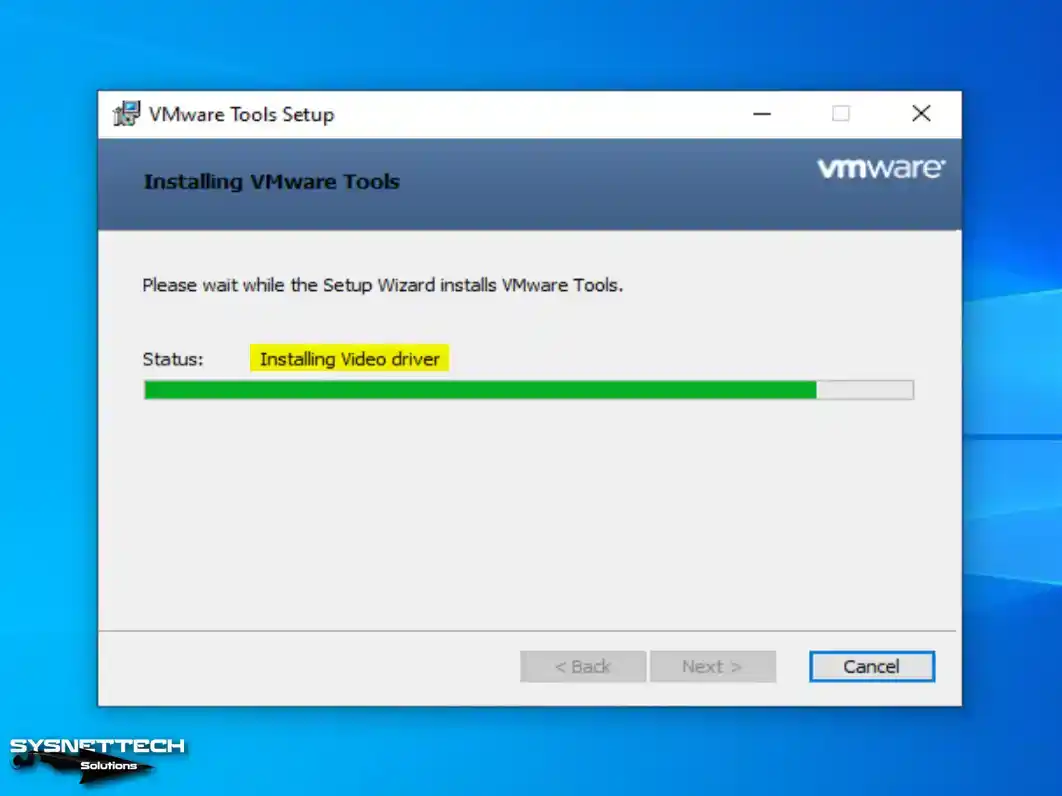
Wait while the video drivers and other virtual hardware drivers of the Win10 system are installed.
Step 7
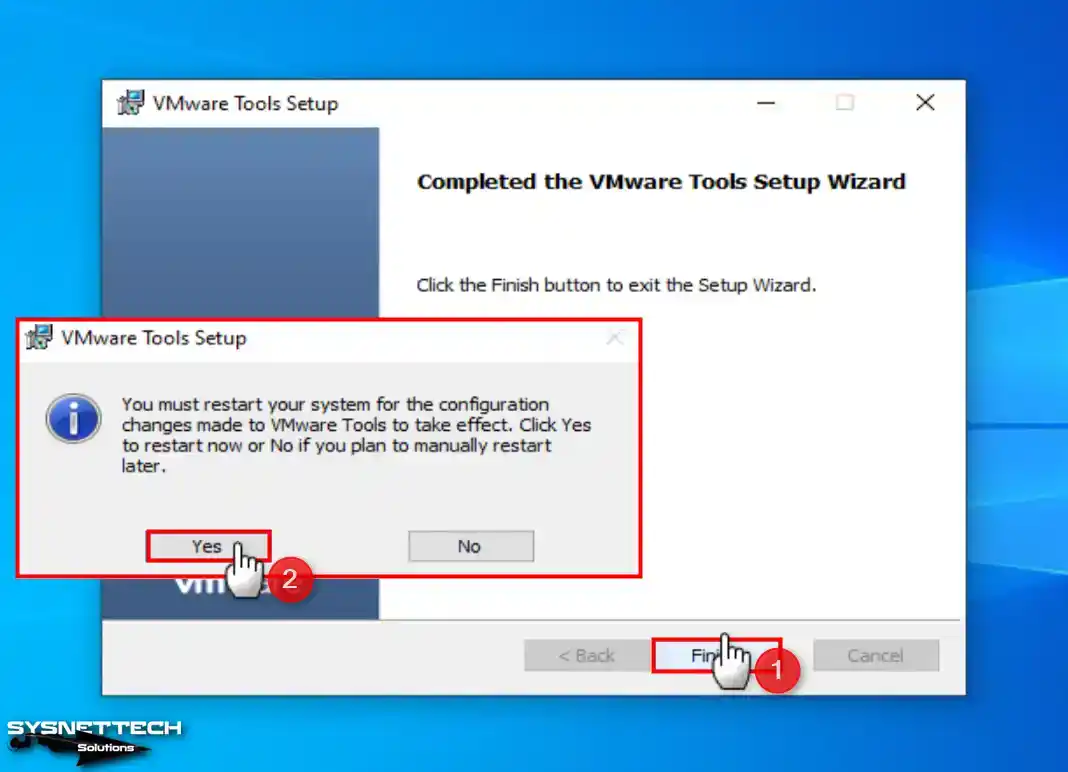
After installing the necessary drivers of the guest operating system, click Finish to close the wizard and restart your system for the changes to take effect.
Step 8
You can see that the VMware SVGA 3D device has been successfully installed under Display Adapters in the device manager of your Windows 10 virtual system, and you can also use your VM in full-screen resolution.

Video
Installing Old Versions
ESXi Version
YouTube Video
Slide
Conclusion
As a result, using Windows 10 on VMware ESXi 8.0 increases productivity. Additionally, it reduces IT costs. In short, server virtualization improves resource utilization. Additionally, it increases efficient business processes by providing centralized management.
By following the steps in this article, you can create a virtual machine for Windows 10 on your ESXi host. Then, you can configure it professionally and enjoy the benefits of this setup.
For testing or production purposes, virtualization with VMware ESXi 8.0 is ideal. It also optimizes the IT infrastructure and gives you a lot of options.
В этом видео мы научимся устанавливать операционную систему Windows 10 на гипервизор VMware ESXi.
Данный урок является одним из курса по теме «Администрирование Windows Server 2019». Ссылка на курс: https://it-black.ru/course-win-server
Остальные курсы можно найти на странице: https://it-black.ru/course
Полный пакет всех курсов можно приобрести по ссылке: https://it-black.ru/course-package
Поддержать проект:
ЮMoney: https://yoomoney.ru/fundraise/11K3EV3M872.240321
Публичный адрес для получения BTC: bc1q20m6cfrxrr6kajnme7l5r55x8afef69rfr9hzc
Публичный адрес для получения ETH: 0xce2Ce3A307a435a763B8831E7B0347728E8b7F59
Публичный адрес для получения USDt: 0xce2Ce3A307a435a763B8831E7B0347728E8b7F59 Публичный адрес для получения BNB: 0xce2Ce3A307a435a763B8831E7B0347728E8b7F59 Спонсорство на Ютуб (если вы не в России): https://www.youtube.com/@it-black/membership
2024-05-14 12:31
VMware ESXi

How To Install Windows 10 On Vmware Esxi 6 0 Theitbros In this article, we will examine how to set up and use the microsoft windows 10 operating system in a new virtual machine using the vmware vsphere hypervisor esxi 8.0 virtualization infrastructure on a physical server. This video tutorial shows you how to install and use windows 10 on new virtual machine on vmware vsphere hypervisor esxi 8.0. more.

How To Install Windows 10 On Vmware Esxi 6 0 Theitbros #vmware #windows10 #fortigate in today’s tutorial, we are going to learn how to install windows 10 on vmware esxi for our home labwatch, learn, subscribe &. In this article, we’ll show you how to download, install, and configure vmware vsphere hypervisor, create a virtual machine, and install a guest operating system. contents: free vmware hypervisor: restrictions and limitations. Vmware esxi installation and setup describes how to install and configure vmware esxi™. This step by step guide shows how to download & install vmware esxi 7 on windows 10 11 desktop laptop with the vmware workstation.

Install Vmware Esxi 7 X On Windows 10 11 By Vmware Workstation Vmware esxi installation and setup describes how to install and configure vmware esxi™. This step by step guide shows how to download & install vmware esxi 7 on windows 10 11 desktop laptop with the vmware workstation. Windows 10 documentation covers information on how to install the operating system in a virtual machine. for additional information about the operating system, refer to the instructions included in the installation media. This article will show you how to install and configure the vmware vsphere hypervisor 7.0 on a computer. vmware vsphere hypervisor 7.0 is also known as esxi 7.0. a full list of the esxi 7.0 hardware requirements can be found in the vmware esxi 7.0 install guide. In this short video i will walk you though the the steps of vm creation in vmware esxi hypervisor , install microsoft windows 10 operating system and finally. Connect to the vmware vsphere hypervisor 7.0 (esxi 7.0) or vsphere vcenter server using the vmware host or vsphere web client. 2. upload the windows operating system iso image file to the vmfs datastore.
In this tutorial video, you will be guided through installing Windows 10 on VMware vSphere ESXi 6.7U2. This informative guide will provide the necessary information to establish your virtual machine’s operating system successfully.
To set Microsoft Win 10 operating system in the VM on vSphere 6.7U2:
Step 1: If you did not install vSphere before, please refer to the following video.
➦ https://www.youtube.com/watch?v=PF8g7QHQ2bU
Step 2: After you have installed vSphere 6.7, create a new VM for the Windows 10 operating system.
➦ https://www.youtube.com/watch?v=AAxTDrGKeek
Step 3: After creating a new VM on the server, add the Microsoft Win 10 image file to the virtual machine.
➦ https://www.youtube.com/watch?v=_gtGXqi-6rM
Step 4: After installing the Windows operating system on vSphere, you must set up VMware Tools.
Step 5: For VMware Tools setup for Win 10 virtual machine, click Actions and then Guest OS / Install VMware Tools.
Step 6: Restart the virtual machine after installing VM Tools.
Step 7: Watch the video for the remaining steps.